

Page 1

RTM
User's Guide
Page 2

Table of contents
1 Getting started ......................................................................................................................6
1.1 Introduction ............................................................................................................................... 6
1.1.1 What is Acronis Small Office: Server Cloud Backup? .................................................................................... 6
1.1.2 Acronis Small Office Backup basic concepts ................................................................................................. 7
1.1.3 FAQ about backup and recovery .................................................................................................................... 9
1.1.4 System requirements and supported media .............................................................................................. 10
1.1.5 Small Office Backup installation ................................................................................................................... 12
1.1.6 Small Office Backup activation ..................................................................................................................... 12
1.1.7 Trial subscription information ...................................................................................................................... 13
1.1.8 How to get a subscription ............................................................................................................................. 13
1.1.9 Installing Acronis Hotfixes............................................................................................................................. 14
1.1.10 Technical Support .......................................................................................................................................... 15
1.2 Program workspace .................................................................................................................15
1.2.1 Main window ................................................................................................................................................. 16
1.2.2 Wizards and notification area icons ............................................................................................................. 20
1.2.3 Acronis Backup Explorer ............................................................................................................................... 20
1.2.4 Sign-in menu .................................................................................................................................................. 26
1.2.5 Settings menu ................................................................................................................................................ 26
1.2.6 Help menu ..................................................................................................................................................... 27
2 Backing up data ................................................................................................................... 28
2.1 What is a disk/partition image? ...............................................................................................28
2.2 Full, incremental and differential backups ..............................................................................28
2.3 Backing up partitions and disks ...............................................................................................29
2.4 Making reserve copies of your backups ..................................................................................31
2.5 How to make bootable removable media with a backup........................................................31
2.6 Adding an existing backup to the list .......................................................................................33
2.7 Deleting backups and backup versions ....................................................................................33
2.8 Backup options ........................................................................................................................33
2.8.1 Backup schemes ............................................................................................................................................ 35
2.8.2 Single version scheme ................................................................................................................................... 35
2.8.3 Version chain scheme ................................................................................................................................... 36
2.8.4 Custom schemes ........................................................................................................................................... 36
2.8.5 Image creation mode .................................................................................................................................... 39
2.8.6 Backup protection ......................................................................................................................................... 40
2.8.7 Pre/Post commands for backup ................................................................................................................... 40
2.8.8 Backup splitting ............................................................................................................................................. 41
2.8.9 Backup validation option .............................................................................................................................. 42
2.8.10 Backup reserve copy ..................................................................................................................................... 42
2.8.11 Removable media settings ........................................................................................................................... 43
2.8.12 Backup comment .......................................................................................................................................... 43
2.8.13 Error handling ................................................................................................................................................ 44
2.8.14 Computer shutdown ..................................................................................................................................... 44
2.8.15 Windows account .......................................................................................................................................... 45
2.8.16 Performance of backup operation ............................................................................................................... 45
2.8.17 Notifications for backup operation .............................................................................................................. 46
2.8.18 Excluding items from backup ....................................................................................................................... 47
2.9 Validating backups ...................................................................................................................49
2 Copyright © Acronis International GmbH, 2002-2013
Page 3

2.10 Consolidating backup versions ................................................................................................49
2.10.1 Archive to consolidate protection ................................................................................................................ 50
2.10.2 Backup selection ............................................................................................................................................ 50
2.10.3 Result location ............................................................................................................................................... 50
2.10.4 Consolidation summary ................................................................................................................................ 50
2.11 Cloning backup settings ...........................................................................................................51
3 Recovering data ................................................................................................................... 52
3.1 Recovering your system after a crash......................................................................................52
3.1.1 Trying to determine the crash cause ........................................................................................................... 52
3.1.2 Preparing for recovery .................................................................................................................................. 53
3.1.3 Recovering your system ................................................................................................................................ 53
3.2 Recovering partitions and disks ...............................................................................................56
3.3 How to recover more than one partition at once ...................................................................58
3.4 Recovering a disk backup to a different disk under rescue media ..........................................61
3.4.1 Recovering a disk with a hidden partition ................................................................................................... 62
3.5 Recovering specific files and folders ........................................................................................67
3.5.1 Recovering file versions ................................................................................................................................ 67
3.6 Acronis Universal Restore ........................................................................................................68
3.6.1 Purpose of Acronis Universal Restore ......................................................................................................... 68
3.6.2 Recovering to different hardware ................................................................................................................ 69
3.6.3 Limitations in using Acronis Universal Restore ........................................................................................... 73
3.7 About recovery of dynamic/GPT disks and volumes ...............................................................73
3.8 Backup protection dialog box ..................................................................................................74
3.9 Arranging boot order in BIOS...................................................................................................74
3.10 Recovery options .....................................................................................................................75
3.10.1 Disk recovery mode ...................................................................................................................................... 76
3.10.2 Pre/Post commands for recovery ................................................................................................................ 76
3.10.3 Validation option ........................................................................................................................................... 76
3.10.4 Computer restart ........................................................................................................................................... 77
3.10.5 File recovery options ..................................................................................................................................... 77
3.10.6 Overwrite file options ................................................................................................................................... 77
3.10.7 Performance of recovery operation ............................................................................................................ 78
3.10.8 Notifications for recovery operation ........................................................................................................... 78
4 Using online backup ............................................................................................................. 80
4.1 What is Acronis Cloud? ............................................................................................................80
4.2 How it works ............................................................................................................................80
4.3 Backing up to Acronis Cloud ....................................................................................................81
4.4 Scheduling ................................................................................................................................82
4.4.1 Daily execution parameters.......................................................................................................................... 83
4.4.2 Monthly execution parameters ................................................................................................................... 83
4.4.3 Weekly execution parameters ..................................................................................................................... 84
4.4.4 Upon event execution parameters .............................................................................................................. 84
4.5 Online backup options .............................................................................................................84
4.5.1 Acronis Cloud connection attempts ............................................................................................................ 84
4.5.2 Acronis Cloud cleanup .................................................................................................................................. 85
4.5.3 Encryption key ............................................................................................................................................... 86
4.5.4 Windows account for Online backup .......................................................................................................... 86
3 Copyright © Acronis International GmbH, 2002-2013
Page 4

4.5.5 Operation priority ......................................................................................................................................... 87
4.5.6 Network connection speed limit .................................................................................................................. 87
4.5.7 Notifications ................................................................................................................................................... 88
4.5.8 Exclusions ....................................................................................................................................................... 90
4.6 Recovery from Acronis Cloud ..................................................................................................90
4.6.1 Recovering data from online backups ......................................................................................................... 90
4.6.2 Selecting a version to recover ...................................................................................................................... 91
4.7 Removing data from Acronis Cloud .........................................................................................91
5 Tools ................................................................................................................................... 93
5.1 Creating bootable rescue media ..............................................................................................93
5.1.1 Acronis Media Builder ................................................................................................................................... 93
5.1.2 Creating WinPE-based rescue media ........................................................................................................... 98
5.1.3 How to prepare a USB flash drive for Acronis Media Builder .................................................................. 103
5.2 Adding a new hard disk..........................................................................................................104
5.2.1 Selecting a hard disk .................................................................................................................................... 104
5.2.2 Selecting initialization method ................................................................................................................... 106
5.2.3 Creating new partitions .............................................................................................................................. 106
5.2.4 Add new disk summary............................................................................................................................... 109
5.3 How to use Acronis Startup Recovery Manager ....................................................................109
5.4 Mounting an image ................................................................................................................110
5.5 Unmounting an image ...........................................................................................................113
6 Useful information ............................................................................................................. 115
6.1 Protecting your system ..........................................................................................................115
6.2 Deciding where to store your backups ..................................................................................116
6.2.1 FTP connection ............................................................................................................................................ 117
6.2.2 Authentication settings ............................................................................................................................... 118
6.3 Making sure that your rescue media can be used when needed ..........................................118
6.3.1 Selecting video mode when booting from the rescue media .................................................................. 121
6.4 Testing that your backups can be used for recovery .............................................................123
6.5 Migrating your system from an HDD to an SSD .....................................................................123
6.5.1 Preparing for migration .............................................................................................................................. 123
6.5.2 Migrating to an SSD using the backup and recovery method ................................................................. 127
6.6 Scheduling ..............................................................................................................................128
6.6.1 Daily execution parameters........................................................................................................................ 129
6.6.2 Monthly execution parameters ................................................................................................................. 129
6.6.3 Weekly execution parameters ................................................................................................................... 129
6.6.4 Upon event execution parameters ............................................................................................................ 130
6.7 Choosing columns for viewing in wizards ..............................................................................130
6.8 Backup information ...............................................................................................................130
6.9 Timeout settings ....................................................................................................................131
7 Troubleshooting ................................................................................................................ 132
7.1 Acronis System Report ...........................................................................................................132
7.2 Acronis Smart Error Reporting ...............................................................................................133
7.3 How to collect crash dumps ..................................................................................................134
7.4 General recommendations ....................................................................................................135
4 Copyright © Acronis International GmbH, 2002-2013
Page 5

7.5 Creating a custom rescue CD .................................................................................................136
7.6 Viewing log.............................................................................................................................136
7.7 Acronis Customer Experience Program .................................................................................138
8 Glossary of Terms .............................................................................................................. 140
5 Copyright © Acronis International GmbH, 2002-2013
Page 6

1 Getting started
In this section
What is Acronis Small Office: Server Cloud Backup? ................................. 6
Acronis Small Office Backup basic concepts .............................................. 7
FAQ about backup and recovery ................................................................ 9
System requirements and supported media ........................................... 10
Small Office Backup installation ............................................................... 12
Small Office Backup activation ................................................................. 12
Trial subscription information .................................................................. 13
How to get a subscription ........................................................................ 13
Installing Acronis Hotfixes ........................................................................ 14
Technical Support .................................................................................... 15
1.1 Introduction
1.1.1 What is Acronis Small Office: Server Cloud Backup?
Acronis Small Office Server Cloud Backup (the short name is Small Office Backup) is a
subscription-based integrated software suite that ensures the security of all of the information on
your PC. It can back up the operating system, applications, settings and all of your data by using two
main utilities:
Disk and partition backup
With the unique technology developed by Acronis and implemented in Small Office Backup you
can perform exact, sector-by-sector disk backups. Such backups include all operating systems,
applications and configuration files, personal settings, and data.
This means that in case of disaster you will be able to recover your computer system and data
should a disaster occur, such as losing data, accidentally deleting critical files or folders, or
suffering a complete hard disk crash.
You can store backups on almost any PC storage device.
Acronis Online Backup
This utility allows you to store your most important files on Acronis Cloud, a special secure
remote storage. Your data will be protected even if your computer is lost, stolen or destroyed.
Windows-style interface and wizards will make your work easier. Just perform a few simple steps and
let Small Office Backup take care of everything else! When a system problem occurs, the software
will get you up and running in no time.
Online and offline modes
Acronis Small Office Backup works correctly only on computers with an Internet connection.
First of all, the connection is required for the product activation. Without activation, the fully
functional product works for a limited time. See details in Small Office Backup activation (p. 12).
To get access to the program console, you must sign in by providing the credentials of your
Acronis account. Therefore, the console cannot work without Internet. This means that you will
not be able to create new backups.
Without Internet you cannot purchase, update and change subscriptions.
6 Copyright © Acronis International GmbH, 2002-2013
Page 7

In any event, some functions are available to you without Internet (offline mode).
All the program functions that can be run from the Windows Start menu are available in the
offline mode. For example, you can create a bootable rescue media and mount images.
If you have scheduled backups, the new versions of the backups will be created according to the
schedule even in the offline mode.
Compatibility with Acronis Backup & Recovery
Acronis Small Office Backup can be upgraded to Acronis Backup & Recovery.
Users of Acronis Backup & Recovery can recover data from disk and partition backups created
with Acronis Small Office Backup.
If you upgrade your Small Office Backup to Acronis Backup & Recovery, you will not have to
recreate your backups from scratch. All you need to continue your existing backups is to
reconfigure the corresponding backup settings.
1.1.2 Acronis Small Office Backup basic concepts
This section provides general information about basic concepts which could be useful for
understanding how the program works.
Backup and recovery
Backup refers to the making copies of data so that these additional copies may be used to recover
the original after a data loss event.
Backups are useful primarily for two purposes. The first is to restore a state following a disaster
(called disaster recovery). The second is to recover small numbers of files after they have been
accidentally deleted or corrupted.
Acronis Small Office Backup does both by creating disk (or partition) images.
Backup versions
Backup versions are the file or files created during each backup operation. If you do not use
consolidation feature, the amount of versions created is always equal to the amount of times the
backup is executed or to the amount of stored points in time.
So, a version represents a point in time to which the system or data can be restored. To put it
another way, backup versions represent full, incremental and differential backups - see Full,
incremental and differential backups (p. 28).
The backup versions are similar to file versions. This feature allows you to restore a file as it existed
on a particular date and time. A backup version allows you to recover your data in a similar way.
This could be useful when trying to find damaged or deleted files. Simply browse through the backup
versions in the Acronis Backup Explorer until you find the backup version containing the required
files. Additionally, you can recover different saved versions of the found files.
There is one more type of incremental backup version. If you mount a partition in the read-write
mode, the program assumes that the mounted image will be modified and creates an incremental
version to capture the changes. This type of incremental version has somewhat different properties.
For example, it cannot be consolidated.
7 Copyright © Acronis International GmbH, 2002-2013
Page 8

Backup file format
Acronis Small Office Backup usually saves backup data in the proprietary tib format using
compression. This reduces the amount of needed storage space.
When creating a tib file, the program calculates checksum values for data blocks and adds these
values to the data being backed up. These checksum values allow for the verification of data
integrity.
The data from tib file backups can be recovered only through the Acronis Small Office Backup
program. This may be done in Windows or in the recovery environment.
Backup validation
The backup validation feature allows you to confirm that your data can be recovered. As mentioned
above, the program adds checksum values to the data blocks being backed up. During backup
validation, Acronis Small Office Backup opens the backup file, recalculates the checksum values and
compares those values with the stored ones. If all compared values match, the backup file is not
corrupted and there is a high probability that the backup can be successfully used for data recovery.
Consolidation
Consolidation allows you to delete backups which you no longer need from a backup chain.
A chain to be consolidated can consist of a full backup and one or more incremental backups.
If necessary, you can delete the base full backup from the chain. The program will create a new full
backup in place of the oldest remaining backup. Consolidation keeps whichever backups you choose
and deletes any backups that are not selected.
Because consolidation may require significant time and system resources (including disk space), we
recommend using it sparingly. In many cases, starting a new backup chain and then deleting the old
one will be a better choice.
Disaster recovery
Recovering from a disaster usually requires a rescue media and a backup of the system partition.
Acronis Small Office Backup provides for recovery from a disaster caused by system data corruption,
viruses, malware, or other causes.
If the operating system fails to boot, Acronis Small Office Backup will recover the system partition.
The boxed product comes with a rescue CD. Other legal owners of the program can create a rescue
media by using the Media Builder tool.
Scheduling
For your backups to be really helpful, they must be as "up-to-date" as possible. This means that you
should run backups on a regular basis, say once a day. Although creating an Acronis Small Office
Backup backup is quite easy, on occasion, you may forget to do a backup.
With the scheduler, you do not have to remember. You can schedule automatic backups ahead of
time. Your data will be backed up as long as there is sufficient storage space.
Understanding these terms and concepts will be helpful when using the program's features.
8 Copyright © Acronis International GmbH, 2002-2013
Page 9

1.1.3 FAQ about backup and recovery
I have a 150GB system partition, but the occupied space on that partition is only 80GB. What
will Small Office Backup include in a backup? - By default, Small Office Backup copies only the
hard disk sectors that contain data, so it will include only 80GB in a backup. You can also choose
the sector-by-sector mode. Note than such a backup mode is required only in special cases. For
more information see Image creation mode (p. 39). While creating a sector-by-sector backup, the
program copies both used and unused hard disk sectors and the backup file will usually be
significantly larger.
Will my system disk backup include drivers, documents, pictures, etc.? - Yes, such a backup will
contain the drivers, as well as the contents of the My documents folder and its subfolders, if you
kept the default location of the My documents folder. If you have just a single hard disk in your
PC, such a backup will contain all of the operating system, applications and data.
I have an old hard disk drive which is almost full in my notebook. I purchased a new bigger
HDD. How can I transfer Windows, programs and data to the new disk? - You can back up the
old hard disk and then recover the backup to a new one.
I have replaced my failed motherboard with a different one and now Windows does not start. I
have backups of my system disk. Is it possible to use them for restoring my computer back to
life? - Yes, this is possible, but only with use of Acronis Universal Restore. You will need to select
the Use Acronis Universal Restore check box when configuring recovery. For more information,
see Recovering to different hardware (p. 69). You may need to download the chipset and the
hard disk controller drivers from the Web site of your motherboard manufacturer to add them
during recovery.
I want to replace my old desktop PC with a notebook. Will Small Office Backup be able to
transfer Windows, programs and data to the notebook? - Yes, this can be done. First back up
your old PC and then recover the backup to the notebook with use of Acronis Universal Restore.
You will need to select the Use Acronis Universal Restore check box when configuring recovery.
During recovery with Universal Restore you may need to provide drivers for the chipset, hard
disk controllers, etc. of your new computer. For more information, see Recovering to different
hardware (p. 69).
I want to migrate my old system hard disk to an SSD. Can this be done with Small Office
Backup? - Yes, Small Office Backup provides such a function. For procedure details, see Migrating
your system from an HDD to an SSD (p. 123)
What should I back up: a partition or the whole disk? - In most cases, it is better to back up the
whole disk. However, there may be some cases when a partition backup is advisable. For
example, your notebook has a single hard disk with two partitions: system (disk letter C) and the
data (disk letter D). The system partition stores your working documents in the My documents
folder with subfolders. The data partition stores your videos, pictures, and music files. Such files
are already compressed and backing them up using Small Office Backup would not give you
significant reduction of the backup file size. In this case, it may be better to use a local sync for
the data partition files and a separate backup for the system partition. However, we also
recommend creating at least one whole disk backup if your backup storage has enough space.
Can I back up and recover a dual boot machine? Yes, this is possible in most cases. If your
systems are installed in separate partitions of the same physical hard disk drive, recovery usually
proceeds without any problems. If the systems are on different physical hard disk drives, there
may be some problems with bootability after recovery. Please note that activating Acronis
Startup Recovery Manager on dual- and multiboot systems with Linux loaders requires special
preparation. For more information, see How to use Acronis Startup Recovery Manager (p. 109).
9 Copyright © Acronis International GmbH, 2002-2013
Page 10

Furthermore, recovering a backup of a dual boot machine to different hardware requires using
Acronis Universal Restore.
Does Small Office Backup support RAID? - Small Office Backup supports hardware RAID arrays of
all popular types. It also supports all software RAID configurations except RAID 1 (mirrored) and
RAID 5. Acronis Bootable Rescue Media supports most of the popular hardware RAID controllers.
If the standard Acronis rescue media does not "see" the RAID as a single volume, the media does
not have the appropriate drivers. You can try to create WinPE-based rescue media. This media
may provide the necessary drivers.
Can I use Acronis Small Office Backup to migrate from a single disk to RAID? This is possible in
many cases. If you recover a backup of a single disk to RAID, you will usually need to use the
Universal Restore feature to add the RAID drivers during recovery. The drivers must have the .inf
filename extension.
1.1.4 System requirements and supported media
1.1.4.1 Minimum system requirements
Small Office Backup has minimum hardware requirements corresponding to that of the operating
system installed on the computer to be used for running Small Office Backup. In addition Small Office
Backup requires the following hardware:
CD-RW/DVD-RW drive for bootable media creation
Mouse or other pointing device (recommended)
Small Office Backup rescue media has the following hardware requirements:
512 MB RAM
Processor Pentium 1 GHz or faster
1.5 GB of free space on a hard disk
The recommended screen resolution is 1280 x 1024.
The minimum screen resolution is 1024 x 768.
1.1.4.2 Supported operating systems
Small Office Backup has been tested on the following operating systems (both 32 and 64 bit, if
applicable):
Windows Server 2008 R2
Windows Server 2012
Windows Server 2008
Windows Small Business Server 2011
Windows Server 2003 R2
Windows Server 2003
Windows Small Business Server 2008
Windows Small Business Server 2003 R2
Windows Small Business Server 2003
Supported virtual machines:
10 Copyright © Acronis International GmbH, 2002-2013
Page 11

VMware vSphere / ESX / ESXi and Workstation
Microsoft Hyper-V and Virtual PC
Red Hat Enterprise Virtualization (RHEV) and KVM
Citrix XenServer
Parallels Workstation and Server Bare Metal
Small Office Backup also lets you create a bootable CD-R/DVD-R that can back up and recover a
disk/partition on a computer running any Intel- or AMD- based PC operating system, including
Linux®. (Note that the Intel-based Apple Macintosh is not supported.)
1.1.4.3 Supported file systems
FAT16/32
NTFS
Ext2/Ext3/Ext4 *
ReiserFS *
JFX *
Linux SWAP *
If a file system is not supported or is corrupted, Acronis Small Office Backup can copy data using a
sector-by-sector approach.
* The Ext2/Ext3/Ext4, ReiserFS, JFX, and Linux SWAP file systems are supported only for disk or partition
backup/recovery operations. You also cannot perform backups to disks or partitions with these file systems.
1.1.4.4 Supported storage media
Hard disk drives*
Solid State Drives (SSD)
FTP servers**
CD-R/RW, DVD-R/RW, DVD+R (including double-layer DVD+R), DVD+RW, DVD-RAM, BD-R,
BD-RE***
USB 1.1 / 2.0 / 3.0, FireWire (IEEE-1394) and PC card storage devices
* Acronis Small Office Backup does not support the following dynamic volume types: Mirrored and
RAID-5.
Recovery of a dynamic volume as a dynamic volume with manual resizing is not supported
** An FTP server must allow passive mode file transfers. For data to be recovered directly from an
FTP server, the backup must consist of files no greater than 2GB each.
The firewall settings of the source computer should have Ports 20 and 21 opened for the TPC and
UDP protocols to function. The Routing and Remote Access Windows service should be disabled.
*** Burned rewritable discs cannot be read in Linux without a kernel patch.
1.1.4.5 SSD support
The recommended offset for Solid State Drives (SSD) is a multiple of 64 KB (most commonly, 1024KB
or 2048 sectors).
11 Copyright © Acronis International GmbH, 2002-2013
Page 12

Small Office Backup provides full support of SSDs. It keeps the proper offset of SSD during such
operations as image recovery and cloning. Specifically, full support means that:
If you recover a disk backup to an SSD or clone a disk to an SSD, the offset will be automatically
set to the default 1024 KB (2048 sectors).
If you recover a partition backup to a target empty non-partitioned (unallocated) SSD, the offset
will be automatically set to the default 1024 KB (2048 sectors).
If you recover a partition backup to a target empty partitioned SSD, the target SSD will keep its
original offset.
1.1.5 Small Office Backup installation
Installing Small Office Backup
To install Small Office Backup:
1. Run the setup file. Before starting the setup process, Small Office Backup will check for a newer
build on the website. If there is one, the newer version will be offered for installation.
2. In the install menu, click Install to start the installation procedure.
3. Read and accept the terms of the license agreement in the License Agreement window.
4. Read the participation terms and decide whether you want to participate in the Acronis
Customer Experience Program.
5. In the Setup options window, change the installation folder, if necessary.
6. Click Proceed to begin installation.
Recovering from an Small Office Backup error
If Small Office Backup ceased running or produced errors, its files might be corrupted. To repair this
problem, you first have to recover the program. To do this, run Small Office Backup installer again. It
will detect Small Office Backup on your computer and will ask you if you want to repair or remove it.
Removing Small Office Backup
Depending on your operating system perform one of the following:
Click Start -> Settings -> Control Panel -> Add or remove programs -> Acronis Small Office Backup ->
Remove.
or
Click Start -> Control Panel -> Programs and Features (or Uninstall a program) -> Acronis Small
Office Backup -> Remove (or Uninstall).
Then follow the instructions on the screen. You may have to reboot your computer afterwards to
complete the task.
1.1.6 Small Office Backup activation
To use Acronis Small Office Backup, you need to activate it via the Internet. Without activation, the
fully functional product works for 30 days. If you do not activate it during that period, all program
functions will become unavailable except recovery.
Note that only Small Office Backup with a full subscription must be activated. You do not need to
activate the product with a trial subscription.
12 Copyright © Acronis International GmbH, 2002-2013
Page 13

Activation will be performed automatically if the following conditions are met:
Your computer has an Internet connection.
You have an Acronis account.
You purchased a full subscription or serial number.
You installed the product only on 1 computer.
Acronis Small Office Backup is activated when you sign in for the first time after purchasing the full
subscription.
Moving license between computers
If you have one Acronis account, you can activate Acronis Small Office Backup on 1 computer only. If
you install the product on a second computer, you will see a corresponding error message at the
bottom of the console window. In such an event, you can move the license to your new computer
from the one where the product is already activated. If you want to move the license, perform the
following steps.
To move the license from a computer that has an installed activated product:
1. Install Acronis Small Office Backup on another computer.
2. Sign in using the same Acronis account.
3. Find the error message at the bottom of the window and click Move license.
4. On the opened webpage, follow the on-screen instructions.
From the list, choose a computer you want to move the license from. Note that the product will
be deactivated on the chosen computer.
1.1.7 Trial subscription information
After you install Small Office Backup and sign in to your Acronis account, you will automatically get a
trial subscription.
The trial subscription allows you to use Small Office Backup only during the trial period of 30 days.
After the trial period expires, you will only be able to recover your data and add new disks.
Please note that the Acronis Universal Restore utility is not available in the trial subscription.
For details about purchasing a full subscription, see How to get a subscription (p. 13).
Acronis Cloud trial subscription
When you activate your trial subscription, you get fully functional Online Backup and 50 GB of
storage space on Acronis Cloud for 30 days. After that, Online Backup will work for 30 days in
recovery-only mode.
After the period of 60 days, all the versions of backed up files will be permanently deleted from
Acronis Cloud.
1.1.8 How to get a subscription
Acronis Small Office Backup is a subscription-based product. First you will automatically get a 30-day
free trial subscription (see details in Trial version information (p. 13)). After that you will be able to
buy a full subscription.
13 Copyright © Acronis International GmbH, 2002-2013
Page 14

To get a full subscription:
1. Start Small Office Backup.
2. In the login window, enter the email address and password of your Acronis account, and then
click Sign in.
If you do not have the account yet, click Create account. See details below.
3. On the toolbar, click the Manage subscription button.
4. In the opened webpage, choose a tariff plan, click Upgrade and provide your payment
information.
If you have a serial number, click the corresponding link, enter the serial number in the box, and
click Submit.
How to create an Acronis account
Start Small Office Backup, click Sign in on the toolbar, and then click Create account. Fill in the
appropriate fields of the registration form, and the account will be created for you.
Provide your first and last names and e-mail address. You will be offered a country selected on the
basis of the IP address of your computer, though you can select another country, if you wish.
Then provide a password for your new account and confirm the password by retyping it once more in
the appropriate field. When you have performed all actions necessary for account registration,
please wait for an e-mail message that will confirm opening of the account.
To keep your personal data secure, choose a strong password for your Acronis account, guard it from getting
into the wrong hands, and change it from time to time.
1.1.9 Installing Acronis Hotfixes
What is an Acronis Hotfix?
Acronis Hotfix is a small update for Acronis products. It makes changes to one or more application
files or registry keys but does not change an application version. A hotfix targets only a specific
Acronis Small Office Backup build, and cannot be applied to any other build.
Acronis Hotfixes are distributed through Acronis Knowledge Base articles, which describe the
problem to be fixed in detail. Each article can be accessed through SER or directly by searching
Acronis Knowledge Base.
14 Copyright © Acronis International GmbH, 2002-2013
Page 15

Advantages of installing Acronis Hotfixes:
In this section
Main window ........................................................................................... 16
Wizards and notification area icons ......................................................... 20
Acronis Backup Explorer .......................................................................... 20
Sign-in menu ............................................................................................ 26
Settings menu .......................................................................................... 26
Help menu ................................................................................................ 27
Hotfix installation does not require much time and resources. You do not need to wait until the
next product update to fix a particular issue.
A hotfix package is much smaller than the product installation package, though it may include
files from previous hotfixes for consistency.
You can install only necessary hotfixes, if several hotfixes are available.
All changes from hotfixes released between updates will be included in the new product versions (updates or
upgrades).
How to install Acronis Hotfixes?
To check whether new Acronis Hotfixes are available, click Check for updates from the Help menu. A
list of available hotfixes for the current build will be displayed in a table, where you can select those
you want to install. When you select an Acronis Hotfix, its release notes (changes and enhancements
to be applied to the product) will be displayed below.
Note, if a new Acronis Small Office Backup update is available, Acronis Hotfixes will not be displayed since each
update contains all hotfixes released before.
After selecting Acronis Hotfixes you want to install, click Download and Install button. Also, if you
select Do not notify me about the unselected hotfixes in the future option, a hotfix window will not
appear at the program startup until a new hotfix is available. Though, if you check for updates
manually (Help -> Check for updates), the window will appear even when this option is selected.
After all selected Acronis Hotfixes are installed, click Close and run button to start the product.
1.1.10 Technical Support
Maintenance and Support Program
If you need assistance with your Acronis product, please go to http://www.acronis.com/support/
Product Updates
You can download the latest updates for all your registered Acronis software products from our
website at any time after logging into your Account (https://www.acronis.com/my) and registering
the product. See Registering Acronis Products at the Website (http://kb.acronis.com/content/4834)
and Acronis Website User Guide (http://kb.acronis.com/content/8128).
1.2 Program workspace
15 Copyright © Acronis International GmbH, 2002-2013
Page 16

1.2.1 Main window
The main window provides quick access to all of the program functionality.
If you have not created any backups yet, the program will offer to create a new backup or add an
existing backup. If you have at least one backup, the screen will display the list of your backups.
The toolbar
See the toolbar commands description in Toolbar (p. 18).
The backups area
The area shows the backups you already have. It provides access to all operations with the existing
backups and allows you to start recovery of your data.
Back up now - adds a new backup version to the existing backup or replaces the existing backup
version, depending on the backup scheme being used.
Recover - click to recover data.
When a backup box is collapsed, the backup and recovery operations can be started by clicking the
appropriate icons. These icons, along with the Operations menu icon (a gear), appear when you
move the pointer over a box area.
You can collapse and expand the backup box by clicking the triangle near a backup name.
16 Copyright © Acronis International GmbH, 2002-2013
Page 17

Operations menu
Clicking the gear icon in the box of a selected backup or right-clicking in the free area of the box
opens an Operations menu containing the following items:
View log - click to open the log for the current backup.
Expand - expands the selected backup box (available for collapsed boxes).
Collapse - collapses the selected backup box into a narrow stripe (available for expanded boxes).
Recover files (available only for disk backups) - opens the Backup Explorer window, where you
can select any version of the backup.
Back up now - adds a new backup version to the existing backup or replaces the existing backup
version, depending on the backup scheme being used.
Open location - opens the folder containing the backup files.
Edit settings - allows editing of the current backup settings.
Recover (available for Online Backup only) - opens the Acronis Cloud application.
Clean up (available for Online Backup only) - opens a dialog box where you can choose whether
you want to delete the backup files only or both the backup files and settings. Note that the
backup box will remain in the backup list in both cases.
Recreate backup settings - allows configuring the settings for backups that were manually added
to the backup list. For example, this item may appear for backups created on another computer.
Without backup settings, you will be unable to perform certain operations. Specifically, you
cannot refresh the backup by clicking Back up now. Also, you cannot edit and clone the backup
settings and schedule.
Validate - starts backup validation.
Delete - opens a dialog box where you can choose whether you want to delete the backup
completely or the backup box only. In the last case, the backup files will remain in the location,
and you will be able to add the backup to the list later. Note that if you delete a backup
completely, the deletion cannot be undone.
More - opens the following additional items:
Create shortcut - creates a shortcut on the Desktop. With the shortcut you can run a backup
without starting Small Office Backup.
17 Copyright © Acronis International GmbH, 2002-2013
Page 18

Consolidate versions - you can delete the backup versions you no longer need while
Command
Description
Disk and partition backup
This feature allows you to protect your
computer by creating backups of your partitions
(including the system one) and whole disks.
File backup to Cloud
This feature allows you to store your data in the
secure Acronis Cloud which is accessible via the
Internet.
Manage subscription
Clicking this button opens a webpage that
allows you to view your cloud storage state,
update your subscription, change tariff, etc.
Mount/Unmount image
With this tool you can explore a previously
created image.
Tools
Add new disk
This feature allows you to add a new hard disk
drive to your computer.
Acronis Startup Recovery
Manager
This feature allows you to start Acronis Small
Office Backup without loading the operating
system by pressing F11 at boot time before the
operating system starts.
Create bootable media
If your computer cannot start, use bootable
rescue media to run the standalone version of
Small Office Backup, and recover your system
from a previously created system partition
backup.
maintaining the consistency of the backup.
Clone settings - clones the current backup settings when you need to create several similar
backups. Clone the backup settings and then introduce the required changes.
Move... - click to move all the backup files to another location. The subsequent backup
versions will be saved to the new location.
If you change the backup destination by editing the backup settings, only new backup versions will be
saved to the new location. The earlier backup versions will remain in the old location.
Remove from the list - removes the current backup from the backup list shown in the My
backups area. This operation also turns off the scheduling of the removed backup (if a
schedule was set), but it does not delete the backup files.
Recover (available for Online Backup only) - opens the Acronis Cloud application.
In case of online backup, the Operations menu will have less items. The Operations menu of backups created on
another computer and added to the backup list without importing the backup settings will also have less items.
1.2.1.1 Toolbar
The toolbar at the top of the window contains the most frequently used commands for creating new
backups, managing the backup list, validating backups, etc.
18 Copyright © Acronis International GmbH, 2002-2013
Page 19

19 Copyright © Acronis International GmbH, 2002-2013
Browse for backup
Click this item to browse for backups on your
computer and add them to the backup list. This
may be useful when you have backups created
on another computer.
Recover
Click this item to recover data from your
backups and then select the backup that
contains the required data.
Show only my favorite backups
This icon filters the backups which you have
marked as favorite.
Expand all backup boxes
This icon expands all collapsed backup boxes.
Collapse all backup boxes
This icon collapses all expanded backup boxes
into narrow stripes.
Type
This command sorts all backups by types.
Name
This command sorts all backups in alphabetical
order.
Date created
This command sorts all backups starting from
the newest down to the oldest.
Sort by
Date updated
This command sorts all backups by date of the
last version. The newer the last backup version,
the higher the backup will be placed in the list.
Total size
This command sorts all backups by size, starting
from the biggest down to the smallest.
Scheduling type
This command sorts all backups into two groups
- backups with a schedule and backups without
a schedule, which can be started only manually.
Execution result
This command sorts all backups
Explore all backups
This command allows you to explore all your
backups in the Acronis Backup Explorer using
the time line.
Validate all backups
This command checks the integrity of all your
backups.
More features
Update backup list
Click to search for lost backups.
Remove from
the list
All
backups
This command removes all backup boxes from
the backup list. The removed backups can be
returned to the list by using the Browse for
backup tool.
Page 20

Not-backe
d-up-yet
boxes
This command removes all "empty" backup
boxes from the backup list. Be careful because,
after removal, such backup boxes cannot be
returned to the list.
1.2.2 Wizards and notification area icons
When you use the available Acronis Small Office Backup tools and utilities, the program will in many
cases employ wizards to guide you through the operations.
Wizards have a sidebar listing all the steps (both required and optional) needed for completing the
operation. For example, see the screen shot below.
The completed steps are marked with green checkmarks. The green arrow shows the current step.
After you complete all the required steps and come to the Finish step, the program displays the
Summary screen. Check the summary of the operation to be performed and then click Proceed to
start the operation.
Taskbar notification area icons
During most of the operations, special indicator icons appear in the Windows taskbar notification
area (the right portion of the status bar with the clock). If you mouse over the icon, you will see a
tool tip indicating the operation's progress or state. Right-clicking on the icon opens a shortcut menu
where you can change the operation's status or cancel the operation if necessary. This icon doesn't
depend on the main program window being open. It is present for background execution of
scheduled backups as well.
1.2.3 Acronis Backup Explorer
The Acronis Backup Explorer provides you with a wealth of information on your backups: backup
types, backup versions number, dates, contents, backup results, etc. In addition, the Backup Explorer
20 Copyright © Acronis International GmbH, 2002-2013
Page 21

allows you to explore and recover backed up data (both partitions and individual files and even file
versions). It also allows for operations with backups - you can validate them, mount images as disks,
and delete backup versions you no longer need.
Let's have a closer look on the Acronis Backup Explorer. It has two tabs for viewing backups and their
content: Disks and partitions and Files and folders.
1.2.3.1 Disks and partitions tab
The Disks and partitions tab shows the backed up disks and partitions that the selected backup
version contains.
The tab shows the disks and partitions state of when the current backup version was created.
You can switch between the backup versions by using the time line at the bottom of the screen. For
more information see Time line (p. 23).
To recover disks and/or partitions:
1. On the time line, select the backup version from which you want to recover your disks/partitions.
The version's exact date and time will be displayed near the backup name. Your data will be
recovered to the state it was at that point in time.
2. Select the corresponding check boxes of the disks or partitions you want to recover.
3. Click the Recover button.
To recover specific files and folders from the disk/partition backups:
1. Click the Files and folders tab.
2. Select files and folders you want to recover.
3. Click the Recover button.
For more information on recovering files and folders see Files and folders tab (p. 22).
21 Copyright © Acronis International GmbH, 2002-2013
Page 22

Right-clicking on a backup version opens the shortcut menu with other available operations:
Recover - select to recover the current backup version.
Validate - select to check the integrity of the backup version data.
Mount - select to mount the backup version as a disk.
Delete version - select to delete the backup version (the backup chain will not be corrupted).
View - select to set up the time line to show some additional information.
To find a file or folder you need to recover, type the file or folder name in the search field.
Both tabs also show backup comments, and allow for adding, editing and deleting comments to the
selected backup version. If a backup version does not have comments, click the Add comment icon,
then type your comments in the comments area and click the Save icon. If there is already a
comment, you can edit it after clicking the Edit icon. Having finished editing, click the Save icon to
save the changed comment or the Cancel icon to cancel the changes.
1.2.3.2 Files and folders tab
The Files and folders tab shows the backed up files and folders contained in the selected backup
version. The left-hand area of the tab shows a directory tree and the right-hand area - the contents
of a selected directory tree item.
The tab shows the files and folders states of when the current backup version was created. You can
switch between the backup versions by using the time line at the bottom of the screen. For more
information on using the time line see Time line (p. 23).
To recover files and/or folders:
1. On the time line, select the backup version, from which you want to recover your files/folders.
The version's exact date and time will be displayed near the backup name. Your data will be
recovered to the state it was at this point in time.
2. Select the corresponding check boxes of the files and folders you want to recover (see selection
rules below). Short information about the selected items (their number and total size) will be
displayed near the Recover button.
3. Click the Recover button.
You can also recover files and folders by dragging them to your Desktop or into a selected folder in
Windows Explorer.
You cannot recover files by dragging them to an FTP, recordable CD/DVD or other optical media, as well as
mounted ISO files.
Selection rules
Check boxes that correspond to the items may be in the following states:
Selected (check mark in square) - this state indicates that the item is selected for recovery. A
selected folder means that all items in the folder are selected.
Cleared (clear square) - this state indicates that the item is not selected.
Mixed (filled square) - this state is available for folders only and indicates that some items in the
folder are selected and the others are not. Note that you cannot set the state by clicking the
check box, but you can change it to a cleared or selected state.
22 Copyright © Acronis International GmbH, 2002-2013
Page 23

Selecting a disk, partition, file or folder to make it the current item in a list does not mean selecting it for
recovery!
The majority of user interface elements located on this tab are described in the Disks and partitions
tab (p. 21) section. Here we describe the items specific for the tab.
When you click an item, short information on this item is displayed under the browser area. The set
of displayed parameters depends on the item's type. Clicking the View versions link opens the View
Versions window with a list of all versions of the file in the backup. You can recover a desired version
by its backup time.
By double-clicking on a file in the right-hand area, you will recover the file to a temporary folder.
Then Acronis Small Office Backup will open the file using the associated application.
1.2.3.3 Time line
Usually the time line at the bottom of Acronis Backup Explorer screen shows information on the
backup versions stored in the selected backup. The time line provides easy navigation through
backup versions and allows you to recover your data to the state it was in at a certain date and time.
The squares that represent backup versions have colored stripes at the bottom. The color of the
stripes depends on the backup types (violet for disk backups, and brown for other backups).
23 Copyright © Acronis International GmbH, 2002-2013
Page 24

The picture below shows various states of a time line. The states vary depending on the number of
backups and the time interval through which you are navigating.
The "Now" interval shows backup versions created during the last hour.
The "Today" interval shows backup versions created from the beginning of the current day to the last
hour.
The "week" interval can be named either "Week ago" or "This week".
When today is Monday, Tuesday or Wednesday, the "week" interval is named "Week ago". In such
cases, the time line shows backup versions created during the previous week and from the beginning
of the current week to the beginning of today.
When today is Thursday, Friday, Saturday or Sunday, the "week" interval is named "This week". In
such cases the time line shows backup versions created from the beginning of the current week to
the beginning of today.
The "month" interval can be named either "Month ago" or "This month".
When today is any date from the 1st to 15th day of the month, the "month" interval is named
"Month ago". In that case the time line shows backup versions created during the previous month
and from the beginning of the current month to the "week" interval.
When today is any date from the 16th to 31st day of the month, the "month" interval is named "This
month". In that case the time line shows backup versions created from the beginning of the current
month to the "week" interval.
The "This year" interval shows backup versions created from the beginning of the current year to the
“month” interval.
24 Copyright © Acronis International GmbH, 2002-2013
Page 25

The "Older" interval shows backup versions created from earlier than the beginning of the current
year.
Working with time intervals and backup versions
Time intervals may be expanded (when the number of backup versions fits onto the time line) or
folded into a square "block". When a time interval is expanded, the squares representing backup
versions may contain a "warning" or "error" icon. Such an icon indicates that warning(s) or error(s)
have been written into the Log during version creation.
If more than one backup version has been created during a day within "week", "month", "year", or
"older" time interval, such a date is shown on the time line using a special "version pack" icon.
If you hover over a folded block for more than half a second, a balloon will show the information
about the time interval start, its end, and the number of backup versions it contains.
If you hover over a backup version within an expanded time interval, a balloon will show more
detailed information about the backup version.
Clicking on a folded block or its name above or below the time line expands the corresponding time
interval. If the number of backup versions within the time interval is too big to fit onto the time line,
the horizontal scroll line allows you to navigate through the backup versions within the time interval.
If you select another folded block and there is no room for displaying all backup versions of the newly
expanded block, then the current expanded block will collapse.
By clicking on a backup version, you select it in the Backup Explorer.
Shortcut menus
Right-clicking on the time line opens the shortcut menu. The menu contents will change depending
on the selected item.
Backup version:
Recover
Validate
Mount...
Delete version
Backup version packs and time blocks:
Right-clicking on a folded version pack or time interval's block opens the shortcut menu with a single
item:
Expand
25 Copyright © Acronis International GmbH, 2002-2013
Page 26

Viewing additional information on the time line
You can also set up the time line to show additional information. The appropriate commands are
available in the View submenu. The View submenu is opened by right-clicking on a backup version or
by right-clicking on time line's free space.
Show software installations - if this item is selected, the time line shows icons that indicate
moments when new programs have been installed on your computer.
Show software updates - if this item is selected, the time line shows icons that indicate updates
of Windows and programs installed on your computer.
Show warnings - if this item is selected, the time line shows all the backup versions that have
been suspended or completed with warning messages (selected by default).
Show errors - if this item is selected, the time line shows failed backup versions and backup
versions that have completed with errors.
1.2.4 Sign-in menu
Clicking Sign in opens a window for signing in to your Acronis account. After you sign in, the Sign in
item is replaced by the e-mail address of your account.
Clicking the e-mail address of your account opens a menu with the following items:
My account – click to go to the screen where you can view and change your account information.
Acronis Cloud – click to go to your account page on the Acronis website.
The line below shows the percentage of your used space on Acronis Cloud.
Manage subscription – click to open a webpage where you can view the subscription state,
change tariff plan and renew your current subscription.
Sign out – click to sign out from the current account. This may be useful if you have more than
one account.
1.2.5 Settings menu
With the Settings menu you can make or change some settings of Small Office Backup. To open the
menu, click the gear icon at the upper-right corner of the program screen. The Settings menu
contains the following items:
View log - opens the log of Small Office Backup operations.
26 Copyright © Acronis International GmbH, 2002-2013
Page 27

Customer Experience Program - allows joining or leaving Acronis Customer Experience Program.
For more information on the program click the Learn more link in the opened window.
Timeout settings - allows you to specify the time interval the program should wait for your
response. For more information see Timeout settings (p. 131).
1.2.6 Help menu
The Help menu allows you to open the program's Help, perform certain operations, view product's
build number, etc. To open the menu, click the question mark icon at the upper-right corner of the
program screen. The Help menu contains the following items:
Help - opens the program's Help.
Generate system report - click to generate an Acronis system report for sending to Acronis
Customer support.
Customer support - takes you to Acronis Customer support Web page.
Check for updates - click to check for Small Office Backup updates (you can also disable or enable
automatic checking for updates by selecting or clearing the Automatically check for updates at
startup check box).
Activate - click to activate the product.
Upgrade to full version - click to buy the full version of the product if you are using the trial
version.
Acronis Web site - takes you to the Acronis Web site.
About Acronis Small Office Backup - shows information about Small Office Backup including the
product's serial number and build number.
27 Copyright © Acronis International GmbH, 2002-2013
Page 28

2 Backing up data
In this section
What is a disk/partition image? ............................................................... 28
Full, incremental and differential backups .............................................. 28
Backing up partitions and disks ................................................................ 29
Making reserve copies of your backups ................................................... 31
How to make bootable removable media with a backup ........................ 31
Adding an existing backup to the list ....................................................... 33
Deleting backups and backup versions .................................................... 33
Backup options ......................................................................................... 33
Validating backups ................................................................................... 49
Consolidating backup versions ................................................................. 49
Cloning backup settings ........................................................................... 51
2.1 What is a disk/partition image?
When Small Office Backup backs up a disk or partition, it stores a sector-by-sector snapshot of the
disk or partition. This includes the operating system, registry, drivers, software applications, data
files, and system areas hidden from the user. This procedure is called "creating a disk image," and the
resulting backup is often called a disk/partition image.
By default Acronis Small Office Backup stores only the hard disk sectors that contain data.
Furthermore, Acronis Small Office Backup does not back up pagefile.sys and hiberfil.sys (a file that
keeps RAM contents when the computer goes into hibernation). This reduces image size and speeds
up image creation and recovery.
A partition image includes all files and folders (including hidden and system files), boot record, and
FAT (file allocation table). It also includes files in the root directory and the zero track of the hard disk
with the master boot record (MBR).
A disk image includes images of all disk partitions and the zero track with the MBR.
2.2 Full, incremental and differential backups
Acronis Small Office Backup offers you three backup methods:
1) Full: contains all of the data at the moment of the backup creation. It forms a base for further
incremental or differential backups. It can also be used as a standalone backup.
2) Incremental: Only those files will be included which have been changed since the LAST backup.
3) Differential: Only those files will be included which have been changed since the last FULL backup.
We suggest you to choose one of the following three approaches of using the backup methods:
"Full" - A standalone full backup might be an optimal solution if you often roll back the system to its
initial state or if you do not like to manage multiple files.
28 Copyright © Acronis International GmbH, 2002-2013
Page 29

"Incremental" - These are most useful when you need frequent backups and the ability to roll back to
a specific point in time. Having created a full backup once, if you then create an incremental backup
each day of a month, you will get the same result as if you created full backups every day of the
month. As a rule, incremental backups are considerably smaller than full or differential backups.
Such a backup scenario may consist of a weekly full system backup with intermediate, daily
backups that cover data that was changed since the LAST backup.
This scenario, while requiring less storage space and time for the daily backups, will require more
work for the program to provide recovery after a system crash. In the event of a Thursday crash,
the program would have to recover the Wednesday, Tuesday, and Monday incremental backups
and the last FULL backup.
"Differential" – is an intermediate between the first two approaches. Each differential backup
includes all the files changed since the last full backup. It takes less time and space than "Full", but
more than "Incremental". The good thing is that recovering is simpler than for (2) - the program will
have to recover the last differential backup and the last full backup.
To choose a desired backup method, you usually need to configure a custom backup scheme. For
more information see Custom schemes (p. 36).
An incremental or differential backup created after a disk is defragmented might be considerably
larger than usual. This is because the defragmentation program changes file locations on the disk and
the backups reflect these changes. Therefore, it is recommended that you re-create a full backup
after disk defragmentation.
If you lose an incremental backup or it becomes corrupted, all later incremental backups will be unusable.
2.3 Backing up partitions and disks
To back up partitions or disks:
1. Start Small Office Backup and click Disk and partition backup. This opens the Disk Backup
window.
2. Select a partition to back up by selecting the corresponding check box. If you want to back up
more than one partition, select all their check boxes in the list. If the disk has several partitions
and you want to back up the whole disk, click Switch to disk mode in the upper-right corner and
29 Copyright © Acronis International GmbH, 2002-2013
Page 30

then select the disk's check box. To return to the partition selection, click Switch to partition
mode.
3. Select a destination for backup (you can leave the default destination when it suits you or browse
for a destination after clicking the Browse button).
You will not be able to change the selected destination after creating the first backup version.
When the backup destination is any removable media (USB stick, BD, DVD...), the Make this
media bootable check box becomes selectable. Selecting the check box results in creating a
bootable recovery environment on the removable media and adding a standalone Small Office
Backup version. You will be able to run Small Office Backup from the removable media on a
bare-metal system or the crashed computer that cannot boot.
If possible, avoid storing your system partition backups on dynamic disks, because the system partition is
recovered in the Linux environment. Linux and Windows work with dynamic disks differently. This may
result in problems during recovery.
4. [optional step] If you need the backup to run on a schedule, click the link to the right of
Schedule, turn on scheduling and set the required schedule. For more information see
Scheduling (p. 82).
5. [optional step] You can also change the default backup scheme by clicking on the appropriate
link. For more information see Backup schemes (p. 35).
You cannot change the backup scheme when backing up to optical media such as a DVD/BD. In this case,
Small Office Backup by default uses a custom scheme with only full backups. This is because the program
cannot consolidate backups stored on optical media.
6. [optional step] You can exclude hidden or system files and folders from backup, as well as files
matching the criteria you specify. For more information see Excluding items from backup (p. 47).
7. [optional step] If you would like to assign a specific name to the backup, type the name in the
Backup name field instead of the default one.
You can also add useful information to the backup name. To do so, click the Browse button and
select the items you want to add in the right field of the File name line:
add date - the backup creation date will be added
add time - the backup creation time will be added
add user name - the current user name will be added
add machine name - the computer name will be added
add task name - the name of the task that includes the backup will be added
add task run number - the sequence number of the task run will be added
8. [optional step] Click Disk backup options to set the options for the backup being configured. For
example, when your data disk contains sensitive information, you may want to protect the
information by encryption. You can also choose to validate the backup immediately after its
creation, though it can be done later. For more information see Backup options (p. 33).
9. When you set up the backup as needed, you can run it immediately by clicking the Back up now
button. If you want to run the backup later or on a schedule, click the down arrow to the right of
the Back up now button and select Later in the drop down list to save the settings you have
made.
30 Copyright © Acronis International GmbH, 2002-2013
Page 31

2.4 Making reserve copies of your backups
You can create reserve copies of your backups and save them on the file system, a network drive, or
a USB flash drive. A reserve copy may help you if the main backup becomes corrupted or if the
storage of the main backup fails.
In addition to enhancing the backed up data security with replication, this feature allows you to copy
a set of documents, for example, to a USB stick for working on them at home. So now you can
perform a normal backup and copy the same files to a USB stick or any local hard drive.
A reserve copy always contains all the files selected for backup, that is, when creating a reserve copy the
program always makes a full backup of the source data. You cannot make a reserve copy in the form of an
incremental or differential backup.
Also remember that the operation will take more time, because normal backup and reserve copying
are performed one after another and not simultaneously. Furthermore, you will need more storage
space or an additional storage device.
For example, to make a reserve copy of some files on a USB stick:
1. While configuring a backup, click the Disk backup options link, expand the Backup reserve copy
item and then select the Create a reserve copy of my backups box. This opens the Browse for
folder window.
2. Select the destination and create a folder for a reserve copy by clicking the New folder button.
3. Finish configuring your backup as usual.
4. Click Back up now.
Please be aware that CD/DVDs are not supported as locations for reserve copies.
2.5 How to make bootable removable media with a
backup
While configuring a disk or partition backup on removable media, you can make the media bootable.
Small Office Backup can make the following media bootable:
DVD/BD
USB flash drive formatted in FAT32
31 Copyright © Acronis International GmbH, 2002-2013
Page 32
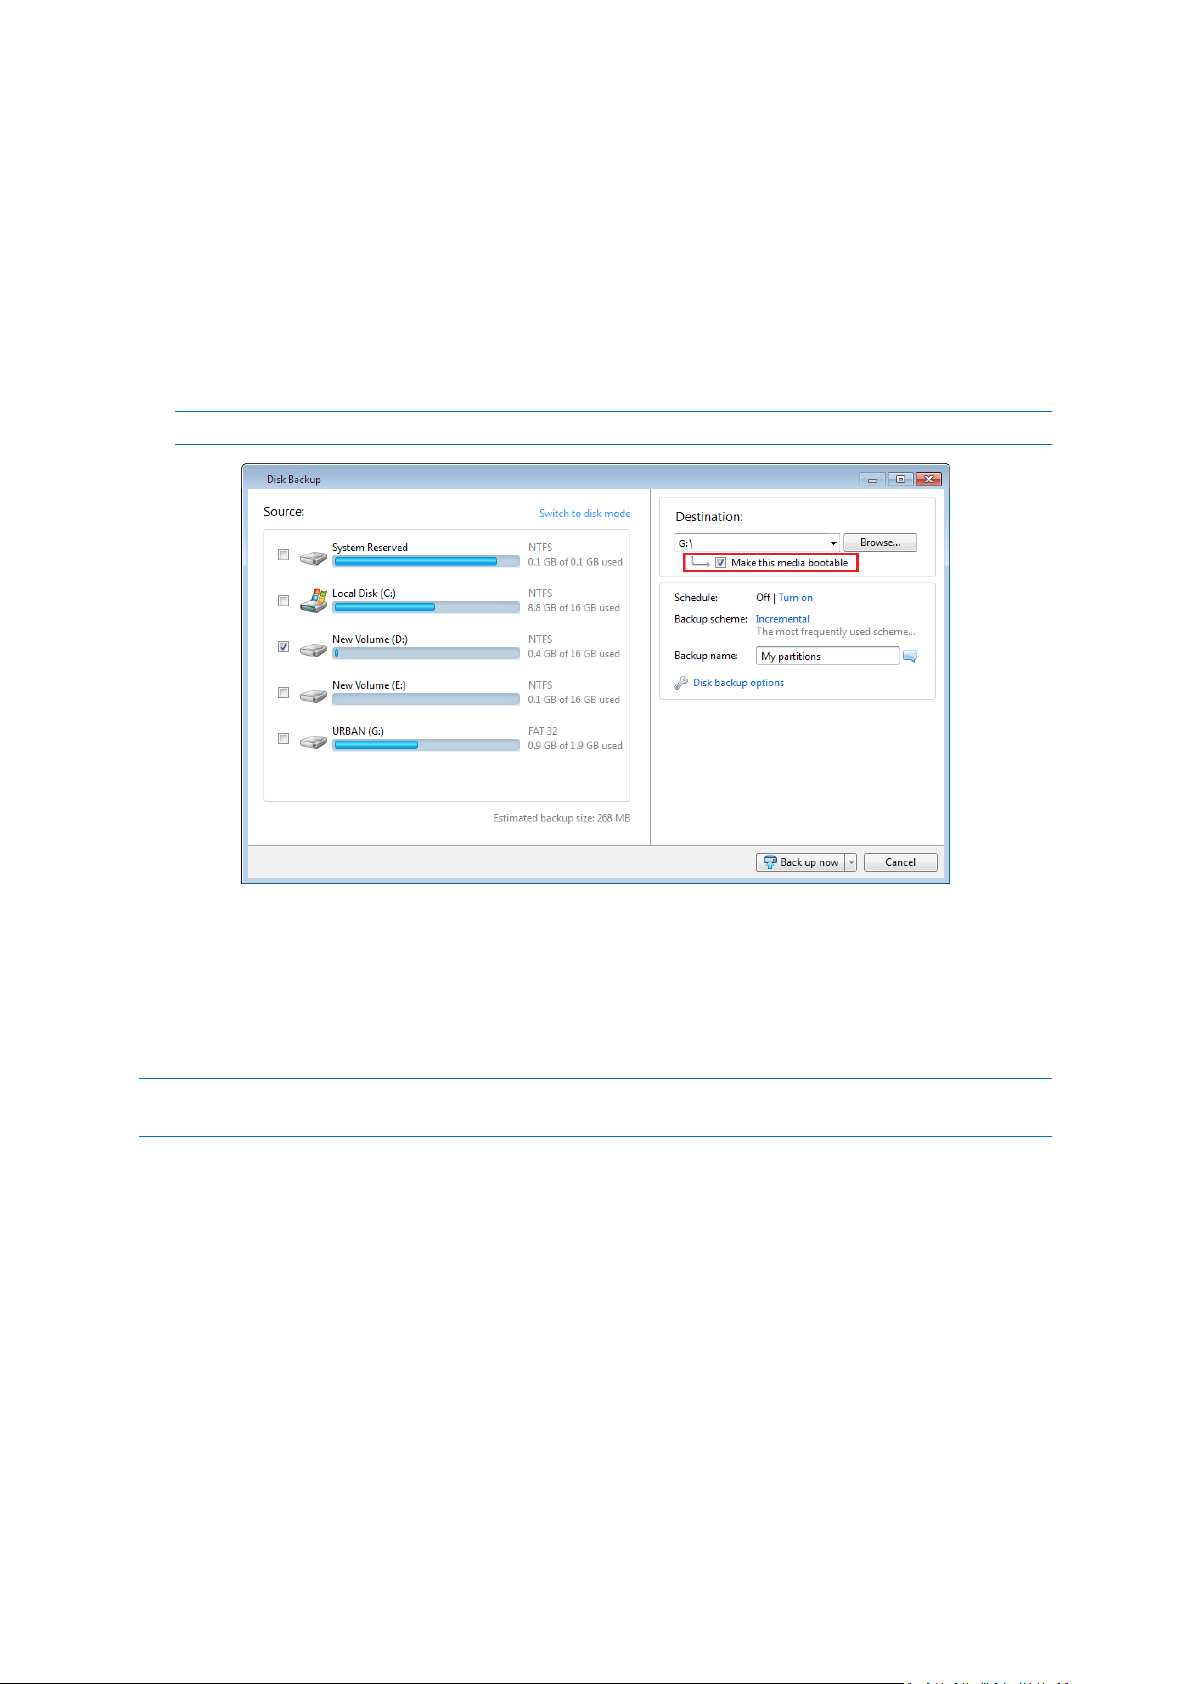
This may be a viable option if your backup is not very large. For example, we strongly recommend
not to back up to DVDs if the number of discs used will be more than three. If your backup takes
several DVDs, recovery will require a lot of disc swapping.
Here is the procedure to use:
1. Start Small Office Backup and click Disk and partition backup.
2. Select a partition or the whole disk to back up.
3. As a backup destination, select the removable media (DVD/BD/Flash drive)
4. Select the Make this media bootable check box:
If you select an internal or external hard disk as the destination, this option will be disabled.
5. Click Back up now.
If the backup does not fit one disc (for example, DVD), the file will be split into several volumes. The
first disc will be the bootable one.
If you plan to perform this backup regularly, you can make the appropriate settings in the Disk
backup options. See Removable media settings (p. 43).
Bootable media with a backup file can only be created when using Small Office Backup in Windows. It is
impossible to create such media in a bootable environment.
Additional information
Sometimes Small Office Backup may not recognize a USB flash drive as suitable for making it
bootable. In such a case, you can try to prepare the drive. See How to prepare a USB flash drive for
Acronis Media Builder (p. 103).
Though Small Office Backup cannot make a bootable USB hard disk, you may try using third-party
tools. For example, see the procedure suggested by MudCrab, an Acronis Forum MVP at
http://www.themudcrab.com/acronis_grub4dos.php.
32 Copyright © Acronis International GmbH, 2002-2013
Page 33

2.6 Adding an existing backup to the list
If you have backups that are not shown in the backups list (for example, backups created on another
computer), you can add them manually.
To add a backup to the backup list:
1. Click Browse for backup.
2. In the opened window, select the backup you want to add.
3. Click the Add to backup list button.
2.7 Deleting backups and backup versions
You may want to delete backups and backup versions you no longer need. Acronis Small Office
Backup stores information on the backups in a metadata information database.
Therefore, deleting unneeded backup files in Windows Explorer will not delete information about
these backups from the database, and Acronis Small Office Backup will consider that they still exist.
This will result in errors when the program tries to perform operations on the backups that no longer
exist. So you must only remove obsolete backups and backup versions by using the tools provided by
Acronis Small Office Backup.
To delete an entire backup:
1. Start Small Office Backup.
2. On the corresponding backup box, click the gear icon to open the Operations menu and then
click Delete.
When you delete an entire backup, all its versions will be deleted as well.
To delete a specific backup version:
1. Start Small Office Backup.
2. On the corresponding backup box, click the gear icon and then click Recover files.
3. In Backup explorer, right-click on the time line the version you want to delete, and then click
Delete version.
When you delete a backup version, please remember that this version may have dependent versions.
In this case the dependent versions will be deleted as well, because data recovery from such versions
becomes impossible.
If you delete a full backup version - the program will also delete all subsequent incremental and
differential versions till the next full version.
If you delete an incremental backup version or a differential backup version - the program will
also delete all subsequent incremental versions till the next full or differential version.
2.8 Backup options
In the Disk Backup Options and Online Backup Options windows you can configure options for a
disk/partition and online backup processes respectively. To open the options window, click the
appropriate link.
33 Copyright © Acronis International GmbH, 2002-2013
Page 34

After you have installed the application, all options are set to the initial values. You can change them
In this section
Backup schemes ....................................................................................... 35
Single version scheme .............................................................................. 35
Version chain scheme .............................................................................. 36
Custom schemes ...................................................................................... 36
Image creation mode ............................................................................... 39
Backup protection .................................................................................... 40
Pre/Post commands for backup ............................................................... 40
Backup splitting ........................................................................................ 41
Backup validation option ......................................................................... 42
Backup reserve copy ................................................................................ 42
Removable media settings ....................................................................... 43
Backup comment ..................................................................................... 43
Error handling .......................................................................................... 44
Computer shutdown ................................................................................ 44
Windows account ..................................................................................... 45
Performance of backup operation ........................................................... 45
Notifications for backup operation .......................................................... 46
Excluding items from backup ................................................................... 47
for your current backup operation only or for all backups that will be created in future. Select the
Save the settings as default check box to apply the modified settings to all further backup operations
by default.
Note that options of each backup type are fully independent, and you should configure them
separately.
If you want to reset all the modified options to the values that were set after the product installation
initially, click the Reset to initial settings button.
34 Copyright © Acronis International GmbH, 2002-2013
Page 35

2.8.1 Backup schemes
Backup schemes along with the scheduler help you to set up your backup strategy. The schemes
allow you to optimize backup storage space usage, improve data storage reliability, and
automatically delete the obsolete backup versions.
Backup scheme defines the following parameters:
Backup methods that will be used to create backup versions (full, differential or incremental)
Sequence of the backup versions created using different methods
Version cleanup rules
Acronis Small Office Backup allows you to choose the following backup schemes:
Single version (p. 35) - select this scheme if you want to use the smallest backup storage.
Version chain (p. 36) - this may be the optimal scheme in many cases.
Incremental - select this scheme if you want to create only incremental backups after an initial
full backup (this is the default scheme).
Differential - select this scheme if you want to create only differential backups after an initial full
backup.
Custom (p. 36) - select this item if you want to set up a backup scheme manually.
2.8.2 Single version scheme
The program creates a full backup version and overwrites it every time according to the specified
schedule or when you run backup manually.
Backup scheduler setting: monthly.
Result: you have a single up-to-date full backup version.
Required storage space: minimal.
35 Copyright © Acronis International GmbH, 2002-2013
Page 36

2.8.3 Version chain scheme
At first the program creates the 1st full backup version. The version will be kept until you delete it
manually. After that, according to the specified schedule (or when you run backup manually) the
program creates: 1 full and 5 differential backup versions, then again 1 full and 5 differential backup
versions and so on. The versions will be stored for 6 months. After the period the program analyzes if
the oldest backup versions (except the 1st full version) may be deleted. It depends on the minimum
number of versions (eight) and version chains consistency. The program deletes the oldest versions
one by one after creating new versions with the same backup method (for example, the oldest
differential version will be deleted after creation of the newest differential version). First of all the
oldest differential versions will be deleted, then - the oldest full version.
Backup scheduler setting: monthly.
Result: you have monthly backup versions for the last 6 months plus the initial full backup version
that may be kept for a longer period.
Required storage space: depends on the number of versions and their sizes.
2.8.4 Custom schemes
With Acronis Small Office Backup you also can create your own backup schemes. Schemes can be
based on the pre-defined backup schemes. You can make changes in a selected pre-defined scheme
to suit your needs and then save the changed scheme as a new one.
You cannot overwrite existing pre-defined backup schemes.
In addition, you can create custom schemes from scratch based on full, differential or incremental
backup versions.
So first of all select one of the backup methods in the appropriate box.
Full (p. 28)
Select this method if you want to create only full backup versions.
Differential (p. 28)
Select this method if you want to create backup chains containing only full and differential
backup versions.
You can configure the scheme by using one of the following options:
Create only differential versions after the initial full version - select this item to create only
one backup version chain. Automatic cleanup is not available for this option.
Create a full version after every [n] differential versions - select this item to create several
backup version chains. This is a more reliable but more space-consuming backup scheme.
Incremental (p. 28)
Select this method if you want to create backup chains containing only full and incremental
backup versions.
You can configure the scheme by using one of the following options:
Create only incremental versions after the initial full version - select this item to create only
one backup version chain. Automatic cleanup is not available for this option.
36 Copyright © Acronis International GmbH, 2002-2013
Page 37

Create a full version after every [n] incremental versions - select this item to create several
backup version chains. This is a more reliable but more space-consuming backup scheme.
Automatic cleanup rules
To delete obsolete backup versions automatically, you can set one of the following cleanup rules:
Delete versions older than [defined period] (available for full method only) - Select this option to
limit the age of backup versions. All versions that are older than the specified period will be
automatically deleted.
Delete version chains older than [defined period] (available for incremental and differential
methods only) - Select this option to limit the age of backup version chains. The oldest version
chain will be deleted only if, after deletion, the age of the oldest version exceeds the specified
period.
Store no more than [n] recent versions (available for full method only) - Select this option to
limit the maximum number of backup versions. When the number of versions exceeds the
specified value, the oldest backup version will be automatically deleted.
Store no more than [n] recent version chains (available for incremental and differential methods
only) - Select this option to limit the maximum number of backup version chains. When the
number of version chains exceeds the specified value, the oldest backup version chain will be
automatically deleted.
Keep size of the backup no more than [defined size] - Select this option to limit maximum size of
the backup. After creating a new backup version, the program checks whether the total backup
size exceeds the specified value. If it's true, the oldest backup version will be deleted.
The first backup version option
Often the first version of any backup is one of the most valuable versions. This is true because it
stores the initial data state (for example, your system partition with recently installed Windows) or
some other stable data state (for example, data after a successful virus check).
Do not delete the first version of the backup - Select this check box to keep the initial data state. The
program will create two initial full backup versions. The first version will be excluded from the
automatic cleanup, and will be stored until you delete it manually.
If you select incremental or differential method, the first backup chain will start from the second full
backup version. And only the third version of the backup will be incremental or differential one.
Note that when the check box is selected, the Store no more than [n] recent versions check box will
change to Store no more than 1+[n] recent versions.
2.8.4.1 Managing custom backup schemes
If you change anything in an existing backup scheme, you can save the changed scheme as a new
one. In this case you need to specify a new name for that backup scheme.
You can overwrite existing custom schemes.
You cannot overwrite existing pre-defined backup schemes.
In a scheme name, you can use any symbols allowed by OS for naming files. The maximum length
of a backup scheme name is 255 symbols.
You can create not more than 16 custom backup schemes.
37 Copyright © Acronis International GmbH, 2002-2013
Page 38

After creating a custom backup scheme, you can use it as any other existing backup scheme while
configuring a backup.
You can also use a custom backup scheme without saving it. In this case, it will be available only for
the backup where it was created and you will be unable to use it for other backups.
If you do not need a custom backup scheme anymore, you can delete it. To delete the scheme, select
it in the backup schemes list, click Delete, and then click Delete scheme in the confirmation window.
The pre-defined backup schemes cannot be deleted.
2.8.4.2 Automatic version consolidation
Automatic consolidation of a backup is enabled by setting the overall limitations for the backup.
These limitations include:
a maximum number of backup versions
a maximum storage period for the backup files
a maximum backup size
Automatic backup version consolidation is available only for the incremental and differential methods of the
custom backup version scheme.
By default there are no limits set and automatic consolidation is not performed. To enable automatic
consolidation, you must select at least one of the limits and either leave its default value or change it
according to your needs.
If limits are set, then after creating a backup version the program checks the backup for quota
violations, such as exceeding a pre-set maximum number of gigabytes set aside for backup versions
and, if any limitation is exceeded, consolidates the oldest backup versions. For example, if you've
pre-set your backup to store 50GB of backup files and your backup versions reach 55GB, you have
exceeded a quota and the system will respond automatically based on rules that you've already set.
This operation creates a temporary file and thus requires disk space. Consider also that the quota
must be violated so that the program can detect the violation. Therefore, to be able to consolidate
the files, the program needs some space on the disk in excess of the backup quota. The extra amount
of space can be estimated as the size of the largest backup version in the backup.
In case of setting a limit on the number of backup versions, the actual number of versions can exceed
the maximum number of versions by one. This enables the program to detect quota violation and
start consolidation. Similarly, if you pre-set a backup version storage period, for example, 30 days,
the program will start consolidation when the oldest backup version is stored for 31 days.
2.8.4.3 Examples of custom schemes
Disk backup “Full version every 2 months + differential version twice a month”
Case: You need to back up your system partition twice a month and create a new full backup version
every two months. In addition, you want to use no more than 100 GB of disk space to store the
backup versions. Let’s see how you can do it using a custom backup scheme.
1. Start Small Office Backup and click Disk and partition backup.
2. In the Disk Backup window, select your system partition (usually C:), and specify the backup
destination. For more information see Backing up partitions and disks (p. 29).
38 Copyright © Acronis International GmbH, 2002-2013
Page 39

3. Click Turn on for the Schedule item. In the Scheduler window click Monthly, and specify, for
example, the 1st and 15th days of the month. This will result in a backup version in about every 2
weeks. Then specify a start time for the backup operation.
4. Click Incremental next to the Backup scheme item (Incremental is the default backup scheme).
5. In the Disk Backup Options window, make sure that the Backup scheme tab is selected.
6. Choose Custom scheme instead of Incremental scheme.
7. In the Backup method box, select Differential from the drop down list.
8. Click Create a full version after every [n] differential versions, and type or select "3".
In that case the program will first create the initial full backup version (no matter how you set up
a backup process, the first backup version will always be the full one), and then 3 differential
versions, each one in about two weeks. Then again a full version and 3 differential versions and
so on. So every new full version will be created in two months.
9. To limit storage space for the versions, click Turn on automatic cleanup.
10. Click Keep size of the backup no more than [defined size], type or select "100" "GB", and click
OK.
When the total backup size exceeds 100 GB, Acronis Small Office Backup will clean up the existing backup
versions to make the remaining versions satisfy the size limit. The program will delete the oldest backup
chain consisting of a full backup version and 3 differential backup versions.
11. In the Disk Backup window, check that all settings are correct and click Back up now. If you want
your first backup to be run only at the time you specified in the Scheduler, click the down arrow
to the right of the Back up now button and select Later in the drop down list.
2.8.5 Image creation mode
Small Office Backup usually backs up partitions and disk one by one and includes in the backup only
those sectors that contain data. In some cases, it can be useful to change this way of image creating.
For example you may need to back up a disk containing a non-Windows operating system or data
that spans across multiple partitions or disks.
Multi-volume snapshot
The option determines whether to take snapshots of multiple volumes at the same time or one
by one.
When this option is set to Enable, snapshots of all volumes being backed up will be created
simultaneously. Use this option to create a time-consistent backup of data that spans across
multiple volumes, for instance for an Oracle database.
When this option is set to Disable, the volumes' snapshots will be taken one after the other. As a
result, if the data spans across several volumes, the resulting backup may be not consistent.
Back up sector-by-sector
Select this check box to make a sector-by-sector backup.
By default the program copies only the hard disk sectors that contain data. However, sometimes
it might be useful to make a full sector-by-sector backup. For example, you have deleted some
files by mistake and want to make a disk image before trying to undelete them, because
sometimes undeleting may create problems in the file system. Please note that this mode
increases processing time and usually results in a larger image file because it copies used and
unused hard disk sectors.
Back up unallocated space
39 Copyright © Acronis International GmbH, 2002-2013
Page 40

This option becomes available if you have selected the previous parameter, Back up
sector-by-sector. By default, while performing sector-by-sector backup, unallocated space is not
included into the backup file. Enabling this option will include all unallocated disk space into the
backup.
2.8.6 Backup protection
A backup file can be password-protected. By default, there is no password protection for backups.
To protect the backup:
Enter the password for the backup into the Password field. A password should consist of at least
eight symbols and contain both letters (in upper and lower cases preferably) and numbers to
make it more difficult to guess.
Retype the previously entered password into the Confirm field.
To increase the security of your confidential data, you can encrypt the backup with strong
industry-standard AES (Advanced Encryption Standard) cryptographic algorithm. AES is available
with three key lengths – 128, 192 and 256 bits to balance performance and protection as desired.
The 128-bit encryption key is sufficient for most applications. The longer the key, the more
secure your data. However, the 192 and 256-bit long keys significantly slow down the backup
process.
If you want to use AES encryption, choose one of the following keys:
AES 128 - to use 128-bit encryption key
AES 192 - to use 192-bit encryption key
AES 256 - to use 256-bit encryption key
If you do not want to encrypt the backup and only want to protect a backup with a password,
select None.
Having specified the backup protection settings, click OK.
Note that you cannot change the password of a password-protected backup after the backup was created.
If you try to recover data from a password-protected backup, the program will ask for the password in a special
window, allowing access only to authorized users.
2.8.7 Pre/Post commands for backup
You can specify commands (or even batch files) that will be automatically executed before and after
the backup procedure.
For example, you may want to start/stop certain Windows processes, or check your data before
starting backup.
To specify commands (batch files):
Select a command to be executed before the backup process starts in the Pre-command field. To
create a new command or select a new batch file, click the Edit button.
Select a command to be executed after the backup process ends in the Post-command field. To
create a new command or select a new batch file, click the Edit button.
40 Copyright © Acronis International GmbH, 2002-2013
Page 41

Please do not try to execute interactive commands, i.e. commands that require user input (for
example, "pause"). These are not supported.
2.8.7.1 Edit user command for backup
You can specify user commands to be executed before or after the backup procedure:
In the Command field, type-in a command or select it from the list. Click ... to select a batch file.
In the Working directory field, type-in a path for command execution or select it from the list of
previously entered paths.
In the Arguments field enter or select command execution arguments from the list.
Disabling the Do not perform operations until the command's execution is complete parameter
(enabled for Pre commands by default), will permit the backup process to run concurrently with your
command execution.
The Abort the operation if the user command fails (enabled by default) parameter will abort the
operation if any errors occur in command execution.
You can test a command you entered by clicking the Test command button.
2.8.8 Backup splitting
Acronis Small Office Backup cannot split already existing backups. Backups can be split only when being
created.
Large backups can be split into several files that together make up the original backup. A backup can
also be split for burning to removable media.
The default setting - Automatic. With this setting, Acronis Small Office Backup will act as follows.
When backing up to a hard disk:
If the selected disk has enough space and its file system allows the estimated file size, the
program will create a single backup file.
If the storage disk has enough space, but its file system does not allow the estimated file size, the
program will automatically split the image into several files.
If you do not have enough space to store the image on your hard disk, the program will warn you
and wait for your decision as to how you plan to fix the problem. You can try to free some
additional space and continue or select another disk.
When backing up to a CD-R/RW, DVD-R/RW, DVD+R/RW, BD-R/RE:
Acronis Small Office Backup will ask you to insert a new disk when the previous one is full.
Alternatively, you may select the desired file size from the drop-down list. The backup will then be
split into multiple files of the specified size. That comes in handy when backing up to a hard disk with
the view to burning the backup to CD-R/RW, DVD-R/RW, DVD+R/RW or BD-R/RE later on.
41 Copyright © Acronis International GmbH, 2002-2013
Page 42

Creating images directly on CD-R/RW, DVD-R/RW, DVD+R/RW, BD-R/RE might take considerably more time
than it would on a hard disk.
2.8.9 Backup validation option
You can specify the additional validation setting: Validate backup when it is created.
When this option is enabled, the program will check the integrity of the recently created or
supplemented backup version immediately after backup. When setting up a backup of critical data or
a disk/partition backup, we strongly recommend that you enable this option in order to ensure that
the backup can be used to recover the lost data.
Regular validation
You can also schedule validation of your backups to ensure that they remain "healthy". By default
regular validation is turned on with the following settings:
Frequency: once a month
Day: the date when the backup was started
Time: the moment of backup start plus 15 minutes
Advanced settings: the Run the validation only when the computer is idle check box is selected
Example: You start a backup operation on July 15, at 12.00. The backup version is created at 12.05.
Its validation will run at 12.15 if your computer is in the "screen saver" state at the moment. If not,
then the validation will not run. In a month, August 15, at 12.15, the validation will start again. As
before, your computer must be in the "screen saver" state. The same will occur on September 15,
and so on.
You can change the default settings and specify your own schedule. This may be useful if you set a
custom backup scheme with incremental backups. For example, you may want to schedule validation
of all backup versions (the initial full backup version and subsequent incremental backup versions)
once a week.
For more information see Scheduling (p. 82).
2.8.10 Backup reserve copy
Backup reserve copy is an independent full backup version created immediately after a normal
backup and containing the same data. You can save reserve copies of your backups on the file
system, a network drive, or a USB flash drive.
To make a reserve copy:
1. Select the Create a reserve copy of my backups check box.
2. Specify a location for the backup copies.
All options of reserve copies (such as backup compression, backup splitting, etc.) are inherited from
the source backup.
A reserve copy always contains all the files selected for backup, that is, when creating a reserve copy the
program always makes a full backup of the source data. You cannot make a reserve copy in the form of an
incremental or differential backup.
42 Copyright © Acronis International GmbH, 2002-2013
Page 43

Also remember that you will pay for the enhanced convenience and increased security of your data
by the time required for performing the backup because normal backup and reserve copying are
performed one at a time and not simultaneously.
Please, be aware that CD/DVDs are not supported as locations for reserve copies.
2.8.11 Removable media settings
When backing up to removable media, you can make this media bootable by writing additional
components to it. Thus, you will not need a separate bootable disk.
The following settings are available:
Place Acronis Small Office Backup on media
Acronis Small Office Backup - includes support of USB, PC Card (formerly PCMCIA) and SCSI
interfaces along with the storage devices connected via them, and therefore is strongly
recommended.
Place Acronis System Report on media
Acronis System Report - the component allows you to generate system report that is used for
collecting information about your system in case of any program problem. Report generation will
be available before you start Small Office Backup from the bootable media. The generated
system report can be saved to a USB flash drive.
Place Acronis One-Click Restore on media
Acronis One-Click Restore is a minimal addition to your bootable media, allowing one-click data
recovery from an image backup stored on this media. This means that when booting from the
media and after clicking Recover, all data will be silently recovered to its original place. No
options or selections such as resizing partitions will be possible.
Acronis One-Click Restore can be added to the media only when creating a full backup of an entire hard disk. It
cannot be added when creating an incremental or differential backup, as well as backup of a partition. In such
case the Place Acronis One-Click Restore on media check box will not be present on the General tab of the
current backup options, even if the box is selected in the default Removable media settings.
Ask for first media while creating backups on removable media
You can choose whether to display the Insert First Media prompt when backing up to removable
media. With the default setting, backing up to removable media may not be possible if the user is
away, because the program will wait for someone to press OK in the prompt box. Therefore, you
should disable the prompt when scheduling a backup to removable media. Then, if the
removable media is available (for example, CD-R/RW inserted) the backup can run unattended.
If you have other Acronis products installed on your computer, the bootable versions of these
programs' components will be offered as well.
Small Office Backup does not support creating bootable media if a flash drive is formatted in NTFS.
2.8.12 Backup comment
This option allows you to add comments to the backup. Backup comments may help you to find the
necessary backup later.
If a backup does not have comments, type your comment in the comments area. When a comment
already exists, you can edit it after clicking Edit.
43 Copyright © Acronis International GmbH, 2002-2013
Page 44

Note that by default the comment will be assigned to all versions of the backup. You can edit the
comment of a specific backup version in Backup Explorer.
2.8.13 Error handling
When the program encountered an error while performing backup, it stops the backup process and
displays a message, waiting for a response on how to handle the error. If you set an error handling
policy, the program will not stop the backup process and warn you about an error with a message,
but will simply handle the error according to the set rules and continue working.
You can set the following error handling policy:
Do not show messages and dialogs while processing (silent mode) (the preset is disabled) - You
can enable this setting to ignore errors during backup operations. This feature was mainly
designed for unattended backups when you cannot control the backup process. In this mode no
notifications will be displayed to you if errors occur during backup. Instead you can view the
detailed log of all operations after the backup process finishes.
Ignore bad sectors (the preset is disabled) - This option is present only for disk and partition
backups. It lets you run a backup even if there are bad sectors on the hard disk. Although most
disks do not have bad sectors, the possibility that they might occur increases during the course of
the hard disk's lifetime. If your hard drive has started making strange noises (for example, it
starts making quite loud clicking or grinding noises during operation), such noises may mean that
the hard drive is failing. When the hard drive completely fails, you can lose important data, so it
is high time to back up the drive as soon as possible. There may be a problem though – the failing
hard drive might already have bad sectors. If the Ignore bad sectors check box is left unselected,
a backup is aborted in case of read and/or write errors that could occur on the bad sectors.
Selecting this box lets you run a backup even if there are bad sectors on the hard disk ensuring
that you save as much information from the hard drive as possible.
Repeat attempt if a backup fails - This option allows you to automatically repeat a backup
attempt if the backup fails for some reason. You can configure this option by specifying two
settings - number of attempts and time interval between attempts. According to these settings,
Acronis Small Office Backup will try to back up your data until the backup is successfully created.
But if the error interrupting the backup persists, then the backup will not be created.
This option is not available, when you back up your data to a USB flash drive or USB hard drive.
2.8.14 Computer shutdown
If you know that the backup process you are configuring may take a long time, you may select the
Shut down the computer after the backup is complete check box. In this case, you will not have to
wait until the operation completion. The program will perform the backup and turn off your
computer automatically.
This option is also useful when you schedule your backups. For example, you may want to perform
backups every weekday in the evening to save all your work. Schedule the backup and select the
check box. After that you may leave your computer when you finish your work knowing that the
critical data will be backed up and the computer will be turned off.
44 Copyright © Acronis International GmbH, 2002-2013
Page 45

2.8.15 Windows account
When you create a backup, you can specify a Windows account under which this backup should be
performed. This may be useful if your computer is used not only by you, but also by your relatives. In
such a case each user often has personal documents, e-mail accounts, settings, and other personal
data. By default Acronis Small Office Backup backs up data of the current user. We recommend that
you change this setting if the Windows account under which you are currently working is not yours.
The program will back up only the data related to the specified account. Data of all other accounts
will not be backed up.
To change the current Windows account:
1. Select the Run backup as different Windows account check box.
2. Type the account name and password in the appropriate fields.
2.8.16 Performance of backup operation
On the Performance tab you can configure the following settings:
Compression level
You can choose the compression level for a backup:
None - the data will be copied without any compression, which may significantly increase the
backup file size.
Normal - the recommended data compression level (set by default).
High - higher backup file compression level, takes more time to create a backup.
Maximum - maximum backup compression, but takes a long time to create a backup.
The optimal data compression level depends on the type of files stored in the backup. For example, even
maximum compression will not significantly reduce the backup size, if the backup contains essentially
compressed files, like .jpg, .pdf or .mp3.
Operation priority
Changing the priority of a backup or recovery process can make it run faster or slower (depending on
whether you raise or lower the priority), but it can also adversely affect the performance of other
running programs. The priority of any process running in a system, determines the amount of CPU
usage and system resources allocated to that process. Decreasing the operation priority will free
more resources for other CPU tasks. Increasing backup or recovery priority may speed up the process
by taking resources from the other currently running processes. The effect will depend on total CPU
usage and other factors.
You can set up the operation priority:
Low (enabled by default) - the backup or recovery process will run slower, but the performance
of other programs will be increased.
Normal - the backup or recovery process will have the equal priority with other processes.
High - the backup or recovery process will run faster, but the performance of other programs will
be reduced. Be aware that selecting this option may result in 100% CPU usage by Acronis Small
Office Backup.
45 Copyright © Acronis International GmbH, 2002-2013
Page 46

Network connection speed limit
If you frequently back up data to network drives or FTP, think of limiting the network bandwidth used
by Acronis Small Office Backup.
You can specify the network backup data transfer speed by choosing the following:
Limit transfer rate to - enter the bandwidth limit for transferring backup data in kilobytes per
second.
2.8.17 Notifications for backup operation
Sometimes a backup or recovery procedure can last an hour or longer. Acronis Small Office Backup
can notify you when it is finished via e-mail. The program can also duplicate messages issued during
the operation or send you the full operation log after operation completion.
By default all notifications are disabled.
Free disk space threshold
You may want to be notified when the free space on the backup storage becomes less than the
specified threshold value. If after starting a backup Acronis Small Office Backup finds out that the
free space in the selected backup location is already less than the specified value, the program will
not begin the actual backup process and will immediately inform you by displaying an appropriate
message. If the free space becomes less than the specified value while the backup is being run, the
program will display the same message.
To set the free disk space threshold:
Select the Show notification message on insufficient free disk space check box
In the Size box, type or select a threshold value and select a unit of measure
Acronis Small Office Backup can monitor free space on the following storage devices:
Local hard drives
USB cards and drives
E-mail notification
You can specify an e-mail account that will be used to send you e-mail notifications.
First of all, choose which notifications you want to receive:
Send e-mail notifications about the operation state - select this check box to receive messages
about the backup process state.
Send disaster recovery plan (DRP) after creating a backup - select this check box to receive
messages containing a detailed list of steps you need to perform to recover your data from each
backup.
To specify the e-mail settings:
Enter the e-mail recipient address in the To field. You can enter several e-mail addresses in a
semicolon-delimited format.
Enter the e-mail sender address in the From field.
Enter the outgoing mail server (SMTP) in the Outgoing mail server (SMTP) field.
46 Copyright © Acronis International GmbH, 2002-2013
Page 47

Set the port of the outgoing mail server. By default the port is set to 25.
If the mail server requires your credentials, select the Server requires authentication check box.
Enter the user name in the User name field.
Enter the password in the Password field.
To check whether your settings are correct, click the Send test message button.
Additional notification settings:
To send a notification concerning process completion, select the Send notification upon
operation's successful completion check box.
To send a notification concerning process failure, select the Send notification upon operation
failure check box.
To send a notification with operation messages, select the Send notification when user
interaction is required check box.
To send a notification with full log of operations, select the Add full log to the notification check
box.
2.8.17.1 Disaster recovery plan
Disaster recovery plan (DRP) is an email message that contains a list of backed up data items and
detailed instructions that guide a user through a process of recovering these items from a backup.
If the Disaster recovery plan option is enabled, a DRP is created and sent by e-mail to the specified
list of users after the first successful backup. The DRP will be created and sent again after the first
successful backup in the following cases:
The backup settings have been edited so that the DRP parameters changed.
The backup contains new data items or does not contain items previously backed up.
To set up sending DRPs:
1. In a backup options window, click the Notifications tab and then select the Send disaster
recovery plan (DRP) after creating a backup check box.
2. Configure email settings. See details in Notifications for backup operation (p. 46).
2.8.18 Excluding items from backup
If you want to exclude unnecessary files from a backup, specify the appropriate file types on the
Exclusions tab of the backup options. You can specify exclusions both for Disk and partitions backup
and for Online Backup.
47 Copyright © Acronis International GmbH, 2002-2013
Page 48

How to use the default exclusion settings
After you have installed the application, all the exclusion settings are set to the initial values. You can
change them for your current backup operation only or for all backups that will be created in future.
Select the Save as default check box to apply the modified settings to all further backup operations
by default. If you want to reset all the modified settings to the values that they were originally set to
when the product was installed, click the Reset to initial settings button.
What you can exclude and how
1. You can exclude hidden and system files from a backup by selecting the corresponding check
boxes.
We do not recommend excluding hidden and system files from the backups of your system partition.
2. You can exclude files meeting the criteria you specify. To do this, select the Files matching the
following criteria check box, enter the exclusion criterion, and then click Add.
By default, the program excludes from backups files with the following extensions: .~, .tmp, and .tib.
How to add an exclusion criterion:
You can enter explicit file names for exclusion from the backup:
file.ext - all such files will be excluded from the backup.
C:\file.ext - the file.ext file on the C: disk will be excluded.
You can use wildcard characters (* and ?):
*.ext - all files with a .ext extension will be excluded.
??name.ext - all files with a .ext extension, having six letters in their names (starting with any
two symbols (??) and ending with name), will be excluded.
To exclude a folder, click Browse, select the folder you want to exclude on the directory tree,
click OK, and then click Add.
To delete a criterion, for example, added by mistake, click the Delete icon to the right of the
criterion.
48 Copyright © Acronis International GmbH, 2002-2013
Page 49

2.9 Validating backups
The validation procedure checks whether you will be able to recover data from a particular backup
version, so when you select for validation on the time line…
a full backup version, the program validates the full backup version only.
a differential backup version, the program validates the initial full backup version and the
selected differential backup version.
an incremental backup version, the program validates the initial full backup, the selected
incremental backup version, and the whole chain (if any) of backup versions to the selected
incremental backup version. If the chain contains one or more differential backup versions, the
program validates (in addition to the initial full backup version and the selected incremental
backup version) only the most recent differential backup version in the chain and all subsequent
incremental backup versions (if any) between the differential backup version and the selected
incremental backup version.
This information can be helpful, for example, when you find out that a backup comprising a full
backup version and a chain of incremental ones is corrupted. To troubleshoot the backup, do as
follows. First of all validate the full backup version by selecting it on the time line, right-clicking and
choosing Validate in the shortcut menu. If it is damaged, all the backup chain will be useless. When it
is not damaged, proceed to validating incremental backup versions starting from the oldest, until you
find the culprit. All incremental backup versions made after the corrupted one will be unusable, but
you will be able to recover the data at least from the previous backup versions.
To validate an entire backup:
1. Select the backup to validate, click the gear icon to open the Operations menu and select
Validate. If the selected backup is password-protected, Acronis Small Office Backup will ask for
the password in a dialog box.
2. After you enter the correct password the program will start the validation procedure.
3. When the validation is complete, you will see the result in the line below the backup's box. You
can cancel validation by clicking Cancel.
2.10 Consolidating backup versions
Using consolidation of backup versions, you can create a consistent copy of backup while deleting
selected backup versions. This allows you to delete the backup versions you no longer need from any
backup without harming that backup.
Consolidation creates a consistent copy of the backup that does not contain deleted backup versions.
If you select a new location for the consolidated backup, the source backup stays as is unless you
delete it. This requires more disk space but ensures security of the backup in case the consolidation
fails because of power failure or a lack of disk space.
Acronis Small Office Backup cannot consolidate backup versions created when "editing" partition images
mounted in the Read/Write mode.
To consolidate backup versions in a backup:
Start Small Office Backup.
49 Copyright © Acronis International GmbH, 2002-2013
Page 50

On the box of the backup you want to consolidate, click the gear icon, point to More and then
click Consolidate versions.
Follow the wizard's steps.
2.10.1 Archive to consolidate protection
The archive you chose is password-protected in order to prevent it from unauthorized access. You
need to specify the previously entered password to obtain access to the archive.
To specify the password:
Type-in the password in the Password field. If you enter the wrong password, the consolidate
archive procedure will not be able to continue.
Click OK to continue.
2.10.2 Backup selection
The Backup selection window displays a list of backups belonging to the selected archive with the
backup creation date and time (like in the Recovery wizard). The top backup is the full backup; the
rest are incremental backups.
To select the backups you want to keep:
Select the backups you want to keep. The other backups will not be included into the
consolidated archive. Information on the selected backup (its name, date of creation, type and
comments) is displayed on the right pane of the window.
Click Next to continue.
2.10.3 Result location
Specify the place where you want to save the archive copy and its name. By default, the program
suggests the same location and the source archive name. Your original archive will be overwritten.
To specify another location for the consolidated archive:
Select the New location item and click the Browse button. Specify the location where you want
the consolidated archive to be stored to from the drives tree.
If required, you can create a new folder in the selected location (by clicking the Create new
folder button), or delete the unnecessary folder (by clicking the Delete button).
In the File name field enter a name for the consolidated archive, or click the Generate name
button to generate the name automatically.
If you don't need the original archive, you may delete it by selecting the Delete original archive
check box.
Click Proceed to continue.
2.10.4 Consolidation summary
The summary window contains a list of briefly described operations that Acronis Small Office Backup
will perform after clicking Proceed. If some parameters need to be changed, choose the necessary
step in the left part of the window and correct the parameter.
50 Copyright © Acronis International GmbH, 2002-2013
Page 51

Click the Proceed button to start the listed operations.
Click the Options button to perform the optional steps.
Click the Cancel button to exit the wizard without performing any operations.
2.11 Cloning backup settings
When you already have a backup and you need to create a new backup of the same type, there is no
need to configure the backup process from scratch. The program allows you to copy all settings from
an existing backup. After that, you only have to slightly correct the copied settings for your new
backup and click Back up now.
To create a new backup based on an existing backup:
1. Find the corresponding backup box, click the gear icon to open the Operations menu, point to
More, and then click Clone settings.
A new backup box named (1) [the initial backup name] will be created. It will contain the same
settings as the "parental" backup.
2. On the cloned backup box, click the gear icon to open the Operations menu, and then click Edit
settings.
3. Change selection of items to back up. You may modify backup name, destination, and other
settings if needed.
4. Click the Save button.
5. To create the first backup version, click Back up now on the backup box.
51 Copyright © Acronis International GmbH, 2002-2013
Page 52

3 Recovering data
In this section
Recovering your system after a crash ...................................................... 52
Recovering partitions and disks ............................................................... 56
How to recover more than one partition at once .................................... 58
Recovering a disk backup to a different disk under rescue media .......... 61
Recovering specific files and folders ........................................................ 67
Acronis Universal Restore ........................................................................ 68
About recovery of dynamic/GPT disks and volumes ............................... 73
Backup protection dialog box .................................................................. 74
Arranging boot order in BIOS ................................................................... 74
Recovery options...................................................................................... 75
The purpose of data backup is to recover backed up data when the original is lost due to hardware
failure, fire, theft or accidental deletion of files.
We hope that you backed up your system and data using the backup features provided by Acronis
Small Office Backup. If so, nothing will have been lost.
The following sections describe how to recover disks, partitions, files and folders. In most cases, you
will use Acronis Backup Explorer to recover files and folders. For more information, see Acronis
Backup Explorer (p. 20).
3.1 Recovering your system after a crash
When your computer fails to boot, it is advisable to at first try to find the cause using the suggestions
given in Trying to determine the crash cause (p. 52). If the crash is caused by corruption of the
operating system, use a backup to recover your system. Make the preparations described in
Preparing for recovery (p. 53) and then proceed with recovering your system (p. 53).
3.1.1 Trying to determine the crash cause
A system crash can be due to two basic factors. One reason is that your computer will not boot due
to a hardware failure. The second reason is that the operating system is corrupted and Windows will
not start up.
In the first scenario, it is better to let your service center handle the repairs. However, you may want
to perform some routine tests. Check the cables, connectors, power of external devices, etc. Then,
restart the computer. The POST (power-on self test) that starts immediately after you turn on your
computer, checks your system hardware. If the POST has found a failure, you will need to send the
PC for repairs.
If the POST does not reveal a hardware failure, enter BIOS and check whether it recognizes your
system hard disk drive. To enter BIOS, press the required key combination (Del, F1, Ctrl+Alt+Esc,
Ctrl+Esc, or some other, depending on your BIOS) during the POST sequence. Usually the message
with the required key combination is displayed during the startup test. Pressing this combination
takes you to the setup menu. Go to the hard disk autodetection utility which usually comes under
"Standard CMOS Setup" or "Advanced CMOS setup". If the utility does not detect the system drive, it
has failed and you need to replace the drive.
52 Copyright © Acronis International GmbH, 2002-2013
Page 53

If the utility correctly detects your system hard disk drive, then the cause of the crash is probably a
virus, malware or corruption of a system file required for booting.
If the system drive is healthy, try to recover the system using a backup of your system disk or system
partition. Because Windows does not boot, you will have to use Acronis bootable rescue media.
You will also need to use a system disk backup when recovering the system after replacing the
damaged hard disk drive.
3.1.2 Preparing for recovery
a) Scan the computer for viruses if you suspect that the crash occurred due to a virus or malware
attack.
b) Boot from the rescue media and validate the backup you want to use for recovery. This is
necessary because, when a backup is validated in the recovery environment, the program sometimes
declares it corrupted though it has been successfully validated in Windows. This may be due to the
fact that Acronis Small Office Backup uses different device drivers in Windows and in the recovery
environment. If Acronis Small Office Backup considers the backup corrupted, it will not proceed with
recovery.
3.1.3 Recovering your system
After you have performed the steps described in Preparing for recovery (p. 53), begin the system
recovery procedure. Here we will explain how to recover a corrupted system to the same hard disk.
System recovery to a replaced hard disk drive will be similar with some minor differences. You do not
need to format the new disk, as this will be done in the process of recovery.
Attach the external drive if it contains the backup to be used for recovery and make sure that the drive is
powered on. This must be done before booting from Acronis rescue media.
1. Arrange the boot order in BIOS so as to make your rescue media device (CD, DVD or USB stick)
the first boot device. See Arranging boot order in BIOS (p. 74).
2. Boot from the rescue media and select Acronis Small Office: Server Cloud Backup.
53 Copyright © Acronis International GmbH, 2002-2013
Page 54

3. Select My disks below Recover on the Welcome screen.
4. Select the system disk or partition backup to be used for recovery.
Right-click on the backup and choose Recover in the shortcut menu.
5. Select Recover whole disks and partitions at the Recovery method step.
6. Select the system partition (usually C) on the What to recover screen. If the system partition has
a different letter, select the partition using the Flags column. It must have the Pri, Act flags.
54 Copyright © Acronis International GmbH, 2002-2013
Page 55
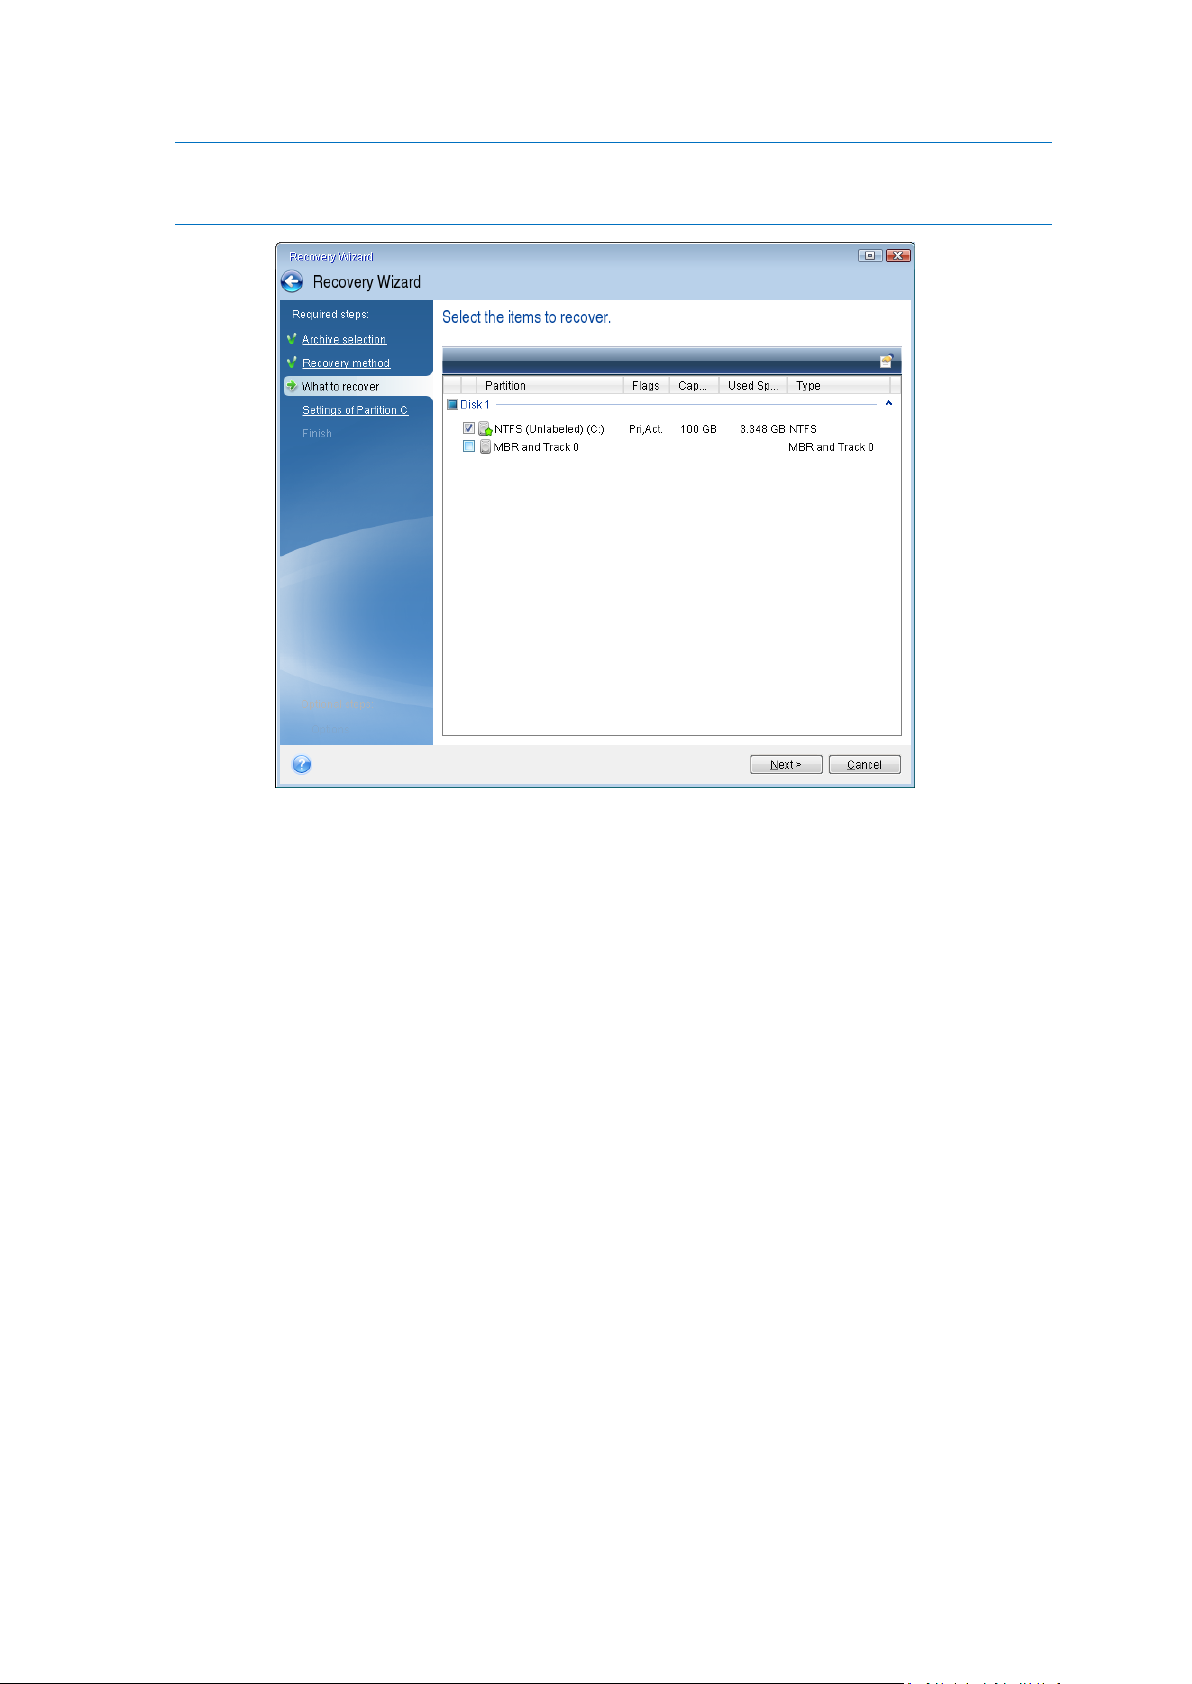
In case of Windows Server 2008, Windows Server 2008 R2 and Windows Server 2012 the System Reserved
partition will have the Pri, Act flags . You will need to select for recovery both the System Reserved partition
and the System partition.
7. At the "Settings of partition C" (or the letter of the system partition, if it is different) step check
the default settings and click Next if they are correct. Otherwise, change the settings as required
before clicking Next. Changing the settings will be needed when recovering to the new hard disk
of a different capacity.
55 Copyright © Acronis International GmbH, 2002-2013
Page 56

8. Carefully read the summary of operations at the Finish step. If you have not resized the partition,
the sizes in the Deleting partition and Recovering partition items must match. Having checked
the summary click Proceed.
9. When the operation finishes, exit the standalone version of Small Office Backup, remove the
rescue media and boot from the recovered system partition. After making sure that you have
recovered Windows to the state you need, restore the original boot order.
3.2 Recovering partitions and disks
You can start recovering a partition or disk from an image backup both on the main window and in
Acronis Backup Explorer. To start recovery from the main window, select the box of a backup
containing the partition image you need to recover. Click the Recover button (or the Recover icon if
the backup box is collapsed). This opens the Disk Recovery window.
56 Copyright © Acronis International GmbH, 2002-2013
Page 57

To start the recovery in Acronis Backup Explorer, click the gear icon and select Recover files. On the
time line, select the required version, click the Disks and partitions tab, select the partitions you
want to recover and click the Recover button.
1. Select the corresponding check box of the partition to recover.
If you backed up an entire disk, you can choose to recover the entire disk at once by clicking Switch to disk
mode. To be able to select partitions again, click Switch to partition mode.
2. In the recovery destination field below the partition name, select the destination partition. Those
partitions where the partition to be recovered can fit are marked by black lettering. Unsuitable
partitions are marked by red lettering. Note that all data on the destination partition will be lost
because it is replaced by the recovered data and file system.
To recover an image to the source partition without resizing, at least 5% of free space is required on the
partition. Otherwise, the Recover now button will be unavailable.
3. After you finish with your selections, click Recover now to start recovery.
Sometimes you need to recover the MBR (Master Boot Record). For instance, it may be necessary
when Windows does not boot after recovery. To recover the MBR (either together with the partition
or individually), click Show MBR and then select the MBR check box.
If you recover the entire disk, the Recover disk signature check box appears. Disk signature is a part
of a hard disk MBR. It is used for uniquely identifying the disk media.
We recommend that you select the Recover disk signature check box due to the following reasons:
Small Office Backup creates scheduled backups using the signature of the source hard disk. If you
recover the same disk signature, you don't need to re-create or edit the backups created
previously.
Some installed applications use a disk signature for licensing and other purposes.
57 Copyright © Acronis International GmbH, 2002-2013
Page 58

We recommend that you clear the Recover disk signature check box when:
You use an image backup not for disaster recovery but for cloning your Windows hard drive to
another one.
In this case, Small Office Backup generates a new disk signature for the recovered hard drive, even if
you recover to the same drive.
Disk recovery options - click to set up additional parameters for the disk recovery process.
Use Acronis Universal Restore - click to use Acronis Universal Restore technology during recovery.
Acronis Universal Restore will help you create a bootable system clone on different hardware (for
more information see Acronis Universal Restore (p. 68)).
Choose this option when recovering your system disk to a computer with a processor, motherboard
or mass storage device that is different from the one in place when the system was originally backed
up.
3.3 How to recover more than one partition at once
Here we describe recovery of two partitions. If an image of a hard disk has more than two partitions,
the procedure is similar.
The following procedure is valid only for recovery to a basic disk. Recovery to a dynamic disk with partition
resizing is impossible.
1. Click Recover on the backup box of a disk containing several partitions. The Disk Recovery
window appears.
2. Click the down arrow next to Version: and then select the backup version you want to recover by
its backup date and time.
58 Copyright © Acronis International GmbH, 2002-2013
Page 59

3. Select a partition to recover. This opens the recovery destination field below the partition name
(label).
4. Click the down arrow to the right of the field and select the destination hard disk. The partition
to be recovered is then placed on the selected hard disk. It occupies all the available disk space.
To reduce the partition size so as to leave enough disk space for the remaining partition, click the
Partition properties link below the recovery destination field. The Partition Properties window
appears.
5. You can resize the partition by dragging its right border with a mouse on the horizontal bar on
the screen.
To assign the partition a specific size, enter the appropriate number into the Total size field.
59 Copyright © Acronis International GmbH, 2002-2013
Page 60
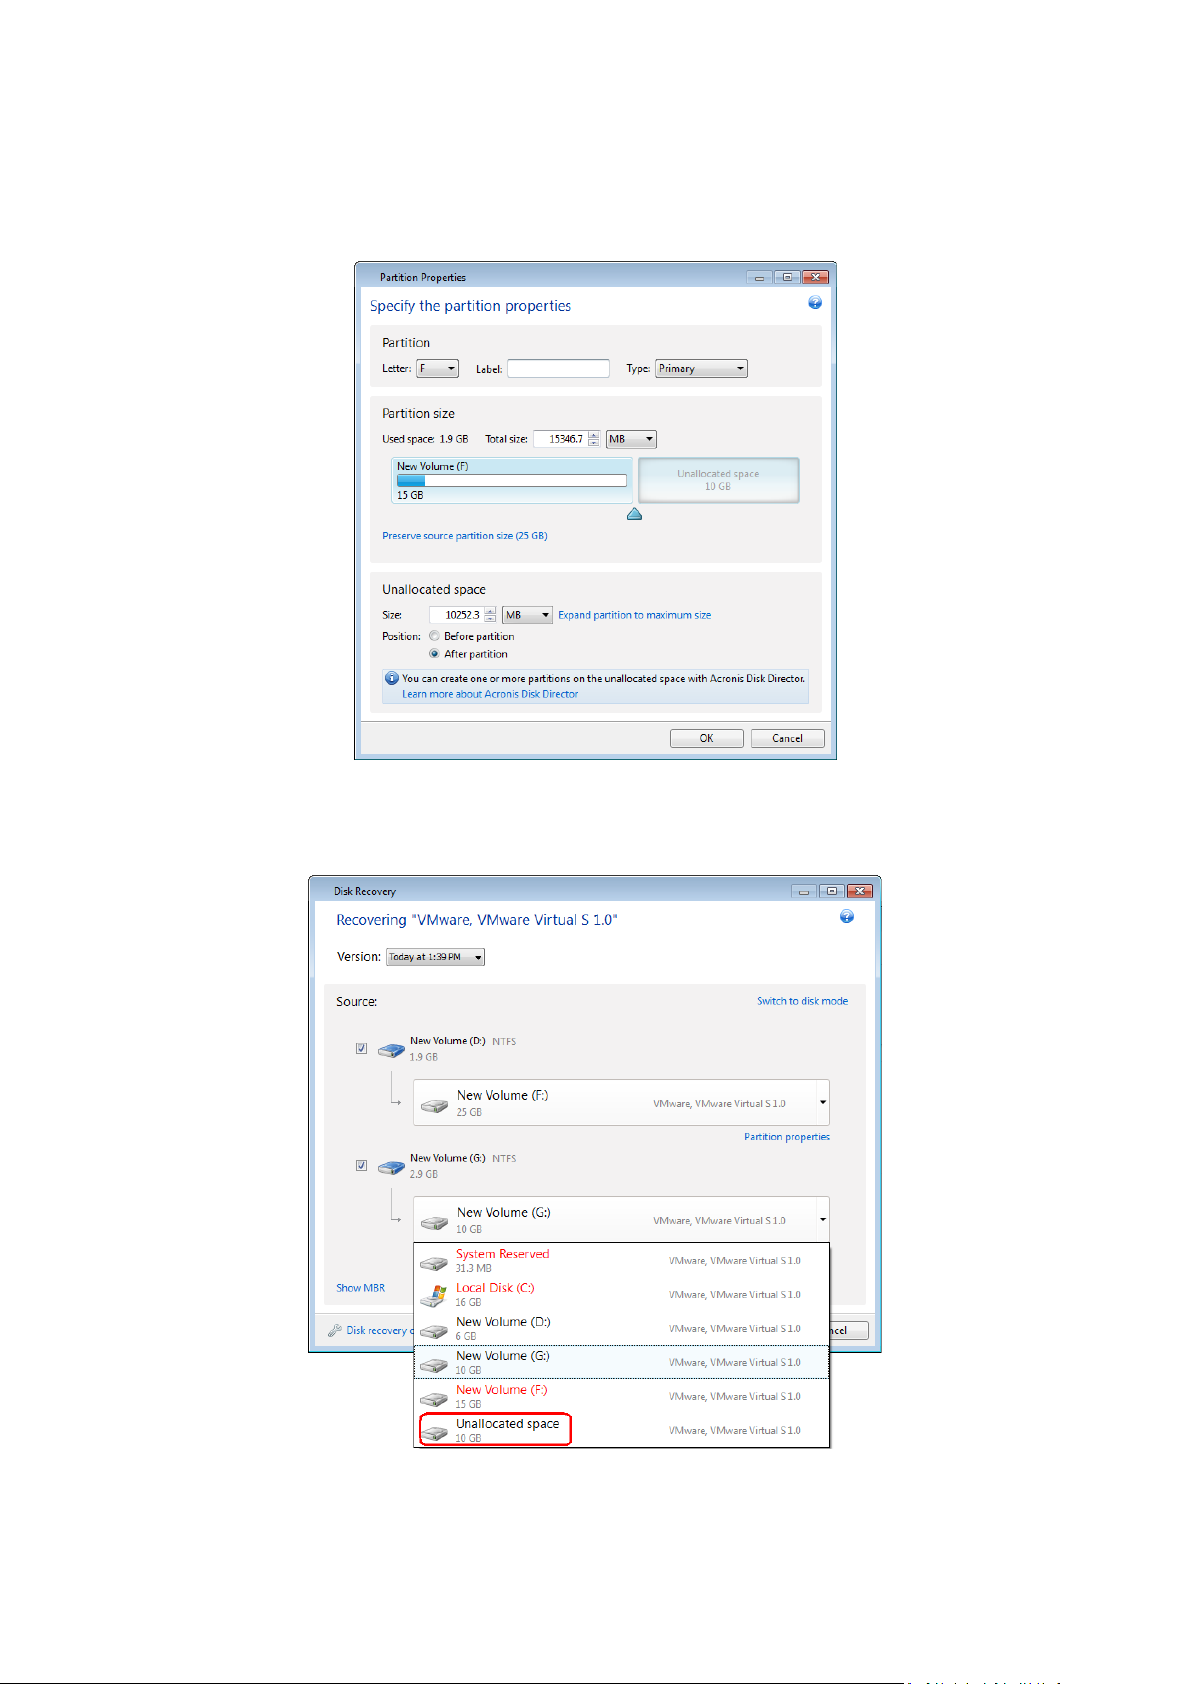
Remember that you need to leave as much unallocated (free) space after having resized the
partition as will be needed for the remaining partition. Select a disk letter and partition type.
When you finish the settings, click OK to confirm them and return to the main Disk Recovery
window.
6. Select the next partition's check box.
7. Select the unallocated space on the destination hard disk. The program creates a partition
occupying the entire unallocated space.
60 Copyright © Acronis International GmbH, 2002-2013
Page 61
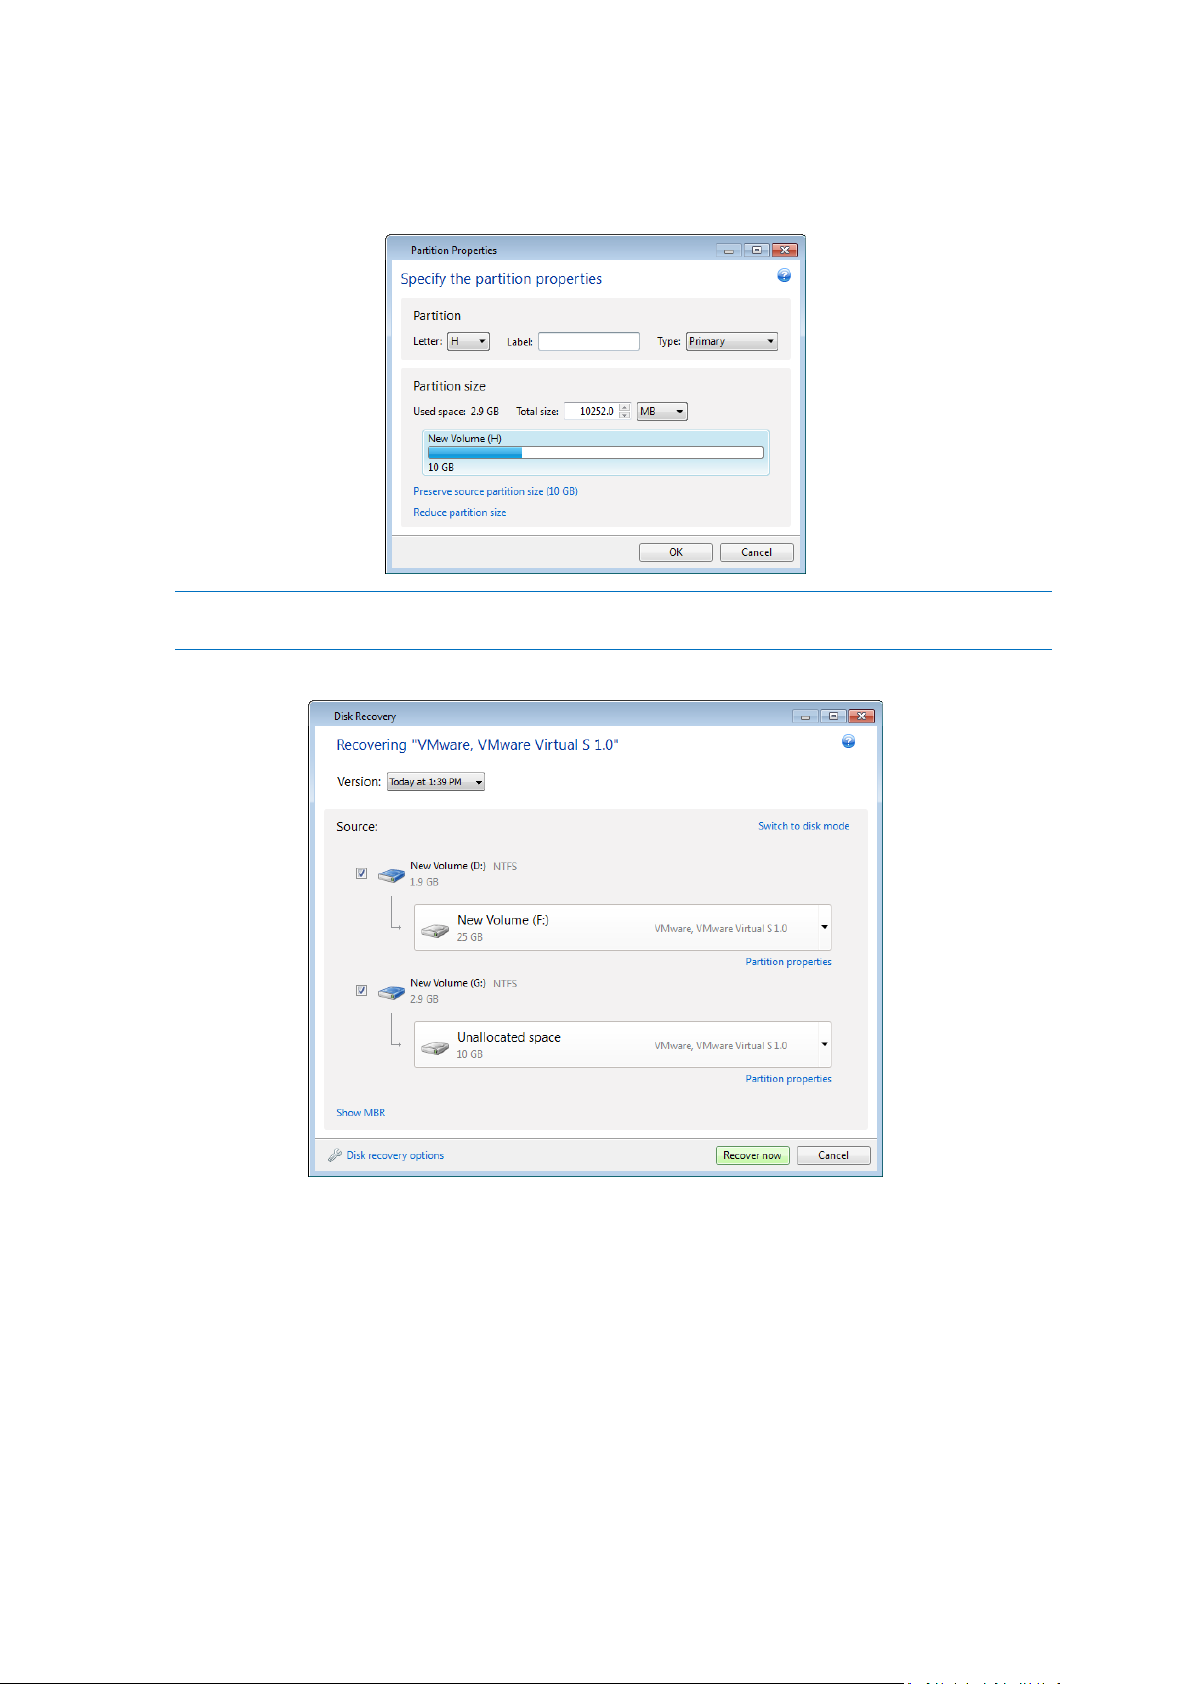
8. Click the Partition properties link and make the settings for the partition. Select a disk letter and
partition type. When you finish the settings, click OK to confirm them and return to the main Disk
Recovery window.
If the image contains more than two partitions, leave enough unallocated space for other partitions to be
recovered and repeat steps 5-7 until you make the settings for all partitions.
9. Click Recover now to recover the partitions to the destination hard disk.
3.4 Recovering a disk backup to a different disk under
rescue media
Recovery of a disk backup containing several partitions to a hard disk that has a different capacity is
one of the most complicated operations. This is especially true when the original hard disk you have
backed up has a hidden diagnostic or recovery partition.
Complete the preparations described in Preparing for recovery (p. 53).
If you have not already done so, assign unique names (labels) to the partitions of your computer's
disks. This will allow for identification of the partitions by their names and not by the disk letters.
61 Copyright © Acronis International GmbH, 2002-2013
Page 62

Disk letters may differ when booting from the rescue media. The names will help you find the drive
containing your backups, as well as the target (new) drive.
Information on partition sizes, drive capacities, their manufacturers, and model numbers can also
help to correctly identify the drives.
It is highly recommended to install the new hard drive to the same position in the computer and to
use the same cable and connector that was used for the original drive. This is not always possible,
e.g. the old drive may be an IDE and the new drive may be a SATA. In any case, install the new drive
to where it will be used.
3.4.1 Recovering a disk with a hidden partition
A hidden partition may be created by the PC manufacturer for diagnostics or system recovery. Users
of Windows Server 2008, Windows Server 2008 R2 and Windows Server 2012 usually have the
hidden System Reserved partition. Recovering a backup of a system disk with a hidden partition
requires that you to take into account some additional factors. First of all, it is necessary for the new
drive to keep the physical order of the partitions that existed on the old drive. In addition, you should
place the hidden partition in the same location - usually at the start or the end of the disk space. To
minimize the risk of possible problems, it is better to recover the hidden partition without resizing.
Here we describe recovery of a system disk with Windows and the hidden System Reserved partition.
Attach the external drive if it contains the backup to be used for recovery and make sure that the drive is
powered on. This must be done before booting from Acronis rescue media.
1. Arrange the boot order in BIOS so as to make your rescue media device (CD, DVD or USB stick)
the first boot device. See Arranging boot order in BIOS (p. 74).
2. Boot from the rescue media and select Acronis Small Office: Server Cloud Backup.
3. Select Recovery Disk and Partition Recovery in the main menu. Choose the image backup of
your system disk that you want to use for recovery.
Before continuing with the recovery, you need to know the sizes and physical order of all existing
partitions. To see this information, click Details on the wizard's toolbar. Small Office Backup
displays information about the backup. This includes a graphical view of all partitions the disk
contains and their physical order on the disk.
62 Copyright © Acronis International GmbH, 2002-2013
Page 63

4. Select Recover whole disks and partitions at the Recovery method step.
5. At the What to recover step, select the boxes of the partitions to be recovered. Do not select the
MBR and Track 0 box, because this will result in selecting the entire disk for recovery. Recovering
the entire disk does not allow you to resize partitions manually. You will be able to recover the
MBR later. Select the partitions and click Next.
Selecting partitions leads to appearance of the relevant steps "Settings of partition ...". Note that
these steps start with partitions which do not have an assigned disk letter (as usually is the case
with hidden partitions). The partitions then take an ascending order of partition disk letters. This
order cannot be changed. The order may differ from the physical order of the partitions on the
hard disk.
63 Copyright © Acronis International GmbH, 2002-2013
Page 64
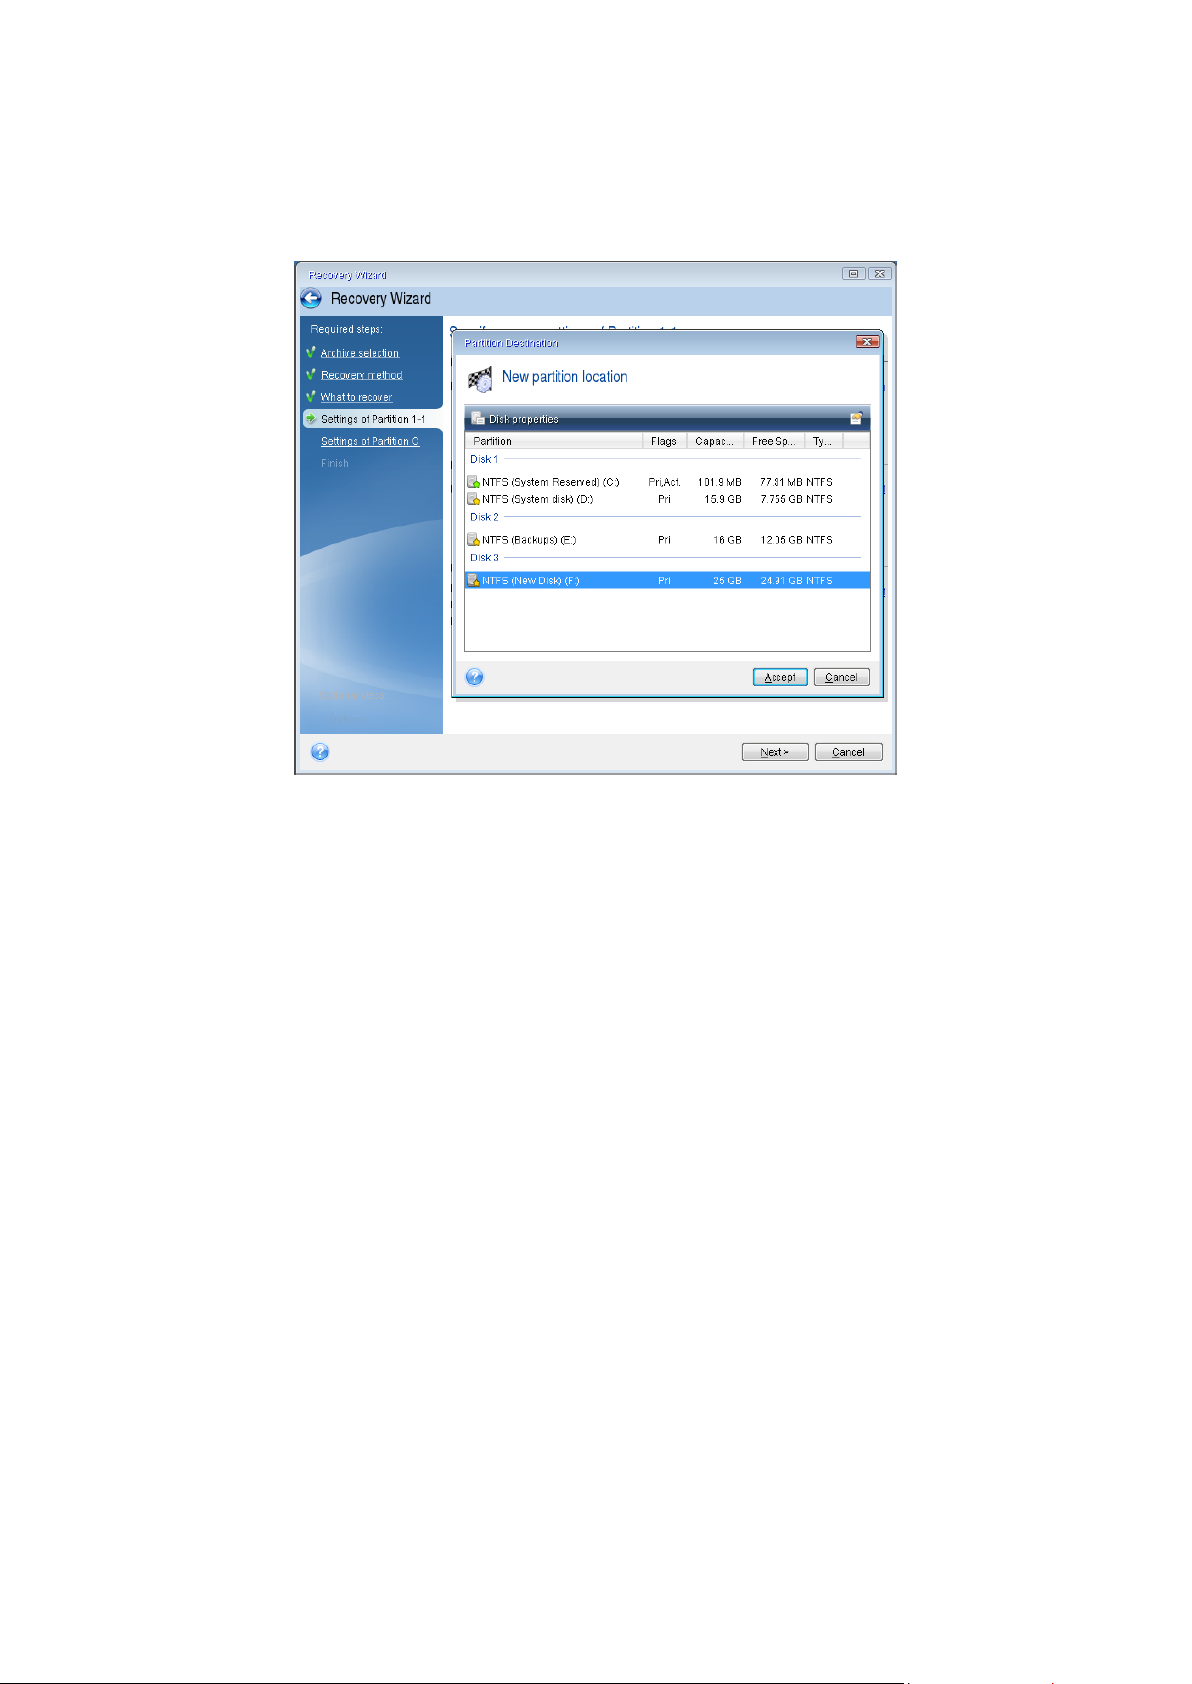
6. You can specify the following partition settings: location, type, and size. You first need to specify
the settings of the hidden partition (System Reserved partition in our case) as it usually does not
have a disk letter. Because you are recovering to the new disk, click New location. Select the
destination disk by either its assigned name or capacity.
7. Clicking Accept returns you to the "Settings of partition 1-1" screen. Check the partition type and
change it, if necessary. You should remember that the System Reserved partition must be
primary and marked as active.
64 Copyright © Acronis International GmbH, 2002-2013
Page 65
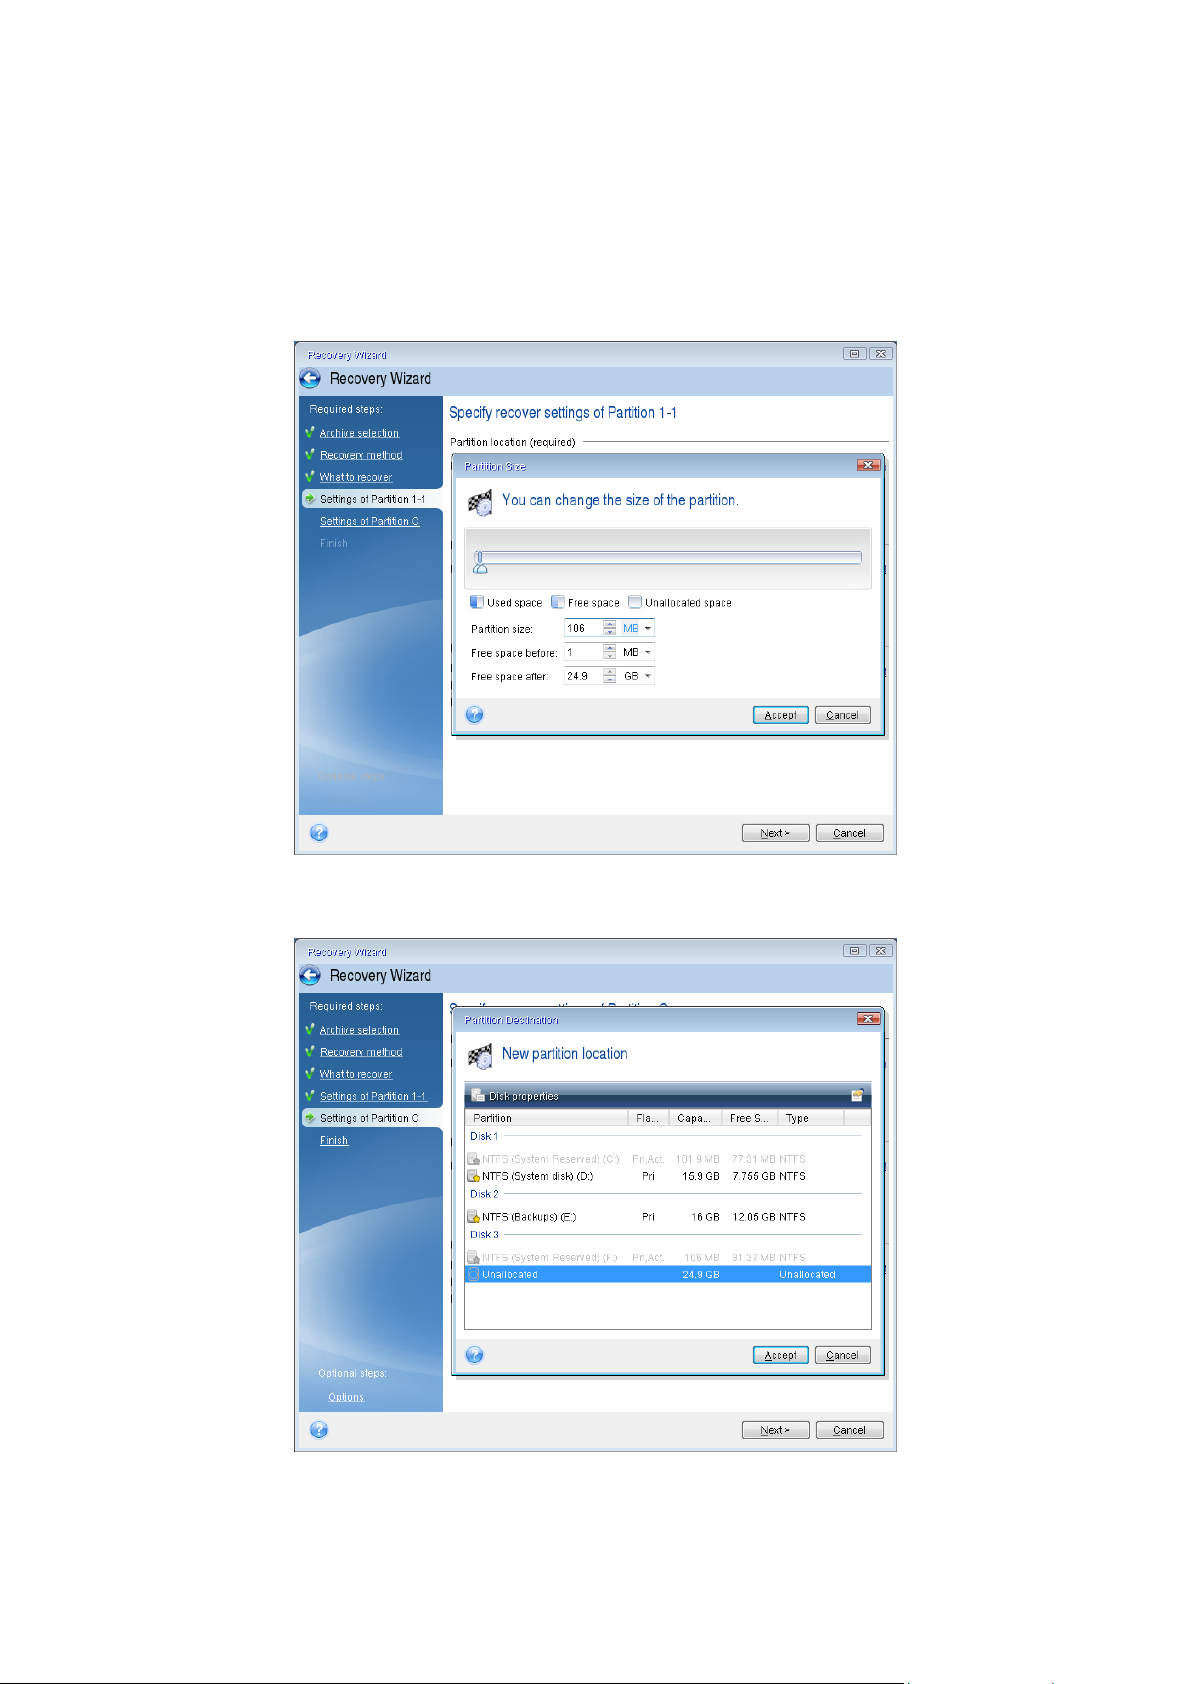
8. Proceed to specifying the partition size by clicking Change default in the Partition size area. By
default the partition occupies the entire new disk. You need to keep the hidden partition size
unchanged and place it in the same location on the disk (at the start or the end of disk space). To
do this, resize and relocate the partition by dragging it or its borders with a mouse on the
horizontal bar on the screen. Or you can enter corresponding values into the appropriate fields
(Partition size, Free space before, Free space after). Click Accept when the partition has the
required size and location and then click Next.
Specify the settings for the second partition which in this case is your system partition. Click New
location, and then select unallocated space on the destination disk that will receive the partition.
65 Copyright © Acronis International GmbH, 2002-2013
Page 66

Click Accept, check the partition type (change, if necessary). The system partition must be
primary.
Specify the partition size which by default equals the original size. Usually there is no free space
after the partition, so allocate all the unallocated space on the new disk to the second partition.
Click Accept and then click Next.
9. Carefully read the summary of operations to be performed and then click Proceed.
In the case being described (recovery of the System Reserved partition) steps 10-12 are optional. You need
to perform them when recovering a hidden partition created by the PC manufacturer.
10. When the operation finishes, proceed to MBR recovery. You need to recover the MBR because
the PC manufacturer could change the generic Windows MBR or a sector on track 0 to provide
access to the hidden partition.
11. Select the same backup again. Right-click and select Recover in the shortcut menu. Choose
Recover whole disks and partitions at the Recovery method step and then select the MBR and
Track 0 box.
12. At the next step, select the destination disk as the target for MBR recovery, click Next and then
Proceed. After MBR recovery is complete, exit the standalone version of Small Office Backup.
Windows should not "see" both the new and old drive during the first boot after recovery because this could
result in problems booting Windows. If you upgrade the old drive to a larger capacity new one, disconnect the
old drive before the first boot.
Switch off the computer, if you need to disconnect the old drive. Otherwise, just reboot the
computer after removing the rescue media.
Boot the computer to Windows. It may report that new hardware (hard drive) is found and Windows
needs to reboot. After making sure that the system operates normally, restore the original boot
order.
66 Copyright © Acronis International GmbH, 2002-2013
Page 67

3.5 Recovering specific files and folders
You will usually start recovering files and folders from Acronis Backup Explorer. When recovering a
specific file version, you will start recovery from the View Versions window. In either case, starting
recovery opens the File Recovery window.
Let's consider recovery of files and folders from the Backup Explorer.
1. Start Small Office Backup.
2. Find the disk backup which contains the files and folders you want to recover. On the
corresponding box click the gear icon and select Recover files.
3. In the Backup Explorer, select the files and folders you want to recover. For more information on
selection in the Backup Explorer see Files and folders tab (p. 22). Click Recover to start recovery.
This will open the File Recovery window.
4. Select a destination on your computer to where you want to recover selected files/folders. You
can recover data to its original location or choose a new one, if necessary. To choose a new
location, click the Browse... button.
5. When you choose a new location, the selected items will be recovered by default without
recovering the original, absolute path. You may also wish to recover the items with their entire
folder hierarchy. In this case select the Recover absolute path check box.
6. When needed, set the options for the recovery process (recovery process priority, file-level
security settings, etc.). To set the options, click the File recovery options link. The options you set
here will be applied only to the current recovery operation.
7. To start the recovery process, click the Recover now button.
8. The recovery progress will be shown in a special window. You can stop the recovery by clicking
Cancel. Please keep in mind that the aborted recovery may still cause changes in the destination
folder.
3.5.1 Recovering file versions
If you need to recover a specific version of a file, select the file in the Backup Explorer. When you
select the file, the View versions link appears below the file size information. Clicking the link opens
the View Versions window with a list of all versions of the file in the backup.
67 Copyright © Acronis International GmbH, 2002-2013
Page 68

Until you select a file version, the Open and Recover... buttons remain disabled. Selecting a file
version enables the buttons:
Select the required version by its backup time and click the Recover... button. This will open the File
Recovery window. Select the destination and recover the file version to the folder of your choice. For
more information see Recovering specific files and folders (p. 67).
To choose the correct version, you can open the version in the associated application and view the
file contents. Choose the version by its backup time, and then click the Open button. Acronis Small
Office Backup will recover the file version to a temporary folder. Then it will open the file using the
associated application.
3.6 Acronis Universal Restore
3.6.1 Purpose of Acronis Universal Restore
A system disk image can be restored easily on the hardware where it was created or to identical
hardware. However, if you change the motherboard or use another processor version, a likely
possibility in case of hardware failure, the recovered system could fail to boot.
Trying to move the system to a new more powerful computer will usually produce the same result.
This is because the new hardware is incompatible with critical drivers included in the image.
Microsoft System Preparation Tool (Sysprep) will not resolve this problem. Sysprep allows you to
replace only Plug-and-Play device drivers (sound cards, network adapters, video cards etc.).
However, System Hardware Abstraction Layer (HAL) and mass storage device drivers must be
identical on both the source and the target computers (see Microsoft Knowledge Base, articles
302577 and 216915).
Acronis Universal Restore technology provides an efficient solution for hardware-independent
system restoration by replacing the crucial Hardware Abstraction Layer (HAL) and mass storage
device drivers.
68 Copyright © Acronis International GmbH, 2002-2013
Page 69

Acronis Universal Restore is applicable for:
Instant recovery of a failed system on different hardware
Hardware-independent cloning of operating systems
3.6.1.1 General principles of Acronis Universal Restore
1. Automatic selection of HAL and mass storage drivers
Acronis Universal Restore searches the Windows default driver storage folders (in the image being
restored) for HAL and mass storage device drivers and installs drivers that best fit the target
hardware.
You can specify a custom driver repository (a folder or folders on a network drive or CD) which will
also be used to search for drivers. In addition, Acronis Universal Restore can search drivers on
removable media.
The Windows default driver storage folder is determined in the registry value "DevicePath", which can be found
in the registry key
HKEY_LOCAL_MACHINE\SOFTWARE\Microsoft\Windows\CurrentVersion\DevicePath. This storage folder is
usually WINDOWS/inf.
2. Installing drivers for Plug-and-Play devices Acronis Universal Restore relies on the built-in
Plug-and-Play discovery and configuration process to handle hardware differences in devices that are
not critical for the system start. This includes video, audio and USB. Windows takes control over this
process during the logon phase. If some of the new hardware is not detected, you will have a chance
to install the drivers for it later manually.
3.6.2 Recovering to different hardware
Using Acronis Universal Restore will help you create a bootable system clone on different hardware.
For more information see Acronis Universal Restore (p. 68). Choose this option when recovering your
system disk to a computer with a dissimilar processor, different motherboard or a different mass
storage device than in the system you originally backed up. This may be useful, for example, after
replacing a failed motherboard or when deciding to migrate the system from a desktop to a laptop.
You can use Acronis Universal Restore for recovering your system disk both from tib and vhd files.
Before proceeding with recovery, make sure you have drivers for the hard disk drive controller or
chipset drivers for the new motherboard. These drivers are critical for booting the operating system.
You can download the drivers for your motherboard on the Vendor's web-site. Please note that if you
downloaded the drivers in *.exe, *.cab, *.zip format, you should extract them first. The driver files
should have *.inf, *.sys or *.oem extensions.
3.6.2.1 Recovering your system with the help of Acronis Universal
Restore
1. Start Small Office Backup and select a backup containing your system partition.
2. Click the Recover button on the backup's box if the backup consists of a single version. When
there are several backup versions, click Explore and recover. Select the backup version you want
to recover on the Disks and partitions tab, and then click Recover.
3. When the Disk Recovery window opens, select the system partition's check box and choose the
recovery destination.
69 Copyright © Acronis International GmbH, 2002-2013
Page 70

4. Select the Use Universal Restore check box. Then click Settings to open the Drivers manager
window.
5. If the target hardware has a specific mass storage controller (such as an SCSI, RAID, or Fibre
Channel adapter) for the hard disks, specify where to find the driver or drivers for the specific
hardware. If the driver is stored on a diskette or CD, select the Search removable media for
device drivers box. If some drivers are stored on a local hard disk or a network share, click Add
custom driver locations.... Then, browse to the driver or drivers location. After you finish
specifying the drivers locations, click OK.
Acronis Universal Restore does not support search for drivers on FTP servers.
In most cases, Acronis Universal Restore will use three sources for drivers:
- the removable media;
- the drivers storage location or locations specified at this step; and
- the Windows default driver storage folders (in the image being recovered).
The program will find the most suitable of all available drivers and install them into the
recovered system.
6. To start recovery, click the Recover now button.
7. When a warning appears that you need to reboot the computer to continue the operation, click
Reboot to continue.
During recovery, the program may be unable to find some driver in the specified sources and will
display an error message. In this case, you can click Ignore to continue recovery or click Cancel to
cancel the process and then try to find the required driver. You can then continue with the recovery
process.
Acronis Universal Restore patches the registry and installs the new drivers after the system is recovered.
Therefore, make sure that the driver location will still be available. For example, do not specify the search path
for the drivers on the same disk to which you are recovering the backup. We recommend that you place the
drivers on a separate USB hard disk, USB flash stick or on a network share.
After successfully recovering the system partition boot to the recovered Windows.
During the first booting, Windows will display numerous "Found new hardware" pop-up messages
and will then ask you to reboot the computer.
If you use Acronis Universal Restore for recovering a backup of multiboot configuration with two or
more editions of Windows, the most critical drivers will be replaced for all Windows installations.
3.6.2.2 Recovering your system with the help of Acronis Universal
Restore under rescue media
In most cases it is preferable to use your bootable rescue media for system recovery. The rescue
media must include Acronis Universal Restore add-on. Therefore, you need to re-create the rescue
media after activating the add-on.
1. Make your rescue media the first boot device in BIOS. See Arranging boot order in BIOS (p. 74).
2. Boot from the rescue media and select Acronis Small Office: Server Cloud Backup.
3. Click the My Disks link below Recover on the Welcome screen to start the Recovery Wizard.
Then, choose the backup of the system disk for recovery. Because drive letters in the standalone
Small Office Backup may differ from the way Windows identifies drives, you may need to specify
70 Copyright © Acronis International GmbH, 2002-2013
Page 71

the path to the backup file. In such a case click Browse and select the disk and folder that stores
the backup.
4. Choose Recover whole disks and partitions and select the Use Acronis Universal Restore check
box.
71 Copyright © Acronis International GmbH, 2002-2013
Page 72

5. If the target hardware has a specific mass storage controller (such as an SCSI, RAID, or Fibre
Channel adapter) for the hard disks, specify where to find the driver or drivers for the specific
hardware at the Drivers manager step. If the driver is stored on a diskette or CD, select the
Search removable media for device drivers box. If some drivers are stored on a local hard disk or
a network share, select the Search for device drivers in the following locations box (when it is
not selected by default). Specify the path to the driver or drivers after clicking Add Search Path.
When both boxes are selected at this step, Acronis Universal Restore will use three sources for
drivers:
- the removable media;
- the drivers storage folder or folders specified at this step; and
- the Windows default driver storage folders (in the image being recovered).
The program will find the most suitable of all available drivers and install them into the
recovered system.
6. Select the system disk at the What to recover step. Then, specify the destination of the disk
being recovered (new system disk). At this point the program checks whether the destination
disk is free. If not, you will be prompted by the Confirmation window stating that the destination
disk contains partitions, perhaps with useful data. To confirm deletion of the partitions, click OK.
7. Carefully read the summary of operations at the Finish step and then click Proceed.
If the capacities of the source (backed up) disk and the destination disk are different, the new disk space will be
proportionally distributed between the recovered partitions.
After successfully recovering the system partition, exit Small Office Backup. Enter the BIOS, make the
system hard disk the first boot device, and boot to the recovered Windows.
72 Copyright © Acronis International GmbH, 2002-2013
Page 73

3.6.3 Limitations in using Acronis Universal Restore
My system is BIOS-booted (Windows or
Acronis Bootable Media)
My system is UEFI-booted (Windows or
Acronis Bootable Media)
My source disk is MBR
and my OS does not
support UEFI
The operation will not affect neither
partition layout nor bootability of
the disk: partition style will remain
MBR, the destination disk will be
bootable in BIOS.
After operation completion, the
partition style will remain MBR, but
the operating system will fail booting
from UEFI, since your operating
system does not support it.
1. The system recovered by Acronis Universal Restore might not start, if the partition structure in the
image or the target disk partitioning does not coincide with that of the source disk. The loader
restored from the image will point to the wrong partition and the system will not boot or will
malfunction.
This may occur if you:
back up only selected partitions but not the entire source disk
restore only selected partitions and not the entire source disk. In some cases, especially if your
system resides on a partition other than the original one, this can confuse the loader and prevent
the restored system from rebooting.
To avoid this problem, we recommend that you back up and recover the entire system disk.
2. The Acronis Universal Restore option does not work if a computer is booted with Acronis Startup
Recovery Manager (using F11). This is because Acronis Startup Recovery Manager is primarily meant
for data recovery on the same computer.
3.7 About recovery of dynamic/GPT disks and volumes
1. Small Office Backup supports recovery of dynamic volumes to the following locations on the local
hard drives:
To the original location (to the same dynamic volume).
To another dynamic disk or volume.
To unallocated space of the dynamic group.
To a basic disk.
If a dynamic volume is recovered to an unallocated space of the dynamic group, the recovered
volume type will be the same as it was in the backup.
Manual resizing of dynamic volumes during recovery to dynamic disks is not supported. If you need
to resize a dynamic volume during recovery, it should be recovered to a basic disk.
When performing a so called "bare-metal recovery" of dynamic volume(s) to a new unformatted disk,
the recovered volumes become basic. If you want the recovered volumes to remain dynamic, the
target disk(s) should be prepared as dynamic (partitioned and formatted). This can be done using
third-party tools, for example, Windows Disk Management snap-in.
2. The target disk's partition style after recovery. It depends on whether your computer supports
UEFI and on whether your system is BIOS-booted or UEFI-booted. See the following table:
73 Copyright © Acronis International GmbH, 2002-2013
Page 74

My source disk is MBR
and my OS supports UEFI
The operation will not affect neither
partition layout nor bootability of
the disk: partition style will remain
MBR, the destination disk will be
bootable in BIOS.
The destination partition will be
converted to GPT style that will make
the destination disk bootable in UEFI.
My source disk is GPT
and my OS supports UEFI
After operation completion, the
partition style will remain GPT, the
system will fail booting on BIOS,
because your operating system
cannot support booting from GPT
on BIOS.
After operation completion, the
partition style will remain GPT, the
operating system will be bootable on
UEFI.
To ensure Windows bootability after recovery, you must recover an image of your source disk in the disk
mode.
3. The target volume type does not change when recovering over an existing volume. Examples:
When recovering a dynamic volume over a basic volume the target volume remains basic.
When recovering a dynamic striped volume over a dynamic spanned volume the target volume
remains spanned.
4. Recovering a basic volume or disk to the dynamic group:
When recovering a basic volume to an unallocated space of the dynamic group, the recovered
volume becomes dynamic.
When recovering a basic disk to a dynamic disk of a dynamic group consisting of two disks, the
recovered disk remains basic. The dynamic disk to which the recovery is performed becomes
"missing" and a spanned/striped dynamic volume on the second disk becomes "failed".
3.8 Backup protection dialog box
A backup file can be protected with a password. You can set password protection in backup options
while creating a backup.
If you try to recover data from a password-protected backup, mount it or append an incremental
backup to such a backup, the program will ask for the password in a special window, allowing access
only to authorized users. In this case, you must specify the correct password for the selected backup
file. Only then will you be able to proceed with the selected operation.
3.9 Arranging boot order in BIOS
BIOS has a built-in setup utility for initial computer configuration. To enter it, you have to press a
certain key combination (Del, F1, Ctrl+Alt+Esc, Ctrl+Esc, or some other, depending on your BIOS)
during the POST (power-on self test) sequence that starts immediately after you turn your computer
on. Usually the message with the required key combination is displayed during the startup test.
Pressing this combination takes you to the menu of the setup utility that is included in your BIOS.
The menu can differ in appearance, sets of items and their names, depending on the BIOS
manufacturer. The most widely known BIOS makers for PC motherboards are Award/Phoenix and
AMI. Moreover, while items in the standard setup menu are mostly the same for various BIOSes,
items of the extended (or advanced) setup heavily depend on the computer and BIOS version.
74 Copyright © Acronis International GmbH, 2002-2013
Page 75

Among other things, the BIOS menu allows you to adjust the boot order.
In this section
Disk recovery mode ................................................................................. 76
Pre/Post commands for recovery ............................................................ 76
Validation option...................................................................................... 76
Computer restart ..................................................................................... 77
File recovery options ................................................................................ 77
Overwrite file options .............................................................................. 77
Performance of recovery operation ........................................................ 78
Notifications for recovery operation ....................................................... 78
Computer BIOS allows booting operating systems not only from hard disks, but also from CD-ROMs,
DVD-ROMs, and other devices. Changing the boot order may be required, for example, to make your
rescue media (CD, DVD or USB stick) device the first booting device.
If there are several hard disks installed in your computer labeled as C:, D:, E:, and F:, you can change
the boot order so that an operating system is booted from, for example, disk E:. In this case, you
have to set the boot order to look like E:, CD-ROM:, A:, C:, D:.
This does not mean that booting is done from the first device in this list; it only means that the first attempt to
boot an operating system will be from this device. There may be no operating system on disk E:, or it may be
inactive. In this case, BIOS queries the next device in the list.
The BIOS numbers disks according to the order in which they are connected to IDE controllers
(primary master, primary slave, secondary master, secondary slave); next go the SCSI hard disks.
This order is broken if you change the boot order in BIOS setup. If, for example, you specify that
booting has to be done from hard disk E:, numbering starts with the hard disk that would be the third
in usual circumstances (it is usually the secondary master for IDE hard drives).
Some motherboards have a so called boot menu opened by pressing a certain key or key combination, for
instance, F12. The boot menu allows selecting the boot device from a list of bootable devices without changing
the BIOS setup.
3.10 Recovery options
In the Disk Recovery Options and File Recovery Options windows you can configure options for a
disk/partition and file recovery processes respectively. After you installed the application, all options
are set to the initial values. You can change them for your current recovery operation only or for all
further recovery operations as well. Select the Save the settings as default check box to apply the
modified settings to all further recovery operations by default.
Note, that disk recovery options and file recovery options are fully independent, and you should
configure them separately.
If you want to reset all the modified options to their initial values that were set after the product
installation, click the Reset to initial settings button.
75 Copyright © Acronis International GmbH, 2002-2013
Page 76

3.10.1 Disk recovery mode
With this option you can select the disk recovery mode for image backups.
Recover sector-by-sector - select this check box if you want to recover both used and unused
sectors of disks or partitions. This option will be effective only when you choose to recover a
sector-by-sector backup.
3.10.2 Pre/Post commands for recovery
You can specify commands (or even batch files) that will be automatically executed before and after
the recovery procedure.
For example, you may want to start/stop certain Windows processes, or check your data for viruses
before recovery.
To specify commands (batch files):
Select a command to be executed before the recovery process starts in the Pre-command field.
To create a new command or select a new batch file, click the Edit button.
Select a command to be executed after the recovery process ends in the Post-command field. To
create a new command or select a new batch file, click the Edit button.
Please do not try to execute interactive commands, i.e. commands that require user input (for
example, "pause"). These are not supported.
3.10.2.1 Edit user command for recovery
You can specify user commands to be executed before or after recovery:
In the Command field type-in a command or select it from the list. Click ... to select a batch file.
In the Working directory field type-in a path for command execution or select it from the list of
previously entered paths.
In the Arguments field enter or select command execution arguments from the list.
Disabling the Do not perform operations until the command execution is complete parameter
(enabled by default), will permit the recovery process to run concurrently with your command
execution.
The Abort the operation if the user command fails (enabled by default) parameter will abort the
operation if any errors occur in command execution.
You can test the command you entered by clicking the Test command button.
3.10.3 Validation option
Validate backup before recovery
The preset is disabled.
Before data is recovered from the backup, Acronis Small Office Backup can check its integrity. If
you suspect that the backup might have been corrupted, enable this option.
Check the file system after recovery
The preset is disabled.
76 Copyright © Acronis International GmbH, 2002-2013
Page 77

Having recovered a partition from an image, Acronis Small Office Backup can check the integrity
of the file system. To do so, enable this option.
Limitations on use of this option:
Check of the file system is available only when recovering partitions using FAT16/32 and NTFS file
systems.
The file system will not be checked if a reboot is required during recovery, for example, when
recovering the system partition to its original place.
3.10.4 Computer restart
The preset is Disabled.
If you want the computer to reboot automatically when it is required for recovery, select the Restart
the computer automatically if needed for the recovery check box. This may be used when a
partition locked by the operating system has to be recovered. Enabling the option allows rebooting
the computer without user interaction during recovery.
3.10.5 File recovery options
You can select the following file recovery option:
Set current date and time for recovered files - you can choose whether to recover the file date
and time from the backup or assign the files the current date and time. By default the file date
and time from the backup will be assigned.
3.10.6 Overwrite file options
Choose what to do if the program finds a file in the target folder with the same name as in the
backup.
This option is available only while restoring data from file-level backups.
Selecting the Overwrite existing files check box will give the files from the backup unconditional
priority over the files on the hard disk, though, by default, the more recent files and folders are
protected against overwriting. If you want to overwrite those files and folders too, clear the
appropriate check box.
If you do not need to overwrite some files:
Select/clear the Hidden files and folders check box to enable/disable overwriting of all hidden
files and folders.
Select/clear the System files and folders check box to enable/disable overwriting of all system
files and folders.
Select/clear the More recent files and folders check box to enable/disable overwriting of new
files and folders.
Click Add specific files and folders to manage the list of custom files and folders that you do not
want to overwrite.
To disable overwriting of specific files, click the Add... button to create an exclusion criterion.
While specifying the criteria, you can use the common Windows wildcard characters. For
example, to preserve all files with extension .exe, you can add *.exe. Adding My???.exe will
preserve all .exe files with names consisting of five symbols and starting with “my”.
77 Copyright © Acronis International GmbH, 2002-2013
Page 78

To delete a criterion, for example, added by mistake, click the Delete icon to the right of the
criterion.
3.10.7 Performance of recovery operation
On the Performance tab you can configure the following settings:
Operation priority
Changing the priority of a backup or recovery process can make it run faster or slower (depending on
whether you raise or lower the priority), but it can also adversely affect the performance of other
running programs. The priority of any process running in a system, determines the amount of CPU
usage and system resources allocated to that process. Decreasing the operation priority will free
more resources for other CPU tasks. Increasing backup or recovery priority may speed up the process
by taking resources from the other currently running processes. The effect will depend on total CPU
usage and other factors.
You can set up the operation priority:
Low (enabled by default) - the backup or recovery process will run slower, but the performance
of other programs will be increased.
Normal - the backup or recovery process will have the equal priority with other processes.
High - the backup or recovery process will run faster, but the performance of other programs will
be reduced. Be aware that selecting this option may result in 100% CPU usage by Acronis Small
Office Backup.
3.10.8 Notifications for recovery operation
Sometimes a backup or recovery procedure can last an hour or longer. Acronis Small Office Backup
can notify you when it is finished via e-mail. The program can also duplicate messages issued during
the operation or send you the full operation log after operation completion.
By default all notifications are disabled.
Free disk space threshold
You may want to be notified when the free space on the backup storage becomes less than the
specified threshold value. If after starting a backup Acronis Small Office Backup finds out that the
free space in the selected backup location is already less than the specified value, the program will
not begin the actual backup process and will immediately inform you by displaying an appropriate
message. The message offers you three choices - to ignore it and proceed with the backup, to browse
for another location for the backup or to cancel the backup.
If the free space becomes less than the specified value while the backup is being run, the program
will display the same message and you will have to make the same decisions.
To set the free disk space threshold:
Select the Show notification message on insufficient free disk space check box
In the Size box, type or select a threshold value and select a unit of measure
Acronis Small Office Backup can monitor free space on the following storage devices:
78 Copyright © Acronis International GmbH, 2002-2013
Page 79

Local hard drives
USB cards and drives
Network shares (SMB/NFS)
The message will not be displayed if the Do not show messages and dialogs while processing (silent mode)
check box is selected in the Error handling settings.
This option cannot be enabled for FTP servers and CD/DVD drives.
E-mail notification
You can specify an e-mail account that will be used for notifying you of the recovery process.
To specify the e-mail settings:
Select the Send e-mail notifications about the operation state check box.
Enter the e-mail recipient address in the To field. You can enter several e-mail addresses in a
semicolon-delimited format.
Enter the e-mail sender address in the From field.
Enter the outgoing mail server (SMTP) in the Outgoing mail server (SMTP) field.
Set the port of the outgoing mail server. By default the port is set to 25.
If the mail server requires your credentials, select the Server requires authentication check box.
Enter the user name in the User name field.
Enter the password in the Password field.
To check whether your settings are correct, click the Send test message button.
Additional notification settings:
To send a notification concerning process completion, select the Send notification upon
operation's successful completion check box.
To send a notification concerning process failure, select the Send notification upon operation
failure check box.
To send a notification with operation messages, select the Send notification when user
interaction is required check box.
To send a notification with full log of operations, select the Add full log to the notification check
box.
79 Copyright © Acronis International GmbH, 2002-2013
Page 80

4 Using online backup
In this section
What is Acronis Cloud? ............................................................................ 80
How it works ............................................................................................ 80
Backing up to Acronis Cloud .................................................................... 81
Scheduling ................................................................................................ 82
Online backup options ............................................................................. 84
Recovery from Acronis Cloud ................................................................... 90
Removing data from Acronis Cloud ......................................................... 91
4.1 What is Acronis Cloud?
Acronis Cloud might be unavailable in your region. To find more information, click here:
http://kb.acronis.com/content/15117
On the one hand, Acronis Cloud is a remote storage which you may use for storing your data. All you
need for using this storage is an Acronis account.
You can save important files to a secure remote location and recover them when the need arises.
Because files are stored on a remote storage, they are protected even if your computer gets stolen or
your house burns down. So the risk of data loss as a result of fire, theft, or other natural disasters is
practically eliminated. If something happens to your backup image, PC, or external storage device,
you can get your most important files back. If your computer crashes, you can recover your files back
to your PC or another system that has Small Office Backup installed on it.
On the other hand, Acronis Cloud is a Web application that allows you to recover and manage the
data you store on Acronis Cloud. You can use any computer with a Web browser without the
necessity of installing Small Office Backup or other Acronis application that operates with Acronis
Cloud.
Simply go to the Acronis Web site using this link
http://www.acronis.com/my/backup-recovery-online/ and log in to your account. When your
subscription information page opens, click Recover my data now. After the Acronis Cloud page
opens, select the backup or sync that contains the files you need to recover and then download the
files to your current computer.
You can save documents, photos, music, and more from one PC on one account. If a computer
crashes, no problem... Just log in from another computer and retrieve your files.
4.2 How it works
Acronis Small Office Backup allows you to have only one online backup for one Acronis account.
Therefore, if you want to create one more online backup, you must first create another Acronis
account.
When you get a trial or full product subscription, Small Office Backup automatically creates an empty
backup box for you. You can find it in the backup list. To create your first online backup, click Start
backup on the box, configure the backup settings and click Back up now. The program will
80 Copyright © Acronis International GmbH, 2002-2013
Page 81

immediately start uploading your data to Acronis Cloud. See details in Backing up to Acronis Cloud (p.
81).
An online backup created by using Acronis Small Office Backup is compatible with the Acronis Backup
& Recovery product. It means that if you upgrade your Small Office Backup to Acronis Backup &
Recovery, you will not need to recreate your online backup from scratch. You will be able to change
settings and continue your existing online backup.
4.3 Backing up to Acronis Cloud
You can have only one active online backup on the current computer. Let's consider how to configure
an online backup if you have not used Acronis Cloud yet.
To create an online backup:
1. Start Small Office Backup. If you are not signed in yet, click Sign in on the toolbar, enter the email
address and password of your Acronis account, and then click Sign in.
2. In the backup list, find the online backup box and click the Start backup button.
Small Office Backup creates the online backup box automatically, when you get a subscription.
3. In the opened window, specify items to include by selecting the corresponding check boxes.
4. [optional step] You can exclude from online backups hidden or system files, folders and files
matching the criteria you specify For more information see Exclusions (p. 47).
5. [optional step] The destination for the backup will be Acronis Cloud. The destination field shows
your quota of the storage space on Acronis Cloud and the approximate amount of data to be
backed up.
6. [optional step] To set an online backup schedule, click the Turn on link next to Schedule. For
more information on scheduling your online backup see Scheduling (p. 82). To run the backup on
81 Copyright © Acronis International GmbH, 2002-2013
Page 82

the schedule, click the down arrow to the right of the Back up now button and select Later in the
drop down list. The backup with the settings you have made will run according to the schedule.
The backup will run even after you sign out of Acronis Cloud.
7. Click the Back up now button if you want to run backup immediately. You can also delay the
backup start for up to six hours by clicking the down arrow to the right of this button and
selecting a delay interval from the dropdown list.
The first online backup may take a considerable amount of time to complete. Further backup processes will
likely be much faster, because only changes to files will be transferred over the Internet.
4.4 Scheduling
To open the Scheduler window, click the Turn on link to the right of Schedule while configuring a
backup.
Here you can specify the backup and validation schedule settings.
You can choose and set up one of the following backup or validation frequencies:
Daily (p. 83) - the operation will be executed once a day or more frequently.
Weekly (p. 84) - the operation will be executed once a week or several times a week on the
selected days.
Monthly (p. 83) - the operation will be executed once a month or several times a month on the
selected dates.
Upon event (p. 84) - the operation will be executed upon an event.
Clicking the Do not schedule button turns off the scheduler for the current operation. In this case the
backup will run only when you click Back up now in the main window.
82 Copyright © Acronis International GmbH, 2002-2013
Page 83

Advanced settings
In this section
Daily execution parameters ..................................................................... 83
Monthly execution parameters ............................................................... 83
Weekly execution parameters ................................................................. 84
Upon event execution parameters .......................................................... 84
Clicking Advanced settings allows you to specify the following additional settings for backup and
validation:
To postpone a scheduled operation until the next time the computer is not in use (a screen saver
is displayed or computer is locked), select the Run the backup only when the computer is idle
check box. If you schedule validation, the check box will change to Run the validation only when
the computer is idle.
If you want to wake up the sleeping/hibernating computer to perform the scheduled operation,
select the Wake up the sleeping/hibernating computer check box.
If you do not want your computer to go to sleep or hibernate while performing the scheduled
backup operation, select the Prevent the computer from going to sleep/hibernate check box.
If the computer is switched off when the scheduled time comes, the operation won't be
performed. You can force the missed operation to run at the next system startup. To do so,
select the Run at system startup with delay (in minutes) check box and set a time delay to start
operation after the system startup.
If you want to regularly back up data located on a removable media (for example USB flash drive)
or remote storage (for example network folder or NAS), we recommend that you select the Run
when the current source device is attached check box. This is useful because an external storage
device may be often unavailable at the scheduled moment of backup. In that case, if the check
box is selected, the missed backup operation will start when the device is connected or attached.
Having finished scheduling, click OK.
4.4.1 Daily execution parameters
You can set up the following parameters for daily operation execution:
Start time or periodicity
If you select At, set the operation's start time. Enter hours and minutes manually, or set the
desired start time using the up and down buttons. You can specify several start times by
clicking Add.
If you select Every, choose daily operation periodicity from the dropdown list (for example,
every 2 hours).
Description of the Advanced settings see in Scheduling (p. 82).
4.4.2 Monthly execution parameters
You can set up the following parameters for monthly operation execution:
Periodicity or dates
83 Copyright © Acronis International GmbH, 2002-2013
Page 84

If you select Every, choose a numeral and the day of the week from the dropdown lists
(example: First Monday - the operation will be performed on the first Monday of every
month)
If you select On, choose the date(s) for operation execution (example: you may want the
operation to be run on the 10th, 20th, and last day of the month)
Start time
Set the operation's start time. Enter hours and minutes manually, or set the desired start time
using the up and down buttons.
Description of the Advanced settings see in Scheduling (p. 82).
4.4.3 Weekly execution parameters
You can set up the following parameters for weekly operation execution:
Week days
Select the days on which to execute the operation by clicking on their names.
Start time
Set the operation's start time. Enter hours and minutes manually, or set the desired start time
using the up and down buttons.
Description of the Advanced settings see in Scheduling (p. 82).
4.4.4 Upon event execution parameters
You can set up the following parameters for the Upon event operation execution:
Event
User logon – the operation will be executed each time the current user logs on to the OS.
User logoff – the operation will be executed each time the current user logs off the OS.
System startup – the operation will be executed at every OS startup.
Additionally, you can set a time delay to start backup after the system startup. For example,
to start backup 20 minutes after system startup, type 20 in the appropriate box.
System shutdown or restart – the operation will be executed at every computer shutdown
or reboot.
Additional condition
If you want to run an operation only at the first occurrence of the event on the current day,
select the Once a day only check box.
Description of the Advanced settings see in Scheduling (p. 82).
4.5 Online backup options
If you want to reset all the modified options to their initial values that were set after the product
installation, click the Reset to initial settings button.
4.5.1 Acronis Cloud connection attempts
You can specify the number of connection attempts and the time interval between the attempts.
84 Copyright © Acronis International GmbH, 2002-2013
Page 85

In case of any network problems, if the first connection attempt fails, the program will repeat the
attempts until a connection is successfully established. You can set the number of connection
attempts and the time interval between the attempts in seconds. To do so, type or select the values
in the appropriate boxes.
4.5.2 Acronis Cloud cleanup
You can configure the cleanup settings for Acronis Cloud to optimize usage of its space.
To set the limits for the amount of versions on Acronis Cloud:
Select the Delete versions that are older than check box and enter a value that limits the
maximum age of the older versions. All other versions will be automatically deleted except the
most recent versions.
85 Copyright © Acronis International GmbH, 2002-2013
Page 86

Select the Store no more than … recent versions check box and enter a value that limits the
maximum number of all versions in the storage.
4.5.3 Encryption key
To protect your data on Acronis Cloud from unauthorized access, you can use encryption. In this case
your data will be stored on Acronis Cloud in encrypted form. To encrypt and decrypt your data, the
program needs the encryption key, that you should specify when you register your computer. An
encryption key is a unique alphanumeric code, like a password. You can specify any set of characters
you like. Note that the key is case-sensitive.
An encryption key cannot be retrieved. Please memorize the key that you specify during your computer
registration.
While attempting to access the encrypted data, the program asks you to enter the encryption key.
Note that you cannot set or change the encryption key for an already existing online backup.
4.5.4 Windows account for Online backup
When you create a backup, you can specify a Windows account under which this backup should be
performed. This may be useful if your computer is used not only by you, but also by your relatives. In
such a case each user often has personal documents, e-mail accounts, settings, and other personal
data. By default Small Office Backup backs up data of the current user. We recommend that you
change this setting if the Windows account under which you are currently working is not yours. The
program will back up only the data related to the specified account. Data of all other accounts will
not be backed up.
To change the current Windows account:
1. Select the Run backup as different Windows user check box.
86 Copyright © Acronis International GmbH, 2002-2013
Page 87

2. Type the account name and password in the appropriate fields.
4.5.5 Operation priority
Changing the priority of an operation process can make it run faster or slower (depending on
whether you raise or lower the priority), but it can also adversely affect the performance of other
running programs. The priority of any process running in a system determines the amount of CPU
usage and system resources allocated to that process. Decreasing the operation priority will free up
more resources for other CPU tasks. Increasing operation priority may speed up the backup process
by taking resources from the other currently running processes. The effect will depend on total CPU
usage and other factors.
You can set up the backup process priority:
Low (enabled by default) - the backup process will run slower, but the performance of other
programs will be increased
Normal - the backup process will have equal priority with other processes
High - the backup process will run faster, but the performance of other programs will be
reduced. Be aware that selecting this option may result in 100% CPU usage by Small Office
Backup
4.5.6 Network connection speed limit
You can reduce the influence of Acronis Cloud connection on other network connections of your
computer. Set the connection speed that will allow you to send e-mail or surf the Web without
annoying slowdowns while online backup is running. To do so:
87 Copyright © Acronis International GmbH, 2002-2013
Page 88

Select the Limit transfer rate to check box and specify an optimal value and an appropriate
measurement unit (kilobits or megabits per second)
4.5.7 Notifications
You can specify an e-mail account that will be used to send you e-mail notifications.
First of all, choose which notifications you want to receive:
Send e-mail notifications about the operation state - select this check box to receive messages
about the backup process state.
Send disaster recovery plan (DRP) after creating a backup - select this check box to receive
messages containing a detailed list of steps you need to perform to recover your data from each
backup.
To specify the e-mail settings:
Enter the e-mail recipient address in the To field. You can enter several e-mail addresses in a
semicolon-delimited format.
Enter the e-mail sender address in the From field.
Enter the outgoing mail server (SMTP) in the Outgoing mail server (SMTP) field.
Set the port of the outgoing mail server. By default the port is set to 25.
If the mail server requires your credentials, select the Server requires authentication check box.
Enter the user name in the User name field.
Enter the password in the Password field.
If you would like to use encryption, select the required encryption protocol from the dropdown
list in the Encryption field.
88 Copyright © Acronis International GmbH, 2002-2013
Page 89

To check whether your settings are correct, click the Send test message button.
Additional notification settings:
To send notification concerning process completion, select the Send notification upon
operation's successful completion check box.
To send notification concerning process failure, select the Send notification upon operation
failure check box.
To send notification with operation messages, select the Send notification when user interaction
is required check box.
To send notification with full log of operations, select the Add full log to the notification check
box.
4.5.7.1 Disaster recovery plan
Disaster recovery plan (DRP) is an email message that contains a list of backed up data items and
detailed instructions that guide a user through a process of recovering these items from a backup.
If the Disaster recovery plan option is enabled, a DRP is created and sent by e-mail to the specified
list of users after the first successful backup. The DRP will be created and sent again after the first
successful backup in the following cases:
The backup settings have been edited so that the DRP parameters changed.
The backup contains new data items or does not contain items previously backed up.
To set up sending DRPs:
1. In a backup options window, click the Notifications tab and then select the Send disaster
recovery plan (DRP) after creating a backup check box.
2. Configure email settings. See details in Notifications for backup operation (p. 46).
89 Copyright © Acronis International GmbH, 2002-2013
Page 90

4.5.8 Exclusions
You can exclude from online backup hidden or system files and folders, as well as files matching the
criteria you specify. For more information see Excluding items from backup (p. 47).
4.6 Recovery from Acronis Cloud
4.6.1 Recovering data from online backups
With Small Office Backup you can browse and recover data that was backed up on Acronis Cloud.
1. Start Small Office Backup and click the Recover button on the box of the online backup from
which you want to recover data. You will be taken to Acronis Cloud web application.
If the data from the selected computer is stored on the Cloud in encrypted form, you will be asked to enter
the encryption key which has been used for encryption. You will not be able to access the data until you
enter the correct encryption key.
2. On the Files tab, select the files and folders you want to recover. Click the Download button to
start recovery.
If you selected several files and folders, they will be placed into a zip archive.
90 Copyright © Acronis International GmbH, 2002-2013
Page 91

3. After the File Download window opens, click Save to start download.
4. By default the data will be downloaded to the Downloads folder. You may change the download
path.
5. After the download finishes, you may click Open folder to open the Downloads folder.
4.6.2 Selecting a version to recover
By default Small Office Backup selects the latest versions with respect to the date you specified.
However, for any file you can select a specific version of the file to recover.
To recover a specific file version:
1. In the backup contents, select the file which version you want to recover, then click the gear icon
at the right-hand side. Select View versions in the opened menu.
2. Select the version to which you want to rollback. The version's exact date and time will be
displayed. Your current version will be reverted to the state it was at that point in time.
3. Click Recover to proceed. The selected version will become the latest version on Acronis Cloud.
4. After the process finishes, refresh the Files page in your Web browser.
5. Select the file once more and then click Download to download the selected version to your
Downloads folder.
4.7 Removing data from Acronis Cloud
Because the available space on Acronis Cloud is limited, you need to manage your Cloud space by
cleaning up the obsolete data or the data you do not need anymore. Cleanup can be done in a variety
of ways.
Deleting all versions of a backup
The most "drastic" one is deleting the entire backup from a computer on Acronis Cloud. To remove
the backup, click the gear icon in the box of the online backup to open the Operations menu and
select Clean up.
91 Copyright © Acronis International GmbH, 2002-2013
Page 92

Note, that this command deletes all the backup versions from Acronis Cloud. The backup box will
remain in the backup list, and the backup settings will not be changed.
Cleanup settings
The Online backup options provide for automatic cleanup of Acronis Cloud. You can specify deletion
of files that have been kept longer than the specified number of months or days. In addition, you can
set the maximum number of file versions to be kept on Acronis Cloud. You can accept the default
settings for those options or set the values you need. For more information see Acronis Cloud
cleanup (p. 85).
One-time cleanup
When your Acronis Cloud is full or is running out of space, we recommend that you use the cleanup
tool in Acronis Cloud web application. This tool allows you to free up considerable amount of space
on the cloud fast and easy.
To clean up Acronis Cloud:
1. Start Small Office Backup and click Recover on an online backup box. You will be taken to the
Acronis Cloud web application.
2. On the Storage status tab, click the Clean up space link in the center of the screen.
3. In the opened window, configure the cleanup settings and click Clean up now.
Deleting specific files and folders
You can also manage Acronis Cloud by deleting individual files and folders.
1. Start Small Office Backup and click Recover on an online backup box. You will be taken to the
Acronis Cloud web application.
2. Select files and folders you want to delete by selecting their check boxes. Having finished
selection, click the Delete button.
92 Copyright © Acronis International GmbH, 2002-2013
Page 93

5 Tools
In this section
Acronis Media Builder .............................................................................. 93
Creating WinPE-based rescue media ....................................................... 98
How to prepare a USB flash drive for Acronis Media Builder ................ 103
Acronis Tools include protection tools, image mounting tools, and the Add new disk utility.
Protection tools
Acronis Startup Recovery Manager
Allows you to start Acronis Small Office Backup without loading the operating system by pressing
F11 at boot time before the operating system starts.
Rescue Media Builder
Allows you to create a bootable rescue media with Acronis products (or their specified
components) installed on your computer.
Disk management
Add new disk
Add new disk wizard helps you to add a new hard disk drive to your computer. You will be able to
prepare the new hard disk drive by creating and formatting new partitions on this hard disk.
Image mounting
Mount image
With this tool you can explore a previously created image. You will be able to assign temporary
drive letters to the partition images and easily access these images as ordinary, logical drives.
Unmount image
With this tool you can unmount the temporary logical drives you have created to explore an
image.
5.1 Creating bootable rescue media
5.1.1 Acronis Media Builder
You can run Acronis Small Office Backup from an emergency boot media on a bare-metal system or a
crashed computer that cannot boot. You can even back up disks on a non-Windows computer,
copying all its data into the backup by imaging the disk in the sector-by-sector mode. To do so, you
will need bootable media that has a copy of the standalone Acronis Small Office Backup version
installed on it.
If you purchased the boxed product, you already have a bootable CD, because the installation CD
itself is bootable.
If you purchased Acronis Small Office Backup on the Web or as a download from a retailer, you can
create bootable media using the Bootable Media Builder. For this, you will need a blank CD-R/RW, a
blank DVD+R/RW or any other media from which your computer can boot, such as a USB flash drive.
93 Copyright © Acronis International GmbH, 2002-2013
Page 94

Please note, you cannot boot Windows operating system from a bootable media created on a USB flash drive.
Acronis Small Office Backup also provides the ability to create an ISO image of a bootable disc on the
hard disk.
If you have other Acronis products, such as Acronis Disk Director Home installed on your computer,
you can include standalone versions of these programs on the same bootable media as well.
Notes
If you have chosen not to install the Bootable Media Builder during Acronis Small Office Backup
installation, you will not be able to use this feature.
When booting from the Rescue Media, you cannot perform backups to disks or partitions with
Ext2/Ext3/Ext4, ReiserFS, JFX, and Linux SWAP file systems.
Please keep in mind that the backups created by the later program version may be incompatible
with the previous program versions. Due to this reason, we strongly recommend that you create
a new bootable media after each Acronis Small Office Backup upgrade.
5.1.1.1 Rescue media contents selection
You can select which components of Acronis programs you want to place on the bootable media. If
you have other Acronis products installed on your computer, such as Acronis Disk Director Home, the
bootable versions of these programs' components will be offered as well.
Small Office Backup offers the following components:
Acronis Small Office: Server Cloud Backup - includes support of USB, PC Card (formerly PCMCIA)
and SCSI interfaces along with the storage devices connected via them, and therefore is strongly
recommended.
Acronis System Report - the component allows you to generate a system report that is used for
collecting information about your system in case of any program problem. Report generation will
be available before you start Small Office Backup from the bootable media. The generated
system report can be saved to a USB flash drive.
94 Copyright © Acronis International GmbH, 2002-2013
Page 95

To select a component:
Select the check box of the program you want to include into the bootable media. The bottom
field displays the space required for the selected components. If you have other Acronis products
installed on your computer, you can also include standalone versions of these programs into the
same bootable media.
If automatic start of the program is necessary, select the Starts automatically after check box.
The Start automatically after parameter specifies the timeout interval for the boot menu. If this
parameter is not specified, the program will display the boot menu and wait for you to select
whether to boot the OS or the Acronis component. If you set, for example, 10 sec for Acronis
rescue media, the standalone Small Office Backup will launch 10 seconds after the menu is
displayed.
Click Next to continue.
5.1.1.2 Bootable media startup parameters
Here, you can set bootable media startup parameters in order to configure rescue media boot
options for better compatibility with different hardware. Several options are available (nousb,
nomouse, noapic, etc.). These parameters are provided for advanced users. If you encounter any
hardware compatibility problems while testing boot from the rescue media, it may be best to contact
Acronis Technical Support.
To add a startup parameter
Enter a command into the Parameters field.
Having specified the startup parameters, click Next to continue.
Additional parameters that can be applied prior to booting Linux kernel
Description
The following parameters can be used to load Linux kernel in a special mode:
acpi=off
Disables ACPI and may help with a particular hardware configuration.
noapic
Disables APIC (Advanced Programmable Interrupt Controller) and may help with a particular
hardware configuration.
nousb
Disables loading of USB modules.
nousb2
Disables USB 2.0 support. USB 1.1 devices still work with this option. This option allows using some
USB drives in USB 1.1 mode, if they do not work in USB 2.0 mode.
quiet
This parameter is enabled by default and the startup messages are not displayed. Deleting it will
result in the startup messages being displayed as the Linux kernel is loaded and the command shell
being offered prior to running the Acronis program.
95 Copyright © Acronis International GmbH, 2002-2013
Page 96

nodma
Disables DMA for all IDE disk drives. Prevents kernel from freezing on some hardware.
nofw
Disables FireWire (IEEE1394) support.
nopcmcia
Disables PCMCIA hardware detection.
nomouse
Disables mouse support.
[module name]=off
Disables the module (e.g. sata_sis=off).
pci=bios
Forces to use PCI BIOS, and not to access the hardware device directly. For instance, this parameter
may be used if the machine has a non-standard PCI host bridge.
pci=nobios
Disallows use of PCI BIOS; only direct hardware access methods are allowed. For instance, this
parameter may be used if you experience crashes upon boot-up, probably caused by the BIOS.
pci=biosirq
Uses PCI BIOS calls to get the interrupt routing table. These calls are known to be buggy on several
machines and they hang the machine when used, but on other computers it is the only way to get
the interrupt routing table. Try this option, if the kernel is unable to allocate IRQs or discover
secondary PCI buses on your motherboard.
vga=ask
Gets the list of the video modes available for your video card and allows selecting a video mode most
suitable for the video card and monitor. Try this option, if the automatically selected video mode is
unsuitable for your hardware.
5.1.1.3 Bootable media selection
Select a destination for bootable media creation:
CD-R/RW - if you are creating CD, insert a blank disc so that the program can determine its
capacity.
ISO image - having created an ISO disk image, you will be able to burn it onto any kind of
recordable DVD, using DVD recording software. Creating a bootable DVD directly from Bootable
Media Builder is impossible.
any other media your PC can boot from, such as USB flash drives, etc.
96 Copyright © Acronis International GmbH, 2002-2013
Page 97

If you use non-optical media, the media must have a FAT file system. This limitation is not applicable
for an ISO image.
5.1.1.4 Destination file selection
If you chose to create a bootable disk ISO image, specify the ISO file name and the folder where to
place it:
Select the destination folder from the folder tree
Enter a name for the .iso file in the File name field
Click Next to continue
5.1.1.5 Bootable media creation summary
This page displays operations to be performed.
Click Proceed to start the bootable media creation process.
Use the sidebar on the left to navigate through the wizard's steps for revision.
To cancel operation and quit Acronis Media Builder, click Cancel.
After you create a boot disc, mark it and keep it in a safe place.
Please keep in mind that the backups created by the later program version may be incompatible with
the previous program versions. Due to this reason, we strongly recommend that you create a new
bootable media after each Acronis Small Office Backup upgrade. One more thing you should
remember – when booting from the rescue media and using a standalone version of Acronis Small
Office Backup you cannot recover files and folders encrypted with use of the encryption feature
available in Windows operating systems. On the other hand, backups encrypted using the Acronis
Small Office Backup encryption feature can be recovered.
5.1.1.6 How to create a bootable USB flash drive
You can create a bootable USB flash drive containing a standalone Acronis Small Office Backup. This
may be handy, for example, if your notebook does not have an internal CD/DVD-drive.
97 Copyright © Acronis International GmbH, 2002-2013
Page 98

You will need a USB flash drive with a capacity of 256 MB or more. The drive must be formatted in
FAT16 or FAT32 file system.
To create a bootable USB flash drive, attach the drive to a USB port. Start Acronis Media Builder and
then select the drive as the destination for the rescue media creation. Then follow the Media Builder
wizard steps.
If Acronis Media Builder does not recognize your USB flash drive, you can try using the procedure
described in an Acronis Knowledge Base article at http://kb.acronis.com/content/1526.
5.1.2 Creating WinPE-based rescue media
Acronis Plug-in for WinPE can be added to WinPE distributions based on any of the following kernels:
Windows Vista family of operating systems (PE 2.0):
Windows Server 2003 SP1
Windows Server 2003 SP1 with KB926044
Windows Server 2003 SP2
Windows Server 2008 family of operating systems (PE 2.1):
Windows Server 2008
Windows Server 2003 SP1 with KB926044
Windows Server 2003 SP2
Windows Server 2008 R2 family of operating systems (PE 3.0):
Windows Server 2003 SP2
Windows Server 2008 family
Windows Server 2008 R2 family
Windows 8 family of operating systems (PE 4.0):
Windows Server 2008
Windows Server 2008 R2
Windows Server 2012
To be able to create or modify PE 2.x and 3.0 images, you must have Windows Automated
Installation Kit (AIK) installed. To create PE 4.0, you should install Windows Assessment and
Deployment Kit (ADK).
If you do not have none of these kits installed, prepare as follows:
1. Depending on your operating system, download and install one of these packs:
AIK for Windows Vista family of operating systems (PE 2.0):
http://www.microsoft.com/Downloads/details.aspx?familyid=C7D4BC6D-15F3-4284-9123-67983
0D629F2&displaylang=en
AIK for Windows Server 2008 family of operating systems (PE 2.1):
http://www.microsoft.com/downloads/details.aspx?FamilyID=94bb6e34-d890-4932-81a5-5b50c
657de08&DisplayLang=en
AIK for Windows Server 2008 R2 family of operating systems (PE 3.0):
http://www.microsoft.com/DOWNLOADS/details.aspx?familyid=696DD665-9F76-4177-A811-39C
26D3B3B34&displaylang=en
ADK for Windows 8 family of operating systems (PE 4.0):
98 Copyright © Acronis International GmbH, 2002-2013
Page 99

http://www.microsoft.com/en-us/download/details.aspx?id=30652
2. [optional] Burn the Windows AIK to DVD or copy to a flash drive.
3. Install the Microsoft .NET Framework v.2.0 from this kit (NETFXx86 or NETFXx64, depending on
your hardware).
4. Install Microsoft Core XML (MSXML) 6.0 Parser from this kit.
5. Install Windows AIK from this kit.
It is recommended that you familiarize yourself with the help documentation supplied with Windows
AIK or Windows ADK. A good starting point is the "Create an image" section of "Getting Started for IT
Professionals" white paper. To access the document, select Microsoft Windows AIK ->
Documentation -> Getting Started for IT Professionals from the Start menu.
For more information on customizing Windows PE, see the Windows Preinstallation Environment
User’s Guide (Winpe.chm).
Integrating Small Office Backup with WinPE 2.x, 3.0 or 4.0 ISO
Acronis WinPE ISO Builder provides three methods of integrating Small Office Backup with WinPE 2.x,
WinPE 3.0 and WinPE 4.0:
Creating the PE 2, PE 3 or PE 4 ISO with the plug-in from scratch.
Adding the Acronis Plug-in to the existing PE 2, PE 3 or PE 4 ISO. This comes in handy when you
have to add the plug-in to the previously configured PE 2, PE 3 or PE 4 ISO that is already in use.
Adding the Acronis Plug-in to a WIM file for any future purpose (manual ISO building, adding
other tools to the image and so on).
To be able to perform any of the above operations, Windows Automated Installation Kit (WAIK) must
be installed on your PC. If you have not installed WAIK, install it as described earlier in this section.
Acronis WinPE ISO Builder supports only x86 WinPE 2.x and WinPE 3.0. This WinPE distribution can also work on
x64 hardware.
A PE image based on Win PE 2.x or 3.0 requires at least 256MB RAM to work. The recommended memory size
for PE 2.x or 3.0 is 512MB.
5.1.2.1 Creating a new WinPE ISO with the Acronis Plug-in
Creating a new Win PE 2.x, PE 3.0 or PE 4.0 ISO with the Acronis Plug-in begins from creating a
Windows PE build directory:
1. Select Microsoft Windows AIK -> Windows PE Tools Command Prompt from the Start menu.
Users of Windows Server 2008 R2 should select Microsoft Windows AIK -> Deployment Tools
Command Prompt from the Start menu.
If you installed WinPE 4.0, select Windows Kits Windows ADK Deployment and Imaging
Tools Environment from the Start menu.
2. Run the copype.cmd script to create a folder with Windows PE files. For example, from a
command prompt, type:
copype x86 c:\winpe_x86
When the operation finishes, create an ISO:
3. Select Acronis -> Acronis Small Office Server Cloud Backup -> Acronis WinPE ISO Builder from
the Start menu.
4. Specify the path to the folder WinPE\ISO (for example c:\winpe_x86\ISO).
99 Copyright © Acronis International GmbH, 2002-2013
Page 100
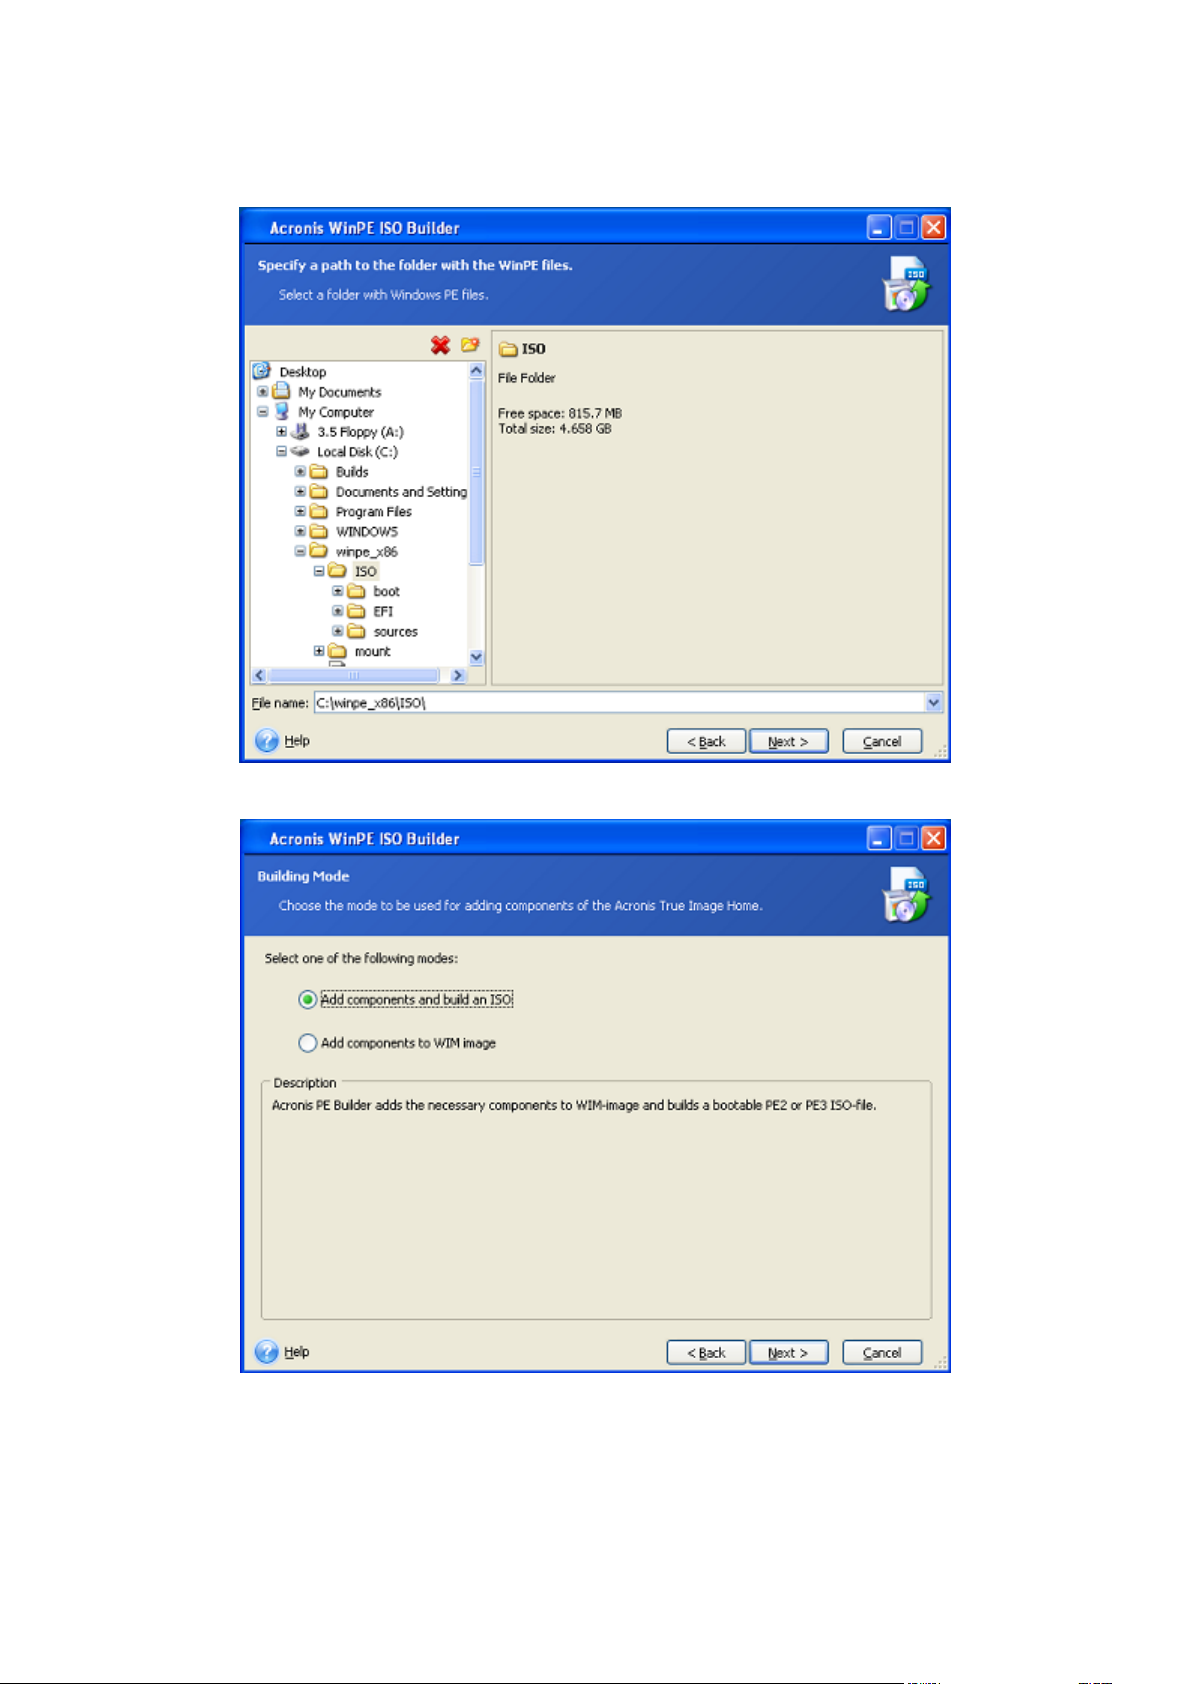
In case you create Win PE 4.0 ISO, specify the path to the folder WinPE\media (for example
c:\winpe_x86\media).
5. On the next screen choose the Add components and build an ISO option and click Next.
6. Specify the full path to the resulting image file including the filename or leave the default path
and filename (AcronisMedia.iso).
100 Copyright © Acronis International GmbH, 2002-2013
 Loading...