

Page 1
Page 2

Contents
1 Introduction ....................................................................................................................5
2 QuickStart Guide ..............................................................................................................6
2.1 Files Connect System Requirements ......................................................................................... 6
2.2 Installing Files Connect .............................................................................................................. 7
2.3 First Run / Installing Your License .............................................................................................. 8
2.4 Configuring Your First Shared Volume ....................................................................................... 9
2.5 Configuring Your First Shared Print Queue ..............................................................................12
2.6 The Mac Client .........................................................................................................................13
2.7 Connecting from the Mac Finder .............................................................................................17
2.8 The Optional Files Connect Zidget™ ........................................................................................18
2.9 Additional Resources ...............................................................................................................18
3 Installing Files Connect ................................................................................................... 21
3.1 Getting Started ........................................................................................................................21
3.1.1 System Requirements ................................................................................................................................... 21
3.1.2 Getting Help ................................................................................................................................................... 23
3.2 Installing Files Connect ............................................................................................................23
3.2.1 Before you begin ........................................................................................................................................... 23
3.2.2 Installing Files Connect ................................................................................................................................. 24
3.2.3 Sharing the Print Server Directory ............................................................................................................... 25
3.3 Launching Files Connect the First Time ...................................................................................25
3.3.1 Automatically Importing SMB Shares .......................................................................................................... 25
3.3.2 Installing AppleTalk ....................................................................................................................................... 27
3.3.3 Using Kerberos .............................................................................................................................................. 28
3.4 Setting up Files Connect Clustering .........................................................................................28
3.4.1 Cluster Worksheet......................................................................................................................................... 30
3.4.2 Installing Files Connect on a Cluster ............................................................................................................ 32
3.5 Administering Files Connect on a Cluster ................................................................................49
3.6 Configuring the Files Connect server for Mac client and Zidget access ...............................50
3.7 Adding additional servers to the Master Server ......................................................................51
4 Upgrading Files Connect ................................................................................................. 52
5 Configuring Files Connect ............................................................................................... 53
5.1 Files Connect File Server ..........................................................................................................53
5.1.1 Starting and stopping the Files Connect File Server ................................................................................... 53
5.1.2 Configuring the Files Connect Server ........................................................................................................... 53
5.1.3 Configuring Network Reshare support ........................................................................................................ 74
5.2 Administering Files Connect remotely .....................................................................................81
5.3 Configuring Client Computers to Print to Files Connect ..........................................................82
5.3.1 Files Connect Zidget ...................................................................................................................................... 82
5.4 Installing and Configuring the Zidget on the Client .................................................................83
5.4.1 Adding a printer with the Zidget .................................................................................................................. 85
5.4.2 Mounting Files Connect shared volumes with the Zidget.......................................................................... 86
Page 3

5.4.3 Mounting DFS shared volumes with the Zidget .......................................................................................... 86
5.4.4 Printer Setup Utility ....................................................................................................................................... 87
5.4.5 Using Bonjour Within the Print Dialog ......................................................................................................... 89
5.4.6 Using Print Accounting Features from a Client ........................................................................................... 98
5.5 The Mac Client .........................................................................................................................98
5.6 Adding a printer from a Web Page ........................................................................................102
5.7 Macintosh Client Configuration for DFS Support ..................................................................104
5.7.1 Files Connect Mac Client ............................................................................................................................. 104
5.7.2 Files Connect Zidget Option ....................................................................................................................... 104
5.8 Adding a License Number ......................................................................................................106
6 Searching with Files Connect ........................................................................................ 106
6.1 Enumeration Search ..............................................................................................................107
6.2 Catalog Search .......................................................................................................................107
6.3 Spotlight Search .....................................................................................................................107
6.4 Storing Search Index Files ......................................................................................................107
6.4.1 Verbose logging options ............................................................................................................................. 108
6.4.2 Enable Windows Error Reporting .............................................................................................................. 108
6.4.3 Archive Active Log File ................................................................................................................................ 108
7 Using Files Connect ...................................................................................................... 109
7.1 Using the Files Connect File server ........................................................................................109
7.1.1 Creating Volumes for Use with Files Connect ........................................................................................... 109
7.2 Files Connect Users ................................................................................................................121
7.2.1 Connecting Macintosh Users...................................................................................................................... 121
7.2.2 Viewing Files Opened with Files Connect .................................................................................................. 123
7.3 Using the Log .........................................................................................................................124
7.3.1 Keeping track of activities with the Operation Log ................................................................................... 124
7.3.2 Using the Print Log ...................................................................................................................................... 125
7.4 Remapping Extensions ...........................................................................................................126
7.4.1 Associating a Type and Creator .................................................................................................................. 127
7.4.2 Creating a New Type and Creator .............................................................................................................. 128
7.5 Using the Files Connect Print Server ......................................................................................128
7.5.1 How the Print Server Works ....................................................................................................................... 128
7.5.2 Setting up Print Queues .............................................................................................................................. 129
7.5.3 Setting Up Processing Methods ................................................................................................................. 130
7.5.4 Controlling the Processing of Jobs ............................................................................................................. 134
7.5.5 Publishing A Print Queue ............................................................................................................................ 135
7.6 Using Print Accounting ..........................................................................................................136
7.6.1 Setting up Print Accounting ........................................................................................................................ 136
8 Backup & Disaster Recovery ......................................................................................... 140
9 Appendices .................................................................................................................. 142
9.1 Appendix A: Using the Registry Keys .....................................................................................142
9.1.1 Reconnecting a dropped session ............................................................................................................... 142
9.1.2 Sending password expiration notifications during session ...................................................................... 142
9.1.3 Scheduling re-indexing with EZIPUTIL ....................................................................................................... 143
9.1.4 Adding print log entries to text files........................................................................................................... 143
9.1.5 Customizing Files Connect Print Processing Log columns ........................................................................ 143
9.1.6 Columns ....................................................................................................................................................... 143
3 Copyright © Acronis International GmbH, 2002-2017
Page 4

9.2 Appendix B: Monitoring Files Connect ..................................................................................144
9.2.1 Counters for Files Connect File Server ....................................................................................................... 144
9.2.2 Counters for Files Connect File Server Users ............................................................................................ 145
9.2.3 Counters for Files Connect File Server Volumes ....................................................................................... 146
9.2.4 Counters for Files Connect Printing ........................................................................................................... 146
9.2.5 Counters for Files Connect Print Queues .................................................................................................. 146
10 Supplemental Material ................................................................................................ 147
10.1 TCP/IP Ports ...........................................................................................................................147
10.2 Files Connect Support Tools ..................................................................................................147
10.2.1 Mac Support Applications and Tools ......................................................................................................... 148
10.2.2 Mac Performance Testing Applications ..................................................................................................... 148
10.2.3 Windows Support Tools and Scripts .......................................................................................................... 149
10.2.4 Windows Applications ................................................................................................................................ 149
10.3 Files Connect Compatibility Information ...............................................................................150
10.4 Windows Registry Keys ..........................................................................................................151
10.4.1 General Parameter Registry Keys -- Non-Refreshable ............................................................................. 152
10.4.2 General Parameter Registry Keys -- Refreshable ...................................................................................... 160
10.4.3 Debug Logging Registry Keys -- Refreshable ............................................................................................. 173
10.4.4 Debug Logging Registry Keys -- Non-Refreshable ..................................................................................... 175
10.4.5 Print Parameter Registry Keys -- Refreshable ........................................................................................... 176
10.4.6 Print Parameter Registry Keys -- Non-Refreshable ................................................................................... 178
10.4.7 Filename Policy Registry Keys -- Refreshable ............................................................................................ 178
10.4.8 HTTP Discovery Registry Keys -- Refreshable ............................................................................................ 181
10.4.9 Spotlight Registry Keys -- Refreshable ....................................................................................................... 183
10.4.10 HSM Registry Keys -- Refreshable .............................................................................................................. 185
10.4.11 VSS Registry Keys -- Refreshable ................................................................................................................ 186
10.5 Files Connect Streams ............................................................................................................186
11 Zidget Help .................................................................................................................. 187
12 Known issues ............................................................................................................... 190
13 What's New ................................................................................................................. 190
4 Copyright © Acronis International GmbH, 2002-2017
Page 5

1 Introduction
This guide provides the documentation of Files Connect installation, configuration and features.
About Files Connect
With Files Connect, Windows® computers can provide Apple Filing Protocol (AFP) file sharing and
IP-printing to Macintosh® computers. Files Connect is optimized to provide the fastest file and print
services available, resolve common Mac/Window file sharing issues, and provide support for Apple
technologies such as Network Spotlight full-content search and Time Machine backup.
Files Connect includes the following services:
Files Connect File Server
Files Connect Print Server
With Files Connect, Macintosh users can connect to and mount directories on a Windows file server
just as native AFP volumes. With the Files Connect Print Server installed, Macintosh users can create
desktop printers that deliver print jobs to printers via the server automatically and just as easily as
with AppleTalk. Files Connect’s integration into the existing network is seamless–Macintosh users
continue using the same tools and applications for accessing servers and printers that they always
have.
5 Copyright © Acronis International GmbH, 2002-2017
Page 6

2 QuickStart Guide
In this section
Files Connect System Requirements .......................................................... 6
Installing Files Connect .............................................................................. 7
First Run / Installing Your License .............................................................. 8
Configuring Your First Shared Volume ....................................................... 9
Configuring Your First Shared Print Queue .............................................. 12
The Mac Client ......................................................................................... 13
Connecting from the Mac Finder ............................................................. 17
The Optional Files Connect Zidget™ ........................................................ 18
Additional Resources ............................................................................... 18
2.1 Files Connect System Requirements
Verify your server meets the requirements for Files Connect. It is recommended you quit any running
programs, including the Services control panel, before starting the installation.
The following are the minimum system requirements for the Files Connect File & Print Server on
Windows Server and Windows Workstation platforms and for connecting from Macintosh Clients. For
optimal results, your Windows Server machine should be running the latest service pack from
Microsoft®. Adding additional RAM to your server machine will greatly enhance Files Connect
performance. The recommended system requirements for a particular implementation or
application can vary so please contact us at http://www.acronis.com/en-us/contactsupportgl.html if
you have questions or need assistance.
Operating System Requirements:
Windows Server Platforms:
Note: GroupLogic Appletalk is not supported on Windows Server 2012 and above.
Note: Older versions of Windows Server are supported by Files Connect versions older than 10.5. These include
Windows Storage Server 2008 Service Pack 2, Windows Storage Server 2003 Service Pack 2 & R2 Service Pack 2,
2008 Service Pack 2, 2003 Service Pack 2 & 2003 R2 Service Pack 2 and are no longer supported for newer
versions of Files Connect.
2016 Standard & Datacenter
2012 R2 Standard & Datacenter & Essentials
2012 Standard & Datacenter & Essentials
2008 R2 Service Pack 1
2011 Small Business Server Standard Update Rollup 3
Note: We do not support Windows Small Business Server 2011 Essentials!
Windows Storage Server 2012 R2
Windows Storage Server 2012
Windows Storage Server 2008 R2 Service Pack 1
Windows Powered NAS
6 Copyright © Acronis International GmbH, 2002-2017
Page 7

Windows Workstation Platforms:
Note: Older versions of Windows, like Vista and XP are supported by Files Connect versions older than 10.5.
Windows 10
Windows 8
Windows 7 Service Pack 1
Macintosh Clients:
Mac OS X: Mac OS X 10.2.8 or later.
Note: Files Connect supports the latest Macintosh client technologies, including Bonjour®, the Service Location
Protocol (SLP), Kerberos®, and Apple’s built-in encrypted logon support for long passwords.
Note: Print Accounting requires Mac OS X 10.3. Print Accounting is not compatible with applications running in
64-bit mode on Mac OS X 10.6 or later.
Note: Acronis' Zidget software requires Mac OS X 10.4 or later.
Note: Files Connect's DFS and Network Spotlight support require Mac OS X 10.5 or later.
Hardware Requirements:
Minimal configuration
Local shares - Pentium IV with 1 GB of RAM (suitable for small deployments with few clients)
Network Reshare - Core2 class CPU with 2 or more cores, 4 GB of RAM, single Gigabit Ethernet
NIC (suitable for small deployments with few clients)
Recommended configuration
Local shares - Core class CPU with 2 or more cores, 4 GB of RAM
Network Reshare - Core 'i' class CPU with 4 or more cores, 8 GB of RAM, dual non-bonded Gigabit
Ethernet NICs
Note: You may need substantially more depending on the number of volumes and users and other applications
running on the server.
2.2 Installing Files Connect
1. Run the Files Connect Installer.
7 Copyright © Acronis International GmbH, 2002-2017
Page 8

Note: To install Files Connect you must log in to Windows with Administrator privileges.
2. Click Next to begin the installation.
3. Accept the Software License Agreement and click Next.
4. Click Next to accept the default Destination Folder.
5. Click Install to begin installation.
Note: If you have a previous version of Files Connect installed, it will be upgraded to the new version. Any
existing settings will be retained.
6. Click Finish to close the completed installer and automatically launch the Files Connect
Administrator.
2.3 First Run / Installing Your License
When first run, Files Connect will ask if you would like to enable the Print Server, choose Yes or No.
New Files Connect installations default to Trial mode. If you have an Files Connect serial number,
click Licensing and then click Add License to add your serial number.
If you upgraded a previous version of Files Connect, it will continue to use your existing serial
number.
8 Copyright © Acronis International GmbH, 2002-2017
Page 9

2.4 Configuring Your First Shared Volume
1. Launch Files Connect Administrator.
Suspend File Sharing - Disconnect all clients and prevent new connections to the server.
Suspend Print Sharing - Disconnect all the printers and prevent new connections to them.
Users - Display a list of the connected users.
Volumes - Create or configure shared volumes.
Print Queues - Create or administer Print Queues.
Files - Display currently open files used by Macintosh clients.
Settings - Edit Files Connect settings.
Log - View Files Connect related events from the Windows Event Viewer.
Note: The first time the Files Connect Administrator is opened, it will prompt you to create shared volumes
or import your existing SMB shares to Files Connect. This can also be done any time from within the
Volumes window.
9 Copyright © Acronis International GmbH, 2002-2017
Page 10
2. Click Volumes. The Volumes window will appear.
Create - Create a volume.
Modify - Opens the Volume Properties window.
Remove - Removes the selected volume.
Restart - Restarts the volume.
Suspend - Take a volume temporarily offline so that clients cannot connect to it.
Note: Suspended volumes will be resumed every time the Files Connect service is restarted
Show in Explorer - Show the volume’s parent folder in Windows Explorer.
Import SMB Shares... - Reshare all folders shared with Windows file sharing (SMB) with Files
Connect as well.
10 Copyright © Acronis International GmbH, 2002-2017
Page 11
3. Click Create to create a new volume. The Volume Properties windows appears.
Apple Filing Protocol (AFP) file and search - This is the default setting and creates a volume
accessible by AFP. The volume will be accessible and searchable from the Files Connect
Mac Client app and the Mac Finder. When opening files and browsing these volumes, the
Mac will connect using AFP in either case.
Search only (Mac client will connect using SMB) - With this option, the volume will be
displayed in the Files Connect Mac Client app and will be searchable, but it will not be shared
as an AFP volume. Macs connecting to the Files Connect server using AFP will not see this
volume. Macs will automatically connect to “Search only” volumes and files found in Files
Connect Mac Client app search results using SMB. This connection uses preexisting Windows
or NAS SMB file server shared volumes.
Volume is read-only - Prevent writing to the volume.
Allow guests to use volume - When checked, a Macintosh user can log into the file server
without supplying a name and password.
Use volume as home directory - Filter out all directories except for a user’s home directory.
Reset permissions on move - Resets the permissions on moved files and folders to inherit
from the destination folder.
Enforce Filename Policy - Enforces the filename policies that are defined in the
global settings.
Volume supports ACLs - ACL support allows Mac OS X 10.4 and later clients to use
Windows Access Control Lists.
Path - Choose path of the folder to share.
11 Copyright © Acronis International GmbH, 2002-2017
Page 12
Convert shortcuts to aliases - When enabled, Files Connect will convert all .URL shortcuts in
the volume to Mac-readable aliases.
Support Spotlight Searching - Enable Spotlight searching of file attributes and content.
Windows Search - When checked, this volume will use Windows Search as the default
search engine for this volume.
Acronis Content Indexing - When checked, this volume will use Acronis Content Indexing
as the default search engine for this volume.
Indexing Options- Configure where the index Create a file name index that speeds up
searches.
Support Catalog Search - Marking this checkbox enables Catalog searching for this volume.
Support Time Machine backup - Advertises the volume to Time Machine clients.
4. Browse the path of the folder you want to share.
Note: The use of removable devices as volumes is not supported. (e.g.: Flash drives, USB drives, etc.)
5. Click OK to share the volume with Files Connect.
2.5 Configuring Your First Shared Print Queue
1. Click Print Queues in the Administrator main window. The Print Queues window will appear.
Create - Create print queues. Open a window with a list of the pending jobs that allows you
to start, stop, or reorder the print jobs.
Suspend Processing - When a queue is suspended jobs are accepted by the server however
they are not sent to the printer until processing is resumed.
View Jobs in Queue - Open a window with a list of the pending jobs that allows you to
start, stop, or reorder the print jobs.
Replicate Windows Print Queues - Takes the existing Windows print queues and republishes
them as Files Connect queues.
12 Copyright © Acronis International GmbH, 2002-2017
Page 13

2. Click Create to create a new Print Queue.
Name - The name that you will see when you print from a Macintosh. Where Files Connect
will send the jobs after they are received.
Publish queue - Whether the print queue should be discoverable by clients.
Processing - Where Files Connect will send the jobs after they are received.
File - The PPD to be used by clients when printing to this queue.
Print Accounting - Require the Macintosh client to supply job tracking information every
time they print to this queue (refer to Using Print Accounting features from a Client (p. 98)
and Using Print Accounting (p. 136) for additional information).
3. Enter a Name for the Print Queue.
4. Select a Processing method and enter the information required for the selected processing
method.
5. Click OK.
2.6 The Mac Client
Introduced in Files Connect 10.5, the Mac Client is by far the easiest way to connect to network
resources.
You can get the Mac Client by opening the Web Service address of your Files Connect deployment
with the proper port. e.g. http://filesconnect.neucott.com:8081
Once you've opened the address of Files Connect in a browser, you will see a button to download the
Mac Client.
13 Copyright © Acronis International GmbH, 2002-2017
Page 14

Installation
1. Download the Mac application and install it.
2. In your Menu Bar you will see the Files Connect icon.
3. Click on it and select Preferences.
14 Copyright © Acronis International GmbH, 2002-2017
Page 15
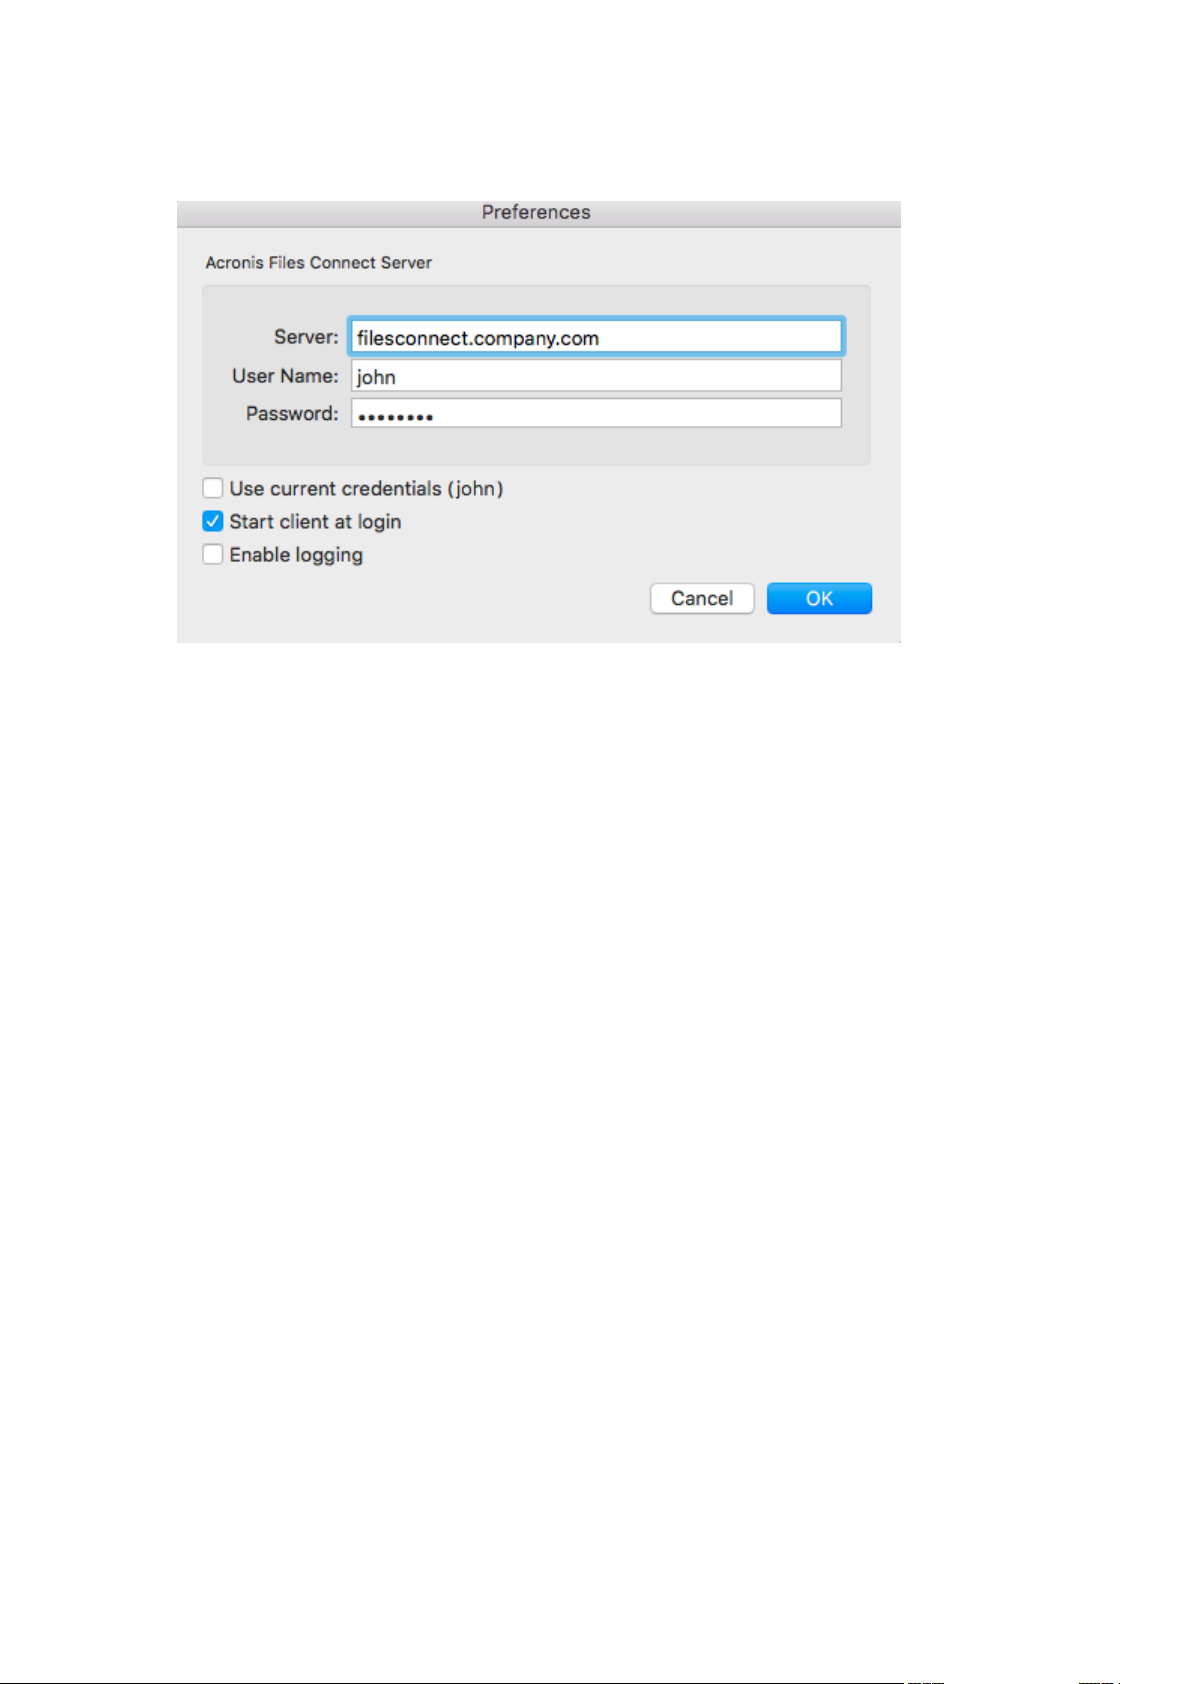
4. Enter the address of your Files Connect server. If you have multiple servers, using the master's
address will give you access to all servers and volumes.
5. Enter your credentials which will be used to connect to Files Connect's resources. These are most
likely your Active Directory username and password.
6. Alternatively, if your computer is bound to the company domain and you are logged in to the
computer with the account you wish to use, you can select Use current credentials
(yourusername).
15 Copyright © Acronis International GmbH, 2002-2017
Page 16

Usage
1. Once connected, you can navigate the available resources via the 4 tabs in the upper left. They
allow you to view the available resources:
Only shares -
Servers and their respective shares -
DFS shares -
16 Copyright © Acronis International GmbH, 2002-2017
Page 17

Printers -
2. You can search for files by many parameters like file type, creation date, filename, file content
and more. The search will be performed only for the selected share.
3. The quickest way to search is by clicking on the Files Connect icon in the Menu Bar and using the
search field.
The default is to search by name and content if content search is enabled for the volumes being
searched.
4. Double-clicking a share or a found file will automatically mount the file share and open the file.
5. You can right-click on a file and select “Show in Finder”, which will open the Finder and will open
the file's location.
6. To refresh the list of shares & printers, click on the icon in the Menu Bar, open Preferences and
press OK without changing anything.
2.7 Connecting from the Mac Finder
1. From the Finder, click on the Go menu and then Connect to Server.
2. Type afp:// and then the name of the server. For example, afp://server.mycompany.com.
3. Then select the volume you want to mount.
Make sure you connect with afp://. If you connect with smb:// you'll be connecting with the
Windows SMB protocol and won't get the benefits of Files Connect.
Note: AFP volume names are case-sensitive. When you specify a volume to connect to, the case will need to
match the volume name configured in the Files Connect Administrator > Volumes panel. Connecting to the
server without specifying a volume will present a list of available volumes.
Note: You may also be able to see the server by clicking the Browse button.
Note: If you cannot connect using the name of the server, try with the IP address. For example, afp://10.1.5.27
17 Copyright © Acronis International GmbH, 2002-2017
Page 18

2.8 The Optional Files Connect Zidget™
If you would like to your Mac users to be able to take advantage of the optional Files Connect
Zidget™, you may need to add a DNS entry for AccessConnectServerList.yourdomain.com that points
to the Files Connect server. More detailed instructions can be found in the Configuring Files Connect
for Zidget Access (p. 50) article.
Your users will then be able to install the Zidget from http://ServerList:8081
http://ExtremeZIPServerList:8081 to browse for printers and file servers through this simple
Dashboard widget.
You can allow mobile clients to connect to your Volumes using the new Mobile Access feature. To
enable it, open the Files Connect Administrator's Settings menu, go to the Mobile Access tab and
select the checkbox.
For more information, please visit the Setting Mobile Access (p. 71) and Using Mobile Access (p. 118)
sections.
2.9 Additional Resources
Network Reshares
With the introduction of “Network Reshare”, Files Connect now includes the ability to create file
share volumes that point to folders located on other servers and NAS devices on your network.
Macintosh clients continue to connect to Files Connect using the standard AFP file sharing protocol,
while Files Connect utilizes the SMB/CIFS file sharing protocol to access files that are requested by
Mac users from remote servers and NAS systems. By doing so, Mac users retain all the benefits of
AFP file sharing while gaining access to resources that have traditionally only been available through
SMB/Windows file sharing.
For in-depth information on the configuration and usage of Network Reshares, visit the following
article: Configuring Network Reshare (p. 74).
18 Copyright © Acronis International GmbH, 2002-2017
Page 19

Network Spotlight Search
Mac OS X 10.5 or later supports Spotlight searching of AFP file servers. Spotlight search allows files to
be found by searching on content, in addition to file names and file attributes. When enabled,
Spotlight search replaces both enumeration and catalog search and provides results when searching
at both the root of a volume and within subfolders.
You can do Spotlight searches through the new Mac Client. For more information, read The Mac
Client (p. 13).
For in-depth information on the configuration and usage of Spotlight Search, visit the following
articles: Spotlight Search (p. 107), Spotlight Search Operations and Support Spotlight Search (p. 64).
Filename Policies
Because Files Connect sits in a key position between the file server and the Macintosh client, we can
enforce policies on valid file names as well as file types to prevent the Macintosh users from breaking
workflows. You can configure Files Connect to detect and reject the Macintosh client attempting to
save (create, rename, move) files with characters that are “illegal” in Microsoft Explorer or other
applications that don’t support the Unicode file system APIs. The administrator can configure what is
allowed or deemed illegal. This list can include characters that cannot be displayed on Windows,
“trailing spaces” Unicode characters not available in the default Windows font, any specified
character, file names longer than “x” characters, or specific file extensions. Filename Policies do not
affect existing files on the server or files that are copied using Windows file sharing.
For in-depth information on the configuration and usage of Filename Policies, visit the following
article: Setting File Name Polic (p. 66)y.
DFS Support
Files Connect can be configured to make a Microsoft Distributed File System (DFS) available to
Macintosh clients. In addition to the server side configuration, installation of the Files Connect Mac
Client or Zidget dashboard widget (for Mac OS X 10.4 or later) is required for each Macintosh client
that requires access to DFS. Details on the required client side configuration can be found here. DFS
support also requires two settings on the Security tab of the Settings dialog. Valid Directory Services
credentials must be entered and Support UNIX Permissions and ACLs must be enabled for DFS to
function.
For in-depth information on the configuration and usage of DFS, visit the following article: DFS
Support (p. 72).
ShadowConnect
ShadowConnect is a feature included with Files Connect 7.2 and later that leverages Microsoft
Volume Shadow Copy Services (VSS) to allow Mac users to browse and restore previous versions of
modified or deleted files. Using built-in Windows functionality, Windows users can right-click on a file
located on a file server volume and select a Restore previous versions option. This allows them to
browse a list of previously saved versions of the file, which they can choose to restore. Before
ShadowConnect, Mac users were not able to take advantage this technology. By using
19 Copyright © Acronis International GmbH, 2002-2017
Page 20

ShadowConnect, Mac users can browse these same previous versions of files and folders using
familiar Mac OS features, such as Cover Flow and Quick Look. After locating the desired version,
ShadowConnect allows the Mac user to restore the file or folder to its original location or a copy can
be made in a location of their choosing. ShadowConnect brings the ability to restore previous
versions to Mac users, while providing enhanced browsing capabilities that make it easier than ever
to find the file they're looking for.
For in-depth information on the configuration and usage of ShadowConnect, visit the following
article: ShadowConnect
http://www.acronis.com/en-us/support/documentation/ShadowConnect/index.html#33051.html.
20 Copyright © Acronis International GmbH, 2002-2017
Page 21

3 Installing Files Connect
In this section
Getting Started ......................................................................................... 21
Installing Files Connect ............................................................................ 23
Launching Files Connect the First Time.................................................... 25
Setting up Files Connect Clustering ......................................................... 28
Administering Files Connect on a Cluster ................................................ 49
Configuring the Files Connect server for Mac client and Zidget access50
Adding additional servers to the Master Server ...................................... 51
In this section
System Requirements .............................................................................. 21
Getting Help ............................................................................................. 23
3.1 Getting Started
With Files Connect, Windows® computers can provide AppleShare® IP file sharing and IP-printing,
TCP/IP, and AppleTalk® print services to Macintosh® computers. Files Connect is optimized to provide
the fastest file and print services available. Files Connect includes the following services:
Files Connect File Server
Files Connect Print Server
With Files Connect, Macintosh users can connect to and mount directories on a Windows file server
just as if they also were native AppleShare volumes. With the Files Connect Print Server installed,
Macintosh users can create desktop printers that deliver print jobs to printers via the server
automatically and just as easily as with AppleTalk. Files Connect’s integration into the existing
network is seamless–Macintosh users continue using the same tools and applications for accessing
the server and printers that they always have, but the server delivers much higher performance.
With Files Connect Print Accounting, the Macintosh clients must provide additional information such
as a job code or employee ID before the server will accept the job.
3.1.1 System Requirements
The following are the minimum system requirements for the Files Connect File & Print Server on
Windows Server and Windows Workstation platforms and for connecting from Macintosh Clients. For
optimal results, your Windows Server machine should be running the latest service pack from
Microsoft®. Adding additional RAM to your server machine will greatly enhance Files Connect
performance. The recommended system requirements for a particular implementation or
application can vary so please contact us at http://www.acronis.com/en-us/contactsupportgl.html if
you have questions or need assistance.
Operating System Requirements:
Windows Server Platforms:
Note: GroupLogic Appletalk is not supported on Windows Server 2012 and above.
21 Copyright © Acronis International GmbH, 2002-2017
Page 22

Note: Older versions of Windows Server are supported by Files Connect versions older than 10.5. These include
Windows Storage Server 2008 Service Pack 2, Windows Storage Server 2003 Service Pack 2 & R2 Service Pack 2,
2008 Service Pack 2, 2003 Service Pack 2 & 2003 R2 Service Pack 2 and are no longer supported for newer
versions of Files Connect.
2016 Standard & Datacenter
2012 R2 Standard & Datacenter & Essentials
2012 Standard & Datacenter & Essentials
2008 R2 Service Pack 1
2011 Small Business Server Standard Update Rollup 3
Note: We do not support Windows Small Business Server 2011 Essentials!
Windows Storage Server 2012 R2
Windows Storage Server 2012
Windows Storage Server 2008 R2 Service Pack 1
Windows Powered NAS
Windows Workstation Platforms:
Note: Older versions of Windows, like Vista and XP are supported by Files Connect versions older than 10.5.
Windows 10
Windows 8
Windows 7 Service Pack 1
Macintosh Clients:
Mac OS X: Mac OS X 10.2.8 or later.
Note: Files Connect supports the latest Macintosh client technologies, including Bonjour®, the Service Location
Protocol (SLP), Kerberos®, and Apple’s built-in encrypted logon support for long passwords.
Note: Print Accounting requires Mac OS X 10.3. Print Accounting is not compatible with applications running in
64-bit mode on Mac OS X 10.6 or later.
Note: Acronis' Zidget software requires Mac OS X 10.4 or later.
Note: Files Connect's DFS and Network Spotlight support require Mac OS X 10.5 or later.
Hardware Requirements:
Minimal configuration
Local shares - Pentium IV with 1 GB of RAM (suitable for small deployments with few clients)
Network Reshare - Core2 class CPU with 2 or more cores, 4 GB of RAM, single Gigabit Ethernet
NIC (suitable for small deployments with few clients)
Recommended configuration
Local shares - Core class CPU with 2 or more cores, 4 GB of RAM
22 Copyright © Acronis International GmbH, 2002-2017
Page 23

Network Reshare - Core 'i' class CPU with 4 or more cores, 8 GB of RAM, dual non-bonded Gigabit
In this section
Before you begin ...................................................................................... 23
Installing Files Connect ............................................................................ 24
Sharing the Print Server Directory ........................................................... 25
Ethernet NICs
Note: You may need substantially more depending on the number of volumes and users and other applications
running on the server.
3.1.2 Getting Help
You can open Help from the Windows menu in the Files Connect Administrator.
You can visit Acronis at: http://www.acronis.com.
You can find the latest releases of Files Connect at
http://www.grouplogic.com/files/glidownload/ezipreleases.cfm
You can search the Knowledge base at http://www.kb.acronis.com
For the first year you own Files Connect, technical support and upgrades are included in the price of
the product. After your first year of free support, you can purchase extended support. For technical
support services, submit a support request at http://www.acronis.com/en-us/contactsupportgl.html
or call 1.703.528.1555 Monday through Friday, 8:00 am to 6:00 pm ET. Have your Files Connect serial
number ready for verification. In addition, you can send your questions to
http://www.acronis.com/en-us/contactsupportgl.html.The Maintenance and Support program
includes important benefits—e-mail, fax and telephone technical support services for problems that
you encounter, upgrades, bug fixes, and other incremental releases of the software.
3.2 Installing Files Connect
The primary component of Files Connect is a Windows Service that provides file and print sharing to
Macintosh clients. Files Connect also includes an administrative tool with which you can configure
shared volumes and other settings and a Gateway service which allows you to enable Acronis Access
users to connect to your Volumes. The number of clients who can connect using Files Connect
depends on your license and its client count. You can upgrade your client count as necessary. Files
Connect counts multiple connections from one user account on one IP address as one user
for licensing purposes.
3.2.1 Before you begin
This topic gives you the information you need before installing Files Connect.
23 Copyright © Acronis International GmbH, 2002-2017
Page 24

Installing Files Connect on a Domain Controller is not recommended as it can cause issues with
Kerberos.
Required Windows File Permissions for Shared Volumes
Files Connect relies on the SYSTEM account on the Windows server to perform many of its core
functions. For this reason, any folder hierarchy that is shared as a volume with Files Connect requires
that the SYSTEM account have Full Control access to the entire folder hierarchy. These permissions
are the default for the Windows OS partition, but any additional disks or partitions containing Files
Connect volumes must have SYSTEM = “Full Control” set to allow Files Connect to function properly.
Please verify that all the volumes you share have this permission set.
Sharing the Root of a Drive
Although Files Connect supports sharing out the root of the drive, Windows treats permissions at the
root of the file system differently from other folders. We recommend that you do not share out drive
letters directly. Instead, you should create a sub-folder for your shared volume.
3.2.2 Installing Files Connect
1. Run the Files Connect Installer.
Note: To install Files Connect you must log in to Windows with Administrator privileges.
2. Click Next to begin the installation.
3. Accept the Software License Agreement and click Next.
4. Click Next to accept the default Destination Folder.
24 Copyright © Acronis International GmbH, 2002-2017
Page 25

5. Click Install to begin installation.
In this section
Automatically Importing SMB Shares ...................................................... 25
Installing AppleTalk .................................................................................. 27
Using Kerberos ......................................................................................... 28
Note: If you have a previous version of Files Connect installed, it will be upgraded to the new version. Any
existing settings will be retained.
6. Click Finish to close the completed installer and automatically launch the Files Connect
Administrator.
Note: For reinstallations, the Files Connect installer stops the Files Connect Service to perform the install.
However, in some cases the installation fails because the Files Connect Service cannot be stopped. These cases
include possible service errors, conflicts with other running processes, or installing while the Services Control
Panel is open. If you experience installation failures, you can stop the Service manually from the Services Control
Panel and proceed with the install.
3.2.3 Sharing the Print Server Directory
When you install Files Connect, the installer creates a directory called Files Connect Print Support.
You have the option to share that directory for Macintosh clients. If you share the directory with the
Files Connect File Server, Macintosh clients can mount the volume to download the optional Files
Connect Macintosh Print Client. Macintosh clients do not need to use this program to print to the
Files Connect Print Server; however, using it provides easy IP printing and makes it easy for
Macintosh clients to use Bonjour (OS X), SLP (OS 9), or an IP address to find the Files Connect Print
Server.
3.3 Launching Files Connect the First Time
When you launch the Files Connect Administrator for the first time with no configured volumes
(shares), Files Connect prompts you to create new volumes or import existing volumes. Files Connect
can import existing volumes on your server that are shared using Windows file sharing (SMB).
If you are upgrading from a previous version, Files Connect checks for volumes shared with previous
versions of Files Connect and automatically creates these Files Connect volumes.
3.3.1 Automatically Importing SMB Shares
Note: All shares will be imported as "AFP" shares.
25 Copyright © Acronis International GmbH, 2002-2017
Page 26

SMB Shares
Each time the Files Connect Administrator is launched, Files Connect checks for any SMB shares that
are not being shared as Files Connect volumes. If any such volumes exist, the Import SMB Shares
button within the Volumes dialog becomes active. If you choose to do so, Files Connect creates new
AFP volumes for those SMB shares.
Files Connect does not replicate hidden shares (for example, C$). When Mac OS X clients copy files to
a server with SMB, they do not have access to alternate streams, where resource fork and Finder
information is usually stored. Instead, this resource fork and Finder information is written to a
separate file, the “dot underscore” file. To the Macintosh client, this action happens behind the
scenes—the dot underscore is hidden, and all they see is a single file that appears to contain
resource fork and Finder information. But when you view these files from Windows, the
dot underscore file is just another hidden file with no relation to the original data file.
In Files Connect, the server can migrate resource and Finder information from the dot underscore file
into alternate data streams of the file so that Macintosh clients have access to that information.
When a Macintosh client requests information about a file or folder, Files Connect first tries to read
from the file or folder’s Finder info stream (AFP_AfpInfo) and, in the case of a file, from its resource
stream (AFP_Resource). If either one of these streams is missing, Files Connect tries to find a
corresponding dot underscore file. If that file is present and contains the necessary data, the data are
migrated into the appropriate stream. The dot underscore migration feature is enabled by default,
but you can disable this feature. To disable this feature, set the refreshable registry value
ServerMigratesDotUnderscoreFiles to 0 and if Files Connect is running use the Refresh Registry
button in the Administrator to read in the new value.
In addition, Files Connect contains an optional feature that allows Files Connect to delete a dot
underscore file after its contents have been migrated into the data file. This feature is disabled by
default, but you can enable this feature. To enable this feature, set the refreshable registry value
26 Copyright © Acronis International GmbH, 2002-2017
Page 27

ServerDeletesMigratedDotUnderscoreFiles to 1 and refresh the registry. Since Files Connect migrates
In this section
Importing SMB shares after first launch .................................................. 27
Naming Conventions for SMB volumes ................................................... 27
dot underscore information only when necessary, dot underscore migration may occur over time,
as Files Connect explores new areas of the volume for the first time. Files Connect does not perform
this migration all at once when the volume first comes online. If the dot underscore file is locked, or
has different permissions than the corresponding data file, the information may not be copied to the
AFP_Resource or AFP_Info streams. This fact is logged. The dot underscore migration is a transition
feature and is not designed for simultaneous use with SMB. Files Connect does try to deal with AFP
clients accessing a file while it is still being written with SMB, but this is not a supported use of the
feature. Any changes that occur to dot underscore files after the initial migration is ignored by Files
Connect, since the service always “prefers” its alternate streams to dot underscore files. Therefore, if
a user alters the resource fork of a file over SMB after the resource fork information has been
migrated by Files Connect, these changes are not migrated. While dot underscore files can contain
information other than resource fork or Finder information, this other information is not migrated
into the data file. The following types of information are not migrated:
File Comments
Real Name (File’s name as created on home file system)
Icon, B&W (Standard Macintosh black and white icon)
Icon, Color (Macintosh color icon)
File Dates Info (File creation date, modification date, and so on)
Macintosh File Info (Macintosh file information, attributes and so on)
Short Name (AFP short name)
Directory ID (AFP directory ID)
Note: SMB shares will not be migrated on a Windows Cluster Server installation of Files Connect.
3.3.1.1 Importing SMB shares after first launch
The prompt for SMB importing that is described above is only performed once—the first time you
launch the Files Connect Administrator. After first launch, use the Import SMB Shares button in the
Volumes window of the Files Connect Administrator to bring shares over as Files Connect volumes.
See Creating volumes (p. 110) for information about migrating volumes.
3.3.1.2 Naming Conventions for SMB volumes
Imported SMB volumes must adhere to the standards of Files Connect volume names. With Files
Connect 8.0.4 or later, a name can have up to 127 characters for UTF16 and 190 for UTF8. Volumes
over 27 characters cannot be used with Mac OS 10.4 and below. If any migrated or replicated shares
have names that are too long, the names are truncated. In the event that a migrated or replicated
share has a name matching a current Files Connect volume, Files Connect appends a number to its
volume name, e.g. “Volume (2)”. The volume name may be truncated in order to have room to
append the number.
3.3.2 Installing AppleTalk
When the AppleTalk protocol is installed on the server, Files Connect registers itself with AppleTalk.
Mac OS 9 clients see Files Connect when they open the Chooser. If AppleTalk is not already installed,
27 Copyright © Acronis International GmbH, 2002-2017
Page 28

you can install the AppleTalk protocol for Windows. To install the AppleTalk protocol, add it as a
In this section
Troubleshooting Kerberos ....................................................................... 28
protocol in the Network Control Panel.
Note: Windows XP, Windows Vista, Windows Server 2008 and Windows Server 2012 do not include AppleTalk.
3.3.3 Using Kerberos
The Massachusetts Institute of Technology created Kerberos to address such network security issues
as username/password exchange, network security, client computer security, and login persistence.
Kerberos is a protocol that provides secure network authentication and support for “single sign-on”
to network resources. With single sign-on support, a user logs in one time to a network domain (also
called a realm) and, after he or she is authenticated, gains access to resources on other computers
without resubmitting a user name and password. Kerberos works on the premise that only the client
and. authenticating server share a piece of secret information and it provides a way to confirm that
the shared information is accurate throughout the user’s session. When a user on a client computer
types in a username and password and submits that information to a server to log in, Kerberos first
authenticates the user and then issues a ticket that uniquely identifies the client for that session. The
ticket is used for future access to other applications and shared volumes during the user’s session.
Kerberos provides encrypted key exchange to ensure security on both internal networks (behind
firewalls) and insecure networks such as the internet. Once a user is authenticated, all further
communication is encrypted for privacy and security.
Files Connect supports the Kerberos extensions in the AFP protocol and works directly with Active
Directory. It is registered as a Kerberos service provider and can authenticate Macintosh tickets.
Since the tickets themselves are a standard format within Kerberos, Files Connect takes tickets from
a Macintosh and passes them to Microsoft Windows Active Directory for authentication and then
grants access to Windows server resources if Active Directory says the client has a valid ticket.
3.3.3.1 Troubleshooting Kerberos
If you are having trouble getting Kerberos to work with Files Connect, use the following
troubleshooting steps:
To verify that a client computer has communicated successfully with the Kerberos ticket
authority and received a ticket for Files Connect, run the Kerberos application located in
/System/Library/CoreServices. The active Kerberos tickets are listed in Kerberos.app.In addition,
the Kerberos application can be used to destroy existing tickets before their normal expiration
time.
To verify that a client computer is bound to the Active Directory Domain correctly and is running
the right version of Kerberos modules, try connecting to the server from the Macintosh over
SMB instead of AFP by typing smb://SERVER_NAME smb://SERVER_NAME into the Server
Address field in the Connect To Server dialog. If you are required to log in then you will know
that there is a general problem with Kerberos.
3.4 Setting up Files Connect Clustering
Clustering provides fast failover and quick restart of the services provided by a failed server node.
You set up an Files Connect cluster using Microsoft Cluster Servers (MSCS)—specially linked servers
28 Copyright © Acronis International GmbH, 2002-2017
Page 29

running the Microsoft Cluster Service. If one server fails or is taken offline, the other server or servers
in the cluster immediately take over the failed server’s operations. Applications running on the
cluster are always available. Resources running on multiple servers appear to connected clients as a
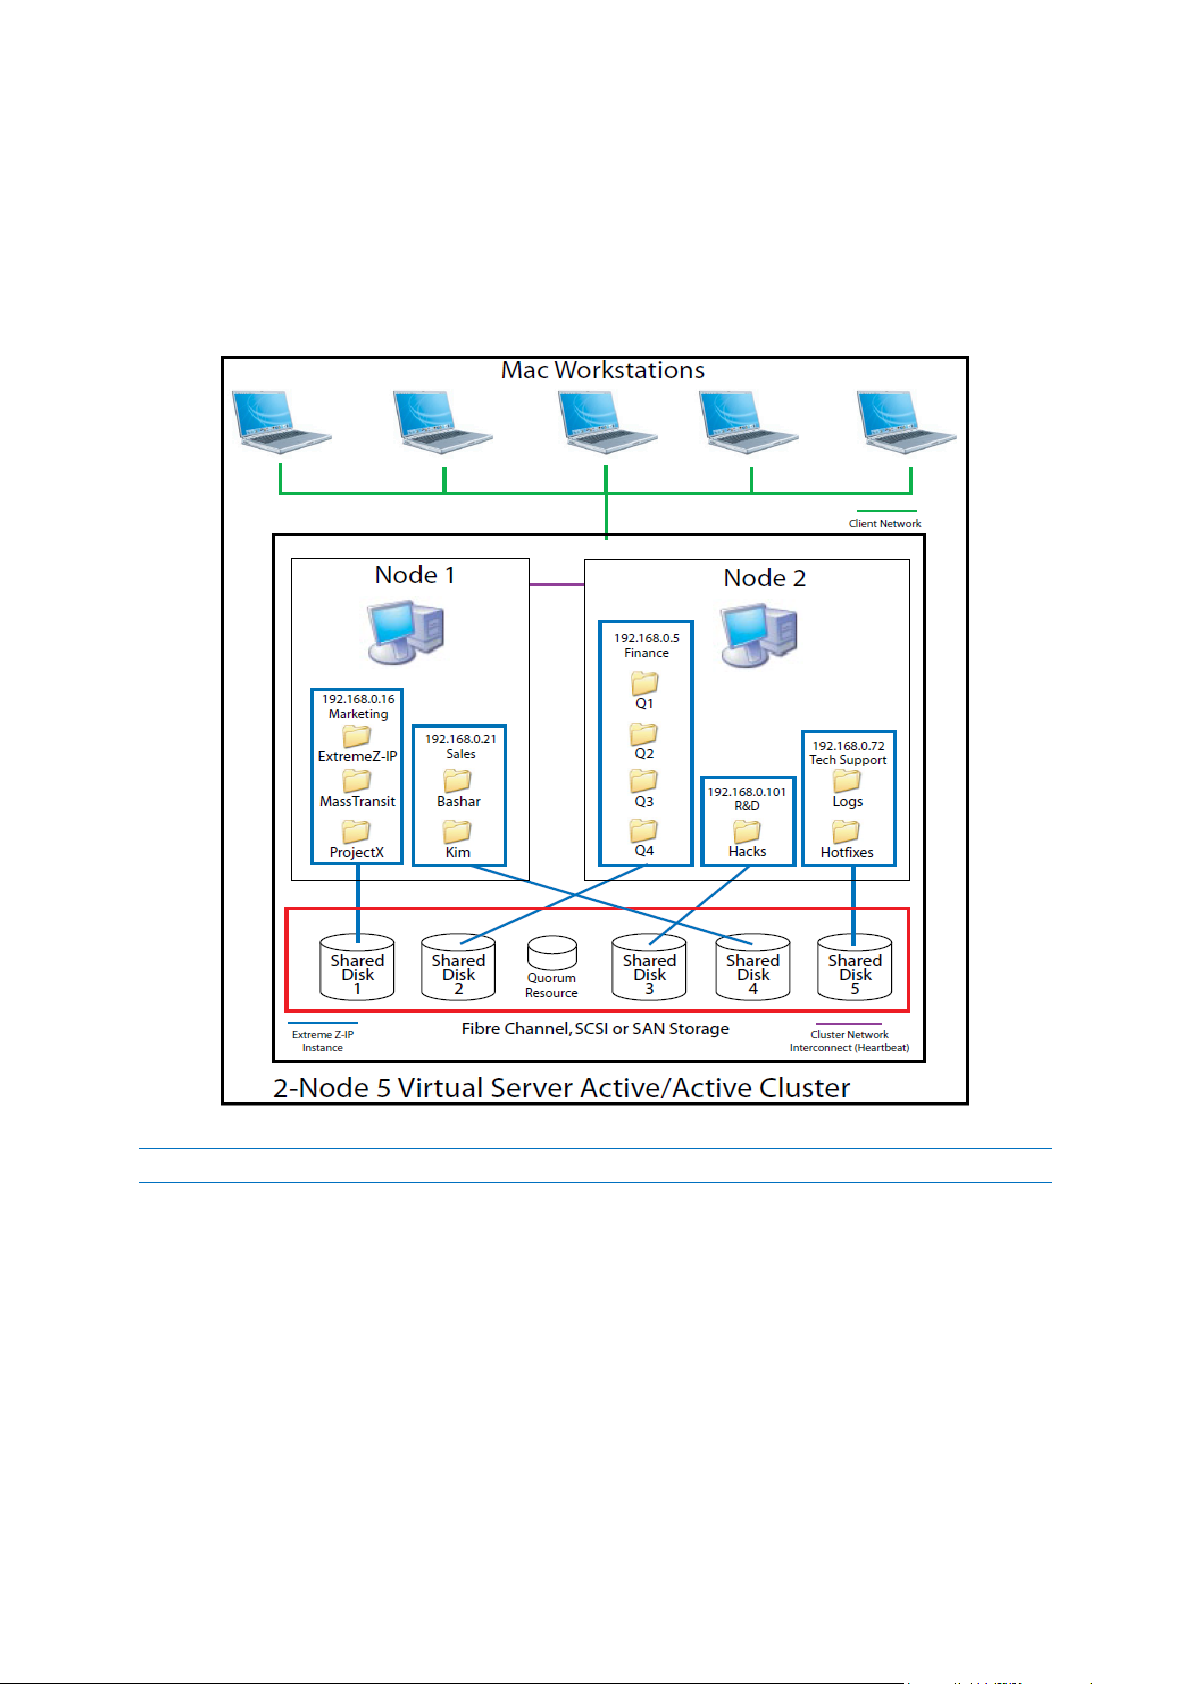
single system, referred to as an Files Connect virtual server. When a successful failover occurs
because of a problem, the connected user sometimes cannot tell that service was interrupted. Files
Connect is a cluster-aware application that you can use on active/active clustered configurations.
Multiple instances of Files Connect can run on a single server node. Each instance has its own IP
address and can be assigned its own shared volume. The configuration of multiple virtual servers
provides server consolidation and load management benefits. Running multiple instances of Files
Connect on a server node provides high reliability because each instance runs in isolation from the
others. For help in configuring a cluster, see the following Cluster Worksheet. Files Connect supports
the following services in clustered configurations:
active-active clustering
multiple virtual servers per node in a cluster
improved reliability and availability
eight node clusters in Windows 2003 & 2008
possible server consolidation
When you are running Files Connect in a clustered environment, the Files Connect Administrator
window shows the following in
the title bar:
the name of the server in upper case characters
the name of the service in upper or lower case as you typed it when you set up the service.
MSCS uses the following terms to describe the component parts of a cluster configuration. Do not
confuse these terms as you proceed with installing Files Connect.
Node - A single member server in a cluster.
Resource - A hardware or software component that runs in a cluster, such as a disk, an IP address,
a network name, or an instance of the Files Connect service.
Group - A combination of resources that are managed as a unit of failover. Groups are also
known as resource groups or failover groups. A typical Files Connect failover group consists of a
disk, an IP address, a network name, and an instance of Files Connect.
Dependency - A service or other resource that must be available first in order for the dependant
service to start.
Failover - The process of moving resources or resource groups from one server to another.
Failover can occur when one server experiences a failure of some sort or when you, the
administrator, initiate the failover. This term is equivalent to the Microsoft Cluster Administrator
action of moving a Cluster Group to another node.
Quorum Resource - A disk resource containing the failover information that is shared between
nodes in a cluster.
Heartbeat - The communication between Cluster nodes tells the other nodes that the service is
still running.
Virtual Server - A virtual server is a combination of configuration information and cluster
resources, such as an IP address, network name and an application resource. An Files Connect
Virtual Server (EVS) is defined by its unique IP address.
29 Copyright © Acronis International GmbH, 2002-2017
Page 30
Active/Active - This term describes a configuration in which multiple nodes are Files Connect file
In this section
Cluster Worksheet ................................................................................... 30
Installing Files Connect on a Cluster ........................................................ 32
servers running in production.
Active/Passive - This term describes a configuration in which one node is active in production
and another node sits idle until a failover occurs.
Shared Storage - This term refers to the external SCSI or fibre channel storage system. Shared
storage is a requirement for multi-node clusters. Although this storage is shared, only one node
can access an external storage resource at any given time.
This diagram shows an example of a cluster setup.
Note: Each server has its own IP address. You can configure multiple shares for each virtual server.
3.4.1 Cluster Worksheet
For each Files Connect service running on your cluster you will need the following:
1. A name for the unique Files Connect service (the first instance is created by default and is named
ExtremeZ-IP)
2. A unique IP address and optionally a network name
3. Shared physical storage
30 Copyright © Acronis International GmbH, 2002-2017
Page 31

4. A cluster group in which to put the new Files Connect service
To simplify this process we have provided a worksheet to prepare for your installation. Duplicate the
worksheet for each additional Files Connect virtual server you would like to create. Information
needed to install the software Files Connect Serial Number:
For each virtual server you want to set up, you will need to have unique values for all the sections
below.
Information needed to create a new service:
Unique service name
Information needed to set up a new cluster group
Cluster Group name
Network name (DNS/Netbios name)
Unique service name (created above)
Volumes to be shared
Drive
Letter Volume Name
Is the volume shared with Windows?
31 Copyright © Acronis International GmbH, 2002-2017
Page 32

3.4.2 Installing Files Connect on a Cluster
In this section
Reviewing the Installation Procedure ...................................................... 32
Configuring Files Connect Services .......................................................... 32
Creating an Files Connect Service ............................................................ 33
Adding an Files Connect Service to a Cluster ........................................... 34
Creating a Windows 2008 Cluster Group ................................................. 35
Creating a Windows 2012 Role ................................................................ 42
Before installing Files Connect on a new cluster, you must have installed and configured the
clustering service on your servers. On Windows 2003 Server (Enterprise, Storage Node Server, or
Datacenter Edition) you will need to install and configure Microsoft Cluster Service. On Windows
Server 2008 (Enterprise or Datacenter Edition), you will need to install and configure the
Failover Clustering role. In addition, you need the following:
An Files Connect cluster-enabled serial number that is encoded with the number of nodes and
virtual servers for which it is licensed. Use a single serial number for all the nodes of the cluster.
A shared disk or disks where the Files Connect shared volumes will reside
An IP address and network name for each Files Connect virtual server you want to create; create
a DNS entry for each IP address.
Note: If folders shared over SMB (for Windows clients) reside on the same physical disk as Files Connect shares,
we recommend configuring DFS (Distributed File System) so that your Windows users can use one IP address or
host name to access your shared volumes.
3.4.2.1 Reviewing the Installation Procedure
Installation consists of the following four parts, each with a number of steps that are described in the
following sections:
1. Use the installer and serial number provided by Acronis to install the Files Connect on each node
of the cluster.
2. Use the Files Connect Administrator application to configure the necessary Files Connect
service(s) on each node of the cluster.
3. Use the Microsoft Cluster Administrator application, provided with Windows 2003, or the
Failover Cluster Management application, provided with Windows Server 2008, to configure the
Microsoft clustering service.
4. Use the Files Connect Administrator application to configure shared folders and other features of
the Files Connect service.
3.4.2.2 Configuring Files Connect Services
To operate, Files Connect requires the following four components:
IP Address
Network Name
Physical Disk
Files Connect Service
Place each set of components in its own cluster group or Files Connect Virtual Server (EVS). The
number of EVSs created is based on the number of physical disks that need to be shared out with
Files Connect. For example, if the volumes are on three physical disks, create three EVSs. This
32 Copyright © Acronis International GmbH, 2002-2017
Page 33

configuration has the most flexibility; however, in some cases you may not want to use up multiple IP
addresses. Then you can have multiple physical disks shared out by one EVS. The Cluster Worksheet
(p. 30) can help you set up a plan for your cluster.
3.4.2.3 Creating an Files Connect Service
Each Files Connect virtual server you want to use requires an Files Connect service instance. Each of
these Files Connect services requires a unique Service Name. When Files Connect is installed on a
cluster enabled server, no services are created by default. In this step, you will create a new Files
Connect service for each virtual server, on each node you want the service to run on.
To create an Files Connect service, do the following:
1. After completing the Files Connect installation process, or on a cluster server with an exiting Files
Connect installation, run the Files Connect Administrator application.
2. If Files Connect is being installed for the first time and no services exist, you will be prompted to
create a service.
3. When setting up a cluster, choose Multiple Services.
4. You will be prompted to create your first service. Enter the Service Name of your choosing. In this
example, our service name is “Marketing”.Write down the exact service name you use in this
command. You need the exact name when configuring Microsoft clustering in the next section.
33 Copyright © Acronis International GmbH, 2002-2017
Page 34

5. After the service is created, it will appear in the Files Connect Services window. Files Connect
Services will be shown each time the Files Connect Administrator is launched. It is used to select
the service you would like to administer, as well as to add or remove additional services.
6. If you are configuring multiple services, select Add Service and to create any additional services
necessary.
7. You will need to perform these steps on each cluster node that these Files Connect services will
run on.
3.4.2.4 Adding an Files Connect Service to a Cluster
You can configure the cluster for Files Connect in a number of ways:
If you already have set up a Cluster Group, simply add Files Connect as a generic service to your
Cluster Group.
If you do not have any existing cluster group, follow the steps in the sections below, which take
you through the process of using the Cluster Application Wizard® to configure the cluster group.
Or, you may use another method with which you are familiar.
If folders shared over SMB for Windows clients reside on the same physical disk as your Files Connect
volumes, you can add the Files Connect service to an existing group. In addition, when using an
active/active configuration with Windows SMB shares, you may want to install and configure
Windows DFS (Distributed File System). DFS makes it easier for connected users to find shared
folders on the network without having to learn multiple IPs or DNS names. For more information, see
34 Copyright © Acronis International GmbH, 2002-2017
Page 35

Microsoft’s DFS documentation. Although the Macintosh client does not support DFS, Files Connect
has the ability to make DFS volumes available to Macintosh clients.
3.4.2.5 Creating a Windows 2008 Cluster Group
This is the recommended method for creating a new cluster group that includes an Files Connect
service. If you already have a cluster group configured and would like to add Files Connect to that
group, right click the cluster group and select Add Resource - Generic Service. Then follow the steps
below to select the desired Files Connect service. This will bypass the cluster group network and
storage configuration steps.
To create a cluster group, do the following:
35 Copyright © Acronis International GmbH, 2002-2017
Page 36

1. Open Failover Cluster Management in Administrative Tools and select your cluster on the left
pane.
36 Copyright © Acronis International GmbH, 2002-2017
Page 37

2. Right click on the cluster name and select Configure a Service or Application. This will launch the
High Availability Wizard. Click Next.
37 Copyright © Acronis International GmbH, 2002-2017
Page 38

3. Select Generic Service and click Next.
38 Copyright © Acronis International GmbH, 2002-2017
Page 39

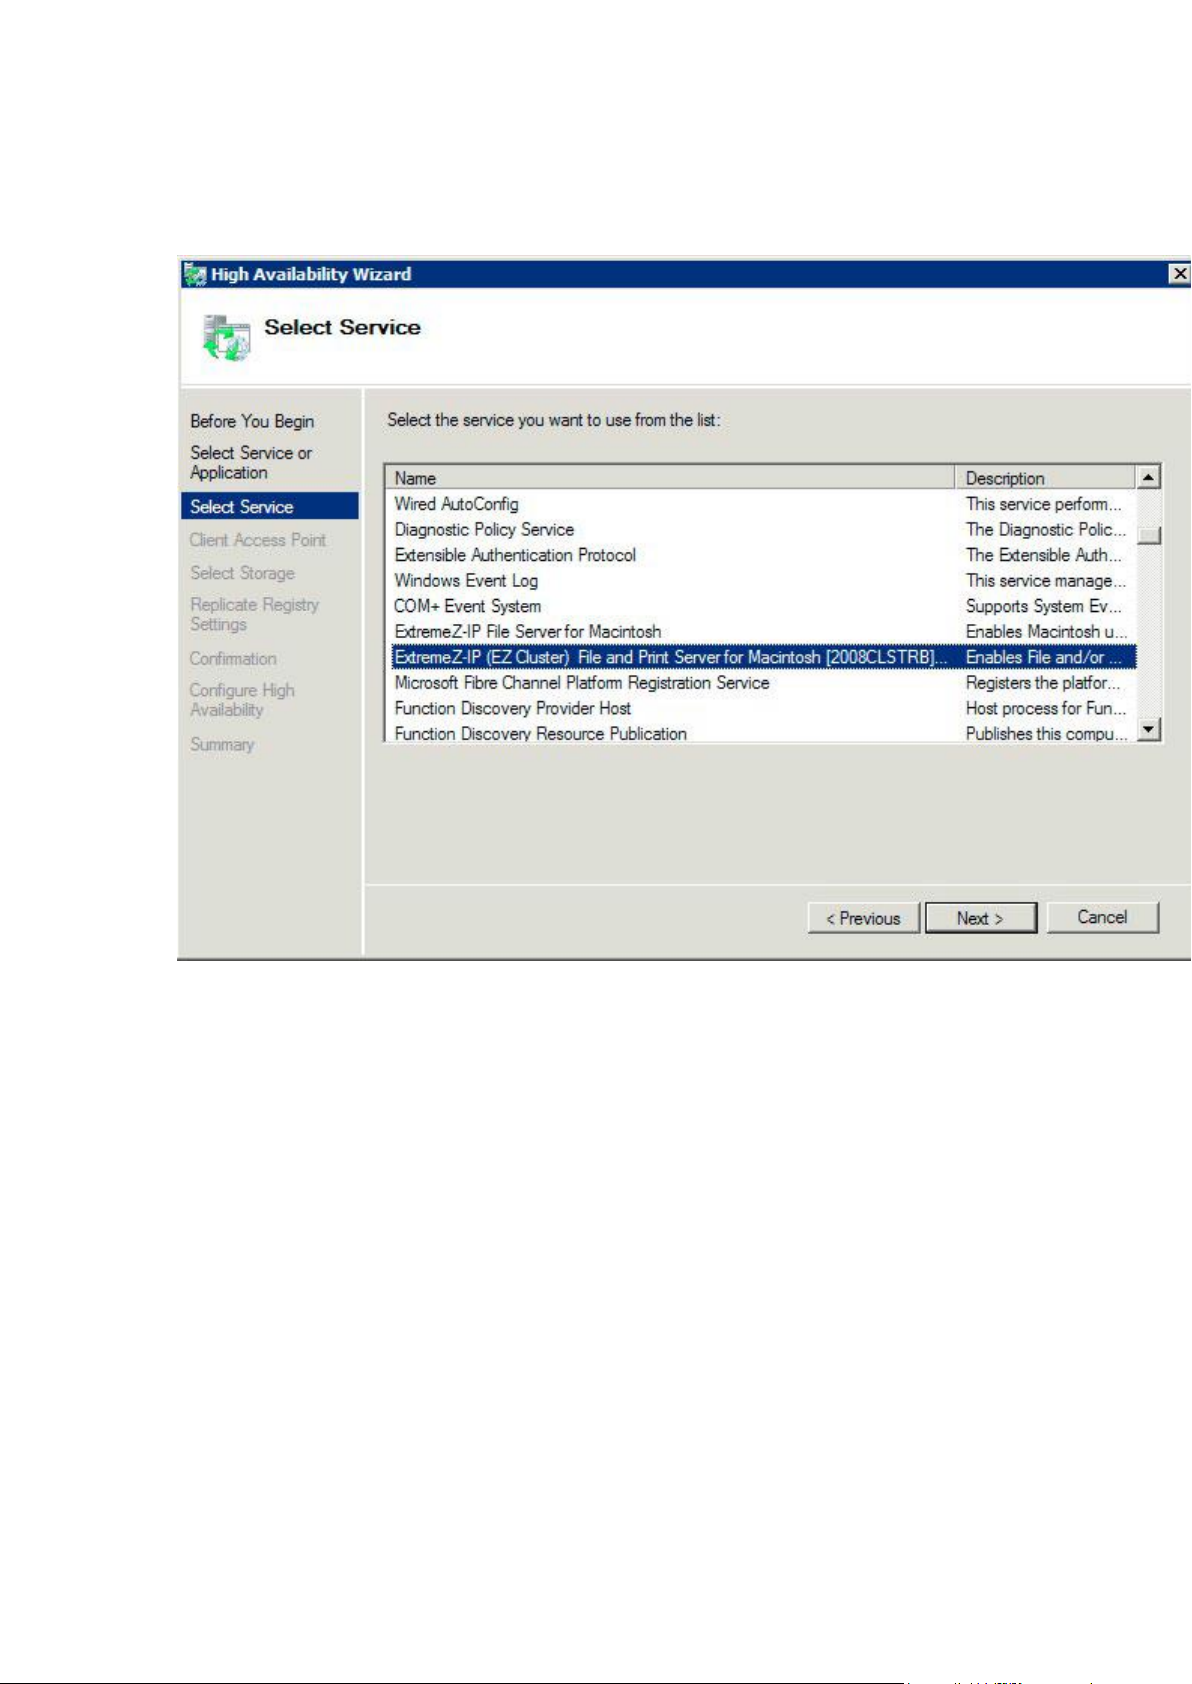
4. You must now select the service to add. You may see multiple entries for Files Connect in the list.
Each entry will display the Files Connect service name as defined when the service was created.
See the clustering section for more information. Select the entry that includes the specific Files
Connect service name you would like to configure and click Next.
39 Copyright © Acronis International GmbH, 2002-2017
Page 40

5. Enter the network service name for your cluster group. This will define the DNS name that clients
will use to connect to this cluster group. Select the Networks that this cluster group will use and
define an IP address for the cluster group on each selected network.
40 Copyright © Acronis International GmbH, 2002-2017
Page 41

6. Select the volume(s) you would like to make available to this cluster group and click Next. These
In this section
Setting Cluster Resource Dependencies .................................................. 41
Bringing the New Resource Online .......................................................... 42
should be the volumes that contain the directories to be shared with Files Connect.
7. Click Next on the Replicate Registry Settings step. No changes are necessary.
8. Click Next on the Confirmation step.
Setting Cluster Resource Dependencies
To ensure that cluster services start-up in correct order, you must set resource dependencies for the
IP Address, Network Name, and the Physical Disk.
To set resource dependencies for the IP Address, Network Name, and the Cluster Disk, do the
following:
1. From Failover Cluster Management, under Other Resources for the cluster group, right click on
the Files Connect File and Print Server resource.
2. Click Properties.
3. Select the Dependencies tab.
4. Add the IP Address, Network Name, and the Cluster Disk as dependencies.
5. Click OK.
41 Copyright © Acronis International GmbH, 2002-2017
Page 42

Note: Since the Files Connect resource is created under the High Availability Wizard, all the nodes in the cluster
are owners for the resource. If you do not want this configuration, you can change it before you bring t he
service online. To change the owners for the resource, click the Advanced Policies tab and modify the Possible
Owners accordingly.
Bringing the New Resource Online
At completion of this configuration, the Files Connect resource may be offline. You can now bring the
new resource online.
To bring the Files Connect resource online, do the following:
1. Right click the Files Connect File and Print Server resource.
2. Select Bring this resource online.
3.4.2.6 Creating a Windows 2012 Role
This is the recommended method for creating a new cluster group that includes an Files Connect
service. If you already have a role configured and would like to add Files Connect to that role, right
click on the role and select Add Resource -> Generic Service. Then follow the steps below to select
the desired Files Connect service. This will bypass the role network and storage configuration steps.
To create a role, do the following:
42 Copyright © Acronis International GmbH, 2002-2017
Page 43

1. Open Failover Cluster Management in Administrative Tools and select your cluster on the left
pane.
43 Copyright © Acronis International GmbH, 2002-2017
Page 44

2. Right click on Roles and select Configure a Role. This will launch the High Availability Wizard.
Click Next.
44 Copyright © Acronis International GmbH, 2002-2017
Page 45

3. Select Generic Service and click Next.
45 Copyright © Acronis International GmbH, 2002-2017
Page 46
4. You must now select the service to add. You may see multiple entries for Files Connect in the list.
Each entry will display the Files Connect service name as defined when the service was created.
See the clustering section for more information. Select the entry that includes the specific Files
Connect service name you would like to configure and click Next.
46 Copyright © Acronis International GmbH, 2002-2017
Page 47
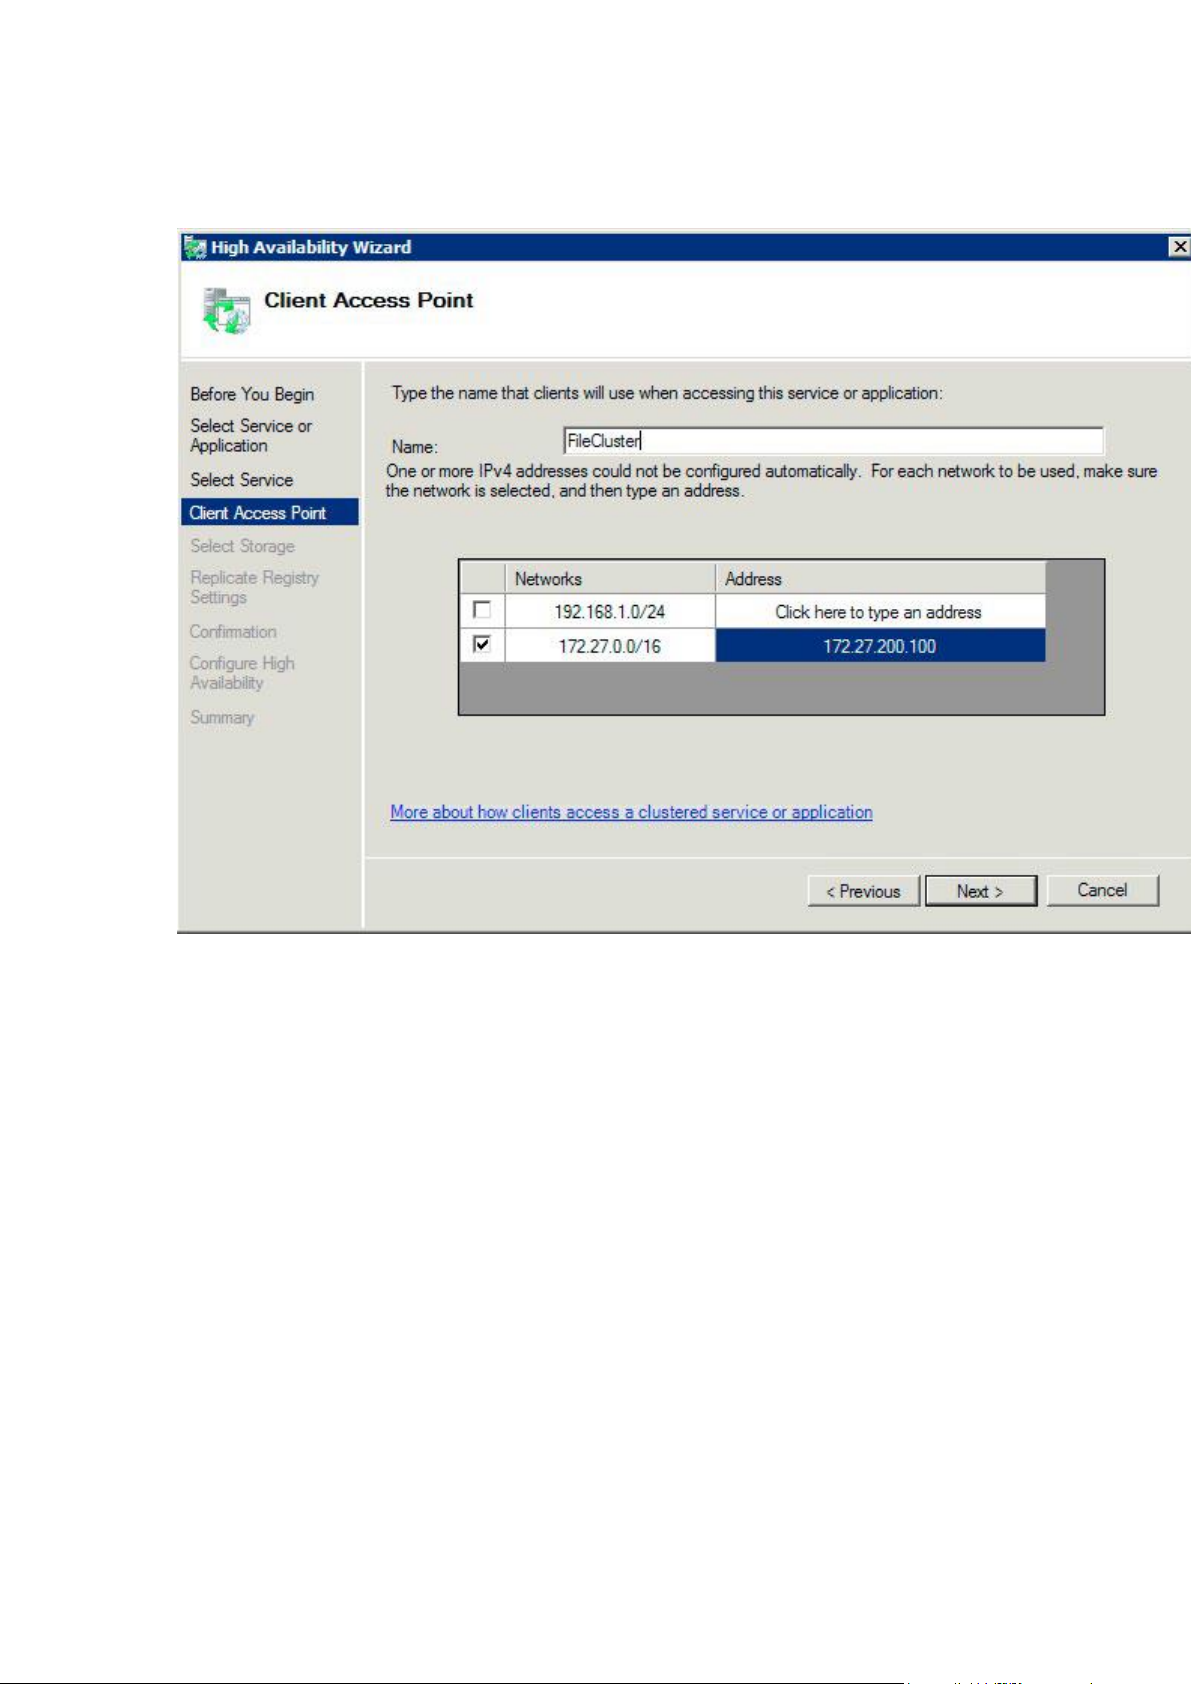
5. Enter the network service name for your cluster group. This will define the DNS name that clients
will use to connect to this cluster group. Select the Networks that this cluster group will use and
define an IP address for the cluster group on each selected network.
47 Copyright © Acronis International GmbH, 2002-2017
Page 48

6. Select the volume(s) you would like to make available to this cluster group and click Next. These
In this section
Setting Cluster Resource Dependencies .................................................. 48
Bringing the New Service Online.............................................................. 49
should be the volumes that contain the directories to be shared with Files Connect.
7. Click Next on the Replicate Registry Settings step. No changes are necessary.
8. Click Next on the Confirmation step.
Setting Cluster Resource Dependencies
To ensure that cluster services start-up in correct order, you must set resource dependencies for the
IP Address, Network Name, and the Physical Disk.
To set resource dependencies for the IP Address, Network Name, and the Cluster Disk, do the
following:
1. From Failover Cluster Management, under the Resources tab for the role, right click on the Files
Connect File and Print Server resource.
2. Click Properties.
3. Select the Dependencies tab.
4. Add the IP Address, Network Name, and the Cluster Disk as dependencies.
5. Click OK.
48 Copyright © Acronis International GmbH, 2002-2017
Page 49

Note: Since the Files Connect resource is created under the High Availability Wizard, all the nodes in the cluster
are owners for the resource. If you do not want this configuration, you can change it before you bring the
service online. To change the owners for the resource, click the Advanced Policies tab and modify the Possible
Owners accordingly.
Bringing the New Service Online
At completion of this configuration, the Files Connect resource may be offline. You can now bring the
new resource online.
To bring the Files Connect resource online, do the following:
1. Right click the Files Connect File and Print Server resource.
2. Select Bring online.
3.5 Administering Files Connect on a Cluster
In a clustered environment, the Files Connect administrator behaves differently than it does in a
non-clustered environment. You should always execute administration tasks on the node currently
running the Files Connect Virtual Server you want to administer. Starting the service from the Files
Connect Administrator or the Services control panel is disabled for clustered
configurations. Clustered services should be started ONLY from the Microsoft Cluster Administrator.
If the service is started by some other means (an application or the Services control panel) the
Cluster Administrator will not know the service is running and, if required, cannot manage a failover.
Administer services only from the node they are running on. Then, you can create volumes that
point to a specific folder. On a cluster, a node can only access the disks in its cluster group. In order
to select a folder with the Browse for folder dialog you must run the Files Connect administrator on
the node where the Physical Disks are located. Using the Files Connect Administrator, you can create
a volume on another node; however, you will need to enter the path manually.
1. When the Files Connect Administrator is started, you will be prompted to select the Files Connect
service that you want to administer.
2. Select an Files Connect Service and click OK.
49 Copyright © Acronis International GmbH, 2002-2017
Page 50

3. Once you have chosen a service, the Administrator launches and connects to that service. The
Administrator title bar tells you which server it is connected to in the format “(Network Name –
Service Name)”.
If the connection to the server is broken (that Cluster Group is failed over) the administrator cannot
reconnect to that service since it is on another node. However, you can now administer it on the
node to which it has been moved. If it fails back to the original node, you can reconnect to it.
3.6 Configuring the Files Connect server for Mac client
and Zidget access
Files Connect supports both the Mac client and Zidget with no additional configuration.
In the Service Discovery tab of the Administrator you can change the settings related to the Web
Service which controls how users get and connect to the Files Connect server. Files Connect servers
are configured to be their own master server unless specifically set to be Slaves by enabling Register
with Master Server. On the Master server this checkbox should be Disabled.
The Mac client can be deployed by entering the Files Connect Master server's address and a valid
username and password.
The Zidget can be deployed in most environments without needing any additional configuration
beyond creating a DNS CNAME record of ExtremeZIPServerList.yourdomain.com for your Files
Connect server.
50 Copyright © Acronis International GmbH, 2002-2017
Page 51

If you would like, you can also assign a server to a specific location. A location is composed of
locations separated by colons that contains the hierarchy of zones/locations that the Zidget should
use to display them.
An example for single level zone is “GLIHQ” and a multi-level location might be “Virginia:Arlington:1st
Floor”. In addition to the location property of a print queue or file server, an administrator can also
assign them descriptions. When a queue is selected, the status area of Zidget displays any
description that the administrator has set for the queue. However, locations and descriptions are
optional.
If no servers or print queues have locations assigned to them, then they are all displayed in
Zidget as a list without any additional hierarchy.
If only some of the servers do not have a location, they will be displayed at the end of the list
below the locations.
3.7 Adding additional servers to the Master Server
If you have multiple Files Connect servers, designate one server to be the Master server that the Mac
client and Zidget will contact to discover the other Files Connect servers on the network.
All Slave servers will be automatically registered with the Master server by enabling the Register
with Master Server setting on the Slaves and entering the address of the Master server.
51 Copyright © Acronis International GmbH, 2002-2017
Page 52

4 Upgrading Files Connect
Upgrading to a new version of Files Connect is an easy and straightforward process. The Files
Connect installer automatically detects the existing version and upgrades it to the newer one - you
do not have to uninstall the previous version in order to install the new one.
Note: You may receive an inadvertent error message indicating that the service could not be stopped or that a
file could not be removed. If you receive these errors, the best strategy is to manually stop the Files Connect
service first, then re-run the installer.
Review the Backup & Disaster Recovery (p. 140) guidelines and perform a backup of your
deployment before proceeding.
Upgrading to a new version of Files Connect:
Note: Upgrades from ExtremeZ-IP to Files Connect require no special configurations. Start the Files Connect
installer and proceed with the steps below.
1. Start the Files Connect installer.
2. Press Next.
3. Accept the license agreement and press Next.
4. Press Install.
5. When the installation procedure completes, press Finish.
Upgrading to a new version of Files Connect on a Microsoft Failover Cluster:
Upgrading Files Connect on a cluster requires that you upgade your inactive nodes one by one, and
finally failing-over the rest, so they can be upgraded as well.
1. Verify your clustered configuration has no issues. This is done by right-click on your cluster in
Microsoft Failover Cluster Manager and selecting Validate Cluster. Follow the wizard until
everything is verified and there are no errors. If errors are found, they must be fixed before
proceeding with the upgrade.
2. Select one of your inactive clustered instances.
3. Start the Files Connect installer.
4. Press Next.
5. Accept the license agreement and press Next.
6. Press Install.
7. When the installation procedure completes, press Finish.
8. Repeat the above procedures until all inactive instances are upgraded.
9. Fail-over the active instance(s) to any of the upgraded instances. Once the active instance has
become inactive, upgrade it as described above.
10. Confirm that Files Connect works correctly.
52 Copyright © Acronis International GmbH, 2002-2017
Page 53

5 Configuring Files Connect
In this section
Files Connect File Server .......................................................................... 53
Administering Files Connect remotely ..................................................... 81
Configuring Client Computers to Print to Files Connect .......................... 82
Installing and Configuring the Zidget on the Client ................................. 83
The Mac Client ......................................................................................... 98
Adding a printer from a Web Page ........................................................ 102
Macintosh Client Configuration for DFS Support ................................... 104
Adding a License Number ...................................................................... 106
In this section
Starting and stopping the Files Connect File Server ................................ 53
Configuring the Files Connect Server ....................................................... 53
Configuring Network Reshare support .................................................... 74
In this section
Setting up Files Connect ........................................................................... 54
Setting File Server Options ....................................................................... 55
Setting Print Server Options..................................................................... 58
Setting Security Options ........................................................................... 59
Setting Search Options ............................................................................. 62
Setting Filename Policy ............................................................................ 66
5.1 Files Connect File Server
5.1.1 Starting and stopping the Files Connect File Server
To start the Files Connect File Server, log into Windows with Administrator privileges and launch the
Files Connect Administrator. If you have not already started the Files Connect service, the Files
Connect Administrator asks if you want to start the service. In addition, you can start and stop the
service from the Service Control Panel on a standalone server or the Cluster Administrator on a
cluster server.
5.1.2 Configuring the Files Connect Server
This section gives an overview of configuring the Files Connect service. Use the Files Connect
Administrator to view, disconnect, and send messages to connected users, create shared volumes,
and adjust specific machine settings. You can configure the local computer or remote computers on
which Files Connect is installed as long as you have Administrative privileges.
To configure Files Connect on the computer you are using, from the Windows Start menu, go to
Programs/Files Connect and select Files Connect Administrator.
Note: In addition to the method described above, you can configure Files Connect from the command line using
the EZIPUTIL.EXE. For more information about EZIPUTIL.EXE simply run the tool and you will be greeted with the
4 major categories: Volume, Server, Session and Print. Selecting any of them will present you with a list of
available commands and examples.
53 Copyright © Acronis International GmbH, 2002-2017
Page 54

Service Discovery ..................................................................................... 69
Setting Mobile Access .............................................................................. 71
DFS ........................................................................................................... 72
Logging ..................................................................................................... 73
5.1.2.1 Setting up Files Connect
Before using Files Connect, review the default settings; you can make changes at this time or later.
The Settings dialog box has the following tabs: File Server, Print Server, Security, Search, Filename
Policy, Service Discovery, and DFS.
To change settings, do the following:
1. Access the Files Connect Administrator window.
2. Click Settings.
3. Choose the settings appropriate for your use, then click OK to return to the Files Connect
Administrator window.
Suspend File Sharing - Start/Suspend File Sharing Services.
Log - View a log of ExtremeZIP activity.
54 Copyright © Acronis International GmbH, 2002-2017
Page 55

Users - View the users who are connected; disconnect users; send messages.
In this section
AFP Port.................................................................................................... 56
Logon Messages ....................................................................................... 56
Enabling Home Directory Support ........................................................... 56
Convert Windows Shortcuts to Mac links ................................................ 56
Enable Network Reshare support ............................................................ 56
Changing Types and Creators ................................................................... 57
Allow Guests to Connect .......................................................................... 57
Allow Clear Text Logins ............................................................................ 57
Allow Encrypted Logins ............................................................................ 57
Allow Kerberos Logons ............................................................................. 57
Enable ArchiveConnect ............................................................................ 57
Mark Offline Files ..................................................................................... 57
Volumes - Set up volumes you want to share.
Files - View files opened by users Macintosh clients. Displays the active TCP/IP sessions, open
file forks and file locks.
Licensing - Add serial numbers.
Check for Updates - Check our web site for updates.
5.1.2.2 Setting File Server Options
Use the File Server Settings tab to change the way Files Connect interacts with Mac clients when it
offers file sharing services.
55 Copyright © Acronis International GmbH, 2002-2017
Page 56

AFP Port
If required for your connection, make changes to the AFP port. Although rarely necessary, you can
type a new port number for the TCP/IP port the file server uses; the default is 548.
Note: If Macintosh clients cannot connect to your server, Files Connect may be running on a port other than the
default. In this case, Files Connect displays a message on the Files Connect Administrator window warning you
that you have picked a non-default port.
Logon Messages
The logon message displays on the Macintosh users’ computers after they successfully log in. Leave
the message blank if you do not want clients to receive a message when they log in. To increase the
number of characters you can use in the message you send to clients, use the registry key. You can
use as many as 500 characters; Macintosh clients using Mac OS 9 see fewer characters.
Note: Mac OS X 10.9 or later does not support sending messages.
Enabling Home Directory Support
If you are using some Files Connect volumes exclusively for home directories, check Enable Home
Directory Support. In addition, you must enable home directory support for individual volumes when
you set up the volumes; see the Volume Properties (p. 112) dialog box. This setting filters out all
directories except the user’s home directory when the user asks for the contents of the volume.
Users do not see home directory volumes that do not contain their home directories.
If your users’ home directory locations are specified in their Microsoft Active Directory profile,
choose Use Profile Home Directory.
If your users’ home directories are named to match their user names, choose Use User Name As
Home Directory.
See the Knowledgebase
article: http://www.grouplogic.com/knowledge/index.cfm/fuseaction/view/docID/210
http://www.grouplogic.com/knowledge/index.cfm/fuseaction/view/docID/210
Convert Windows Shortcuts to Mac links
Makes Windows shortcuts usable to Mac clients.
Enable Network Reshare support
Network Reshare allows Files Connect AFP file volumes to give access to folders located on other
servers and NAS devices on your network. Macintosh clients continue to connect to Files Connect
using the standard AFP file sharing protocol, while Files Connect utilizes the SMB/CIFS file sharing
protocol to access files that are requested by Mac users from remote servers and NAS systems. By
doing so, Mac users retain all the benefits of AFP file sharing while gaining access to resources that
have traditionally only been available through SMB/Windows file sharing. For more information on
Network Reshares, see this section: Configuring Network Reshare support. (p. 74)
56 Copyright © Acronis International GmbH, 2002-2017
Page 57

Changing Types and Creators
Click the Types and Creators button to fill out the Macintosh Type/Creator to Extension Mappings
dialog box to meet your specifications. See Remapping Extensions (p. 126) for more information on
remapping MS-DOS extensions to Macintosh types.
Allow Guests to Connect
If you choose to allow guests to connect, a Macintosh user can log into the file server without
supplying a name and password. Permission to connect does not give Macintosh clients access to
your entire computer. You designate which volumes on your computer you want to share with
Macintosh clients. See Creating a Volume (p. 110). The user’s privileges during that session are
limited to the permissions normally given to the Everyone group under Windows.
Note: You must configure Windows XP and later Windows systems so that guests can access the server. See
Configuring Guest Access for Windows XP and above in Appendix D here.
Allow Clear Text Logins
Checking this option lets Macintosh users connect by sending their passwords in clear-text form over
the network. Clear-text passwords may be a security problem and are limited to 8 characters. Mac
OS X versions 10.5 and later do not allow clear-text authentication.
Allow Encrypted Logins
If you select this option, Macintosh users can encrypt their passwords before sending them across
the network. With encryption, users have greater security and can use longer passwords.
Allow Kerberos Logons
This option provides support for “single sign-on” to network resources. It applies only to users with
Mac OS X 10.3.5 or greater. See the section Using Kerberos (p. 28) which describes Kerberos in more
detail.
Enable ArchiveConnect
This option turns on enhanced ArchiveConnect support for any file archive volumes shared with Files
Connect. ArchiveConnect is a separate Mac client-side application that enables Mac OS X clients to
access file archives without triggering unintended retrieval of offline files.
Mark Offline Files
Select a custom label color that will be used to highlight offline files within the Mac OS X Finder.
57 Copyright © Acronis International GmbH, 2002-2017
Page 58

5.1.2.3 Setting Print Server Options
In this section
Automatic Retry of Print Jobs .................................................................. 58
Deleting Offline Jobs ................................................................................ 59
Advanced Print Server Options ................................................................ 59
To make changes to Print Server Settings, click Settings on the Files Connect Administrator window,
then click the Print Server tab. Changes you make to print server settings take effect immediately
after you click the Apply or OK button.
Retry offline jobs every - Change wait time for retrying jobs.
Delete jobs that have been offline for - Delete offline jobs.
Log print job processing results - Control whether or not the server logs print job processing
results.
Automatic Retry of Print Jobs
When a job fails for any reason —LPR error code, TCP connection terminated, error from Windows
print queue—the job status is set to Offline and it is sent to the end of the queue. Use the Print
Server tab to configure the interval that will elapse before the server retries printing the job.
By default, Files Connect automatically retries offline jobs every five minutes until the job
prints successfully. To disable this feature, uncheck the Retry offline jobs every . . . box. You can
enter only one auto-retry interval, which applies to all offline jobs.
58 Copyright © Acronis International GmbH, 2002-2017
Page 59

Deleting Offline Jobs
Files Connect can also automatically delete jobs that have been offline for a specified period of time.
This functionality is disabled by default, and, when enabled, the default setting is one day. To enable
this feature, check the Delete jobs that have been offline for . . . box.
Note: In order to make sure that jobs aren’t automatically deleted because of a queue-wide problem, such as a
network problem, or printer turned off, Files Connect will not automatically delete a job after the configured
period of time unless at least two other jobs have been successfully printed since the job went offline.
For the purposes of our performance counters, any queue that has more than one offline job and has
not successfully processed a job since the last job went offline is considered an offline queue. So a
single offline job does not make a queue offline—it could just be a bad job, but having multiple
offline jobs without any recent successful jobs would suggest that a queue-wide problem exists. A
queue that is offline does not differ from an online queue in terms of its processing; how it is
reported in erformance counters is the only difference.
Advanced Print Server Options
If you want each print job to be logged in the Windows Event Log, check the Log print job processing
results box. You can enter a location for storing temporary files; as a default, Files Connect uses the
default temporary directory.
5.1.2.4 Setting Security Options
On the Security Settings tab, place a check in the appropriate checkbox to change permissions and
other options. Enter information for Directory Services in the appropriate text boxes.
59 Copyright © Acronis International GmbH, 2002-2017
Page 60

In this section
Allow Mac Clients to Change Folder Permissions .................................... 60
Reset Permissions on Move ..................................................................... 60
Support UNIX permissions and ACLs ........................................................ 60
Support ACLs on all volumes (global) ....................................................... 60
Show Only Accessible: Folders, Files ........................................................ 61
Allow Remote Administration of Server .................................................. 61
Notify Mac Clients of Password Expiration .............................................. 61
Enable IPv6 ............................................................................................... 61
Verify Directory Services .......................................................................... 61
Allow Mac Clients to Change Folder Permissions
If you select this option, Macintosh clients can change folder permissions. With this option disabled,
Mac clients are prevented from changing permissions the Windows Administrator has set on the
server. Many Macintosh applications set unexpected permissions without user intervention. For
increased reliability, it is recommend that Mac clients not be allowed to modify permissions unless
this capability is required for a particular workflow.
Reset Permissions on Move
If you select this option, the behavior of the move operations changes so that, when folders or files
are moved, their permissions are changed to those of their new parent folder.
Support UNIX permissions and ACLs
UNIX permissions and Access Control Lists (ACLs) require that the Files Connect service have access
the list of users in Active Directory in order to resolve SID, UUID, UID, and name mappings. For UNIX
permissions, the Macintosh client requests a name mapping for UID. However, for the ‘ls’ command
the Macintosh uses AD and does the name mapping internally. Therefore, the Macintosh does not
make a name request to Files Connect. If the UID Files Connect provides does not match the user’s
UID obtained from Active Directory, then the Macintosh will not allow the user to change UNIX
permissions at all. In addition, the client will not be able to determine the user’s group membership
or if the user is the owner.
To verify your account, enter the requested information in the Directory Services text fields. This
account will be used to search Active Directory to resolve account IDs. By default, Files Connect will
search within your entire Active Directory forest to validate security credentials. If you would like
Files Connect to only search the Domain specified, uncheck the Use Global Catalog option. Add
additional search criteria, if necessary, and click Validate Account. If the credentials are invalid, the
service will not be able to access Active Directory and UNIX permissions will be disabled. Files
Connect DFS support requires that this option is enabled and that valid Directory Service credentials
are entered.
Support ACLs on all volumes (global)
To support ACLs on all volumes, check this box.
60 Copyright © Acronis International GmbH, 2002-2017
Page 61

Show Only Accessible: Folders, Files
If you check the Folders option, users will see only folders that they can access. If you check the Files
option, users will only see files that they can access.
Allow Remote Administration of Server
This option lets Windows users, who have Administrative privileges, use the Remote Administration
features of Files Connect to configure the server remotely; see Administering Files Connect Remotely
(p. 81).
Notify Mac Clients of Password Expiration
You can require that Active Directory users change their sign-on password after a specified time.
With this textbox, you can notify Macintosh users that their old passwords are about to expire and
ask them to create new passwords.
Enable IPv6
If you would like to use IPv6, check the Enable IPv6 checkbox. On some versions of Windows you will
need to install IPv6 manually before services such as Files Connect will be able to use it.
Verify Directory Services
UNIX permissions and ACLs require access to Active Directory in order to resolve SID, UUID, UID, and
name mappings. For UNIX permissions, Finder requests a name mapping for UID. However, for ones,
the Macintosh uses AD and does the name mapping internally. Therefore, the Macintosh does not
make a name request to Files Connect. If the UID Files Connect provides does not match the user’s
UID obtained from Active Directory, then the software will not allow the user to change UNIX
permissions at all. In addition, the client will not be able to determine the user’s group membership
or if the user is the owner.
To verify your account, enter the requested information in the Directory Services text fields. Add
additional search criteria, if necessary, and click Validate Account. The SSL option can be selected to
enable secure SSL communication with Active Directory. If the account is not valid, you may not be
able to access Active Directory and UNIX permissions support will not be enabled. In addition, DFS
support will not function.
61 Copyright © Acronis International GmbH, 2002-2017
Page 62

5.1.2.5 Setting Search Options
In this section
Spotlight Search ....................................................................................... 63
Catalog Search .......................................................................................... 65
To set search options, check the appropriate boxes and enter the relevant information.
62 Copyright © Acronis International GmbH, 2002-2017
Page 63
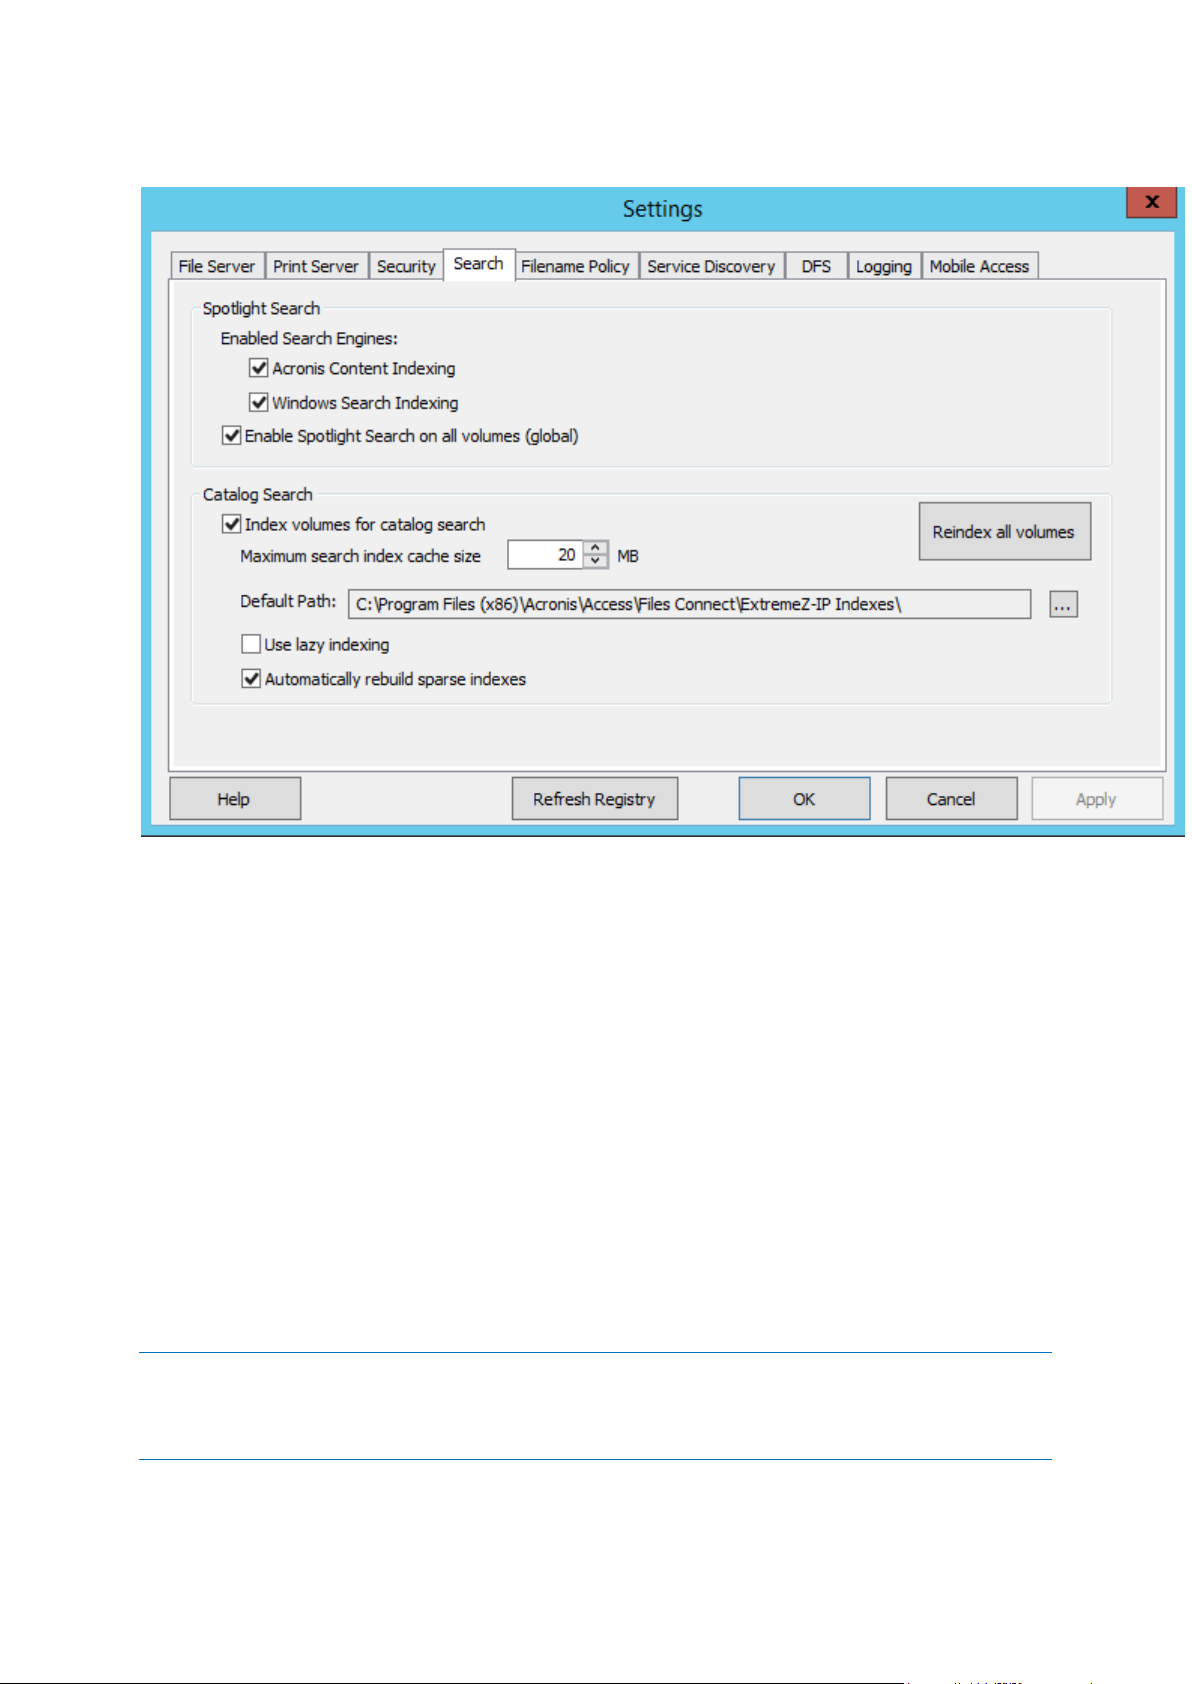
Spotlight Search
In this section
Windows Search Indexing ........................................................................ 63
Acronis Content Indexing ......................................................................... 64
Enable Spotlight Search on all volumes (global) ...................................... 64
Windows Search Indexing
For most cases, Windows Search is the default and recommended search engine. It comes built into
every modern Windows operating systems (see below for exceptions). Using Windows Search
ensures that the index is automatically kept up to date by updating the index for every change. The
main disadvantages of Windows Search are that it does not support resharing volumes on
non-Windows machines and that it has issues when working with more than a couple of million
indexed files.
Marking this checkbox will allow indexing using the built-in Windows Search. In addition to enabling
this setting, Spotlight Search requires that the Microsoft Windows Search application is installed on
the Files Connect server and is configured to index any volume where Spotlight Search is enabled.
Note: Windows Search is built into the Windows operating system starting from Windows Server 2008 and
Windows Vista. With these or newer operating systems, no additional installation is required.
On Windows 2003 Server and Windows XP, you can install it by running Windows Update. It is listed as an
optional install.
Once installed, Windows Search can be configured to index the necessary volumes by right clicking
the Windows Search icon in the Start bar and selecting Windows Search Options.
63 Copyright © Acronis International GmbH, 2002-2017
Page 64

As of Files Connect 10.5, Windows Search supports searching by Windows or Mac file tags, but
requires an add-on to be installed. To install it, do the following:
1. Navigate to your Files Connect installation folder (by default:C:\Program Files
(x86)\Acronis\Access\Files Connect\)
2. Open the AppleTagAddOn folder and run the regHandler batch file. Make sure to run it as an
administrator, to make sure that it is installed correctly.
3. It is recommended to restart the machine running Files Connect.
4. Rebuild the index for the desired volumes.
Note: You can enable or disable Spotlight searching on a per volume basis in the individual volume’s Volume
Properties dialog. See the Volume Properties (p. 112) article. You can set this property at the time of initial
volume creation or after the volume has been created. Enabling this setting takes effect for all new sessions
using the volume.
Acronis Content Indexing
Acronis Content Indexing provides Network Spotlight support for reshare volumes on non-Windows
machines (e.g. Network-attached storages (NAS')) and for StorNext volumes. It also indexes more
files than Windows Search and indexes more of the file, making it easier to search.
Marking this checkbox, will allow indexing using Acronis Content Indexing.
Acronis Content Indexing will skip the indexing of archive stub files, so you can now use this indexing
on volumes that are being archived with an Hierarchical storage management (HSM) system.
As of Files Connect 10.5 and newer, we have a new feature that continuously monitors local shares
and network reshares for changes and updates the index immediately.
Note: You can enable or disable Spotlight searching on a per volume basis in the individual volume’s Volume
Properties dialog. See the Volume Properties (p. 112) article. You can set this property at the time of initial
volume creation or after the volume has been created. Enabling this setting takes effect for all new sessions
using the volume.
Enable Spotlight Search on all volumes (global)
To support Spotlight Search on all volumes, select this box. After it has been enabled, the Acronis
Content Indexing process will begin immediately for all volumes except volumes already configured
to use Windows Search.
64 Copyright © Acronis International GmbH, 2002-2017
Page 65

Catalog Search
In this section
Index volumes for catalog search ............................................................ 65
Maximum search index cache size ........................................................... 65
Default Path ............................................................................................. 66
Use lazy indexing ...................................................................................... 66
Automatically rebuild sparse index .......................................................... 66
Index volumes for catalog search
By default, indexed searching is enabled on all existing and newly created volumes. You can disable
or enable indexed searching on a per volume basis in the individual volume’s Volume Properties
dialog in Files Connect Administrator see View the Volumes Window (p. 110). You can set this
property at initial volume creation time or after the volume has been created. In order for changes to
this setting to take effect, you must stop and restart the Files Connect File Services for Macintosh
service.
Maximum search index cache size
This cache is set to a maximum size of 20 MB by default. We do not recommend changing this cache
size. An index file containing 250,000 files is only about 8 MB in size. Leaving the cache limit at the
default setting gives sufficient performance in almost all cases. If the index files on disk are larger
than search index cache size, the file will be read from disk when the client does a search; however in
many cases the file will be in the Windows file system cache so performance impact is minimal.
When the server is running with limited physical memory, the cache size can be reduced to as little as
8 MB.
65 Copyright © Acronis International GmbH, 2002-2017
Page 66

Default Path
By default on a standalone server, Files Connect stores index files in the Files Connect Indexes
directory in the Files Connect application folder. If you would like to locate the index files in a
different location, click Browse to select a new folder.
Note: If you modify the default path while Files Connect is running, all index files for volumes without individual
custom paths are created in the new location.
Administrators can also specify custom index file paths for individual volumes; this setting overrides
the global default path setting.
Note: In a clustered environment we recommend that you set the Default Path to be a location on the shared
disk.
Use lazy indexing
By default, indexed searching uses any available system resource to keep its indexes current and
cooperates with other system processes. It should not affect overall system performance adversely.
However, when a server is under high load or is running many different services simultaneously, you
can limit the system resources that search indexing consumes by enabling the Use lazy indexing
checkbox. This setting takes effect immediately.
Automatically rebuild sparse index
In order to optimize runtime performance, the Files Connect index file entries for files that have been
deleted or moved from a volume are not physically removed from the index file at the time the
actual file is deleted. The indexed search service ignores these deleted entries to keep search results
accurate. However, the index file grows over time and, as the file gets larger, slows search
performance to a small extent. The rate at which the index file grows is dependent on the number of
files being added, moved, and deleted on the file server. In order to keep Files Connect search
performing at optimal levels, volumes’ indexes are routinely re-indexed and compacted. The interval
at which this occurs is determined by the ratio of deleted (stale) records to valid entries in the index.
By default, the Files Connect search service re-indexes an individual volume when approximately
one-third of that volume’s index file records are deleted, stale records.
Maintenance occurs on a per volume basis and only on volumes requiring re-indexing. While
re-indexing, the volume’s existing search index is kept up to date and used to provide one hundred
percent accurate search results. Re-indexing should not have any detrimental effect on other server
processes while it is running. While Files Connect is re-indexing an individual volume, a status of
“Reindexing” shows in the Volumes dialog of the Files Connect Administrator. If you prefer, you can
schedule re-indexing on a set schedule during off-hours. You can use an EZIPUTIL command,
described on the Appendices (p. 142) page used in a batch file or script and triggered by a scheduling
service of your choice. If you choose this method of scheduled re-indexing, disable automatic
re-indexing by removing the check in the Automatic rebuild of sparse indexes setting checkbox.
5.1.2.6 Setting Filename Policy
Because Files Connect sits in a key position between the file server and the Macintosh client, we can
enforce policies on valid file names as well as file types to prevent the Macintosh users from breaking
workflows. You can configure Files Connect to detect and reject the Macintosh client attempting to
save (create, rename, move) files with characters that are “illegal” in Microsoft Explorer or other
applications that don’t support the Unicode file system APIs. The administrator can configure what is
allowed or deemed illegal. This list can include characters that cannot be displayed on Windows,
66 Copyright © Acronis International GmbH, 2002-2017
Page 67

“trailing spaces” Unicode characters not available in the default Windows font, any specified
In this section
Enforce Filename Policy ........................................................................... 67
Filename Policy Violations Report ........................................................... 67
Apply policy to all volumes ...................................................................... 68
Limit error messages to clients to one every ........................................... 68
Log failures to Windows Event Log every ................................................ 68
Custom message on error ........................................................................ 68
Do Not Allow ............................................................................................ 68
character, file names longer than “x” characters, or specific file extensions. Filename Policies do not
affect existing files on the server or files that are copied using Windows file sharing.
Enforce Filename Policy
Checking this setting will allow you to enforce filename policies set in Files Connect.
Filename Policy Violations Report
A report listing all existing files and folders that violate the presently configured filename policy can
be created by clicking the Generate button. A confirmation dialog box will appear and allow you to
access the folder containing the report’s output. This folder will contain a Report Summary text file
and individual, comma-seperated summary files for each Files Connect volume on the server. These
CSV files can be viewed in a spreadsheet application or text editor.
67 Copyright © Acronis International GmbH, 2002-2017
Page 68

Apply policy to all volumes
You can enforce filename policies globally or on a per volume basis. A globally enabled feature takes
precedence over a pervolume setting. Checking this setting applies filename policies across all Files
Connect volumes and overrides individual volume policy settings.
Limit error messages to clients to one every
Checking this setting limits the number of error messages to one for each client at the specified time
interval. You can set the time interval.
Log failures to Windows Event Log every
If you check this setting, the server will log errors to the Windows Event Log at the specified time
interval.
Custom message on error
Note: Mac OS X 10.9 and later does not support sending messages.
You can specify a custom message that will be appended to the standard filename policy error
messages. For example: “This action violates company policy regarding filenames.” would lead to the
following message being sent to the user: “File ‘foo.mp3’ cannot be created because the ‘mp3’
extension is not allowed. This action violates company policy regarding filenames.”
Do Not Allow
In this section, set characters, filenames, and extensions that your Macintosh users will not be able
to save to your file server.
Characters illegal in Windows file or folder names — If you check this setting, users cannot save
files with names that include characters illegal in Windows. The characters are / ? < > \ : * | and
trailing spaces and trailing periods.
Characters Not Displayable in Windows Explorer — If you check this setting, users cannot save
files with names that include characters that cannot be displayed in the font used by Windows
Explorer (the default is Tahoma).
Custom error message - Custom message that will be added to the built-in description for each
error.
Specific Characters - You can specify additional characters that you do not want users to include
in filenames. Type the characters in this field without separators.
File names over —You can limit file names to a specified number of characters.
Folder names over —You can limit folder names to a specified number of characters.
File Paths longer than - You can limit the path length to a specified number of characters.
Note: The limit will be the entire Windows file path as it resides on the server. The file paths may appear
shorter to the Mac clients.
Extension —You can restrict users from saving specific file extensions, such as mp3, mov and wav,
by typing in the extension without the (.) dot precursor and clicking Add. To remove extensions
from the list, highlight the extension and click Remove.
68 Copyright © Acronis International GmbH, 2002-2017
Page 69

5.1.2.7 Service Discovery
In this section
Server Name ............................................................................................. 69
AppleTalk .................................................................................................. 70
Bonjour ..................................................................................................... 70
Web Service ............................................................................................. 70
Port ........................................................................................................... 70
Register with Master Server .................................................................... 70
Location .................................................................................................... 71
Description ............................................................................................... 71
SLP ............................................................................................................ 71
Register Service Connection Point ........................................................... 71
Macintosh clients can use a number of different protocols to discover an Files Connect server,
depending on what operating system is being used and how the administrator configures the
server. Select the network protocols you want the server to use to register with—AppleTalk, Bonjour,
Zidget/HTTP, or SLP— by placing a check in the appropriate checkboxes. The protocols available for
discovering file, print, and DFS resources can be configured independently.
Server Name
The Server name appears in the login window whenever a Macintosh user connects to the server.
This name also appears in the Mac OS X Connect to Server dialog and on earlier Mac OS systems in
the Chooser and the Network Browser when Macintosh users browse the network. You may change
the name; use uppercase and lowercase text.
69 Copyright © Acronis International GmbH, 2002-2017
Page 70

AppleTalk
The AppleTalk protocol is primarily used by the Mac OS 9 Chooser. When AppleTalk is selected, Mac
OS 9 users can see volumes and print queues in the Chooser without specifying the IP address, and
Mac OS X users can see them in Connect to Server and Add Printer dialogs. To register the server on
AppleTalk, the protocol must be installed on the Windows server. Windows XP, Vista, and Windows
2008 Servers do not include AppleTalk support.
Bonjour
Bonjour allows Mac OS X users to see volumes in the Connect to Server dialog and print queues in
the Print Center.
Web Service
The Mac Client and the Files Connect Zidget both use the web service's address in order to function.
The Mac Client is the new app for Files Connect that makes it easy for users to connect to all the
necessary resources and also has a powerful search engine.
The Zidget is a replacement for AppleTalk and Bonjour service discovery that works across subnets
without your having to configure your router. The Zidget uses XML over HTTP to retrieve a list of Files
Connect servers and their Print Queues from a Master Files Connect server. If there is a DNS entry in
the default domain for ExtremeZIPServerList, the Zidget asks that server for a list of all the Files
Connect servers on the network. They then query each server individually for its default zone or
location and any print queues that it hosts.
Because the Files Connect Zidget uses standard HTML and XML, the administrators can use this
protocol to create their own web interfaces as well. More details about how to do this can be found
in the Zidget section of the manual.
Port
Enter the port used for client server communication between the server and the Mac client or Zidget.
On Files Connect 10.5 and newer, you can also select a certificate to be used for the newly added
HTTPS port.
Note: Even if you turn off Zidget/HTTP Files Connect still uses this port to support the legacy Files Connect Print
Components and Print Accounting. Only the new features are disabled.
Register with Master Server
This setting should be enabled only on Slave servers in order to register them with the Master server.
By enabling the Register with Master server checkbox, you are turning this server into a Slave to the
server whose address you enter. The Master server will have its table of servers automatically
populated for every Slave server that is registered this way.
The Mac Client and the Zidget support connecting to a single Master server to discover the other
Files Connect servers on the network.
70 Copyright © Acronis International GmbH, 2002-2017
Page 71

Location
This field specifies the location of the server. It is similar to an AppleTalk zone, but allows for
multi-level hierarchies. The location is also the default location of print queues on the server, but you
can assign a different location on a queue by queue basis. Zidget groups the AFP Server and print
queue display based on location. If you want to have a hierarchy of locations, such as 1100 N. Glebe
RD, Arlington, Virginia, enter the locations separated by colons (“Virginia:Arlington:1100 N. Glebe
RD”).
Description
The optional description for the server. Zidget displays this description when the user selects a file
server.
SLP
With SLP, Mac OS 9 users can see volumes and print queues in the Network Browser. Type the name
of the SLP scope (or Neighborhood) in which you want the file server to appear when Mac OS 9
clients use the Network Browser. Type a host name, which is the name of the server provided to
Macintosh clients when they use the Network Browser.
Register Service Connection Point
This option allows Files Connect to publish its existence using a Microsoft Service Connection Point
(SCP). This technology is used to locate and contact other Files Connect servers in your Active
Directory.
5.1.2.8 Setting Mobile Access
The Mobile Access feature allows Acronis Access mobile users to access your Files Connect Volumes,
including the ability to view, upload, sync, annotate and edit files from within the Acronis Access
mobile app.
Note: This feature is not yet supported on clustered versions of Files Connect.
Note: Volumes defined as Time Machine volumes and volumes that are configured as AFP Home Directories
will NOT be shared out by the Mobile Access Gateway.
Enable access to Volumes from Acronis Access mobile apps - When enabled, Acronis Access mobile
clients will be able to navigate to and access Files Connect Volumes. This setting is affects all
volumes.
Mobile Gateway Connection Options
Address – Network IP address for the mobile access gateway service. This is also the address that the
mobile clients will connect to.
Port - Network port that the mobile access gateway service will run on. The default port is 443. If you
change the port, you will need to enter it at the end of the Gateway address when connecting from a
mobile device.
71 Copyright © Acronis International GmbH, 2002-2017
Page 72

Certificate – Choose an SSL or self-signed certificate for the mobile access gateway service. You can
In this section
Namespaces ............................................................................................. 72
Target Servers .......................................................................................... 73
choose a certificate from the Microsoft Windows Certificate Store.
5.1.2.9 DFS
Files Connect can be configured to make a Microsoft Distributed File System (DFS) available to
Macintosh clients. In addition to the server side configuration, installation of the Files Connect Mac
Client or the Zidget dashboard widget (for Mac OS X 10.4 or later). Details on the required client side
configuration can be found in the The Mac Client (p. 13) and Installing and Configuring the Zidget
Client (p. 83) articles.
DFS support also requires two settings on the Security tab of the Settings dialog. Valid Directory
Services credentials must be entered and Support UNIX Permissions and ACLs must be enabled for
DFS to function.
Namespaces
To add a namespace, click the Add button. You will be prompted to enter the path of your DFS
namespace. Files Connect will attempt to verify that the DFS namespace entered is valid. If it is not
valid, you will be prompted to correct the DFS namespace path.
Files Connect will automatically create a DFS virtual root volume in the ‘Files Connect DFS Volumes’
folder, located in the Files Connect program directory. This volume will contain links to target servers
in the DFS namespace and will be added as a shared volume with a volume name matching your DFS
72 Copyright © Acronis International GmbH, 2002-2017
Page 73

domain or host server name. The location where DFS virtual root volumes are created can be
modified by selecting Advanced on the DFS settings tab.
You are returned to the DFS tab, which is updated with the newly added namespace’s information.
You will find your namespace listed on the left and the target servers in that namespace listed on the
right. The Valid column in the Namespaces list will indicate if the namespace was successfully
validated. DFS namespaces can later be removed by selecting the namespace and clicking the
Remove button.
Target Servers
The protocol used by Macintosh clients to connect to each target server can be configured on a per
target server basis. When a namespace is first added, Files Connect will attempt to detect, for each
target server in the namespace, whether it supports the AFP protocol. If AFP is supported, the target
server will be set to AFP by default. If AFP support cannot be confirmed, the target server will be set
to OFF. Links to target servers set to OFF will not be visible to Macintosh clients in the DFS volume(s).
If you would like Macintosh clients to connect to a target server using SMB, you can select the SMB
option for each individual server. If you later install Files Connect on a target server, you can return
to the DFS settings tab and select AFP for that server.
5.1.2.10 Logging
Files Connect allows the customization and configuration of it’s logging functionality and it’s ability to
generate Windows Error Reports.
73 Copyright © Acronis International GmbH, 2002-2017
Page 74

5.1.3 Configuring Network Reshare support
In this section
Introduction ............................................................................................. 74
A common use case: AFP access to NAS storage ..................................... 74
Requirements ........................................................................................... 74
Recommendations ................................................................................... 75
Limitations ................................................................................................ 75
Initial Network Reshare configuration ..................................................... 76
Network Reshare and Kerberos authentication ...................................... 79
Network Reshare volume configuration .................................................. 81
5.1.3.1 Introduction
Files Connect has traditionally only included the ability to share files and folders located on the
Windows server where Files Connect is installed, or on storage that is directly attached to that server.
A folder within this local storage can be selected as an Files Connect volume and made available to
Macintosh users as a standard Mac AFP file share.
With the introduction of “Network Reshare” in version 8.0, Files Connect now includes the ability to
create file share volumes that point to folders located on other servers and NAS devices on your
network. Macintosh clients continue to connect to Files Connect using the standard AFP file sharing
protocol, while Files Connect utilizes the SMB/CIFS file sharing protocol to access files that are
requested by Mac users from remote servers and NAS systems. By doing so, Mac users retain all the
benefits of AFP file sharing while gaining access to resources that have traditionally only been
available through SMB/Windows file sharing.
Files Connect Network Reshare allows access to both standard SMB/CIFS file shares, as well as
Distributed File System (DFS) file shares. More details on Network Reshare of DFS resources can be
found in the Knowledge base article here.
5.1.3.2 A common use case: AFP access to NAS storage
A common real world Network Reshare use case involves Mac access to NAS storage, such as NetApp
NAS systems. Most NAS systems do not include the ability to host AFP file shares. Mac users are left
with no choice but to connect to NAS file shares using the native OS X SMB client. This typically
results in suboptimal file browsing, transfer, and search performance, along with frequent Mac
application incompatibilities, file name issues, file corruptions, etc.
Using Network Reshare, file shares on NAS systems can be made available to Macs through a
Windows server running Files Connect. Macs connect to Files Connect AFP file shares and Files
Connect interfaces with the NAS system through the NAS’s existing SMB/CIFS file shares. In this way,
incompatibilities and issues on the Mac side are addressed by allowing native AFP access and Files
Connect’s uses Windows server-side SMB access to NAS storage, which provides improved
performance and throughput compared to Mac SMB client access. As a result, the performance of
Mac AFP file share access though Files Connect to NAS storage is most often better than that same
Mac accessing the same NAS files directly over SMB.
5.1.3.3 Requirements
Windows 2003 Server, Windows 2008 Server (including R2 versions) or Windows 2012 (including
R2 versions) Server.
74 Copyright © Acronis International GmbH, 2002-2017
Page 75

Note: If using Windows 2008 R2, make sure to install this MS
hotfix: http://support.microsoft.com/kb/2647452 http://support.microsoft.com/kb/2647452
Files Connect Server 8.0 or later.
Files Connect trial license or Enterprise License Program (ELP) license.
The Network Reshare capability allows a single Files Connect server to give AFP file access to many
additional file servers or NAS systems. This feature is only enabled in Files Connect trials
http://www.grouplogic.com/enterprise-file-sharing/mac-windows-file-sharing/free-trial.html and on
Files Connect Enterprise License Program
http://www.grouplogic.com/enterprise-file-sharing/mac-windows-file-sharing/pricing-options.html (
ELP) annual subscription licenses. This licensing option allows Files Connect to be installed on an
unlimited number of servers in your enterprise, as well as to create Network Reshare volumes.
5.1.3.4 Recommendations
Files Connect Server Network Interface Card Performance
Network Reshare routes all communication between your Mac clients and your file server or NAS
storage through the Windows server where Files Connect is installed. Installing Files Connect on a
server with the fastest available NICs, and ideally one or more dedicated NICs for communicating
with the servers or NAS being reshared, will result in the highest level of performance.
Windows 2008 and SMB v2
While Network Reshare is compatible with Windows 2003 and 2008, the SMB v2 protocol supported
by Windows 2008 consistently demonstrates higher levels of performance. Installing Files Connect on
a Windows 2008 server and using remote storage that is running Windows 2008, or a NAS operating
system that supports the SMB v2 protocol, will result in the best file sharing throughput for Mac
users.
Kerberos for Files Connect Network Reshare
In order to support Kerberos logins you will need configure Active Directory to “Trust this computer
for delegation”. More information can be found in the following article Network Reshare and
Kerberos authentication (p. 79)
5.1.3.5 Limitations
To support real-time indexed filename search, Files Connect requires file system notifications
provided by Windows in order to keep its search index up to date when files change. These
notifications are not available over the SMB connection Files Connect uses to access file servers
and NAS systems being reshared. For this reason, traditional index-based filename search is
disabled on Network Reshare volumes. Files Connect 9.0 introduces a new Acronis Content
Indexing option. This indexing is performed based on a defined schedule, rather than tracking
real-time changes. With this option enabled, users can take advantage of fast indexed filename
searches.
To support full content Network Spotlight search, Files Connect utilizes either the Window
Search index maintained by the Windows Search service on the server Files Connect is installed
on, or the Acronis Content Indexing service. Windows Search can be configured to index remote
shares that are hosted on a Windows Server that has Windows search installed and indexing.
Acronis Content Indexing can be configured to index any remote shares, even those residing on a
non-Windows server or NAS.
If Network Spotlight search, either using Windows Search or Acronis Content Indexing, is not
enabled, Macs searching Files Connect Network Reshare volumes will receive search results
75 Copyright © Acronis International GmbH, 2002-2017
Page 76

based on filename, but searches will take additional time to complete compared to searching
indexed local volumes.
Finder color labels may be removed when saving/overwriting a file on an Files Connect
Windows 2003 Network Reshare volume
If Files Connect server is installed on Windows 2003, opening and then saving an existing file that
exists in a Network Reshare volume may result in the Finder color label on that file being
removed.
It is required for the Files Connect service account to have unlimited rights in the file system as it
is necessary in order to properly work with files and their metadata, including security
descriptors. If the necessary rights are not given, you may encounter the
"ERROR_INVALID_OWNER" error.
5.1.3.6 Initial Network Reshare configuration
Files Connect runs as a standard Windows service on the Windows server it is installed on. By default,
the Files Connect service runs in the context of the Windows local SYSTEM account. By acting as this
account, Files Connect has access to the files and folders in Files Connect volumes that are located
directly on the server’s storage.
When Files Connect is configured with Network Reshare volumes, it also needs access to the files and
folders on the remote file servers and NAS devices that are being reshared. In order for Files Connect
to be allowed access to these files, the Files Connect service must be reconfigured to run in the
context of an Active Directory (AD) user account that has Administrator access to the local Windows
server and Full Control access to any necessary file shares that exist on remote servers or NAS
systems being reshared.
Note: On the machine running the Files Connect service, you must not have a local account with the same name
and password as the Active Directory account used by the Files Connect service.
If you’re using Windows 2008 R2, ensure you’ve installed this Microsoft hotfix. It addresses an issue
that is directly related to Windows functionality used by Files Connect Network Reshare. Hotfix
link:http://support.microsoft.com/kb/2647452 http://support.microsoft.com/kb/2647452
To configure Network Reshare:
1. Ensure you’ve upgraded to Files Connect version 8.0 or later and have launched the Files Connect
Administrator application at least once and allowed the Files Connect service to start up.
2. Configuring the Active Directory account which will handle authentication for Files Connect:
a. In Active Directory: Create or identify an AD user account that will handle authentication for
Files Connect. Ensure the AD account used is dedicated to this Files Connect server, has a
fixed password, is not subject to group policies for password expiration and is a subject to any
domain group policy necessary to grant the rights to "Act as part of the operating system"
and "Log on as a service".
b. On the Files Connect Server: Add the dedicated Files Connect user account to the local
Windows server Administrators group. This user needs Full Control permissions to the
C:\Program Files (x86)\Group Logic\Files Connect folder and to any locally shared volumes.
c. On remote shares: The dedicated Files Connect account needs Full Control access to the
remote shared volumes as defined in NTFS or NAS device permissions.
Note: On the EMC Isilon, true 'Full Control' requires granting the service account the Isilon right "Run as
root".
76 Copyright © Acronis International GmbH, 2002-2017
Page 77
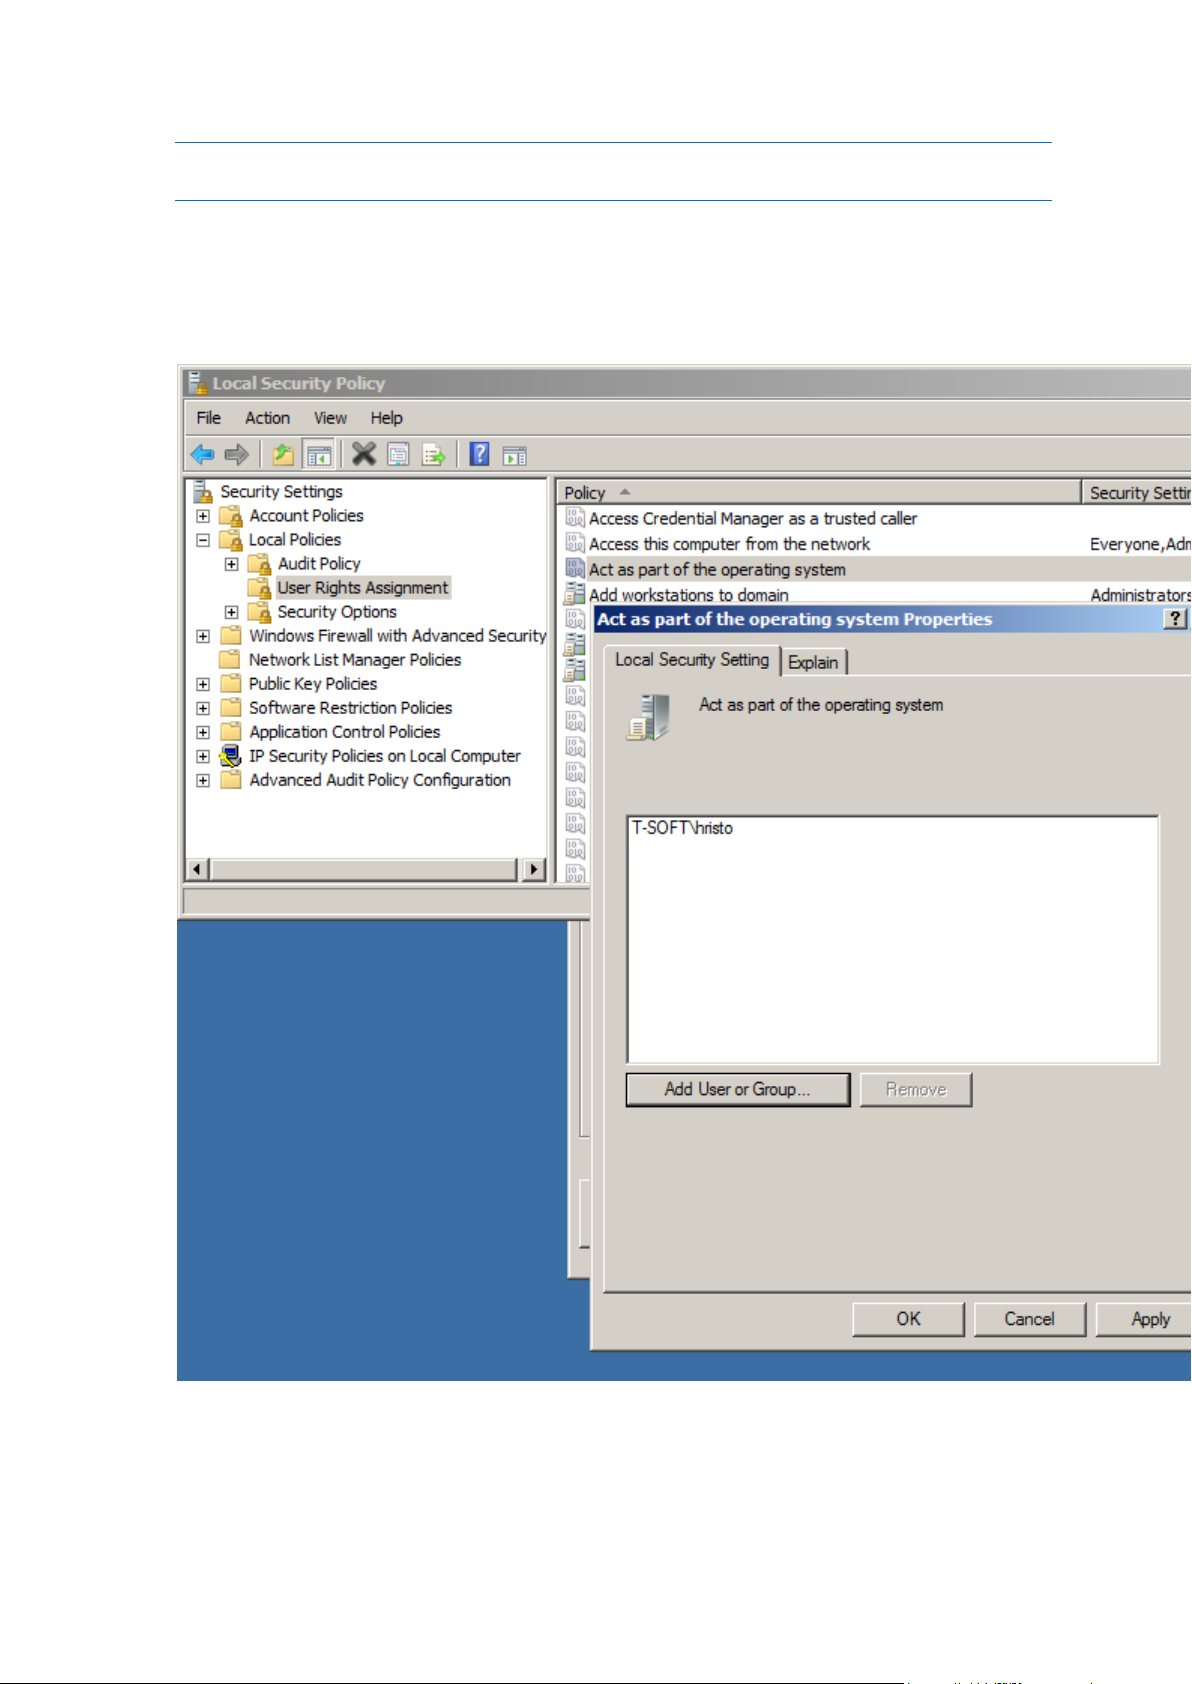
Note: On NetApp, true 'Full Control' requires the service account to be part of NetApp's "Administrators"
group.
3. Add the selected user to the Windows server’s local security policy
a. From Administrative Tools on the Start menu, open Local Security Policy. This policy is
found under Security Settings -> Local Policies -> User Rights Assignment section.
b. Double click “Act as part of the operating system” and add the chosen user. You may have to
reboot Windows for this setting to take effect.
4. Open the Services control panel.
5. Open the Extreme-Z IP File and Print Server for Macintosh service’s properties by right clicking on
the service from the Services control panel.
a. Select the “Log On” tab and choose the “This account” radio button.
77 Copyright © Acronis International GmbH, 2002-2017
Page 78
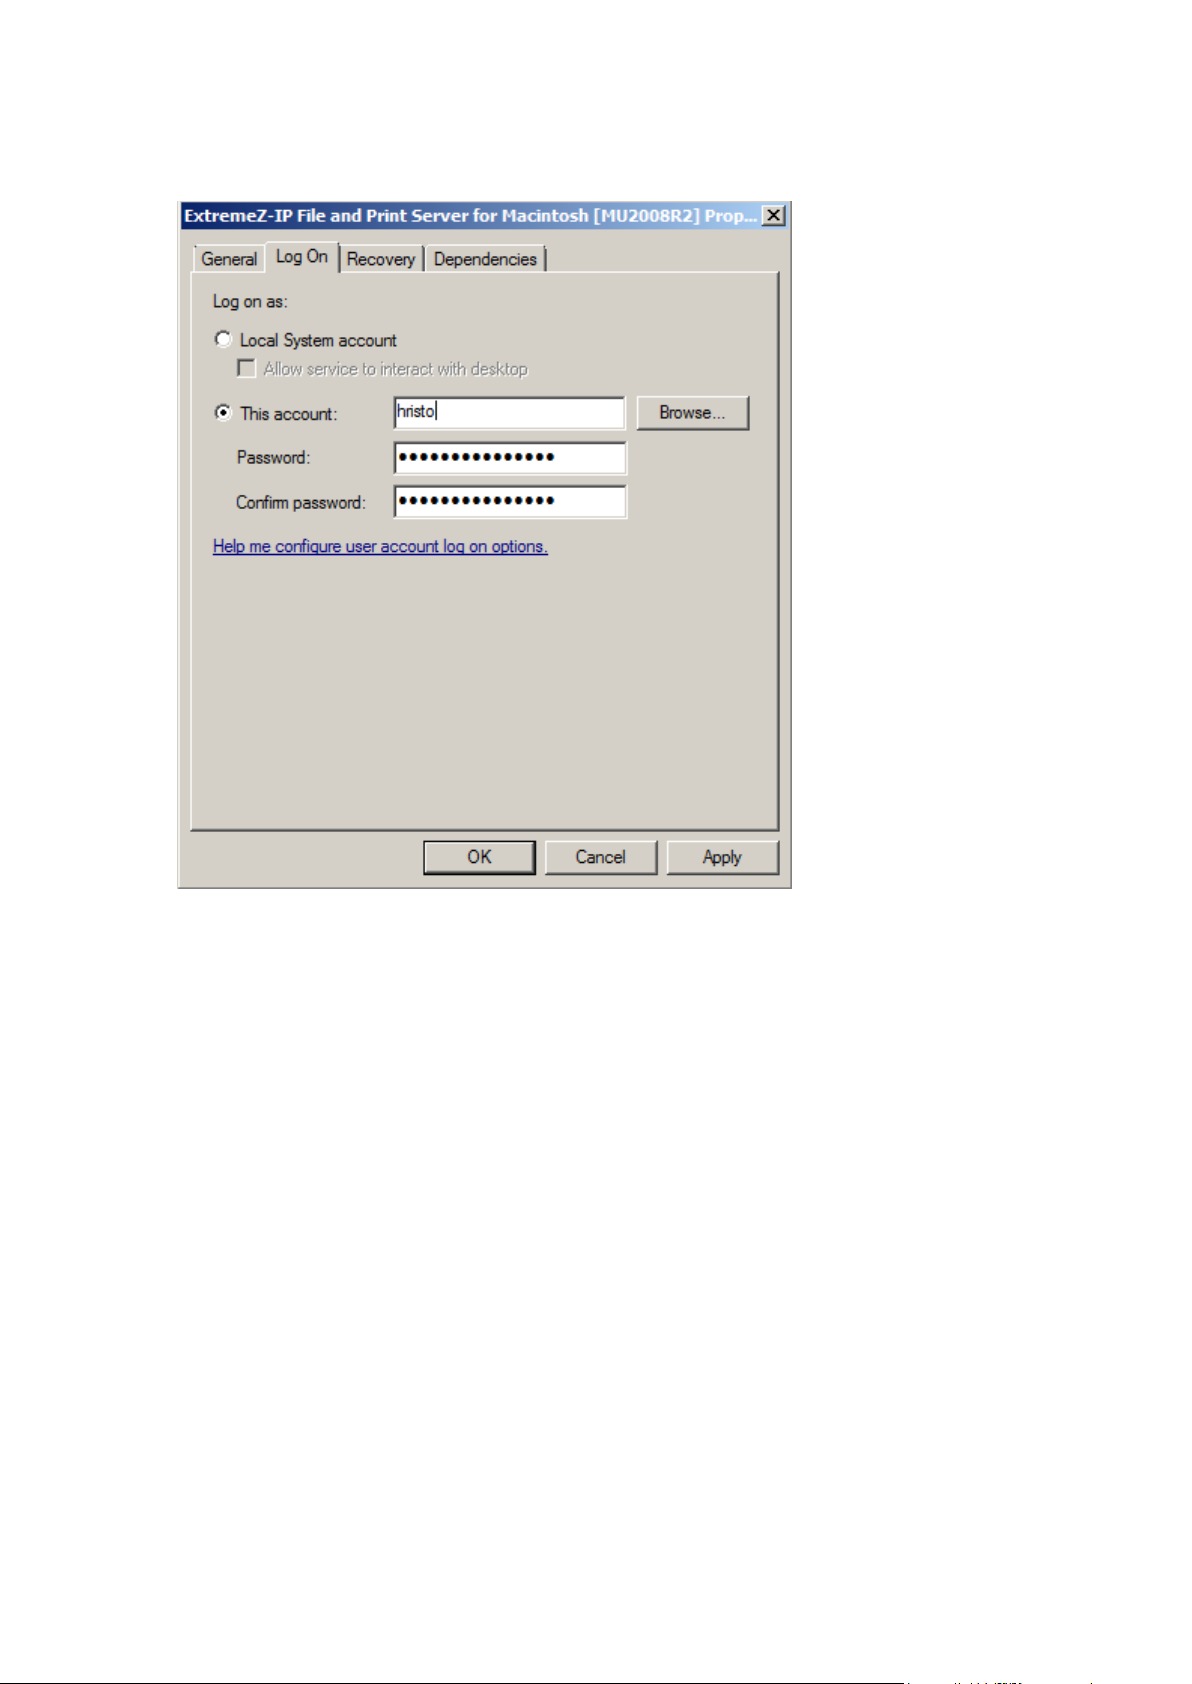
b. Configure the service to log on as the same AD service account used in step 3. Keep
the Services control panel open. You will need it again in step 7.
6. Turn on Network Reshare support
a. Start the Files Connect Administrator application.
b. Click the Settings button.
c. Open the File Server tab.
d. Select the Enable Network Reshare support checkbox.
e. Click OK.
78 Copyright © Acronis International GmbH, 2002-2017
Page 79

f. Press the Close button to close the Files Connect Administrator.
7. In the Services control panel restart the Extreme-Z IP File and Print Server for Macintosh service.
5.1.3.7 Network Reshare and Kerberos authentication
In order for Mac users using Kerberos to access SMB/CIFS reshares through Files Connect, delegation
must be enabled in Active Directory. If your environment requires Kerberos authentication, you will
need to update the Active Directory computer object for any Windows servers that are running Files
Connect. The Files Connect server must be given permission to present delegated credentials to the
SMB server on behalf of your users.
The Kerberos protocol will not function properly if your service is installed on the Domain
Controller. As such, we do not recommend installing Files Connect on the Domain Controller if
you wish to use Kerberos for Single Sign-on or just authentication.
To enable Kerberos authentication:
1. Open Active Directory Users and Computers and locate the Windows server that you have Files
Connect installed on. It is commonly found in the Computers folder.
Note: If the computer object for the server that is running Files Connect is not located in the default
“Computers” container in Active Directory, it is necessary to edit the ActiveDirectoryComputers registry key
(p. 152) so the Files Connect service can construct the correct distinguished name for the Files Connect
server's computer object.
79 Copyright © Acronis International GmbH, 2002-2017
Page 80

Once the key is configured, restart the Files Connect service and proceed with the steps below. If the Files
Connect server's computer object is in the default “Computers” container, there is no need to configure this
key and you can proceed with the steps below.
2. Right-click on the Files Connect server and select Properties.
3. Open the Delegation tab.
4. Select “Trust this computer for delegation to specified services only”.
5. Select “Use any authentication protocol”, this is required for negotiation with the SMB server.
6. You must now add any Windows servers or NAS devices that you would like your users to be able
to access through reshare. Click Add… to search for these Windows computers in AD and add
them. Select only the “cifs” service type.
7. Repeat these steps for all Files Connect servers for which you want to enable Kerberos
authentication.
Note: It may take 15 to 20 minutes for these changes to propagate through the Active Directory forest.
Configurations for the Files Connect dedicated AD account:
Configuring the permissions
1. Open Active Directory Users and Computers and locate the Files Connect dedicated account
object.
2. Right-click on it and select Properties.
3. Open the Security tab and press Advanced.
Note: The Security tab may not appear until Active Directory Users & Computers > View > Advanced
Features is enabled
4. Enter the name of the Files Connect dedicated account object and press OK.
5. Press Add and enter the name of the dedicated account object again and press OK.
6. On the Permissions Entry For window, select This object only for the Apply to field.
7. Select the Allow box for Write All properties and press OK.
8. Close all open dialogs by pressing OK.
9. Restart the Files Connect File and Print Server service.
10. Make sure that the Allow Kerberos Logons checkbox is enabled before proceeding with the next
section. You can find it in the Files Connect Administrator - > Settings -> File Server.
Configuring the delegation
1. Open Active Directory Users and Computers and locate the Files Connect dedicated account.
2. Right-click on it and select Properties.
3. Open the Delegation tab.
4. Select the Trust this user for delegation to specified services only radio button and the Use any
authentication button.
5. Press Add and enter the name of the machine where Files Connect is installed.
6. Select cifs and press OK.
7. Press Apply and close all remaining dialogs.
80 Copyright © Acronis International GmbH, 2002-2017
Page 81

5.1.3.8 Network Reshare volume configuration
To configure a Network Reshare volume:
1. Launch the Files Connect Administrator application.
2. Click the Volumes button and the then click Create.
3. Click On another server. If you are not shown an option to choose On another server, you may
be running a standard Files Connect retail license rather than the required Enterprise License
Program (ELP) license.
4. Enter the UNC path of the SMB/CIFS file share that you would like to reshare as an Files Connect
volume, then click OK. This UNC path is in the typical \\servername\sharename format. An
example is: \\nas.mycompany.com\myshareDistributed File System (DFS) UNC paths can also be
entered for Network Reshare volumes. DFS target resolution will all occur in the SMB reshare
layer and Macs will be able to seamlessly browse and access the reshared DFS resource. For
more details on DFS with Network Reshare, see our Accessing DFS files using Files Connect
Network Reshare article.
5. In the Volume Properties dialog, modify the Volume Name if desired and click OK.
Note: If you receive an error stating that “The specified path is not available.” you may have entered an invalid
UNC path, or the user account you selected in the Initial Network Reshare configuration steps above may not
have Full Control access to this file share at this UNC path. If this is a Windows file share, ensure this user
account has both “Sharing” and “Security” permissions to the file share.
5.2 Administering Files Connect remotely
You can configure Files Connect on a remote computer if Files Connect is already installed on that
computer. You must have Windows Administrative privileges on the remote computer. The
experience of administering a remote server is very similar to that of the local server Administrator,
except that the title of the Administrator dialog box shows the name or IP Address of the
remote computer whose Files Connect service you are configuring and you cannot browse for folders
to share. Otherwise, you can configure the remote server just as you would a local server.
To administer a remote Files Connect server, do the following:
1. Hold down the Control key while you launch the Files Connect Administrator. Alternatively, if
there is no local installation of Files Connect, Files Connect Administrator will start immediately
in remote mode.
2. Type the name or IP Address of the remote computer and click OK.
3. The Administrator will attempt to use your Windows credentials to log onto the server. If
necessary, you will be prompted for an alternate username and password.
81 Copyright © Acronis International GmbH, 2002-2017
Page 82

5.3 Configuring Client Computers to Print to Files
In this section
Files Connect Zidget ................................................................................. 82
Connect
To make use of Files Connect printing, clients follow specific steps depending on their operating
system. Once you add print queues through the Files Connect Administrator Print Queues dialog box,
they are immediately available for clients to print to them. Printer Browser installers for Macintosh
clients are copied onto your server’s drive when you install Files Connect. Macintosh clients can copy
to their computer, and install, an operating system specific Printer Browser installer from the Files
Connect server. It is also possible to use Apple Remote Desktop to deploy the installer packages to
multiple Macintosh computers.
A Macintosh user can select an Files Connect queue to print to in a number of ways, depending on
the operating system they are using and the functionality they need. When using Mac OS X, the
following are the primary ways to set up a printer:
Files Connect Zidget supports discovering printers across subnets, automatic PPD download, and
adding queues that have been set up to require Print Accounting codes if the Macintosh also has
the optional Files Connect print components on it. It is also available from inside any application,
therefore; you can set up a printer when you need to print without leaving your current
application. The slight downside is that you must install it on each Macintosh. Although simple to
install, it does require additional work.
Bonjour discovery from within the print window of an application has the advantage of being
built-in to Mac OS X. The native Mac OS X Bonjour discovery is also very simple to use. The
disadvantage of Bonjour is that it does not support automatic PPD download or Print Accounting
queues.
Files Connect Printer Browser works from within the Apple Printer Setup Utility. It supports
automatic PPD download from the server and can be used to add queues that have been set up
to require Print Accounting codes. The disadvantage to the custom Files Connect print
components is that they have to be installed by someone with administrator rights on the
client computer either manually or with Apple Remote Desktop. It also requires more training
than the Zidget does.
When using Mac OS 9, there are two options for setting up a printer:
The built in Chooser desk accessory can use AppleTalk to locate and set up the printer.
Note: AppleTalk is not installed by default on Windows servers.
Files Connect Choose IP Printer is an optional install that supports faster printing. It uses the SLP
and TCP/IP protocols.
The advantages and disadvantages are similar to the ones stated above for Mac OS X. The built-in
Chooser is simple and well understood by Macintosh users, but the custom client has more features
and is several times faster than printing with AppleTalk.
5.3.1 Files Connect Zidget
The Files Connect Zidget is a new way of connecting to Files Connect file and print servers. Zidget is a
Dashboard Widget that the Macintosh user can use to discover and connect to a file server whether
82 Copyright © Acronis International GmbH, 2002-2017
Page 83

or not the server is in the user’s local subnet. Zidget also allows the Macintosh user to browse DFS
namespaces that are shared through the Files Connect server. Using Zidget, the Macintosh user can
also browse for and add Files Connect printers. Zidget will automatically download the PPD for the
printer, and set up the print queue without the user having to use the Print Center.
The Zidget can also be used to add queues on the print server that receive jobs directly, or direct
print printers that are advertised by the Files Connect server but do not route jobs through the print
server. Zidget contacts a server called the Files Connect master server to retrieve a list of all the Files
Connect servers in your organization. It then contacts each of those servers to find out whether they
are just file servers or if they also are print servers. If the server is a print server it then retrieves a list
of all the print queues on that server. The servers as well as individual print queues can be assigned
to locations or zones. Once the Zidget has retrieved information from all the servers it merges them
into a list of locations for the user to choose from.
Although many customers may choose to mimic their existing AppleTalk zone structure, they can also
use a more complex location-based method for organizing their print queues. For that matter, they
can use any other hierarchical arrangement they would like, such as Color and Black and White. The
location-based method can be hierarchical such as building, floor, and room.
5.4 Installing and Configuring the Zidget on the Client
In order to make deployment of the Zidget as easy as possible, it can be downloaded directly from
the HTTP server that is built into Files Connect. You can link to the URL for the Zidget from any web
page, send it in an email, have users manually type it into a web browser, or distribute it any other
way that you see fit. The Zidget could also be made part of the standard corporate deployment or
installed in /Library/Widgets on multiple Macintoshes using technologies such as Apple Remote
Desktop. If you have not already installed Zidget, the Files Connect server lets you download Zidget
directly from the URL http://yourserver:8081 http://yourserver/.
Because the Zidget is HTTP based, it is trivial to add a Download Zidget link to your company’s
intranet or support website. If the Zidget is downloaded by Safari, the download will automatically
present the user with a dialog asking them if they want to install it. By default, Zidget will resolve
ExtremeZIPServerList.yourdomain.com in DNS in order to find the Master Server from which it will
retrieve a list of the available printers and file servers. If you are using the default setup and have
created this DNS CNAME record to point to your Files Connect server, no further steps are required
on the Macintosh to configure the Zidget after it has been installed.
83 Copyright © Acronis International GmbH, 2002-2017
Page 84

To install Zidget on a Macintosh client, do the following:
1. In a web browser such as Safari, navigate to the Files Connect server
(e.g. http://your-server:8081 http://your-server:8081/).
2. Click on the Download Zidget link. The file Zidget.wdgt.zip will be downloaded.
3. Click Install to confirm the dialog asking if you want the Zidget installed (if you have not disabled
auto installation of widgets in Safari).
4. If your Master Server is something other than the default ExtremeZIPServerList, click the “i” icon
to modify this setting. The Refresh Interval determines how often the available file servers,
printers, and DFS namespaces in the Zidget are refreshed.
84 Copyright © Acronis International GmbH, 2002-2017
Page 85

In this section
Adding a printer with the Zidget .............................................................. 85
Mounting Files Connect shared volumes with the Zidget ....................... 86
Mounting DFS shared volumes with the Zidget ....................................... 86
Printer Setup Utility ................................................................................. 87
Using Bonjour Within the Print Dialog ..................................................... 89
Using Print Accounting Features from a Client ........................................ 98
5.4.1 Adding a printer with the Zidget
To add a printer with Zidget, do the following:
1. Press the F12 key to invoke Dashboard.
2. Select the Files Connect Zidget.
3. Double-click a location/zone if necessary.
4. Select a printer from that location/zone.
5. Click the Add Printer button and the printer will be created on the Macintosh with the proper
PPD if one is available from the server.
85 Copyright © Acronis International GmbH, 2002-2017
Page 86

6. The status section of the Zidget updates to say the printer was successfully created.
5.4.2 Mounting Files Connect shared volumes with the Zidget
To mount a shared volume with the Zidget:
1. Press the F12 key to invoke Dashboard.
2. Select the Files Connect Zidget.
3. Double-click a location/zone if necessary.
4. Select a server from that location/zone.
5. Click the Connect to Server button.
5.4.3 Mounting DFS shared volumes with the Zidget
To mount a DFS shared volume:
1. Press the F12 key to invoke Dashboard.
2. Select the Files Connect Zidget.
3. Double-click the DFS domain or server, in this example GROUPLOGIC.
86 Copyright © Acronis International GmbH, 2002-2017
Page 87

4. Double-click the DFS root, in this example ProductionDFS.
In this section
Adding a Printer using the optional Files Connect Print Components .... 87
Adding a Printer using Bonjour from the Printer Setup Utility ................ 88
5. Select a DFS target.
6. Click the Connect to Server button.
5.4.4 Printer Setup Utility
You can add an Files Connect print queue from the Printer Setup Utility in two ways. The most
common way is to use the optional Macintosh print components that come with Files Connect.
However, if you do not want to install any additional software on the Macintosh, you can use the
built-in Bonjour browse capability to add a printer.
5.4.4.1 Adding a Printer using the optional Files Connect Print
Components
If you have installed the Macintosh Print Components on the Macintosh, you can use the custom
Files Connect Printer
To use the Files Connect components to add a printer, do the following:
1. Use the Printer Browse Module (PBM) to locate an Files Connect print queue.
87 Copyright © Acronis International GmbH, 2002-2017
Page 88

2. Select ExtemeZ-IP Printers on the pop-up list. A list of the Files Connect Printers on the network
appears.
3. Select the queue you want to use.
4. Click Add.
5.4.4.2 Adding a Printer using Bonjour from the Printer Setup Utility
To add a printer using Bonjour from the Printer Setup Utility, do the following:
1. Open the Printer Setup Utility or the Print & Fax System Preferences pane depending on what
version of Mac OS X you are using.
2. Choose Add.
3. Pick your printer from the Printer Browser.
88 Copyright © Acronis International GmbH, 2002-2017
Page 89
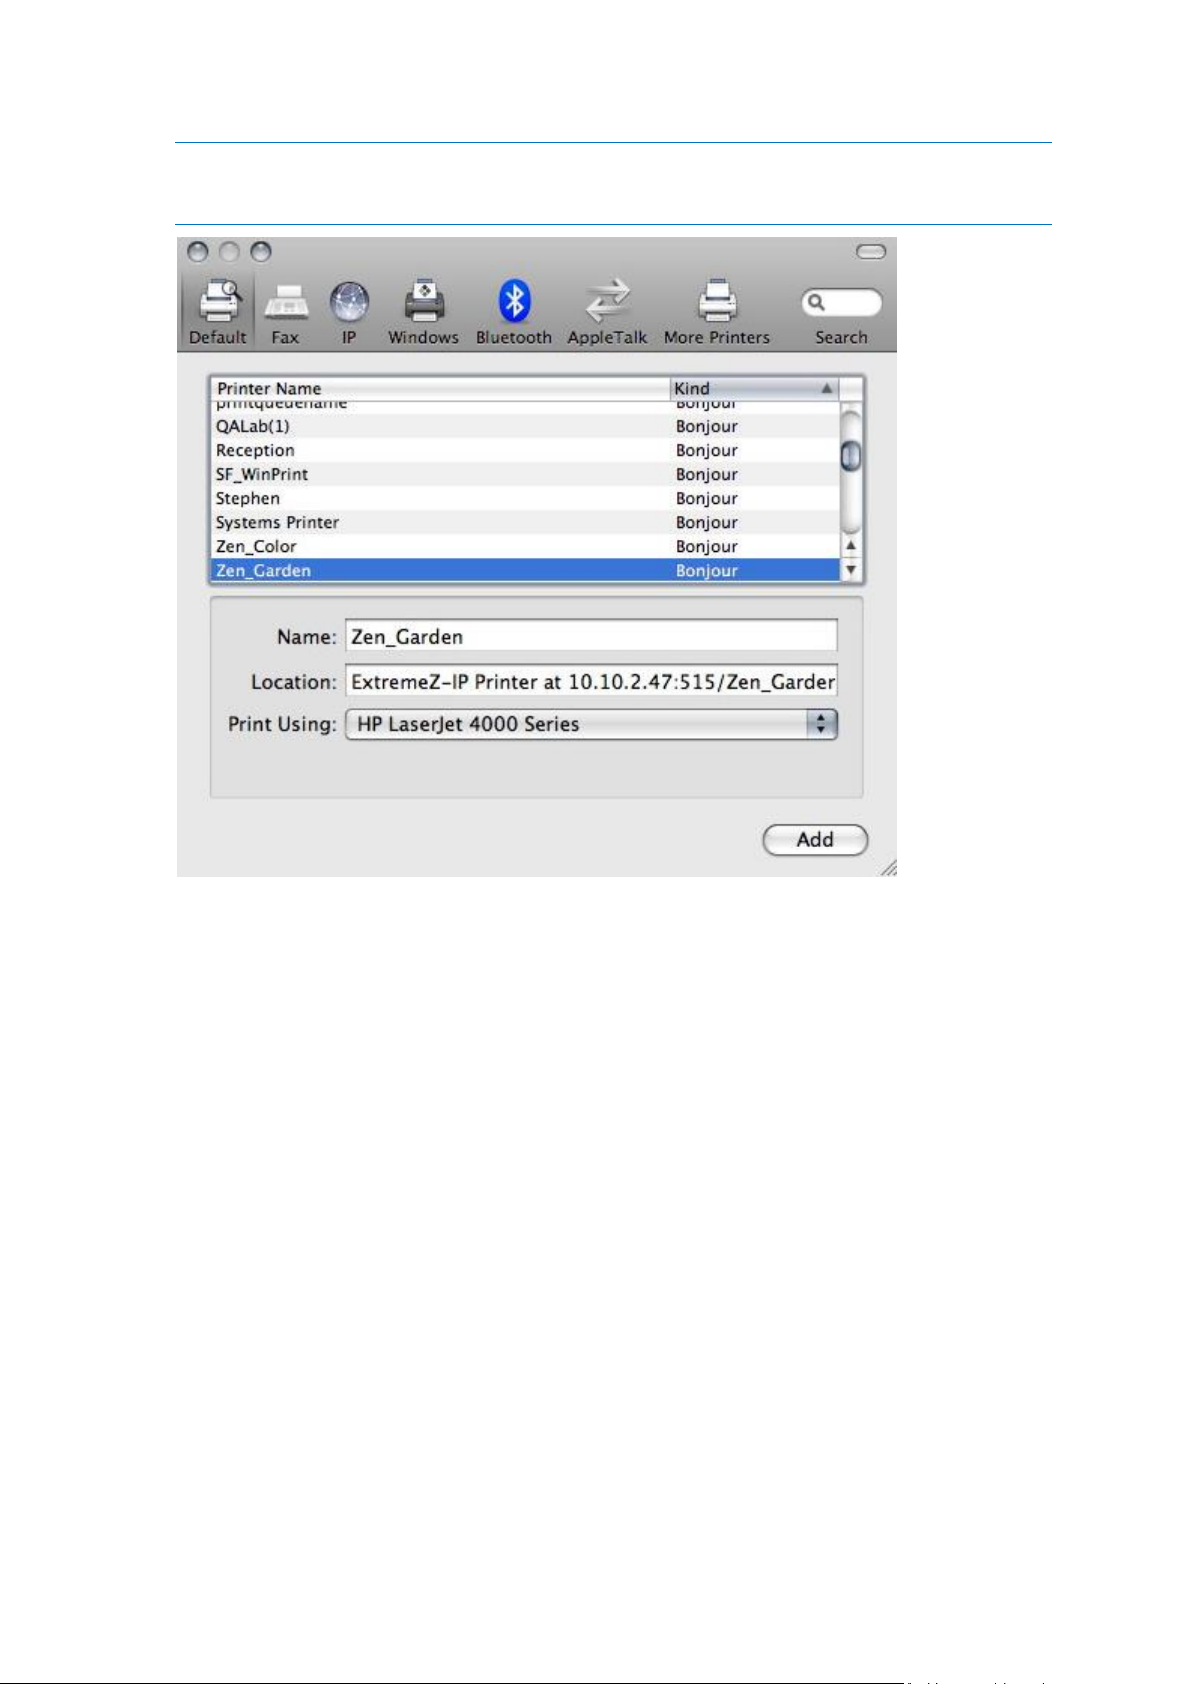
Note: If a PPD was specified in the Files Connect print queue configuration on the server, Files Connect
sends a printer PPD hint to the client Mac. If the client Macintosh already contains a valid PPD for the
printer type, the Print Using dropdown is set to the correct printer type automatically.
4. Click the Add button.
5.4.5 Using Bonjour Within the Print Dialog
To set up a printer from within the print dialog using Bonjour on Mac OS 10.4, Tiger (Apple
removed the feature in Leopard), do the following:
1. Choose Print from any application.
2. From the Printer dropdown menu, choose Bonjour Printers.
89 Copyright © Acronis International GmbH, 2002-2017
Page 90

3. Select the desired printer from the list.
In this section
Choosing a Printer with Mac OS 9............................................................ 91
Using Bonjour from Windows .................................................................. 93
90 Copyright © Acronis International GmbH, 2002-2017
Page 91

5.4.5.1 Choosing a Printer with Mac OS 9
Once they have installed the Choose IP Printer program, Mac OS 9 clients use Choose IP Printer on
the Apple menu instead of the Chooser to find the Files Connect printers and set up desktop printers.
91 Copyright © Acronis International GmbH, 2002-2017
Page 92
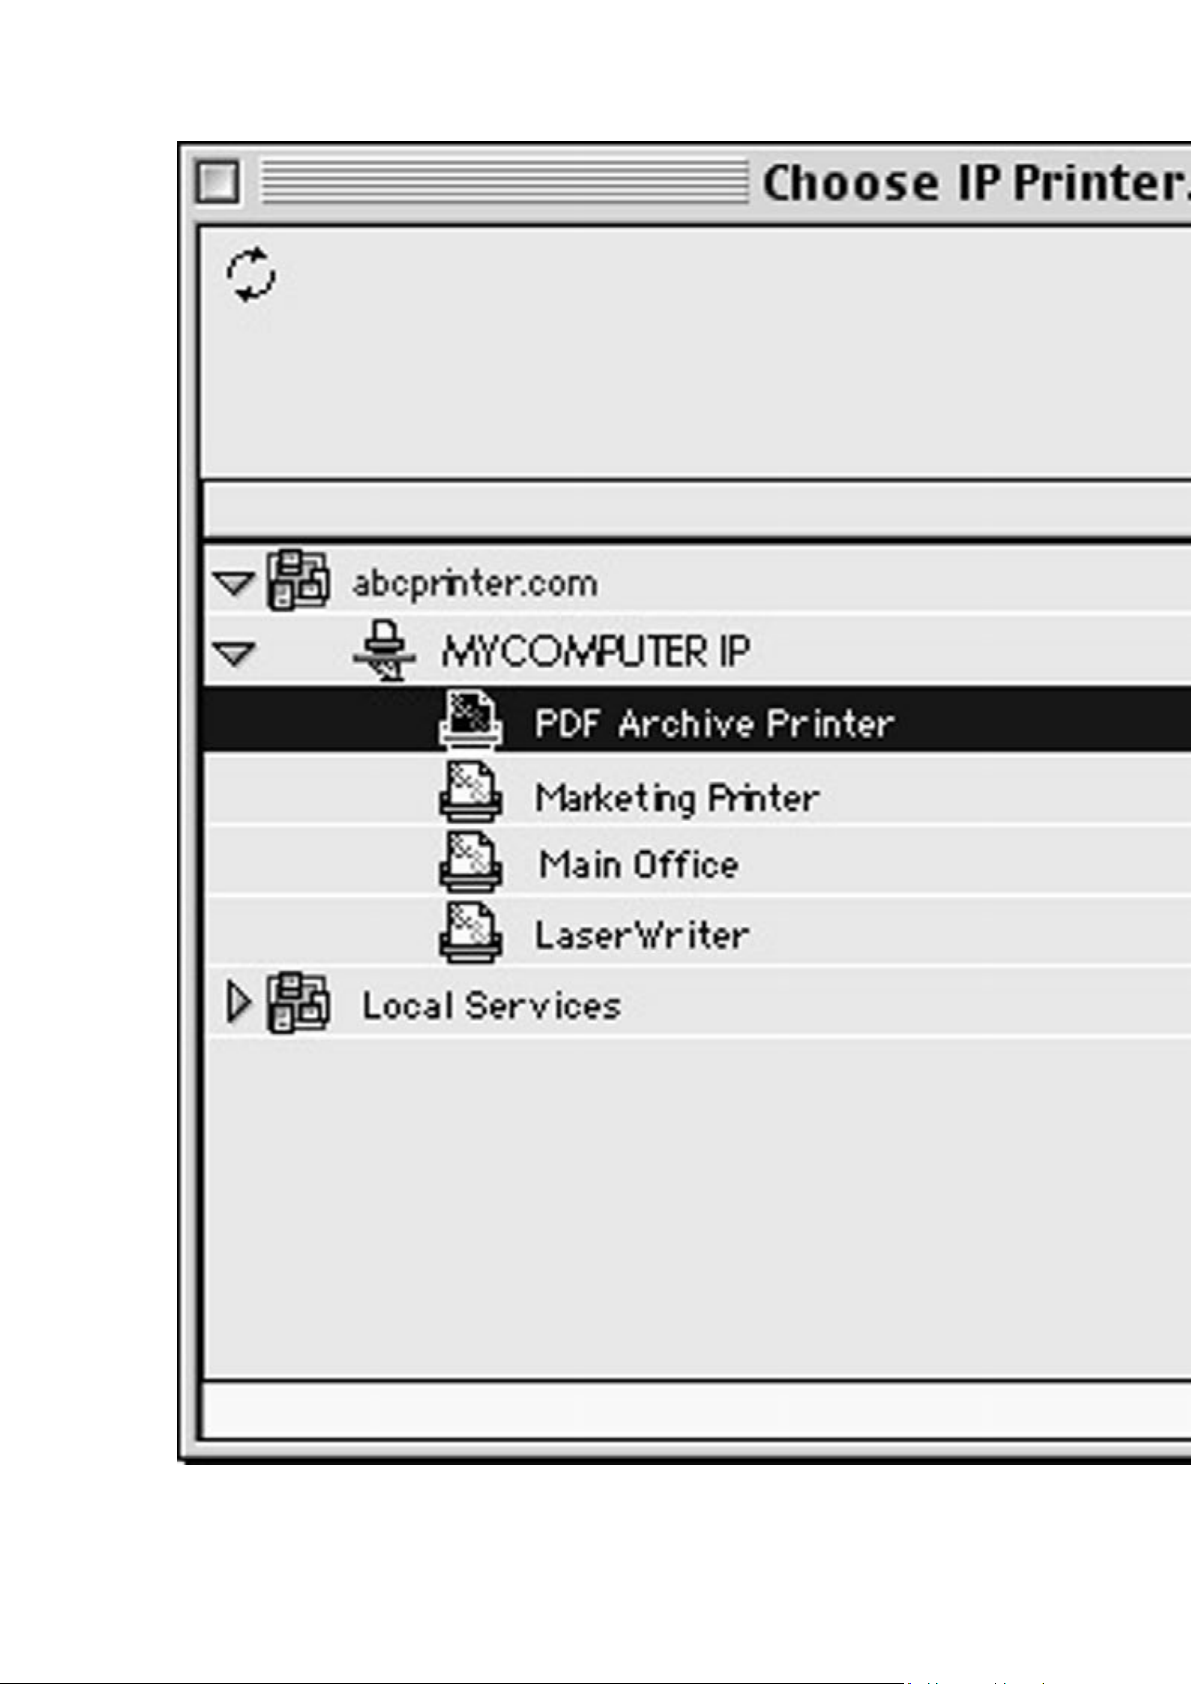
92 Copyright © Acronis International GmbH, 2002-2017
Page 93

5.4.5.2 Using Bonjour from Windows
To set up a Bonjour printer from Windows, do the following:
1. Install Apple Bonjour for Windows, available at:
http://www.apple.com/support/downloads/bonjourforwindows.html
http://www.apple.com/support/downloads/bonjourforwindows.html
93 Copyright © Acronis International GmbH, 2002-2017
Page 94

2. Once installed, run the Bonjour Printer Wizard.
94 Copyright © Acronis International GmbH, 2002-2017
Page 95

3. Click Next.
95 Copyright © Acronis International GmbH, 2002-2017
Page 96

4. Select the printer you would like to install, then, click Next.
If a PPD was specified in the Files Connect print queue configuration on the server, Files Connect
sends the printer model listed in the PPD to the Windows client. If the Windows client already
contains a valid driver for the printer type, the printer manufacturer and model should be
automatically selected.
96 Copyright © Acronis International GmbH, 2002-2017
Page 97

5. If a PPD was not selected automatically, select the appropriate manufacturer and model and click
Next.
97 Copyright © Acronis International GmbH, 2002-2017
Page 98

5.4.6 Using Print Accounting Features from a Client
When a Macintosh user prints from a program and sends the job to a print queue to which you have
assigned codes using Files Connect Print Accounting, their Print dialog box displays the information
you assigned.
To use Print Accounting, do the following:
1. Print to an available Files Connect Print Server print queue. If print accounting is enabled for that
print queue, a special dialog box appears. The following is an example:
2. Type in the information requested by the server. In the example above, the Files Connect
Administrator has enabled Browse buttons for each field, so the Macintosh user can browse the
list of codes for that field. Fields that have asterisks (*) before their names are required and must
be completed before the job can be sent.
3. Click Print to send the job to the selected print queue.
5.5 The Mac Client
Introduced in Files Connect 10.5, the Mac Client is by far the easiest way to connect to network
resources.
You can get the Mac Client by opening the Web Service address of your Files Connect deployment
with the proper port. e.g. http://filesconnect.neucott.com:8081
98 Copyright © Acronis International GmbH, 2002-2017
Page 99

Once you've opened the address of Files Connect in a browser, you will see a button to download the
Mac Client.
Installation
1. Download the Mac application and install it.
2. In your Menu Bar you will see the Files Connect icon.
3. Click on it and select Preferences.
99 Copyright © Acronis International GmbH, 2002-2017
Page 100

4. Enter the address of your Files Connect server. If you have multiple servers, using the master's
address will give you access to all servers and volumes.
5. Enter your credentials which will be used to connect to Files Connect's resources. These are most
likely your Active Directory username and password.
6. Alternatively, if your computer is bound to the company domain and you are logged in to the
computer with the account you wish to use, you can select Use current credentials
(yourusername).
100 Copyright © Acronis International GmbH, 2002-2017
 Loading...