

Page 1

User's Guide
DiskEditor 6.0
Compute with confidence
www.acronis.com
Page 2

Copyright © Acronis, 2000-2002. All rights reserved.
Windows is a registered trademark owned by Microsoft Corporation.
All other mentioned trademarks may be registered trademarks of their respective owners.
Distribution of materials from this Guide, both in original and/or edited form,
is forbidden unless a special written permission is obtained directly from it’s
author.
THIS DOCUMENTATION IS PROVIDED «AS IS». THERE ARE NO EXPLICIT
OR IMPLIED OBLIGATIONS, CONFIRMATIONS OR WARRANTIES, INCLUDING THOSE RELATED TO SOFTWARE MARKETABILITY AND SUITABILITY
FOR ANY SPECIFIC PURPOSES, TO THE DEGREE OF SUCH LIMITED LIABILITY APPLICABLE BY LAW.
Page 3

Table of Contents
INTRODUCTION ................................................................................................... 4
CHAPTER 1. INSTALLING ACRONIS DISKEDITOR AND GETTING STARTED .6
1.1 ACRONIS DISKEDITOR SYSTEM PACKAGE...................................... 6
1.2 INSTALLATION................................................................................. 6
1.3 REPAIRING/UPGRADING ACRONIS DISKEDITOR .............................7
1.4 REMOVING THE SOFTWARE............................................................. 7
1.5 USER INTERFACE............................................................................. 7
CHAPTER 2. WORKING WITH ACRONIS DISKEDITOR ................................... 8
2.1 PARTITION OR DISK SELECTION...................................................... 8
2.2 MAIN WINDOW OF THE PROGRAM .................................................. 9
2.3 WORKING IN MULTI-WINDOWS MODE ......................................... 11
2.4 EDIT HARD DISKS.......................................................................... 13
2.5 WRITE BLOCK TO A FILE AND READ FROM A FILE........................ 14
2.6 VIEW.............................................................................................. 16
2.7 SEARCH ......................................................................................... 16
2.8 WORKING WITH DIFFERENT ENCODINGS ...................................... 18
CHAPTER 3. MAIN WINDOW VIEW MODES ................................................. 19
3.1 MASTER BOOT RECORD (MBR).................................................... 19
3.2 CREATING PRIMARY PARTITION ................................................... 20
3.3 FORMATTING A PARTITION ........................................................... 22
3.4 CREATING A LOGICAL PARTITION................................................. 25
3.5 FILE ALLOCATION TABLE (FAT) AND ROOT FOLDER (ROOT)...... 26
3.5.1 A FILE AS A CHAIN OF CLUSTERS .............................................................26
3.5.2 A FOLDER IN DISKEDITOR MAIN WINDOW ..............................................27
3.5.3 FILES WITH SHORT NAMES .......................................................................29
3.5.4 FILES WITH LONG NAMES.........................................................................30
3.6 FOLDERS AND SUBFOLDERS .......................................................... 31
Acronis DiskEditor 3
Page 4

Introduction
Hard Disk
A hard disk is a very effective device for storing information. Modern hard
disks feature huge volumes of stored information, very high recording densities, and very high access speed to retrieve stored information.
A hard disk is usually an extremely reliable device. One of its parameters –
non-failure operating time – may reach 20,000 to 500,000 hours.
This does not mean, however, that storing information on hard disks is 100%
error-free. Information on hard disks maybe threatened by a number of factors every user should be aware of.
Hard Disks Utility Programs
There are program tools that allow a user to inspect various computer systems, including disk subsystem. Disk managers included in these tools, are
capable of defragmenting hard disks, finding and correcting files and folders
structure imperfections, as well as finding and marking bad sectors. Special
utilities are capable of finding and destroying computer viruses that threaten
your information integrity.
In some cases a user will require a much more powerful set of tools, known
as a disk editor, to repair their hard disk drive. The Acronis DiskEditor is exactly the software for this job.
Acronis DiskEditor is a professional-grade program that performs a variety of
actions on a hard disk: to restore boot records and files and folders structure, to find lost clusters, remove computer virus code from a disk, and much
more.
This program has much to offer a beginner as well. It can be used in an educational setting. It is one thing to read a few books about hard disk construction and data storage, and it’s quite another to observe it yourself with the
Acronis DiskEditor.
About this Guide
A hard disk is a rather complex information storage device. One should have
the base knowledge of hard disks and their interaction with the computer to
work effectively on them using the Acronis DiskEditor program. If you are
ready to work on a hard disk with a disk editor, it is necessary to remember
that mistakes can cause sever problems: you could violate the disk’s information integrity, not only making any data inaccessible, but also unservicable.
4 Introduction
Page 5

It is impossible to offer complete information on organizing data storage on a
hard disk and on its interacting with operating system and applications in
such a short Guide. Thus we will inform you only about the most vital data
below skipping many complex technical details of information storage and
the internal construction of a hard disk. The general outline will be on the
capabilities of Acronis DiskEditor program.
For information on the basic features of the program and its functionality,
please see Chapter 2 «Working with Acronis DiskEditor».
Information about different view modes and the overall performance of
working with a disk see Chapter 3 «Main Window View Modes».
Software Usage Conditions
The conditions for Acronis DiskEditor software usage are described in the
«License agreement», included with this package. The supplied registration
card is the confirmation of your legal purchase and usage of Acronis
DiskEditor on your system. Each registration card has its own unique registration number.
Under current legislation the «License agreement» is considered a contract
between a user (you) and a software manufacturer (Acronis, Inc.). The contract has legal effect and its violation may entail a court examination.
Illegal use and/or distribution of this software will be prosecuted.
Technical Support
Users of legally purchased and registered copies of Acronis DiskEditor receive
free technical support from Acronis, Inc. In case you have problems with installation or use that cannot be solved with this guide or read-me file, please
visit our support web-site or e-mail our support department at the addresses
shown below. You must also send us the registration number of your Acronis
DiskEditor copy. This number is written on a registration card supplied with
this product.
Support URL: http://www.acronis.com/support/
E-mail: support@acronis.com
Acronis DiskEditor 5
Page 6

Chapter 1. Installing Acronis DiskEditor
and Getting Started
1.1 Acronis DiskEditor System Package
Acronis DiskEditor system package includes:
• An installation CD,
• This guide,
• License agreement,
• Registration card,
• Advertising materials.
1.2 Installation
To install the Acronis DiskEditor:
1. Insert the Acronis DiskEditor installation CD into CD-ROM drive and
start the installation procedure.
2. Carefully follow the installation program instructions on the screen.
3. After making your installation choices and copying of Acronis
DiskEditor files onto your hard disk, you will be offered to create a
bootable rescue diskette or CD-R(W) (you may omit this step if you
have purchased the boxed product that contains a bootable CD).
While DiskEditor works in Windows, your computer may fail to boot.
So, it’s recommended to create a bootable rescue media.
6 Chapter 1 : Installing Acronis DiskEditor and Getting Started
Page 7

After installation of Acronis DiskEditor is completed, you should restart your
computer.
1.3 Repairing/Upgrading Acronis DiskEditor
In order to upgrade or repair your software, start the Acronis DiskEditor installation program again. It will determine that DiskEditor was already installed on your computer and will ask you if you want to restore (update) the
program or completely remove it from disk.
1.4 Removing the Software
To remove the software select Acronis Æ DiskEditor Æ Uninstall Acronis
DiskEditor from the Programs menu. You will see a dialog box asking if you
really want to remove the software from your PC hard disk. Press
confirm removal. Acronis DiskEditor software will be completely removed.
1.5 User Interface
The Acronis DiskEditor program has a graphic user interface and is controlled
by mouse or
Escape keys.
Tab, Shift+Tab, Left , Right , Up , Down, Space, Enter and
Yes to
If you routinely work with applications under Windows, X-Windows, or OS/2, there
will be no problems understanding and using the Acronis DiskEditor interface.
Acronis DiskEditor 7
Page 8

g
Chapter 2. Working with Acronis
DiskEditor
2.1 Partition or Disk Selection
Working with the Acronis DiskEditor program begins with the Open dialog
window that users see after clicking the Acronis DiskEditor line in the program group of Programs desktop start menu.
The window of partition or disk selection
By default the program automatically marks the first hard disk for working.
But you may select any other disk or individual partition – click the left
mouse button on a corresponding rectangle.
The difference between selecting the entire disk or a partition only is the following: if
you select the entire disk you will be able to view and edit data stora
the entire disk – Partition table, File Allocation Table of all disk partitions, the root
folder, data area. If you select a partition only, you will be able to view and edit only
data storage structures of this partition – File Allocation Table, the root folder and
data area of the selected partition.
e structures of
8 Chapter 2 : Working with Acronis DiskEditor
Page 9

2.2 Main Window of the Program
The main window shows numbers of disk and sector where internal program
cursor is positioned usually contains information and the work of various
modes.
Below the main window of the program is the view as Partition table mode.
The main window in the view as Partition table mode
To make the information contained in this field sensible, the current sector
should be the MBR or the extended Partition table.
Acronis DiskEditor 9
Page 10

The next figure shows the Partition table as a single dump (hexadecimal byte
values are on the left, and the corresponding characters are on the right).
The main window in the view as Hex mode
The current editing position is shown by the cursor that can be either in the
left, or right part of the window
In this section of the Guide all examples of DiskEditor’s main window view modes are
given for demonstration purposes.
The main menu of Acronis DiskEditor contains the following items:
• Disk – allows you to open the window of a hard disk partition or to se-
lect a hard disk for editing;
• Edit – allows you to operate with blocks of selected hard disk parti-
tions; also allows you to save contents of a disk sector after editing;
• View – allows you to select a view mode for more convenient presen-
tation of data;
• Search – allows you to search a partition (or a hard disk) for any line
(or any sequence of characters) and go to a certain disk sector according to its absolute offset;
• Help – allows you to get help concerning the editor window or about
the program’s developer and version.
10 Chapter 2 : Working with Acronis DiskEditor
Page 11

2.3 Working in Multi-Windows Mode
The disk editor features multiple windows: from Disk menu of DiskEditor you
can open several main windows, each of them showing various hard disk
sectors.
Disk menu
You can switch between various Acronis DiskEditor windows with the help of
the mouse, clicking the necessary window, or consistently advancing windows with the help of
Alt+Tab key combination.
Acronis DiskEditor as a multiwindow editor
Acronis DiskEditor 11
Page 12

Selecting Properties item in Disk menu allows you to get access to the window with main properties of the computer hard disk selected for working (or
of selected partition of the given disk).
The Hard Disk Properties window
The main hard disk properties displayed in this window are:
• System name – disk’s system name,
• Model – hard disk model,
• Sectors per track – number of sectors per a track,
• Heads – number of heads,
• Cylinders – number of cylinders,
• Total size – hard disk capacity,
• Interface – interface type (ATA, SCSI),
• Controller – controller type.
12 Chapter 2 : Working with Acronis DiskEditor
Page 13
2.4 Edit Hard Disks
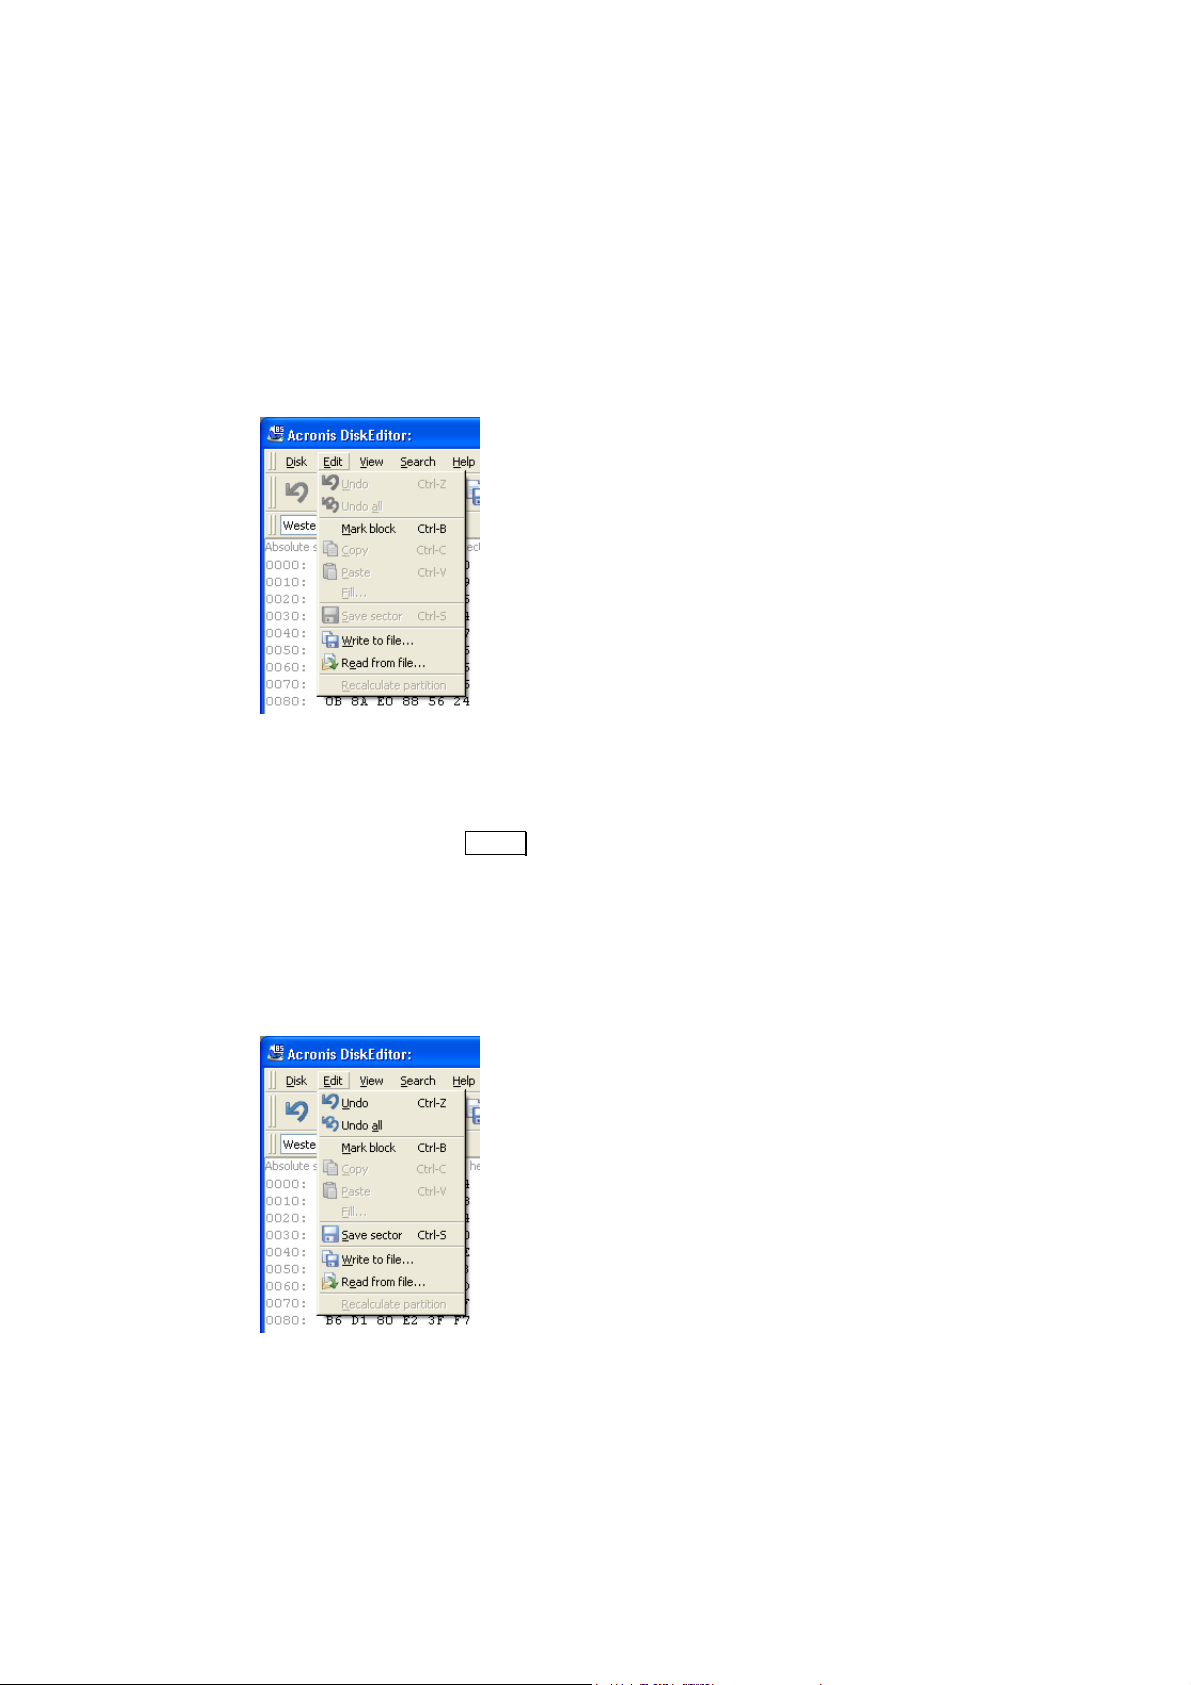
Edit menu of DiskEditor’s main window allows you to access the main opera-
tions with blocks of given hard disk sectors. You can edit hard disk data directly in the fields of any view mode (see the View menu). You can operate
with data blocks using Edit menu in the view as Hex mode.
Edit menu
Any view mode allows you to select blocks with the help of the mouse by
clicking and holding its left button, or with the help of the keyboard advancing the window with
Shift key pressed.
Simply changing data in the hexadecimal or character area, in the view as
Hex mode of the main window or in any fields of other view modes, does not
lead to changes in the given disk sector. Having performed such changes,
you will see that the Save sector item in Edit menu will become enabled as
well as the appropriate toolbar button.
Save sector operation
This feature allows you to save the results of your sector editing or to reject it.
Acronis DiskEditor 13
Page 14

If you have made changes in a hard disk sector and decided to exit the editor without saving them, you will see a warning about saving your changes.
Saving modified sector
2.5 Write Block to a File and Read from a File
Write to file… and Read from file… menu items allows you to save the selected
block to a file or to read the block from a file and save it to a disk sector.
The selection of Write to file… item results in opening the Write to file window
(the saved block should be preliminary selected). In this window enter the
file name and its path, or locate a file by clicking the
file size will be calculated automatically. To save a file click the OK button.
Browse… button. The
14 Chapter 2 : Working with Acronis DiskEditor
Page 15

Write to a file
To read a block from a file, and insert it into a disk sector, you must place
the cursor on the necessary sector byte and then select Read from file…
menu item. The selection of this menu item will result in opening the Read
from file window. In this window enter the file name and its path or locate a
file by clicking the
Browse… button. To insert file contents to sector from the
current cursor position (or considering offset in the file) click the OK button.
Read from a file
Acronis DiskEditor 15
Page 16

2.6 View
Information in the Acronis DiskEditor window can be viewed and edited in several different modes. You can select the appropriate view mode with the help of View menu.
View menu
The editor offers 7 view modes:
• As Hex,
As Partition table,
•
•
As FAT16 bootsector,
As FAT32 bootsector,
•
As FAT32 FS info sector,
•
As NTFS bootsector,
•
•
As FAT folder.
The Chapter 3 «Main Window View Modes» is entirely devoted to features of
view modes.
2.7 Search
Search menu allows you to search a hard disk for some line and to go to a
disk sector according to its absolute offset.
Search Menu
16 Chapter 2 : Working with Acronis DiskEditor
Page 17

Selecting Search item in the same menu will give you access to functions of
searching lines in the disk being edited. (You can do the same by pressing
Ctrl+F key combination.) Search parameters can be set in the Search dialog
window.
The Search dialog window
A search line can be set both as char, and numeric (hexadecimal) value. During a search you can ignore letter case, as well as search for a given line at a
given offset inside the sector.
During search, disk data is interpreted according to the encoding selected. If
you selected a search mode without letter case matching, not only case but
also elements above characters will be ignored for Roman character sets.
After the search process is finished, the current position will be moved to
where a line was found, or will remain the same if no lines were found. You
can search for the next line from the current position by selecting Find next
item in the Search menu or by pressing
F3 key.
You can go to the necessary sector according to its absolute offset by
selecting the Go to… line the Search menu (or by pressing
Alt+P key
combination). Selecting this line opens the Go to… dialog window.
Go to sector…
Acronis DiskEditor 17
Page 18

The transition is performed by entering absolute sector offset, or cylinder, head,
and sector numbers. The listed parameters are bound by this expression:
(CYL x HDS + HD) x SPT + SEC – 1,
Where CYL, HD, SEC are numbers of cylinder, head, sector in the CHS coordinates (Cylinder – Head – Sector); HDS is the number of heads per disk,
SPT is the number of heads per track.
You can return to sector from another one by selecting the Back item in the
Search menu (or by pressing
Ctrl+Backspace key combination).
2.8 Working with Different Encodings
The main window of the program features a list of encodings available in
DiskEditor. This list is shown closed and dropped down below.
The closed and dropped down list of encodings
The list of encodings is intended for correct interpretation of hard disk sector
contents. Selecting the necessary encoding, you will be able to view sector
contents correctly. This is interpreted in the right part of program’s main
window in the hex mode.
18 Chapter 2 : Working with Acronis DiskEditor
Page 19

Chapter 3. Main Window View Modes
A hard disk of 1.79 Gb capacity is used as an example of how DiskEditor
displays information. All disk partitions were removed and the disk was completely cleared of any information with the help of Acronis DriveCleanser
which zeroed all hard disk sector bytes. This is done to demonstrate how
data storage structures are created on a hard disk by standard means – for
example MS Windows (or MS DOS) operating system using FDISK and/or the
FORMAT utility.
3.1 Master Boot Record (MBR)
The main window of the program in the view as Partition table mode is
shown below. As you can see the disk is empty and contains no partitions.
Partition table
As a hard disk can contain only 4 primary partitions, 4 lines on the screen are
allocated for information about partitions. A hard disk partition is characterized by the following parameters:
• Type, for example FAT16/32, NTFS, etc.,
• Boot patch flag – whether partition is bootable or not,
• Begin partition cylinder,
• Begin partition head,
• Begin partition sector,
• End partition cylinder,
Acronis DiskEditor 19
Page 20

• End partition head,
• End partition sector,
• Number of hard disk sectors allocated for partition.
Hard disk partitions are described in the Partition table in two ways simultaneously: (1) in CHS co-ordinates (Cylinder – Head – Sector; limited and
obsolete variant) – coordinates of initial and end partition sectors, and (2)
partition heading and its length in sectors.
Each record of the Partition table contains a partition boot patch flag indicating to the main loader what partition to boot. The boot patch flag can be assigned to one partition only.
At the lowest (byte) level MBR structure containing the master boot record
and the Partition table can be described as follows:
• Bytes 000h – 1BDh – load code of active partition’s bootsector,
Bytes 1BEh – 1CDh, 1CEh – 1DDh, 1DEh – 1EDh, 1EEh – 1FDh –
•
partition records,
•
Bytes 1FEh – 1FF – Partition Table signature equal to AA55h.
3.2 Creating Primary Partition
Using the FDISK utility supplied with your Windows operating system (enabling large disks support), we will create the Primary partition at a 0.97 Gb
capacity (or 1000 Mb) on the selected hard disk.
To see changes in the Partition table contents, select the hard disk with the
newly created partition for viewing. If we select the created partition for
working, the Partition table will be unavailable for viewing. The Partition
table contains information about the entire hard disk. If you select a disk
partition for working, DiskEditor will allow you to browse only the space
allocated for that partition, and accordingly, to look at its information only.
20 Chapter 3 : Main Window View Modes
Page 21

The creation of a hard disk primary partition will immediately update the
Partition table.
Primary partition
Creating 1000 Mb primary partition on the disk results in filling the 1st line of
the Partition table. You can see partition parameters on the figure. Partition
contains 2048193 sectors total and is of FAT32 type (or 0Bh in hex).
Please note that Enter button to the left of Partition type field is enabled;
clicking it you can quickly proceed to partition specified by the Partition table
record.
You must be extremely careful when changing partition parameters. One can easily
completely destroy information stored on the disk. The best way to master
DiskEditor capabilities is with an old disk, without important information, that can be
used for creating and destroying partitions, formatting and performing any experiments. Please do not experiment with your work disk!
Acronis DiskEditor 21
Page 22

To work with a hard disk you must know where and what data is stored on
it. As a complete disk editing program, DiskEditor allows you to create a
complete partition on a disk without the use of the FDISK utility (or any other
utilities). DiskEditor is also capable of much more: while the FDISK utility allows you to create only FAT16/32 partitions, DiskEditor allows you to create
partitions for almost any types known. Look closely at the Partition type drop-
down list.
Partition types supported by Acronis DiskEditor
This list also contains a substantial group of partition types, that may seem
exotic to some users.
3.3 Formatting a Partition
We now use the FORMAT utility, also supplied with Windows operating system, to format the created primary partition with /S option that allows to
transfer system files to partition:
FORMAT C: /S
(The disk can have another letter assigned, for example, D:.)
Formatting a partition with the FORMAT utility results in the creation of
partition bootsector contents.
The following modes allow you to view a bootsector: as FAT16 bootsector, as
FAT32 bootsector, and as NTFS bootsector. You should keep in mind that
simple selection of a view mode does not automatically result in positioning
DiskEditor to a partition bootsector. You have to do it manually. For this purpose you can use Search Æ Go To… menu while working with the entire hard
disk and enter the sector offset from the Partition table into Absolute sector
field in the dialog window.
22 Chapter 3 : Main Window View Modes
Page 23
Or to use Disk Æ Open menu to select a partition in the Open dialog window (a
partition, not a disk) which bootsector you need. In this case DiskEditor will
position on the 1
st
sector of that partition – its bootsector.
If you are in the view as Partition table mode, you can find a bootsector of
any partition simply clicking
Enter button to the left of partition record.
Keeping in mind that all hard disk sectors have been zeroed with the help of
program Acronis ProofEraser, if you want to look at a hard disk partition
bootsector in the view as FAT32 bootsector mode before this partition is formatted, you would, see some random data without any relation to actual
partition characteristics.
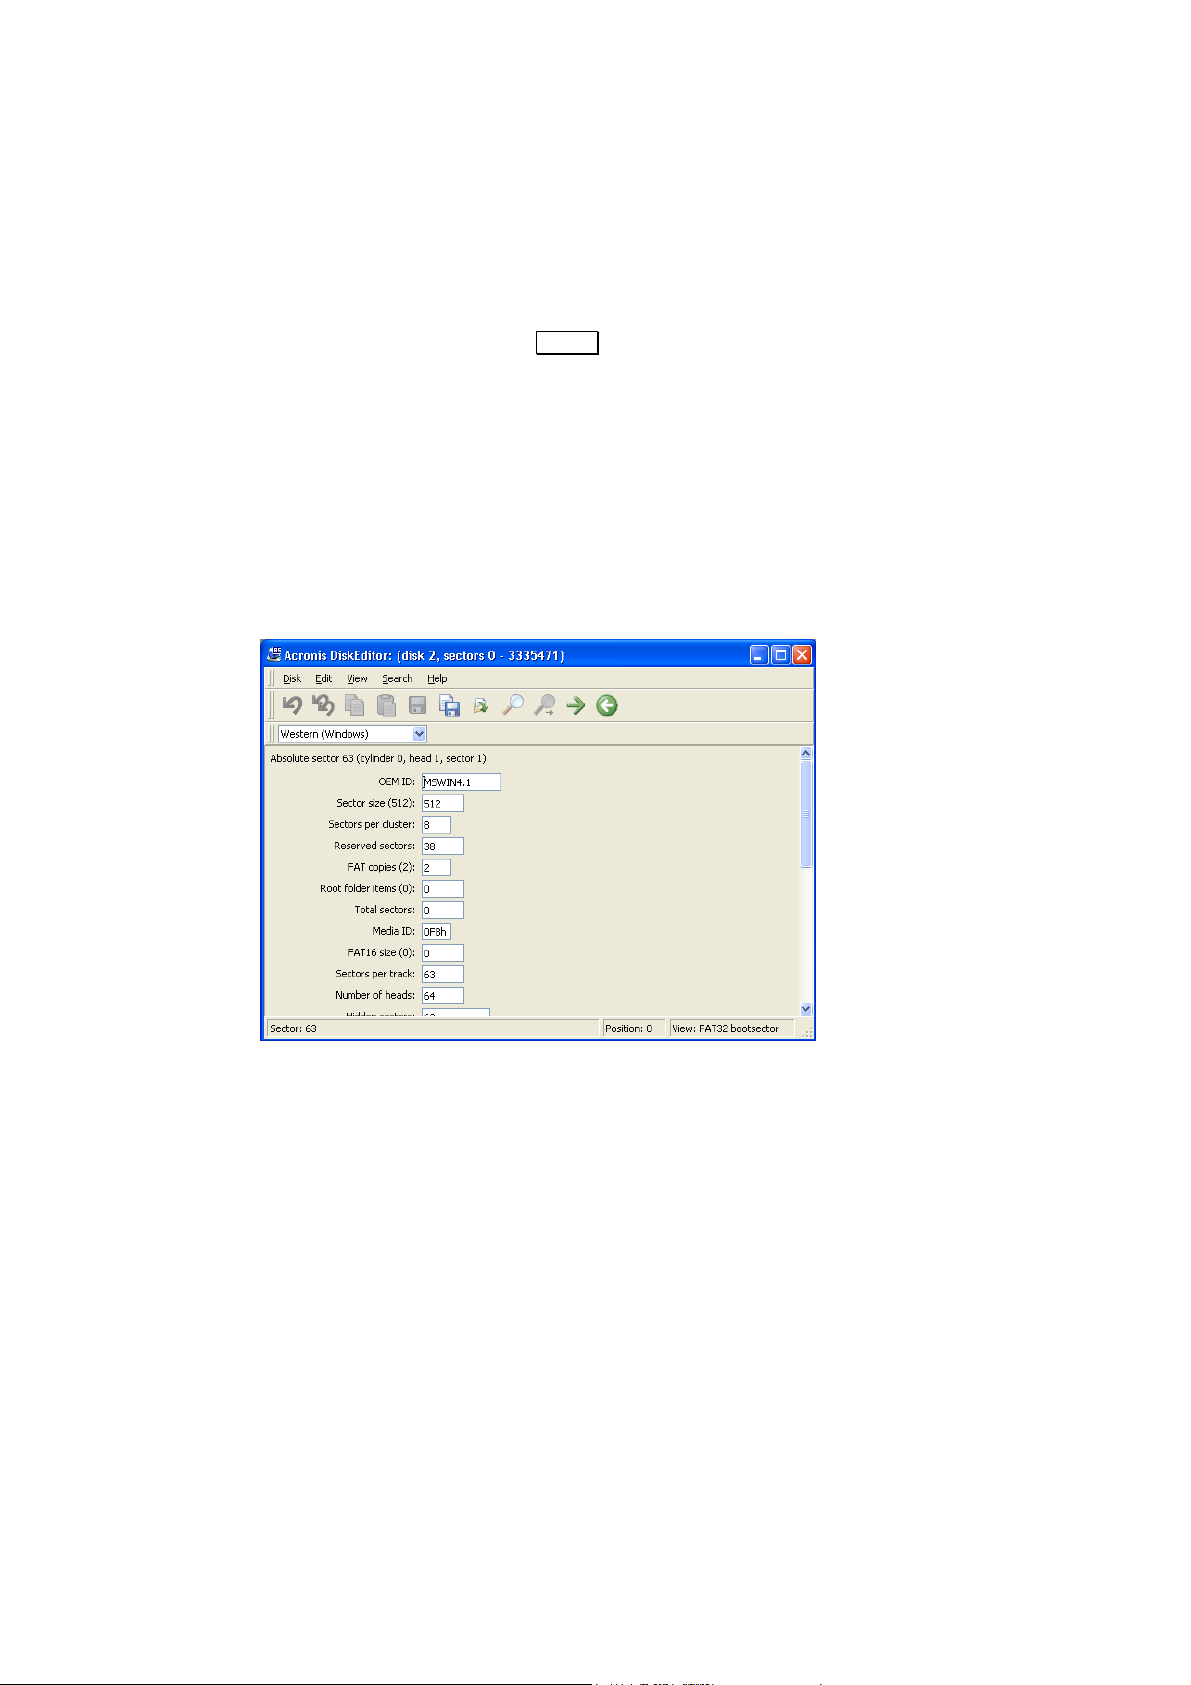
Let us assume you positioned DiskEditor on a partition bootsector and selected
the view as FAT32 bootsector mode. In this case you will see a picture similar to
that shown below; actual data entirely depends on your hard disk).
Bootsector mode
The main window in the view as bootsector mode has many fields. Not all
fields are of equal importance: file systems are created and developed, grow
old, or become obsolete. Therefore some fields used earlier may become
obsolete in the future. The most important fields are:
• OEM ID – the line formed at partition formatting;
Sector size – sector size in bytes;
•
•
Sector per cluster – the number of sectors per cluster;
Reserved sectors – the number of sectors occupied by the loader and
•
reserved;
•
FAT copies – the number of FAT copies; theoretically a disk can
contain up to 4 FAT copies, but usually there are 2;
Acronis DiskEditor 23
Page 24

g
• Root folder item, Total sectors, FAT16 size – fields used by FAT16 file
system;
•
Media ID – Media (disk) identifier;
•
Sectors per track – the number of sectors per track;
•
Number of heads – the number of heads;
Big total sectors – the number of disk sectors available to partition file
•
system (for partitions > 32 Mb);
•
FAT size – the size of File Allocation Table in disk sectors;
Active FAT – four low bits of this field contain the number of active FAT
•
copy used for reading and writing if copy duplication is switched off;
File System Version – always 0 for FAT32;
•
•
First Cluster of Root – the first cluster of the root folder (FAT32 stores
the root folder as all other folders and files; FAT16 used a special disk
area for it);
•
FAT32 FS Info sector – the relative number of information sectors of
FAT32 file system;
Backup sector – the sector containing a copy of bootsector;
•
•
Hard Drive – disk’s BIOS number;
Extension signature – the signature of extended bootsector;
•
Serial number – volume serial number (set at formatting);
•
Volume label – a char line;
•
•
File system name – file system char identifier (FAT32);
•
Bootsector signature – a bootsector signature.
Some bootsector fields are reserved for further use.
We have described this structure above. A hard disk partition also begins
with the sector containing the operating system loader program. Primary
loader and partition loader are bound as follows: the purpose of primary
loader is to locate the first (boot) sector of active partition, to load its code to
memory, and to pass controls to it. Further actions concerning operating
system loading are performed by the active partition loader.
To view instructions contained in the primary loader (partition loader) code, you can
use DEBUG utility supplied both with DOS and Windows. DEBUG allows to read any
disk sector and disassemble its code, i.e. to translate the machine code to assembler
language. Your understanding of these instructions will depend on your knowled
of assembler language.
e
24 Chapter 3 : Main Window View Modes
Page 25

3.4 Creating a Logical Partition
Creation of logical partition results in filling the second line of the Partition
table.
Logical partition
The partition is marked Extended LBA or 0Fh in hex. Externally it is
characterized by the same parameters, as the Primary disk partition, but its
organization and purpose differ. The primary partition contains a single
logical disk. Extended DOS/Windows partition allows you to organize any
number of logical disks.
Again, this User’s Guide describes DiskEditor capabilities used on a FAT32 file system.
The first sector of the Extended partition is similar to the first sector of the
Primary hard disk partition or MBR, but unlike the latter it does not include
loaders and contains the Extended Partition Record, or EPR.
The Primary partition loader loads the operating system located on this disk
(if any). However, it is impossible to load Windows 9x/Me from a logical disk
of the Extended partition without special set-up.
The first record of the Extended Partition Record specifies the first logical
disk of the partition.
If the first logical disk does not occupy an entire extended partition, the second EPR record specifies position of sector with the next Extended Partition
Record. Third and fourth EPRs are not used.
Acronis DiskEditor 25
Page 26

While MBR Partition table (of a physical disk) can address to 4 partitions at once,
the Extended Partition Record addresses to a chain of partitions that ends with a
partition, which the second record of EPR does not address.
Please note that the Extended Partition Record addresses not from the beginning of
a physical hard disk (MBR sector), but from the beginning of the Extended partition
(EPR sector).
The chain of extended records is continuous and non-branching. From the
angle of a physical disk, all logical disks are located in the area described in
the Partition table as the Extended partition.
Each logical disk from the Extended partition has the same structure as the
Primary disk partition: it begins with a bootsector (but the logical disk loader
is never used), and has the Partition table (Extended).
3.5 File Allocation Table (FAT) and Root Folder (Root)
The structure of a partition with the FAT file system was described above. A
partition begins with a bootsector containing a loader and a table describing
file system parameters.
Bootsector is followed by one or several File Allocation Tables (FAT), the
Root folder, and the Data area divided into clusters and used for storing
folders and files. (There may be a number of reserved sectors between a
bootsector and the first FAT copy.)
3.5.1 A File as a Chain of Clusters
A file on a disk is stored as a chain of clusters. A cluster consists of one or
more sectors, the number of sectors per cluster depends on partition size
and equals a degree of 2 (1, 2, 4, 8, 16, etc.). Each cluster has its number
with numeration beginning with 2.
The File Allocation Table (FAT) describes the order of folders and files in
clusters. Each cluster corresponds to a FAT element (a table cell).
FAT elements can indicate of the following values:
• 0 – free cluster,
2 – the number of the next element in a cluster chain (0FEFh – for
•
FAT12, 0FFEFh – for FAT16, 0FFFFFEFh – for FAT32),
0FFF0h – 0FFF6h – reserved values,
•
0FFF7h – bad cluster,
•
FFF8h – FFFFh – last cluster in a chain.
•
26 Chapter 3 : Main Window View Modes
Page 27

To read a file it is necessary to find its record in a folder by its name and to
read the number of the 1
st
file cluster. The first cluster represents the
beginning of a file. Then it is necessary to read a FAT element corresponding
to the first cluster of a file. If this element contains a «last in chain» label,
there’s no need to continue searching: this file is simply located in a single
cluster. If a cluster is not the last, it contains the number of the next cluster.
Contents of the next cluster should be read after the first. When the last
cluster in a chain is found, it is necessary to cut off the remaining bytes of
the cluster if this file does not occupy all of it. Extra bytes are cut off according to the file length stored in the folder record.
To write a file, the operating system has to execute the following sequence of
actions: create a file description in a free folder element, search for a free
FAT element, and place the reference to it to a folder record; fill the first
cluster described by the FAT element found; and place the number of the
next cluster or an attribute of the last cluster in a chain to this FAT element.
The operating system operates in this way to add next clusters to chains
according to the increasing number. It’s clear that consistently located
clusters can be addressed much faster than if they were randomly spread
along the disk. Clusters that are already occupied or clusters marked in FAT
as defective are left out.
File deletion (from a Recycle bin that appeared in Windows 95) declares all
file clusters free (along with zeroing of corresponding FAT elements) and
replacing the first symbol of file name in the folder record by 0E5h value.
Operating system ignores such elements during a usual folder search.
3.5.2 A Folder in DiskEditor Main Window
Let us now create a very simple file on the logical partition of our hard disk.
It can be done with the help of Windows Notebook application. Name this file
test.txt, fill it with a single word «test», and save it the partition root folder.
Acronis DiskEditor 27
Page 28

Now run DiskEditor and mouse-click the partition in the partition selection
window.
Selecting the partition
DiskEditor will automatically position on the bootsector of this partition and
the main window will open in the view as FAT32 bootsector mode by default.
A bootsector of the logical partition is the sector with 2048319 absolute offset (your values may be different). The File Allocation Table of the logical
partition has is 1255 sectors long. 32 sectors are reserved so, 2048319 + 2 *
1255 + 32 = 2050861, i.e. the root folder is, most likely, located at sector
2050861.
Select Go to sector… item in the Search menu (or press
Alt+P) key combina-
tion) and in the Absolute sector field of the Go to sector… dialog window enter 2050861 and click
OK button.
Go to the root folder
DiskEditor will position on the root folder area. Switch the main window to
the view as FAT folder mode as shown below.
28 Chapter 3 : Main Window View Modes
Page 29
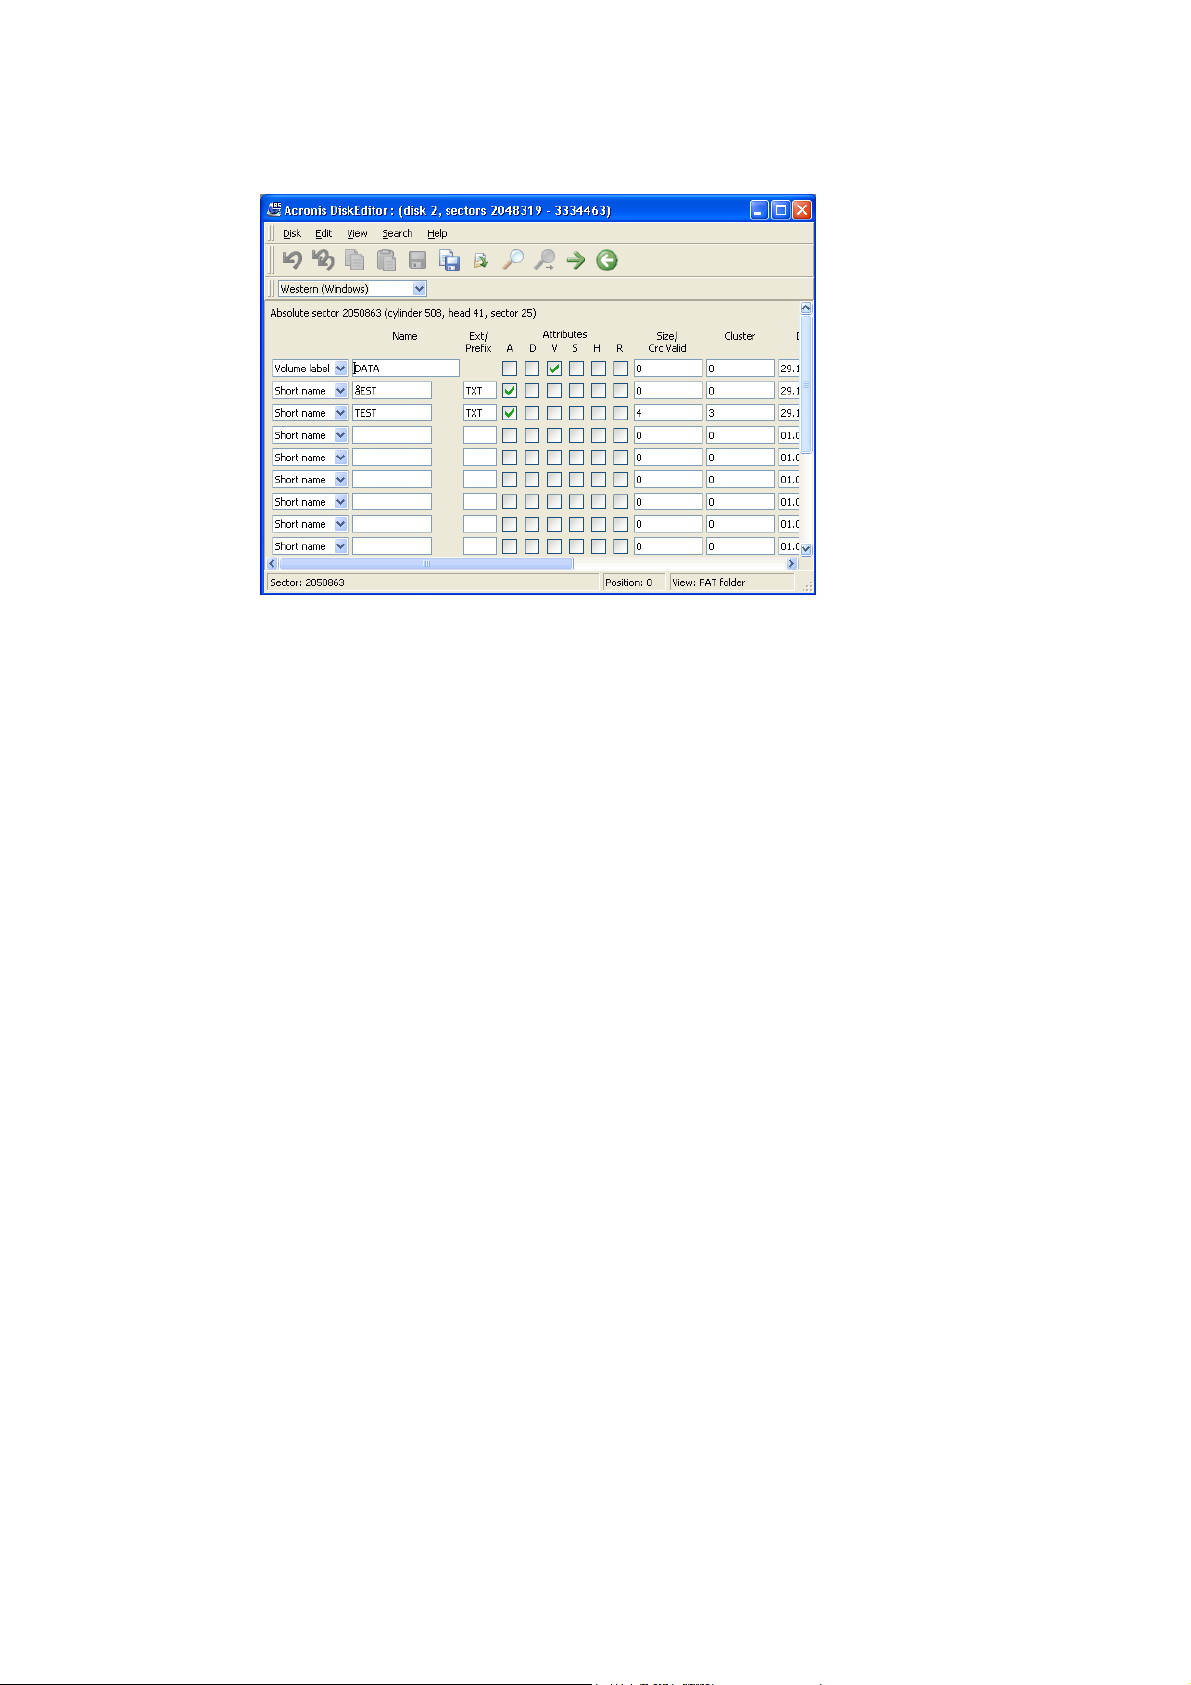
The root folder
3.5.3 Files with Short Names
As discussed, a file name and other attributes are registered in a folder record.
A folder record has the following structure, or main bytes of a folder record
indicate the following values:
Offset Length Purpose
bytes bytes
0 8 File name up to 8 symbols.
8 3 File extension (type) up to 3 symbols.
0Bh 1 File Attributes:
Bit 0 – Read-Only (can’t update or delete);
Bit 1 – Hidden (H), hidden file;
Bit 2 – System (Sys), system file;
Bit 3 – Volume label;
Bit 4 – folder attribute (Directory Entry);
Bit 5 – Archive (A), file was not archived.
0Ch–15h 10 Reserved.
16h 2 Last changed (created) time:
Bit 0-4 – pairs of seconds (0-29),
Bit 5-10 – minutes (0-59),
Bit 11-15 – hours (0-23).
18h 2 Last changed (created) date:
Bit 0-4 – day (0-31),
Bit 5-8 – month (1-12),
Acronis DiskEditor 29
Page 30

g
Bit 9-15 – year from 1980 ( 0-119 ).
1Ah 2 Primary cluster number.
1С 4 File size in bytes.
The figure above shows values already interpreted by the DiskEditor program, these fields have the following values:
Name File name.
Ext/Prefix File name extension or a number of a long name frag-
ment.
A, D, V, S, H, R Represent Archive, Directory Entry Volume Label,
System, Hidden, Read-Only file attributes.
Size/Crc Valid File size or a long name checksum.
Cluster Number of the first file cluster.
Time File creation time.
Create date File creation date.
Reserved Reserved field.
Root folders in FAT16 file system have fixed sizes, locations, and contained limited
number of elements. FAT32 represents root folders like usual (sub) folders by a cluster chain of any length. The number of entries in it – files and subfolders – is unlimited. The number of folder entries is unlimited as well, thou
by the maximum file (folder) name length counted off from the root folder.
3.5.4 Files with Long Names
Everything described above represents the classic way of describing files with
names in «8.3» format in FAT folder. But all Windows version after Windows
95, support long file names (up to 255 chars), allowing almost any chars in
Unicode encoding. This is handled by simply allocating not one, but several
adjacent 32-byte elements for each file in a folder. The number of elements
used for a long name depends on its length. The first several elements
contain a long name, followed by a usual element, with the structure
provided for a short name containing an uppercase file name. Elements with
parts in this long name are numbered one after another. The 01h element is
located just before the element with a short name. If one element with a
long name fragment is insufficient, another 02h element is used, etc. The
number of the last element is increased by 40h. If a long name takes one
element, its number will be 41h.
A folder record with a fragment of a long name has the following structure:
h it’s indirectly limited
Offset, Length, Purpose
bytes bytes
0 1 Element’s number.
1 10 Name (or its fragment).
30 Chapter 3 : Main Window View Modes
Page 31

0Bh 1 File attributes (always 0Fh).
0Ch 1 Reserved.
0Dh 1 Check code (calculated from short name).
0Eh 12 Name (continued).
1A 2 Number of the first cluster (0)
1Ch 4 Name (continued).
The above scheme can be viewed in Acronis DiskEditor program in the view
as FAT folder mode. As you can see above, test.txt corresponds to two folder
elements. The lower line indicating Short Name value in the drop-down list on
the left and the uppercase name (TEST.TXT), and the upper one indicating Long
Name value in the list and 041h in the Ext/Prefix field indicating that a file’s long
name took one additional folder record.
3.6 Folders and Subfolders
Above we described the structure of the root folder in FAT32 file system that
contains file information: names, attributes, and some other.
A root folder may contain records corresponding to subfolders. A root folder
together with subfolders form the folder tree of the file system.
FAT represents a subfolder similar to a file described by a parent folder record, and consists of a set of the same folder elements as a root folder.
The very first element of a subfolder is a self-reference under «.» pseudonym. This reference provides the number of the first cluster of the
given folder. It is followed by an element referring to the parent folder
under «..» pseudonym. This reference allows to find the beginning of the
parent folder. At that cluster, with zero number, is specified the root
folder.
Acronis DiskEditor 31
 Loading...