

Page 1

Acronis
Disk Director Suite 9.0
User’s guide
Page 2

Copyright © Acronis, Inc., 2000–2005. All rights reserved.
Windows and MS-DOS are registered trademarks of Microsoft Corporation.
All other trademarks and copyrights referred to are the property of their
respective owners.
Distribution of substantively modified versions of this document is prohibited
without the explicit permission of the copyright holder.
Distribution of the work or derivative work in any standard (p aper) book form for
commercial purposes is prohibited unless prior permission is obtained from the
copyright holder.
DOCUMENTATION IS PROVIDED «AS IS» AND ALL EXPRESS OR IMPLIED
CONDITIONS, REPRESENTATIONS AND WARRANTIES, INCLUDING ANY IMPLIED
WARRANTY OF MERCHANTABILITY, FITNESS FOR A PARTICULAR PURPOSE OR
NON-INFRINGEMENT, ARE DISCLAIMED, EXCEPT TO THE EXTENT THAT SUCH
DISCLAIMERS ARE HELD TO BE LEGALLY INVALID.
2
Page 3

END-USER LICENSE AGREEMENT
BY ACCEPTING, YOU (ORIGINAL PURCHASER) INDICATE YOUR ACCEPTANCE OF THESE
TERMS. IF YOU DO NOT WISH TO ACCEPT THE PRODUCT UNDER THESE TERMS YOU
MAY CHOOSE NOT TO ACCEPT BY SELECTING "I decline..." AND NOT INSTALLING THE
SOFTWARE.
The Acronis Disk Director Suite (the Software) is Copyright © Acronis, Inc., 2000–2005.
All rights are reserved. The ORIGINAL PURCHASER is granted a LICENSE to use the
software only, subject to the following restrictions and limitations.
1. The license is to the original purchaser only, and is not transferable without prior
written Permission from Acronis.
2. The Original Purchaser may use the Software on a single computer owned or leased
by the Original Purchaser. You may not use the Software on more than a single
machine even if you own or lease all of them without the written consent of Acronis.
3. The Original Purchaser may not engage in, nor permit third parties to engage in, any
of the following:
A. Providing or permitting use of or disclosing the Software to third parties.
B. Providing use of the Software in a computer service business, network, timesharing or
multiple user arrangement to users who are not individually licensed by Acronis.
C. Making alterations or copies of any kind in the Software (except as specifically
permitted above).
D. Attempting to un-assemble, de-compile or reverse engineer the Software in any way.
E. Granting sublicenses, leases, or other rights in the Software to others.
F. Making copies, or verbal or media translations, of the users guide.
G. Making telecommunication data transmission of the software.
Acronis has the right to terminate this license if there is a violation of its terms or default
by the Original Purchaser. Upon termination for any reason, all copies of the Software
must be immediately returned to Acronis, and the Original Purchaser shall be liable to
Acronis for any and all damages suffered as a result of the violation or default.
ENTIRE RISK
THE ENTIRE RISK AS TO THE QUALITY AND PERFORMANCE OF THE SOFTWARE IS
WITH YOU THE PURCHASER. ACRONIS DOES NOT WARRANT THAT THE SOFTWARE OR
ITS FUNCTIONS WILL MEET YOUR REQUIREMENTS OR THAT THE OPERATION OF THE
SOFTWARE WILL BE UNINTERRUPTED OR ERROR FREE OR THAT ANY DEFECTS WILL BE
CORRECTED. NO LIABILITY FOR CONSEQUENTIAL DAMAGES - IN NO EVENT SHALL
ACRONIS OR ITS VENDORS BE LIABLE FOR ANY DAMAGES WHATSOEVER (INCL UDING,
WITHOUT LIMITATION, DAMAGES FOR THE LOSS OF BUSINESS PROFITS, BUSINESS
INTERRUPTION, LOSS OF BUSINESS INFORMATION, OR ANY OTHER PECUNIARY LOSS)
ARISING OUT OF THE USE OR INABILITY TO USE THE SOFTWARE, EVEN IF ACRONIS
HAS BEEN ADVISED OF THE POSSIBILITY OF SUCH DAMAGES.
Copyright © Acronis, Inc., 2000–2005
3
Page 4

Table of Contents
INTRODUCTION........................................................................................................................................... 6
CHAPTER 1. INSTALLATION AND USE .............................................................................................9
1.1 WHAT’S INCLUDED.............................................................................................................................. 9
1.2 SYSTEM REQUIREMENTS...................................................................................................................... 9
1.3 INSTALLATION PROCESS ...................................................................................................................... 9
1.4 UPGRADING ACRONIS DISK DIRECTOR SUITE.................................................................................... 11
1.5 REMOVING SOFTWARE ...................................................................................................................... 11
1.6 USER INTERFACE ............................................................................................................................... 11
1.7 BEFORE YOU RUN ACRONIS DISK DIRECTOR SUITE .......................................................................... 11
1.8 RUNNING ACRONIS DISK DIRECTOR SUITE........................................................................................ 12
CHAPTER 2. BEGINNING THE WORK.............................................................................................. 14
2.1 ACRONIS DISK DIRECTOR SUITE LOGICAL ORGANIZATION............................................................... 14
2.2 ACRONIS DISK DIRECTOR SUITE MAIN WINDOW .............................................................................. 15
2.3 CALLING PARTITION OPERATIONS..................................................................................................... 17
2.4 PARTITION OPERATION PROPERTIES .................................................................................................. 18
2.5 PROTECTING ACRONIS DISK DIRECTOR SUITE WITH A PASSWORD................................................... 21
CHAPTER 3. AUTOMATIC PARTITION OPERATIONS................................................................ 23
3.1 CREATING A NEW PARTITION............................................................................................................ 23
3.2 INCREASING PARTITION FREE SPACE................................................................................................. 32
3.3 COPYING PARTITIONS ........................................................................................................................ 34
CHAPTER 4. MANUAL PARTITION OPERATIONS........................................................................ 40
4.1 MAIN PARTITION OPERATIONS .......................................................................................................... 40
4.2 ADDITIONAL PARTITION OPERATIONS ............................................................................................... 55
CHAPTER 5. WORKING WITH ACRONIS RECOVERY EXPERT............................................... 65
5.1 AUTOMATIC RECOVERY .................................................................................................................... 66
5.2 MANUAL RECOVERY ......................................................................................................................... 69
CHAPTER 6. WORKING WITH ACRONIS DISK EDITOR............................................................. 72
6.1 GENERAL INFORMATION .................................................................................................................... 72
6.2 THE SELECTION OF THE PARTITION OR A DISK FOR EDITING ............................................................... 72
6.3 MAIN WINDOW OF THE PROGRAM ..................................................................................................... 73
6.4 EDIT HARD DISKS.............................................................................................................................. 74
6.5 WRITE BLOCK TO A FILE AND READ FROM A FILE ............................................................................. 75
6.6 VIEW.................................................................................................................................................. 76
6.7 SEARCH ............................................................................................................................................. 77
6.8 WORKING WITH DIFFERENT ENCODINGS ........................................................................................... 79
CHAPTER 7. WORKING WITH ACRONIS OS SELECTOR........................................................... 80
7.1 GENERAL INFORMATION .................................................................................................................... 80
7.2 STARTING THE WORK......................................................................................................................... 80
7.3 SETTING THE BOOT MENU ................................................................................................................. 82
7.4 BOOTING OPERATING SYSTEMS.......................................................................................................... 82
7.5 SETTING AN OPERATING SYSTEM AS THE DEFAULT ............................................................................ 83
7.6 SETTING OPERATING SYSTEM PASSWORDS......................................................................................... 83
7.7 SETTING OPERATING SYSTEM PROPERTIES ......................................................................................... 83
7.8 HIDING OPERATING SYSTEMS............................................................................................................. 88
7.9 USING SHORTCUTS............................................................................................................................. 89
7.10 DELETING OPERATING SYSTEMS..................................................................................................... 89
7.11 RENAMING OPERATING SYSTEMS ................................................................................................... 89
4
Copyright © Acronis, Inc., 2000–2005
Page 5

7.12 COPYING OPERATING SYSTEMS ...................................................................................................... 89
7.13 SETTING ACRONIS OS SELECTOR OPTIONS..................................................................................... 90
CHAPTER 8. INSTALLING AND USING SEVERAL OPERATING SYSTEMS ON A SINGLE PC
95
8.1 INTRODUCTION .................................................................................................................................. 95
8.2 INSTALLING SEVERAL WINDOWS COPIES TO A SINGLE PC ................................................................. 95
8.3 INSTALLING LINUX AND WINDOWS ON THE SAME PC...................................................................... 100
8.4 HOW TO INSTALL SEVERAL OS ON THE SAME PARTITION................................................................. 102
CHAPTER 9. BOOTABLE MEDIA BUILDER.................................................................................. 103
9.1 GENERAL INFORMATION .................................................................................................................. 103
9.2 INVOKING THE BOOTABLE MEDIA BUILDER WIZARD...................................................................... 103
9.3 CREATING BOOTABLE DISKETTES FOR ACRONIS DISK DIRECTOR SUITE.......................................... 104
9.4 CREATING BOOTABLE DISKETTES FOR ACRONIS OS SELECTOR....................................................... 104
9.5 CREATING BOOTABLE CDS .............................................................................................................. 105
APPENDIX A. HARD DISK AND OPERATING SYSTEM.............................................................. 106
A.1 HARD DISK ORGANIZATION............................................................................................................. 106
A.2 HARD DISK PARTITION .................................................................................................................... 107
A.3 PARTITION TYPES ............................................................................................................................ 107
A.4 PRIMARY PARTITIONS...................................................................................................................... 109
A.5 EXTENDED PARTITIONS ................................................................................................................... 109
A.6 LOGICAL PARTITIONS ...................................................................................................................... 109
A.7 FORMATTING HARD DISKS .............................................................................................................. 109
A.8 FILE SYSTEMS.................................................................................................................................. 110
A.9 FILE SYSTEM MAIN SPECIFICATIONS ............................................................................................... 111
APPENDIX B. PARTICULARITIES OF OPERATING SYSTEM FUNCTIONING..................... 115
B.1 DOS-TYPE OPERATING SYSTEMS .................................................................................................... 115
B.2 WINDOWS 95/98/ME........................................................................................................................ 117
B.3 WINDOWS NT/2000/XP................................................................................................................... 118
B.4 LINUX.............................................................................................................................................. 120
B.5 OTHER OPERATING SYSTEMS .......................................................................................................... 120
APPENDIX C. GLOSSARY................................................................................................................... 122
Copyright © Acronis, Inc., 2000–2005
5
Page 6

Introduction
g
Introduction
What is Acronis Disk Director Suite?
Acronis Disk Director Suite is a complex program that includes partition and boot
managers and hard disk data editing tools. With it, you can:
• Create hard disk partitions
• Resize and move them without data loss and destruction
• Convert partitions to other file systems without dat a loss
• Copy (move) partition contents
• Delete partitions
• Recover hard disk partitions that were accidentally deleted or damaged
• due to a hardware or software error
• Format, label, assign letters, hide and unhide partitions, set active
• partitions and perform additional disk management operations
• Install multiple operating systems on a single PC
• Boot installed operating systems from any hard disk partition
• Boot installed operating systems from under Windows
• Install several operating systems on a single partition
• Hide or protect with a password any operating system on your PC
• Duplicate installed operating systems and define different configurations for each
copy
• Recover boot records, files and folders structure, find lost clusters, remove viruses, etc.
Some terms of this Guide might seem unfamiliar. Appendix A «Hard Disk And Operating
System» and Appendix C «Glossary» provide descriptions of some hard disk data stora
components and used terms.
e
What’s new in Acronis Disk Director Suite 9.0?
Acronis Disk Director Suite has many new features that make it an
software suite
. In addition to the traditional Acronis Partition Expert capabilities,
integrated
this new version includes the functionality of Acronis Recovery Expert, Acronis
Disk Editor and the multipurpose boot manager Acronis OS Selector. New
features of this integrated software suite include:
• Recovering hard disk partitions that were accidentally deleted or damaged due
to a hardware or software error
• Installation of several different operating systems on a single PC
• Booting installed operating systems from any hard disk partition
6
Copyright © Acronis, Inc., 2000–2005
Page 7

Introduction
• Booting installed operating systems from under Windows
• Installation of several operating systems on a single partition
• Hiding or protecting with a password any operating system on your PC
• Duplicating installed operating systems and defining different configurations
for each copy
• Recovering boot records, files and folders structure, finding lost clusters and
removing viruses.
How to find the information you need in this guide
The Acronis Disk Director Suite User’s Guide contains:
• Chapter 1 «Installation And Use» — general information about software
installation, running, error recovery, removal and user interface essentials
• Chapter 2 «Beginning The Work» — information about the main window of
Acronis Disk Director Suite, logical software organization, main features,
and methods of calling and executing partition operations
• Chapter 3 «Automatic Partition Operations» —
beginner information about
disk partition operations, performed through wizards
• Chapter 4 «Manual Partition» —
experienced-user information about manuall y
performed disk partition operations
• Chapter 5 «Working with Acronis Recovery Expert» — recovering deleted or
damaged partitions
• Chapter 6 «Working with Acronis Disk Editor» — editing hard disk data
• Chapter 7 «Working with Ac ronis OS Sele cto r» — working with the Acronis b oot
manager
• Chapter 8 «Installing and using several operating systems on a single PC» —
installation of several operating systems on one computer
• Chapter 9 «Bootable Media Builder» — creating bootable media
• Appendix A «Hard Disk And Operating System» — supplemental information
about hard disks, partitions and file systems
• Appendix B «Particularities of Operating System Function» — specificity of
various operating systems
• Appendix C «Glossary» — technical terms to help you understand this guide.
Software use conditions
The conditions of Acronis Disk Director Suite use are listed in the supplied
«License Agreement». To prove that you legally purchased and use Acronis Disk
Director Suite, you received a registration card along with the package. Each
registration card has a unique number.
Copyright © Acronis, Inc., 2000–2005
7
Page 8

Introduction
Based on current legislation, the «License Agreement» is considered as a
contract between user and software v endor. The contract is legally binding; its
violation may lead to prosecution.
Illegal use or distribution of software is a violation of the law and will be
prosecuted.
Technical support
Users who have legally purchased and registered their copy of Acronis Disk Director
Suite will receive free technical support from Acronis. If you have problems installing
or using the system that you cannot resolve with the help of this guide and
readme file, please e-mail technical support. You will need to provide the
registration number of your Acronis Disk Director Suite copy supplied with this
package.
Support URL:
http://www.acronis.com/support/
E-mail: support@acronis.com
8
Copyright © Acronis, Inc., 2000–2005
Page 9

Installation And Use
Chapter 1. Installation And Use
1.1 What’s Included
The Acronis Disk Director Suite package includes:
• Installation CD-ROM
• This guide
• License Agreement
• Registration card
• Advertising information
1.2 System Requirements
To take full advantage of Acronis Disk Director Suite you should have:
• A PC-compatible computer with a Pentium or similar CPU
• 32 MB RAM
• A floppy or a CD-RW drive
• A mouse (recommended)
• Microsoft Windows 98/Me/NT/2000/XP; Microsoft Windows NT Server / 2000
Server / 2000 Advanced Server / 2003 Server.
1.3 Installation Process
1.3.1 Acronis Disk Director Suite installation
To install Acronis Disk Director Suite:
1. Insert the CD into the CD-ROM drive and run the installer.
2. Follow all instructions.
3. During installation, you can specify if you need to install Acronis OS
Selector with Acronis Disk Director Suite.
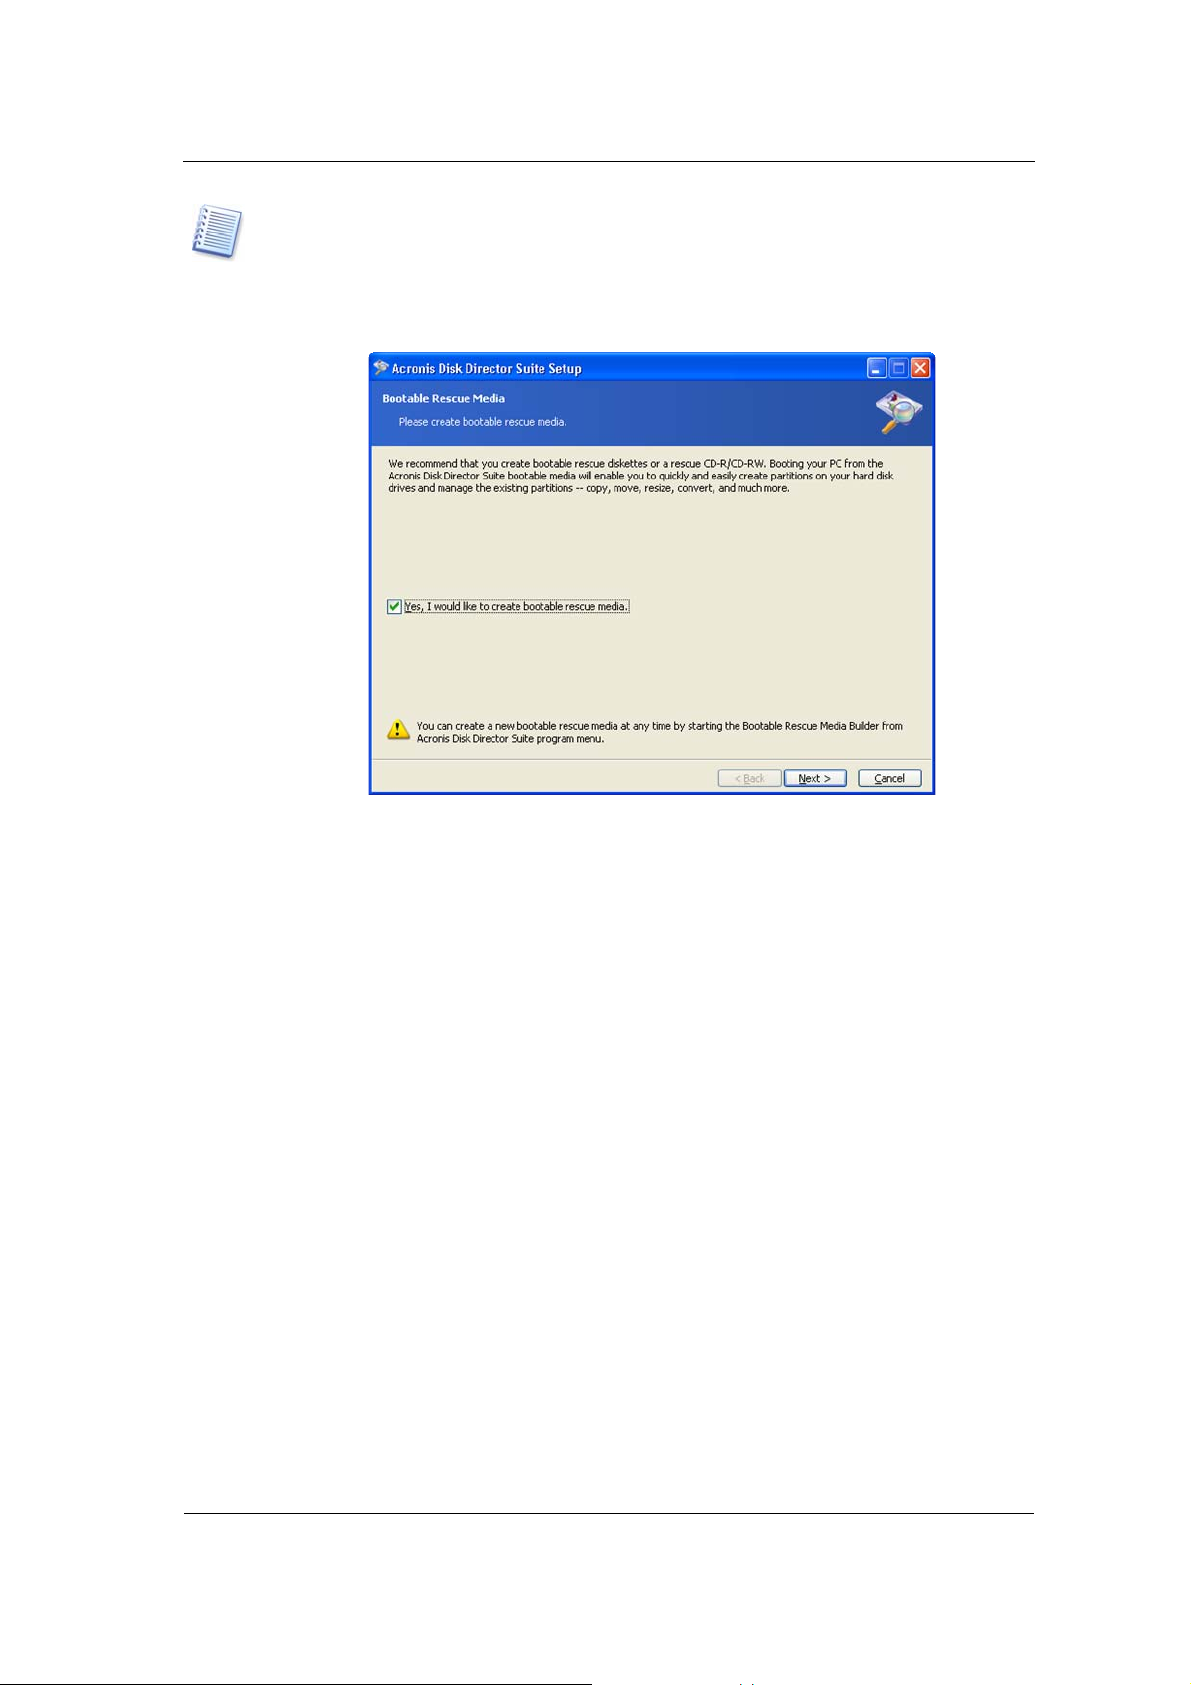
4. In the end of installation process you'll be prompted to create
media
.
5. There are two situation in which you might have to run the software from
bootable diskettes or CD:
bootable
• After a serious Windows failure, you may be required to reinstall this software
and reconfigure partitions.
• You will require bootable media in order to use Acronis Disk Director Suite on
a non-Windows system, for example, a Linux-based, PC.
Copyright © Acronis, Inc., 2000–2005
9
Page 10
Installation And Use
In Windows 98/Me operational systems the user is not offered to create bootable
media during the installation of Acronis Disk Director Suite. To make it will be
possible later with help Bootable Media Builder (see Chapter 9 «Bootable Media
Builder»).
After installing Acronis Disk Director Suite, reboot your PC.
If there was no bootable media made during Acronis Disk Director Suite
installation, you can create it anytime using Bootable Media Builder (see Chapter
9 «Bootable Media Builder»).
1.3.2 Acronis OS Selector installation
During the installation of Acronis OS Selector, the hidden system folder
BOOTWIZ will be created on your PC to keep the program loader. Acronis OS
Selector will also copy OS system files found on your PC into this folder to avoid
problems during bootup and to simplify adding new OS in the future.
Acronis OS Selector can be installed in the Typical or Custom variants.
During Typical installation, the BOOTWIZ folder will be created in the system
hard disk partition that contains the Windows files and folders.
Using the Custom installation option, you will be able to select the location of
the BOOTWIZ folder. This might come in handy when a system partition is
accidentally destroyed or damaged. In that case, you will be able to access the
Acronis OS Selector boot menu even if the system partition is inaccessible. The
menu will enable you to create and restore partitions and access the Acronis Disk
Editor tool.
10
Copyright © Acronis, Inc., 2000–2005
Page 11

Installation And Use
1.4 Upgrading Acronis Disk Director Suite
If you already have Acronis Partition Expert, Acronis OS Selector, Acronis
Recovery Expert or Acronis Disk Editor installed on your PC, the installation
program will automatically find them and prompt you on their replacement with
new versions.
Software upgrades (with certain bug fixes) may be downloaded free from the Acronis
Web site:
http://www.acronis.com/support/updates/.
1.5 Removing Software
To remove, select Acronis DiskDirector Remove Acronis Disk
Director Suite from the Programs menu. You will see the dialog box to confirm
removal of the software from your PC hard disk.
To confirm, click
Yes. Acronis Disk Director Suite will be completely removed.
To remove Acronis OS Selector only, select Acronis
Acronis OS Selector. And then in the dialog box select item “Uninstall Acronis
OS Selector”.
1.6 User Interface
When Acronis Disk Director Suite software is installed, it has a graphical user
interface that is controlled by the mouse or by
Tab, Shift+Tab, Left, Right,
Up, Down, Space, Enter and Escape keys.
If you regularly work with Windows or X Window applications, you should not
encounter any problems with the Acronis Disk Director Suite interface.
Acronis Disk Director Suite uses a series of dialogs requiring the user to choose
among several actions or to mark partitions or disks to be manipulated.
1.7 Before You Run Acronis Disk Director Suite
DiskDirector Install
PLEASE NOTE: Operations on system, application or data partitions must be done
very carefully to avoid potential hard disk booting or data storage pro blems.
Acronis Disk Director Suite has been thoroughly tested to work with numerous hard
disks, so if problems arise, they are likely caused by improper use, not the software.
A power loss, turning off the PC or pr essing th e Reset button on your PC during the
repartitioning procedure could result in partition damage and data loss.
Please take all necessary precautions and following these
Copyright © Acronis, Inc., 2000–2005
simple rules:
11
Page 12

Installation And Use
g
1. Create a dis k image of the disk on which parti tions are to be reconfigured.
This will ensure that your data will not be lost under any circumstances.
Almost all current PCs feature CD-RW drives. Having your most important
data backed up to a hard disk or CD will enable you to work on the disk
partitions with full confidence that your data is safe.
Acronis offers extremely effective hard disk and partition disk imaging software —
Acronis
Ima
restored at any time.
True Image (visit http://www.acronis.com/products/tru eimag e/). Acronis True
e creates a backup stored in a compressed archive file whose contents can be
2. Test your disk to make sure it’s fully functional and does not contain bad
sectors or file system errors.
You can invoke system hard disk checking tools directly from Acronis Disk Director
Suite by selecting
toolbar button.
Disk Check or clicking Check the selected partition for errors
3. Do not perform any partition operations while running other software that
has low-level disk access, such as antivirus or backup tools. Close such
programs before running Acronis Disk Director Suite.
If you follow these simple rules, you will protect yourself against data loss.
1.8 Running Acronis Disk Director Suite
1.8.1 Running under Windows
Under Windows, Acronis Disk Director Suite can be run by selecting
Programs
Under Windows, Acr oni s D isk D ire cto r S uit e can perform operations on any partitions,
including primary, logical, system or data
1.8.2 Running Acronis Disk Director Suite for the first time
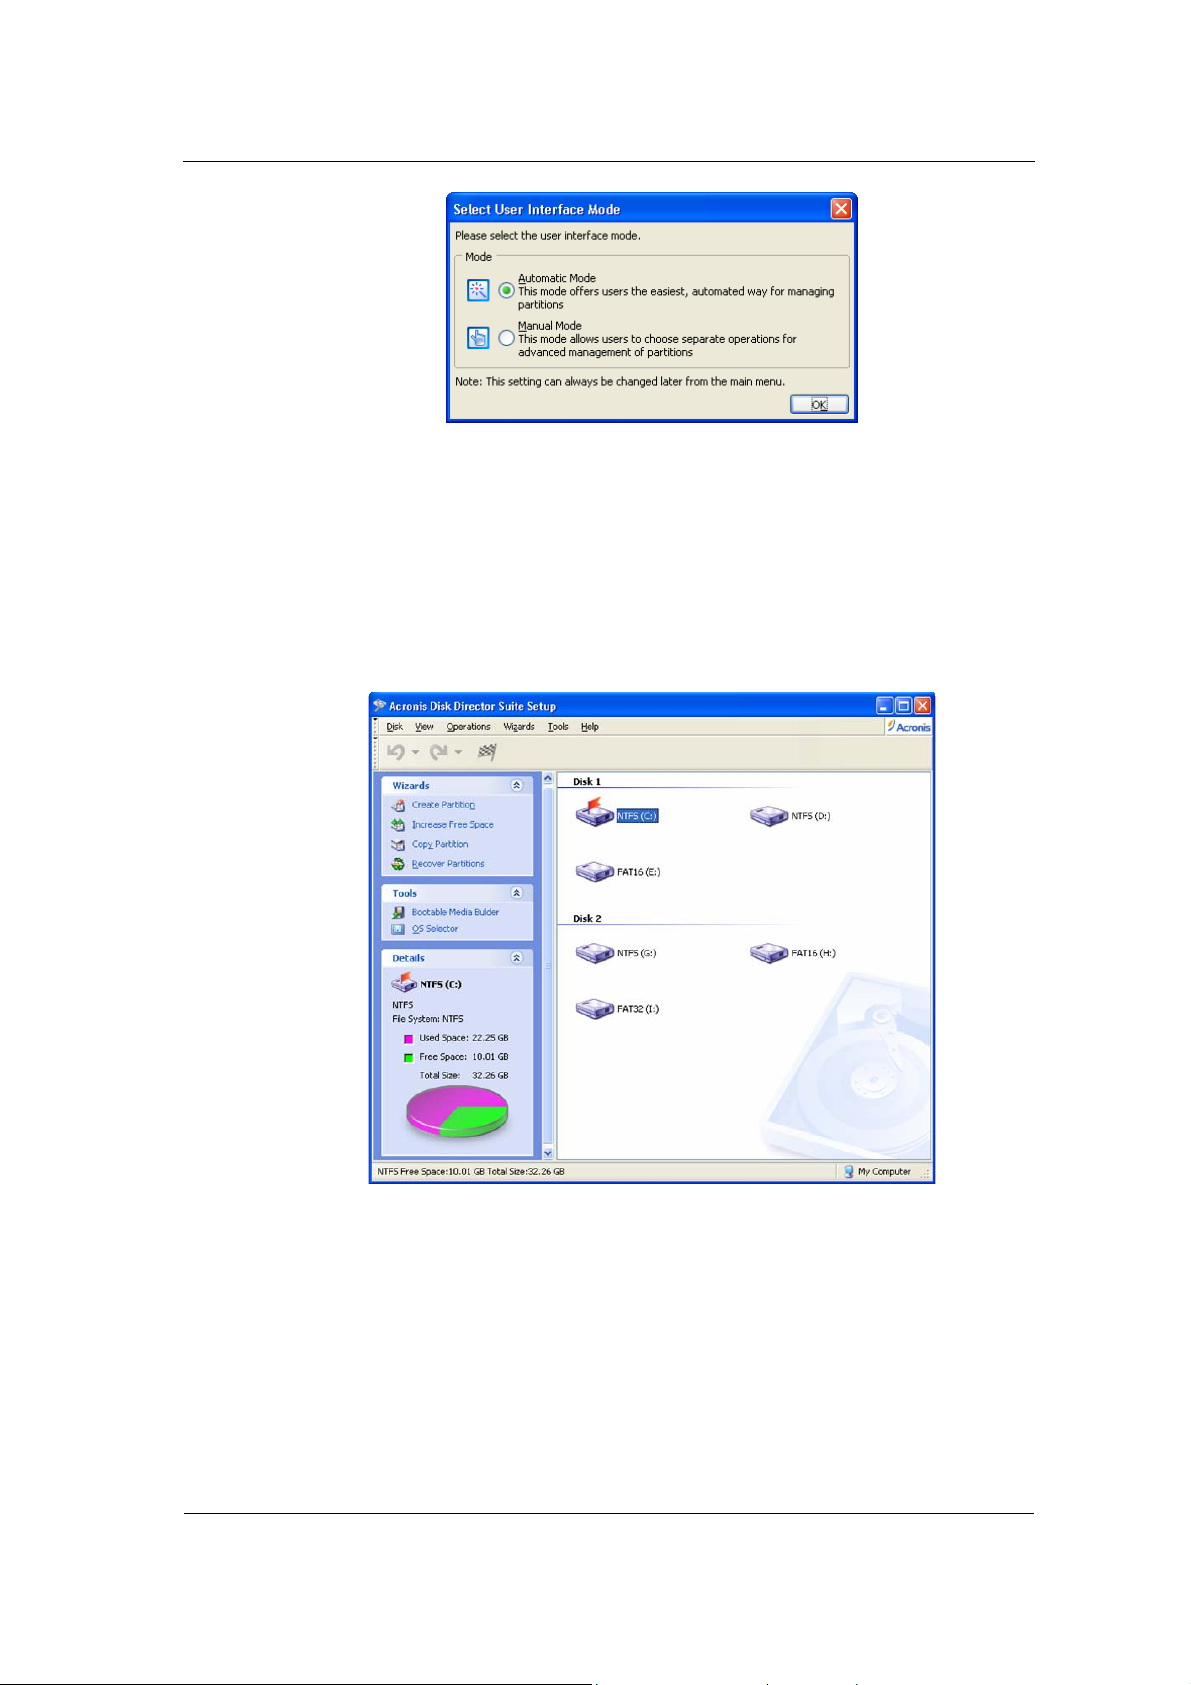
When you run Acronis Disk Director Suite for the first time, you will be prompted
to choose whether you want to work in the
Mode
.
Automatic Mode provides enough functionality to create almost any partition
configuration on your PC hard disks.
If you need a detailed partition structure representati on with a complete set of
partition operations and controls, select the
Acronis DiskDirector Acronis Disk Director Suite.
without
rebooting your PC.
Automatic Mode or in the Manual
Manual Mode.
Start
You can switch between modes at any time (see 2.1.3 «Switching modes»).
12
Copyright © Acronis, Inc., 2000–2005
Page 13

Installation And Use
1.8.3 Running from bootable diskettes or CD
Previously, we explained how to create bootable diskettes or a CD (see 1.3
«Installation Process»). While working with Acronis Disk Director Suite, you may
need to use the bootable media: (1) after a serious Windows failure or (2) to
work on a Linux-based PC. (see also Chapter 9 «Bootable Media Builder»).
Your PC BIOS must be set correctly to boot and run the software from bootable
diskettes or CD.
Bootable diskettes or CD can be created during Acronis Disk Director Suite
installation (see 1.3 «Installation Process»). If you need to do this after installation,
select
Builder
to create bootable media, as the CD-ROM itself is bootable.
Start Program Acronis DiskDirector Bootable Rescue Media
. If you purchased Acronis Disk Director Suite on a CD-ROM, you do not have
Copyright © Acronis, Inc., 2000–2005
13
Page 14

Beginning The Work
Chapter 2. Beginning The Work
2.1 Acronis Disk Director Suite Logical Organization
Acronis Disk Director Suite provides two operation modes (see 1.8 «Running
Acronis Disk Director Suite»):
«Automatic partition operations» mode is designed for the most frequent
•
operations
•
«Manual partition operations» mode for any partition operations. This mode is
intended for experienced users with some knowledge of disk data storage
organization; it provides full operational control
2.1.1 Automatic partition operations
In this mode, all actions are performed through task-based wizards.
suitable for the majority of users
Create partition wizard — enables you to create a partition from unallocated
•
disk space or other part iti on s
• Increase free space wizard — enables you to enlarge a partition at the expense
of unallocated disk space or other partitions
• Copy partition wizard — enables you to copy a partition
• Recover partitions wizard – enables you to recover any deleted or damaged
partitions. Working with Recover partitions wizard is described in detail in a
separate chapter of this guide. See Chapter 5 «Working with ». With these
wizards, even an inexperienced user will be able to perform the recovery
operations using step-by-step instructions.
2.1.2 Manual partition operations
In this mode, experienced users have access to all Acronis Disk Director Suite
features.
Partition operations are performed by entering necessary parameters into dialog
boxes.
The main difference between the automatic and manual modes is that wizards
perform operation series in the automatic mode and only single disk/partition
operations in the manual mode.
2.1.3 Switching modes
Having selected an operation mode during installation (see 1.3 «Installation
Process»), you can switch to another mode at any time. Select View
Mode for the automatic mode or View
14
Automatic
Manual Mode for the manual.
Copyright © Acronis, Inc., 2000–2005
Page 15
Beginning The Work
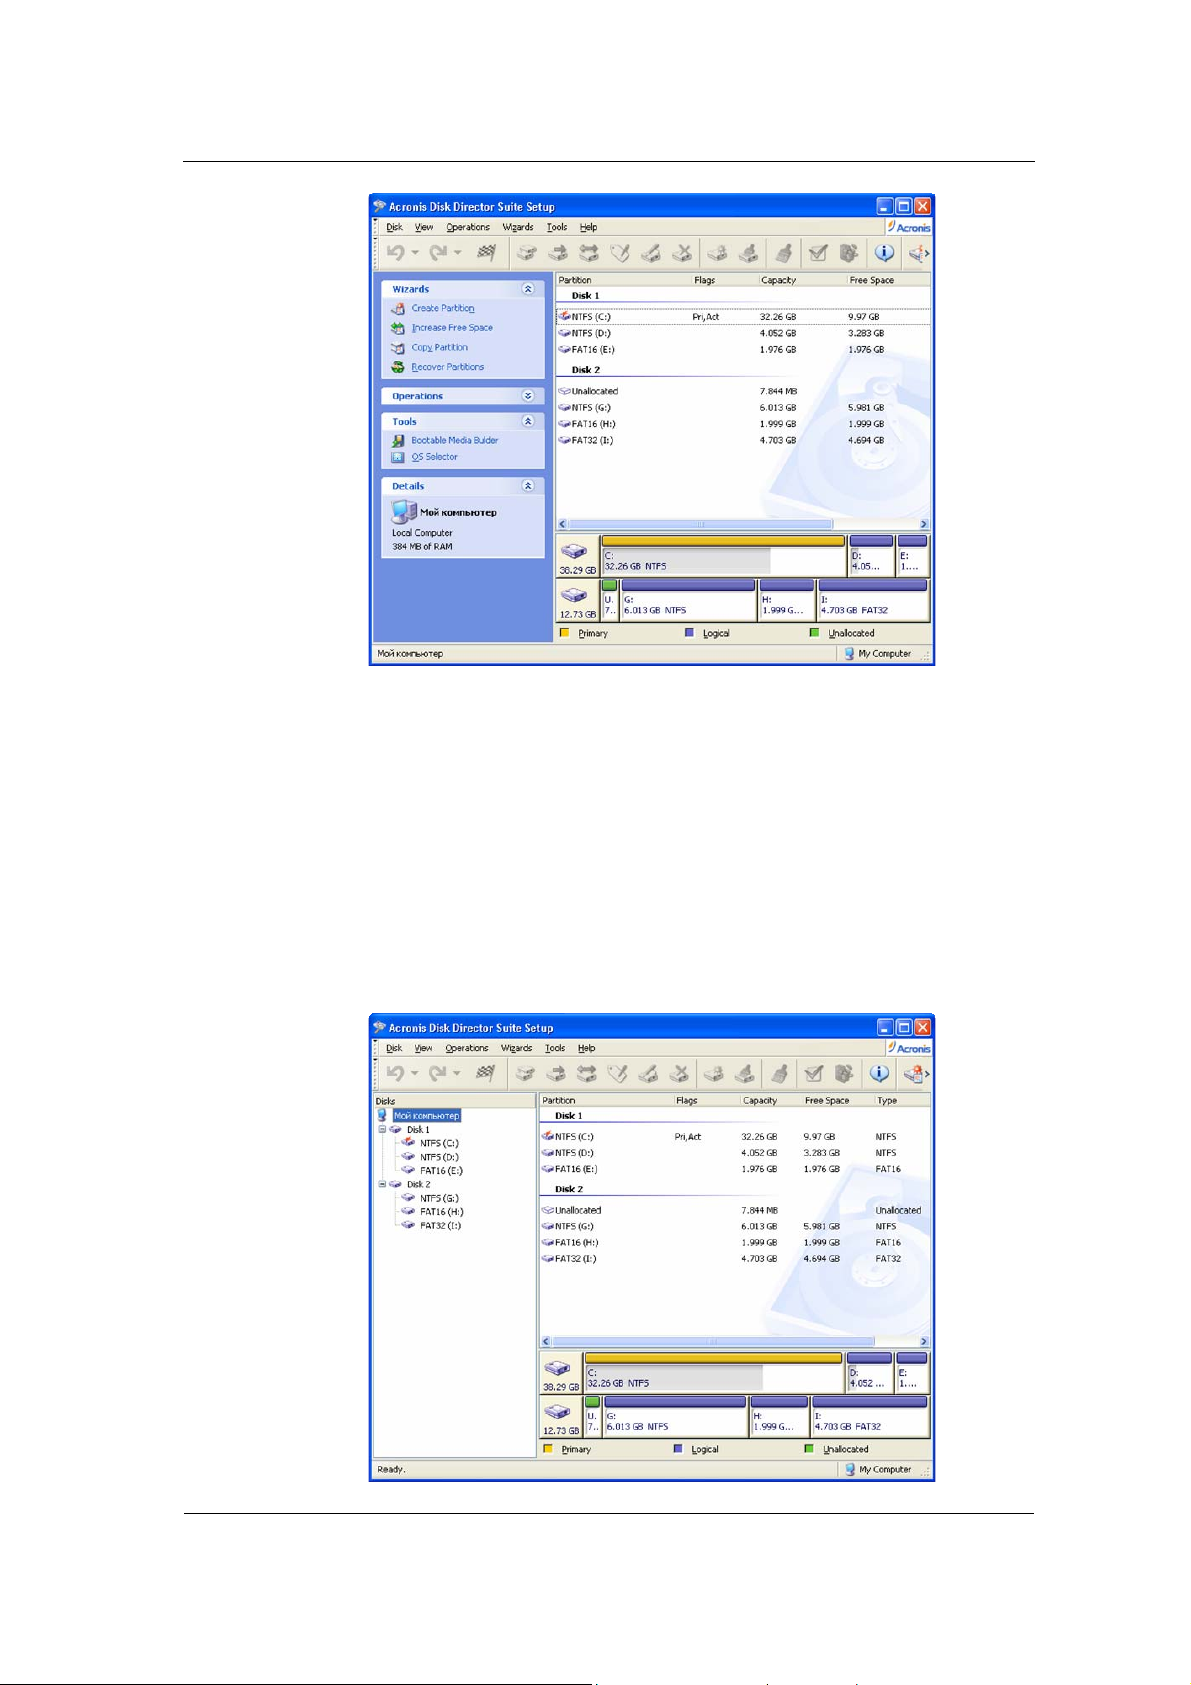
2.2 Acronis Disk Director Suite Main Window
Acronis Disk Director Suite is controlled through the main window. It includes the
menu, toolbar, and disk and partition tree (shown/hidden through the View
menu). This represents the computer disk and partition list.
The main window appearance differs depending on the selected operation mode
(see 2.1 «Acronis Disk Director Suite Logical Organization»). The difference
applies to the available operation list in the main menu, partition context menus,
sidebar and toolbar, and the amount of partition structure details represented.
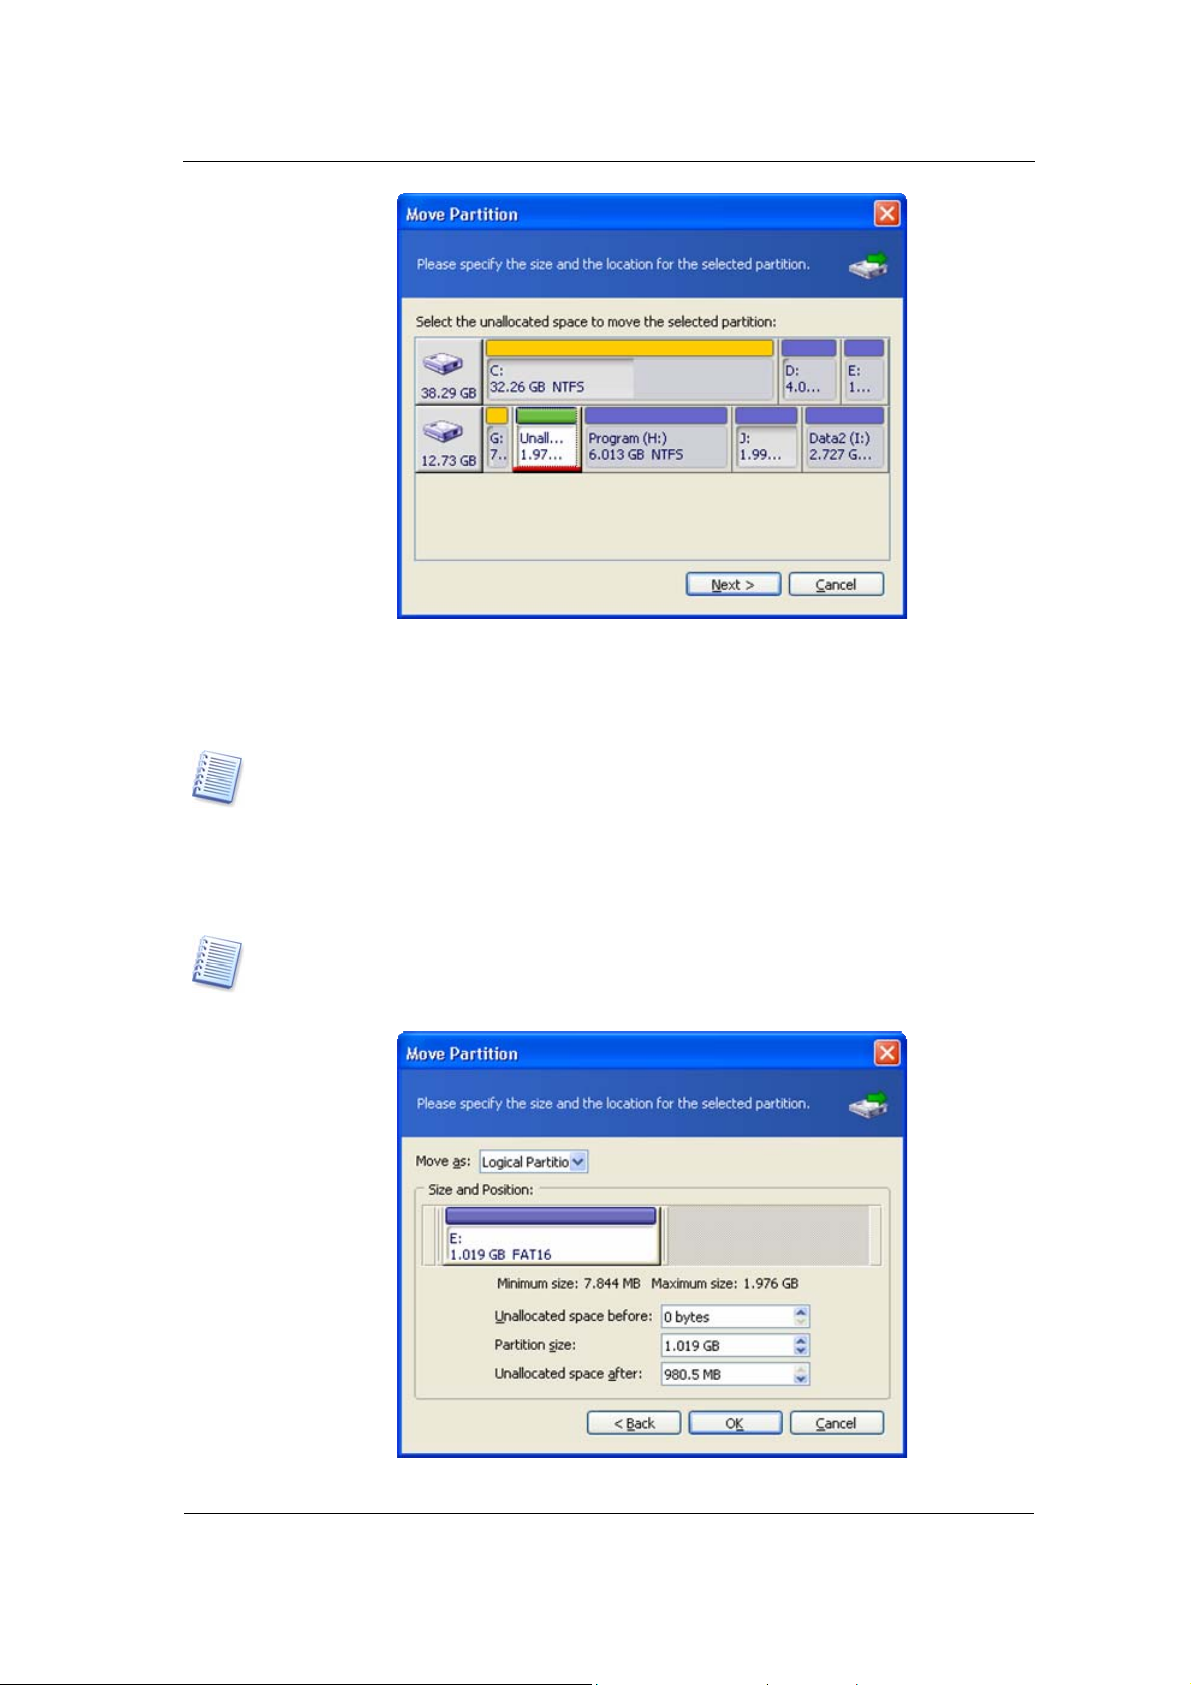
Acronis Disk Director Suite main window, Automatic Mode
In the manual partition operations mode, the main window also includes all
unallocated disk space, while only partitions are shown in the automatic mode.
Partition creation, free space and copy wizards automatically recognize
unallocated disk space in this mode.
Copyright © Acronis, Inc., 2000–2005
15
Page 16
Beginning The Work
Acronis Disk Director Suite main window, Manual Mode
2.2.1 Disk and partition information
The main window shows the partition’s disk number, assigned letter, label, type,
status, size, free space size and file system. Disk and partition information is also
provided in the partition and disk tree.
The bottom part of the main window graphically indicates the selected disk and
its partitions as rectangles with basic data on them (label, letter, size, type, file
system).
2.2.2 Customizing the main window appearance
You can customize the appearance using the View menu — in particular to show or
hide window elements like sidebar, partition and disk tree and toolbars.
The partition and disk tree in the main window
16
Copyright © Acronis, Inc., 2000–2005
Page 17

Beginning The Work
2.3 Calling Partition Operations
All partition operations in both modes are called and executed similarly.
2.3.1 Calling the main operations
Any partition operation can be launched:
• By selecting it from the Disk submenu
• From customizable toolbars
• From the partition context menu (both in the main window and the graphical
panel)
• From Operations and Advanced sidebar lists
Note that the list of available operations in the Disk submenu and the Operations
sidebar list depends on the selected partition type. This holds true for unallocated
space as well.
2.3.2 Advanced operations
Advanced hard disk partition operations are:
• Convert — convert the FAT16 partition file system to FAT32, Ext2 to Ext3, and
vice versa
• Hide/Unhide — hide/unhide a partition
• Set Active — set an active partition
• Resize Root — resize FAT16 partition root
• Change Bytes per INODE — resize INODE table (Linux Ext2/Ext3)
• Change Cluster Size — change FAT16/FAT32 partition cluster size
• Change Type — change partition type
• Recover - recovering deleted or damaged partitions (see Chapter 5 «Working
with Acronis Recovery Expert»).
• Edit - editing hard disk data (see Chapter 6 «Working with Acronis Disk Editor»).
Advanced partition operations are called from the Advanced sidebar list, the same
partition context menu item or toolbar button.
Note that the additional operations list of the partition context menu or toolbar
depends on the selection of a partition type. For example, the FAT16 partition menu
contains
Linux Ext2/Ext3 partition context menu contains
INODE, which is not found on the FA T menus
Advanced Resize Root; this is absent in the FAT32 partition menu. The
Advanced Change Bytes per
.
Copyright © Acronis, Inc., 2000–2005
17
Page 18
Beginning The Work
2.3.3 Invoking Acronis Disk Director Suite wizards
Wizards are invoked from the Wizards submenu and the corresponding sidebar list.
For example, select Wizards Create Partition for the partition creation wizard.
2.4 Partition Operation Properties
2.4.1 Displaying operation results
Results of any disk partition operation are immediately displayed in the Acronis
Disk Director Suite main window.
If you create a partition, it will be immediately shown in the hard disk partition
list in the main window, as well as in graphical form on the bottom of the main
windows.
Any partition changes, including resizing, relocating and labeling are also
immediately displayed in the main window.
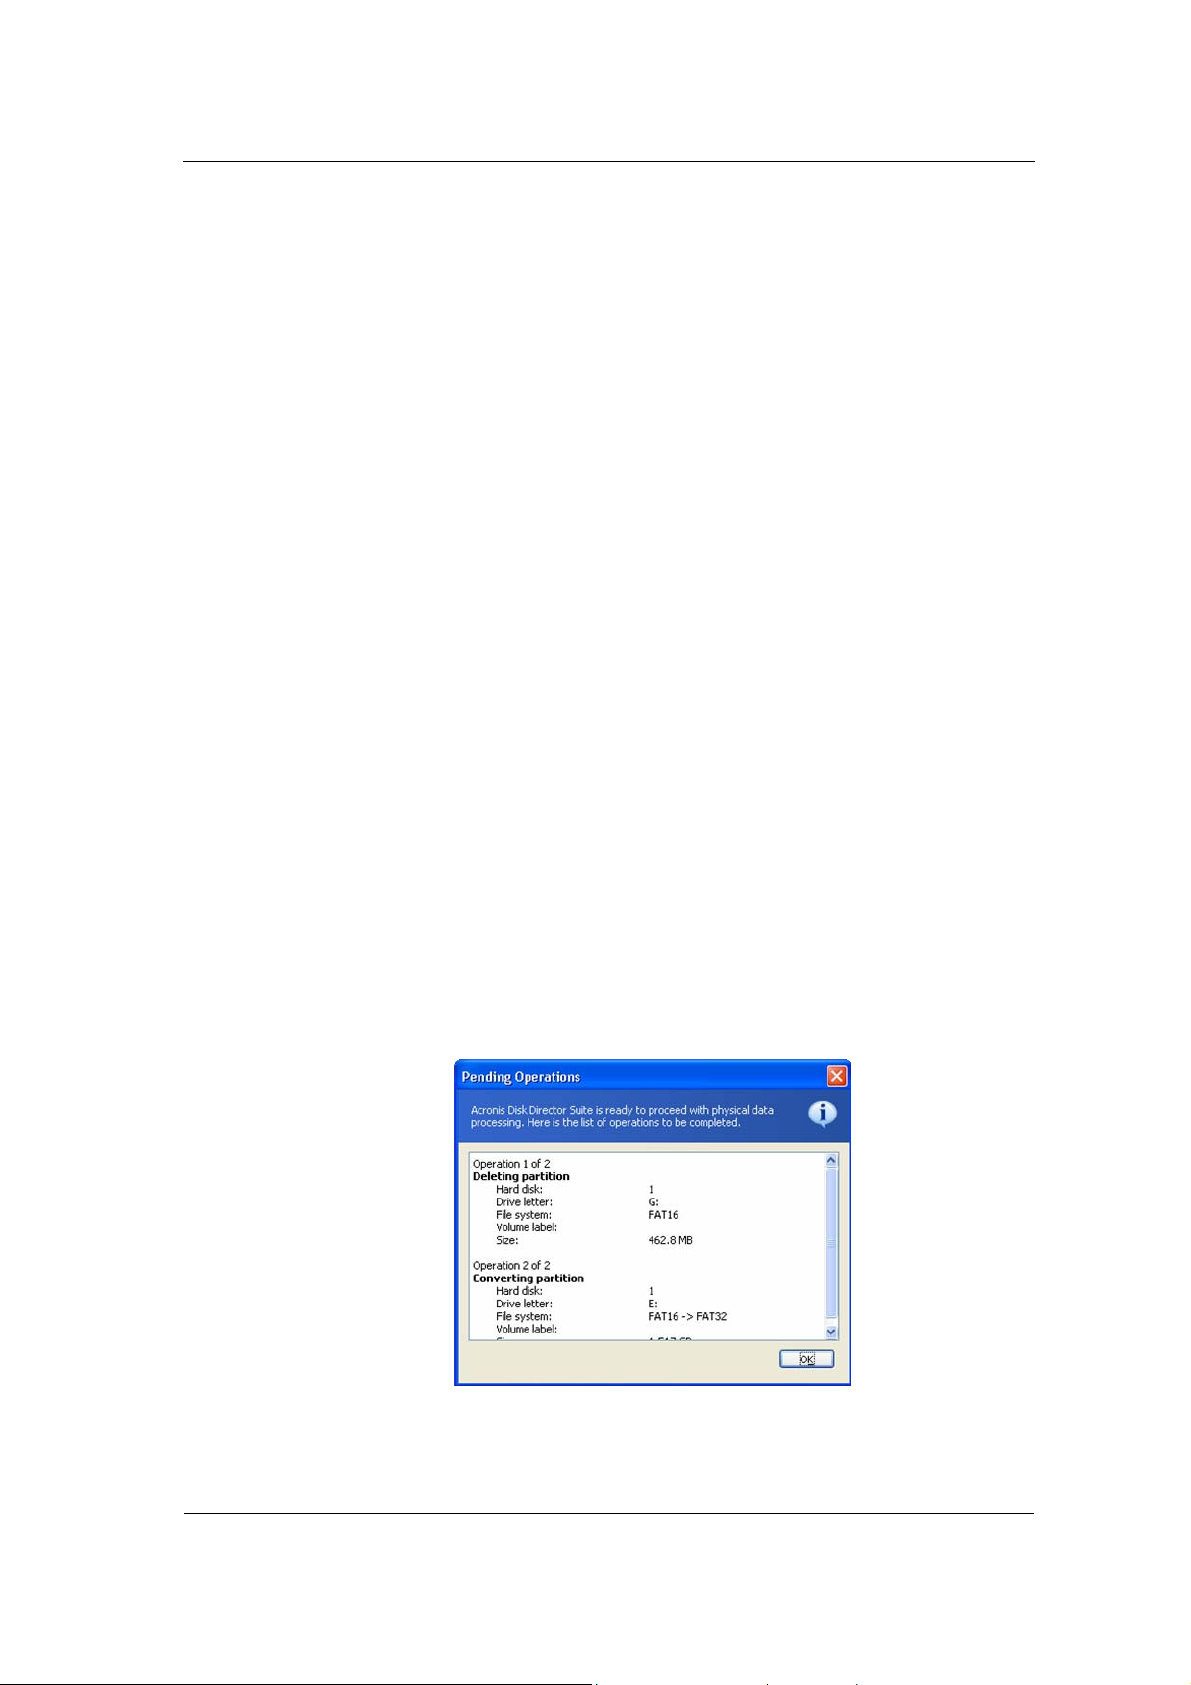
2.4.2 Pending operations
All operations are pending until the user issues the command for the changes to be
made permanent. Until then, Acronis Disk Director Suite will only show the new
partition structure that is provided by operations to be performed.
Therefore, you can view the graphical representation of the new partition
structure first and then decide whether to perform or cancel specific operations.
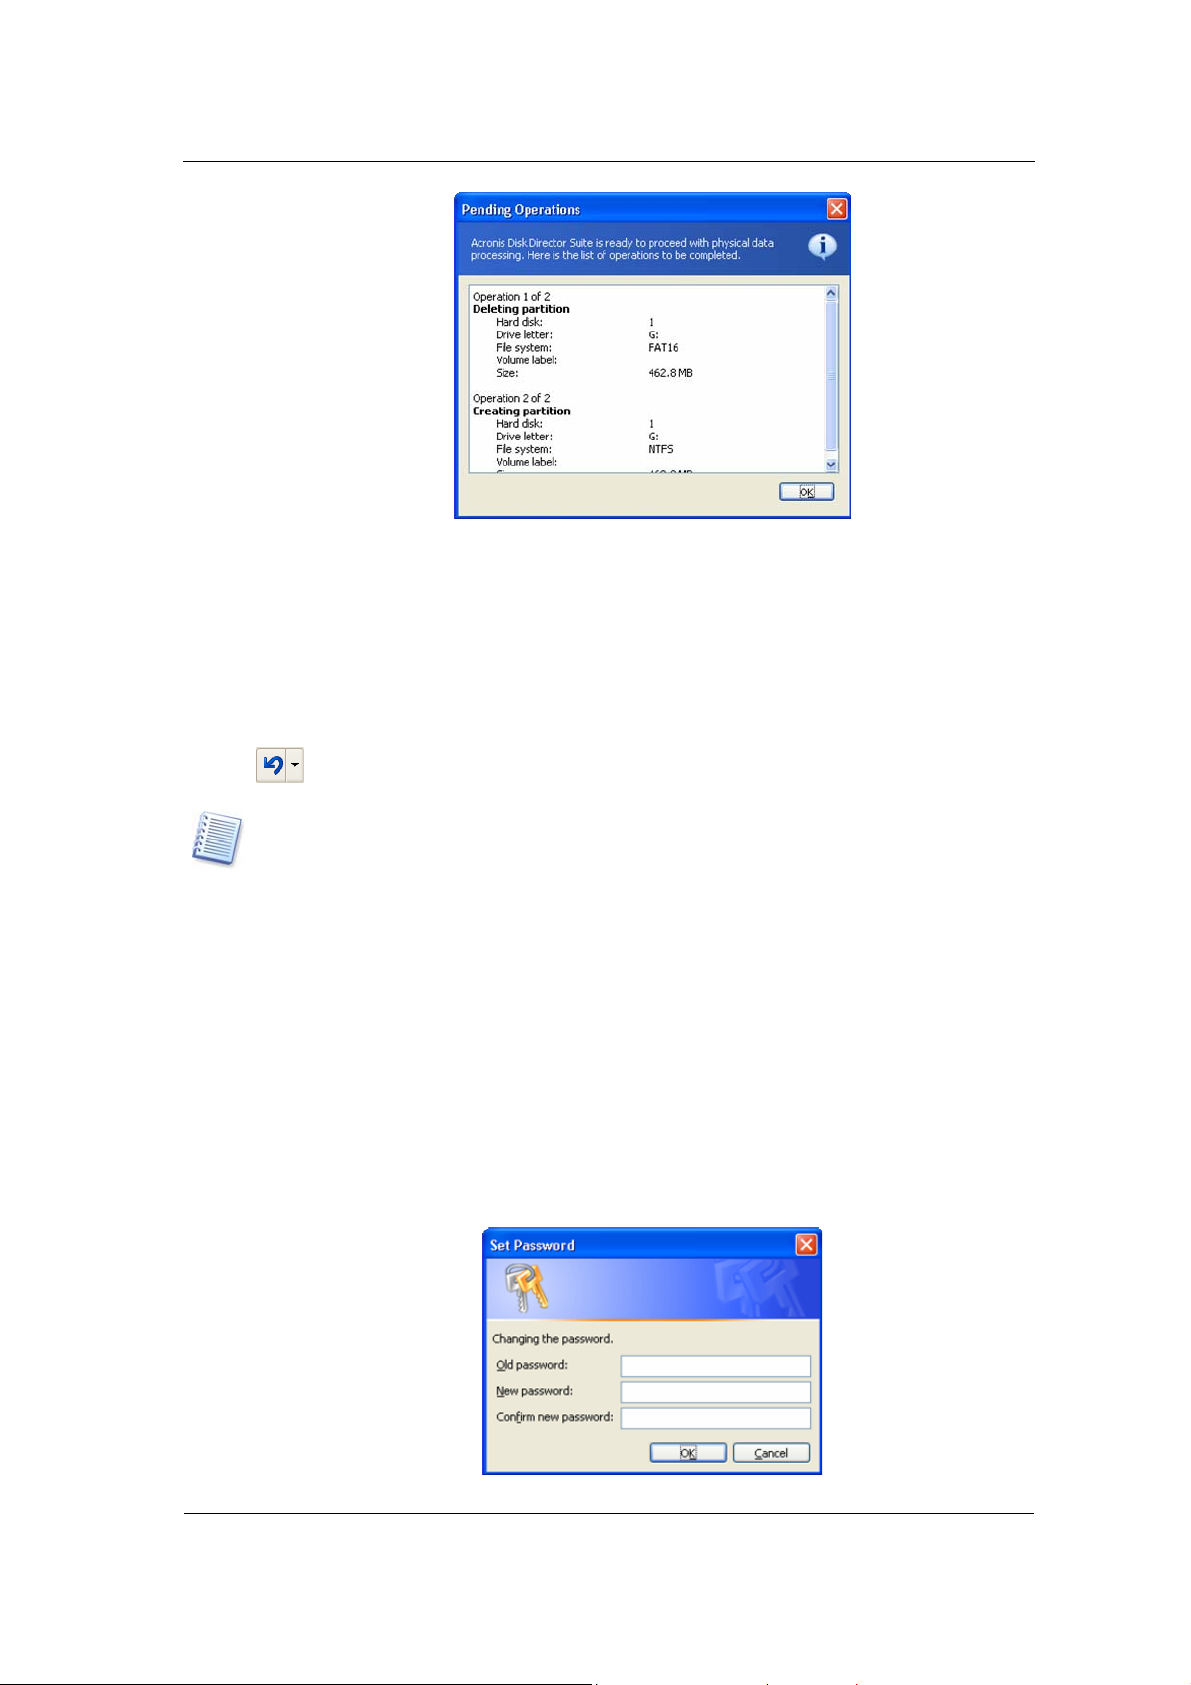
2.4.3 Viewing delayed operations
All pending operations are added to the pending operations list. You can view it in the Pending Operations window by clicking Operations Show:
Pending operations list
This organization enables you to control all planned operations, double check
your intended work, and undo them fully or partially, if needed.
18
Copyright © Acronis, Inc., 2000–2005
Page 19

Beginning The Work
2.4.4 Performing pending operations
To execute planned hard disk operations, th e user has to select one of the two
following commands:
• Select Operations Commit in the main menu
• Click
Commit Pending Operations toolbar button
This performs all pending operations. You will not be able to undo any actions or
operations after you Commit the operation.
2.4.5 Modifying pending operations
All of your actions result in the creation of pen ding operations. For example,
you can create a new partition by providing its type, file system, size, location
and label. You can easily view the pending op eration for the partition you are
work i n g o n ( s e e 2. 4 . 3 « Viewing delayed operations» ) .
You can always change any operation parameter, including type, files system,
size, location, etc. before performing th e operation. Using Change type, Convert,
Move, Resize, and similar operations, you will also see that your actions
result in creating new pending operations. These actions will only change the
existing pending operation parameters.
If you decide to change the label of a different, existing partition, Acronis Disk
Director Suite will immediately create a new pending operation. Thus the same
actions sometimes result in the creation of a new pending operation or
modification of existing operations.
do not
2.4.6 Undoing user actions
Calling wizards or dialog boxes for planning disk partition operations are user
actions. User entries are necessary operation parameters on the wizard or dialog
box pages.
One user action in Acronis Disk Director Suite enables you to plan a list of
partition operations, for example, calling a wizard for partition creation or
resizing. (You can easily verify your actions by looking at the Pending Operations
when the wizard finishes its work.)
You can also create a partition by selecting Disk Create Partition. This requires
a list of actions to be performed (enter a label, select partition type, file system,
size and location), resulting in the creation of a single partition create operation
only.
The difference between user actions and partiti on operations should be kept in
mind if you wish to undo user actions.
Any user action in Acronis Disk Director Suite can be undone or redone before
committing the operation. To undo a user action:
Copyright © Acronis, Inc., 2000–2005
19
Page 20

Beginning The Work
g
• Select Operations Undo from the main menu (or press Ctrl+Z)
• Click
Undo Last Action toolbar button
To redo a user action:
• Select Operations Redo from the main menu (or press Ctrl
• Click
Redo Last Action toolbar button
+Y)
As user actions result in creating pending partition operations, as mentioned
above, undoing them results in canceling one or more partition operations. And
conversely, redoing a user action results in the addition of one or more pending
operations.
Depending on the situation, undoing an action may cancel a pending operation
or undo changes of an existing operation (see 2.4.5 «Modifying pending
operations»).
Similarly, redoing an action might add a pending operation to the list again or
redo a change of a pending operation parameter.
You can undo user actions one at a time or all at once by selecting Operations Undo
. Similarly, you can redo user actions (along with the corresponding graphical
All
representation of partition reconfiguration) one-by-one or all at once by selectin
Operations Redo All.
2.4.7 Wizard operations
Pending partition operations created by Acron i s D i s k D ir e c t or S u i t e wizards differ in
that a user must provide a list of operation parameters to perform them. Each
parameter is entered on a separate wizard page.
Entering operation parameters, you change wizard pages using Back and Next
buttons until you reach the Preview page with the Finish button.
On the Preview wizard page, you can click Back to return and change any
operation parameters.
After clicking Finish on the last wizard page:
• The new partition structure is graphically represented in the Acronis Disk
Director Suite main window
• The wizard creates a list of pending operations; you can see it by selecting
Operations Show
20
Copyright © Acronis, Inc., 2000–2005
Page 21
Beginning The Work
Remember that no actions are performed on your disks when the wizard finishes
working! If you are sure that the new structure is suitable, select Operations
Commit or click Commit Pending operations. Wizard-created pending operations
will then be performed at this time.
Before you select Operations Commit or click Commit Pending operations, you
can undo your actions (calling a wizard) and wizard-created pending operations
in the usual way (selecting Operations Undo or pressing
Ctrl+Z) or clicking
Undo Last Action.
Acronis Disk Director Suite shows the wizard and its results as a user action by
creating
mentioned methods, i.e. pressing
operations
the list of operations. Any pending actions can be fully undone by any of the
Undo Last Action will undo a user action and all
planned by the wizard.
2.5 Protecting Acronis Disk Director Suite With A Password
You should always be aware of possible unauthorized access to your data. To
protect your hard disk, partition, applications and data, Acronis Disk Director
Suite provides password protection.
If you need to protect Acronis Disk Director Suite with a password:
1. Select Disk
2. Enter a password in the New Password and Confirm New Password fields
in the Set Password window.
Set Password.
Copyright © Acronis, Inc., 2000–2005
21
Page 22

Beginning The Work
3. Click OK to enable password protection.
After you run the program, you’ll be prompted to enter a password in the
Password Protected window:
If you enter a wrong password, you'll be asked to re-enter it. Clicking Cancel will
close the program.
If you need to change the password:
1. Select Disk Set Password.
2. Enter the old password in the Old Password field and the new password i n
the New Password and Confirm New Password fields in the Set Password
window.
3. Click OK
Please Note: If you protect Acronis Disk Director Suite with a password and forget it,
you will have to uninstall Disk Director Suite by selecting
Disk Director Suite Uninstall Acronis Disk Director Suite, and install it again!
to enable password protection.
Programs Acronis
22
Copyright © Acronis, Inc., 2000–2005
Page 23

Automatic Partition Operations
Chapter 3. Automatic Partition Operations
The «Automatic partition operations» mode enables you to perform the following
typical partition operations:
• Create a new partition
• Increase partition free space
• Copy a partition
• Recover Partitions
These operations are performed with wizards, enabling you to enter operation
parameters step-by-step and return to any step as needed. Each parameter is
provided with detailed instructions.
Detailed description of Recover Partitions Wizard see in the Chapter 5 «Work i n g
with Acronis Recovery Expert».
3.1 Creating A New Partition
You might need a new hard disk partitio n to:
• Store several same-type files — for example, an MP3 collection, video files,
etc. on a partition
• Store backups (images) of other partitions/disks on a partition
• Install a new operating system (or swap file) on a partition
Create partition wizard lets you create a partition of any type (Active, Primary
or Logical), select a file system, label, assign a letter, and other disk
management functio ns.
1. If you need to create a partition:
1. Run the create partition wizard by selecting Wizards Create partition or
similar Wizards list item on the sidebar, or by clicking
Create partition
on the toolbar.
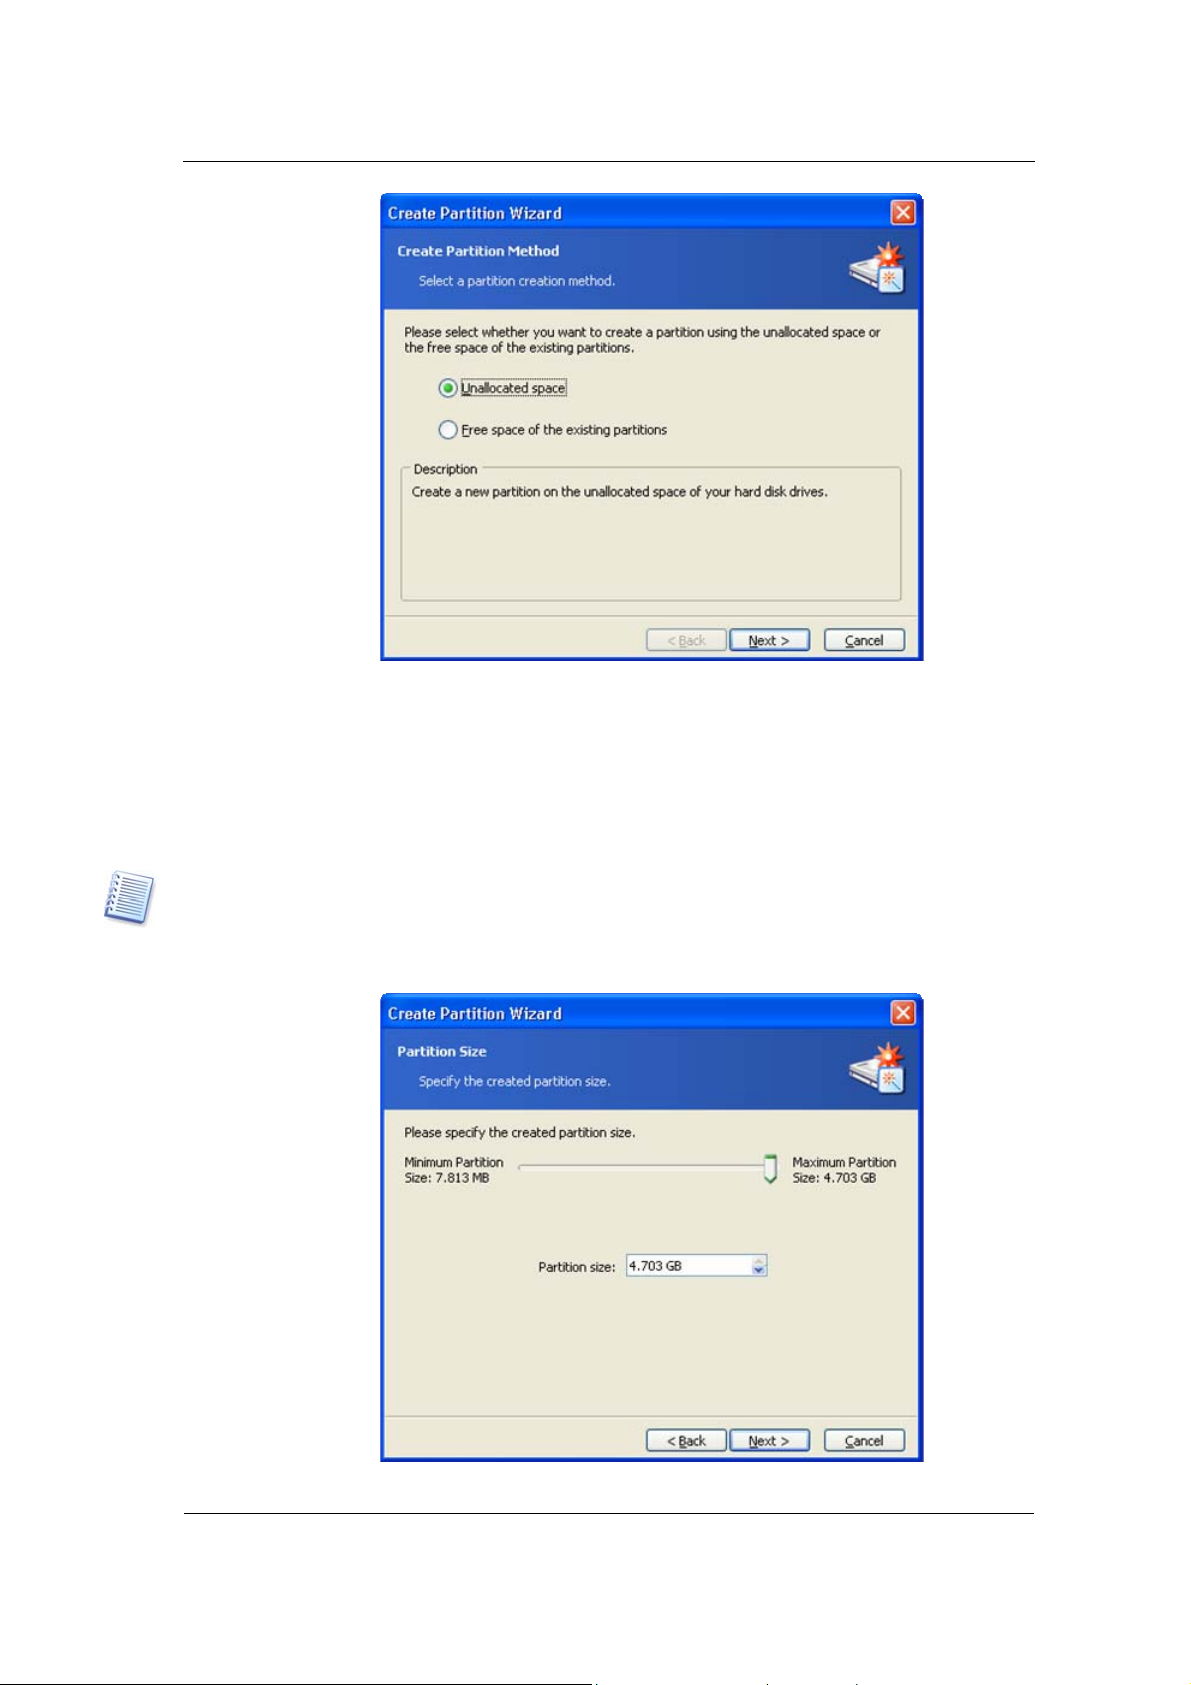
2. The wizard will analyze computer disks and partitions. If the wizard finds
unallocated space, you will see the Action Selection wizard page.
It will ask you to select how to create a new partition:
(1) using disk unallocated space.
(2) using existing partitions free space
Unallocated space is the space not used by any existing partitions. In contrast, partition
free space is the space free from any data.
Copyright © Acronis, Inc., 2000–2005
23
Page 24
Automatic Partition Operations
Partition creation method selection window
2. If you want to create a partition using unallocated disk space:
1. Set the switch to Unallocated space.
2. The wizard will offer to create a partition on the largest unallocated area.
For example, if you have 5.0 GB and 12.0 GB unallocated areas, the wizard will offer
to create a partition on the 12.0-GB area.
If you want to create a partition on the 5.0-GB unallocated space, you will have to reject the
wizard’s offer and simply select this area and click
«Manual partition operations» mode.
Create a new partition. You can do this in the
3. On the Partition Size wizard page, set the partition size.
New partition size window
24
Copyright © Acronis, Inc., 2000–2005
Page 25
Automatic Partition Operations
g
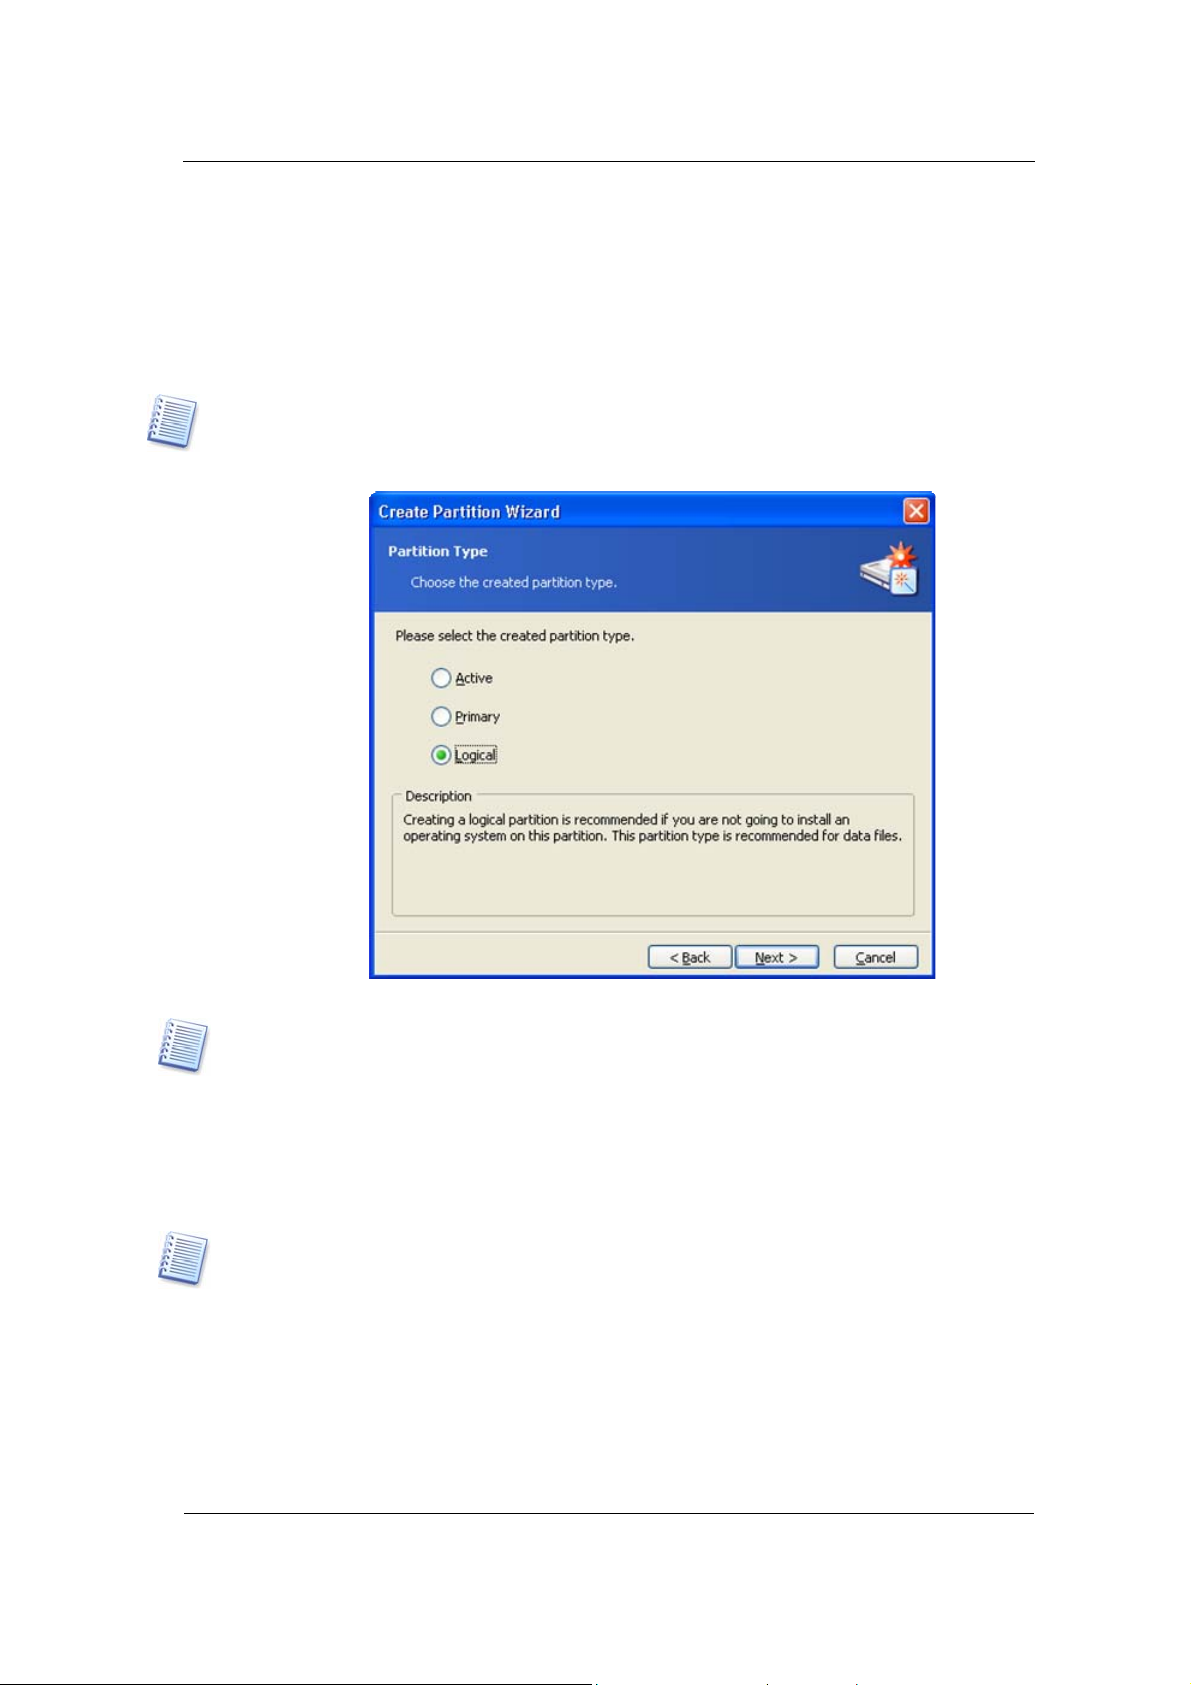
4. On the next wizard page, select partition type — Active (Active Primary), Primary or
Logical.
5. Typically Primary is selected to install an operating system to a partition. If the
partition is for data storage, select Logical.
6. Select Active if you want to install an operating system on this partition to boot at
startup.
Note that if you enter a size of more than 2 GB, you will not be able to use the FAT16 file
system on this partition. It will be disabled in the
File System wizard page.
Partition type selection window
A hard disk can contain up to four primary partitions. If they already exist, Active and
Primary options will be disabled and you will be able to select only the Lo
ical partition
type.
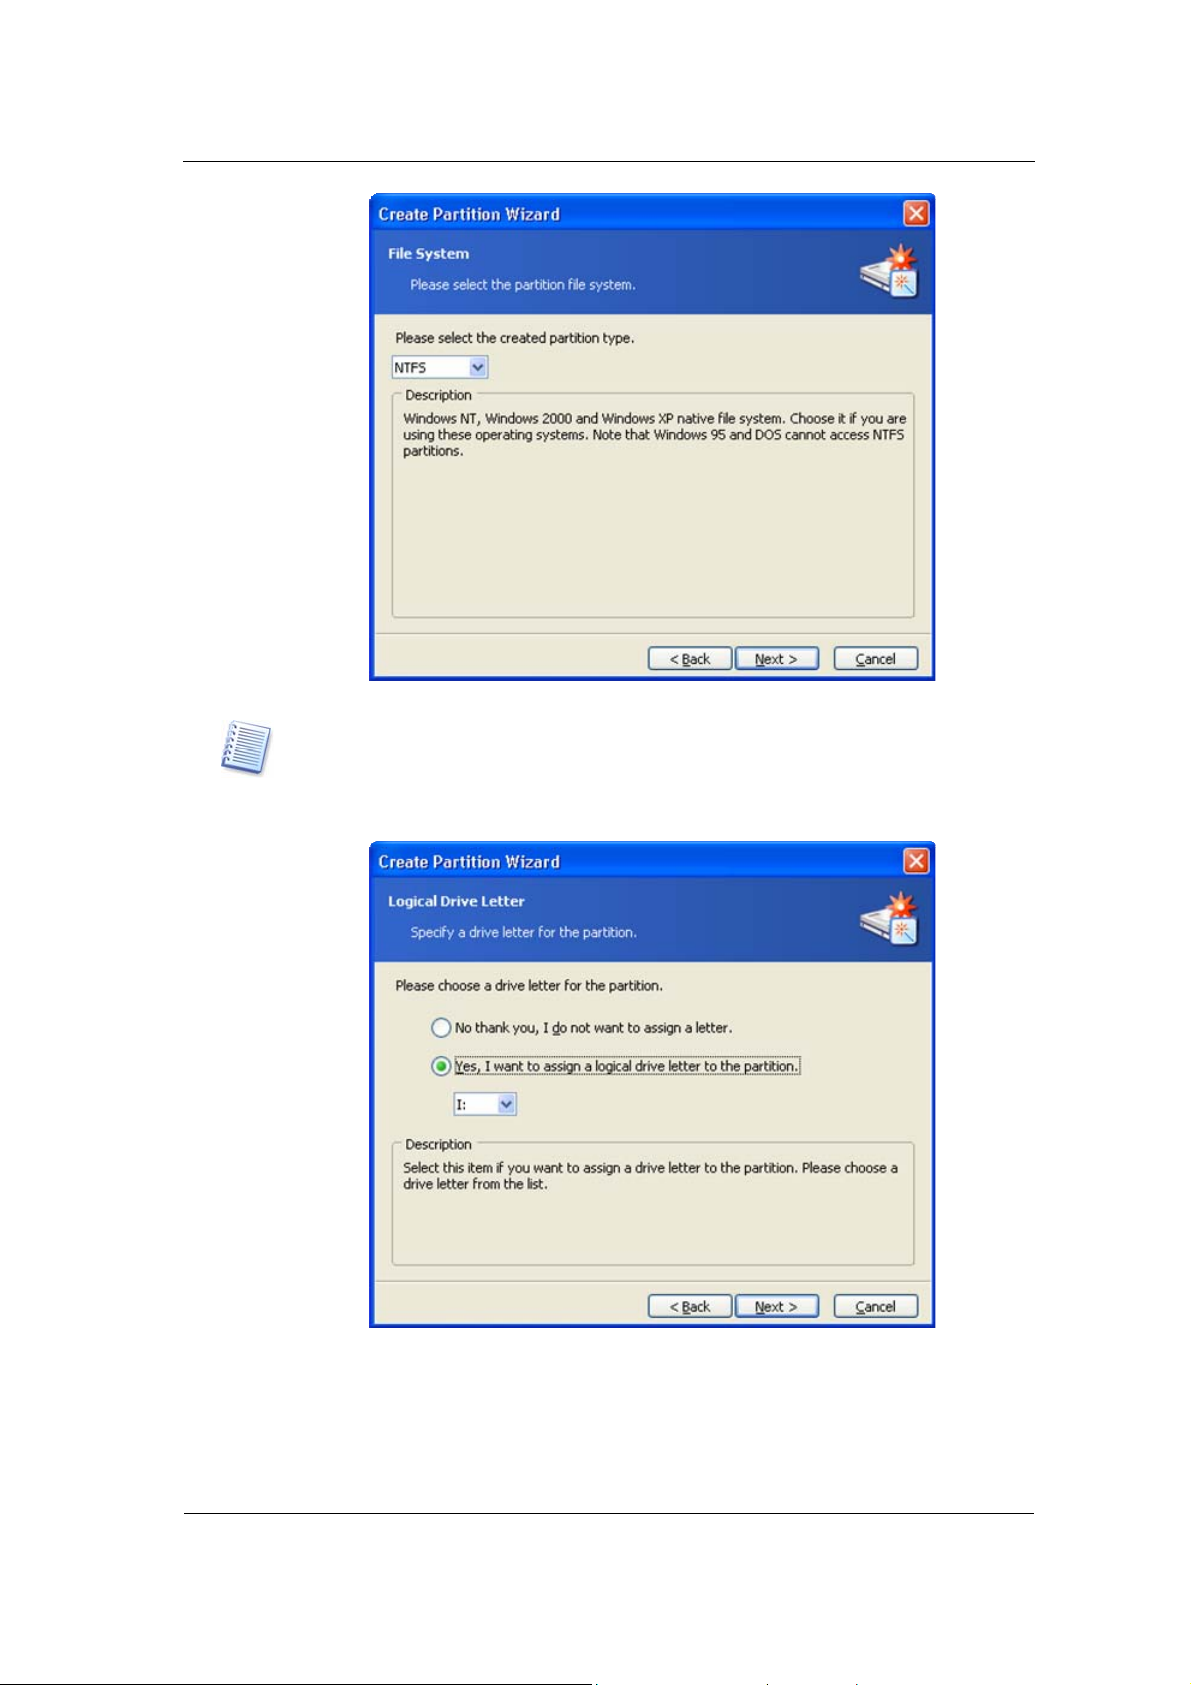
7. On the next File System wizard page, select a file system. The wizard will offer you
one of the Windows file systems — FAT16, FAT32 or NTFS, — or Linux file systems
— EXT2, EXT3, ReiserFS, Swap — or to leave the partition Unformatted.
More details about the properties of main file systems, the operating systems, and disks
are prov id e d in t h e A. 9 « File System Main Specifications» appe n d ix .
Copyright © Acronis, Inc., 2000–2005
25
Page 26
Automatic Partition Operations
Partition file system selection window
Selecting a partition file system results in partition formatting, i.e. creating
partition
data storage structures – boot record, file allocation table, etc.
8. On the next wizard page, you will be asked to select a partition letter.
Partition Logical Drive Letter selection window
At startup, an operating system assigns letters (C:, D:,…) to partitions.
These letters are used by applications and the operating system to locate
files on partitions. For example, C:\Program Files\Acronis\Disk
Director\DiskDirector.exe. See also Appendix C «Glossary» — «Letter (of a
drive, partition)».
26
Copyright © Acronis, Inc., 2000–2005
Page 27

Automatic Partition Operations
Hard disk partitions are not only assigned letters, but are also numbered . That me ans some
operating system partitions are assig ned letter s and numbers, in others, only nu mbers.
Create, delete and move partition operations, as well as hiding/unhiding a
partition and direct letter change may result in problems running
applications, opening files (as some shortcuts become unusable) or booting
an operating system.
Therefore, when performing partition operations, you must be careful and
remember that each operating system works differently with partition
letters. Each OS has its own partition letter assignment rules.
Windows 95/95OSR2/98/Me
Windows 95 (original) assigns partition letters automatically in fixed order,
according to these rules:
• Partition letters start from C: and continue until Z:. C: partition is
considered system, i.e. used for OS startup.
Note that this OS cannot recognize all partitions, but only 1 (FAT12), 4 and 6 (FAT16)
types. File system type is determined not by partition type, but by its contents. Partitions of
other types are passed (no lette rs are assi gned to them) .
• The first primary active partition found on the first hard disk is assigned
C:. If there’s no such partition, C: is assigned to the first suitable
primary partition
• Similarly and consecutively, one of the primary
partitions from other
hard disks is considered. They are assigned D:, E:, etc. (If there is no
suitable partition found on the first disk, then C:, D:, etc. are
assigned.)
• Next, all suitable logical partiti ons are considered in the sequence order
on the first, second, third, etc. hard disks. They are assigned E:, F:,
G:, for example
• Finally, in order, letters are assigned to all remaining suitable primary
partitions of the first, second, third, etc. disks.
The Windows 95 OSR2/98/ME partition letter assignment order is almost
the same as in original Windows 95, with the following exceptions:
• Additional type
11 (FAT32), 12 (FAT32 LBA) and 13 (FAT16 LBA)
partitions are considered. This is tied to FAT32 and high-capacity hard
disk support
Partition operations in the mentioned operating systems may result in
problems running applications, opening files, and other problems if letter
assignments change.
Windows NT/2000/XP
Copyright © Acronis, Inc., 2000–2005
27
Page 28
Automatic Partition Operations
g
Windows NT/2000/XP operating systems' initial letter assignment is done
automatically: in Windows NT 3.x it's similar to Windows 95, and in
Windows NT 4.0 and Windows 2000/XP similar to Windows 95OSR/98.
Windows NT 4.0 does not support FAT32, but assigns letters to such
partitions.
Please note that letter order in these operating systems can differ depending on
the number of hard disks and other disk drives recognized by the BIOS.
All these operating systems enable you to change initially assigned letters.
Partition create, delete and move operations do not affect letters assigned
to other partitions. Assigning a partition a new letter or hiding it will
prevent only its applications and files from running or opening. Other
partitions will not be affected by these operations.
OS startup problems may appear if you directly change the letter
assigned to the system partition or a partition with PAGEFILE.SYS swap
file.
Hard disk partition letter assignment in various operating systems is further
explained in all
operation or booting.
uide chapters where the partition operations might affect PC
9. On the next page, you can enter an optional partition label that will enable you to
distinguish one created partition from another.
In Windows, a partition label is shown in the Explorer disk and folder tree, for
example, WIN98(C:), WINXP(D:), DATA(E:), etc. WIN98, WINXP and DATA are
partition labels. See also Appendix C «Glossary» — «
Label».
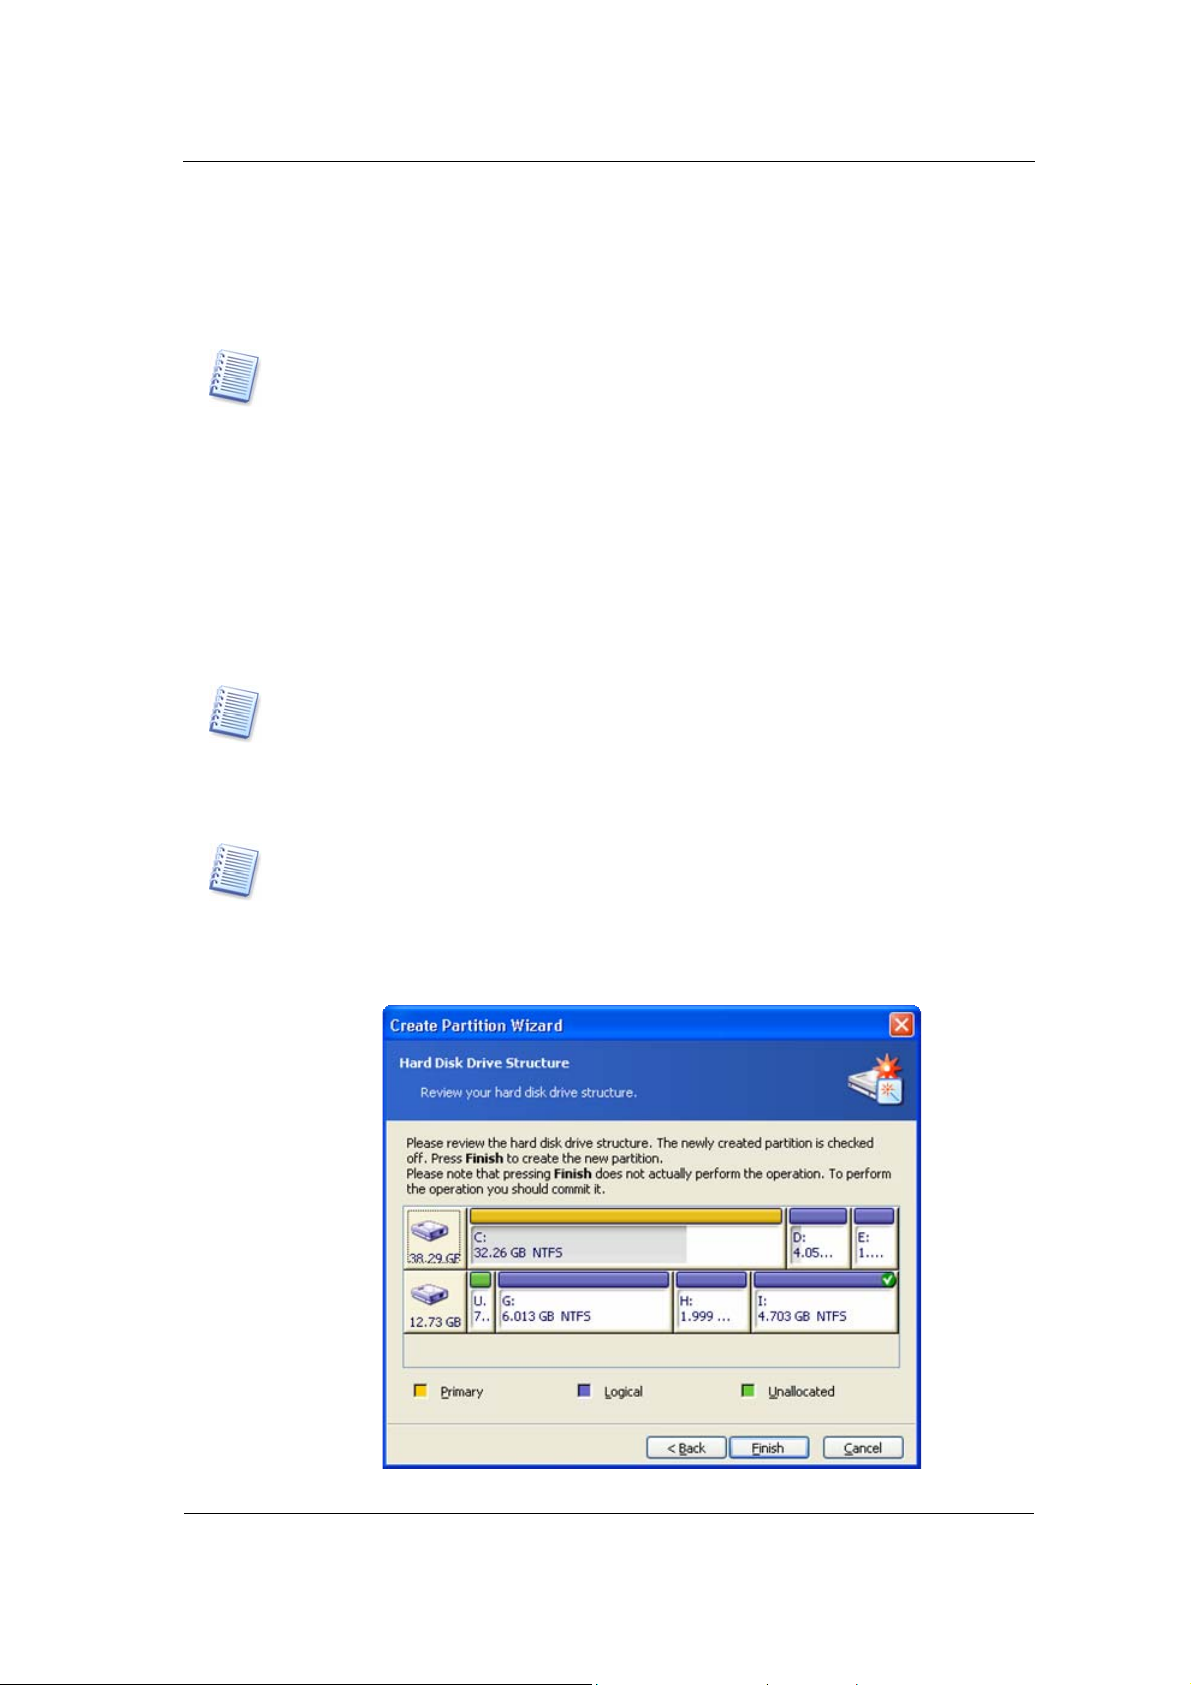
10. The last wizard page graphically shows you the new disk partition structure,
including those just created.
Created partition in the disk partition structure
28
Copyright © Acronis, Inc., 2000–2005
Page 29
Automatic Partition Operations
Clicking Finish on this page will make Acronis Disk Director Suite create a
pending operation for new partition creation, (your actions may only modify an
existing operation as well. See 2.4.5 «Modifying pending operations»). The new
partition structure will be graphically represented in the Acronis Disk Director Suite
main window.
More details about Finish command results are provided in 2.4.7. «Wizard operations».
3. If you want to create a new partition using other partition free space:
1. On the Action Selection wizard page, set the switch to Free space of the existing
partitions.
2. On the Select Hard Disk Drive wizard page, select a disk on which to create a
partition.
Partition disk selection page
Copyright © Acronis, Inc., 2000–2005
29
Page 30
Automatic Partition Operations
g
Note that this wizard page represents physical disks actually connected to your PC. The
next page shows
Appendix C «Glossary» — «Physical disk», «Logical disk».
logical disks (or partitions) on the selected physical disk. See also
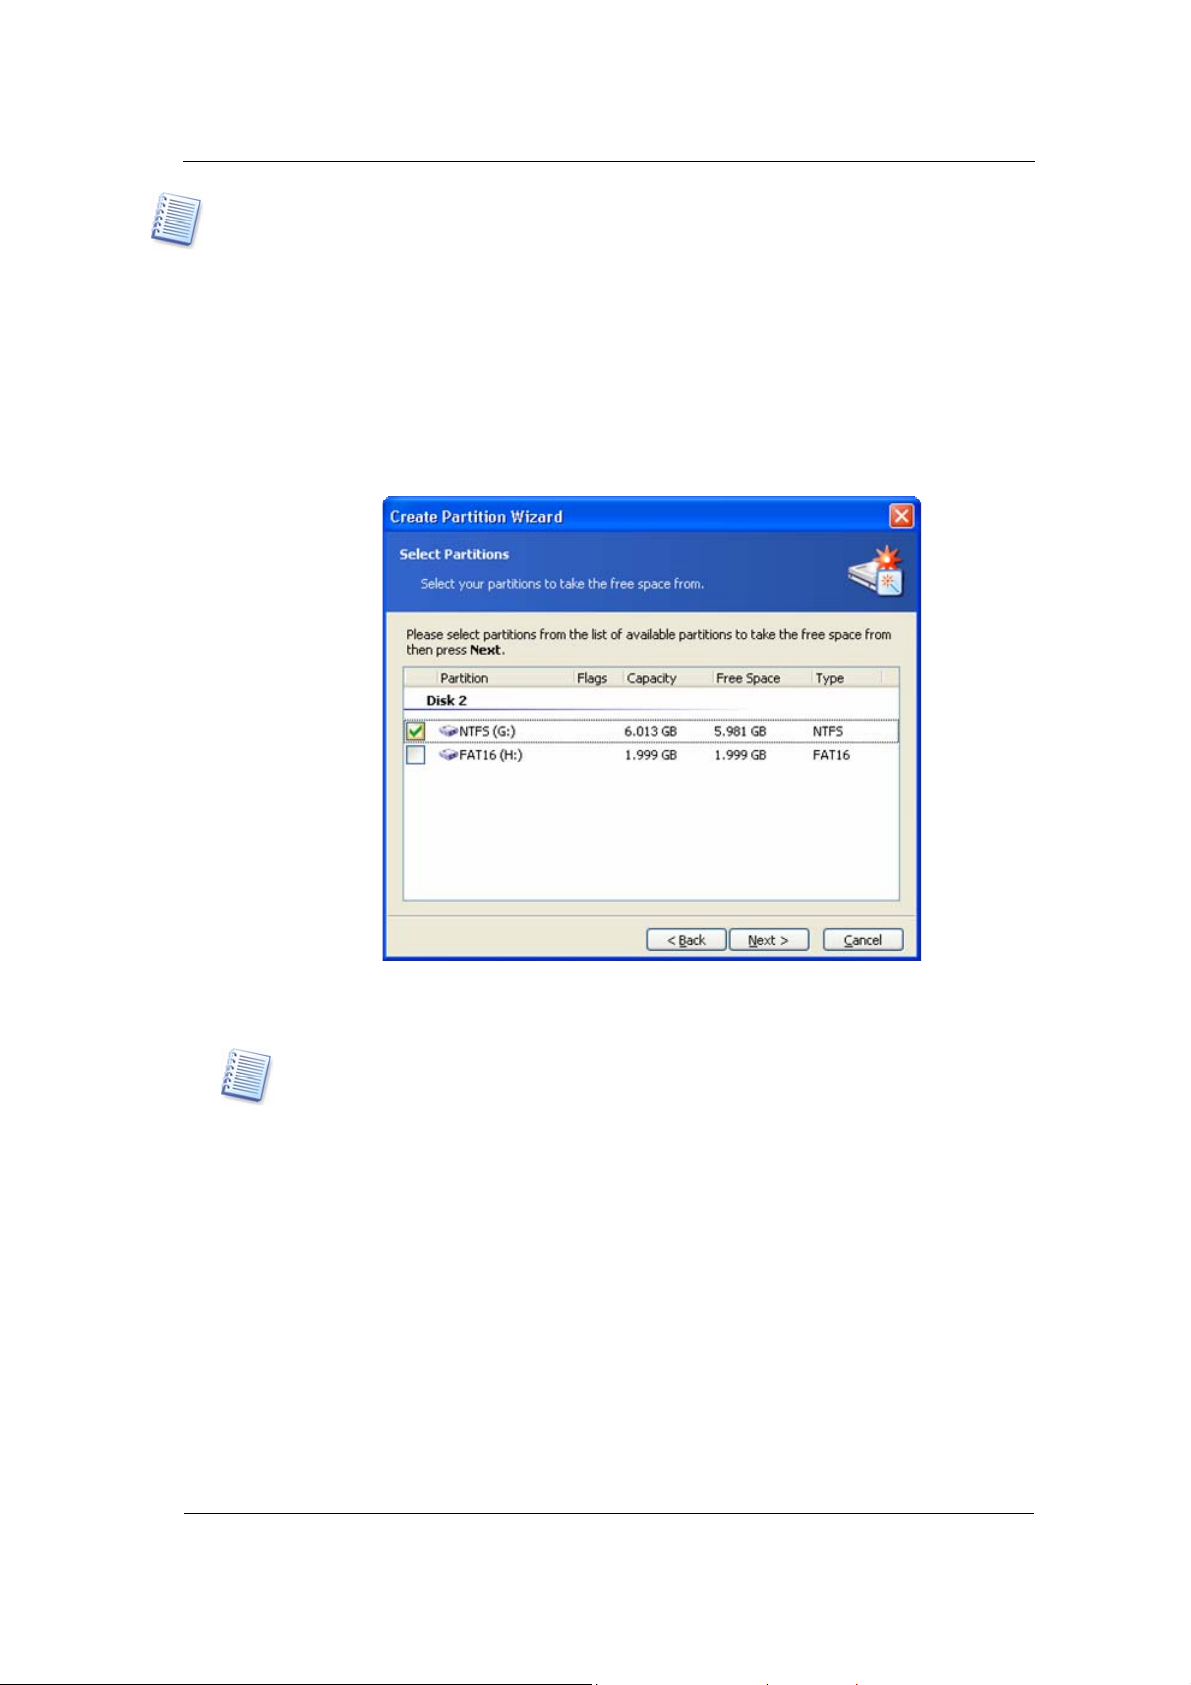
3. On the next Select Partitions wizard page, select the disk partition(s) whose space
you want to use to create a new partition.
This means that if these partitions have free space, their size can be
reduced. As a result, the freed space will be automatically considered as
unallocated (not used by any partitions). A new partition can be created in
this space.
30
The window of existing partition selection to create a new partition
By creating a partition using the free space of other partitions, Acronis Disk
Director Suite can collect it in such a way that the final partition size is not
smaller than 110% of data-occupied space.
When creating a partition with the switch set to
partitions,
unallocated disk space, the partition will be created this way; the existin
partitions will not be resized. If a partition cannot be created using unallocated
space only, then the deficient space will be taken from existing partitions.
you provide a small partition size. If it is possible to create it using
Free space of the existing
If you do not select a partition to take space from on the Select Partitions
wizard page and there is no unallocated disk space, you will see an error
message:
Copyright © Acronis, Inc., 2000–2005
Page 31

Automatic Partition Operations
Error message of deficient disk space for partition creation
In this case, you will have to return to the previous wizard page and select
a different partition from which to take the necessary space.
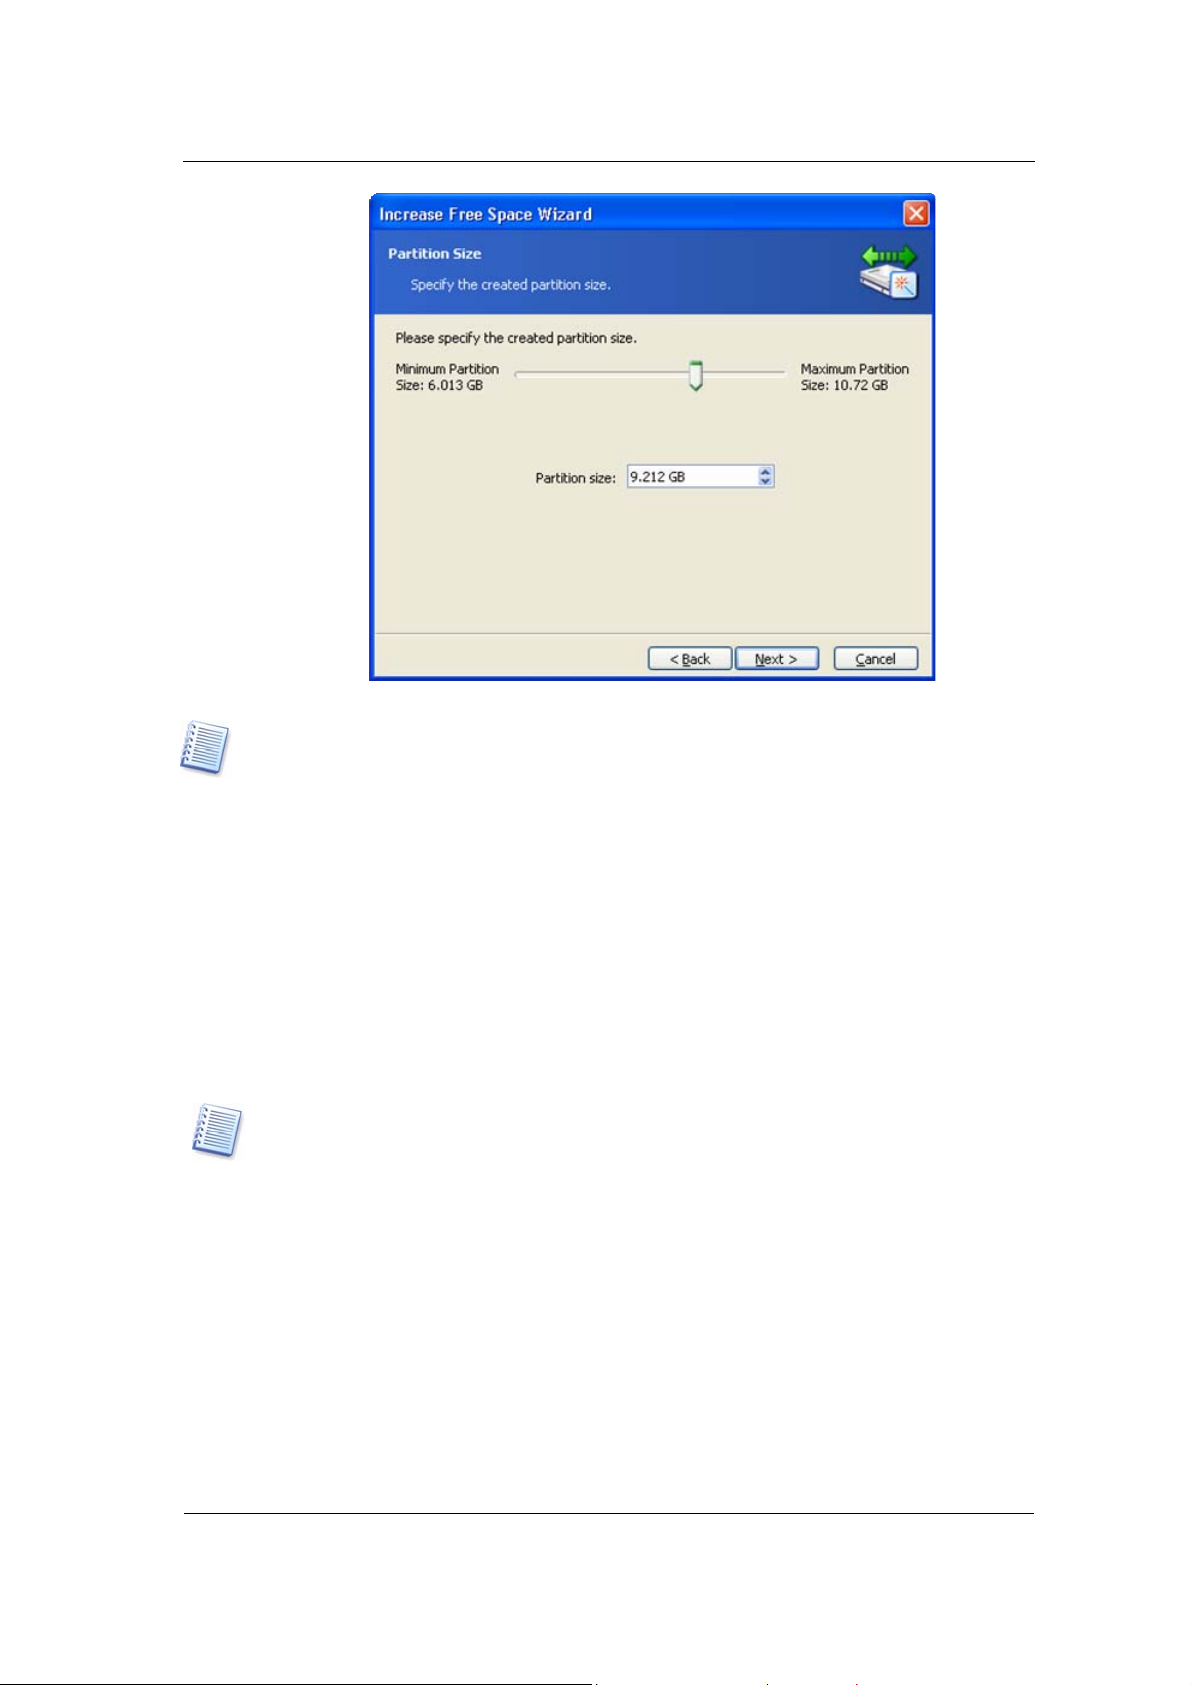
4 On the Partition Size wizard page, enter the size of the created partition (the wizard
automatically determines minimum and maximum partition sizes).
Created partition size window
5 The next wizard pages provide partition type, file system, letter (if you work in
Windows NT/2000/XP), and optional labeling.
Copyright © Acronis, Inc., 2000–2005
31
Page 32

Automatic Partition Operations
Further actions for partition creation are the same as described in 3.1
«Creating A New Partition» section.
Clicking Finish on the last wizard page allows Acronis Disk Director Suite
to create a pending operation list for new partition creation (these actions
may only modify an existing operation as well. See 2.4.5 «Modif yi ng p end in g
operations»).
The list will include not only the operation of partition creation itself, but
also operations of partition resize for creating a new partition.
If you want to create a new partition and there is no free space on disks:
1. Run the create partition wizard, by clicking
Create a new partition.
2. You will immediately see the Select Hard Disk Drive wizard page, passing the Action
Selection page.
3. Further actions for partition creation are the same as described in 3.1 «Creating A
New Partition» section.
4. Click Finish on the last wizard page to allow Acronis Disk Director Suite to create
a pending operation list for new partition creation (these actions may only modify an
existing operation as well. See 2.4.5 «Modifying pending operations»).
3.2 Increasing Partition Free Space
You might need to increase partition free space in some cases:
• There is no free space to install new applications or store data
• Some programs, like defragmenters, could stop working correctly if partition
free space is smaller than a certain value
Reducing system partition free space below a certain value might cause
operating system problems. The Increase free space wizard will enable you to
enlarge a partition using other partitions' free space. If there is not enough free
space in other partitions, it can use unallocated disk space.
If you need to increase partition free space (size):
1. Run the Increase free space wizard by selecting Wizards Increase free space or a
similar item in the Wizards sidebar list or by clicking
Increase free space on a
partition on the toolbar.
2. On the Select Partition To Increase wizard page, select a partition that you want to
enlarge.
32
Copyright © Acronis, Inc., 2000–2005
Page 33

Automatic Partition Operations
Selecting a partition to increase free space
3. On the Select Partitions wizard page, select a disk partition on which space will be
used to increase the selected partition.
«Enlarging a partition at the expense of another partition» is described above:
see 3.1 «Creating A New Partition».
Selecting a partition to use to increase free space
4. On the next wizard page, you will see the maximum size available for the selected
partition. You must select the size yourself.
Copyright © Acronis, Inc., 2000–2005
33
Page 34
Automatic Partition Operations
g
Entering the size to increase partition free space
Note that although selected partition size is increased at the expense of other
partition space, unallocated space also will be used if needed. Unallocated space is
automatically considered to be the maximum partition size.
5. In the last Preview wizard window, you will see a graphical representation of the
new partition structure, including the resized partition.
Clicking Finish on the last wizard page will allow Acronis Disk Director
Suite to create the pending operation list for partition resizing (your actions
may only modify an existing operation. See 2.4.5 «Modifying pending
operations»).
The new partition structure will be graphically represented in the Acronis
Disk Director Suite main window.
Similar to creating a new partition (see 3.1 «Creating A New Partition»), Acronis Disk
Director Suite considers the results of partition free space increase as a sin
complex operation that can be undone only as a whole.
le
3.3 Copying Partitions
Having copied a partition, you get the duplicate of all its data. Partition copy can
be used:
• As a partition backup (or rather as a data backup)
• A system partition backup is advised if you want to upgrade the existing
operating system
• To quickly move all data from the old disk to the new disk
34
Copyright © Acronis, Inc., 2000–2005
Page 35

Automatic Partition Operations
g
g
We again recommend our backup solution — Acronis True Image. It enables you to
create a backup (ima
archive file, while allowin
http://www.acronis.com/product s/truei mage/ ).
e) of a partition and/or entire hard disk in a compressed
comments and password protection. See
The copy partition wizard will let you create a partition copy on the selected disk
space. It can be created on unallocated disk sp ace or at the expense of existing
partition space, inserted between other partitions, resized after comparison with
the original, can change the type or file system, and assign a label or a letter if
needed.
If you need to copy a partition:
1. Run the wizard by selecting Wizards Copy partition or a similar item in
the Wizards sidebar list, or by clicking
Copy a partition on the toolbar.
2. On the Select Partition To Copy wizard page, select a partition to copy.
Selecting a partition to copy
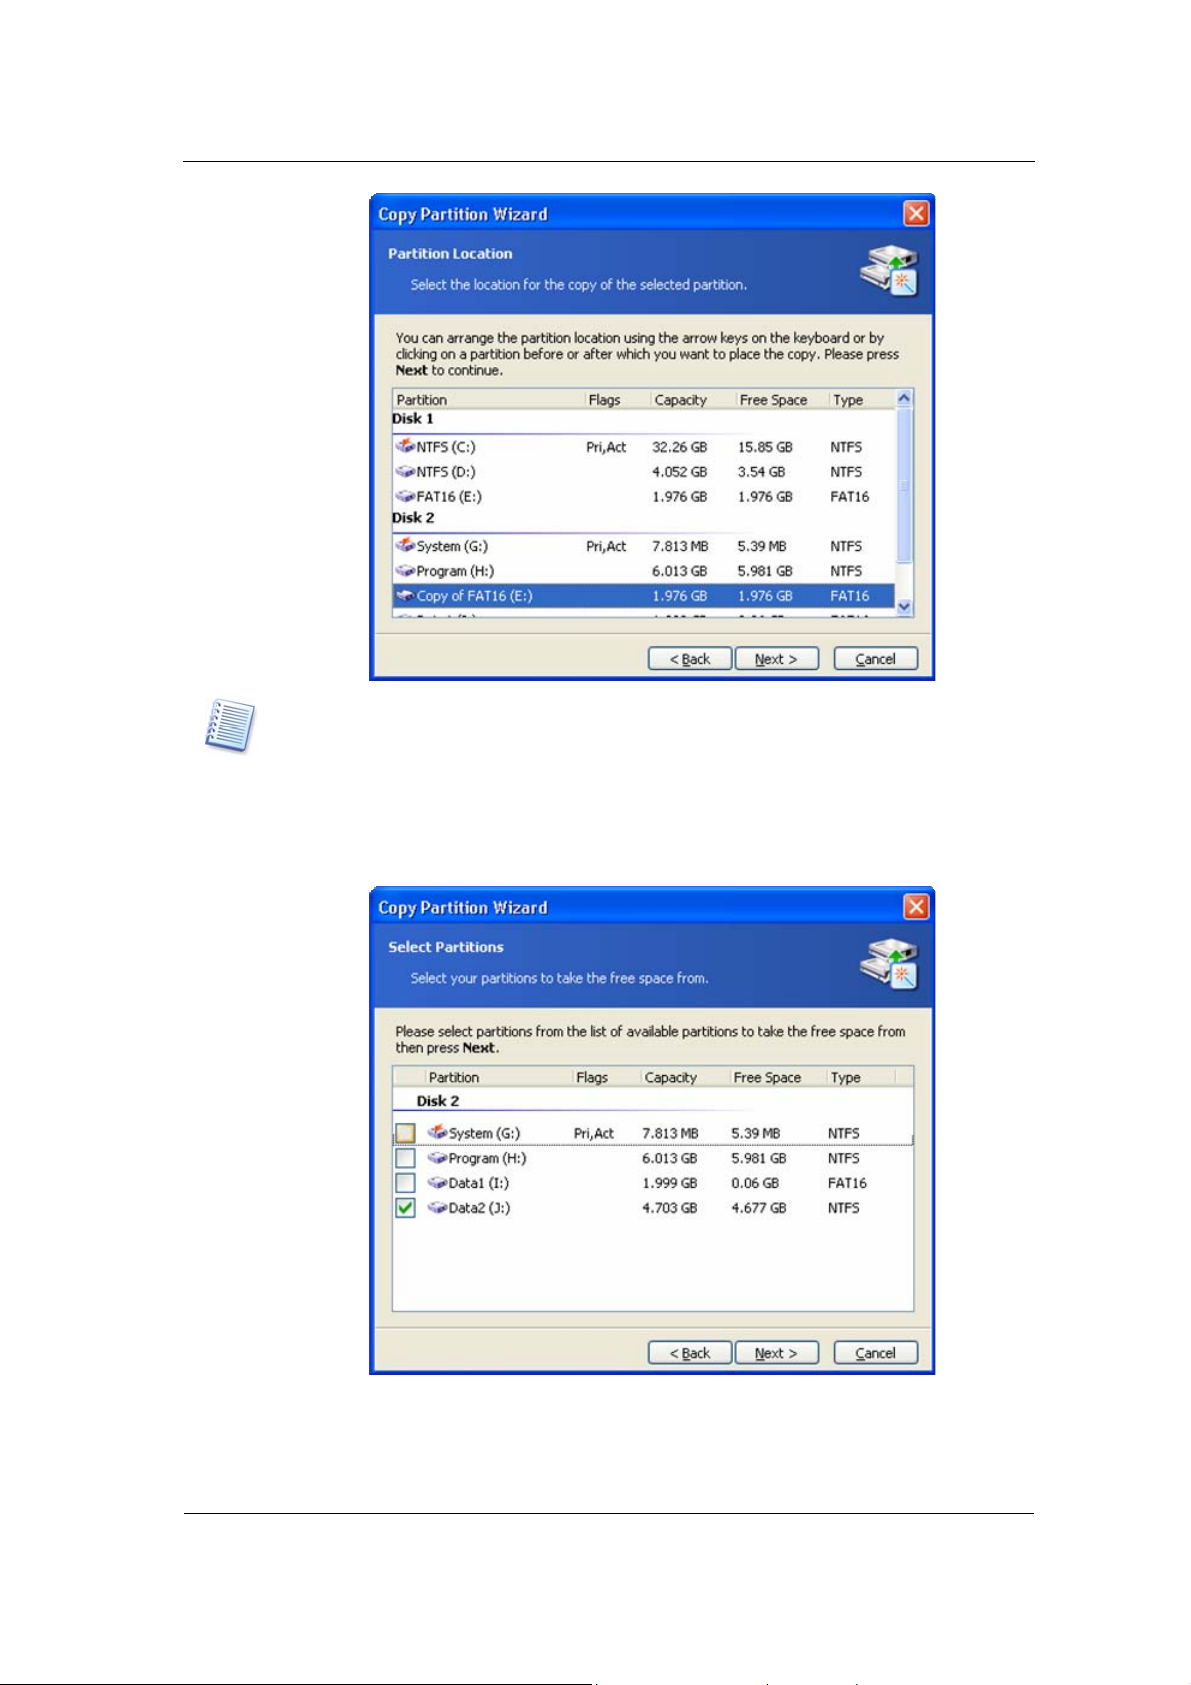
3. On the next Partition Location wizard page, a record of copied partition
parameters will be created.
Copyright © Acronis, Inc., 2000–2005
35
Page 36

Automatic Partition Operations
The page for selecting a disk location for partition copy
You will have to select a copy location on one of the disks, among existing
partitions. To make your selection, click before or after a partition to mark
where you want to locate the copy.
In this example, the copy will be located before PROGRAM(H:) partition in
the figure below.
The copy will be located after PROGRAM(H:) partition in the figure below.
The figure below shows the result of locating a partition copy after clicking
after PROGRAM(H:) partition.
36
Copyright © Acronis, Inc., 2000–2005
Page 37
Automatic Partition Operations
You can locate a copy anywhere on your disk(s). The copy partition wizard will
automatically perform all necessary operations, even if it has to resize or move
other partitions!
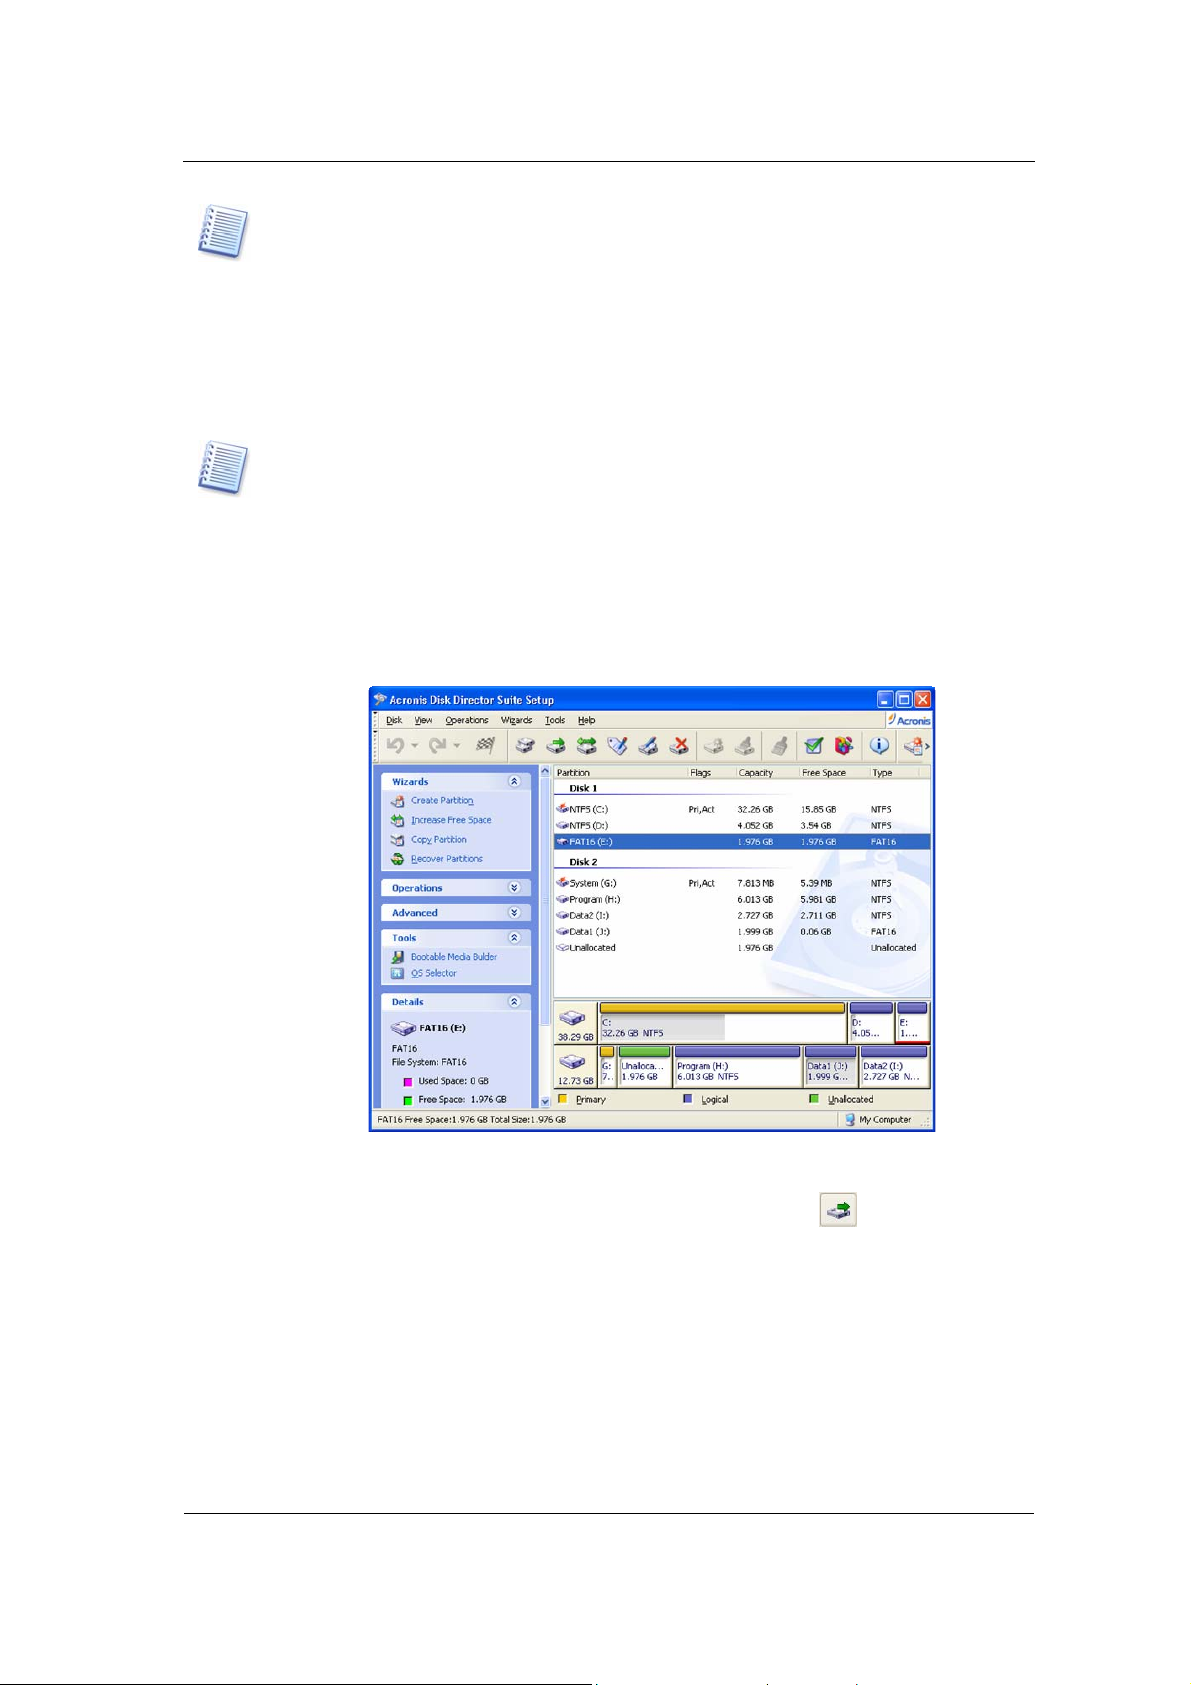
4. The selected disk might lack space for a copy. Nevertheless, you can copy
a partition by selecting another partition whose space will be partly used.
This can be done in the Select Partitions window.
The page to select a partition, which will be partly used for a copy location
If you do not select a partition to be partly used as the copy location on the
Select Partitions wizard page and there is not enough unallocated disk
space, you will see an error message:
Copyright © Acronis, Inc., 2000–2005
37
Page 38

Automatic Partition Operations
Error message showing not enough disk space for a partition copy
In that case, the wizard will prompt you to select a partition from which to
take some space.
If there is not enough space, the partition will not be copied!
5. On the next Partition Size wizard page, you can provide a desired partition
size. The wizard will automatically determine the minimum and maximum
copy size.
The page for partition copy size selection
38
Copyright © Acronis, Inc., 2000–2005
Page 39

Automatic Partition Operations
g
g
The minimum copy size is determined by the data area size of a copied partition.
The maximum size is determined by the available disk space. It includes the space
taken from a partition and unallocated disk space.
By copying a partition at the expense of existing partition free space, Acronis Disk
Director Suite can take the partition space to make sure that partition size is not
smaller than 110% of data-occupied space.
6. On the next Partition Type wizard page, you can select partition copy type:
Active, Primary and Logical.
As a rule, Primary is selected if a partition contains an operating system. If a
partition is intended for data storage, you should select Logical.
Select Active if you want to boot the partition’s operating system at
startup.
By copying a partition at the expense of existing partition free space, Acronis Disk
Director Suite can take the partition space to make sure that partition size is not
smaller than 110% of data-occupied space.
Further actions for copying a partition are the same as described in 4-7
sections of 3.1 «Creating A New Partition».
Copying a partition in Windows 95/98/Me and assigning it a letter can change the
order of letters assi
workin
operating systems, see 3.1 «Creating A New Partition».
. For a detailed discussion of partition letter assignment rules for various
ned to other partitions. As a result, some shortcuts might stop
Clicking Finish on the last wizard page will allow Acronis Disk Director
Suite to create the pending operation list for copying a partition (your
actions may only modify an existing operation. See 2.4.5 «Modifyi ng p en di ng
operations»).
The new partition structure will be graphically represented in the Acronis
Disk Director Suite main window.
Copied partition in the Acronis Disk Director Suite main window
Copyright © Acronis, Inc., 2000–2005
39
Page 40

Manual Partition Operations
g
g
Chapter 4. Manual Partition
Operations
Unlike the «Automatic partition operations» mode (see 2.1), the «Manual partition
operations» mode is intended for experienced users only, and offers much wider
operation lists. Manual operation parameters are entered in the dialog boxes.
To switch to the «Manual partition operations» mode, select View -> Manual
mode.
4.1 Main Partition Operations
Main hard disk partition operations include the typical, most frequently used
operations of partition creation (selecting a type, file system, formatting, etc.),
assigning label and letter partition, resizing, relocating, clearing, deletion, etc.
4.1.1 Creating partitions
If there is unallocated space on a disk, you can create a partition using manual
disk operations.
Note that the Create partition wizard mentioned above can create a partition using
both unallocated disk space and the space of existing partitions (see 3.1 «Creatin
New Partition»). It will enable you to create a partition on unallocated space only. If
there is no such space, it should be provided by resizin
partitions.
and moving existing
A
If you need to create a disk partition:
1. Select hard disk and unallocated space in the Acronis Disk Director Suite
main window; The Create partition button will become available on the
toolbar, and the Create Partition operation on the sidebar and in the
context menu.
Selecting unallocated disk space
40
Copyright © Acronis, Inc., 2000–2005
Page 41

Manual Partition Operations
g
g
2. Execute operation of partition creati on by selecting Disk Create partition
or a similar item in the Operations sidebar list, or by clicking
Create
partition on the toolbar.
3. In the Create Partition window, enter a partition label and select a file
system and partition type (Primary — Logical) from the list; you can also
enter partition size and location using a mouse or by direct input to
Partition size, Unallocated space before (and Unallocated space aft er) fields.
As a rule, Primary is selected if a partition is to contain an operating
system. If a partition is meant for data storage, Logical should be selected.
Created partition parameters window
4. By clicking OK, you'll add the pending operation of new partition creation.
The new partition structure will be graphically represented in the Acronis
Disk Director Suite main window.
Creating a partition in unallocated disk space in Windows 95/98/Me can change the
order of letters assi
working. A detailed discussion of partition letter assi
operating systems appears in 3.1 «Creating A New Partition».
ned to other partitions. As a result, some shortcuts might stop
4.1.2 Copying a partition to unallocated disk space
The reasons for copying a partition were discussed above (see 3.3 «Copying
Partitions»). Partition copy can be used:
• As a partition backup (or rather a data backup)
• As a system partition backup if you want to upgrade the existing operating
system
• To quickly move all data from the old disk to the new
If you need to copy a partition:
nment rules for various
Copyright © Acronis, Inc., 2000–2005
41
Page 42

Manual Partition Operations
1. Select a hard disk and a partition to copy.
Selecting a partition to copy
2. Execute partition copy operation by selecting Disk Copy or a similar item
in the Operations sidebar list or by clicking
Copy the selected partition
to another free space on the toolbar.
3. Acronis Disk Director Suite will automatically compare the size of a copied
partition and disk free space as shown in the Copy Partition window.
Free space available for copying
Note that the unallocated space is smaller than copied partition size, but its
data area is smaller than unallocated space. Therefore copying is possible.
If there is not enough free space to copy a partition on a hard disk, no unallocated
space will be available for selection.
4. Select the unallocated disk space to copy a selected partition to it.
42
Copyright © Acronis, Inc., 2000–2005
Page 43

Manual Partition Operations
g
g
5. In the next wizard page, enter partition copy type (Logical — Primary),
size, and location.
While copying a partition, you might have to change its type. For example, you have
to copy a primary part ition, but there a re already four prima ry partitions on the disk.
You will be able to copy it only as a logical partition. If you need to restore the primary
partition from a copy, you will be able to change its type again.
Entering partition copy parameters
The size and location of a partition copy can be provided with a mouse or
by entering data into the Unallocated space before, Partition size (and
Unallocated space after) fields.
6. By clicking OK in the Copy Partition wizard, you'll add the pending
operation of partition copying and location (your actions may only undo
or modify already existing operation; see 2.4.5 «Modifying pending
operations»).
The new partition structure will be graphically represented in the Acronis
Disk Director Suite main window.
Copying a partition in Windows 95/98/Me and assigning it a letter can change the
order of letters assigned to other partitions. As a result, some shortcuts mi
workin
operating systems appears in 3.1 «Creating A New Partition».
. A detailed discussion of partition letter assignment rules for various
4.1.3 Moving a partition to unallocated disk space
You might need to move a partition to:
ht stop
• Change order of letters assigned by operating system
Copyright © Acronis, Inc., 2000–2005
43
Page 44
Manual Partition Operations
g
For example, Windows 95/98/Me, unlike Windows NT/2000/XP, does not let users
assign random letters to partitions, so you must move a partition to assi
necessary letter.
• Work with some older OS (MS-DOS, Windows 95, Windows NT 4.0), that can
boot only from binary partitions located in the beginning of the disk
• Speed up partition operations
For example, you might have a special partition for a swap file. If you move this
partition closer to the beginning of a disk, OS might work much faster with it.
• Change partition configuration
If you need to move a partition to unallocated disk space:
1. Select the hard disk and partition to move.
n it the
Selecting a partition to move
2. Execute operation of partition moving by selecting Disk Move or a similar
item in the Operations sidebar list or by clicking
Move the selected
partition to another free space on the toolbar.
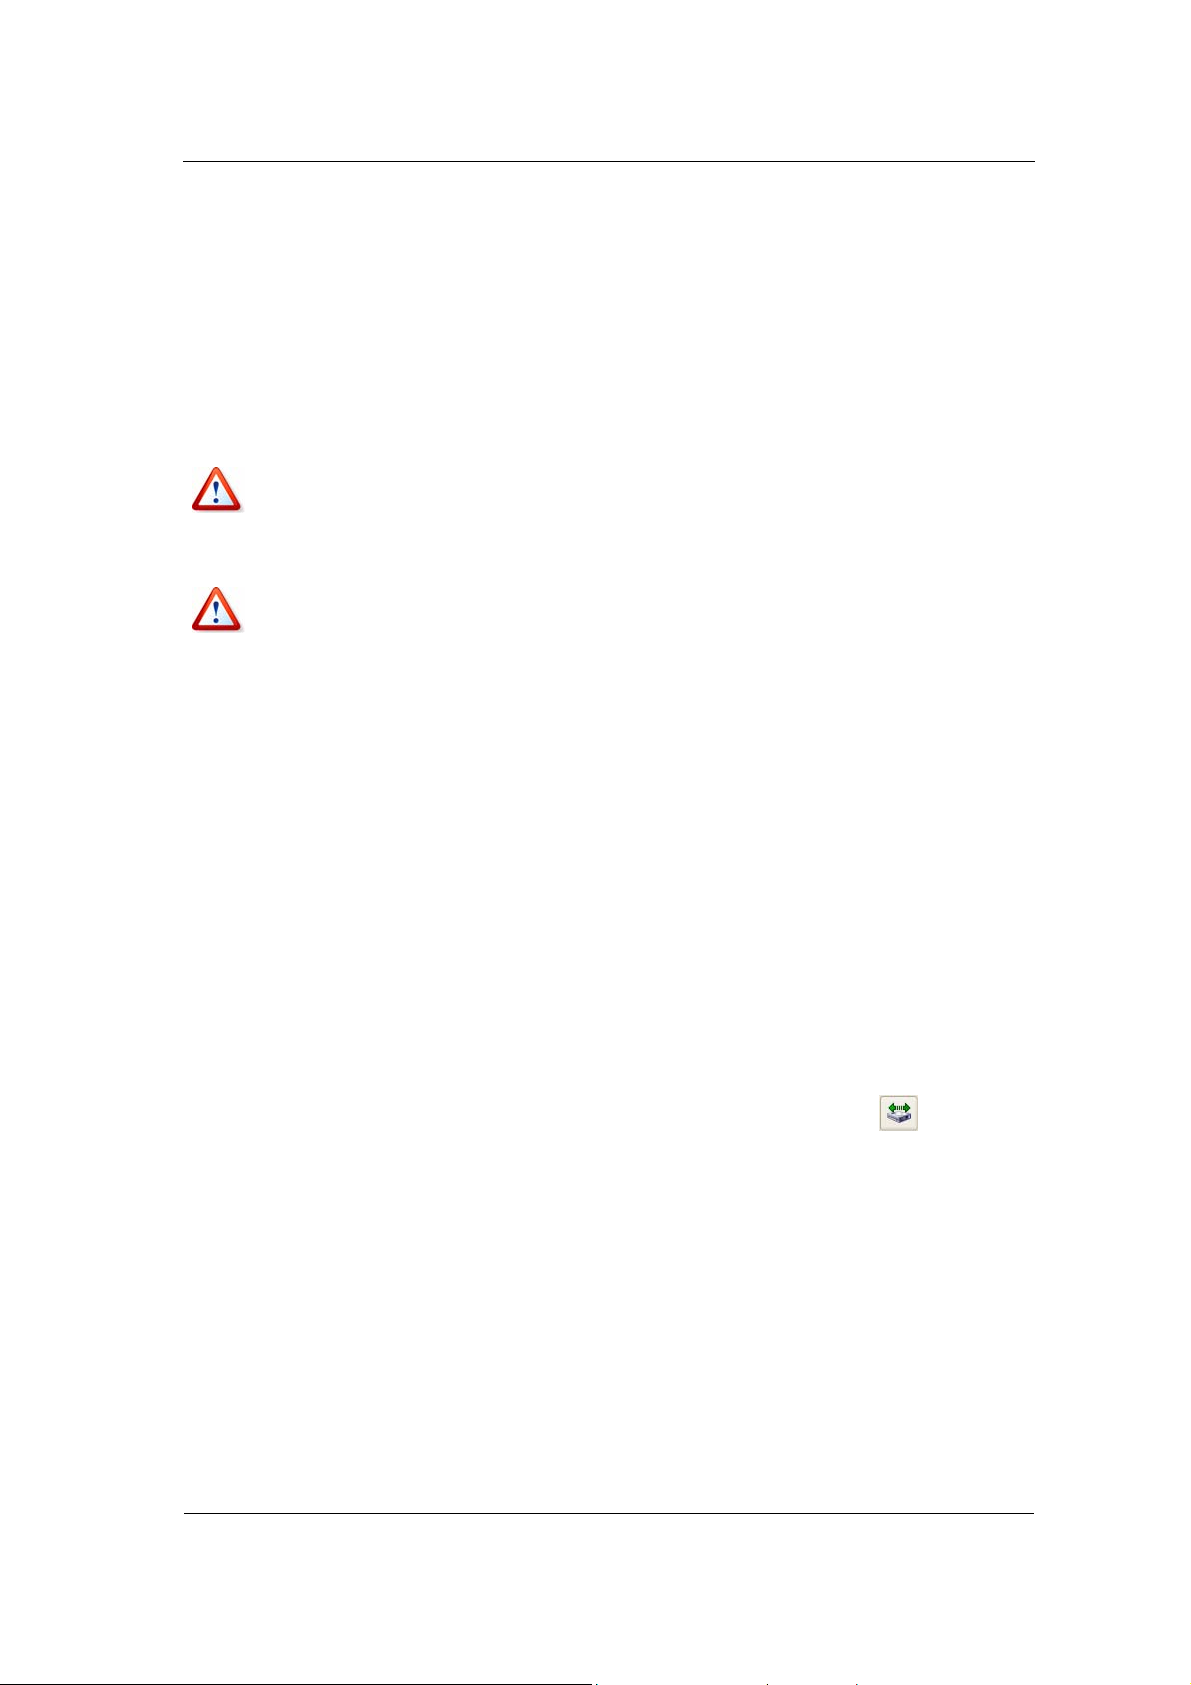
3. Acronis Disk Director Suite will automatically compare moved partition size
and available free space, indicating it in the Move Partition window.
44
Copyright © Acronis, Inc., 2000–2005
Page 45
Manual Partition Operations
Unallocated space available for partition moving
Note that the unallocated space is smaller than moved partition size, bu t its
data area is smaller than unallocated space. Therefore, moving the
partition with its data intact is possible.
If there is not enough free space to copy a partition on a hard disk, no unallocated
space will be available for selection.
4. Select free space to move the selected partition to.
5. On the next wizard page, select the type of moved partition (Logical —
Primary), size and location.
Changing partition type is not as necessary here as partition copying (see 4.1.2
«Copying a partition to unallocated disk space»). Nevertheless, Acronis Disk Director
Suite gives you this added flexibility.
Copyright © Acronis, Inc., 2000–2005
Entering moved partition parameters
45
Page 46
Manual Partition Operations
g
g
g
The size and location of partition copy can be provided with a mouse click
or by entering data into the Unallocated space before, Partition size (and
Unallocated space after) fields.
6. By clicking OK in the Move partition window, you'll add a pending operation
to part ition moving (your actions may only undo or modify already existing
operation; see 2.4.5 «Modifying pending operations»).
The new partition structure will be graphically represented in the Acronis
Disk Director Suite main window.
Moving a partition to unallocated disk space in Windows 95/98/Me can change the
order of letters assi
workin
operating systems appears in 3.1 «Creating A New Partition».
Take special care when moving an operating system partition and its boot code
location. The OS mi
versions limit boot code location to the first 2016 MB.
. A detailed discussion of partition letter assignment rules for various
ned to other partitions. As a result, some shortcuts might stop
ht stop booting. For example, Windows NT 4.0 and earlier
4.1.4 Resizing and/or moving a partition
You may find that there is not enough free space on a certain partition. For example,
maybe it is almost filled with MP3 files. Acron is D is k Di re c to r Su i te lets you enlarge
a partition easily.
Reasons for moving a partition were discussed above (see 4.1.3 «Moving a partition
to unallocated disk space»).
If you need to resize and/or move a partition:
1. Select the hard disk and a partition to be resized.
2. Execute operation of partition resizing by selecting Disk Resize or a
similar item in the Operations sidebar list, or by clicking
Resize/move
the selected partition on the toolbar.
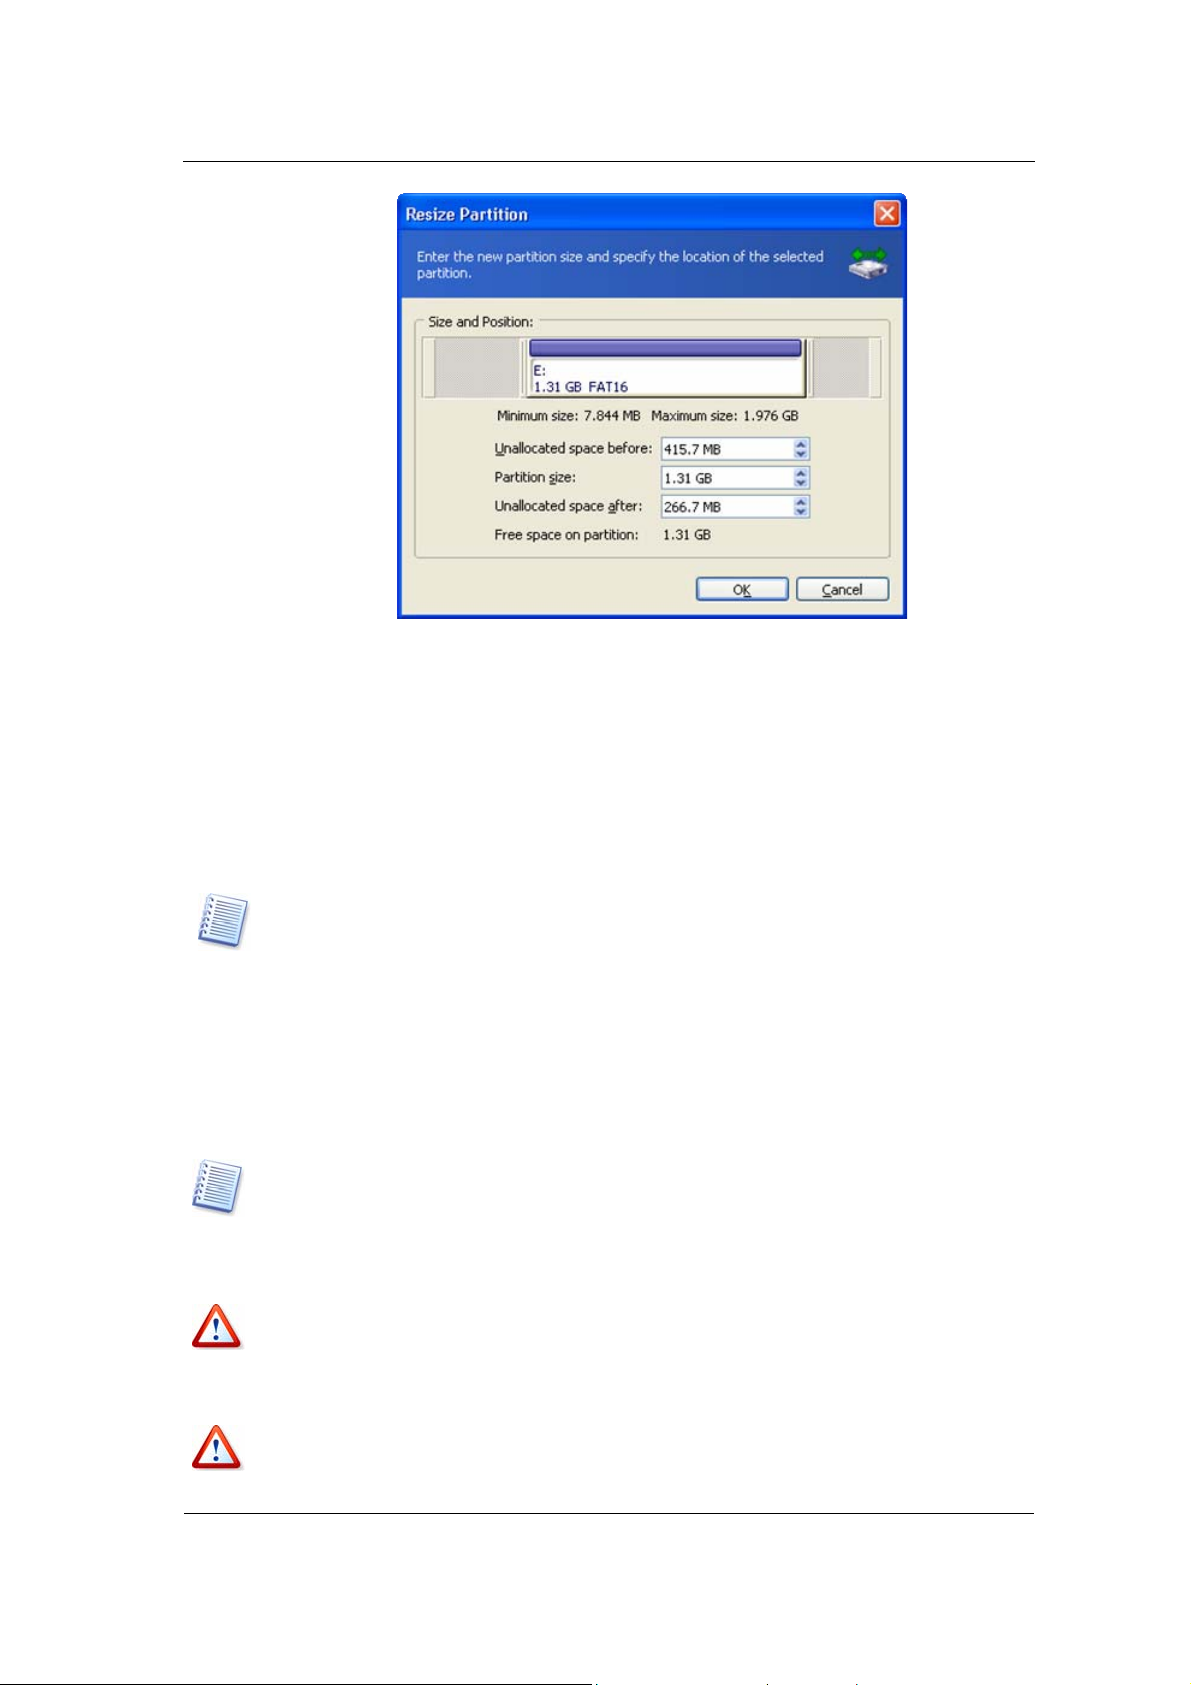
3. Resize the partition in the Resize Partition window:
(1) Hold the mouse button and drag a corresponding partition rectangle
side until you get the proper size in the Partition size field.
(2) Specify the partition size in the Partition size field.
46
Copyright © Acronis, Inc., 2000–2005
Page 47
Manual Partition Operations
g
g
g
g
g
g
Resize partition window
4. Relocate a partition on a disk by one of the following methods:
(1) Holding the mouse button and dragging the corresponding partition
rectangle left side to resize free space before the partition.
(2) Having pointed to the rectangle, hold the left mouse button and
move a partition as a whole until you get the necessary MB or GB
amount in the Unallocated space before field.
(3) Specifying the necessary value in the Unallocated space before field.
Acronis Disk Director Suite automatically considers the limitations of file systems
and parameters provided. In particular, it won’t let you enlar
over the maximum 4 GB (2 GB for Windows 95OSR2/98/Me) value.
e a FAT16 partition
5. By clicking OK in the Resize Partition window, you'll create a pending
oper ation f or part ition r esizi ng and m oving (your actions may only undo or
modify an existing operation; see 2.4.5 «Modifying pending operations»).
The new partition structure will be graphically represented in the Acronis
Disk Director Suite main window.
Acronis Disk Director Suite features a wizard for performing more complex partition
resizing (see 3.2 «Increasing Partition»). Simple partition resizin
partition size only if there is free (unallocated) space before or after a partition. The
wizard lets you perform more complex operations such as increasin
space
at the expense of other partitions.
Moving a partition to unallocated disk space in Windows 95/98/Me can change the
order of letters assi
workin
operating systems appears in 3.1 «Creating A New Partition».
. A detailed discussion of partition letter assignment rules for various
ned to other partitions. As a result, some shortcuts might stop
lets you increase
partition free
Take special care when moving an operating system partition and its boot code
location. The OS mi
versions limit boot code location to the first 2016 MB.
Copyright © Acronis, Inc., 2000–2005
ht stop booting. For example, Windows NT 4.0 and earlier
47
Page 48
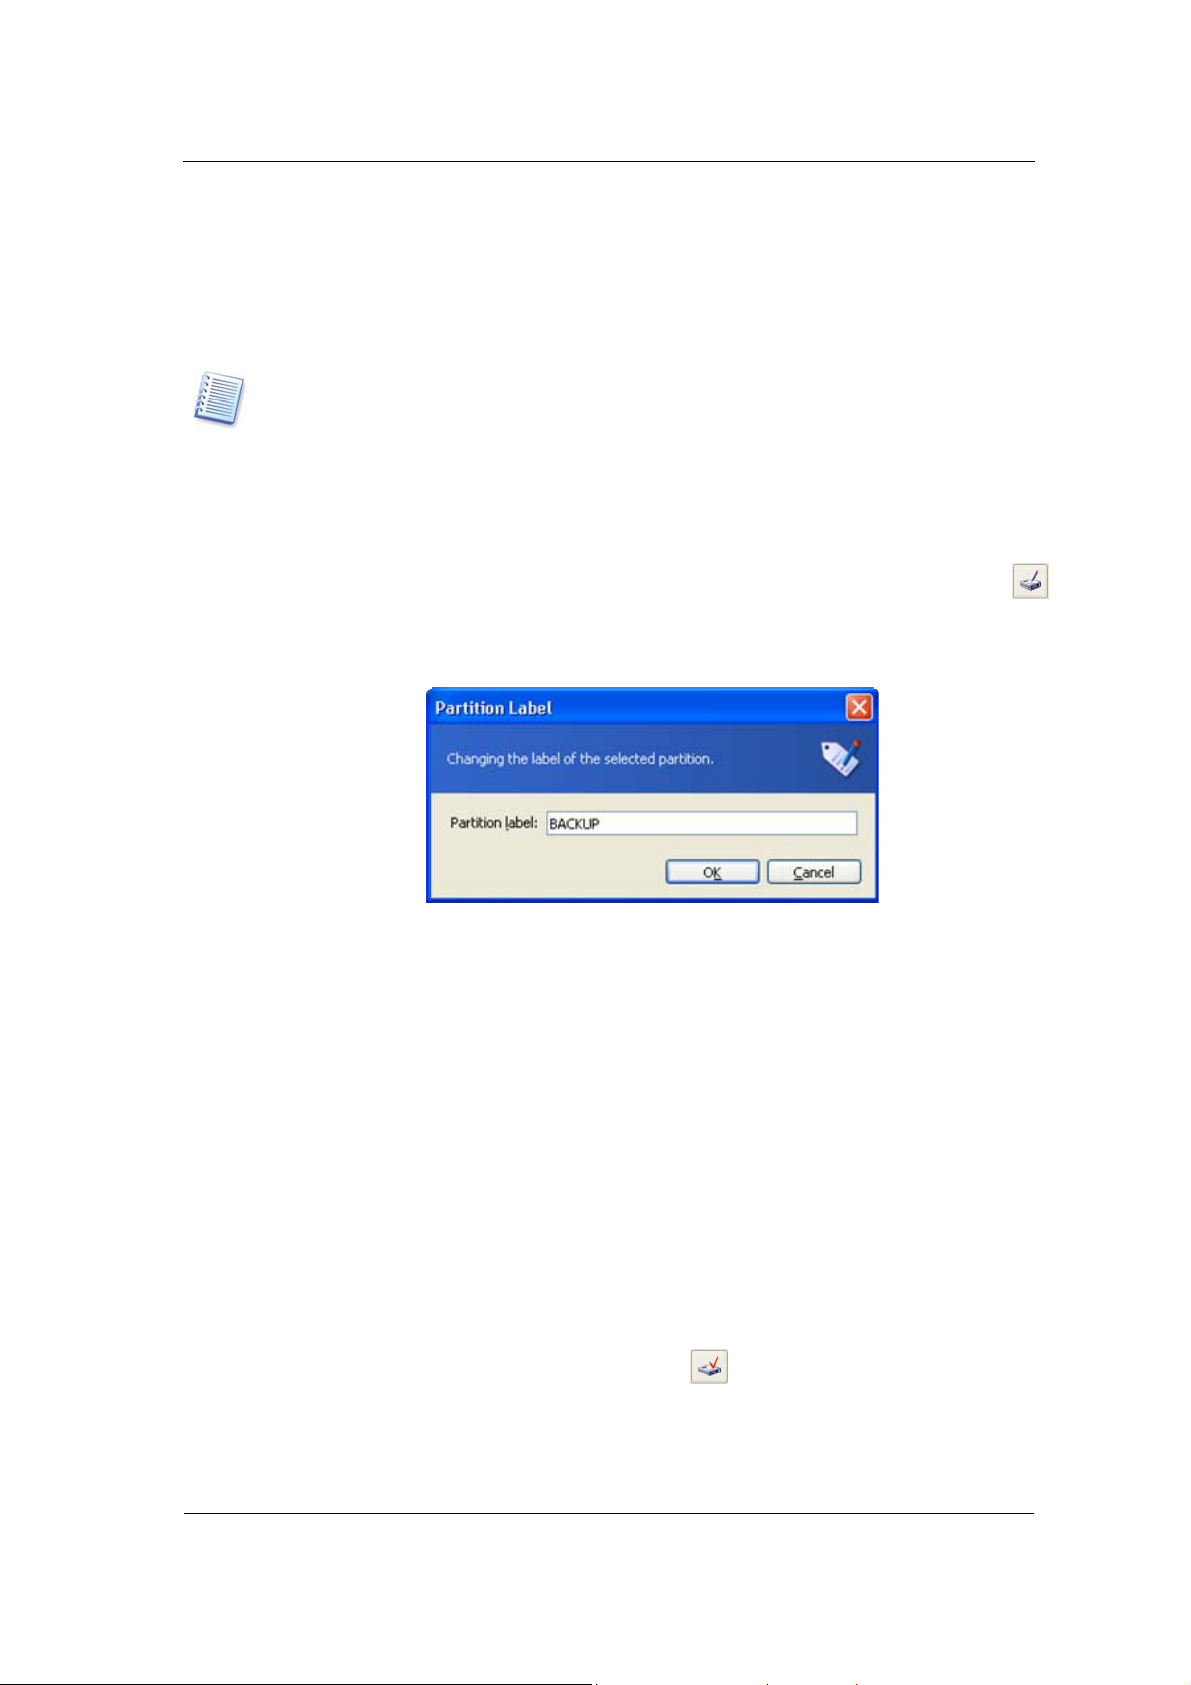
Manual Partition Operations
g
4.1.5 Changing partition labels
Partition label is an optional attribute. It’s a name assigned to a partition for easier
recognition of your partitions. For example, one could be called System — a
partition with an operating system, Program — an application partition, Data — a
data partition, etc.
In Windows, partition labels are shown in the Explorer disk and folder tree:
WIN98(C:), WINXP(D:), DATA(E:), etc. WIN98, WINXP and DATA are partition
labels. A partition label is shown in all application dialo
saving files. (See Appendix C «Glossary» — «
Label».)
boxes for opening and
If you need to change a partition label:
1. Execute operation of partition label changing by selecting Disk Change
Label or a similar item in the Operations sidebar list, or by clicking
Change the selected partition label on the toolbar.
2. Enter a new label in the Partition label window.
3. By clicking OK in the Partition Label window, you'll add the pending
operation of partition label ch ang in g (your actions may only undo or modify
an existing operation; see 2.4.5 «Modifying pending operations»).
The new partition label will be graphically represented in the Acronis Disk
Director Suite main window.
4.1.6 Formatting a partition
Acronis Disk Director Suite lets you logically format a partition. It includes
organizing a file system that supports files and folder data storage.
If you need to format an existing partition:
1. Select a disk and a partition.
2. Run partition formatting by selecting Disk Format or a similar item in the
Operations sidebar list, or by clicking
the toolbar.
3. Enter the partition label in the Format Partition window.
Partition label window
Format the selected partition on
48
Copyright © Acronis, Inc., 2000–2005
Page 49

Manual Partition Operations
Format Partition window
4. Select a file system to be created on a partition after formatting.
Acronis Disk Director Suite supports the following file systems (see A.9
«File System Main Specifications»):
• FAT16/FAT32, NTFS — Windows file systems
• Linux Ext2, Ext3, ReiserFS, Swap — Linux file systems
5. Select cluster size (Auto, 512 bytes, 1, 2, 4… 64 KB).
Note that:
(1) The smaller the cluster size, the less disk space will be los t (see A.9.2
«FAT16» —
Table 3).
(2) The smaller the cluster size, the bigger the file allocation table (FAT).
The bigger the FAT, the slower the operating sy stem works with the
disk.
(3) Having selected Auto, you allow Disk Director Suite to automatically
determine the cluster size depending on selected file system and
partition size.
6. By clicking OK in the Format Partition window, you'll add the pending
operation of partition formatting (your actions may only modify an existing
operation. See 2.4.5 «Modifying pending operations»).
Attention! Partition formatting destroys all its data, including files and folders! Take
special care when performing this operation.
Remember that each operation described must be executed by selecting Operations
Commit
pending operations»).
or clicking Commit Pending Operations (see 2.4.4 «Performing
4.1.7 Deleting a partition
After a partition is deleted, its space is added to unallocated disk space. It can be
used for a new partition or to resize an existing partition.
If you need to delete a partition:
Copyright © Acronis, Inc., 2000–2005
49
Page 50
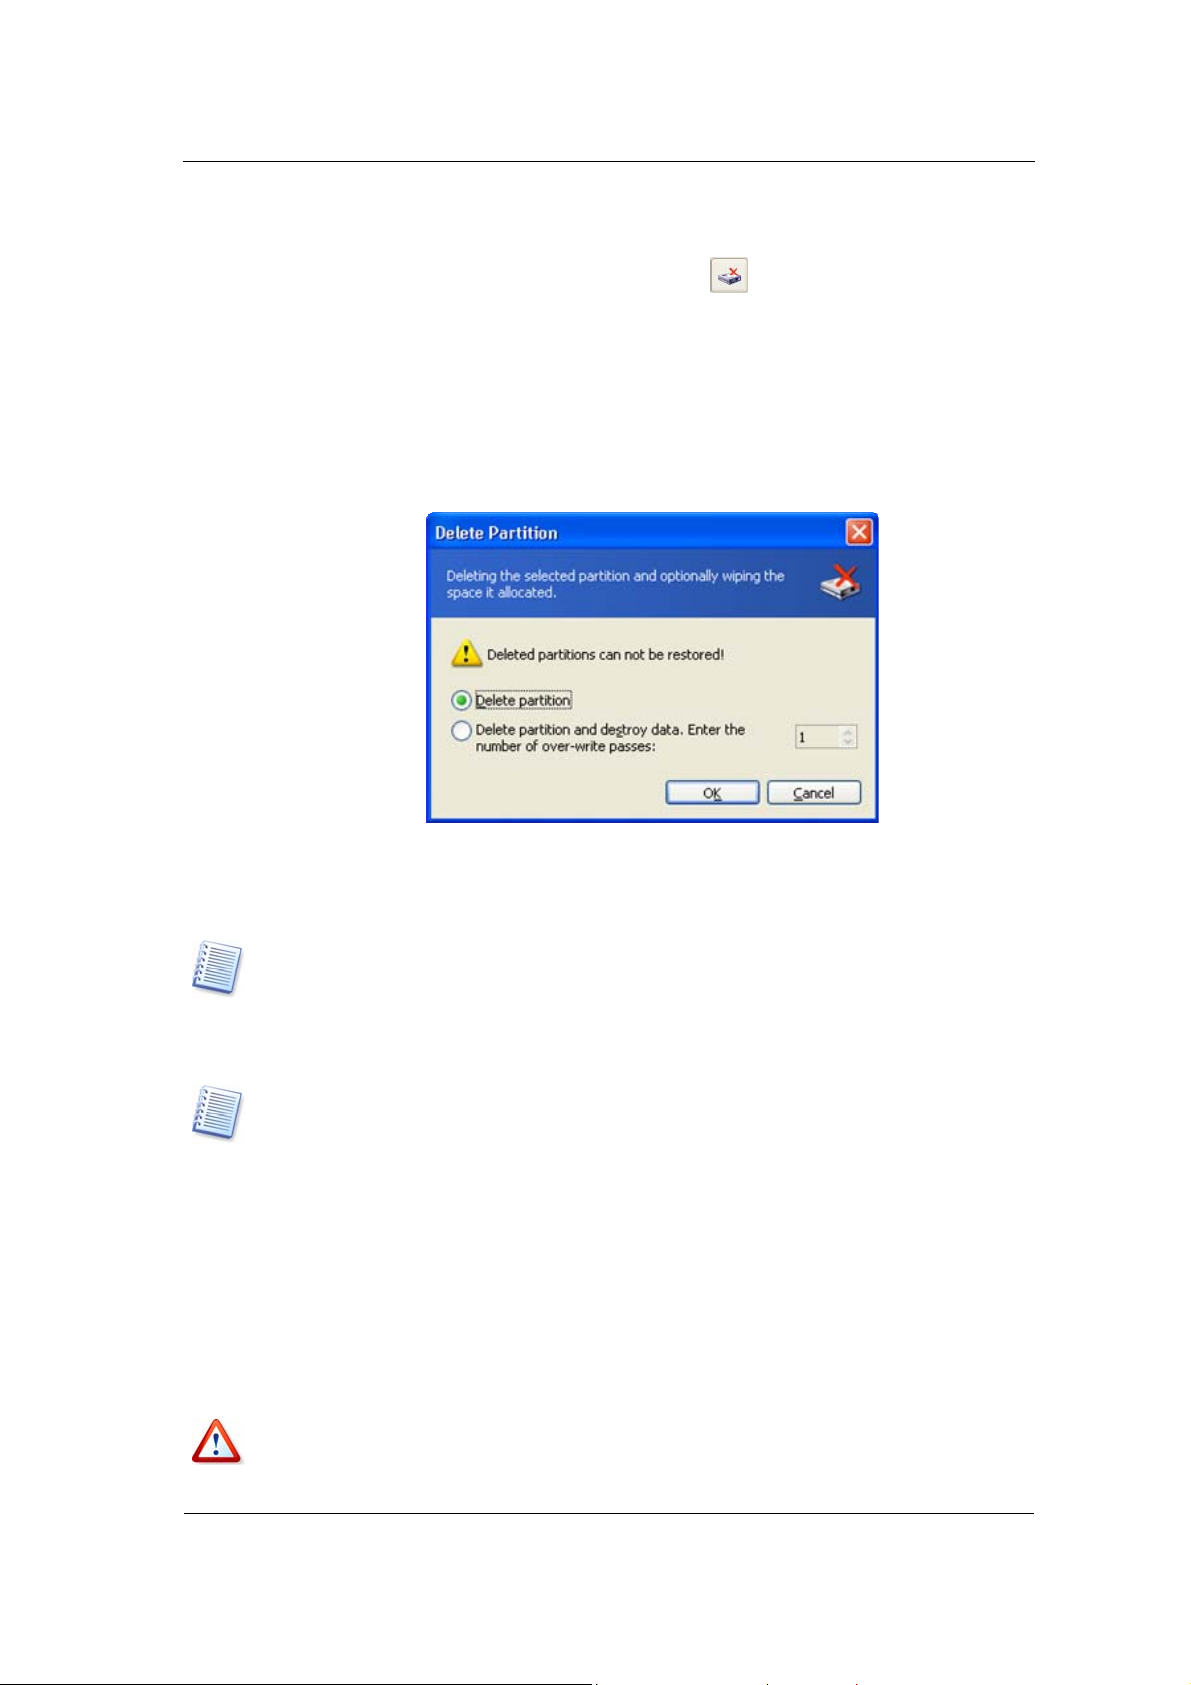
Manual Partition Operations
g
g
1. Select a hard disk and a partition to be deleted.
2. Execute partition deletion by selecting Disk Delete or a similar item in
the Operations sidebar list, or by clicking
Delete the selected partition on
the toolbar.
3. Select the deletion method in the Delete Partition window; you can:
(1) just delete a hard disk partition (without wiping disk sectors) — set
the switch to Delete partition.
(2) delete a hard disk partition and fully wipe partition sectors — set the
switch to Delete partition and destroy data.
Delete Partition window
Having set the switch to Delete partition and destroy data, enter a number
of passes for wiping.
Wiping unallocated disk space means multiple writing of special data to hard disk
sectors. Acronis Disk Director Suite features a rather simple wiping algorithm. During
each pass, a symbol sequence or lo
unallocated space sectors. Only logical zeroes are written during the last pass.
more passes
Acronis offers extremely powerful hard disk/partition wiping software — Acronis
Privacy Expert Suite, featuring strict algorithms for guaranteed confidential
information wiping and destruction
performed, the more complete the wiping will be.
ical zeroes (0x00) or ones (0xFF) is written to
The
.
4. Confirm partition deletion by clicking OK in the Delete Partition window.
5. By clicking
OK in the Delete Partition window, you'll add the pending
operation of partition deletion (your actions may only undo an existing
operation depending on the situation selected see 2.4.5 «Modify ing p endin g
operations»).
The new partition structure will be graphically represented in the Acronis
Disk Director Suite main window.
Attention! Deleting a partition destroys all its data, including files and folders!
Deletin
performing this operation.
a system partition will make a PC inoperable. Take special care when
50
Copyright © Acronis, Inc., 2000–2005
Page 51

Manual Partition Operations
g
g
Deleting a partition Windows 95/98/Me can change the order of letters assigned to
other partitions. As a result, some shortcuts mi
discussion of partition letter assi
in 3.1 «Creating A New Partition».
nment rules for various operating systems appears
ht stop working. A detailed
4.1.8 Checking hard disk partitions for errors
Acronis Disk Director Suite enables you to check hard disk partitions for file
system errors.
Hard disk partitions should be checked before any partition operations (see 1.7
«Before You Run ».
If you need to check a hard disk partition:
1. Select a hard disk and partition in the Acronis Disk Director Suite main
window.
2. Execute operation of partition error checking by selecting Disk Check or
a similar item in the Operations sidebar list, or by clicking
Check the
selected partition for errors on the toolbar.
3. If you want to fix errors, check the Fix the found errors box in the Check for
errors window.
Check for Errors window
4. By clicking OK, you'll run partition error checking.,
5. Check results are shown in the Check Partition window.
Copyright © Acronis, Inc., 2000–2005
51
Page 52

Manual Partition Operations
T
g
Partition check results window
4.1.9 Defragmenting a partition
Defragmentation is reorganizing file storage on a hard disk partition.
Defragmentation is the process of eliminating file fragmentation, which causes
files to be spread across the disk after disk operations.
File fragmentation significantly reduces PC and server performance, especially
when intensive I/O operations are taking place. Conversely, file defragmentation
can increase performance, as the read head has to move less across the disk to
read all file parts.
Acronis Disk Director Suite supports defragmentation in Windows XP and Windows
2003 Server only. Windows 2000 has its own embedded Disk Defragmenter.
defragment a partition in Windows NT 4.0 and earlier Windows operatin
is recommended that you install a third-party disk defragmenter tool.
systems, it
o
If you need to defragment a hard disk partition:
1. Select a hard disk and partition to defragment in the Acr onis Disk Director
Suite main window.
2. Execute operation of partition defragmentation by selecting Disk
Defragment or a similar item in the Operations sidebar list, or by clicking
Defragment the selected partition on the toolbar.
3. By clicking OK in the Defragmentation window, you'll run partition
defragmentation.,
52
Copyright © Acronis, Inc., 2000–2005
Page 53

Manual Partition Operations
Run partition defragmentation window
4. Defragmentation results are shown in the Defragment Partition window.
Partition defragmentation results window
4.1.10 Wiping unallocated hard disk space
PC hard disks can contain a substantial amount of confidential information. Often
users forget that private information be completely destroyed to avoid
unauthorized access to it — simply deleting an old file is not sufficient.
Windows tools do not guarantee data destruction. Deleted files can be restored
easily. Formatting and even deleting a partition leaves hard disk sector contents
the same. Acronis Disk Director Suite offers a simple but reliable algorithm for
wiping hard disk unallocated space.
If you need to wipe unallocated disk space:
1. Select a hard disk and unallocated space in the Acronis Disk Director Suite
main window — Wipe unallocated space becomes available on the toolbar.
Copyright © Acronis, Inc., 2000–2005
53
Page 54

Manual Partition Operations
2. Execute operation of free space clearing by selecting Disk Wipe or a
similar item in the Operations sidebar list, or by clicking
selected unallocated space on the toolbar.
3. In the Wipe Unallocated Space window, enter a number of disk passes (up
to 99),
For information about the Acronis Disk Director Suite data wiping algorithm
see the commentary for 4.1.7 «Deleting a partition».
4. By clicking OK, you'll add a pending operation of unallocated disk space
wiping.
4.1.11 Clearing a hard disk
Acronis Disk Director Suite lets you clear not only unallocated disk space, but an
entire disk as well.
Wipe the
Hard disk passes number window
If you need to clear the entire hard disk:
1. Select a hard disk on the Tree View panel of Acronis Disk Director Suite —
Clear the current hard disk drive button becomes available on the toolbar (if
there is no Tree View panel in the main window, show it by selecting View
Tree View).
2. Execute operation of ha rd disk space clearing by selecting Disk Clear or
a similar item in the Operations sidebar list, or by clicking
Clear the
current hard disk drive on the toolbar.
3. Select the clearing method in the Clear Hard Drive window; you can:
(1) just delete hard disk partitions (without wiping disk sectors) — set the
switch to Delete partitions.
(2) delete hard disk partitions and fully clear hard disk sectors — set the
switch to Delete partitions and destroy data.
Having set the switch to Delete partitions and destroy data, enter the
number of passes for wiping.
54
Copyright © Acronis, Inc., 2000–2005
Page 55
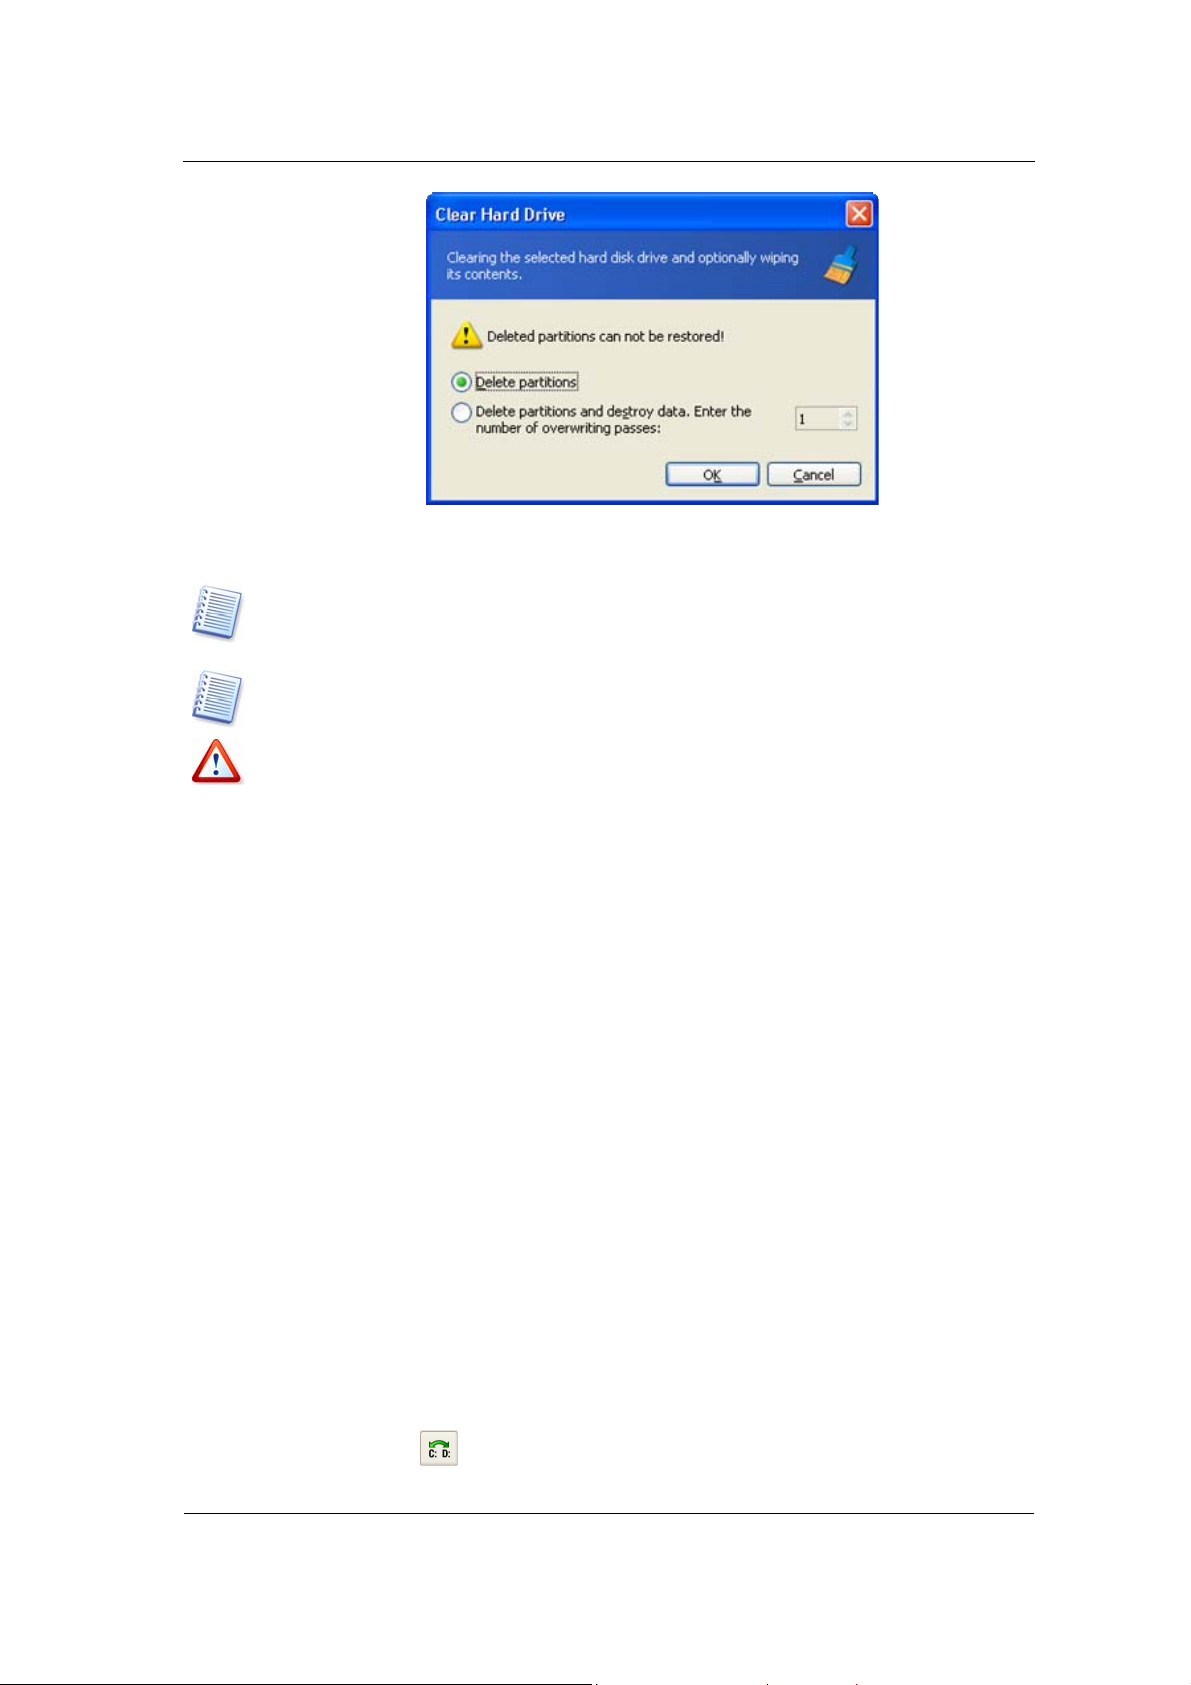
Manual Partition Operations
g
g
Hard disk clearing parameters window
4. By clicking OK, you'll add a pending operation of hard disk clearing.
Deleting hard disk partitions does not destroy disk sector contents. They can be
restored by special means, if needed. Therefore, if you need to destroy confidential
information, set the switch to
For information about the Acronis Disk Director Suite data wiping algorithm see the
commentary for 4.1.7 «Deleting a partition».
Deleting a partition in Windows 95/98/Me can change the order of letters assigned to
other partitions. As a result, some shortcuts mi
discussion of partition letter assi
in 3.1 «Creating A New Partition».
Delete partitions and destroy data!
ht stop working. A detailed
nment rules for various operating systems appears
4.2 Additional Partition Operations
Additional hard disk partition operations include some rarely used but useful
operations for converting partition file systems, hiding and unhiding
partitions, setting activ e partitions, changing root size and changing partiti on
cluster size.
4.2.1 Changing partition letter
Some operating systems assign letters (C:, D:,…) to hard disk partitions at
startup. They are used by applications and operating systems to locate files on
partitions.
Connecting an additional disk, as well as cr ea ting or deleting a partition on existin g
disks, might change your system configuration. As a result, some applications
might stop working or user files might not be opened. To prevent this, you can
change letters assigned by an operating sy st em.
If you need to change a letter assigned to a partition by an operating
system:
1. Select the hard disk and partition on it.
2. Execute operation of partition letter changing by selecting Disk
Advanced Change Letter or a similar item in the Advanced sidebar list, or
by clicking
3. Select a new letter in the Change letter window.
Copyright © Acronis, Inc., 2000–2005
Change the logical drive letter on the toolbar.
55
Page 56

Manual Partition Operations
g
g
g
Change letter window
4. By clicking OK in the Change letter window, you'll add a pending operation
to p ar t it io n l et te r as s ig nm e nt (your actions may only undo or modify already
existing operation; see 2.4.5 «Modifying pending operations»).
The new partition structure will be graphically represented in the Acronis
Disk Director Suite main window.
Only Windows NT/2000/XP lets you change letters assigned to partitions. Windows
95/98/Me assigns letters to partitions automatically.
Directly changing a partition letter might affect shortcuts to existing partitions.
Changin
applications and openin
mi
rules for various operating systems appears in 3.1 «Creating A New Partition».
a partition letter in Windows NT/2000/XP might result in problems running
files on the partition. If it is a system or swap file partition, it
ht cause OS boot problems. A detailed discussion of partition letter assignment
4.2.2 Converting a file system
FAT16
The main
disadvantages
of FAT16 are:
• Inability to support partitions larger than 2 GB
• Inability to work with files larger than 2 GB
• Inability to work with hard disks larger than 8 GB
• Limited root size — up to 512 elements
• Filenames containing up to eight name symbols, a dot and three extension
symbols (Windows 95 OSR2 and Windows NT do not have this limitation)
FAT32
The FAT32 file system appeared in Windows 95 OSR2 and is supported by
Windows 98/Me and Windows 2000/XP.
Its main purpose was to remove FAT16 limitations. FAT32 is the evolution of
FAT16.
56
Copyright © Acronis, Inc., 2000–2005
Page 57

Manual Partition Operations
The main difference between FAT32 and FAT16 is the support of higher-capacity
folders, files and disks, and more flexible root organization that features
unlimited size and long filename support. (For more details see A.9 «File System
Main Specifications».)
Converting FAT16 to FAT32
You would convert a FAT16 partition to FAT32 in the following cases:
1. If you need a partition larger than 2 GB.
2. If you replace a small-capacity hard disk with a high-capacity hard disk
If you need to convert a FAT16 partition to FAT32:
1. Select the disk and FAT1 6 partition to convert to FAT32 from the list in the
Acronis Disk Director Suite main window.
2. Execute operation of partition converting by selecting Disk Advanced
Convert or a similar item in the Advanced sidebar list, or by clicking
Convert the file system on the selected partition on the toolbar (or selecting
it from partition or the graphical representation context menu).
3. Enter partition type (Logical — Primary) in the Convert Partition
window.
Convert partition window
4. By clicking OK, you'll add a pending operation of FAT16 partition conversion
to FAT32 partition (your actions may only undo or modify an existing
operation as well. See 2.4.5 «Modifying pending operations»).
The new partition file system will be graphically represented in the Acronis
Disk Director Suite main window.
Attention! Converting a FAT16 partition to FAT32 might cause the installed operating
system to stop «understanding» the file syst em and/or the allocation table. For more
information about compatibility of file and operating systems see A.9 «File System
Main Specifications».
4.2.3 Hiding a partition
Acronis Disk Director Suite allows you to hide a partition. It can be useful for
protecting important information from unauthorized or casual access. Unlike
Copyright © Acronis, Inc., 2000–2005
57
Page 58

Manual Partition Operations
g
g
g
g
other software, Acronis Disk Director Suite can hide any partition independent of
its type, primary or logical.
If you need to hide a partition:
1. Select a disk and a partition to hide in the list in the Acronis Disk Director
Suite main window.
2. Execut e operation of partition hiding by selecting Disk Advanced Hide
or a similar item in the Advanced sidebar list, or by clicking
Hide the
selected partition on the toolbar (or selecting it from partition or the
graphical representation context menu).
3. By clicking
OK in the Hide Partition window, you'll add a pending operation to
partit ion hiding (your actions may only undo or modify an existing operation as
well. See 2.4.5 «Modifying pending operations»).
Hide Partition window
A hidden partition is labeled Hid in the Flags field of partition list in the
main window.
Attention! Hiding a system partition will prevent your PC from booting. Hiding a swap
file partition in Windows NT/2000/XP will produce a similar result. If you have
several primary partitions with different operatin
partition will automatically make another partition active.
systems, hiding an active system
Note that the Advanced Hide sidebar item is changed to Advanced Unhide after
you select a hidden partition from the list. The partition context menu also changes.
Hiding a partition in Windows 95/98/Me can change the order of letters assigned to
other partitions. As a result, some shortcuts mi
NT/2000/XP, hidin
a result, only hidden partition shortcuts will stop workin
partition letter assignment rules for various operating systems appears in 3.1
«Creating A New Partition».
a partition does not affect letters assigned to other partitions. As
4.2.4 Unhiding a partition
Unhiding a partition is performed so an operating system can "see" the partition,
assign it a letter and provide access to partition files.
If you need to unhide a partition:
58
ht stop working. In Windows
. A detailed discussion of
Copyright © Acronis, Inc., 2000–2005
Page 59

Manual Partition Operations
g
g
g
1. Select a disk and partition to unhide from the list in the Acronis Disk
Director Suite main window.
2. Execute operation of partition unhiding by selecting Disk Advanced
Unhide or a similar item in the Advanced sidebar list, or by clicking
Unhide the selected partition on the toolbar (or selecting it from partition or
the graphical representation context menu).
3. By clicking OK in the Unhide Partition window, you'll add the pending operation
to partition unhiding (your actions may only undo or modify an existing
operation, See 2.4.5 «Modifying pending operations»).
Unhide partition window
The partition Hid label will disappear from the Flags field.
Note that the Advanced Unhide sidebar item is changed to Advanced Hide after
you select a hidden partition from the list. The partition context menu chan
same.
es the
If you unhide the only primary partition on a disk, it will be set active.
Hiding a partition in Windows 95/98/Me can change the order of letters assigned to
other partitions. As a result, some shortcuts mi
discussion of partition letter assi
in 3.1 «Creating A New Partition».
4.2.5 Setting active partition
If you have several primary partitions, you must specify one to be the boot partition.
For this, you can set a partition to active. A disk can have only one active partition.
If you need to set an active partition:
1. Select a primary partition to set to active from the list in the Acronis Disk
Director Suite main window.
2. Execute operation of setting active partition by selecting Disk Advanced
Set Active or a similar item in the Advanced sidebar list, or by clicking
Set the selected partition as active on the toolbar (or selecting it from
partition or the graphical representation context menu).
ht stop working. A detailed
nment rules for various operating systems appears
Copyright © Acronis, Inc., 2000–2005
59
Page 60
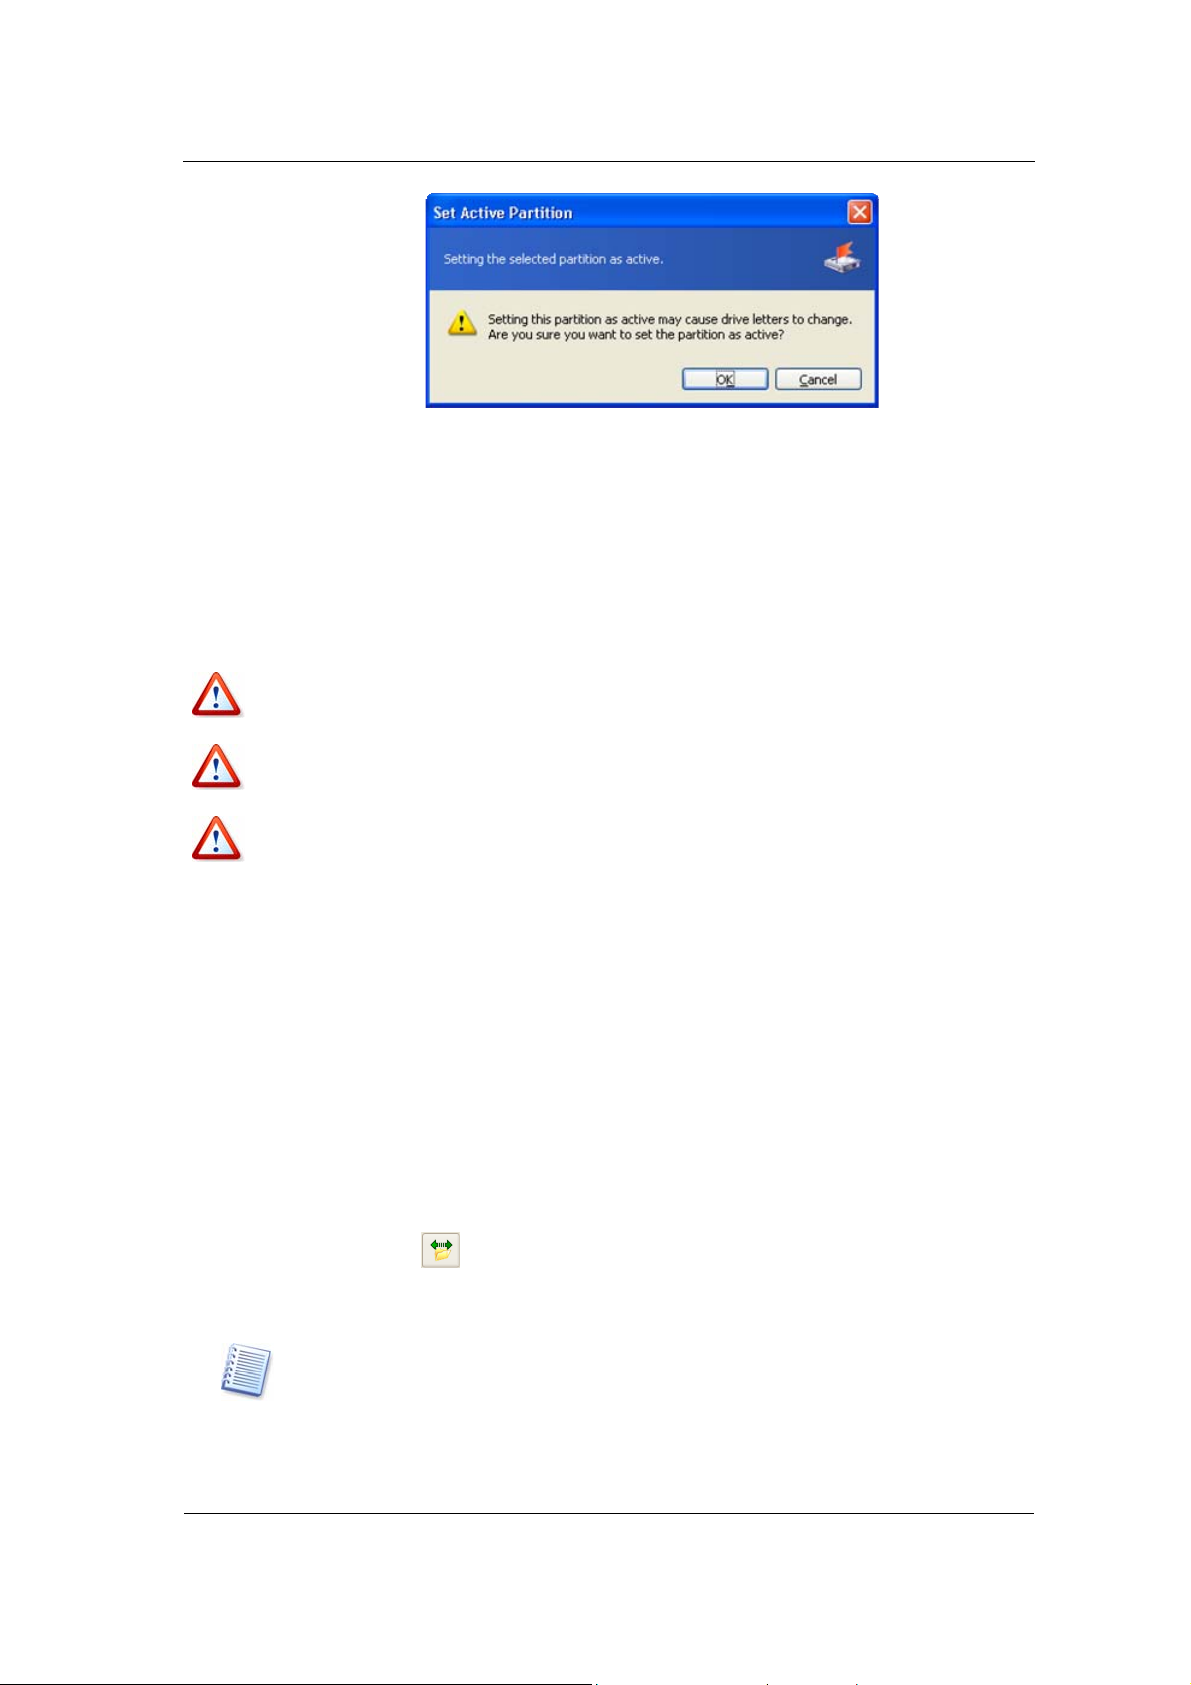
Manual Partition Operations
g
g
Set Active Partition
3. By clicking OK in the Set Active Partition window, you'll add the pending
oper ation of se tting activ e par tition (your actions may only undo or modify
an existing operation. See 2.4.5 «Modifying pending operations»).
The new partition structure will be graphically represented in the Acronis
Disk Director Suite main window.
The partition will be marked Act in the Flags field. The primary partition is
also marked Pri, so the Flags field will contain Pri, Act.
Before you make a partition active, you must make sure it is formatted and contains
an operating system. Otherwise your PC will not boot from this partition!
If you set a partition to active and there was another active partition on a disk, it will
be unset
Setting an active partition in Windows 95/98/Me can change the order of letters
assi
detailed discussion of partition letter assi
appears in 3.1 «Creating A New Partition».
automatically. This also might prevent your PC from booting.
ned to other partitions. As a result, some shortcuts might stop working. A
4.2.6 Resizing a root
Unlike all others, the FAT16 root is located in a special place and has a limited
size (512 elements after standard formatting). Acronis Disk Director Suite lets
you change the root size of existing partitions.
If you need to resize a FAT16 partition root:
1. Select a disk and FAT16 partition from the list in the A cronis Disk Director
Suite main window.
2. Execute operation of FAT16 partition root resizing by selecting Disk
Advanced Resize Root or a similar item in the Advanced sidebar list, or
by clicking
the selected partition on the toolbar (or selecting it from partition or the
graphical representation context menu).
nment rules for various operating systems
Change the number of files that can be located in the root of
If you select a partition with another file system, mentioned sidebar and
context menu items will not be available.
60
Copyright © Acronis, Inc., 2000–2005
Page 61

Manual Partition Operations
3. Enter the new root size (a number of elements) in the Resize Root
window.
Resize FAT16 root window
FAT16 can contain a maximum of 65,520 elements.
4. By clicking OK, you'll add the pending operation of FAT16 partition root
resizing (your actions may only undo or modify an existing operation. See
2.4.5 «Modifying pending operations»).
4.2.7 Changing cluster size
Smaller clusters (see Appendix C «Glossary» — «Cluster») might significantly
reduce disk space losses related to the fact that any file occupies at least one
cluster/block.
Disk space losses depending on cluster size are shown in Appendix A (see A .9.2
«FAT16» —
Table 3).
However, reducing FAT32 partition cluster size might increase the space
occupied by the file allocation table (FAT) and slow down file access.
If you need to change cluster size:
1. Select a disk and partition from the list in the Acronis Disk Director Suite
main window.
2. Execute operation of cluster resizing by selecting Disk Advanced
Change cluster size or a similar item in the Advanced sidebar list, or by
clicking
Change the cluster size of the selected partition on the toolbar
(or selecting it from partition or the graphical representation context
menu).
3. In the Cluster Size window, you can:
(1) see the current cluster size of selected partition.
(2) see average statistics of disk space losses for the selected partition
and different cluster size.
Some cluster sizes might become unavailable for a partition because there will
not be enough clusters to store the actual partition data.
Copyright © Acronis, Inc., 2000–2005
61
Page 62

Manual Partition Operations
T
(3) set new cluster size in the New cluster size field.
Cluster size window
4. By entering a new cluster size and clicking OK in the Cluster Size window,
you'll add the pending operation of cluster resizing (your actions may only
undo or modify an existing operation, See 2.4.5 «Modifying pending
operations»).
4.2.8 Changing partition type
Each partition record includes the «partition type field». It is a hexadecimal valu e
that defines the file and operating system suitable for a partition.
his hexadecimal value is optional, as some operating systems use it and some do
not. In particular, Windows 95/98/Me only uses the «partition type» field when
determining if it can support a partition.
Usually, partition type is set during its creation depending on the file system to be
used. However, you might need to select the type manually. For example, if a
partition is created without a file system or if a partition is meant for use with a
specific OS, it must be assigned a corresponding type.
If you need to change partition type:
1. Select a disk and partition to chan ge type from the list in the Acronis Disk
Director Suite main window.
2. Execute operation of partition type changing by selecting Disk Advanced
Change ty pe or a similar item in the Advance d sidebar list, or by clicking
Change the type of the selected partition on the toolbar (or selecting it
from partition or the graphical representation context menu).
3. Select the necessary partition type in the Partition type window.
62
Copyright © Acronis, Inc., 2000–2005
Page 63

Manual Partition Operations
g
g
Partition type window
4. By clicking OK in the Partition type window, you'll add the pending
oper atio n of pa rtiti on ty pe cha ngin g (your actions may only undo or modify
an existing operation, See 2.4.5 «Modifying pending operations»).
Attention! Changing partition type might prevent some operating systems from
working with it, even if it is a compatible file system!
Changing partition type in Windows 95/98/Me can hide a partition and change the
order of letters assi
workin
operating systems appears in 3.1 «Creating A New Partition».
. A detailed discussion of partition letter assignment rules for various
ned to other partitions. As a result, some shortcuts might stop
4.2.9 Resizing i-node table in Linux Ext2/Ext3
In Linux Ext2/Ext3, the i-node index descriptor is the main data structure
describing files.
Each descriptor contains a file description, including file type, size, data block
pointers, etc. Data block addresses reserved for a file are stored in its index
descriptor.
The space for all i-nodes must be allocated in advance (at formatting). In the
Ext2/Ext3 file systems, the maximum number of files is set at formatting.
The «bytes per a single i-node» value indicates the average partition fi le size. If
there are many small files, there must be many descriptors, each of which
occupies some space. Large files require fewer descriptors.
Acronis Disk Director Suite enables you to resize i-node tables of existing
partitions to change the maximum file amount on them.
If you need to resize an i-node table of an existing Linux Ext2/Ext3
partition:
1. Select a disk and Linux Ext2/Ext3 partition from the list in the Acronis Disk
Director Suite main window.
Copyright © Acronis, Inc., 2000–2005
63
Page 64

Manual Partition Operations
2. Execute operation of INODE resizing by selecting Disk Advanced Change
Bytes per i-node or a similar item in the Advanced sidebar list, or by
clicking
Change the number of bytes per i-node on the toolbar (or
selecting it from partition or the graphical representation context menu).
If you select a partition with another file system, mentioned sidebar and context
menu items will be unavailable.
3. Enter the new amount of bytes per descriptor (i-node) in the Change bytes per
i-node window.
Resize i-node window
4. By clicking OK in the Change bytes per i-node window, you'll add the pending
operation of Linux Ext2/Ext3 partition i-node resizing (your actions may only
undo or modify an existing operation, See 2.4.5 «Modifying pending operations»).
64
Copyright © Acronis, Inc., 2000–2005
Page 65

Working with Acronis Recovery Expert
Chapter 5. Working with Acronis Recovery
Expert
Acronis Recovery Expert allows recovery of hard disk partitions accidentally
deleted or damaged due to a hardware or software failure. It uses a wizard
interface.
You can run Acronis Recovery Expert in the following ways.
While working with Acronis Disk Director Suite in the Automatic mode:
• Using Recover Partition item in the wizards section of the Acronis Disk
Director Suite main window sidebar
• Using the respective main menu item
While working in the Manual mode:
• Besides the aforementioned methods available f or the Automatic mode, you
can invoke Acronis Recovery Expert in the Manual mode using Advanced
Recover item of the context menu by hovering a mouse pointer onto
Unallocated space and right-clicking
Then Acronis Recovery Expert begins reading the partition configuration of your
hard disks.
After the process is finished, you may see a warning that there are no
unallocated spaces on your hard disks:
Hard disks do not have any unallocated spaces
Copyright © Acronis, Inc., 2000–2005
65
Page 66
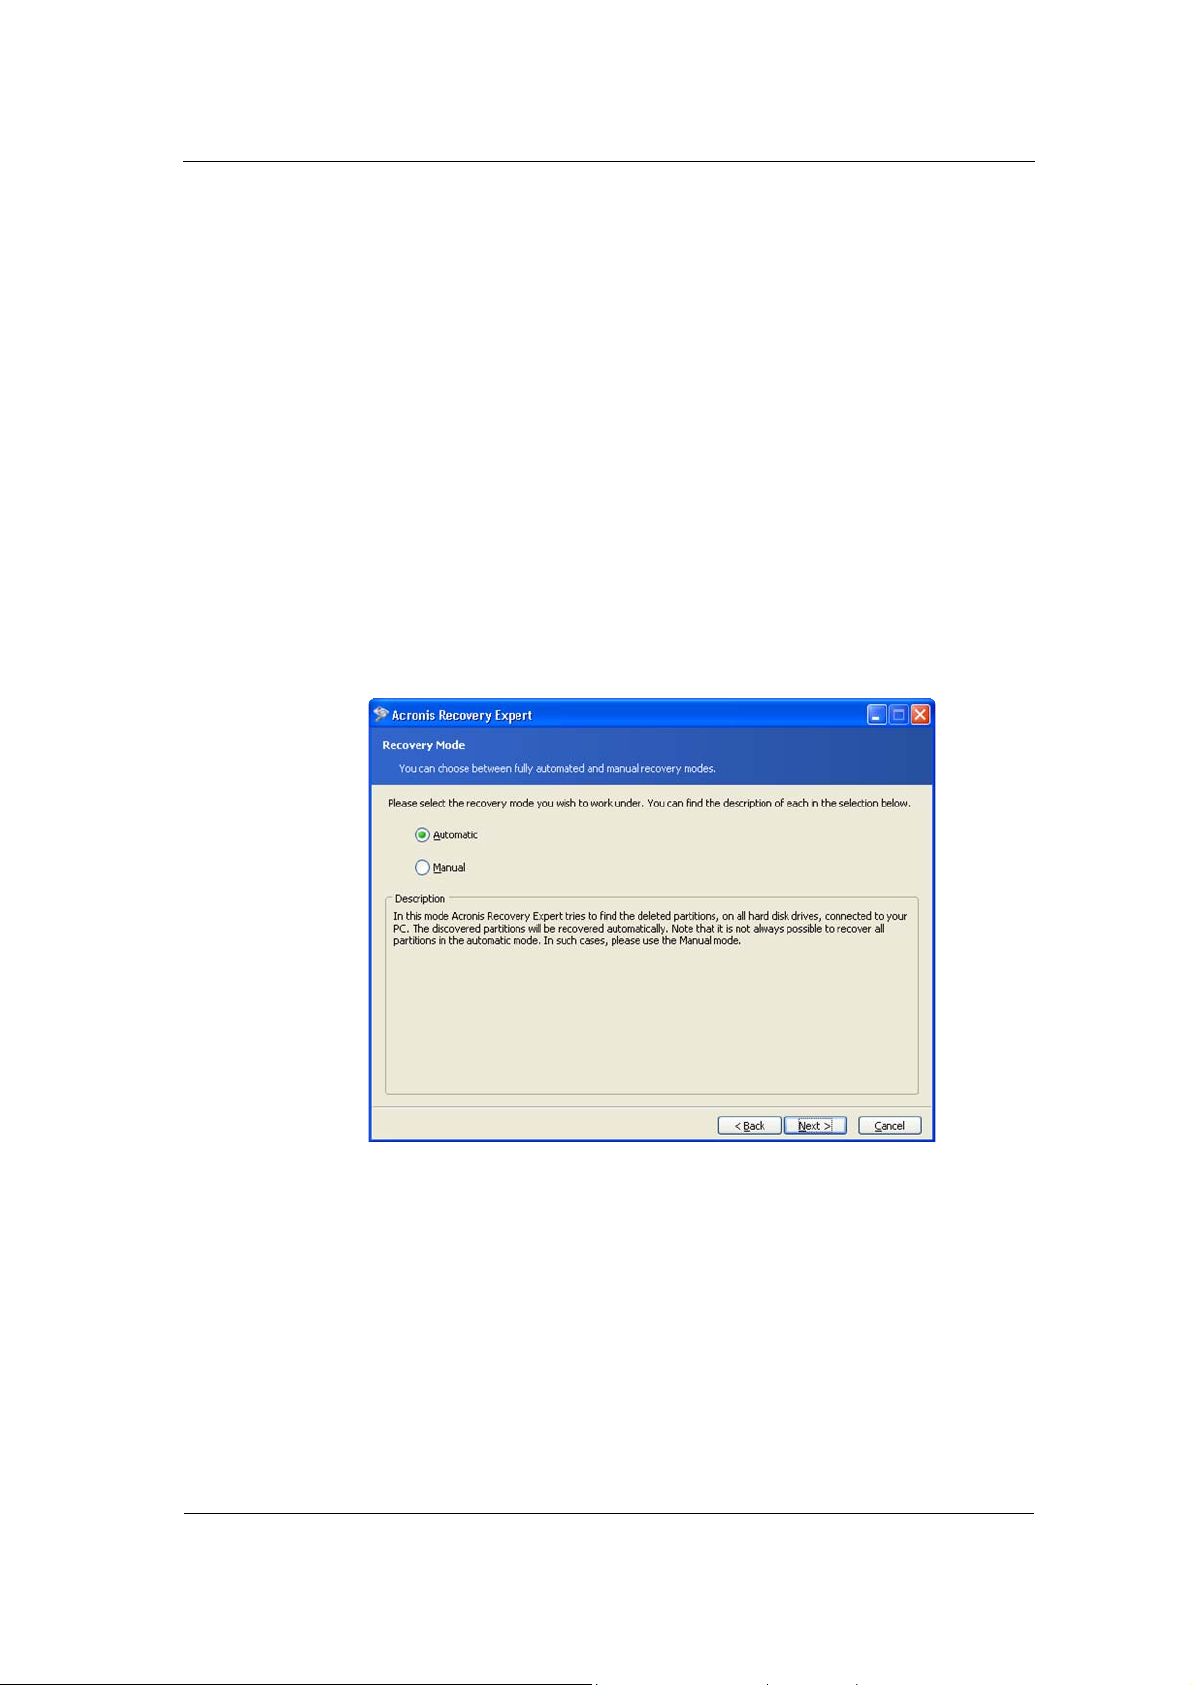
Working with Working with Acronis Recovery Expert
Please note: the entire hard disk space can be partly partitioned and/or partly
unallocated. If you delete a disk partition – whether intentionally or by mistake –
its space becomes unallocated. You can create a new partition using unallocated
space only.
Acronis Recovery Expert checks to see if your hard disks contain unallocated
space. If you have no unallocated space, then it makes no sense to search for
deleted partitions. If you have unallocated space, it may have contained one or
more partitions. Acronis Recovery Expert will search unallocated space
thoroughly – either automatically or manually.
5.1 Automatic Recovery
You can recover deleted partitions automatically or manually. To do s o, set the
switch to the necessary position in the Recovery mode window.
Let us describe automatic partition recovery first. Set the switch to Automatic.
Selecting Automatic recovery mode
In the next Searching for Deleted Partitions window, Acronis Recovery Expert
searches for all deleted partitions. The search progress is shown in the lower part
of the window.
66
Copyright © Acronis, Inc., 2000–2005
Page 67
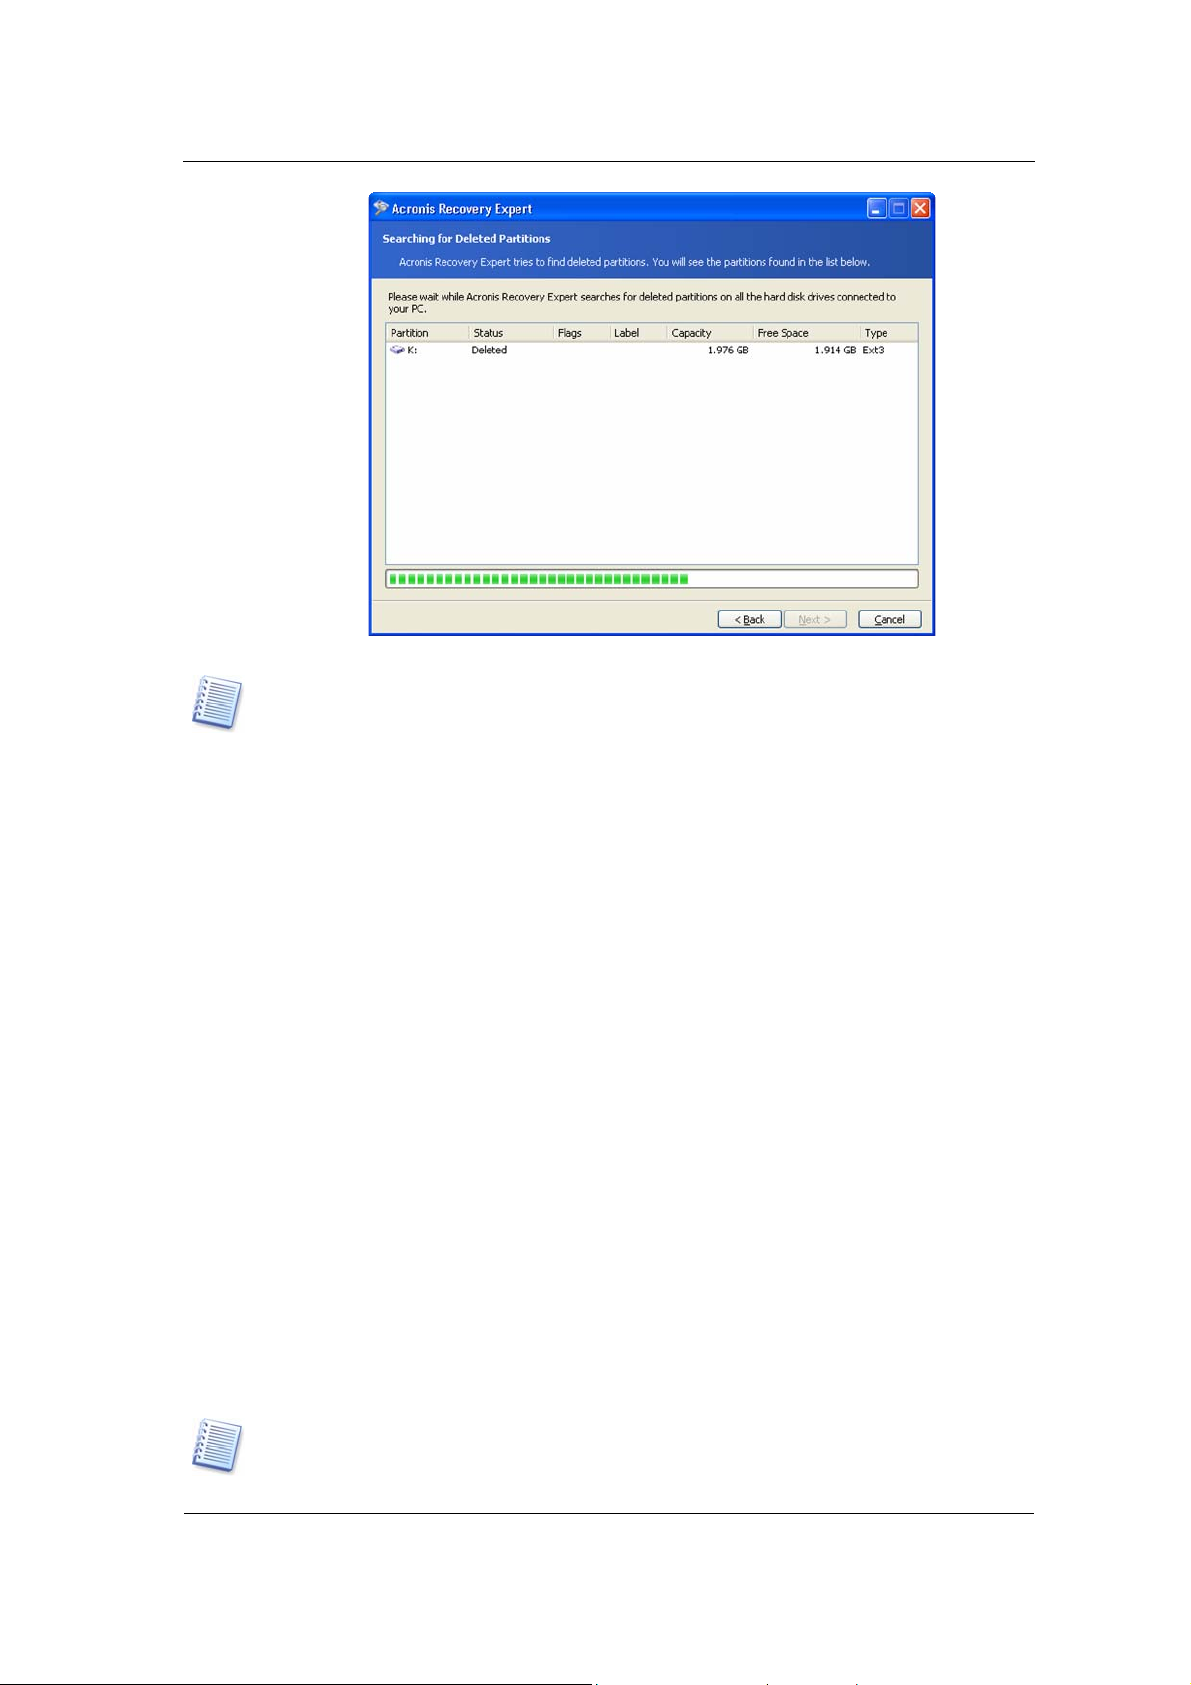
Working with Acronis Recovery Expert
Deleted partitions search progress
The information about hard disk partitions is stored in a special disk area – the 1
sector of 0th cylinder, 0th head – called the partition table. This sector is called a boot
sector or the master boot record (MBR). Acronis Recovery Expert not only checks the
partition table for deleted partitions, but also scans the entire disk surface. Therefore
the recovery process might take some time to complete.
st
Please note: Acronis Recovery Expert may find deleted partition(s) almost at
once (in a few seconds). Partition(s) found are then added to the list in the
Searching for Deleted Partitions window. The search will, however, continue until
the entire disk is scanned for partitions.
In the automatic recovery mode, the search must be finished before you can
proceed to the next recovery steps. The
Next button becomes enabled only
after the progress bar is full in the Searching for Deleted Partitions window. The
manual mode however enables you to work at once (see 5.2 «Manual
Recovery»).
Partitions found during the search are shown in the list with their main
parameters:
• number
• status
• label
• capacity
• partition free space
• file system
Please note: Found partitions are automatically added to the list
Copyright © Acronis, Inc., 2000–2005
during the search.
67
Page 68

Working with Working with Acronis Recovery Expert
A deleted partition found
Note that you do not have to select partitions for recovery in the automatic mode.
Acronis Recovery Expert will recover
all partitions found.
The Recovered Partitions window shows a partition to recover as a part of hard
disk partition structure, marking it with an icon in the upper right corner of its
rectangle.
A hard disk partition to be recovered
A partition has been found by Acronis Recovery Expert and is shown in the disk
structure, but has not yet been recovered.
68
Copyright © Acronis, Inc., 2000–2005
Page 69

Working with Acronis Recovery Expert
g
This finishes partition recovery preparations. To complete this operation, select
Commit in the Operations section of the Main menu. This will complete the
given partition recovery.
If you exit Acronis Disk Director Suite without confirmin
operation, it will be canceled.
5.2 Manual Recovery
Set the switch to Manual in the Recovery mode window to select the manual
recovery mode.
the partition recovery
Selecting manual recovery mode
The next Searching Method window enables you to select one of two deleted
partition searching methods: 1) Fast; 2) Complete.
What's the difference? Using the Fast search method, Acronis Recovery Expert
checks the beginning of each side of every cylinder of a hard disk. Using the
Complete method, Acronis Recovery Expert checks every hard disk sector.
The Fast method takes less time, while the Complete method is slower but more
thorough.
Note that the Fast method should find all deleted partitions in most cases!
Copyright © Acronis, Inc., 2000–2005
69
Page 70
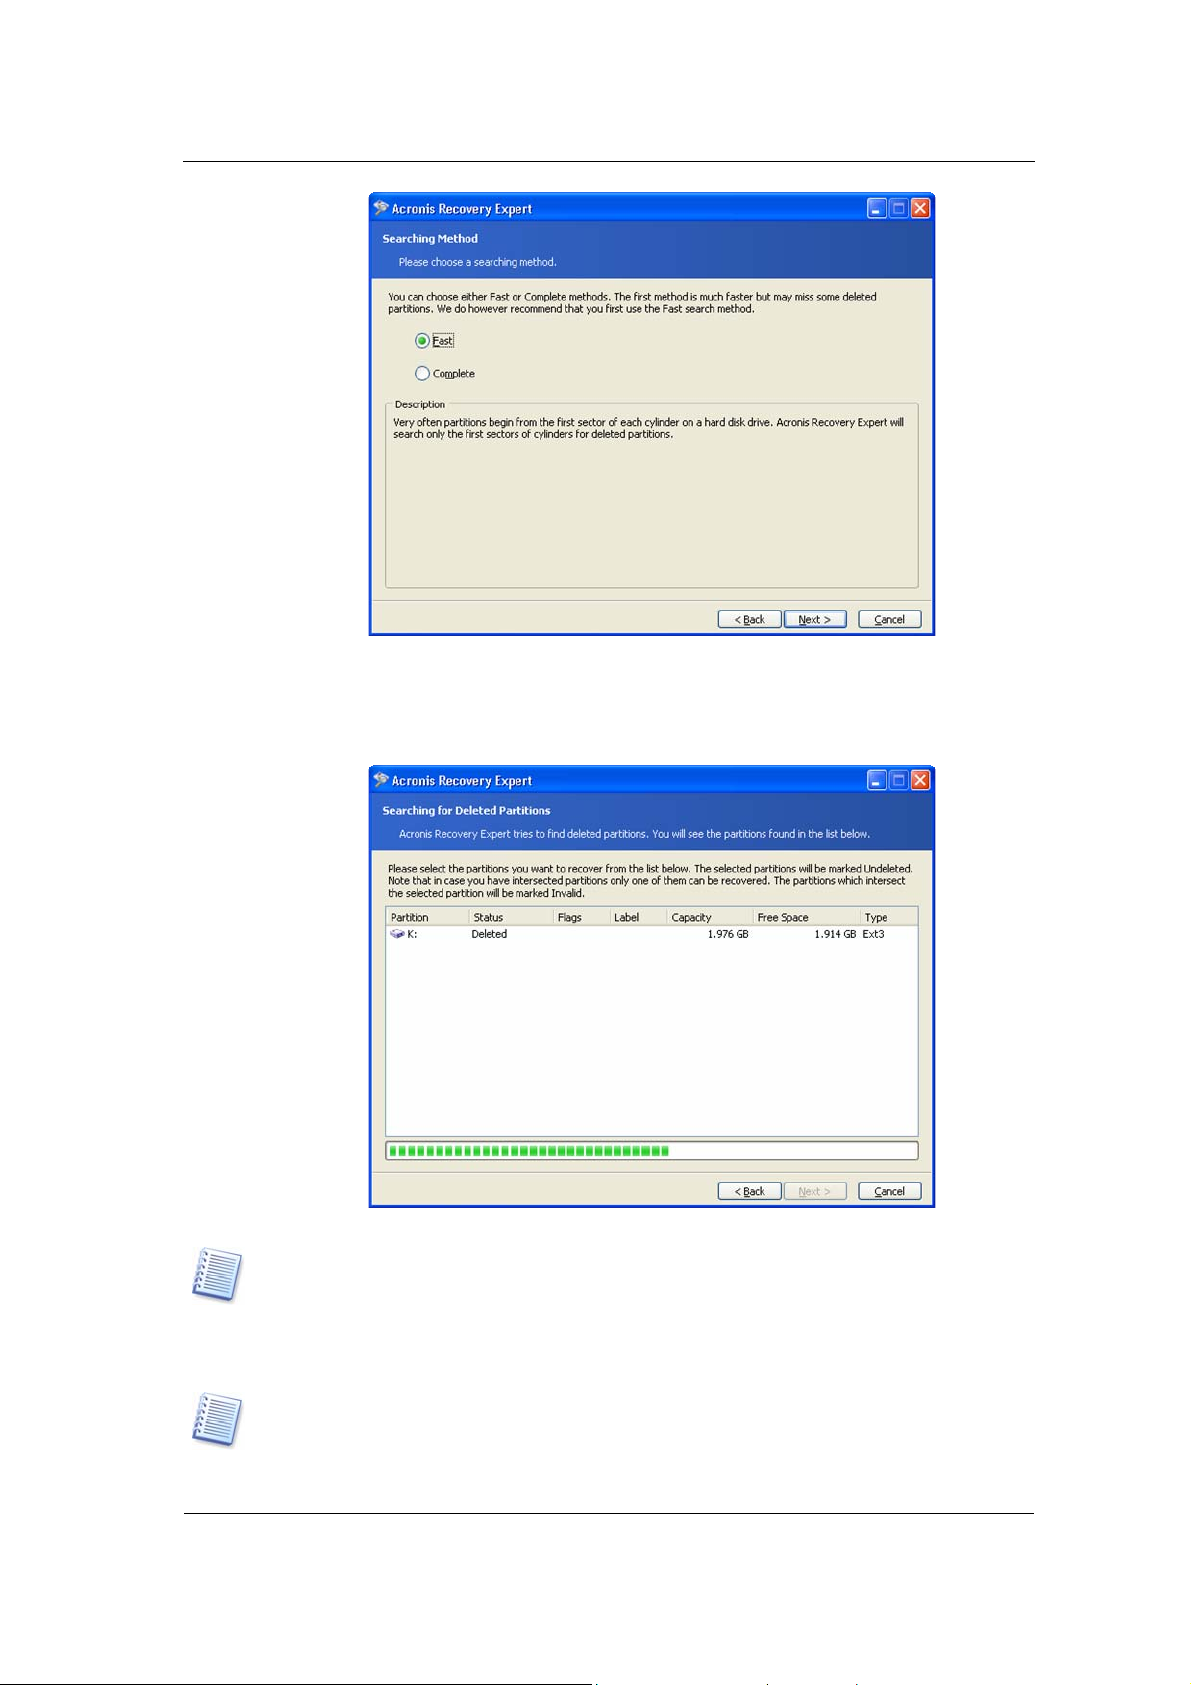
Working with Working with Acronis Recovery Expert
g
T
Searching method selection
The Searching for Deleted Partitions window shows you parameters of a partition
that existed on the selected unallocated space before it was deleted.
A deleted hard disk partition found by Acronis Recovery Expert
Unlike in the automatic recovery mode, you do not have to wait until the search for
deleted hard disk partitions is finished in the manual mode. As a found partition or
multiple partitions are added to the list, you can select them for immediate recovery.
Selecting a partition enables the
Next button. Clickin
proceed to recovery.
he manual recovery mode allows you to select all found partitions for recovery. For
example, if one of your partitions was deleted intentionally and another by mistake,
the manual mode enables you to select and recover only the partition you deleted by
mistake. Partitions are selected for recovery by clicking them.
70
it, you'll stop the search and
Copyright © Acronis, Inc., 2000–2005
Page 71
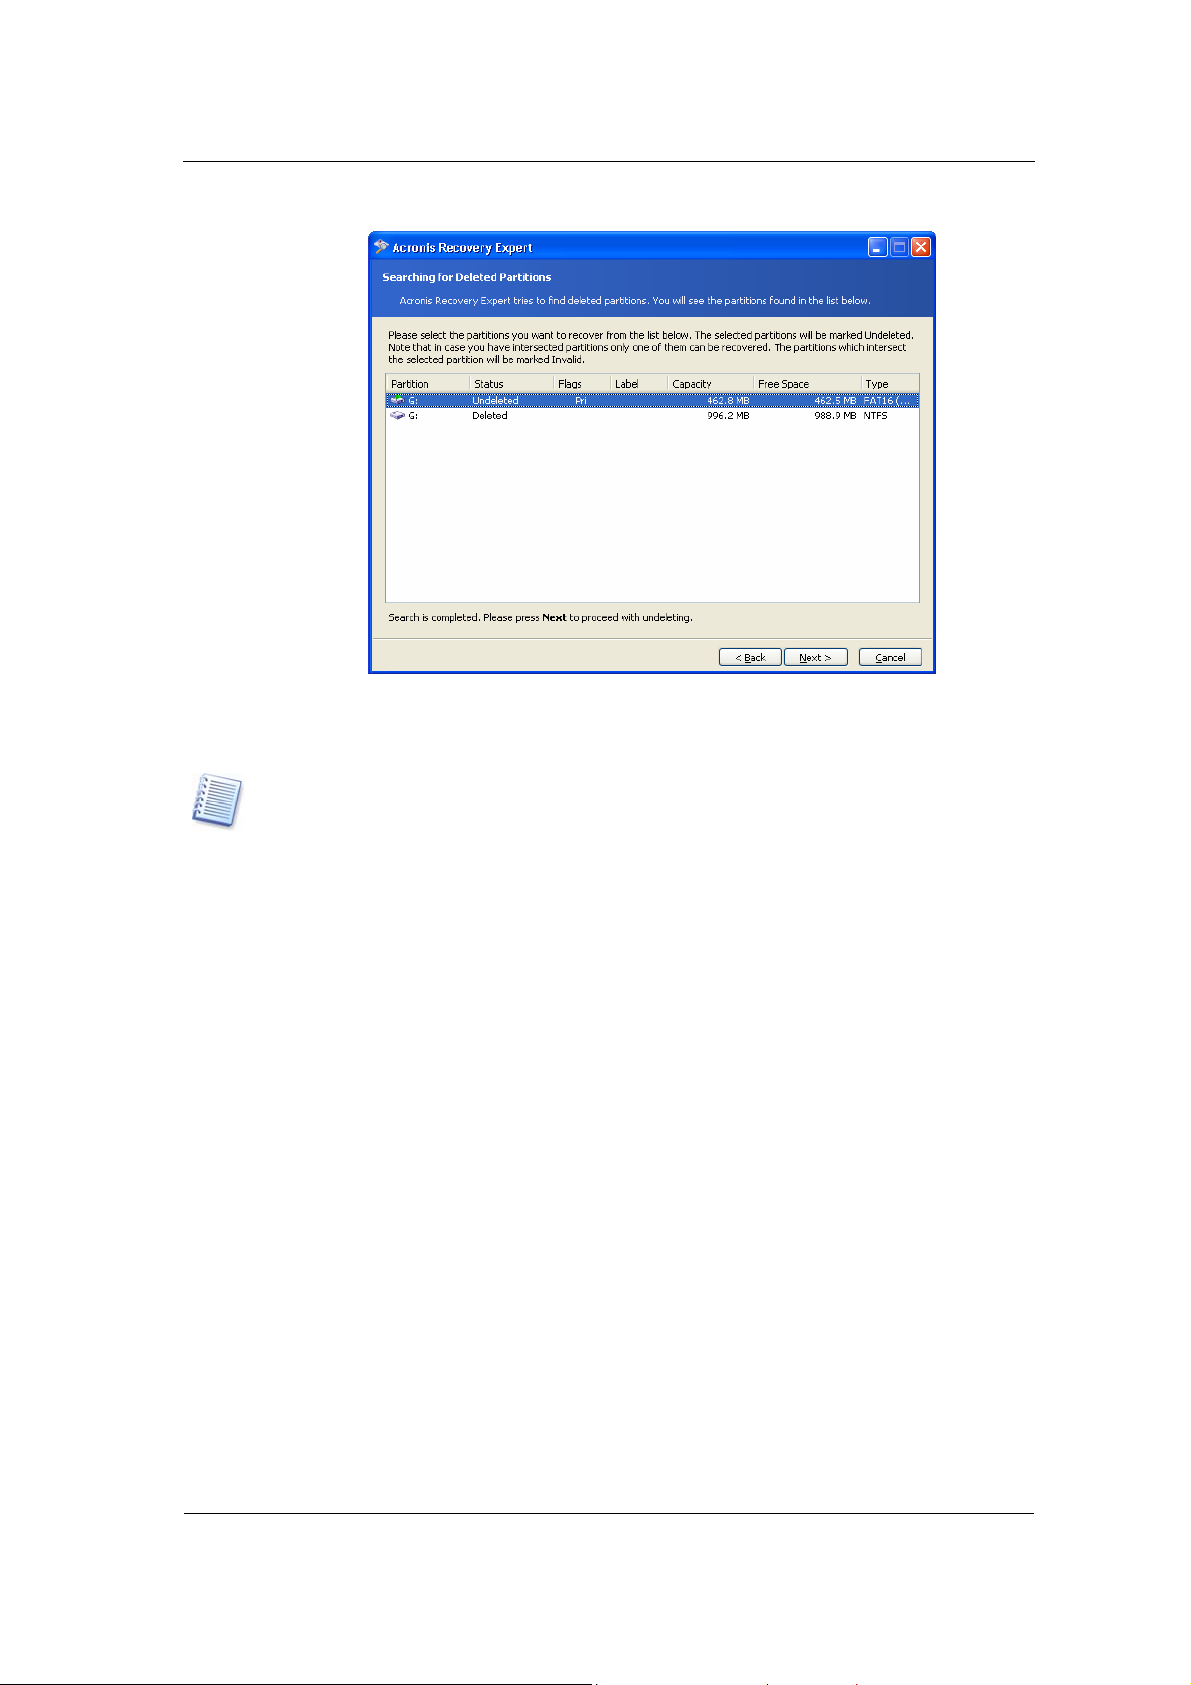
Working with Acronis Recovery Expert
g
Click the partition rectangle to select the deleted partition and continue recovery.
A deleted partition selected for recovery
This finishes partition recovery preparations. To complete this operation, select
Commit in the Operations section of the Main menu.
If you exit Acronis Disk Director Suite without confirmin
operation, it will be canceled.
a partition recovery
Copyright © Acronis, Inc., 2000–2005
71
Page 72

Working with Acronis Disk Editor
Chapter 6. Working with Acronis Disk
Editor
6.1 General information
Acronis Disk Editor is a professional-grade program that performs a variety of
actions on a hard disk: to restore boot records and files and folders structure,
find lost clusters, remove computer virus code from a disk and much more.
This program has much to offer a beginner as well. It can be used in an
educational setting. It is one thing to read a few books about hard disk
construction and data storage, and it’s quite another to observe it yourself with
the Acronis Disk Editor.
6.2 The selection of the partition or a disk for editing
Disk or partition data editing operations are only available in the Manual mode of
Acronis Disk Director Suite.
To start editing hard disk or partition data:
• Select the necessary partition (disk) to edit with Acronis Disk Editor from the
list of available partitions (disks) in the Acronis Disk Director Suite main
window;
• Select Edit in the Advanced section of the main window sidebar or the
respective item of the context menu invoked by right-clicking. You can also
access editing operations selecting main menu: Disk Advanced Edit.
This will invoke Acronis Disk Editor, providing access to other editing operations
of the selected partition (disk):
72
Copyright © Acronis, Inc., 2000–2005
Page 73

Working with Acronis Disk Editor
6.3 Main Window of the Program
The main window shows the numbers of disk and sector where the internal
program cursor is positioned. It usually contains information about the work of
various modes. Below the main window of the program is the view as partition
table mode.
The main window in the view as partition table mode
To make the information contained in this field sensible, the current sector
should be the MBR or the extended partition table.
The next figure shows the partition table as a single dump (hexadecimal byte
values are on the left, and the corresponding characters are on the right).
The current editing position is shown by the curs or that can be either in the left
or right part of the window
Copyright © Acronis, Inc., 2000–2005
The main window in the view as hex mode
73
Page 74

Working with Acronis Disk Editor
In this section of the guide, all examples of Acronis Disk Editor’s main window view
modes are given for demonstration purposes.
The main menu of Acronis Disk Editor contains the following items:
• Disk – allows you to browse properties of a disk being edited
• Edit – allows you to manipulate blocks of selected hard disk partitions; also
allows you to save contents of a disk sector after editing
• View – allows you to select a view mode for more convenient presentation of
data
• Search – allows you to search a partition (or a hard disk) for any line (or any
sequence of characters) and go to a certain disk sector according to its
absolute offset
• Help – allows you to get help concerning the editor window or about the
program’s developer and version
6.4 Edit Hard Disks
The Edit menu of the Acronis Disk Editor main window allows you to access the
main operations with blocks of given hard disk sectors. You can edit hard disk
data directly in the fields of any view mode (see the View menu). You can
manipulate data blocks using Edit menu in the view as hex mode.
Edit menu
Any view mode allows you to select blocks with the help of the mouse by clicking
and holding its left button, or with the help of the keyboard, advancing the
window with
Shift key pressed.
When viewing in hex mode, simply changing data in the hexadecimal or
character area in the main window — or in any fields of other view modes — will
not change the given disk sector. To execute the changes, you must s ave them
first. After creating changes, you will see that the Save sector item in Edit menu
74
Copyright © Acronis, Inc., 2000–2005
Page 75

Working with Acronis Disk Editor
will become enabled as well as the appropriate toolbar button. If you do not save
your changes, you effectively reject them.
Save sector operation
If you have made changes in a hard disk sector and decide to exit the editor
without saving them, you will see a warning about saving your changes.
Saving modified sector
6.5 Write Block to a File and Read from a File
The Write to file… and Read from file… menu items allow you to save the selected
block to a file or to read the block from a file and save it to a disk sector.
The selection of the Write to file… item results in opening the Write to file window
(the block to be saved should already be selected). In this window , enter the file
name and its path or locate a file by clicking the
will be calculated automatically. To save a file, click the
Copyright © Acronis, Inc., 2000–2005
Browse… button. The file size
OK button.
75
Page 76
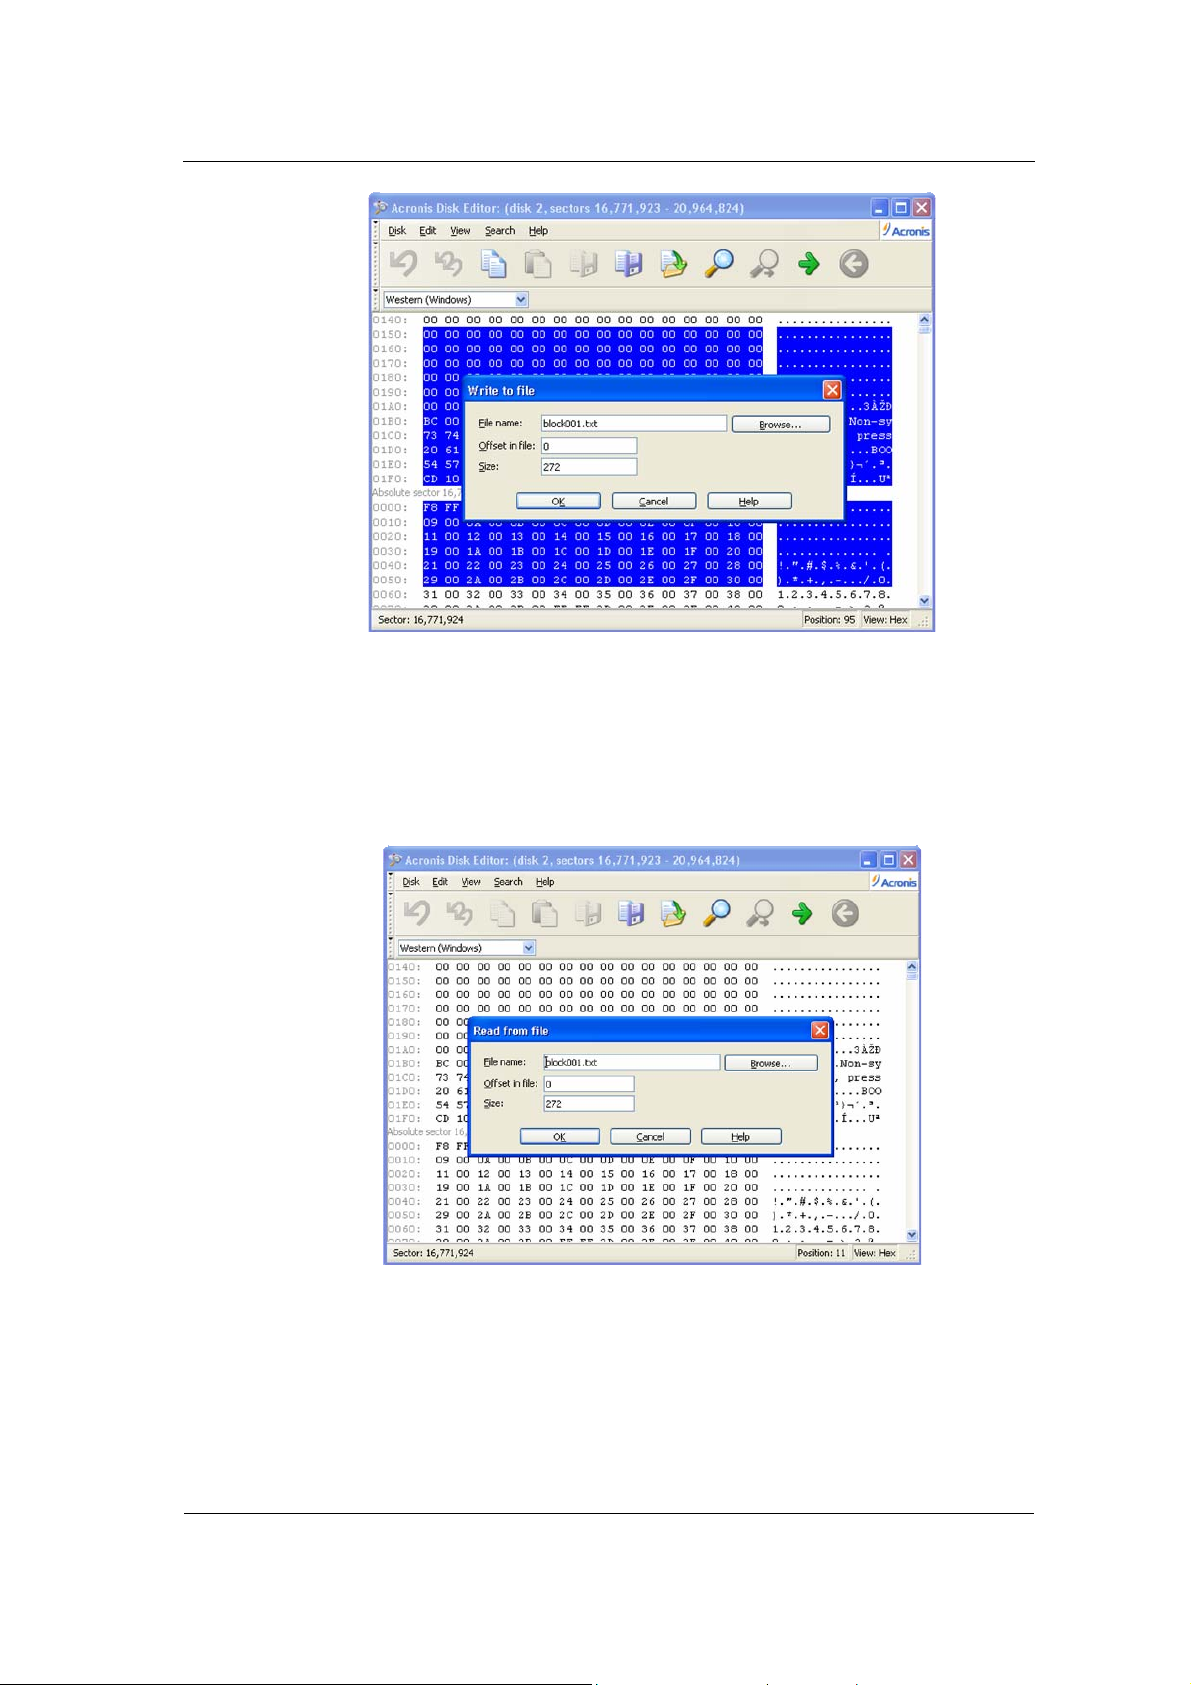
Working with Acronis Disk Editor
Write to a file
To read a block from a file and insert it into a disk sector, you must place the
cursor on the necessary sector byte and then s elect Read from file… menu item.
The selection of this menu item will result in opening the Read from file window.
In this window, enter the file name and its path or locate a file by clicking the
Browse… button. To insert file contents to sector from the current cursor position
(or considering offset in the file), click the
OK button.
6.6 View
Information in the Acronis Disk Editor window can be viewed and edited in several different modes. You can select the appropriate vi ew mode with the help of the View menu.
76
Read from a file
Copyright © Acronis, Inc., 2000–2005
Page 77

Working with Acronis Disk Editor
View menu
The editor offers seven view modes:
• hex
• partition table
• FAT16 boot sector
• FAT32 boot sector
• FAT32 FS info sector
• NTFS boot sector
• FAT folder
6.7 Search
The Search menu allows you to search a hard disk for some line and to go to a disk sector according to its absolute offset.
Selecting the Search item in the same menu will give you access to functions for
searching lines in the disk being edited. (You can do the same by pressing
Ctrl+F key combination.) Search parameters can be set in the Search dialog
window.
Search Menu
Copyright © Acronis, Inc., 2000–2005
77
Page 78

Working with Acronis Disk Editor
The Search dialog window
A search line can be set both as char and numeric (hexadecimal) value. During a
search, you can ignore letter case as well as search for a given line at a given
offset inside the sector.
During a search, disk data is interpreted according to the encoding selected. If
you selected a search mode without letter case matching, not onl y case but also
elements above the characters will be ignored.
After the search process is finished, the current position will be moved to w here
a line was found, or will remain the same if no lines were found. You can search
for the next line from the current position by selecting Find next item in the
Search menu or by pressing
F3 key.
You can go to the necessary sector accor ding to its absolute offset by selecting
the Go to… line the Search menu (or by pressing
Alt+P key combination).
Selecting this line opens the Go to… dialog window.
Go to sector…
The transition is performed by entering absolute sector offset, or cylinder, head and
sector numbers. The listed parameters are bound by this expression:
(CYL x HDS + HD) x SPT + SEC – 1,
Where CYL, HD and SEC are numbers of cylinder, head and sector in the CHS
coordinates (Cylinder – Head – Sector); HDS is the number of heads per disk and
SPT is the number of heads per track.
You can return to a sector from another one by selecting the Back item in the
Search menu (or by pressing
Ctrl+Backspace key combination).
78
Copyright © Acronis, Inc., 2000–2005
Page 79

Working with Acronis Disk Editor
6.8 Working with Different Encodings
The main window of the program features a list of encodings available in Acronis
Disk Editor. This list is shown closed and dropped down below.
The closed and dropped down list of encodings
The list of encodings is intended for correct interpretation of hard disk sector
contents. Selecting the necessary encoding, you will be able to view sector
contents correctly. This is interpreted in the right part of the program’s main
window in the hex mode.
Copyright © Acronis, Inc., 2000–2005
79
Page 80

Working with Acronis OS Selector
Chapter 7. Working with Acronis OS
Selector
7.1 General information
Acronis OS Selector is a powerful, reliable and easy-to-use boot manager that
allows several operating systems on a single PC and lets you create different
configurations for any OS installed. With Acronis OS Selector you can:
• Install several different operating systems on a single PC
• Load installed operating systems from any hard disk partition
• Load installed operating systems from under Windows
• Install several operating systems on a single partition
• Hide or protect with a password any operating system on your PC
• Duplicate installed operating systems and define different configurations for
each copy
7.2 Starting the work
After Acronis OS Selector is installed together with Acronis Disk Director Suite, all
operating systems that exist on the given PC will be automatically located and
added to the boot menu. Besides, the software will also automatically set the
parameters and properties for every OS found (see section 7.7 «Setting
operating system properties».
You can run Acronis OS Selector by clicking the respective item in the tools
section of the Acronis Disk Director Suite main window sidebar or in the main
menu.
• Acronis OS Selector can also be run as a separate application by clicking Start
Programs Acronis Disk Director Suite OS Selector
You can control Acronis OS Selector in two ways:
• From its main window under Windows
• From Acronis OS Selector boot menu invoked at bootup before the operatin g
system is booted. The boot menu has the same interface and structure as the
main window
80
Copyright © Acronis, Inc., 2000–2005
Page 81
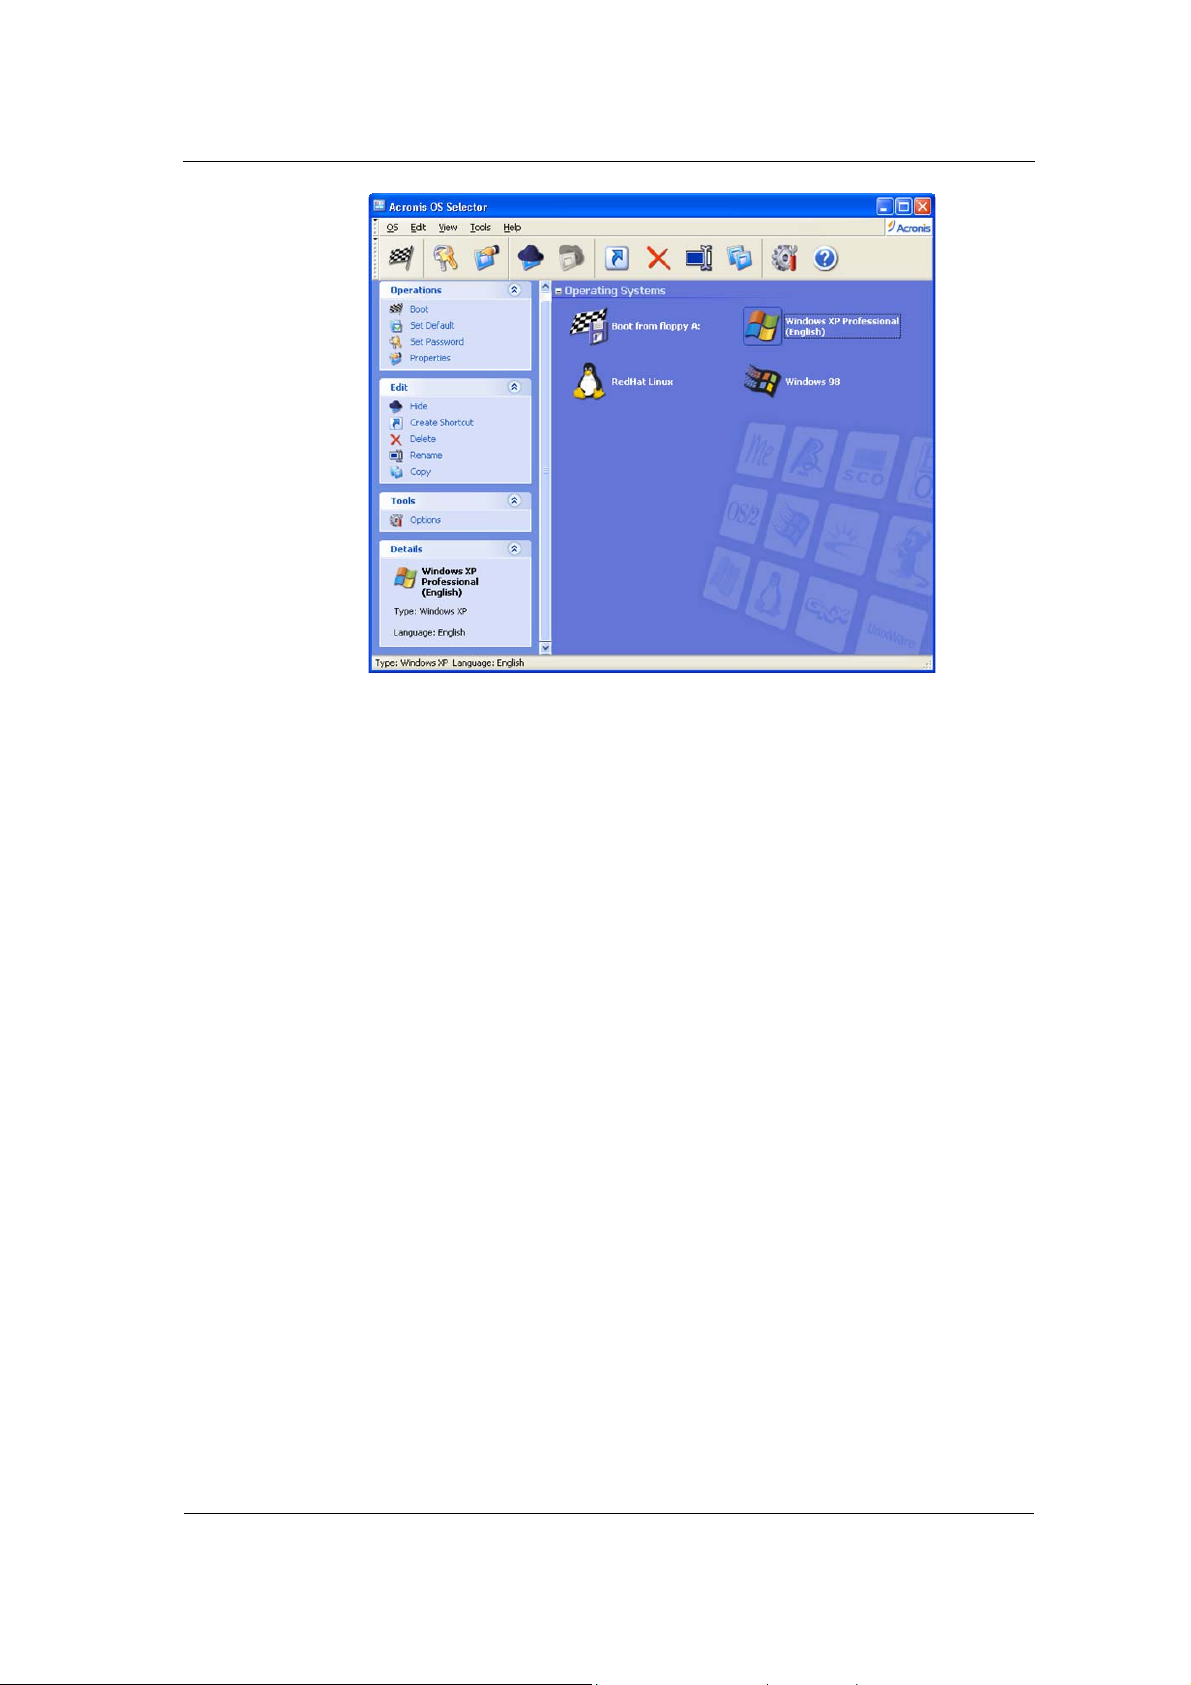
Working with Acronis OS Selector
Acronis OS Selector Main Window
The key part of the main window, Operating systems, contains a list of
operating systems available for loading on this PC. Acronis OS Selector
automatically determines all operating systems installed and lists them in the
boot menu at PC bootup and in the Acronis OS Selector main window under
Windows.
The left part of the window, the sidebar, first introduced in Windows XP, contains
the following sections also available in the main menu and customizable
toolbar:
Operations
This section includes actions available for selected operating systems or their
shortcuts (see section 7.9 «Using shortcuts»).
• Boot – boots the selected operating system or its configuration (shortcut)
• Set Default – sets the default operating system
• Set password – protects the selected operating system with a password
• Properties – sets properties of the selected operating system
Edit
This section provides the following means of operating system and shortcut
management:
• Hide – hides a selected operating system or shortcut from the boot menu
• Create Shortcut – creates a shortcut for a selected operating system
• Delete – deletes a selected operating system or shortcut
Copyright © Acronis, Inc., 2000–2005
81
Page 82

Working with Acronis OS Selector
• Rename – renames a selected OS or shortcut
• Copy – duplicates a selected OS or shortcut
Tools
• Options – sets Acronis OS Selector options
Details
This section provides brief context help on the selected operating system or its
shortcut.
7.3 Setting the Boot Menu
After Acronis OS Selector is installed, the boot menu is automatically activated.
To prevent it from being invoked at bootup, select Deactivate in the
Activation section of the Acronis OS Selector main menu under Windows or in
the respective boot menu section at PC bootup. Then you will be prompted to
select an operating system to be booted after the boot menu is deactivated.
7.4 Booting operating systems
You can boot any operating system with Acronis OS Selector:
• From the boot menu (if activated)
• From under Windows from Acronis OS Selector main window
7.4.1 Booting an OS using the boot menu
Having turned on the PC, wait for the Acronis OS Selector boot menu to be
invoked and select and double-click an operating system to boot.
You can also boot a selected OS by:
• Clicking Boot in the Operations section of the boot menu sidebar
• Clicking Boot on the toolbar
• Selecting Boot in the OS section of the main menu
7.4.2 Booting OS from the Acronis OS Selector main window
With Acronis OS Selector, you can boot an available operating system from under
Windows by:
• Running Acronis OS Selector
• Selecting an operating system to boot in the central part of the main
window
• Double-clicking the selected operating system icon
82
Copyright © Acronis, Inc., 2000–2005
Page 83

Working with Acronis OS Selector
You will be prompted to reboot. Click OK to confirm and continue.
If you select the same operating system you are in at the moment, the PC will reboot
after your confirmation.
You can also boot the selected OS using:
• The Boot button in the Operations section of the Main Window
• The Boot button on the toolbar
• The Boot item in the OS section of the main menu
7.5 Setting an operating system as the default
Any operating system can be set as the default. This means it will already be
selected when the boot menu is invoked.
If you install a new operating system after Acronis OS Selector installation, it will be
set as the default automatically.
You can set an operating system as the default by clicking Set default in the
Operations section of the sidebar or the respective item in the OS section of
the main menu, or the respective item of the context menu invoked by a rightclick.
7.6 Setting operating system passwords
If needed, you can protect any installed operating system with a password to
prevent its unauthorized booting.
To set a password:
• Select an the OS to protect
• Click Set Password in the Operations section of main window sidebar
• Enter and confirm a password in the Set Operating System Password
dialog and click OK
An operating system password must be at least six characters long.
You can also set an operating system password by clicking Set Password on
the toolbar, in the OS section of the main menu, or in the context menu,
invoked by a right-click.
7.7 Setting operating system properties
Acronis OS Selector automatically determines properties of all operating systems
installed on a PC. If needed, you can set them by manually clicking Properties
Copyright © Acronis, Inc., 2000–2005
83
Page 84
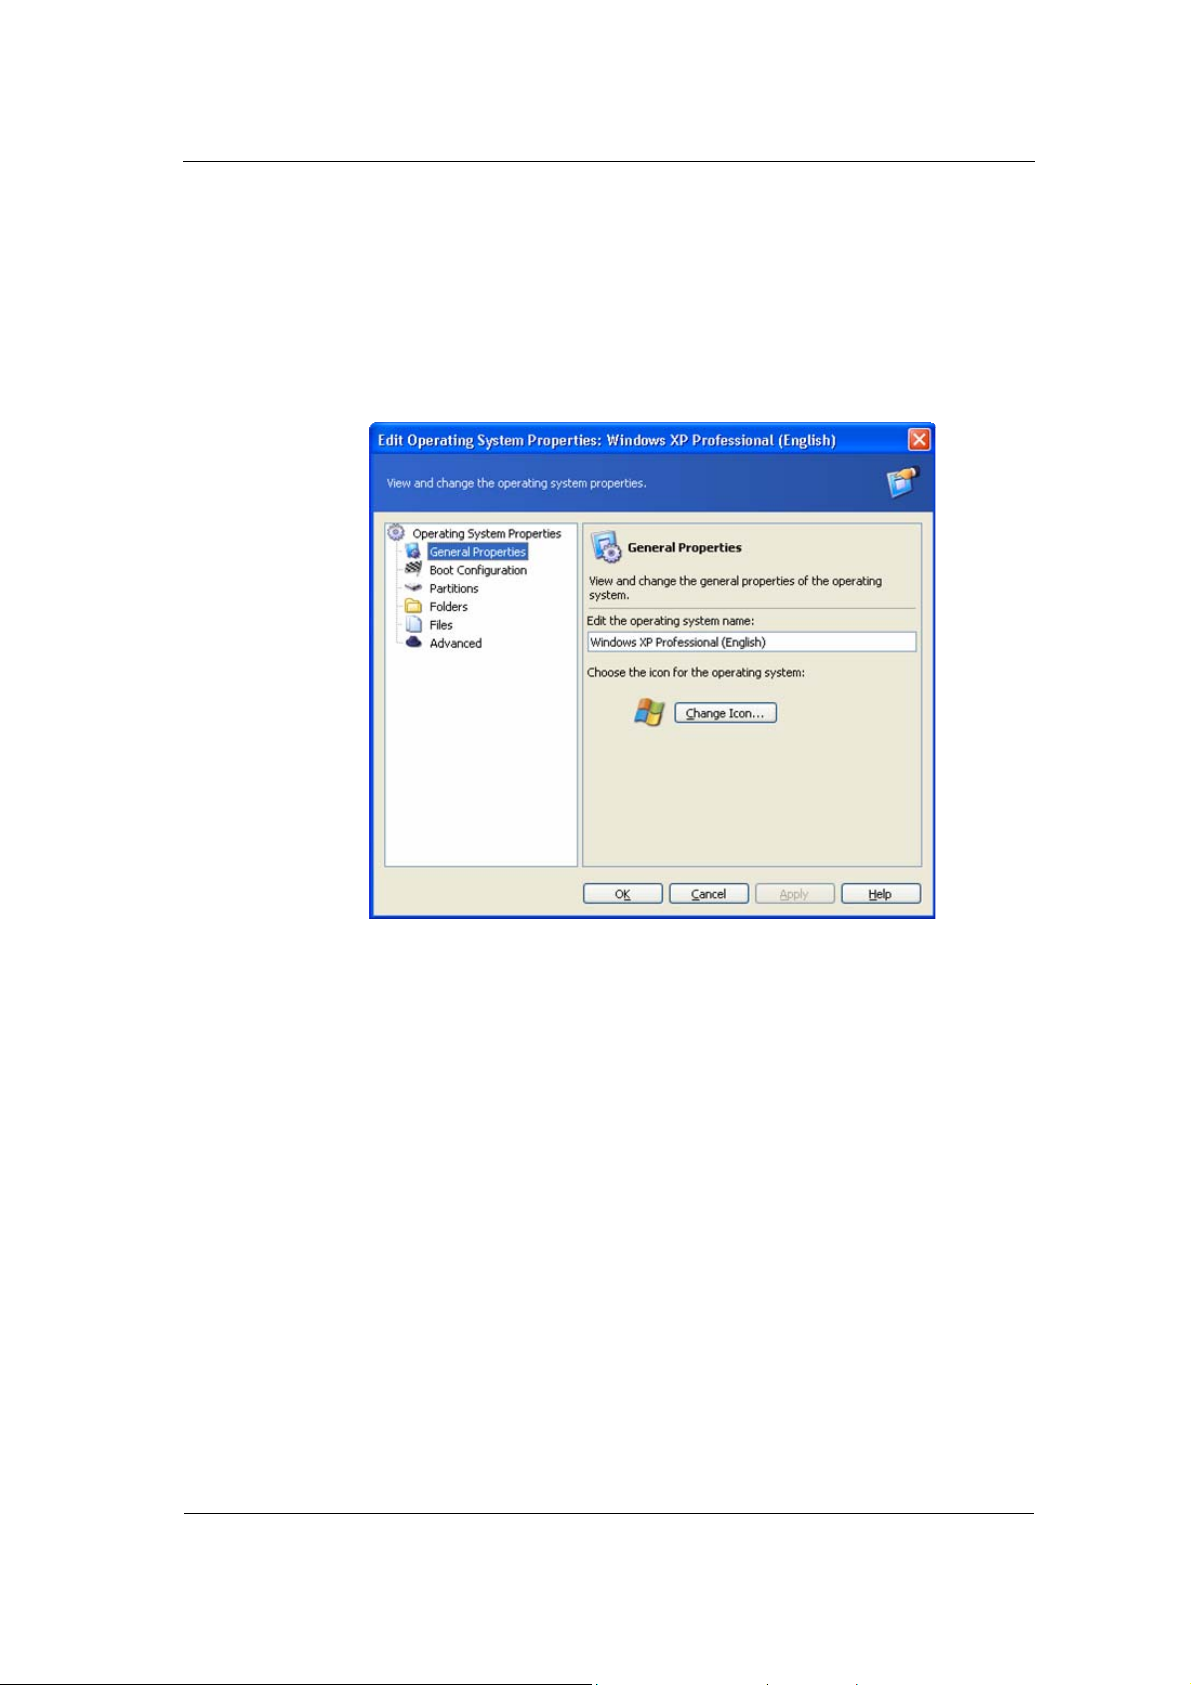
Working with Acronis OS Selector
in the Operations section of the main window sidebar, boot menu, the
respective main menu, toolbar or context menu items. You can set the
following properties:
7.7.1 General Properties
This section allows you to change the name and icon for any operatin g system
listed in the boot menu.
7.7.2 Boot configuration
This section allows you to set the following boot parameters:
• Write Boot Sector – write boot sector each time an operating system boots
• Boot as MS-DOS 7.1 – can be set for operating systems compatible with
MS-DOS 7.1+ that were not automatically located by Acronis OS Selector
• Boot as OS/2 – can be set for operating systems compatible with OS/2 that
were not automatically located by Acronis OS Selector
• Enable large disks support – enables large disks support for Windows
95/98/Me operating systems
General properties window
84
Copyright © Acronis, Inc., 2000–2005
Page 85

Working with Acronis OS Selector
Boot configuration window
7.7.3 Partitions
Acronis OS Selector allows you to hide hard disk partitions (except for the
system). To hide a partition, select it and enable the Hidden option for it. This is
not applicable to Windows 2000 partitions. You can perform this operation under
that operating system using the Advanced section.
Copyright © Acronis, Inc., 2000–2005
Partitions properties window
85
Page 86

Working with Acronis OS Selector
7.7.4 Folders
Acronis OS Selector automatically determines system folders for all Windows
operating systems. System folders contain files required for an operating system
to work properly. Windows 95/98/Me/NT utilizes Windows and Program Files
folders, while Windows 2000/XP uses the above plus Documents and Settings.
Under other operating systems (e.g., Linux OS), you can add folders to the system
folders list only if host partitions are FAT16/32 or NTFS.
For other operating systems (e.g. Linux), you will have to specify system folders
manually using the Add button. If needed, you can edit the list using the
Remove button.
Each folder in the list has its Properties section which, with the help of the
Enable/Disable parameter, allows you to specify if folder contents are to be
restored at operating system bootup.
Folders properties window
Properties of each folder will allow you to set up folder contents recovery at the
given OS bootup. This is needed to avoid conflicts among multiple operating
systems. Acronis OS Selector makes files and folders of different OS invisible to
each other to avoid their possible corruption:
Enable – enable folder contents recovery at bootup;
Disable – leave folder contents as is.
86
Copyright © Acronis, Inc., 2000–2005
Page 87
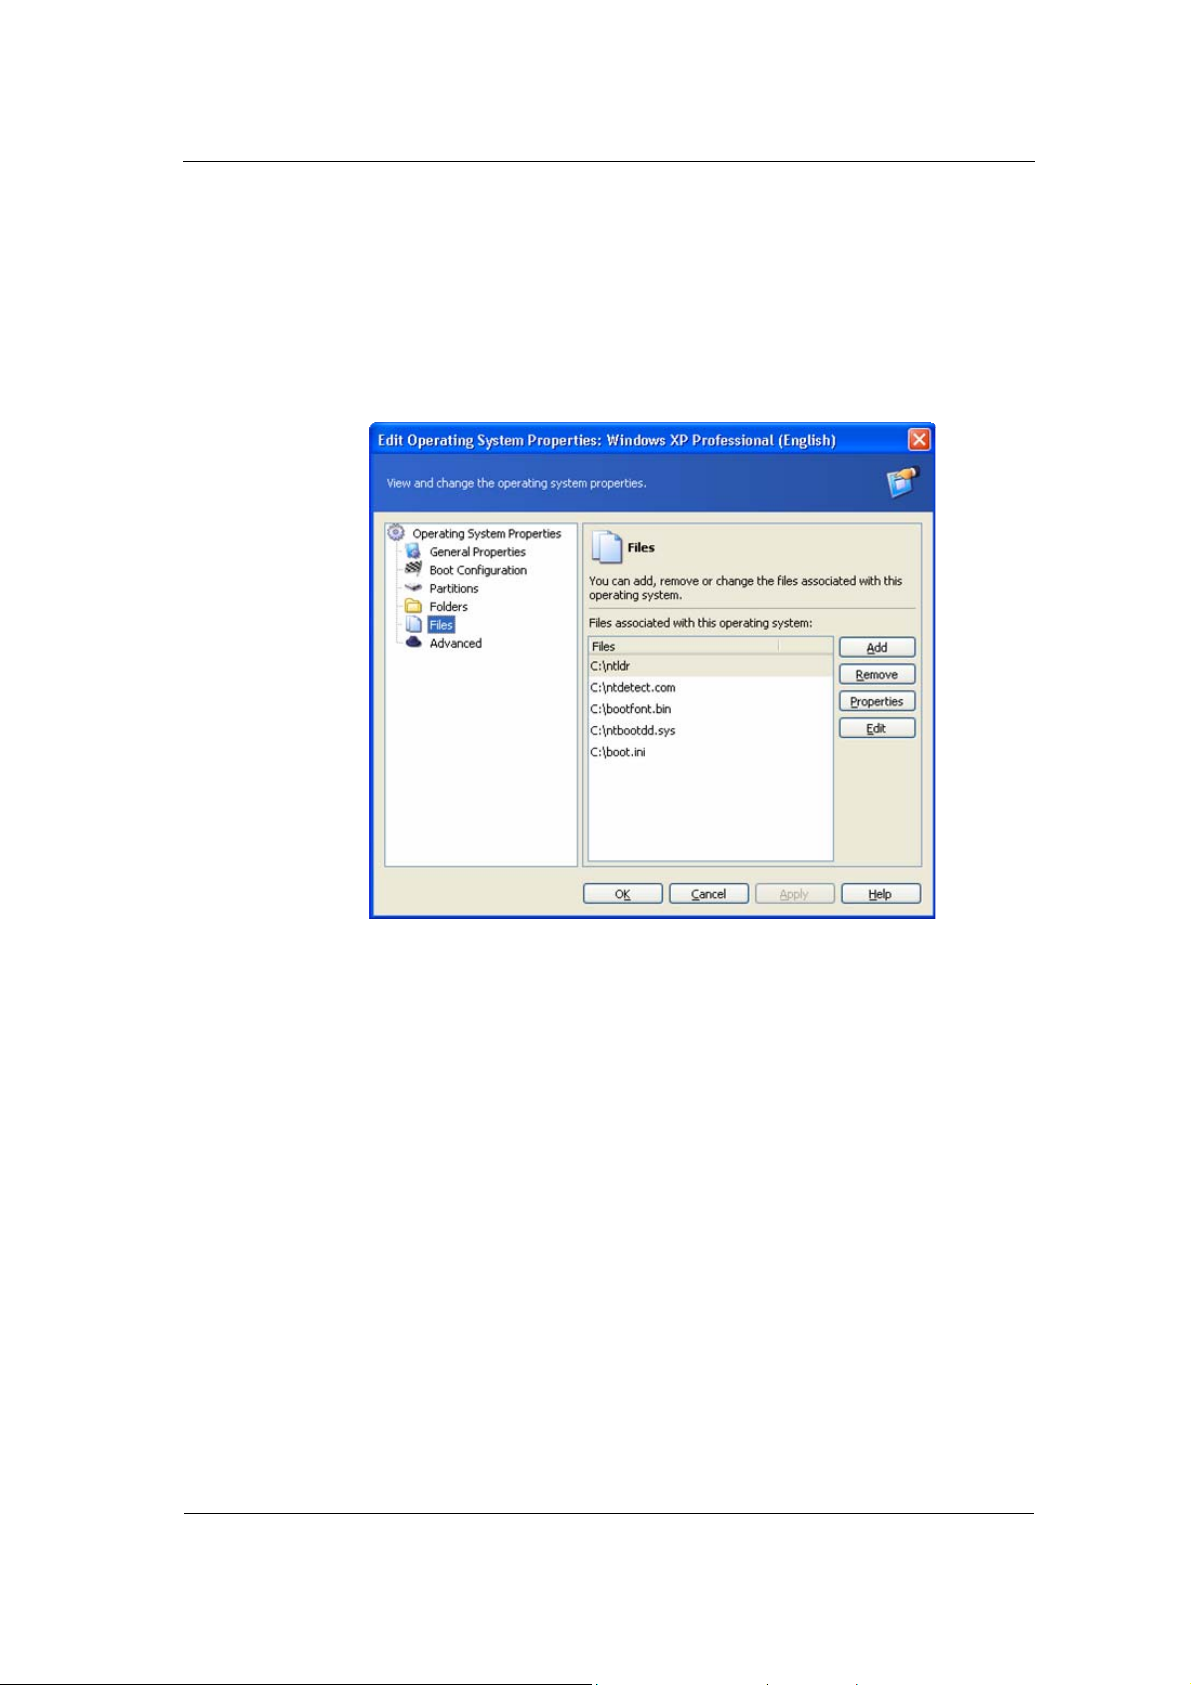
Working with Acronis OS Selector
7.7.5 Files
This section allows you to specify the location of system files required by the
given operating system. Examples of these files might be command.com,
config.sys, msdos.sys, and autoexec.bat.
For all Windows operating systems, the list of system files is populated
automatically and can be changed if needed.
Properties of system files will provide you with the following options:
Automatic deletion of a selected file with Acronis OS Selector under the
given OS. Check Yes, delete when the operating system starts to
enable the option. This might become necessary when two system files are in
conflict causing possible OS bootup problems.
During installation, Acronis OS Selector automatically determines system files
of any Windows versions and makes them Changeable. You can change this
option manually if needed.
For operating systems that use FAT16/FAT32 file systems (Windows 9x, DOS)
the IO.SYS file must be located in the starting 2 KB of root folder. If y ou set
fragmentation limit for this file (in bytes), Acronis OS Selector will
automatically defragment it when the limit is exceeded.
7.7.6 Advanced
You can’t hide a partition under the Windows 2000 operating system just by
setting Hidden options. To perform this operation, you will need to check the
Force hiding partitions box available in this section.
Files properties window
Copyright © Acronis, Inc., 2000–2005
87
Page 88
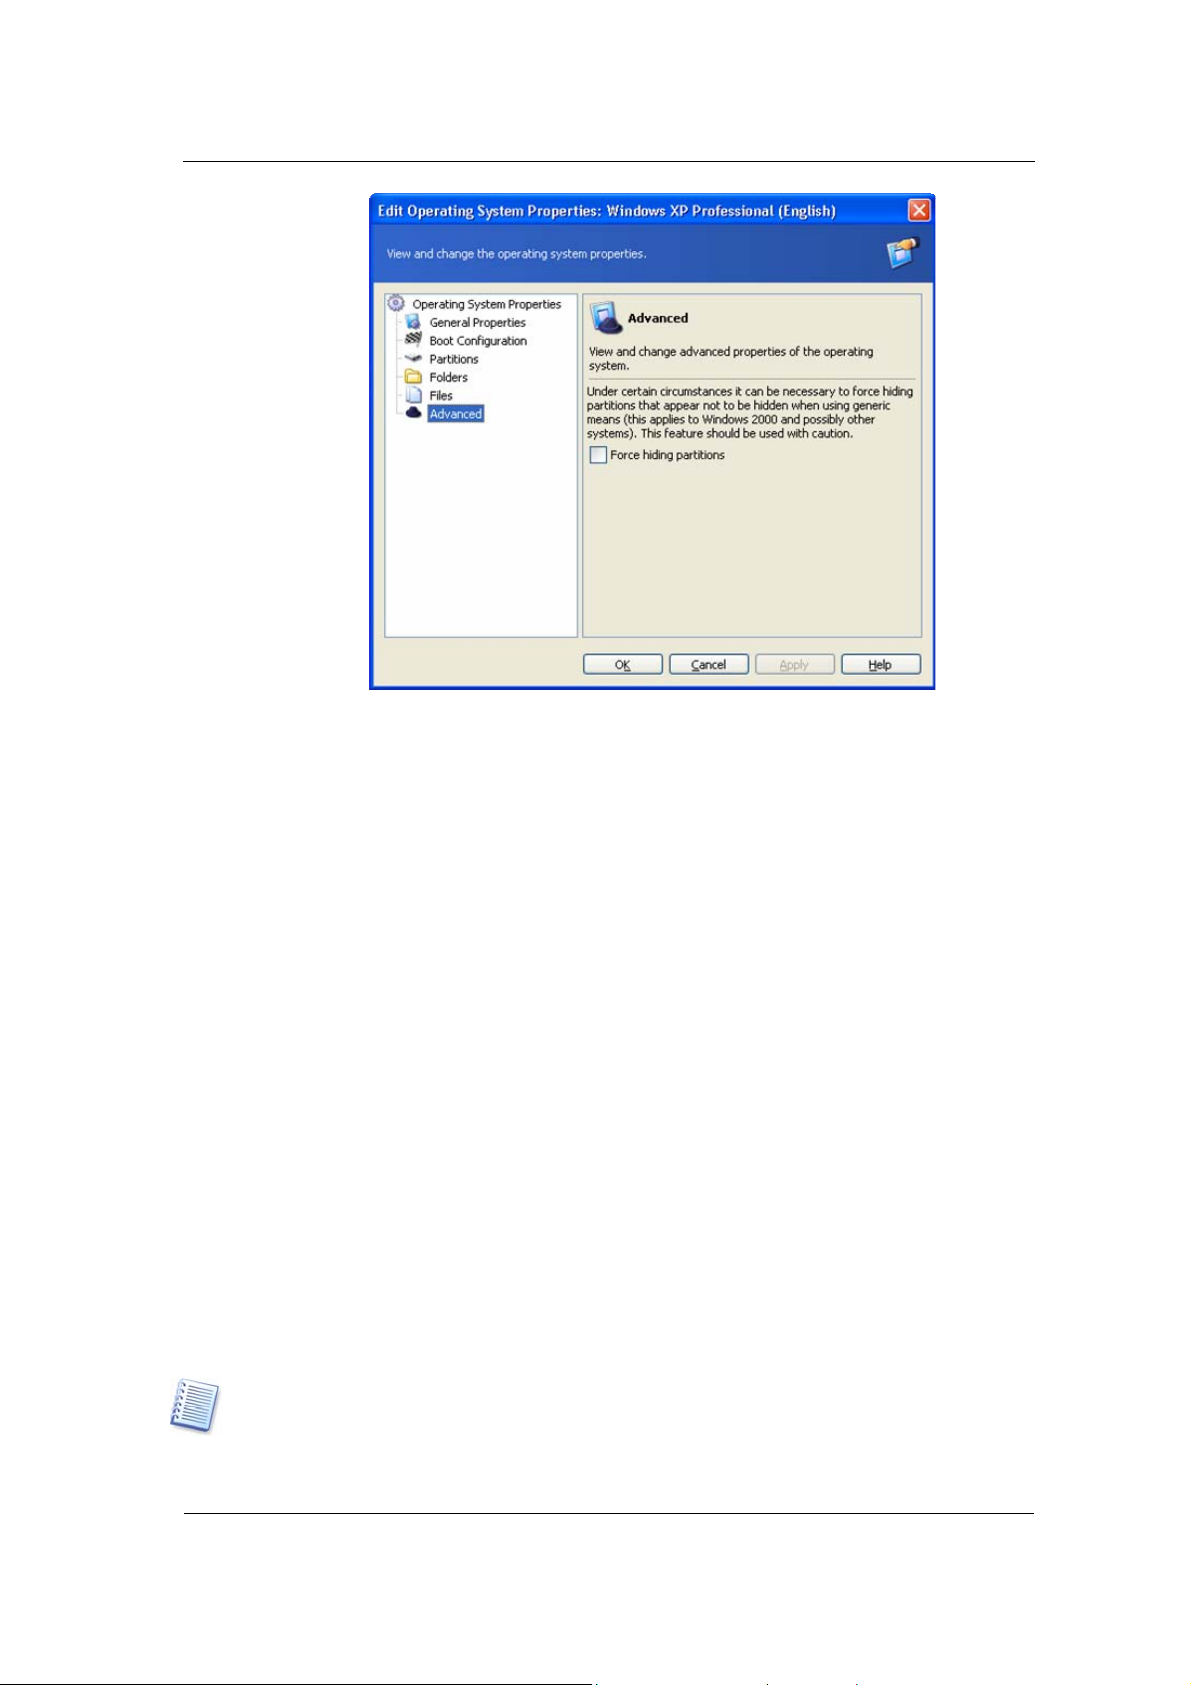
Working with Acronis OS Selector
Advanced properties window
7.8 Hiding operating systems
If needed, you can hide any operating system installed so it won’t be shown in
the boot menu and Operating systems section of the Acronis OS Selector
main window.
To hide an operating system:
• Select an OS
• Click Hide in the Edit sidebar section, on the toolbar, or in the Edit section of
the main menu. You can also hide an operating system using the context
menu invoked by a right-click
This will hide the selected OS from the list of available.
To unhide an operating system:
• Select Show Hidden in the View section of Acronis OS Selector main menu
to see the list of all hidden operating systems in the lower part of the
Operating systems window
• Select an operating system to unhide and click Unhide in the Edit sidebar
section or select the respective items of the main menu (Edit section) or the
context menu
If there are other operating systems in this list, you can hide them again by
unchecking Show hidden in the View section of the main menu.
88
Copyright © Acronis, Inc., 2000–2005
Page 89

Working with Acronis OS Selector
7.9 Using shortcuts
Acronis OS Selector allows you to create shortcuts for any operating system in
the boot menu. Shortcuts enable you to create several different config urations
for the same operating system.
Shortcut parameters are set in the same way as those of the operating system.
Shortcuts can be copied, deleted and renamed like operating systems.
You can create a shortcut for a selected operating system in the following ways:
• Clicking Create shortcut in the Edit sidebar section, main window toolbar
or boot menu
• Clicking Create Shortcut in the Edit section of the main menu
• Clicking Create Shortcut on the toolbar
• Using a context menu invoked by a right-click
7.10 Deleting operating systems
With the Delete button, you can delete any operating system installed on your
PC along with its shortcuts.
By deleting an operating system, you can remove all contents of system folders
assigned to this OS.
Windows system folders will be deleted if only will be checked Delete the
operating system directories check-box.
7.11 Renaming operating systems
Acronis OS Selector users can assign any name to operating systems or their
shortcuts. That can be done by clicking Rename on the sidebar, tool bar, main
menu or context menu.
7.12 Copying operating systems
Acronis OS Selector allows you to duplicate any installed operating system or its
shortcut. It might be useful if you want to test unknown software before having
it on main OS.
Copying an OS implies duplicating all its system files and folders and
configuration files, as well as all programs installed in a separate folder located
inside hidden system BOOTWIZ folder (see 1.3.2 «Acronis OS Selector
installation»).
An NTFS operating system (Windows NT/2000/XP) can be copied only if its system
files and folders are specified in its options and have the Enable parameter
activated.
Copyright © Acronis, Inc., 2000–2005
89
Page 90

Working with Acronis OS Selector
Copying can take a long time, so you will be prompted to confirm that you want
to perform the task.
To copy an operating system, you need to:
• Select an operating system in the boot menu or program main window
• Click Copy in the Edit sidebar section or select a respective item in the main
menu or context menu
After this, you will see a copy of this OS in the Operating systems window with
a number automatically appended to its name, depending on the number of
copies already made. If needed, you can rename a copy by clicking Rename in
the Edit sidebar section or selecting a respective item in the main menu or
context menu.
7.13 Setting Acronis OS Selector options
You can set Acronis OS Selector options by clicking Options in the Tools sidebar
section or selecting a respective item on the Toolbar or main menu.
7.13.1 General options
Acronis OS Selector is able to protect system folders automatically when a new
operating system is detected.
System folder protection is required when multiple OSes are on a single PC,
especially in situations when several operating systems are located on the same
hard disk partition.
90
Copyright © Acronis, Inc., 2000–2005
Page 91

Working with Acronis OS Selector
To choose a suitable configuration, click one of the options below:
• Yes, protect folders – folders protection will be enabled automatically when
new operating systems are detected. Settings for the existing operation
systems will be left intact
• No, do not protect folders – Acronis OS Selector will not enable folder
protection when new operating systems are detected
7.13.2 Startup Options
In this section, you can set Acronis OS Selector bootup behavior:
• At once (ESC for menu) – if activated, Acronis OS Selector will boot the
default operating system and you will have to press Escape to enter the
boot menu
• With timeout – if activated, the default operating system will be booted after
an interval (in seconds.)
• Disable – you will have to manually select an operating system from the
boot menu. This is active by default
7.13.3 Display properties
Acronis OS Selector can control monitor video modes before Windows is boote d
and the graphics card and monitor drivers are loaded:
Copyright © Acronis, Inc., 2000–2005
Startup options window
91
Page 92
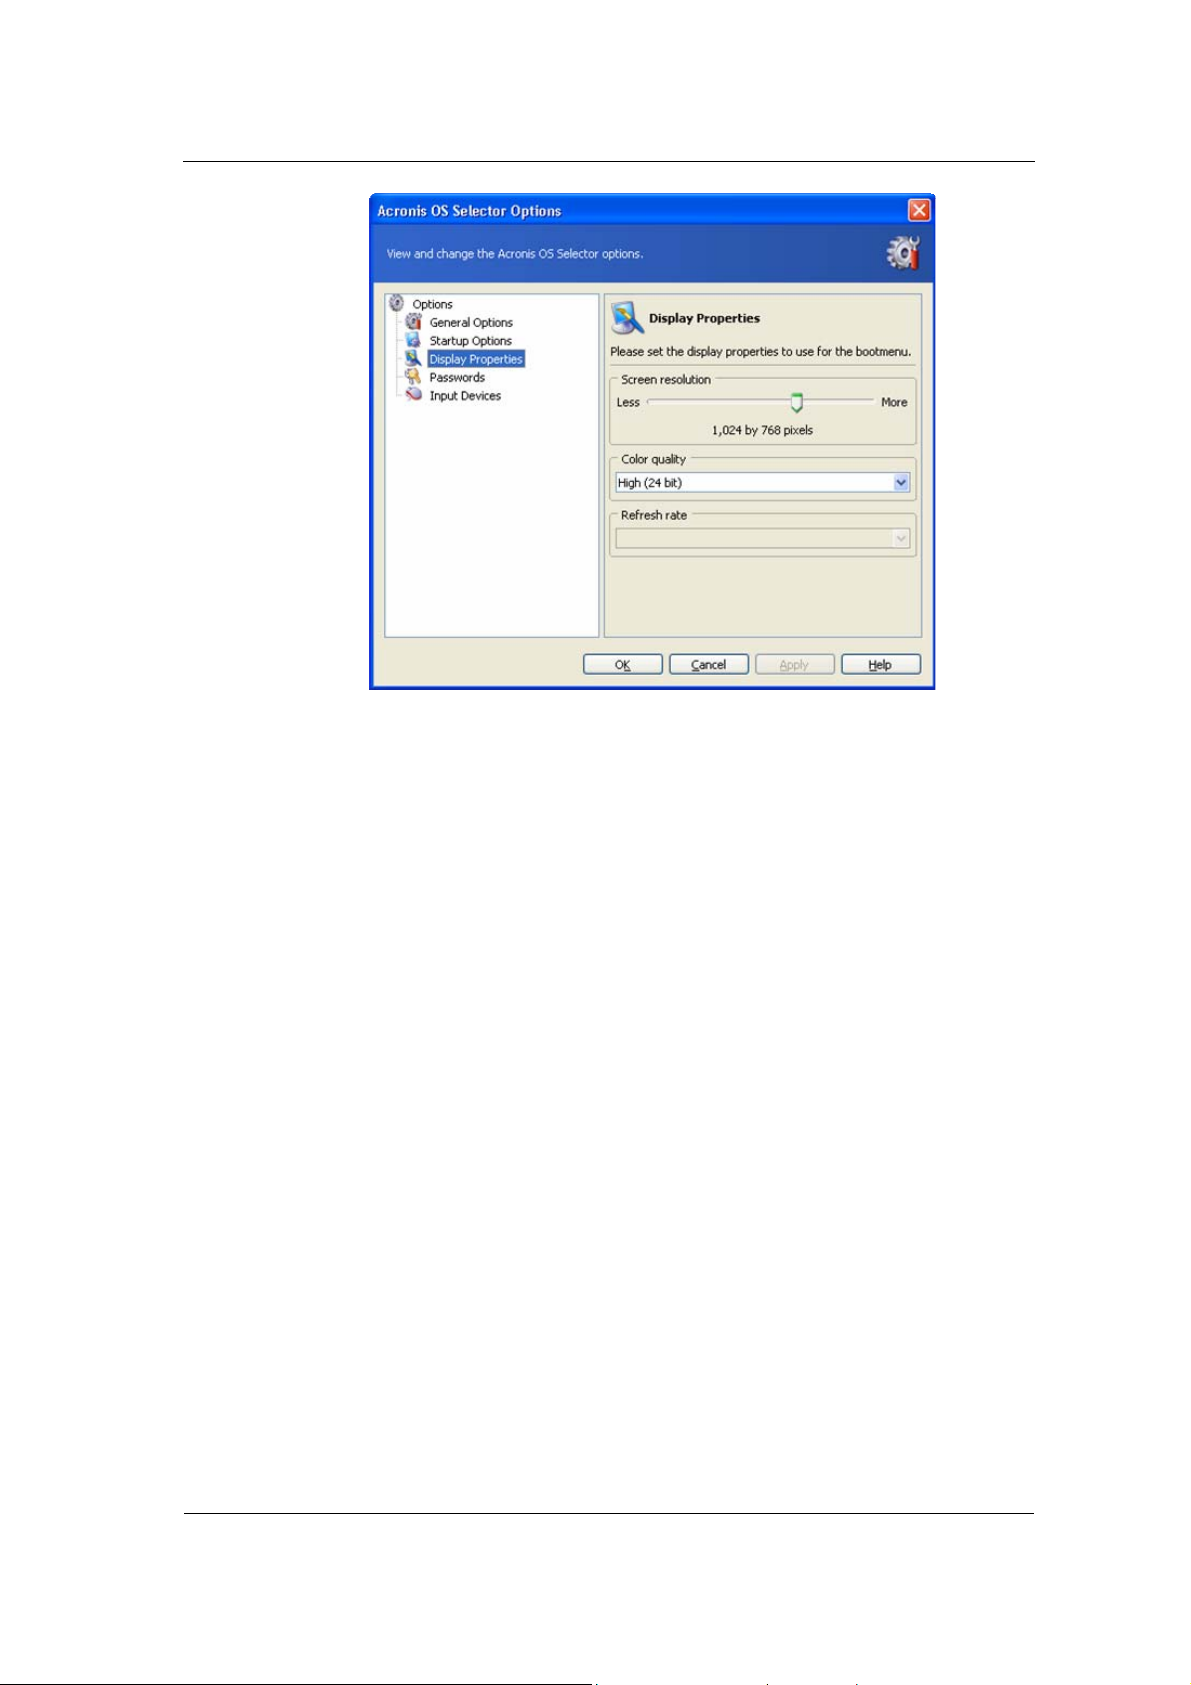
Working with Acronis OS Selector
Disolay properties window
The following properties are available in the Options Display properties
section:
• Resolution – you can manually set resolution you want, given that it’s
supported by your graphics card and monitor and ranges from VGA (640 x
480) to SXGA (1280 x 1024.)
• Bit depth – you can set the number of colors displayed choosing among Low
(8-bit, 256 colors); Medium (16-bit, 65,536 colors); and High (24-bit,
16,777,216 colors.)
• Refresh rate – you can manually set the display refresh r ate, which is set to
60Hz by default. If you select Optimal, the program will determine your
graphics configuration automatically and set the maximum available refresh
rate. The maximum rate that can be set manually is 150Hz
7.13.4 Passwords
You can set, change or remove Acronis OS Selector global passwords, including:
• Boot menu password – asked for each time Acronis OS Selector starts, except
for cases when the boot menu is disabled to boot the default operating
system immediately
• Administrator password – required when a user tries to change any options
and settings of Acronis OS Selector and operating systems
92
Copyright © Acronis, Inc., 2000–2005
Page 93

Working with Acronis OS Selector
To disable global passwords, leave both input fields blank.
Password properties window
When the default operating system is booted without invoking the boot menu, you
might have to enter the boot menu password running Acronis OS Selector under
Windows.
7.13.5 Input devices
In this section of Acronis OS Selector options, you can provide extended support
of input devices (mouse, etc.) in Acronis OS Selector boot menu.
Using the Default parameter, the program automatically determines installed
input devices.
If needed, you can manually specify an input device to use:
• Mouse or compatible device (touch pad, TrackPoint or its notebook analog) on
PS/2 or USB
• Mouse on COM1
• Mouse on COM2
• Do not use mouse
Copyright © Acronis, Inc., 2000–2005
93
Page 94

Working with Acronis OS Selector
Input devices properties window
94
Copyright © Acronis, Inc., 2000–2005
Page 95

Installing and using several operating systems on a single PC
Chapter 8. Installing and using several
operating systems on a single
PC
8.1 Introduction
One of the key benefits offered by Acronis OS Selector is the ability to add
almost any new operating system to a PC, even if it already has one or more
operating system installed. Using Acronis OS Selector, a user is able to install:
• Several different copies of the same OS (e.g. Windows XP);
• Different operating systems from the same developers (e.g. Microsoft Windows 98
and Windows XP);
• Operating systems from various developers (e.g. a Windows version and a Linux
variant).
In all cases, Acronis OS Selector eliminates software conflicts that might violate
operating system stability and even result in failures.
Acronis OS Selector supports and automatically recognizes the following
operating systems:
• Various DOS environments: MS DOS 5.x–6.x; MS DOS 7.0 (not a separate
product but is included in Windows 95); MS DOS 7.1 (not a separate product
but is included in Windows 95OSR2/98); MS DOS 8.0 (not a separate product
but is included in Windows Me). All Windows 9x and Windows NT operating
systems: Windows 95/95 OSR2/98/Me/NT/2000/XP
• The most widespread Linux distributions
• The most widespread Unix PC distributions: FreeBSD, Solaris, QNX
Below, you will find instructions for some of the most typical situations related to
adding a second OS to a PC that already has one installed.
8.2 Installing several Windows copies to a single PC
8.2.1 General information
Any Windows operating system consists of two parts, bootable and main.
Windows 95/98/Me has the MS-DOS 7.0, 7.1, 8.0 operating system,
respectively, as bootable, while Windows NT/2000/XP has NTLDR OS core
loader (that is also a simple boot manager) that requires BOOT.INI configuration
Copyright © Acronis, Inc., 2000–2005
95
Page 96

Installing and using several operating systems on a single PC
T
g
file NTDETECT.COM initial hardware detector (for more details see Appendix B
«Particularities of Operating System Function».
The main part of Windows OS is located in Windows (or WINNT), Program Files,
Documents and settings system folders that might be stored on any hard disk
partition and even disk, while the bootable part is required to be located on the
first hard disk primary partition.
he disk has to be the first, according to BIOS. This may vary from the enumeration
several operatin
their enumeration in the partition list in the Acronis Disk Director Suite main window.
The disk number will be provided in the WinNT4/2000/XP Number column (to
make it visible, right-click on column header line and check it.) The first disk in the
system is numbered 0.
systems provide. If there are several disks in the PC, you can see
Due to these bootable part location limitations, you can avoid problems with
Windows only if you follow the installation order, according to which, older
operating systems are to be installed first:
Windows 95 Windows NT 4.0 Windows 95 OSR2 Windows 98
Windows Me Windows 2000 Windows XP.
This operating system installation order solves boot problems. Otherwise, boot
files of a newer OS will be damaged by those of an older version of Windows that
knows nothing of its subsequent versions.
Acronis OS Selector breaks this limitation and eliminates the need to worry about
Windows installation order.
8.2.2 Preparing partitions for Windows installation
Before you start installing another Windows copy, you will have to prepare a free
primary partition for it.
You can do this by using unallocated space (for partition creation instructions see
3: 3.1 «Creating A New Partition» and 4: 4.1.1 «Creating partitions»). If there’s
no unallocated space, you can free it by resizing respective partitions (see 4.1.4
«Resizing and/or moving a partition»).
Besides, Acronis Disk Director Suite allows conversion of free logical partitions
into a primary (for more details see 4.2.2 «Converting a file system»). Still, you
must remember that there can't be more than four primary partitions in a
system.
8.2.3 Installing a New Operating System
After you prepare a partition, you can start the installation by means of Acronis
OS Selector:
In the Menu line of Acronis OS Selector main window select OS → New →
Boot from floppy;
96
Copyright © Acronis, Inc., 2000–2005
Page 97

Installing and using several operating systems on a single PC
When a new item is created, open its Properties with the context menu and
select Partitions;
Flag the partition you want the OS on as Active;
In the left side bar of Acronis OS Selector, in the Tools group select Options
→ General options and flag Yes, protect folders;
In the active OS properties select Folders and set Enable opti on active for
all system folders included;
Reboot and select the newly created and edited diskette bootup from the
Boot menu, having inserted the respective diskette or CD with the OS
distribution;
Once booted from a diskette or CD, follow instructions to install the OS.
If you only have a bootable CD and no diskettes, all the properties you have set for
Boot from floppy will work for this CD as well. You will have to reboot, insert the
CD and select the respective item in the boot menu. But first you will have to
adjust BIOS settings so the PC boots from a CD first.
During Windows installation, the bootable part will automatically select the
primary partition you have previously set as active.
When you boot either version of Windows using Acronis OS Selector later, each
OS in the list will recognize the partition where its bootable part is located as
active.
8.2.4 Re-activating the Acronis OS Selector boot menu
Because Windows operating systems can change the Master Boot Record (MBR)
during installation, Acronis OS Selector, which also uses the MBR, might become
inoperable.
If this happens, you won’t have to re-install Acronis OS Selector, but you will
have to restore it by re-activating from a backup boota ble disk (for more details
see Chapter 9 «Bootable Media Builder»). After loading it, select Activate in the
Activation section of the main menu.
Besides, automatic activation is provided for Windows 95 and Windows 98
operating systems. To do this, Acronis OS Selector adds a REINSTAL.COM launch
line into AUTOEXEC.BAT that restores Acronis OS Selector MBR code. Still, if this
program doesn’t do the thing correctly, you can re-activate Acronis OS Selector
manually.
It’s impossible to perform automatic MBR recovery under Windows Millennium
Edition, as this OS has a feature-limited version of MS-DOS 8.0 that can’t run
programs from AUTOEXEC.BAT.
Copyright © Acronis, Inc., 2000–2005
97
Page 98
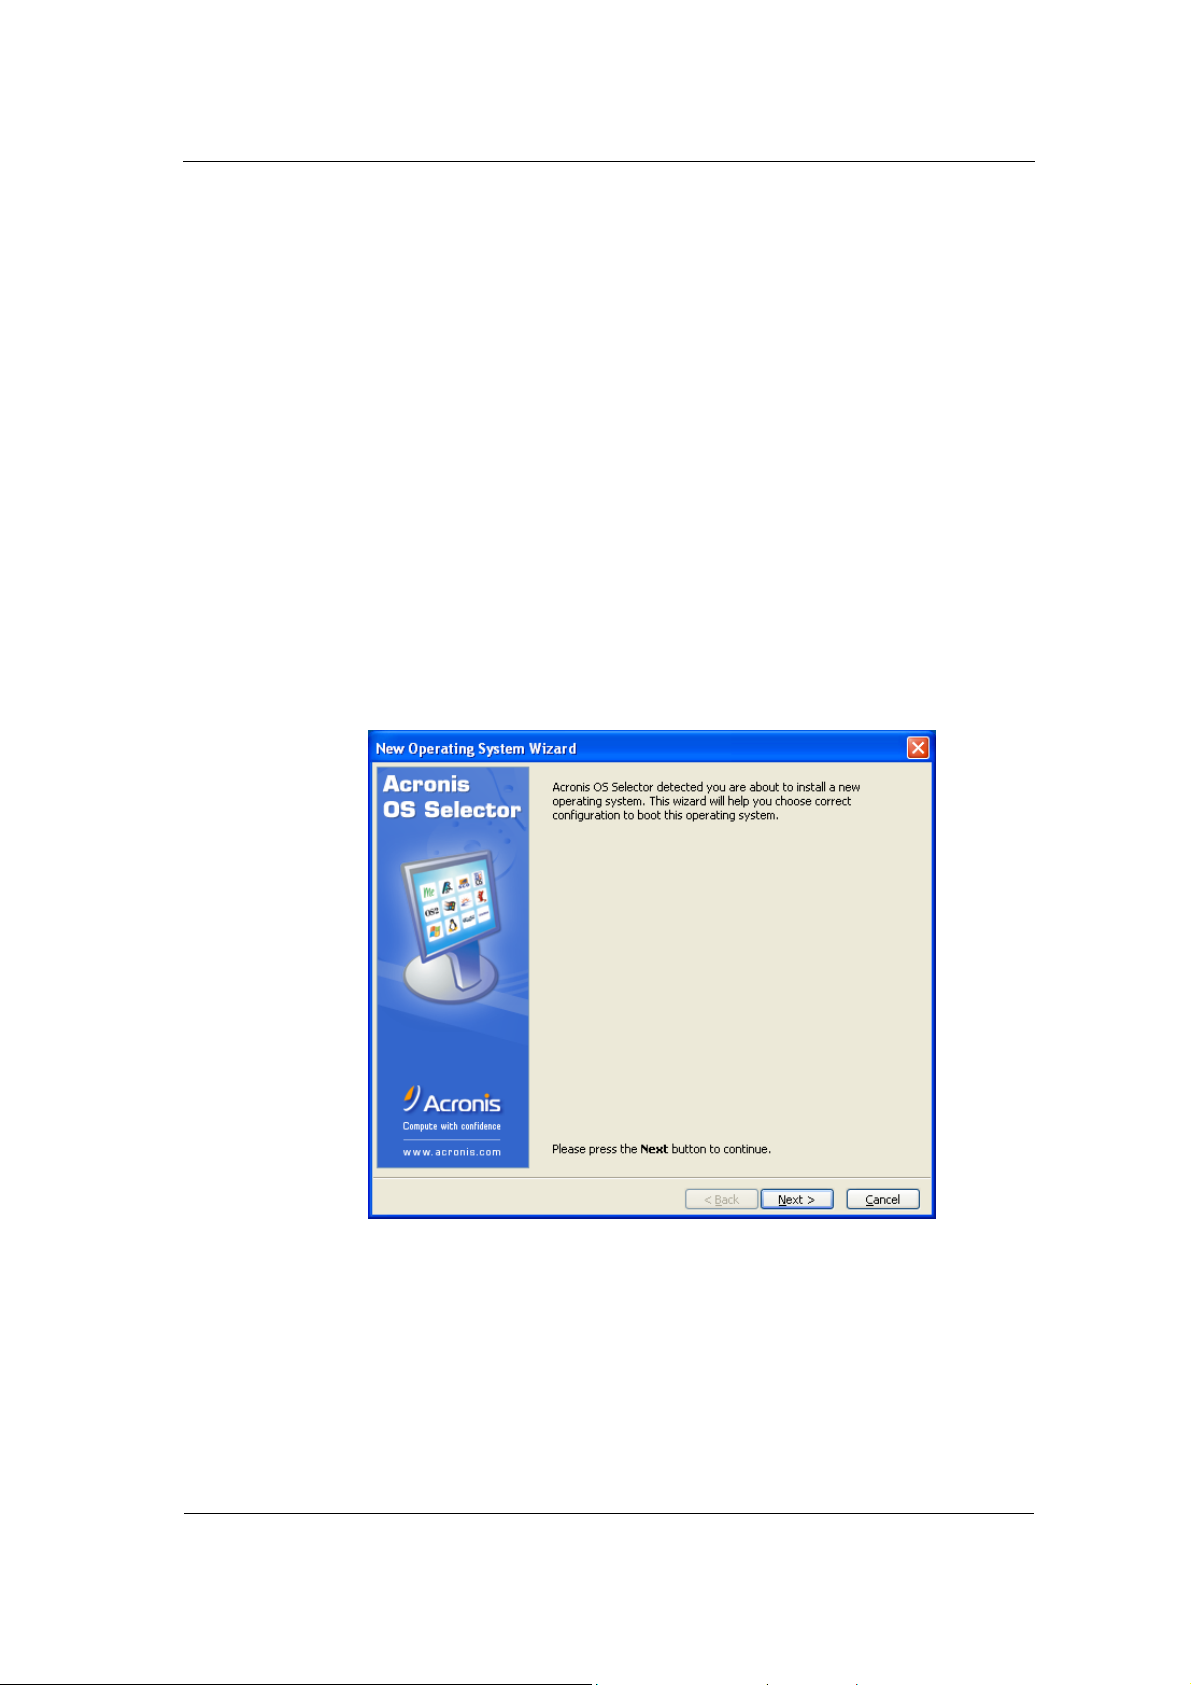
Installing and using several operating systems on a single PC
8.2.5 Installing additional Windows copies
In some cases, you might need to install two copies of the same Windows OS
(e.g. two or more Windows XP copies, each having its own properties and
application sets).
The first way to do it is described above in section and implies a complete OS
installation.
The second way is simpler, operating system duplication using the Operating
system copy feature described in detail in section 7.12 of this guide. The
program will fully duplicate contents of Windows, Program Files and Documents
and Settings folders, including all software installed. you will be able to remove
unneeded applications from your system.
8.2.6 New Operating System Wizard
If you installed a new copy of Windows NT/2000/XP on your PC, the New
Operating System Wizard will help you set up its properties when you run
Boot menu of Acronis OS Selector for the first time.
New Operating System Wizard
Having installed Windows 2000 or Windows XP, you can either save or repla ce
already existing Windows versions. If you need to:
Update existing Windows version with a new copy of Windows 2000/XP,
select Yes, update existing operating system. In this case, the New
Operating System Wizard will automatically determine Windows versions
available for update.
98
Copyright © Acronis, Inc., 2000–2005
Page 99

Installing and using several operating systems on a single PC
Leave your existing Windows copies as is, select No, add new operating
system. In this case, a new copy of Windows 2000/XP will be added to the
list of available OSes in the Boot menu.
If you chose to update the existing OS, the New Operating Syst em Wizard
will automatically determine the list of operating systems installed available for
update. In the list provided, select an OS to updat e by replacing it with a new
copy of Windows 2000/XP.
When a new OS is configured, click Proceed to confirm operations selected.
Copyright © Acronis, Inc., 2000–2005
99
Page 100
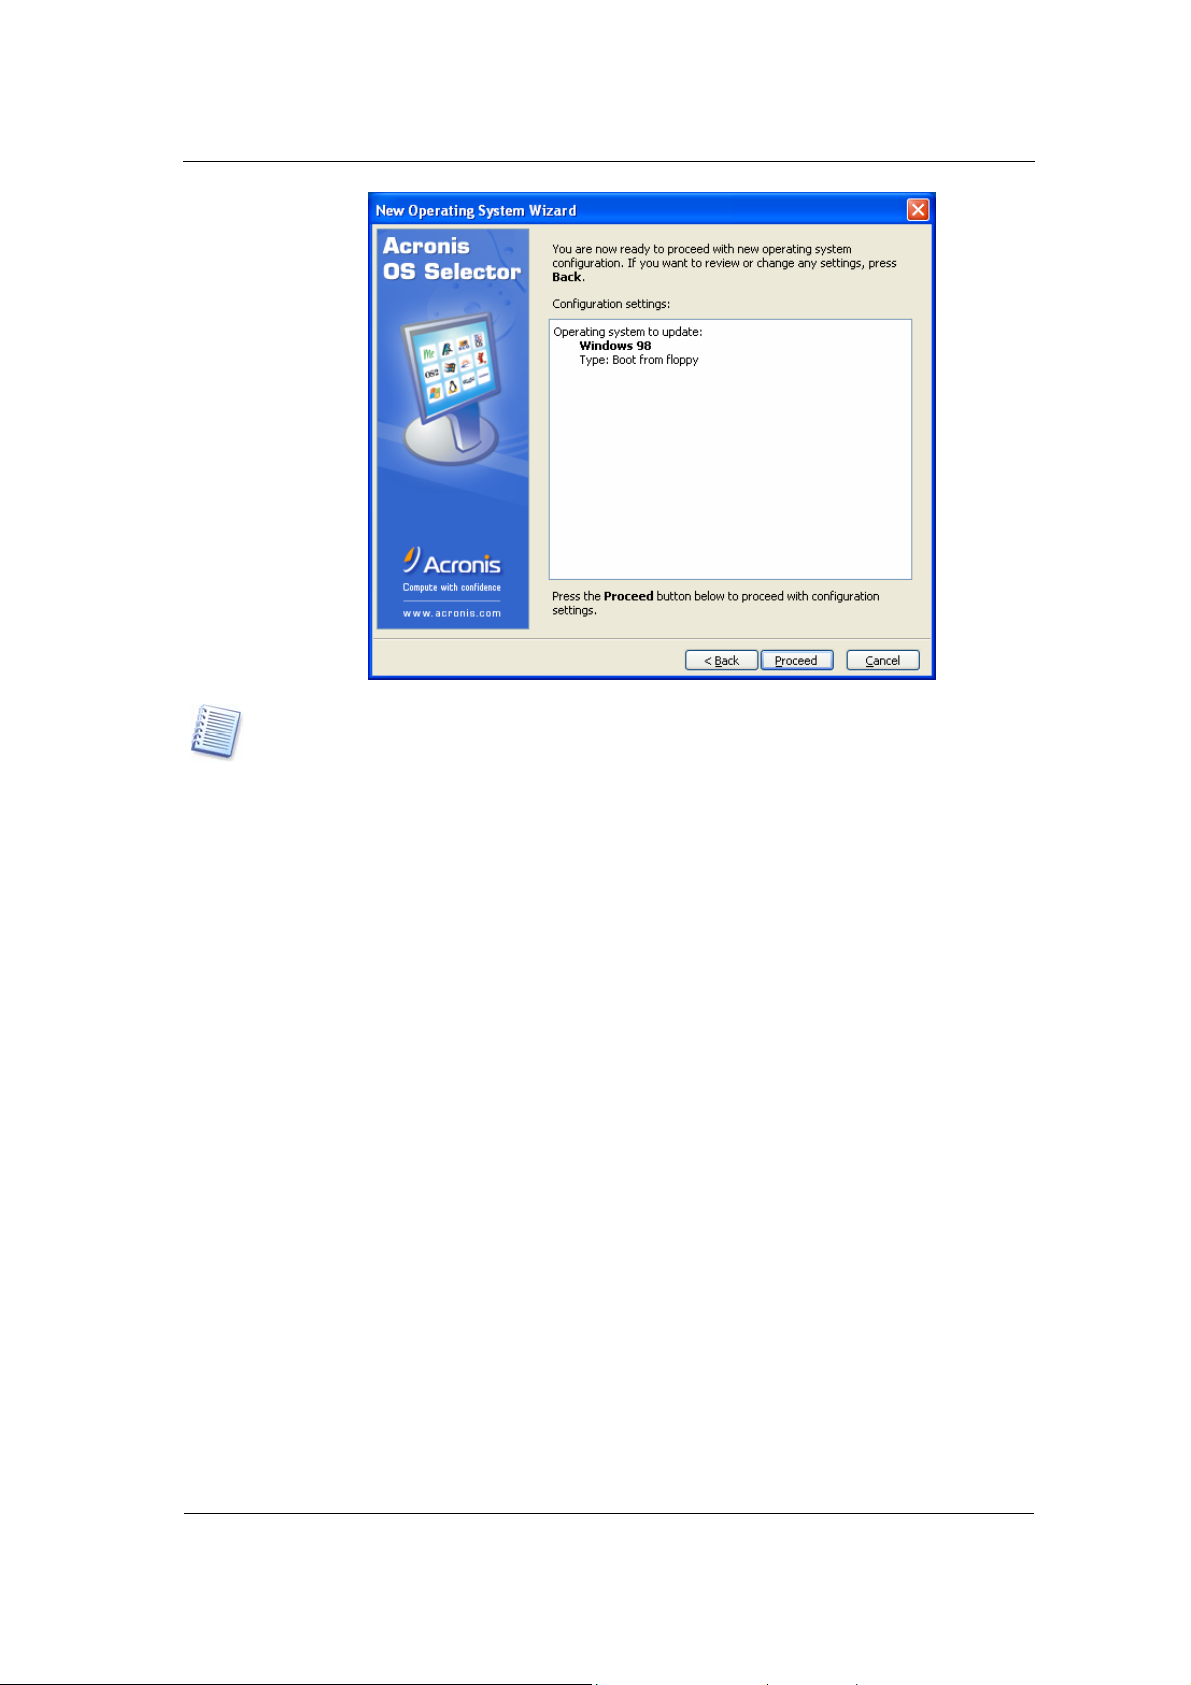
Installing and using several operating systems on a single PC
If Acronis OS Selector can't automatically determine the location of system folders, you
will have to provide the information manually. System folders might be located on:
1) Any physical hard disks shown in the list
2) Any media unsupported by BIOS
8.3 Installing Linux and Windows on the same PC
8.3.1 General information
The Linux operating system is a modern, reliable and high-perf ormance platform
for both business and home users. Since its popularity is growing, many
Windows users are choosing to sample Linux; however, not all of them are
willing to change operating systems completely or have a second PC on which to
install Linux .
The preferred options is to run Windows and Linux on a single PC.
8.3.2 Linux peculiarities
From the perspective of bootup, Linux, like Windows, has two parts: 1) a loader
that loads the Linux core into memory and passes it the controls; 2) an OS main
part.
The most popular Linux loaders are Lilo and Grub.
The Linux main part is usually installed to an Ext2/Ext3 or ReiserFS file system
partition that can either be primary or logical and can be located on any hard
disk. This operating system needs another partition for its virtual memory (Linux
Swap).
100
Copyright © Acronis, Inc., 2000–2005
 Loading...