

Page 1
User Guide
Page 2

Copyright Statement
Copyright © Acronis International GmbH, 2002-2014. All rights reserved.
"Acronis", "Acronis Compute with Confidence", "Acronis Recovery Manager", "Acronis Secure Zone",
Acronis True Image, Acronis Try&Decide, and the Acronis logo are trademarks of Acronis
International GmbH.
Linux is a registered trademark of Linus Torvalds.
VMware and VMware Ready are trademarks and/or registered trademarks of VMware, Inc. in the
United States and/or other jurisdictions.
Windows and MS-DOS are registered trademarks of Microsoft Corporation.
All other trademarks and copyrights referred to are the property of their respective owners.
Distribution of substantively modified versions of this document is prohibited without the explicit
permission of the copyright holder.
Distribution of this work or derivative work in any standard (paper) book form for commercial
purposes is prohibited unless prior permission is obtained from the copyright holder.
DOCUMENTATION IS PROVIDED "AS IS" AND ALL EXPRESS OR IMPLIED CONDITIONS,
REPRESENTATIONS AND WARRANTIES, INCLUDING ANY IMPLIED WARRANTY OF MERCHANTABILITY,
FITNESS FOR A PARTICULAR PURPOSE OR NON-INFRINGEMENT, ARE DISCLAIMED, EXCEPT TO THE
EXTENT THAT SUCH DISCLAIMERS ARE HELD TO BE LEGALLY INVALID.
Third party code may be provided with the Software and/or Service. The license terms for such
third-parties are detailed in the license.txt file located in the root installation directory. You can
always find the latest up-to-date list of the third party code and the associated license terms used
with the Software and/or Service at http://kb.acronis.com/content/7696
Acronis patented technologies
Technologies, used in this product, are covered and protected by one or more U.S. Patent Numbers:
7,047,380; 7,275,139; 7,281,104;7,318,135; 7,353,355; 7,366,859; 7,475,282; 7,603,533; 7,636,824;
7,650,473; 7,721,138; 7,779,221; 7,831,789; 7,886,120; 7,895,403; 7,934,064; 7,937,612; 7,949,635;
7,953,948; 7,979,690; 8,005,797; 8,051,044; 8,069,320; 8,073,815; 8,074,035; 8,145,607; 8,180,984;
8,225,133; 8,261,035; 8,296,264; 8,312,259; 8,347,137; and patent pending applications.
2 Copyright © Acronis International GmbH, 2002-2014
Page 3

Table of contents
1 Introducing Acronis® Disk Director® 12 ...................................................................................6
1.1 New in this version .................................................................................................................... 7
2 Installation and upgrade ........................................................................................................8
2.1 Hardware requirements ............................................................................................................ 8
2.2 Supported operating systems .................................................................................................... 8
2.3 Supported file systems .............................................................................................................. 9
2.4 Supported media ....................................................................................................................... 9
2.5 Installing Acronis Disk Director .................................................................................................. 9
2.6 Updating Acronis Disk Director .................................................................................................. 9
2.7 Removing Acronis Disk Director ..............................................................................................10
2.8 Upgrading Acronis Disk Director ..............................................................................................10
2.9 Demo version information .......................................................................................................10
3 Basic concepts ..................................................................................................................... 11
3.1 Basic and dynamic disks ...........................................................................................................11
3.2 Types of basic volumes ............................................................................................................12
3.3 Types of dynamic volumes ......................................................................................................12
3.4 Active, system, and boot volumes ...........................................................................................13
3.5 Dynamic volume types support ...............................................................................................14
3.6 Volume alignment in disks with a 4-KB sector size ..................................................................14
4 Getting started .................................................................................................................... 17
4.1 Precautions ..............................................................................................................................17
4.2 User privileges .........................................................................................................................17
4.3 Running Acronis Disk Director .................................................................................................17
4.4 Acronis Disk Director main window .........................................................................................18
4.5 Disk and volume information ..................................................................................................19
4.5.1 Disk statuses .................................................................................................................................................. 19
4.5.2 Volume statuses ............................................................................................................................................ 20
4.6 Disk layout ...............................................................................................................................21
4.7 Performing operations .............................................................................................................21
4.7.1 Pending operations ....................................................................................................................................... 22
4.7.2 Undoing pending operations ........................................................................................................................ 22
4.8 Log ............................................................................................................................................22
4.8.1 Actions on log entries.................................................................................................................................... 23
4.8.2 Filtering and sorting log entries .................................................................................................................... 24
4.9 Collecting system information .................................................................................................24
4.10 How to .....................................................................................................................................24
5 Volume operations .............................................................................................................. 26
5.1 Creating a volume ....................................................................................................................26
3 Copyright © Acronis International GmbH, 2002-2014
Page 4

5.2 Resizing a volume ....................................................................................................................28
5.3 Copying a volume ....................................................................................................................29
5.4 Moving a volume .....................................................................................................................30
5.5 Merging basic volumes ............................................................................................................31
5.6 Formatting a volume ...............................................................................................................32
5.7 Deleting a volume ....................................................................................................................33
5.8 Splitting a basic volume ...........................................................................................................33
5.9 Changing a volume label ..........................................................................................................34
5.10 Changing a drive letter ............................................................................................................34
5.11 Converting a primary volume to logical ...................................................................................35
5.12 Converting a logical volume to primary ...................................................................................35
5.13 Changing a partition type ........................................................................................................36
5.14 Setting a volume active............................................................................................................36
5.15 Adding a mirror ........................................................................................................................37
5.16 Removing a mirror ...................................................................................................................37
5.17 Breaking a mirrored volume ....................................................................................................38
5.18 Browsing a volume's content ..................................................................................................39
5.19 Checking a volume for errors...................................................................................................39
5.20 Defragmenting a volume .........................................................................................................39
5.21 Changing a cluster size .............................................................................................................40
5.22 Changing a file system .............................................................................................................40
5.23 Hiding a volume .......................................................................................................................41
5.24 Unhiding a volume ...................................................................................................................41
5.25 Specifying i-node density .........................................................................................................42
6 Disk operations .................................................................................................................... 44
6.1 Disk initialization ......................................................................................................................44
6.2 Basic disk cloning .....................................................................................................................45
6.3 Disk conversion: MBR to GPT ..................................................................................................46
6.4 Disk conversion: GPT to MBR ..................................................................................................47
6.5 Disk conversion: basic to dynamic ...........................................................................................48
6.6 Disk conversion: dynamic to basic ...........................................................................................48
6.7 Changing a disk status: online to offline ..................................................................................49
6.8 Changing a disk status: offline to online ..................................................................................50
6.9 Importing foreign disks ............................................................................................................50
6.10 Removing a missing disk ..........................................................................................................51
6.11 Cleaning up a disk ....................................................................................................................51
7 Tools ................................................................................................................................... 52
7.1 Acronis Bootable Media Builder ..............................................................................................52
7.1.1 How to create bootable media .................................................................................................................... 53
7.1.2 Working under bootable media ................................................................................................................... 57
4 Copyright © Acronis International GmbH, 2002-2014
Page 5

7.2 Acronis Recovery Expert ..........................................................................................................59
7.3 Acronis Disk Editor ...................................................................................................................60
7.3.1 Starting work with Acronis Disk Editor ........................................................................................................ 61
7.3.2 Main window, menu and controls ............................................................................................................... 61
7.3.3 Editing disks ................................................................................................................................................... 62
7.3.4 View ................................................................................................................................................................ 63
7.3.5 Search ............................................................................................................................................................. 63
7.3.6 Usage examples ............................................................................................................................................. 64
8 Glossary .............................................................................................................................. 68
5 Copyright © Acronis International GmbH, 2002-2014
Page 6

1 Introducing Acronis
Acronis® Disk Director® 12 is a powerful and easy-to-use tool for managing disks and volumes. With a
comprehensive set of operations, you can organize your hard disk and volume configuration for
optimal performance, while keeping your data safe.
Disk Director® 12
Key features
Acronis Disk Director offers many features including:
Create both basic and dynamic volumes
The handy Create Volume wizard has been improved to support dynamic volumes creation. Now,
in addition to basic volumes, you can easily create dynamic volumes in Acronis Disk Director to:
Increase the volume size beyond the capacity of a single disk, by using a spanned volume
Reduce access time to files, by using a striped volume
Achieve fault tolerance, by using a mirrored volume *
Add, remove, or break mirrored volumes *
Make your basic or simple volume fault-tolerant in just one action by adding a mirror. If you need
extra unallocated space on a disk containing one of the mirrors—remove a mirror. Break a
mirrored volume to get two independent simple volumes with initially identical content.
Copy or move a volume of one type as a volume of another type
Change the type of a volume when copying or moving it. For example, you can copy the contents
of a mirrored volume to a spanned volume.
Convert primary volumes to logical and vice versa
Convert a primary volume to logical to create a fifth volume on a disk that currently has four
primary volumes.
Convert basic disks to dynamic and vice versa
Convert the existing basic disks to dynamic to achieve additional disk reliability for data storage.
Convert GPT disks to MBR and vice versa
Change the partitioning scheme of your disk the way you need it.
Import foreign disks
Make dynamic disks added from another machine accessible for the system.
Changing a disk status: online to offline and vice versa *
Change a disk status to offline in order to protect it from unintentional use.
Disk cloning
The Disk Cloning wizard lets you replace the old basic MBR disk with a new one without
reinstalling operating systems and applications. It transfers all the source disk data to a target
disk. The source disk volumes can be cloned to the target disk "as is", or resized automatically
with respect to the target disk size.
Disk and volume management operations
Experience the vast array of disk and volume management operations:
Resize, move, copy, split and merge volumes without data loss or destruction
Format and label volumes, assign volume letters, and set volumes active
Initialize newly added hard disks
Delete volumes
®
6 Copyright © Acronis International GmbH, 2002-2014
Page 7

Change file systems
Clean up disks
Hide/unhide volumes
Specify i-node density
Change a cluster size
Explore volume data, even on Linux volumes before performing operations
Preview changes made in disk and volume layout before applying them
Browse through the detailed information about all hard disks, volumes and file systems
Acronis Recovery Expert
Helps you to recover accidentally lost or deleted volumes on basic MBR disks.
Acronis Bootable Media Builder
Now, you can create bootable media based both on WinPE and Linux to use Acronis Disk Director
on bare metal or outside of an operating system.
Acronis Disk Editor
A professional tool that performs a variety of actions on a hard disk.
Log
Examine information about disk and volume operations, including reasons for failure, if any.
* For the operating systems that support such functionality.
1.1 New in this version
Windows 8 and Windows 8.1 support—You can install Acronis Disk Director 12 on machines
running any edition of Windows 8 and Windows 8.1.
UEFI-based machines support—You can create Acronis bootable media and boot into a recovery
environment on a UEFI-based machine. Both bootable media types are available: Linux-based
and WinPE-based. The product functionality on a UEFI-based machine is equal to a BIOS-based
machine.
WinPE 4.0 and WinPE 5.0 support—When you create a bootable rescue media based on a
Windows Preinstallation Environment, you can download and use the latest versions of Windows
Assessment and Deployment Kit for Windows 8 and Windows 8.1.
7 Copyright © Acronis International GmbH, 2002-2014
Page 8

2 Installation and upgrade
In this section
Hardware requirements ............................................................................. 8
Supported operating systems .................................................................... 8
Supported file systems ............................................................................... 9
Supported media........................................................................................ 9
Installing Acronis Disk Director .................................................................. 9
Updating Acronis Disk Director .................................................................. 9
Removing Acronis Disk Director ............................................................... 10
Upgrading Acronis Disk Director .............................................................. 10
Demo version information ....................................................................... 10
Item
Minimum
requirements
Recommended
Boot firmware
BIOS-based
UEFI-based
Computer processor
Modern processor,
800 MHz or faster
1 GHz 32-bit (x86) or
64-bit (x64)
processor
System memory
256 MB
512 MB or more
Screen resolution
800*600 pixels
1024*768 pixels or
higher
Installation disk space
150 MB
Other hardware
A mouse
A CD/DVD recording
drive, or a flash drive
for bootable media
creation
This section answers questions that might arise before the product installation and guides you
through the installation and upgrade of Acronis Disk Director.
2.1 Hardware requirements
The table below lists the minimum and recommended hardware requirements to install and run
Acronis Disk Director.
2.2 Supported operating systems
The following operating systems are supported by Acronis Disk Director 12:
Windows XP - all editions
Windows Vista - all editions
Windows 7 - all editions
Windows 8 - all editions
Windows 8.1 - all editions
8 Copyright © Acronis International GmbH, 2002-2014
Page 9

2.3 Supported file systems
Acronis Disk Director supports the following file systems for performing operations:
FAT16
FAT32
NTFS
Ext2
Ext3
Reiser3
Linux SWAP
The operations resulting in a change of volume size—that is: Create (p. 26), Resize (p. 28), Copy (p.
29), Move (p. 30), Merge, Split—are not available for the XFS, Reiser4, and HPFS file systems.
JFS file system is not supported in the current edition of Acronis Disk Director.
2.4 Supported media
Hard disk drives (HDD) and solid-state drives (SSD)
Support for IDE, SCSI and SATA interfaces
CD-R/RW, DVD-R/RW, DVD+R (including double-layer DVD+R), DVD+RW, DVD-RAM, BD-R, BD-RE
for bootable media creation*
USB 1.1 / 2.0 / 3.0**, FireWire (IEEE-1394) hard disk drives
PC card storage devices
* Burned rewritable discs cannot be read in Linux without a kernel patch.
** Reboot is required if you perform any of the following volume operations on a USB flash drive:
resizing, splitting, moving, deleting, converting, changing a cluster size.
2.5 Installing Acronis Disk Director
To install Acronis Disk Director 12
1. If you have the previous version of Acronis Disk Director, remove it before proceeding with the
installation of Acronis Disk Director 12.
2. Run the setup file of Acronis Disk Director 12.
3. Click Install Acronis Disk Director.
4. Accept the terms of the license agreement.
5. Type in your license key. Skip this step if you want to evaluate the demo product version (p. 10).
6. Select whether you want to install the program for all users on this machine, or for the current
user only.
7. Proceed with installation.
2.6 Updating Acronis Disk Director
To update Acronis Disk Director 12
1. Download the latest product update from the official Acronis web site.
9 Copyright © Acronis International GmbH, 2002-2014
Page 10

2. Run the Acronis Disk Director setup file.
3. Click Update/Remove Acronis Disk Director.
4. Select Update.
5. Proceed with the update.
2.7 Removing Acronis Disk Director
To remove Acronis Disk Director
1. Depending on the operating system running, do either of the following:
for operating systems starting from Windows Vista – select Start -> Computer -> Uninstall
or change a program, then select Acronis Disk Director and click Uninstall.
for operating systems older than Windows Vista – select Control Panel -> Add or remove
programs, then select Acronis Disk Director and click Remove.
2. Follow the instructions on the screen. Acronis Disk Director will be completely removed.
2.8 Upgrading Acronis Disk Director
Before proceeding with the upgrade, make sure that you have the license key for Acronis Disk
Director.
Upgrading from Acronis Disk Director 11
If you already have Disk Director 11 installed and want to upgrade it to Acronis Disk Director 12:
1. Remove Acronis Disk Director 11 from your machine.
2. Follow the on-screen instructions as described in Installing Acronis Disk Director (p. 9).
Upgrading from the demo version of Acronis Disk Director 12
If you already have the demo version (p. 10) of Acronis Disk Director 12 installed and want to
upgrade it to a full version:
1. Run Acronis Disk Director.
2. Select Help > Enter license key from the top menu, and then type in your license key for Acronis
Disk Director.
2.9 Demo version information
The demo version of Acronis Disk Director is fully functional, except for the following limitations:
All volume operations can be performed on volumes whose initial and resulting size is not larger
than 100 MB. Operations on volumes whose size is larger than 100 MB cannot be committed.
The following disk operations can be committed only if the total size of all volumes on the disk is
not larger than 100 MB:
MBR to GPT (p. 46) and vice versa (p. 47) disk conversion.
Basic to dynamic and vice versa disk conversion.
Clone basic disk (p. 45).
10 Copyright © Acronis International GmbH, 2002-2014
Page 11

3 Basic concepts
In this section
Basic and dynamic disks ........................................................................... 11
Types of basic volumes ............................................................................ 12
Types of dynamic volumes ....................................................................... 12
Active, system, and boot volumes ........................................................... 13
Dynamic volume types support ............................................................... 14
Volume alignment in disks with a 4-KB sector size .................................. 14
This section gives you a clear understanding of basic and dynamic disks and volume types.
After reading this section, you will know the advantages and limitations of each possible volume
configuration. In addition, you will be able to decide what types of disks and volumes best suit your
needs for organizing data storage.
3.1 Basic and dynamic disks
Each disk on your machine can be one of two types: basic or dynamic.
Basic disks
This is the type of disk that most computers originally have.
Basic disks can normally be used by any operating system, including any version of Windows.
A basic disk can store one or more volumes—called basic volumes. A basic volume cannot occupy
more than one disk.
When to use basic disks:
On a machine that has only one hard disk drive
On a machine that runs an older Windows operating system, or an operating system other than
Windows
By using Acronis Disk Director, you can convert a basic disk to a dynamic disk.
Dynamic disks
These disks provide a greater functionality as compared to basic disks.
Dynamic disks can be used only by the Windows operating systems starting with Windows 2000.
A dynamic disk can store one or more volumes—called dynamic volumes. Unlike a basic volume, a
dynamic volume can occupy more than one disk.
When to use dynamic disks. Dynamic disks are most effective if your machine has more than one
hard disk drive. In this case, you can:
Create a large volume that occupies several disks.
Add fault-tolerance to your system and data, by mirroring a volume—such as the one with the
operating system—to another disk. If a disk with one of these mirrors fails, no data will be lost on
such volume.
11 Copyright © Acronis International GmbH, 2002-2014
Page 12

By using Acronis Disk Director, you can convert a dynamic disk to a basic disk. You may need to do so,
for example, to install an operating system other than Windows on that disk.
Converting a dynamic disk to basic may require deleting some volumes on it, such as volumes that
occupy more than one disk.
3.2 Types of basic volumes
A basic disk can store two types of volumes: primary volumes and logical volumes.
The main difference between a primary volume and a logical volume is that a primary volume can be
used as the system or active volume—that is, a volume from which the machine or its Windows
operating systems start.
On each basic GPT (p. 73) disk, you can create up to 128 primary volumes. The maximum volume size
on a GPT disk is 16 exabytes.
Unlike basic GPT disks, on each basic MBR (p. 75) disk, you can create either up to four primary
volumes, or up to three primary volumes plus an unlimited number of logical volumes. The maximum
volume size on an MBR disk is 2 terabytes.
If you are not planning to use more than four volumes on the disk, all volumes can be primary
volumes. Otherwise, you can leave the active volume and the system volume as primary volumes,
and then create as many logical volumes as required.
If the disk already has four primary volumes and you need to create a fifth volume, first convert one
of the volumes—but not the system or active volume—to a logical volume, as described in
Converting a primary volume to logical (p. 35), and then create a new logical volume.
3.3 Types of dynamic volumes
The following are the types of dynamic volumes that are supported by Acronis Disk
Director—provided that they are supported by the operating system, as shown in Dynamic volume
types support (p. 14).
Simple volume
A volume (p. 79) that consists of disk space from a single dynamic disk (p. 71).
Physically, a simple volume can occupy more than one region of disk space, which can be logically
perceived as a single contiguous region.
When you extend a simple volume to another disk, the volume becomes a spanned volume (p. 77).
When you add a mirror to a simple volume, the volume becomes a mirrored volume (p. 75).
Spanned volume
A volume that consists of disk space from two or more dynamic disks (p. 71), in portions that do not
need to be equally-sized.
A spanned volume can reside on up to 32 disks.
Unlike mirrored (p. 75) and RAID-5 volumes, spanned volumes are not fault-tolerant. Unlike striped
volumes (p. 77), spanned volumes do not provide faster data access.
12 Copyright © Acronis International GmbH, 2002-2014
Page 13

Striped volume
A volume that resides on two or more dynamic disks and whose data is evenly distributed across
equally-sized portions of disk space (called stripes) on those disks.
Access to data on striped volumes is usually faster than on other types of dynamic volumes, because
it can be performed simultaneously on multiple hard disks.
Unlike a mirrored volume (p. 75), a striped volume does not contain redundant information, so it is
not fault-tolerant.
A striped volume is also known as a RAID-0 volume.
Mirrored volume
A fault-tolerant volume whose data is duplicated on two physical disks (p. 76).
Each of the two parts of a mirrored volume is called a mirror.
All of the data on one disk is copied to another disk to provide data redundancy. If one of the hard
disks fails, the data can still be accessed from the remaining hard disks.
Volumes that can be mirrored include the system volume (p. 78) and a boot volume (p. 69).
A mirrored volume is sometimes called a RAID-1 volume.
Note: No redundancy provided by the dynamic volumes architecture can replace the proper backup procedure.
If you want to be sure of the safety of your data, the best policy is to combine both precautions.
3.4 Active, system, and boot volumes
Some volumes on the disks of your machine contain information that is necessary for the machine to
start and for a particular operating system to run. Each such volume is called active, system, or boot,
depending on its function.
If only one Windows operating system is installed on your machine, a single volume is often the
active, system, and boot volume at the same time.
Because of their special role, you should use extra caution when performing operations with these
volumes. Some operations with these volumes have limitations as compared to ordinary volumes.
Active volume
This is the volume from which the machine starts after you switch it on.
The active volume usually contains one of the following programs:
The operating system
A program that enables you to choose which operating system to run (if more than one is
installed), such as GRUB
A diagnostic or recovery tool that runs before the operating system, such as Acronis Startup
Recovery Manager
In Acronis Disk Director, the active volume is marked with a flag-like icon:
If you choose to run a Windows operating system, the start process continues from the volume
known as the system volume.
13 Copyright © Acronis International GmbH, 2002-2014
Page 14

System volume
Simple
Spanned
Striped
Mirrored
Windows XP Home
- - -
-
Windows XP Professional
+ + +
-
Windows XP Professional x64
+ + +
-
Windows Vista Home Basic
+ + +
-
Windows Vista Home Premium
+ + +
-
Windows Vista Business
+ + +
-
Windows Vista Ultimate
+ + +
-
Windows 7 Starter
+ + +
-
Windows 7 Home Premium
+ + +
-
Windows 7 Professional
+ + +
+
Windows 7 Ultimate
+ + +
+
Windows 8
+ + +
+
Windows 8.1
+ + +
+
This is the volume from which any of the installed Windows operating systems starts—even if more
than one is installed.
The system volume contains files that are necessary to start Windows, such as boot.ini and Ntldr.
There is always one system volume, whereas each of the installed Windows operating systems
usually stores its files on its own volume, called a boot volume.
Boot volume
This is the volume on which the files of a particular Windows operating system are stored.
A boot volume contains folders such as the Program Files folder and the Windows folder.
Note: The notions of system volume and boot volume apply only to Windows operating systems.
3.5 Dynamic volume types support
The table below lists the operating systems that support certain dynamic volume types.
3.6 Volume alignment in disks with a 4-KB sector size
When a new volume is created, its beginning is aligned with the disk's physical sector boundaries.
It ensures that each file system allocation unit (cluster) on the volume starts and ends on the
boundaries of the disk's physical sectors. If the volume clusters are aligned with sectors, this volume
and all following volumes are also aligned. If clusters are not aligned with sectors, the volumes are
misaligned. Misalignment decreases the overall system performance and hardware lifetime.
When misalignment occurs
Volume misalignment occurs when you create a volume on a modern HDD or SSD drive that has a
4-KB sector size using a Windows operating systems earlier than Vista.
14 Copyright © Acronis International GmbH, 2002-2014
Page 15

What is the cause of misalignment
All Windows operating systems earlier than Vista use a factor of 512 bytes to create volume clusters.
The volume start is aligned to 512-byte sectors. Also, these operating systems use the
Cylinder/Head/Sector (CHS) addressing scheme. Volumes created with this scheme are aligned by
cylinders/tracks of the disk.
Usually, a track consists of 63 physical sectors. Since the first track is reserved for the master boot
record (MBR) and other service purposes, the first volume starts from the beginning of the second
track of the disk. Therefore, volumes aligned by 63 sectors are not aligned with 4-KB sectors: 63
sectors by 512 bytes do not match with the integer number of 4-KB sectors.
Thus, the first created volume and all of the following volumes on the hard disk drive will be
misaligned.
Why misalignment is an important issue for hard disk drives
When a single bit of data is changed, the operating system entirely overwrites the cluster that
contains the changed data. But if misalignment occurs, the cluster will overlap more physical sectors
than it would have occupied if aligned. As a result, more physical sectors need to be erased and
rewritten each time data changes.
The redundant read/write operations noticeably slow down the disk speed and overall system
performance.
The same is true for SSD drives that have a 4-KB or larger sector (memory page) size. For SSD drives
misalignment decreases not only system performance, but also drive lifetime. SSD memory cells are
designed for a certain amount of read/write operations. Therefore, redundant read/write operations
lead to early degradation of the SSD drive.
How to avoid volume misalignment
The latest operating systems, starting from Windows Vista, already support the new sector size.
Thus, volumes created with these operating systems will be properly aligned.
Many hard disk drive manufacturers supply their modern drives with controllers that can shift
addressing offset to one sector (63 sector becomes 64 sector), so volumes will appear aligned.
How to work with 4-KB sector size disks using Acronis Disk Director
Suppose that you added a new 4-KB sector size hard disk drive with to a machine that is running
Windows XP only. There are no volumes on this drive yet. If you start creating volumes on this disk
using Windows XP, you may experience some slowdown of the system performance while accessing
the disk. To ensure proper volume alignment and normal access to volumes on this disk, perform the
following steps:
1. Create a bootable media with Acronis Disk Director—see How to create bootable media.
2. Run Acronis Disk Director from a bootable media—see Running Acronis Disk Director (p. 17).
3. Select the Bootable media OS disk layout—see Disk layout (p. 21).
4. Create volumes—see Creating a volume (p. 26).
If Windows Vista, Windows 7, Windows 8, or Windows 8.1 is installed in addition to Windows XP,
select the disk layout of either of those operating systems.
After the volumes are created, you can perform other operations with them (including changing their
size) under any disk layout.
15 Copyright © Acronis International GmbH, 2002-2014
Page 16

How to fix volume misalignment using Acronis Disk Director
Suppose that you have already created basic volumes on a disk with a 4-KB sector size, using
Windows XP. Volumes already contain data. To align the misaligned volumes on the disk using
Acronis Disk Director, clone this disk to another and then clone it back—see Disk cloning (p. 45). After
cloning, Acronis Disk Director shifts the first volume start with 1MB offset, all the disk volumes will be
aligned properly.
16 Copyright © Acronis International GmbH, 2002-2014
Page 17

4 Getting started
In this section
Precautions .............................................................................................. 17
User privileges .......................................................................................... 17
Running Acronis Disk Director ................................................................. 17
Acronis Disk Director main window ......................................................... 18
Disk and volume information ................................................................... 19
Disk layout ................................................................................................ 21
Performing operations ............................................................................. 21
Log ............................................................................................................ 22
Collecting system information ................................................................. 24
How to ...................................................................................................... 24
After reading this section, you will know how to run and use Acronis Disk Director, what precautions
you should take, and how to perform the most common tasks you might need.
4.1 Precautions
To avoid any possible disk and volume structure damage or data loss, please take all necessary
precautions and follow these simple rules:
1. Back up the disk whose volumes will be created or managed. Having your most important data
backed up to another hard disk or CD will allow you to work on disk volumes being reassured
that your data is safe.
Acronis has an extremely effective comprehensive data backup and recovery solution — Acronis True
Image. It creates a data or disk backup copy stored in a compressed archive file that can be restored in case
of an accident.
2. Check volumes (p. 39) to make sure they are fully functional and do not contain any bad sectors
or file system errors.
3. Do not perform any disk/volume operations while running other software that has low-level disk
access. Acronis Disk Director must obtain exclusive access to the target disk/volume. This means
no other disk management utilities (such as the Windows Disk Management utility) can access it
at that time. If you receive a message stating that the disk/volume cannot be blocked, close the
disk management applications that use this disk/volume and start again. If you cannot determine
which applications use the disk/volume, close them all.
With these simple precautions, you will protect yourself against accidental data loss.
4.2 User privileges
In order to perform any operation using Acronis Disk Director, you must be logged on as a member of
the Administrators group.
4.3 Running Acronis Disk Director
Running Acronis Disk Director in Windows
1. Select Start -> All Programs -> Acronis -> Disk Director -> Acronis Disk Director.
17 Copyright © Acronis International GmbH, 2002-2014
Page 18
2. In the disk management area, examine the current layout of disks and volumes.
3. Add one or more management operations on disks and volumes to the queue of pending
operations. These operations will take effect only after you commit them.
4. In the disk management area, examine how the layout of disks and volumes will look when the
pending operations are completed.
5. Commit the pending operations.
Some operations, such as changing the size of a volume from which Windows starts, may require
restarting the machine.
Running Acronis Disk Director from a bootable media
Acronis Disk Director has a bootable version that can be run on a bare metal system, or on a crashed
machine that cannot boot normally, or even on a non-Windows system, like Linux. A bootable
version of Acronis Disk Director is created with Acronis Bootable Media Builder.
To run Acronis Disk Director, boot the machine from a bootable media, and then select Acronis Disk
Director.
While working under bootable media (p. 57), Acronis Disk Director can perform almost all the
operations on any disks and volumes that can be performed under Windows.
4.4 Acronis Disk Director main window
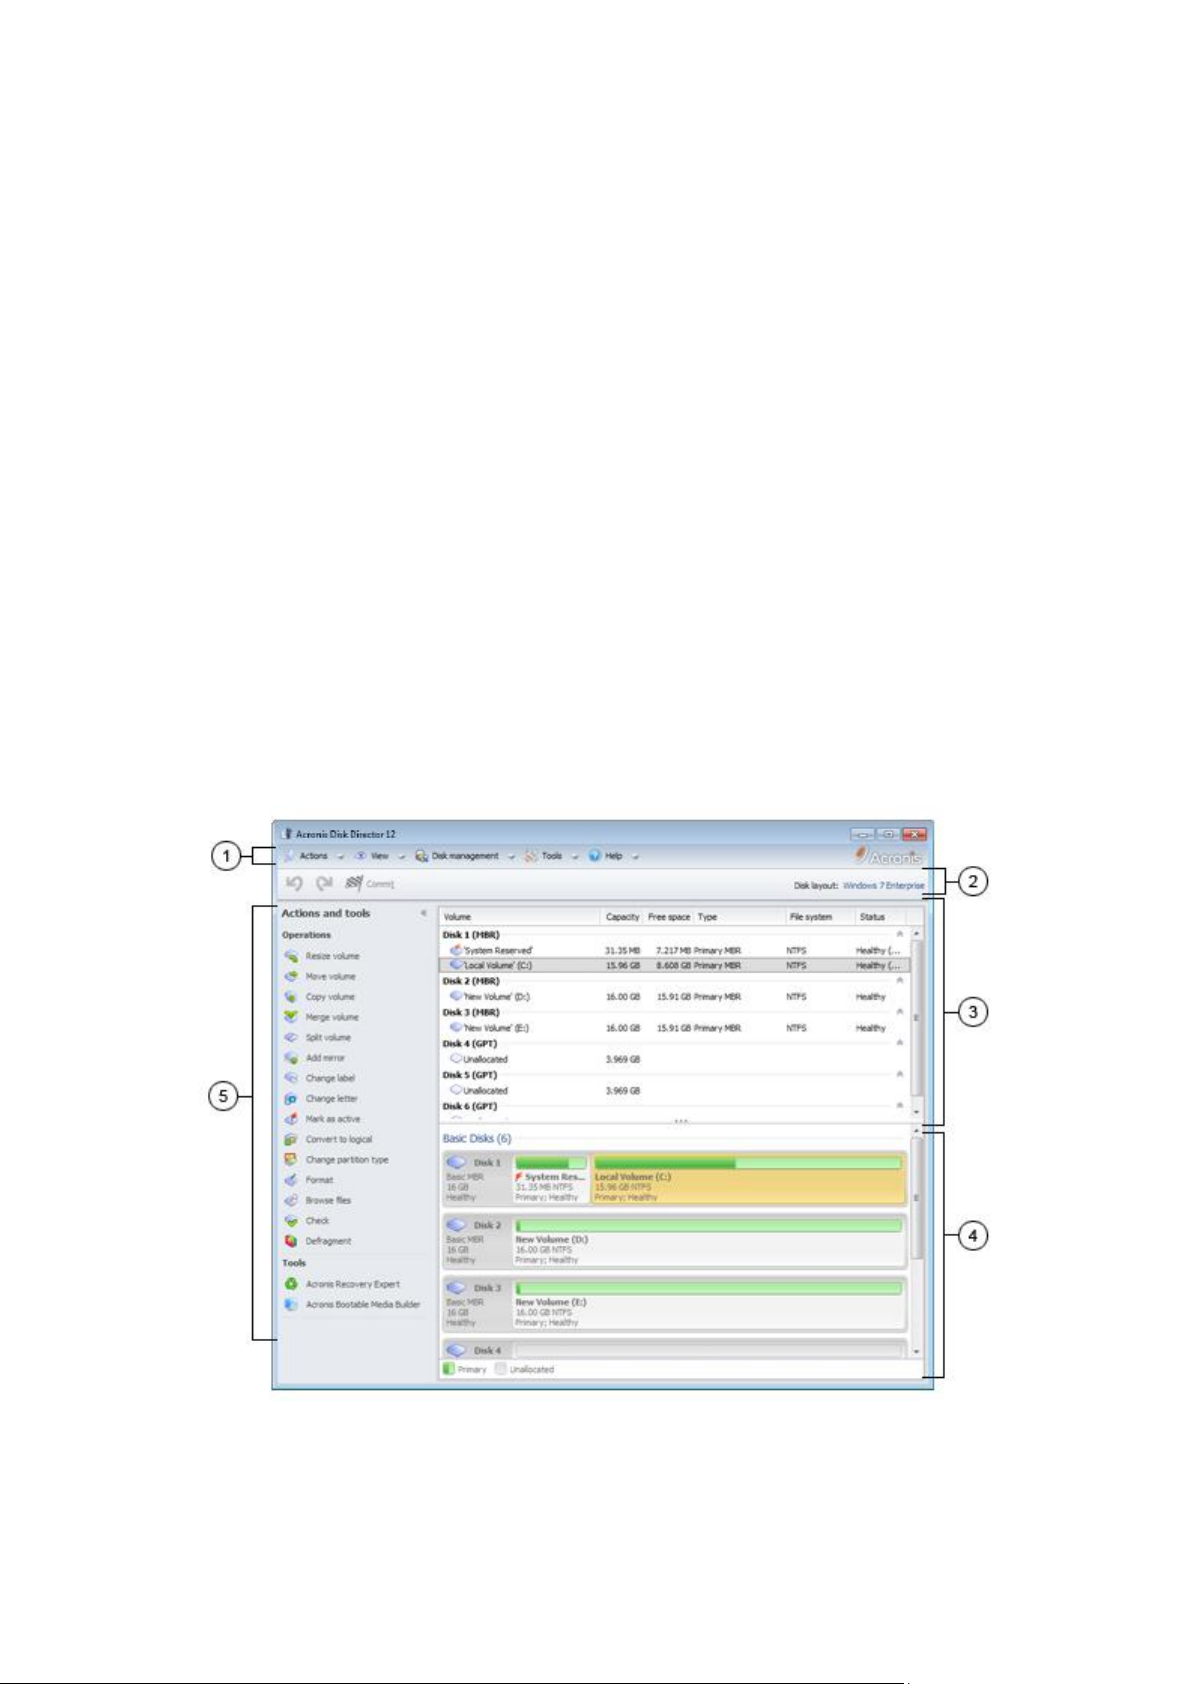
The main window of Acronis Disk Director is your main working place with the product.
The main window of Acronis Disk Director
18 Copyright © Acronis International GmbH, 2002-2014
Page 19

1. Menu
The menu provides access to all the actions, tools and settings of Acronis Disk Director.
2. Toolbar
The toolbar displays the current disk layout (p. 21) and lets you perform the following actions on
pending operations: Commit (p. 22), Undo and Redo (p. 22).
Disk Management view
The disk management area contains the table of disks and volumes and the graphical panel.
3. Table
The table lists all the disks and their volumes and lets you select any of them to perform operations.
You can sort volumes by columns. Click the column's header to sort the volumes in ascending order.
Click it once again to sort the volumes in descending order.
If required, you can hide the shown columns and show the hidden ones.
To show or hide columns
1. Right-click any column header to open the context menu. The menu items that are ticked off
correspond to the column headers presented in the table.
2. Click the items you want to be displayed/hidden.
4. Graphical panel
The graphical panel provides visual information about all the disks and their volumes for better
understanding of the volume configuration. The graphical panel also lets you select both the volumes
and disks to perform operations on them.
5. Actions and tools pane
Provides quick access to the operations that can be performed on the selected disk or volume (see
Volume operations (p. 26) and Disk operations (p. 44)) and Acronis tools (see Tools (p. 52)).
4.5 Disk and volume information
In the table and graphical panel—along with the type, size, letter, partitioning scheme, and other
information about disks and volumes—you can also check their status. The status helps you to
estimate the condition of a disk or volume.
4.5.1 Disk statuses
Check the disk status to estimate whether the disk is functioning without problems. Disk statuses are
displayed in the graphical panel below their capacity.
Here are brief descriptions of the most common disk statuses:
Online
A basic or dynamic disk is accessible and functioning correctly. This is the normal disk status. You
can change an online disk to offline—see Changing a disk status: online to offline.
Online (Errors)
19 Copyright © Acronis International GmbH, 2002-2014
Page 20

I/O errors are found on a dynamic disk. If a disk has errors, we recommended you to repair it as
soon as possible to avoid data loss.
Offline
A dynamic disk is accessible in read only mode (if you switched it to offline previously), or not
accessible at all (corrupted or intermittently unavailable). You can make the disk that you
previously switched to offline, fully accessible—see Changing a disk status: offline to online.
Foreign
This status occurs when you move a dynamic disk to your machine from another computer. To
access data on foreign disks, you have to add these disks to your machine's system
configuration—see Importing foreign disks (p. 50), or convert them to basic disks—see Disk
conversion: dynamic to basic.
Missing
A dynamic disk is corrupted, powered down, or disconnected.
Not Initialized
A disk does not contain a valid signature. After you install a new disk, the disk must be registered
in the operating system—see Disk initialization. Only then, you can create volumes on that disk.
To find out more information about disk statuses, please refer to the Disk status descriptions article
on the Microsoft website.
Important! For instructions explaining how to repair disks with an Online (Errors), Offline, or Missing status,
please refer to the Troubleshooting Disk Management article on the Microsoft website.
4.5.2 Volume statuses
Check a volume status to make sure the volume is accessible and works without problems. Volume
statuses appear both in the table and graphical panel.
Here are brief descriptions of the most common volume statuses:
Healthy
A basic or dynamic volume is accessible and functioning correctly. This is the normal volume
status.
The Healthy status often has a number of substatuses that are displayed in the table view (in
parentheses) and in the graphical view (below the volume size and separated by a semicolon).
The System, Boot and Active substatuses are the most common and described in the Active,
system, and boot volumes (p. 13) section.
The healthy volume whose file system is corrupted is marked with the following icon:
Failed
A dynamic volume (striped, or spanned) cannot be started automatically, or one of the
underlying disks is missing.
Failed Redundancy
The data on a mirrored volume is no longer fault tolerant because one of the dynamic disks is not
online. You can access the volume until the remaining dynamic disk is online. To avoid data loss,
we recommend you to repair the volume as soon as possible.
To find out more information about disk statuses, please refer to the Volume status descriptions
article on the Microsoft website.
Important! For instructions explaining how to repair volumes with erroneous statuses, please refer to the
Troubleshooting Disk Management article on the Microsoft website.
20 Copyright © Acronis International GmbH, 2002-2014
Page 21

4.6 Disk layout
On a machine with two or more operating systems, representation of disks and volumes depends on
which operating system is currently running.
A volume may have a different letter in different Windows operating systems. For example, volume
E: might appear as D: or L: when you boot another Windows operating system installed on the same
machine. It is also possible that this volume will have the same letter E: under any Windows
operating system installed on the machine. Moreover, a dynamic disk created in one Windows
operating system is considered as a Foreign Disk in another Windows operating system or might
even be unsupported by this operating system.
When you need to perform a disk management operation on such machine, it is necessary to specify
for which operating system the disk management operation will be performed, i.e. specify the disk
layout.
The name of the currently selected operating system is shown on the toolbar after “Disk layout:”.
Click the operating system name to select another operating system in the Operating System
Selection window.
Under bootable media, this window appears immediately after Acronis Disk Director is launched. The
disk layout will be displayed according to the operating system you select.
4.7 Performing operations
In Acronis Disk Director, all operations on disks and volumes are performed in the same way.
To perform any operation
1. Do any of the following:
Click the disk or the volume, and then select the required action in the Actions menu.
Click the disk or the volume, and then select the required action on the Actions pane.
Right-click the disk or volume, and select the required action in the context menu.
Note: the list of available actions in the Actions menu, the context menu and the Actions pane
depends on the selected volume or disk type. The same also applies to unallocated space.
2. You will be forwarded to the operation specific window, or the wizard page, where you have to
specify the operation's settings.
3. Click OK. The operation will not be performed immediately, but will be considered pending (p.
22) and added to the pending operation list.
You can prepare a sequence of operations to be performed on disks and volumes. All pending
operations will be performed only after you commit them.
Nevertheless, the results of any pending disk or volume operation are immediately displayed in the
product main window. For example, if you create a volume, it will be immediately shown in the table
view at the top, as well as in the graphical view at the bottom. Any volume changes, including
changing the volume letter or label, are also immediately displayed.
While an operation is pending it can be easily undone and redone—see Undoing pending operations
(p. 22).
21 Copyright © Acronis International GmbH, 2002-2014
Page 22

4.7.1 Pending operations
Almost all the operations are considered pending before you commit them. Until then, Acronis Disk
Director will only demonstrate the new volume structure that will result from the operations,
planned to be performed on disks and volumes.
This approach enables you to control all planned operations, double-check the intended changes,
and, if necessary, undo operations before they are executed.
All pending operations are added to the pending operations list that can be viewed in the Pending
operations window.
To view and commit pending operations
1. On the toolbar, click Commit pending operations.
2. In the Pending operations window, view and examine the list of pending operations.
3. Click Proceed to execute the operations. You will not be able to undo any operations after you
choose to proceed the operation.
To quit the Pending operations window without committing, click Cancel.
If you try to exit Acronis Disk Director while there are pending operations that are not yet
committed, you will be asked whether you want to commit them. Quitting the program without
committing the pending operations effectively cancels them.
4.7.2 Undoing pending operations
Any pending operation can be undone or redone.
To undo the latest pending operation in the list
do any of the following:
Click the Undo button on the toolbar
Press Ctrl + Z
Undoing an operation results in canceling one or more pending operations. While the list is
populated, this action is available.
To redo the last pending operation that was undone
do any of the following:
Click the Redo button on toolbar
Press Ctrl + Y
4.8 Log
The Log stores the history of operations performed on the machine using Acronis Disk Director. For
instance, when you create a new volume, the respective entry is added to the log. With the log, you
can examine information about disk and volume operations, including reasons any for failures.
Physically, a log is a collection of XML files stored on the machine.
Operations performed using bootable media are logged as well, but the log’s lifetime is limited to a
current session. Rebooting eliminates the log, but you can save the log to a file while the machine is
booted with the media.
22 Copyright © Acronis International GmbH, 2002-2014
Page 23

To browse the Log
To
Do
Select a single log entry
Click on it.
Select multiple log
entries
non-contiguous: hold down CTRL and click the log entries individually
contiguous: select a single log entry, then hold down SHIFT and click
another entry. All the entries between the first and last selections will be
selected too.
View a log entry’s details
1. Select a log entry.
2. Do one of the following
Click View Details. The log entry's details will be displayed in a
separate window.
Expand the Information panel, by clicking the chevron.
Save the selected log
entries to a file
1. Select a single log entry or multiple log entries.
2. Click Save Selected to File.
3. In the opened window, specify a path and a name for the file.
Save all the log entries
to a file
1. Make sure, that the filters (p. 24) are not set.
2. Click Save All to File.
3. In the opened window, specify a path and a name for the file.
Save all the filtered log
entries to a file
1. Set filters (p. 24) to get a list of the log entries that satisfy the filtering
criteria.
2. Click Save All to File.
3. In the opened window, specify a path and a name for the file. As a result,
the log entries of that list will be saved.
Delete all the log entries
Click Clear Log.
All the log entries will be deleted from the log, and a new log entry will be
created. It will contain information about who deleted the entries and when.
Select View -> View log from the menu.
Way of working with the log
Use filters to display the desired log entries. You can also hide the unneeded columns and show
the hidden ones. See the Filtering and sorting log entries (p. 24) section for details.
In the log table, select the log entry (or log entries) to take action on it—see Actions on log
entries (p. 23).
Use the Information panel to review detailed information on the selected log entry. The panel is
collapsed by default. To expand the panel, click the chevron. The content of the panel is also
duplicated in the Log entry details window.
4.8.1 Actions on log entries
The following is a guideline for you to perform actions on log entries.
All the operations described below are performed by clicking the corresponding items on the log
toolbar.
23 Copyright © Acronis International GmbH, 2002-2014
Page 24

4.8.2 Filtering and sorting log entries
To
Do
Display log entries for a
given time period
1. In the From field, select the date starting from which to display the log
entries.
2. In the To field, select the date up to which to display the log entries.
Filter log entries by
owner and сode
Type the required value (owner name, code number) in the field below the
respective column header.
As a result you will see that the list of log entries fully or just partly coincide
with the entered value.
Filter log entries by type
Press or release the following toolbar buttons:
to filter error messages
to filter warning messages
to filter information messages
Sort log entries by date
and time; type; message
Click the column's header to sort the log entries in ascending order. Click it
once again to sort the log entries in descending order.
The following is a guideline for you to filter and sort log entries.
Configuring the log table
By default, the table has three columns that are displayed, the others are hidden. If required, you can
hide the shown columns and show the hidden ones.
To show or hide columns
1. Right-click any column header to open the context menu. The menu items that are ticked off
correspond to the column headers presented in the table.
2. Click the items you want to be displayed/hidden.
4.9 Collecting system information
The system information collection tool gathers system information about the machine and saves it to
a file. You may want to provide this file when contacting Acronis technical support.
To collect system information
1. Select from the top menu Help > Collect system information from 'machine name'.
2. Specify where to save the file with system information.
4.10 How to
How to create a volume that spans across several disks?
Create a dynamic volume (spanned or striped) by using the Create volume (p. 26) wizard.
How to increase a volume size at the expense of other volumes' unallocated space?
Resize (p. 28) the volume.
How to merge two volumes without losing your data?
Use the Merge operation.
How to make the existing volume fault-tolerant?
24 Copyright © Acronis International GmbH, 2002-2014
Page 25

Add a mirror to this volume.
How to recover an accidentally deleted basic volume that has important data?
Use the Recovery Expert (p. 59) tool.
How to replace a hard disk without reinstalling the operating system and applications?
Use the Clone (p. 45) operation.
How to move dynamic disks from one system to another?
Use the Import foreign disks (p. 50) operation.
How to get quick access to the data stored on a Linux volume under Windows?
Use the Browse files (p. 39) operation.
How to place files from a Linux volume into a folder on a Windows volume?
Use the Merge operation, selecting the Windows volume as the main volume.
How to erase all information on the volume?
Use the Format (p. 32) operation.
How to increase the system performance?
Use the Defragmentation (p. 39) operation.
How to verify the logical integrity of a file system on a volume and repair any errors found?
Use the Check (p. 39) operation.
How to explore data stored on a volume before performing any operation?
Use the Browse files (p. 39) operation.
How to work with hard disk drives that use 4-KB sector size?
Follow the guidelines described in the Volume alignment in disks having a 4-KB sector size
section.
How to save, copy and restore the MBR?
Read the Usage examples (p. 64) section of Acronis Disk Editor.
How to change the volume's cluster size?
Use the Change cluster size (p. 40) operation.
How clean up the disk?
Use the Clean up disk (p. 51) operation.
25 Copyright © Acronis International GmbH, 2002-2014
Page 26

5 Volume operations
In this section
Creating a volume .................................................................................... 26
Resizing a volume ..................................................................................... 28
Copying a volume ..................................................................................... 29
Moving a volume...................................................................................... 30
Merging basic volumes ............................................................................ 31
Formatting a volume ................................................................................ 32
Deleting a volume .................................................................................... 33
Splitting a basic volume ........................................................................... 33
Changing a volume label .......................................................................... 34
Changing a drive letter ............................................................................. 34
Converting a primary volume to logical ................................................... 35
Converting a logical volume to primary ................................................... 35
Changing a partition type ......................................................................... 36
Setting a volume active ............................................................................ 36
Adding a mirror ........................................................................................ 37
Removing a mirror ................................................................................... 37
Breaking a mirrored volume .................................................................... 38
Browsing a volume's content ................................................................... 39
Checking a volume for errors ................................................................... 39
Defragmenting a volume ......................................................................... 39
Changing a cluster size ............................................................................. 40
Changing a file system ............................................................................. 40
Hiding a volume ....................................................................................... 41
Unhiding a volume ................................................................................... 41
Specifying i-node density ......................................................................... 42
This section describes all the operations that you can perform with volumes in Acronis Disk Director.
Acronis Disk Director must obtain exclusive access to the target disk/volume. This means no other
disk management utilities (such as the Windows Disk Management utility) can access it at that time.
If you receive a message stating that the disk/volume cannot be blocked, close the disk management
applications that use this disk/volume and start again. If you cannot determine which applications
use the disk/volume, close them all.
5.1 Creating a volume
You might need a new volume to:
Store data—for example, a music collection, photo albums, or video files;
Store backups (images) of other volumes/disks (especially boot volumes) to be able to recover
the system in case of disaster;
Install a new operating system (or swap file).
To create a new volume
1. Run the Create Volume Wizard by right-clicking any unallocated space, and then click Create
volume.
26 Copyright © Acronis International GmbH, 2002-2014
Page 27

2. Specify the type that the new volume will have. Every volume type is provided with a brief
description to let you better understand the advantages and limitations of each possible volume
type. To learn more about volume types—see Types of basic volumes (p. 12) and Types of
dynamic volumes.
The list of volume types contains only the types that are supported by the current operating system.
3. Depending on the type of the new volume, specify one or more disks where you want to create
the new volume:
If the new volume is basic, select one basic disk and specify one region of unallocated space
on that disk.
Note: You cannot create a basic volume on a disk that already has four primary volumes; you first need
to convert one of those volumes to logical—see Converting a primary volume to logical (p. 35). This
restriction does not apply to GPT disks.
If the new volume is simple or spanned, select one or more disks.
If the new volume is striped, select two or more disks.
If the new volume is mirrored, select two disks.
Note for striped and mirrored volumes: Because these volumes occupy space on their disks in equal parts,
the maximum size of such volume will depend on the selected disk with the least amount of unallocated
space.
When creating a dynamic volume and selecting one or several basic disks as its destination, the
selected disks will be converted to dynamic automatically.
4. Specify the size of the new volume. By default, the volume size is set to maximum. To specify a
different size, move the slider or enter the required value into the Volume size field.
If the disk still has unallocated space after you have set the size of the volume, you can set the
amount of unallocated space before and after the basic volume. To do this, drag the volume
within the unallocated space, or type the required amount of space before and after the volume
in the respective fields.
In the volume layout diagram at the bottom of the window, you can specify the space that the
volume will occupy on each of the selected disks, by typing the amounts or by dragging the
sliders.
5. Specify the following options of the new volume:
File system (by default, NTFS). Some of the supported file systems will be disabled
depending on the chosen volume type and size—for example, FAT32 will be disabled if the
volume size has been set at more than 2 TB.
Cluster size. Select the cluster size—the smallest amount of disk space which will be
allocated to store a file. We recommend leaving the default size, which is marked in the list
as (default). The default cluster size depends on the volume size and the type of the file
system—for example, the default cluster size for up to 2-TB NTFS volumes is 4 KB.
Volume label (by default, NONE). A short name that you can assign to a volume to better
differentiate it from other volumes. The maximum length of a volume label depends on the
volume’s file system—see Changing a volume label (p. 34).
Letter (by default, the first free letter of the alphabet). Assign a drive letter to the volume to
be able to locate files and folders on it.
If the new volume is basic, specify whether it will be:
Primary. Set the volume as Primary, if you plan to install an operating system on it. Mark the
primary volume as Active, if you need the machine to start from this volume.
Logical. Set the volume as Logical, if it is intended for data storage.
27 Copyright © Acronis International GmbH, 2002-2014
Page 28

6. Click Finish to add the pending volume creation operation.
The results of the pending operation are immediately displayed as if the operation had been
performed.
To perform the pending operation you will have to commit it (p. 22). Exiting the program without
committing the pending operations will effectively cancel them.
5.2 Resizing a volume
This operation extends a volume—whether basic or dynamic—by taking unallocated space from one
or more disks; or reduces a volume so that a portion of the volume’s free space becomes unallocated
space.
Extending a basic volume. A basic volume occupies a single region on a single basic disk. When you
extend a basic volume, you can choose to leave the disk as basic and use only the unallocated space
that is adjacent to the volume. Alternatively, you can choose to convert the disk to dynamic and use
unallocated space from all dynamic disks on your machine. In the second case, the volume will
become a simple or spanned volume.
Resizing a volume from which the machine or an operating system starts. You can resize the system
volume, a boot volume, or the active volume only when it is a basic volume.
To resize a volume
1. Select the volume that you want to resize, and then click Resize volume.
2. Specify the new size of the volume, by typing it or by moving the slider.
3. When resizing a basic volume:
To be able to use only unallocated space that is adjacent to the volume, click Leave the
volume as basic. The volume will remain a basic volume.
To be able to use unallocated space from all dynamic disks on the machine, click Convert the
volume to simple/spanned. The volume will be converted to a simple or spanned volume,
and the corresponding disk will become dynamic.
Note: This option is not available if the volume is the system volume, a boot volume, or the active
volume.
If you choose the Leave the volume as basic option, the following options are available:
Append all unallocated disk space to the volume
With this option, all unallocated space on the disk will become adjacent to the volume that
you are resizing. This may involve relocating other volumes within the disk.
As a result you will be able to extend the volume by using all unallocated space, including the
unallocated space that is not currently adjacent to the volume, while keeping the disk as a
basic disk.
When this check box is selected, the following option is available:
Take free space from other volumes
With this option, other volumes on the disk will be reduced so that only a specified
percentage of the corresponding current free space will remain on each of those
volumes.
As a result you will get additional unallocated space, which will be adjacent to the
volume that you are resizing.
28 Copyright © Acronis International GmbH, 2002-2014
Page 29

By default, this option does not apply to the boot volumes on the disk. To include these
volumes, select the Use free space on boot volumes check box.
4. Examine how the resized volume will be located on the disk or disks, by using the preview area at
the bottom of the window.
5. Click OK to add the pending volume resizing operation.
The results of the pending operation are immediately displayed as if the operation had been
performed.
To perform the pending operation you will have to commit it (p. 22). Exiting the program without
committing the pending operations will effectively cancel them.
5.3 Copying a volume
This operation copies a volume by creating a new volume and copying the original volume’s content
to it.
Unlike copying all files from the volume, copying the volume itself ensures that the entire content of
the new volume is the same.
The original and new volumes can have different types and sizes. For example, you can copy a striped
volume as a larger simple volume.
Important: When you copy the system volume, the active volume, or a boot volume, you might not be able to
boot the machine from the new volume. Bootability will be preserved when you move such volume (p. 30) or
clone the disk (p. 45) containing it.
To copy a volume
1. Select the volume that you want to copy, and then click Copy volume.
2. Select the type that the new volume will have. The default type is that of the original volume.
3. Depending on the type of the new volume, specify one or more disks where you want to create
the new volume:
If the new volume is basic, select one basic disk and specify one region of unallocated space
on that disk.
If the new volume is simple or spanned, select one or more disks.
If the new volume is striped, select two or more disks.
If the new volume is mirrored, select two disks.
Note for striped and mirrored volumes: Because these volumes occupy space on their disks in equal parts,
the maximum size of such volume will depend on the selected disk with the least amount of unallocated
space.
4. Specify the size of the new volume. This size cannot be less than the size of data on the original
volume. For a basic volume, you can increase its size only by taking unallocated space that is
adjacent to it.
In the volume layout diagram at the bottom of the window, you can specify the space that the
volume will occupy on each of the selected disks, by typing the sizes or by dragging the sliders.
5. Click Finish to add the pending volume copying operation.
The results of the pending operation are immediately displayed as if the operation had been
performed.
29 Copyright © Acronis International GmbH, 2002-2014
Page 30

To perform the pending operation you will have to commit it (p. 22). Exiting the program without
committing the pending operations will effectively cancel them.
5.4 Moving a volume
This operation moves a volume by creating a new volume, copying the original volume’s content to
it, and then deleting the original volume.
Unlike moving all files from the volume, moving the volume itself ensures that the entire content of
the new volume is the same. This is important if you are moving a volume from which Windows
starts.
The original and new volumes can have different types. For example, you can move a striped volume
as a larger simple volume.
Tip: If you want to relocate a basic volume within the same disk, you can use the resizing a volume (p. 28)
operation instead of this operation. Namely, you can leave the size of the volume unchanged, but change the
amount of unallocated space before and after the volume.
For details about moving a volume from which the machine or a Windows operating system starts,
see “Moving system, boot, and active volumes” later in this section.
Caution: Avoid moving a volume from which an operating system other than Windows, such as Linux, starts.
Otherwise, that operating system may become unbootable.
To move a volume
1. Select the volume that you want to move, and then click Move volume.
2. Select the type that the new volume will have. The default type is that of the original volume.
3. Depending on the type of the new volume, specify one or more disks where you want to create
the new volume:
If the new volume is basic, select one basic disk and specify one region of unallocated space
on that disk.
If the new volume is simple or spanned, select one or more disks.
If the new volume is striped, select two or more disks.
If the new volume is mirrored, select two disks.
Note for striped and mirrored volumes: Because these volumes occupy space on their disks in equal parts,
the maximum size of such volume will depend on the selected disk with the least amount of unallocated
space.
4. Specify the size of the new volume. This size cannot be less than the size of data on the original
volume. For a basic volume, you can increase its size only by taking unallocated space that is
adjacent to it.
5. In the volume layout diagram at the bottom of the window, you can specify the space that the
volume will occupy on each of the selected disks, by typing the sizes or by dragging the sliders.
6. Click Finish to add the pending volume moving operation.
The results of the pending operation are immediately displayed as if the operation had been
performed.
To perform the pending operation you will have to commit it (p. 22). Exiting the program without
committing the pending operations will effectively cancel them.
30 Copyright © Acronis International GmbH, 2002-2014
Page 31

Moving system, boot, and active volumes
Important: Do not move any of these volumes unless you absolutely need to. If you want to transfer your
system to a new hard disk, consider disk cloning instead—see Basic disk cloning (p. 45).
The machine or its operating system will not always remain bootable after you move such volume. To
preserve bootability, follow these guidelines:
If the volume is system or active (that is, the volume from which the machine starts), you should
move it only if it is located on a basic disk; move it only within that basic disk.
If the volume is a boot volume (that is, the volume from which one of the installed Windows
operating systems starts), you should move it only when it is located on a basic disk; move it to
the same or a different basic disk.
A reboot is required when you move the boot volume of the currently running Windows operating
system, the system volume, or the active volume.
5.5 Merging basic volumes
This operation lets you merge two adjacent basic volumes, even if their file systems are different. All
data will remain intact and reside on the resultant volume. The resultant volume will have the same
label, letter and file system as the main volume—that is, the volume to which data from the other
volume will be added.
Free space requirements. The combined amount of free space on the main volume and on the other
volume must be at least 5 percent of the size of data on the other volume. For example, if files and
folders on the other volume occupy 100 GB, you need a combined total of 5 GB of free space, for
example 2 GB on one volume and 3 GB on another.
Caution: Volumes that contain encrypted files cannot be merged.
To merge basic volumes
1. Right-click the volume that you need to be merged, and then click Merge volume.
2. Select another volume you need to merge.
In Main volumes, specify which one of the selected volumes will be considered as a main. Data
from the other volume will be added to a separate folder on the main volume. This folder will be
named according to the volume label and volume letter (if present); for example: Merged
Volume 'System' (C)
3. Click OK to add the pending volumes merging operation.
At the bottom of the window, you can estimate how the resultant volume will look like after the
merging.
The results of the pending operation are immediately displayed as if the operation had been
performed.
To perform the pending operation you will have to commit it (p. 22). Exiting the program without
committing the pending operations will effectively cancel them.
Merging an NTFS volume to a volume with a file system that does not support security options (for example,
FAT32 volume), will result in the loss of security settings (volume ownership data and access permissions). With
the opposite action (merging a non-secured volume to a secured one), the main volume security settings will be
assigned to the resultant volume.
***
Dynamic disks merging is not supported in the current version of Acronis Disk Director.
31 Copyright © Acronis International GmbH, 2002-2014
Page 32

5.6 Formatting a volume
The formatting operation prepares a volume to store files and folders, by creating a file system on it.
Caution: Formatting destroys all data that is currently stored on the volume.
You may want to format a volume in the following cases:
When you are creating the volume. In this case, the formatting window is part of the
Create Volume Wizard.
When you want to quickly destroy data on the volume—for example, as a security best practice.
When you want to change the volume’s file system to later store files more efficiently.
To format a volume
1. Right-click the volume that you want to format, and then click Format.
2. In File system, select the file system that you want to create on the volume. The NTFS file system
is recommended for most Windows operating systems.
Note: The FAT16 and FAT32 file systems can be created on a volume of up to 2 GB and up to 2 TB in size,
respectively.
For the list of supported file systems, see Supported file systems.
3. In Cluster size, specify the cluster size—also known as allocation unit size—for the file system.
We recommend leaving the default size, which is marked in the list as (default).
For more information on choosing the cluster size, see “More about cluster sizes” later in this
section.
4. Optionally, in Volume label, type the volume label that you want to assign to the volume to
better differentiate it from other volumes.
The maximum number of characters in the volume label depends on the file system that you
selected—see Changing a volume label (p. 34).
5. Click OK to add the pending volume formatting operation.
The results of the pending operation are immediately displayed as if the operation had been
performed.
To perform the pending operation you will have to commit it (p. 22). Exiting the program without
committing the pending operations will effectively cancel them.
More about cluster sizes
Using the default cluster size is normally the best option.
Smaller cluster sizes allow for more efficient storage if the volume is to contain a vast number of very
small files.
Bigger cluster sizes make it possible for the volume to have a size beyond normal limits. For example,
you can create a 4-GB volume with the FAT16 file system, by using a cluster size of 64 KB.
Important: Some programs do not work correctly with volumes whose file systems have big cluster sizes, such
as a cluster size of 64 KB in the FAT16 and FAT32 file systems, and cluster sizes of 8 KB through 64 KB in the
NTFS file system. For example, these programs may incorrectly calculate the total and available space on such
volumes.
32 Copyright © Acronis International GmbH, 2002-2014
Page 33

5.7 Deleting a volume
This operation deletes a selected volume. The space that was occupied by the volume becomes
unallocated space on the corresponding disk or disks.
Caution: After you delete the volume, all data that is stored on it will be lost.
Tip: Deleting a mirrored volume means deleting both of its mirrors. For information on how to delete only one
mirror, see Removing a mirror (p. 37).
To delete a volume
1. Right-click the volume that you want to delete, and then click Delete volume.
2. Click OK to add the pending volume deletion operation.
The results of the pending operation are immediately displayed as if the operation had been
performed.
To perform the pending operation you will have to commit it (p. 22). Exiting the program without
committing the pending operations will effectively cancel them.
5.8 Splitting a basic volume
This operation splits a basic volume in two by using a portion of the volume’s free space to create
another basic volume.
When splitting a basic volume, you can move some files and folders from it to the new volume.
The original basic volume will retain its type (primary or logical), volume letter, and volume label.
The new basic volume:
Will be a logical volume.
Will be assigned the first available volume letter.
Will have the same volume label as the original volume.
Free space requirements. The original volume needs to have at least 16 MB of free space. The
required space will be available again as soon as splitting is finished.
Caution: Volumes that contain encrypted files cannot be split. Also, dynamic volumes cannot be split.
To split a basic volume
1. Right-click the basic volume that you need to split, and then click Split volume.
2. To move some files and folders from the original volume to the new volume, select the Move
selected files to created volume check box, then click Select, and then select the files and folders
that you want to move.
Caution: When splitting a boot volume, avoid moving system folders, such as Windows or Program Files.
Otherwise, the corresponding Windows operating system will likely fail to start.
3. Specify the size of the new volume, by typing it or by dragging the slider.
4. Click OK to add the pending volume splitting operation.
The results of the pending operation are immediately displayed as if the operation had been
performed.
To perform the pending operation you will have to commit it (p. 22). Exiting the program without
committing the pending operations will effectively cancel them.
33 Copyright © Acronis International GmbH, 2002-2014
Page 34

5.9 Changing a volume label
The volume label is a short name that you can assign to a volume to better differentiate it from other
volumes.
In Acronis Disk Director, the volume label is shown in the list of volumes and is followed by the drive
letter (if present)—for example: System (C:)
Unlike the volume’s drive letter—which may be different in different Windows operating systems
installed on the machine—the volume label remains the same even after the hard disk drive with the
volume has been moved to another machine.
The maximum length of a volume label depends on the volume’s file system. For example, it is 32
characters for the NTFS file system, 11 characters for the FAT16 and FAT32 file systems, and 16
characters for the ext2 and ext3 file systems.
To change a volume label
1. Right-click the volume whose label you want to change, and then click Change label.
2. In New label, type the new volume label.
Note: Some file systems—for example, FAT16 and FAT32 (see below)—do not allow certain characters in
the volume label. The OK button will remain disabled as long as the label you typed contains such
characters.
3. Click OK to add the pending volume label changing operation.
The results of the pending operation are immediately displayed as if the operation had been
performed.
To perform the pending operation you will have to commit it (p. 22). Exiting the program without
committing the pending operations will effectively cancel them.
Label characters not allowed in FAT16 and FAT32
The FAT16 and FAT32 file systems do not allow the following characters in the volume label:
backslash (\), slash (/), colon (:), asterisk (*), question mark (?), quotation mark ("), less than sign (<),
greater than sign (>), and pipe (|).
Volumes whose labels cannot be changed
You cannot assign a volume label to a volume whose file system is shown as Unsupported,
Not formatted, or Linux swap.
If an Acronis backup product, such as Acronis True Image Home, is installed on your machine, you
may have a volume known as Acronis Secure Zone (ASZ). The volume label of this volume cannot be
changed.
5.10 Changing a drive letter
Windows operating systems assign drive letters, such as C, to volumes to locate files and folders on
them.
You can set up, modify, or remove the drive letter of a volume that is supported by Windows;
namely, a volume whose file system is FAT16, FAT32, or NTFS.
34 Copyright © Acronis International GmbH, 2002-2014
Page 35

The change will affect only the Windows operating system whose disk layout is currently
selected—by default, the currently running Windows operating system. For information on how to
select the disk layout, see Disk layout (p. 21).
Caution: Avoid changing the drive letter of a boot volume. Otherwise, the corresponding Windows operating
system or some of the installed programs might fail to work normally.
To change a drive letter
1. Right-click the volume whose drive letter you want to change, and then click Change letter.
2. Select a new drive letter from the list of available ones. To leave the volume without a drive
letter, click Do not assign a letter.
3. Click OK to add the pending drive letter changing operation.
The results of the pending operation are immediately displayed as if the operation had been
performed.
To perform the pending operation you will have to commit it (p. 22). Exiting the program without
committing the pending operations will effectively cancel them.
5.11 Converting a primary volume to logical
This operation applies to basic disks whose partitioning scheme is MBR. It converts a primary volume
on such disk to a logical volume.
Each basic MBR disk can have either up to four primary volumes, or up to three primary volumes plus
an unlimited number of logical volumes.
You need to convert a primary volume to logical if you want to later create a fifth volume on a disk
that currently has four primary volumes.
The size of the converted volume might differ slightly from that of the original primary volume,
because some space might be required to store supplementary information.
Caution: Avoid converting the active volume or the system volume to logical. Otherwise, the machine will likely
become unbootable.
You can later convert the volume back to primary—see Convert to primary (p. 35).
To convert a primary volume to logical
1. Right-click the primary volume that you want to convert to logical, and then click Convert to
logical.
2. Click OK to add the pending primary volume to logical conversion operation.
The results of the pending operation are immediately displayed as if the operation had been
performed.
To perform the pending operation you will have to commit it (p. 22). Exiting the program without
committing the pending operations will effectively cancel them.
5.12 Converting a logical volume to primary
This operation applies to basic disks whose partitioning style is MBR. It converts a logical volume on
such disk to a primary volume.
35 Copyright © Acronis International GmbH, 2002-2014
Page 36

Each basic MBR disk can have either up to four primary volumes, or up to three primary volumes plus
an unlimited number of logical volumes.
You need to convert a logical volume to primary if you want to restore the bootability of a machine
whose system volume was accidentally converted to logical.
If the disk contains more than one logical volume, you can convert a logical volume to primary only
when there are two or less primary volumes on the disk.
You can later convert the volume back to logical—see Convert to logical (p. 35).
To convert a logical volume to primary
1. Right-click the logical volume that you want to convert to primary, and then click Convert to
primary.
2. Click OK to add the pending logical volume to primary conversion operation.
The results of the pending operation are immediately displayed as if the operation had been
performed.
To perform the pending operation you will have to commit it (p. 22). Exiting the program without
committing the pending operations will effectively cancel them.
5.13 Changing a partition type
This operation changes the partition type of a volume—a hexadecimal number that normally
identifies the file system or the intended use of the volume.
For example, NTFS volumes have a partition type of 07h.
By changing the partition type, you can “hide” the volume from the operating system.
To change a partition type
1. Right-click the volume whose partition type you need to change, and then click Change partition
type.
2. Select the desired partition type from the list—for example, 017h Hidden NTFS, HPFS.
3. Click OK to add the pending partition type changing operation.
The results of the pending operation are immediately displayed as if the operation had been
performed.
To perform the pending operation you will have to commit it (p. 22). Exiting the program without
committing the pending operations will effectively cancel them.
5.14 Setting a volume active
This operation applies to primary volumes on basic MBR disks.
To specify the volume from which the machine will start, you need to set a volume to become active.
A disk can have only one active volume, so if you set a volume as active, the volume, which was
previously active, will be automatically unset.
To set a volume active
1. Right-click the primary volume you want to set as active, and then click Mark as active.
If there is no other active volume in the system, the pending volume setting active operation
volume will be added.
36 Copyright © Acronis International GmbH, 2002-2014
Page 37

Note: By setting the new volume active, the former active volume letter might be changed and some of the
installed programs might stop running.
2. If another active volume is present in the system, you will receive a warning that the previous
active volume will no longer be active. Click OK in the Warning window to add the pending
volume setting active operation.
Even if you have the operating system on the new active volume, in some cases the machine will not be
able to boot from it. You will have to confirm your decision to set the new volume active.
The results of the pending operation are immediately displayed as if the operation had been
performed.
To perform the pending operation you will have to commit it (p. 22). Exiting the program without
committing the pending operations will effectively cancel them.
5.15 Adding a mirror
Mirrored volumes provide fault tolerance by storing two exact copies of data—called mirrors—on
two different disks.
Adding a mirror to a basic or simple volume means converting that volume to a mirrored volume,
which involves copying the volume's data to another disk.
To add a mirror to a volume
1. Right-click the basic or simple volume to which you want to add a mirror, and then click Add
mirror.
2. Select the disk on which you want to place the mirror. The disks that do not have enough
unallocated space to create the mirror are not available for selection.
If you are adding a mirror to a basic volume or are placing the mirror on a basic disk, you will
receive a warning that the corresponding disk (or disks) will be converted to dynamic.
3. Click OK to add the pending addition of a mirror to the volume operation.
The results of the pending operation are immediately displayed as if the operation had been
performed.
To perform the pending operation you will have to commit it (p. 22). Exiting the program without
committing the pending operations will effectively cancel them.
5.16 Removing a mirror
Mirrored volumes provide fault tolerance by storing two exact copies of data—called mirrors—on
two different disks.
Removing a mirror from a mirrored volume means converting that volume to a simple volume, thus
losing fault tolerance.
The space that was occupied by the removed mirror becomes unallocated space on the
corresponding disk (provided that that disk is not missing).
You may want to remove a mirror in the following cases:
When you need extra unallocated space on a disk containing one of the mirrors, at the expense
of losing fault tolerance
37 Copyright © Acronis International GmbH, 2002-2014
Page 38

When a disk containing one of the mirrors becomes missing—for example, after you replaced a
failed hard disk drive with a new one
You can later make the volume fault-tolerant again by adding a mirror to it—see Add mirror.
You cannot remove a mirror when both disks containing the mirrored volume are missing.
To remove a mirror from a mirrored volume
1. Right-click the mirrored volume from which you want to remove a mirror, and then click Remove
mirror.
2. Select the mirror that you want to remove.
Note: If one of the mirrors is located on a missing disk, you can remove only that mirror.
3. Click OK to add the pending mirror removal operation.
The results of the pending operation are immediately displayed as if the operation had been
performed.
To perform the pending operation you will have to commit it (p. 22). Exiting the program without
committing the pending operations will effectively cancel them.
5.17 Breaking a mirrored volume
Mirrored volumes provide fault tolerance by storing two exact copies of data—called mirrors—on
two different disks.
Breaking a mirrored volume means converting its two mirrors into two independent simple volumes
with initially identical content.
One of the two volumes will retain the drive letter and volume label of the mirrored volume. You can
assign a drive letter and/or volume label to the other volume.
This operation differs from removing a mirror—see Remove mirror (p. 37)—in that when you remove
a mirror, only the remaining mirror becomes a simple volume.
You can break a mirrored volume only when the disks containing both of its mirrors are online.
To break a mirrored volume
1. Right-click the mirrored volume that you want to break, and then click Break mirror.
2. For one of the two mirrors, specify the volume label and/or drive letter that the mirror will have
when it is converted to a volume. To not assign a drive letter to the volume, click Do not assign
the letter.
The other mirror will be assigned the drive letter and volume label of the original mirrored
volume.
3. Click OK to add the pending mirrored volume breaking operation.
The results of the pending operation are immediately displayed as if the operation had been
performed.
To perform the pending operation you will have to commit it (p. 22). Exiting the program without
committing the pending operations will effectively cancel them.
38 Copyright © Acronis International GmbH, 2002-2014
Page 39

5.18 Browsing a volume's content
Before configuring any operations on a volume—we recommend you to view its contents to make
sure you choose the right volume. It can be especially useful in cases when a volume cannot be seen
by Windows Explorer—for example, a volume with Linux file systems, or when running Acronis Disk
Director from bootable media where there are no tools to view what is exactly stored on a volume.
To browse a volume's content
1. Right-click the volume whose contents you need to browse, and then click Browse files.
2. In the Browse window, expand the folder tree to explore files and folders on the selected
volume.
3. When you are finished with browsing, click OK.
Note: The Browse window shows the real volume contents, read from the disk. If there are some operations
pending, such as splitting a volume, you will not be able to explore the locked volumes until the operations are
committed or canceled. However, operations on folders in the Browse window are executed immediately.
5.19 Checking a volume for errors
This operation is enabled in Windows operating systems, and is disabled under bootable media.
This operation enables you to verify the logical integrity of a file system on a volume (for FAT16/32
and NTFS file systems) and repair any errors found.
Hard disk volumes should be checked before configuring any operation on them—see Precautions (p.
17).
Acronis Disk Director does not perform the checking itself, rather it launches the Check Disk tool
(Chkdsk.exe) included in Windows operating system.
To check a volume
1. Right-click the volume whose file system you need to check, and then click Check.
2. To find and fix errors (if any), select the Fix found errors check box.
3. To locate bad sectors and recover readable information, select the Try to fix found bad sectors
check box.
4. Click OK to run the volume check. If the volume contains a very large number of files—for
example, millions—the check can take a long time to complete. The results of the operation will
be displayed in a separate window.
Note: If the volume is in use, the tool can only check it for errors, but cannot repair them. The checking and
fixing of errors on this volume will be performed the next time you restart the system.
5.20 Defragmenting a volume
This operation is enabled in Windows operating systems, and is disabled under bootable media.
Defragmentation increases the system performance by consolidating fragmented files on a volume.
Fragmentation occurs when the operating system cannot allocate enough contiguous space to store
a complete file as a unit and thus, writes different pieces of a file in gaps between other files. The
defragmentation rearranges pieces of each file as close together and contiguously as possible,
minimizing the time required to access it.
39 Copyright © Acronis International GmbH, 2002-2014
Page 40

Acronis Disk Director does not perform defragmentation itself, rather it launches the Disk
Feature
FAT16
FAT32
Ext2
Ext3
Defragmenter tool (Defrag.exe) included in Windows operating system.
To defragment a volume
1. Right click the volume you need to defragment, and then click Defragment.
2. In the Defragmentation window, click OK to start defragmenting the volume.
Depending on the amount of fragmented files, the defragmentation may take a long time to
complete. The results will be displayed in a separate window.
5.21 Changing a cluster size
Changing a cluster size of a volume affects the amount of free/used disk space.
Smaller cluster sizes allow for more efficient storage of smaller files by reducing the amount of
wasted disk space. Furthermore, larger files may become more fragmented across the volume,
increasing the amount of time that is needed to access them.
Bigger cluster sizes improve performance by decreasing the time to access to larger files. However,
having a bigger cluster size wastes disk space if the typical size of the files stored on the volume is
smaller than the cluster size.
To change cluster size
1. Right-click the volume whose cluster size you need to change, and then click Change cluster size.
2. Select the required cluster size from the list. The default cluster size is marked in the list as
(default). The default cluster size depends on the volume size and the type of the file system. For
example, the default cluster size for up to 2-TB NTFS volumes is 4 KB.
Important: The program does not allow you to select a particular cluster size if, the free volume space will
decrease to the point where the data will not fit on the volume.
Some programs do not work correctly with volumes whose file systems have big cluster sizes, such as a
cluster size of 64 KB in the FAT16 and FAT32 file systems, and cluster sizes of 8 KB through 64 KB in the
NTFS file system. For example, these programs may incorrectly calculate the total and available space on
such volumes. Acronis Disk Director displays warning messages, when you select such cluster sizes.
3. Click OK to add the pending cluster size changing operation.
The results of the pending operation are immediately displayed as if the operation had been
performed.
To perform the pending operation you will have to commit it (p. 22). Exiting the program without
committing the pending operations will effectively cancel them.
5.22 Changing a file system
This operation lets you change the volume file systems of the following type:
FAT16 to FAT32 and back
Ext2 to Ext3 and back
The table below describes main differences between the file systems.
40 Copyright © Acronis International GmbH, 2002-2014
Page 41

Maximum volume
size
2 GB (4-KB
Cluster Size) or
4 GB (64-KB
Cluster Size)
2 TB (4-KB
Cluster Size) or
8 TB (64-KB
Cluster Size)
2 TB (4-KB Block
Size) or 32 TB
(8-KB Block
Size)
2 TB (1-KB Block
Size) or 32 TB
(8-KB Block
Size)
Maximum file size
2 GB
4 GB
2 TB
2 TB
Maximum file
name length
255
255
255
254
Partitioning
scheme
MBR
MBR
MBR, GPT, APM
MBR, GPT
To change a file system
1. Right-click the volume whose file system you need to convert, and then click Change file system.
2. Select the required file system.
3. Click OK to add the pending file system changing operation.
The results of the pending operation are immediately displayed as if the operation had been
performed.
To perform the pending operation you will have to commit it (p. 22). Exiting the program without
committing the pending operations will effectively cancel them.
5.23 Hiding a volume
This operation applies to volumes on basic MBR disks.
Hiding a volume means changing the volume type so that the operating system cannot "see" this
volume. You may want to hide a volume in order to protect information from unauthorized or casual
access. Hiding a volume does not affect letters assigned to other volumes, but the hidden volume
loses its letter and this letter becomes free for assignment.
Important: Hiding a volume that contains a swap file will prevent your machine from booting. Hiding a system
volume or a boot volume with a currently running operating system is disabled in order to retain your machine
bootability.
***
If you have Acronis OS Selector installed on your computer, you need to mark a volume you want to hide as
hidden in Acronis OS Selector also.
To hide a volume
1. Right-click the volume you need to hide, and then click Hide volume.
If the volume has mount points, they will be removed automatically.
2. Click OK to add the pending volume hiding operation.
The results of the pending operation are immediately displayed as if the operation had been
performed.
To perform the pending operation you will have to commit it (p. 22). Exiting the program without
committing the pending operations will effectively cancel them.
5.24 Unhiding a volume
This operation applies to hidden volumes on basic MBR disks.
41 Copyright © Acronis International GmbH, 2002-2014
Page 42

Unhiding a hidden a volume means changing the volume type so that it will be visible by the
operating system. You may want to unhide a volume in order to:
Make a previously hidden volume again visible to the operating system.
Access data and make changes to files stored on a hidden OEM volume.
If you have Acronis OS Selector installed on your computer, you need to mark a volume you want to unhide as
unhidden in Acronis OS Selector also.
To unhide a volume
1. Right-click the hidden volume you need to unhide, and then click Unhide volume. The program
automatically assigns the first vacant drive letter to this volume.
2. Click OK to add the pending volume unhiding operation.
The results of the pending operation are immediately displayed as if the operation had been
performed.
To perform the pending operation you will have to commit it (p. 22). Exiting the program without
committing the pending operations will effectively cancel them.
5.25 Specifying i-node density
This operation applies to volumes whose file systems are Ext2 or Ext3.
The i-node is the main data structure for Linux Ext2/Ext3. All of a files information, with the
exception of its actual name and data, is stored in the i-node. Each file has its own i-node. Each
i-node contains a file description, including number, file type, size, data block pointers, etc. Space for
i-nodes is allocated when you install the operating system or when a new file system is created. The
maximum number of i-nodes, and hence the maximum number of files, is set at file system creation.
Running out of i-nodes prohibits the creation of additional files and directories on the volume even if
there is sufficient disk space. I-nodes themselves consume disk space, so specifying the i-node
density lets you organize disk space in the optimal way. I-node density is determined by specifying
the number of bytes per i-node. Usually, the default value is 4096 bytes per i-node.
Important: If you change the i-node density of a boot volume the operating system will become unbootable. To
restore the system bootability use a boot loader.
To specify i-node density
1. Right-click the Ext2/Ext3 volume, and then click Change i-node density.
2. In Bytes per i-node, specify the required value.
Use lower i-node density (that is, increased Bytes per i-node value) for a volume that
contains just a few large files. This will allocate more space for files and less for i-nodes. The
less i-nodes there are the in the system, the faster the “file system check” operation will be
performed.
Use higher i-node density (that is, reduced Bytes per i-node value) for volumes that contain a
large number of small files. This will allocate more space for i-nodes and less for data. The
more i-nodes there are in the file system, the less likely you will not run of i-nodes. But, the
“file system check” operation will be performed slower.
3. Click OK to add the pending i-node density changing operation.
The results of the pending operation are immediately displayed as if the operation had been
performed.
42 Copyright © Acronis International GmbH, 2002-2014
Page 43

To perform the pending operation you will have to commit it (p. 22). Exiting the program without
committing the pending operations will effectively cancel them.
43 Copyright © Acronis International GmbH, 2002-2014
Page 44

6 Disk operations
In this section
Disk initialization ...................................................................................... 44
Basic disk cloning ..................................................................................... 45
Disk conversion: MBR to GPT ................................................................... 46
Disk conversion: GPT to MBR ................................................................... 47
Disk conversion: basic to dynamic ........................................................... 48
Disk conversion: dynamic to basic ........................................................... 48
Changing a disk status: online to offline .................................................. 49
Changing a disk status: offline to online .................................................. 50
Importing foreign disks ............................................................................ 50
Removing a missing disk .......................................................................... 51
Cleaning up a disk .................................................................................... 51
This section describes all the operations that you can perform with disks using Acronis Disk Director.
Acronis Disk Director must obtain exclusive access to the target disk/volume. This means no other
disk management utilities (such as the Windows Disk Management utility) can access it at that time.
If you receive a message stating that the disk/volume cannot be blocked, close the disk management
applications that use this disk/volume and start again. If you cannot determine which applications
use the disk/volume, close them all.
6.1 Disk initialization
If you add one or more new disks to your machine, you need to initialize them—that is, to register
disks in the operating system. The newly detected disks appear in the disks and volumes list as Not
initialized.
To initialize a disk or disks
1. Right-click the newly added disk (or any of newly added disks), and then click Initialize.
2. In the Disk Initialization window, select the other not initialized disks (if there are several), and
set the disk partitioning scheme (MBR or GPT) and the disk type (basic or dynamic) for every
selected disk.
GPT partition scheme is not recognized by XP Home/XP Professional x86.
3. Click OK to add the pending disk initialization operation.
The results of the pending operation are immediately displayed as if the operation had been
performed.
To perform the pending operation you will have to commit it (p. 22). Exiting the program without
committing the pending operations will effectively cancel them.
After the initialization, all the disk space remains unallocated and so still impossible to be used for
program installation or file storage. To be able to use it, you need to either create a new
volume—see Creating a volume (p. 26), or to extend the existing volumes to the disk—see Resizing a
volume (p. 28).
If you decide to change the disk settings it can be done later using Acronis Disk Director 12.
44 Copyright © Acronis International GmbH, 2002-2014
Page 45

6.2 Basic disk cloning
This operation is available for basic MBR disks.
The cloning operation transfers all the source disk data to a target disk. The source disk volumes can
be cloned to the target disk “as is”, or resized automatically with respect to the target disk size.
You may want to use cloning in the following cases:
If you are about to replace an old hard disk with a new one without reinstalling operating
systems and applications on the new disk.
If you want to transfer all the volumes and their contents from the existing disk to a larger one.
If you want to have an exact copy of one disk on another disk.
Important: If you use an Acronis backup product, such as Acronis True Image Home, avoid cloning a disk that
contains the Acronis Startup Recovery Manager (ASRM) component of that product. Otherwise, the machine
might not be able to boot from the target disk.
To clone a basic disk
1. Do any of the following:
Right-click the basic disk you want to clone (i.e. a source disk), and then click Clone basic
disk.
Select Clone basic disk from the Actions pane. The program displays a list of partitioned
disks and asks you to select the source disk, from which data will be transferred to another
disk.
2. In the Select a disk as target for the cloning operation window, select a basic disk as target for
the cloning operation. The program enables you to select a target disk if its size is sufficient to
hold all the data from the source disk without any loss. If there is some data on the target disk,
you will receive a warning stating that this data will be lost after the cloning.
3. In the Select a cloning method window, select the cloning method:
As is – information from the source disk is transferred to the target “As is”. So, if the target
disk is the same size and even larger, it is possible to transfer all the information there
exactly as it is stored at the source. When cloning to a larger target disk, the remaining space
becomes unallocated.
Use proportional volume resizing (for the supported file systems) – recommended when the
target disk is larger, or smaller than the source. The program will automatically increase or
decrease (if possible) the size of the volumes with respect to the target disk size. Thus, no
unallocated space appears on the target disk.
Note for smaller target disks: the program analyzes the target disk to establish whether its size will be
sufficient to hold all the data from the source disk without any loss. If such transfer with proportional
resizing of the source disk volumes is possible, then you will be allowed to proceed. If due to the size
limitations safe transfer of all the source disk data to the target disk is impossible even with the
proportional resizing of the volumes, then the Clone basic disk operation will be impossible and you will
not be able to continue.
4. If you are about to clone a disk containing the system volume, pay attention to the Advanced
options, described later in this section.
5. Click Finish to add the pending disk cloning operation
The results of the pending operation are immediately displayed as if the operation had been
performed.
45 Copyright © Acronis International GmbH, 2002-2014
Page 46

To perform the pending operation you will have to commit it (p. 22). Exiting the program without
committing the pending operations will effectively cancel them.
Using advanced options
When cloning a disk containing the system volume, you need to retain operating system bootability
on the target disk volume, by copying the original disk's NT signature. The NT signature is a record
that is kept in the disk’s master boot record and uniquely identifies the disk. For the operating
system to remain bootable, the target disk must have the same NT signature as the source disk.
Important: Two disks with the same NT signature cannot work properly under one operating system. After
cloning the disk and copying the NT signature, you should remove one of the disks from the machine.
You have the following two alternatives to retain system bootability on the target disk volume:
Copy NT signature – to provide the target disk with the source disk NT signature matched with
the Registry keys also copied on the target disk.
Leave NT signature – to keep the old target disk signature and update the operating system
according to the signature.
If you need to copy the NT signature:
1. Select the Copy NT signature check box. You receive the warning stating that you will have to
remove one of the two hard disk drives from the machine. The Turn off the machine after the
cloning operation check box is selected and disabled automatically.
2. Click Finish to add the pending operation.
3. Click Commit on the toolbar and then click Proceed in the Pending Operations window.
4. Wait until the task is finished.
5. Wait until the machine is turned off.
6. Disconnect either the source or the target hard disk drive from the machine.
7. Start up the machine.
If you need to leave an NT signature:
1. Click to clear the Copy NT signature check box, if necessary.
2. Click Finish to add the pending operation.
3. Click Commit on the toolbar and then click Proceed in the Pending Operations window.
4. Wait until the task is finished.
6.3 Disk conversion: MBR to GPT
You may want to convert an MBR basic disk to a GPT basic disk in the following cases:
If you need more than four primary volumes on one disk.
If you need additional disk reliability against any possible data damage.
If you need to make a volume whose size is over 2 TB.
Important: If you have a primary volume, belonging to an MBR disk, and convert the disk first to GPT and then
back to MBR, the volume will be logical and will not be able to be used as a boot volume. You can convert this
volume to primary, as described in Converting a logical volume to primary (p. 35).
Important: The basic MBR disk that contains the boot volume with the currently running operating system
cannot be converted to GPT.
To convert a basic MBR disk to basic GPT
1. Right-click the basic MBR disk you want to convert to GPT, and then click Convert to GPT.
46 Copyright © Acronis International GmbH, 2002-2014
Page 47

An information window will pop up, stating that you are about to convert MBR to GPT.
2. Click OK to add the pending MBR to GPT disk conversion operation.
The results of the pending operation are immediately displayed as if the operation had been
performed.
To perform the pending operation you will have to commit it (p. 22). Exiting the program without
committing the pending operations will effectively cancel them.
Note: A GPT-partitioned disk reserves the space at the end of the partitioned area necessary for the backup
area, which stores copies of the GPT header and the partition table. If the disk is full and the volume size cannot
be automatically decreased, the conversion of the MBR disk to GPT will fail.
If you plan to install an operating system that does not support GPT disks, the reverse conversion of
the disk to MBR is also possible through the same menu items. The name of the operation will be
listed as Convert to MBR.
Dynamic disk conversion: MBR to GPT
The program does not support direct MBR to GPT conversion for dynamic disks. However, you can
perform the following conversions to reach the goal using the program:
1. MBR disk conversion: dynamic to basic using the Convert to basic operation.
2. Basic disk conversion: MBR to GPT using the Convert to GPT operation.
3. GPT disk conversion: basic to dynamic using the Convert to dynamic operation.
6.4 Disk conversion: GPT to MBR
You may want to convert a basic GPT disk to a basic MBR disk in case you need to install an operating
system and software that do not support GPT disks.
The program lets you convert a disk from GPT to MBR with the following implications:
All volumes of the disk will be logical
Boot volumes (if any) will be unbootable until you convert them to primary volumes—see
Converting a logical volume to primary (p. 35)
Volumes that allocate more than 2 TB from the beginning of the disk become inaccessible
To convert a GPT disk to MBR
1. Right-click the GPT disk you need to convert to MBR, and then click Convert to MBR.
A warning window will pop up, stating that you are about to convert GPT into MBR.
You will be explained the changes that will happen to the system after the chosen disk is
converted from GPT to MBR. For example, if such conversion will stop the disk from being
accessed by the system, the operating system will stop loading after such conversion or some
volumes on the selected GPT disk will not be accessible with MBR (e.g. volumes that allocate
more than 2 TB), you will be warned here about such implications.
2. Click OK to add the pending GPT to MBR disk conversion operation.
The results of the pending operation are immediately displayed as if the operation had been
performed.
To perform the pending operation you will have to commit it (p. 22). Exiting the program without
committing the pending operations will effectively cancel them.
47 Copyright © Acronis International GmbH, 2002-2014
Page 48

6.5 Disk conversion: basic to dynamic
You would want to convert a basic disk to dynamic in the following cases:
If you plan to use the disk as part of a dynamic disk group
If you want to achieve additional disk reliability for data storage.
To convert a basic disk to dynamic
1. Right-click the basic disk you want to convert, and then click Convert to dynamic. You will receive
a final warning about the basic disk being converted to dynamic.
2. Click OK to add the pending basic to dynamic disk conversion operation.
Note: A dynamic disk uses the last megabyte of the physical disk to store the database, including the four-level
description (Volume-Component-Partition-Disk) for each dynamic volume. If during the conversion to dynamic it
turns out that the basic disk is full and the size of its volumes cannot be decreased automatically, the basic disk
to dynamic conversion operation will fail.
The results of the pending operation are immediately displayed as if the operation had been
performed.
To perform the pending operation you will have to commit it (p. 22). Exiting the program without
committing the pending operations will effectively cancel them.
Should you decide to revert your dynamic disks back to basic ones—for example, if you want to start
using an operating system on your machine that does not support dynamic disks—you can convert
your disks using the same menu items, though the operation now will be named Convert to basic.
System disk conversion
The program does not require an operating system reboot after conversion of a basic disk that
contains one or more boot volumes to dynamic if:
1. There is a single Windows Vista, Windows 7, Windows 8, or Windows 8.1 operating system
installed on the disk.
2. The machine runs this operating system.
Caution: The conversion of a disk containing boot volumes takes a certain amount of time. Any power loss,
unintentional turning off of the machine or accidental pressing of the Reset button during the procedure could
result in bootability loss.
For machines where more than one operating system is installed, the program ensures bootability of
each of the operating systems.
6.6 Disk conversion: dynamic to basic
You would want to convert dynamic disks back to basic ones if, for example, you want to start using
an operating system your machine that does not support dynamic disks.
This operation is available only for a dynamic disk that is empty or contains only one or more simple volumes,
with each simple volume occupying a single region on the disk. These volumes will become basic volumes.
To convert a dynamic disk to basic
1. Right-click the dynamic disk you need to convert, and then click Convert to basic. You will receive
a final warning about the dynamic disk being converted to basic.
You will be advised about the changes that will happen to the system if the chosen disk is
converted from dynamic to basic. For example, if the disk you want to convert to basic contains
48 Copyright © Acronis International GmbH, 2002-2014
Page 49

any volumes that are only supported by dynamic disks (all volume types except Simple volumes),
then you will be warned here about the possible damage to the data involved in the conversion.
2. Click OK to add the pending dynamic to basic disk conversion operation.
The results of the pending operation are immediately displayed as if the operation had been
performed.
To perform the pending operation you will have to commit it (p. 22). Exiting the program without
committing the pending operations will effectively cancel them.
After the conversion the last 8 MB of disk space is reserved for the future conversion of the disk from
basic to dynamic.
In some cases the possible unallocated space and the proposed maximum volume size might differ
(for example, when the size of one mirror establishes the size of the other mirror, or the last 8 MB of
disk space is reserved for the future conversion of the disk from basic to dynamic).
Boot disk conversion
The program does not require an operating system reboot after dynamic to basic conversion of the
disk, if:
1. There is a single Windows Vista, Windows 7, Windows 8, or Windows 8.1 operating system
installed on the disk.
2. The machine runs this operating system.
Caution: The conversion of a disk containing boot volumes takes a certain amount of time. Any power loss,
unintentional turning off of the machine or accidental pressing of the Reset button during the procedure could
result in bootability loss.
The program ensures:
the bootability of each of the operating systems, for machines where more than one operating
system is installed
safe conversion of a dynamic disk to basic when it contains volumes with data for simple
volumes.
6.7 Changing a disk status: online to offline
Effective for Windows Vista SP1, Windows 7, Windows 8, Windows 8.1 operating systems and applies
to the current disk layout (p. 21).
The online status means that a basic or dynamic disk is accessible in the read-write mode. This is the
normal disk status. You may need to change an online disk to offline in order to protect it from
unintentional use, for example a disk is corrupted or has bad sectors.
To make a disk offline
1. Right click the online disk, and then click Change status to offline.
2. In the appearing window, click OK to confirm the operation.
When taking a dynamic disk whose volumes span across several disks offline, these volumes get
statuses with respect to their type: Simple/Spanned/Striped volumes become Failed; Mirrored
volumes become Failed Redundancy. The disk you took offline also becomes Missing. To recover
Simple/Spanned/Striped volumes it is enough to take the offline disk to online. To recover Mirrored
volumes, you need to take the offline disk online, and then reactivate it.
49 Copyright © Acronis International GmbH, 2002-2014
Page 50

For information on how to bring a disk that is offline and missing back online, please refer to the
following Microsoft knowledge base article:
http://technet.microsoft.com/en-us/library/cc732026.aspx.
6.8 Changing a disk status: offline to online
Effective for Windows Vista SP1, Windows 7, Windows 8, Windows 8.1 operating systems and applies
to the current disk layout (p. 21).
The offline status means that a dynamic disk is accessible in the read-only mode. You may need to
change an offline disk to online to make the disk that you switched to offline previously fully
accessed.
To make a disk online
1. Right click the offline disk, and then click Change status to online.
2. In the appearing window, click OK to confirm the operation.
If the dynamic disk has the offline status and the disk's name is Missing, this means that the disk cannot be
located or identified by the operating system. It may be corrupted, disconnected, or powered off. For
information on how to bring a disk that is offline and missing back online, please refer to the following
Microsoft knowledge base article: http://technet.microsoft.com/en-us/library/cc732026.aspx.
6.9 Importing foreign disks
On a machine with two or more operating systems, representation of disks and volumes depends on
which operating system is currently running.
Normally, all dynamic disks created within the same machine and operating system are members of
the same disk group. When moved to another machine, or added to another operating system on the
same machine, a disk group is considered as foreign. Foreign group disks cannot be used until they
are imported into the existing disk group. A foreign group is imported as is (will have the original
name) if no disk group exists on the machine.
To access data on foreign disks, you have to add these disks to your machine's system configuration
using the Import foreign disks operation.
All dynamic disks of the foreign disk group are imported at the same time, you cannot import just one dynamic
disk.
To import foreign disks
1. Right-click one of the foreign disks, and then click Import foreign disks.
The appearing window lists all foreign dynamic disks that were added to the machine, and
displays information about volumes that will be imported. Volume statuses lets you detect
whether you are importing all the required disks of the disk group. When importing all the
required disks, all their volumes have the Healthy status. Statuses other than Healthy indicate
that not all of the disks were imported.
For more information on volume statuses please refer to the following Microsoft article:
http://technet.microsoft.com/en-us/library/cc771775.aspx
2. Click OK to add the pending foreign disks importing operation.
The results of the pending operation are immediately displayed as if the operation had been
performed.
50 Copyright © Acronis International GmbH, 2002-2014
Page 51

To perform the pending operation you will have to commit it (p. 22). Exiting the program without
committing the pending operations will effectively cancel them.
6.10 Removing a missing disk
The Missing status occurs on a dynamic disk when the disk has been corrupted, turned off, or
disconnected. The Logical Disk Manager (LDM) database keeps information about the missing disk
because such disk might contain parts of dynamic volumes, such as mirrored volumes, that can be
repaired.
If the disk can be reconnected or turned on, all you need to recover its functionality is to reactivate
the disk. For information on how to bring a disk that is offline and missing back online, please refer to
the following Microsoft knowledge base article:
http://technet.microsoft.com/en-us/library/cc732026.aspx.
If the missing disk cannot be reactivated, or you would like to completely delete this disk from disk
group, you can remove the disk from the LDM database.
Before removing a missing disk you have to delete (p. 33) all the volumes on the disk. However, if the disk
contains any mirrored volumes, you can save them using the Remove mirror (p. 37) operation, instead of
deleting the entire volume.
To remove a missing dynamic disk
1. Right-click the disk with the Missing status, and then click Remove missing disk.
2. Click OK to add the pending disk removal operation.
The results of the pending operation are immediately displayed as if the operation had been
performed.
To perform the pending operation you will have to commit it (p. 22). Exiting the program without
committing the pending operations will effectively cancel them.
6.11 Cleaning up a disk
This operation erases all volumes and data on a disk, making it not initialized. All volumes, even those
spanning across other disks, are erased from the disks and the space that was occupied by these
volumes becomes unallocated space. To be able to use the cleared up disk, you need to initialize it
once again.
To clean up a disk
1. Right-click the disk you need to clean up, and then click Clean up disk.
2. Click OK to add the pending disk clean up operation.
The results of the pending operation are immediately displayed as if the operation had been
performed.
To perform the pending operation you will have to commit it (p. 22). Exiting the program without
committing the pending operations will effectively cancel them.
Note: If you accidentally cleared an MBR disk with important data, it is still possible to recover the volumes on
this disk by using Acronis Recovery Expert (p. 59). But do not forget to initialize the disk and set MBR
partitioning scheme first.
51 Copyright © Acronis International GmbH, 2002-2014
Page 52

7 Tools
In this section
Acronis Bootable Media Builder .............................................................. 52
Acronis Recovery Expert .......................................................................... 59
Acronis Disk Editor ................................................................................... 60
This section describes Acronis Bootable Media Builder and Acronis Recovery Expert tools.
After reading this section, you will have learned how to create bootable media in order to use
Acronis Disk Director on bare metal or outside of an operating system, and how to recover deleted or
lost volumes.
7.1 Acronis Bootable Media Builder
Acronis Disk Director has a bootable version that can run from bootable media without booting an
operating system.
Bootable media is physical media (CD, DVD, USB drive or other media supported by a machine BIOS
as a boot device) that boots on any PC-compatible machine and enables you to run Acronis Disk
Director either in a Linux-based environment or Windows Preinstallation Environment (WinPE),
without the help of an operating system. You can create bootable media using Acronis Bootable
Media Builder. Acronis Bootable Media Builder also provides the ability to create an ISO image of a
bootable disc on a hard disk.
There are situations in which you might prefer to run Acronis Disk Director from bootable media. For
example:
to use Acronis Disk Director on a non-Windows systems, like Linux
if you do not often use Acronis Disk Director and therefore do not want to install it on the
machine
to access the data that has survived in a corrupted system
to create basic or dynamic volumes on bare metal
to perform offline operations on a boot volume that cannot be done online because of restricted
access, being permanently locked by the running applications or for any other reason.
If you have other Acronis products, such as Acronis True Image Home, installed on your machine, you
can also include bootable versions of these programs on the same bootable media.
Linux-based bootable media
Linux-based media contains bootable version of Acronis Disk Director based on Linux kernel. It can
boot and perform operations on any PC-compatible hardware, including bare metal and machines
with corrupted or non-supported file systems.
PE-based bootable media
PE-based bootable media contains a minimal Windows system called Windows Preinstallation
Environment (WinPE) and Acronis Plug-in for WinPE, that is, a modification of Acronis Disk Director
that can run in the preinstallation environment.
52 Copyright © Acronis International GmbH, 2002-2014
Page 53

WinPE proved to be the most convenient bootable solution in large environments with
heterogeneous hardware.
Advantages:
Using Acronis Disk Director in Windows Preinstallation Environment provides more functionality
than using Linux-based bootable media. Having booted PC-compatible hardware into WinPE, you
can use not only Acronis Disk Director, but also PE commands and scripts and other plug-ins
you've added to the PE.
PE-based bootable media helps overcome some Linux-related bootable media issues such as
support for certain RAID controllers or certain levels of RAID arrays only. Media based on WinPE
allows for dynamic loading of the necessary device drivers.
7.1.1 How to create bootable media
To enable creating physical media, the machine must have a CD/DVD recording drive or allow a flash
drive to be attached. Bootable Media Builder can also create an ISO image of a bootable disk to burn
it later on a blank disk.
Linux-based bootable media
Start the Bootable Media Builder either from the management console, by selecting Tools > Create
Bootable Media or, as a separate component.
1. In the Bootable media type, choose Linux-based.
2. Select the way volumes and network resources will be handled—called the media style:
A media with Linux-like style volume handling displays the volumes as, for example, hda1
and sdb2. It tries to reconstruct MD devices and logical (LVM) volumes before starting a
recovery.
A media with Windows-like style volume handling displays the volumes as, for example, C:
and D:. It provides access to dynamic (LDM) volumes.
3. The wizard will guide you through the necessary operations. Please refer to Linux-based bootable
media (p. 54) for details.
PE-based bootable media
Acronis Plug-in for WinPE can be added to WinPE distributions based on any of the following kernels:
Windows Vista (PE 2.0) (also suitable for Windows XP SP2 with KB926044 or later)
Windows Vista SP1 (PE 2.1) (also suitable for Windows XP SP2 with KB926044 or later)
Windows 7 (PE 3.0)
Windows 8 (PE 4.0)
Windows 8.1 (PE 5.0)
Please note that your computer must have:
For WinPE 2.x or 3.0—at least 256 MB RAM
For WinPE 4.0—at least 512 MB RAM
For WinPE 5.0—at least 1 GB RAM
To be able to create or modify PE 2.x and 3.0 images, you must have Windows Automated
Installation Kit (AIK) installed. To create PE 4.0 or PE 5.0, you should install Windows Assessment and
Deployment Kit (ADK).
53 Copyright © Acronis International GmbH, 2002-2014
Page 54

To install Windows AIK:
1. Depending on your operating system, download and install one of these packs:
AIK for Windows Vista and Windows XP with Service Pack 2 or later (PE 2.0):
http://www.microsoft.com/Downloads/details.aspx?familyid=C7D4BC6D-15F3-4284-9123-67983
0D629F2&displaylang=en
AIK for Windows Vista SP1 (PE 2.1):
http://www.microsoft.com/downloads/details.aspx?FamilyID=94bb6e34-d890-4932-81a5-5b50c
657de08&DisplayLang=en
AIK for Windows 7 (PE 3.0):
http://www.microsoft.com/downloads/details.aspx?familyid=696DD665-9F76-4177-A811-39C26
D3B3B34&displaylang=en
2. [optional] Burn the Windows AIK to DVD or copy to a flash drive.
3. Install the Microsoft .NET Framework v.2.0 from this kit (NETFXx86 or NETFXx64, depending on
your hardware).
4. Install Microsoft Core XML (MSXML) 6.0 Parser from this kit.
5. Install Windows AIK from this kit.
To install Windows ADK:
1. Depending on your operating system, download one of these packs:
ADK for Windows 8 (PE 4.0): http://www.microsoft.com/download/details.aspx?id=30652
ADK for Windows 8.1 (PE 5.0): http://www.microsoft.com/download/details.aspx?id=39982
2. Run the setup file and follow the wizard's steps.
3. On the last step, select Windows PE and Deployment Tools to be installed, and click the Install
button.
It is recommended that you familiarize yourself with the help documentation supplied with Windows
AIK or Windows ADK. A good starting point is the "Create an image" section of "Getting Started for IT
Professionals" white paper. To access the document, select Microsoft Windows AIK ->
Documentation -> Getting Started for IT Professionals from the Start menu.
For more information on customizing Windows PE, see the Windows Preinstallation Environment
User’s Guide (Winpe.chm).
7.1.1.1 Linux-based bootable media
When using the media builder, you have to specify:
1. [optional] The parameters of the Linux kernel. Separate multiple parameters with spaces.
For example, to be able to select a display mode for the bootable Acronis Disk Director each time
the media starts, type: vga=ask
For a list of parameters, see Kernel parameters (p. 55).
2. The Acronis bootable components to be placed on the media:
Acronis Disk Director
Bootable version of the product that has almost the same functionality as in the Acronis Disk
Director for Windows operating systems — see Working under bootable media (p. 57) for
details.
3. [optional] The timeout interval for the boot menu plus the component that will automatically
start on timeout.
54 Copyright © Acronis International GmbH, 2002-2014
Page 55

If not configured, the Acronis loader waits for someone to select whether to boot the
operating system (if present) or the Acronis component.
If you set, say, 10 sec., Acronis Disk Director will launch 10 seconds after the menu is
displayed.
4. The type of media to create. You can:
create CD, DVD or other bootable media such as removable USB flash drives if the hardware
BIOS allows for boot from such media
build an ISO image of a bootable disc to burn it later on to a blank disc
5. Path to the media ISO file.
Kernel parameters
This window lets you specify one or more parameters of the Linux kernel. They will be automatically
applied when the bootable media starts.
These parameters are typically used when experiencing problems while working with the bootable
media. Normally, you can leave this field empty.
You can also specify any of these parameters by pressing F11 while in the boot menu.
Parameters
When specifying multiple parameters, separate them with spaces.
acpi=off
Disables Advanced Configuration and Power Interface (ACPI). You may want to use this
parameter when experiencing problems with a particular hardware configuration.
noapic
Disables Advanced Programmable Interrupt Controller (APIC). You may want to use this
parameter when experiencing problems with a particular hardware configuration.
vga=ask
Prompts for the video mode to be used by the bootable media's graphical user interface.
Without the vga parameter, the video mode is detected automatically.
vga=mode_number
Specifies the video mode to be used by the bootable media's graphical user interface. The mode
number is given by mode_number in the hexadecimal format—for example: vga=0x318
Screen resolution and the number of colors corresponding to a mode number may be different
on different machines. We recommend using the vga=ask parameter first to choose a value for
mode_number.
quiet
Disables displaying of startup messages when the Linux kernel is loading, and starts the
management console after the kernel is loaded.
This parameter is implicitly specified when creating the bootable media, but you can remove this
parameter while in the boot menu.
Without this parameter, all startup messages will be displayed, followed by a command prompt.
To start the management console from the command prompt, run the command: /bin/product
nousb
55 Copyright © Acronis International GmbH, 2002-2014
Page 56

Disables loading of the USB (Universal Serial Bus) subsystem.
nousb2
Disables USB 2.0 support. USB 1.1 devices still work with this parameter. This parameter allows
you to use some USB drives in the USB 1.1 mode if they do not work in the USB 2.0 mode.
nodma
Disables direct memory access (DMA) for all IDE hard disk drives. Prevents the kernel from
freezing on some hardware.
nofw
Disables the FireWire (IEEE1394) interface support.
nopcmcia
Disables detection of PCMCIA hardware.
nomouse
Disables mouse support.
module_name=off
Disables the module whose name is given by module_name. For example, to disable the use of
the SATA module, specify: sata_sis=off
pci=bios
Forces the use of PCI BIOS instead of accessing the hardware device directly. You may want to
use this parameter if the machine has a non-standard PCI host bridge.
pci=nobios
Disables the use of PCI BIOS; only direct hardware access methods will be allowed. You may want
to use this parameter when the bootable media fails to start, which may be caused by the BIOS.
pci=biosirq
Uses PCI BIOS calls to get the interrupt routing table. You may want to use this parameter if the
kernel is unable to allocate interrupt requests (IRQs) or discover secondary PCI buses on the
motherboard.
These calls might not work properly on some machines. But this may be the only way to get the
interrupt routing table.
7.1.1.2 Adding the Acronis Plug-in to WinPE 2.x or 3.0
Bootable Media Builder provides three methods of integrating Acronis Disk Director with WinPE:
Adding the Acronis Plug-in to the existing PE ISO. This comes in handy when you have to add the
plug-in to the previously configured PE ISO that is already in use.
Creating the PE ISO with the plug-in from scratch.
Adding the Acronis Plug-in to a WIM file for any future purpose (manual ISO building, adding
other tools to the image and so on).
To be able to perform any of the above operations, install Bootable Media Builder on a machine
where Windows AIK or Windows ADK is installed. If you do not have such machine, prepare as
described in How to create bootable media.
56 Copyright © Acronis International GmbH, 2002-2014
Page 57

Bootable Media Builder supports only x86 WinPE 2.x, WinPE 3.0, WinPE 4.0, and WinPE 5.0. These WnPE
distributions can also work on x64 hardware.
Adding Acronis Plug-in to WinPE ISO
To add Acronis Plug-in to WinPE ISO:
1. When adding the plug-in to the existing Win PE ISO, unpack all files of your Win PE ISO to a
separate folder on the hard disk.
2. Start the Bootable Media Builder either by selecting Tools > Acronis Bootable Media Builder or,
as a separate component.
3. Select Bootable media type: Windows PE.
When creating a new PE ISO:
Select Create Windows PE automatically
The software runs the appropriate script and proceeds to the next window.
When adding the plug-in to the existing PE ISO:
Select Use WinPE files located in the folder I specify
Specify the path to the folder where the WinPE files are located.
4. [optional] Specify Windows drivers to be added to Windows PE. Once you boot a machine into
Windows PE, the drivers can help you access the device where the backup archive is located.
Click Add and specify the path to the necessary *.inf file for a corresponding SCSI, RAID, SATA
controller, network adapter, tape drive or other device. You will have to repeat this procedure
for each driver you want to be included in the resulting WinPE boot media.
5. Choose whether you want to create ISO or WIM image.
6. Specify the full path to the resulting image file including the file name.
7. Check your settings in the summary screen and click Proceed.
8. Burn the .ISO to CD or DVD using a third-party tool or copy to a flash drive.
Once the machine boots into WinPE, Acronis Disk Director starts automatically.
To create a PE image (ISO file) from the resulting WIM file:
replace the default boot.wim file in your Windows PE folder with the newly created WIM file. For
the above example, type:
copy c:\AcronisMedia.wim c:\winpe_x86\ISO\sources\boot.wim
use the Oscdimg tool. For the above example, type:
oscdimg -n –bc:\winpe_x86\etfsboot.com c:\winpe_x86\ISO
c:\winpe_x86\winpe_x86.iso
For more information on customizing Windows PE, see the Windows Preinstallation Environment
User’s Guide (Winpe.chm).
7.1.2 Working under bootable media
Operations on a machine booted with bootable media are almost the same as operations in the
running operating system. The difference is as follows:
1. The Check volume (p. 39) and Defragment volume (p. 39) operations are not available under
bootable media.
2. Specify the disk layout (p. 21), if two or more Windows operating systems installed on the
machine. If only one Windows operating system is installed, the disk layout of this operating
57 Copyright © Acronis International GmbH, 2002-2014
Page 58

system will be used. For bare metal, or if no Windows operating system is found, the disk layout
busybox
fxload
ls
pktsetup
strace
cat
gawk
lspci
poweroff
swapoff
cdrecord
gpm
lvm
ps
swapon
chmod
grep
mc
raidautorun
sysinfo
chown
growisofs
mdadm
readcd
tar
chroot
grub
mkdir
reboot
tune2fs
cp
gunzip
mke2fs
rm
udev
dd
halt
mknod
rmmod
udevinfo
df
hexdump
mkswap
route
udevstart
dmesg
hotplug
more
scp
umount
dmraid
ifconfig
mount
scsi_id
uuidgen
e2fsck
init
mtx
sed
vconfig
e2label
insmod
mv
sg_map26
vi
will be used according to the bootable media environment (Linux-based or Windows PE).
3. The Linux-based bootable media shows local disks and volumes as unmounted (sda1, sda2...).
4. The log lifetime is limited to the current session. You can save the entire log or the filtered log
entries to a file.
7.1.2.1 Setting up a display mode
For a machine booted from media, a display video mode is detected automatically based on the
hardware configuration (monitor and graphics card specifications). If, for some reason, the video
mode is detected incorrectly, do the following:
1. In the boot menu, press F11.
2. Add the following command to the command prompt: vga=ask, and then proceed with booting.
3. From the list of supported video modes, choose the appropriate one by typing its number (for
example, 318), and then press ENTER.
If you do not wish to follow this procedure every time you boot from media on a given hardware
configuration, re-create the bootable media with the appropriate mode number (in our example,
vga=0x318) typed in the Kernel parameters window—see Linux-based bootable media (p. 54) for
details.
7.1.2.2 List of commands and utilities available in Linux-based bootable
media
Linux-based bootable media contains the following commands and command line utilities, which you
can use when running a command shell. To start the command shell, press CTRL+ALT+F2 while in the
bootable media's management console.
Linux commands and utilities
58 Copyright © Acronis International GmbH, 2002-2014
Page 59

echo
iscsiadm
parted
sh
zcat
egrep
kill
pccardctl
sleep
fdisk
kpartx
ping
ssh
fsck
ln
pktsetup
sshd
7.2 Acronis Recovery Expert
Acronis Recovery Expert is an easy-to use tool that lets you recover volumes on a basic MBR disk that
were accidentally deleted or damaged due a hardware or software failure.
In case your volumes are damaged and the machine fails to boot—for example, after a power outage
or a system error—use the bootable version of Acronis Disk Director and run Acronis Recovery
Expert. It will help you to recover boot sectors and partition tables on hard disks and make your
system bootable again.
The Recovery Expert first attempts to recover volumes "as is", i.e. logical volumes will be recovered
as logical and primary as primary respectively. If the primary volume cannot be recovered as is, it will
be recovered as logical. Also, if the logical volume cannot be recovered as is, it will be recovered as
primary.
To run Acronis Recovery Expert
Select Tools > Acronis Recovery Expert from the top menu.
Recovering volumes in automatic mode
The automatic mode is easy to use and requires minimal effort. The program will try to find and
recover all the deleted volumes on all basic disks.
1. In the Recovery mode window, choose Automatic.
2. In the Searching for deleted volumes window, Acronis Recovery Expert scans all the basic disks
for deleted volumes. First, Acronis Recovery Expert checks your disks for unallocated space. If
there is no unallocated space, you will be asked to close the Recovery Expert. If unallocated
space is found, then the Recovery Expert starts searching for traces of deleted volumes.
The Recovery Expert checks the beginning of each side of every cylinder of every disk for boot
sectors. A boot sector is the first sector of a volume that contains information about this volume,
even after its deletion. Once a deleted volume is found, it will be displayed in the volume list. The
search will, however, continue until all the remaining disks are scanned. Only after the search is
completed, the Next button becomes enabled, and you can proceed to the next window.
Note: you cannot select volumes to recover in the automatic mode. Acronis Recovery Expert will recover all
the discovered deleted volumes.
If the search is completed with no result, you will be asked to either perform the search using the
Complete method, or to finish searching and close the application. With the complete method,
the program scans each sector on every hard disk. It is more thorough and may take a long time
to perform. If there are no volumes found with the complete method, you will be asked to close
the Recovery Expert.
3. The Recovered Volumes window displays the volumes to recover as a part of the hard disk
volume structure. Make sure that all the required volumes are properly placed in the hard disk
structure, and then click Next.
4. Click Proceed to start recovering the volumes.
59 Copyright © Acronis International GmbH, 2002-2014
Page 60

Recovering volumes in manual mode
In this section
Starting work with Acronis Disk Editor .................................................... 61
Main window, menu and controls ........................................................... 61
The manual recovery mode lets you take full advantage of the volume recovery. You will be able to
specify the searching method, disks to search on, and volumes to recover.
1. In the Recovery mode window, choose Manual.
2. In the Unallocated Space Selection window, select unallocated space on basic disks where the
deleted volumes used to be located. If you are not sure about the location of the deleted
volumes, select all the unallocated spaces on all the basic disks.
3. In the Searching Method window, choose:
Fast – (recommended) checks the beginning of each side of every cylinder of the selected
disks. It takes less time, and should find all deleted volumes in most cases.
Complete – checks every sector on the selected disks for file system. It is more thorough and
requires much more time to perform than the Fast method.
4. In the Searching for deleted volumes window, Acronis Recovery Expert scans all the selected
hard disk drives for deleted volumes. Once a deleted volume is found, it will be displayed in the
volume list. The search will, however, continue until all the remaining disks are scanned. If no
volumes are found, you will be asked to close the Recovery Expert.
The program can even find and display intersected volumes, that is, volumes that were created
and deleted on the disk at different times. Moreover, every successive volume allocates space
from the previously deleted volume, but not at the beginning of it. Only one of the intersected
volumes can be recovered.
Unlike the automatic recovery mode, you do not have to wait until the whole search is finished
using the manual mode. As soon as a located volume or multiple volumes are added to the list,
you can select them for immediate recovery. Selecting a volume changes its status to Undeleted
and enables the Next button.
5. The Recovered Volumes window displays the volumes to recover as a part of the hard disk
volume structure, marking them with an icon in the upper right corner of its rectangle. Make
certain that all the selected volumes are properly placed in the hard disk structure, and then click
Next.
6. Click Proceed to start recovering the volumes.
7.3 Acronis Disk Editor
Acronis Disk Editor is a professional tool that performs a variety of actions on a hard disk: with it, you
can restore boot records, repair files and folder structure, find lost clusters, remove computer virus
code from a disk and much more. This program has much to offer to a computer novice as well. For
example, it can be used as an educational tool.
Working with Acronis Disk Editor requires a thorough understanding of the hard disk structure, file
systems, operating systems, partitioning schemes and principles of data storage organization.
Complete instructions concerning the organization of data storage, and the interaction of hard disks
with operating systems and applications, is not within the scope of these documentation.
When editing disks and volumes, you should be certain of your actions. You can easily violate a disk’s
information integrity by making data inaccessible. Also, your machine operability may be severely affected (the
operating system will stop loading, applications will stop running).
60 Copyright © Acronis International GmbH, 2002-2014
Page 61

Editing disks.............................................................................................. 62
View.......................................................................................................... 63
Search ....................................................................................................... 63
Usage examples ....................................................................................... 64
7.3.1 Starting work with Acronis Disk Editor
To start Acronis Disk Editor
1. Connect the console to the machine where Acronis Disk Director Agent is installed.
2. In the disk management area, right-click a disk or volume, and then click Edit. This will start
Acronis Disk Editor, providing access to its operations.
The difference between selecting the entire disk or selecting a volume is the following:
if you select the entire disk you will be able to view and edit data storage structures of the entire
disk – Partition table, File Allocation Table of all disk volumes, the root folder, data area.
selecting a volume lets you view and edit only data storage structures of this volume – File
Allocation Table, the root folder and data area of the volume.
7.3.2 Main window, menu and controls
The main window displays the numbers of disk and sector where the internal program cursor is
positioned.
The menu of Acronis Disk Editor contains the following items:
Disk – lets you browse properties of the selected disk.
Edit – lets you manipulate blocks of selected hard disk volumes; also lets you to save the content
of a disk sector after editing.
View – lets you select a view mode for more convenient data presentation. By default, the main
window of the program displays the selected volume or disk in the hexadecimal (Hex) mode.
Search – lets you search a volume (or a hard disk) for any line (or any sequence of characters)
and go to a certain disk sector according to its absolute offset.
Help – lets you get help concerning the editor window, the program’s manufacturer and version.
Using controls
While all the operations can be accessed from the menu, the most frequently used operations are
available on the toolbar.
You can access almost all of the program's main functions (or menu items) with the help of F1, F2,…
F10 keyboard shortcuts and combinations like Ctrl+O, Ctrl+F, Alt+P, etc. For example, the dialog
window for searching volumes and/or hard disks for lines is performed by pressing the Ctrl+F key
combination. You can go to a sector according its absolute offset by pressing Alt+P. You can switch
between various main window view modes. For example, press F2 for the As Hex view mode, F6 for
the As Partition Table view mode, F7 for the As Boot Sector view mode. There are other available
shortcut keys.
The list of encodings is used to interpret the hard disk sector content. Selecting the necessary
encoding, will allow you to view the sector's content correctly interpreted in the right part of
program’s main window in the Hex mode.
61 Copyright © Acronis International GmbH, 2002-2014
Page 62

7.3.3 Editing disks
The Edit menu lets you access the main operations with blocks of given hard disk sectors. You can
edit hard disk data directly in the fields of any view mode — see View (p. 63).
Let us consider the disk editing in the As Hex view mode.
Selecting data
Any view mode lets you select blocks of disk sectors with the mouse or with the keyboard.
In the Hex view mode, use the following to select blocks:
With a mouse. Place the mouse pointer at the necessary sector byte and drag it to create a block
selection around the outside of all the bytes that you want to select.
With a keyboard. Place the cursor at the necessary sector byte. Press and hold the Shift key and
use the arrow keys (or Page Up and Page Down keys) to create a selection.
Hint: Pressing the End key while holding the Shift selects the entire disk sector. To select all the disk sectors,
press Ctrl+A.
Editing disk data
Point the cursor to the block that you need to edit in the hexadecimal or character area in the main
window. Then, enter the required value. In other view modes, you should edit values in the
appropriate fields.
Use the Undo menu item to discard the last one or more changes. Undo all discards all the changes
you made.
Saving your changes
The changes you made will not be applied to the given disk sector immediately. Be sure to click Save
sector for changes to take effect.
Attention: After saving changes you will not be able to undo them.
If you do not save your changes, you effectively reject them. If you have made changes in a hard disk
sector and decide to exit the editor without saving them, you will see a warning prompting you to
save your changes.
Writing a block to a file
Not available under Linux-based bootable media
The Write to file menu item lets you to save the selected block to a file.
It is a good practice to save the selected blocks before you begin to edit them. This will help you to
revert changes made to the given hard disk sectors and to restore the data.
To save a disk sector block to a file
1. Select the block that you need to save, and then click Write to file.
2. In the Write to file window, click Browse and specify the path and file name.
3. Click OK to save the file.
Tip: You can create a selection right in the Write to file window: in the Size filed, specify the the number of
bytes that will be selected from the current cursor position.
62 Copyright © Acronis International GmbH, 2002-2014
Page 63

Reading a block from a file
Not available under Linux-based bootable media
The Read from file menu item lets you read the block from a previously saved file and insert it into a
disk sector.
To read a block from a file
1. Place the cursor to the necessary sector byte, and click Read from file.
2. In the Read from file window, click Browse and specify the file.
3. Click OK. The file content will be inserted to a sector from the current cursor position.
4. Click Save sector (Ctrl+S) to save changes.
7.3.4 View
Information about disks and volumes in the Acronis Disk Editor window can be viewed and edited in
several different modes. You can select the appropriate view mode with the help of the View menu.
The editor offers seven view modes:
HEX (hexadecimal mode)
Partition table
FAT16 boot sector
FAT32 boot sector
FAT32 FS info sector
NTFS boot sector
FAT folder
The hexadecimal view mode is the main and the most universal. Other modes that represent some
kind of patterns for viewing data let you work with decoded values of bytes or groups of bytes. You
will be able to see the stages of disk data storage formation while the standard disk volume is being
created and formatted and while files and folders are being created.
Additionally, in the View menu, you can hide or show the status bar and toolbar.
7.3.5 Search
The Search menu lets you search a disk for a line and to go to a disk sector according to its absolute
offset.
A search line can be set both as char and as numeric (hexadecimal) values. During a search, you can
ignore letter case as well as search for a given line at a given offset inside the sector.
The disk data is interpreted according to the encoding selected. If you selected a search mode
without a matching case letter, both the case and elements above the characters will be ignored.
After the search process is finished, the current position will be moved to where a line was found, or
will remain the same if no lines were found. You can search for the next line by pressing the F3 key.
You can go to the necessary sector according to its absolute offset, by selecting the Go to menu item
(or by pressing the Alt+P key combination).
The transition is performed by entering an absolute sector offset, or by entering cylinder, head and
sector numbers. The listed parameters are bound by this expression:
63 Copyright © Acronis International GmbH, 2002-2014
Page 64

(CYL x HDS + HD) x SPT + SEC – 1,
where CYL, HD and SEC are cylinder, head and sector numbers in the CHS coordinates (Cylinder –
Head – Sector); HDS is the number of heads per disk and SPT is the number of heads per track.
You can return to a sector from another one by selecting the Back item in the Search menu (or by
pressing the Ctrl + B key combination).
7.3.6 Usage examples
This section describes how to use Acronis Disk Editor for the most common scenarios.
7.3.6.1 Protecting and restoring MBR
This example applies to basic disks whose partitioning scheme is MBR.
The master boot record (MBR) is located in the first sector of the hard disk and stores information
about the hard disk partitioning and code that is loaded with BIOS. Information stored in the MBR is
crucial for the machine booting.
If the MBR code is corrupted due to boot sector viruses or human error, the machine becomes
unbootable and you cannot access the data stored on the hard disks.
By having the MBR code copy saved in a safe place, you will protect your machine against such
disasters. Even if your machine fails to boot normally, you can boot it by using WinPE-based bootable
media created with Acronis Bootable Media Builder. Under bootable media, you can start Acronis
Disk Editor and restore the MBR from a previously saved copy. Thus, the machine bootability will be
completely restored.
The following describes how you can save the MBR code copy and restore it in case failure.
Step 1. Saving MBR
1. In Acronis Disk Director right-click the disk whose MBR code you need to save, and then click
Edit.
2. In Acronis Disk Editor press F2 key to switch to the Hex view mode.
3. Place the cursor at the very beginning of the first sector byte (Absolute sector 0, or 0000 in Hex).
Then, hold down the Shift key and use the arrow keys to select the first 445 bytes of the sector.
This will select the MBR code and disk signature.
Tip. The exact cursor position is displayed in the Position field on the status bar (in the
bottom-right corner of the window).
4. Select the Write to file item in the Edit menu.
5. In the Write to file window, click Browse and specify the path and file name.
6. Click OK to save the file.
Step 2. Restoring MBR
1. Create a WinPE-based bootable media in order to be able to restore the system in case of failure.
Bootable media is created with Acronis Bootable Media Builder as described in How to create
bootable media.
2. Boot the machine with the bootable media and run Acronis Disk Director.
3. Right-click the disk whose MBR you need to restore and then click Edit.
4. In Acronis Disk Editor press F2 key to switch to the Hex view mode.
64 Copyright © Acronis International GmbH, 2002-2014
Page 65

5. Place the cursor at the very beginning of the first sector byte (Absolute sector 0, or 0000 in Hex),
and then click Read from file.
6. In the Read from file window, click Browse and specify the file storing the MBR code.
7. Click OK. The file content will be inserted into a sector from the current cursor position.
8. Press Ctrl+S key combination to save changes.
9. Reboot the machine.
7.3.6.2 Copying the MBR to another disk
This example applies to basic disks whose partitioning scheme is MBR.
You need to copy the source disk's MBR code, if you move the system volume from this disk to a
target disk that does not have MBR or has a different loader.
To copy the MBR to another disk
1. In Acronis Disk Director, right-click the source disk whose MBR code you need to copy, and then
click Edit.
2. In Acronis Disk Editor, press the F2 key to switch to the Hex view mode.
3. Place the cursor at the very beginning of the first sector byte (Absolute sector 0, or 0000 in Hex).
Then, hold down the Shift key and use the arrow keys to select the first 445 bytes of the sector.
This will select the MBR code and disk signature.
Tip. The exact cursor position is displayed in the Position field on the status bar (in the
bottom-right corner of the window).
4. Select the Write to file item in the Edit menu.
5. In the Write to file window, click Browse and specify the path and file name.
6. Click OK to save the file.
7. Press Alt+F4 to quit Acronis Disk Editor.
8. In Acronis Disk Director, right-click the target disk where to copy the MBR code, and then click
Edit.
9. In Acronis Disk Editor, press the F2 key to switch to the Hex view mode.
10. Place the cursor at the very beginning of the first sector byte (Absolute sector 0, or 0000 in Hex),
and then click Read from file.
11. In the Read from file window, click Browse and specify the file storing the MBR code.
12. Click OK. The file content will be inserted into a sector from the current cursor position.
13. Press the Ctrl+S key combination to save changes.
14. Reboot the machine.
7.3.6.3 Wiping disk data
Hard disks can contain a substantial amount of confidential information. Often users forget that
private information must be completely destroyed to avoid unauthorized access to it. Simply deleting
an old file is not sufficient.
Windows tools do not guarantee data destruction. Deleted files can be restored easily. Formatting
and even deleting a partition leaves hard disk sector contents the same.
Acronis Disk Editor can be used as a simple and reliable tool for complete wiping hard disk data.
To wipe disk data
1. In Acronis Disk Director, right-click the disk whose data you need to destroy, and then click Edit.
65 Copyright © Acronis International GmbH, 2002-2014
Page 66

2. In Acronis Disk Editor, press the F2 key to switch to the Hex view mode.
3. Place the cursor at the very beginning of the first sector byte (Absolute sector 0, or 0000 in Hex).
Then, press the Shift+Ctrl+End key combination to select the rest of the disk sectors.
4. Click Fill and enter the 0 (zero) fill value.
5. Click OK and then confirm the operation.
Be careful! After you confirm the operation, all the disk data will be deleted completely and you will not be able
to recover it unless you have backups of this disk made with Acronis disk backup and recovery solutions.
7.3.6.4 Restoring deleted files
Acronis Disk Editor can be used to restore deleted files even after the volume has been formatted or
deleted.
A file can be restored only if:
it was stored contiguously as a unit on this volume, i.e. the file should not be fragmented.
it was not overwritten by another data.
Restoring files with Acronis Disk Editor is a bit tricky and requires some hex editor working skills. To
restore a file, you need to obtain some distinctive information about it from the Hex view. This
information will help you to locate the file when searching for it in Hex view.
The following example describes how to restore a couple of .jpeg images files from the formatted
volume.
Prerequisites:
1. The files had been located on the volume My Data (G:) before it was formatted.
2. These images were taken by the certain type of camera.
3. Files were stored as units and they were not overwritten by another data.
To restore files
1. In a file manager that supports Hex, open an existing .jpeg file similar to the deleted file. Our goal
is to find some information that can be used to distinguish these .jpeg files among the other data
stored on the volume.
Lets open a similar .jpeg image that was taken with the same camera in Hex mode with the
Western (Windows) encoding. As we can see in character area, this .jpeg file begins with
something like:
...JFIF....H.H...
and ends with something like:
...OLF...
Normally, when taking a picture the camera writes information about the manufacturer in every
.jpeg file. This information is usually stored at the beginning of every file. Thus, by knowing how
the file begins and ends plus having information about the manufacturer, we have enough
information to distinguish our .jpeg files.
2. In Acronis Disk Director, right-click the formatted volume G: that stored the file you need to
restore, and then click Edit.
3. In Acronis Disk Editor, press the F2 key to switch to the Hex view mode. Then, select the Western
(Windows) encoding on the toolbar.
4. Press the Ctrl+F key combination. Then, enter JFIF in the search field. When this value is found,
take a look at the lines below to see information about the camera manufacturer. If it does not
66 Copyright © Acronis International GmbH, 2002-2014
Page 67

contain the information that we are looking for, we should search for the next JFIF entry until we
find the one we are looking for.
5. Once the required data is found, create a selection as follows.
Select the beginning of the sector where the JFIF letter combination appears. Then hold down
the Shift key and use the arrow keys (or Page Up and Page Down keys) to select the rest of
sectors up to the end of the sector where the OLF letter combination is.
6. Select the Write to file item in the Edit menu.
7. In the Write to file window, click Browse and specify the path and file name. For example,
C:\image_1.jpeg.
8. Click OK to save the file.
9. Open this file in any image viewer. If you see the image, then you did everything right. If you do
not see the image, make sure that you select the image data exactly as described in step 5.
To restore another .jpeg file, repeat the steps 4–9.
67 Copyright © Acronis International GmbH, 2002-2014
Page 68

8 Glossary
A
Active volume
The volume from which a machine starts.
If no operating systems other than Windows are installed on your machine, the active volume is
typically the same as the system volume (p. 78).
If an operating system other than Windows, such as Linux, is installed on your machine, the active
volume can be the volume where the program known as a boot loader, such as GRUB, is stored.
The active volume is either a primary volume (p. 76) (on a basic disk) or a simple volume (p. 77) (on a
dynamic disk).
Only one volume on a disk can be active.
The active volume on a basic disk is also called the active partition.
Allocation unit
See Cluster (p. 69).
B
Bad cluster
A cluster (p. 69) that contains one or more bad sectors (p. 68).
It is not possible to store data in or retrieve it from such cluster.
Bad sector
A sector (p. 77) that cannot store the information written in it—for example, due to physical defects
or aging of the magnetic surface.
Basic disk
A disk that can be accessed by all versions of Windows, as well as by other operating systems.
A basic disk can store one or more volumes (p. 79), which are called basic volumes.
A basic disk can be converted to a dynamic disk.
Basic volume
A volume on a basic disk (p. 68).
A basic volume can be primary (p. 76) and logical (p. 74).
68 Copyright © Acronis International GmbH, 2002-2014
Page 69

Block
See Sector (p. 77).
Boot sector
The first sector (p. 77) of a disk (p. 70) or a volume (p. 79) that contains the initial code to start the
operating system.
The boot sector must end with a hexadecimal signature of 0xAA55.
Boot volume
The volume which contains files that are necessary for a particular Windows operating system to
start and work.
If only one Windows operating system is installed on your machine, the boot volume is usually the
same as the system volume (p. 78).
If more than one Windows operating system is installed on your machine, each of these operating
systems normally has its own boot volume, whereas there is still only one system volume.
In terms of volume type, a boot volume can be a primary or logical volume on a basic disk, or a
simple volume on a dynamic disk.
See also system volume (p. 78).
Bootable media
A physical media (CD, DVD, USB flash drive or other media supported by a machine BIOS as a boot
device) that contains a bootable version of Acronis Disk Director or Windows Preinstallation
Environment (WinPE) with the Acronis Plug-in for WinPE.
A machine can also be booted into the above environments using the network boot from Acronis PXE
Server or Microsoft Remote Installation Service (RIS). These servers with uploaded bootable
components can also be thought of as a kind of bootable media.
Bootable media is most often used to create basic or dynamic volumes on bare metal.
Booting
The process of starting a machine when the machine is turned on or reset.
When the machine boots, its hardware runs a program known as a boot loader, which in turn starts
the selected operating system.
A machine that cannot boot normally—for example, because a volume with the operating system is
not available—is called unbootable.
Some operations, such as resizing the system volume in Windows, require rebooting the machine.
C
Cluster
The unit of disk space allocation to store files in a file system.
69 Copyright © Acronis International GmbH, 2002-2014
Page 70

Each non-empty file completely occupies one or more clusters.
The typical size of a cluster is 4 KB. When formatting a volume, you can choose the cluster size for it.
Smaller cluster sizes allow for more efficient storage of smaller files by reducing the amount of
wasted disk space; but larger files may become more fragmented across the volume, which may
increase the amount of time that is needed to access them.
A cluster is also known as an allocation unit.
Physically, a cluster is one or more (usually eight) sectors on a disk.
Cylinder
A group of all tracks (p. 78) on all magnetic platters of a hard disk (p. 73) that can be accessed
without moving the magnetic head.
Access to the data inside one cylinder is much faster than moving the head from one cylinder to
another.
D
Defragmentation
The process of rearranging files on a volume to reduce fragmentation (p. 73), which may improve file
access times.
Disk
A storage device, often a magnetic storage medium, which is attached to a machine.
Examples of disks include hard disks and floppy disks.
Disk group
A number of dynamic disks that store the common configuration data in their Logical Disk Manager
(LDM) databases and therefore can be managed as a whole.
Normally, all dynamic disks created within the same machine are members of the same disk group.
As soon as the first dynamic disk is created by the LDM or another disk management tool, the disk
group name can be found in the registry key
HKEY_LOCAL_MACHINE\SYSTEM\CurrentControlSet\Services\dmio\Boot Info\Primary Disk
Group\Name.
The next created or imported disks are added to the same disk group. The group exists as long as at
least one of its members exists. Once the last dynamic disk is disconnected or converted to basic, the
group is discontinued, though its name is kept in the above registry key. In case a dynamic disk is
created or connected again, a disk group with an incremental name is created.
When moved to another machine, a disk group is considered as foreign (p. 73) and cannot be used
until imported into the existing disk group. The import updates the configuration data on both the
local and the foreign disks so that they form a single entity. A foreign group is imported as is (will
have the original name) if no disk group exists on the machine.
70 Copyright © Acronis International GmbH, 2002-2014
Page 71

For more information about disk groups please refer to the following Microsoft knowledge base
Disk 1
MBR LDM
database
1 MB
Disk 2
Protecti
ve
MBR
GPT
Microsoft
Reserved
Partition (MSR)
LDM
database
GPT
LDM Metadata
partition
1 MB
article:
222189 Description of Disk Groups in Windows Disk Management
http://support.microsoft.com/kb/222189/EN-US/
Disk type
The type of disk, which is determined by the way the disk is organized.
A disk has one of two types: basic disk (p. 68) or dynamic disk (p. 71).
Drive
A physical device for accessing information on a disk (p. 70).
Examples of drives include hard disk drives (p. 73) and floppy disk drives.
Drive letter
See Volume letter (p. 79).
Dynamic disk
A hard disk that is managed by Logical Disk Manager (LDM), which is available in Windows starting
with Windows 2000.
Use of LDM helps to flexibly allocate volumes on a disk for fault tolerance, better performance or
larger volume size.
A dynamic disk can use either the master boot record (MBR) or GUID partition table (GPT)
partitioning scheme (p. 76).
Each dynamic disk has a hidden database where the LDM stores the configuration of all dynamic
volumes existing in the disk group, which makes for better storage reliability. On an MBR disk, this
database occupies the last 1 MB of the disk. On a GPT disk, Windows creates the dedicated LDM
Metadata partition, taking space from the Microsoft Reserved Partition (MSR.)
A dynamic MBR disk (Disk 1) and a dynamic GPT disk (Disk 2).
For more information about dynamic disks please refer to the following Microsoft knowledge base
articles:
71 Copyright © Acronis International GmbH, 2002-2014
Page 72

Disk Management (Windows XP Professional Resource Kit)
http://technet.microsoft.com/en-us/library/bb457110.aspx
816307 Best practices for using dynamic disks on Windows Server 2003-based computers
http://support.microsoft.com/kb/816307
Dynamic volume
A volume on one or more dynamic disks.
Dynamic volumes provide greater functionality as compared to basic volumes; but older operating
systems, such as Windows 98, might not be able to work with them.
Different types of dynamic volumes suit different purposes. For example, you can:
Increase the volume size beyond the capacity of a single disk, by using a spanned volume
Reduce access time to files, by using a striped volume
Achieve fault tolerance, by using a mirrored volume
For a complete list of volume types, see Volume type (p. 79).
F
Fault tolerance
The ability of a volume to ensure data integrity after a hardware failure.
Fault tolerance is usually achieved by introducing data redundancy, which enables preserving data in
case one of the hard disks containing the volume fails.
Examples of fault-tolerant volumes include mirrored (p. 75) and RAID-5 volumes.
File
A set of data, such as a text document, that is stored under an identifying name—for example:
Document.txt
Files are stored in a file system (p. 72) on a volume. In different file systems, files can be stored in
different ways, with different file name requirements and different ways to write the full path to the
file in the folder (p. 72) tree.
File system
A data structure that is used to store and manage files (p. 72) on a volume.
A file system tracks free and occupied space, supports folders (p. 72) and file names, and stores the
physical positions of files on a disk.
Examples of file systems that are supported in Windows are FAT16 (also known simply as FAT),
FAT32, and NTFS.
Examples of file systems that are supported in Linux are ext2 and ext3.
When formatting (p. 73) a volume, you can choose a file system for it.
72 Copyright © Acronis International GmbH, 2002-2014
Page 73

Folder
A named container for files that are stored on a volume.
A folder can contain other folders (sometimes called subfolders).
In the file system (p. 72), a folder is a table that contains a description of files (p. 72) and other
folders. Such a structure allows creation of a folder tree that begins with the root folder (p. 76).
Foreign disk
A dynamic disk which is a part of a foreign dynamic disk group (p. 73).
Foreign dynamic disk group
A group of dynamic disks that is not native for the currently running operating system.
To be able to use such disks, you need to import them to the existing disk group on the machine.
Formatting
The process of creating a file system on a volume.
After the volume is formatted, you can place files and folders on it.
Fragmentation
The scattering of parts of a file across different areas of the volume.
As a result of adding, deleting, and changing files, many files can occupy space on the volume in
multiple non-contiguous pieces. This requires more time to access such files.
The defragmentation (p. 70) process aims at improving access times by making fragmented files
contiguous.
Free space
Space on a volume that is not occupied by data such as files and folders.
Not to be confused with unallocated space (p. 78) on a disk.
G
GPT disk
A disk whose partitioning scheme (p. 76) is GUID partition table (GPT).
GPT disks are typically used by 64-bit operating systems, such as Windows XP Professional x64
Edition.
See also MBR disk (p. 75).
GUID partition table (GPT)
One of the two partitioning schemes of a disk. See in Partitioning scheme (p. 76).
73 Copyright © Acronis International GmbH, 2002-2014
Page 74

H
Hard disk
A fixed storage media along with integrated electronics that consists of several magnetic platters that
rotate synchronously on one spindle.
Hard disks have a relatively high capacity and high read/write speed.
A hard disk is also called a hard disk drive.
Hidden volume
A volume (p. 79) that is made invisible to an operating system.
Hiding a volume is usually done by changing its partition type (p. 75).
I
Initialization
The process of registering a disk in the operating system.
Initialization involves assigning a partitioning scheme (p. 76) (MBR or GPT) and a type (basic or
dynamic) to the disk.
Initialization is usually performed when you add a new hard disk drive to the machine.
L
Logical drive
See Logical volume (p. 74).
Logical volume
A volume which is located on a basic MBR disk (p. 75) and is not a primary volume (p. 76).
Logical volumes usually store user data and sometimes the files that are used by the installed
operating systems.
Unlike the number of primary volumes, the number of logical volumes on the disk is unlimited.
A logical volume is also called a logical drive.
M
Machine
A physical or virtual computer uniquely identified by an operating system installation.
Main volume
Of two volumes being merged, the volume on which the other volume’s files and folders will be
placed.
74 Copyright © Acronis International GmbH, 2002-2014
Page 75

After the two volumes are merged into one, the resulting volume has the drive letter and volume
label of the main volume.
Master boot record (partitioning scheme)
One of the two partitioning schemes of a disk. See Partitioning scheme (p. 76).
Master boot record (sector)
The first sector (p. 77) on a hard disk (p. 73).
This sector usually stores information about the hard disk partitioning (p. 76). It also stores a small
program that initiates the booting (p. 69) of the machine.
MBR disk
A disk whose partitioning scheme (p. 76) is master boot record (MBR).
MBR disks are typically used by 32-bit operating systems, such as Windows XP Professional.
Media builder
A dedicated tool for creating bootable media.
Mirror
Each of the two portions of disk space that make up a mirrored volume (p. 75).
Each mirror occupies a separate hard disk.
Both mirrors are identical in size and content, which ensures fault tolerance in case a hard disk with
one of the mirrors fails.
The operation of converting a simple volume (p. 77) to mirrored is called adding a mirror.
Mirrored volume
A fault-tolerant volume whose data is duplicated on two physical disks (p. 76).
Each of the two parts of a mirrored volume is called a mirror.
All of the data on one disk is copied to another disk to provide data redundancy. If one of the hard
disks fails, the data can still be accessed from the remaining hard disks.
Volumes that can be mirrored include the system volume (p. 78) and a boot volume (p. 69).
A mirrored volume is sometimes called a RAID-1 volume.
P
Partition type
A hexadecimal number that normally identifies the type of a volume or the volume’s file system (p.
72).
For example, a partition type of 07h identifies a volume whose file system is NTFS.
75 Copyright © Acronis International GmbH, 2002-2014
Page 76

By assigning a particular partition type to a volume, you can mark the volume as a hidden volume (p.
74). For example, changing the partition type of an NTFS volume to 17h makes that volume hidden.
Partitioning
The process of creating a logical structure on a hard disk (p. 73).
Partitioning usually involves creating one or more volumes (p. 79) on the disk.
Acronis Disk Director is an example of a program that can perform partitioning.
Partitioning scheme
The method of organizing volumes on a disk.
There are two partitioning schemes: master boot record (MBR) and GUID partition table (GPT). A disk
whose partitioning scheme is MBR is called an MBR disk; a disk whose partitioning scheme is GPT is
called a GPT disk.
The partitioning scheme determines the number of volumes that the disk can have:
A basic MBR disk can have either four primary volumes (p. 76), or three primary volumes and an
unlimited number of logical volumes (p. 74).
A basic GPT disk can have up to 128 primary volumes.
The partitioning scheme also determines the maximum size of each volume:
The maximum volume size on an MBR disk is 2 terabytes.
The maximum volume size on a GPT disk is 16 exabytes (more than 16 million terabytes).
Partitioning scheme is also known as partitioning style or partition style.
Physical disk
A disk (p. 70) that is physically a separate device. Thus, floppy disks, hard disks and CD-ROMs are
physical disks.
Primary partition
See Primary volume (p. 76).
Primary volume
A volume which is located on a portion of a basic disk (p. 68) and works as if it were on a separate
hard disk.
Primary volumes often store files that are necessary to start the machine or an operating system.
Many operating systems can start only from a primary volume.
The number of primary volumes on the disk is limited and depends on the partitioning scheme (p.
76).
A primary volume is also called a primary partition.
76 Copyright © Acronis International GmbH, 2002-2014
Page 77

R
Root folder
The folder (p. 72) where the folder tree of a file system (p. 72) begins.
Starting from the root folder, you can uniquely describe the file (p. 72) position in the folder tree by
sequentially naming all the intermediate nested folders—for example:
\Windows\System32\Vmm32.vxd.
In this example, the Windows folder is a subfolder of the root folder, the System32 folder is a
subfolder of the Windows folder, and the Vmm32.vxd file is located in the System32 folder.
S
Sector
The smallest information unit on a disk (p. 70) that is transferred in a single read or write operation.
Usually, a sector is 512 bytes in size.
Simple volume
A volume (p. 79) that consists of disk space from a single dynamic disk (p. 71).
Physically, a simple volume can occupy more than one region of disk space, which can be logically
perceived as a single contiguous region.
When you extend a simple volume to another disk, the volume becomes a spanned volume (p. 77).
When you add a mirror to a simple volume, the volume becomes a mirrored volume (p. 75).
Spanned volume
A volume that consists of disk space from two or more dynamic disks (p. 71), in portions that do not
need to be equally-sized.
A spanned volume can reside on up to 32 disks.
Unlike mirrored (p. 75) and RAID-5 volumes, spanned volumes are not fault-tolerant. Unlike striped
volumes (p. 77), spanned volumes do not provide faster data access.
Stripe
Each of the several equally-sized portions of disk space that make up a striped volume (p. 77) or a
RAID-5 volume.
Each stripe occupies a separate hard disk.
A striped volume consists of two or more stripes. A RAID-5 volume consists of three or more stripes.
Striped volume
A volume that resides on two or more dynamic disks and whose data is evenly distributed across
equally-sized portions of disk space (called stripes) on those disks.
77 Copyright © Acronis International GmbH, 2002-2014
Page 78

Access to data on striped volumes is usually faster than on other types of dynamic volumes, because
it can be performed simultaneously on multiple hard disks.
Unlike a mirrored volume (p. 75), a striped volume does not contain redundant information, so it is
not fault-tolerant.
A striped volume is also known as a RAID-0 volume.
Swap file
A file (p. 72) that is used by an operating system to store data that does not fit in the physical
memory of the machine.
Use of the swap files enables more programs to run than would otherwise be allowed by the
memory limitations. The operating system unloads currently unneeded data to the swap file, and
loads needed data from the swap file into memory.
A swap file is also called a paging file.
System folder
A folder that contains files that are necessary for an operating system to work.
Examples of system folders for Windows operating systems are “Program Files” and “Windows”.
System volume
The volume which contains files that are necessary for any of the installed Windows operating
systems to start.
Examples of such files are: Boot.ini, Ntdetect.com, and Ntldr
If only one Windows operating system is installed on your machine, the system volume is usually the
same as the boot volume (p. 69).
If more than one Windows operating system is installed on your machine, each of these operating
systems normally has its own boot volume, whereas there is still only one system volume.
In terms of volume type, the system volume can be a primary volume on a basic disk, or a simple
volume on a dynamic disk.
See also boot volume (p. 69).
T
Track
Any one of the concentric circles to which a hard disk (p. 73) is divided.
Information from one track can be accessed without moving the magnetic head.
78 Copyright © Acronis International GmbH, 2002-2014
Page 79

U
Unallocated space
Space on a disk that is available for creating a new volume or a part of it, or for extending an existing
volume.
Not to be confused with free space (p. 73) on a volume.
V
Volume
An independent area of storage on a hard disk (p. 73).
Typically, a volume contains a file system (p. 72), which is used to store files and folders.
A disk can store more than one volume. Some volumes, such as spanned volumes (p. 77), can reside
on more than one disk.
Volume label
An optional name that can be assigned to a volume (p. 79) to simplify its identification by the user.
The length of a volume label depends on the volume’s file system (p. 72). For example, the NTFS file
system allows volume labels of up to 32 characters.
Some file systems, such as FAT16 and FAT32, do not allow certain characters in a volume label—for
example, a colon (:) or a quotation mark (").
Volume letter
A letter, such as C, that a Windows operating system assigns to a volume to locate files and folders
that are stored on it.
A volume letter is usually assigned when you format the volume. It can be assigned, changed, or
removed later without affecting the volume’s data.
A volume letter is also called a drive letter.
Volume type
The type of volume, which is determined by the volume structure and by the type of disk on which
the volume resides.
The following is the list of volume types with short descriptions:
Basic volume (p. 68): A volume on a basic disk. Can be one of the following types:
Primary volume (p. 76): Can store information needed to start the machine or an operating
system
Logical volume (p. 74): Usually stores user files and operation system data
Dynamic volume (p. 72): A volume on one or more dynamic disks. Can be one of the following
types:
Simple volume (p. 77): Occupies a single disk.
79 Copyright © Acronis International GmbH, 2002-2014
Page 80

Spanned volume (p. 77): Occupies two or more disks in arbitrarily-sized portions.
Striped volume (p. 77): Occupies two or more disks in equally-sized portions. Can provide
faster data access.
Mirrored volume (p. 75): Occupies two disks in two identical portions (mirrors).
Fault-tolerant.
RAID-5 volume: Occupies three or more disks in equally-sized portions. Fault-tolerant.
80 Copyright © Acronis International GmbH, 2002-2014
 Loading...