

Page 1

A
Page 1 of 19Pianissimo
Welcome to Pianissimo!
Thank you for using Pianissimo!
Pianissimo is a Virtual Grand Piano, delivering the rich, warm sound and expressiveness of a classic grand piano.
It operates as a VSTi plug-in, or runs as a stand-alone application.
Pianissimo uses a combination of sample playback and advanced physical modeling to create a stunning acoustic
grand piano sound. Starting with 250 MB of high quality samples of a Steinway™
Pianissimo uses complex signal processing and programming to recreate the warmth, response, and playability of
a real grand piano. This warm, natural sound is then paired with a professional studio-quality reverb algorithm to
add the depth and ambiance of a real acoustic space. Add in modeled sympathetic resonance, incidental
mechanical hammer sounds, remarkable control over tone and velocity response, 256 voices of polyphony, and
incredibly low CPU usage, and Pianissimo might just be the best sounding, most playable virtual piano ever.
The VSTi will operate in any DAW with support for virtual instruments in the VSTi format, including Mixcraft™.
The Stand-Alone version supports any MIDI device, and any Wave, ASIO, or WaveRT device. It allows for two-
track recording, loading and saving of standard MIDI Type 1 files, and supports mixing down to WAV, MP3, WMA,
and Ogg Vorbis files.
Quick Start
Registration
Pianissimo Controls
Stand-Alone Host Controls
Important Sound Setup Information
Pianissimo is Designed And Programmed by Dan Goldstein.
rt by Rosalind Clarke.
Sample Programming by S. Christian Collins.
Copyrights & Trademarks
Pianissimo © 2008 Acoustica Inc. All Rights Reserved.
Pianissimo™ is a registered trademark of Acoustica™ Inc.
Steinway™ is a registered trademark of Steinway & Sons.
Neither Acoustica nor Pianissimo is affiliated with or endorsed by Steinway & Sons.
z.reverb by zplane.development.
Microsoft Windows Media Format © 2008 Microsoft Corporation. All rights reserved.
Many thanks to the LAME team for their work on the LAME encoder. See their website at mp3de v.org/mp3/
MPEG patent technology licensed by Thomson @ www.mp3licensing.com
OGG support © 2008, Xiph.Org Foundation
z Redistributions of source code must retain the above copyright notice, this list of conditions and the following disclaimer.
z Redistributions in binary form must reproduce the above copyright notice, this list of conditions and the following disclaim er in the documentation
and/or other materials provided with the distribution.
z Neither the name of the Xiph.org Foundation nor the names of its contributors may be used to endorse or promote products derived from this
software without specific prior written permission.
This software is provided by the copyright holders and contributors "as is" and any express or implied warr anties, including, but not limited to, the implied
warranties of merchantability and fitness for a particular purpose are disclaimed. In no event shall the foundation or contributors be liable for any direct,
Model D grand piano,
11/26/2008file://C:\acoustica\Pianissimo\flatmanual\pianissimo.htm
Page 2

Page 2 of 19Pianissimo
indirect, incidental, special, exemplary, or consequential damages (including, but not limited to, procurement of substitute goods or services; loss of use,
data, or profits; or business interruption) however caused and on any theory of liability, whether in contract, strict liability, or tort (including negligence or
otherwise) arising in any way out of the use of this software, even if advised of the possibility of such damage.
Quick Start
Pianissimo is simple to use, and will generally function without any setup or configuration. Here are some quick
steps to getting Pianissimo up and running:
If using as a VSTi:
Run your DAW host program (such as Mixcraft). Most host programs (including Mixcraft) will automatically find any
new plug-ins, including Pianissimo. If your host does not automatically locate Pianissimo, search the Preferences
for an option such as "Find New VST Plug-Ins," or consult your owner's manual.
Pianissimo should show up as an available virtual instrument in your DAW.
Select Pianissimo. It may take up to a minute to load Pianissimo's sample data. A Pianissimo loading screen will
display during this time. Once the loading is complete, open the Editor window.
11/26/2008file://C:\acoustica\Pianissimo\flatmanual\pianissimo.htm
Page 3

A
A
Page 3 of 19Pianissimo
ll of Pianissimo's controls will now be available. You can lower and raise the piano lid, adjust the tone controls,
change the reverb amount and type, and more. Use your DAW host to play back a MIDI file, or control the
instrument via your MIDI keyboard controller. You can also click on the virtual keys to play the piano sound. Try
out the different presets, and have fun with it!
For detailed information on Pianissimo's VSTi controls, see Pianissimo Controls.
For information on registering Pianissimo, see Registration.
If using in Stand-Alone mode:
Run Pianissimo, either using the Pianissimo desktop icon, or selecting the Start Menu in Windows and choosing All
Programs->Acoustica Pianissimo->Pianissimo. It may take up to a minute to load Pianissimo's sample data. A
Pianissimo loading screen will display during this time.
By default, Pianissimo in stand-alone mode can be controlled by any MIDI input. It will use your default audio
device (in WaveRT mode for Windows Vista and up, and Wave mode for all versions of Windows prior to Vista).
To adjust your audio device and latency settings, select File->Preferences.
For tips of reducing the latency of your audio device, see Important Sound Setup Information.
Once your sound device is set up, select File->Load Midi File, and select Brahms Rhapsody Demo.mid. Select
OK, and press the large Play button on the toolbar, or select Recording->Play from the main menu. You will hear a
beautifully performed excerpt from Brahms Rhapsody.
ll of Pianissimo's controls will now be available. You can lower and raise the piano lid, adjust the tone controls,
change the reverb amount and type, and more. You can control the instrument via your MIDI keyboard controller.
You can also click on the virtual keys to play the piano sound. Try out the different presets, and have fun with it!
You can then select File->New to begin a new project. Use the Recording button to begin recording, and turn the
metronome on and off with the large Metronome toolbar button. Once you've made a recording, you can save it as
a MIDI file using the File->Save MIDI File command, or save your recording as an MP3 using the File->Mix Down
11/26/2008file://C:\acoustica\Pianissimo\flatmanual\pianissimo.htm
Page 4
Page 4 of 19Pianissimo
To MP3 command.
For detailed information on Pianissimo's stand-alone controls, see Stand-Alone Host Cont rols.
For information on registering Pianissimo, see Registration.
Registration
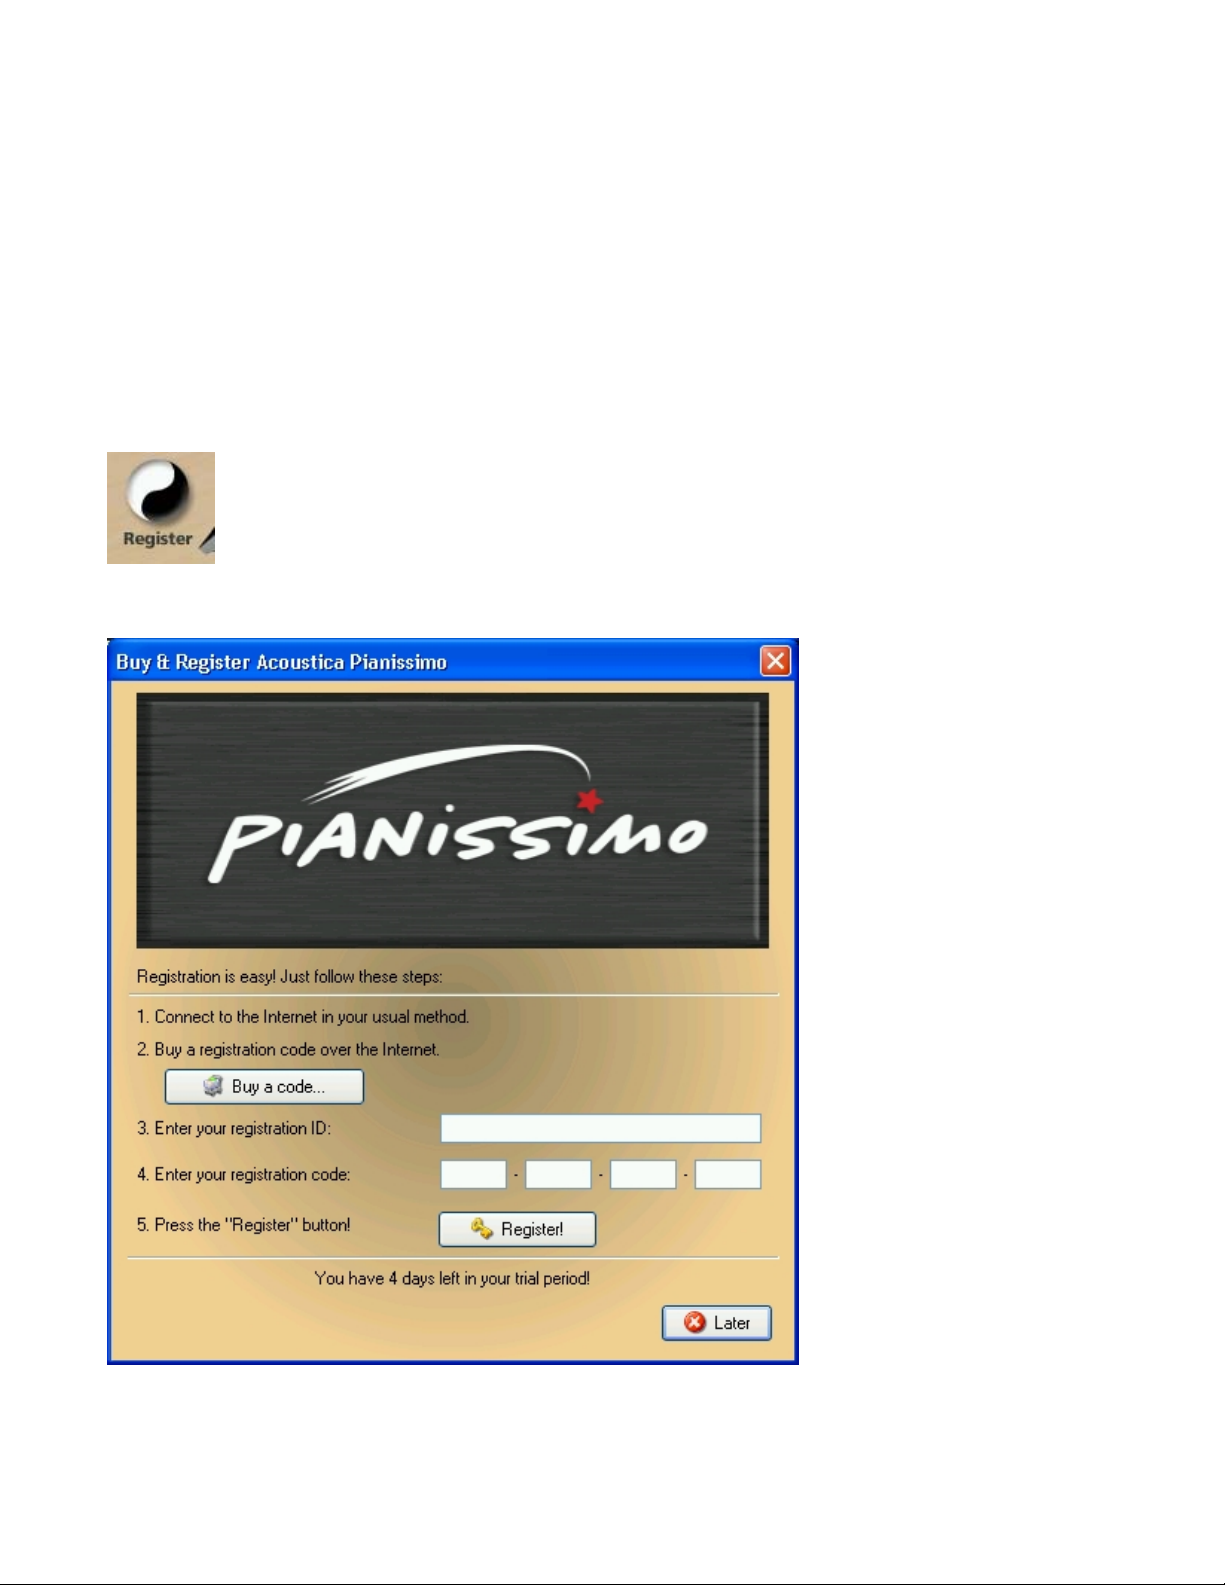
Pianissimo will work for 7 days before it must be registered with a valid ID and registration code. A registration
code can be purchased from our web site, www.acoustica.com/pianissimo
If your version of Pianissimo is unregistered, this Register button will be visible in the upper left hand corner of
Pianissimo:
Pressing this button will bring up the Registration Dialog:
Enter your Registration ID and Registration Code, and press the Register button. If you've entered your ID and
Registration Code properly, Pianissimo will immediately become registered, and the Register button will no longer
be visible.
11/26/2008file://C:\acoustica\Pianissimo\flatmanual\pianissimo.htm
Page 5
Page 5 of 19Pianissimo
If you have any problems registering Pianissimo, please contact Customer Service.
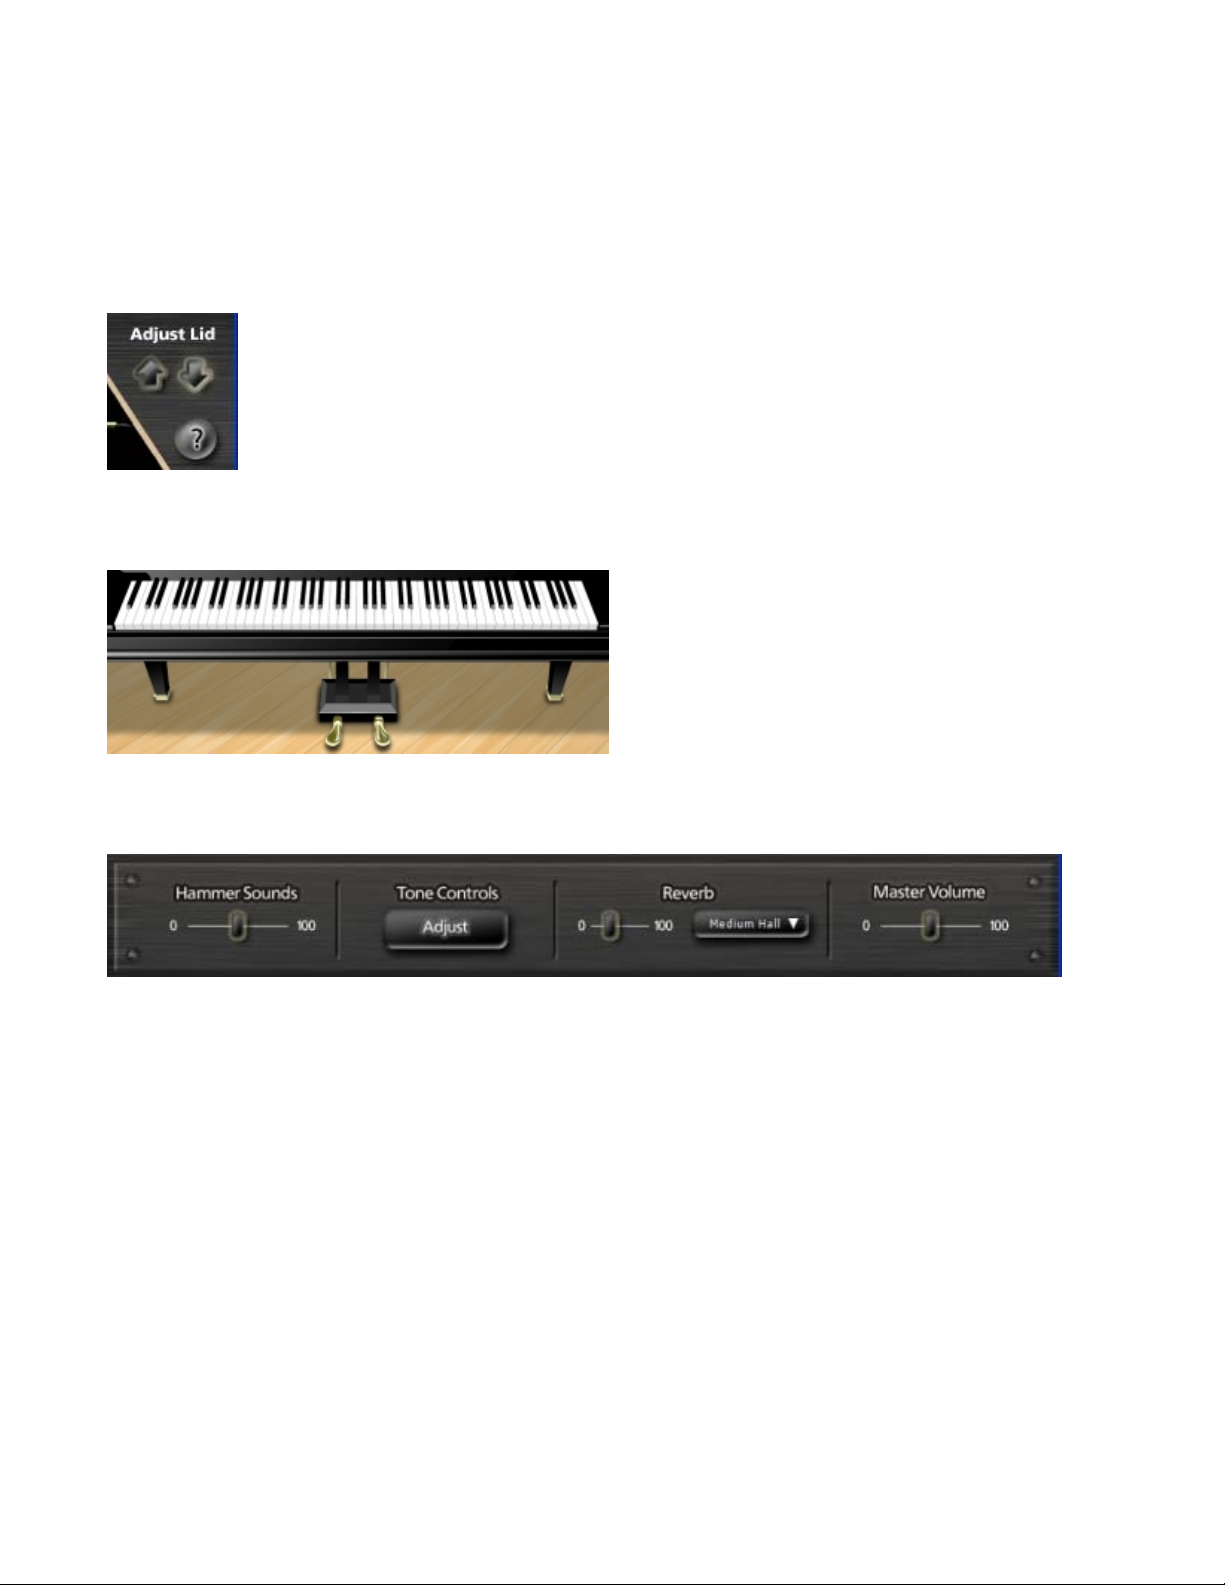
Pianissimo Controls
There are four sections of controls in the Pianissimo window. Click on the section that you are interested in.
Lid Adjustment Controls
Keys and Pedals
Control Panel
11/26/2008file://C:\acoustica\Pianissimo\flatmanual\pianissimo.htm
Page 6
Tone Controls
Lid Adjustment Controls
Page 6 of 19Pianissimo
The Lid Adjustment controls allow you to raise and lower the position of the grand piano's lid. Raising the lid
creates a brighter sound, with crisp high notes. Lowering the lid creates a warmer sound, as the high notes are
muted, emphasizing the bass notes. There are four possible lid positions: fully open, mostly open, partially open,
and closed.
Lid Up Button - Pressing this button raises the lid one position up.
Lid Down Button - Pressing this button lowers the lid one position down.
Help Button - Pressing this button opens this help file.
Keys and Pedals
11/26/2008file://C:\acoustica\Pianissimo\flatmanual\pianissimo.htm
Page 7

Page 7 of 19Pianissimo
Piano Keys - Pianissimo has 88 keys and two pedals. All keys and pedals are controllable via MIDI, and can also
be played via the mouse.
Soft Pedal (left) - The left pedal, or soft pedal, lowers the volume of the piano's notes, allowing you to press the
keys harder while playing a softer sound.
Sustain (Damper) Pedal (right) - The right pedal, or sustain or damper pedal, causes the notes to continue
playing (sustain) after you let go of the keys. While sustained, the notes will continue playing until their sound
decays naturally, or until the sustain pedal is released.
Control Panel
These controls allow you to adjust the most common aspects of Pianissimo's sound. With these controls, you can
set the relative volume of Pianissimo's hammer and mechanical sounds, open the Tone Controls dialog, set the
type and amount of reverb, and customize the master volume of the instrument.
Hammer Sounds Slider - Pianissimo recreates the sound of the incidental mechanical noises that occur within a
piano as you physically press and release the sustain pedal, or release the keys of your keyboard (technically,
escapement noise). These sounds are generally subtle but add to the overall realism of a solo piano recording.
However, in a dense musical mix with other instruments, it may not be desirable to have these subtle noises
audible. This slider allows you to control the amount of audible Hammer Sounds, and has a range of 0 (no
Hammer Sounds) to 100 (very loud Hammer Sounds).
Tone Controls Button - This button launches the Tone Controls box.
Reverb Adjustments - When a grand piano is played in a living room, church, or concert hall, the echoes and
resonance of the room ("reverberation", or "reverb") add a warmth and depth to the sound of the piano. This adds
tremendous realism to the sound of the piano, as it places the sound in a realistic acoustic space. The following
controls allow you to adjust or remove the reverb effect:
z Reverb Amount Slider - This slider controls the amount of reverberation ("reverb") that is heard. This slider
has a range of 0 (no Reverb) to 100 (very loud reverb).
z Reverb Type Dropdown - This control allows you to select the type of reverb. Each reverb type has a different
sonic character. Some types, such as Large Hall, sound very grandiose and full. Some types, such as Bath
Room, add a very subtle room tone to the piano sound. Experiment with different reverb types to recreate your
favorite piano tone. The available types are Medium Hall, Large Hall, Plate, Cathedral, Bath Room, Empty Room,
and Small Room.
Master Volume - This control adjusts the overall volume of the piano sound, including Reverb and Hammer
Sounds. For quiet, gentle playing, you may wish to turn up the overall volume. For loud, heavy playing, you may
wish to lower the piano sound. Note that Pianissimo will seldom ever "clip" or distort, even with very loud playing.
This slider has a range of 0 (no sound) to 100 (very loud sound).
Tone Controls
11/26/2008file://C:\acoustica\Pianissimo\flatmanual\pianissimo.htm
Page 8

Page 8 of 19Pianissimo
The Tone Controls allow you to adjust more detailed aspects of how the piano sounds and performs. These
controls are less typically used, but can effect the tone and realism of Pianissimo's sound.
Velocity Curve Dropdown - This dropdown allows you to change the Velocity Response Curve of Pianissimo.
This affects how loudly the piano responds to your playing and your MIDI controller, and allows you to tailor the
instrument's keyboard response to match your playing style and expectations. The following curves are available:
z Very Light - Suitable for people who play extremely lightly on the keyboard but wish to have the piano response
as though it were being played very forcefully.
z Light - Suitable for people who play lightly on the keyboard but wish to have the piano response as though it
were being played more forcefully.
z Normal - Suitable for most players and most keyboards.
z Heavy - Suitable for people who play heavily on the keyboard but wish to have the piano response as though it
were being played more lightly.
z Very Heavy - Suitable for people who play extremely heavily on the keyboard but wish to have the piano
response as though it were being played very lightly.
Sympathetic Resonance - Sympathetic resonance is a subtle phenomenon that occurs in real pianos when the
sustain pedal is pressed. Normally, when a piano key is not being played, a felt damper presses against that key's
strings, keeping them from vibrating. However, when the sustain pedal is pressed down, those felt dampers are
removed, and all of the strings of the piano are left to freely vibrate. When keys are pressed and notes are played,
other nearby strings, because they are no longer dampened, start to vibrate in sympathy with the strings that have
been played. This causes a slightly fuller piano sound to emerge, as more strings are vibrating (or resonating)
around the ones that were actually played. When the sustain pedal is released, this Sympathetic Resonance
sound is immediately muted.
z Sympathetic Resonance Slider - This slider controls the amount of sympathetic resonance that is heard. This
slider has a range of 0 (no Sympathetic Resonance) to 100 (very loud Sympathetic Resonance).
Chorus Effect - With the exception of some bass notes, most keys in a piano have multiple strings that are struck.
Because these strings are tuned ever-so-slightly out of tune with each other, the resulting mix of tunings creates a
thicker, more animated sound then the sound of a single string vibrating. This sound is intrinsic to the sound of a
piano note, which evolves and changes slightly as it plays. The Chorus Effect in Pianissimo can be used to further
thicken the sound of the piano. At very low levels, this can make the piano sound somewhat fuller and larger. At
medium levels, this can be used to simulate the synthetic "ballad piano" sound heard in many rock ballads from the
1980s, as demonstrated in the 80's Ballad Piano preset. At high levels, this can be used to simulate the out-oftune sound of an old bar piano or honky-tonk piano, as demonstrated in the Noisy Honky Tonk Piano preset.
z Chorus Effect Slider - This slider controls the amount of additional Chorus Effect that is added to Pianissimo,
to thicken the standard piano sound. Note that most users will leave this at the 0 setting, which offers the most
11/26/2008file://C:\acoustica\Pianissimo\flatmanual\pianissimo.htm
Page 9

Page 9 of 19Pianissimo
realistic piano sound. This slider has a range of 0 (no Chorus Effect) to 100 (very rich Chorus Effect).
EQ - Pianissimo offers a built-in three-band equalizer ("EQ") that can be used to increase or decrease the amount
of bass, mid-range, and treble frequencies that are in the piano sound. Sometimes these controls can be used to
simulate the response of a particular piano - i.e. one that is brighter might have more treble frequencies; one that is
darker might have more bass frequencies. Other times, these controls can be used to help the piano fit into a mix
with other instruments. Still other times, these controls may help adjust the piano tone to your particular speakers.
z Bass Slider - This slider increases or decreases the amount of bass frequencies in the piano sound,
approximately all frequencies below 880Hz. Note that most users will leave this at the 100 setting, which offers the
most realistic piano sound. This slider has a range of 0 (no bass frequencies) to 200 (twice as many bass
frequencies).
z Mid Slider - This slider increases or decreases the amount of mid-range frequencies in the piano sound,
approximately all frequencies from 880Hz to 5000Hz. Note that most users will leave this at the 100 setting, which
offers the most realistic piano sound. This slider has a range of 0 (no mid-range frequencies) to 200 (twice as
many mid-range frequencies).
z High Slider - This slider increases or decreases the amount of high frequencies in the piano sound,
approximately all frequencies above 5000Hz. Note that most users will leave this at the 100 setting, which offers
the most realistic piano sound. This slider has a range of 0 (no high frequencies) to 200 (twice as many high
frequencies).
Stand-Alone Host Controls
There are three sections of controls in the Pianissimo window. Click on the section that you are interested in.
Main Menu
Toolbar Controls
Status Bar
Main Menu
The Main Menu gives you direct access to every feature in the Pianissimo Stand-Alone host.
File Menu - This menu gives you access to file-related features, including loading and saving your recording.
z New - This menu option erases your current recordings and returns Pianissimo to its original state.
z Open MIDI File - This menu option allows you to load a Standard MIDI File (Type 0 or Type 1). MIDI files
contain pre-recorded tracks that you can use to play music automatically with Pianissimo. If you select a MIDI file
with more than two tracks, you will see the MIDI Track Import dialog. This dialog allows you to select a Left Hand
and/or a Right Hand track to use from the MIDI file. Many MIDI files contain tracks for drums, bass, and other
instruments which will not sound correct played on the piano, in Pianissimo, so for best results, select only those
11/26/2008file://C:\acoustica\Pianissimo\flatmanual\pianissimo.htm
Page 10

Page 10 of 19Pianissimo
tracks intended as piano tracks:
z Save MIDI File - This menu option will save your current recorded tracks to a MIDI file. This MIDI file will also
contain all of your current Pianissimo settings, such as Lid Position, Reverb Settings, Master Volume, etc. Saving
a MIDI file is equivalent to saving your project - if you load it later, all of your current recordings and Pianissimo
instrument settings will return.
z Mix Down To.. - This menu option allows you to save your recording as a WAV, MP3, WMA, or OGG Vorbis
audio file. Note that the Metronome sound will never be audible in a mixed-down audio file. This powerful feature
allows you to record yourself playing, then generate an MP3 file or other audio file which you can e-mail to your
friends or play on your portable MP3 player. You can also generate an audio file and burn it to CD using your
favorite CD Burning program, such as Acoustica's MP3 CD Burner.
z Preferences - This menu option will take you to the Preferences dialog.
z Exit - This menu option exits Pianissimo.
Recording Menu - This menu gives you access to recording and playback functions.
Pianissimo features an easy-to-use two-track recorder. The two tracks, know as Left Hand and Right Hand, can be
recorded separately and played together for educational purposes, or to help in performing difficult musical pieces.
You can use the Beats Per Minute (tempo) controls to speed up or slow down a recorded track for playback.
Pianissimo also features a metronome, which will follow the Time Signature and Beats Per Minute (tempo)
controls. The metronome only sounds during recording or playback. You can freely turn the metronome on and off
during recording and playback.
z Metronome - This menu option toggles the Metronome on and off.
z Set Tempo and Time Signature... - This menu option brings up the Tempo Dialog:
This dialog allows you to easily enter a precise tempo and time signature.
z Arm For Recording - Left Hand/Right Hand - These menu options set the Left Hand or Right Hand track to
record when the Record toolbar button or menu option is pressed.
11/26/2008file://C:\acoustica\Pianissimo\flatmanual\pianissimo.htm
Page 11

Page 11 of 19Pianissimo
z Mute - Left Hand/Right Hand - These menu options will mute or un-mute either the Left Hand or Right Hand
recorded track. This powerful feature allows you to hear only one track without erasing or recording over the other
track. This can be very useful for educational purposes. For example, an instructor may choose to record the left
and right hand parts of a composition onto separate tracks. Then the student can mute the right hand track to hear
only the left hand part, and practice performing the right hand part alone with the left hand recording, and vice
versa.
z Erase - Left Hand/Right Hand - These menu options will erase the Left Hand or Right Hand recorded track.
z Play - This menu option will begin playback, if a recording has been created or loaded.
z Record - This menu option will begin recording onto the selected Left Hand or Right Hand track.
Preset Menu - This menu allows you to change the current Pianissimo preset. Pianissimo has several presets you
can choose, all of which use the features of Pianissimo to create a range of piano sounds.
Help Menu - This menu gives you access to this help file, registration functions, the about box, and allows you to
check for new software updates.
z Help - This menu option displays this help file.
z Register - If Pianissimo has not yet been registered, this menu option will display Pianissimo's Registration
Dialog.
z Check For Update - If an active Internet connection exists, this menu option will cause Pianissimo will check to
see if a new software version is available. If there is a new version available, you will be given the option to
download and install the new version.
z About - This menu option will display the About Box, with information about the authors of Pianissimo.
Toolbar
The Stand-Alone Host's toolbar allows you to easily control recording, playback, and metronome features.
Pianissimo features an easy-to-use two-track recorder. The two tracks, know as Left Hand and Right Hand, can be
recorded separately and played together for educational purposes, or to help in performing difficult musical pieces.
You can use the Beats Per Minute (tempo) controls to speed up or slow down a recorded track for playback.
Pianissimo also features a metronome, which will follow the Time Signature and Beats Per Minute (tempo)
controls. The metronome only sounds during recording or playback. You can freely turn the metronome on and off
during recording and playback.
Left Hand Button - When pressed, this button lights up the Left Hand. When the Left Hand is lit, this indicates that
pressing the Record button will begin recording a new Left Hand track.
Right Hand Button - When pressed, this button lights up the Right Hand. When the Right Hand is lit, this
indicates that pressing the Record button will begin recording a new Right Hand track.
Record Button - This button immediately starts the recording process. When pressed, this button will change to
the Recording Button. Pressing this button again will stop recording.
Play Button - This button will start playback of your recording. If no recording exists to play back, this button will
be unavailable. When pressed, this button will change to the Stop Button. Pressing this Stop Button will stop
11/26/2008file://C:\acoustica\Pianissimo\flatmanual\pianissimo.htm
Page 12

Page 12 of 19Pianissimo
playback or recording.
Measures and Beats Display - this control displays the current location of playback or recording, in measures and
beats. The numbers is displayed as follows: Measures:Beats. For example, a display of 02:04 is read as
Measure 2, Beat 4.
Metronome Button - This button toggles the metronome on and off. When lit, the metronome is on, and when
dark, the metronome is off. Note that the metronome can only be heard during playback or recording. Pianissimo
includes several sounds for the metronome, including beeps, bass drum, snare drum, hi hat, and rim shot sounds.
The sounds used by the metronome are adjustable in the Preferences Dialog. The metronome will follow the Time
Signature and Beats Per Minute (tempo) controls.
BPM Display and Up/Down Buttons - This control displays the current Beats Per Minute (BPM). A higher
numbers suggests a faster song; a lower number suggests a slower song. You can use the Up and Down buttons
to raise and lower the Beats Per Minute, in order to speed up or slow down your recording and playback tempo.
You can also click on the BPM display to bring up the Tempo Dialog:
This dialog allows you to easily enter a precise tempo and time signature.
Time Signature Display - This control displays the current Time Signature. You can click on the BPM display to
bring up the Tempo Dialog:
This dialog allows you to easily enter a precise tempo and time signature.
Status Bar
The status bar displays information about Pianissimo and your computer.
Midi Input - This light will flash when MIDI data is received from a MIDI device, such as a USB keyboard. This
acts as a helpful problem-solving indicator. If the light does not flash, then no MIDI data is being received by
Pianissimo.
11/26/2008file://C:\acoustica\Pianissimo\flatmanual\pianissimo.htm
Page 13

Page 13 of 19Pianissimo
CPU meter - This displays the percentage of your CPU that is in use at the moment. As this number approaches
100%, Pianissimo will have a difficult time producing clean, uninterrupted audio.
Mixing Status Bar and Cancel Button - These controls are only available when using the Mix Down To.. feature
in the Main Menu. This progress meter will show you the current progress, from 0 to 100%, in creating your audio
file. You can press the Cancel button at any time to cancel the mixing operation.
Preferences Dialog
The Preferences dialog allows you to configure your audio and MIDI hardware, and allows you to select certain
options that control how Pianissimo's Stand-Alone Host operates.
There are five pages in the Preferences Dialog: Sound Device, General, MIDI, Project Defaults, and Metronome.
The function of these five pages is described below.
Sound Device Page
Please read this Important Sound Setup Information.
Driver
You can choose from Wave or ASIO or WaveRT mode. This choice changes the rest of the controls available on
this page. The ASIO option will be unavailable if no ASIO drivers are found on your computer. (WaveRT mode is
only available on Vista.)
Use High Priority Threads For Audio Engine
This will cause all audio mixing sound engine threads to mix at a high system priority. By default, Pianissimo will
mix at high priority.
Default Settings
This button will reset your driver and settings to the default. This will change your settings to the Wave driver at
44,100 Hz, stereo, 16 bits ( 8 buffers @ 16384 bytes).
11/26/2008file://C:\acoustica\Pianissimo\flatmanual\pianissimo.htm
Page 14

Page 14 of 19Pianissimo
General Page
Ask before recording over existing recording
This option will cause Pianissimo to always ask you before you record over an existing recording on a track. This
can help prevent accidentally erasing a desirable recording. It is set to be on by default.
MIDI Page
MIDI Input (Recording Device)
This option allows you to select a specific hardware device to use for controlling Pianissimo. By default it is set to
"All MIDI Devices" meaning any and all MIDI devices available to your computer will operate Pianissimo.
Project Defaults
Author
This option allows you to set a default author, to be written into the author tag of a file you generate using the File>Mix Down To commands.
Copyright
This option allows you to set default copyright information, to be written into the copyright tag of a file you generate
using the File->Mix Down To commands.
Tempo
This option allows you to select a default tempo, to be used when a new project is created in Pianissimo.
Time Signature
This option allows you to select a default time signature, to be used when a new project is created in Pianissimo.
Metronome
The Metronome will pulse along with the measures and beats of playback and recording. It is an invaluable tool for
recording, helping the player perfect their timing and stay true to the tempo of the music even during dynamic
passages. Pianissimo includes several sounds for the metronome, including beeps, bass drum, snare drum, hi
hat, and rim shot sounds. You can use the preferences to change the sounds that are played by the metronome to
better suit your style.
Metronome Sound File (Measure)
This option allows you to select an audio file on your hard drive to be used by the metronome to signal the start of
a new measure.
Metronome Sound File (Beat)
This option allows you to select an audio file on your hard drive to be used by the metronome to signal the start of
a new beat.
Metronome Volume
This slider allows you to control the volume of the metronome heard during playback or recording, if the
metronome is switched on. The range of this slider is 0 (no volume) to 100% (maximum volume).
Important Sound Setup Information
11/26/2008file://C:\acoustica\Pianissimo\flatmanual\pianissimo.htm
Page 15

Y
A
j
Page 15 of 19Pianissimo
When you first start Pianissimo in stand alone mode, you should make sure that the audio latency response is set
up properly. All sound devices and sound cards are not created equal and some have better performance than
others. In addition, your computer's speed will make a difference in audio performance. Adjusting your sound
device's performance will be a balancing act between latency versus gapping or breaks in continuous sound.
If you are recording audio with Pianissimo's built in monitoring or playing virtual instruments, you will definitely need
to adjust your latency response properly.
Choosing An Audio Driver Type
1. Click "Preferences" from the "File" menu.
2. Click on the "Sound Device" tab.
3. For Vista users, the default choice is "WaveRT". If you have a slower computer, you may need to adjust the
latency to a higher value. (1000 milliseconds = 1 second.) WaveRT is recommended if you have Vista. If
"WaveRT" is enabled, click it. (WaveRT stands for Wave Real Time.)
4. If you don't have Vista, the next option is "ASIO". If available, click "ASIO". If it is grayed out, go to your sound
device or sound card manufacturer's website and install the latest drivers. Click on the "ASIO Device" and choose
the sound device or sound card you wish to use. You can adjust the settings of the ASIO device by clicking "Open
Mixer". Each ASIO driver is implemented differently and so you will have to consult the manual or help for your
sound device in order to adjust the latency response. Make sure that the "Default Output (Playback)" is set to the
correct device so that you will hear audio properly.
5. If you don't have Vista or an ASIO option enabled, you have to use the last option "Wave". Click the "Wave"
radio button. To reduce latency, decrease the "Number Of Buffers" and reduce the "Buffer Size". As you adjust
these fields, the "Latency" field will update. You will have to make adjustments, click "OK" and play some audio.
100 milliseconds or less is tolerable. 20 milliseconds or less is preferred.
Computer Speed Consideration
If you have a slower computer, you may need to adjust your latency to be longer in order to avoid gapping or
breaks in the audio. If you are hearing breaks in the audio, you will need to increase your latency. Alternatively,
you may need to purchase a higher performance sound device or sound card designed with music recording and
playback in mind. Changing the latency will depend on what type of audio driver you are using. See the section
above on "Choosing An Audio Driver Type" for more information. Another good speed enhancement is to defragment your hard drive.
Shutting Down Unnecessary Software
When using Pianissimo, shut down unnecessary programs such as email, instant messaging, and your web
browser. Each additional program uses your computer's memory and CPU, and, in many cases, it will cause
performance to suffer in Pianissimo. Check the Window's task manager to see what programs are using a lot of
memory or CPU usage. On XP and Vista, you can bring up the task manager by pressing Ctrl+Alt+Delete. If you
can remember to reactivate your anti-virus software, shut down your anti-virus software while using Pianissimo.
HOWEVER, DON'T FORGET TO TURN YOUR ANTI-VIRUS SOFTWARE BACK ON WHEN YOU ACCESS
OUR EMAIL OR THE INTERNET!
Get The Latest Drivers
lways make sure to have the latest drivers for your sound device in order to get the best performance and quality
in your recordings! Visit the website for your sound device or sound card to install the latest drivers. (Even if you
ust purchased the device, it is very likely that the included drivers are out of date already.)
Wave Preferences
These are the preference options if Wave mode is selected in the Sound Device Preferences.
Tip: Always make sure that you have the latest drivers for your sound device or sound card. Visit your sound
11/26/2008file://C:\acoustica\Pianissimo\flatmanual\pianissimo.htm
Page 16

Page 16 of 19Pianissimo
device or sound card manufacturer's website.
Default Input (Recording)
Choose the default sound device from which to record audio. Please note that on Vista, you may need to make
sure the device is on and plugged in, otherwise it may not show up.
Default Output (Playback)
Choose the sound device from which to play audio. Please note that on Vista, you may need to make sure the
device is on and plugged in to the speakers, otherwise it may not show up.
Sample Rate
Choose a sample rate for both recording and playback. 44100 is the default for CD Quality. Pianissimo supports
sample rates up to 192000, if your sound card supports it.
Bit Depth
This is the number of bits per sample. 16 is the default for CD Quality. Pianissimo supports bit depth of 24 bit for
ultra high quality. Only use 8 bit if you have to (8 bit sounds very noisy).
Number Of Buffers
This is the number of audio buffers to pre-mix before starting playback. The number of buffers will determine the
latency. More buffers lead to higher latency. Fewer buffers lead to lower latency but possible audio gapping.
Buffer Size
The size of the buffer also determines the latency of the software. Larger buffers lead to higher latency. Choosing
different buffer sizes may help the software work better with your sound card or sound device. Smaller buffers lead
to lower latency but also possible audio gapping.
Open Mixer...
This button opens the Window's mixer to allow you to configure the inputs or recording levels for your sound
devices.
ASIO Preferences
These are the preference options if ASIO mode is selected on the Sound Device Preferences. ASIO is an
alternative driver system that allows for lower latency and better synchronization between playback and recording.
Tip: Always make sure that you have the latest drivers for your sound device or sound card. Visit your sound
device or sound card manufacturer's website.
Default Input (Recording)
Choose the default sound input to record audio from. Please note that on Vista, you may need to make sure the
device is on and plugged in, otherwise it may not show up.
Default Output (Playback)
Choose the sound output to play audio from. Please note that on Vista, you need to make sure the device is on
and plugged in to speakers, otherwise it may not show up.
ASIO Device
Choose the default ASIO Device to record from. ASIO only allows for one device at a time.
Open Mixer...
This button opens the ASIO mixer for the ASIO Device and allows you to choose the latency settings and other
more advanced settings. (The ASIO mixer is made by a 3rd party and will look different depending on what type of
sound device you have.)
11/26/2008file://C:\acoustica\Pianissimo\flatmanual\pianissimo.htm
Page 17

A
A
Page 17 of 19Pianissimo
WaveRT Preferences
These are the preference options if WaveRT mode is selected on the Sound Device Preferences. WaveRT stands
for Wave Real Time and is Microsoft's new audio driver layer for Windows Vista only.
Latency
djust the number of milliseconds of latency that you'd like. Lower numbers are better for performance. However,
as you lower the latency, you are also increasing the potential for audio gapping or non-continuous audio.
WaveRT is the preferred driver. Make sure that you have the latest drivers for your sound device. Also, contact
your sound device manufacturer to see if the audio drivers support WaveRT properly.
Troubleshooting
Stand-Alone Pianissimo Host Only
I'm Not Hearing Audio
Sound Is Breaking Up / Popping Or Clicking
Sound Is Delayed Or Lagging (Latency)
Pianissimo Host or VSTi Plug-In
Sympathetic Resonance Is Not Working
I Can't Hear the Hammer Sounds
What Is the Velocity Curve?
I'm Not Hearing Audio
If you click on a piano note and don't hear anything, there are a few things you can check here.
1. Are the speakers on and plugged in? (Sorry, management made us ask.)
2. Is the correct audio device configured? Check the preferences, click the "Audio Device" page and make sure
that the correct default output is chosen.
3. Can you choose a different audio driver type such as WaveRT (Vista only), ASIO or Wave? Go into your
Preferences from the File menu and select the "Audio Device" page. Click ASIO, WaveRT or Wave. Configure the
newly selected driver with the correct default ouput and driver.
4. Load the volume control that came with your sound card and make sure that the Wave device is turned up and
not muted.
5. Can you play an audio file through Windows or another sound application? If you can't there may be a problem
with your sound card's configuration or drivers. Refer to your sound card documentation to try to figure out what is
wrong.
6. Update or install your sound card's drivers. Check their website for the latest drivers and documentation.
lso, see the important sound setup page.
Sound Is Breaking Up / Popping Or Clicking
When playing audio and it sounds like it is starting and stopping quickly, it could be because the computer is over
11/26/2008file://C:\acoustica\Pianissimo\flatmanual\pianissimo.htm
Page 18

A
A
A
A
A
Page 18 of 19Pianissimo
tasked due to other programs running at the same time. In addition, your computer may not be powerful enough to
mix the audio. Always shut down as many unnecessary programs as possible. It may even be advantageous to
temporarily shut down your virus software. (We do not recommend doing this unless you have done a full scan
and are not connected to the Internet.)
Pianissimo has to work harder as it mixes more notes.
Try increasing the buffer size or the number of buffers in the Sound Device Preferences if your are in Wave mode.
If you are in ASIO mode, try a different ASIO driver or go into the ASIO driver's mixer and increase the latency. If
you are in WaveRT mode, try increasing the latency time.
lways make sure that you have the latest drivers for your sound card. Visit your sound card manufacturer's
website to see if there is an update.
lso, see the important sound setup page.
Sound Is Delayed Or Lagging (Latency)
The opposite problem of sound breaking up or gapping is that the sound will be delayed and have a latency from
the time a note is played to the time you hear it. The solution to latency depends on the type of audio drivers you
are using.
Reducing Latency Using Wave drivers
Go to the Preferences, click "Sound Device" followed by clicking "Wave". Reduce the number of buffers and/or
buffer size. Try different settings to try and find the right balance between performance and smooth non-gapping
audio. The latency will be shown in milliseconds.
Reducing Latency Using ASIO
Go to the Preferences, click "Sound Device" followed by clicking "ASIO". Click the Open Mixer... button. Use your
SIO driver control to configure the latency. Usually, you will have some way to set the latency in terms of
milliseconds. If possible, choose 10 milliseconds. 40-80 milliseconds is also tolerable.
Reducing Latency Using WaveRT
Go to the Preferences, click "Sound Device" followed by clicking "WaveRT". and select a lower latency time.
(WaveRT is only available on Vista or higher.)
lways make sure that you have the latest drivers for your sound card. Visit your sound card manufacturer's
website to see if there is an update.
lso, see the important sound setup page.
Sympathetic Resonance Is Not Working
Sympathetic resonance is a subtle phenomenon that occurs in real pianos when the sustain pedal is pressed.
Normally, when a piano key is not being played, a felt damper presses against that key's strings, keeping them
from vibrating. However, when the sustain pedal is pressed down, those felt dampers are removed, and all of the
strings of the piano are left to freely vibrate. When keys are pressed and notes are played, other nearby strings,
because they are no longer dampened, start to vibrate in sympathy with the strings that have been played. This
causes a slightly fuller piano sound to emerge, as more strings are vibrating (or resonating) around the ones that
were actually played. When the sustain pedal is released, this Sympathetic Re sona nce sound is immediately
muted.
Sympathetic resonance is a very subtle effect, and it's only audible under certain circumstances. Sympaethic
resonance adds a subtle shimmer to the sound of notes when the sustain pedal is held down. If you press several
keys, then press the sustain pedal, you may hear the subtle shimmer of sympathetic resonance fade into the
sound. When you release the pedal, it will fade away.
11/26/2008file://C:\acoustica\Pianissimo\flatmanual\pianissimo.htm
Page 19

Page 19 of 19Pianissimo
If you cannot hear this effect, try turning the sympathetic resonance control all the way up. You can find this
adjustment on the Tone Controls page. Once the control is all the way up, press several keys on the keyboard,
then press the sustain pedal. You should be able to hear the sympathetic resonance effect fade in. Now, dial back
the amount until it is barely audible. This is a good approximation of the level of this effect in a real grand piano.
If you don't like the way it sounds, set the sympathic resonance amount to zero.
I Can't Hear the Hammer Sounds
Hammer sounds are trigger when you press the sustain pedal, release the sustain pedal, or release a key. These
sounds are designed to be relatively quiet, so that they do not get in the way of your piano's notes. However, as in
a real grand piano, they are part of the mechanics of the piano and add a wonderful degree of realism to a solo
piano recording.
If you cannot hear the hammer sounds, try turning the hammer sounds control all the way up. You can find this
adjustment on Pianissimo's Control Panel. Once the control is all the way up, press and release the sustain pedal.
You should be able to hear the sound of the dampers moving off and on the strings. Now, dial back the amount
until the hammer sounds are barely audible. This is a good approximation of the level of this effect in a real grand
piano.
If you don't like the way it sounds, set the Hammer Sounds amount to zero.
What Is the Velocity Curve?
When you're using a USB or MIDI keyboard controller, or playing back a MIDI file, you may find that Pianissimo
doesn't respond quite the way you want it to. Pressing a key lightly may sound too quiet, and pressing a key too
hard may sound too loud. You can use the Velocity Curve adjustment to change the way Pianissimo responds to
your key presses. There are 5 velocity curves available:
Very Light: Select this curve if you play the piano keys very lightly, but wish for the piano to respond as though
you were playing them harder. This extreme setting is generally not useful to most players.
Light: Select this curve if you play the piano keys lightly, but wish for the piano to respond as though you were
playing them a little harder.
Normal: This is Pianissimo's normal velocity curve.
Heavy: Select this curve if you play the piano keys heavily, but wish for the piano to respond as though you were
playing them a little lighter.
Very Heavy: Select this curve if you play the piano keys very heavily, but wish for the piano to respond as though
you were playing them a lighter. This extreme setting is generally not useful to most players.
11/26/2008file://C:\acoustica\Pianissimo\flatmanual\pianissimo.htm
 Loading...