


USER MANUAL

ii

TABLE OF CONTENTS |
|
Mixcraft Home Studio 7 Limitations.. . . . . . . . . . . . . . . . . . . . . . . . . . . . . . . . . . |
1 |
Important Sound Setup Information .. . . . . . . . . . . . . . . . . . . . . . . . . . . . . . |
. . .3 |
Quick Start........................................................ |
7 |
Registration...................................................... |
17 |
Mixcraft Reference. . . . . . . . . . . . . . . . . . . . . . . . . . . . . . . . . . . . . . . . . . . . . . . . |
19 |
Sound Tab.. . . . . . . . . . . . . . . . . . . . . . . . . . . . . . . . . . . . . . . . . . . . . . . . . . . . . |
. 69 |
Virtual Instrument (MIDI) Clips.. .. .. .. .. .. .. .. .. .. .. .. .. .. .. .. .. .. .. .. .. .. .. .. .. .. .. .. .. .. .. .. .. .. .. .. .. ..87 |
|
MIDI Basics.. . . . . . . . . . . . . . . . . . . . . . . . . . . . . . . . . . . . . . . . . . . . . . . . . . . . |
. 113 |
Project Tab...................................................... |
117 |
Recording Audio. . . . . . . . . . . . . . . . . . . . . . . . . . . . . . . . . . . . . . . . . . . . . . . . . |
119 |
Loop and Sound Effects Library.. . . . . . . . . . . . . . . . . . . . . . . . . . . . . . . . . . |
. 127 |
Performance Panel .. . . . . . . . . . . . . . . . . . . . . . . . . . . . . . . . . . . . . . . . . . . . . |
. 141 |
Audio Mixer.. . . . . . . . . . . . . . . . . . . . . . . . . . . . . . . . . . . . . . . . . . . . . . . . . . . . . |
151 |
Video .. . . . . . . . . . . . . . . . . . . . . . . . . . . . . . . . . . . . . . . . . . . . . . . . . . . . . . . . . |
. 155 |
Loading and Saving Projects.. . . . . . . . . . . . . . . . . . . . . . . . . . . . . . . . . . . . . . |
183 |
Exploring The Main Window. . . . . . . . . . . . . . . . . . . . . . . . . . . . . . . . . . . . . . . |
189 |
Mixing Down To Audio and Video Files .. . . . . . . . . . . . . . . . . . . . . . . . . . . . |
.201 |
Burning Audio CD’s.. . . . . . . . . . . . . . . . . . . . . . . . . . . . . . . . . . . . . . . . . . . . . |
205 |
Markers .. . . . . . . . . . . . . . . . . . . . . . . . . . . . . . . . . . . . . . . . . . . . . . . . . . . . . . . |
209 |
Effects.. . . . . . . . . . . . . . . . . . . . . . . . . . . . . . . . . . . . . . . . . . . . . . . . . . . . . . . . |
. 217 |
Included Effects.. . . . . . . . . . . . . . . . . . . . . . . . . . . . . . . . . . . . . . . . . . . . . . . . |
225 |
Virtual Instruments .. .. .. .. .. .. .. .. .. .. .. .. .. .. .. .. .. .. .. .. .. .. .. .. .. .. .. .. .. .. .. .. .. .. .. .. .. .. .. .. .. .. .. .. .. |
259 |
iii

Included Virtual Instruments.. . . . . . . . . . . . . . . . . . . . . . . . . . . . . . . . . . . . . . |
271 |
Alpha Sampler .. . . . . . . . . . . . . . . . . . . . . . . . . . . . . . . . . . . . . . . . . . . . . . . . . |
283 |
Omni Sampler. . . . . . . . . . . . . . . . . . . . . . . . . . . . . . . . . . . . . . . . . . . . . . . . . . |
289 |
Plug-In Management. . . . . . . . . . . . . . . . . . . . . . . . . . . . . . . . . . . . . . . . . . . . . |
297 |
Using Natively Supported Control Surfaces.. . . . . . . . . . . . . . . . . . . . . . . . |
.301 |
Using Generic MIDI Controllers and Control Surfaces. . . . . . . . . . . . . . . . |
309 |
Musical Typing Keyboard.. . . . . . . . . . . . . . . . . . . . . . . . . . . . . . . . . . . . . . . . |
. 315 |
Preferences. . . . . . . . . . . . . . . . . . . . . . . . . . . . . . . . . . . . . . . . . . . . . . . . . . . . . |
319 |
Main Window Menus.. . . . . . . . . . . . . . . . . . . . . . . . . . . . . . . . . . . . . . . . . . . . |
333 |
Keyboard Shortcuts. . . . . . . . . . . . . . . . . . . . . . . . . . . . . . . . . . . . . . . . . . . . . |
345 |
Cursors. . . . . . . . . . . . . . . . . . . . . . . . . . . . . . . . . . . . . . . . . . . . . . . . . . . . . . . . |
353 |
Troubleshooting.. . . . . . . . . . . . . . . . . . . . . . . . . . . . . . . . . . . . . . . . . . . . . . . . . |
357 |
Glossary. . . . . . . . . . . . . . . . . . . . . . . . . . . . . . . . . . . . . . . . . . . . . . . . . . . . . . . |
370 |
iv

GETTING STARTED
Welcome to Mixcraft 7, a powerful recording DAW software offering the tools and performance power to create professional music and video projects... easily!
ABOUT THE MANUAL
This manual was written to provide a basic walkthrough of some of the steps that an artist may encounter when using Mixcraft. This manual provides a range of step-by-step instructions and explanations of features in the software. We'll also throw in some helpful tips from time to time.
CHECKING FOR UPDATES
Acoustica periodically provides updates to software. You can easily obtain these updates through Acoustica's website,with an active Internet connection. To check for updates, go to the Help menu at the top of the screen and choose Check For Update...
ADDITIONAL HELP
We've made a heck of an effort to include as much Mixcraft 7 information as possible in this manual, but if you get stumped, contact Acoustica tech support online at www.acoustica.com and click the Support link.
Mixcraft also has a lively online forum with tons of useful archived information and support not only from the Acoustica tech support staff, but seasoned Mixcraft users as well. Find it at www.acoustica.com, click Support, then Discussion Boards.
Welcome to the Acoustica family... we hope you'll enjoy Mixcraft 7 and make some great music (and video) along the way!
v

vi

MIXCRAFT HOME STUDIO 7 LIMITATIONS
Mixcraft is available in three different versions: Mixcraft Home Studio 7, Mixcraft 7, and Mixcraft Pro Studio 7. In order to bring Mixcraft Home Studio 7 to you at such an affordable price point, it sacrifices some features compared with its big brothers. Below is a summary of its reduced feature set:
Feature |
Limits |
Tracks |
16 total Audio and Instrument tracks |
Performance Panel |
8 sets |
Automation |
Pan/Volume only |
Loops |
2000+ Loops, no Sound FX or Sample Libraries |
Virtual Instruments |
Acoustica Instruments, Impulse, Messiah, |
|
MiniMogueVA, VB3 Organ |
Effect Plug-ins |
Acoustica Chorus, Acoustica Compressor, |
|
Acoustica Delay, Acoustica Distortion, |
|
Acoustica EQ, Acoustica Flanger, Acoustica |
|
Reverb, Classic Auto-Filter, Classic Chorus, |
|
Classic Compressor, Classic Delay, Classic |
|
EQ, Classic Flanger, Classic Master Limiter, |
|
Classic Phaser, Classic Reverb, EZQ Equalizer, |
|
GTune Guitar Tuner, Voxengo Amp Simulator, |
|
Voxengo Spectrum Analyzer |
Samplers |
Alpha Sampler |
|
(does not include Omni Sampler) |
Submix, Send, and Output Tracks |
No |
Mixdown Formats |
WAV, WMA, OGG, WMV, AVI. Does not |
|
include MP3 mixdown. |
CD Burning |
No |
MIDI/Audio FX Routing |
No |
ReWire Hosting |
No |
Import To Library |
No |
1

2
IMPORTANT SOUND SETUP INFORMATION
When Mixcraft is first launched, it’s important to ensure that the audio latency is set optimally. Ideally, using a very low latency setting is best, as it results in little or no audible delay when playing virtual instruments or recording using software monitoring.
Your computer’s processor speed and amount of RAM, as well as your audio system or sound card all affect audio playback and recording performance. Optimally adjusting your sound device will be a balancing act between latency versus gapping or breaks in continuous sound. If you are recording audio using Mixcraft’s built-in monitoring or playing virtual instruments, you’ll need to adjust your latency response properly.
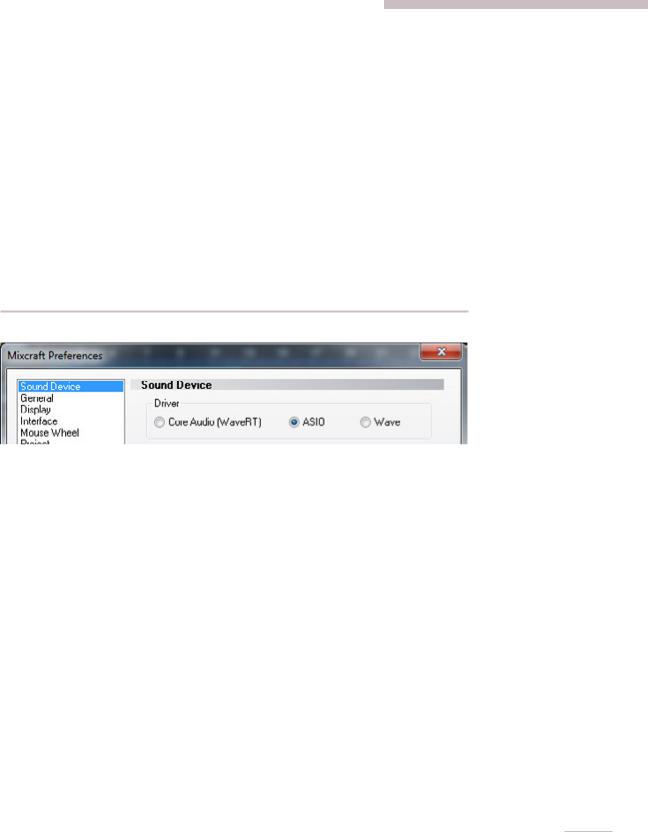
CHOOSING AN AUDIO DRIVER TYPE
1.Click File> Preferences...
2.Click on the Sound Device tab.
3.Wave RT was introduced in Windows Vista and is part of every newer version of Windows; this the default audio driver. If you have a slower computer, you may need to increase the latency setting.
4.If you’re using Windows 7 or 8, you may be able to click WaveRT Exclusive Mode. Depending on your computer’s speed and power, this mode will allow down to three milliseconds of latency. In this mode, other programs will lose audio capability when Mixcraft is running. You may need to restart other programs to get their audio back. WaveRT exclusive mode is the best way to use every last ounce of computing power.
5.If you don’t have WaveRT, the next best option is ASIO. If it’s grayed out, go to your sound device or sound card manufacturer’s website and install the latest drivers. Click on the ASIO Device flip menu and choose the sound device or sound card you wish to use. You can adjust the settings of the ASIO device by clicking “Open Mixer.” Each ASIO driver is implemented differently; consult the manual or help for your sound device in order to optimize the latency setting. Ensure that Default Output (Playback) is set to the correct device so you’ll hear audio properly.
3

Right On Track
You may notice that Mixcraft won’t allow you to drop the loop on a track with a little keyboard icon; that’s because these are MIDI tracks. Make sure to drag audio loops to audio tracks, i.e. tracks with a little speaker icon. Mixcraft actually has a number of different track types optimized for
different purposes, but while we’re in “quick startville,” we’ll just concern ourselves with Audio Tracks, that play digitized audio, and MIDI Tracks, that play note on/off messages.
6.If you don’t have Vista or an ASIO option enabled, select Wave. To reduce latency, decrease the Number Of Buffers and reduce the Buffer Size. The Latency field will update – this will entail a bit of trial and error as adjustments are made. Click OK, then check the quality of audio playback. A setting of 100 milliseconds or less is tolerable; lower settings of 20 milliseconds or less are preferred.
QUICK GLANCE CHART
Type |
Windows Version |
Notes |
WaveRT |
Windows 7,8 |
The default option. Latency |
|
and Vista |
down to 20 milliseconds. |
WaveRT EXCLUSIVE |
Windows 7,8 |
Takes over the computer's |
|
|
audio, but will work down to |
|
|
three milliseconds of latency. |
|
|
This option is available when |
|
|
WaveRT is selected. Audio from |
|
|
other programs and Windows |
|
|
will not work at the same time |
|
|
that you are in this mode. |
ASIO |
XP, Vista, Win 7, |
Best for playback and recording |
|
Win 8 |
synchronization. Must have a |
|
|
supported ASIO driver for your |
|
|
sound device. |
Wave |
XP, Vista, Win 7, |
Only use if absolutely necessary. |
|
Win 8 |
|
COMPUTER SPEED CONSIDERATION
If you have a slower computer and experience audible breaks in audio recording or playback, you may need to increase the latency setting. Alternatively, you may need to purchase a higher performance sound card or audio system designed with music recording and playback in mind. Changing the latency will depend on what type of audio driver is being used. See the Choosing An Audio Driver Type section above for more information. Another effective speed enhancement is to defragment your hard drive, or purchase a new hard drive. (Old hard drives can get slow with age.)
Notice the CPU meter on the lower right corner of Mixcraft.
This indicates the amount of CPU resources used by Mixcraft compared to the entire computer’s CPU usage.
4
5

6

QUICK START
We know what you’re thinking … “I don’t wanna read this big ol’ manual now, I wanna rock!” (or thereabouts). Don’t worry, we’ve got ya covered. In this section, we’ll show how to play audio clips from Mixcraft’s huge included library, record audio and MIDI tracks, and add effects.
LOAD AND PLAY AN AUDIO CLIP
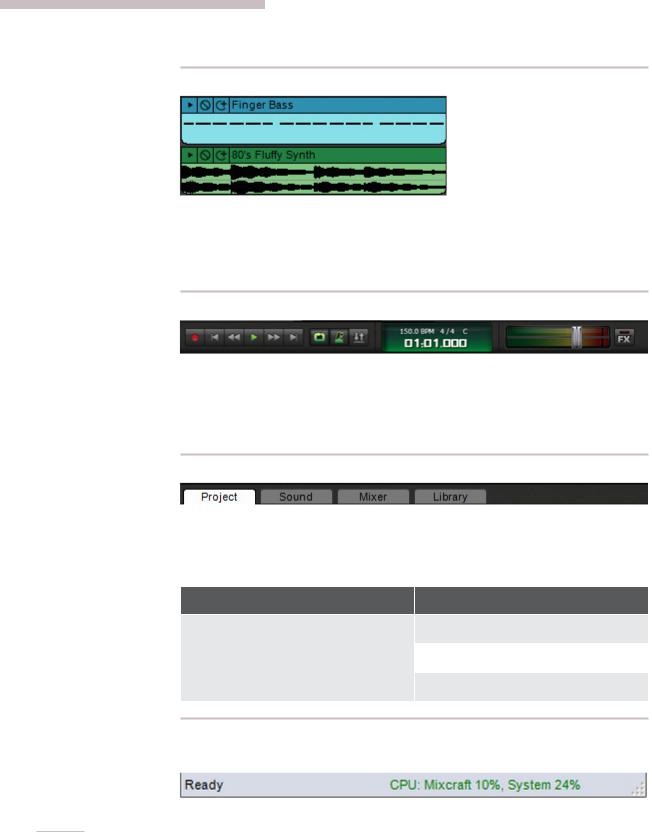
To launch Mixcraft, double-click the Mixcraft 7 icon on the desktop. We’ll begin by dragging an audio clip of a bass line into the Main Window – that’s the big gray grid where clips of audio, MIDI, and video playback.
Click the Library tab at the bottom of the arrange window, then click the Sort By pop-up menu and select Song Kit. You’ll see a list of song styles below; select 12-8 Blues. In the list of loops on the right, you’ll see Bass 12 Bars. Click and drag this to bar 1 of Audio Track in the empty gray grid beneath the word Start. While hovering a loop over the grid in the Track View window, you’ll notice two tiny white triangles; this is called the Caret.
The Caret shows where clips will land when the mouse button is released. It also indicates where playback or recording will begin. Once you’ve dropped the audio into place, a dialog box will open and ask: “Use Best Sounding Project Tempo, Key & Time Signature?” We’ll explain exactly what this means later on, but for now, click Yes.
Once you’ve dropped a loop into the main grid, it creates a “Clip.” Clips are the rectangular audio, MIDI, or video “building blocks” in the main grid that make up a project.
7
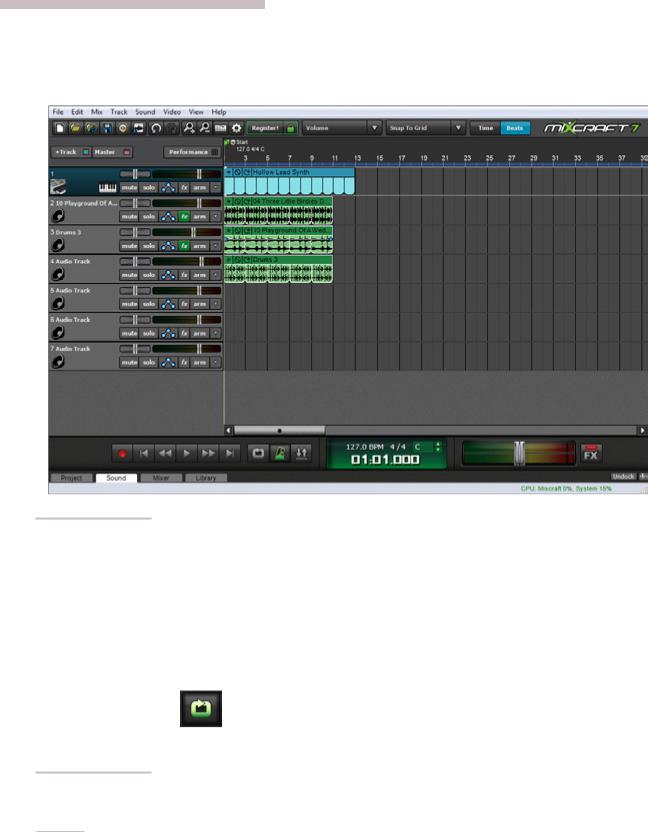
The Main Grid window should look something like this:
Jargon Alert: The “>” Sign
Throughout this manual, when you see something like
+Track>Insert Audio, the “>” sign usually refers to a sequence
of actions. Think about it as a shorthand way of us saying,
“click this>then this> then this.”
Click the green play arrow button in the transport section to hear the bass clip play; click a second time to stop playback, or press the space bar to start or stop playback. If the clip begins playing somewhere in the middle, click the mouse near the number 1 in the timeline (the numbered line at the top of the Main Grid window). This will relocate the Caret, thereby changing the playback start.
Try dragging different types of loops into the Main Grid on separate audio tracks. Mixcraft will automatically match tempo and key signature, making it super easy to create music! If you run out of audio tracks, create more by clicking +Track>Insert Audio track at the top of the Track List.
If you’d like a section to loop during playback, drag the mouse in the timeline at the top to create a purple highlight area, then click the Loop button in the transport area. The button will turn green to show that loop mode is active. Click it again to turn off looping. (Pressing the L button will also toggle looping.)
8
RECORDING AN AUDIO TRACK
Select a blank audio track in the Track List at the left side of the screen. Existing blank audio tracks will already be named Audio Track and have a little speaker icon beneath the name (we told you this would be easy!). If there aren’t any blank audio tracks in the Track List, create new ones by clicking the +Track button at the top of the Track List and selecting Insert Audio Track.
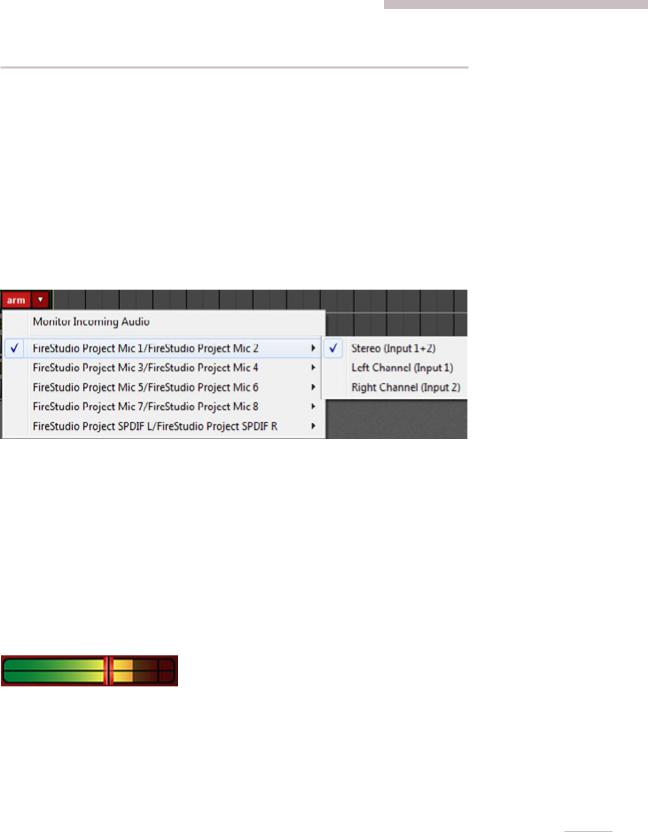
Click on the audio track you’d like to record on; the track will highlight in green. Now choose the recording input source by clicking the down arrow to the right of the Arm button. Depending on your audio hardware, this list may appear differently, but the idea is to select the hardware input you’ll be plugging a mic or instrument into. In the example below, we’ve chosen the left channel (i.e. input 1) of a two-channel audio device.
If you’re recording a mono signal, click the sound device followed by Left or Right depending on where you’ve plugged into the audio device. If you’re recording in stereo with simultaneous left and right inputs, select Stereo. Pay close attention to this setting, because it’s easy to accidentally record mono input sources (e.g., lead vocals, bass guitar, etc.) as a stereo file if you’ve set this incorrectly. It won’t hurt anything, but you’ll unnecessarily waste hard drive space.
After selecting the input, click the track’s Arm button. The Arm button will turn red, letting you know Mixcraft is ready to record. Now send some audio through the input to verify that the correct input was chosen. You should see the meters moving onscreen on the recording track.
When a track is armed, the volume slider turns into a red recording input level adjuster. Move the slider to adjust the recording input level. If peaks send the meter into the red, back off the level. Ideally, the input signal should nominally sit in the green-to-yellow area.
9

Important Note: If you’re using an audio device with an ASIO driver (you can check in File>Preferences>Sound Device), the volume slider will disappear when the track is armed for recording. This is because ASIO recording drivers do not support input level adjustment in software. To set the proper recording input level, you’ll need to use either the input level on your audio hardware, or if it doesn’t have one, you’ll most likely want to set the recording level using the output level control on an external preamp or channel strip.
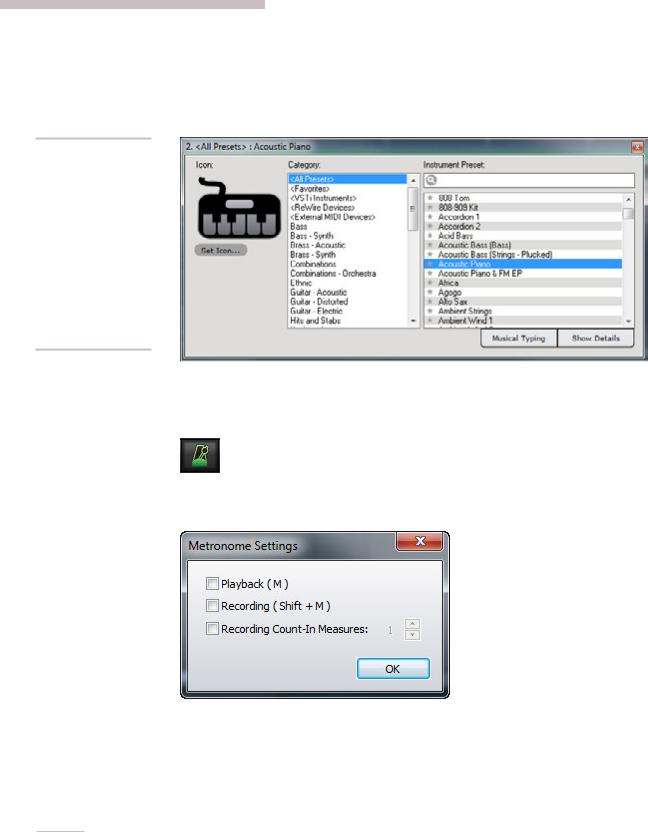
In order to record in time with a project’s tempo, you’ll most likely want to record with a metronome. To turn on the metronome, click the metronome button in the middle of the transport. It looks like, well, a metronome.
The dialog below opens:
Check the Recording box. This means the metronome will click during recording. Checking the Playback box makes it click during playback, but we can leave this off for now. If it’s not already checked, check the Recording Count-In Measures box. Upon pressing the Record button, this gives a “countdown” before recording begins. The number selector lets you choose the length of the countdown – 1 bar usually provides enough time. Hit OK when you’re done. Once you’ve configured the metronome,
you can quickly toggle it on and off by pressing the M key on the computer keyboard.
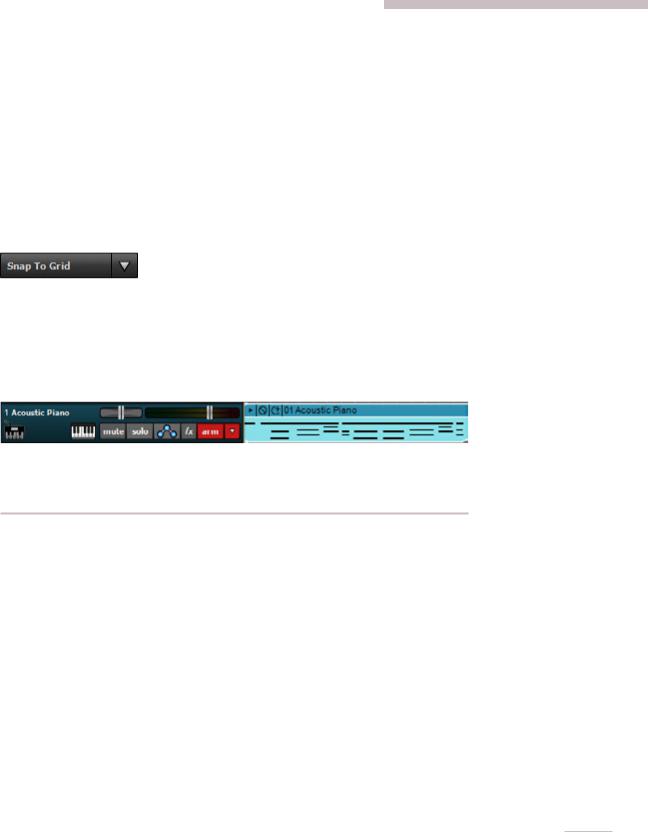
Almost there! Let Mixcraft know where to begin recording by positioning the Caret in the grid. This can be done by either clicking in the timeline at the top of the main window, or by clicking anywhere in the Main Grid. We recommend positioning the Caret on an exact number in the timeline (e.g., 1, 2, 3). Setting the Snap To setting at the top of the screen to Snap To Grid will simplify positioning the Caret.
Now it’s time to grab that microphone or guitar, and let it rip. If you want to monitor the recording source during recording, click the little speaker icon (left of the Mute button).
10
Here we go. click the red Record button in the transport (the one with the red dot), wait four clicks for recording to begin and record something! When you’re done, click the Record button again to stop (you’ll notice the red circle turns into a square
while recording), or just hit your computer’s space bar. It should look something like this:
Congratulations, you’ve made your first Mixcraft audio recording!
RECORDING A MIDI TRACK
Unlike an Audio Clip, which contains digital sound data, a MIDI Clip contains MIDI notes. Think of a MIDI Clips as a sort of computerized player piano ... a MIDI Clip primarily contains digital on/off messages saying, “hey computer instrument, play these notes at this time, wouldja?”
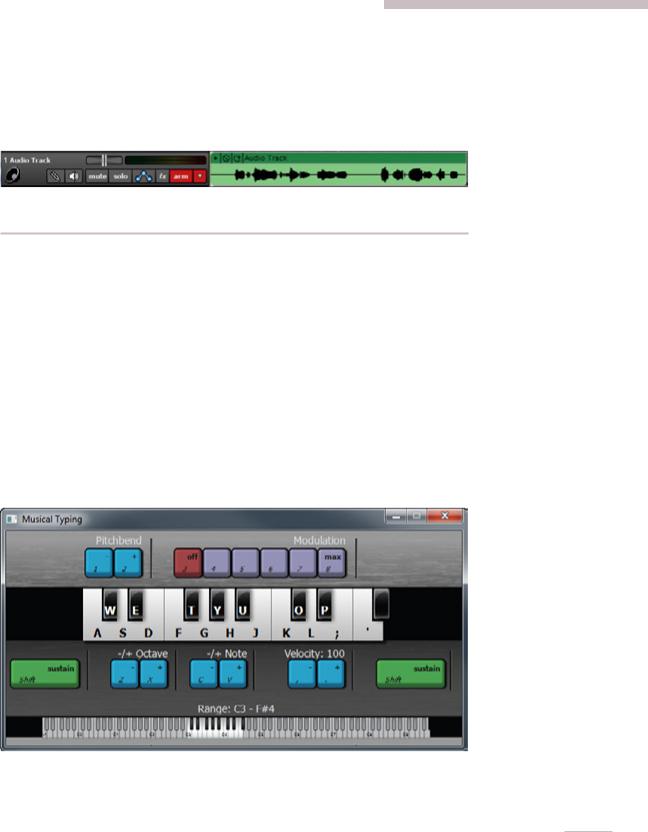
There are a number of ways to create MIDI clips, but the most common way is to plug in a USB MIDI controller keyboard, press the Record button, and tickle the ivories (plastics?). If you have a USB MIDI controller, plug it into an available USB port on your computer. If you don’t have a USB keyboard controller, you can input notes direct from the computer’s keyboard using Musical Typing. This can be toggled on and off by going to the View menu at the top and selecting Musical Typing, or by using the key shortcut CTRL+ALT+K. Musical typing uses the computer’s QWERTY keyboard to play musical notes. When activated, the layout shows the “mini music keyboard,” octave, transpose, velocity, and other relevant parameters:
Now that we’re playing some kind of keyboard, we’ll select one of Mixcraft’s built-in Virtual Instruments. A Virtual Instrument is like having keyboard instrument that lives inside the computer. Handy, right?
11
There’s Already
A Piano, Man
New MIDI Tracks default to an acoustic piano sound, so you really don’t need to select an instrument to play MIDI notes, but we thought you might want to know so you wouldn’t be stuck with all piano, all the time!
First, create a new virtual instrument track. Click the +Track button at the top left, and select Insert Virtual Instrument Track. Now click the track’s piano keyboard icon. This opens a dialog box where instruments can be selected:
We’ll go with our old friend “Acoustic Piano,” but feel free to scroll through the list and choose something saucy such as “Space Walk.” When you’ve made your selection, click on the red X in the upper right corner.
Before we record a MIDI performance, let’s turn on Mixcraft’s metronome. This lets you play in time with the project’s tempo. To turn on the metronome, click the metronome button in the middle of the transport:
The dialog below opens:
Check the Recording box. This means the metronome will click during recording. Checking the Playback box makes it click during playback, but we can leave this off for now. If it’s not already checked, check the Recording Count-In Measures box. Upon pressing the Record button, this gives a “countdown” before recording begins. The number selector lets you choose the length of the countdown. Unless your computer
12
and MIDI keyboard are really far away from each other, choosing 1 bar should give you plenty of time to get those fingers poised. Hit OK when you’re done. Once you’ve configured when the metronome plays, you can quickly toggle it on and off by pressing the M key on the computer keyboard.
We’re almost there! Let Mixcraft know where to begin recording by positioning the Caret in the grid. This can be done by either clicking in the timeline at the top of the main window, or by clicking anywhere in the Main Grid. We recommend positioning the Caret exactly on a number (e.g., 1, 2, 3). To simplify positioning the Caret, make sure Snap To Grid is selected in the Snap To menu at the top of the screen.
Make sure the track is armed for recording – if it’s not red, click on it. Now click the red Record button in the transport (that’s the one with the red dot), wait four clicks for recording to begin, and lay down the rock. When you’re done, click the Record button again to stop (you’ll notice the red circle turns into a square while recording), or just hit your computer’s space bar. You should have something like this:
To create more MIDI tracks, select empty tracks in the Track List on the left of the screen and add more instruments as described above.
ADDING AN EFFECT TO AN AUDIO CLIP OR VIRTUAL INSTRUMENT TRACK
Mixcraft includes a large suite of real-time audio effects that can be applied to audio clips or virtual instruments. These are usually referred to as “plug-ins.”
To add a plug-in effect, click on an Audio Track or Virtual Instrument track (if it’s an audio track, make sure it has associated audio clips in the grid). Now click the track’s fx button.
The fx button will turn green and following dialog window opens. Click <Select An Effect>. A drop-down menu will display a whole gaggle of effects; choose one that sounds fun. For this example, we’lI choose Acoustica Delay.
13
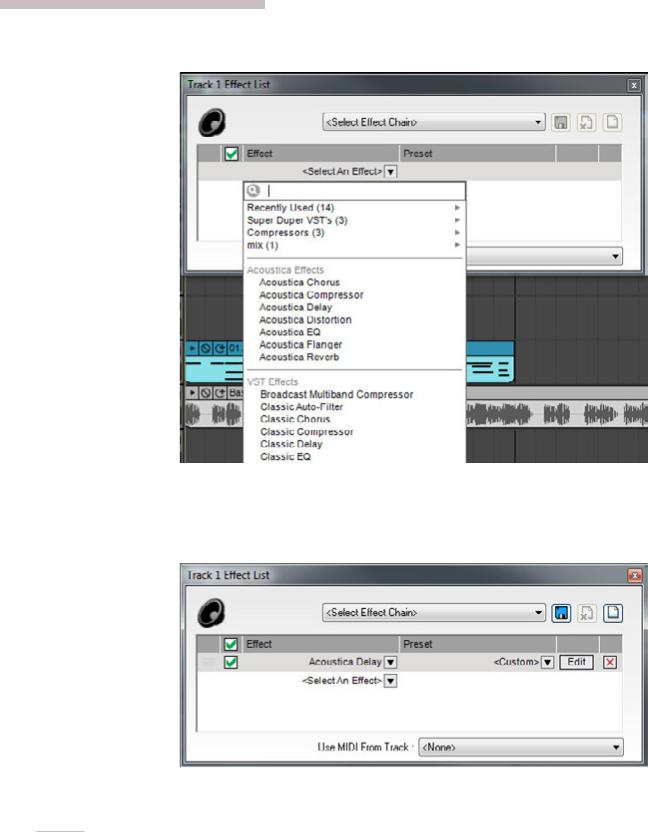
At this point, you could just click the X in the top-right corner and be off on your delayin’ way, but most likely you’ll want to change the default settings. Mixcraft plug-ins include factory preset settings – to try out the factory preset settings, click on <Custom> in the Preset list.
To create your own plug-in settings, click the Edit button to view a plug-in’s user interface.
14
This opens up the Acoustica Delay interface and lets you set its parameters to your liking. You can press the play button in the transport and hear the settings change in real-time. (We recommend using Loop Mode for more convenient previewing.)
15

16

REGISTRATION
Following installation, Mixcraft runs in trial mode for 14 days, so you’ll want to register as soon as possible for full functionality. To register your copy, click the Register!
button on the toolbar or select Help> Enter Registration Code… in the Main Window menus.
Type in or copy and paste the registration ID (usually your email address) in the Step 3 edit box and type or copy and paste the 20-character registration code (excluding dashes) into the Step 4 edit box. (Do not enter any extra spaces.) Click the Register! button and you’re done!
Thank you for choosing Mixcraft. Your support and patronage helps us to continually improve Mixcraft. Enjoy! – The Acoustica Team
17

18

MIXCRAFT REFERENCE
A visual guide to the individual sections of the Mixcraft 7 user interface.
MAIN WINDOW
This is where you’ll spend most of your time in Mixcraft. We’ll explain each of its sections below.
MENUS
Basic menus for accessing many Mixcraft functions.
19
MAIN WINDOW TOOLBAR
Contains button shortcuts for frequent Mixcraft functions and parameters.
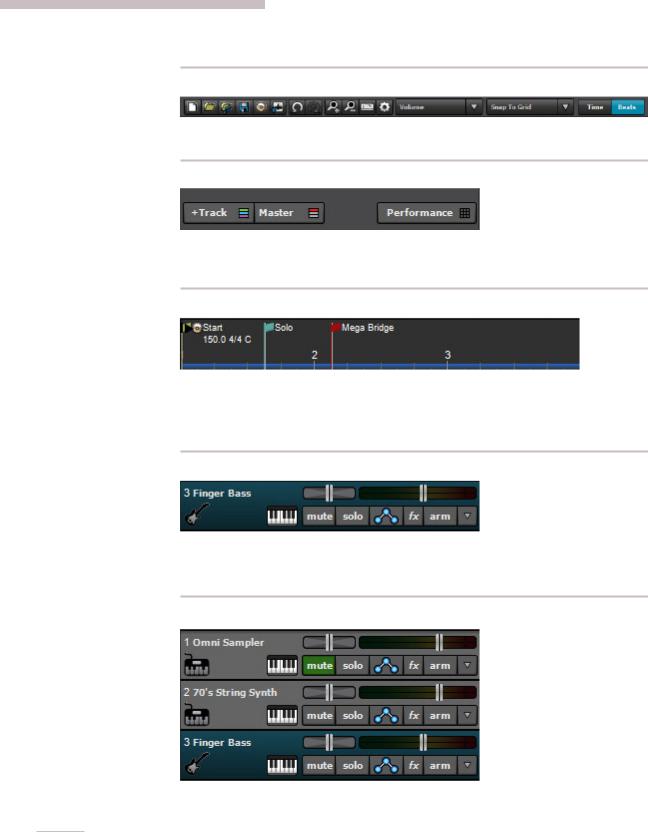
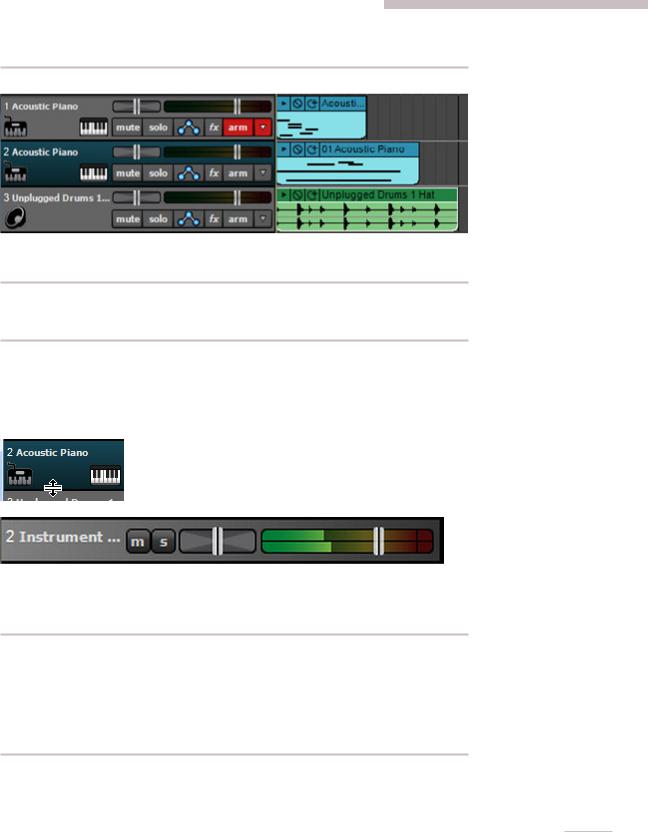
TRACK HEADER
Button shortcuts atop the Track List allowing creation of new tracks, enabling the master track, and enabling the Performance Panel.
TIMELINE
The Timeline acts as a song roadmap. The “ruler” can be set to display bar numbers and divisions or elapsed time. The gray area above the ruler is where recording punch in/out points, tempo, time signature, key, and song markers are displayed.
TRACK
The Track displays important info and parameters for individual audio, MIDI, and video tracks.
TRACK LIST
The entire list of all audio, MIDI, and video tracks.
20

MAIN CLIP GRID
This is the playback and recording area where audio, MIDI, and video clips can be created and moved.
PLAYHEAD
When playback is stopped, this vertical line shows where exactly where playback will start. During playback or recording, the playhead moves across the screen showing the current playback position.
21
AUDIO AND MIDI CLIPS
Clips can contain either MIDI data or audio. Clip automation can edited as well.
Tip: Zoom in and out by spinning your mouse wheel. (The mouse wheel’s behavior can be changed in File>Preferences>Mouse Wheel.)
TRANSPORT BAR
Standard tape deck-style controls for playback, recording, loop mode, and punch in/ out. The large middle display shows song tempo, time signature, song key, and the current position of the playhead. To the right are the master level meter, volume slider, and master effects bypass button.
TABS
These show additional project information and parameters. Tabs pop up and occupy the bottom half of the screen when clicked.
If the Sound Tab is selected, the following editors are available:
Audio Clips |
Loop Editor |
Virtual Instruments Clips (MIDI) |
Piano Roll |
|
|
|
Step Edit |
|
|
|
Score Edit |
STATUS BAR
This lonely area at the bottom of the window displays current CPU usage and whether
Mixcraft is saving, loading, or freezing something.
22
ADDING/MOVING/SIZING/DELETING
Drag, right-click, or use key shortcuts to add, delete, move, and duplicate tracks.
MOVING TRACKS
Tracks can be moved by clicking and dragging them vertically within the Track List.
RESIZING TRACKS
Tracks can be resized vertically. Track height can be increased for easier editing, or decreased to fit more tracks on the screen simultaneously. To resize a track vertically, move the mouse to the bottom of a track and drag up or down. When the mouse is in the correct location for resizing, the cursor will become an up/down cursor.
Alternatively, you can click Track>Properties>Track Height and choose a size of small, normal, or large.
RESIZING ALL TRACKS
You can resize all tracks at once by clicking on the View>All Tracks Height and choosing a new size.
To resize all tracks to a specific size, hold down the SHIFT key, click on the bottom of a track and drag up or down. All tracks will resize upon mouse release.
DELETING TRACKS
Click on a track to select it. Then click Track>Delete Track, or right-click on the track and choose Delete Track. All sounds on the track will also be deleted.
23
FREEZE TRACK
If your computer is slow or you’re hearing gapping or stuttering as a result of many effects or time stretching, tracks can be frozen to reduce the necessary amount of processing. After freezing a track, a temporary WAV file, containing the track’s effects and audio, is used for playback. Effects or sounds will not be editable until the track is “unfrozen.” (Dragging a new sound onto a track will unfreeze it.)
To freeze, right-click on a track you’d like to freeze and choose Freeze Track
(key shortcut Ctrl+F), or choose Track>Freeze Track in the top drop-down menu.
CUSTOMIZING TRACK APPEARANCE
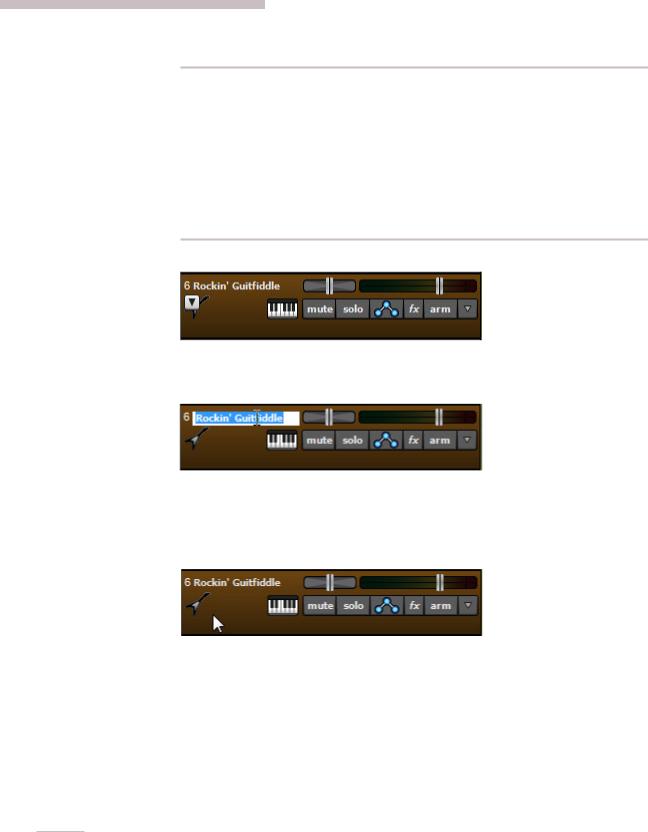
Change the color, icon, name or size of tracks.
NAME
The default name for newly created tracks will be “Track,” for audio tracks, or “Instrument Track,” for MIDI tracks. Tracks can be renamed by left-clicking the current name and typing. Hit the Enter key or click on another area of the window to finish.
IMAGE
Each track can have its own image for distinction, personalization, and organization. Choose from twenty stock images or import your own!
To change the track image, double-click an existing track image or hover over the track image and click the pop-up button. You can also select Track>Properties>Choose Image… in the main window drop-down menus, or right-click on a track and select
Properties>Choose Image...
24
 Loading...