

Acorto Xpress 6 Installation Manual
XPRESS 6
User Guide


Table of Contents
Important Safety Information ....................... 1
The XPRESS 6 System .................................... 2
The XPRESS 6 System Components ............... 3
1. Front Panel Door Lock Button ....................3
2. Touch Pad ..............................................3
3. Product Outlet ........................................3
4. Power Switch ..........................................3
5. Drain Tray and Grate ...............................3
6. On-Board Refrigeration Unit ......................3
7. Service Switch ........................................3
8. Bean Hoppers .........................................3
9. Grounds Bin ...........................................3
10. Flavor System .......................................3
Using the Espresso System ............................................... 4
Starting the System ....................................... 4
Starting System if Display Reads: MACHINE IS
OFF .............................................................4
Touch Pad ...................................................... 5
Touch Pad Description ....................................5
Pouring Drinks ............................................... 7
Product Outlet ...............................................7
Cup Stand ....................................................7
Sample Drinks ............................................... 8
Drink Variations ............................................. 8
Make it Decaf ................................................8
Make it Non-Fat .............................................8
Make it Iced ..................................................8
Make it a Triple Shot ......................................9
Add a Flavor .................................................9
Front Panel Lock Button ............................... 10
Machine Software Overview ............................................ 11
Software Programming Menu ...................... 11
Accessing the Programming Menu .................. 11
Scrolling Through the Software Menus ............ 11
Entering a Sub-Category .............................. 11
Changing a Value ........................................ 11
Exiting a Sub-Category ................................. 12
Exiting the Main Menu .................................. 12
Checking Grand Total Drink Statistics ............. 12
Checking Detailed Total Drink Statistics .......... 12
Accessing Detailed Daily Drink Statistics ......... 12
Software ...................................................... 13
Programming Menu Informational Screens ...... 13
Categories .................................................. 13
Service Switch ............................................. 15
The Service Switch in the VEND position ......... 15
The Service Switch in the CLEAN position ........ 15
The Service Switch and Cleaning the Machine .. 15
Beans and the Bean Hoppers .......................................... 16

Bean Hoppers .............................................. 16
Filling a Bean Hopper ................................... 16
Inserting the Hopper Stopper ........................ 16
Removing the Hopper Stopper ....................... 17
Removing a Bean Hopper .............................. 17
Milk and the Milk System ................................................. 18
Refrigeration Unit ........................................ 18
Placing Milk in the Machine ........................... 18
Milk Weight Trays ........................................ 19
Checking the Refrigeration Unit Temperature ... 19
Flavor and the Flavor System .......................................... 20
Flavor Storage ............................................. 20
Replacing Empty Flavor Boxes ..................... 20
Removing a Flavor Box Connector .................. 20
Replacing a Flavor Box ................................. 21
Chocolate Sauce .......................................... 21
Chocolate Heater Assembly ..... Error! Bookmark
not defined.
Cleaning and Maintenance ............................................... 22
Cleaning ....................................................... 22
Cleaning Timers .......................................... 22
Auto-Rinse Cycle ......................................... 22
Daily Cleaning Procedures ........................... 23
Clean the Milk System .................................. 23
Clean the Brew Group .................................. 23
Empty Grounds Bin ...................................... 24
Clean Drain Grate and Drain Tray .................. 24
Clean Exterior Surfaces ................................ 24
Clean Interior of Refrigeration Unit ................. 25
Refill Consumables ....................................... 25
Clean Product Nozzle .................................... 25
Monthly Cleaning Procedures ....................... 25
Check Air Filter ............................................ 25
Removing the Air Filter ................................. 26
Cleaning a Bean Hopper ............................... 26
Preventive Maintenance ............................... 27
Ordering Cleaning and Replacement Items .. 27
Operational Messages ...................................................... 28
Error Messages ................................................................. 30
Troubleshooting ............................................................... 31
FAQ .................................................................................... 33
Machine Warranty ............................................................. 37

Important Safety Information
The safety of you and your customers is important to
Concordia. The XPRESS 6 dispenses hot liquids and steam.
Please follow all safety precautions outlined in this manual, in
order to reduce the risk of electric shock, burns, and/or injury
to persons or property.
Machine Operation
Do not use the machine for anything other than its
specific intended purpose.
Close supervision is required anytime the machine is
used near children.
Machine must be installed in a safe and stable location
and in accordance with Concordia’s installation
requirements.
Do not attempt to override safety interlocks.
Do not operate the machine with unauthorized parts or
attachments. Improper use may cause fire, electrical
shock, hazard, or injury.
WARNING: Use of unauthorized parts or attachments
will nullify the machine warran ty.
Hot Surfaces and Liquids
Care must be taken around the machine, as hot liquids
and steam are produced and dispensed. Serious burns
can occur.
Do not touch hot surfaces or parts.
Electrical
To protect against electrical hazards, do not immerse
the power cord, plugs, or machine in water or any other
liquid.
Turn the power switch to “OFF” when the machine will
not be used for an extended period.
Do not operate the machine with an improper or
damaged power cord or plug, or after the machine has
been damaged in any manner.
Customer Service (800) 778-0990 1
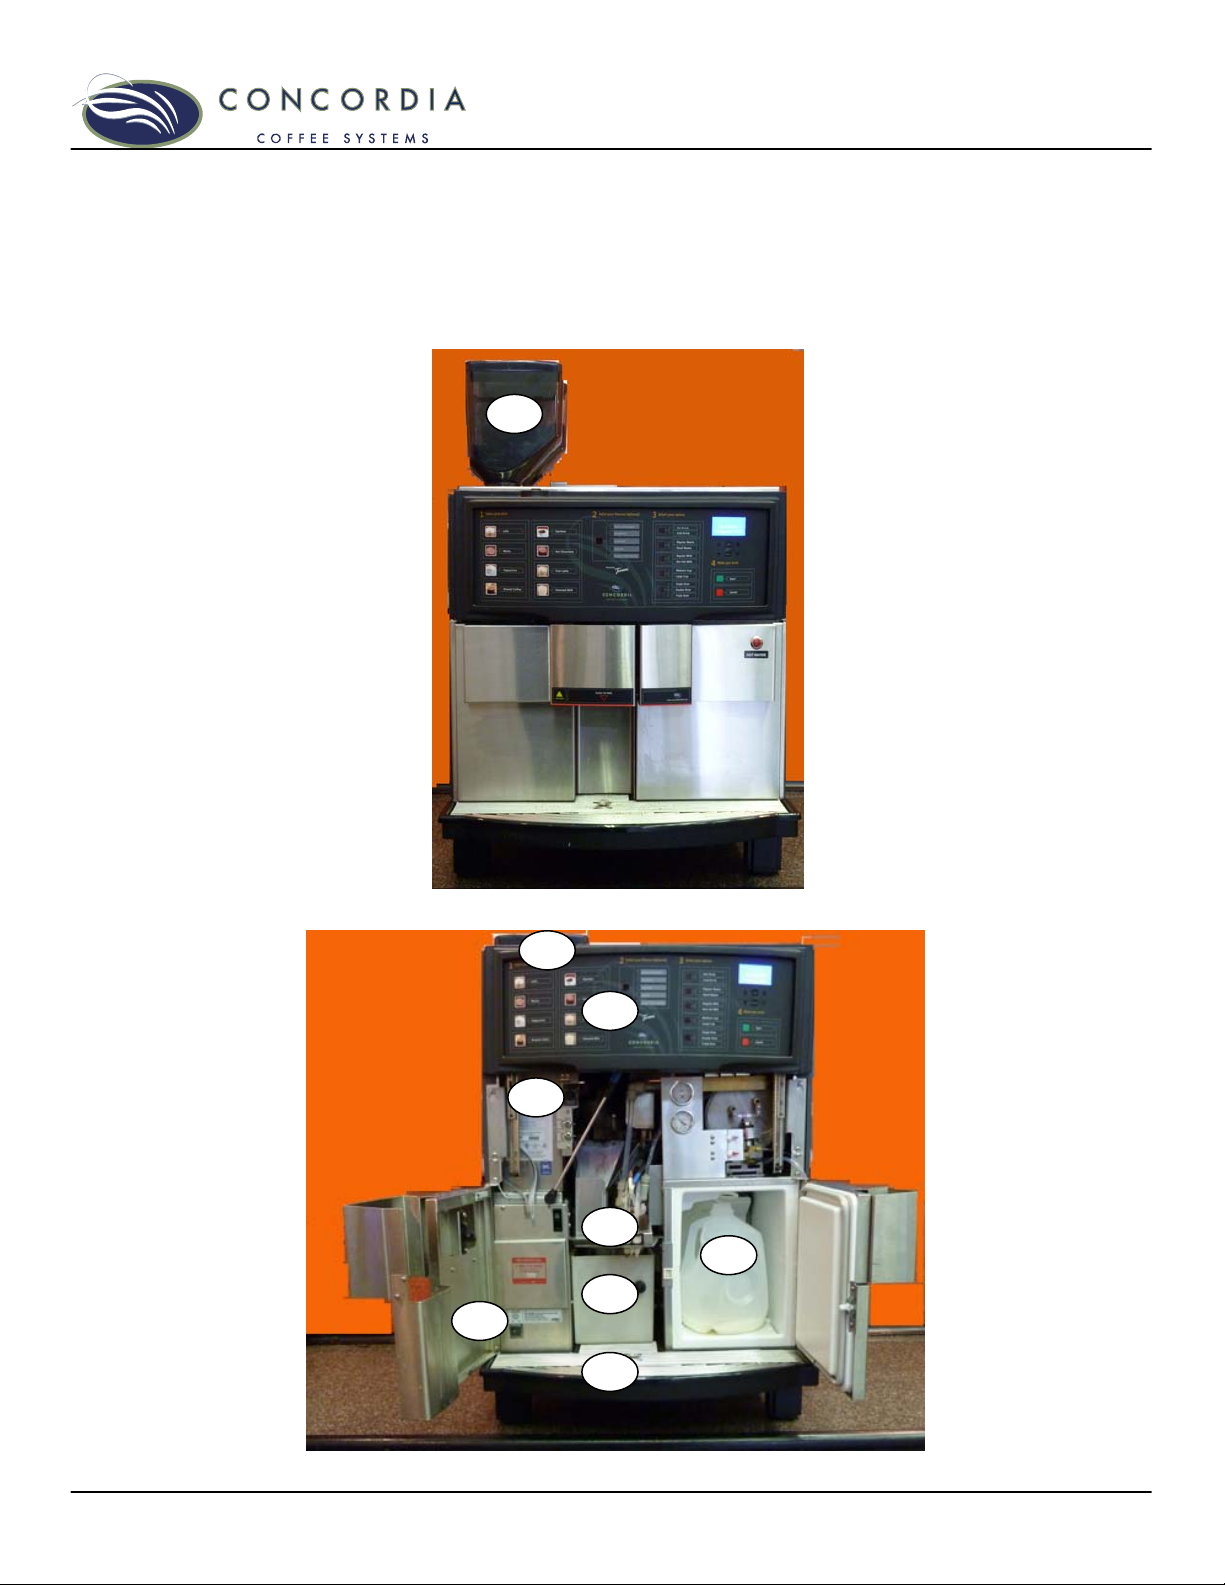
The XPRESS 6 System
The XPRESS 6 Concordia espresso machine grinds fresh whole
beans, brews fresh espresso, steams fresh milk, infuses flavors,
and delivers a perfect, freshly brewed, gourmet espresso
beverage.
8
1
2
7
3
6
9
4
5
2 Customer Service (800) 778-0990

The XPRESS 6 System Components
1. Front Panel Door Lock Button
The front panel and doors of the machine can be locked,
providing security in a self-service environment.
2. Touch Pad
The touch pad provides a user-friendly interface for
selecting and pouring beverages.
3. Product Outlet
The product outlet is where drinks and hot water are
dispensed.
4. Power Switch
The power switch is located behind the left front door of
the machine and controls the machine power supply.
5. Drain Tray and Grate
The drain tray and grate direct excess liquid to the
drain.
6. On-Board Refrigeration Unit
The on-board refrigeration unit holds two 1-gallon/4-liter
milk containers.
7. Service Switch
The service switch is used to alternate between VEND
MODE and CLEAN MODE, and is located behind the
front panel.
8. Bean Hoppers
SHOWN IN TOP PHOTO. Located on top of the machine,
each bean hopper holds fresh, whole espresso roast
beans.
9. Grounds Bin
The grounds bin holds the used espresso grounds. The
EMPTY GRNDS BIN message will appear on the display
approximately every 30 drinks.
10. Flavor System
NOT SHOWN. The flavor system connects the flavor
boxes to the machine, to provide selected flavors for a
customer’s drink.
Customer Service (800) 778-0990 3
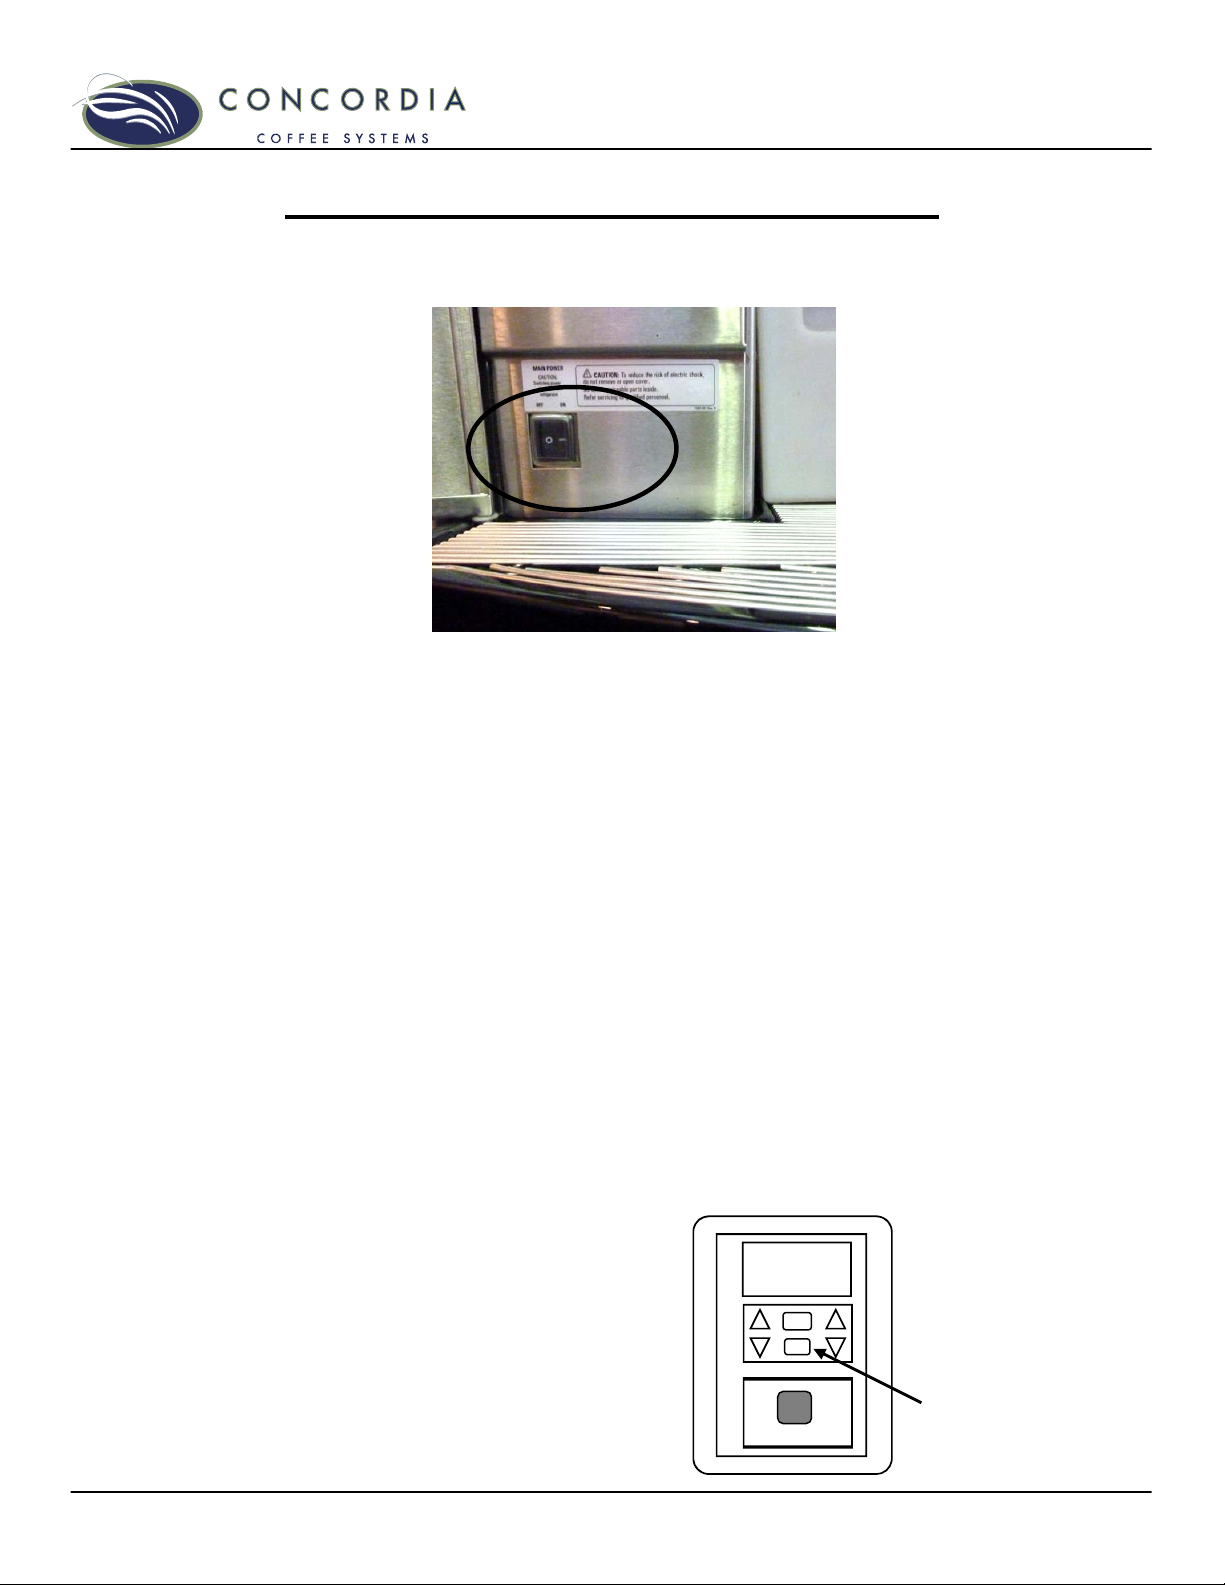
Using the Espresso System
Starting the System
The power switch is located behind the left door.
1. Press the power switch to the ON position to start the
machine.
2. Close the door. The machine will not warm up if the door
is open.
3. The display will read:
CALIBRATING
WAIT WARMING UP
Machine warm-up takes approximately 10-15 minutes. During
warm-up, the machine is heating the water, generating steam,
and calibrating the brew group.
WARNING: Wait at least 10 seconds between turning the
machine off and back on again. Quickly flipping the power
switch on and off can blow a fuse within the machine and/or
result in machine malfunction.
Starting System if Display Reads: MACHINE IS OFF
If the power switch is on and the display reads MACHINE IS
OFF, you cannot pour drinks. In this mode, only the
refrigeration unit is functioning.
To start the machine, press and hold
the PROGRAM button. A tone will
sound; when the tone stops, release
the PROGRAM button.
CALIBRATING
WAIT WARMING UP
CLEAN
PROGRAM
PROGRAM
BUTTON
CANCEL
4 Customer Service (800) 778-0990
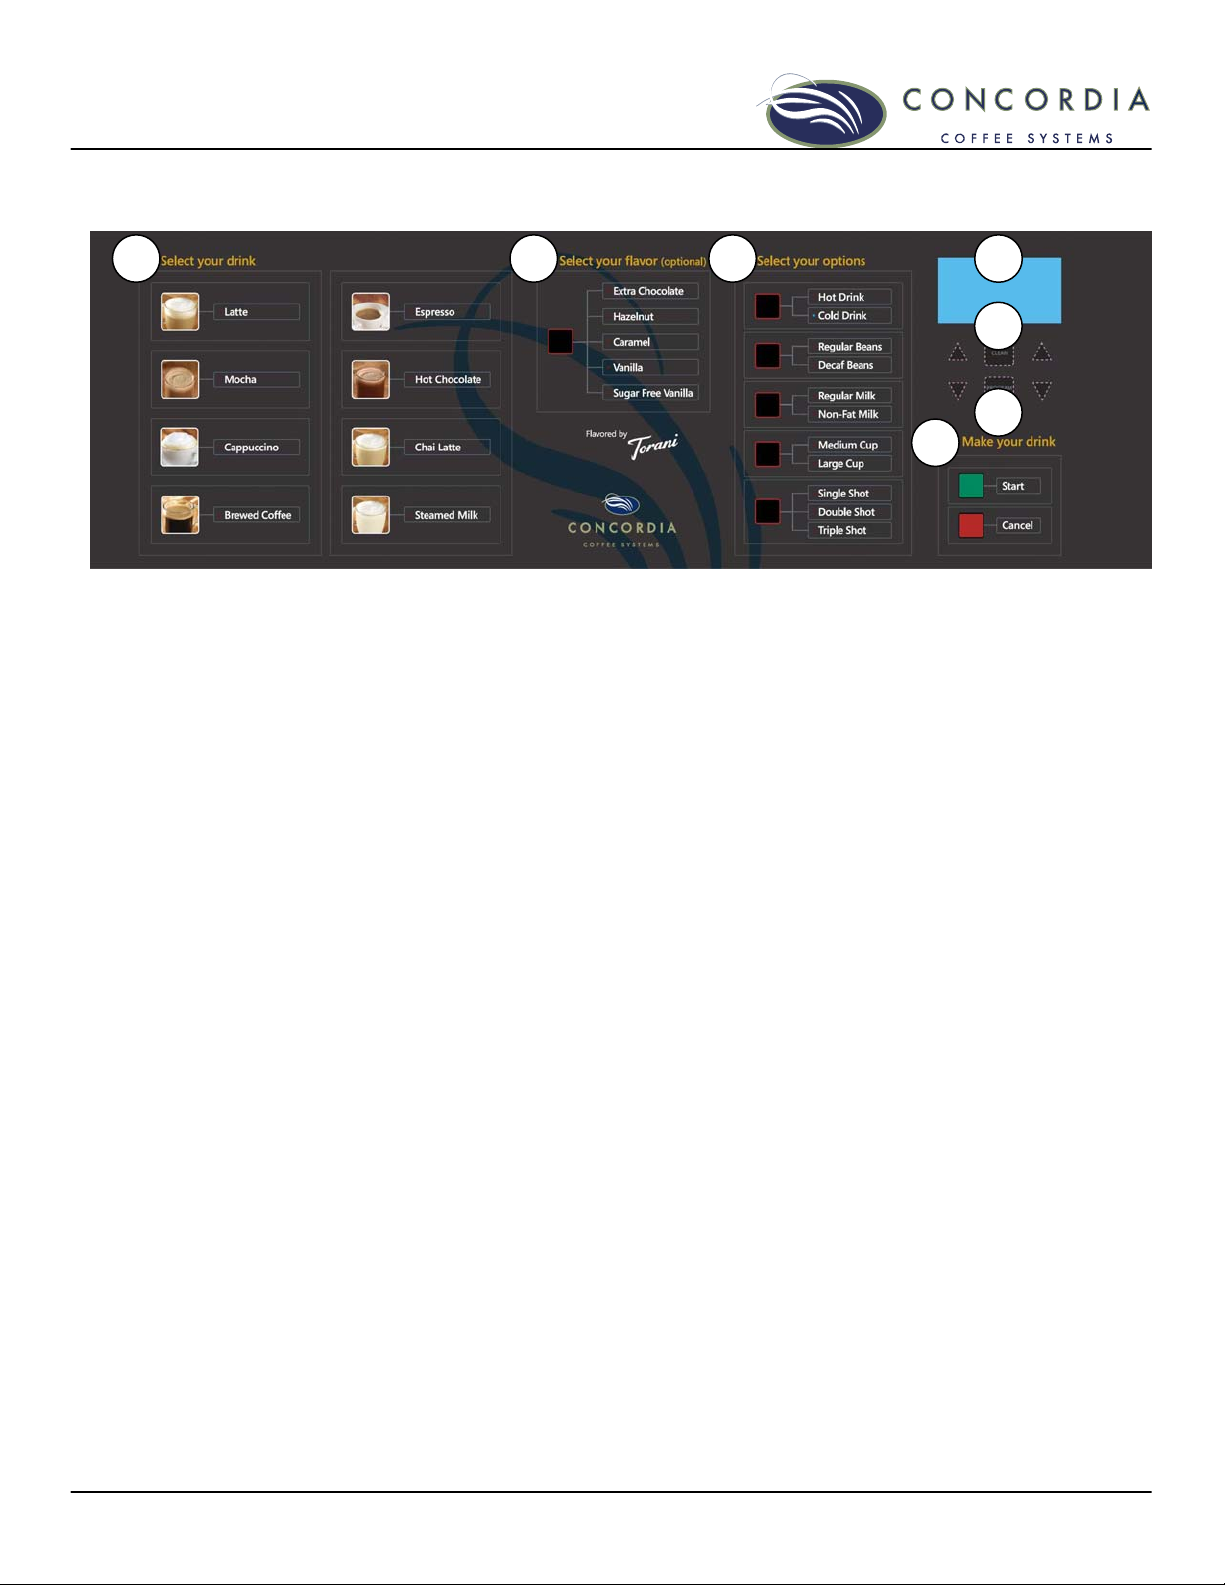
Touch Pad
1 2 3 4
Touch Pad Description
1. SELECT YOUR DRINK
These buttons determine the type of drink to be poured.
LATTE
Latte is poured.
MOCHA
Mocha is poured.
CAPPUCCINO
Cappuccino is poured.
BREWED COFFEE
Brewed coffee is poured.
ESPRESSO
One shot of espresso is poured.
HOT CHOCOLATE
Hot chocolate is poured.
CHAI LATTE
Chai latte is poured.
STEAMED MILK
Steamed milk is poured.
2. SELECT YOUR FLAVOR
These buttons determine the desired flavor to be added to a
drink.
EXTRA CHOCOLATE
Adds a serving of chocolate sauce to a drink.
HAZELNUT
Adds a serving of hazelnut syrup to a drink.
CARAMEL
Adds a serving of caramel syrup to a drink.
VANILLA
Adds a serving of vanilla syrup to a drink.
SUGAR FREE VANILLA
Adds a serving of sugar free vanilla syrup to a drink.
5
6
7
Customer Service (800) 778-0990 5

3. SELECT YOUR OPTIONS
These buttons determine what size drink to be poured.
HOT DRINK / COLD DRINK
The default is HOT DRINK. Press button once to select
COLD DRINK.
REGULAR BEANS / DECAF BEANS
The default is REGULAR BEANS. Press button once to
select DECAF BEANS.
REGULAR MILK / NON-FAT MILK
The default is REGULAR MILK. Press button once to
select NON-FAT MILK.
MEDIUM CUP / LARGE CUP
The default is MEDIUM CUP, a 12oz/360mL drink with
one shot of espresso. Press button once to select LARGE
CUP, a 16oz/480mL drink with two shots of espresso.
SINGLE SHOT / DOUBLE SHOT / TRIPLE SHOT
The default is SINGLE SHOT. Press button once to
select DOUBLE SHOT, and press button twice to select
TRIPLE SHOT.
4. MESSAGE DISPLAY SCREEN
The blue LCD screen shows information about the current drink
being poured, or any operational or error messages. For more
information on these messages, please see pages 28 and 29.
5. CLEAN BUTTON
After pressing the CLEAN button, select the cleaning option
needed. The service switch must be in th e CLEAN mode. See
the cleaning card included with the machine for full cleaning
procedures.
6. PROGRAM BUTTON
For complete programming and software menu navigation
instructions, see page 11.
MENU SCROLL UP ARROW
Scroll up in menu and submenu categories
MENU SCROLL DOWN ARROW
Scroll down in menu and submenu categories
INCREASE VALUE ARROW
Increase value in submenu category
DECREASE VALUE ARROW
Decrease value in submenu category
PROGRAM BUTTON
Press once for GRAND TOTAL drink statistics
Press three times to access main programming menu
7. MAKE YOUR DRINK
START
Will start the pouring of a drink.
CANCEL
Will clear current selection(s) or stop the pouring of a
drink.
6 Customer Service (800) 778-0990
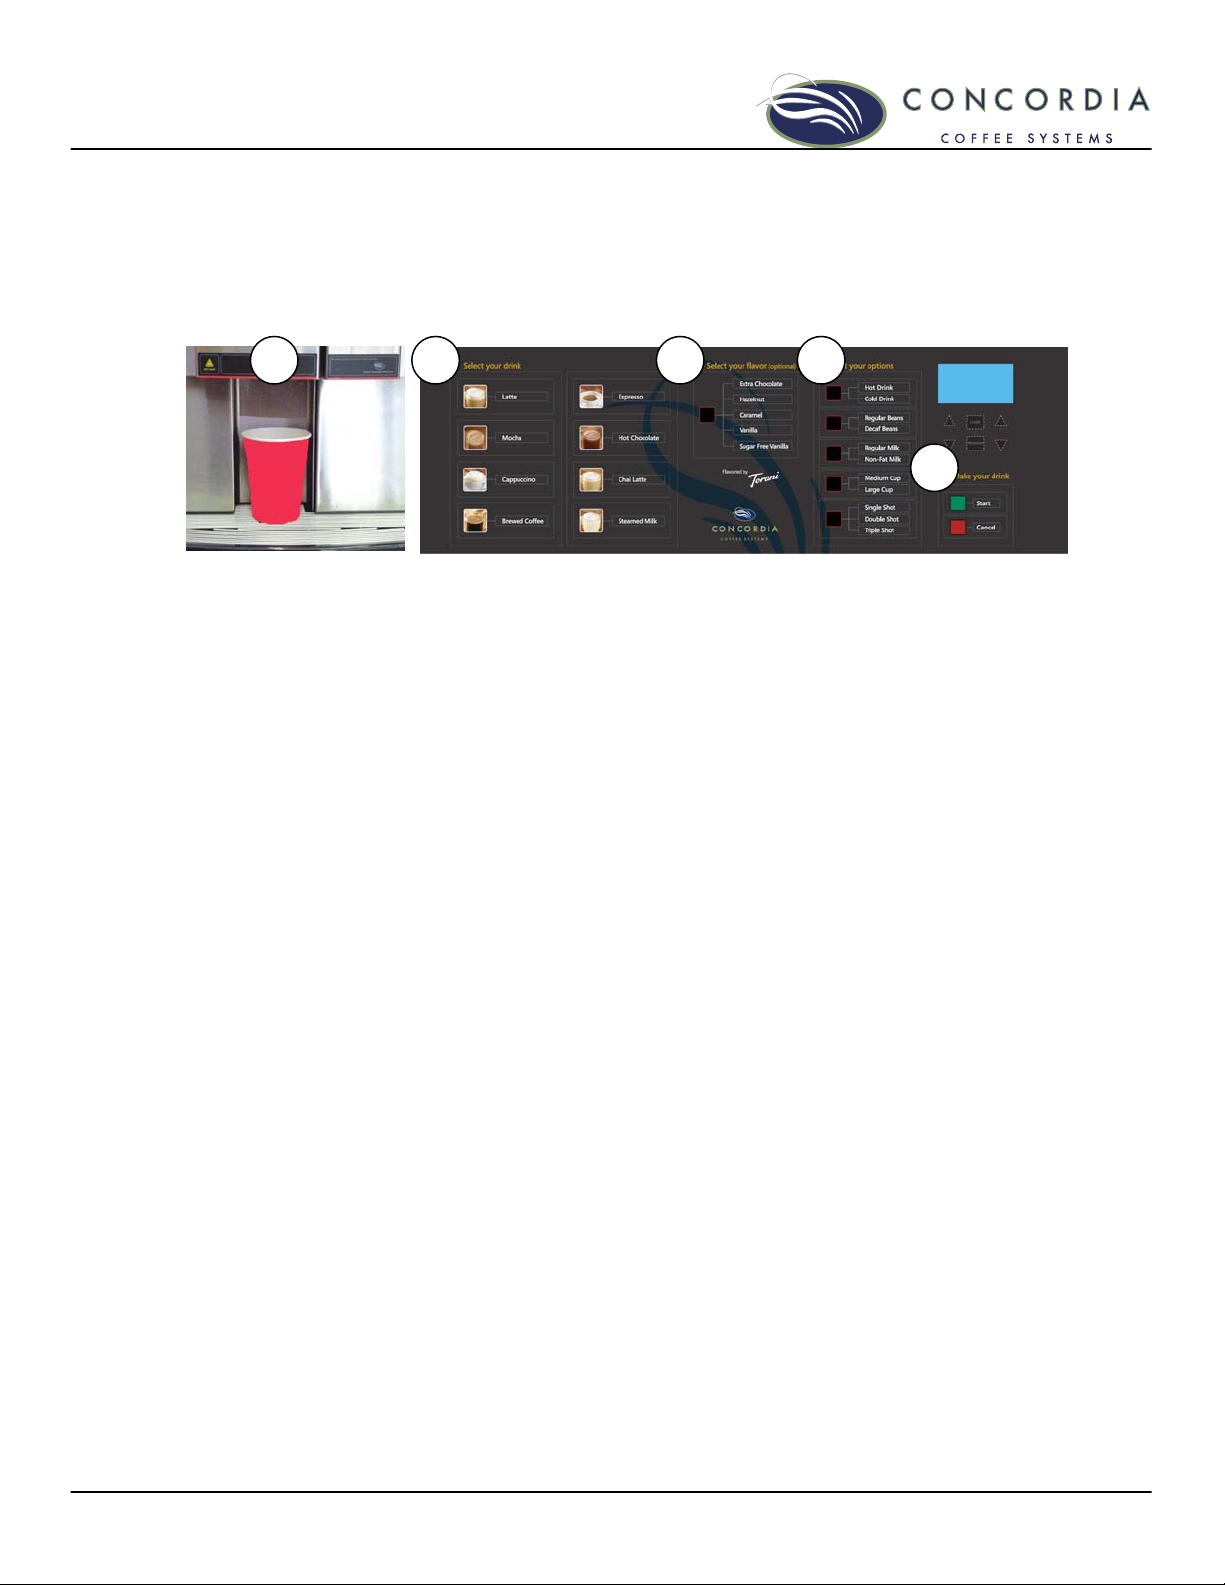
Pouring Drinks
Product Outlet
Drinks are dispensed at the product outlet. Before selecting a
drink, the customer places their selected cup directly under the
product outlet.
1
1. Place Cup Under Product Outlet
2. Select your drink
Latte
Mocha
Cappuccino
Brewed Coffee
Espresso
Hot Chocolate
Chai Latte
Steamed Milk
3. Select your flavor (optional)
Extra Chocolate
Hazelnut
Caramel
Vanilla
Sugar Free Vanilla
2 3
4
5
4. Select your options
Hot Drink or Cold Drink
Regular Beans or Decaf Beans
Regular Milk or Non-Fat Milk
Medium Cup or Large Cup
Single Shot or Double Shot or Triple Shot
5. Make Your Drink
Press Start to dispense your drink
To cancel a drink
Press the CANCEL button to stop the dispensing of a beverage.
Cup Stand
A cup stand is an optional, and accommodates usage of
different size cups. It may be folded up when a large cup is
being used. The cup stand can be removed for cleaning.
Customer Service (800) 778-0990 7

Sample Drinks
TO SELECT A MEDIUM LATTE:
Press the LATTE button
Press the START button
TO SELECT A LARGE LATTE:
Press the LATTE button
Press the LARGE CUP button
Press the START button
TO SELECT A MEDIUM MOCHA:
Press the MOCHA button
Press the START button
TO SELECT A LARGE MOCHA:
Press the MOCHA button
Press the LARGE CUP button
Press the START button
TO SELECT A MOCHA WITH EXTRA CHOCOLATE:
Press the MOCHA button
Press the CHOCOLATE button
Press the START button
Drink Variations
Make it Decaf
The beverage will be made with decaffeinated espresso roast
beans.
TO SELECT: Press the desired drink button
Press desired FLAVOR and OPTION button(s)
Press the START button
Make it Non-Fat
The beverage will be made using non-fat milk.
TO SELECT: Press the desired drink button
Press desired FLAVOR and OPTION button(s)
Press NON-FAT MILK
Press the START button
Make it Iced
The beverage will be made using cold milk. Add ice after the
drink is poured.
TO SELECT: Press the desired drink button
Press desired FLAVOR and OPTION button(s)
Press the COLD DRINK button
Press the START button
8 Customer Service (800) 778-0990

Make it a Triple Shot
The beverage will be made with three shots of espresso.
TO SELECT: Press the desired drink button
Press desired FLAVOR and OPTION button(s)
Press the shot option button twice, to select
TRIPLE SHOT
Press the START button
Add a Flavor
The beverage will be made with a flavor.
TO SELECT: Press the desired drink button
Press desired FLAVOR button
Press desired OPTION button(s)
Press the START button
NOTE: Only one flavor can be chosen per milk-based drink,
and no flavor can be chosen for brewed coffee. It is possible to
add a flavor to a hot chocolate, chai latte, or mocha drink. It is
not possible to add two flavors to a drink.
NOTE: Pressing the EXTRA CHOCOLATE button will add a
serving of chocolate to a drink. If selected with a mocha or hot
chocolate, an extra serving of chocolate will be added.
Customer Service (800) 778-0990 9
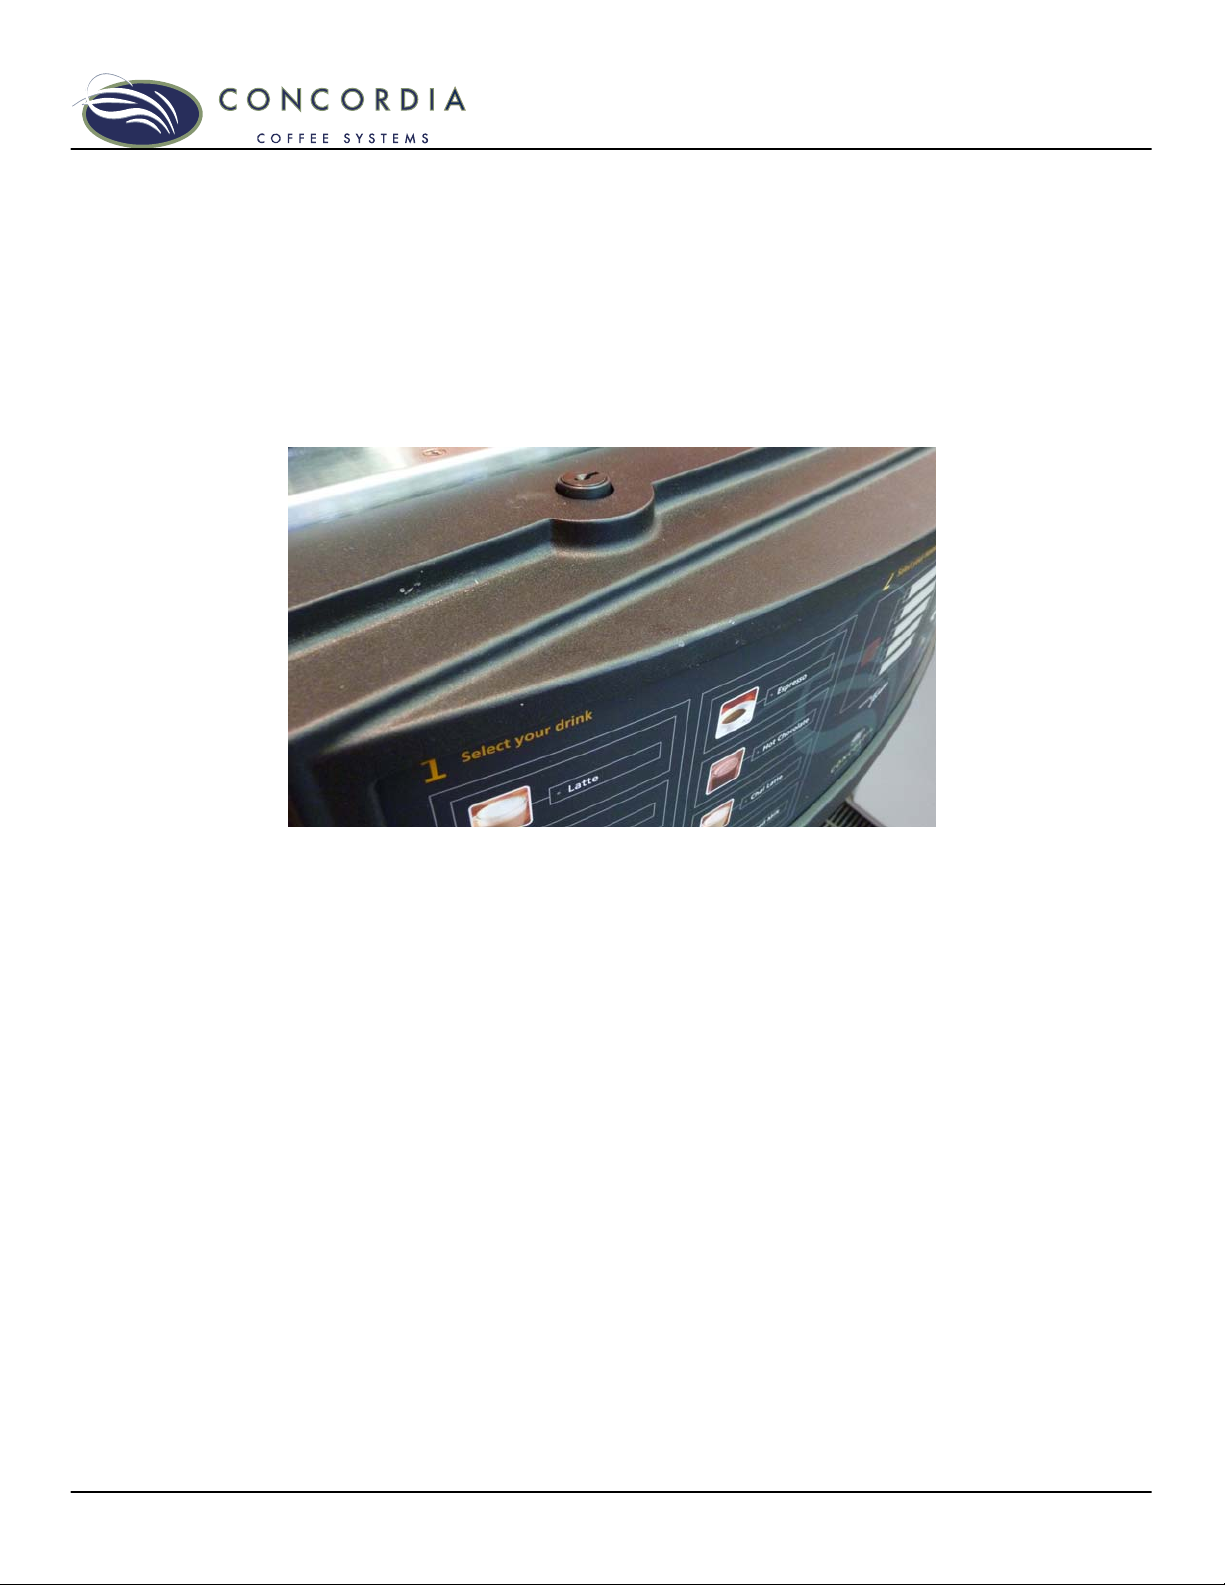
Front Panel Lock Button
The front panel houses the touch pad, and can be lifted to
access the service switch.
To open the front panel, press down on the lock button and the
front panel will slide upwards.
To prevent unauthorized machine access, lock the front panel
using the key provided.
10 Customer Service (800) 778-0990
 Loading...