

Page 1
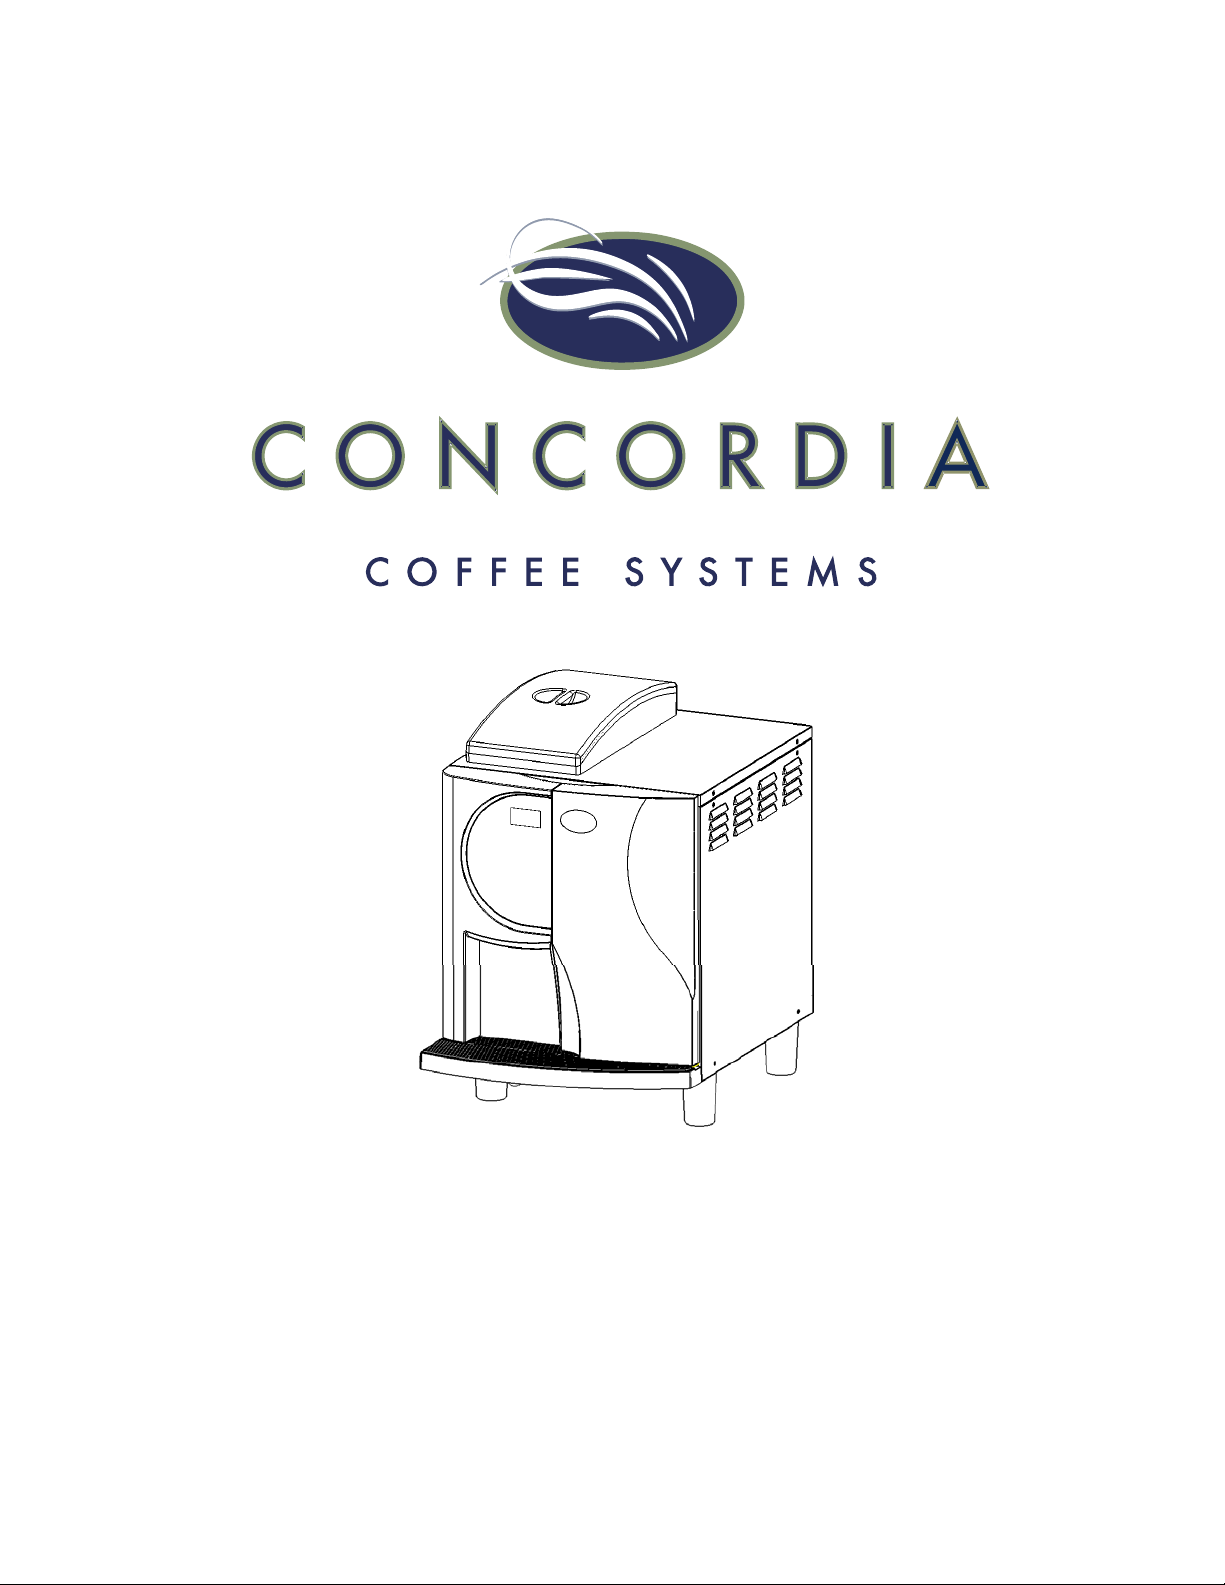
INTEGRA
User Guide
Page 2

Table of Contents
Important Safety Information ............................................. 1
The INTEGRA Machine ................................... 2
The INTEGRA Machine Components ............... 3
1. Touch Pad ..............................................3
2. Product Outlet ........................................3
3. Power Switch ..........................................3
4. Drain Tray and Grate ...............................3
5. On-Board Refrigeration Unit ......................3
6. Service Switch ........................................3
7. Bean Hopper ..........................................3
8. Grounds Bin ...........................................3
Using the Espresso System ............................................... 4
Starting the System ....................................... 4
Starting System if Display Reads: MACHINE IS
OFF .............................................................4
Touch Pad ...................................................... 5
Touch Pad Description ....................................5
Pouring Drinks ............................................... 7
Product Outlet ...............................................7
Sample Drinks ............................................... 8
Drink Variations ............................................. 8
Make it Decaf ..............................................8
Machine Software Overview .............................................. 9
Software Programming Menu ........................ 9
Accessing the Programming Menu ....................9
Scrolling in the Menu......................................9
Accessing a Sub-Category ...............................9
Changing a Value ..........................................9
Exiting a Sub-Category ...................................9
Exiting the Main Menu ....................................9
Check Grand Total Drink Statistics ................. 10
Detailed Total Drink Statistics ........................ 10
Detailed Daily Drink Statistics ........................ 10
Software ...................................................... 11
Programming Menu Informational Screens ...... 11
Categories .................................................. 11
Service Switch ............................................. 13
The Service Switch in the SERVICE position ..... 13
The Service Switch in the RUN position ........... 13
The Service Switch and Cleaning the Machine .. 13
Beans and the Bean Hopper ............................................ 14
Storing Espresso Roast Beans ...................... 14
Bean Hopper ................................................ 14
Directions for Filling Bean Hopper .................. 14
The Hopper Stopper ..................................... 15
Using the Hopper Stopper ............................. 15
Page 3

Removing a Bean Hopper .............................. 15
Milk and the Milk System ................................................. 16
Refrigeration Unit ........................................ 16
Placing Milk in the Machine ........................... 16
Checking Refrigeration Unit Temperature ........ 17
Cleaning and Maintenance ............................................... 18
Cleaning ....................................................... 18
Cleaning Timers .......................................... 18
Auto-Rinse Cycle ......................................... 18
Daily Cleaning Procedures ........................... 19
Clean the Milk System .................................. 19
Clean the Brew Group .................................. 19
Empty Grounds Bin ...................................... 20
Clean Drain Grate and Drain Tray .................. 20
Clean Exterior Surfaces ................................ 20
Clean Interior of Refrigeration Unit ................. 21
Refill Consumables ....................................... 21
Clean Milk Dispenser Nozzle .......................... 21
Monthly Cleaning Procedures ....................... 21
Check Air Filter ............................................ 21
Removing the Air Filter ................................. 21
Clean Bean Hoppers ..................................... 22
Replacing Upper Piston O-ring...……………… . 22
Preventive Maintenance ............................... 25
Ordering Cleaning and Replacement Items .. 26
Operational Messages ...................................................... 27
Error Messages ................................................................. 29
Trouble Shooting……………………………………………..30
FAQ .................................................................................... 32
Machine Warranty ............................................................. 35
Page 4

Page 5

Important Safety Information
The safety of you and your customers is important to
Concordia. The INTEGRA dispenses hot liquids and steam.
Please follow all safety precautions outlined in this manual, in
order to reduce the risk of electric shock, burns, and/or injury
to persons or property.
Machine Operation
Do not use the machine for anything other than its
specific intended purpose.
Close supervision is required anytime the machine is
used near children.
Machine must be installed in a safe and stable location
and in accordance with Concordia’s installation
requirements.
Do not attempt to override safety interlocks.
Do not operate the machine with unauthorized parts or
attachments. Improper use may cause fire, electrical
shock, hazard, or injury.
WARNING: Use of unauthorized parts or attachments
will nullify the machine warran ty.
Hot Surfaces and Liquids
Care must be taken around the machine, as hot liquids
and steam are produced and dispensed. Serious burns
can occur.
Do not touch hot surfaces or parts.
Electrical
To protect against electrical hazards, do not immerse
the power cord, plugs, or machine in water or any other
liquid.
Turn the power switch to “OFF” when the machine will
not be used for an extended period.
Do not operate the machine with an improper or
damaged power cord or plug, or after the machine has
been damaged in any manner.
Customer Service (800) 778-0990 1
Page 6
The INTEGRA Machine
The INTEGRA is a Concordia Coffee Systems espresso machine.
The INTEGRA grinds fresh whole beans, brews fresh espresso,
steams fresh milk, and delivers a perfect, freshly brewed,
gourmet espresso beverage.
2 Customer Service (800) 778-0990
Page 7

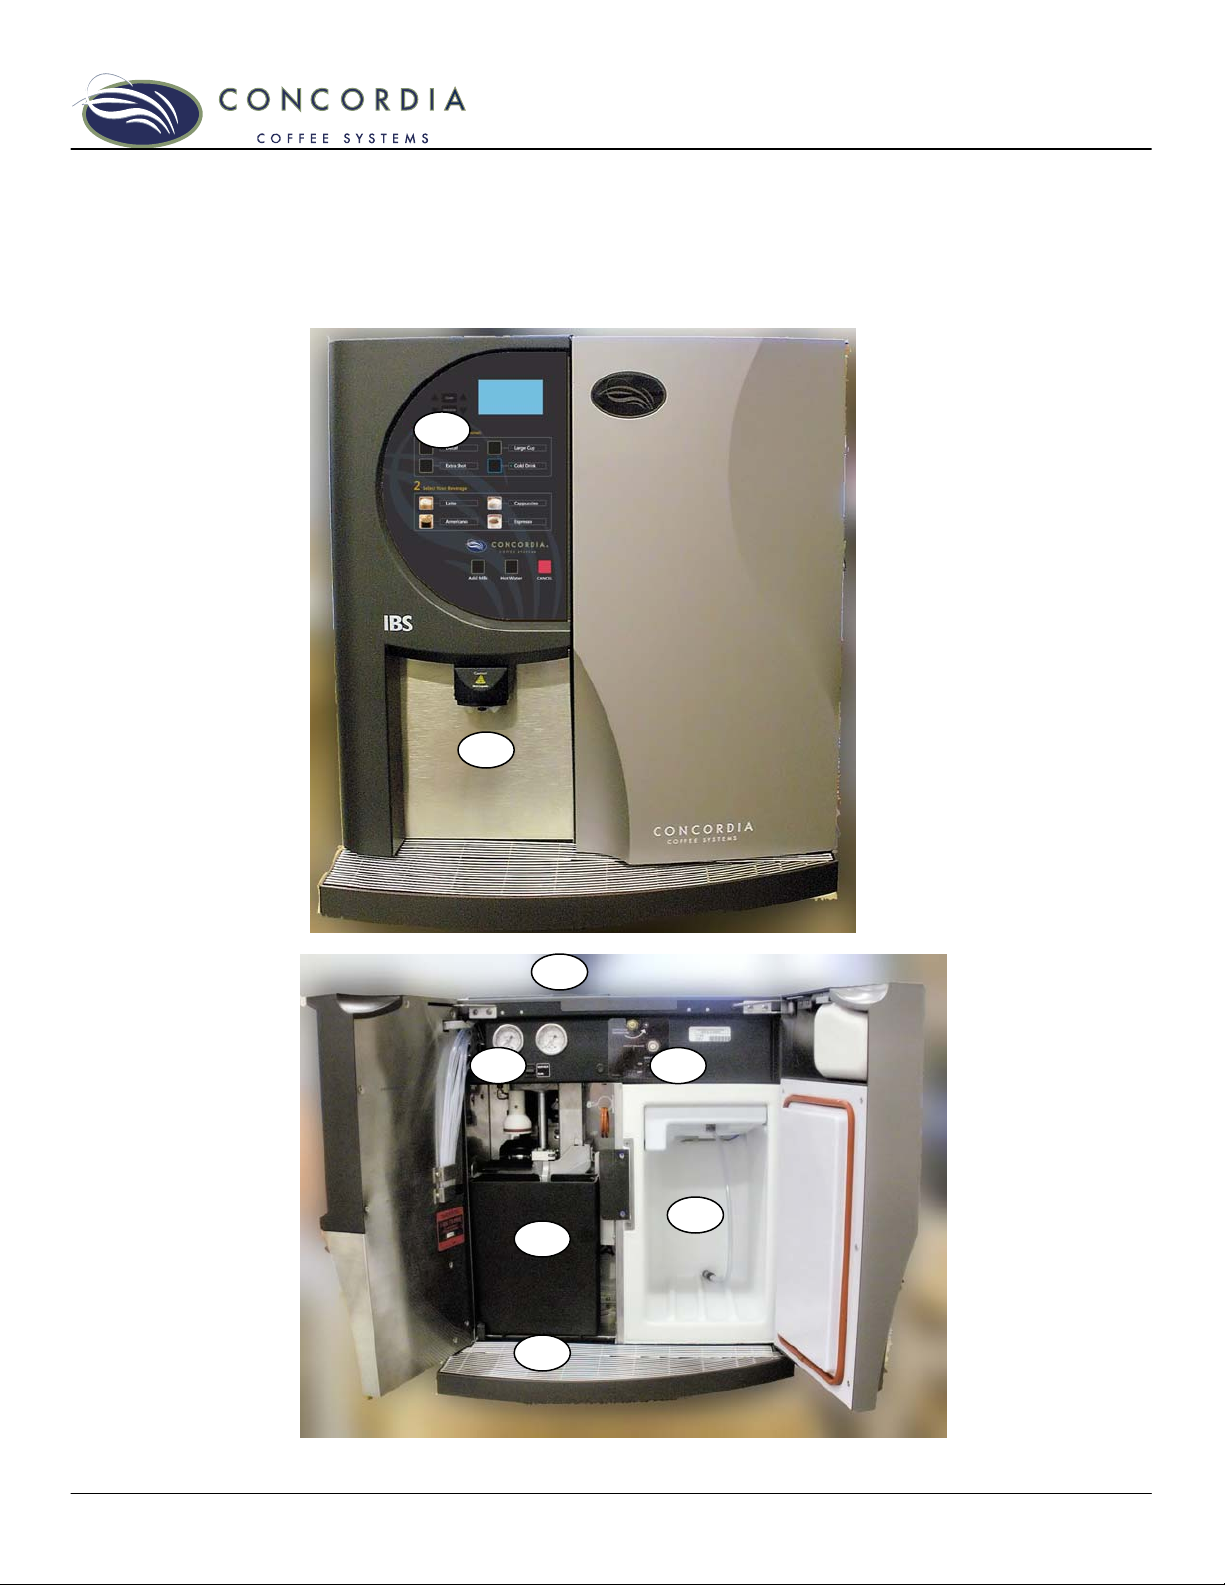
The INTEGRA Machine Components
1. Touch Pad
SHOWN IN TOP PHOTO. The touch pad provides a userfriendly interface for selecting and pouring beverages.
2. Product Outlet
SHOWN IN TOP PHOTO. The product outlet is where
drinks and hot water are dispensed.
3. Power Switch
Located behind the left front door of the machine, the
power switch controls the machine power supply.
4. Drain Tray and Grate
The drain tray and grate direct excess liquid to the
drain.
5. On-Board Refrigeration Unit
The on-board refrigeration unit holds a single 1-gallon
milk container.
6. Service Switch
The service switch is used to alternate between RUN
MODE and SERVICE MODE, and is located behind the
left door below the gauges.
7. Bean Hopper
Located on top of the machine, the bean hopper has two
compartments. Each compartment holds fresh, whole
espresso roast beans.
8. Grounds Bin
The grounds bin holds the used espresso grounds. The
EMPTY GRNDS BIN message will appear on the display
every 35 drinks.
Customer Service (800) 778-0990 3
Page 8
Using the Espresso System
Starting the System
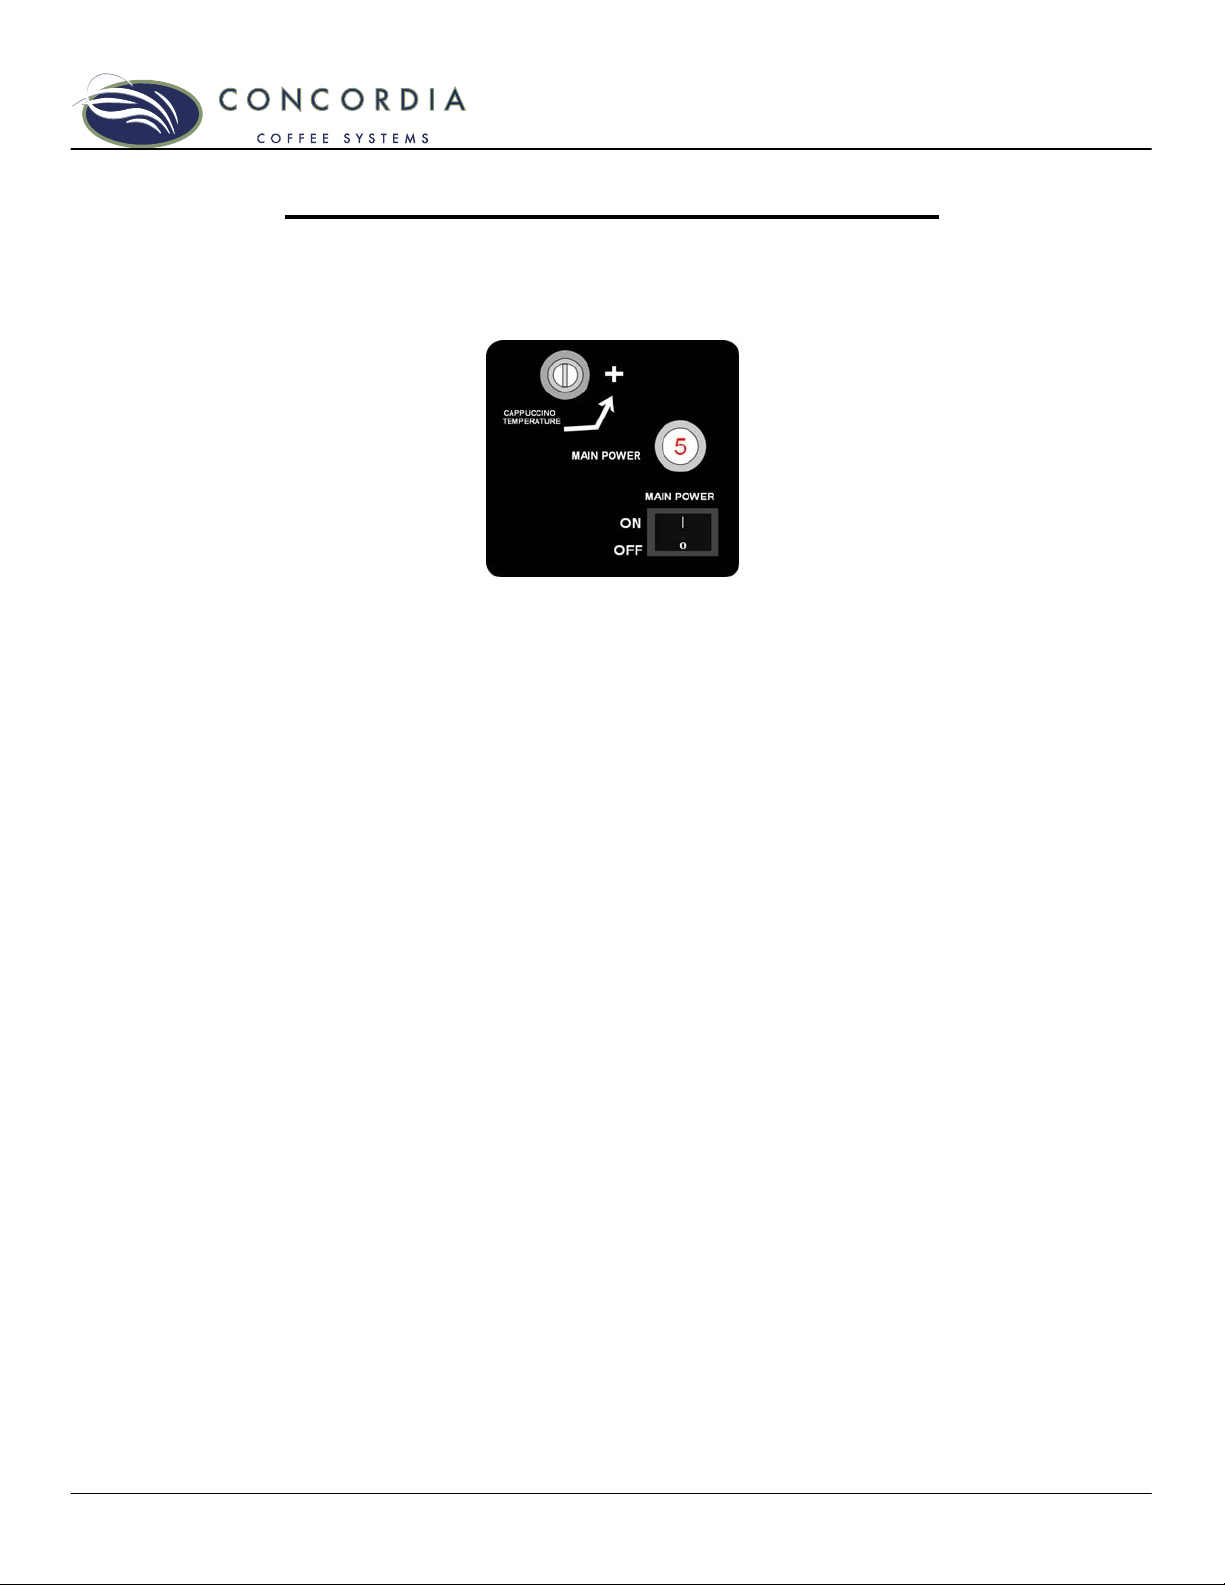
The power switch is located on the panel behind the
refrigeration unit door.
1. Press the power switch to the ON position to start the
machine.
2. Close the door. Machine will not warm up if the door is
open.
3. The display will read:
CALIBRATING
WAIT WARMING UP
Machine warm-up takes approximately 20-30 minutes. During
warm-up, the machine is heating the water, generating steam,
and calibrating the brew group.
WARNING: Wait at least 10 seconds between turning the
machine off and back on again. Quickly flipping the power
switch on and off can blow a fuse within the machine and/or
result in machine malfunction.
Starting System if Display Reads: MACHINE IS OFF
If the power switch is on and the display reads MACHINE IS
OFF, you are unable to pour drinks. In this mode, only the
refrigeration unit is functioning.
To start the machine, press and hold the PROGRAM button. A
tone will sound; when the tone stops, release the PROGRAM
button.
4 Customer Service (800) 778-0990
Page 9
Touch Pad
1
2
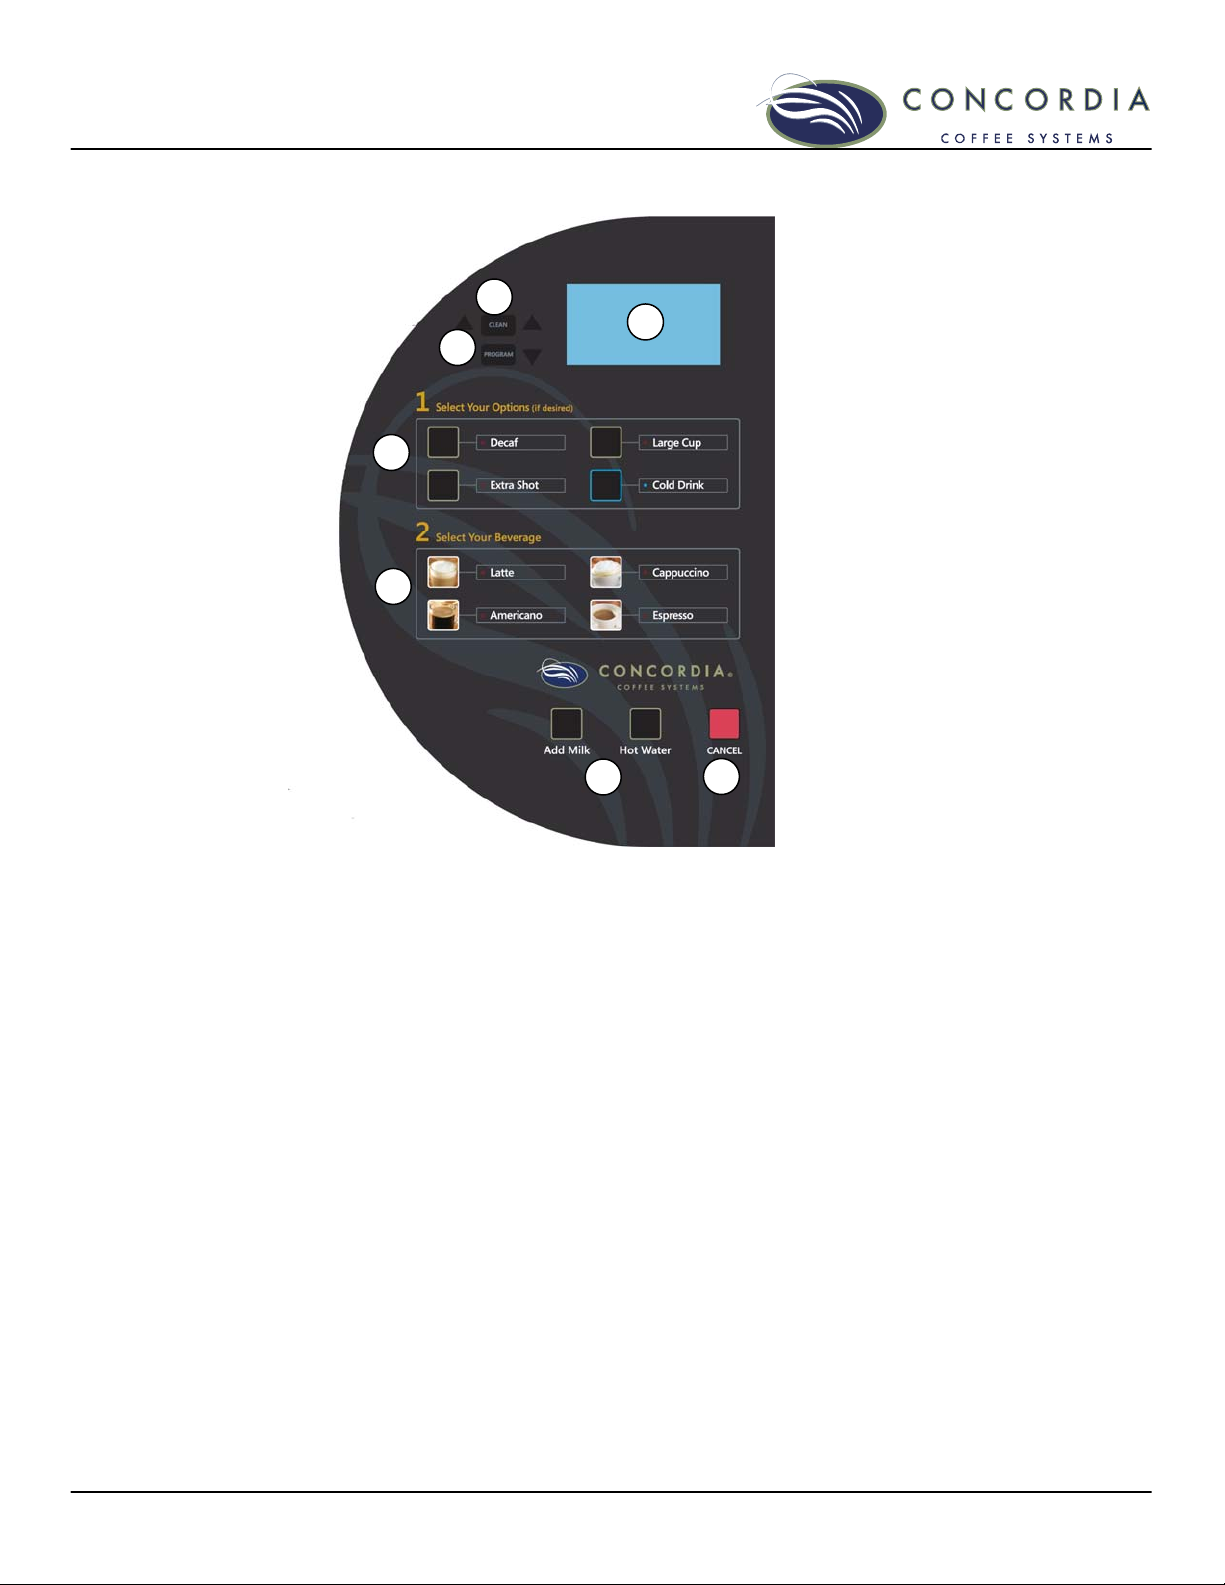
Touch Pad Description
1. OPTIONS
THESE BUTTONS DETERMINE OPTIONS FOR DRINKS.
DECAF
Decaffeinated beans will be used when pouring the
selected espresso-based drink.
EXTRA SHOT
An extra shot of espresso is added to the selected
espresso-based drink.
LARGE CUP
The drink poured will be 16oz/480mL.
COLD DRINK
The drink will be poured using cold milk.
2. DRINKS
THESE BUTTONS DETERMINE WHICH TYPE OF DRINK WILL BE
POURED.
LATTE
Latte is poured.
CAPPUCCINO
Cappuccino is poured.
BREWED COFFEE
Brewed coffee is poured.
5
7
6
3
4
Customer Service (800) 778-0990 5
Page 10

ESPRESSO
Espresso is poured.
3. ADDITIONAL OPTIONS
ADD MILK
3oz. of steamed milk is poured.
HOT WATER
Will pour hot water.
4. CANCEL BUTTON
CANCEL
Will clear current selection(s) or stop the pouring of a
drink.
5. CLEAN BUTTON
AFTER PRESSING THE CLEAN BUTTON, SELECT THE CLEANING
OPTION NEEDED. THE SERVICE SWITCH MUST BE IN THE
SERVICE MODE FOR THIS FUNCTION. SEE THE CLEANING
CARD INCLUDED WITH THE MACHINE FOR FULL CLEANING
PROCEDURES.
6. PROGRAM BUTTON
FOR COMPLETE PROGRAMMING AND SOFTWARE MENU
NAVIGATION INSTRUCTIONS, SEE PAGE 9
MENU SCROLL UP ARROW
Scroll up in menu and submenu categories
MENU SCROLL DOWN ARROW
Scroll down in menu and submenu categories
INCREASE VALUE ARROW
Increase value in submenu category
DECREASE VALUE ARROW
Decrease value in submenu category
PROGRAM BUTTON
Press once for GRAND TOTAL drink statistics
Press 3 times to access main programming menu
7. LCD
THE BLUE SCREEN PROVIDES MESSAGING ABOUT THE STATE
OF THE ESPRESSO MACHINE.
6 Customer Service (800) 778-0990
Page 11
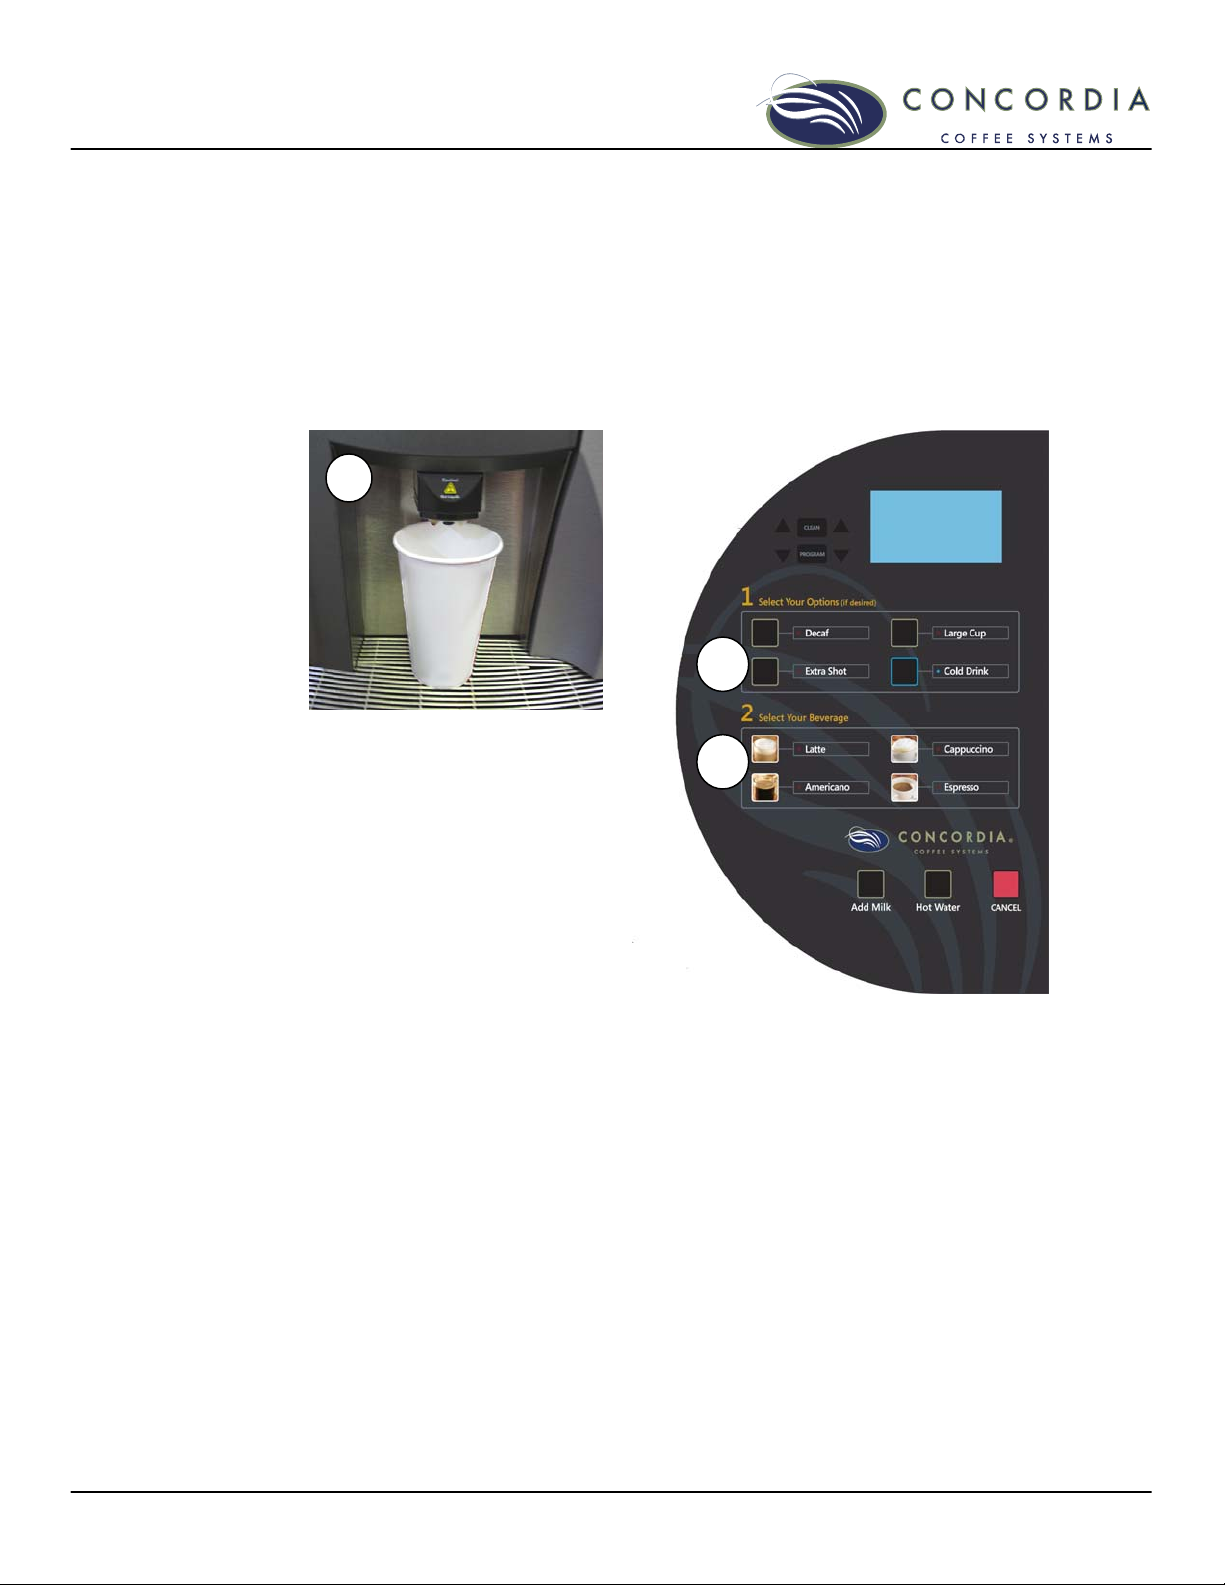
Pouring Drinks
Product Outlet
Drinks are dispensed at the product outlet. Before selecting a
drink, the customer places their selected cup directly under the
product outlet. et.
1. Place Cup Under Product Outlet 1. Place Cup Under Product Outlet
1
2
3
2. Select Drink Options 2. Select Drink Options
Decaf Decaf
Extra Shot Extra Shot
Large Cup Large Cup
Cold Drink Cold Drink
3. Select Drink 3. Select Drink
Latte Latte
Cappuccino Cappuccino
Brewed Coffee Brewed Coffee
Espresso Espresso
To stop a drink To stop a drink
Press the CANCEL button to interrupt the dispensing of a
Press the CANCEL button to interrupt the dispensing of a
beverage.
beverage.
Customer Service (800) 778-0990 7
Page 12

Sample Drinks
LATTE
TO SELECT A REGULAR LATTE:
Press the LATTE button
TO SELECT A LARGE LATTE:
Press the LARGE CUP button
Press the LATTE button
Drink Variations
Make it Decaf
Decaf simply means the drink will be made with decaffeinated
espresso beans.
TO SELECT: Press the DECAF button
Press desired DRINK and OPTION button(s)
8 Customer Service (800) 778-0990
Page 13
Machine Software Overview
Software Programming Menu
Accessing the Programming Menu
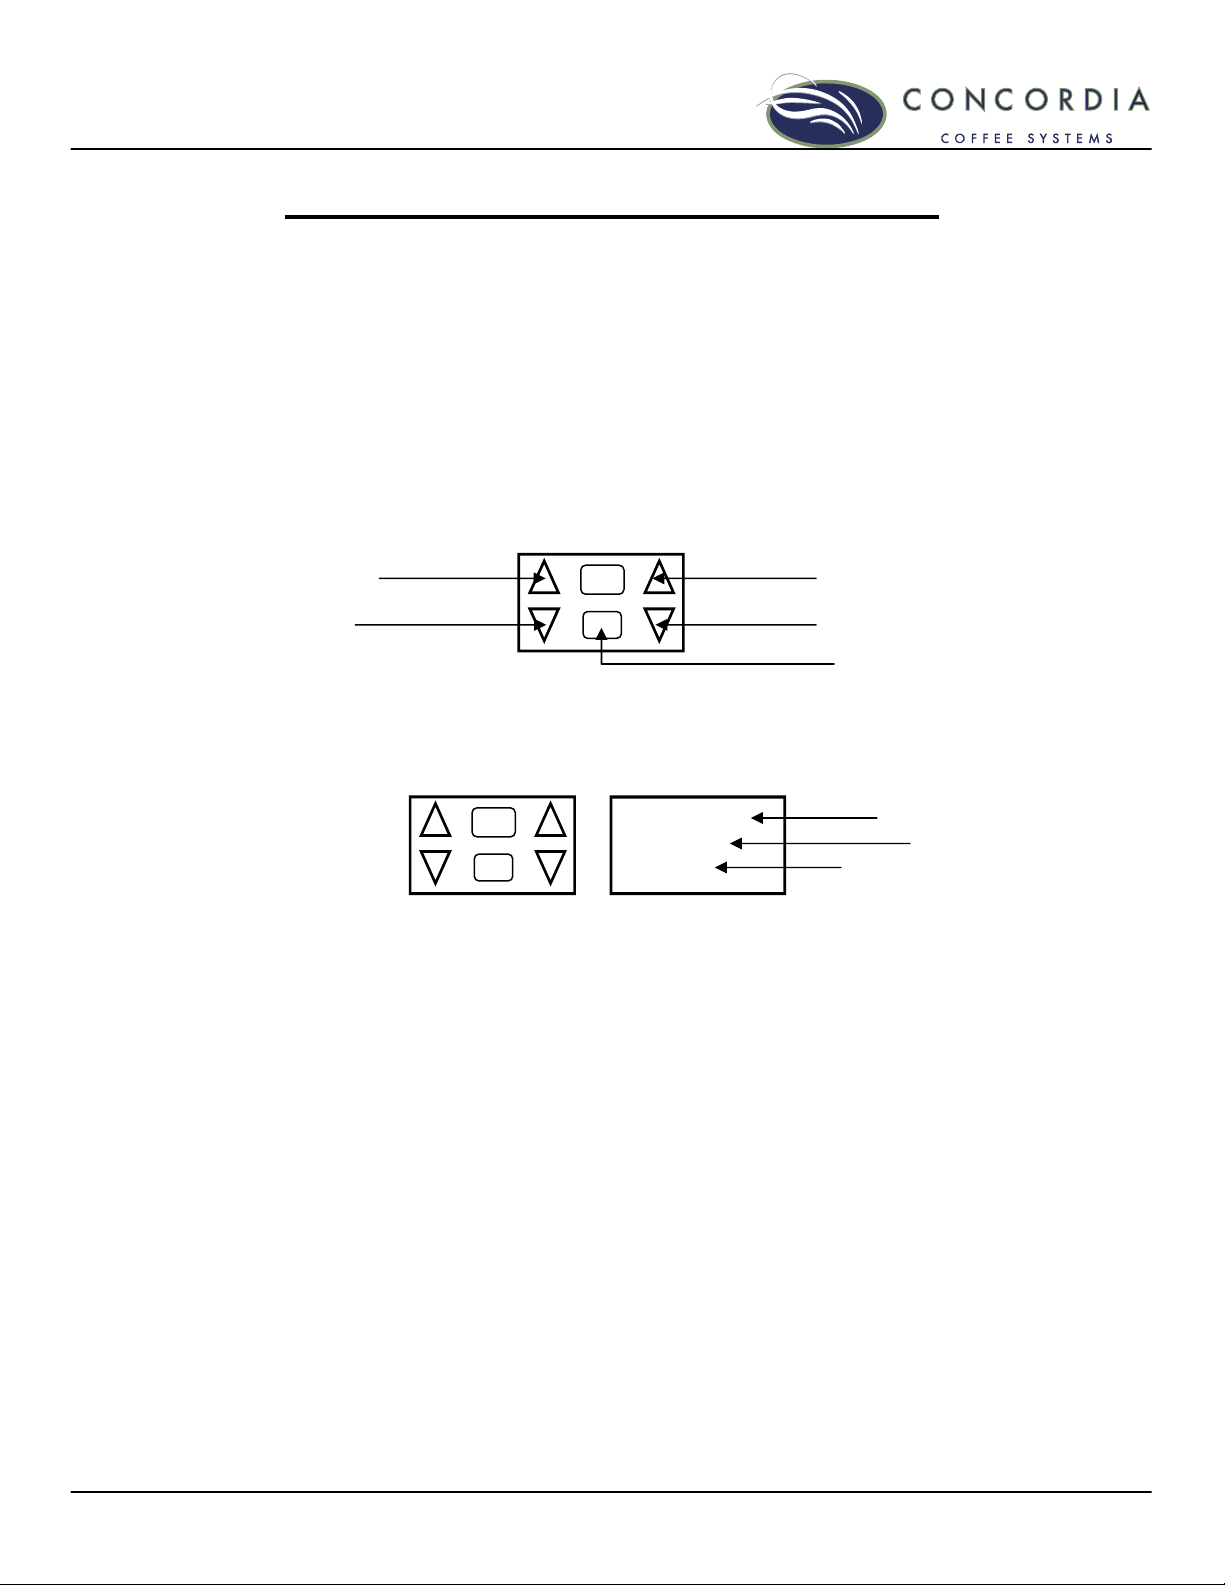
Press the PROGRAM button three times, slowly. You should
hear a tone after each press.
The display will change from SELECT DRINK to SELECT
CATEGORY.
Scrolling in the Menu
Press the SCROLL DOWN arrow to scroll forward.
Press the SCROLL UP arrow to scroll in reverse.
MENU SCROLL UP
MENU SCROLL DOWN
CLEAN
PROGRAM
INCREASE VALUE
DECREASE VALUE
PROGRAM BUTTON
Accessing a Sub-Category
With the desired category appearing in the display, press the
PROGRAM button once to enter the sub-category.
CLEAN
PROGRAM
TEMP SETTING
STEAM
244°C
CATEGORY
SUB-CATEGORY
VALUE
While in the sub-category, the main menu category moves to
the top line of the display, the sub-category appears on the
middle line, and the current value appears on the lower line of
the display.
Changing a Value
Press the INCREASE VALUE arrow to increase the value.
Press the DECREASE VALUE arrow to decrease the value.
Exiting a Sub-Category
Press the PROGRAM button once.
Main menu category will appear in the middle of the display.
Exiting the Main Menu
From any main menu category, press any drink button once.
Display will read: SELECT DRINK
Customer Service (800) 778-0990 9
Page 14

Check Grand Total Drink Statistics
• Press the PROGRAM button once
• The drink GRAND TOTAL appears in the display
• Display will automatically return to SELECT DRINK
after a few seconds
Detailed Total Drink Statistics
• Press the PROGRAM button three times (press slowly,
you will hear a beep after each press)
• SELECT CATEGORY will appear in the display
• Scroll to the sub-category TOTAL DRINK COUNTS
• Press the PROGRAM button
• Press the SCROLL UP arrow to scroll through the
statistics
To Exit
• Press the PROGRAM button once
OR
• Press any DRINK button
Detailed Daily Drink Statistics
Daily statistics are reset after a brew group/shut down clean is
completed.
• Press the PROGRAM button three times (press slowly,
you will hear a beep after each press)
• SELECT CATEGORY will appear in the display
• Scroll to the sub-category DAILY DRINK COUNTS
• Press the PROGRAM button
• Press the SCROLL UP arrow to scroll through the
statistics
To Exit
• Press the PROGRAM button once
• Press any DRINK button
10 Customer Service (800) 778-0990
Page 15

Software
Below is a list of INTEGRA software categories. For information
and instructions on adjusting these settings, please contact
Concordia Customer Service for assistance.
Programming Menu Informational Screens
• GRAND TOTAL
Will display the total number of drinks dispensed.
• PART NUMBER
Will display the part number (version) of the installed
software.
Categories
• TOTAL DRINK COUNTS
Displays the total number of drinks poured since CPU board
installation. This number is reset only when a new CPU
board is installed.
• DAILY DRINK COUNTS
Displays the total number of drinks poured, by drink type,
since the last brew clean.
• TIME & DATE
Contains settings for the internal clock and the automatic
start feature.
• CHK TEMPERATURES
Displays water, refrigerator, and steam temperatures.
• SET TEMPERATURES
Change steam, water and refrigerator settings.
• COFFEE PWDR DOSE
Changes the amount of ground coffee delivered into the
brew chamber.
• SHOT SELECT
Determines the quantity of espresso shots per drink.
• WATER VOLUME
Changes water volume for espresso extraction, brewed
coffee, and hot water button settings.
• MILK TIMINGS
Change milk timings for all drinks, milk butt ons.
• DRINK PRICES
Displays the prices for each drink.
Customer Service (800) 778-0990 11
Page 16

• SPECIAL FEATURES
This category enables or disables the following features:
vending, grounds bin, decaf, hot water button, or steamed
milk button.
• MISCELLANEOUS
Display current software version, load defaults, and reset
the Preventive Maintenance (PM) counter.
• TEST ROUTINES
Used for service diagnostic testing; each component of the
machine can be run independently.
12 Customer Service (800) 778-0990
Page 17
Service Switch
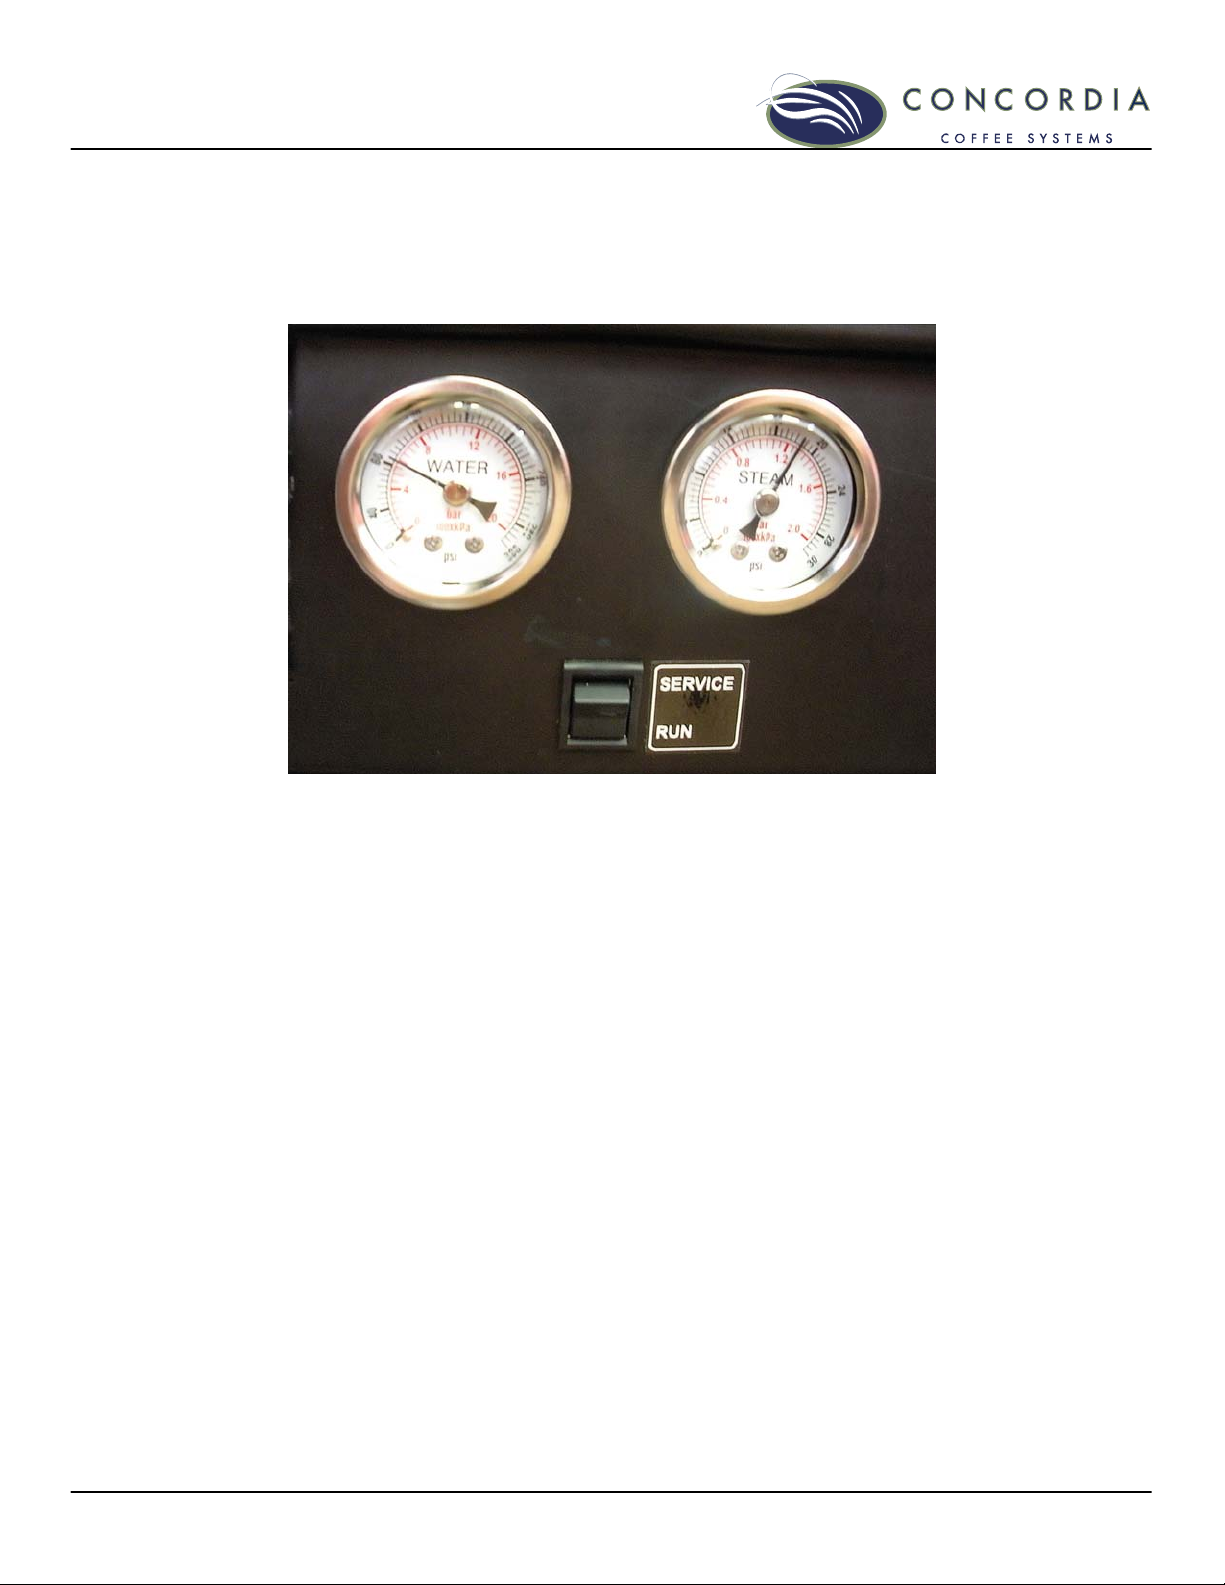
Located behind the left door and below the water and steam
gauges, the service switch is used to place the unit in either
SERVICE or RUN mode.
The Service Switch in the SERVICE position
• The machine will beep and the display will read
SERVICE KEY
• Cleaning and programming buttons are enabled
The Service Switch in the RUN position
• Normal operating position
• Cleaning and programming buttons are disabled
The Service Switch and Cleaning the Machine
During cleaning, the service switch must be in the SERVICE
position.
1. Open the left door
2. Push the service switch to the SERVICE position
3. Follow the cleaning instructions outlined on the supplied
cleaning instruction card
4. Once cleaning is complete, push the service switch back
to SERVICE position
Customer Service (800) 778-0990 13
Page 18

Beans and the Bean Hopper
The INTEGRA is configured to deliver both regular and
decaffeinated espresso beverages.
Whole espresso roast beans are placed in the bean hopper
compartments, which are gravity fed to the grinders. Always
use fresh, whole espresso roast beans to ensure a quality
beverage.
WARNING: Never place espresso roast beans in the grinder
using your hand(s).
WARNING: Do not place ground coffee, or other foreign
materials, in the bean hopper.
Storing Espresso Roast Beans
Espresso roast beans are typically sealed in airtight packaging
by the roaster. Once the bag has been opened, the freshness of
the beans will begin to decrease.
NOTE: Do not store espresso roast beans in a freezer.
Bean Hopper
The large bean hopper compartment (right side) holds
approximately 3lbs/1.5kg of regular beans, and the small bean
hopper compartment (left side) holds approximately 2lbs/1kg of
decaffeinated beans.
The bean hopper must be placed on the machine with the large
bean hopper compartment on the right side, or the hopper will
not properly feed beans into the machine.
Directions for Filling Bean Hopper
1. Remove the hopper lid
2. Pour the beans into the hopper compartments
3. Replace the hopper lid
NOTE: If it is necessary to remove the bean hopper, insert
both hopper stoppers first. Be sure to remove the hopper
stoppers when finished.
DO Use fresh, whole, espresso roast beans.
DO NOT Place ground coffee into the bean hopper.
DO NOT Place foreign materials in the bean hopper.
DO NOT Feed beans into the grinder by hand.
14 Customer Service (800) 778-0990
Page 19
The Hopper Stopper
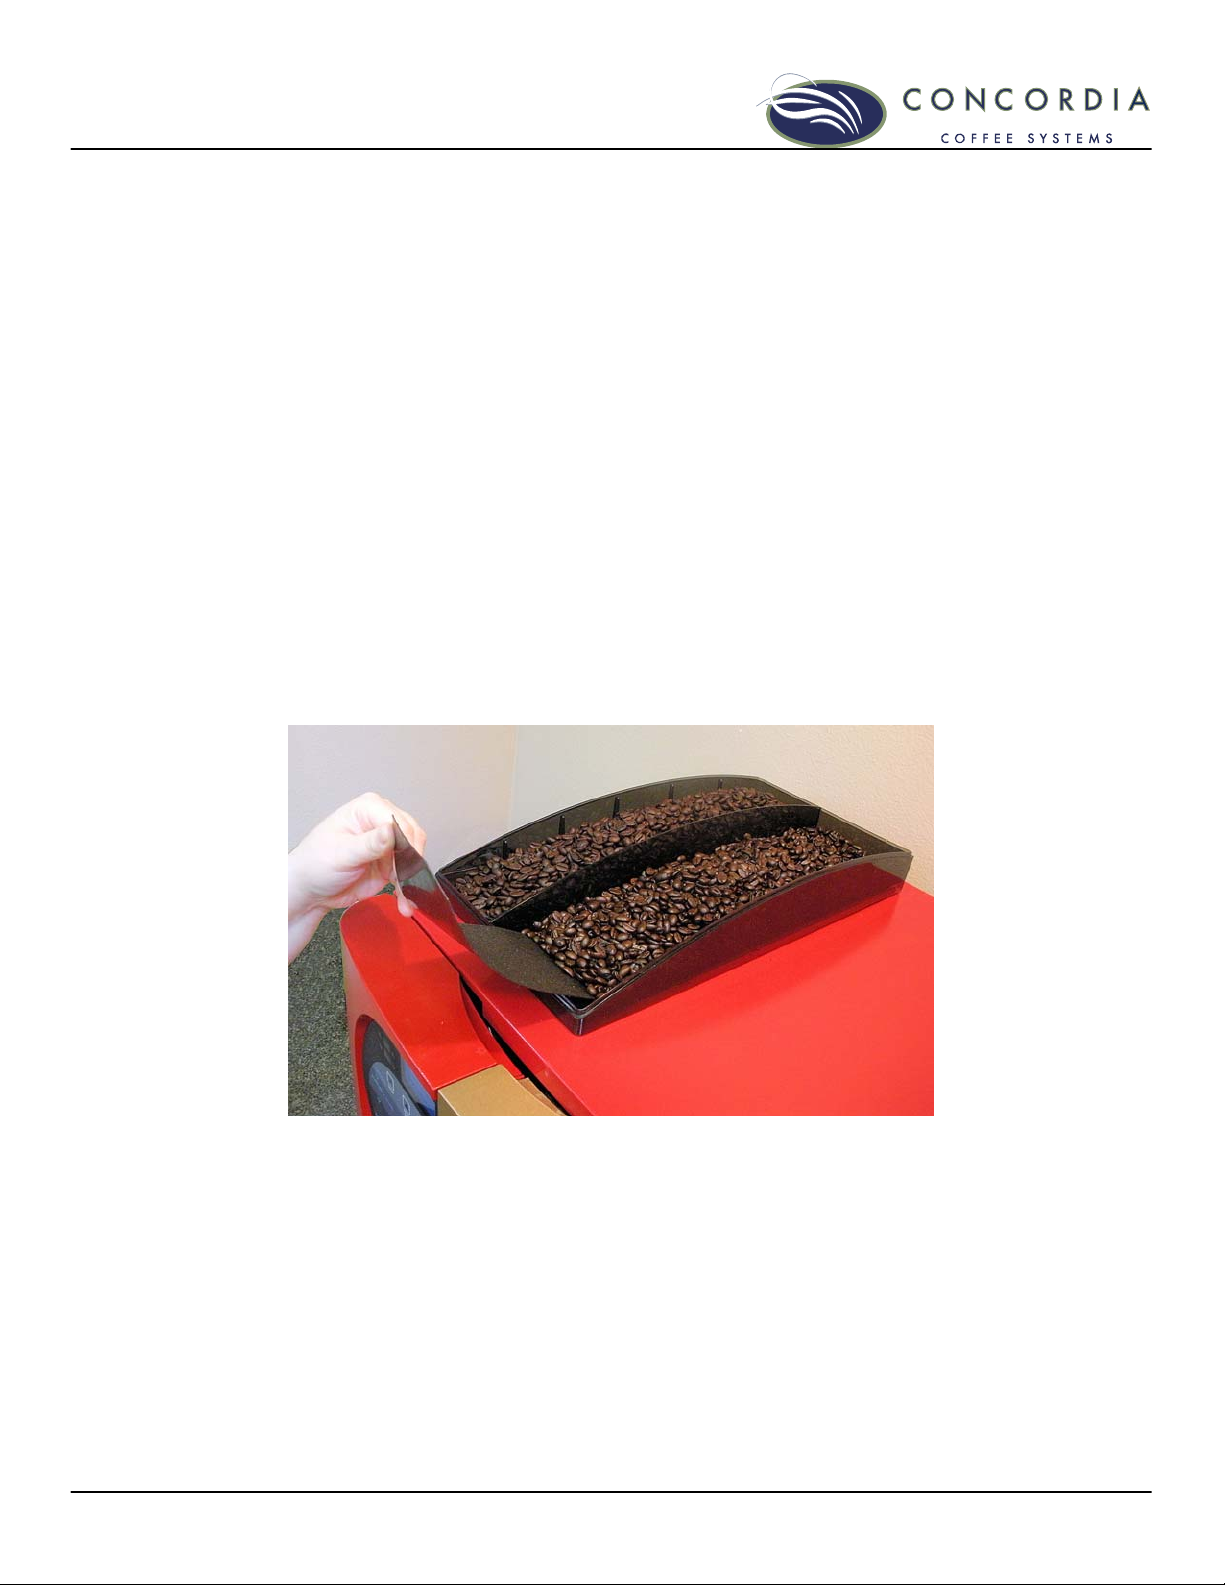
When removing a bean hopper with beans, the hopper stopper
prevents beans from passing through the hopper chute.
Using the Hopper Stopper
1. To insert a hopper stopper, slide it between the beans
and the interior hopper wall.
2. Use pressure when inserting the hopper stopper, to
ensure that there is no space between the interior
hopper wall and the hopper stopper.
3. With both hopper stoppers in place, you can remove a
full hopper from the machine.
NOTE: Both hopper stoppers must be used when removing
the bean hopper.
To remove the hopper stoppers once the bean hopper is back in
its proper position on top of the espresso machine, simply pull
the hopper stoppers out from the bean hopper compartments.
Removing a Bean Hopper
Once both hopper stoppers are in place, simply lift the bean
hopper upwards.
Customer Service (800) 778-0990 15
Page 20
Milk and the Milk System
Refrigeration Unit
The INTEGRA features an on-board refrigeration unit to house
the milk used for drinks. The refrigeration unit is designed to
accommodate one standard, off-the-shelf 1-gallon milk
container.
The following types of milk can be used in the INTEGRA:
• Whole
• 2%
• 1%
• Non-Fat
WARNING: Do NOT use any type of flavored milk in the milk
delivery system. The sugars in flavored milk (including eggnog)
can damage the machine and clog the milk delivery tubes.
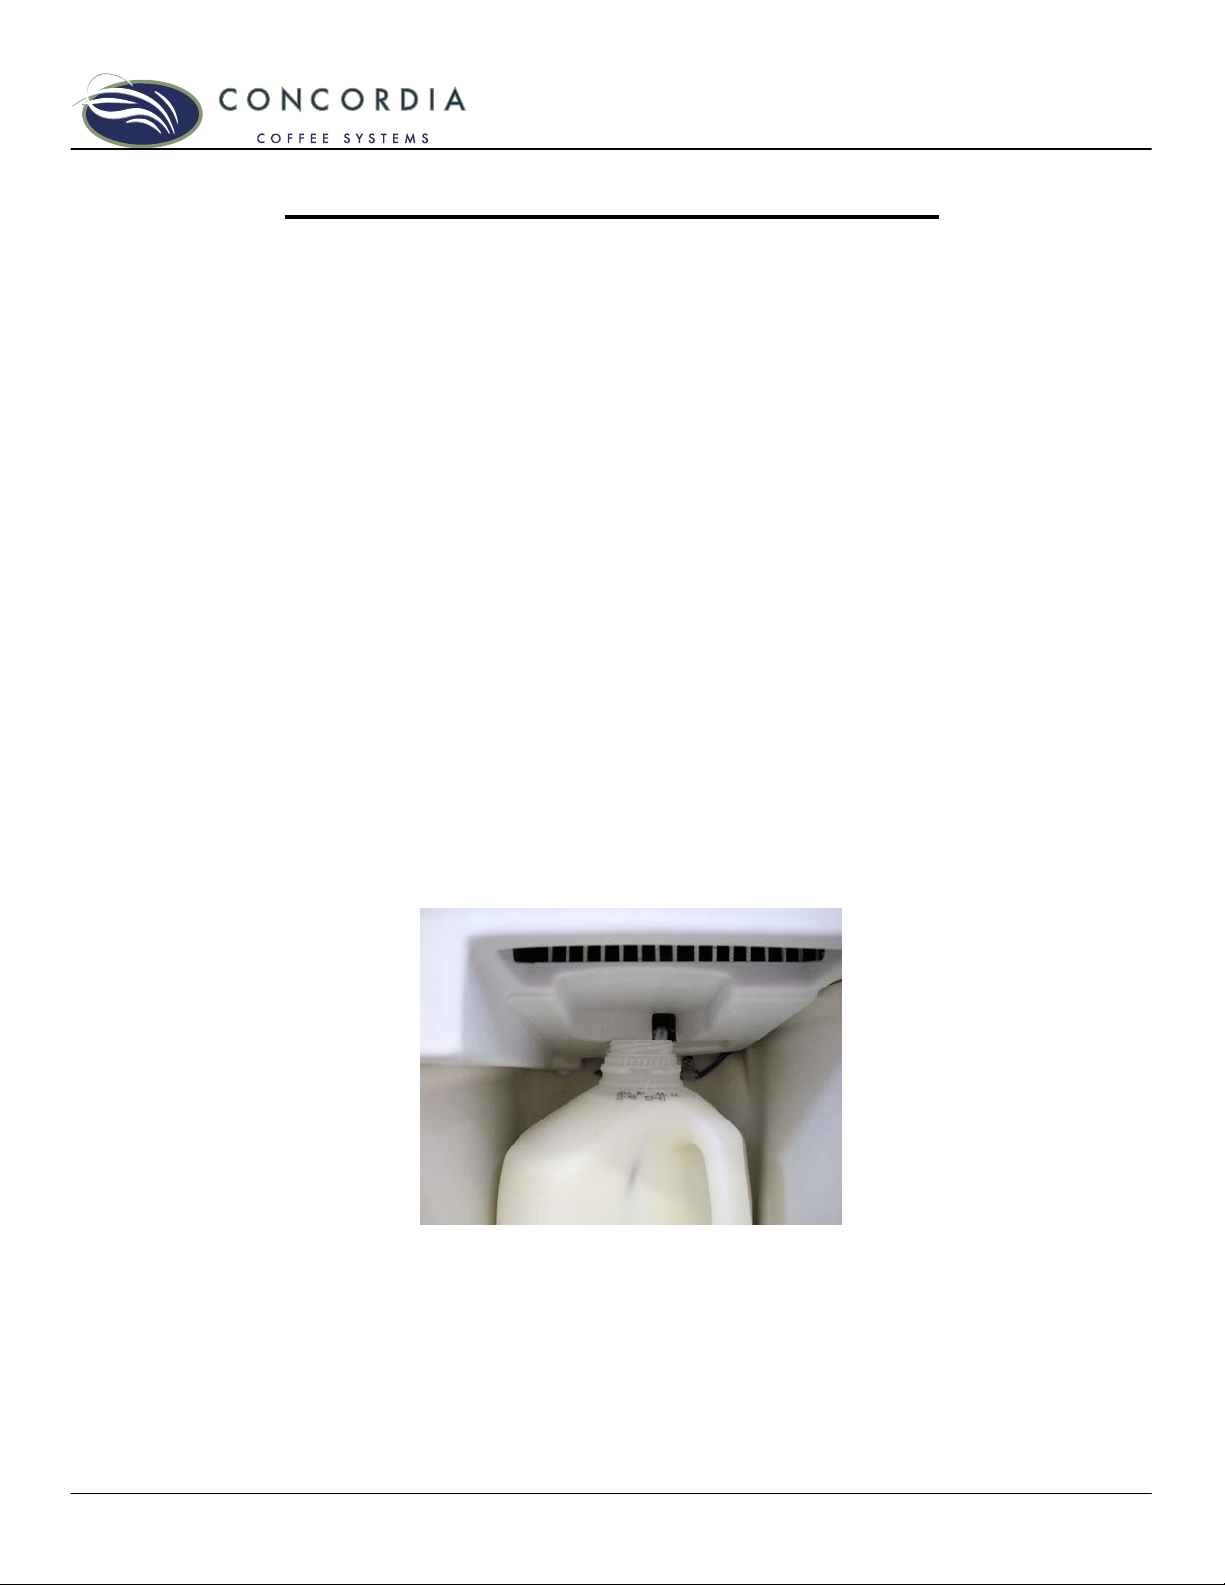
Placing Milk in the Machine
1. Open the refrigeration unit door and partially place the
opened milk container in the refrigeration unit.
2. Place the milk pick-up tube in milk container.
3. Slide the container into the refrigeration compartment
while feeding the milk pick-up tube fully into the milk
container.
4. Close refrigeration unit door.
DO make sure milk pick-up tube is fed into the middle
of the container.
DO NOT place milk pick-up tube into the milk container
handle.
DO NOT kink or bend the milk pick-up tube.
DO NOT pull excessively on milk pick-up tube.
16 Customer Service (800) 778-0990
Page 21

Checking Refrigeration Unit Temperature
The temperature for the refrigeration unit is always displayed in
the machine’s LCD.
If the refrigeration unit door has been open for an extended
period, it is normal that the temperature will rise. To have the
refrigeration unit return to the proper temperature, close the
refrigeration unit door and check the temperature in an hour. If
the temperature is not correct at that time, please contact
Customer Service.
Customer Service (800) 778-0990 17
Page 22

Cleaning and Maintenance
Cleaning
To maintain the machine warranty, ensure sanitation, avoid
mechanical failure, and ensure continual operation, the
INTEGRA MUST be cleaned and maintained on a regular basis.
Concordia cleaning products must be used in order to ensure
proper cleaning and to maintain machine warranty. Please see
page 22 for ordering information.
NOTE: Do NOT store cleaning products near consumables.
Cleaning Timers
The milk system and brew group must be cleaned every 24
hours, or after every 100 drinks, whichever occurs first.
All timers start after the first drink is poured following a
cleaning. For example, if you clean the machine on Friday
night, and it is idle Saturday and Sunday, the timers are not
started until the first drink is poured Monday morning.
Auto-Rinse Cycle
The machine has the option of an automatic rinse cycle to run
at a pre-set interval. A loud tone will sound as a warning before
the auto-rinse cycle begins. The display will read: DANGER!
HOT WATER.
During the auto-rinse cycle, hot water runs through the brew
system and steam runs through the milk delivery system to
provide a quick rinse during slow usage periods.
You cannot pour drinks during the auto-rinse cycle
(approximately 30 seconds).
18 Customer Service (800) 778-0990
Page 23

Daily Cleaning Procedures
Daily cleaning and maintenance can be performed in less than
15 minutes a day!
1. Clean the milk system
2. Clean the brew group
3. Empty grounds bin
4. Clean the drain grate and drain tray
5. Clean exterior surfaces
6. Clean the interior of refrigeration unit
7. Clean milk dispenser nozzle
To perform cleaning procedures, the service switch must be in
the SERVICE position. For more information about the service
switch, please see page 13.
Clean the Milk System
Every 24 hours or after 100 drinks are poured, the machine’s
display will read MILK CLEAN DUE. The milk system must be
cleaned within two hours or 50 drinks, or the machine will be
disabled and will stop dispensing drinks. When this happens,
the display will read RUN MILK CLEAN! Once the milk system
is cleaned, the system will reset and normal operation will
resume.
For complete instructions on cleaning the milk system, please
see the cleaning card included with the machine.
Clean the Brew Group
Every 24 hours, the machine’s display will read BREW CLEAN
DUE. The brew group must be cleaned within two hours, or the
machine will be disabled and will stop dispensing drinks. When
this happens, the display will read RUN BREW CLEAN! Once
the brew group is cleaned, the system will reset and normal
operation will resume.
For complete directions on cleaning the brew group, please see
the cleaning card included with the machine.
Customer Service (800) 778-0990 19
Page 24
K
Empty Grounds Bin
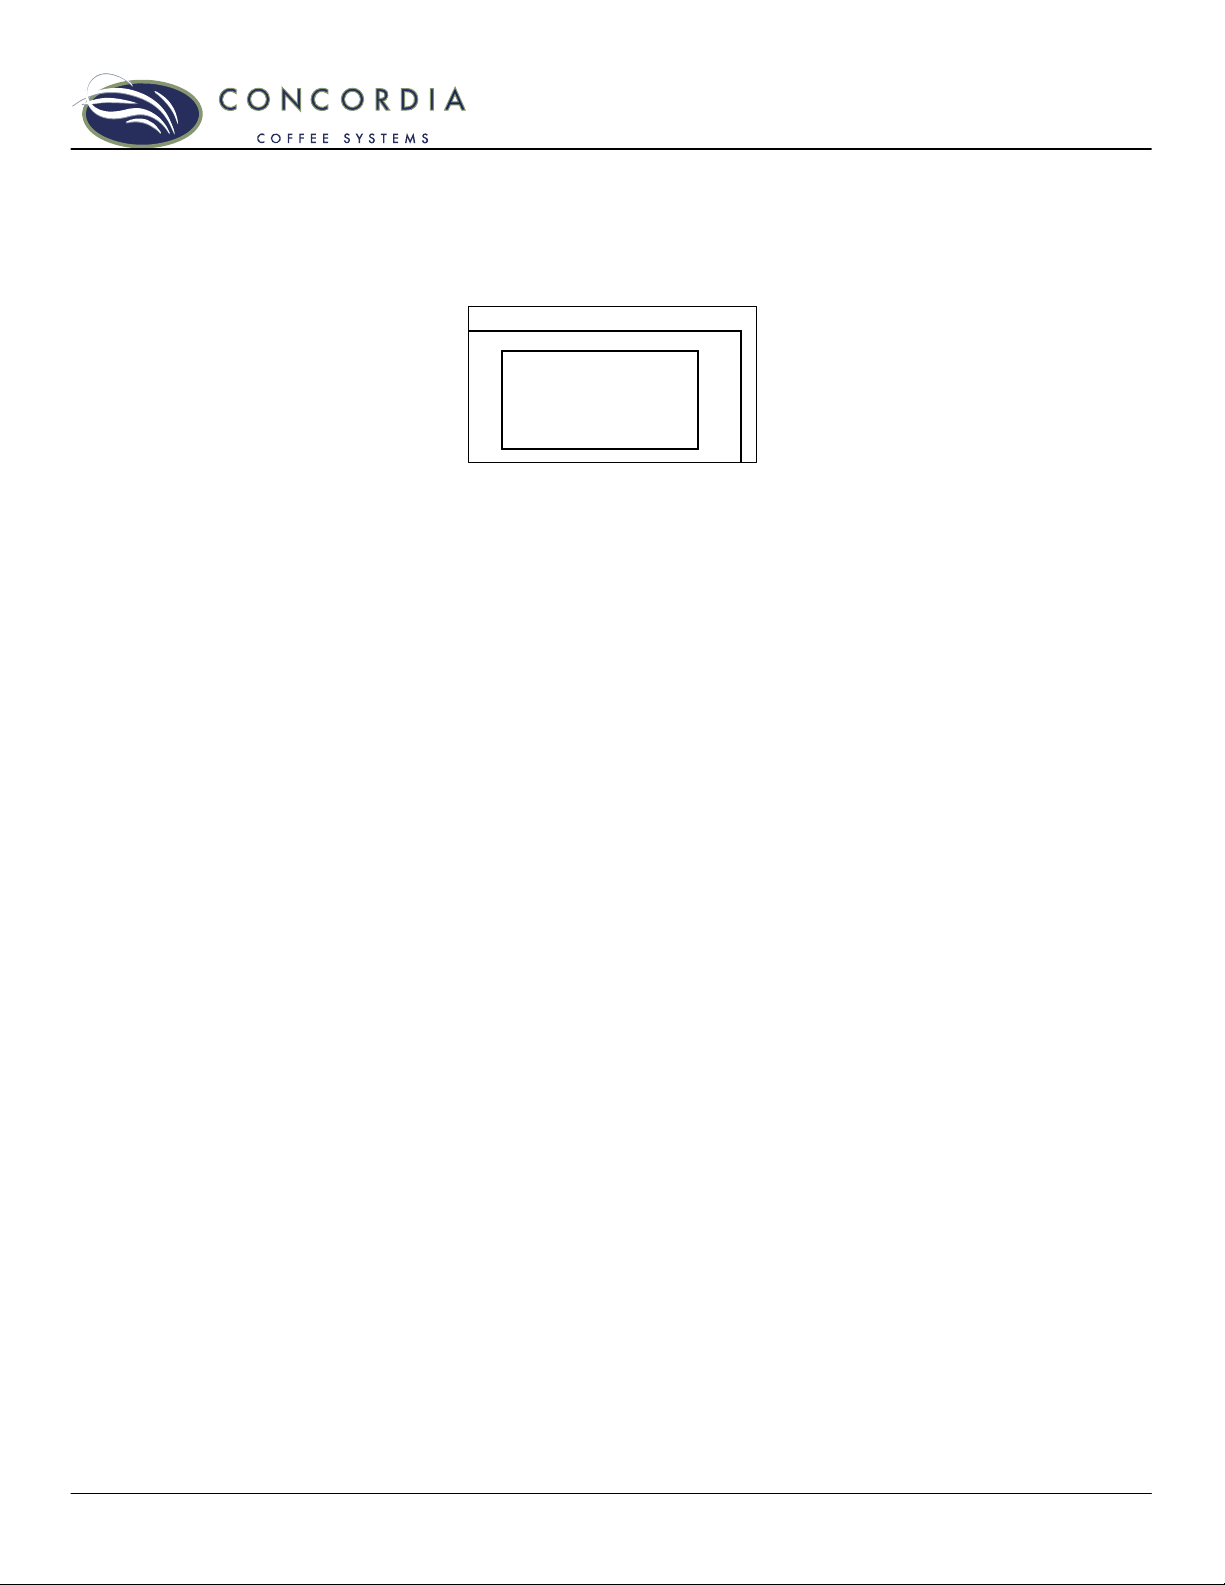
The grounds bin is located behind the left front door, and holds
the used espresso grounds. The EMPTY GRNDS BIN message
will appear on the display every 35 drinks.
SELECT DRIN
EMPTY GRNDS BIN
To empty the grounds bin:
1. Open the left front machine door.
2. Remove the grounds bin (black box).
3. Discard the used grounds into a waste receptacle. Keep
the grounds bin out of machine for at least six seconds –
this will clear the EMPTY GRNDS BIN message from
the LCD display.
4. Wipe out residue from the grounds bin. Rinse out as
necessary.
5. Replace the grounds bin into the machine. Be sure to
push it in all the way!
6. Close the left front machine door.
NOTE: Always empty the grounds bin each time it is
removed. Each time the grounds bin is removed for
more than six seconds, the grounds bin counter is reset
to zero and an overflow may later occur if the grounds
bin is not emptied.
Clean Drain Grate and Drain Tray
1. Remove the drain grate and clean with sanitizer to
remove residue.
2. The drain grate can be placed in a dishwasher, if
desired.
3. Clean the black plastic drain tray with towel moistened
with soap and water. Do NOT use bleach or any other
chemical cleaner.
Clean Exterior Surfaces
1. Clean the exterior of the machine area using a towel
moistened with sanitizer.
2. Clean the doors and the front panel of the machine.
20 Customer Service (800) 778-0990
Page 25

3. Thoroughly clean around the drink dispensing area.
Wipe with a wet towel.
4. If further cleaning is necessary, clean using mild dish
soap mixed with warm water.
WARNING: To avoid contact with chemicals and hot
water, do not clean the drink dispensing area during the
milk system clean or brew system clean processes.
Clean Interior of Refrigeration Unit
1. Remove the milk container.
2. Using a cloth or paper towel, wipe up any spilled milk.
3. Use a mixture of soap and water to clean interior walls
of the refrigeration unit, and the milk pick-up tubes.
4. Return the milk container to the refrigeration unit.
WARNING: Do NOT use bleach to clean any part of
the refrigeration units.
Refill Consumables
Refill all beans and milk, as needed.
Clean Milk Dispenser Nozzle
In order to ensure no cleaning chemicals remain, wipe down
the milk dispenser nozzle with a moistened towel. Clean with a
mild soap and water mixture and rinse thoroughly.
Monthly Cleaning Procedures
Check Air Filter
Check the filter monthly for buildup of dust and grime. When
dirty, replace filter.
Removing the Air Filter
The air filter is located to the upper right of the refrigeration
unit.
1. Open th e refrigeration unit door. Filter located in upper
right hand corner.
2. Pull air filter forward to remove.
3. If dirty, replace with new air fi lter. To order an air filter ,
call Concordia Customer Service.
NOTE: Failure to replace a dirty air filter may cause damage to
the machine’s cooling system.
Customer Service (800) 778-0990 21
Page 26
Clean Bean Hoppers
1. Insert a hopper stopper in each bean hopper
compartment.
2. Remove bean hopper from machine.
3. Empty beans into clean container.
4. Clean the inside of both bean hopper compartments with
warm soapy water, and rinse thoroughly.
WARNING: Do not wash a bean hopper in a
dishwasher.
5. Dry the inside of the bean hopper.
6. Ensure the hopper stoppers are in place.
7. Refill the bean hopper compartments with beans.
8. Place the bean hopper in its proper position on machine.
9. Remove the hopper stoppers.
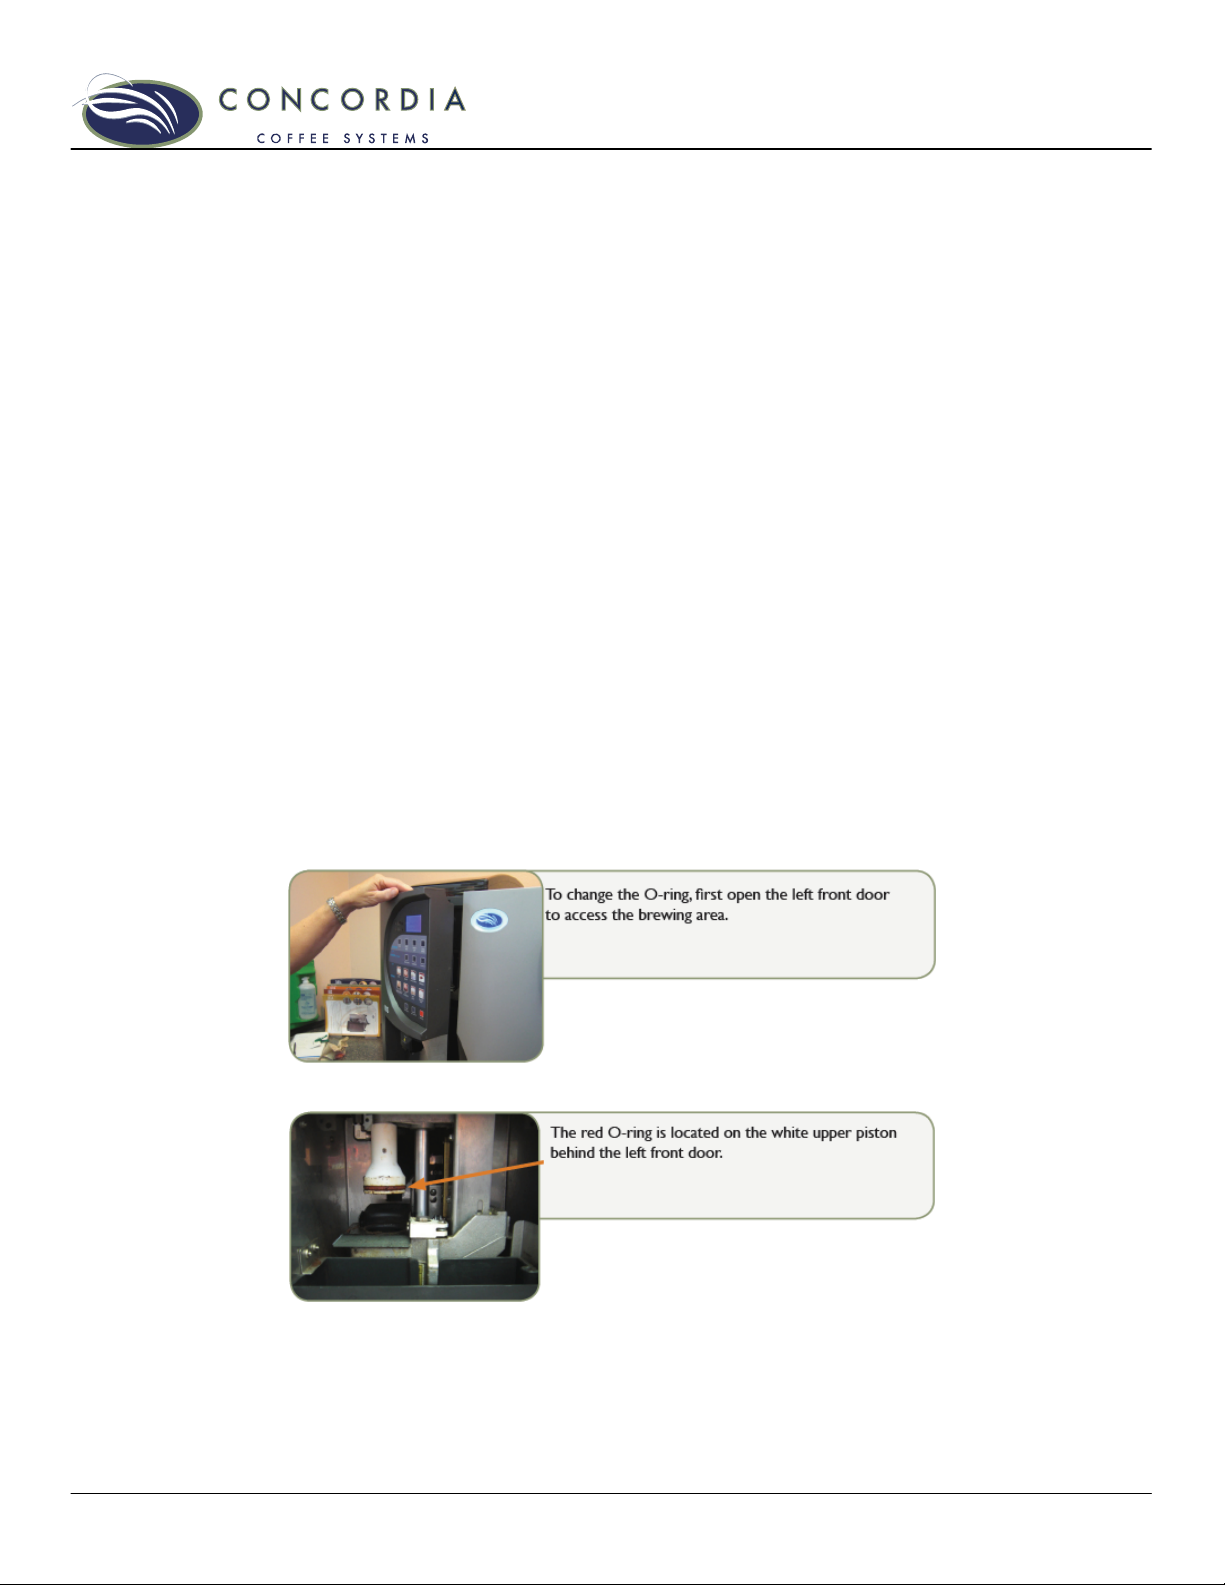
Replace Upper Piston O-ring
Replacement of the upper piston O-ring is required every
5,000-drink cycles. When the message “REPLACE O-Ring” is
displayed, follow the procedure below.
22 Customer Service (800) 778-0990
Page 27
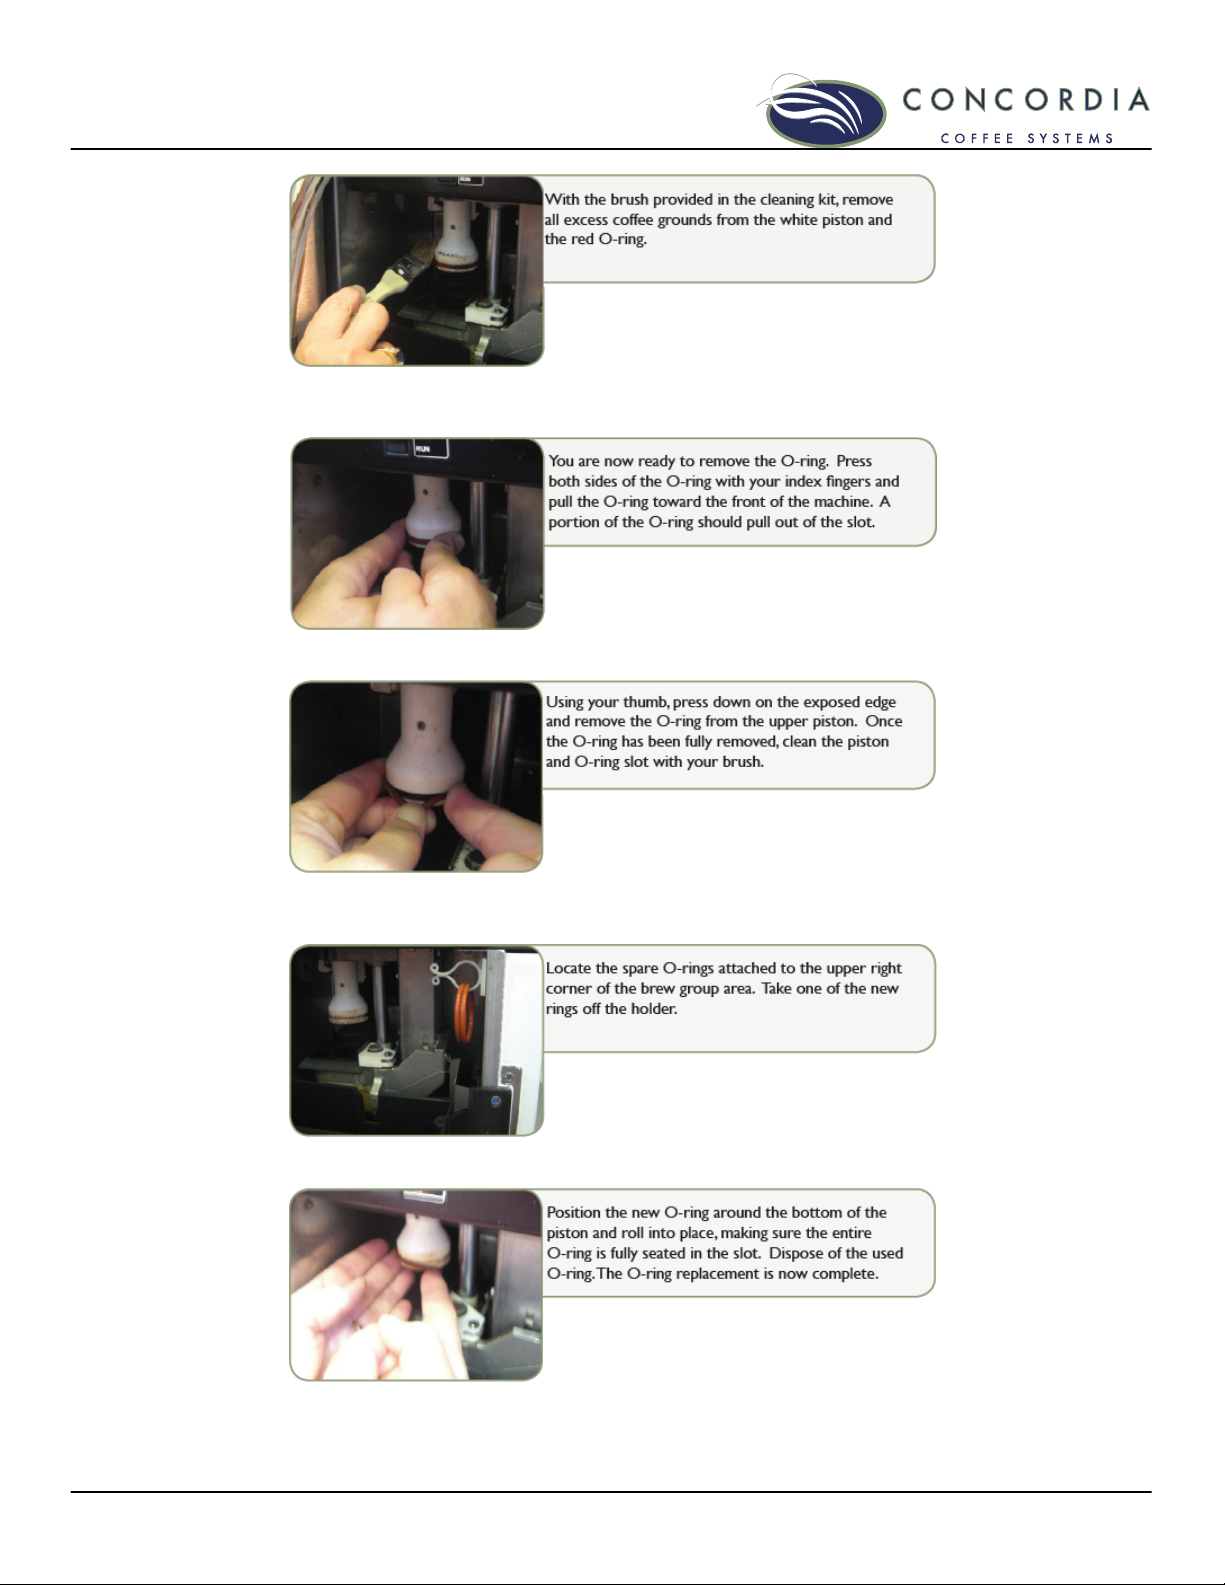
Replacing Upper Piston O-ring continued…
IMPORTANT: Remove all caked-on coffee grounds from the groove-
front and back.
Customer Service (800) 778-0990 23
Page 28
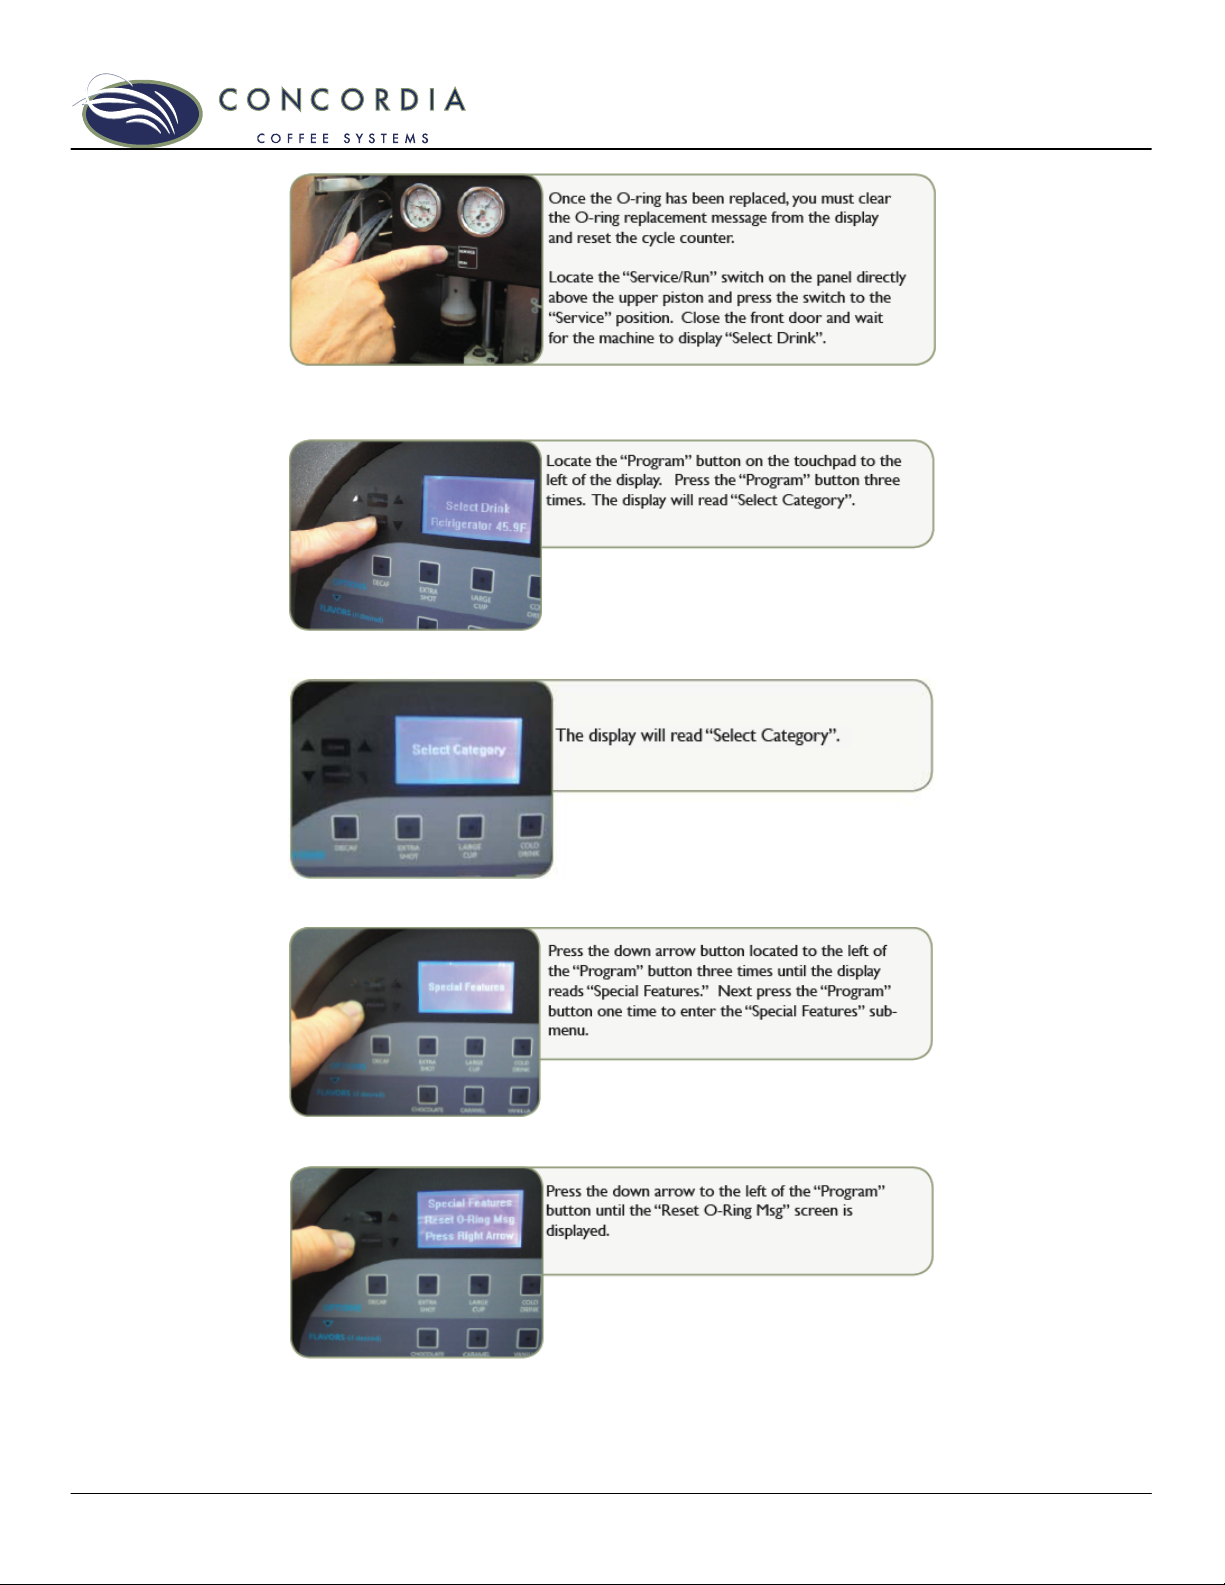
Replacing Upper Piston O-ring continued…
24 Customer Service (800) 778-0990
Page 29
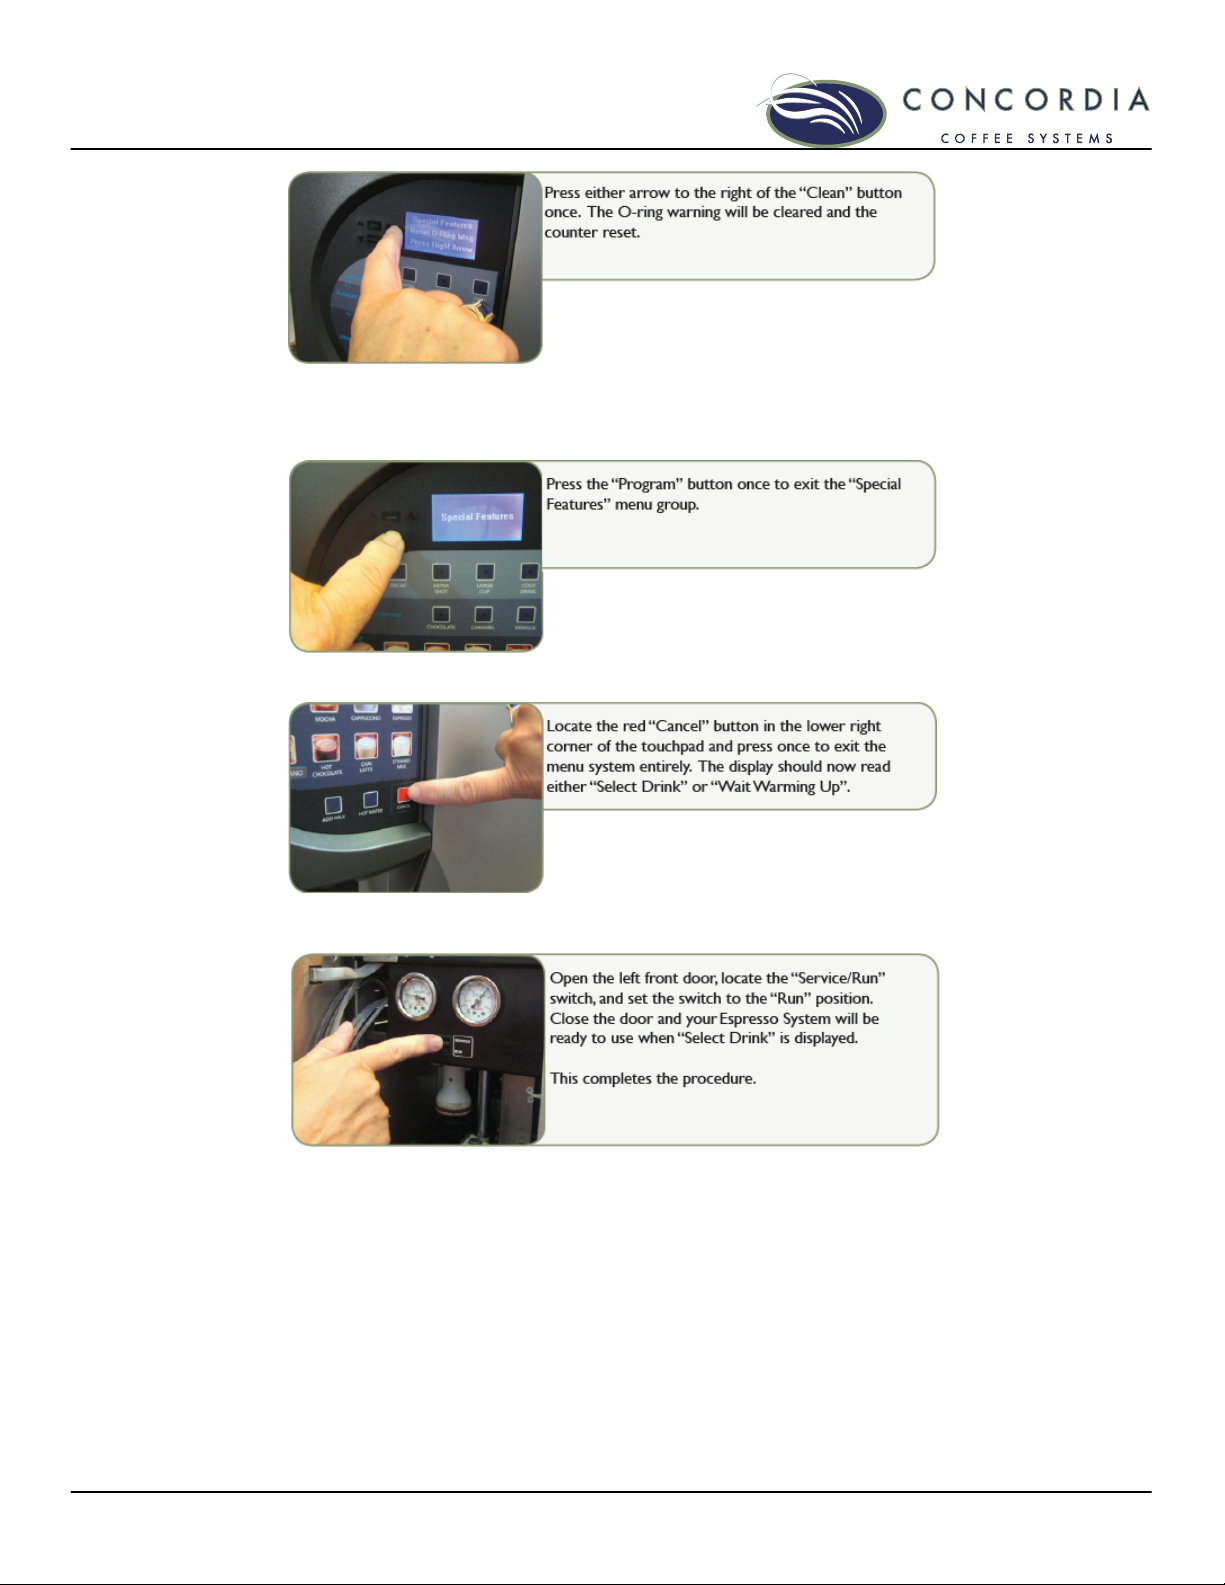
Replacing Upper Piston O-ring continued…
Customer Service (800) 778-0990 25
Page 30
Preventive Maintenance
The Preventive Maintenance (PM) Service Call ensures
continued optimal operation of the machine through the
proactive replacement, cleaning and adjustment of internal
components. Preventive Maintenance is required to maintain
the warranty and extended service agreements.
Preventive Maintenance must be preformed every 10,000
drinks by a Certified Technician. The INTEGRA is equipped to
monitor the total drink statistics, and display a REQUEST PM
message when the machine reaches 10,000 drinks.
When the REQUEST PM message appears, call Concordia
Service to schedule a Preventive Maintenance Service Call.
Ordering Cleaning and Replacement Items
The following items can be ordered for the INTEGRA:
PART
Hopper Stopper
Quick Reference Guide: Brew Group and Milk System Cleaning
Card
6-Month Cleaning Kit (includes Milk System Cleaner #1, Milk
System Cleaner #2, Brew Group Cleaning tablets)
To order any of these items, simply call Concordia Service.
26 Customer Service (800) 778-0990
Page 31
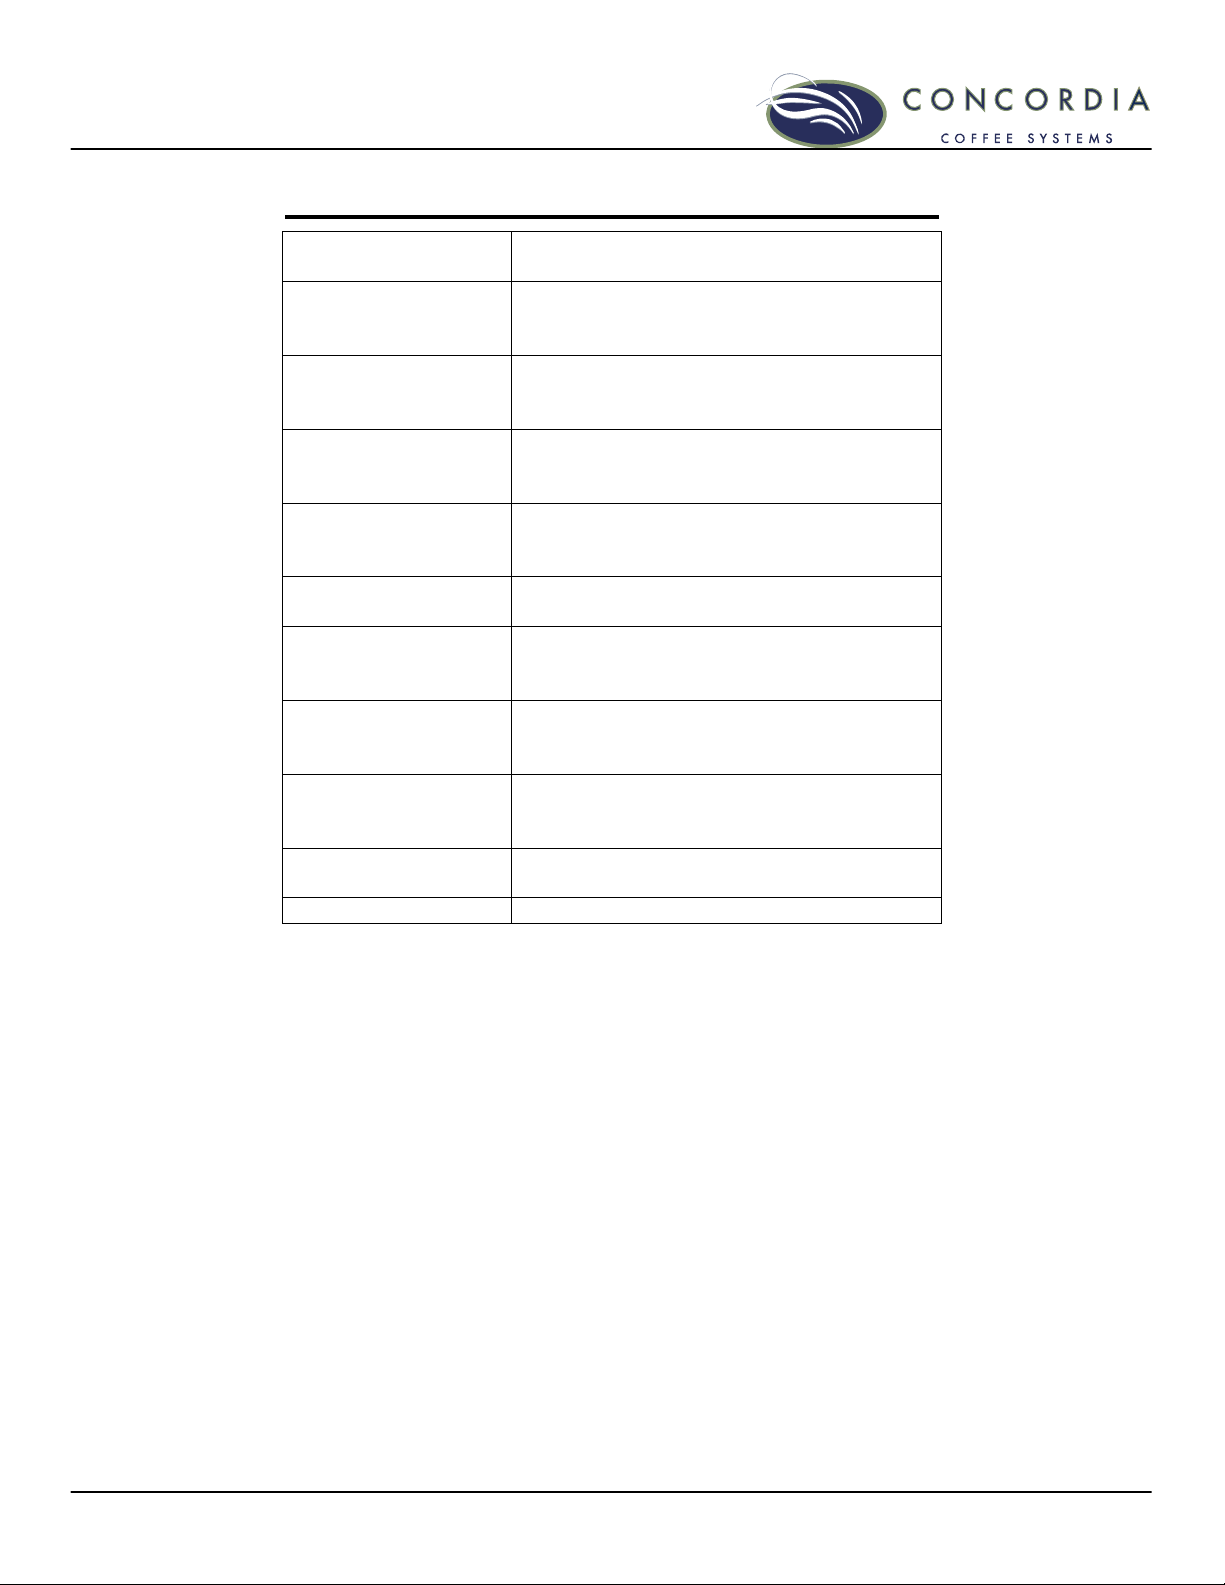
Operational Messages
DISPLAY
MESSAGE
BREW CLEAN DUE
MILK CLEAN DUE
RUN MILK CLEAN!
RUN BREW
CLEAN!
EMPTY GRNDS
BIN
MACHINE IS OFF
NO BEANS
(REGULAR)
NO BEANS
(DECAF)
NO MILK
MILK ONLY Coffee-based drinks are unavailable.
WHAT TO DO
Clean the brew group. For cleaning
procedures, see the cleaning card
included with the machine.
Clean the milk system. For cleaning
procedures, see the cleaning card
included with the machine.
The milk system must be cleaned to
resume operation. See the cleaning
card included with the machine.
The brew group must be cleaned to
resume operation. See the cleaning
card included with the machine.
Empty the grounds bin. See page 20.
To turn the machine on, press and hold
the PROGRAM button until the tone
stops, see page 4.
Fill right bean hopper.
Stir beans to loosen them.
Fill left bean hopper.
Stir beans to loosen them.
Replace the milk supply in the
refrigeration unit.
Customer Service (800) 778-0990 27
Page 32
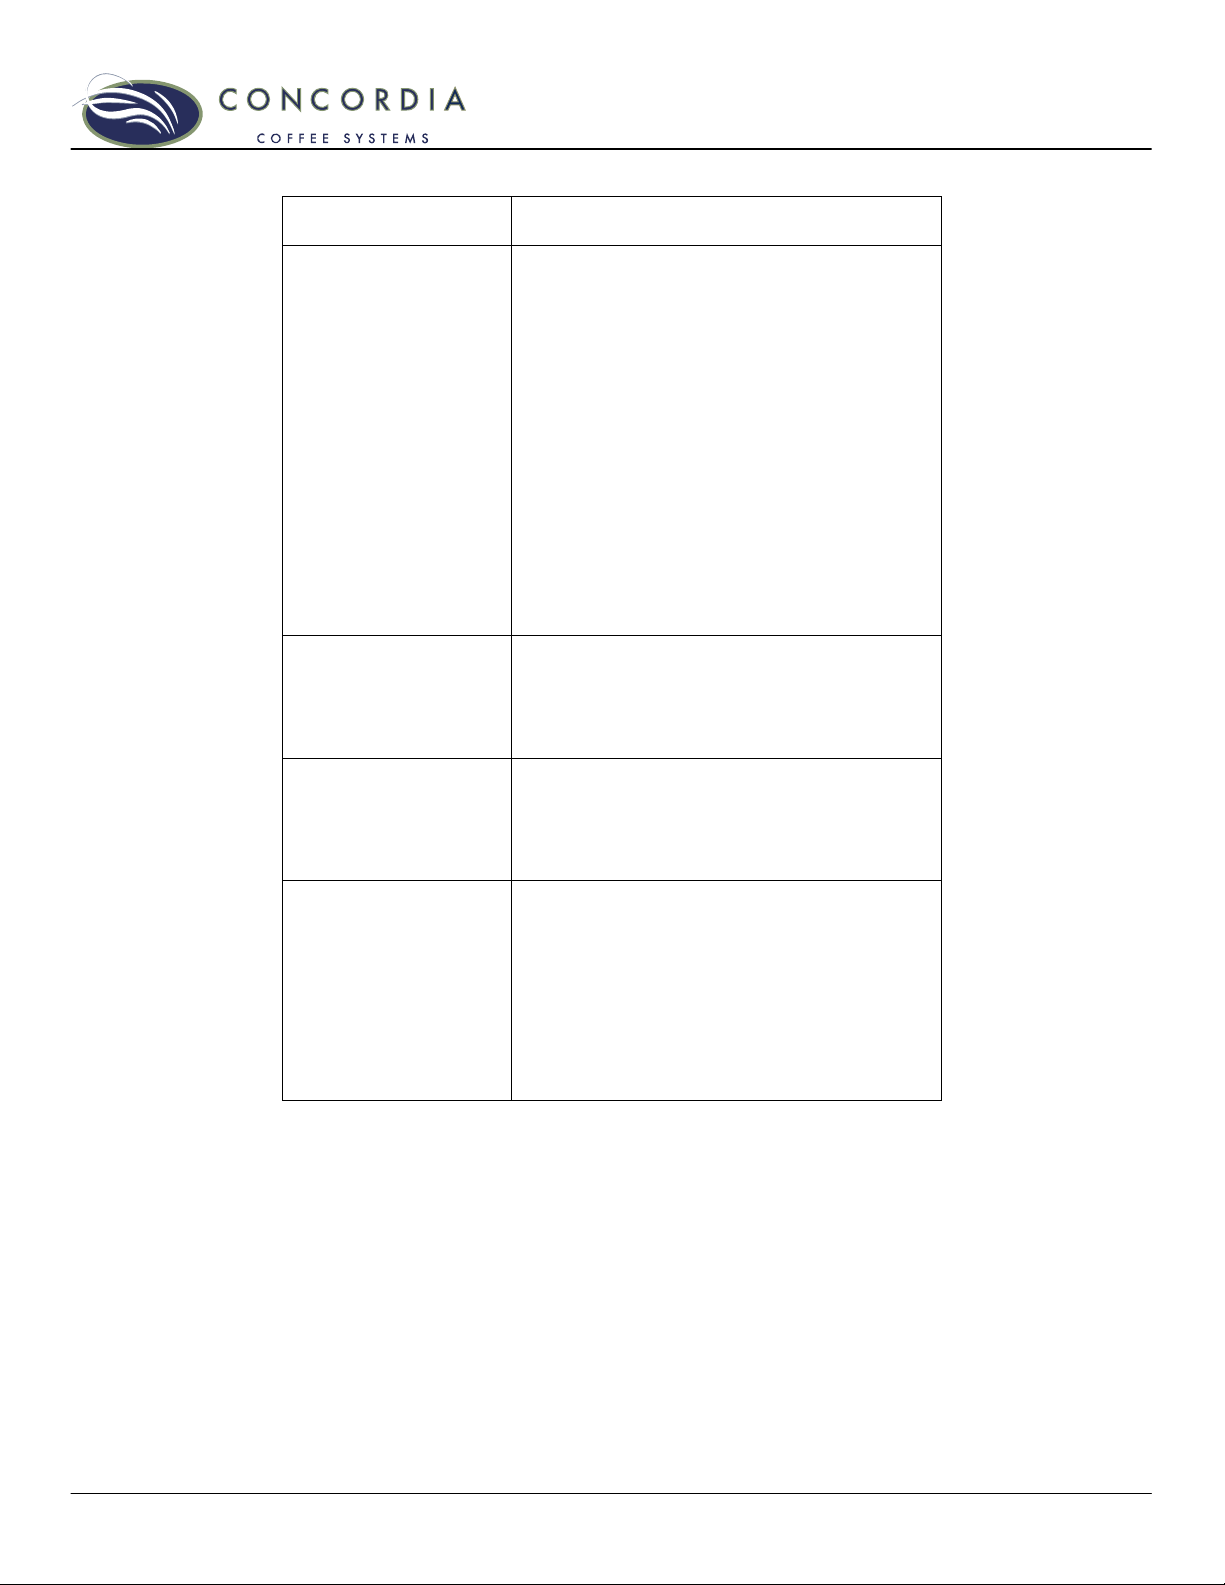
DISPLAY
MESSAGE
WHAT TO DO
The refrigeration unit temperature is
displayed on the LCD at all times.
A refrigerator temperature of 42°F/6°C
or greater is considered high. Machine
will beep in warning.
Refrigerator
temperature
Make sure the refrigeration unit door is
closed.
If the milk system was recently cleaned
and the refrigeration unit door was
open for an extended period, close the
door and wait one hour. Refrigeration
unit should return to operating
temperature.
Call Customer Service to schedule a
Preventive Maintenance service call, see
REQUEST PM
page 26.
Machine is still operational.
Replacement of the upper piston O-ring
is required every 5,000-drink cycles.
REPLACE O-RING
When the message “REPLACE O-Ring” is
displayed, follow the procedure on page
22.
Machine warm-up requires 10-15
minutes. If message appears on screen
for more than 30 minutes, turn machine
WAIT WARMING
UP
off at power switch, wait 10 seconds,
and turn machine on.
If message continues more than 15
minutes after restarting machine, call
Customer Service.
28 Customer Service (800) 778-0990
Page 33
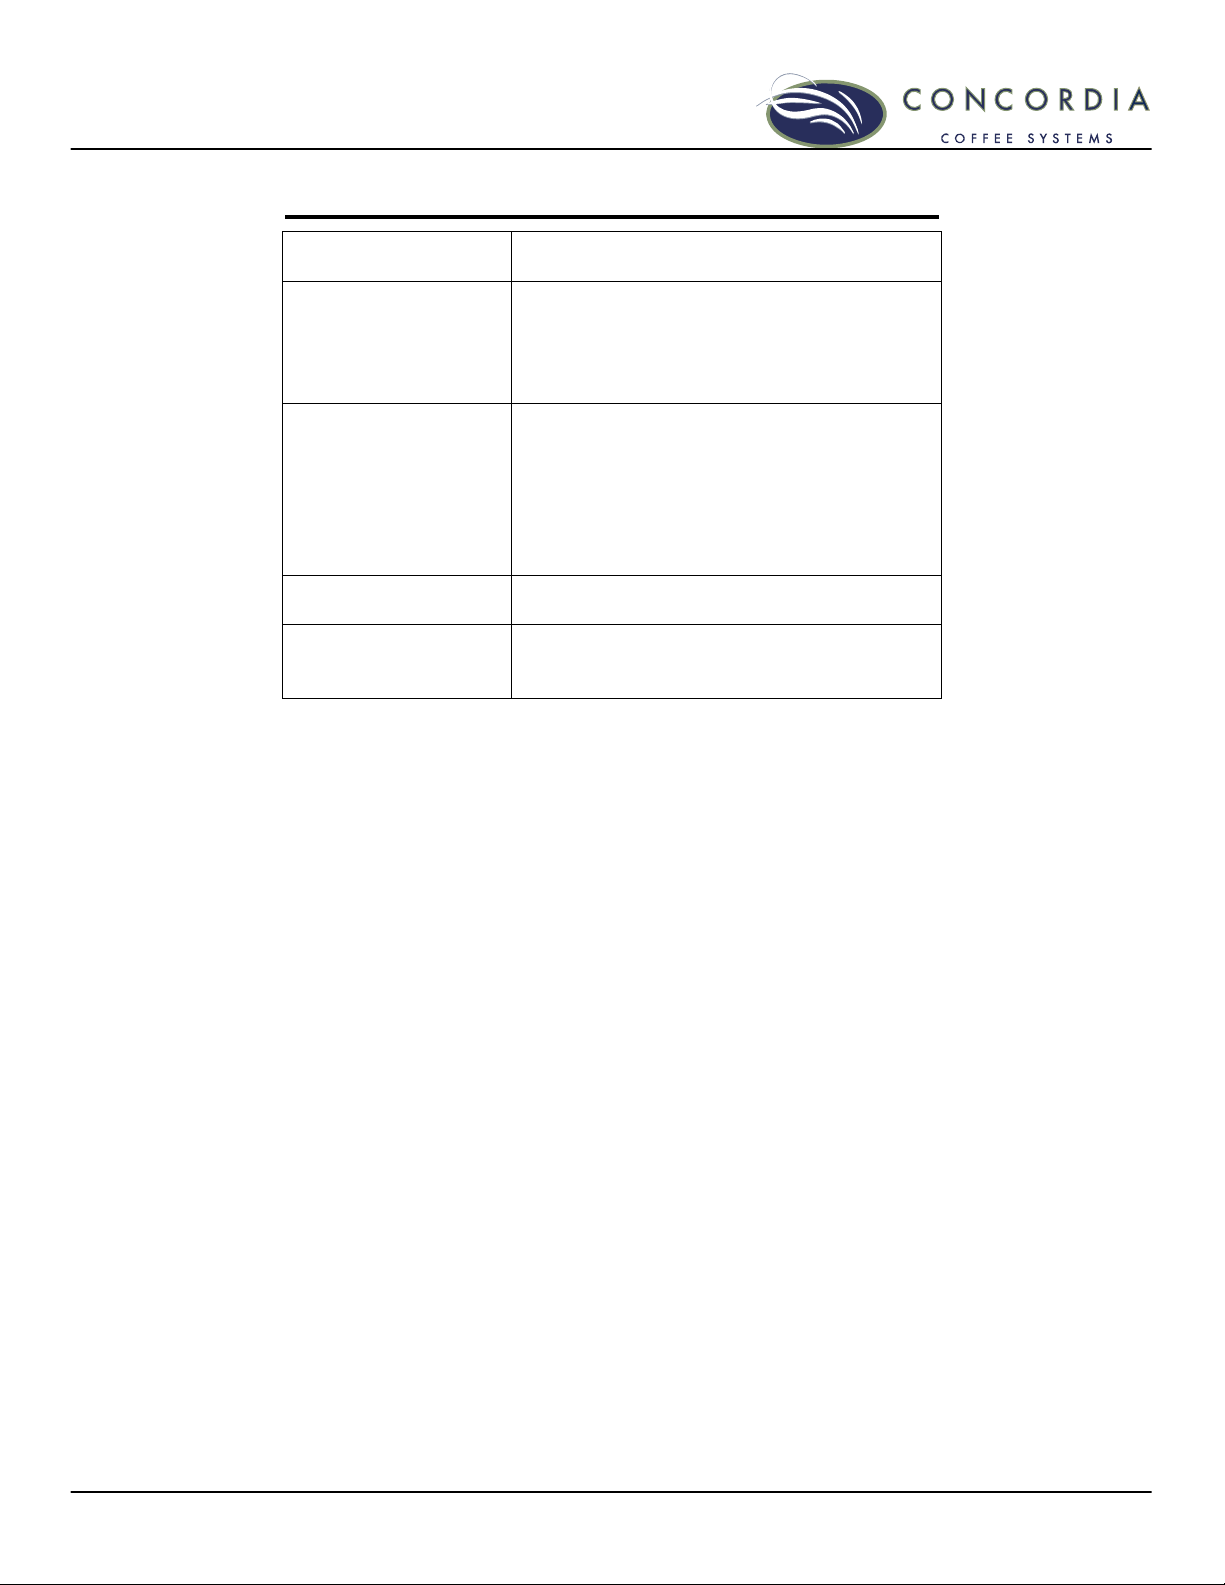
Error Messages
DISPLAY
MESSAGE
CHK WATER
SUPPLY
CHK WATER FLOW
GROUNDS BIN
OUT
CHECK REFR
MODULE
WHAT TO DO
Make sure incoming water supply valve
is open. This valve controls the water
supply to the machine.
If error persists, call Customer Service.
Make sure incoming water supply valve
is open. This valve controls the water
supply to the machine.
Run a brew clean.
If error persists, call Customer Service.
Make sure grounds bin is in place.
The refrigeration unit may not be
operating properly, call Customer
Service.
Customer Service (800) 778-0990 29
Page 34
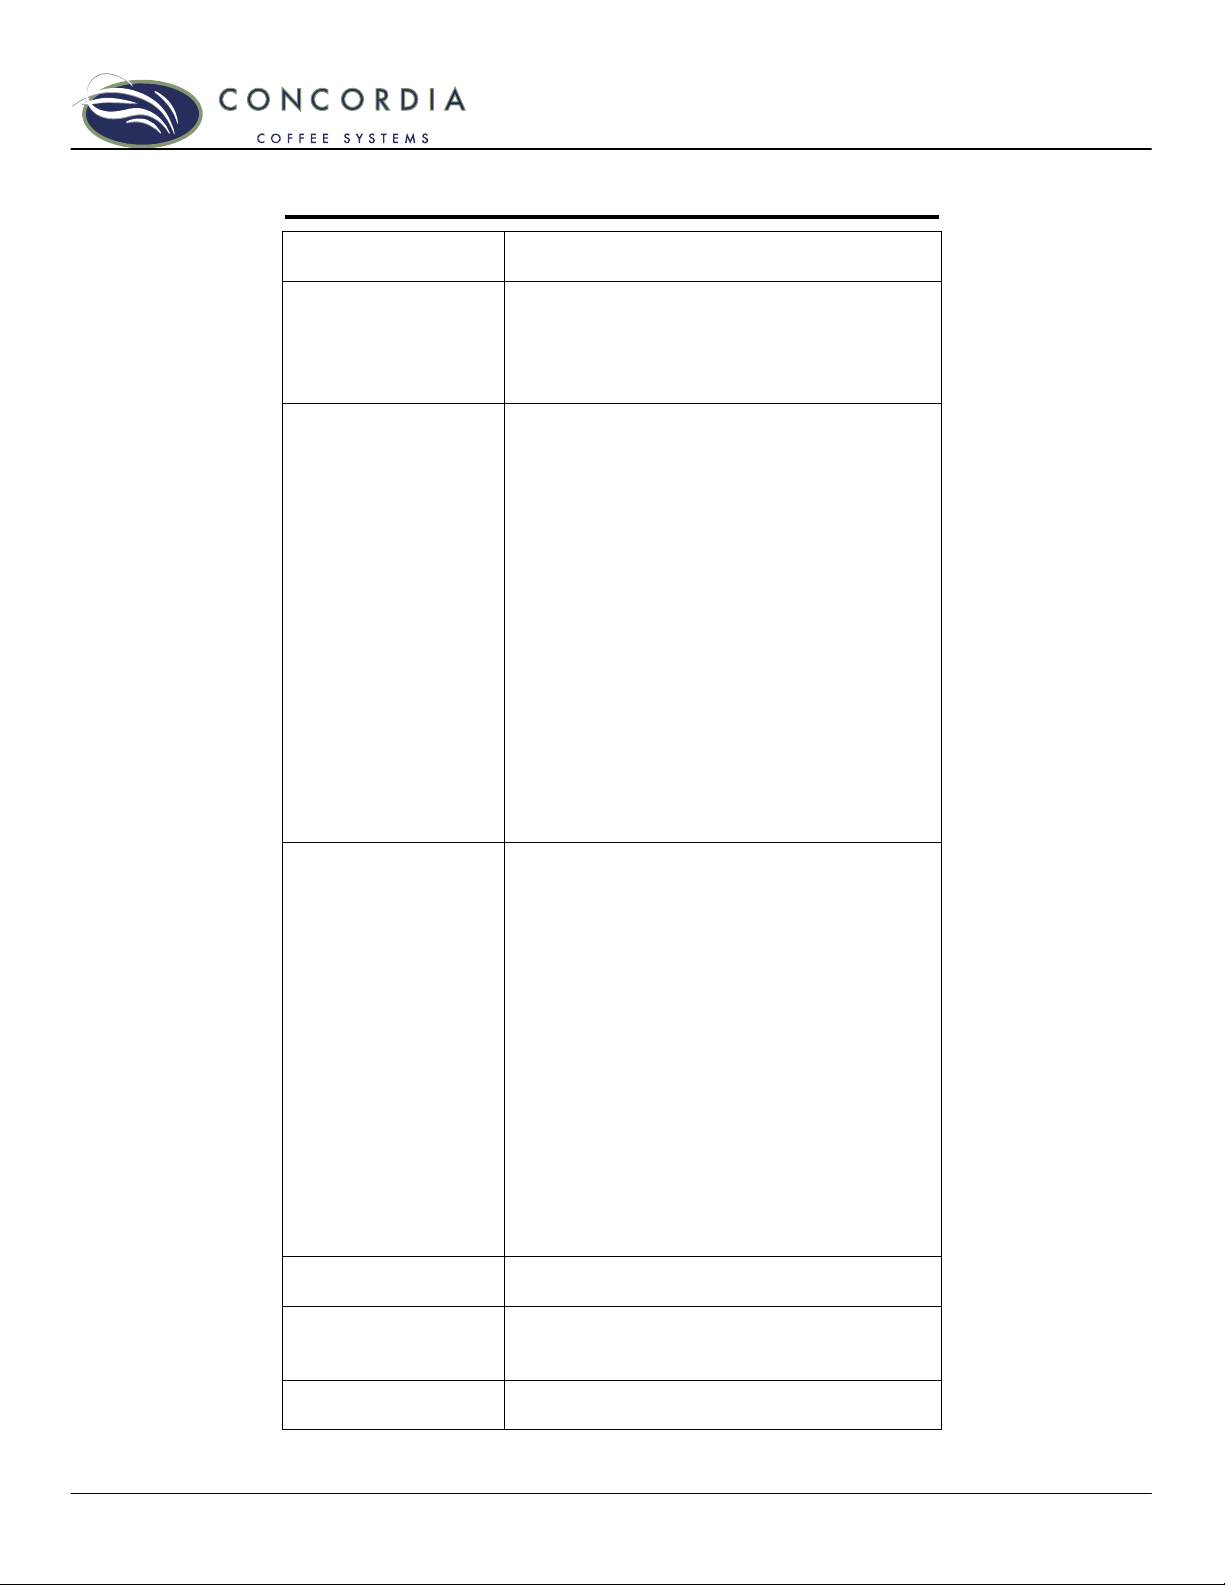
Troubleshooting
MACHINE
SYMPTOM
Display is blank
No milk flow
Machine won’t
operate
Inconsistent cup
fill
All drinks are
over or
underfilling
All drinks are
overfilling
WHAT TO DO
Make sure machine’s power switch is
turned “ON,” see page 4.
Make sure the power cord is plugged
into the wall receptacle.
Check milk containers in the
refrigeration unit.
Make sure the milk pickup tube is
inserted all the way into the milk
container, see page 16.
Make sure the milk pickup tube is fed
into the middle of the container and not
into the handle.
Check milk pickup tube for kinks or
bends. Gently try to smooth out kink.
Remove tube from milk container, if
necessary, and then re-insert.
Clean the milk system. See the cleaning
card included with the machine.
Make sure all doors are closed.
Check for error message on LCD.
Make sure the front panel is closed.
Make sure the grounds bin is correctly
positioned.
Make sure the power cord is plugged
into the wall receptacle.
Make sure machine’s power switch is
turned “ON,” see page 4.
Verify building main circuit breaker is
not tripped.
Clean the milk system. See the cleaning
card included with the machine.
Clean the milk system. See the cleaning
card included with the machine.
Clean the milk system. See the cleaning
card included with the machine.
30 Customer Service (800) 778-0990
Page 35
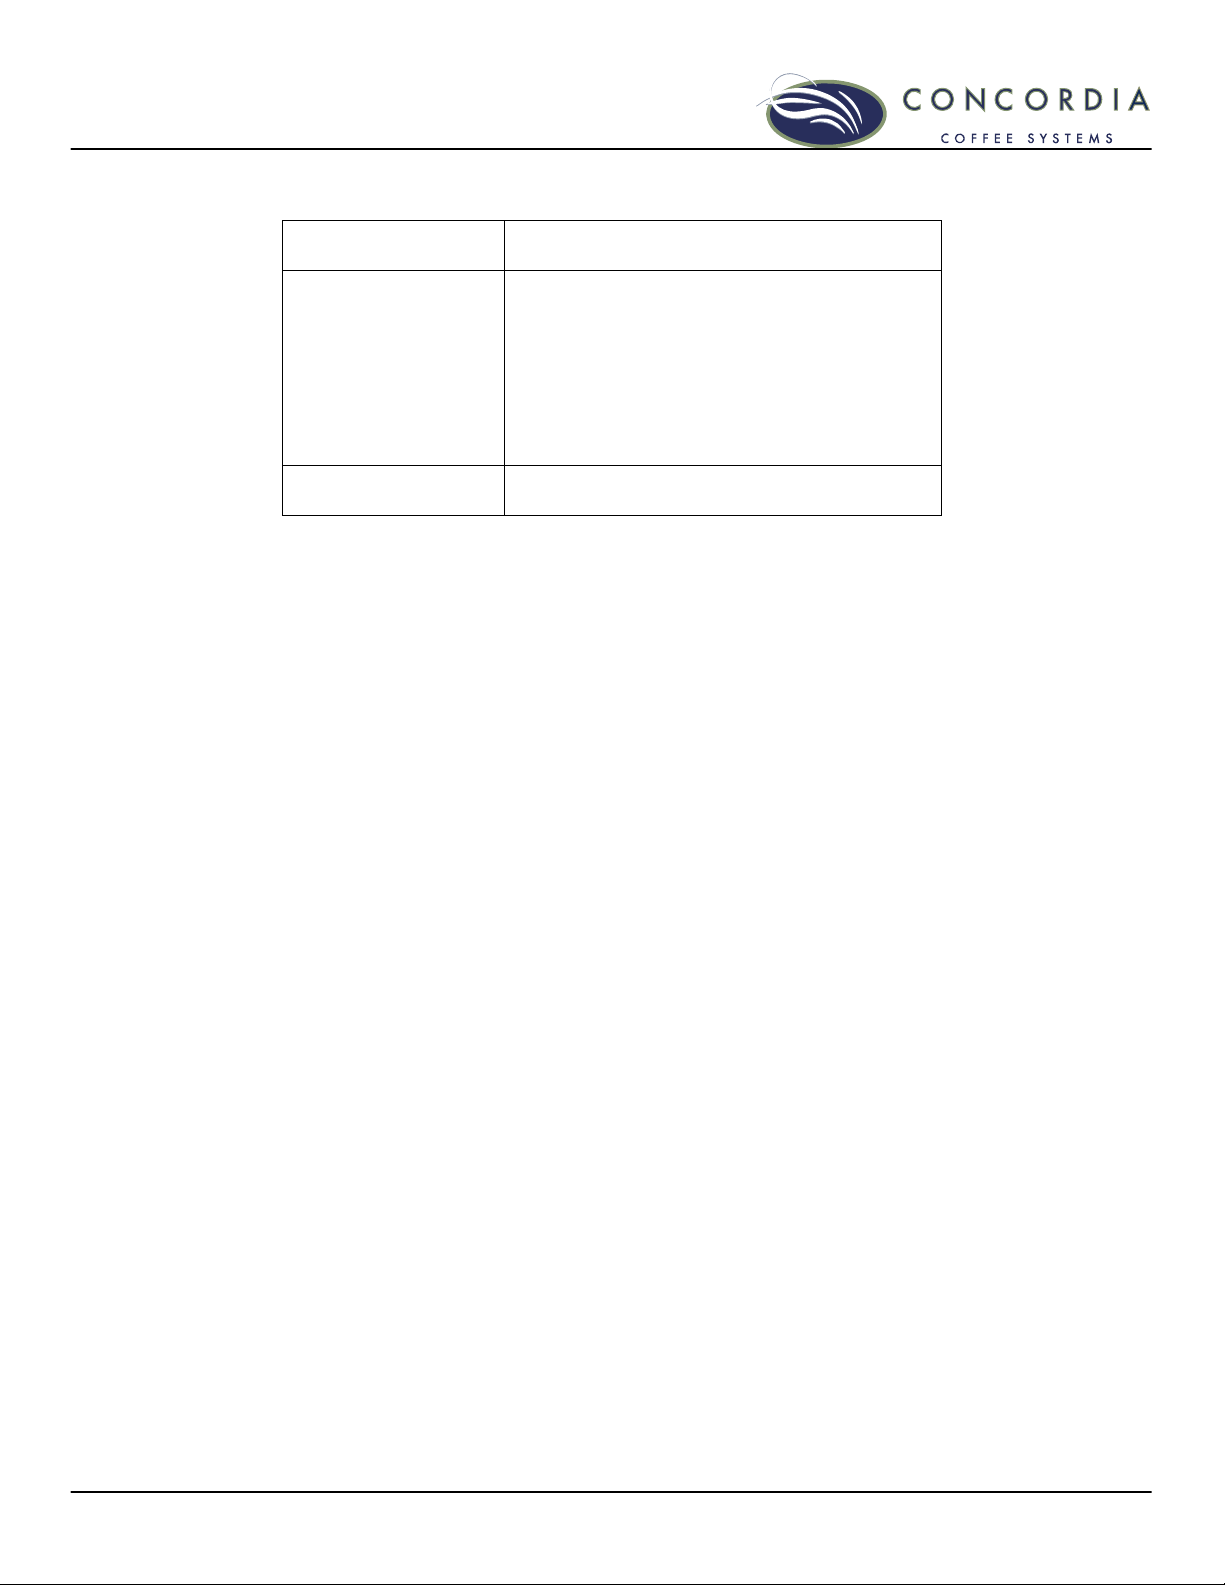
MACHINE
SYMPTOM
Espresso is bitter
Cappuccino milk
isn’t foamy
WHAT TO DO
Clean the brew group. See the cleaning
card included with the machine.
The machine needs to be recalibrated.
Call Concordia for assistance.
The espresso beans are stale. Use fresh
beans.
Clean the milk system. See the cleaning
card included with the machine.
Customer Service (800) 778-0990 31
Page 36

FAQ
Q Can I use different types of espresso roast beans?
Yes. You are free to choose the type of bean that you
will use in the INTEGRA. If you plan to change the type
of beans being used, you must schedule a calibration
service call.
Q Can I use regular coffee beans in my espresso
machine?
No. Use only espresso roast beans.
Q Can I change the brand of milk?
Yes. Changing the brand of milk may result in a
noticeable change in drink quality.
Q Can I change the type of milk on offer?
Yes. You are free to use any type of milk that you
desire. If you change from whole milk to 2%, you may
notice a difference in steamed and foamed milk, but this
difference is not significant enough to affect overall drink
quality.
Q Can I use flavored milk(s) in my espresso machine?
No. Never use flavored milk, such as eggnog or
chocolate milk. The machine’s internal components are
not designed to handle the additional sugars in flavored
milk.
Q How do I cancel a drink?
Press the CANCEL button any time during drink pour to
stop the pouring of a drink.
Q How do I change the cup size? For example, I want
to change from a 12oz/360mL cup to a
10oz/300mL cup.
Call Concordia to schedule a Calibration Service Call,
and a Concordia Certified Technician will adjust your
machine to the new drink size. A Calibration Service Call
is not covered under the Machine Warranty or Extended
Service Agreement.
Q How can I tell if my employees cleaned the
machine?
If your machine is not cleaned within 24 hours, the
display will read MILK CLEAN DUE or BREW CLEAN
DUE. For complete information on the cleaning timers,
see page 18.
32 Customer Service (800) 778-0990
Page 37

Q How do I check the daily drink statistics?
Your espresso machine tracks both daily and cumulative
drink statistics. For step-by-step directions on checking
drink statistics, see page 10.
Q Where do I purchase espresso roast coffee beans?
Espresso roast beans can be purchased from retail and
wholesale stores, as well as directly from the roaster.
Q What is the difference between coffee beans and
espresso roast coffee beans?
Espresso roast coffee beans are specifically roasted for
use in espresso machines. They retain their oils for a
full-flavored drink.
Q My machine is beeping and the display reads
EMPTY GRNDS BIN. What do I do?
Empty the grounds bin. The grounds bin must be
emptied every 35 drinks. For complete directions on
emptying the grounds bin, see page 20.
Q If I want to clean my bean hoppers, how do I pull
them off the machine without spilling the beans?
To remove a full bean hopper you must first place both
hopper stoppers in both bean hopper compartments. For
complete instructions on inserting a hopper stopper, see
page 15. Once the hopper stoppers are in place, pull the
bean hopper straight up to remove.
Q My machine is beeping and the display reads BREW
CLEAN DUE.
When the display reads BREW CLEAN DUE, the brew
group must be cleaned within two hours to ensure
uninterrupted operation. If the brew group is not
cleaned within two hours, the message will change to
RUN BREW CLEAN! and the machine will be disabled.
The brew group must be cleaned to resume operation.
For complete directions on cleaning the brew group, see
the cleaning card included with the machine.
Q My machine is beeping and the display reads MILK
CLEAN DUE.
When the display reads MILK CLEAN DUE, the milk
system must be cleaned within two hours to ensure
uninterrupted operation. If the milk system is not
cleaned within two hours, the message will change to
RUN MILK CLEAN! and the machine will be disabled.
The milk system must be cleaned to resume operation.
For complete directions on cleaning the milk system, see
the cleaning card included with the machine.
Customer Service (800) 778-0990 33
Page 38
Q I cleaned my machine, and several hours later the
display reads MILK CLEAN DUE.
The milk clean cycle is required every 24 hours or every
100 drinks. When high volumes of drinks are sold, it is
necessary to clean the milk system more than once per
day.
For complete directions on cleaning the milk system, see
the cleaning card included with the machine.
Q Can I change the time my machine turns on each
day?
Yes! You can program your machine to automatically
turn on Monday-Friday or Monday-Sunday, and you can
program the time in five-minute intervals. This f eatu re is
adjustable through the DATE & TIME programming
menu category. Please contact Concordia Customer
Service for assistance in accessing and changing the
setting.
Q What are the default temperature settings?
Default
Steam
Brew Water 198°F/92.2°C
Refrigerator 36°F/2.2°C
Refer Temp Hi (alarm) 41°F/5°C
Refer Temp Lo (alarm) 0°F/-17.8°C
Temperature
Setting
252°F/122.2°
C
34 Customer Service (800) 778-0990
Page 39

Machine Warranty
Limited Warranty Statement and Disclaimers
Concordia warrants the Goods to be free from defects in
materials and workmanship under normal conditions for a
period of either twelve (12) months after the original date of
shipment; or either 36,500 drink cycles; whichever period ends
first (“Limited Warranty period”), subject to the terms set forth
herein.
In the event of a failure of the Goods during the Limited
Warranty due to a defect in materials or workmanship, subject
to the warranty exclusions set forth below, Concordia will
arrange for the Goods to be repaired on-site, without charge for
labor or parts, if the limited warranty service occurs during
normal business hours (8:00 a.m. to 5:00 p.m., local time,
Monday through Friday, except holidays). If limited warranty
service is required outside normal business hours, you will not
be charged for parts but you will be charged for labor at
Concordia’s scheduled rates.
The foregoing limited warranty represents the full extent of
Concordia’s liability with respect to the Goods. Your right to
repair as specified above is your sole and exclusive remedy
against Concordia. In no event shall Concordia be liable for
damages of any kind, including but not limited to special,
indirect, incidental or consequential damages, arising from or
relating to the sale or use of the Goods, either during or after
the term of limited warranty.
Additional Limited Warranty Exclusions
This limited warranty does not cover cost of repairs made or
attempted by anyone other than Concordia-authorized
personnel. In the event of such unauthorized repairs, Concordia
may void the limited warranty. In addition, this limited
warranty does not apply if Concordia determines that a problem
resulted from inadequate or improper maintenance, improper
operations, unauthorized alterations or adjustments, or use of
unapproved supplies. This includes, but is not limited to the
following:
Evidence of abnormal wear and tear due to abuse, misuse, or
improper maintenance;
Water used with the Goods that exceeds three grains of
hardness per gallon or substantially similar standard;
Inoperative or dirty milk valves and milk pumps from improper
maintenance;
Jammed or impacted coffee grinder caused by foreign objects in
grinder;
Customer Service (800) 778-0990 35
Page 40

Plugged drain;
Inoperative brew group due to improper maintenance;
Insufficient water supply and/or insufficient or incorrect power;
Improper recalibration due to the use of different coffee beans,
type of milk or size of cups;
Relocation of the Goods from originally approved location;
Newly installed equipment which interferes with the operation
of the Concordia unit;
In addition, the Goods must be cleaned properly each day it is
used and operated only in accordance with instructions.
Except for the above limited warranty, Concordia disclaims and
makes no performance representations, warranties, guarantees
or conditions, either express or implied, oral or written, with
respect to the Goods or any services provided, including
without limitation any implied warranty, guarantee or condition
(a) of merchantability, (b) of fitness for a particular pu rpose, or
(c) arising from course of performance, course of dealing, or
usage of trade. In no event shall Concordia’s liability exceed the
amount of the purchase price for the Goods.
36 Customer Service (800) 778-0990
Page 41

Page 42
Customer Service
USA (800) 778-0990
1287 120th Avenue NE
Bellevue, WA 98005
USA
Concordia Coffee Systems
PN 2900-263
Rev C
 Loading...