

Page 1
www.CamOneTec.com
Bedienungsanleitung
Bitte vor Inbetriebnahme sorgfältig lesen!
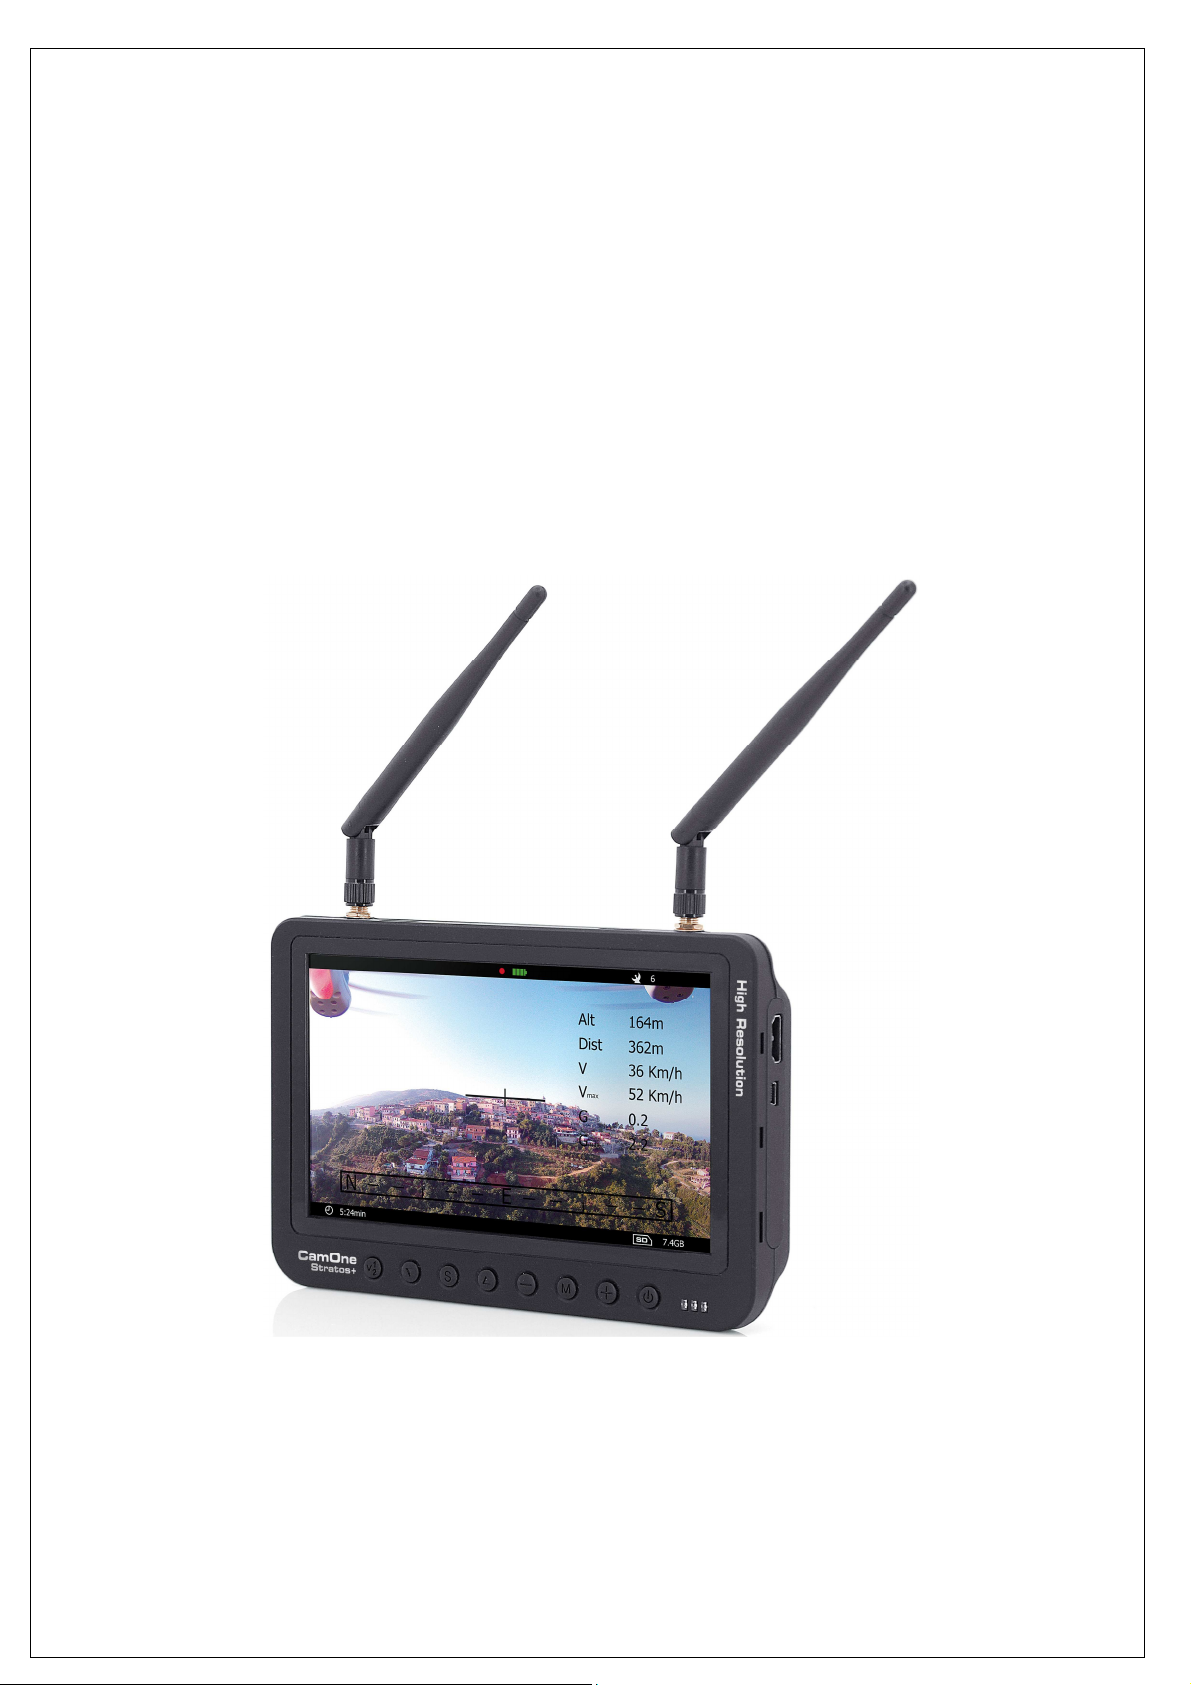
CamOne Stratos
7” 178mm High Resolution
5.8GHz Diversity Screen
Dank der neusten 5.8GHz Technik ist der Bildschirm optimal für den
Einsatz mit 2.4GHz / 355MHz RC-Anlagen geeignet.
Vers.: 1.0
“CamOne” ist eine registrierte Marke von ACME the game company GmbH, Deutschland
© Copyright 2015 ACME the game company GmbH
Page 2
www.CamOneTec.com
Sicherheitshinweise
WARNUNG:
BEACHTEN SIE FOLGENDE HINWEISE,
UM STROMSCHLÄGE ODER SCHÄDEN
AM PRODUKT AUSZUSCHLIESSEN:
• SETZEN SIE DAS GERÄT NICHT REGEN,
FEUCHTIGKEIT, TROPF- ODER
SPRITZWASSER AUS
BRINGEN SIE DAS GERÄT
• VERWENDEN SIE AUSSCHLIESSLICH
EMPFOHLENE ZUBEHÖRTEILE
• DEMONTIEREN SIE NICHT DAS GERÄT
• IM INNERN BEFINDEN SICH KEINE TEILE,
DIE VOM BENUTZER GEWARTET
WERDEN KÖNNEN.
LASSEN SIE WARTUNGSARBEITEN VON
QUALIFIZIERTEN KUNDENDIENST-MITARBEITERN
DURCHFÜHREN
CE Declaration
Hiermit erklären wir, dass dieses Modell den
grundlegenden Anforderungen und den anderen
relevanten Vorschriften der Richtlinie 1999/5/EG
entspricht. Eine Kopie der Konformitätserklärung kann
unter der oben genannten Adresse angefordert werden.
Der Hersteller haftet nicht für den Verlust von
Aufnahmen durch Fehlfunktion oder für Defekte des
Gerätes, Speichermediums oder des Zubehörs.
Beachten Sie: Die Privatsphäre anderer ist auch
gesetzlich geschützt und sollte tabu sein. Das
Aufzeichnen Dritter kann eine strafbare Handlung sein.
Sie sind für Ihr Handeln verantwortlich.
SERVICE & SUPPORT
ACME the game company GmbH
Boikweg 24
33129 Delbrück
Germany
Tel.: +49 2944 97 383 0
service@camonetec.com
or
http://www.CamOneTec.com
WEEE Reg. No.: DE64989527
Benutzerinformation zur Entsorgung von
elektrischen und elektronischen Geräten
Entsprechend der Firmengrundsätze der ACME the
game company GmbH wurden hochwertige
wiederverwertbare Komponenten in diesem Produkt
verbaut. Dieses Symbol auf Produkten und/oder
Begleitdokumenten besagt, dass das Produkt am
Ende der Lebensdauer getrennt vom Hausmüll
entsorgt werden muss.
Bringen Sie diese Produkte, auch den Akku, zur
ordnungsgemäßen und umweltfreundlichen
Entsorgung zu Ihrer nächsten Sammelstelle
(bzw. Recyclinghof).
www.CamOneTec.com
2
Page 3

3
www.CamOneTec.com
Inhaltsverzeichnis
Lieferumfang .......................................................................................................................................... 3
Inbetriebnahme ...................................................................................................................................... 4
Laden und Einlegen des LiPo-Akkus .................................................................................................... 5
Sonnenschutz ........ ................................................................................................................................ 6
Anschlüsse ............................................................................................................................................. 6
Tastenerklärung ..................................................................................................................................... 7
Bildschirmsymbole ................................................................................................................................. 8
Menü ...................................................................................................................................................... 8
Technische Daten................................................................................................................................... 9
HD Schnittstelle / Wiedergabe…….…………………………………………………………………………… 9
Service und Reparatur............................................................................................................................ 9
Zubehör ................................................................................................................................................ 10
Lieferumfang
Überprüfen Sie die Vollständigkeit bevor Sie das Gerät in Betrieb nehmen!
7“ Diversity Monitor inkl. LiPo Akku
2x 5.8GHz Empfängerantenne Bedienungsanleitung
12V DC-Kabel 12V DC-Kabel 2x
mit BEC-Stecker mit BEC-Buchse AV-Out Kabel
CamOne Stratos HR Sonnenschutz
Folgendes wird zur weiteren Inbetriebnahme benötigt:
Halterung mit Standard-Stativschraube zur Befestigung des Monitors
Page 4
www.CamOneTec.com
Inbetriebnahme
CamOne Stratos
7” High Resolution
5.8GHz Diversity Screen
Tauchen Sie ein in die faszinierenden Möglichkeiten der Foto- und Videowelt und übertragen Sie ihre
Aufnahmen kabellos, sicher und live auch über eine große Entfernung.
Der neu entwickelte CamOne Stratos 7“ 5,8GHz Diversity Screen trumpft mit modernster Technik auf
und ist sowohl für den Hobby- als auch für den professionellen Einsatzbereich hervorragend geeignet.
Die moderne Systemelektronik filtert mithilfe der beiden integrierten 5,8GHz Empfänger das beste
verfügbare Signal raus und liefert dadurch ein scharfes und störungsfreies Livebild. Wählen können
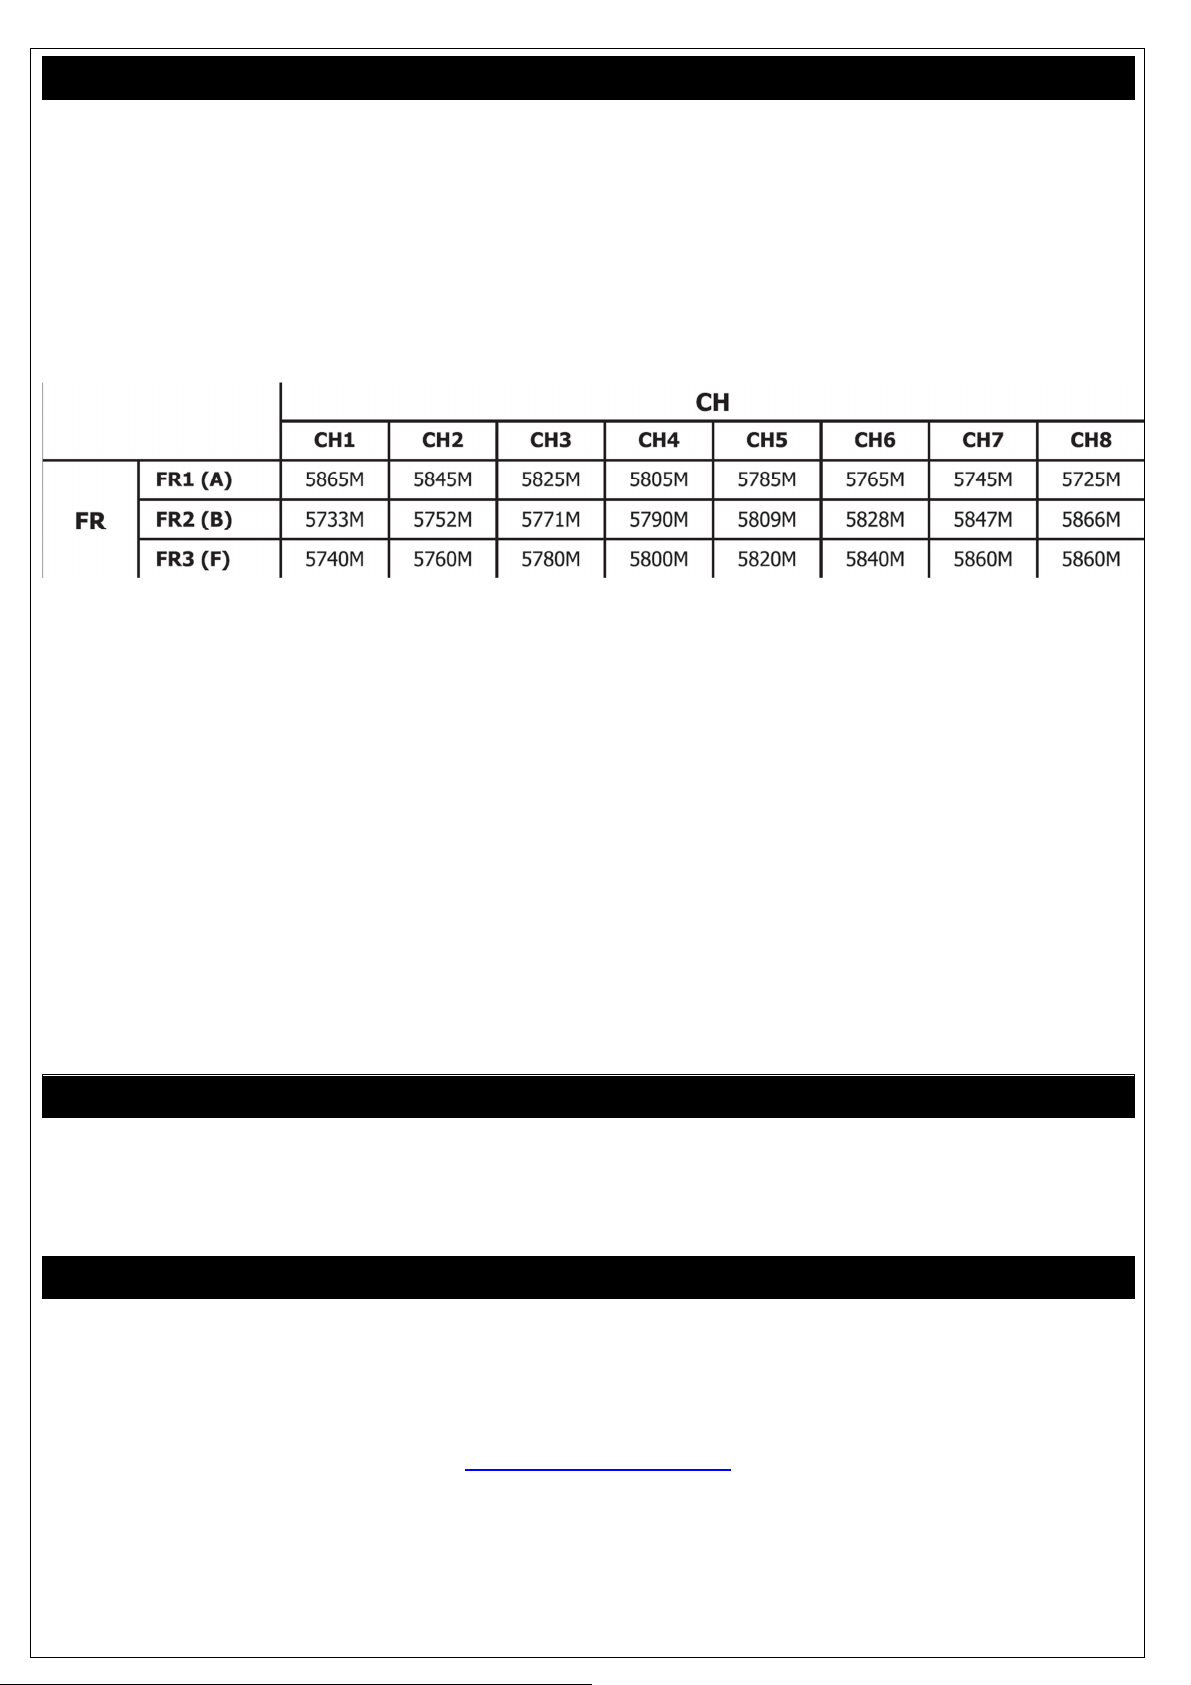
Sie dabei zwischen unterschiedlichen Bändern mit jeweils 8 Kanälen.
Highlights
• Zweifache Signalabtastung für automatische Empfangsoptimierung
• DNR-Funktion
• Auto Scan Funktion
Rechtlicher Hinweis
In einigen EU-Ländern ist die Nutzung von FPV-Systemen und das gleichzeitige Steuern eines
Flugzeugmodells untersagt. Stellen Sie sicher, dass die verfügbaren Frequenzen in Ihrem
Anwendungsgebiet zugelassen sind!
Empfehlung
Nutzen Sie das System immer mit 2 Personen:
Ein Pilot, der das Modell steuert, sowie ein virtueller Betreiber, der den 5,8GHz Diversity Screen
kontrolliert.
Schrauben (handfest) Sie zunächst die mitgelieferten 5,8GHz Antennen in die dafür vorgesehenen
Gewinde ein.
Die Stromversorgung erfolgt über eingelegten wechselbaren LiPo-Akku, achten Sie bei der
Verwendung darauf dass dieser ausreichend geladen ist.
Um den Bildschirm in Betrieb zu nehmen, drücken Sie den rechten An-/Aus Schalter für 3 Sekunden.
Die LED leuchtet blau auf.
Der Bildschirm scannt jetzt automatisch die Kanäle auf ein Videosignal durch und zeigt Ihnen das
Videobild an.
4
Page 5
www.CamOneTec.com
5
Laden
und Einlegen
des
LiPo
-
Akkus
Sonnenschutz
und Stativgewinde
Um den internen LiPo-Akku zu laden, benötigen Sie das separate Steckernetzteil
(HS1126; nicht im Lieferumfang enthalten).
Stecken Sie das Netzteil in eine geeignete Steckdose, danach in die „DC IN“ Buchse des Bildschirms.
Während des Ladevorganges leuchtet die rechte LED (neben den Tasten) rot auf. Sobald dieser
abgeschlossen ist, erlischt diese LED.
Zusätzlich kann der interne LiPo-Akku über einen externen Akku geladen werden.
Dieser Akku sollte mindestens 7,4 Volt und 2600mAH haben.
Bitte beachten Sie, dass Schäden, die aus unsachgemäßer Handhabung oder Anschluss einer nicht
geeigneten Stromquelle resultieren, nicht von der Garantie abgedeckt sind.
Führen Sie diese Arbeit daher sorgfältig und nur dann durch, wenn Sie sich mit der Technik
auskennen und sich der entsprechenden Gefahren bewusst sind. Stellen Sie sicher, dass die
verwendete Stromquelle über ausreichend Kapazität verfügt!
Der LiPo Akku ist wechselbar.
Um diesen heraus zunehmen, ziehen Sie den Riegel nach unten heben den Akku über eine
Auskerbung nach Oben raus.
Zum Einlegen, führen Sie den Akku schräg in den Schacht ein, so dass die Kontakte zum Bildschirm
zuerst eingedrückt sind.
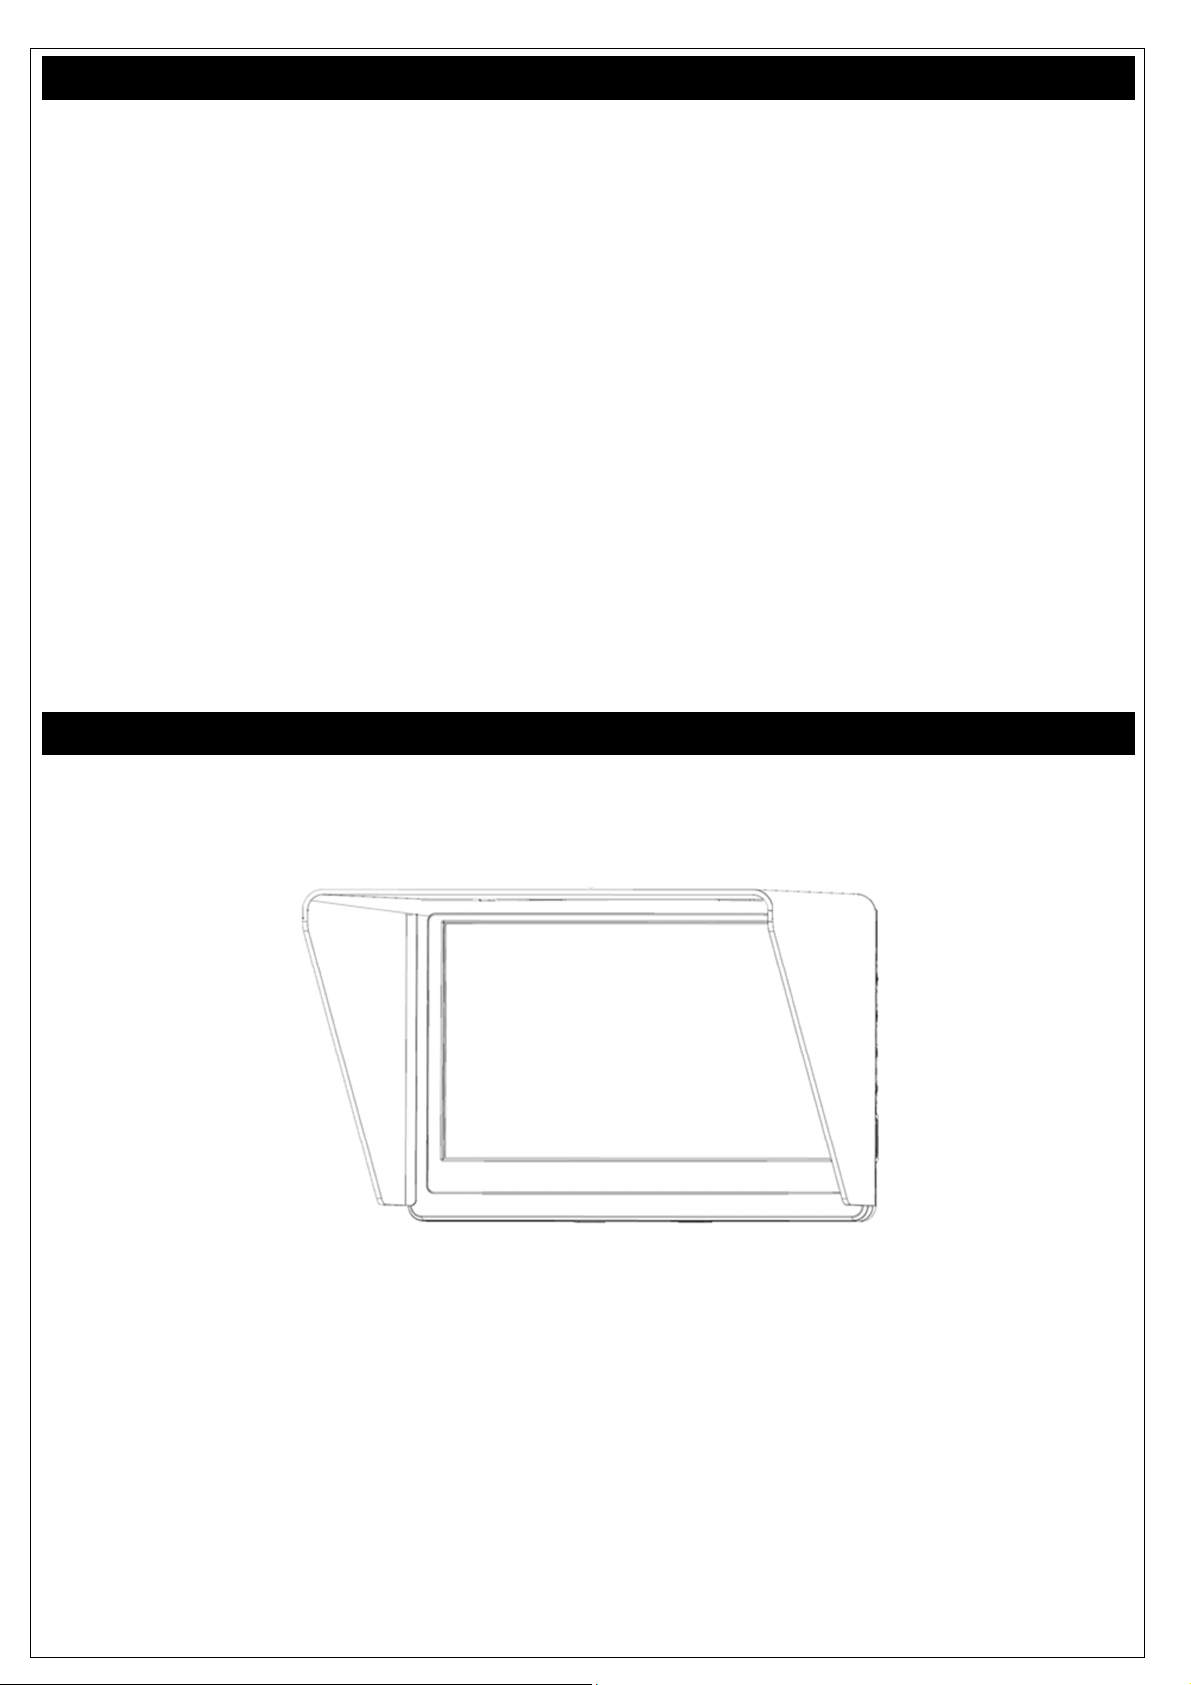
Um den Bildschirm auch bei Sonneneinstrahlung optimal zu nutzen, verwenden Sie den
Sonnenschutz.
Diesen können Sie einfach um den Bildschirm befestigen.
Auf der Unterseite des Bildschirms befindet sich die Aufnahme für das Stativgewinde. Damit ist die
Montage auf einem Stativ möglich. Achten Sie darauf, dass sich um Zollgewinde handelt.
Page 6
www.CamOneTec.com
6
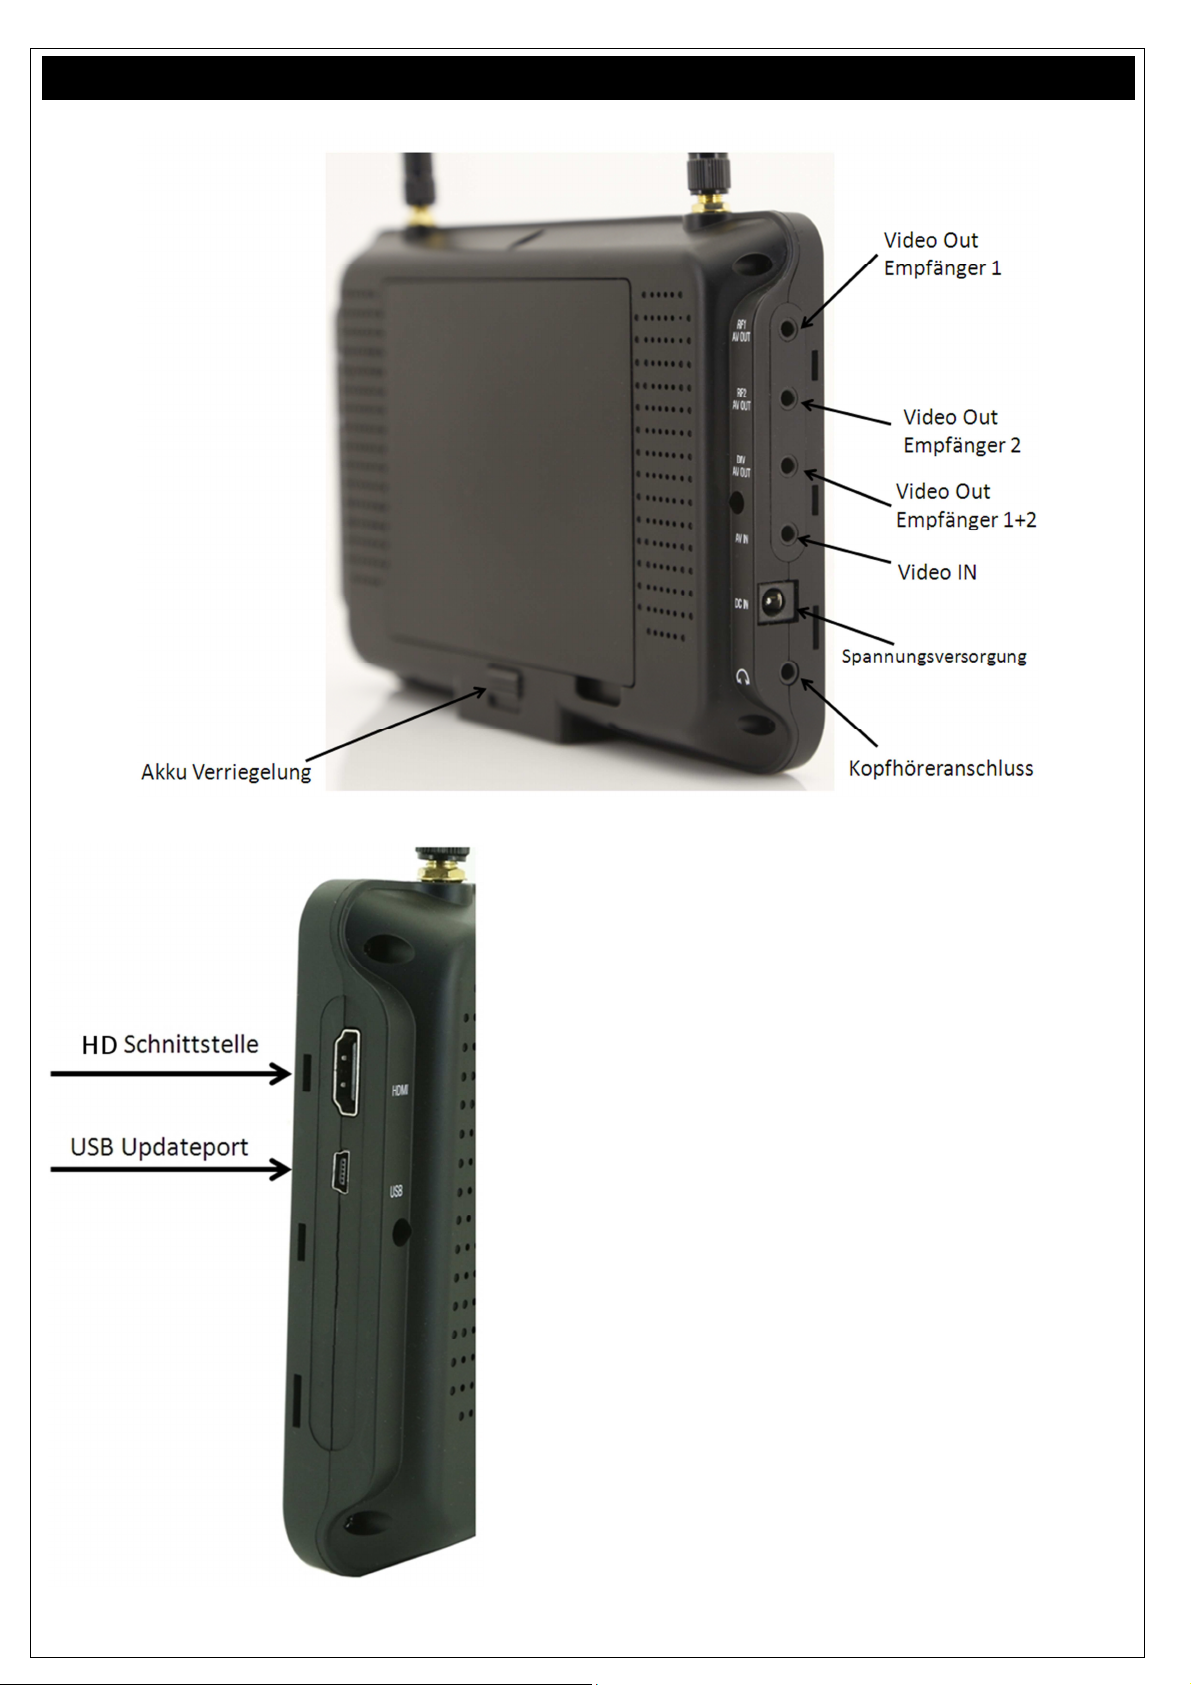
Anschlüsse
HD Schnittstelle / Wiedergabe
Der Bildschirm verfügt über eine HD 1.3 INSchnittstelle. Über diese können von einer
HD Videoquelle Filmmaterial abspielt werden.
USB-Port
Der Bildschirm verfügt über einen USB-Port um
diesen auf die neueste Firmware upzudaten.
Dazu werden auf der Homepage des Herstellers
Informationen bereitgestellt.
Der USB-Eingang dient nicht zur
Stromversorgung.
Page 7
www.CamOneTec.com
7
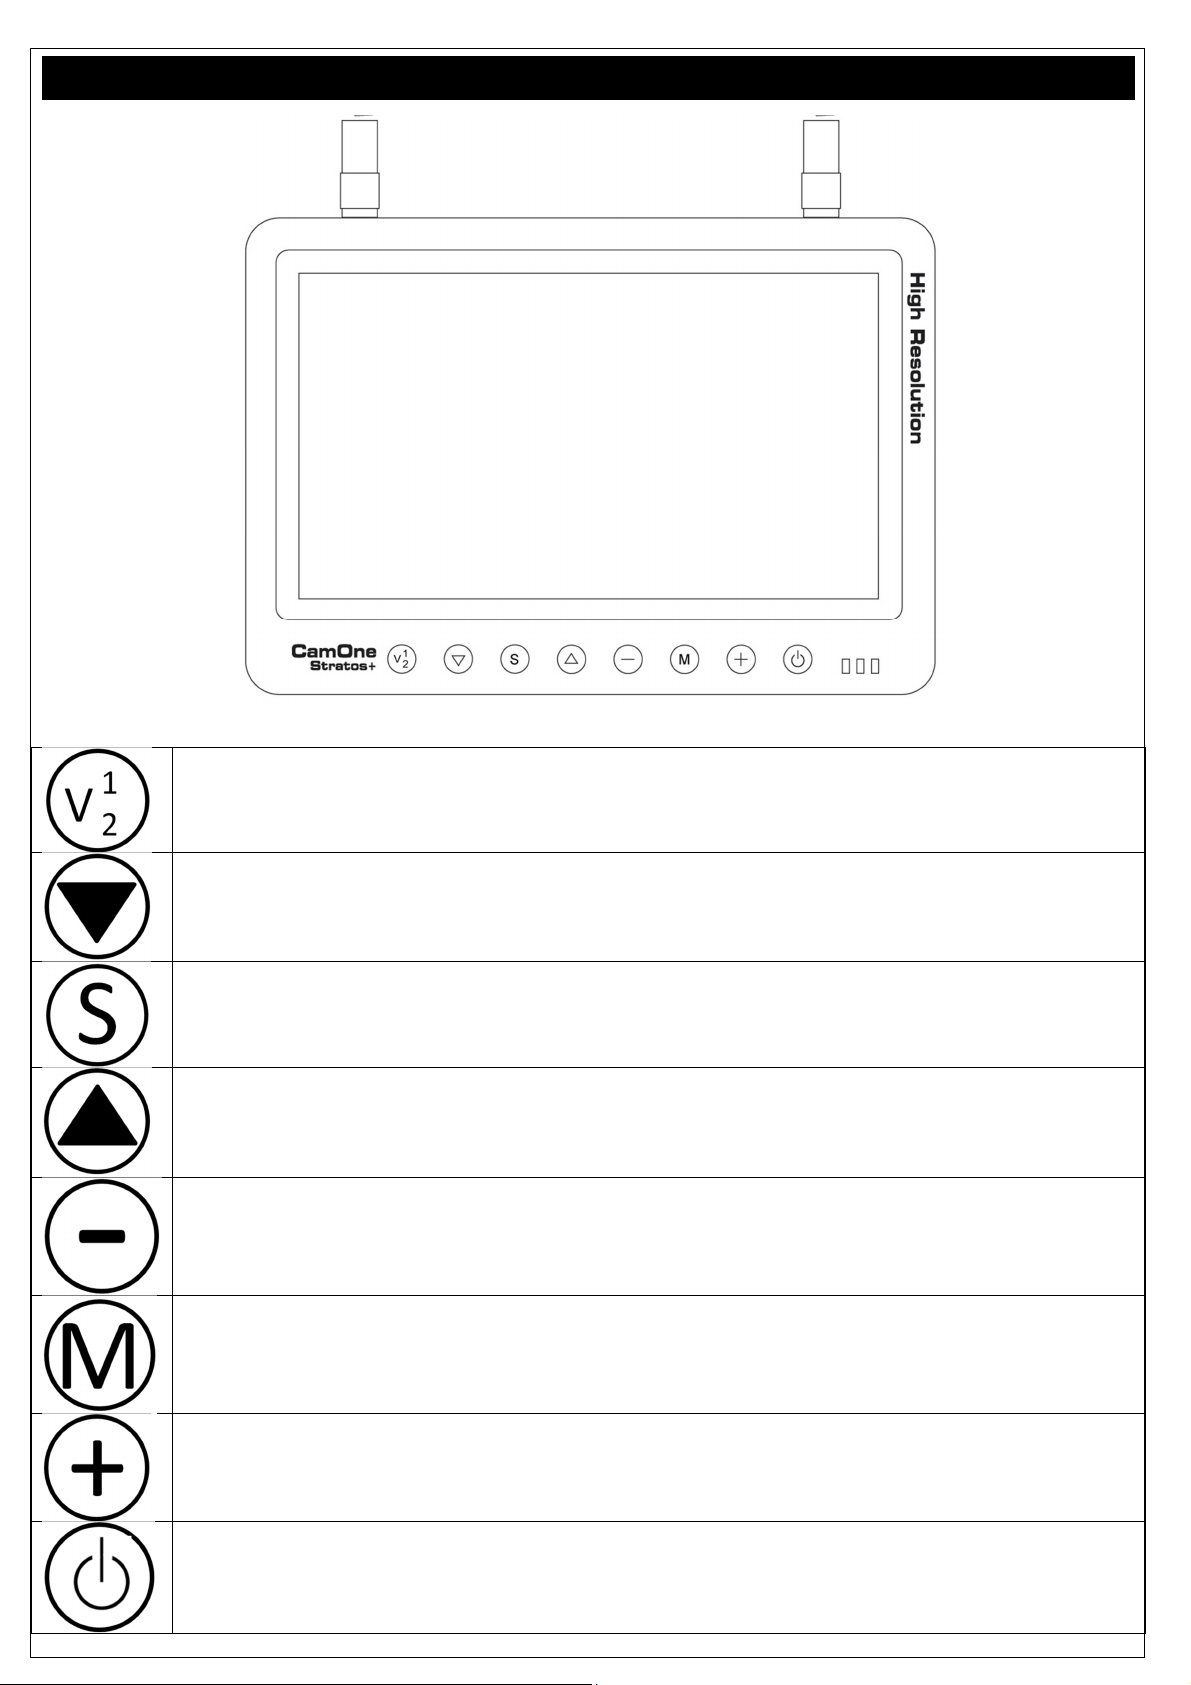
Tastenerklärung
Empfänger Wahl
Band Wahl
SCAN Funktion
Kanal Wahl
Minustaste
MENU
Plustaste
Power (An/ Aus)
Halten Sie die An/ Aus Taste solange gedrückt bis das Eröffnungsbild erscheint
Manuelle Wahl der beiden Empfänger
Manuelles verändern des Signal-Bandes A/B/F
Der Bildschirm durchsucht (Auto Scan Funktion) automatisch alle Bänder und Kanäle
Manuelles verändern des Kanals 1-8
Änderung der Bildschirm Helligkeit und Menüeinstellung
Einmalklick zur Einblendung der Bildschirmsymbole
Doppelklick um in das Menü gelangen
Änderung der Bildschirm Helligkeit und Menüeinstellung
Page 8
www.CamOneTec.com
8
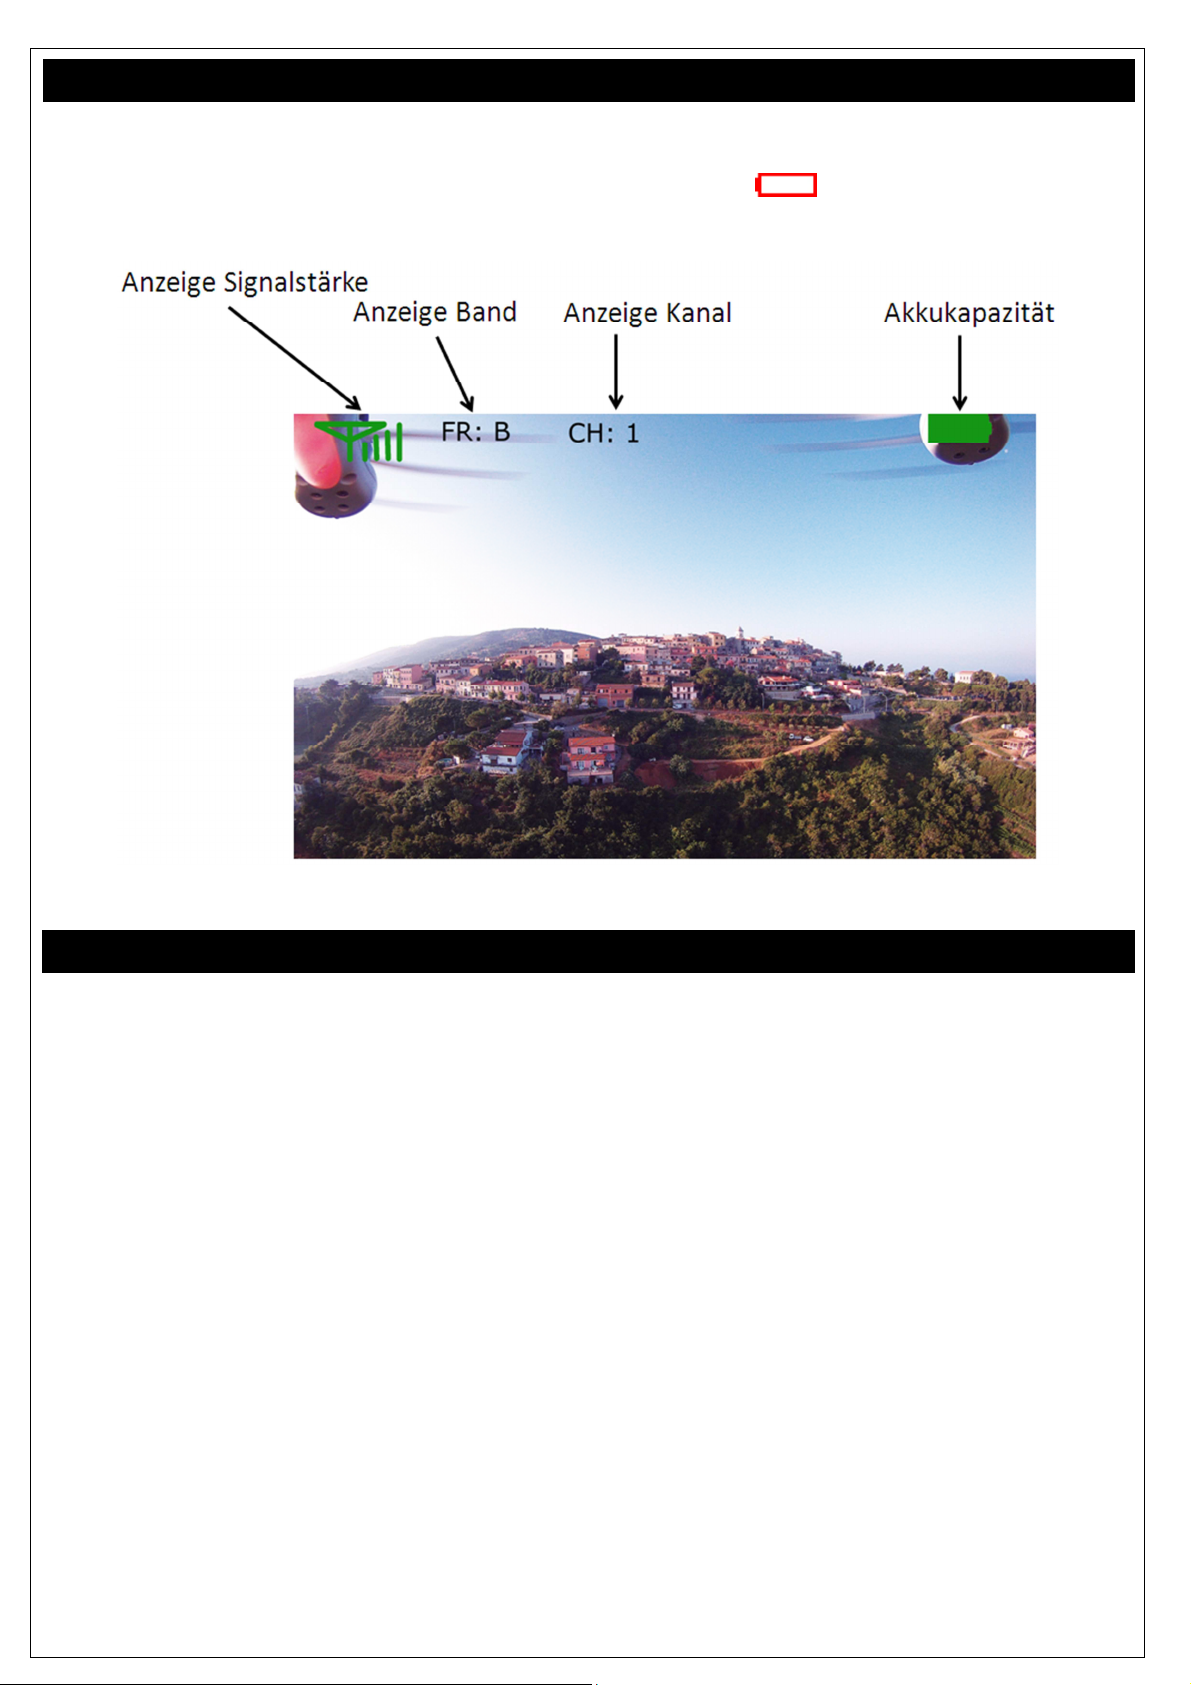
Bildschirmsymbole
Men
ü
Änderungen des Frequenzbandes oder des Kanals werden unmittelbar im Bild angezeigt.
Wenn die Batterieanzeige keine Ladestatusbalken mehr angezeigt , muss der Akku geladen
werden.
Drücken Sie den „MENU“ Knopf zweimal um in die Menü-Auswahl zu gelangen.
Sie können den Bildschirm nach Ihren Vorgaben einstellen.
Durch Drücken der „MENU“ Taste können Sie zwischen den einzelnen Menüpunkten wechseln.
Um im einem Abschnitt den Wert zu verändern, drücken Sie die „Minus- / Plus Taste“. Das Menü
schließt sich nach 5 Sekunden automatisch falls keine Tasten mehr betätigt werden.
Menüstruktur
-Helligkeit (zusätzlich lässt sich der Wert im LiveBild mit den „Minus- / Plus
Tasten“einstellen)
-Kontrast
-Farbe
-Lautstärke
-RF Sel. (manuelle Auswahl der Empfängsmodule)
-Modus (16:9 oder 4:3)
-Rotation (Bilddrehung in vier Lagen)
-Sprache (siehe Technische Daten)
-Reset (Zurücksetzen der Einstellung auf die Werkeinstellung
-Exit (Verlassen des Menüs)
Page 9
www.CamOneTec.com
9
Techni
sche Daten
HD
Schnittstelle
/ Wiedergabe
Service und Repa
raturen
Bildschirmgröße: 7“ | 178 mm
Abmessungen: 184 x 126 x 28 mm
Auflösung: 1024 x 600 Pixel
Bildschirmtyp: TFT LCD Monitor, LED backlight
Helligkeit: 500 cd/m2
Kontrast: 700:1
Halterung: Stativgewinde / Schiebeeinsatz
Frequenz: ISM 5.8 GHz
Kanäle:
Anschlüsse: RF1 AV Out (Video, Mono Audio output)
RF2 AV Out (Video, Mono Audio output)
DIV AV Out (Video, Mono Audio output)
AV IN (Video)
USB Updateport
HD1.3 IN
Betriebsspannung: DC-IN 7- 22,2 V
Akku: 1800mAH LiPo Akku
Gewicht: ca. 500g
Lautsprecher: 8Ω/ 1W X 2
Betriebstemperatur: 0° C ~ +50° C
Sprachen: Englisch, Französisch, Deutsch, Spanisch,
Portugiesisch, Japanisch, Russisch, Italienisch,
Niederländisch und Chinesisch
Der Bildschirm verfügt über eine HD 1.3 IN-Schnittstelle. Über diese können von einer
HD Videoquelle Filmmaterial abspielt werden.
Informationen über Service und Reparaturen können Sie sich bei Ihrem Händler oder unter
www.CamOneTec.com einholen.
Bei weiteren Fragen wenden Sie sich bitte an unseren Service
(Tel. +49 2944 97 383 40 oder per Mail service@camonetec.de).
Der Bildschirm verfügt über einen USB-Port um diesen auf die neueste Firmware upzudaten. Dazu
werden auf der Homepage des Herstellers Informationen bereitgestellt.
Der USB-Eingang dient nicht zur Stromversorgung.
Page 10

www.CamOneTec.com
Empfohlenes
Zubehör
CamOne
Monitor
halter
– Art.Nr. FCHD7X
- Reichweite 300 Meter
CamOne Gravity Air 2D Gimbal – Art. Nr. DJB131
- absorbiert Vibrationen und andere Einflüße von außen
- Tilt Position unabhängig der Fernsteuerung justierbar
- Metallendanschläge
- kompakte Bauweise
inkl. vieler Halterung
- Full HD 1080 p
CamOne Video Transmitter – Art. Nr. FCHD91
- 5.8GHz 25mW
- 30g leicht
CamOne infinity Full HD Kamera – Art. Nr. COIN01
- sehr leicht
- 30 Meter wasserdicht
Befestigen Sie den Bildschirm direkt an der
Fernsteuerung
Artikel.-Nr.: Artikel
FCHD7X CamOne Monitorhalter
HS1126 Stratos Netzteil 220V 12V
FCHD38 FlyCamOne FPV-Kopf mit 2 Servos
FCHD58 FlyCamOne HD RX Kabel
FCHD15 FlyCamOne HD GPS Modul
FCHD20 FlyCamOne HD HDMI Kabel
FCHD21 FlyCamOne HD AV Kabel
FCHD23 FlyCamOne HD 5.8GHz Adaptar Kabel
FCHD24 FlyCamOne HD Kabelverlängerung 200cm
FC3104 5.8GHz Planarantenne
Viele weitere unserer Artikel finden Sie auf unserer Homepage (www.camonetec.com) oder in gut sortierten Fachgeschäften.
10
Page 11

11
www.CamOneTec.com
www.CamOneTec.com
Manual
Please read before use!
CamOne Stratos
7” 178mm High Resolution
5.8GHz Diversity Screen
Thanks to the newest 5.8GHz technology, the Diversity screen is ideal
Vers.: 1.0
"CamOne" is a registered trademark of ACME the game company GmbH, Germany
© Copyright 2015 ACME the game company GmbH
for use in combination with 2.4GHz / 355MHz RC Systems-.
Page 12

S
afety Advice
www.CamOneTec.com
WARNING:
Follow these instruction to prevent
damage of the unit:
• DO NOT USE UNPROTECTED IF
RAIN OR WATER. PREVENT
CONTACT WITH ANY KIND OF
LIQUIDS.
• USE RECOMMENDED
ACCESSORIES ONLY.
• DO NOT DISASSEMBLE.
• THERE ARE NO INTERNAL PARTS THAT NEED TO
ME MAINTENANCE.
• REPAIRS SHOULD BE CARRIED OUT BY
QUALIFIED PERSONNEL ONLY.
CE Declaration
Herewith we declare that this item is
in accordance with the essential
requirements and other relevant
regulations of the directive
1999/5/EC. A copy of the original
declaration of conformity can be
obtained at the address above.
This Product contains a LiPo Battery
LiPo batteries are recyclable, and a valuable resource.
To dispose of the battery, remove it and take it to a
resource recovery facility.
The manufacturer is not liable for the loss of recordings due to malfunction or defect of the device, storage medium or
The privacy of others is protected by law and should be respected. The recording of third party can be an illegal act.
SERVICE & SUPPORT
ACME the game company GmbH
Boikweg 24
33129 Delbrück
Germany
Tel.: +49 2944 97 383 0
service@camonetec.com
or
http://www.CamOneTec.com
WEEE Reg. No.: DE64989527
Information for disposal of crossed Bin
This symbol is marked on a product or
packaging, it means that the product
including the batteries must not be disposed of with
your general household waste. Only discard
electrical/electronic items in separate collection
schemes, which cater for the recovery and recycling
of materials contained within. Your co-operation is
vital to ensure the success of these schemes and for
the protection of the environment
accessories.
You are responsible for your actions.
marked products
www.CamOneTec.com
12
Page 13

13
www.CamOneTec.com
Index
Content of the box .................................................................................................................................. 3
Activation…….. ...................................................................................................................................... 4
Charging the battery………………… ..................................................................................................... 5
Sunshield ........ ................................................................................................................................ 5
Ports……... ............................................................................................................................................. 5
Buttons………… ..................................................................................................................................... 7
Display icons…….. ................................................................................................................................. 8
Menu ...................................................................................................................................................... 8
Technical Data…..................................................................................................................................... 9
Service and Repairs…............................................................................................................................ 9
Accessories .......................................................................................................................................... 10
Content of the box
Please check the completeness before using the product!
2x 5.8GHz Antenna Manual
with BEC-Plug with BEC-Port AV-Out Cable
7“ Diversity Screen incl. LiPo Battery
12V DC-Cable 12V DC-Cable 2x
CamOne Stratos HR
For further use you additionally require:
Mount with standard tripod-screw to fix the screen
Sunshield
Page 14

www.CamOneTec.com
Activation
CamOne Stratos
7” 178mm High Resolution
5.8GHz Diversity Screen
Step into the fascinating possibilities of the Photo- and Video world and transmit your recordings
wireless, safe and live over a long distance.
The new developed CamOne Stratos 7“ 5.8GHz Diversity Screen boasts with latest technology and
and is perfectly suited for amateur- and professional applications.
Using the 2 integrated 5.8GHz receivers, the modern system electronics filters the
best available signal and shows a sharp and interference- free live picture. You can choose between
several bands that offer 8 channels.
Highlights
• Dual Signal- Scan for automated reception optimization
• DNR-Function
• Auto Scan Mode
Legal Note
Some EU-countries do not allow usage of FPV-Systems and simultaneous control of a
RC model. Make sure that the available frequencies are allowed in your area!
Advice
Always use this system with two persons:
One pilot controlling the model and one virtual operator controlling the 5.8GHz diversity
screen.
First attach the supplied 5.8GHz antennas to the appropriate threads. Make sure that
they are screwed in firmly. The power is supplied by an internal LiPo- battery, please make sure that it
is charged sufficiently.
To activate the screen, press the On/Off- button on the right side for 3 seconds.
The LED (blue) switches on.
The screen will now automatically scan the channels for a video signal.
14
Page 15

www.CamOneTec.com
15
Charging the internal LiPo
- Battery
Sunshield
To charge the internal battery, the separately available Power Adaptor is required
(HS1126; not included).
Connect the Power Adaptor to a power socket and then into the „DC IN“ plug of your screen.
During charging, the right LED (next to the Power Button) flashes red. The LED shuts off as soon as
charging is finished.
You may also charge the internal battery through an external LiPo battery.
This battery should contain at least 7.4 Volt and 2600mAH.
Please note that damages resulting from improper use or connection of an unsuitable power source
are not covered under warranty. Carry out changing operations carefully and well aware of the
technics and potential risks involved. Make sure that the power source used has sufficient capacity!
The battery is replaceable. To remove it, pull down the locker that is located underneath the battery
(backside of the screen) and then lift up the battery block by using the notch that is located next to the
locker. To re-connect the battery, insert it by holding it towars the golden contacts at first.
Add the sunshield to use the screen in bright light without limitations.
Simply fix it around the screen.
The tripod thread is located on the bottom of the screen. This way you are able to attach the screen on
a regular tripod screw.
Page 16

www.CamOneTec.com
Connection Ports
HD Port
The screen features a HD1.3 IN-Port.
This helps you to play back video
materials from a HD source.
USB-Port
The screen can be updated through
USB-Port. Please visit our homepage
to check firmware updates.
The USB-Port is not a power supply
16
Page 17

www.CamOneTec.com
17
Buttons
Receiver Selection
Band Selection
SCAN Mode
Channel Selection
Minus
MENU
Plus
Power (On/ Off)
Choose between Receiver 1 + 2
Choose between bands A/B/F
The screen automatically scans (Auto Scan Mode) all bands and channels
Switch through the channels 1-8
Reduces the brightness and the marked menu setting
Press once to make the icons visible
Double press to enter the main menu
Raises the brightness and the marked menu setting
Keep pressed to switch on the screen
Page 18

www.CamOneTec.com
Display Icons
Men
u
Changes will be shown on the display, no matter if you change the frequency or channel.
If the battery indicator shows an empty battery ( ), the battery needs to be recharged.
Double press the „MENU“ button to enter the Menu.
Here you can adjust the settings according to your needs.
By pressing the „MENU“ button, you can switch through the different menu steps.
To adjust a marked setting, please press the „Minus- / Plus“ buttons. If no further buttons are pressed,
the menu will automatically close after 5 seconds.
Structure
-Brightness (this can also be adjusted during live transmission by pressing the
Minus/Plus buttons)
-Contrast
-Colour
-Volume
-RF Sel. (manual selection of the reception source)
-Mode (16:9 or 4:3)
-Rotation (Image rotation)
-Language (see available languages in the Technical Details)
-Reset (Reset to factory settings)
-Exit
18
Page 19

www.CamOneTec.com
19
Technical Details
HD
Port
/ Playback
Service and Repairs
Display size: 7“ | 178 mm
Total size: 184 x 126 x 28 mm
Resolution: 1024 x 600 Pixel
Type: TFT LCD Monitor, LED backlight
Brightness: 500 cd/m2
Contrast: 500:1
Mountage: Tripod thread
Frequency: ISM 5.8 GHz
Channels:
Ports: RF1 AV Out (Video, Mono Audio output)
RF2 AV Out (Video, Mono Audio output)
DIV AV Out (Video, Mono Audio output)
AV IN (Video)
USB Updateport
HD1.3 IN
Operating voltage: DC-IN 7- 22.2 V
Battery: 1800mAH LiPo Akku
Weight: 480g
Speakers: 8Ω/ 1W X 2
Operating temperature: 0° C ~ +50° C
Languages: English, French, German, Spanish, Portuguese,
Japanese, Russian, Italian, Dutch and Chinese
The screen features a HD1.3 IN-Port. This helps you to play back video materials from a HD source.
Information about service and repairs can be obtained from your dealer or at www.CamOneTec.com.
If you have detailed questions, please contact us at:
(Tel. +49 2944 97 383 0 or by mail service@camonetec.com).
The screen can be updated through USB-Port. Please visit our homepage to check firmware updates.
The USB-Port is not a power supply.
Page 20

www.CamOneTec.com
Recommended Accessories
CamOne Screen
Mount
– Art.
No. FCHD7X
- Range 300 Meter
CamOne Gravity Air 2D Gimbal – Art. No. DJB131
- absorbs vibrations and other influences
- Tilt Position adjustable without controller
- Metal End stops
- Compact size
Incl. many mounts
- Full HD 1080p
CamOne Video Transmitter – Art. No. FCHD91
- 5.8GHz 25mW
- 30g only
CamOne infinity Full HD Camera – Art. No. COIN01
- very light
- 30 Meter waterproof
Mount the screen directly to your RCController.
Art.No.: Product
FCHD7X CamOne Screen Mount
FCHD77-N Stratos Power Adaptor 220V 12V | 1,5A | 3,5mm
FCHD38 FlyCamOne FPV-Head with 2 servos
FCHD58 FlyCamOne HD RX Cable
FCHD15 FlyCamOne HD GPS Module
FCHD20 FlyCamOne HD HDMI Cable
FCHD21 FlyCamOne HD AV Cable
FCHD23 FlyCamOne HD 5.8GHz Adaptor Cable
FCHD24 FlyCamOne HD Extension Cable 200cm
FC3104 5.8GHz Planar Antenna
Find more accessories on our homepage (www.CamOneTec.com) or check your nearest dealer.
20
Page 21

21
www.CamOneTec.com
www.CamOneTec.com
Manuel
A lire avant utilisation!
CamOne Stratos
Ecran 7” 178mm haute résolution
5.8GHz Diversity
La nouvelle technologie en 5.8GHz , rend cet écran compatible avec les systèmes RC en
Vers.: 1.0
“CamOneTec”, “CarCamOne” and the “FlyCamOne” Logo are registered trademarks of ACME the game company GmbH, Germany
© Copyright 2015 ACME the game company GmbH
2.4GHz / 355MHz RC.
Page 22

www.CamOneTec.com
Conseil de sécurité
Avertissements:
Il est indispensable de suivre les instructions ci-après afin
d’éviter d’endommager votre caméra:
-NE PAS UTILISER LE PRODUIT EN CONDITIONS
PLUVIEUSES.
-N’UTILISER QUE LES ACCESSOIRES COMPATIBLES
-NE PAS TENTER DE DEMONTER
-AUCUN COMPOSANT INTERNE NE NECESSITE
D’ENTRETIEN PARTICULIER
-LES REPARATIONS NE DOIVENT ETRE FAITES QUE
PAR LE PERSONNEL QUALIFIE.
CE Declaration
Nous déclarons par la présente que ce produit est en
règle avec les directives relatives aux normes 1999/5/EG.
Une copie de l’original de la déclaration de conformité est
disponible sur simple demande à l’adresse suivante.
SERVICE & SUPPORT
ACME the game company GmbH
Boikweg 24
33129 Delbrück
Germany
Tel.: +49 2944 97 383 0
service@camonetec.com
or
http://www.CamOneTec.com
WEEE Reg. No.: DE64989527
Informations relatives aux produits recyclables.
Le symbole ici présent sur le produit que vous venez
d’acheter signifie que celui-ci contient des composants
susceptibles d’être recyclés. Pour cette raison vous ne
pouvez pas jeter ce produit avec vos déchets
ménagers. Il est indispensable que vous preniez
contact avec un centre de recyclages des déchets
sensibles afin d’assurer le recyclage de ce produit.
Les batteries en fin de vie doivent être collectées en vue
d’être recyclées.
Vous devez pour cela vous rapprocher du centre de
collecte le plus proche de chez vous.
La vie privée d’autrui est tabou. Vous ne devez en aucun cas filmer des personnes sans avoir au préalable obtenu leur
consentement.
www.CamOneTec.com
22
Page 23

www.CamOneTec.com
23
Index
Contenu de la boite................................................................................................................................. 3
Activation…….. ...................................................................................................................................... 4
Charge de la batterie...……………… ..................................................................................................... 5
Protection soleil……................................................................................................................................ 5
Ports……... ............................................................................................................................................. 5
Boutons………….................................................................................................................................... 6
Affichage des icônes .............................................................................................................................. 7
Menu ...................................................................................................................................................... 7
Caractéristiques techniques.................................................................................................................... 8
Service et réparation............................................................................................................................... 8
Accessoires ............................................................................................................................................ 9
Contenu de la boite
Vérifier que le produit est complet avant de commencer à l’utiliser!
2x antennes 5.8GHz Manuel
Câble 12V DC Câble 12V DC 2x
Avec prise BEC avec prise BEC Cordon AV-Out
CamOne Stratos HR
Ecran 7“ Diversity
Pour utiliser le produit vous avez aussi besoin de :
Pare soleil
Page 24

www.CamOneTec.com
Activation
Support avec vis de fixation tripode pour fixer l‘écran
CamOne Stratos
Ecran 7” 178mm haute résolution
5.8GHz Diversity
C’est un accessoire indispensable vous permettant de nouvelles possibilités dans le monde
fascinant de la retransmission sans fil sécurisée de photo et vidéo sur des longues distances.
Le nouvel écran CamOne Stratos 7“ 5,8GHz Diversity équipé des dernières technologies de
retransmission est idéal pour les amateurs mais également pour les professionnels.
Equipé de deux récepteurs intégrés en 5.8GHz, il assure une retransmission précise et sans
interférence grâce au système intégré qui va sélectionner le meilleur signal disponible, 8 fréquences
sont disponibles.
Points forts
• Double système de réception pour une réception optimisée
• Possibilité de faire disparaitre du cadre la barre “Menu”
• Fonction DNR
• Mode Auto Scan
Avertissement légal
Certains pays de l’Union Européenne n’autorisent pas l’utilisation simultanée d’un système FPV et
d’un modèle réduit. Assurez-vous que les fréquences disponibles sont autorisées dans la zone où
vous utilisez le système !
Conseil
Utilisez toujours ce système à deux personnes : Un pilote qui contrôle le modèle réduit et un copilote
qui s’occupe
Vous devez en premier lieu fixer les deux antennes en 5.8GHz dans les emplacements situés sur
l’arrête de l’écran. Assurez-vous de fixer ces deux antennes fermement
L’écran est alimenté par une batterie LiPo, assurez-vous qu’elle est suffisamment chargée.
Pour mettre en marche l’écran, vous devez appuyer sur le bouton On/Off situé sur la droite de l’écran
pendant 3 secondes.
L’écran va alors automatiquement effectuer un balayage des fréquences.
24
Page 25

www.CamOneTec.com
25
Charge de la batterie LiPo
Pare soleil
Pour charger la batterie, il existe un adaptateur secteur disponible en option (HS1126; non inclus).
Connecter alors l’adaptateur secteur au port „DC IN“ de l’écran.
Pendant la charge, le témoin LED de droite (à proximité de l’interrupteur de mise sous tension) va
clignoter en rouge. Une fois terminée, le témoin LED va s’éteindre.
Il vous est également possible de recharger la batterie interne à l’aide d’un chargeur de batterie LiPo.
Il doit être capable de charger à 7.4 Volt avec une capacité de 2600mAH.
ATTENTION, l’utilisation inappropriée des différents ports de connexion ainsi que d’une source
d’alimentation inadéquate pourraient endommager l’écran. Dans ce cas, aucune garantie ne pourra
être appliquée. Nous vous recommandons donc de manipuler le matériel avec soin et de vous assurer
de vos compétences techniques!
Utilisez-le en cas de forte luminosité. Il vous suffit de le fixer à l’écran.
La vis tripode est située sur la tranche inférieure de l’écran. Cela vous permet de fixer l’écran à un
support tripode standard.
Page 26

www.CamOneTec.com
Ports
26
Page 27

www.CamOneTec.com
27
Boutons
Sélection du récepteur
Sélection de la fréquence
Mode SCAN
Sélection du canal
Minus
MENU
Plus
Power (On/ Off)
Choisir entre le récepteur 1 + 2
Choisir entre les fréquences A/B/F
L’écran balaye automatiquement les différentes fréquences (Mode Auto Scan) et
cannaux
Permet de sélectionner les cannaux de 1-8
Réduit la luminosité et permet de sortir du menu réglage
Appuyer une fois afin de faire apparaitre les icones
Faites une double pression pour accéder au menu
Augmente la luminosité et permet de sélectionner des options du menu
Garder ce bouton appuyé afin d’allumer et d’éteindre l‘écran
Page 28

www.CamOneTec.com
Display Icons
Men
u
Les modifications sont affichées sur l’écran et ce même si vous changez de fréquence ou de canal.
Si le voyant des batteries montre une batterie vide ( ), vous devez charger la batterie.
Appuyer deux fois sur „MENU“ pour accéder au menu
Vous pourrez alors ajuster les réglages selon vos besoins.
En appuyant sur le bouton „MENU“, vous pourrez naviguer à travers les réglages.
Pour ajuster un réglage sélectionné, vous devez utiliser les boutons + et -. Si vous ne sélectionnez
rien pendant 5 secondes, le menu va automatiquement disparaitre
Structure
-Luminosité (Possibilité d’ajustement durant la retransmission en utilisant les boutons
+/-)
-Contraste
-Couleur
-Volume
-Input (Sélection manuel de la source du signal)
-RF Sel. (Sélection manuel de la source de réception)
-Mode (16:9 ou 4:3)
-Rotation (Rotation de l‘image)
-Langue (Différentes langues sont disponibles)
-Reset (Réglages d‘usine)
-Sortie
28
Page 29

www.CamOneTec.com
29
Caractéristiques techniques
Port
HD /
Playback
Service
et réparation
Taille de l‘écran: 7“ | 178 mm
Taille totale: 184 x 126 x 28 mm
Résolution: 1024 x 600 Pixel
Type: Moniteur TFT LCD, LED backlight
Brillance: 500 cd/m2
Contraste: 500:1
Montage: VIs tripode
Frequence: ISM 5.8 GHz
Canaux:
Ports: RF1 AV Out (Video, Mono Audio output)
RF2 AV Out (Video, Mono Audio output)
DIV AV Out (Video, Mono Audio output)
AV IN (Video)
USB port de mise à jour
Voltage d‘utilisation: DC-IN 7- 22.2 V
Batterie: 1800mAH LiPo
Poids: 480g
Haut parleur: 8Ω/ 1W X 2
Température d‘utilisation: 0° C ~ +50° C
Langues: Anglais, Français, Allemand, Espagnol, Portugais,
Japonais, Russe, Italien, Néerlandais, Chinois.
L’écran est équipé d’un port HD IN. Cela vous permettra de visualiser en toute facilité vos vidéo sur un
périphérique équipé de cette technologie.
Des pièces détachées ou de rechange sont disponibles chez votre revendeur ou sur
www.camonetec.com .
Pour d’autres informations nous vous invitons à nous contacter :
(Tel.: +49-2944 973830ou par mail à service@camonetec.com).
L’écran peut être mis à jour via le port USB. Merci de visiter notre site internet pour visualiser les
mises à jour disponibles. Le port USB n’est pas une source d’alimentation.
Page 30

www.CamOneTec.com
30
Accessoires recommandés
Fixation écran CamOne
– Art.No. FCHD7X
- Portée 300 mètres
CamOne Gravity Air 2D Gimbal – Art. No. DJB131
- Amortis les vibrations et autres parasites
- Ajustement du tilt sans télécommande
- Conception métallique
- Très compact
Incl. Nombreuses fixations
- Full HD 1080p
CamOne émetteur Vidéo– Art. No. FCHD91
- 5.8GHz 25mW
- 30g o
Caméra CamOne infinity Full HD– Art. No. COIN01
- Très léger
- Etanche à 30 mètres
Permet de monter l’écran directement sur une
télécommande.
Art.No.: Référence
FCHD7X Fixation écran CamOne
FCHD77-N Aadaptateur pour écran Stratos 220V 12V | 1,5A | 3,5mm
FCHD38 FlyCamOne tête FPV avec 2 servos
FCHD58 FlyCamOne HD Cordon RX
FCHD15 FlyCamOne HD Module GPS
FCHD20 FlyCamOne HD Cordon HDMI
FCHD21 FlyCamOne HD Cordon AV
FCHD23 FlyCamOne HD Cordon adaptateur 5.8GHz
FCHD24 FlyCamOne HD Extension 200cm
FC3104 Antenne en 5.8GHz pour augmenter la portée
D’autres accessoires sont disponibles sur notre page (www.camonetec.com ) ou chez votre
revendeur.
 Loading...