

Page 1
RS232
4
S-Video Output
VGA
Video Output
Y
Y
D-Sub
D-Sub
R
W
D-Sub
D-Sub
USB
USB
RS232
USB
USB
1
2
3
5
6
7
4
2
8
8
X1161 series
E62405SP
R
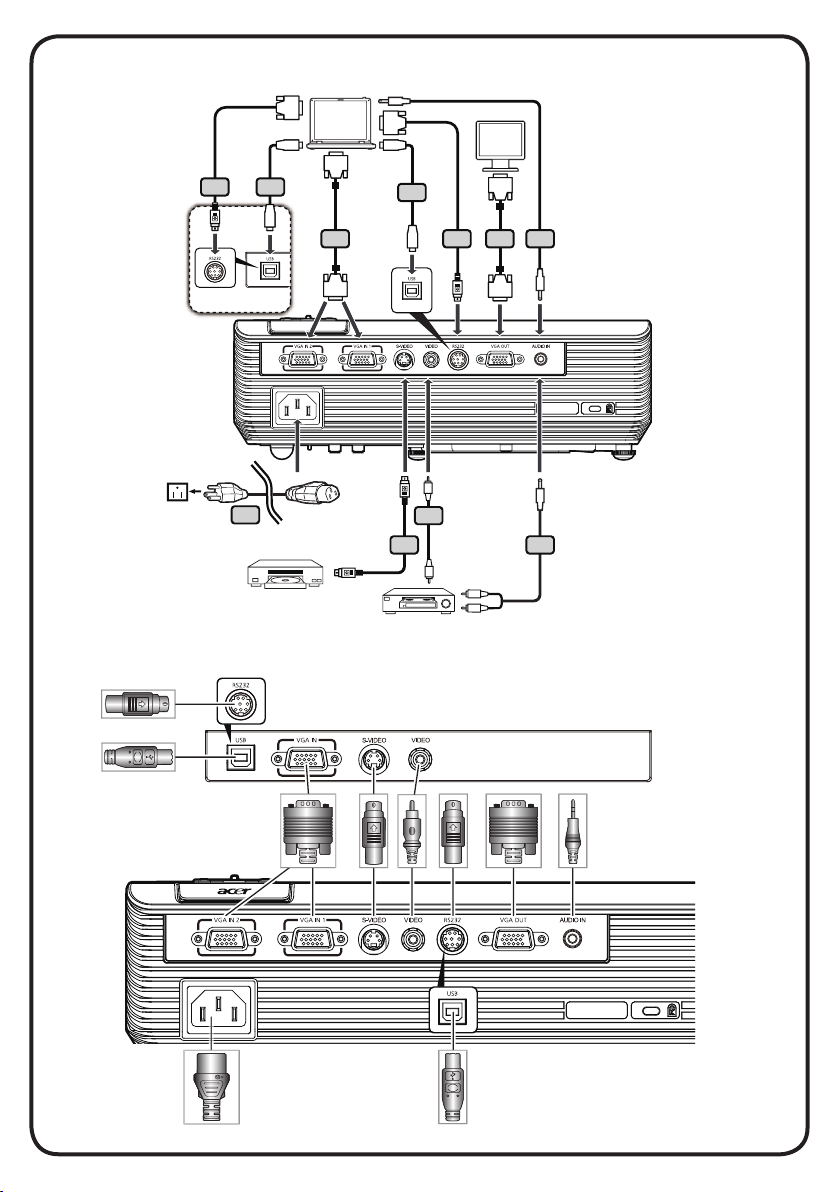
INSTALLATION
INTERFACE CONNECTOR
Note: Connector interface is subject to model’s specifications
molex
molex
Page 2
English
Hrvatski
Quick Start
INSTALLATION
1. Power Cord
2. VGA Cable
3. Composite Video Cable
4. RS232 Cable
5. S-Video Cable
6. Audio Cable Jack/Jack
7. Audio Cable Jack/RCA
8. USB Cable
Note: Connector interface is subject to model’s specifications
Note: “(*)” Only for X1161N series.
INTERFACE CONNECTOR
Connecting to a Computer
1. Ensure the projector and your
computer are turned off.
2. Connect one end of the VGA cable
to the “VGA IN” connector on the
projector; connect the other end to
the VGA connector on the computer
and tighten the screws.
3. Connect one end of the power cord
into the AC power socket on the
projector; connect the other end to an
electrical outlet.
Powering On the Projector
1. Remove the lens cap.
2. Turn on the projector first and then
the computer.
3. Adjust the position, focus and zoom.
4. Run you presentation.
Powering Off the Projector
1. Press the power button twice.
2. Do not remove AC power cord from
outlet until the projector fan shut
down.
(*)
(*)
(*)
Kratki pregled
INSTALACIJA
1. Naponski kabel
2. VGA kabel
3. Kompozitni videokabel
4. RS232 kabel
5. S-Video kabel
6. Jack priključak za audiokabel/jack
priključak
7. Audio kabel s dva utikača/RCA
8. USB kabel
Napomena:
Napomena: “(*)” Samo za seriju X1161N
Sučelje konektora ovisno je o tehničkim podacima
modela
PRIKLJUČCI NA UREÐAJU
Spajanje na računalo
1. Provjerite jesu li projektor i vaše
računalo uključeni.
2. Spojite jedan kraj VGA kabela u
“VGA IN”
spojite drugi kraj na VGA priključak na
računalu i pritegnite vijke.
3. Spojite jedan kraj naponskog kabela u
priključak za napajanje na projektoru, a
drugi kraj spojite na električnu utičnicu.
Uključivanje projektora
1. Uklonite poklopac leće.
2. Prvo upalite projektor, a zatim računalo.
3. Podesite položaj, žarište i zoom.
4. Pokrenite prezentaciju.
Isključivanje projektora
1. Dvaput pritisnite gumb za uključivanje.
2. Ne isključujte naponski kabel iz utičnice
dok se ne ugasi ventilator projektora.
(*)
(*)
(*)
priključak na projektoru;
 Loading...