

Page 1

Manual for
Acer n10 Handheld
Page 2

COPYRIGHT
Copyright © 2003 Acer Inc. or its subsidiaries
All Rights Reserved. Printed in Taiwan.
Acer n10 Handheld Manual
Original issue: February 2003
Acer and the Acer logo are registered trademarks of Acer Inc.
Microsoft, ActiveSync, Outlook, Pocket Outlook, Windows, Windows NT, and the Windows logo are either registered
trademarks or trademarks of Microsoft Corporation in the United States and/or other countries. Microsoft products are licensed
to OEMs by Microsoft Licensing, Inc., a wholly owned subsidiary of Microsoft Corporation.
Other company’s product names or trademarks are used herein for identification purpose only and belong to their respective
companies.
Changes may be made periodically to the information in this publication without obligation to notify any person of such
revision or changes. Such changes will be incorporated in new editions of this Manual or supplementary documents and
publications.
No part of this publication may be reproduced, stored in a retrieval system, or transmitted, in any form or by any means,
electronic, mechanical, photocopy, recording, or otherwise, without the prior written permission of Acer Inc.
DISCLAIMER AND LIMITATION OF LIABILITY
Acer and its subsidiaries makes no representations or warranties, either expressed or implied, with respect to the contents
hereof and specifically disclaims the implied warranties of merchantability or fitness for a particular purpose. Acer and its
subsidiaries assume no responsibility for any damage or loss resulting from the use of this Acer n10 Handheld Manual.
NOTES
Record the serial number, purchase date, and place of purchase information in the space provided below. The serial number is
recorded on the label affixed to your Acer n10. All correspondence concerning your unit should include the serial number, and
purchase information.
Acer n10 Handheld
S/N: _______________________________________
Purchase Date: ____________________________
Place of Purchase: _________________________
Page 3

About this Manual
Welcome to the Acer n10 Handheld Manual. This Manual is designed to help you get
up and running quickly with your new Acer n10—a Windows
2002 handheld. It describes all you need to know about how to use your handheld as
well as the application programs that come with it.
This Manual will discuss the following topics:
• A tour of the Acer n10 system
• Setup and maintenance procedures
• Viewing and entering data
• Using the application programs bundled with you handheld
• Taking advantage of your handheld’s expansion features
• Synchronising data between your handheld and your computer
• Connecting your handheld to a computer, a network, or the Internet
• Personalising your handheld with your own preference settings
This Manual introduces you to the many ways your Acer n10 can help you organise
and manage both business and personal information to make your everyday activities
a more productive and satisfying experience.
®
Powered Pocket PC
iii
Page 4

iv
Page 5

First things first
Your guides
First things first
We would like to thank you for making Acer n10 your choice for your handheld
needs. Your new sleek Acer n10 is a multi-functional tool packed with user-friendly
features and high-performance applications designed to make organising workrelated information and synchronising it with your personal activities a time-efficient
task. We hope you enjoy using your Acer n10 as much as we enjoyed creating it for
you.
Use your Acer n10 to effectively manage information related to both business and
personal tasks.
®
• Use the Microsoft
computing tasks
• Synchronise the information on your computer with the information on your
handheld using Microsoft
• Get connected to the Internet with the Microsoft® Pocket Internet Explorer
• Create an on-the-go backup file
• Expand your handheld’s capabilities using either the built-in SD/MMC slot or
the CF slot
• Beam information to another IR-enabled device
• Customise your handheld based on your personal requirements and
preferences
Pocket PC 2002 software to perform organising and
®
ActiveSync
®
Your guides
To help you use your Acer n10, we have designed a set of guides:
For information on: Refer to:
Programs on your handheld This Manual. Bundled in the Acer n10 Handheld
Companion CD, it provides online reference for using
your Acer n10.
The Acer n10 Handheld Help. To view Help,
tap and then Help.
Programs on your handheld
Additional programs that can be
installed on your handheld
Connecting to and synchronising
with your computer
The Acer n10 Handheld Companion CD.
The Just for Starters... poster.
ActiveSync Help on your computer. To view Help, click
Help and then Microsoft ActiveSync Help.
v
Page 6

First things first
Package contents
For information on: Refer to:
Last-minute updates and detailed
technical information
Up-to-date information regarding
your handheld
Package contents
Your Acer n10 comes packed in a cardboard box. Carefully unpack the box and
remove the contents. If any of the following items are missing or damaged, contact
your dealer immediately:
• Acer n10 handheld • Just for Starters... poster
• Stylus • Acer n10 Handheld Quick Guide
• USB Sync Cable • Acer n10 Handheld Companion
• AC Adapter • Acer Handheld Accessories
• Cover • End User License Agreement
The Read Me files. Located in the Microsoft ActiveSync
folder on your computer and on the Acer n10
Handheld Companion CD.
http://www.acer.com/
CD
Catalogue
• Warranty Agreement
Maintaining your Acer n10
This section provides information on the following:
• Proper care and usage of your handheld
• Resetting your handheld
Proper care and usage of your Acer n10
Your Acer n10’s rugged and tough construction is designed to provide you with years
of reliable and trouble-free service. Observing the following general maintenance
procedures will help ensure this:
1 Take care not to scratch the screen of your handheld. Keep the screen clean. When
working with your handheld, use the supplied stylus or plastic-tipped pens intended
for use with touch-sensitive screens. Never use an actual pen or pencil or other sharp
object on the screen surface.
2 Your handheld is not waterproof and should not be exposed to rain or moisture.
Under extreme conditions, water may enter the circuitry through the front panel
buttons or expansion slots. In general, treat your handheld as you would a pocket
calculator or other small electronic device.
3 Take care not to drop your handheld or subject it to any strong impact. Do not place
your handheld in your back pocket; if you sit on it, you may damage it.
vi
Page 7
First things first
Maintaining your Acer n10
4 Protect your handheld from temperature extremes. For example, do not leave your
handheld on the dashboard of a car on a hot day or on a day when temperatures are
below the freezing point. Also, keep it away from heaters and other sources of heat.
5 Do not use or store your handheld in any location that is extremely dusty, damp or
wet. Always use the (included) CF dummy card to protect the connectors when not in
use.
6 Use a soft, damp cloth to clean your handheld. If the surface of the screen becomes
soiled, clean it with a soft cloth moistened with diluted window-cleaning solution.
Resetting your Acer n10
You may have to perform a reset if your handheld no longer responds to the buttons
on the screen.
Performing a soft reset
A soft reset allows your handheld to get a fresh start, similar to rebooting a computer.
All records and entries are retained after a soft reset.
To perform a soft reset:
• Using the tip of your stylus, lightly press the reset button inside the hole on
the rear panel of your handheld.
Performing a hard reset
A hard reset will erase all records and entries stored in your handheld. Never perform
a hard reset unless a soft reset does not correct your problem. When you perform your
next ActiveSync operation, you can restore any data that you previously synchronised
to your computer. To perform a hard reset:
vii
Page 8
First things first
Locking your Acer n10
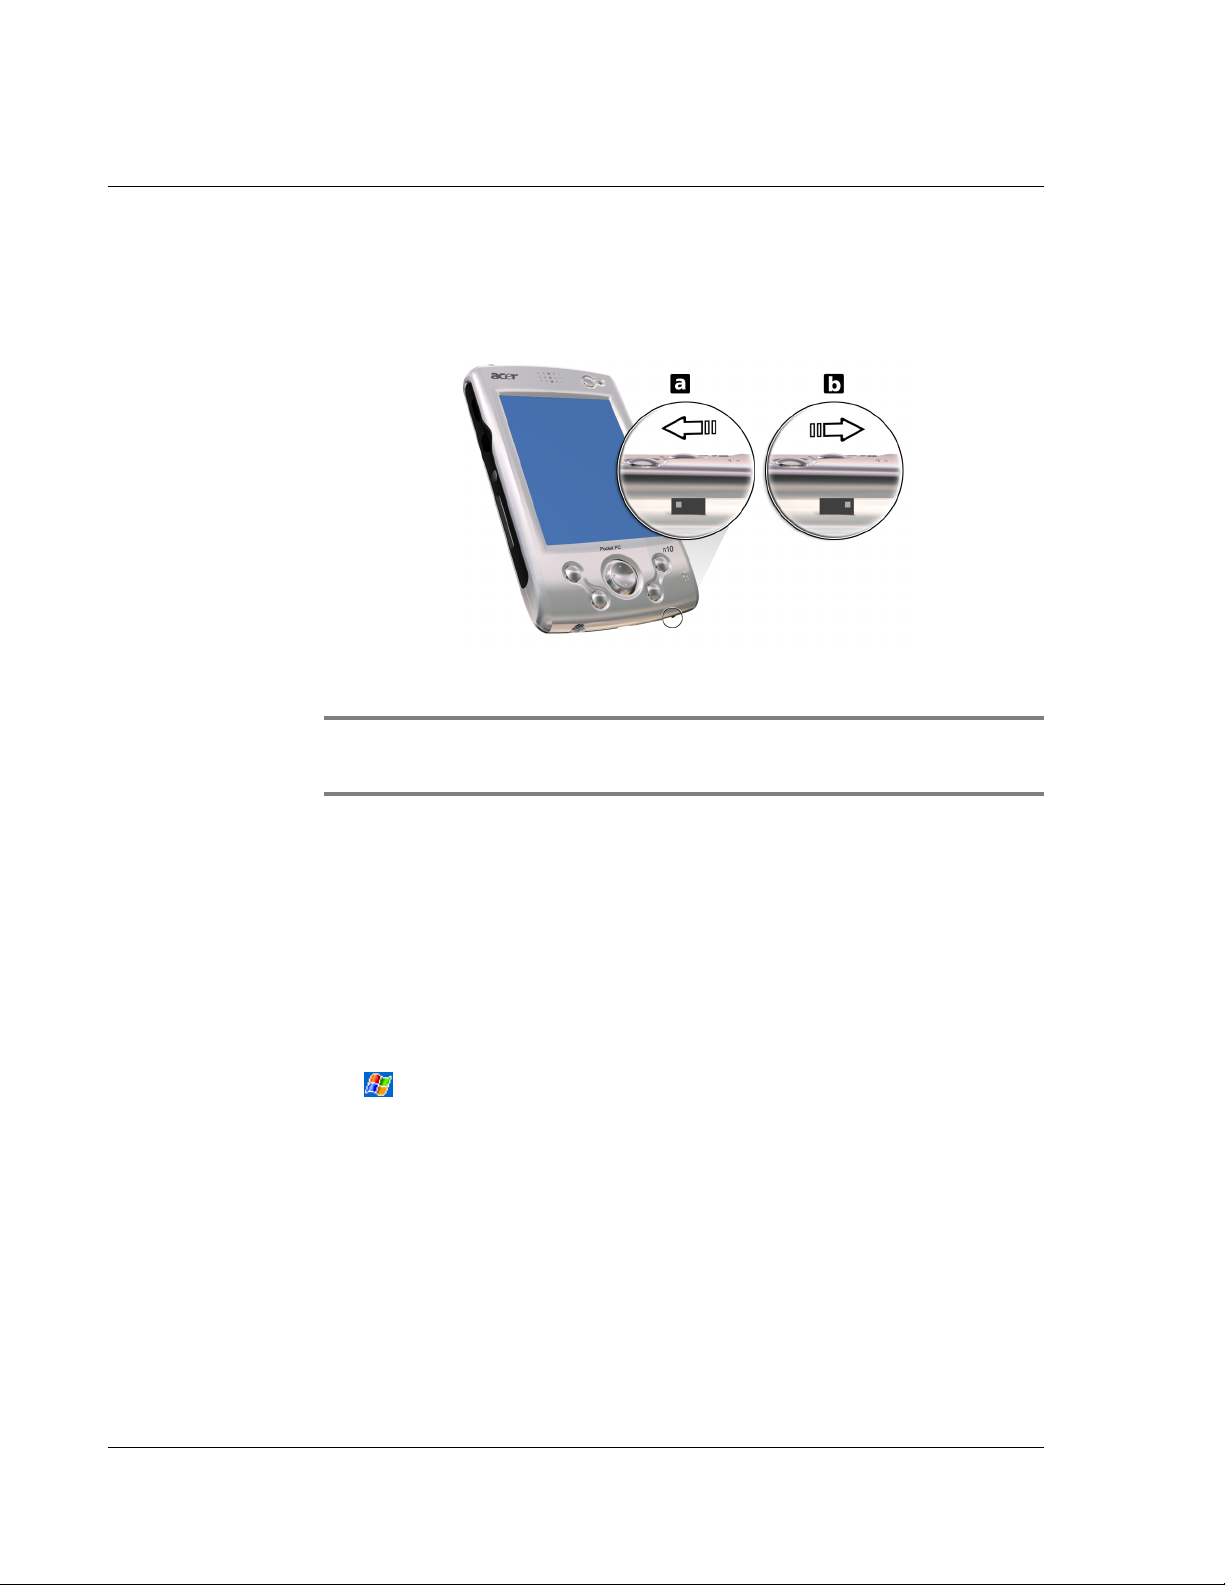
1 Use the tip of your stylus to toggle the reset switch to the left (a) and back to the right
(b) on the bottom of your handheld.
NOTE: When you perform a hard reset, formats, preferences, and other settings including
date and time are restored to their factory default settings. All data, records, and entries
will be erased.
Locking your Acer n10
Your handheld is not just a financial investment but a wealthy source of personal
information, some of which may be confidential so it is only logical to protect it from
any unauthorized access. The security setting of your handheld gives you the option
of assigning a lock password that will be required for access after a set period of
inactivity.
To assign a password
1 Tap , Settings.
2 On the Personal tab, tap Password.
3 Select a password option.
• Simple 4 digit password
• Strong alphanumeric password
4 Define the period of inactivity before the password will be required for access.
5 Enter password then retype it to confirm.
For more information, refer to "Password" on page 110.
viii
Page 9

Contents
About this Manual iii
First things first v
Your guides . . . . . . . . . . . . . . . . . . . . . . . . . . . . . . v
Package contents . . . . . . . . . . . . . . . . . . . . . . . . . . . . vi
Maintaining your Acer n10 . . . . . . . . . . . . . . . . . . . . . . . . vi
Proper care and usage of your Acer n10 . . . . . . . . . . . . . . . . . vi
Resetting your Acer n10 . . . . . . . . . . . . . . . . . . . . . . . .vii
Locking your Acer n10 . . . . . . . . . . . . . . . . . . . . . . . . . viii
1 Getting started 1
System requirements . . . . . . . . . . . . . . . . . . . . . . . . . . 1
Features summary. . . . . . . . . . . . . . . . . . . . . . . . . . . . 1
Performance . . . . . . . . . . . . . . . . . . . . . . . . . . . . 1
Display . . . . . . . . . . . . . . . . . . . . . . . . . . . . . . . 1
Audio . . . . . . . . . . . . . . . . . . . . . . . . . . . . . . . 2
Connectivity. . . . . . . . . . . . . . . . . . . . . . . . . . . . . 2
Expansion . . . . . . . . . . . . . . . . . . . . . . . . . . . . . 2
Battery . . . . . . . . . . . . . . . . . . . . . . . . . . . . . . . 2
Design and ergonomics . . . . . . . . . . . . . . . . . . . . . . . . 2
Acer n10 tour . . . . . . . . . . . . . . . . . . . . . . . . . . . . . 3
Front view . . . . . . . . . . . . . . . . . . . . . . . . . . . . . 3
Left view . . . . . . . . . . . . . . . . . . . . . . . . . . . . . . 5
Right view . . . . . . . . . . . . . . . . . . . . . . . . . . . . . 6
Top view . . . . . . . . . . . . . . . . . . . . . . . . . . . . . . 6
Bottom view . . . . . . . . . . . . . . . . . . . . . . . . . . . . 7
Preparing to use your Acer n10 . . . . . . . . . . . . . . . . . . . . . . 7
Installing the Microsoft® ActiveSync® software . . . . . . . . . . . . . . 8
Connecting the computer . . . . . . . . . . . . . . . . . . . . . . . 8
Charging your Acer n10 . . . . . . . . . . . . . . . . . . . . . . . . 9
Setting up your Acer n10 . . . . . . . . . . . . . . . . . . . . . . . 9
Performing the first synchronisation process . . . . . . . . . . . . . . .10
Command interface . . . . . . . . . . . . . . . . . . . . . . . . . . .11
Handheld buttons and the stylus . . . . . . . . . . . . . . . . . . . .11
Today screen . . . . . . . . . . . . . . . . . . . . . . . . . . . .12
Navigation bar and command bar . . . . . . . . . . . . . . . . . . . .13
Pop-up menus . . . . . . . . . . . . . . . . . . . . . . . . . . . .14
Notifications . . . . . . . . . . . . . . . . . . . . . . . . . . . .15
2 Entering data in your Acer n10 17
Using the input panel . . . . . . . . . . . . . . . . . . . . . . . . . .17
To type with the soft keyboard . . . . . . . . . . . . . . . . . . . . .18
To use Letter Recognizer . . . . . . . . . . . . . . . . . . . . . . .18
ix
Page 10

To use Block Recognizer . . . . . . . . . . . . . . . . . . . . . . . 19
To use Transcriber . . . . . . . . . . . . . . . . . . . . . . . . . . 19
Writing on the screen . . . . . . . . . . . . . . . . . . . . . . . . . . 19
To write on the screen . . . . . . . . . . . . . . . . . . . . . . . . 20
Drawing on the screen . . . . . . . . . . . . . . . . . . . . . . . . . 22
To create a drawing . . . . . . . . . . . . . . . . . . . . . . . . . 22
Recording a message . . . . . . . . . . . . . . . . . . . . . . . . . . 24
To create a recording . . . . . . . . . . . . . . . . . . . . . . . . 24
To play a recording . . . . . . . . . . . . . . . . . . . . . . . . . 24
Using My Text . . . . . . . . . . . . . . . . . . . . . . . . . . . . . 25
To insert a My Text message . . . . . . . . . . . . . . . . . . . . . . 25
3 Managing applications and information 27
Opening an application . . . . . . . . . . . . . . . . . . . . . . . . . 27
Switching between applications . . . . . . . . . . . . . . . . . . . . . 27
Finding and organising information . . . . . . . . . . . . . . . . . . . . 29
To use Find . . . . . . . . . . . . . . . . . . . . . . . . . . . . . 29
To use File Explorer . . . . . . . . . . . . . . . . . . . . . . . . . 30
4 Managing Microsoft® Pocket Outlook applications 31
Calendar . . . . . . . . . . . . . . . . . . . . . . . . . . . . . . . 31
Scheduling an appointment . . . . . . . . . . . . . . . . . . . . . . 33
Creating a meeting request . . . . . . . . . . . . . . . . . . . . . . 34
Contacts . . . . . . . . . . . . . . . . . . . . . . . . . . . . . . . 35
Creating a contact . . . . . . . . . . . . . . . . . . . . . . . . . . 36
Finding a contact . . . . . . . . . . . . . . . . . . . . . . . . . . 36
Tasks . . . . . . . . . . . . . . . . . . . . . . . . . . . . . . . . . 38
Creating a task . . . . . . . . . . . . . . . . . . . . . . . . . . . 38
Notes . . . . . . . . . . . . . . . . . . . . . . . . . . . . . . . . 40
Creating a note . . . . . . . . . . . . . . . . . . . . . . . . . . . 40
Inbox . . . . . . . . . . . . . . . . . . . . . . . . . . . . . . . . 41
Synchronising email messages . . . . . . . . . . . . . . . . . . . . . 42
Connecting directly to an email server . . . . . . . . . . . . . . . . . 42
Using the Message list . . . . . . . . . . . . . . . . . . . . . . . . 43
Composing a message . . . . . . . . . . . . . . . . . . . . . . . . 45
Managing email messages and folders . . . . . . . . . . . . . . . . . 45
5 Managing Microsoft® Pocket PC 2002 companion programs 47
Pocket Word . . . . . . . . . . . . . . . . . . . . . . . . . . . . . 47
To create a new file . . . . . . . . . . . . . . . . . . . . . . . . . 47
To use the Pocket Word file list . . . . . . . . . . . . . . . . . . . . 48
To enter information. . . . . . . . . . . . . . . . . . . . . . . . . 48
Pocket Excel . . . . . . . . . . . . . . . . . . . . . . . . . . . . . . 51
Creating a new workbook . . . . . . . . . . . . . . . . . . . . . . 52
To create a Pocket Excel file list . . . . . . . . . . . . . . . . . . . . 52
®
MSN
Messenger . . . . . . . . . . . . . . . . . . . . . . . . . . . . 54
Setting up . . . . . . . . . . . . . . . . . . . . . . . . . . . . . 54
x
Page 11

Working with contacts . . . . . . . . . . . . . . . . . . . . . . . .55
Chatting with contacts . . . . . . . . . . . . . . . . . . . . . . . .55
Microsoft
Microsoft
6 Using third-party applications 61
RecentDo . . . . . . . . . . . . . . . . . . . . . . . . . . . . . . .61
Backup/Restore . . . . . . . . . . . . . . . . . . . . . . . . . . . . .62
IA Album LE . . . . . . . . . . . . . . . . . . . . . . . . . . . . . .71
Acrobat
PocketTV
®
Windows Media™ Player for Pocket PC . . . . . . . . . . . . . .56
®
Reader for Pocket PC . . . . . . . . . . . . . . . . . . . . . .57
Using the Guidebook . . . . . . . . . . . . . . . . . . . . . . . . .57
Getting books on your Acer n10 . . . . . . . . . . . . . . . . . . . .58
Using the Library. . . . . . . . . . . . . . . . . . . . . . . . . . .58
Opening a book . . . . . . . . . . . . . . . . . . . . . . . . . . .58
Reading a book . . . . . . . . . . . . . . . . . . . . . . . . . . .59
Using Reader features. . . . . . . . . . . . . . . . . . . . . . . . .59
Removing a book . . . . . . . . . . . . . . . . . . . . . . . . . .60
Backup function . . . . . . . . . . . . . . . . . . . . . . . . . . .64
Restore function . . . . . . . . . . . . . . . . . . . . . . . . . . .67
IA Album LE menus. . . . . . . . . . . . . . . . . . . . . . . . . .73
®
Reader® for PocketPC® . . . . . . . . . . . . . . . . . . . . . .80
TM
. . . . . . . . . . . . . . . . . . . . . . . . . . . . . . .80
Command bar . . . . . . . . . . . . . . . . . . . . . . . . . . . .81
Seek/Progress bar . . . . . . . . . . . . . . . . . . . . . . . . . .82
Status bar. . . . . . . . . . . . . . . . . . . . . . . . . . . . . .82
Menu . . . . . . . . . . . . . . . . . . . . . . . . . . . . . . .83
Options . . . . . . . . . . . . . . . . . . . . . . . . . . . . . .83
Files . . . . . . . . . . . . . . . . . . . . . . . . . . . . . . . .84
7 Using expansion features 87
Using a Compact Flash type I/type II card . . . . . . . . . . . . . . . . . .87
Inserting a Compact Flash card . . . . . . . . . . . . . . . . . . . . .87
Removing a Compact Flash card . . . . . . . . . . . . . . . . . . . .88
Using an SD/MMC card. . . . . . . . . . . . . . . . . . . . . . . . . .89
Inserting an SD/MMC card . . . . . . . . . . . . . . . . . . . . . . .89
Removing an SD/MMC card . . . . . . . . . . . . . . . . . . . . . .89
8 Exchanging and updating data using ActiveSync
Using ActiveSync® . . . . . . . . . . . . . . . . . . . . . . . . . . . .91
®
91
9 Getting connected 93
Transferring items using infrared . . . . . . . . . . . . . . . . . . . . .93
To send information . . . . . . . . . . . . . . . . . . . . . . . . .93
To receive information . . . . . . . . . . . . . . . . . . . . . . . .94
Connecting to the Internet . . . . . . . . . . . . . . . . . . . . . . . .95
To create a modem connection to an ISP . . . . . . . . . . . . . . . . .95
To create an Ethernet connection to an ISP . . . . . . . . . . . . . . . .96
Connecting to a network . . . . . . . . . . . . . . . . . . . . . . . . .97
xi
Page 12

To create a modem connection to a network . . . . . . . . . . . . . . . 97
To create an Ethernet connection to a network . . . . . . . . . . . . . . 98
End a connection . . . . . . . . . . . . . . . . . . . . . . . . . . 99
Connecting directly to an email server . . . . . . . . . . . . . . . . . 99
Get help on connecting. . . . . . . . . . . . . . . . . . . . . . . 100
10 Using Microsoft® Pocket Internet Explorer 101
Mobile Favorites folder . . . . . . . . . . . . . . . . . . . . . . . . 101
Favorite links . . . . . . . . . . . . . . . . . . . . . . . . . . . 102
Mobile favorites. . . . . . . . . . . . . . . . . . . . . . . . . . 102
AvantGo channels . . . . . . . . . . . . . . . . . . . . . . . . . . 103
To sign up for AvantGo. . . . . . . . . . . . . . . . . . . . . . . 103
Using Pocket Internet Explorer . . . . . . . . . . . . . . . . . . . . . 104
To view mobile favorites and channels . . . . . . . . . . . . . . . . 105
To browse the Internet . . . . . . . . . . . . . . . . . . . . . . . 105
11 Customising your handheld 107
Adjusting handheld settings . . . . . . . . . . . . . . . . . . . . . . 107
Personal . . . . . . . . . . . . . . . . . . . . . . . . . . . . . 108
System . . . . . . . . . . . . . . . . . . . . . . . . . . . . . 112
Connections . . . . . . . . . . . . . . . . . . . . . . . . . . . 118
Adding and removing programs . . . . . . . . . . . . . . . . . . . . 120
Adding programs . . . . . . . . . . . . . . . . . . . . . . . . . 120
Removing programs . . . . . . . . . . . . . . . . . . . . . . . . 122
Index 125
xii
Page 13

1 Getting started
This chapter will discuss the following topics:
• Basic requirements
• Feature highlights of your Acer n10
• Acer n10 system tour
• Step-by-step procedures on how to prepare your handheld for use
• Basic concepts in using your handheld
System requirements
In order to install the Microsoft® ActiveSync® software and use your new Acer n10
with a computer at work or at home, be sure the system(s) meet the following
minimum system and program requirements.
•Intel
•64 MB RAM
• 120 MB disk space
•CD-ROM drive
• USB port or Infrared port
• SVGA (or compatible) graphics card supporting 256 colours
• Microsoft® Windows XP, 2000, ME or 98SE
• Microsoft® Internet Explorer 4.01
®
Pentium processor (minimum 233 MHz)
1 Getting started
System requirements
Features summary
Performance
• Intel PXA255 Application Processor with Intel XScale technology
• System memory:
• Microsoft® Pocket PC 2002 Premium with Microsoft®Outlook 2000
Display
• 3.5" Transflective TFT LCD
• 240 x 320 resolution
• 65536 colour support
• Microsoft® ClearType technology for clearer, crisper font display
– 64 MB SDRAM for application storage
– 32 MB Flash ROM for operating system
1
Page 14

1 Getting started
Features summary
Audio
• Embedded AC '97 CODEC with CD-quality stereo output
• Built-in industry standard 3.5 mm earphone jack
• Built-in microphone
Connectivity
• Mini USB connector
• SIR (Serial Infrared) capability
Expansion
• Integrated Compact Flash slot (type I/type II)
• Integrated (dual-usage) Secure Digital/MultiMedia Card (SD/MMC) slot
Battery
• Rechargeable 1500 mAH Lithium polymer battery
• 12 hours operation time for normal usage (when backlight is inactive)
NOTE: Length of battery operation will depend on power consumption which is based on
system resource use. For example, constantly using the backlight or using power-demanding
applications will shorten battery life between charges.
• 3 hour charging time from empty to full capacity
Design and ergonomics
• Stylish, light and thin design
Specifications Dimensions
Height 130 mm
Width 78 mm
Depth 16.9 mm
Weight 165 g (including stylus)
• User-friendly navigation features
– Scroll wheel for one-hand operation
– Directional pad for multi-directional scrolling in various menus and
applications
– Quick buttons for easy launch of commonly-used applications
– Start button for one-tap access to all available applications
– Hold switch to allow users to lock all buttons and the LCD touchscreen
from being accidentally pressed when handheld is placed in pocket or in
a bag. Power saving features darken and disable the touchscreen.
2
Page 15
Acer n10 tour
1 Getting started
Acer n10 tour
Front view
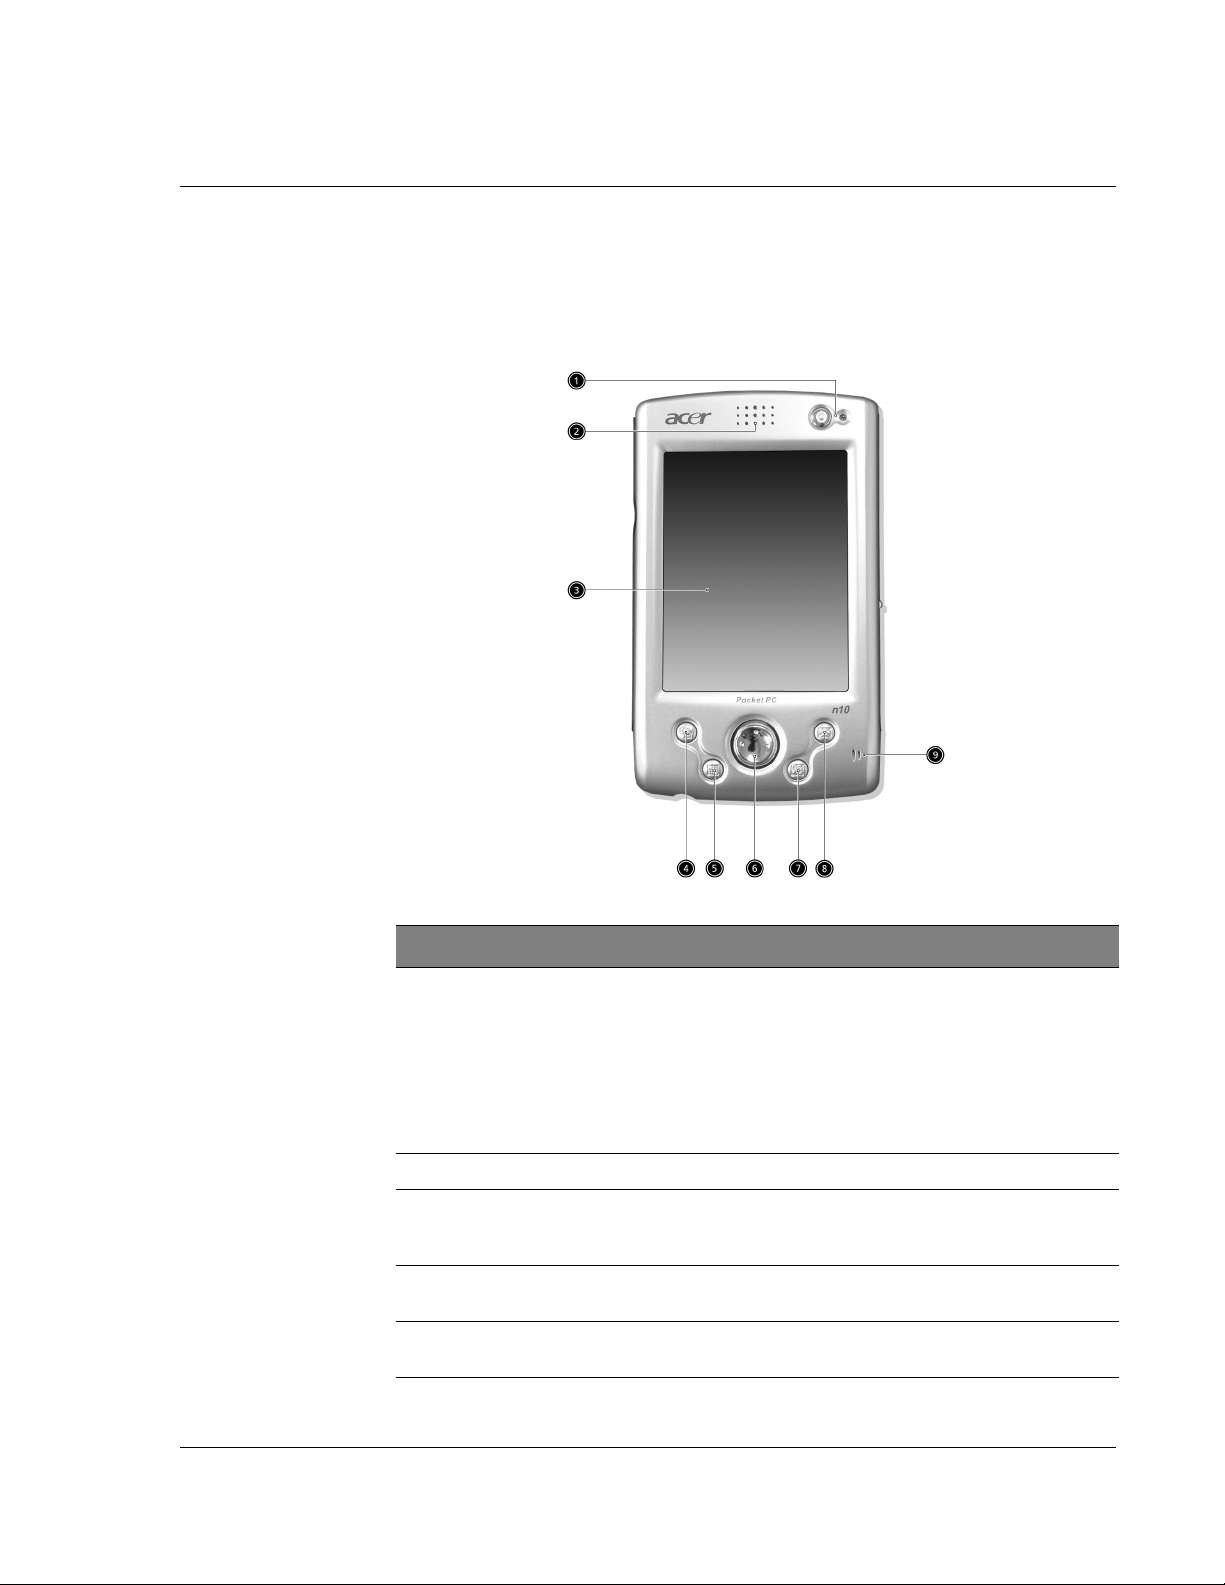
No. Component Description
1 Power button/
LED indicator
2 Internal Speaker Outputs sounds from your handheld.
3 LCD touchscreen Displays the applications and data stored in your handheld.
4 Quick button for
Today
5 Quick button for
Calendar
Press to turn on your handheld on (LED lights up green) if
it is off) and returns to the last screen that was displayed
and off if it is on.
LED status description.
• Flashing green - Charging
• Steady green - Charging complete
• Flashing red - Alarm indicator, email receive
It is touch-sensitive and responds to the stylus or your
finger.
Displays the Today screen. For more information on this
screen, refer to page 12.
Activates the Calendar program. For more information on
this program, refer to page 31.
3
Page 16

1 Getting started
Acer n10 tour
No. Component Description
6 Directional pad Enables multi-directional scrolling in various menus and
7 Quick button for
Contacts
8 Quick button for
Inbox
9 Microphone Inputs audio into your handheld.
NOTE:
Refer to "Personal" on page 108 for instructions on how to reassign the hardware buttons to
other applications installed on your handheld.
If your handheld is turned off, pressing any Quick button turns on the handheld and opens
the program assigned to that button.
applications. Pressing the middle of the pad simulates the
function of a keyboard’s Enter key.
Activates the Contacts program. For more information on
this program, refer to page 35.
Activates the inbox program. For more information on this
program, refer to page 41.
Using the backlight
If lighting conditions make it difficult for you to see the information on your
handheld, use the backlight to illuminate your screen.
You can change the backlight settings. Refer to "System" on page 112.
To activate the backlight:
• Press the power button and hold it down for about two seconds. Release the
button when the backlight turns on.
• To turn off the backlight, press the power button and hold it down for two
seconds. Release the button when the backlight turns off.
4
Page 17
Left view
No. Label Description
1 Getting started
Acer n10 tour
1 IR port Uses infrared techbology to transmit and receive data from
2 Scroll wheel Scroll up or down to display text and other information that
3 Start hardware
button
4 SD/MMC slot Accepts a Secure Digital or MultiMedia Card, allowing you to
other IR-enabled devices.
extends beyond the area of the LCD touchscreen. Scroll
through icons and pull down menus, press to open files/applications (same as double tapping with the stylus).
Hardware button to display the Start menu.
add more memory, install add-on applications or use audio or
text files stored on it with internal applications. You can also
use expansion cards to back up data from your handheld.
5
Page 18
1 Getting started
Acer n10 tour
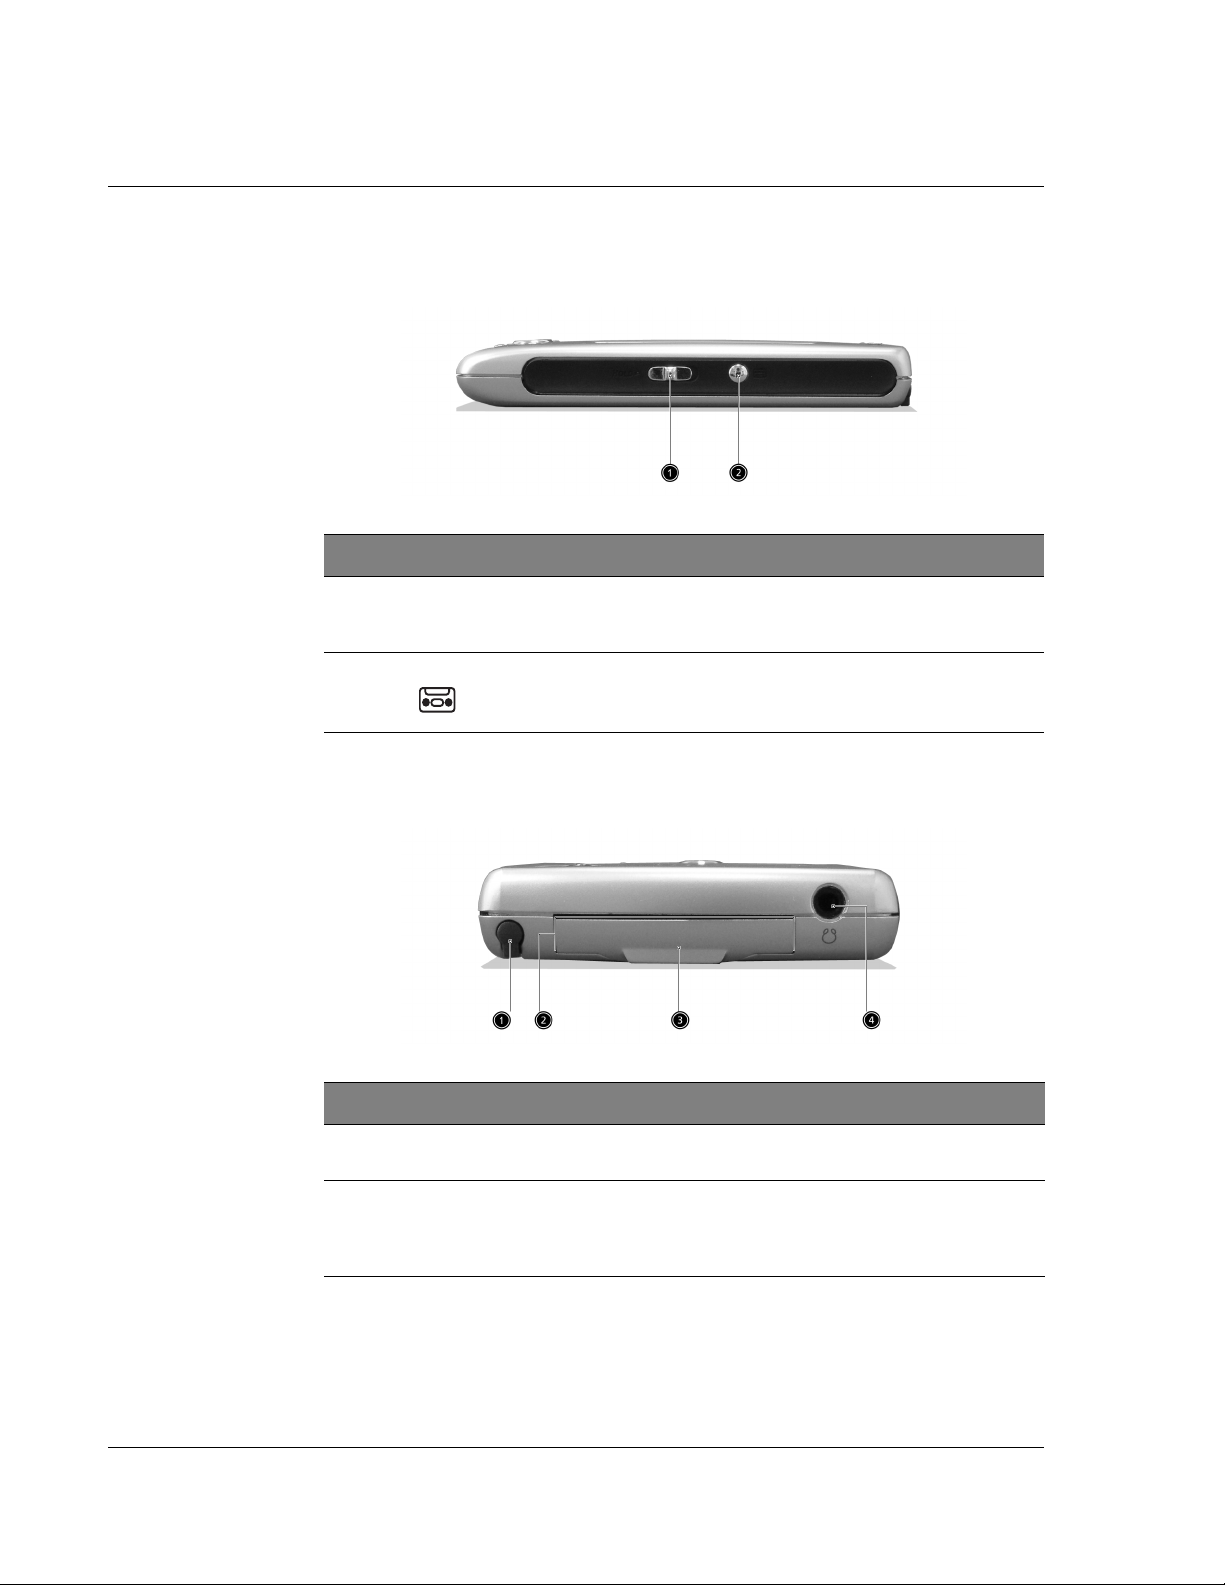
Right view
No. Label Description
1 Hold switch Slide to lock all buttons from being accidentally pressed when
2 Record button Activates the Microsoft® Pocket PC’s Record program.
handheld is placed in pocket or b ag. A red dot is visible on
the hold switch when in hold state.
Top view
No. Label Description
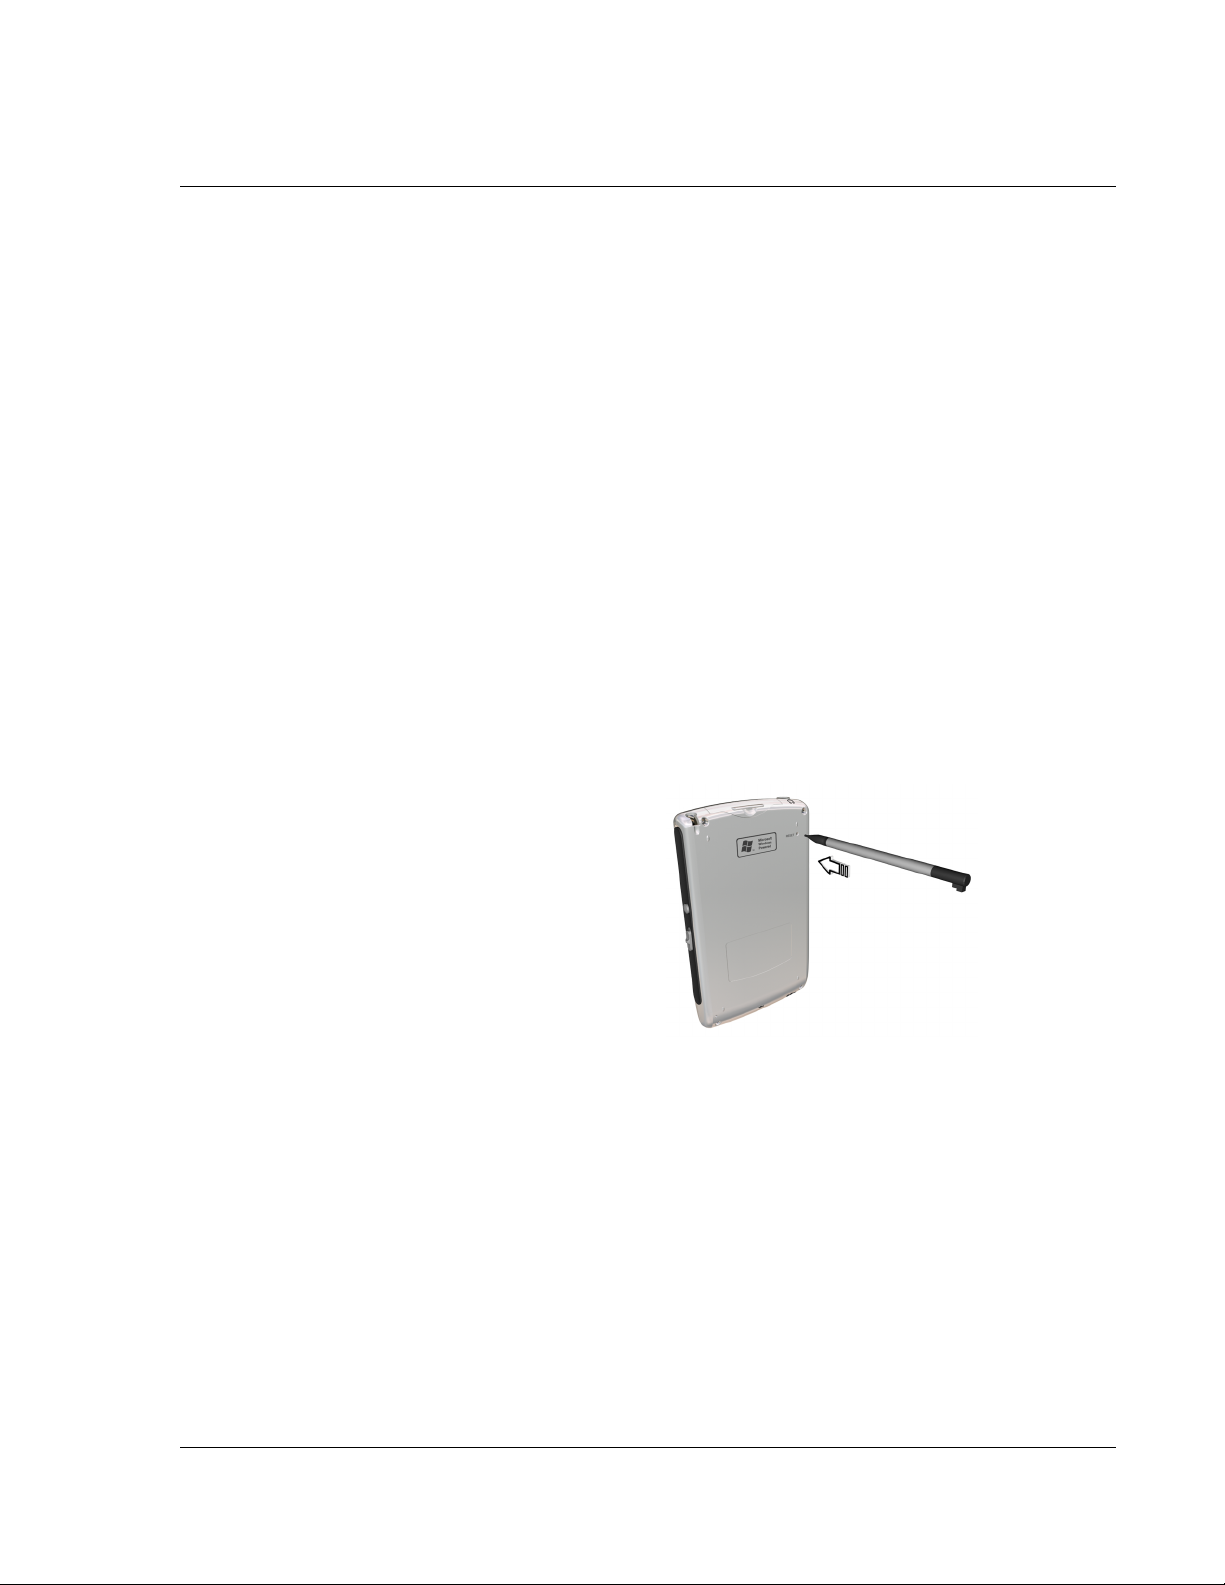
1 Stylus holder Secures the stylus to your handheld. To use the stylus, remove
from its holder and hold it as you would hold a pen or pencil.
2 CF slot Accepts a Compact Flash card (type I or type II), allowing you to
add more memory, install add-on applications or use audio or
text files stored on it with internal applications. You can also use
expansion cards to back up data from your handheld.
6
Page 19
No. Label Description
1 Getting started
Preparing to use your Acer n10
3 Dummy CF
card
4 Earphone jack Connects to audio line-out devices (earphones/headphones).
Use this to protect the CF connector when no card is installed.
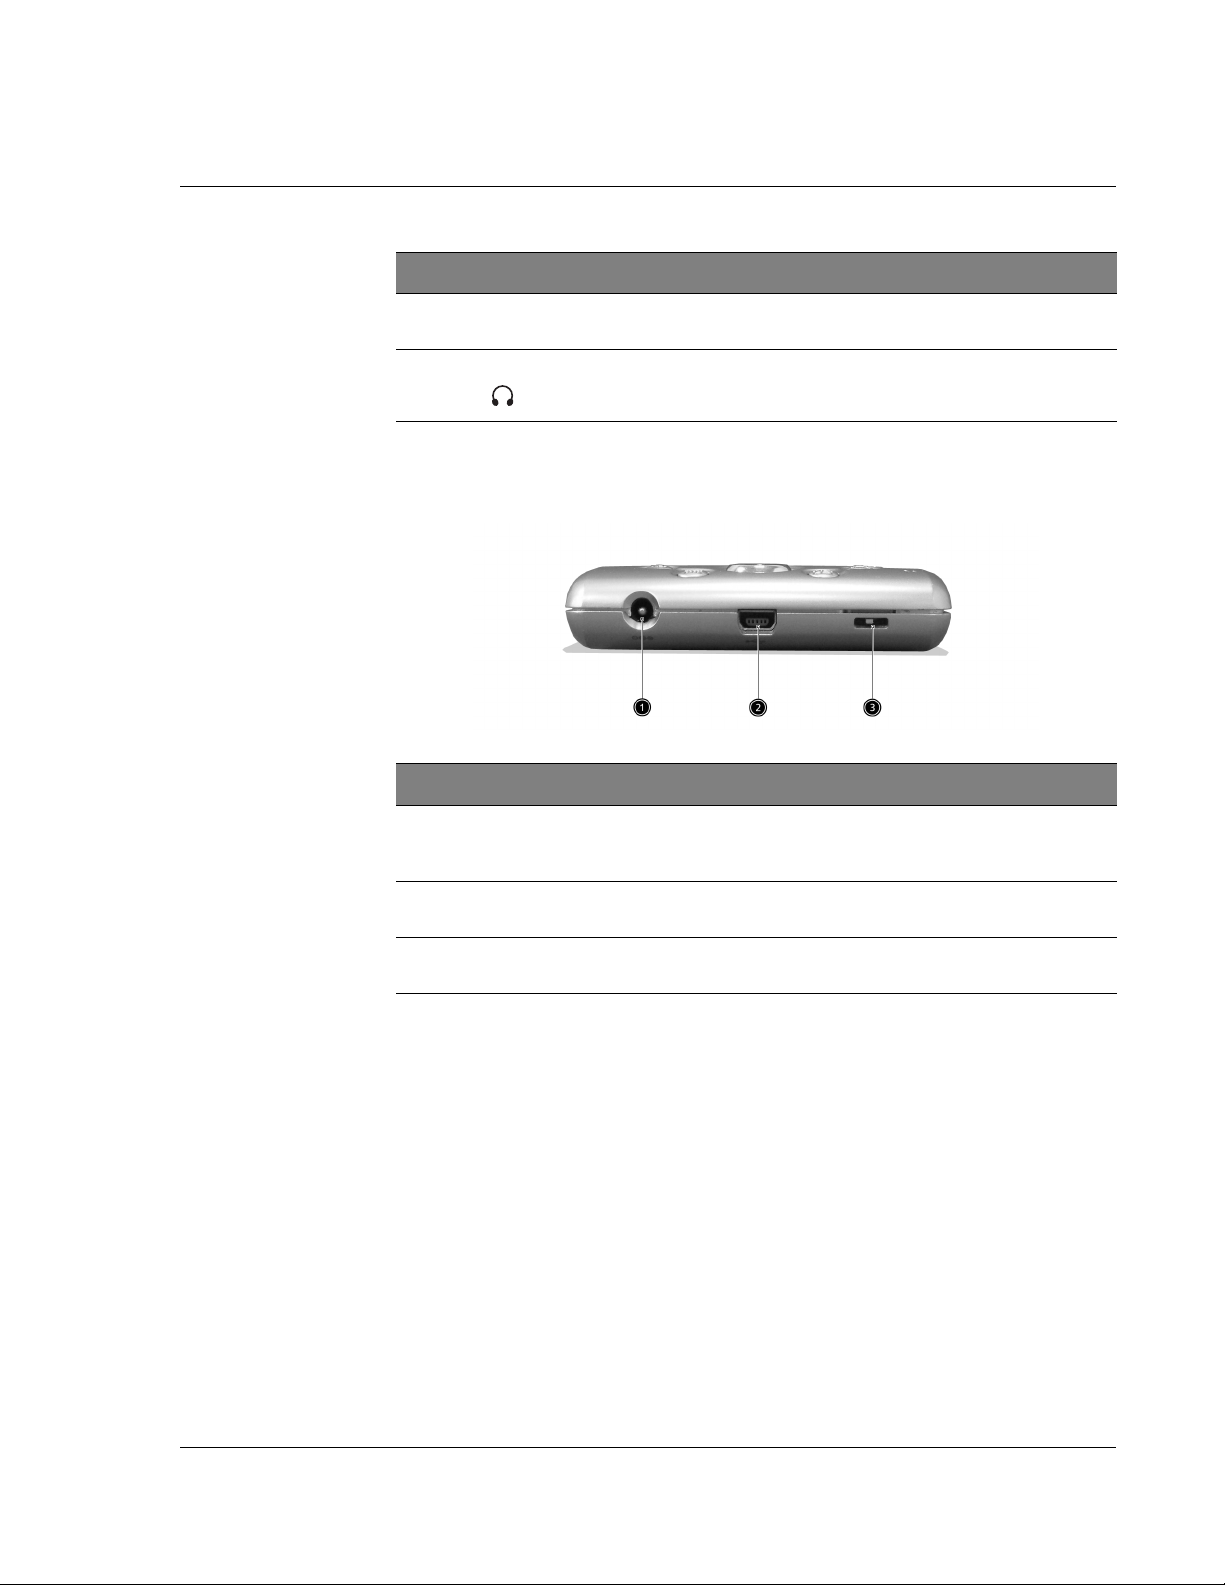
Bottom view
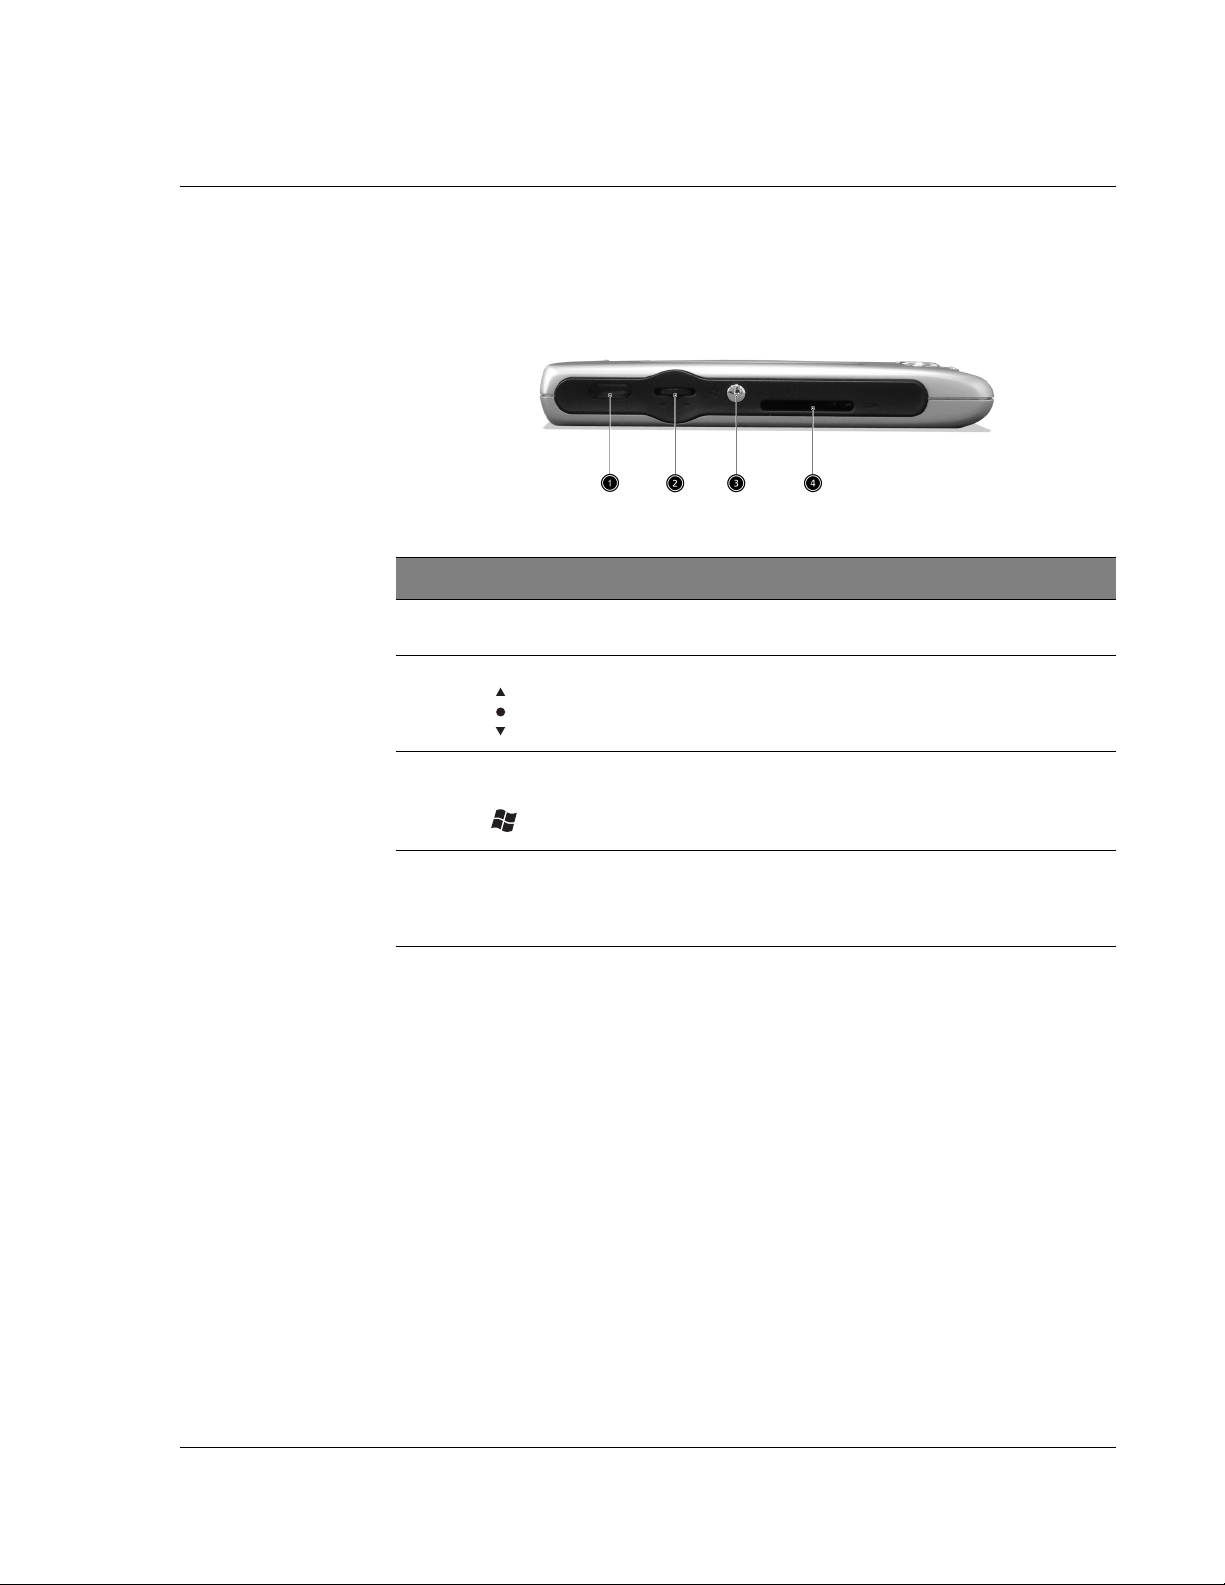
No. Label Description
1 2.5 mm DC
power
connector
Connects your handheld’s DC power supply to an AC wall outlet
to charge the battery.
2 Mini USB
connector
3 Hard reset
switch
Connects your handheld to a portable or desktop computer.
Toggle to return you handheld settings to the factory defaults.
See “Performing a hard reset” on page vii.
Preparing to use your Acer n10
Perform first the following easy installation tasks to begin using your handheld:
• Install the Microsoft
• Connect the cable
• Charge your handheld
• Set up your handheld
• Perform the first ActiveSync operation
®
ActiveSync® software in your computer
7
Page 20

1 Getting started
Preparing to use your Acer n10
Installing the Microsoft® ActiveSync® software
The main function of the Microsoft® ActiveSync® software is to synchronise the
information on your computer with the information on your handheld.
Synchronisation compares the data on your handheld with your computer and
updates the information on both locations. This will then served as a backup data in
case something happens to your handheld.
The following instructions tells you how to install the ActiveSync
Important installation notes
• Before installing ActiveSync, make sure that your handheld cradle is not yet
connected to your computer. Connect the cradle only after you have finished
installing ActiveSync.
• If you don’t have Microsoft
Microsoft
installed, you are encouraged to upgrade to Outlook 2002.
• It is recommended that users install Outlook 2002 from this CD before
installing ActiveSync.
• Do not copy the ActiveSync files to your computer’s hard disk. You must use
the Acer n10 Handheld Companion CD to place the files in their proper
locations and to decompress the files.
®
software.
®
®
Outlook® 2002 now. Even if you have Outlook 98 or Outlook 2000
Outlook® 98 or later installed, please install
To install the Microsoft® ActiveSync® software
1 Exit any open programs, including those that run at startup, and disable any virus-
scanning software.
2 Insert the Acer n10 Handheld Companion CD into the computer’s CD-ROM drive.
The CD’s welcome page appears.
3 Click the animated forward icon to go to the next screen.
4 Click the Start Here tab on the right side of the screen.
5 Read the instructions and installation notes indicated on the Start Here screen.
6 Click the buttons on the left pane to install each of the individual applications.
• Outlook 2000 (recommended)
®
•ActiveSync
After installation, the ActiveSync icon will appear on your computer’s system tray
(on the lower right-hand corner of the screen).
Refer to the ActiveSync
software. If at any time, you would like to restart this setup program, simply re-insert
the CD into the CD-ROM drive.
3.5
software online Help for information on how to use the
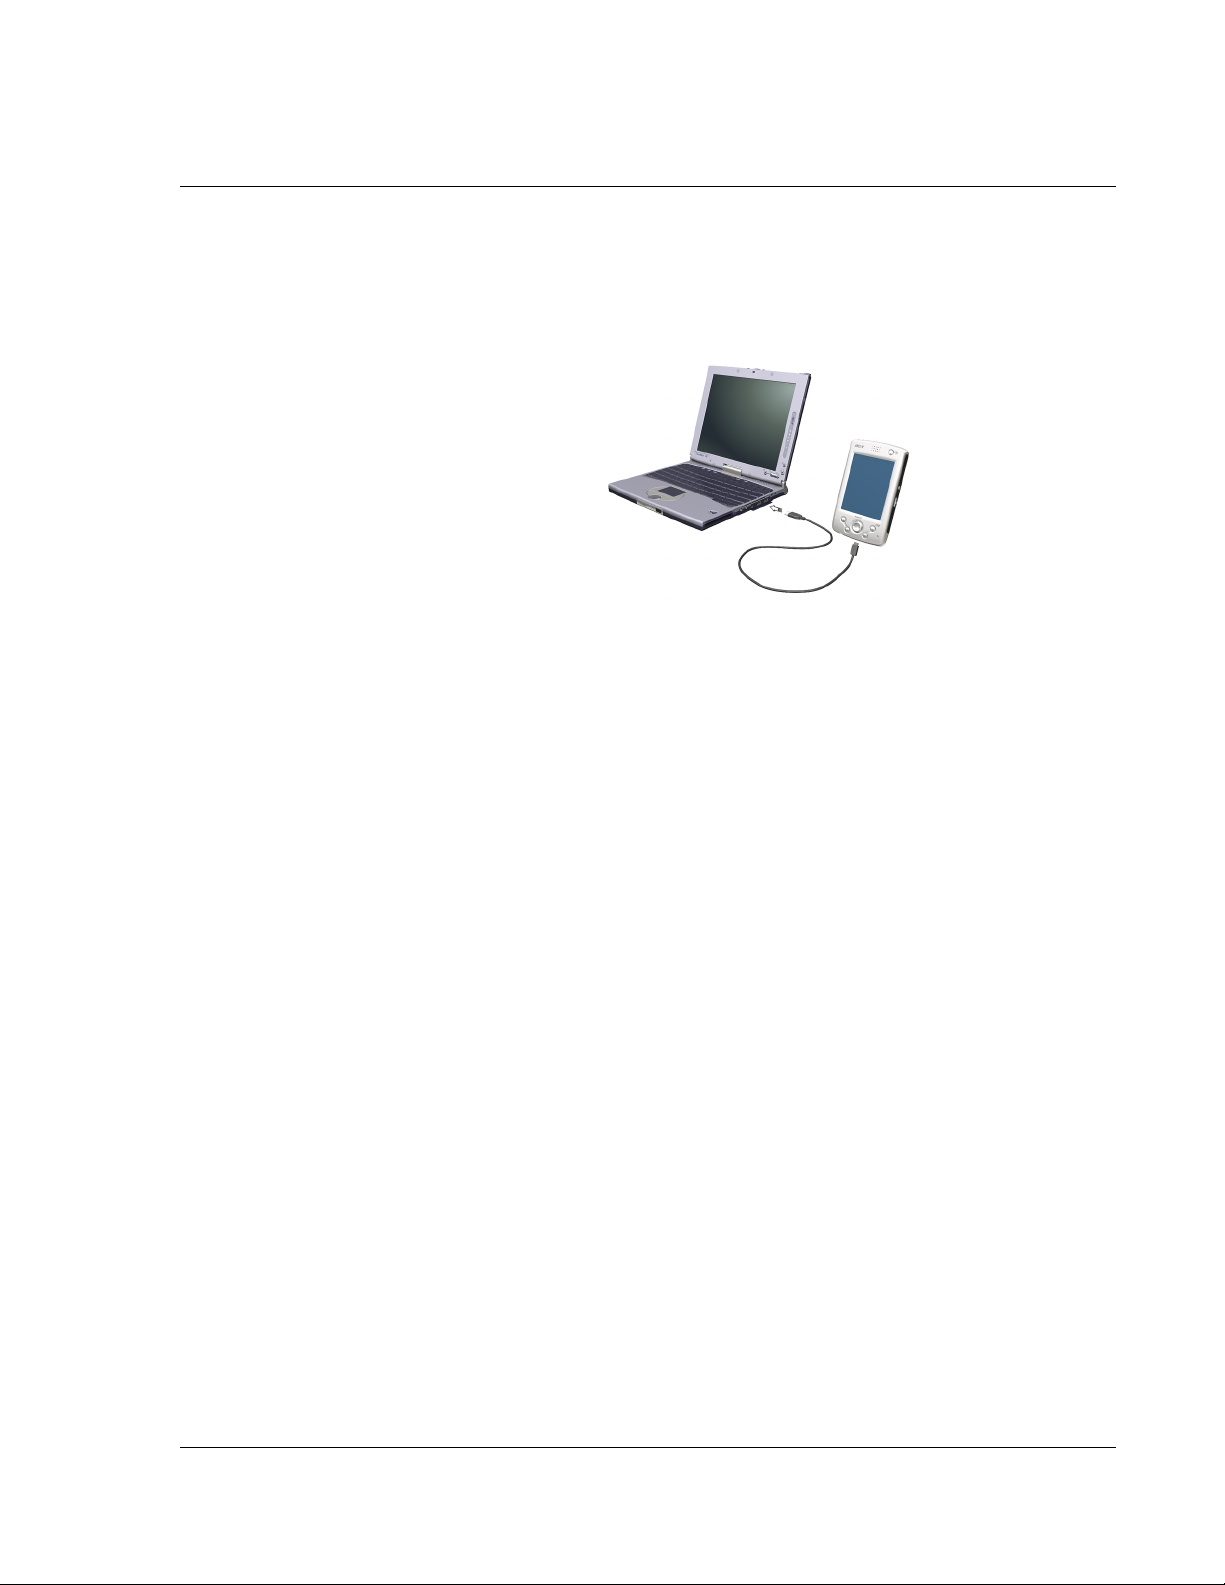
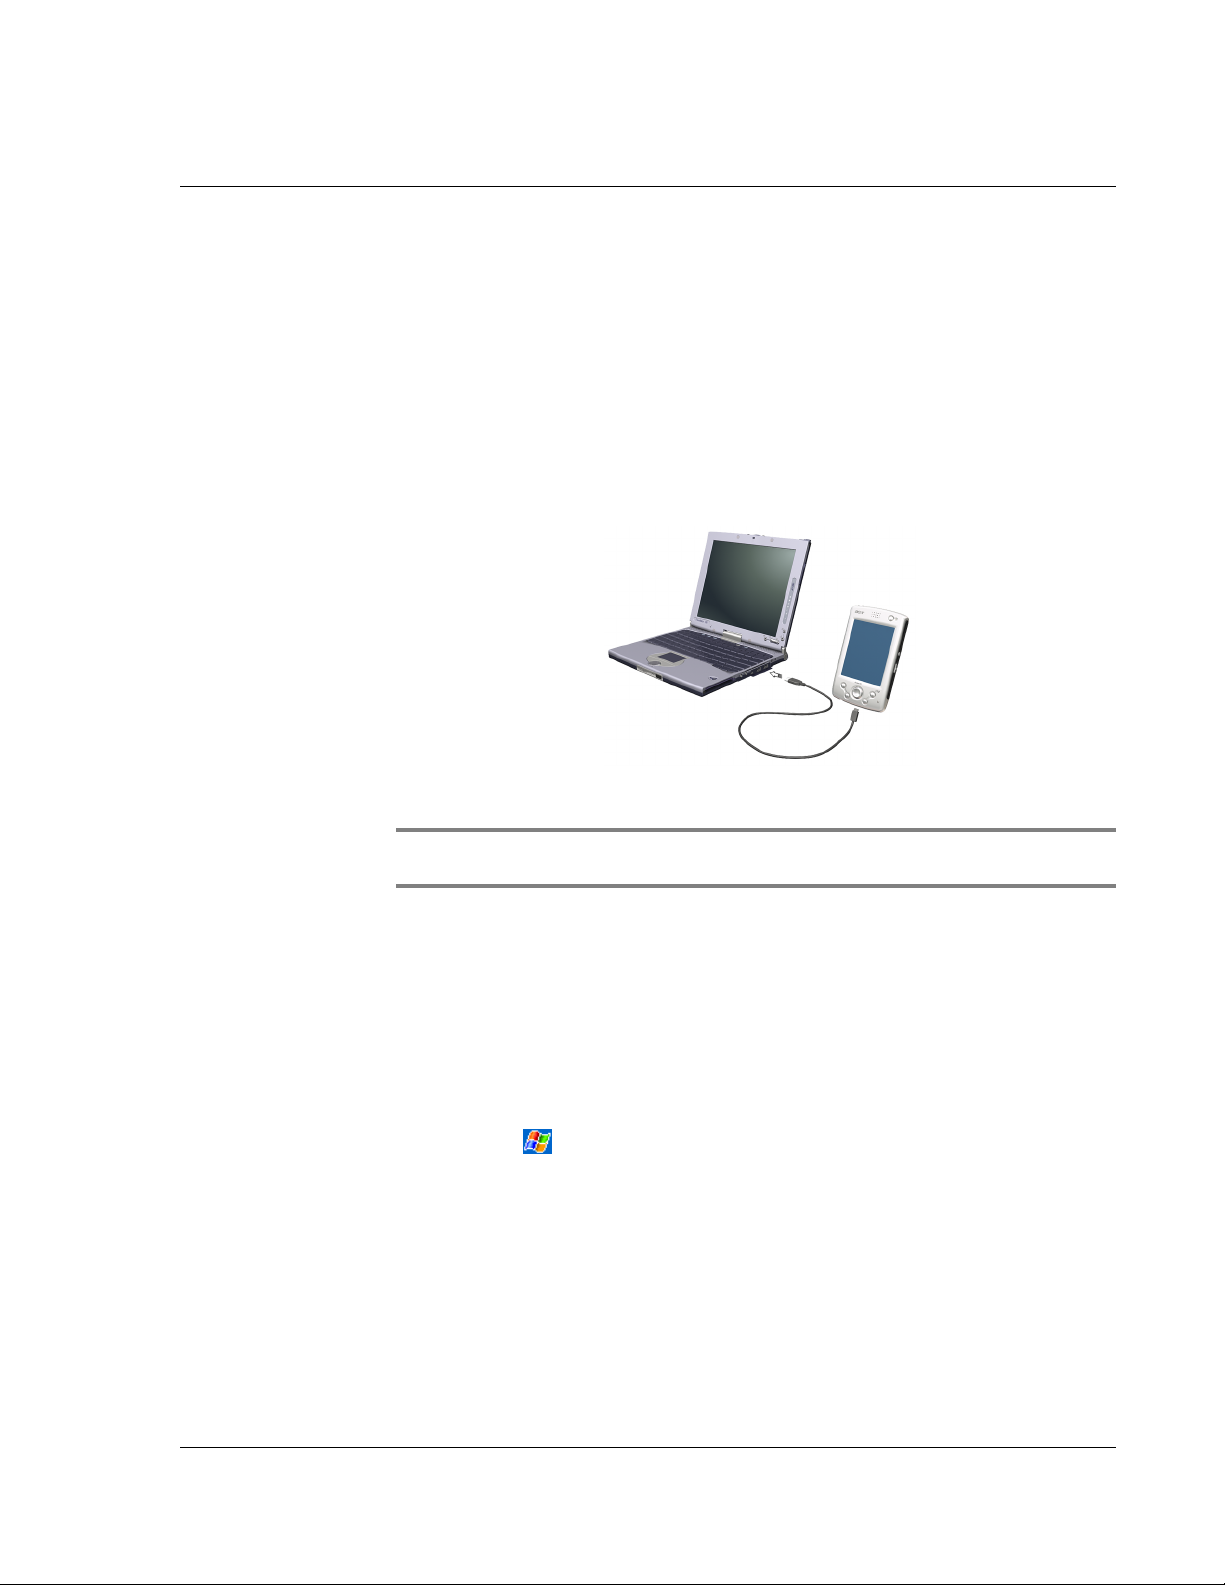
Connecting the computer
The USB sync cable that comes with your handheld enables you to synchronise the
information on your handheld with the data in your computer using ActiveSync
technology.
To connect the computer
8
Page 21
1 Getting started
Preparing to use your Acer n10
Plug the USB sync cable into the mini USB port on the bottom of your handheld and
plug the other end into an available USB port on your computer
.
Charging your Acer n10
For initial use, you need to charge your handheld for three hours. After that, you can
charge it for a few minutes each day to recharge the battery to full capacity. Normally,
you can use your handheld for 12 straight hours of operation (backlight disactive)
before you need to recharge the battery.
To charge your Acer n10
• Connect the AC adapter connector to the handheld, then plug the other end
of the AC adapter into any AC current outlet.
LED status during charging:
• Charging: LED indicator flashes green
• Charging complete: LED indicator steady green
If the battery level becomes low in the course of normal use, a status icon appears on
the handheld screen indicating low or very low battery status (refer to "Status icons"
on page 13). Perform an ActiveSync operation to back up your data; then recharge the
battery.
If your handheld shuts down (i.e., battery is completely drained out) you have about
72 hours (3 days) to recharge the battery before you lose all data on your handheld’s
internal memory.
Setting up your Acer n10
After you have initially charged your handheld for three hours, you can now set it up.
Refer to the instructions below.
9
Page 22
1 Getting started
Preparing to use your Acer n10
To set up your Acer n10
1 Turn on your handheld by pressing the power button on the front panel.See "Front
view" on page 3, for the location of the power button.
2 Follow the onscreen instructions to set up your handheld.
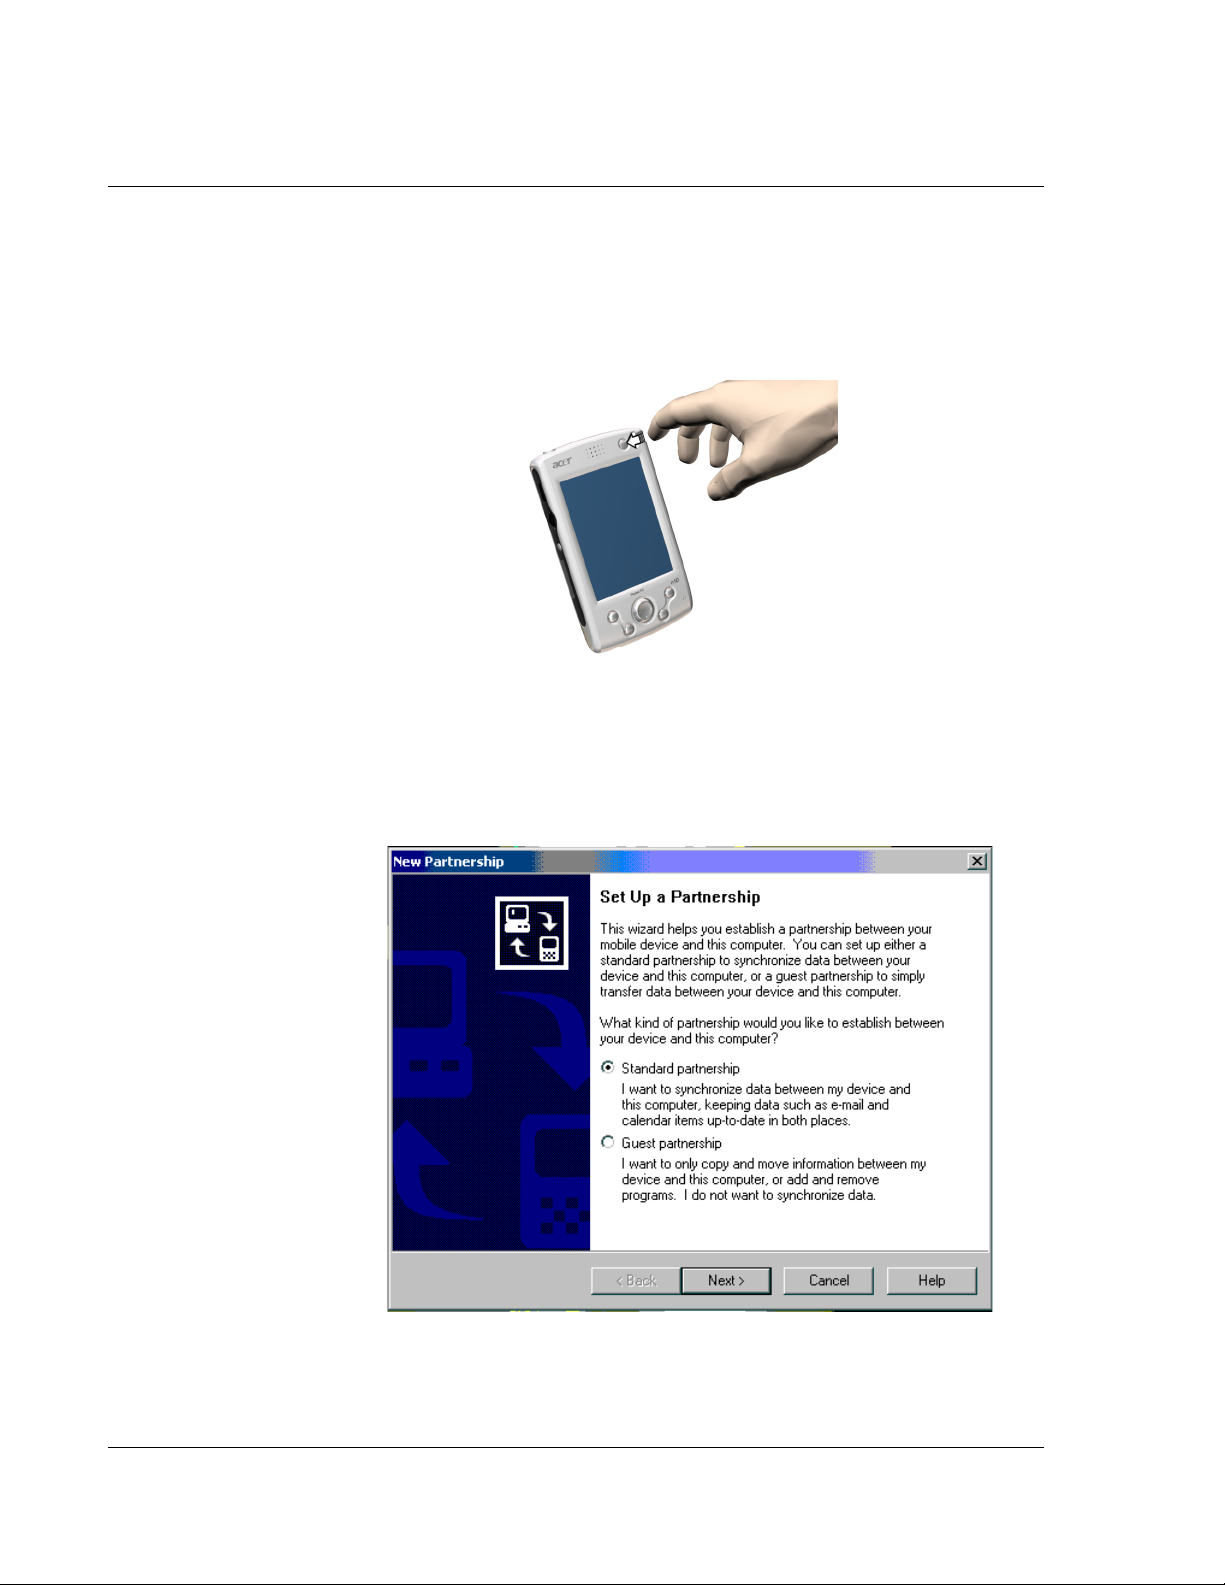
Performing the first synchronisation process
After completing the setup procedures you can now perform the first ActiveSync
operation with the help of the 'New Partnership' setup wizard.
This wizard will help you:
10
Page 23
1 Getting started
Command interface
• Set up a partnership so you can synchronise information between your
handheld and your computer
• Customise your synchronisation settings
To perform the first synchronisation process
1 Connect the USB sync cable to your handheld.
2 Plug the USB connector into a USB port on your computer.
The 'New Partnership' setup wizard will automatically start on your computer screen.
NOTE: If the wizard does not automatically appear, launch ActiveSync on your computer by
clicking on its icon from Start>Programs.
3 Follow the onscreen instructions.
The first synchronisation process will automatically begin when you finish using the
wizard.
After your first synchronisation, take a look at Calendar, Contacts, and Tasks on your
handheld. You'll notice that information you've stored in Microsoft Outlook on your
computer has been copied to your handheld, and you didn't have to type a word.
Disconnect your handheld from your computer and you're ready to go!
Once you have set up ActiveSync and completed the first synchronisation process, you
can initiate synchronisation from your handheld. To switch to ActiveSync on your
handheld, tap , and then tap ActiveSync.
Command interface
Handheld buttons and the stylus
Your handheld has hardware buttons that control actions and scroll functions, and a
stylus for selecting items and entering information.
On your handheld, the stylus replaces the mouse.
11
Page 24
1 Getting started
Command interface
• Tap. Touch the screen once with the stylus to open items and select options.
• Drag. Hold the stylus on the screen and drag across the screen to select text
and images. Drag in a list to select multiple items.
• Tap and hold. Tap and hold the stylus on an item to see a list of actions
available for that item. On the pop-up menu that appears, tap the action you
want to perform.
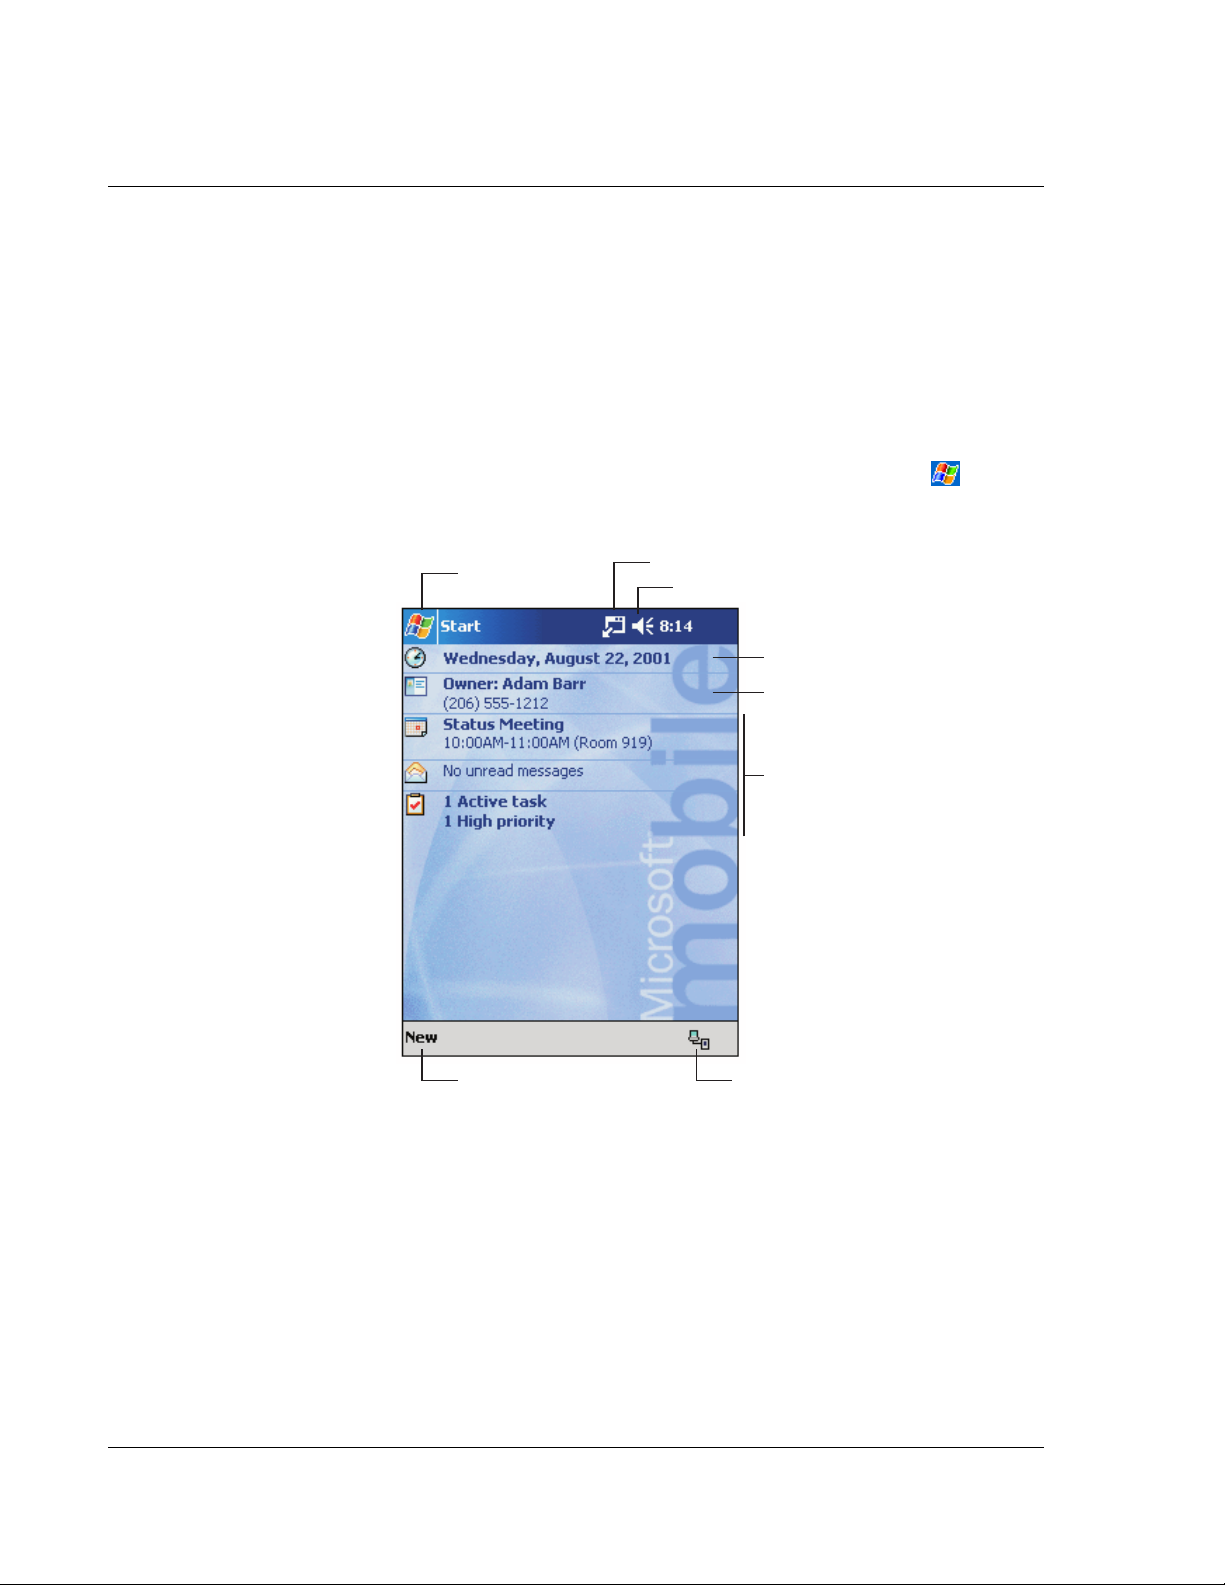
Today screen
When you turn on your handheld for the first time each day (or after 4 hours of
inactivity), you'll see the Today screen. You can also display it by tapping and then
Today. On the Today screen, you can see at a glance important information for the
day.
Tap to switch
to a program.
Tap to create a new item.
Tap to view notification messages.
Tap to change volume or mute all sounds.
Tap to change date and time.
Tap to open an item.
Your day at a glance.
Tap to view connection status.
12
Page 25
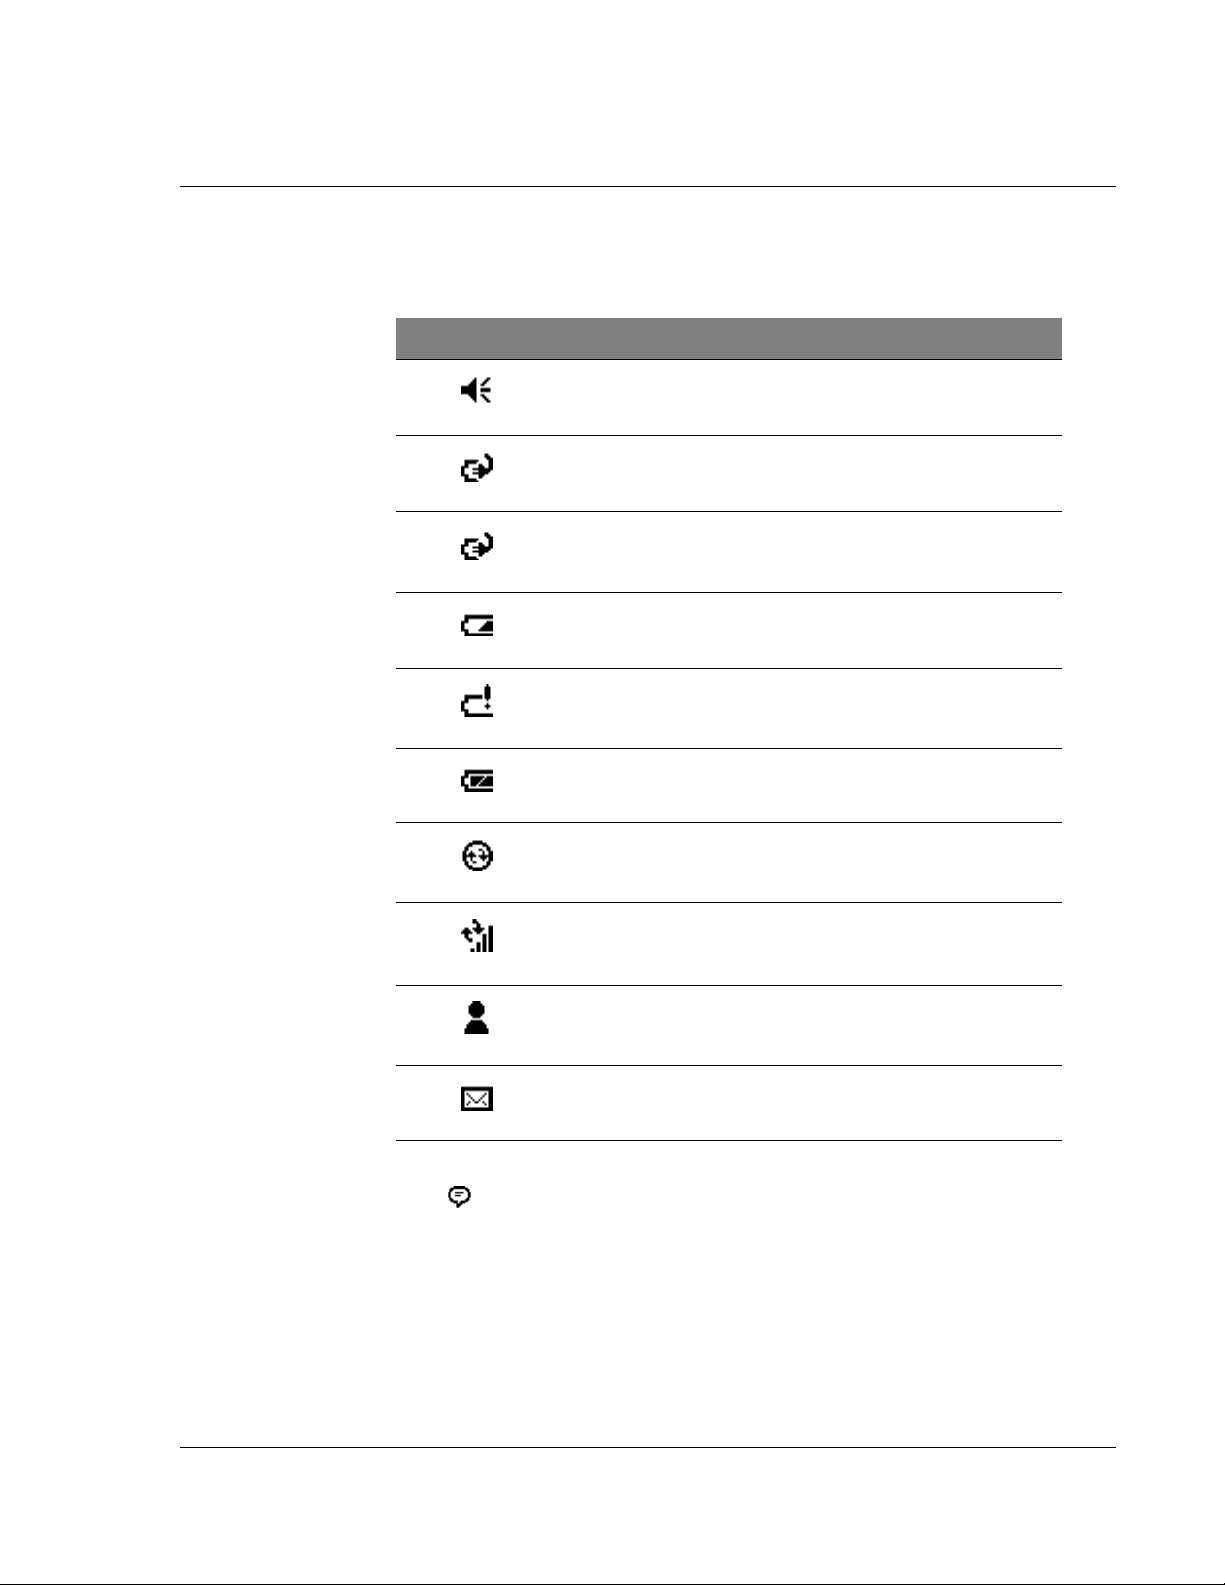
Status icons
Following are some of the status icons you may see.
Status icon Description
Turns all sounds on and off
Backup battery is low
Battery is charging
Battery is low
Battery is very low
1 Getting started
Command interface
Battery is full
Synchronisation is beginning or ending
Synchronisation is occurring
Notification
Notification that one or more email messages were received
1
If more notification icons need to be displayed than there is room to display them, the Notification
icon, ,will display. Tap the icon to view all notification icons.
1
that one or more instant messages were received
Navigation bar and command bar
The navigation bar is located at the top of the screen. It displays the active program
and current time, and allows you to switch to other programs and close screens.
13
Page 26
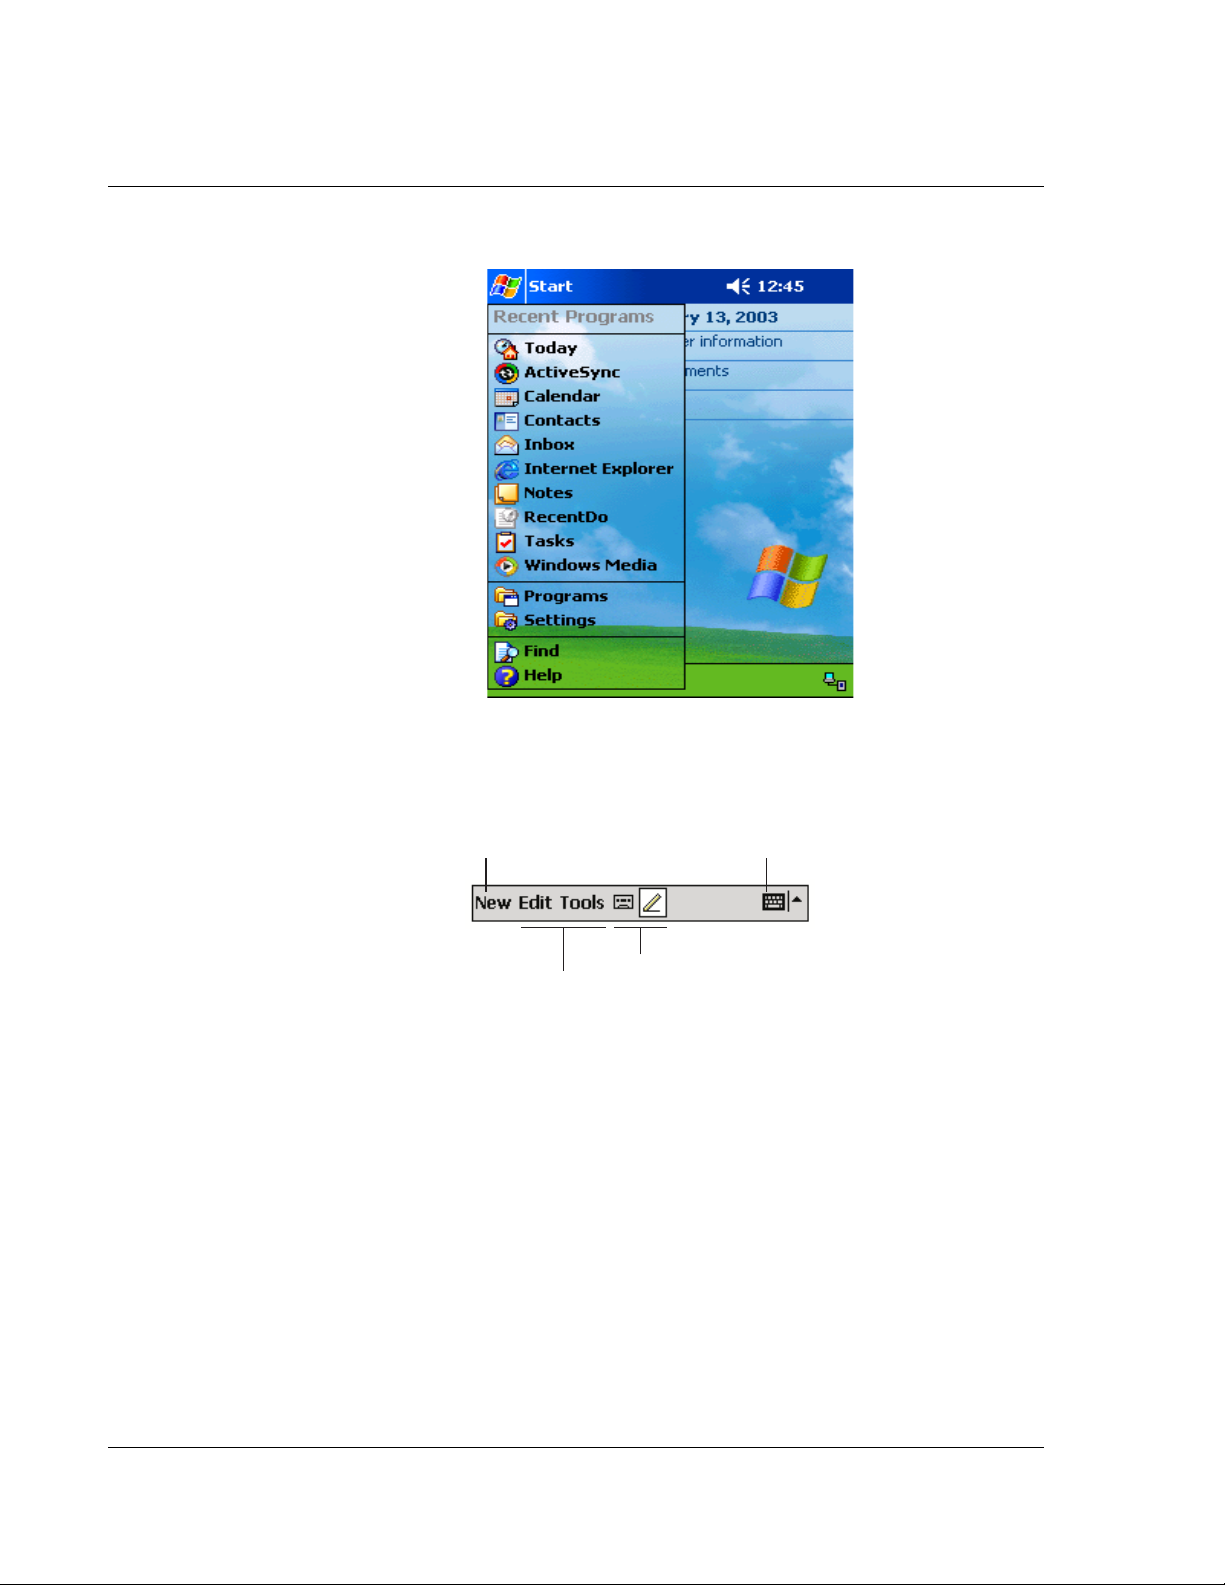
1 Getting started
Command interface
Use the command bar at the bottom of the screen to perform tasks in programs. The
command bar includes menu names, buttons, and the Input Panel button.
• To create a new item in the current program, tap New.
• To see the name of a button, tap and hold the stylus on the button. Drag the
stylus off the button so that the command is not carried out.
New button.
Menu
names.
Buttons.
Input panel button.
Pop-up menus
With pop-up menus, you can quickly choose an action for an item. For example, you
can use the pop-up menu in the Contact list to quickly delete a contact, make a copy
of a contact, or send an email message to a contact. The actions in the pop-up menus
vary from program to program.
To access a pop-up menu:
1 Tap and hold the stylus on the item name that you want to perform the action on.
2 When the menu appears, lift the stylus, then do any of the following:
• Tap the action you want to perform.
14
Page 27
1 Getting started
Command interface
• Tap anywhere outside the menu to close the menu without performing an
action.
Tap and hold to display
the pop-up menu.
Lift the stylus and tap
the action you want.
Tap outside the menu
to close it without performing
an action.
Notifications
Your handheld reminds you in a variety of ways when you have something to do. For
example, if you've set up an appointment in Calendar, a task with a due date in Tasks,
or an alarm in Clock, you'll be notified in any of the following ways:
• A message box appears on the screen.
• A sound, which you can specify, is played.
• The LED indicator on the front panel of your handheld flashes red.
To choose reminder types and sounds for your handheld, tap and then Settings. In
the Personal tab, tap Sounds & Notifications. The options you choose here apply
globally in your handheld.
15
Page 28

1 Getting started
Command interface
16
Page 29
2 Entering data in your Acer n10
Using the input panel
2 Entering data in your
Acer n10
You can enter data into your handheld in several ways:
• Use the input panel to enter typed text, either by using the soft keyboard or
other input method.
• Write directly on the screen.
• Draw pictures on the screen.
• Speak into your handheld’s microphone to record a message.
®
• Use Microsoft
computer to your handheld.
Refer to page 91 for detailed information on using Microsoft® ActiveSync®.
ActiveSync® to synchronise or copy information from your
Using the input panel
Use the input panel to enter information in any program on your handheld. You can
either type using the soft keyboard or write using Letter Recognizer, Block Recognizer,
or Transcriber. In either case, the characters appear as typed text on the screen.
NOTE: Transcriber is available only for the English and European Acer n10 models.
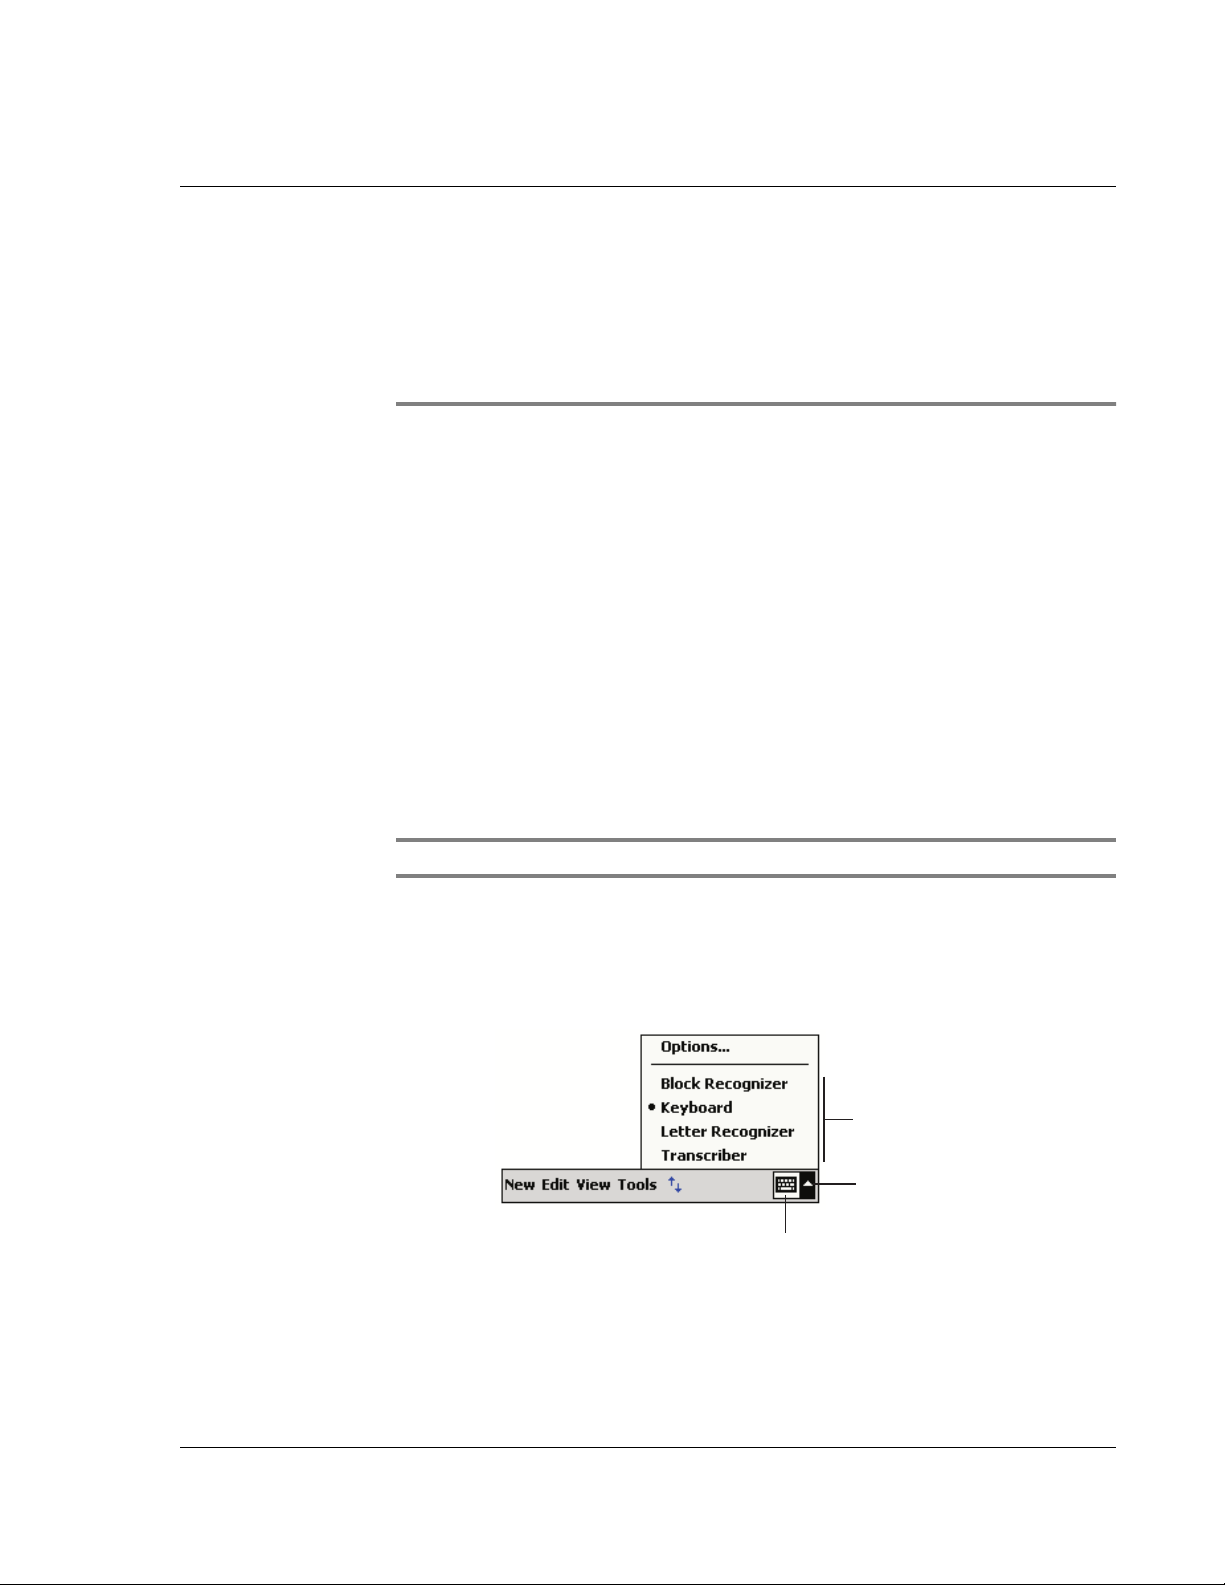
To show or hide the input panel
1 Tap the Input Panel button.
2 Tap the arrow next to the Input Panel button to see your choices.
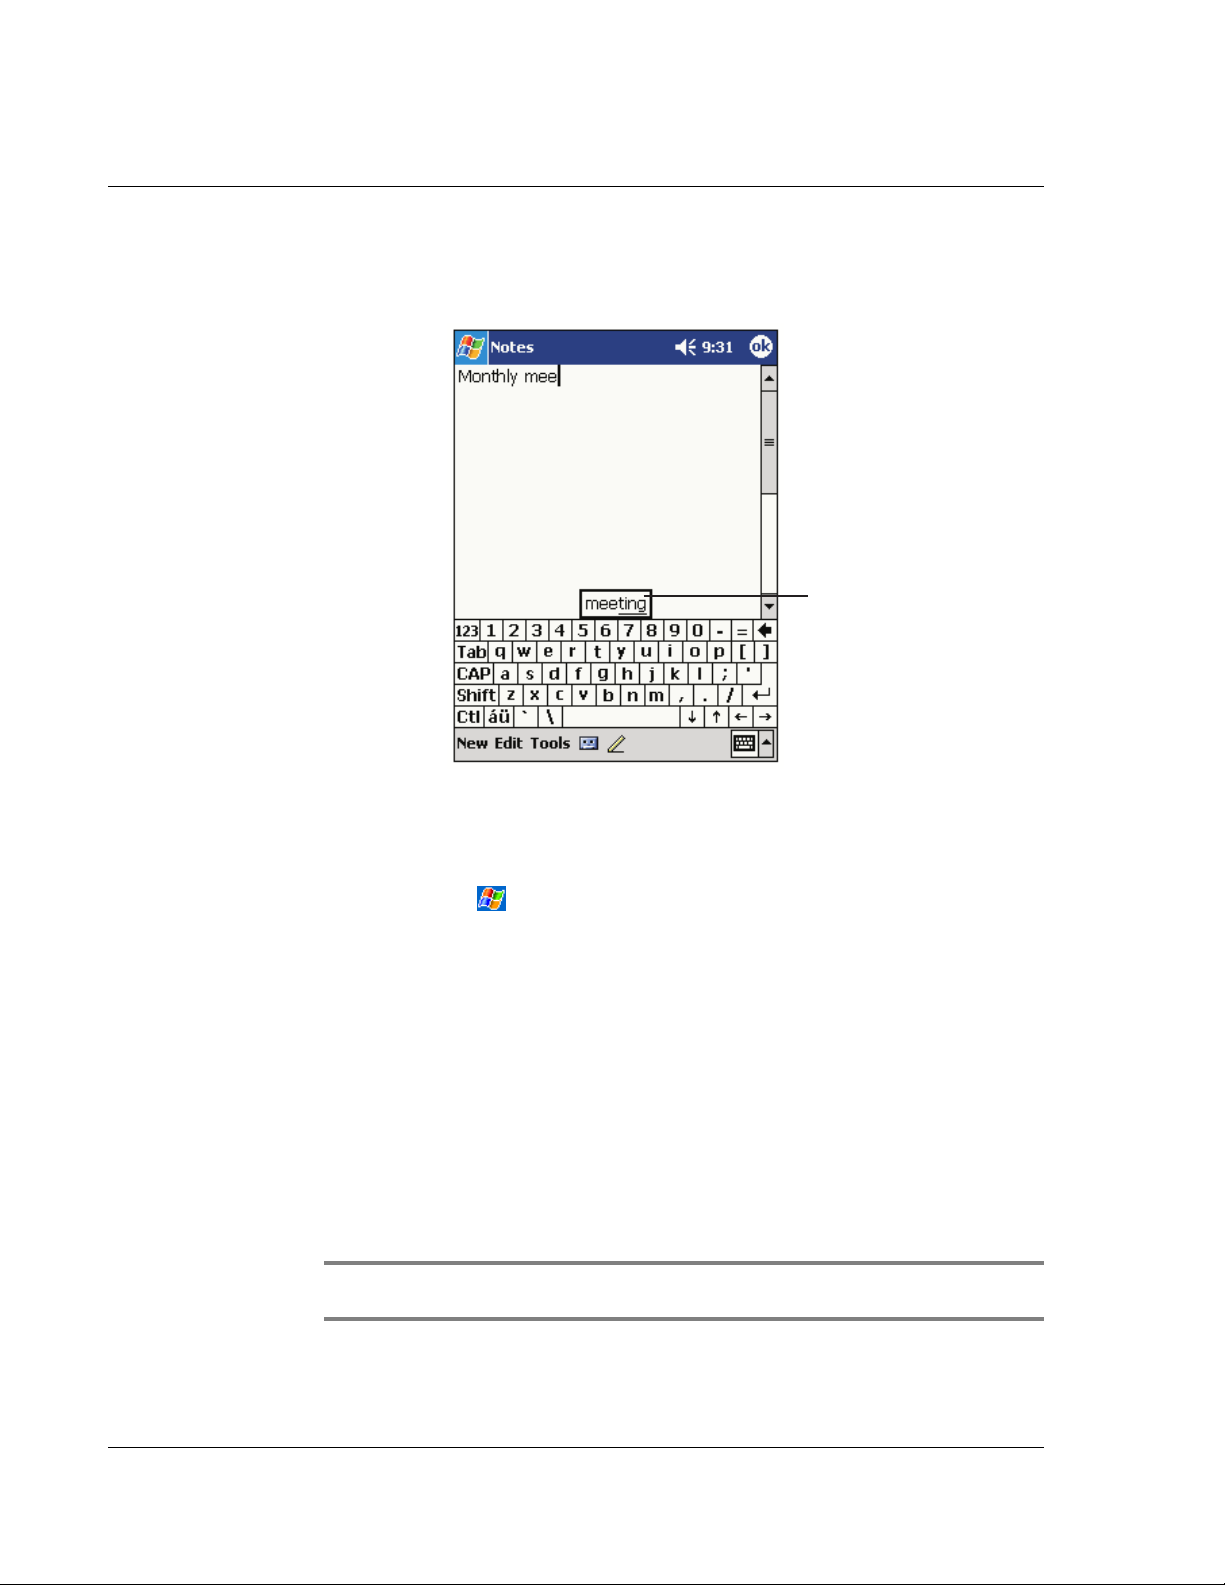
When you use the input panel, your handheld anticipates the word you are typing or
writing and displays it above the input panel. When you tap the displayed word, it is
Select an input method.
Tap to see your choices.
Input Panel button.
17
Page 30
2 Entering data in your Acer n10
Using the input panel
inserted into your text at the insertion point. The more you use your handheld, the
more words it learns to anticipate.
Tap here if this
is the right word.
To change word suggestion options
• To set word suggestion options such as the number of words suggested at
one time, tap , Settings, Personal tab, Input, and then the Word
Completion tab.
To type with the soft keyboard
1 Tap the arrow next to the Input Panel button, then Keyboard.
2 On the soft keyboard that is displayed, tap the keys with your stylus.
To use Letter Recognizer
With Letter Recognizer you can write letters using the stylus just as you would on
paper.
1 Tap the arrow next to the Input Panel button, then Letter Recognizer.
2 Write a letter in the box.
When you write a letter, it is converted to typed text that appears on the screen.
NOTE: For specific instructions on using Letter Recognizer, with Letter Recognizer open, tap
the question mark next to the writing area.
18
Page 31

2 Entering data in your Acer n10
Writing on the screen
To use Block Recognizer
With Block Recognizer you can input character strokes using the stylus that are similar
to those used on other devices.
1 Tap the arrow next to the Input Panel button, then Block Recognizer.
2 Write a letter in the box.
When you write a letter, it is converted to typed text that appears on the screen.
NOTE: For specific instructions on using Block Recognizer, with Block Recognizer open, tap
the question mark next to the writing area.
To use Transcriber
With Transcriber you can write anywhere on the screen using the stylus just as you
would on paper.
NOTE: Transcriber is available only for the English and European Acer n10 models.
Unlike Letter Recognizer and Block Recognizer, you can write a sentence or more of
information. Then, pause and let Transcriber change the written characters to typed
characters.
1 Tap the arrow next to the Input Panel button and then Transcriber.
2 Write anywhere on the screen.
NOTE: For specific instructions on using Transcriber, with the Transcriber Input Panel open,
tap the question mark in the lower right hand corner of the screen.
To select and edit typed text
If you want to edit or format typed text, you must select it first.
1 Drag the stylus across the text to select it.
2 To cut, copy, and paste typed text:
a Tap and hold the selected words
b Tapping an editing command on the pop-up menu, or tap a command on the Edit
menu.
Writing on the screen
In any program that accepts writing, such as the Notes program, and in the Notes tab
of Calendar, Contacts, and Tasks, you can use your stylus to write directly on the
screen. Write the way you do on paper. You can edit and format what you've written
and convert the information to text at a later time.
19
Page 32

2 Entering data in your Acer n10
Writing on the screen
To write on the screen
• Tap the Pen button to switch to writing mode. This action displays lines on
the screen to help you write.
Tap the Pen button and use
your stylus like a pen.
NOTE: Some programs that accept writing may not have the Pen button. See the
documentation for that program to find out how to switch to writing mode.
To select and edit written text
If you want to edit or format written text, you must select it first.
1 Tap and hold the stylus next to the text you want to select until the insertion point
appears.
2 Without lifting, drag the stylus across the text you want to select.
If you accidentally write on the screen, tap Tools, then Undo and try again.
-or-
You can also select text by tapping the Pen button to deselect it and then dragging
the stylus across the screen.
3 You cut, copy, and paste written text in the same way you work with typed text:
a Tap and hold the selected words
b Tapping an editing command on the pop-up menu, or tap a command on the Edit
menu.
20
Page 33

2 Entering data in your Acer n10
Writing on the screen
To convert writing to text
• Tap Tools and then Recognize.
If you want to convert only certain words, select them before tapping
Recognize on the Tools menu (or tap and hold the selected words and then
tap Recognize on the pop-up menu). If a word is not recognized, it is left as
writing.
Select the text you want
to convert and tap Recognize on the
pop-up menu.
The writing is turned into
text.
If the conversion is incorrect, you can select different words from a list of alternates or
return to the original writing. To do so:
1 Tap and hold the incorrect word (tap one word at a time).
2 On the pop-up menu, tap Alternates.
A menu with a list of alternate words appears.
3 Do either of the following:
a Tap the word you want to use.
b Tap the writing at the top of the menu to return to the original writing.
NOTE:
Hyphenated words, foreign words that use special characters such as accents, and some
punctuation cannot be converted.
If you add writing to a word to change it (such as changing a
attempt to recognise the word, the writing you add will not be included if you attempt to
recognise the writing again.
to an "8") after you
"3"
21
Page 34

2 Entering data in your Acer n10
Drawing on the screen
.
Tap to return to your
original writing.
Or, tap the word you want
to use.
Tips for getting good recognition
• Write neatly.
• Write on the lines. Write the cross of the "t" and apostrophes below the top
line so that they are not confused with the word above. Write periods and
commas above the line.
• For better recognition, try increasing the zoom level to 300% using the Tools
menu.
• Write the letters of a word closely and leave big gaps between words so that
your handheld can easily tell where words begin and end.
Drawing on the screen
You can draw on the screen in the same way that you write on the screen. The
difference between writing and drawing on the screen is how you select items and
how they can be edited. For example, selected drawings can be resized, while writing
cannot.
To create a drawing
1 Cross three ruled lines on your first stroke.
A drawing box appears.
22
Page 35

2 Entering data in your Acer n10
Drawing on the screen
2 Subsequent strokes in or touching the drawing box become part of the drawing.
Drawings that do not cross three ruled lines will be treated as writing.
The drawing box indicates
the boundaries of the drawing.
Pen button.
TIP: You may want to change the zoom level so that you can more easily work on or view
your drawing. Tap Tools and then select a zoom level.
To select a drawing
If you want to edit or format a drawing, you must select it first.
• Tap and hold the stylus on the drawing until the selection handle appears.
• To select multiple drawings, deselect the Pen button and then drag to select
the drawings you want.
To edit a drawing
• To cut, copy, and paste selected drawings:
– Tap and hold the selected drawing.
– Tap an editing command on the pop-up menu, or tap a command on the
Edit menu.
• To resize a drawing:
– Make sure the Pen button is not selected.
– Drag a selection handle until required size is attained.
23
Page 36

2 Entering data in your Acer n10
Recording a message
Recording a message
In any program where you can write or draw on the screen, you can also quickly
capture thoughts, reminders, and phone numbers by recording a message.
• In Calendar, Tasks, and Contacts, you can include a recording in the Notes
tab.
• In Notes, you can either create a stand-alone recording or include a recording
in a written note. If you want to include the recording in a note, open the
note first.
• In Inbox, you can add a recording to an email message.
To create a recording
1 Hold your handheld's microphone near your mouth or other source of sound.
NOTE: Refer to "Front view" on page 3 for the location of your handheld’s microphone.
2 Start recording by doing either of the following:
• Press and hold (do not release) the Record hardware button on the right side
of your handheld until you hear a beep.
• Tap the Record button on the Recording toolbar.
3 Make your recording.
4 To stop recording:
• Recording via Record hardware button: Release the Record button. Two
beeps will sound.
• Recording via the Record software button: Tap the Stop button on the
Recording toolbar.
The new recording appears in the note list or as an embedded icon.
To play a recording
• Tap it in the list or tap its icon in the note.
Indicates an embedded
recording.
Tap to begin recording.
Tap to show or hide
the Recording toolbar.
24
Page 37

Using My Text
1 Tap My Text on the screen’s command bar.
2 Tap a message.
2 Entering data in your Acer n10
Using My Text
When using Inbox or MSN Messenger, use My Text to quickly insert preset or
frequently used messages into the text entry area.
To insert a My Text message
Tap to select a
prewritten message.
NOTE: You can add text after inserting a My Text message before sending it.
To edit a My Text message
1 In the Tools menu, tap Edit and then tap My Text Messages.
2 Select the message you wish to edit and make desired changes.
25
Page 38

2 Entering data in your Acer n10
Using My Text
26
Page 39

3 Managing applications and information
Opening an application
3
Managing applications
and information
This chapter will discuss the following topics:
• Opening and switching between applications in your handheld
• Using File Explorer to manage files
• Using the Find function to look for a specific file
Opening an application
You can open applications by doing either of the following:
• Tap , Programs, and then the program name.
If you have many applications installed on your handheld, tap the scroll bar
to see all the available applications.
NOTE: You can customise which programs you see on the menu. For information, see
"Personal" on page 108.
• Press any of the Quick buttons on the front panel of your handheld.
The icons on the buttons identify the programs.
NOTE: Based on your working style and common tasks, you can reassign the Quick buttons
to other applications on your handheld. Refer to "Personal" on page 108 for instructions.
Switching between applications
Choose from the following options to switch between applications:
• Select another program from the menu.
• Press any of the Quick buttons on the front panel of your handheld.
NOTE: Some program names have been abbreviated in check boxes and drop-down menus.
To see the full spelling of an abbreviated label, tap and hold the stylus on the label. Drag the
stylus off the label so that the command is not carried out.
The following table contains a partial list of programs that are on available on your
handheld. Refer to the Acer n10 Handheld Companion CD for additional programs
that you can install into your handheld.
27
Page 40

3 Managing applications and information
Switching between applications
Icon Program Usage
ActiveSync Synchronise information between your handheld and
Calendar Keep track of your appointments and create meeting
Contacts Keep track of your friends and colleagues.
Inbox Send and receive email messages.
Pocket Internet
Explorer
Notes Create handwritten or typed notes, drawings, and
Tasks Keep track of your tasks.
Pocket Excel Create new workbooks or view and edit Excel
computer.
requests.
Browse Web and WAP sites, and download new
programs and files from the Internet.
recordings.
workbooks created on your computer.
MSN Messenger Send and receive instant messages with your MSN
Messenger contacts.
Pocket Word Create new documents or view and edit Word
documents created on your computer.
28
Page 41

3 Managing applications and information
Finding and organising information
Using the Find function and the File Explorer window will allow you to find and
manage your files easily.
To use Find
The Find function on your handheld helps you quickly locate information.
1 On the menu, tap Find.
2 Enter the text you want to find, then select a data type.
TIP: To quickly find information that is taking up storage space on your handheld, select
Larger than 64 KB in Type.
3 Tap Go to start the search.
Type text you
want to find.
Finding and organising information
Tap here to
start search.
29
Page 42

3 Managing applications and information
Finding and organising information
To use File Explorer
Use File Explorer to locate files on your handheld and to organise these files into
folders.
• On the menu, tap Programs, and then File Explorer.
Tap to change folders.
Select the sort order
for the list.
Tap the folder name
to open it.
Tap and hold to create
a new folder.
30
Page 43

4 Managing Microsoft® Pocket Outlook applications
Calendar
Calendar
4 Managing Microsoft
Pocket Outlook applications
This chapter will discuss the basic applications included in the Microsoft® Pocket
Outlook program installed in your handheld. This discussion will include:
• Calendar - schedule meetings and remind yourself of set appointments
• Contacts - keep at hand a directory of contact information
• Tasks - make a to-do list
• Notes - create textual or recorded notes of your thoughts and ideas
• Inbox - write, edit, and view your emails on the road
You can use these programs individually or together. For example, email addresses
stored in Contacts can be used to address e-mail messages in Inbox.
Calendar enables you to conveniently manage your schedules and appointments or
any other activities associated with a time and date. You can schedule appointments,
including meetings and other events. Checking your appointments is easy using one
of several views—Agenda, Day, Week, Month, and Year.
®
NOTE: Switch view options by using the View menu.
31
Page 44

4 Managing Microsoft® Pocket Outlook applications
Calendar
To open Calendar
• Press the Calendar Quick button on the front panel of your handheld.
Calendar will open to today’s schedule.
Tap to go to today.
Tap to display or edit
the appointment details.
Tap to create a new appointment.
NOTE: You can customise the Calendar display, such as changing the first day of the week,
by tapping Options on the Tools menu.
32
Page 45

4 Managing Microsoft® Pocket Outlook applications
Calendar
Scheduling an appointment
You can use Calendar to create or review appointments.
To create an appointment
1 If you are in Day or Week view, tap the desired date and time for the appointment.
2Tap New.
Tap to return to the calendar
(the appointment is saved
automatically).
Tap to choose from
predefined text.
Tap to choose from
previously entered locations.
Tap to select a time.
Tap to select a date.
Notes is a good place
for maps and directions.
3 Using the input panel, enter a description and a location.
Tap first to select the field.
4 If needed, tap the date and time to change them.
5 Enter other desired information.
You will need to hide the input panel to see all available fields.
6 To add notes, tap the Notes tab. You can enter text, draw, or create a recording. For
more information on creating notes, see "Notes" later in this chapter.
7 After entering the desired information, tap OK.
TIP: If you select Remind me in an appointment, your handheld will remind you according
to the options set in , Settings, Personal tab, Sounds & Reminders.
33
Page 46

4 Managing Microsoft® Pocket Outlook applications
Calendar
Using the Calendar summary screen
When you tap an appointment in Calendar, a summary screen is displayed. To change
the appointment, tap Edit.
View appointment details.
View.
Tap to change
appointment.
Creating a meeting request
You can use Calendar to set up meetings with users of Outlook or Pocket Outlook. The
meeting request will be created automatically and sent either when you synchronise
Inbox or when you connect to your email server. Indicate how you want meeting
requests sent by tapping Tools and then Options. If you send and receive email
messages through ActiveSync, select ActiveSync.
To schedule a meeting
1 Create an appointment.
2 In the appointment details, hide the input panel, and then tap Attendees.
3 From the list of email addresses you've entered in Contacts, select the meeting
attendees.
The meeting notice is created automatically and placed in the Outbox folder.
For more information on sending and receiving meeting requests, see the Help menu
of Calendar and Inbox in your handheld.
34
Page 47

Contacts
4 Managing Microsoft® Pocket Outlook applications
Contacts
Contacts maintains a list of your friends’ and colleagues’ contact information. Using
your handheld’s infrared (IR) port, you can quickly share some or all of this
information with other device users.
To open Contacts
• Press the Contacts Quick button on the front panel of your handheld.
Contacts will open to the Contacts list.
NOTE: To change the way information is displayed in the list, tap Tools and then Options.
35
Page 48

4 Managing Microsoft® Pocket Outlook applications
Contacts
Creating a contact
1Tap New.
Tap to return to the contact
list (the contact is saved
automatically).
Scroll to see more fields.
Notes is a good place
for maps and directions.
2 Using the input panel, enter a name and other contact information.
You will need to scroll down to see all available fields.
3 To assign the contact to a category, scroll to and tap Categories and select a category
from the list.
In the contact list, you can display contacts by category.
4 To add notes, tap the Notes tab. You can enter text, draw, or create a recording. For
more information on creating notes, see "Notes," later in this chapter.
5 After entering the desired information, tap OK to return to the Contact list.
Finding a contact
There are four ways to find a contact:
• In the Contact list, enter a contact name in the box under the navigation bar.
To show all contacts again, clear text from the box or tap the button to the
right of the box.
• In the Contact list, tap the category list (labeled All Contacts by default) and
select the type of contact that you want displayed.
To show all contacts again, select All Contacts.
To view a contact not assigned to a category, select None.
36
Page 49

4 Managing Microsoft® Pocket Outlook applications
Contacts
• To view the names of companies your contacts work for, in the contact list,
tap View > By Company.
The number of contacts that work for that company will be displayed to the
right of the company name.
• Tap , Find, enter the contact name, select Contacts for the type, and then
tap Go.
Using the Contacts summary screen
When you tap a contact in the Contact list, a summary screen is displayed. To change
the contact information, tap Edit.
View contact details.
Tap to change contact information.
Tap to view notes.
37
Page 50

4 Managing Microsoft® Pocket Outlook applications
Tasks
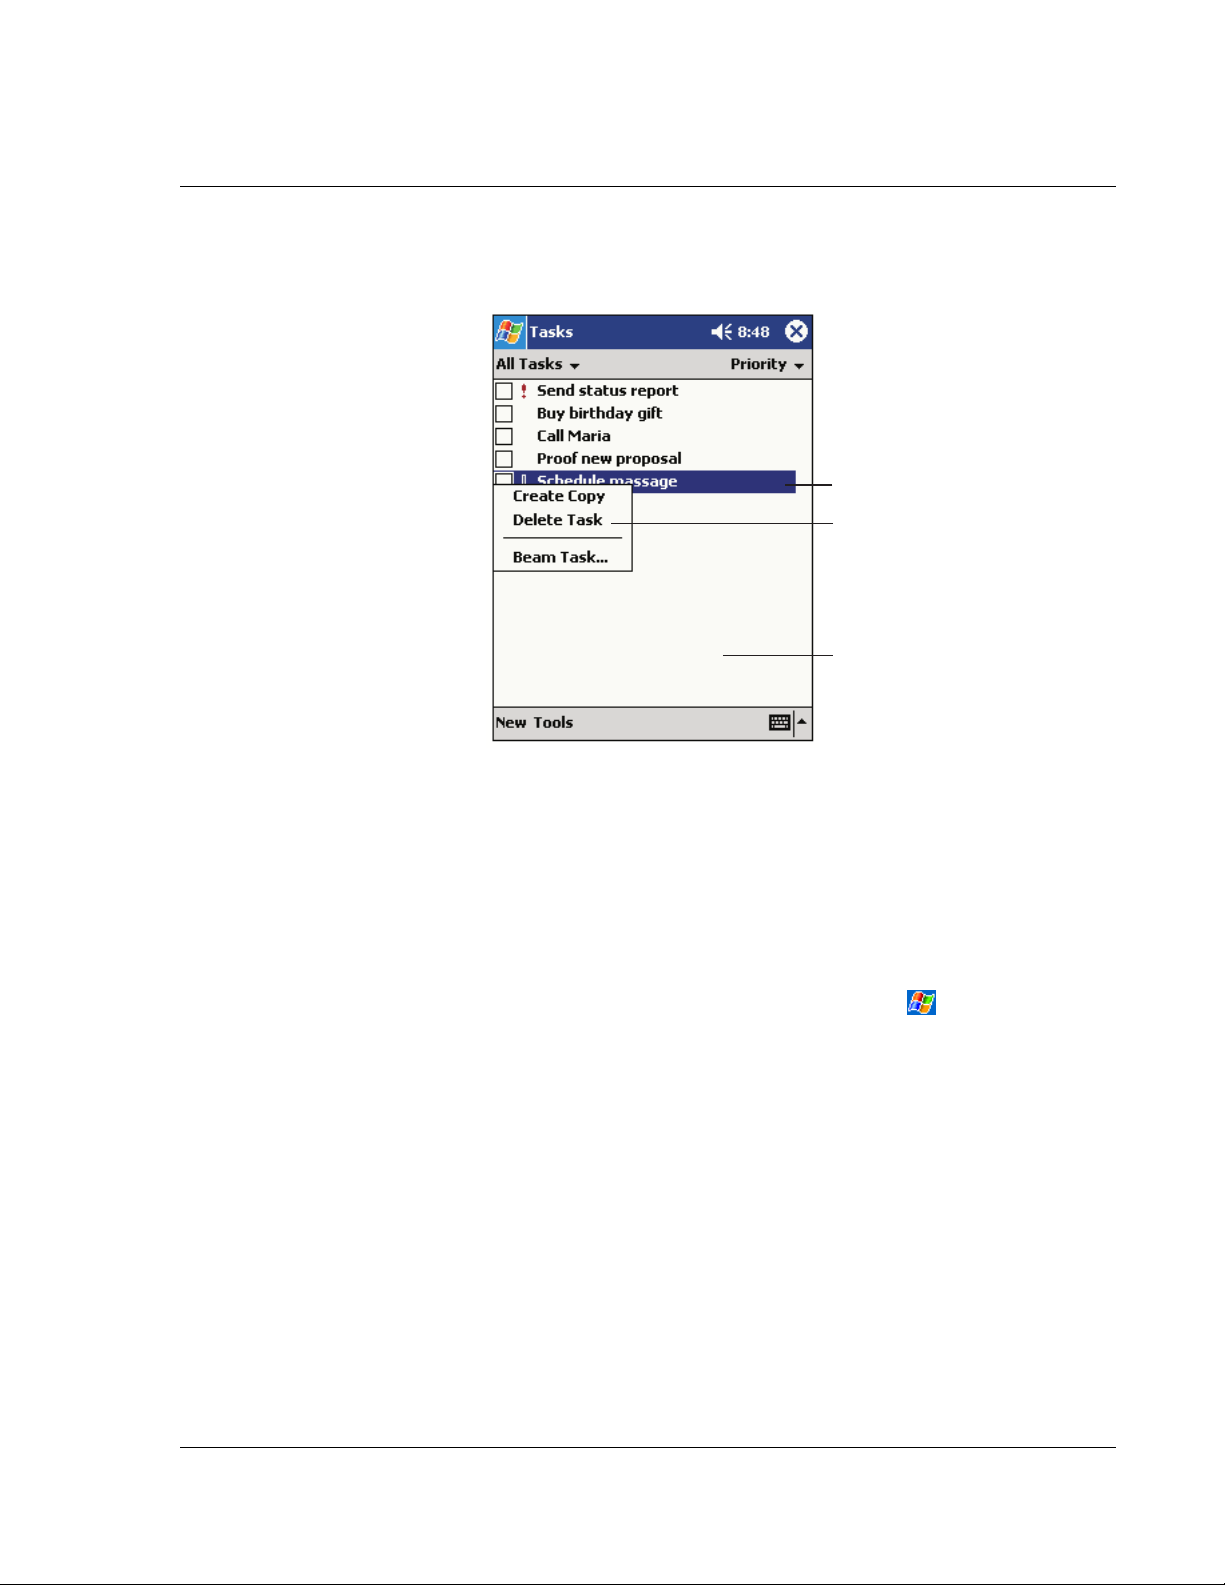
Tasks
Use Tasks to keep track of what you have to do and prioritise them based on their
importance and urgency.
To open Tasks
• Tap then, Tasks.
Tasks will open to the Tasks list.
Select the category of tasks
you want displayed in the list.
Select the sort order
of the list.
Indicates high priority.
Tap to display or edit
the task details.
Tap and hold to display
a pop-up menu of actions.
Tap to create a new task.
NOTE: To change the way information is displayed in the list, tap Tools and then Options.
Creating a task
1Tap New.
2 Using the input panel, enter a description.
3 You can enter a start date and due date or enter other information by first tapping
the field.
If the input panel is open, you will need to hide it to see all available fields.
4 To assign the task to a category, tap Categories and select a category from the list.
In the task list, you can display tasks by category.
5 To add notes, tap the Notes tab.
You can enter text, draw, or create a recording. For more information on creating
notes, see "Notes" later in this chapter.
38
Page 51

4 Managing Microsoft® Pocket Outlook applications
Tasks
Tap to return to the task
list (the task is saved
automatically).
Tap to choose from
predefined subjects.
Notes is a good place
for maps and drawings.
6 After entering the desired information, tap OK to return to the task list.
TIP: To quickly create a task with only a subject, tap Entry Bar on the Tools menu. Then, tap
Tap Here to add a new task and enter your task information.
Using the summary screen
When you tap a task in the task list, a summary screen is displayed. To change the task,
tap Edit.
.
View task details.
Tap to show and hide additional
summary information.
View notes.
Tap to change task.
39
Page 52

4 Managing Microsoft® Pocket Outlook applications
Notes
Notes
Quickly capture thoughts, reminders, ideas, drawings, and phone numbers with
Notes. You can create a written note or a recording. You can also include a recording
in a note. If a note is open when you create the recording, it will be included in the
note as an icon. If the note list is displayed, it will be created as a stand-alone
recording.
To open Notes
• Tap then, Notes.
Notes will open to the Notes list.
Tap to change the sort
order of the list.
Tap to open a note or
play a recording.
Tap and hold to display
a pop-up menu of actions.
Tap to record.
Tap to show or hide the
Tap to create a new item.
Recording toolbar.
Creating a note
1Tap New.
2 Create a note by writing, drawing, typing, or recording.
NOTE: For more information about using the input panel, writing and drawing on the
screen, and creating recordings, see "2 Entering data in your Acer n10" on page 17.
40
Page 53

4 Managing Microsoft® Pocket Outlook applications
Inbox
Tap to return to the note
list (the note is saved
automatically).
Inbox
Tap to show or hide
Tap to write on the screen.
Tap to add a recording
to the note.
Use Inbox to send and receive e-mail messages by doing either of the following:
• Synchronise e-mail messages with Microsoft Exchange or Microsoft Outlook
on your computer.
• Send and receive e-mail messages by connecting directly to an e-mail server
through an Internet service provider (ISP) or a network.
the input panel.
Opening the Inbox
• Press the Inbox Quick button on the front panel of your handheld.
41
Page 54

4 Managing Microsoft® Pocket Outlook applications
Inbox
Inbox will open to the Inbox’ folder navigator.
Synchronising email messages
Email messages can be synchronised as part of the general synchronisation process.
You will need to enable Inbox synchronisation in ActiveSync.
For information on enabling Inbox synchronisation, see ActiveSync Help on your
computer.
During synchronisation:
• Messages are copied from the mail folders of Exchange or Outlook on your
computer to the ActiveSync folder in Inbox on your handheld. By default, you
will receive messages from the past three days only, the first 100 lines of each
message, and file attachments of less than 100 KB in size.
• Email messages in the Outbox folder on your handheld are transferred to
Exchange or Outlook, and then sent from those programs.
• Email messages in subfolders must be selected in ActiveSync on your
computer in order to be transferred.
TIP: You can also synchronise email messages with your computer from a remote location.
For more information, see the ActiveSync Help menu in your computer.
Connecting directly to an email server
In addition to synchronising email messages with your computer, you can send and
receive email messages by connecting to an email server using a modem or a network
card connected to your handheld. You'll need to set up a remote connection to a
network or an ISP, and a connection to your email server. For more information, refer
to "9 Getting connected" on page 93.
42
Page 55

4 Managing Microsoft® Pocket Outlook applications
Inbox
When you connect to the email server, new messages are downloaded to your
handheld’s Inbox folder, messages in the handheld’s Outbox folder are sent, and
messages that have been deleted on the email server are removed from the
handheld’s Inbox folder.
Messages that you receive directly from an email server are linked to your email server
rather than your computer. When you delete a message on your handheld, it is also
deleted from the email server the next time you connect based on the settings you
selected in ActiveSync.
You can work online or offline. When working online, you read and respond to
messages while connected to the email server. Messages are sent as soon as you tap
Send, which saves space on your handheld.
When working offline, once you've downloaded new message headers or partial
messages, you can disconnect from the email server and then decide which messages
to download completely. The next time you connect, Inbox downloads the complete
messages you've marked for retrieval and sends the messages you've composed.
Using the Message list
Messages you receive are displayed in the message list. By default, the most recently
received messages are displayed first in the list.
Select the service and folder
you want to display.
Select the sort order
for messages.
Tap to open a message.
Tap and hold to display
a pop-up menu of actions.
Tap to connect and to
send and receive e-mail.
Tap to connect to
the selected service.
When you receive a message, tap it to open it. Unread messages are displayed in bold.
43
Page 56

4 Managing Microsoft® Pocket Outlook applications
Inbox
Tap to return to
the message list.
Tap to delete this message.
Tap to view the previous
or next message.
Tap to reply to or
forward this message.
When you connect to your email server or synchronise with your computer, by default,
you'll receive messages from the last five days only, the first 100 lines of each new
message, and file attachments of less than 100 KB in size. The original messages
remain on the email server or your computer.
You can mark the messages that you want to retrieve in full during your next
synchronisation or email server connection. Follow the steps below.
1 In the message list, tap and hold the message you want to retrieve.
2 On the pop-up menu, tap Mark for Download. The icons in the Inbox message list give
you visual indications of message status.
Specify your downloading preferences when you set up the service or select your
synchronisation options. You can change them at any time:
• Change options for Inbox synchronisation using ActiveSync options. For more
information, see ActiveSync Help.
• To change options for direct email server connections in Inbox on your
handheld.
a Tap Tools and then tap Options.
b On the Service tab, tap the service you want to change.
c Tap and hold the service and select Delete to remove a service.
44
Page 57

4 Managing Microsoft® Pocket Outlook applications
Inbox
Composing a message
1Tap New.
2 In the To field, enter an email or SMS address of one or more recipients, separating
them with a semicolon, or select a name from the contact list by tapping the Address
Book button.
All e-mail addresses entered in the e-mail fields in Contacts appear in the Address
Book.
3 Compose your message.
To enter preset or frequently used messages, tap My Text and select a message.
If you are sending an SMS message and want to know if it was received, tap Edit,
Options, and select Request SMS text message delivery notification.
4 Tap Send when you've finished the message.
If you are working offline, the message is moved to the Outbox folder and will be sent
the next time you connect.
Tap to send the message.
Tap to show or hide
the complete header.
Tap to show / hide the
recording toolbar.
Tap to display the Address Book.
Tap to insert common messages.
Managing email messages and folders
By default, messages are displayed in one of five folders for each service you have
created: Inbox, Deleted Items, Drafts, Outbox, and Sent Items.
45
Page 58

4 Managing Microsoft® Pocket Outlook applications
Inbox
• The behavior of the Deleted and Sent Items folders depends on the options
you have chosen. To set these options, in the message list:
a Tap Tools and then Options.
b On the Message tab, select your options.
• If you want to organise messages into additional folders tap Tools, and then
Manage Folders to create new folders.
• To move a message to another folder, in the message list, tap and hold the
message and then tap Move to on the pop-up menu.
Folder behavior with a direct connection to an email server
The behavior of the folders you create depends on whether you are using ActiveSync,
SMS, POP3, or IMAP4.
• If you use ActiveSync, email messages in the Inbox folder in Outlook will
automatically be synchronised with your handheld. You can select to
synchronise additional folders by designating them for ActiveSync. The
folders you create and the messages you move will then be mirrored on the
server. For example, if you move two messages from the Inbox folder to a
folder named Family, and you have designated Family for synchronisation,
the server creates a copy of the Family folder and copies the messages into
that folder. You can then read the messages while away from your computer.
• If you use SMS, messages are stored in the Inbox folder.
• If you use POP3 and you move email messages to a folder you created, the
link is broken between the messages on your handheld and their copies on
the email server. The next time you connect, the email server will see that the
messages are missing from the handheld’s Inbox and delete them from the
server. This prevents you from having duplicate copies of a message, but it
also means that you will no longer have access to messages that you move to
folders created from anywhere except your handheld.
• If you use IMAP4, the folders you create and the email messages you move
are mirrored on the server. Therefore, messages are available to you anytime
you connect to your email server, whether it is from your handheld or from
your computer. This synchronisation of folders occurs whenever you connect
to your mail server, create new folders, or rename/delete folders when
connected.
46
Page 59

5 Managing Microsoft® Pocket PC 2002 companion programs
Pocket Word
Pocket Word
5
Managing Microsoft® Pocket
PC 2002 companion programs
®
Perform your usual computing tasks on-the-road using the Microsoft
companion programs which includes:
• Pocket Word
• Pocket Excel
•MSN® Messenger
®
• Microsoft
• Microsoft
NOTE: Microsoft
To open a companion program on your handheld, tap Programs on the menu,
and then tap the program name.
Pocket Word works with Microsoft Word on your computer to give you easy access to
copies of your documents. You can:
• Create new documents on your handheld, such as letters, meeting minutes,
and trip reports, or you can copy documents from your computer to your
handheld.
• Synchronise documents between your computer and your handheld so that
you have the most up-to-date content in both locations.
Windows Media™ Player for Pocket PC
®
Reader for Pocket PC
®
Reader is available only for the English and European Acer n10 models.
Pocket PC 2002
To create a new file
• Tap , Programs, Pocket Word, and then New.
A blank document appears. Or, if you've selected a template for new
documents in the Options dialog box, that template appears with
appropriate text and formatting already provided.
You can open only one document at a time; when you open a second document, you'll
be asked to save the first. You can save a document you create or edit in a variety of
formats, including:
• Word (.doc)
• Pocket Word (.psw)
• Rich Text Format (.rtf)
• Plain Text (.txt)
47
Page 60

5 Managing Microsoft® Pocket PC 2002 companion programs
Pocket Word
NOTE: When you choose to create a new document, you will be prompted to save any
already open document.
To use the Pocket Word file list
Pocket Word contains a list of the files stored on your handheld.
• Tap a file in the list to open it.
• To delete, make copies of, and send files, tap and hold a file in the list. Then,
select the appropriate action on the pop-up menu.
Select the type of folder you
want displayed in the list.
Tap to change the sort
order of the list.
Tap to open a document.
Tap and hold an item to see
a pop-up menu of actions.
Tap to create a new document.
To enter information
You can enter information in Pocket Word in one of four modes—typing, writing,
drawing, and recording, which are displayed on the View menu. Each mode has its
own toolbar, which you can show and hide by tapping the Show/Hide Toolbar button
on the command bar.
If you're opening a Word document created on a computer, select Wrap to Window
on the View menu so that you can see the entire document.
TIP: You can change the zoom magnification by tapping View and then Zoom. Then select
the percentage you want. Select a higher percentage to enter text and a lower one to see
more of your document.
48
Page 61

5 Managing Microsoft® Pocket PC 2002 companion programs
Pocket Word
Typing mode
• Using the input panel, enter typed text into the document.
For more information on entering typed text, see "Using the input panel" on
page 17.
• To format existing text and to edit text, first select the text. You can select
text as you do in a Word document, using your stylus instead of the mouse to
drag through the text you want to select.
• You can search a document to find text by tapping Edit and then Find/
Replace.
Tap and hold to see a
pop-up menu of actions.
Tap to show or hide
the toolbar.
Tap to return to the
document list (changes are
saved automatically).
Tap to change
formatting options.
Tap to format text.
Writing mode
In writing mode, use your stylus to write directly on the screen. Ruled lines are
displayed as a guide, and the zoom magnification is greater than in typing mode to
allow you to write more easily.
For more information on writing and selecting writing, see "Writing on the screen"
on page 19.
49
Page 62

5 Managing Microsoft® Pocket PC 2002 companion programs
Pocket Word
With Space button selected,
drag to insert space. An arrow
appears showing the space
direction and size.
Tap to highlight selected text.
Tap to select formatting options,
such as pen weight and line color.
Space button.
Pen button.
If you cross three ruled lines in a single stylus stroke, the writing becomes a drawing,
and can be edited and manipulated as described in the following section.
NOTE: Written words are converted to graphics (metafiles) when a Pocket Word document
is converted to a Word document on your computer.
Drawing mode
In drawing mode, use your stylus to draw on the screen. Gridlines appear as a guide.
When you lift your stylus off the screen after the first stroke, you'll see a drawing box
indicating the boundaries of the drawing. Every subsequent stroke within or touching
the drawing box becomes part of the drawing.
For more information on drawing and selecting drawings, see "Drawing on the
screen" on page 22.
50
Page 63

5 Managing Microsoft® Pocket PC 2002 companion programs
Pocket Excel
Select Shape on the
pop-up menu to convert
objects to proper shapes.
Resize an object by dragging
the selection handles.
Pocket Excel
Tap an arrow to
see your choices.
Pen button.
Tap to select formatting options,
such as line weight, fill color, and line color.
Recording mode
In recording mode, embed a recording into your document. Recordings are saved as
.wav files.
For more information on recording, see "Recording a message" on page 24.
For more information on using Pocket Word, tap > Programs > Pocket Word then,
tap Help from the menu.
Pocket Excel works with Microsoft Excel on your computer to give you easy access to
copies of your workbooks. You can:
• Create new workbooks on your handheld, such as expense reports and
mileage logs, or you can copy workbooks from your computer to your
handheld.
• Synchronise workbooks between your computer and your handheld so that
you have the most up-to-date content in both locations.
51
Page 64

5 Managing Microsoft® Pocket PC 2002 companion programs
Pocket Excel
Creating a new workbook
• Tap , Programs, Pocket Excel, and then New.
A blank workbook appears. Or, if you've selected a template for new
workbooks in the Options dialog box, that template appears with
appropriate text and formatting already provided.
You can open only one workbook at a time; when you open a second workbook,
you'll be asked to save the first. You can save a workbook you create or edit in a
variety of formats, including:
• Pocket Excel (.pxl)
• Excel (.xls).
NOTE: When you choose to create a new document, you will be prompted to save any
already open document.
To create a Pocket Excel file list
Pocket Excel contains a list of the files stored on your handheld.
• Tap a file in the list to open it.
• To delete, make copies of, and send files, tap and hold a file in the list. Then
select the appropriate action from the pop-up menu.
Displaying the toolbar
Pocket Excel provides fundamental spreadsheet tools, such as formulas, functions,
sorting, and filtering, in its toolbar.
52
Page 65

5 Managing Microsoft® Pocket PC 2002 companion programs
Pocket Excel
• Tap View and then Toolbar.
Cell contents appear here
as you enter them.
Format button.
AutoSum button.
Zoom button.
Protecting your workbooks
If your workbook contains sensitive information, you can protect it with a password.
• Open the workbook, tap Edit, and then Password.
Every time you open the workbook, you will need to enter the password, so
choose one that is easy for you to remember but hard for others to guess.
Tips for working in Pocket Excel
Note the following when working in large worksheets in Pocket Excel:
• View in full-screen mode to see as much of your worksheet as possible.
– Tap View and then Full Screen.
– To exit full-screen mode, tap Restore.
• Show and hide window elements.
– Tap View and then tap the elements you want to show or hide.
• You might want to freeze the top and left most panes in a worksheet to keep
row and column labels visible as you scroll through a sheet.
a Select the cell where you want to freeze panes.
b Tap View and then Freeze Panes.
• Split panes to view different areas of a large worksheet.
a Tap View and then Split.
b Then drag the split bar to where you want it.
To remove the split, tap View and then Remove Split.
53
Page 66

5 Managing Microsoft® Pocket PC 2002 companion programs
MSN® Messenger
• Show and hide rows and columns.
– To hide a hidden row or column:
a Select a cell in the row or column you want to hide.
b Tap Format, then Row or Column, and then Hide.
– To show a hidden row or column:
a Tap Tools, then Go To, and then type a reference that is in the hidden
row or column.
b Then tap Format, then Row or Column, and then Unhide.
For more information on using Pocket Excel, tap > Programs > Pocket Excel then,
tap Help from the menu.
MSN® Messenger
MSN® Messenger on your handheld is an instant messaging program that lets you:
• See who is online
• Send and receive instant messages
• Have instant message conversations with groups of contacts
Requirements to use MSN Messenger
• Microsoft Passport™ account or a Microsoft Exchange email account.
®
or MSN
• Passport to use MSN Messenger Service. If you have a Hotmail
account, you already have a Passport.
Once you have obtained either a Microsoft Passport or a Microsoft Exchange account,
you are ready to set up your account.
TIP: Sign up for a Microsoft Passport account at (http://www.passport.com/). Get a free
Microsoft Hotmail email address at (http://www.hotmail.com/).
Setting up
Before you can connect, you must enter Passport or Exchange account information.
To set up an account and sign in:
1 In the Tools menu, tap Options.
2 In the Accounts tab, enter your Passport or Exchange account information.
3 To sign in, tap the sign-in screen and enter your email address and password.
NOTE: If you already use MSN Messenger on your computer, your contacts will show up on
your handheld without being added again.
54
Page 67

5 Managing Microsoft® Pocket PC 2002 companion programs
MSN® Messenger
Working with contacts
The MSN Messenger window shows all of your messenger contacts at a glance, divided
into Online and Not Online categories. From this view, while connected, you can chat,
send a email, block the contact from chatting with you, or delete contacts from your
list using the pop-up menu.
Tap a contact to start a chat.
Tap and hold to display
a pop-up menu of actions.
• To see others online without being seen, in the Tools menu, tap My Status
and select Appear Offline.
• If you block a contact, you will appear offline but will remain on the blocked
contact's list.
• To unblock a contact, tap and hold the contact, then tap Unblock on the popup menu.
Chatting with contacts
1 Tap a contact name to open a chat window.
2 Enter your message in the text entry area at the bottom of the screen, or tap My Text
to enter a preset message.
55
Page 68

5 Managing Microsoft® Pocket PC 2002 companion programs
Microsoft® Windows Media™ Player for Pocket PC
3Tap Send.
Enter message.
Tap to send message.
Tips when chatting with contacts
• To invite another contact to a multi-user chat, in the Tools menu, tap Invite
and tap the contact you want to invite.
• To switch back to the main window without closing a chat, tap the Contacts
button.
• To revert back to your chat window, tap Chats and select the person whom
you were chatting with.
• To know if the contact you are chatting with is responding, look for the
message under the text entry area.
For more information on using MSN Messenger, tap > Programs > MSN Messenger
then, tap Help from the menu.
Microsoft® Windows Media™ Player for Pocket PC
®
Use Microsoft
files (Windows Media and MP3 files) that are:
• Stored on your handheld
• Copied from Microsoft Windows Media Player on your computer to your
handheld
Windows Media™ Player for Pocket PC to play digital audio and video
56
Page 69

5 Managing Microsoft® Pocket PC 2002 companion programs
Microsoft® Reader for Pocket PC
• On a network
For more information about using Windows Media Player for Pocket PC, tap , and
then tap Help.
Microsoft® Reader for Pocket PC
Use Microsoft® Reader for Pocket PC to read eBooks on your handheld.
You can also download books from your favorite eBook Web site to your computer.
Then, use ActiveSync to copy the book files to your handheld. The books appear in the
Reader Library, where you can tap them in the list to open them.
®
NOTE: Microsoft
Using the Guidebook
The Guidebook contains all the information you'll need to use the Microsoft Reader.
Reader is available only for the English and European Acer n10 models.
57
Page 70

5 Managing Microsoft® Pocket PC 2002 companion programs
Microsoft® Reader for Pocket PC
To open the Guidebook:
• Tap Help on the Reader command bar.
-or-
• On a book page, tap and hold on the book title, and then tap Help on the
pop-up menu.
Getting books on your Acer n10
You can download book files from the Web. Just visit your favorite eBook retailer and
follow the instructions to download the book files.
Sample books and a dictionary are also included in the MSReader folder in the Extras
folder on the Acer n10 Handheld Companion CD.
Use ActiveSync to download the files from your computer to your handheld as
described in the Read Me file in the MSReader folder.
Using the Library
The Library is your Reader home page; it displays a list of all books stored on your
handheld or storage card.
To open the Library:
• On the Reader command bar, tap Library.
-or-
• On a book page, tap the book title, and then tap Library on the pop-up
menu.
Opening a book
• Tap a book title in the Library list.
Tap to scroll through
the Library list.
Tap to select
a sort order.
Tap to specify
the books you
want to display
in the list.
Tap here to
navigate to
other parts of
the Reader.
Tap to open a book.
58
Page 71

5 Managing Microsoft® Pocket PC 2002 companion programs
Microsoft® Reader for Pocket PC
Reading a book
Each book consists of a cover page, an optional table of contents, and the pages of
the book. You can:
• Annotate the book with highlighting, bookmarks, notes, and drawings.
• Search for text and look up definitions for words.
In addition to the text, each book page includes a page number and book title.
Navigation options are listed in the bottom portion of the cover page. Page through
the book by:
• Using the Directional pad or the Scroll wheel on your handheld
• Tapping the page number on each page
The first time you open a book, you'll probably want to go to the first page or to the
table of contents, if there is one. Subsequently, whenever you open the book, you'll
be automatically taken to the last page read.
.
Tap to select
a navigation
option.
Drag to select text and
then tap an option.
Tap arrows to turn
the page, or tap and
hold page # to bring
up page riffle.
Using Reader features
Reading a book electronically gives you several options not available with paper
books. These options are available from any book page.
Select text by dragging across the text on the page. Then, tap an option on the popup menu, as described in the following sections.
Search for text
1 Tap Find on the pop-up menu.
2 Enter the word you want to search for.
59
Page 72

5 Managing Microsoft® Pocket PC 2002 companion programs
Microsoft® Reader for Pocket PC
3 Tap the desired Find option.
Reader highlights found text on the page.
• To close Find, tap outside the box.
• To return to your original page, tap the title and then tap Return on the popup menu.
Copy text
You can copy text from books that support this feature into any program that accepts
text.
1 On a book page, select the text you want to copy.
2 Tap Copy Text on the pop-up menu.
The text can be pasted into the program of your choice.
Book annotations
To see a list of a book's annotations, including bookmarks, highlights, text notes, and
drawings:
1 Tap Annotations Index on the book's cover page.
2 Tap an entry in the list to go to the annotated page.
To use bookmarks
• When you add a bookmark to a book, a color-coded bookmark icon appears
in the right margin. From anywhere in the book, tap the bookmark icon to go
to the bookmarked page.
NOTE: You can add multiple bookmarks to a book.
To use highlights
• When you highlight text, it appears with a colored background.
To use notes
• When you attach a note to text, you enter the text in a note pad that appears
on top of the book page. A Note icon will display in the left margin. To show
or hide the note, tap the icon.
To add drawings
• When you add a drawing, a Drawing icon appears in the bottom-left corner
of the page, and drawing tools appear across the bottom of the page. Draw
by dragging your stylus.
Removing a book
When you finish reading a book, you can delete it to conserve space on your
handheld. If a copy of the book is stored on your computer, you can download it again
at any time.
1 Tap and hold the title in the Library list.
2 Tap Delete on the pop-up menu.
60
Page 73

6 Using third-party applications
RecentDo
6 Using third-party
applications
Several third-party applications are included in the Acer n10 Handheld Companion
CD. These applications are designed to complement the functions of your handheld
and provide you with a more versatile work environment.
RecentDo Provides a quick way to relaunch the most recently accessed
programs, documents and websites.
Backup/Restore Backs up data files and applications in your handheld’s
internal memory to a storage card and restores these back
when you need them.
IA Album LE Views and edits standard image files such as JPEG, BMP, and
GIF files.
Acrobat Reader for
Pocket PC
Views Acrobat Reader (.pdf) files
RecentDo
PocketTV Allows playback of standard MPEG 1 files
Using RecentDo, you can conveniently scan a list of the most recently accessed
programs, documents and websites.
Documents that have been edited and saved will be listed in RecentDo as well as
documents opened by Microsoft Media Player or PocketTV; Documents that were only
opened and viewed will not be included.
To launch RecentDo, tap , and select RecentDo.
61
Page 74

6 Using third-party applications
Backup/Restore
Items in the RecentDo window are categorised into three—Programs, Documents, and
Websites. The listed items are in hypertext format so you can easily relaunch them.
NOTE: Each category can display a maximum of five items.
Backup/Restore
Backup/Restore enables you to back up data files and applications from your
handheld’s internal memory to a storage card and to restore data to your handheld.
Advanced security features offer password protection of sensitive documents/
applications during Backup and/or Restore operations. The expansion features of your
handheld allow you to use any of the following storage cards:
During a backup or restore operation:
•Compact Flash
• Secure Digital
• MultiMedia Card
• All hardware buttons and the automatic handheld off feature are disabled
• The power button serves as a pause/resume button to control the pace of
operation
62
Page 75

6 Using third-party applications
Backup/Restore
There are two tabs in the program window corresponding to the two function of
Backup and Restore.
To launch Backup/Restore:
1 Insert a storage card into the appropriate slot.
For instructions on how to insert expansion cards, refer to the Chapter entitled "7
Using expansion features" on page 87.
2 Tap , Programs, and then Backup/Restore.
Note that when you attempt to launch Backup/Restore without any storage card
available in the system, option for that unavailable storage card will be disabled.
When selected storage card is removed during the backup or restore process, a
warning message will pop up.
Tap ok to reset your machine, then relaunch Backup/Restore.
63
Page 76

6 Using third-party applications
Backup/Restore
Backup function
The Backup function has two operating modes—Normal Backup and Advanced
Backup. With the Advanced mode, you can set to perform an automatic data backup
when the system is running on x battery power; x being the set battery capacity
defined in the Advanced window.
Note that when Advanced backup settings is activated and the specified storage card
is not attached to your handheld when x battery level is reached, then no backup
procedure will be performed.
NOTE: 'AutoBackup' is the default file name of the backup file generated using the
Advanced mode.
To perform data backup
1 Close all running programs except for Backup/Restore.
64
Page 77

6 Using third-party applications
Backup/Restore
2 In the Backup tab, choose whether to accept the default filename (backup) or type a a
new one by tapping on the keyboard icon on the bottom of the screen.
3 Select a storage card from the 'Backup to' radio buttons.
4 Define the backup scope (default: PIM only) from Option' radio buttons.
If free space in the selected storage card is less than the size of the data to be copied
from the handheld’s internal memory, a warning message will pop up.
Tap ok to revert to the Backup tab, then either delete files from the selected storage
card to increase its free space or select a new storage card with a larger free space
enough to accommodate the size of the intended backup data.
Refer to page 70 for instructions on how to delete a file from a storage card.
5 Tap Start to proceed with the backup process.
When a backup file of the same filename as set exists in the selected storage card, a
pop-up message appears.
65
Page 78

6 Using third-party applications
Backup/Restore
Tap Yes to replace existing file, or tap No, then either define a new filename or select
another storage card.
A pop-up message will appears prior to beginning the Backup operation.
66
Page 79

6 Using third-party applications
Backup/Restore
6 Tap OK.
During the backup process, a progress screen will appear displaying backup status.
Tap Cancel to stop the backup process.
7 When the backup process is completed, a message box appears.
Tap ok to revert to the Backup tab screen.
Restore function
You can only restore backup files that are generated by Backup/Restore; file format is
*.abk (Acer backup).
To perform data restoration
1 Close all running programs except for Backup/Restore.
67
Page 80

6 Using third-party applications
Backup/Restore
2 Select a source storage card from the 'Restore from' radio buttons.
The lower half of the screen will display a list of files contained in the selected storage
card. Filename, file size and date when the backup file was created are indicated in
the list.
3 Tap a filename to select the file you wish to restore.
Non-.abk files are not shown.
Tap ok then, select a .abk file
When a .abk file is selected, the window will shift to display file information
including:
• Backup file - filename of the selected .dbk file.
• Created on - date when the selected .dbk file was created.
• Backup option.
68
Page 81

6 Using third-party applications
Backup/Restore
• Main memory free size - free space in your handheld’s main storage memory.
This should be bigger than the file size of the selected .abk file for the restore
process to continue.
4 Tap Start to proceed with the restore process.
A pop-up message appears.
5 Tap OK.
69
Page 82

6 Using third-party applications
Backup/Restore
6 During the restore process, a progress screen will appear displaying restore status.
7 When the restore process is completed, a message box appears.
Tap ok to revert to the Restore tab screen.
To delete a file from a storage card
To increase the size of available free space in a storage card, you have the option to
delete files that you no longer need.
1 Tap the Restore tab.
2 Tap a menu item to select a storage card.
3 From the list, tap a filename to display a pop-up menu.
70
Page 83

4 Tap Delete.
A message confirming deletion will appear.
5 Tap OK.
6 Using third-party applications
IA Album LE
IA Album LE
IA Album LE (Lite Edition) is a convenient image viewing tool for file management,
browsing and viewing.
Key features include:
• Built-in Screen Capture function with option to enable a capture sound.
• Image viewing for BMP, 2BP, PNG, JPEG and GIF files.
71
Page 84

6 Using third-party applications
IA Album LE
• Image file and folder management capabilities.
View and manage any image on your handheld from any source (BMP, 2BP,
PNG, JPEG, CMYK JPEG, or GIF format), whether or not they are screencapture files created by IA ScreenShot.
• Image browsing and viewing modes include Thumbnail, Select, and Full
Screen views.
• Optimise colors for 24-bit, 16-bit, 12-bit, 8-bit, and grayscale displays.
• Crop and Save (i.e.,designate any portion of an image and then save that
portion to a new file).
72
Page 85

6 Using third-party applications
IA Album LE
• Option to:
– Select one of your hardware buttons to function as your Capture button,
or specify a delay-time.
– Convert an existing file to a different format (JPEG, GIF, or Bitmap) and
resolution.
– Save a captured screen image as a Bitmap, GIF, or JPEG file (desired
resolution between 60 and 300 dpi).
• Specify a Home Folder and then quick-jump to that folder or any other folder
you have accessed during the current IA ScreenShot session.
IA Album LE menus
The user interface provides three menus on the Command Bar—File, Tools, and View.
File menu
The File menu provides a convenient way to switch folders, create or delete folders,
delete images, select all images in a folder, and quit the IA Album LE program.
Go To
• The Go To command provides a convenient way to switch folders. Any
folders you have accessed during the current IA Album LE session will be
available on the menu that appears when you tap Go To.
• You can access the GoTo menu by tapping the Go To icon on the Toolbar
when in the Thumbnail View mode.
• There is also a Home command on the GoTo menu. By default, the Home
Folder is set to the \My Documents folder. You can change the Home Folder
to any folder you by:
a Selecting Options... from the Tools menu.
b Tapping the Change... button in the Home field.
73
Page 86

6 Using third-party applications
IA Album LE
New Folder...
The New Folder... command allows you to create a new folder on your handheld that
you can use to store images.
1 Select the folder (in the upper pane) under which you want the new folder to reside.
2 Select the New Folder... command.
3 Enter the name for the new folder in the dialog box.
Note that this command is also on the Toolbar, and on the pop-up menu that appears
when you tap-and-hold in the folder pane, when in Thumbnail View mode.
Delete Folder
The Delete Folder command allows you to delete an existing folder on your handheld.
1 Select the folder you want to delete.
2 Select Delete Folder from the File menu or the pop-up menu that appears when you
tap-and-hold in the Folder pane when in Thumbnail View mode.
Delete
• After you have selected one or more image files, the Delete command
becomes available. It allows you to permanently delete the file or files from
the folder.
• You can also select this command from the Toolbar, or the pop-up menu that
appears when you tap-and-hold in the lower pane, during Thumbnail View
mode.
Select All
• This command selects all images in the current folder. When in Thumbnail
View mode, you can also use the Select All icon on the Toolbar.
• If you wish to deselect all images after multiple images have been selected,
simply tap anywhere within an empty portion of the Thumbnail image pane.
Exit
The Exit command terminates IA Album LE and removes it from the programs running
in memory on your handheld.
View menu
The View menu allows you to choose view modes, display your images in various ways
such as zoom/rotate, and view data concerning the attributes of the images.
Thumbnail View
• Thumbnail view can be invoked by selecting Thumbnail View on the View
menu, or by tapping its icon on the Toolbar.
74
Page 87

6 Using third-party applications
IA Album LE
• Thumbnail view displays the images in the current folder as thumbnails.
• To display an additional row of thumbnail images, tap the upward-pointing
red triangle. Conversely, each time you tap a downward-pointing blue
triangle, a row of thumbnail images will be hidden.
• To change the position of an image in the thumbnail display, tap the stylus
on the desired image and then drag the image to the desired position.
• To select multiple thumbnail images for mass-editing such as Delete, place
your stylus within the edge at the far left or far right of the screen and then
drag the stylus over the desired images.
• Pressing the Right Arrow button or Down button on your handheld’s
Directional pad will select the next Thumbnail image in the current folder.
Pressing the Left Arrow or Up button will select the previous thumbnail.
• If you double-tap an image in Thumbnail view, IA Album LE will switch to
Select View mode, with the tapped thumbnail shown as the enlarged image.
Select View
• You can switch to Select View mode by:
– Double-tapping on the desired image while in Thumbnail View mode
– Tapping the Select View command on the View menu
– Tapping the Select View icon on the Toolbar
– Pressing the Directional pad on your handheld.
The selected image will be enlarged.
• When you are in Select View, you can zoom, pan, and crop an image. To pan
an image that does not fit in the display area in its entirety, press your stylus
on the image and drag it in the desired direction.
• A different Toolbar displays when Select View is the active view mode,
providing convenient access to ten of the more common commands for Select
view. To learn the function of any Toolbar icon, press your stylus on the icon
to view its Tooltip.
• Pressing the Right Arrow button on your handheld will display the next
image in the current folder, and pressing the Left Arrow button will display
the previous image.
• You can press the Up button to zoom in on the currently displayed image,
and press the Down button to zoom out.
75
Page 88

6 Using third-party applications
IA Album LE
Full Screen View
• Full Screen View mode maximises the selected image so that the entire screen
is used to display it. If you tap on an image while in Full Screen View, you will
be returned to the previous view mode.
• You may activate the Full Screen View mode by either:
– Selecting the Full Screen View command on the View menu.
– Tapping the Full Screen View icon on the Toolbar.
– Pressing on the center of the Directional pad until Full Screen view is
activated.
• In addition, pressing the Right Arrow button on your handheld while in Full
Screen View mode will display the next image in the current folder. Pressing
the Left Arrow button will display the previous image.
• You can press the Up button to zoom in on the currently displayed image.
Press the Down button to zoom out.
Previous/Next Image
• The Previous and Next Image commands on the View menu (and the Previous
Image icon on the Toolbar) is available only during Select View mode.
• It selects the image previous to, or next to the current image (sequentially in
the current folder) for display.
Zoom In/Zoom Out
• The Zoom In command on the View menu (and Zoom In icon, the left most
icon on the Toolbar for Select View), is available only in Select View mode.
• Each time you select this command, the current image is incrementally
magnified or reduced.
Actual Size
• The Actual Size command on the View menu (and Actual Size icon on the
Toolbar), is available only in Select View mode.
• When you select this command, the current image will be displayed in its
actual size; that is, a one-to-one pixel ratio.
Auto Rotate
• If Auto Rotate is selected, images will automatically be displayed in the most
appropriate orientation on the screen.
• If active, a check mark will be shown to the left of the command name on the
View menu.
Image Info...
• You can view various image attributes, folder information, and system
resource usage status by selecting the desired image and then tapping Image
Info... on the View menu.
• The Image Info screen consists of the Image, Size, Folder, and System tabs.
When you are finished viewing the info, click OK in the upper right corner of
the screen.
• The Image Info feature is also available on the Toolbar in the form of an icon.
When an image is being displayed in its Actual Size in Select View mode, the
Image Info icon is shown as "1:1" instead of its standard appearance (the
letter "i" inside a blue circle).
76
Page 89

6 Using third-party applications
IA Album LE
Tools menu
The Tools menu is where you set up your preferences for Screen Captures and general
IA Album LE behaviors. It also allows you to crop an image, save it in a different
format, send via infrared beaming, and access the main Help contents.
Crop...
• The Crop... command allows you to specify a portion of a file and then save
that portion of the file to a new individual file.
• It also lets you save a file to a different format and/or location. First select the
image you want to crop (in either Thumbnail View or Select View). A
thumbnail image will be shown in the Crop tab after you select Crop... from
the Tools menu (or the Crop icon on the Toolbar).
Crop tab
• In the Crop tab, you can drag your stylus on the image to manually specify a
square/rectangular area, or you can specify values in the X and Y (origin) and
W and H (area) fields. After a Crop region has been defined, you can drag it
around using your stylus if desired. You can also Pan or Zoom In/Out using
the icons in the Crop tab.
• To save the cropped portion as a new file immediately to the same file type as
the original, tap the Crop button. The default file-naming convention
appends an underscore and a "c" ( _c ) prior to the extension, and places it in
the current folder.
Format tab
• To save to a different file type and/or resolution, open the Format tab. You
can save as JPEG, GIF, or Bitmap.
• Depending on which format you choose, Quality and Color choices will also
be available. You can also save the new image at a different resolution if
desired.
Location tab
• To save the file to a different folder, open the Location tab and select the
folder.
• You can also change the filename in this tab prior to tapping the Crop button
to save the image to the new location.
Capture Settings...
The Capture Settings... command on the Tools menu allows you to set any of your
handheld's system buttons to act as a "capture" button. Then by simply pushing the
capture button that you have designated, whatever is currently displayed on your
handheld screen will be saved as an image file.
Initial setup
To set the preferences and attributes that will control the behavior of your Screen
Captures:
1 Tap Capture Settings... on the Tools menu, or its icon on the Toolbar.
2 Make sure the Enable Screen Capture check box is checked.
77
Page 90

6 Using third-party applications
IA Album LE
3 In the Perform Capture Using field, select the desired button or time-delay from the
drop-down list.
If you select a button, that button on your handheld will be used as your Screen
Capture button. The buttons in the drop-down list refer to the hardware buttons on
your handheld.
If you select a Delay Time value from the list, the screen capture will take place after
the chosen number of seconds passes.
4 In the File Resolution field, you can select a different pre-defined resolution from the
drop-down list box.
Your screen captures will be saved to the resolution you choose in this field. However,
you cannot change the resolution if you choose to save screen captures in the GIF
format.
5 Choose whether or not you want a Confirmation screen to appear each time you
create a screen-capture file.
By default, the Confirm Before File Saving check box is selected. If you remove the
check from this check box, the screen capture process will take place immediately with
no confirmation.
6 Choose whether or not you want to trigger a sound each time you perform a screen
capture. If so, check the Enable Capture Sound check box.
7 In the bottom half of the screen, a default name and default location for the screen-
capture file is automatically specified. The default location is the \My Documents
folder.
If you want to specify a different folder in which to save the screen-capture file, tap
the Change... button next to the Folder field and select the desired folder in the
screen that appears.
8 Likewise, if you want to specify a different filename prefix or suffix, tap the Change...
button next to the Filename field and make the desired change.
The name iasnap001 will be given to the first screen-capture file by default. The next
screen-capture file would be sequentially named iasnap002, etc.
9 By default, screen-capture files will be saved in the Bitmap (.bmp) format. You can
optionally choose to save screen-capture files in the JPEG or GIF format.
JPEG format is suitable for saving a screen on which a photo or video is displayed.
GIF can produce the smallest file size when used to store regular screen shots.
Specify the desired format in the Select the capture file format field. When finished,
tap OK in the upper right corner. This will return you to the previous screen.
10 Tap OK.
Capturing screens
• As long as the Enable Screen Capture check box is selected, and IA Album LE
is running (even in the background), you can perform a Screen Capture
anytime you want, just by pressing the "capture" button you have specified.
When IA Album LE is not running, the original function of that handheld
button will be restored.
• If the Confirm Before File Saving check box is checked in the initial Screen
Capture setup screen, a confirmation screen will appear and ask you to
confirm the filename and destination after you press your "capture" button.
78
Page 91

6 Using third-party applications
IA Album LE
Tap OK in the upper right corner of the Confirmation screen to save the file.
You can assign a new filename if desired.
• If the Confirm Before File Saving check box is not checked in the initial Screen
Capture setup screen, the filename prefix, suffix (format), and location you
specified earlier will be used to automatically save the file.
Send via Infrared...
• The Send via Infrared... command allows you to send the selected file to
another device via infrared beaming, without having to leave IA Album LE.
• After the receiving device has started its "Receive via Infrared" process, tap
Send via Infrared.... You will have approximately 30 seconds in which to line
up the infrared port of your handheld with the infrared port of the receiving
device.
Options...
Tapping Options... on the Tools menu, or its icon on the Toolbar, opens a screen that
contains settings for color dithering, auto-rotation, size of thumbnail images, and
your Home Folder.
• Color Optimization
The choices in the Color Optimization drop-down list are related to output
fidelity of the images displayed on your handheld. If you have an 8-bit, 12bit, or 16-bit color handheld, you should select the appropriate item from the
list so that IA Album LE can map the images to 16-bit, 12-bit, or 8-bit color
displays. This will enable IA Album LE to perform optimum dithering for you
in the event that an image contains a color not supported by your handheld
screen.
Automatic is the default setting, meaning that IA Album LE will do its best to
detect your Pocket PC's display capabilities according to the system, and
automatically optimise colors. None does not optimise any of the images'
colors. The image will be displayed without any modification if None is
selected.
• Auto Rotate
The Auto Rotate buttons control whether the intelligent 90-degree rotation
will occur to the Left or to the Right when in Full Screen view. This function is
activated when the Auto Rotate command on the View menu is selected.
• Thumbnail Size
The Thumbnail Size buttons control whether thumbnail images display in
Large or Small size when IA Album LE is in Thumbnail View or Select View.
The Small button is selected by default.
79
Page 92

6 Using third-party applications
Acrobat® Reader® for Pocket PC®
Acrobat® Reader® for Pocket PC
Acrobat® Reader® for Pocket PC® is a software that lets you view, Adobe Portable
Document Format (PDF) files from your handheld.
Acrobat Reader for Pocket PC includes two components that work together:
®
filter runs on the Windows platform. It prepares untagged
PocketTV
TM
• The ActiveSync
Adobe PDF files for the Pocket PC and transports them to your handheld.
• The Reader is the Pocket PC application, designed to accommodate the
characteristics of small-screen devices.
Acrobat
Adobe PDF files.
For more information about Acrobat
(http://www.adobe.com/products/acrobat/readerforppc.html/).
PocketTVTM allows you to playback standard MPEG-1 video files (i.e. extension .mpeg,
.mpe or .mpg) as well as MPEG-1 video elementary streams (i.e. video only, no audio),
with extension .m1v.
The program also supports .m1u files (MPEG-1 URL). These are text files that contain
the URL of an MPEG file. These files can be used to trigger streaming from web pages.
For more information, see (http://www.pockettv.com/html.html/).
®
Reader® for Pocket PC® allows you to choose between two ways to view
• One allows you to view the Adobe PDF file exactly as intended.
• The second utilises tagged Adobe PDF files, which provide the best reading
experience on handhelds because text and images can be easily reflowed to
fit the screen size.
®
®
Reader® for Pocket PC®, refer to
NOTE: PocketTV can be launched from the File Explorer, by tapping on an MPEG file.
Refer to the subsequent sections for a brief description of PocketTV’s men us and
commands.
80
Page 93

6 Using third-party applications
PocketTVTM
Command bar
The Command bar contains the usual media player commands including:
•Stop
•Play
•Pause
•Step
• Fast-forward
• Volume control
•Mute
• Repeat (loop)
• Open file
• Fullscreen/Landscape switch
PocketTV automatically detects the
screen orientation when a thirdparty Landscape driver is used
(JSLandscape or Nyditot Virtual
Display).
TIP: You can also tap on the video to switch
between normal mode and Fullscreen/
Landscape mode.
81
Page 94

6 Using third-party applications
PocketTVTM
Seek/Progress bar
Allows you to control display pace and shows the playback progress.
Status bar
Shows time information (estimated time elapsed, estimated total play time), fps
indicator (actual frames-per-second) and bit-rate indicator.
82
Page 95

6 Using third-party applications
Menu
Includes the following commands:
• Open File Select a file to open.
There are two possible ways to open a file depending
on whether the option
Options>Files>OpenWithTGetFile is selected or not.
If selected, you can open a file located anywhere,
otherwise it uses the standard Microsoft dialog which
only shows the files located in '\My Documents\' and in
one level of subfolders.
•Open URL Specify an http URL for streaming.
Built-in streaming protocols include http and ftp.
• Save Frame Capture and save the current frame.
The frame is saved in RGB 'Targa' format and can be
viewed or converted using the popular PQView image
viewer.
• Properties Show the file parameters.
PocketTVTM
• About Show copyright and registration information.
•Exit Terminate the application.
This is different from the (X) 'Smart Minimize' button,
which merely deactivates PocketTV and pushes it back
to the background.
Options
Includes the following commands:
• Audio Channels Stereo, Mono (left), Mono (right)
• Audio Quality High, Medium, Low
•Size Auto - fit screen if video is larger than screen
Nominal - fit screen if video is smaller than screen
Fit screen
Fill screen
83
Page 96

6 Using third-party applications
PocketTVTM
• Fullscreen 90 deg Left
• Color Opens the Color Adjustment dialog.
Files
Includes the following commands:
90 deg Right
Auto at Play - switch to Fullscreen when it starts playing
Always when Playing - links play mode with Fullscreen
You can adjust the Brightness (Gamma), Contrast, Color
(saturation) and color balance (red, green and blue
gamma).
There are options to set each individual value to neutral
or default (i.e. adjusted for optimum quality).
NOTE: The Default and Neutral options in the Colors
menu act on all the values.
• Play at Open File is in automatic playback mode when opened.
• Microdrive Additional buffering is use to reduce battery usage
when playing from a hard drive or Microdrive.
• Open with tGetFile Change the format of the Open File dialog.
• Save with tGatFile Change the format of the Save File dialog.
• Remember Last Last opened file before exiting PocketTV is
automatically on the next session.
• File Association Check file association.
NOTE: If PocketTV file association was modified by
another application, you have the option to restore it.
• Button Open the Hardware Button Mapping dialog box.
Any hardware button can be mapped to commonly
used PocketTV commands. Buttons can be individually
unmapped. Buttons that are not mapped keep their
normal shell mapping (e.g. start Contact application
etc.).
You can restore default mapping or clear all mapping.
Normal button mapping is restored when PocketTV is
deactivated
• Status Bar Show or hide the Status bar.
84
Page 97

6 Using third-party applications
PocketTVTM
• Fast Video If ON, PocketTV uses the GAPI library for direct access to
the display buffer for better performance.
• Dither If ON, PocketTV uses an advanced dithering algorithm
that improves video quality noticeably by removing
contouring/banding at no cost in performance.
NOTE: For more information on PocketTV usage and troubleshooting, see
(http://www.mpegtv.com/wince/pockettv/faq.html/).
85
Page 98

6 Using third-party applications
PocketTVTM
86
Page 99

7 Using expansion features
Using a Compact Flash type I/type II card
7 Using expansion
features
The slim and lightweight design of your Acer n10 belies the impressive expansion
features that it is capable of. These expansion features include the following:
• Integrated dual usage SD/MMC slot
• CF Type I/Type II slot
These expansion features allow you to:
• Install additional applications
• Increase storage capacity
• Perform backup procedures
NOTE: In using any peripheral device with your handheld, please refer to the
documentation accompanying each device for information on how to install and operate it.
Using a Compact Flash type I/type II card
On the top of your handheld is a Compact Flash type I/type II slot. This allows you to
install additional applications, expand your handheld memory, and perform data
backup/restore operations.
Refer to "Top view" on page 6 for the location of the CF slot.
For instructions on how to use a CF card to perform data backup, refer to "Backup/
Restore" on page 62.
Inserting a Compact Flash card
1 Hold your handheld securely.
2 Remove the dummy CF card from the card slot
87
Page 100

7 Using expansion features
Using a Compact Flash type I/type II card
3 Insert the CF card into the CF slot.
4 Push the card into the slot using your finger until you feel the card lock and hear an
audible system sound; this will signal that the card is already properly seated within
the slot.
Removing a Compact Flash card
1 Hold your handheld securely.
2 Gently remove the card from the slot.
3 When your handheld emts a two-tone beep you have properly removed the card.
Reinsert the dummy CF card to protect the connectors.
88
 Loading...