

Page 1

Acer MP-S10
User’s Manual
Ver 1.0
1
Page 2

Copyright
Copyright 2006 by Acer Inc., All rights reserved. No part of this publication may be reproduced,
transmitted, transcribed, stored in a retrieval system, or translated into any language or computer
language, in any form or by any means, electronic, mechanical, magnetic, optical, chemical, manual or
otherwise, without the prior written permission of Acer Computer GmbH
Disclaimer
Acer Inc. makes no representations or warranties, either expressed or implied, with respect to the
contents hereof and specifically disclaims any warranties, merchantability or fitness for any particular
purpose. Any software described in this manual is sold or licensed "as is". Should the programs prove
defective following their purchase, the buyer (and not this company, its distributor, or its dealer) assumes
the entire cost of all necessary servicing, repair, and any incidental or consequential damages resulting
from any defect in the software. Further, Acer Computer GmbH, reserves the right to revise this
publication and to make changes from time to time in the contents hereof without obligation to notify
any person of such revision or change.
All brand and product names mentioned in this manual are trademarks and/or registered trademarks of
their respective holders.
All brand and product names mentioned in this manual are trademarks and/or registered trademarks of
their respective holders.
2
Page 3

Contents
1. SAFETY DECLARATION................................................................................................................................................... 1
2. PRODUCT DESCRIPTION................................................................................................................................................. 1
2-1. MAIN FEATURES ............................................................................................................................................................... 1
2-2. BUTTON LOCATION........................................................................................................................................................... 2
2-3. PACKAGING/ACCESSORIES................................................................................................................................................ 3
2-4. INSTALLATION OF USB DRIVER ........................................................................................................................................ 3
2-5. USB CONNECTION AND SAFE REMOVAL........................................................................................................................... 5
3. FUNCTIONS ......................................................................................................................................................................... 5
3-1. BASIC OPERATION ............................................................................................................................................................ 5
3-2. MUSIC MODE.................................................................................................................................................................... 7
3-3.MOVIE MODE ..................................................................................................................................................................... 9
3-4. VOICE RECORDING ........................................................................................................................................................... 9
3-5.PLAYING RECORDED FILES .............................................................................................................................................. 10
3-6. E-BOOK FUNCTION ......................................................................................................................................................... 11
3-7.PHOTO ALBUM................................................................................................................................................................. 13
3-8.GAMES ............................................................................................................................................................................ 14
3-9.SYSTEM SETTING............................................................................................................................................................. 14
3-10. OTHER SETTING............................................................................................................................................................ 18
3-11. THE CONVERT TOOLS INSTALL....................................................................................................................................... 23
4. FOR DRM MUSIC DOWNLOADING............................................................................................................................. 26
5. TROUBLE SHOOTING..................................................................................................................................................... 28
6. SPECIFICATION ............................................................................................................................................................... 29
3
Page 4

1. Safety Declaration
I. Please carefully and thoroughly read this safely guide
II. Please keep this manual secure for future reference.
III. Please keep the unit dry.
IV. Please avoid exposing this unit to sunlight.
V. Don’t pour any liquid into this unit: otherwise it will cause damage or electric shock.
VI. Please contact with a professional for handing this: MP-S10 Player if the following situations
occur.
◆ Liquid penetrates into this unit
◆ The unit is affected by damp
◆ The operation of this unit is not normal, or the user can’t return to normal operational status
by consulting this manual
◆ The unit is dropped or is damaged
VII. Please don't use MP-S10 Player in the following situations:
◆ While driving a vehicle
◆ Carrying out dangerous work
◆ Walking on the street
◆ Any situation that needs full concentration
VIII. If you want to format the disk of MP-S10 Player, please select FAT to format it.
IX. Please don’t use liquid or spraying agent to clean this unit. Please use soft, wet cloth to wipe this
unit.
X. During listening with earphones, please adjust to suitable volume to avoid hearing from being
damaged.
XI. Note: Importer use of battery may cause explosion! Please correctly use the battery as per
instruction stated in Section: Battery!
XII. Don’t throw used battery into the waste bin, it should be recycled.
2. Product Description
The MP3 player is a new generation of digital portable device, supporting MP3/WAV music format,
digital recording, FM stereo radio (Depending on model), AMV format playing capability, JPEG
photograph browser and E-book text reading. Its perfect sound quality, great reliability and exquisite
appearance make it a highly usable and desirable accessory.
2-1. Main Features
● Exquisite Appearance - Unique appearance designed for comfort and handling
● Multi-Codec Player - MP1, MP2, MP3, WMA, AMV and WAV Music format
● Firmware Upgradeable - Upgradeable features via firmware upgrade from website
● Driver Free U Disk - Manage files directly through “Portable Disk” in “My Computer” on
Winows2000 Operating System (or above) without a driver.
● Record/ Replay - The player supports recording through a built-in microphone and saves as WAV and
ACT formats. Additionally, the digital A-B repeat or comparison replay function can be used for
language learning.
● 7 Preset Equalizer Settings - Natural, Rock, Pop, Classic, Soft, Jazz and DBB
● Multi-play Mode - Normal, Repeat One, Folder, Repeat Folder, Repeat All, Random, Intro.
● Power Off - Set Sleep Timer or Off Time mode
at your convenience.
1
Page 5
● GUI (Graphic User Interface) Menu - Vivid animation menu with corresponding characters for easy
and visual operation.
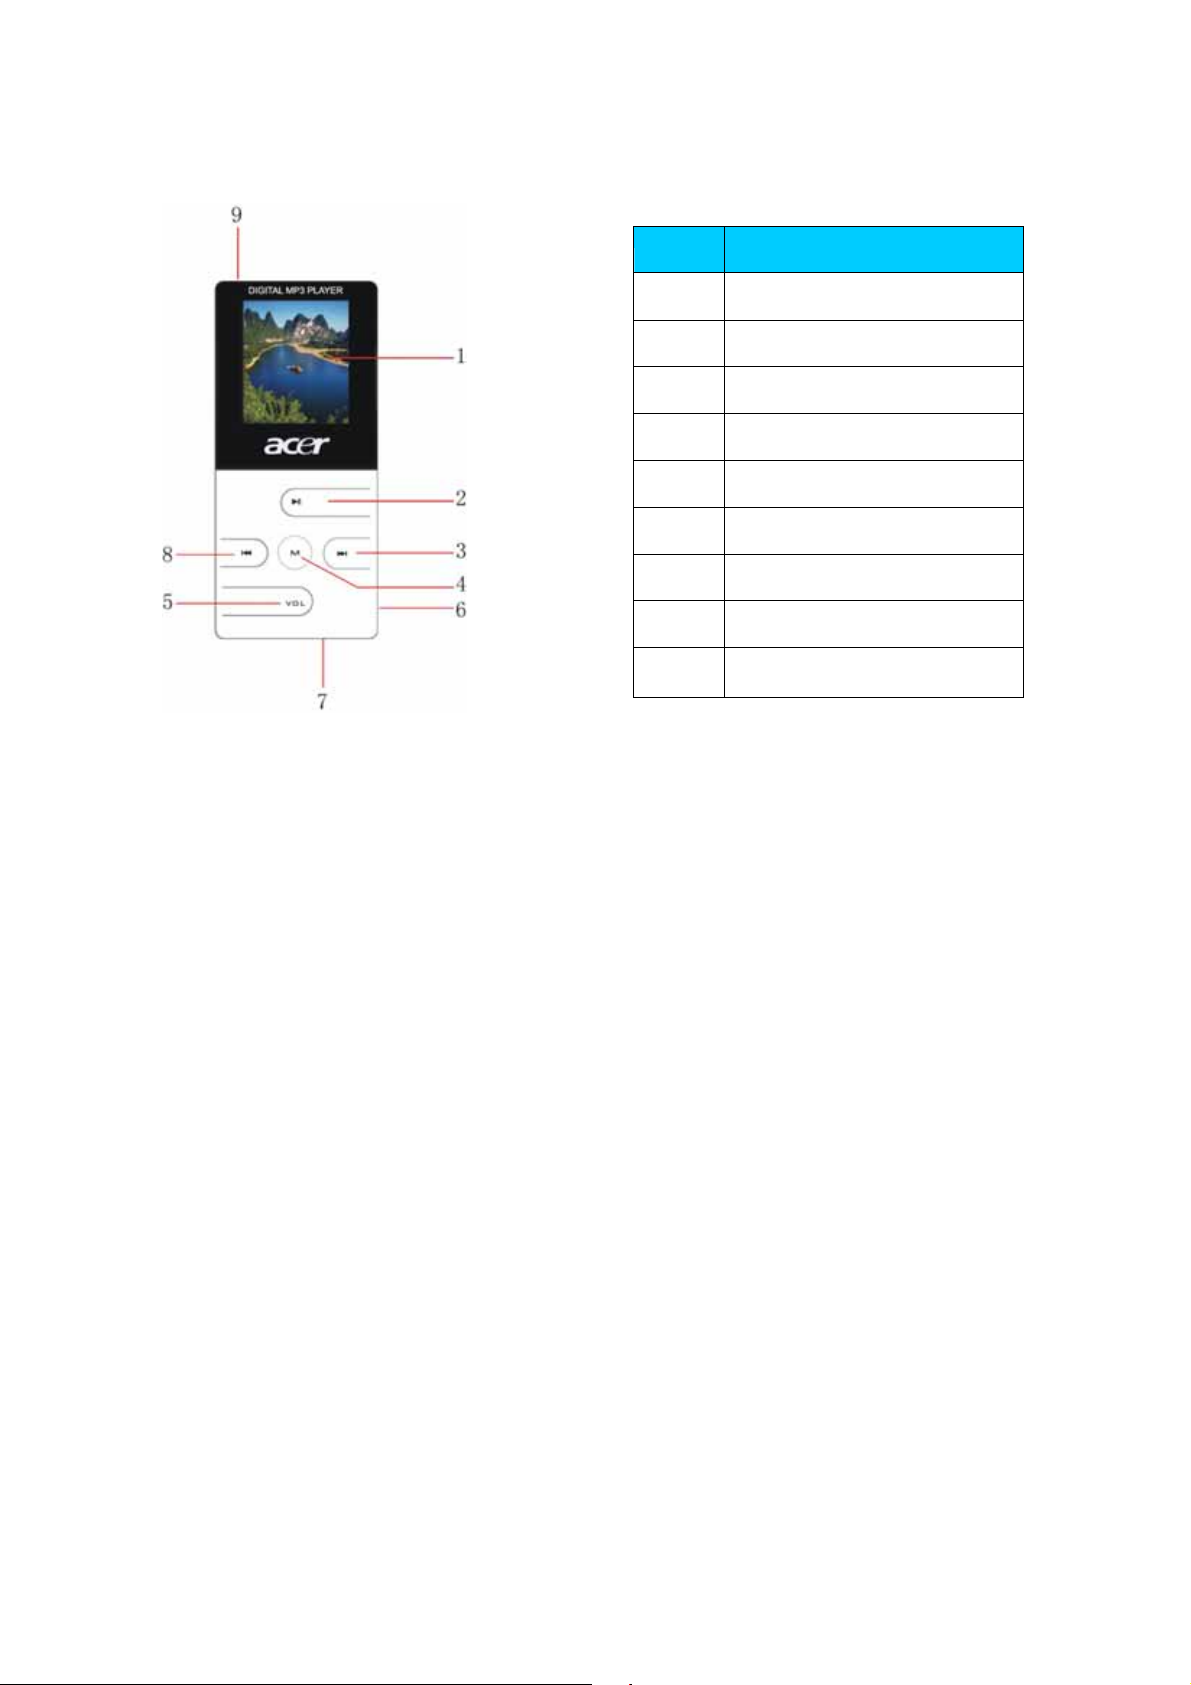
2-2. Button Location
S/N Description
LCD display
1
Play / Stop / ON/OFF button
2
Next track/Forward ()
3
MENU button
4
Volume control button (VOL)
5
Headphone jack
6
USB port
7
Previous track/ Rewind ()
8
9 Power switch
2-2-1. Keys and Switch
z Power switch key: push Power button to ON to power on the player and push it to OFF to power off
the player directly.
z Turn ON/Turn OFF/Play/Pause/Stop button: Long press to Power ON (when the Power button is
ON) or Power OFF, short press to play, pause and stop.
z Menu key: Under music mode or voice mode, long press to enter the main menu.
In the main menu, short press to confirm or enter the sub-menu.
In the sub-menu, short press to confirm current option or enter next submenu, and press and hold to
enter main menu.
z Right (Next) : In Music or Voice mode, short press to enter the next song and press and hold to
move fast forward. In sub-menu, press Right key to switch submenu.
z Left (Previous): In Music or voice mode, short press to enter the previous song and long press to
move fast backward. In sub-menu, press Left key to switch submenu..
z VOL key: Allow you to adjust the volume in the Music and Voice mode. Press VOL key to enter
volume control interface, and press right or next key to adjust volume.
Note: You can short press, long press or hold a key, where:
Short press: You press the key and release it in less than two seconds.
Long press: You press the key and release in more than two seconds.
Hold: You press the key and do not release it until the desired effect is achieved
2-2-2. PORT:
z USB: Standard USB port
z Earphone: Standard earphone jack
2-2-3. Recording
z Mic: input
2
Page 6

2-3. Packaging/Accessories
Please confirm the packaging and accessories have the contents below:
9 Acer MP-S10 Player
9 Installation CD
9 Earphone
9 Quick Star Guide
2-4. Installation of USB Driver
The installation is only needed for windows98 and windows 98 se computers. The steps are as follows:
Insert the accessory CD driver and it will work automatically. The interface shows as follows.
z Click <Install> in the AUTORUN to install Win98 driver.
3
Page 7

z Plug-in the MP-S10 device, the system will search the driver software automatically. Please Specify
a location to save the driver software. (The original location is C:\program Files\MP-S10\Win98
Driver)
z According to the following steps shown in the PC screen, then it will finish the installation of
Win98 Diver.
Confirmation of the installation of USB drive
Connect the player by the USB cable to the computer
Choose “Control Panel”, “System”, and enter “Device Manager”, it will show as follows:
Choose “Disk drives” and the installed USB drive will display
Attention: if it doesn’t show as upward, then please uninstall your USB drive and reinstall it.
4
Page 8

2-5. USB Connection and Safe Removal
The player supports standard USB disk function with operating system of Windows98 (driver needed),
Windows 2K and above (driver free), Mac OS 10.3 and above, Linux 2.4.2 and above.
The player’s power can be supplied through the USB cable. In waiting Mode, press MENU to activate
main menu, then select to enter desired mode.
Connecting to a PC: Power ON the player and plug in the USB cable to enter the following Mode 1.
The player will display the following modes when connected to a PC:
You should not disconnect the MP3 Player from the PC while it’s reading or writing, or else it will cause
your data lost.
1. Waiting:
2. Downloading: 3. Uploading:
2-5-2 . Safe Removal of USB from Your Computer
1) Select the Plug-n-play Device icon from the Windows Taskbar, right-click on it, and select Safely
Remove Hardware.
2) Select the hardware device you want to stop and click on the Stop button.
3) Select the drive you want to stop and click OK
4) Click Close to complete this process.
Caution: Failing to disconnect this product from your computer by the standard procedure may damage
this product.
3. Functions
3-1. Basic Operation
I. Turning ON/OFF
Turn on
c After pushing the Power button (OFF→ON), the player turns ON automatically and enters power ON
logo interface:
d When connecting the USB plug to PC, the player turns ON automatically enters USB mode.
e Long press the “PLAY” button to turn ON.
Turning OFF:
Long press the “PLAY” button to turn OFF
Push Power button to OFF to power off the player.
II. Entering Menu System
Pressing MENU button enters the menu system, including main menu (long press MENU button at
Stop state), submenu at Play state (press MENU button to enter) and submenu at stop state (press
MENU button to enter).
Browsing
5
Page 9

○Browsing music files or menu options:
Short press / button
○Fast forward or fast backward when playing:
Long press / button
Volume Control
In music mode and voice mode short press VOL buttons to enter the volume control interface and then
press the / button to adjust volume.
Play & Stop (Pause when recording)
Short press the PLAY button
III. Function Selection
In the main menu, you can select and enter different modes.
Main menu:
(Long press the
to enter)
button
MENU
Music mode: Movie mode: Record mode:
Voice mode: E-Book: Album: Game :
System setting System setting: USB mode:
Remark:
Long press MENU button to return to the main menu from the mode menu. When connecting the USB
cable to a PC, the Player will enter USB mode automatically.
6
Page 10
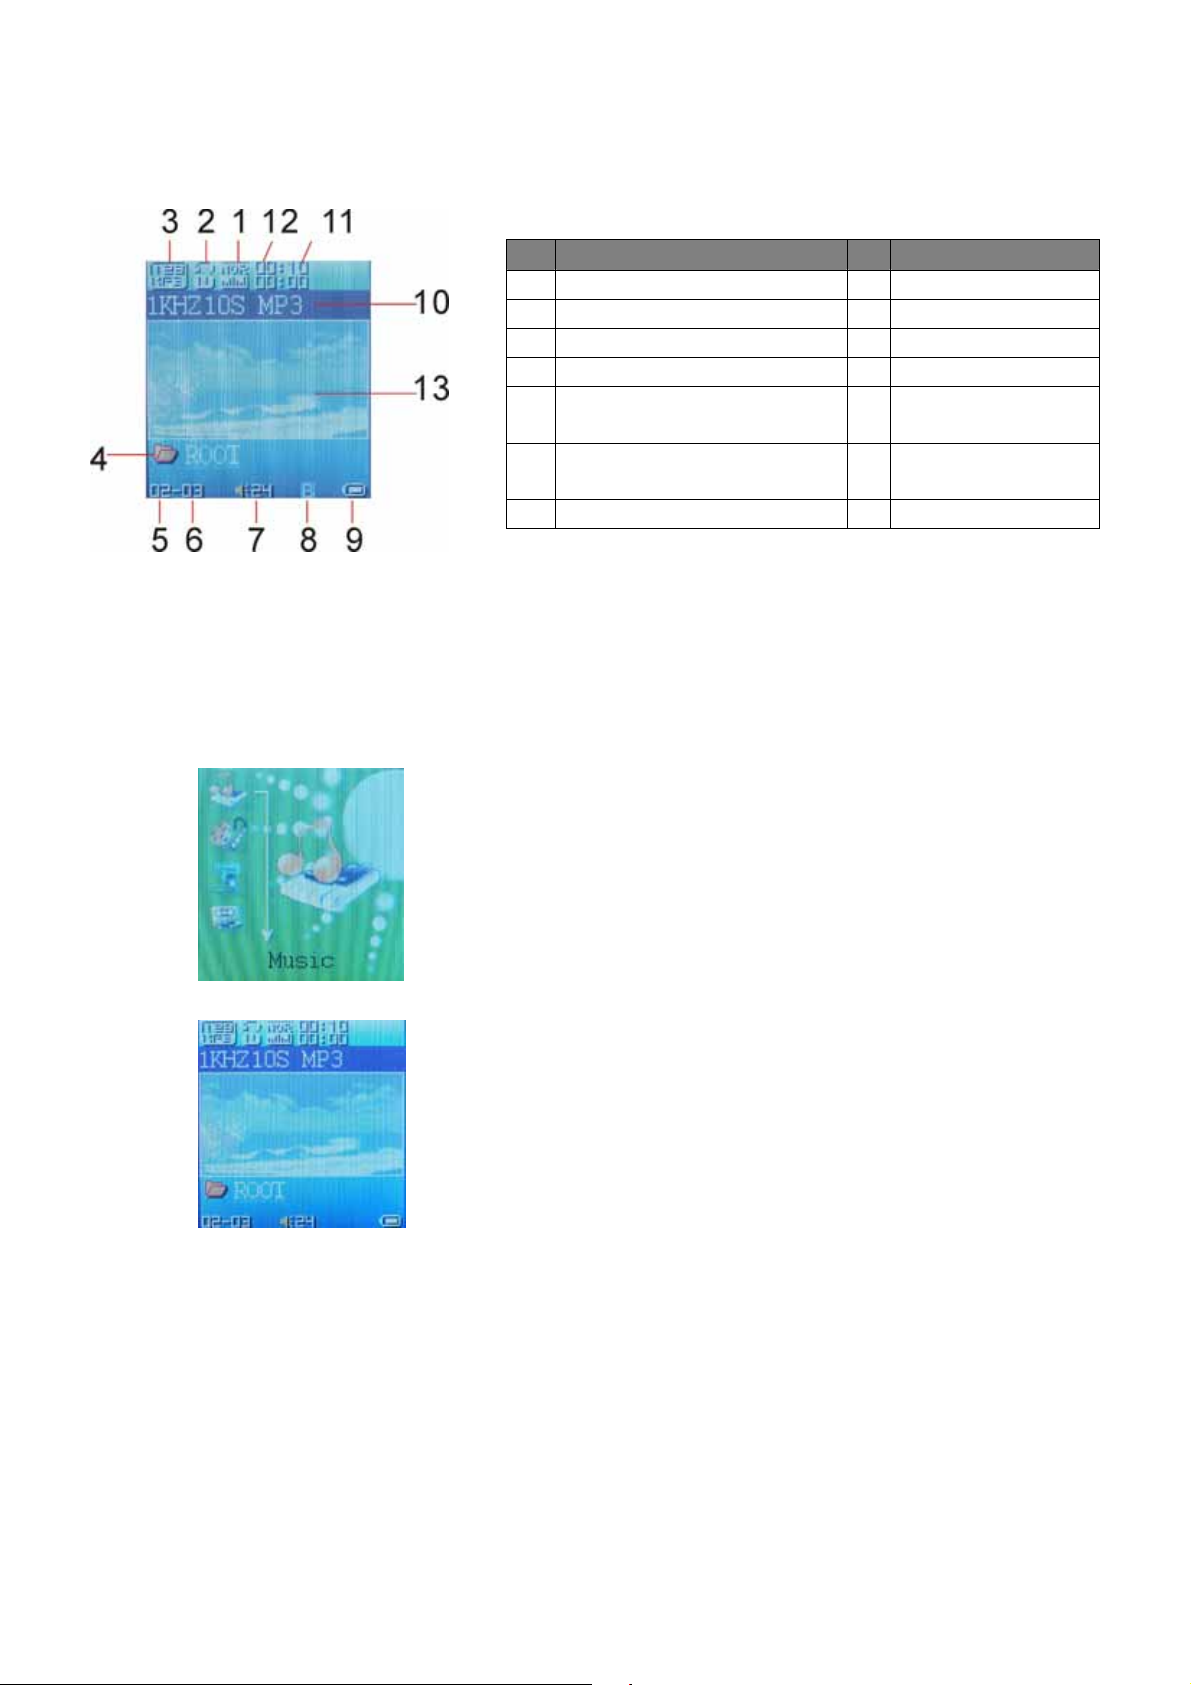
3-2. Music Mode
I. Interface Description
II. Basic Operations
Description S/N Description
S/N
EQ mode
1
Replay mode
2
File format / bit rate
3
Folder name
4
S/N of Current music/voice
file
5
Quantity of music/voice files
in current folder
6
Volume level indication
7
Lyric icon
8
Battery indication
9
ID3 information
10
Playback time
11
Length of time with
current music
12
Animation
Background logo
13
1. Connect the earphones to the player
2. Push POWERÆON to enter the main menu.
3. Long press PLAY button to power ON the player and enter the main menu.
4. Press MENU button to enter the Music mode.
5. Short press the PLAY button to play music.
6. Choose music:
button: previous music.
button: next music
7 Volume control:
Short press VOL button to enter volume control interface and then press / button to adjust the
volume.
7
Page 11

III. EQUALIZER Mode
1. While playing music, press the MENU button to enter Play Submenu:
2. Pressbutton to choose Equalizer option:
3. Press the MENU button to enter EQ selection menu.
IV. Lyric Display
This player supports “*.LRC” lyric files (user can download from http://www.51lrc.com), and lyrics
may be synchronously displayed with playing music.
y Using lyric files
Save the lyric file with the same name as that of the corresponding music file.
For example: Music file name: GiGi-Sky.mp3
Lyric file name: GiGi-Sky.lrc
y How to know whether the lyrics exist?
If the current song has a matching lyric file, the lyric sign will be display at the top of music
mode.
1. Current song has a matching lyric file.
2. Long press MENU to enter the Lyric Interface when playing.
3. Press MENU button to return to Music play mode.
V Battery
The player has a multilevel level battery monitoring system.
Indicates that the battery is charged fully. The bar will diminish with use.
Indicates low battery power. Charge your player in this status. When users see this icon on the LCD,
please connect the player to PC through the USB Cable, the PC will check the capacity of the battery
and charge it directly. When charging, the icon of the battery will flicker. After the battery has been fully
charged, the icon of battery will stop flickers.
Note: Charge the Player when it is unable to power ON. When charging, ensure that the power switch is
in the “ON” position. The unit will not charge unless it is so.
8
Page 12

3-3.Movie mode
1. Enter the main menu and press the / button to select “MOVIE” mode.
2. Press the MENU to enter.
3. Press the PLAY button to start playing AMV files.
4. Choose music:
button: previous file.
button: next file.
5. Volume control:
Short press the VOL button to enter volume control interface and the press the / button to adjust
volume.
3-4. Voice Recording
Ensure that the battery icon is not indicating “low battery”.
The player is able to save 99 recording files under each directory.
I. Recording in Record Mode
1. In the main menu, press the / button to choose recording mode.
2. Press MENU to enter Record mode
3. Press Play to start recording.
9
Page 13

4. Press Play again to pause recording
5. Press Play to continue recording.
6. Long press Play to stop recording.
II. Selecting REC type
1. In the record mode stop interface, press MENU to enter record submenu:
2. Press / button to select ‘REC type” option
3. Press MENU to enter this option
4. Press / button to select desired recording type
REC type:
5. Press MENU to confirm the type selected
6. Press PLAY button to start recording
Note: Voice control means when the microphone detects No sound the player pauses recording
automatically.
3-5.Playing Recorded Files
1. In the main menu, press / button to choose “Voice mode”
10
Page 14

2. Press MENU button to enter Voice mode interface and press PLAY button to start playing.
3. Choose music
button: to choose previous record file
button: to choose next record file.
4. Volume control
Short press the VOL button to enter volume control interface and the press the/ button to adjust
volume.
3-6. E-Book Function
This function supports all TXT file.
1. Enter the main menu, press / button to choose“E-Book”
2. Press MENU button to enter TXT file. If there is no text file, the display shows “No files” on the
OLED)
3. Press / button to select desired text file to read. Press Play button to enter text interface e.g
4. Press / button to turn the pages in sequence(only suitable for ”Manual play”)
11
Page 15

z Play set
1. At the text file menu
2. Press MENU button to enter the submenu of text file that you would like to select:
3. Press / button to choose “play set” option:
4. Press MENU button to enter this option:
5. Press (button to choose “Manual play” or “auto play” options. Press MENU button to confirm.
6. Choose the “auto play” option and then enter the interface as follows:
7. Press / button to adjust “auto play” speed. Press MENU button to confirm.
Remark: When playing picture, long press MENU to fast exit from picture interface and return to the
main menu. Additionally, press Play button to exit from picture interface.
12
Page 16

3-7.Photo Album
This function supports all JPEG format pictures
1. From the main menu, press / button to choose the “Album” option:
2. Press the MENU button to enter picture selection menu (if there are no pictures, the display shows
“No files” on the OLED).
3. Press / button to choose desired picture and press Play to display:
4.Press / button to browse pictures in sequence(only suitable for ”Manual play”).
z Play Set
1. Form the picture menu, press MENU key to enter picture submenu,
2. Press button to select the “play set” option:
13
Page 17

3. Press MENU to enter the following interface:
4. Press (button to choose “Manual play” or “auto play” options, press MENU button to confirm.
5. When choosing “Manual play” options, enter this interface as follows:
6. Press / button to adjust “auto play” speed. Press the MENU button to confirm.
Remark: when viewing pictures, long press MENU to fast exit from picture interface and return to the
main menu. Additionally, Pressing Play will exit from the picture interface.
3-8.Games
The object of Minesweeping is to locate all the mines as quickly as possible without uncovering any of
them. If you uncover a mine, you lose the game.
Game view:
Buttons explained:
MENU button: enter game/uncover a square
Button: right
Button: left
VOL: down
PLAY button: inset red flag (dig mine).
Remark: You can uncover a square by clicking it. If you uncover a mine, you lose the game.
If a number appears on a square, it indicates how many mines are in the eight squares that surround the
numbered one. To mark a square you suspect contains a mine, press the PLAY button to inset red flag.
3-9.System Setting
System parameters can be set here. Every option varies according to firmware upgrade level.
From the menu, press / to select “System setting”:
14
Page 18

Press MENU to enter System Setting interface as follows:
I. Parameter(s) Introduction
System Time: Set the date and time when recorded files are saved.
LCD set: Set the period of time (in seconds) when Backlight stays on without any operation.
Language: Select the language under this mode.
Power off: Set a fixed time after which the player turns OFF automatically.
Replay mode: Set working states on Replay mode.
Online device: Select the USB device mode and set the MP3 player as a Media Transfer Protocol
Device
Online Mode: An option especially designed for “Private Space” function.
Memory info.: Show memory capacity and percentage utilized.
Animation: Set alternative animation picture during the power ON process.
Background: Set alternative animation background picture in the playing interface.
Firmware Version: Show firmware version.
Firmware Upgrade: For firmware upgrading.
Exit: Exit from current interface.
II. Instruction
“System time” set
1. System Setting Interface
2. Press MENU to enter System Time Interface.
15
Page 19

3. Press Play to set time in sequence of “YY-MM-DD”
4. Push / button to adjust numbers
5. Press MENU to confirm and exit.
“LCD set” setting
Operating steps are as follows:
1. From System Setting interface:
2. Press key to select “LCD set” option:
3. Press MENU to enter the “LCD set” submenu:
4. Press (button to choose and press MENU to confirm and enter ‘interface adjustment’, as follows
(e.g. Black):
(
5. Press (/( button to adjust time(Unit:second),and press MENU to confirm and exit.
Brightness
Set light and shade contrast of CSTN screen
Darkle mode
Set fixed period of time (unit: second) so that when no key operation is performed, the players screen
will darkle automatically after the set period of time has elapsed. If “0” is selected, the function is
invalid.
16
Page 20

Black mode
Set fixed period of time (unit: second) so that when no key operation is performed, the players screen
will turn black automatically. If “0” is selected, function is invalid.
“Language” Setting
Operating steps are as follows:
1. From System setting interface, press / button to select “Language” icon:
2. Press MENU button to enter “Language” setting interface:
3. Press / button to select desired language.
4. Press MENU to confirm to exit
Power Off
For the operating steps refer to Language setting (above).
Off Timer mode provides the facility that… after a set, fixed period of time (unit: second) elapses, when
no key operation is performed (in Stop mode), the player will turn off automatically to save power. If
“0” is selected, the power saving function is invalid.
Sleep Timer provides the facility that… after a set, fixed period of time (unit: minute) elapses, the player
will turn off automatically no matter which mode it is in. This function is specially designed for listening
to music before sleep.
Note: Setting of Sleep Timer is valid only once and the set time will be cleared after power OFF. To use
this facility again, the time needs to be set again.
Replay Mode
For Operating steps refer to Equalizer Setting
Manual Replay means that in A-B Replay Mode the endpoint B can only be set manually.
Auto Replay means that in A-B Replay Mode the endpoint B sets automatically. (Especially for English
Reading files without music).
Online Device:
USB Device: Set the MP3 player as a USB Mass Storage Device.
Media Device: Set the MP3 player as a Media Transfer Protocol Device, transfer music files only by
synchronization of Microsoft© Windows Media player 10. If you want to transfer music files with DRM,
you should set the MP3 player to Media Device mode. Then you can synchronize music files by
Windows Media Player 10.
Online Mode
For Operating steps refers to Equalizer setting.
Some operating systems (under Windows 2K SP4) cannot support two driver letters in one USB disk.
Thus, if “Private Space” function is on, choose the which disk you are going to use, i.e., “single ordinary
disk” or “single encrypted disk” in order for correct display of selected disk after connecting to PC.
Memory Info.
The number displayed represents total memory capacity and the percentage refers the capacity utilized.
Animation
There are three animation pictures be selected to display when turn on the player.
For operating steps refer to Language Setting
Background
There are three animation pictures that can be selected to display during play.
For operating steps refer to Language Setting
Firmware Version
17
Page 21

The Firmware Version information that the player uses can be obtained here.
Firmware Upgrade
The Player has been specially designed so that it is Firmware Upgradeable.
DRM Time:
Set DRM Time. The operation is same as set system time. If the DRM time is wrong, the music files
with DRM will not display.
3-10. Other Setting
I. Select Folders (At Stop Submenu)
Users can save files in different folders (folders should be created on PC in advance), to manage and
play files according to different types. The player supports eight-level subdirectories.
1. In Stop interface (Current example is in Music Mode although folders can be selected in Record mode,
Voice Mode, JPEG Album and E-book.)
2. Press MENU to enter Stop Submenu.
3. Press MENU again to enter Select Folder interface.
18
Page 22

4. Press / buttons to choose folder.
5. Press MENU to enter the next folder. Press the PLAY button to confirm the folder to be selected.
Select the “\” folder and then press the MENU button to return to previous folder.
Note: Independent folders can be set at corresponding modes i.e. Music Mode, Record Mode, Voice
Mode, JPEG Album mode and E-book mode. Three modes are not bound to correspond with the same
folder.
II. Delete File (At Stop Submenu)
Files can be deleted in the corresponding modes: Music Mode and Voice Mode
1. In the stop interface.
2. Press MENU button to enter stop submenu:
3. Press buttons to choose “Delete” option.
19
Page 23

4. Press MENU button to enter Delete file folder:
3. Press MENU button to enter Delete file folder submenu
6. Press button to choose “Delete” or “Delete all” and Press MENU button to confirm and deletion
begins
Remark:
“Delete All” means to delete all the relevant files in the current mode from the current folder. (For
example, in Music Mode executing “Delete All”, all the music files in current folders will be deleted,
while recorded files will not be affected).
The deleting interface is much simpler in FM Mode (Depending on model). Follow the above table to
rd
step. It is the saved stations that can be deleted.
the 3
Note:
When deleting files on PC, please take care to eject the player safely before pulling out USB cable,
otherwise files may not be deleted.
III. Play Mode (Play Submenu)
When playing music and recorded files, different play modes can be selected.
Press play/stop key enter Submenu.
The first option in Play Submenu is Normal Play Mode. The player will play files according to the mode
selected
Normal: Play files in current folder in normal sequence and then play other files in next folders one by
one.
Repeat One: Play a single music file repeatedly
Folder: Play all music files in current folder in sequence and stop
Folder All: Play all music files in current folder repeatedly
Repeat All: Play all music files repeatedly
Random: Play music files in current folder randomly
Intro: Play the first 10 seconds of each music file
in sequence in the current folder.
20
Page 24

IV. Tempo Rate (Play Submenu)
When playing music (MP3 format only) or recorded files, different tempo rate can be set (faster or
slower) without changing the tone and sound.
1. When playing music
2. Press MENU button to enter Play Submenu as follows:
3. Press button to choose Tempo Rate option:
4. Press MENU button to enter Tempo Rate interface as follows:
5. Press button to quicken tempo rate and press button to reduce tempo.
V. Replay Mode
A-B Replay
① In Music or Voice Mode
21
Page 25

② Press MENU to enter Play Submenu.
③ Press to select “Replay”
④ Press MENU key to enter “Replay”.
“A” flickers in Replay Mode icon and start point is set
⑤ Press to set “A”.
⑥ Press to set “B”.
After “A” is set, “B” flickers in icon , and endpoint B needs to be set.
The Replay icon is fixed and A-B segment replay begins. When replay times count up to times
(set in advance), the player will quit from Replay Mode. In Replay Mode, pressing can set “A” again
to select another segment. Setting of replay times can be accessed in “Replay Times” from the submenu.
Follow Read (This function does not exist in Voice Mode)
① While replaying A-B segment, Press to enter Follow Read Mode.
② The Replay icon changes to Follow Read icon , and starts recording the sound of the user.
The recording time is as long as the A-B segment.
22
Page 26

③ After recording, the icon changes to , and the original sound is played. Press button to enter
Comparison.
Note: In this mode, pressing button returns to A-B Replay Mode.
Comparison (This function does not exist in Voice Mode)
① Enter this mode and the Replay icon changes to and the original sound is played.
② After playing the original sound, the icon changes to , and the recorded sound of the user is
played.
③ After playing the original sound, the recorded sound is played again. The whole procedure will not
stop (without limitation by Replay Times) until MENU is pressed to exit.
Note:
In this mode pressing will return to Follow Read Mode.
In the three modes above, pressing Mode will exit from Replay Mode directly.
Replay Times (Play Submenu)
For operating steps refer to Backlight setting.
Replay times mean that after A-B segment has been replayed up to fixed times; it will exit from Replay
Mode.
Replay Gap (Play Submenu)
For operating steps refer to Backlight setting.
The replay gap is the break period between different playing times (unit: second).
3-11. The convert tools install
1. Insert your CD into CD-ROM, and then it will appear the following window
2. Click the Utility button, the picture as following:
23
Page 27

3. Click the button; it will jump to this picture
4. Select the file which the audio file that this tools can support
5. Selected file and confirm, then it will appear the following picture
6. Select the path where the file will convert finished
24
Page 28

7. Click button, it will start convert
8. Finish converting file.
9. You can play it in your player
Remark: The format of converting tooling of the player is AMV, and the format that can be converted
directly is MPEG, DAT and WMV.
25
Page 29

4. For DRM music downloading
To operate DRM10.0, OS is required: Windows XP + Server Pack 1, Windows Media Player 10.3646
(WMP10) or above.
Note:
① At first please turn on the new player before downloading DRM10 songs.
② If you do not use the player for a long time, you should turn on the player before downloading
DRM10 songs.
WMP10 adopts MTP(Media Transfer Protocol) to download licensed music from website. And
Synchronize the music to the MP3 player. Users much use the Synchronization function of WMP10 to
download DRM songs.
Connect MP3 with PC.
Run WINDOWS Media Player, and run SYNC function
Add DRM song to the Sync List. (Just drag the DRM song to the SYNE LIST)
Press Start Sync
26
Page 30

(Synchronizing…)
After finished (as follows), pull out the MP3 directly
Now the Media database and License will begin to be loaded to the MP3 automatically.
27
Page 31

Picture as follows:
a).Loading:
b) .Loading finished and license renewed:
c) .Loading failure: (only in the failure condition)
d) .Low battery: (only in the low battery condition)
After synchronization DRM songs, users need to set the DRM time in SYSTEM SETTING if users’
operation system is XP or lower (Details please see 3.5.12 DRM Time)Ⅰ
If users’ operation system is XP or above, then userⅡ s do not need to set the DRM Time
5. Trouble Shooting
z Problem: No sound is heard from the headphones.
Solution: Check whether Volume is set to “0” and connect the headphone plugs firmly.
Check whether the headphone plug is dirty.
Corrupted MP3 files may make a static noise and the sound may cut off. Ensure that
the music files are not corrupted.
z Problem: Characters in OLCD are corrupted
Solution: Check whether the right language has been selected.
z Problem: Download of music files fails.
Solution: Check whether USB cable is not damaged and is connected properly.
Check whether driver is installed correctly.
Check whether the player’s memory is full.
28
Page 32

6. Specification
Dimension 39*89*7mm
Weight 43.5g
LCM Window 26*28mm
PC connection
Memory 128MB, 256MB, 512MB, 1GB, 2GB
Battery
Record
Recording format
Recording time
MP3、WMA、WMV、ASF
MP3 bit rate 8K bps – 320K bps
Frequency response 20Hz to 20KHz
SNR 85dB
Distortion
FM radio (Depending on
model)
Stations saved
Max output of headphone
SNR 45dB
Music format
Working temperature -5 to 40 ℃
Operating System
USB2.0(FS) (Read: 1000K Byte, Write: 1000-900K Byte)
Max Play time: 10 hours
Sample rate 8KHz
WAV 、ACT、MP3
35 hour(ACT,128M Flash)
Max output of headphone
WMA、WMV、ASF bit rate
Receiving frequency range
(L)10mW+(R)10mW(32Ohm)
5K bps – 384K bps
76MHz – 96MHz / 87MHz – 108MHz
20+20
(L)10mW+(R)10mW(32Ohm)
MP1、MP2、MP3、WMA、WMV、ASF、WAV
Windows98/SE/ME/2K/XP、Mac OS 10、Linux 2.4.2
Note: Product design and spec may change without notice.
29
Page 33

http://www.acer-euro.com
30
 Loading...