

Page 1

Acer MP400
User’s Manual
Ver 1.0
Page 2

Copyright
Copyright 2006 by Acer Inc., All rights reserved. No part of this production may be
reproduced, transmitted, transcribed, stored in a retrieval system, or translated into any
languages or computer language, in any form or by any means, electronic, mechanical,
magnetic, optical, chemical, manual or otherwise, without the prior written permission of
Acer Computer GmbH.
Disclaimer
Acer Inc. make no representations or warranties, either expressed or implied, with respect
to the contents hereof and specifically disclaims any warranties, merchantability or fitness
for any particular purpose. Any software described in this manual is sold or licensed “as is”.
Should the programs prove defective following this purchase, the buyer (and not this
company, its distributor, or its dealer) assumes the entire cost of all necessary servicing,
repair, and any incidental or consequential damages resulting from any defect in the
software. Further, Acer Computer GmbH, reserves the right to revise this publication and to
make changes from time to time in the contents hereof without obligation to notify any
person of such revision or change.
All brand and product names mentioned in this manual are trademarks and/or registered
trademarks of their respective holders.
Page 3

Contents
I Safety Declaration 2
II Product Description 2
1. Main Characteristics 2
2. Product Distribution Diagram 3
3. Packed Accessories 3
4. Battery Charge 4
5. Connection of External Interface 5
6. Use of Remote Controller 5
7. USB Drive Installation 6
8. Disk Directory Management 8
9. Safe Movement and Removal 8
III Basic Functions 9
1. Main Menu 9
2. Video Play 10
3. Music Enjoyment 11
4. View Picture 13
5. E-book 15
6. Viewing and Recording of External Programs 17
7. File Operation 18
8. Menu Setup 21
9. Firmware Upgrade 25
IV FAQ 26
V Product Specifications 27
1
Page 4

I Safety Declaration
1. Please carefully and thoroughly read this safety guide.
2. Please keep this manual secure for future reference.
3. Please keep the unit dry.
4. Please avoid exposing this unit to sunlight.
5. Don’t pour any liquid into this unit, otherwise it will cause damage or electric shock.
6. Please contact with a professional for handling this MP400 Player if the following
situations occur:
Liquid penetrates into this unit
The unit is affected by damp
The operation of this unit is not normal, or the user can’t return to normal
operational status by consulting this manual
The unit is dropped or is damaged
7. Please don’t use MP400 Player in the following situations:
While driving a vehicle
Carrying out dangerous work
Walking on the street
Any situation that needs full concentration
8. Please don’t use liquid or spraying agent to clean this unit. Please use soft, wet cloth
to wipe this unit.
9. During listening with earphones, please adjust to suitable volume to avoid hearing
from being damaged.
10. Note: Improper use of battery may cause explosion! Please correctly use the battery
as per instruction stated in Section: Battery!
11. Don’t throw used battery into the waste bin, it should be recycled.
II Product Description
Thank you for purchasing this Acer MP400 product. This kind of product is a
high-performance portable multimedia recorder and player with Li-Polymer battery. With the
use of Acer MP400 product, you can play video or music files with different formats, which
will bring you outstanding visual and music experience. And you can record music and
video signals. This kind of product is also portable USB storage equipment and you can
store and manage your personal data.
1. Main Features
Display – Supports 3.5’’ TFT LCD large screen display. Clearly displays picture and
video files.
Video Play – Supports the playing of video files with the formats of MPEG-4 SP, Xvid,
and WMV-9 SP@ML.
Due to constant changes and the variety of encoding and compression methods for
different video file format, some of the video files downloaded from Internet may not be
properly displayed on MP400. Even if the file follows “MPEG4” format, the file may still
not be able to display by MP400 properly due to special format characteristics.
Music Play – Support the playing of music files with the formats of MP3 (MPE G1 Layer2,
Layer3), and WMA (WMA 9).
Lyric Synchronization – Supports the synchronous display of sound and lyrics(Unicode)
Image V iewing – Support s the J PEG/BMP/GIF file format. You can copy images into the
MP400 for viewing.
Text File Reading – Supports .txt (Unicode) text reading function (e-book function).
Recording – Supports the recording function of video、music and speech. You can use
2
Page 5

the unit to record video、music signals from external sources.
AV Input and Output – Supports AV input function. You can enjoy television programs
through the large screen of MP400. Also supports AV output function, and you can
transfer video and music signals of the MP400 to external devices (such as television).
USB 2.0 Interface – Supports USB 2.0 High-Speed and Full-speed operation.
SD/MMC Card Slot – Supports Extended SD/MMC Card.
Battery – In-board chargeable Li-Polymer battery, which can repeatedly charge the
battery.
Video Format Conversion – You can convert unplayable video files into playable format
through video format conversion software.
Multi-Languages –Supports many languages, including simplified Chinese, traditional
Chinese, English, French, German, Italian, Dutch and Spanish
Firmware upgrade – Support firmware upgrade.
2. Button Location
1 Dc In 7 Power 13 Up
2 Earphone 8 TV/Hold 14 Enter
3 Av In 9 VOL - 15 Down
4 Av Out 10 VOL+ 16 MIC
5 USB connecter 11 Menu 17 Power Led
6 SD/MMC Card Slot 12 Esc
3. Packaging / Accessories
Please confirm the packaging and accessories have the contents below:
9 Acer MP400 Player
9 User’s Manual
9 Power Adapter
9 Installation CD
9 AV Cable
9 USB Cable
9 Stereo earphones
9 Pretection cover
3
Page 6

4. Charging of Battery
This section includes: charging of battery, and the use of external power adapter.
4.1 Power Volume Indication
Battery is fully charged Battery is partially drained Battery is drained
Note: If the power volume indication of battery shows only one block or is empty, it
indicates the power supply is obviously lacking, please charge the battery.
4.2 Charging of Battery
You can use the external power adapter to charge the battery. The charging can be
performed when the power of MP400 Player is on or off. The detailed charging method is as
follows:
1) Connect the power cable with the power adapter.
2) Insert the DC plugs of power adapter into the DC input port of MP400 Player.
3) Insert the power plug into the power socket.
4.3 Use of External Power Adapter
You can use external power adapter to supply directly power for MP400 Player. The
operation method is the same with the battery charging method.
5. Connection of External Interface
1) Connect Television for viewing
Use AV cable to connect to AV out socket of MP400 Player and input socket of signal of
television.
2) Connect Television for Recording
Connect the output socket of signal of television set and AV input socket of MP400
Player through AV cable.
3) Connection of Music Device
Insert the AV cable into the AV input socket of MP400 Player. Connect the music signal
(left/right) of AV cable through “Y” type cable. Insert other end of Y type cable into the
output socket of music device.
4
Page 7

4) Connection of Computer
Use USB cable to connect the MP400 Player with computer, for data transfer.
5) Connection of Stereo Earphones
Insert the stereo earphones into the corresponding socket of MP400 Player.
6. Installation of USB Driver
USB driver only needs to be installed for Windows98/se operation system. The installation
steps are as follow:
1) Insert the accessory CD into the CDROM and it will work automatically. The interface
shows as follows.
2) Click <Install>, and finish the installation of the drive with clues. The restart of the
computer is needed afterward.
Confirm the USB driver has been installed.
1) Turn on the power of MP400 and use USB cable to connect with computer.
2) Select [Control Panel / System / Device Manager]. The following interface is to be
displayed;
3) Select the Universal serial bus controllers and the installed USB driver will be displayed;
Note: If the USB driver hasn’t been displayed as per the above, please uninstall the USB
drive and reinstall it.
5
Page 8

7. Disk Directory Management
1) When the host machine is normally connected with the computer and the storage
device such as SD/MMC card has inserted in the removable disk, the removable disk
icon will be displayed in [windows explorer]. There are six directories, [video]、[music].、
[photo], [Ebook], [VideoRecorder] and [AudioRecorder];
Note: Please don’t delete manually such default directories as [video], [music], [photo],
[Ebook], [VideoRecorder] and [AudioRecorder] under the root directory of removable disk
because the deletion of such directories will result in the abnormal operation of this product.
If these directories above have been deleted unintentionally, please re-open these
directories after this unit is shut off, and the MP400 Player will automatically establish such
directories for you.
2) Please store these files into the corresponding directories as per their types.
Music directory: Music file
Video directory: Video file
Photo directory: Picture file
Textbook directory: Electronic book
Video Recorder directory: Video record
Music Recorder directory: Music record
8. Safe Deletion from Computer
1) Select the icon of [plug and play device] in the task column, click right key and select
[safely delete hardware];
2) Select the hardware device needing to be stopped, and click [Stop] button;
3) Select the drive needing to be stopped, and click [Confirm] button;
4) Click [Close] button to finish the entire operation;
Note: Abnormal interruption of the connection of this product with the computer may cause
6
Page 9

damage to this product.
9. Power on / Power off
1) Power on: Hold down the power key for 3 seconds, and the screen will display the
power on logo of Acer. It will enter into the interface of main menu.
2) Power off: Hold down power key for 3 seconds, and unit will turn off.
III Basic Functions
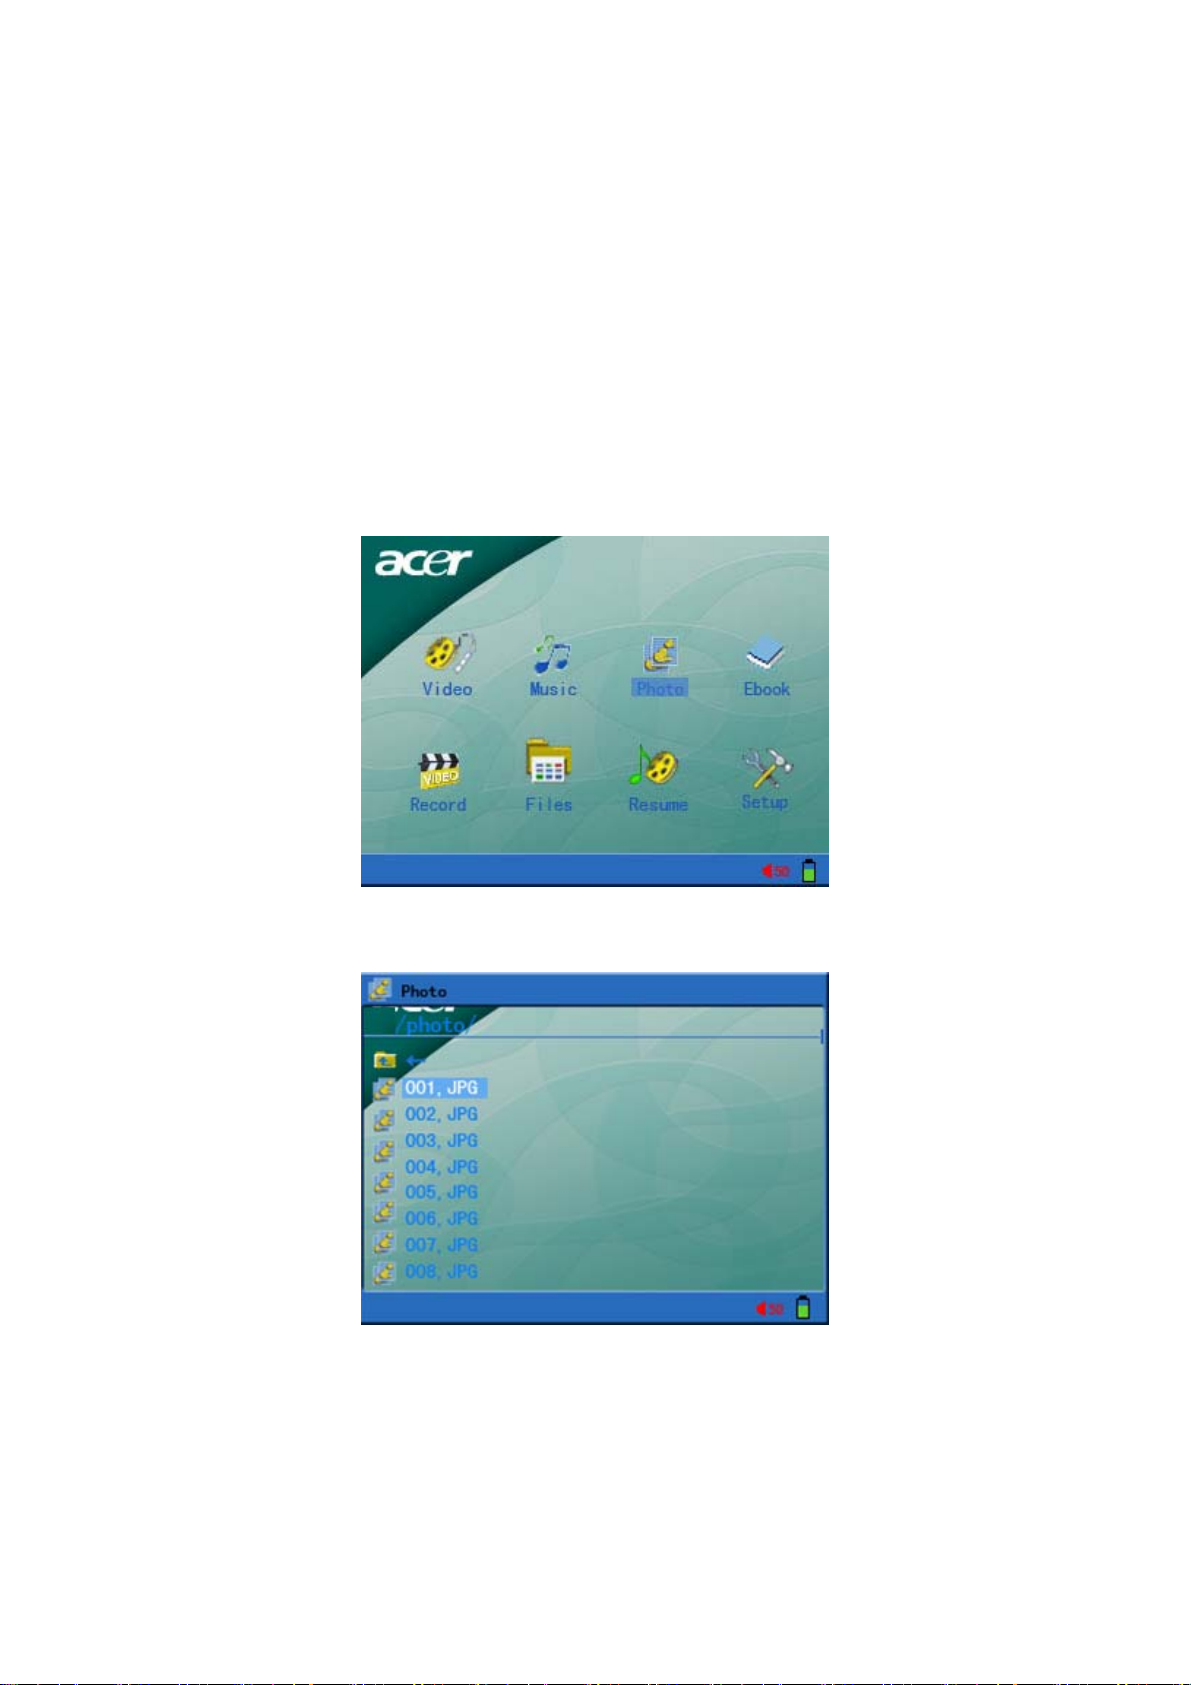
1. Main Menu
After the unit is turned on, the main interface will be displayed on the screen (as shown in
the below figure). Several icons are displayed on the main interface: video, music, photo,
e-book, record, files, resume and setup. Press three-direction key to select your desired
functions (up, down), and press three-direction(Enter) key to confirm, and enter into the
corresponding operational interface. Press TV/Hold key for long time to turn on the function
of locking keyboard, and re-press TV/Hold key for long time to turn off the function of
locking keyboard.
2. Video Play
1) Select video function on the main interface and press three-direction(enter)key to
confirm, and enter into the interface of video file list.
7
Page 10

2) Press “menu” key to call up the file operation menu. The detailed operation method is
shown in the description in the file operation section.
a. Desktop: Select “Desktop” to go back to the main interface.
b. New, copy, move, delete and rename: Refer to file operation description.
c. Information: Open or close the file information column.
3) In the video file list interface, use ‘up” or “down” keys to select your desired video file
and press “Enter” key to start play.
4) During the playback of video, you can perform the following operations:
a. Press ‘Esc” key to stop playback and back to the video file list or long press “ESC”
for 3 second to return to the main menu.
b. Press “VOL -” or “VOL +” keys to adjust the volume of video play.
c. Press “Enter” key to pause playback, and press “Enter” to resume playback.
d. Press “up” or “down” keys to play previous file or next file.
e. Press “up” or “down” keys and hold for over 2 seconds to rewind or fast forward and
enable a search with the playtime/progress bar, release the key to resume playback.
f. During the playback of video, press “menu” key to display the icons of function
menu.
(Pause, fast forward, rewind, next, previous, repeat mode, and ratio of width and
height)
(Repeat mode: single repeat, repeat in directory)
(Ratio of width and height: 4:3, 16:9, original dimension display, full
8
Page 11

screen display)
Note: Use “up” or “down” keys to select the menus above and use “Enter” key to
confirm.
g. During selection of the functions of fast forward or rewind in the above menu, you
can use “down” or “up” keys to change the rate of fast forward or rewind (X2, X4, X8,
X16), and press “Enter” key to resume normal playback.
Note: The fast forward or rewind is performed while the video is playing. This
function will help you to select precisely your desired playing position.
h. This machine has an auto-recording function. If you quit while playing a video, the
player will record the current position. When you want to start playing the video from
where you stopped last time, you can select Resume in the main menu.
3. Music Enjoyment
1) Select “Music” function in the main interface and press “Enter” key to confirm, and to
enter into the interface of music file list.
2) Press “menu” key to call up the menu of file operation, and the detailed operation
method is stated in the description of file operation section.
9
Page 12
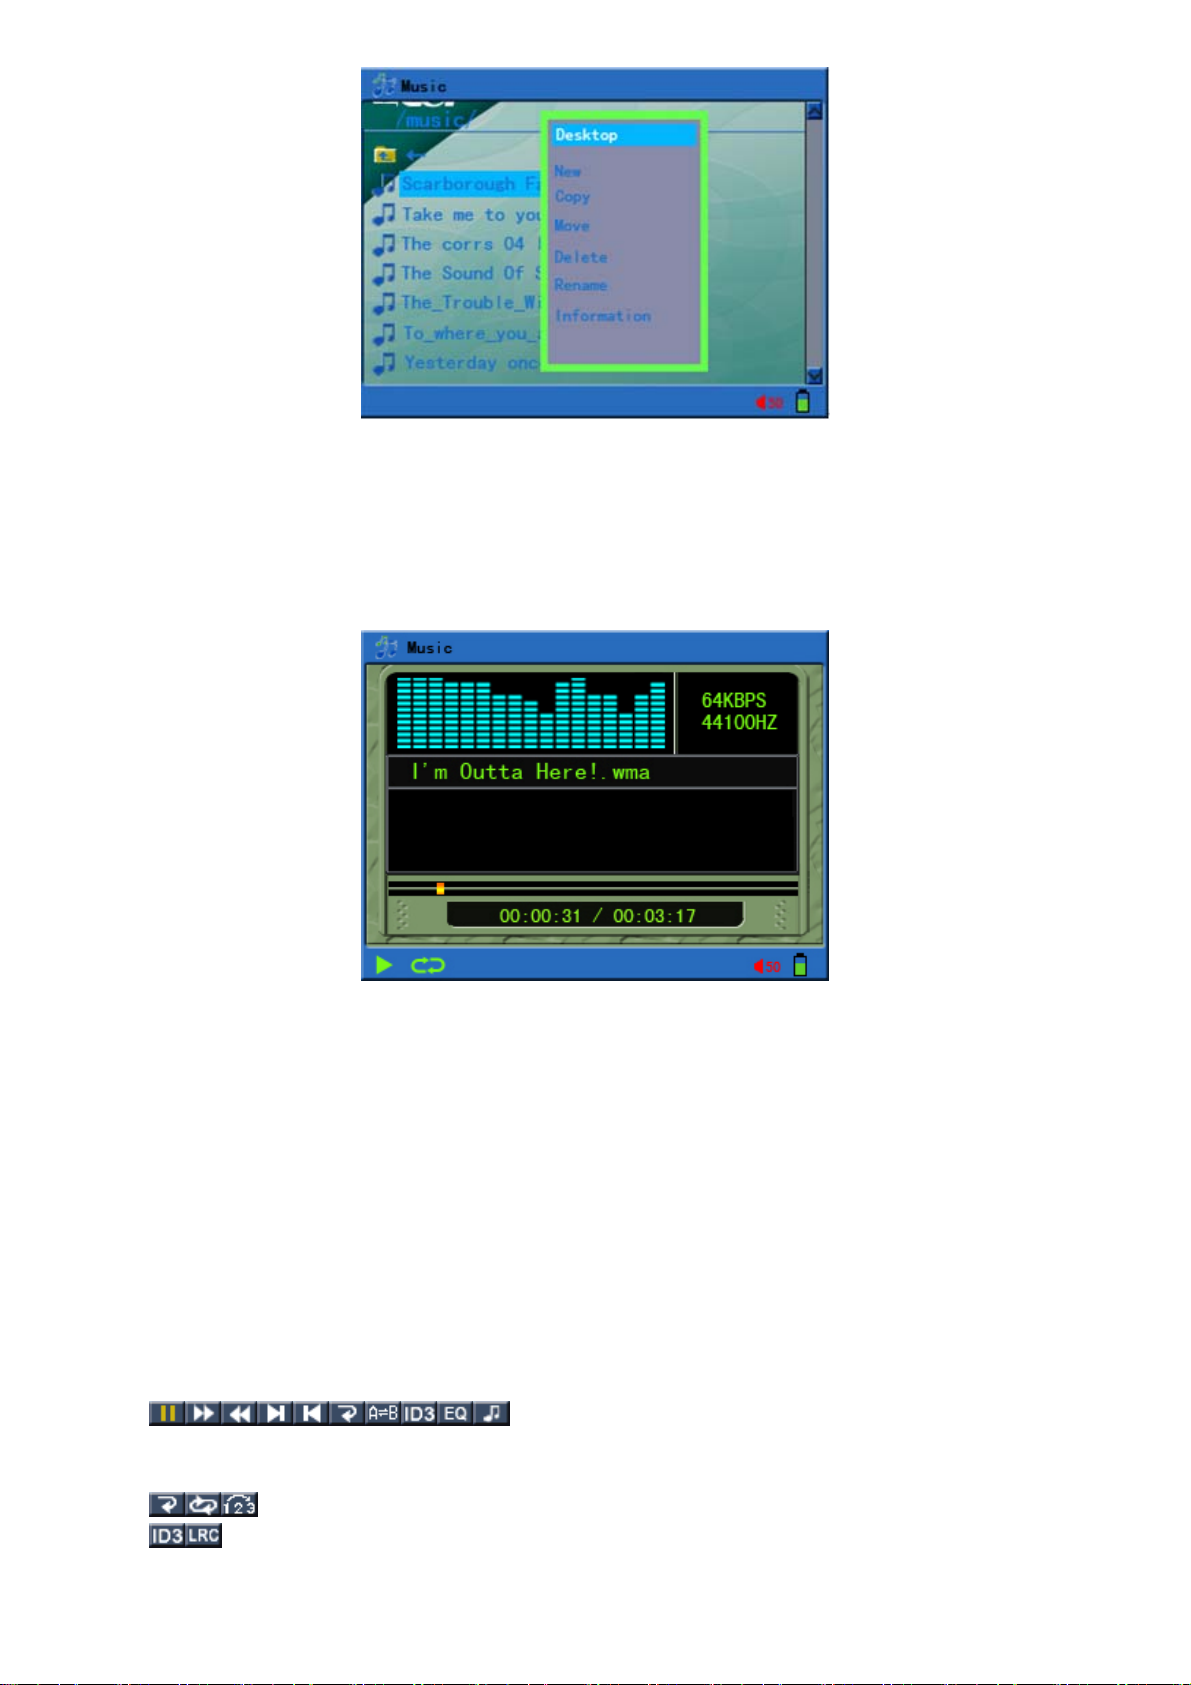
a. Desktop: Select “Desktop” and return to the main interface.
b. New, copy, move, delete and rename: Refer to file operation description.
c. Information: Open or close the file information column.
3) In the interface of music file list, use “up” or “down” keys to select music file, and press
“Enter” key to confirm. Unit will enter into the music play interface, and start to play
music.
4) During music playback, you can perform the following operations:
a. Press “Esc” key to stop playback and return to file directory list or long press “ESC”
for 3 second to return to the main menu.
b. Press “VOL -” or “VOL +” keys to adjust the volume of music playback.
c. Press “Enter” key once to pause the playback, and press “Enter” again to resume
playback.
d. Press “up” or “down” keys to play previous file or next file.
e. Press “down” or “up” keys and hold for over 2 seconds to fast forward or rewind and
enable a search with the playtime/progress bar. Release the key to resume
playback.
5) During the Music playback period, press “menu” key to pop up the icon of music function
menu:
(Pause, fast forward, rewind, previous, next, repeat mode, A-B repeat reading, ID3
information, EQ function, and background music)
(Repeat mode: Single repeat, repeat in directory, and random play)
(Music ID3 information, and display of LRC lyric)
10
Page 13
Note: Use “down” or “up” keys to select the above menu, and use “Enter” key to confirm.
Press “Esc” or “Menu” keys to resume normal playback.
6) During music playback period, the LRC file of lyric shall be Unicode encoding format,
and the file name of lyric shall be in conformity with the file name of song.
7) Select background music playback from the above menu, and the music will continue to
play on return to the upper level window.
8) This machine has an auto-recording function. If you quit while playing music, the player
will record the current position. When you want to start playing the music from where
you stopped last time, you can select Resume in the main menu.
4. View Photos
1) Select “photo” function in the main interface and press “Enter” key to confirm, and to
enter into the interface of photo file list.
2) Press “menu” key to call up the file operation menu and the detailed operation method is
shown in description of file operation section.
11
Page 14

a. Desktop: Select “Desktop” and return to the main interface.
b. New, copy, move, delete and rename: Refer to file operation description.
c. Information: Open or close the file information column.
3) In the interface of photo file list, use “up” or “down” keys to select picture file, and press
“Enter” key to confirm, and start to view photos.
4) During photo viewing, you can perform the following operations:
a. Press “Esc” key to stop photo viewing and return to file directory list or long press
“ESC” for 3 second to return to the main menu.
b. Press “up” or “down” keys to display the previous photo or next photo.
5) During photo viewing, press “menu” key to pop out the picture function menu:
(Next, previous, view mode, setup as background, left rotation 90°, right rotation 90°,
zoom out, zoom in, picture display mode, nine pictures, background music)
(View mode: Slide display, pause of slide display)
(Picture display mode: Four pictures, nine pictures, and one picture)
a. You can use the above menu to open or close the slide function. You can setup the
display interval of slide in the setup menu.
b. Desktop Background: Select “setup as background” function in the above menu, and
the current picture will be set as desktop background. In the MP400, the stored
pictures can be set as desktop background by using such function.
c. Under the condition that the picture is zoomed out, use “up”, “down” keys to move
the picture and press “Enter” key to exit the zoomed out status.
d. Select Background Music in the above menu to change background music and
continue to view the pictures.
Note: If you want to play picture and music synchronously, unit will first play music and
select background music in the menu.
5. E-book Reading
12
Page 15

1) Select “E-book” function in the main interface and press “Enter” key to confirm, and to
enter into the interface of E-book file list.
2) Press “menu” key to call up the file operation menu and the detailed operation method is
shown in the description of file operation section.
a. Desktop: Select “Desktop” and return to the main interface.
b. New, copy, move, delete and rename: Refer to file operation description.
c. Information: Open or close the file information column.
3) In the E-book file list interface: Use “up” or “down” keys to select E-book, and press
“Enter” key to open and display electronic book on the screen.
13
Page 16

4) During the electronic book reading period, you can perform the following operations:
a. Press “up”, “down” keys to page up and page down the viewing pages.
b. Press “Esc” key to quit electronic book reading and return to file list or long press
“ESC” for 3 second to return to the main menu.
If the viewing pages of electronic book are over 10 pages, press “Esc” key to return
to the display of the dialogue box “Save bookmark?” Selecting “yes” will save, and
selecting “no” will not save bookmark.
5) During reading of electronic book, press “Menu” key to pop up the function menu.
(Previous file, next file, background music)
Select Background Music in the above menu to change background music (if the
viewing pages are greater than 10 pages, the bookmark will be automatically saved).
Note: If you want to play the e-book and music synchronously, unit will first play music
and select background music in the menu.
6) The supported file formats in the e-book are as follows: *.txt, and the file encoding is
Unicode.
6. Viewing and Recording of External Programs
Before powering on this unit, please use AV cable to connect the AV input connector of
MP400 Player, and AV output connector of A/V device, respectively.
1) Program Record:
a. In the main interface, select “Record” and press “Enter” key to confirm that it has
entered into the recording interface.
14
Page 17

b. Select the “RecKind”: “Video”, “Audio” (only records music) with signal input, and
speech (only recorded by microphone), and press “Enter” key to confirm.
c. Select “Quality”: HighQ, MediumQ, and LowQ, press “Enter” to confirm.
d. Select ”Start” ,press “Enter” to start recording and repress “Enter” to preview mode.
e. Select “Preview”: Only preview the input signal, but no recording.
f. Select “T ime” , Use “up” or “down” to set timetable(year、month、day、hour、minute)
and press “Enter” to confirm.
g. Press “Esc” key to stop the recording, and close MP400 and remove AV cable or
long press “ESC” for 3 second to return to the main menu.
h. During recording, you can select “Preview” function (press “Enter” key) to stop the
recording, but the playback function is still active at that time. Press “Enter” key to
continue the recording. Such function will allow you to preview while nothing is
being recorded.
2) Video Output Function:
a. Please use AV cable to connect the AV output connector of MP400 Player and AV
input connector of A/V device, respectively, to enjoy the large-screen video and
stereo music. (For the connection, please refer to the User’s Manual of AV device).
b. Turn on the MP400 Player and TV or stereo music device, and set up the MP400 for
normal video or music playback. Eventually press “TV/Hold” key (don’t press it for a
long time), the video will convert into TV display, and music will convert into stereo
music device output. Pressing “TV/Hold” key again will stop AV output, and resume
the display of MP400 Player.
Note: The setup of MP400 TV device shall be in conformity with the setup of TV during
video output period. (The MP400 TV Setup is shown in setup menu, and TV Setup of
TV is shown in User’s Manual of TV device.)
7. File Operation
15
Page 18

1) In the main interface, select “file” and press “Enter” key to confirm that unit has enter
into the file directory list interface. You can store the data file or music or video files in
storage device (such as SD/MMC card).
2) Use “up” or “down” key to select the file or folder you want to access, and then press
“menu” key to call up the file operation menu.
a. Desktop: Select “Desktop” and return to the main interface.
b. View: Select “view” to enter into the selected directory . (i f the folder is selected, such
operation will appear in the menu).
c. New Folder: Select “new” option. The name character list will appear after selection.
Press “Menu” key to store after the folder is named, and the new folder is OK.
d. Copy: Select the file or folder you want to copy, press “menu” key to call up the
operation menu, select “copy” and press “Enter” key to confirm, then press “Menu”
key under the objective directory to call up the operation menu, select “paste”, the
window “Do you paste?” will appear, selecting “YES” will start the pasting, and
16
Page 19

selecting “NO”, it will not paste. (If the file is selected, such operation will appear in
the menu.)
e. Move: Rest the cursor on the file or folder to be moved, press “Menu” key to call up
operation menu, select “move”, the hint “Do you move?” will appear at that time.
Select “Yes”, and press “Menu” key under the objective directory to call up operation
menu. Select paste, the hint “Do you Paste?” will appear, then select “Yes” or “No”.
f. Paste: Used during the operations of copy and move.
g. Delete: Rest the cursor on the file or folder to be deleted, press “Menu” key to call
up operation menu, select “delete”, and hint “Do you delete?” will appear at that time.
Select “Yes” or “No”.
h. Rename: Rest the cursor on the file or folder to be renamed, press “Menu” key to
call up operation menu, select “rename”, and the name character list will appear at
that time. Use direction key to select character, and the middle button of square key
will confirm the input. Press “Menu” key to store name, and pressing “Esc” key will
exit and will not perform rename operation.
i. Information: Open or close file information column.
8. Setup Menu
1) Select “Setup” in the main interface, and press “Enter” key to confirm, and to enter
system setup interface. Long press “ESC” for 3 second to return to the main menu.
2) System setup menu includes the following content:
a. Display: This menu setup item includes backlight brightness, text color, focus text
color and focus color.
Backlight Brightness: To setup the backlight brightness: 10% (10% of full
brightness), 20% (20% of full brightness)…100% (full
brightness).
17
Page 20

Text Color: Color of unhighlighted text. Color values from 001 to 255.
Focus Text: Color of highlighted text. Color values from 001 to 255.
Focus Color: Color of highlight bar. Color values from 001 to 255.
b. Power Setup: This menu setup item includes backlight setup and power off.
Backlight Setup: No operation in non-working state, the player will automatic shut off
of the LCD backlight.
0~255 seconds are available, and 000 will disable this function(default 20 sec).
Power Off: No operation in non-working state ,the player will automatic shut off.
0~255 min are available, and 000 will disable this function(default 10 min).
c. System Setup: This menu setup item includes setups of language, TV Standard,
system information and factory defaults.
Language: To setup the interface language as eight languages such as simplified
Chinese, traditional Chinese, English, German, French, Italian, Spanish and Dutch.
TV Standard: To setup the formats of television: PAL/NTSC.
System Information: To check the company information, production information, soft
revision, remaining capacity.
Factory Defaults: To reset to original factory settings.
18
Page 21

d. Play Mode Setup: This menu setup item includes picture interval time and music
playback mode.
Picture Interval Time: To setup automatic view interval of picture, 001~255 seconds
are available.
Music Play Mode: To setup music play mode, three modes such as random play, all
loop, and single loop.
9. Firmware Upgrade
You can download the firmware with new revision, and you can upgrade this product
through the following steps.
1) Visit homepage of Acer Company (Http://www.acer-euro.com) and download the
latest firmware file of this product.
2) Connect this product with the computer through USB cable.
3) Copy the latest firmware file to the root directory in the removable disk of MP400
Player.
4) Normally disconnect the connection between this product and the USE cord of
computer.
5) Restart this unit and the upgrade of this product will finish automatically.
Note: Please ensure the power capacity is enough before upgrade. If the power is
interrupted during the upgrade process, this product may suffer serious damage. So,
connect the power adapter before upgrade to ensure a continuous power supply.
19
Page 22

IV Frequently Asked Questions and Solutions
This section will provide solutions for some common problems during the use of this
product. Please read this section to see if it can resolve the existing problems. If they can’t
be resolved, please contact with customer service.
1. Question: The unit can’t be turned on, and the LCD doesn’t display any information.
Answer: Please confirm if the battery needs to be charged.
2. Question: The keys don’t work.
Answer: 1) Check if LCD will display “hold” message;
2) If the “hold” message is displayed, please press “TV/Hold” key for 2 seconds
to turn off lock function.
3. Question: When selecting the television as output mode, the television picture shakes or
the picture can’t be normally displayed.
Answer: When using television to view, please firstly setup correctly the [tv standard]. (In
China and Europe, please use [pal], and in Korea, please use [ntsc].
4. Question: Sudden power off
Answer: 1) Please check the [power off] setup in the [setup] of main menu interface;
2) Please check if the battery power is low, if so it should be charged.
5. Question: LCD screen suddenly powers off
Answer: Please check if “TV/Hold” key is pressed and screen conversion has begun.
6. Question: Doesn’t play video, music and picture files.
Answer: 1) The file format shall be within the supporting scope of this product;
2) Please confirm if the file format belongs to the format supported by this
product, and if the correct play mode is selected.
3) If the file format is not within the supported scope, please use the format
conversion software to convert the file format into the supporting format.
7. Question: There is no sound, or volume is too low during the playback of video and
music.
Answer: Please confirm if the volume is too low . Change the volume through the volume
adjusting key.
8. Question: The image is too small during video playback or picture view.
Answer: 1) The image of recorded video file is too small.
2) The self-dimension of picture file is too small.
20
Page 23

V Product Specifications
Category Parameter Specifications
System
Built-in Storage
File Management
File System
User Interface
Key Definition
Language
File View Mode
Power Supply
Switching
Adapter
Battery
Playback Time
Power Saving
Display
Interface
Resolution
Brightness
View Angle
AV Input /
Recording
Video
Music
Speech
AV Output
Video
Music
Earphone
Firmware
DSP
Upgrade
USB 2.0 Device
General
Dimensions
Weight
Operation
Temperature
SD / MMC Card
Single file copy & paste, File/ Folder deletion,
Rename and Folder Creation
FAT 16/32
Power, TV/Hold, VOL+, VOL-, Menu, Esc,
three-direction key(up, down, enter)
Multi-language Menu and Filename Display
List View & Icon
AC 100-240V in, DC 5V, 2A output
Rechargeable Li-Polymer 3.7V/1200mAh
Video: 4 hours, Music: 6.5 hours (average)
Auto Power off, Screen saver
3.5” TFT LCD
320×240 (RGB) Pixels
Backlight Adjustable
Up: 10deg, Down: 30deg
Left: 45deg, Right: 45deg
CVBS (PAL/NTSC)
Line in Stereo
Built-in Microphone
TV Line out (PAL/NTSC)
Line out Stereo
30mW, 320hm, 1 outlet
System Auto Upgrade when Update File
available
USB 2.0 /USB 1.1 interface
Operation System:
Windows98/98SE/ME/2000/XP
Mac OS 9.0 and Later
86.6×73.6×18.8 mm
133.8g
0℃ to 40℃
21
Page 24

Supported File Types And Functions
File Type Description
MPEG-4(*.ASF,
*.AVI)
MPEG-4(*.MP4)
Video
XVID (*.AVI)
WMV9 (*.WMV or
*.ASF)
Decoding
MP3 (*.MP3)
Music
WMA (*.WMA)
JPEG (*.JPG)
MPEG-4 Simple Profile 720*480 @ 30fps
2-channels MPEG-1 & 2 Layer3(MP3)
Video Bit rate Up to 4Mbps
MPEG-4 Simple Profile 720*480 @ 30fps
2-channels MPEG-4 AAC-LC
Video Bit rate Up to 4Mbps
Up to 640*352 @ 30fps, MPEG-1&2 Layer
III
Video Bit rate Up to 3.5Mbps
WMV9 SP@ML 352*288 @ 30fps, WMA9
L2
Video Bit rate Up to 4Mbps
Minimum Support 10fps
MPEG-1&2 Layer III, sample rate up to
48KHz , Bit rate:24-320Kbps , CBR&VBR,
2-channels
WMA8/9 ,sample Rate up to 48KHz ,Bit
rate :32-384Kbps,CBR , 2-channels
Baseline YUV and Grayscale (No
progressive)
Up to 3264*2448 Pixels for HDD
Encoding
Image
Video
Music
GIF (*.GIF) Static; Up to 1000*1000
Monchrome,8-bit
BMP (*.BMP)
Indexed-Color ,RGB ,RLE8
Up to 1400*1050
ISO MPEG-4
(*.ASF)
320*240 @ 30 fps, MP3 Stereo
2 Channels : 16KHz ,32Kbps
MP3 (*.MP3)
24KHz , 64Kbps
32KHz , 96Kbps
22
Page 25

http://www.acer-euro.com
 Loading...