

Page 1

Acer MP400
User’s Manual
Ver 1.0
Page 2

Copyright
Copyright 2006 by Acer Inc., All rights reserved. No part of this production may be
reproduced, transmitted, transcribed, stored in a retrieval system, or translated into any
languages or computer language, in any form or by any means, electronic, mechanical,
magnetic, optical, chemical, manual or otherwise, without the prior written permission of
Acer Computer GmbH.
Disclaimer
Acer Inc. make no representations or warranties, either expressed or implied, with respect
to the contents hereof and specifically disclaims any warranties, merchantability or fitness
for any particular purpose. Any software described in this manual is sold or licensed “as is”.
Should the programs prove defective following this purchase, the buyer (and not this
company, its distributor, or its dealer) assumes the entire cost of all necessary servicing,
repair, and any incidental or consequential damages resulting from any defect in the
software. Further, Acer Computer GmbH, reserves the right to revise this publication and to
make changes from time to time in the contents hereof without obligation to notify any
person of such revision or change.
All brand and product names mentioned in this manual are trademarks and/or registered
trademarks of their respective holders.
All brand and product names mentioned in this manual are trademarks and/or registered
trademarks of their respective holders.
Page 3

Contents
I Safety Declaration 2
II Product Description 2
1. Main Characteristics 2
2. Product Distribution Diagram 3
3. Packed Accessories 3
4. Battery Charge 4
5. Connection of External Interface 5
6. Use of Remote Controller 5
7. USB Drive Installation 6
8. Disk Directory Management 8
9. Safe Movement and Removal 8
III Basic Functions 9
1. Main Menu 9
2. Video Play 10
3. MÚSICA Enjoyment 11
4. View Picture 13
5. E-book 15
6. Viewing and Recording of External Programs 17
7. File Operation 18
8. Menu Setup 20
9. Firmware Upgrade 21
IV Frequently Asked Questions and Solutions 26
V Product Specifications 27
1
Page 4

I Safety Declaration
1. Please carefully and thoroughly read this safety guide.
2. Please keep this manual secure for future reference.
3. Please keep the unit dry.
4. Please avoid exposing this unit to sunlight.
5. Don’t pour any liquid into this unit, otherwise it will cause damage or electric shock.
6. Please contact with a professional for handling this MP400 Player if the following
situations occur:
Liquid penetrates into this unit
The unit is affected by damp
The operation of this unit is not normal, or the user can’t return to normal
operational status by consulting this manual
The unit is dropped or is damaged
7. Please don’t use MP400 Player in the following situations:
While driving a vehicle
Carrying out dangerous work
Walking on the street
Any situation that needs full concentration
8. Please don’t use liquid or spraying agent to clean this unit. Please use soft, wet cloth
to wipe this unit.
9. During listening with earphones, please adjust to suitable volume to avoid hearing
from being damaged.
10. Note: Improper use of battery may cause explosion! Please correctly use the battery
as per instruction stated in Section: Battery!
II Product Description
Thank you for purchasing this Acer MP-500 product. This kind of product is a
high-performance portable multimedia recorder and player with Li-ion battery. With the use
of Acer MP400 product, you can play video or MÚSICA files with different formats, which
will bring you outstanding visual and MÚSICA experience. And you can record MÚSICA
and video signals. This kind of product is also portable USB storage equipment and you
can store and manage your personal data.
1. Main Features
Display – Supports 3.5’’ TFT LCD large screen display. Clearly displays picture and
video files.
Video Play – Supports the playing of video files with the formats of MPEG-4 SP, DivX
3.11/4.x/5x, DivX Pro 3.11/4.x/5.x, Xvid, and WMV-9 SP@ML.
MÚSICA Play – Support the playing of MÚSICA files with the formats of MP3 (MPEG1
Layer2, Layer3), and WMA (WMA 9).
Lyric Synchronization – Supports the synchronous display of sound and lyrics and
educational texts.
Image Viewing – Supports the JPEG file format. You can copy images into the MP400
for viewing.
Text File Reading – Supports .txt text reading function (e-book function).
Recording – Supports the recording function of video and MÚSICA. You can use the unit
to record video and MÚSICA signals from external sources.
AV Input and Output – Supports AV input interface. You can enjoy television programs
through the large screen of MP400d. Also supports AV output interface, and you can
transfer video and MÚSICA signals the MP400 is playing to peripheral MÚSICA and
2
Page 5
video output devices (such as television).
USB 2.0 Interface – Supports USB 2.0 Full-Speed and Low-speed operation.
SD/MMC Card Slot – Supports Extended SD/MMC Card.
Battery –Batería de Polímero de iones de litio.
Video Format Conversion – You can convert unplayable video files into playable format
through video format conversion software.
Varias lenguas– Apoya varias lenguas, incluìdos chino simplificado y complicado,
inglès Francès, alemàn, italiano honlandès, español etc.
Firmware upgrade – Support firmware upgrade.
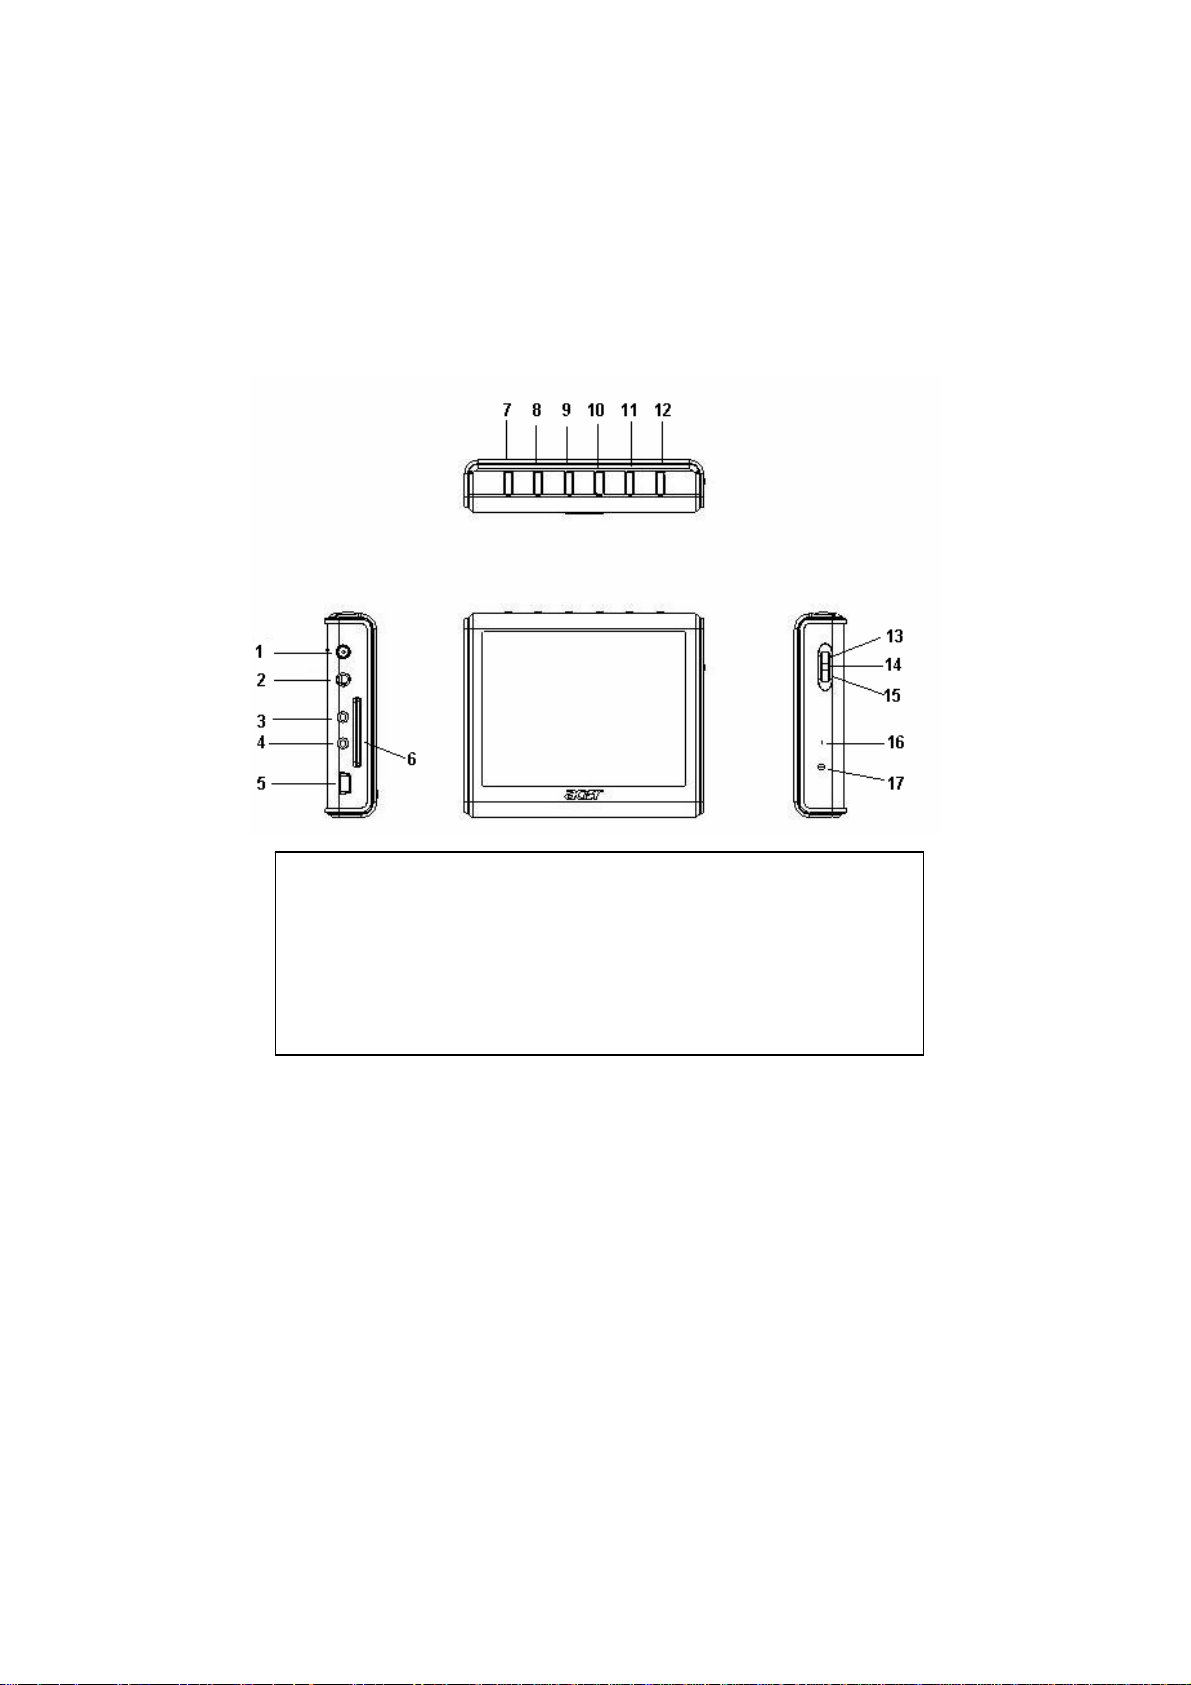
2. Button Location
1 Dc In 7 Power 13 Up
2 Earphone 8 TV/Hold 14 Enter
3 Av In 9 VOL - 15 Down
4 Av Out 10 VOL+ 16 MIC
5 USB connecter 11 Menu 17 Power Led
6 SD/MMC Card Slot 12 Esc
3. Packaging / Accessories
Please confirm the packaging and accessories have the contents below:
9 Acer MP400 Player
9 User’s Manual
9 Power Adapter
9 Installation CD
9 AV Cable
9 USB cord
3
Page 6
9 Stereo earphones
9 Portable leather cover
4. Charging of Battery
This section includes: installation of battery, charging of battery, and the use of external
power adapter.
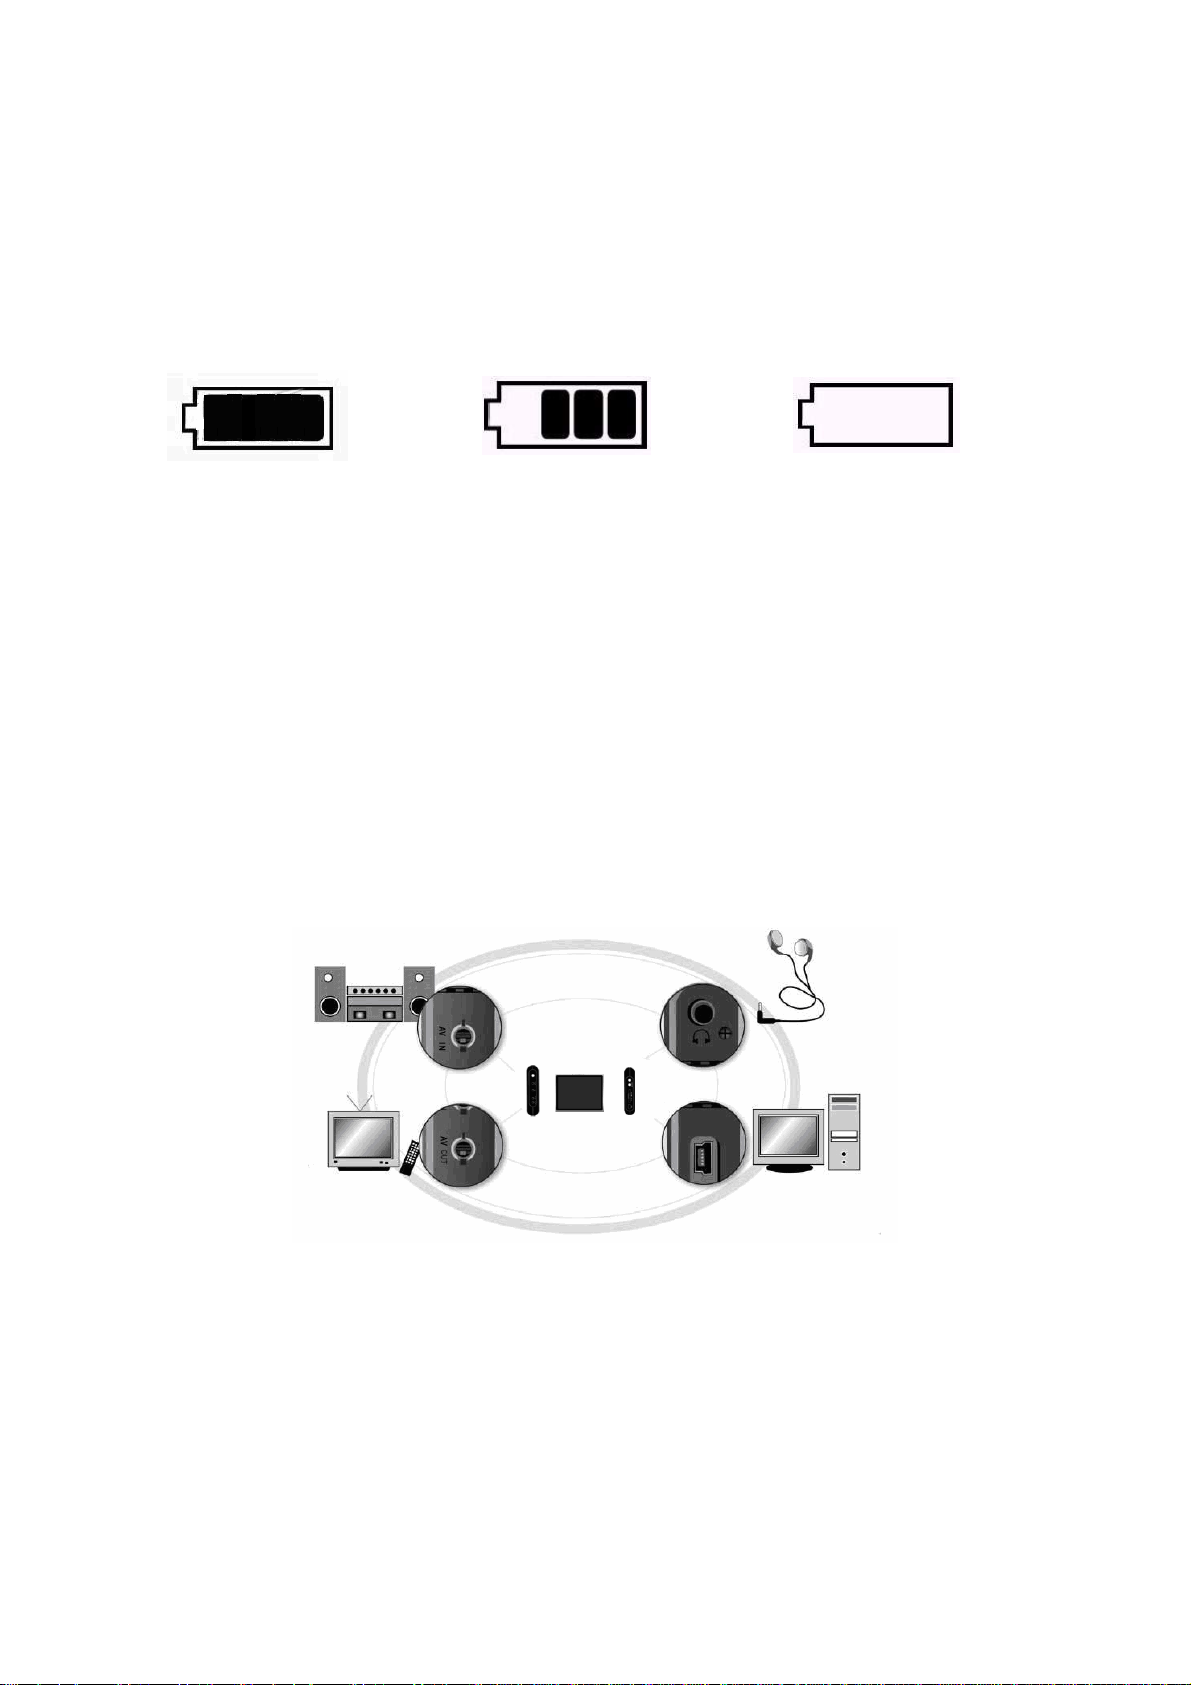
4.1Power Volume Indication
Battery is fully charged Battery is partially drained Battery is drained
Note: If the power volume indication of battery shows only one block or is empty, it
indicates the power supply is obviously lacking, please charge the battery.
4.2 Charging of Battery
You can use the external power adapter to charge the battery. The charging can be
performed when the power of MP400 Player is on or off. The detailed charging method is as
follows:
1) Insert the DC plugs of power adapter into the DC input port of MP400 Player.
2) Insert the power plug into the power socket.
4.3 Use of External Power Adapter
You can use external power adapter to supply directly power for MP400 Player. The
operation method is the same with the battery charging method.
5. Connection of External Interface
1) Connect Television for viewing
Use AV cable to connect to AV out socket of MP400 Player and input socket of signal of
television.
2) Connect Television for Recording
Connect the output socket of signal of television set and AV input socket of MP400
Player through AV cable.
3) Connection of MÚSICA Device
Insert the AV cable into the AV input socket of MP400 Player. Connect the MÚSICA
4
Page 7

signal (left/right) of AV cable through ”Y” type cable. Insert other end of Y type cable into
the output socket of MÚSICA device.
4) Connection of Computer
Use USB cord to connect the MP400 Player with computer, for data transfer.
5) Connection of Stereo Earphones
Insert the stereo earphones into the corresponding socket of MP400 Player.
6.Installation of USB Driver
USB driver only needs to be installed for Windows98/se operation system. The installation
steps are as follow:
1) Insert the CD provided with this unit into the CD-ROM. Double click the Setup.exe file
under the root directory of CD, and start the installation of driver.
2) Click <OK>, and restart computer. The installation of driver is finished;
Confirm the USB driver has been installed.
1) Turn on the power of MP400 and use USB cord to connect with computer.
2) Select [Control Panel / System / Device Manager]. The following interface is to be
displayed;
3) Select the hard disk drive and the installed USB driver will be displayed;
5
Page 8
Note: If the USB driver hasn’t been displayed as per the above, please uninstall the USB
drive and reinstall it.
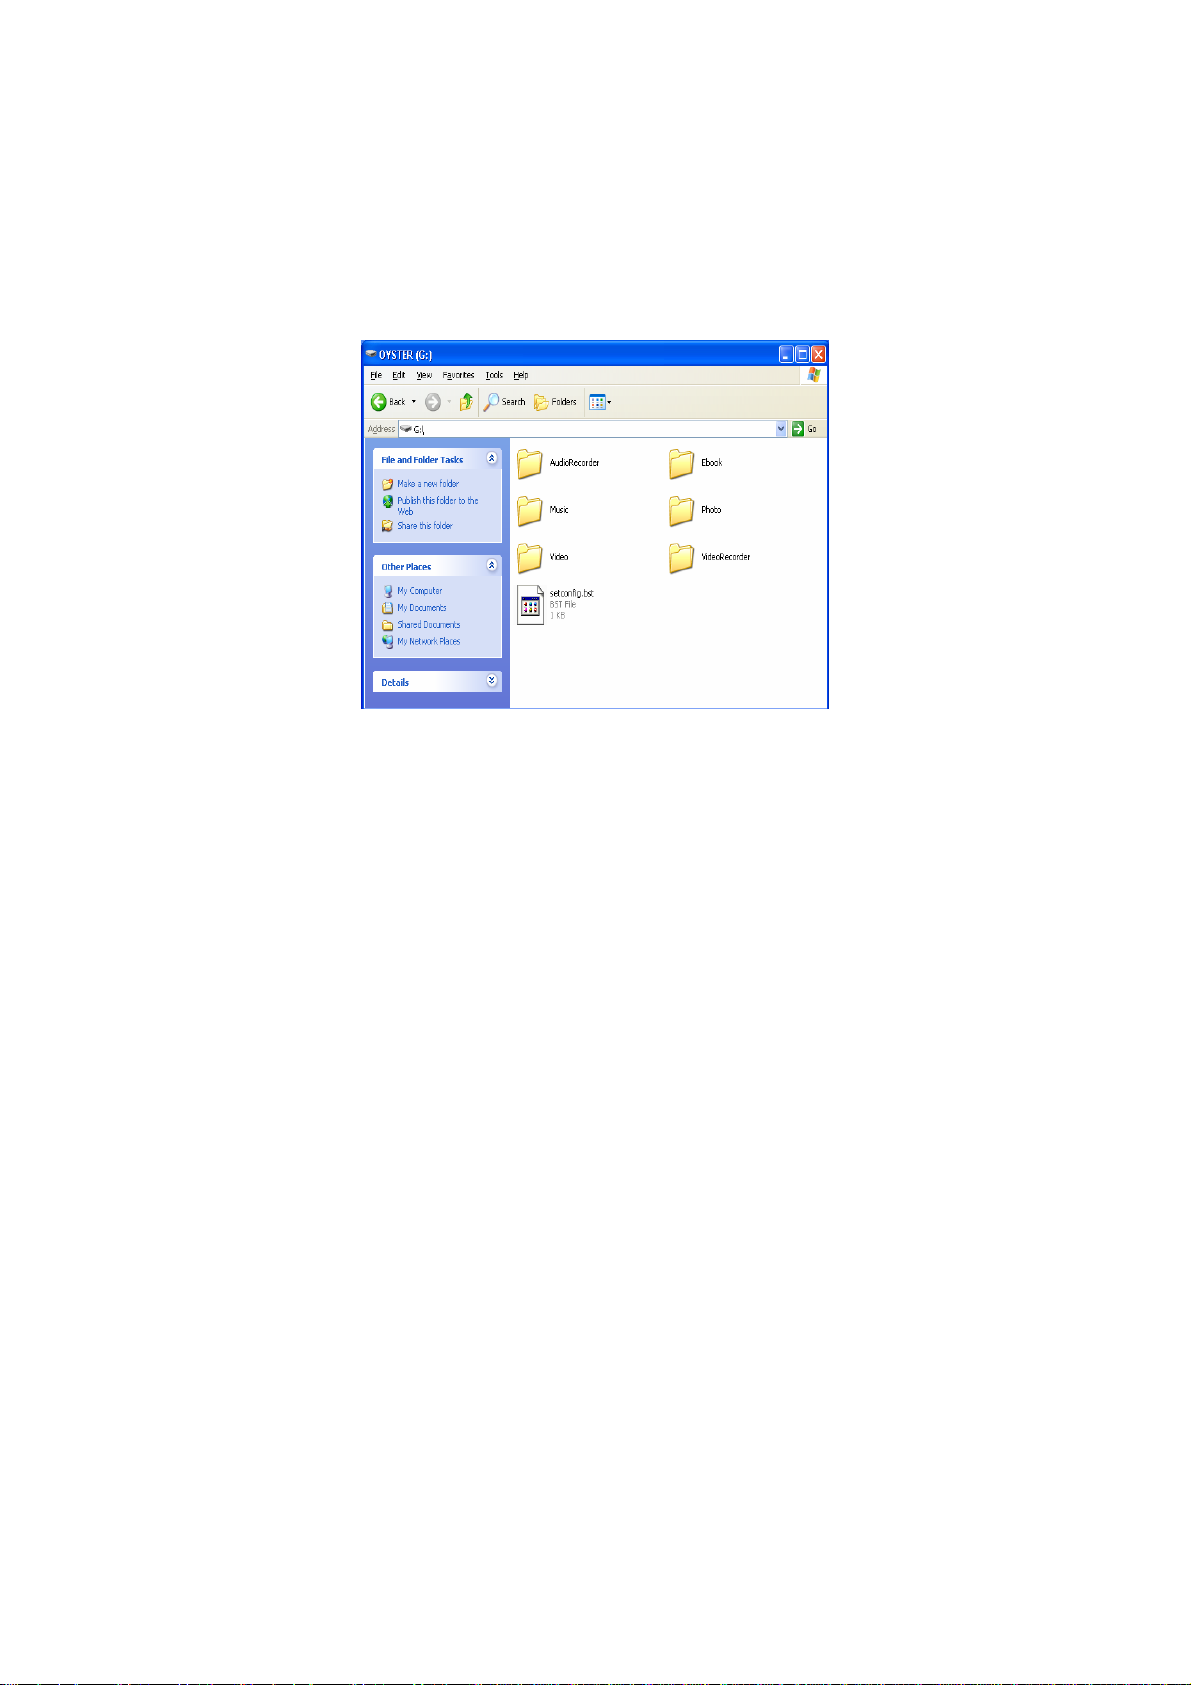
7. Disk Directory Management
1) When the host machine is normally connected with the computer, the disk icon will be
displayed in [windows explorer]. There are six directories, [MÚSICA], [Vídeo], [photo],
[textbook], [VideoRecorder] and [MÚSICARecorder];
Note: Please don’t delete manually such default directories as [MÚSICA], [MÚSICA],
[photo], [textbook], [VideoRecorder] and [MÚSICARecorder] under the root directory of disk
because the deletion of such directories will result in the abnormal operation of this product.
If these directories above have been deleted unintentionally, please re-open these
directories after this unit is shut off, and the MP400 Player will automatically establish such
directories for you.
2) Please store these files into the corresponding directories as per their types.
MÚSICA directory: MÚSICA file
Vídeo directory: Video file
Photo directory: Picture file
Textbook directory: Electronic book
VideoRecorder directory: Video record
MÚSICARecorder directory: MÚSICA record
8. Safe Deletion from Computer
1) Select the icon of [plug and play device] in the task column, click right key and select
[safely delete hardware];
6
Page 9

2) Select the hardware device needing to be stopped, and click [Stop] button;
3) Select the drive needing to be stopped, and click [Confirmation] button;
4) Click [Close] button to finish the entire operation;
Note: Abnormal interruption of the connection of this product with the computer may cause
damage to this product.
9. Power on / Power off
1) Power on: Hold down the on/off key for 2 seconds, and the screen will display the power
on logo of Acer. It will enter into the interface of main menu.
2) Power off: Hold down on/off key for 2 seconds, and unit will turn off after [power off] is
indicated in interface.
III Funciones Básicas
1. Selección de Menú
Después de ligación de fuente de alimentadora eléctrica,el menú será demostrado en
pantalla(como demostrado en el diagrama siguiente),en cual se exibirán los
señales:Video,música,foto,libro eléctrico,grabación,documento y instalación.Presione la
tecla de trés direcciones para seleccionar la función requirida(arriba o abajo),y entrar en
menú de operación correspondiente.Presione por longo tiempo la tecla TV/Hold para iniciar
la función de cerradura de teclas y retirar esta función a través de presionarla por mas
tiempo.
7
Page 10

2. Video Play
1) Seleccione la función de “Video”en el menú y presione la tecla de trés direcciones para
confirmar y entrar en el menu de lista de documento de video.
2) Presione la tecla “menu” para regresar al menu de operación de archive.Consulte las
instrucciones de parte de operación de archive para saber los métodos de uso mas
concretos.
8
Page 11

a. Desktop:Seleccione”Desktop”para regresar al menú.
b. Consultar,recién establecer ,copiar,remover,adherir,cancelar y redesignar.
c. Informaciones de Documento:Abrir o cerrar la columna de informaciones de
documento.
3) En el menú de lista de documento de video,use la tecla de”arriba”o”abajo”para
seleccionar el documento de video requirido y presione la tecla”Enter”para iniciar la
proyección.
4) Cuando selecciona ña función de avanzo o regreso en el menú,puede usar la
teclar”arriba”o”abajo”para cambiar las vezes de avanzo o regreso(X2 X4 X8
X16).Presione la teclar“Enter”para regresar a proyección normal.
a. Presione la tecla “Esc”para cesar proyección y regresar a lista de archive de video.
b. Presione la tecla “arriba” o “abajo”para ajustar el volumen de sono de video.
c. Presione la tecla“Enter”para pausar la proyección y presione la misma tecla por otra
vez para recuperar la proyección.
d. Presione la tecla “arriba” o “abajo”para proyectar el documento anterior o posterior.
e. Presione la tecla “arriba” o “abajo” por mas de 2 segundos para avanzar o regresar.La
función de busca de tiempo y progreso de proyección,la cual será recuperada a
través de liberar la misma tecla.
f. En el período de proyección de video,presione la tecla“menu” para demostrar los
señales de menú de funciones de video.
(Pausar,avanzar,regresar,el posterior,el anterior,modelo de circulación,proporción de
largura y altura.)
(Modelo de circulación:circulación singular,circulación completa)
(Proporción de largura y altura:4:3, 16:9,demostración de tamaño
original y demostración de pantalla completa.)
Instrucción:Use la tecla“arriba” o “abajo”para seleccionar el menú y confirmarlo con la
tecla “Enter”.
g. Cuando selecciona la función de avanzo o regreso del menú,puede usar la
teclar”arriba”o”abajo”para cambiar las vezes de avanzo o regreso(X2 X4 X8
X16).Presione la tecla “Enter”para recuperar la proyección normal.
Notas:El avanzo o regreso de este momento se realiza so caso de proyección de
video,por eso esta función le permite la busca exacta de posiciones de proyección
requirida.
h. Este máquina tiene la función de grabación automática.En proceso de proyectar el
video,la máquina de proyección registrará la posición de proyección corriente en caso
de salir,lo que permite la selección de Resume de menú si se quiere proyectar desde
esta posición.
3. Disfrute de Música
9
Page 12

1) Seleccione la función de “Múscia”en el menu y presione la tecla “Enter”para confirmar y
entrar en el menu de lista de documento de música.
2) Presione la tecla “menu” para regresar al menu de operación de archive.Consulte las
instrucciones de parte de operación de documento para saber los métodos de uso mas
concretos.
a. Desktop:Seleccione”Desktop”para regresar al menú.
b. Consultar,recién establecer ,copiar,remover,adherir,cancelar y redesignar:Puede
consultar las instrucciones de operación.
c. Informaciones de Documento:Abrir o cerrar la columna de informaciones de
10
Page 13

documento.
3) En el menú de lista de documento de video,use la tecla de”arriba”o”abajo”para
seleccionar el documento de video requirido y presione la tecla”Enter”para entrar en el
menú de proyección de múscia y iniciar la proyección de música.
4) En proceso de proyectar la múscia,puede realizar las operaciones siguientes:
a Presione la tecla“Esc”para suspender la proyección y regresar a lista de catálogo de
documento.
b Presione la tecla“VOL -” o “VOL +” para ajustar el volumenn de sono de video.
c Presione la tecla “Enter”para pausar la proyección y presione nuevamente la misma
tecla para recuperar la proyección.
d Presione la tecla “arriba” o “abajo”para proyectar el documento anterior o posterior..
e Presione la tecla “arriba” o “abajo” por mas de 2 segundos para avanzar o
regresar.La función de busca de tiempo y progreso de proyección,la cual será
recuperada a través de liberar la misma tecla.
5) En el período de proyección de frequencia de música,presione la teclar “menu” para los
señales de menu de función de música;
(Pausar,avanzar,regresar,el posterior,el anterior,modelo de circulación A-B
Repetición,Información ID3,Función EQ,Música de fondo)
(Modelo de circulación:circulación singular,circulación completa y proyección
estocástica)
(Información de música:Información ID3,Demostración de letras LRC)
Notas: Use la tecla “arriba” o “abajo”para seleccionar el menú y confirmar con la tecla
“Enter”.Presione la tecla “Esc”o “Menu”para recuperar la proyección normal.
6) During MÚSICA playback period, the LRC file of lyric shall be Unicode encoding format,
and the file name of lyric shall be in conformity with the file name of song. Use notebook
of computer to open the downloaded lyric file and save as Unicode encoding.
7) Select background MÚSICA playback from the above menu, and the MÚSICA will
continue to play on return to the upper level window.
8) Este máquina tiene la función de grabación automática.En proceso de proyectar el
video,la máquina de proyección registrará la posición de proyección corriente en caso
de salir,lo que permite la selección de Resume de menú si se quiere proyectar desde
esta posición.
4. Hojear las Fotos
11
Page 14

1) Selecione la función de“Foto”en el menu y presione la tecla “Enter”para confirmar y
entrar en el menu de lista de documento de foto.
2) Presione la tecla“menu” para obtener el menu de operación de documento.Consulte las
instrucciones de parte de operación para los métodos mas concretos.
a. Desktop:Seleccione”Desktop”para regresar al menú.
b. Consultar,recién establecer ,copiar,remover,adherir,cancelar y redesignar:Puede
consultar las instrucciones de operación.
c. Informaciones de Documento:Abrir o cerrar la columna de informaciones de
12
Page 15

documento.
3) En el menú de lista de documento de foto,use la tecla “arriba”o “abajo”para seleccionar
los documentos de foto y presione la teclar“Enter”para confirmar y iniciar a hojear las
fotos.
4) En proceso de hojear las fotos,puede realizar las operaciones siguientes:
a. Presione la tecla“Esc”para suspender hojear las fotos y regresar para la lista de
catálogo de documento.
b. Presione la tecla de“arriba”o “abajo”para exibir la foto anterior o posterior.
5) En el período de hojear las fotos,presione la tecla “Menu”para obtener el menú de
función de foto.
(El posterior,el anterior,modelo de hojear,instalar como el fondo,girar para izquierdo por
90 grados, girar para derecho por 90 grados,ampliar ,reduzir,modelo de demostración de
foto y música de fondo.)
(Modelo de hojear:Demostrar a modo de diapositiva,suspender la demostración
de diapositva)
(Modelo de demostración de fotos:4 fotos,9 fotos y 1 foto)
a. Puede iniciar o cerrar la función de diaposit iva en el menú.El intervalo de tiempo de
demostración de diapositiva puede ser instalado en el menú de instalación.
b. Fondo de Desktop:Seleecione la función de “Instalado como el fondo”en el menú de
instalación.Todas las fotos conservadas en MP400 pueden ser instaladas como el
fondo de Desktop a través de esta función.
c. En caso de ampliación de fotos,use la tecla “arriba”, “abajo”para remover la foto y
presione la tecla“Enter”para suspender el estado de ampliación.
d. Seleccione la música de fondo en el menú para cambiarla y después puede continuar
a hojear las fotos.
Notas: Si quiere proyectar las fotos y música al mismo tiempo,tiene que proyectar en
primer la música y seleccionar la música de fondo en el menú.
5. Lectura de Libros Eléctricos
1) Seleccione la función de“Libro Eléctrico”en el menu y presione la tecla “Enter”para
confirmar y entrar en el menu de lista de documentos de E-book.
13
Page 16

2) Presione la tecla“menu”para trasladar el menu de operación.Consulte las instrucciones
de la parte de operación de documento para obtener los métodos de uso mas
concretos.
a. Desktop:Seleccione”Desktop”para regresar al menú.
b. Consultar,recién establecer ,copiar,remover,adherir,cancelar y redesignar:Puede
consultar las instrucciones de operación.
c. Informaciones de Documento:Abrir o cerrar la columna de informaciones de
documento.
3) En el menu de lista de documento de E-book,presione la tecla“arriba”o “abajo”para
seleccionar el libro eléctrico,y “Enter”para abrir y exibirlo en el menú.
14
Page 17

4) En el proceso de hojear el libro eléctrico,puede realizar las siguientes operaciones:
a. Presione la tecla“arriba”y “abajo”para hojear las páginas.
b. Presione“Esc”para suspender la lectura de libros eléctricos y regresar para la lista
de documentos.
En caso de el número de las páginas de lectura del libro eléctrico sobrepasar
10,presione “Esc”para regresar y decidir si conservará el cuadro de diálogos de marca
de libro.Seleccione“si”para conservarlo y“no”para no lo conservar.
5) En el proceso de lectura de los libros eléctricos,presione la tecla“Menu”para lanzar el
menú de función.
(El documento anterior el documento posterior, música del fondo)
Seleccione la música del fondo en el menú(Si el número de las páginas de lectura
sobrepasa 10,conservará automaticamente la marca de libro)para cambiarla.
Notas:Si quiere proyectar las fotos y música al mismo tiempo,tiene que proyectar en
primer la música y seleccionar la música de fondo en el menú.
6) El formato de documento apoyado por el libro eléctrico es:*.txt & *.lrc y el código del
documento ha de ser Unicode.
6. Disfrute y Grabación de Programas Exteriores
Antes de ligar la máquina,favor use la línea AV para ligar respectivamente el port AV in de
MP400 y el port AV out del equipo A/V.
1) Grabación de Programas:
a. Selecc ione “Grabación”en el menú y presione la tecla “Enter”para entrar en el menú
de grabación
15
Page 18

b. Seleccione “RecKind”:“Video” con importación de señales, “Audio”(Graba solamente
música)y fonética(Grabada solamente por micrófono),y presione la tecla “Enter”para
confirmar.
c. Seleccione“Quality”: “HighQ”,“MediumQ”y”LowQ”y presione la tecla“Enter”para
confirmar.
d. Seleccione“Grabación iniciada”y presione la tecla“Enter”para iniciar
grabación.Presione nuevamente la tecla “Enter”para suspender la grabación y
seleccionar la función de“Previsión”.
e. Selecc ione la función de“Previsión” para poder prever los señales grabados pero no
realizar las acciones de grabación.
f. Seleccione la función de“Time”, y presione la tecla“arriba”o“abajo”para instalar el
tiempo(Año,mes,día,hora y minuto).Presione la tecla “Enter”para confirmar.
g. Seleccione la tecla“Esc”para suspender grabación,al mismo tiempo se puede desligar
MP400 y remover la línea AV.
h. En el período de grabación,seleccione la función“Previsión” (Presione la
tecla“Enter” )para suspender la grabación,ahora mismo,la función de proyección
retrospectiva continua.Presione la tecla“Enter” para poder continuar la grabación.Esta
función permite la previsión sin grabación.
2) Función de Exportación de Video:
a. Favor use la línea Av para ligar respectivamente el port AV out de MP400 y el port AV
in de equipo A/V para disfrutar el video de grand pantalla y frequencia de sono
tridimencional.(Consulte el folleto de uso del equipo Av para saber de ligación )
b. Ligue el proyector MP400 y el equipo de TV o frequencia de sono tridimencional para
instalar el MP400 en estado de proyección de frequencia de video y frequencia
normal.Presione la tecla“TV/Hold”( No la presione por longo tiempo) ,en este
momento la frequencia de video será cambiada para la demostración de TV,y la
frequencia será cambiada para la exportación de equipo de frequencia de sono
tridimencional.Presione la tecla“TV/Hold”para suspender la exportación Avy recuperar
la demostración del proyector de MP400.
Notas:En caso de exportación de video,la instalación de MP400 TV debe ser idéntica
con TV.(Busque la instalación de MP400 Tv en el menú de instalación y consulte el
folleto de uso de equipo de TV.)
7. Operación de Documento
16
Page 19

1) Seleccione en el menú “Documento”y presione la tecla “Enter”para confirmar y entrar
en el menú de selección de equipo de conservación. (Tal como la carta de SD/MMC)
2) Use la tecla “arriba”o“abajo”para seleccionar el documento o archive lo cual operará,y
después presione la tecla”Menu”para trasladar el menu de operación de documentos.
a. Desktop:Seleccione“Desktop”para regresar para el menú.
b. Consultar:Seleccione “Consultar”para entrar en el catálogo seleccionado.( Si el
archivo se queda seleccionado,aparecerá esta operación en el menú.).
c. Copiar:Seleccione el documento o archivo lo cual operará y presione la
tecla“Menu”para trasladar el menú de operación.Seleccione “copiar” y después
presione la tecla“Menu”abajo de catálogo de objecto para trasladar el menú de
operación.Seleccione“Adherir” para trasladar el ventano de“Si adhere” y
17
Page 20

seleccione“YES”para iniciar a adherir y“NO”para no adherir.(Si selecciona un
documento.aparecerá esta operación en el menú.)
d. Recién-Establecer Archivo:Presione la teclar “Menu”para trasladar el menú de
operación y seleccione“Recién establecido” para trasladar la lista de símbolos de
designación.Después de designar el documento,presione la tecla“Menu”para
conservalo, así el archivo recién-establecido se conserva con suceso.
e. Remover:Localize el indicador en el documento o archivo a ser operado.Pr esione la
tecla “Menu”para trasladar el menú de operación,Seleccione remover,en este
momento aparecerá la sugestión de si querer remover,seleccione”si” y presione la
tecla”Menu”abajo de catálogo de objecto para trasladar el menú de
operación.Seleccione adherir,en este momento aparecerá la sugestión de si querer
adherir,seleccione“Yes”o“No”.
f. Cancelar: Localize el indicador en el documento o archivo a ser operado.Presione la
tecla “Menu”para trasladar el menú de operación.Seleccione cancelar,en este
momento aparecerá la sugestión de si querer cancelar,seleccione“Yes”o“No”.
g. Redesignar: Localize el indicador en el documento o archivo a ser operado.Presione
la tecla “Menu”para trasladar el menú de operación.Seleccione redesignar,en este
momento aparecerá la lista de símbolos de designación,presione la tecla de botón
média de la tecla de trés direcciones para confirmar la importación.Presione la
tecla“Menu”para conservar el nombre y “Esc”para dejar el despacho de
redesignación.
h. Información de Documento:Abrir o cerrar la columna de informaciones de documento.
8. Instalación de Menú
1) Seleccione“Instalación”abajo de menu para entrar en el menu de instalación de
sistema.
18
Page 21

El menú de instalación de sistema consiste de los siguientes contenidos:
a. Demostración;Los ítenes de instalación de este menú se constituen por luminosidad
de luz de fondo,color de texto,y color de foco.
Luminosidad de luz de fondo:Para instalar la luminosidad de luz de
fondo:10%(Luminosidad total de10%),20%( Luminosidad total de
20%)…100%( Luminosidad total)
Color de texto:Son colores de texto en caso de no seren seleccionados. Tiene
001-255 para la selección..
Color de texto de foco:Son colores de texto en caso de seren sleccionados. Tiene
001-255 para la selección.
Color de foco:Son colores de alta luminosidad en caso de seren sleccionados. Tiene
001-255 para la selección.
b. nstalación de fuente:Los ítenes de instalación de este menú consisten de instalación
de luz de fondo y desligación de máquina.
Instalación de Luz de Fondo:La máquina se opera solamente so el estado de
trabajo.La luz de fondo puede desligarse automaticamente en el tiempo instalado por
el consumidor:
Puede seleccionar entre 001-255 segundos.Cuando la instalación es 000,no se
iniciará esta función(Instalación tolerada es 20sec)
Instalación de desligación de máquina: La máquina se opera solamente so el estado
de trabajo. La máquina puede desligarse automaticamente en el tiempo instalado por
el consumidor:
Puede seleccionar entre 001-255 minutos.Cuando la instalación es 000,no se iniciará
19
Page 22

esta función(Instalación tolerada es 10min)
c. System Setup: This menu setup item includes setups of language, television, system
information and factory defaults.
Language: To setup the interface language as eight languages such as simplified
Chinese, traditional Chinese, English, German, French, Italian , Spanish and
Holandés.
Television: To setup the formats of television: PAL/NTSC.
System Information: To check the company information, production description,
revision time, remaining volume, and used volume.
Factory Defaults: To reset to original factory settings.
d. Playback Mode Setup: This menu setup item includes picture interval time and
MÚSICA playback mode.
Picture Interval Time: To setup automatic view interval of picture, 001~255 min are
available.
MÚSICA Play Mode: To setup MÚSICA playback mode, three modes such as random
play, play all, and single cycle.
20
Page 23

9.Firmware Upgrade
You can download the firmware with new revision, and you can upgrade this product
through the following steps.
1) Visit homepage of Acer Company (Http://www.acer-euro.com) and download the latest
firmware file of this product.
2) Connect this product with the computer through USB cord.
3) Copy the latest firmware file to the root directory in the in-board hard disk of MP400
Player.
4) Normally disconnect the connection between this product and the USE cord of
computer.
5) Restart this unit and the upgrade of this product will finish automatically.
Note: Please ensure the power capacity is enough before upgrade. If the power is
interrupted during the upgrade process, this product may suffer serious damage. So,
connect the power adapter before upgrade to ensure a continuous power supply.
IV Frequently Asked Questions and Solutions
This section will provide solutions for some common problems during the use of this
product. Please read this section to see if it can resolve the existing problems. If they can’t
be resolved, please contact with customer service.
1. Question: The unit can’t be turned on, and the LCD doesn’t display any information.
Answer: Please confirm if the battery needs to be charged.
2. Question: The keys don’t work.
Answer: 1) Check if LCD will display “hold” message;
2) If the “hold” message is displayed, please press “TV/Hold” key for 2 seconds
to turn-off Lock function.
3. Question: When selecting the television as output mode, the television picture shakes or
the picture can’t be normally displayed.
Answer: When using television to view, please firstly setup correctly the [tv standard]. (In
China and Europe, please use [pal], and in Korea, please use [ntsc].
4. Question: Sudden power off
Answer: 1) Please check the [power off] setup in the [system set] of main menu
21
Page 24

interface;
2) Please check if the battery power is low, if so it should be charged.
5. Question: LCD screen suddenly powers off
Answer: Please check if “TV/Hold” key is pressed and screen conversion has begun.
6. Question: Doesn’t play video, MÚSICA and picture files.
Answer: 1) The file format shall be within the supporting scope of this product;
2) Please confirm if the file format belongs to the format supported by this
product, and if the correct play mode is selected.
3) If the file format is not within the supported scope, please use the format
conversion software described in this manual to convert the file format into the
supporting format.
7. Question: There is no sound, or volume is too low during the playback of video and
MÚSICA.
Answer: Please confirm if the volume is too low. Change the volume through the volume
adjusting key.
8. Question: The menu is too small during video playback or picture view.
Answer: 1) The menu of recorded video file is too small.
2) The self-dimension of picture file is too small.
22
Page 25

V Product Specifications
Category Parameter Specifications
System
Built-in Storage
File Management
File System
User Interface
Key Definition
Language
File View Mode
Power Supply
Switching
Adapter
Battery
Playback Time
Power Saving
Display
Interface
Resolution
Brightness
View Angle
AV Input /
Recording
Video
Music
Speech
AV Output
Video
Music
Earphone
Firmware
DSP
Upgrade
USB 2.0 Device
General
Dimensions
Weight
Operation
Temperature
SD / MMC Card
Single file copy & paste, File/ Folder deletion,
Rename and Folder Creation
FAT 16/32
Power, TV/Hold, VOL+, VOL-, Menu, Esc,
three-direction key(up, down, enter)
Multi-language Menu and Filename Display
List View & Icon
AC 100-240V in, DC 5V, 2A output
Rechargeable Li-Polymer 3.7V/1200mAh
Video: 4 hours, Music: 6.5 hours (average)
Auto Power off, Screen saver
3.5” TFT LCD
320×240 (RGB) Pixels
Backlight Adjustable
Up: 10deg, Down: 30deg
Left: 45deg, Right: 45deg
CVBS (PAL/NTSC)
Line in Stereo
Built-in Microphone
TV Line out (PAL/NTSC)
Line out Stereo
30mW, 320hm, 1 outlet
System Auto Upgrade when Update File
available
USB 2.0 /USB 1.1 interface
Operation System:
Windows98/98SE/ME/2000/XP
Mac OS 9.0 and Later
86.6×73.6×18.8 mm
133.8g
0℃ to 40℃
Supported File Types And Functions
Decoding Video
File Type Description
MPEG-4(*.ASF,
*.AVI)
MPEG-4 Simple Profile 720*480 @ 30fps
2-channels MPEG-1 & 2 Layer3(MP3)
Video Bit rate Up to 4Mbps
23
Page 26

Music
MPEG-4(*.MP4)
XVID (*.AVI)
WMV9 (*.WMV or
*.ASF)
MP3 (*.MP3)
WMA (*.WMA)
JPEG (*.JPG)
MPEG-4 Simple Profile 720*480 @ 30fps
2-channels MPEG-4 AAC-LC
Video Bit rate Up to 4Mbps
Up to 640*352 @ 30fps, MPEG-1&2 Layer
III
Video Bit rate Up to 3.5Mbps
WMV9 SP@ML 352*288 @ 30fps, WMA9
L2
Video Bit rate Up to 4Mbps
Minimum Support 10fps
MPEG-1&2 Layer III, sample rate up to
48KHz , Bit rate:24-320Kbps , CBR&VBR,
2-channels
WMA8/9 ,sample Rate up to 48KHz ,Bit
rate :32-384Kbps,CBR , 2-channels
Baseline YUV and Grayscale (No
progressive)
Up to 3264*2448 Pixels for HDD
Encoding
Image
Video
Music
GIF (*.GIF) Static; Up to 1000*1000
Monchrome,8-bit
BMP (*.BMP)
Indexed-Color ,RGB ,RLE8
Up to 1400*1050
ISO MPEG-4
(*.ASF)
320*240 @ 30 fps, MP3 Stereo
2 Channels : 16KHz ,32Kbps
MP3 (*.MP3)
24KHz , 64Kbps
32KHz , 96Kbps
24
Page 27

1
Page 28

http://www.acer-euro.com
 Loading...