


Acer MP-320
User Manual

Copyright
Copyright 2004 by Acer Inc.,All right reserved.No part of this
publication may be reproduced,transmitted,stored in a retrieval
system,or translated into any language or computer
language,in any form or by any means,electronic,mechanical,
magnetic,optical,chemical,manual or otherwise, without the
prior written permission of Acer Computer GmbH.
Disclaimer
Acer Inc. makes no representations or warranties, either expressed
or implied,with respect to the contents hereof and
specifically disclaims any warranties,merchantability of fitness for
any particular purpose. Any software described in this manual
is sold or licensed"as is". Should the programs prove
defective following their purchase,the buyer (and not this company)
, its distributor,or its dealer) assumes the entire cost of all
necessary servicing, repair , and any incidental or consequential
damages resulting from any defect in the software,Further,Acer
Computer GmbH,reserves the right to revise this
publication and to make changes from time to time in the contents
hereof without obligation to notify any person of such revision
or change.
All brand and product names mentioned in this manual are trademarks
and/or registered trademarks of their respective holders.

MusePod
Unique Features
Mass Portable Storage Player
1.This player can be used as the portable hard disk (the
capacity is 20G). No driver is necessary under
WinMe/2000/XP.
2.Unique USB Host Functions
Hard disk player can read the file from the other
standard USB Device
3.High speed transfer, USB2.0 standard interface,
compatible with USB1.1
Hard disk player supports USB2.0 with the highest
rate of transmission up to 20Mbyte/s.
4.Large screen LCD with high resolution - 128 X 128
Dot Matrix 4 Gray With Backlight
5.Support multi music formats:
including MP3 (MP3 of VBR format supported)
and WMA
6.Convenient firmware upgrade
The latest functions can be acquired through the
firmware upgrade.
New formats will be supported through the simple
upgrading; meanwhile, the other functions will be
provided constantly.
7.Support multi-languages display of ID3
Support various languages of ID3, including
1

English Manual
simplified Chinese, traditional Chinese, Japanese,
Korean and English
8.FM radio (87.5MHz~108.0MHz)
Auto-scan and memorize desired channels are more
convenient to listen to the FM radio.
9.Provide five types of equalizer (EQ):
Normal, Classic, Jazz, Rock and user EQ, making
music more abundant.
10.Supporting 3D effect, 15-level Bass Boost and
15-level Treble Boost, making music more colorful
11.Easy to use file navigation
12.Treeview navigation menu enables you to find the
music conveniently
13.Up to 2000 folders and 9999 files can be recognized
14.Graphical User Interface
15.Recording by Mic or Line_In
16.Supporting Bookmark Function
17.Supporting PlayList Function
18.Supporting TXT file navigation, namely, the e-book
function
2

MusePod
Front Part and Side Part........................................ 4-5
Top/Bottom Part and LCD ........................................ 6
Using the AC adapter .......................................... 7-11
Charging ................................................................ 7-8
Software Installation .............................................. 8-9
Connecting to the computer .............................. 10-11
Disconnecting to the Computer .............................. 11
Operations ......................................................... 12-13
Playing Music..................................................... 14-16
Section Repeat.................................................. 16-17
Browsing................................................................. 18
Mode Switch...................................................... 18-21
Receive FM Radio............................................. 22-23
Record ............................................................... 24-25
Menu Function................................................... 25-35
USB Host Function............................................ 35-37
Cautions.................................................................. 38
Troubleshooting................................................. 39-42
Accessory............................................................... 43
Specification ........................................................... 44
Contents
3

Front Part
English Manual
Menu
Play/Pause/
Power On
Left
4
LCD
Volume+
Stop/Power Off
Right
Volume-

Side Part
CHARGE LED
LCD
A-B/Rec
SRS/Mode
Line-In
Reset Hole
USB Port
Hold
MIC Hole
USB Host Portne
Earpho
MusePod
DC-IN
5
y
r
r
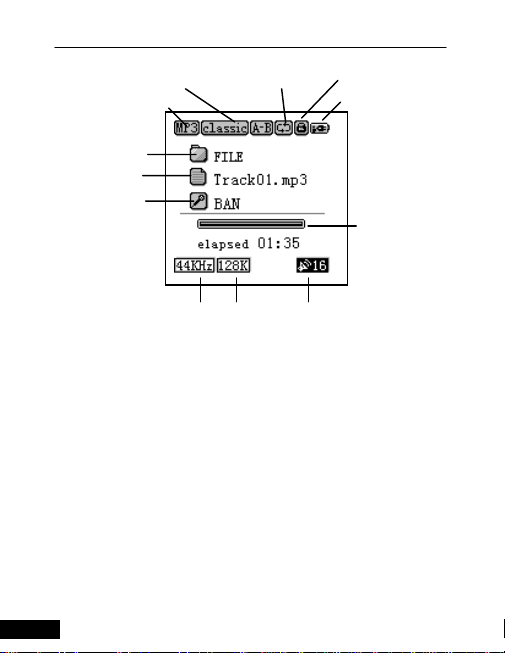
Current Mode
Current Folde
File Name
ID3 Artist
EQ
Repeat Mode
English Manual
Hold
Batter
Indicato
Track Playing
Progress
Sampling Rate Bitrate Volume
6

MusePod
Using the AC adapter
1. The AC adapter supplied with the player can be
used only.
Working voltage of the AC adapter of the player is
100/240V, 50/60Hz.
2. Connect the adapter to the DC jacks of the AC
power and the player
Charging
1. When the player is powered on, the status of the
battery indicator shows the battery capacity of the
player. When the battery is low, the icon will be
twinkling. After twinkling for a while the system will
be shutdown automatically. The battery must be
charged immediately, otherwise the player cannot
continue to work. Before connecting the player to
the computer, please make sure that it is in low
voltage, or the connection to the PC will fail.
2. Charging will start automatically after the adapter is
connected to the power. In the power-on status, the
power-connecting icon is shown in the position of
the original battery indicator icon. It shows that the
battery is being charged and the red LED is always
on. When charging in the power-off status, the red
LED is always on.
7

English Manual
3. When the battery is fully charged, the battery
indicator is fully filled in and the red LED will be off.
Charging time: about 3 hours (after the battery is
fully discharged)
Discharging time (playing time): about 12 hours
(the longest playing time after the battery is fully
charged)
Playing time is measured during playing 128Kbps
Mp3 files in the fully charged status. (It is practically
measured without any operations)
Software Installation
Windows 2000 and Windows XP themselves can
support USB2.0 storage device (PC must be with
USB2.0 port, otherwise it will be transmitted by the
USB1.1 standard), but Windows 98 requires the
driver to be installed. We supply you with the
manager software of the hard-disk player and the
driver. After the installation is completed, you can
now operate the player.
Please plug CD to CD-ROM, then it will install
software automatically if you did not close
CD-ROM Auto function. Then execute Next step
one by one, you can finish installing. During
installing, if you use Win98 operation
8
system, it

MusePod
will setup Win98 driver for HDD player
automatically.How to Use Software Managerment
How to Use Software Managerment
If you install software managerment, you can use it
to manager your HDD player.
1.Turn on your player, then connect it to PC, while
PC find device, please execute managerment
software.
2.You can use this software to edit playlist function.
3.You can use this software to change language.
4.You can use this software to download file and
upload file to HDD player.
You can refer to online help in the software to use
this software.
9

English Manual
Connecting to the Computer
1. Press and hold the “Play” button to turn on the
player. (Warning: please make sure whether the
battery of the player is sufficient. If it is not enough,
please connect the adapter to the power to
guarantee enough battery)
2. Connect the player and the computer properly with
the USB cable. The big end of the USB cable should
be connected to the USB port of the computer, and
the other end should be connected to the USB Slave
port of the player.
The LCD of the player shows:
3. The “Device connected” icon will be shown on
system bar under Windows 2000 and Windows XP.
(Under Windows 98, it can be connected properly
only after the installation of the driver is finished.)
10

MusePod
4. After the installation is completed, a portable hard
disk will be added in My Computer/Explorer. The
files in the hard-disk player can be operated by the
Explorer or the Manager software we supply. The
hard-disk player can be used as a normal hard disk,
and the files can be copied, deleted, etc.
When the hard-disk player is to be connected to the
computer for a long time, please connect the AC
adapter. The low battery will cause improper working of
the player. (When connecting to the PC, if the battery is
too low, the player cannot connect successfully)
Disconnecting to the Computer
Use “Safety Remove” to disconnect the player to the
computer, namely, double-click the right corner of the
task bar on PC, select “Safety Remove”. After the
system displays “Removed Hardware Safely”, the USB
cable connected the player to the computer can be
removed.
Warning:
Do not disconnect the player to the computer when the
player is working.
The player can be disconnected only after the
file copying is completed.
11

English Manual
Operations
Operations:
Basic Operations
1. Power On Press and hold the
“Play/Pause/Power On” button
2. Play/Pause In the playing status, press the
“Play/Pause/Power On” button.
3. Stop Playing Press the “Stop/Power OFF”
button.
4. Fast Forward In Music playing status, press
and hold the “Right” button.
5. Fast Reverse In Music playing status, press
and hold the “Left” button.
6. Play Previous Track In Music playing status,
press the “Right” button.
7. Play Next Track In Music playing status, press
the “Left” button.
8. Power Off Press and hold the “Stop/Power
OFF” button.
8. Volume Adjustment In Music playing or FM
status, press the “+/-” button.
10. File Selection In the file navigation status,
press the “Right/Left/+/-/ Menu”
12

MusePod
button. Press the “Menu” button
to enter the file navigation
interface, press the “Right”
button to enter a folder or select
a file, press the “Left” button to
exit the current directory, press
the “+/-” button to select the
different file or folder, and press
the “Menu” button to confirm.
11. Mode Switch Press and hold the “Mode”
12. Section Definition Press the “A-B” button.
13. Recording Press and hold the “A-B”
14. Menu Display Press and hold the “Menu”
15. Hold button On/Off
10
button to enter the mode switch.
button.
button.
13

English Manual
Playing Music
1. Connect the earphone
2. Unlock Hold
3. Press and hold the “Play/Pause/Power On” button
for 2 seconds to turn on the player, and the
power-on picture displays. After the system
information is read, it will enter the file list. (This
procedure needs some times because the speed of
scanning hard disk is much slower.)
4. Track selection: Press the “Menu” button to enter the
file navigation status, and select different folders or
files by pressing the “Right/Left/+/-” button, then
press the “Menu” to enter a folder or select a file to
play. In the file navigation status, the definitions of
buttons are: “Right” – select the function, “Left” – exit
the current folder, “+” – select upward, “-” – select
downward, “Menu” – confirm the function.
14

MusePod
It begins to play after the track is selected. Press the
“Play/Pause/Power On” button to pause, and then
press it again to continue playing. The playing interface
displays the information of current track. In the playing
status, the information is shown: the first line shows the
folder which the current song file is in; the second line
shows the name of the song (If this song has ID3
information, the title of the ID3 will display after
displaying the song name once); and the third line
shows the Artist of the ID3 (Refer to the LCD)
Folder name
Song name or ID3 Title
Song ID3 Artist
Playing progress
5. Volume Adjustment: Press the “+” button to increase
the volume and the “-“ button to decrease the
volume. The digital number of the icon at the right
corner shows the current volume.
6. During the playing, press and hold the “Right” button
15

English Manual
to make fast forward, while press the “Right” button
to switch to the next track; press and hold the “Left”
button to make fast reverse, while press the “Left”
button to switch to the previous track.
7. Press the “Stop” button to stop playing, and return to
the file list.
8. Press and hold the “Stop” button to shut down the
player, and then the shutdown picture will show.
When “Hold” is on, the icon appears, and buttons on
the player are invalid.
In the stop status, you can set the “Auto Off” time in the
setting menu, the player will be shut down
automatically according to the setting time.
16

MusePod
Section Repeat
When the player is playing, you can use section repeat
function to repeat one section of the music. In the
playing status, press the “A-B” button to select the start
position (A point).
During the playing, press the “A-B” button again to
select the end position (B point).
The player will repeat the section from A to B.
17

English Manual
Browsing
After pressing the “Menu” button, use “Right/Left/+/ -”
button to find and select the track. If the audio file is
selected, the player will enter the playing interface. If
the non-audio file is selected, the player will not
respond.
Press the “Menu” or “Right” button to enter the lower
folder. Press the “Left” button to return to the upper
folder. When the root directory is reached, it will stop.
Mode Switch
Press and hold the “Mode” button or use the menu to
enter Mode Switch.
Press the “+/-” button to switch among the six modes
such as MP3 status, FM status, Recording status, Data
Backup Browsing status, Playlist status and e-book.
Press the “Left” button to exit the mode interface. After
selecting the corresponding mode, press the “Menu” or
“Right” button to confirm the mode switch. Press the
18

MusePod
“Stop” button to exit the mode and return to the file list.
USBDATA Data Browsing Mode:
After entering the Backup Data mode, you can see the
files in the USBData directory, which come from the
Device connected to the USB Host. If you backup the
peripheral USB Device by USB Host function, you can
view the backup USB Data by selecting this option.
Refer to the below figure: (Note: At present it only
supports the connection to standard Mass Storage USB
devices which must use FAT or FAT16 file storage
format, otherwise the system will display “Device
Error”).
19

English Manual
Playlist Function:
You can select your favorite songs to play, which
means the player can support Playlist function. Select
the Playlist option in Mode status to enter the list of
Playlists and see the corresponding Playlist, then you
may select to play the Playlist.
How to add and delete songs in BMK list of Playlist
You can edit Playlist files by the manager software, and
the files can be put in the Playlist folder in the hard disk
so that you can manage these playlists. Also, you can
set Playlist function in the player port, namely, there is
one default Playlist (BMK List) in the player. In the file
navigation status (press the “Menu” button to enter File
Navi mode), you can select the song to be added to
BMK List, and press and hold the “Play” button to finish.
The song added to Playlist will be shown as below:
20

MusePod
As the above figure, ICON shows the two songs Flower
and Yesterday are added to PlayList. You can also
delete the song from Playlist: select a song which is
added to the playlist, and then press and hold the
“Play” button to delete it from Playlist. Now if you enter
the Playlist mode and select one Playlist to play, then
the songs in this Playlist will always play.
E-Book Function:
You can save the TXT files in the TEXTFILE folder in
the root directory of hard disk, then you may read the
e-book by selecting “Text viewer” option (Note: the
e-book can be directly copied to the TextFile directory
in HDD, but the capacity should not be more than 64K
bytes). After entering the Mode, you can select the
“Text Viewer” mode, then press the “+/-” to select the
Text document you want to read, press the “Menu”
button to enter the Browse status, and press the
“+/-/Right/Left” button to page up or page down the
e-book. To return to the Text document browse status,
press the “Menu” button.
21

English Manual
Receive FM Radio
Enter FM status through the mode switch:
1. When the “Preset” button is invalid, press the
“Right/Left” button to adjust the current channel in 0.05
MHz step. Press the “+/-” button to adjust the volume.
Press and hold the “Right/Left” button will automatically
search the next valid channel.
2. When the “Preset” button is valid, press the “Right/
Left” button to switch to the next/previous stored
channel.
3. Auto scan function: Press and hold the “Play” button
in FM status to enter the Auto Scan mode, the player
will automatically save the top 20 channels as CH01 to
CH20. “PRESET” tag will change to “Auto Scan” tag
and the channels will scroll automatically. After the
scan is over, “Auto Scan” tag will automatically switch
to “PRESET” tag. (Please plug the earphone when
automatically scanning the channels. The earphone
works as the antenna in FM status.)
22

MusePod
4. Press the “Menu” button to switch between the
Preset mode and Manual Scan mode. The user can set
some channels as needed or delete some disliked
channels. After switching to Manual Scan mode, the
“PRESET” tag will disappear.
5. Under Manual Scan mode, press the “Right/Left”
button to increase/decrease 0.05MHz. Press and hold
the “Right/Left” button to automatically scan the
adjacent channels. If the channel that is found has not
been saved, you can press the “Mode” button to save
the channel. In this case, after pressing “Mode” button,
“Memory” tag will show at the location of “Preset” tag,
and then press the “Right/Left” button to select the
saved destination, such as CH01 to CH20. Press the
“Mode” button to finally confirm. “Memory” tag then
disappears and the saving process is completed.
In the FM status, you can press and hold the “A-B”
button to record the FM radio. The screen shows as
below.
To stop the record, press the “Stop” button
and return to the FM status.
23

English Manual
Record
Enter the record screen through mode switch or
pressing and holding the “A-B” button. The screen
shows as below.
1. Press and hold the “A-B” button to enter the reco rd
screen directly. (In this case, if “Line-In” is connected,
then the “Line-In” content will be recorded as MP3
sound files, otherwise the sound source will be the
MIC). Press the “Rec” button to halt the record, press
again to resume the record. Press the “Stop” button to
stop the record, and the screen will display “Waiting…”
and the player is generating the recorded file. After
returning to the file list, the current recorded file will be
displayed. If the recorded file is in MP3 format, the
recorded file will be saved under the directory of
“RECORD\ENCODE”. If the recorded file is in WAV
format, the recorded file will be saved under the
directory of “RECORD\VOICERECORD”.
2. The operation of playing recorded file is the same as
that of playing music file. Change to “REC” mode
through mode switch, and select the specific recorded
file or music file to play.
3. In the FM status, press and hold the “A-B/Rec”
button to enter the record mode. Then the current FM
radio program can be recorded. Press the “Stop” button
to return to the FM status.
24

4. To record from other sources, connect the LINE_I N
r
p
jack with the LINE_OUT jack or earphone jack of the
external sound source by using the auxiliary
input/output cable supplied with the player, press and
hold the “A-B” button to start the recording. If the
“Synchronous” is set to “On” in the “Rec Setting”, then 2
successive songs will be separated automatically in
between when recording them in MP3 files.
Before the recording starts, the player will check if the
left space is enough. If not, the player will display “No
Enough Space”. When the “Memory” displays as
“100%”, the recording will not be available.
Please refer to the “Rec Setting” item of the menu for
the detailed recording settings.
Through the LINE_IN interface, you can
record from the CD or MP3 player. Please
make sure the external audio source is in
playback mode before the record starts. (It is
recommended to use the maximum volume
when making the record.)
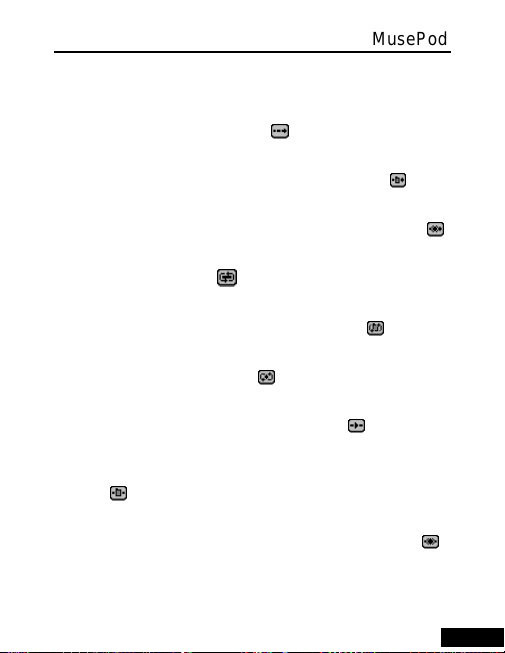
Menu Function
Sampling rate, Bitrate and Output
File Format (MP3, VOC)
Current Folde
Record Time
Ca
acity Utilization
File Name
MusePod
25
English Manual
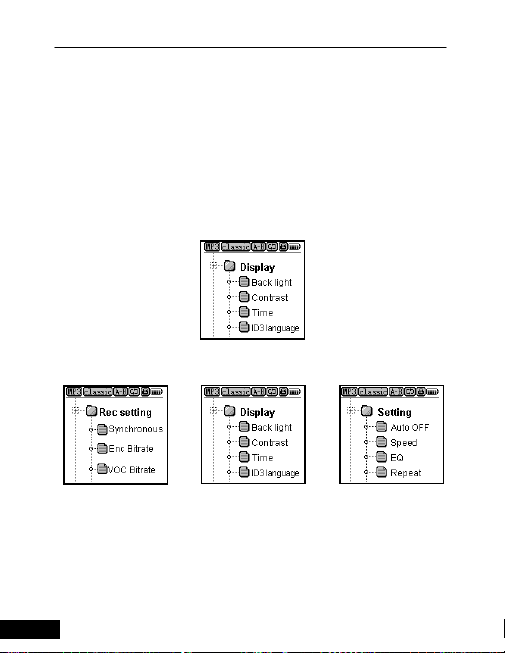
Press and hold the “Menu” button to enter the menu.
There are 5 main menus and 3 sub menus. Press the
“+/-” button to shift among the menu items. Press the
“Right” or “Menu” button to select or enter the sub
menu. Press the “Left” button to return to the upper
menu and press the “Stop” button to exit the menu
operation. You can make the settings after entering the
menu.
Main menu
Sub menu
The menu items of “Mode” are the same as that after
pressing and holding the “Mode” button. Please refer to
the mode switch as above. Use “Display/Backlight” to
set the backlight on time. When the player is idle, the
backlight will be off after the preset time duration. Press
26

MusePod
the “Left/Right” button to select among “off/5 sec/10
sec/15 sec/20 sec/all”. “Off” means backlight off, all
means backlight always on. Press the “Menu” button to
confirm and return to the main menu.
Use “Display/Contrast” to set the contrast of the LCD
screen. Use the scroll bar to display the current value,
which is between 0 and 32. Press the “Left/Right”
button to increase or decrease the value. Press the
“Menu” button to confirm and return to the main menu.
Use “Display/Time” to set the display method of the
playback time of the playback interface. “Normal”
means the time duration that has already elapsed in
playback. “Remain” means the remaining time in
playback. Press the “Left/Right” button to select. Press
the “Menu” button to confirm and return to the main
27

menu.
English Manual
Use “Display/ID3 language” to set the display language
of ID3, which can be specified to simplified Chinese,
traditional Chinese, Japanese, Korean and English.
Press “Left/Right” button to make the selection,
press ”Menu” button to confirm and return to the main
menu. If you select Sim Chinese, the user interface will
change to Sim Chinese, others will not change.
Use “Setting/Auto Off” to set the auto off time when the
player is idle. Press the “Left/Right” button to select
among “OFF/1 min/2 min/5 min/10 min”. When “OFF” is
selected, the player will never be automatically turned
off. “1 min/2 min/5 min/10 min” means the player will be
automatically turned off after 1 min/2 min/5 min/10 min
when the player is in “Stop” or “Pause” status. Press
28

MusePod
the “Menu” button to confirm and return to the main
menu.
Use “Setting/Speed” to set the ID3 scroll display speed.
Press the “Left/Right” button to select among
“1x/2x/3x/4x”. If the length of the ID3 information of a
music file exceeds the LCD screen display, then it will
be scrolled and displayed in 1x/2x/3x/4x. Press the
“Menu” button to confirm and return to the main menu.
Use “Setting/Fast Charge” to set fast charge or normal
charge. Press the “Right/Left” to turn the fast charge
on/off after entering the setting interface. When the fast
charge is selected, the battery can achieve 80%
capacity after 1-hour charge. Please refer to the
picture.
24
29

English Manual
Use “Setting/EQ” to set the EQ mode. Press the
“Left/Right” to select among
“Normal/Rock/Classic/Jazz/User EQ”. When the User
EQ is selected, the vertical scroll bar at the bottom will
be highlighted in 1~5 parts. Press the “Left/Right”
button to switch among different diapason. Press the
“+/-” button to adjust the value of different diapason.
Press the “Menu” button to confirm and return to the
main menu. The user can set the playback EQ
according to the music type or your preference. 5
30
MusePod
Use “Setting/Repeat” to set the playback repeat mode.
There are following 9 types of repeat mode.
In Normal mode, “One Song” means to stop after
playing one song. The icon is
In Normal mode, “One Folder” means to stop after
playing all songs under one folder. The icon is
In Normal mode, “All Songs” means to stop after
playing all songs in the disk (by default). The icon is
In All mode, “One Song” means to play one song
repeatedly. The icon is
In All mode, “One Folder” means to play all songs
under one directory repeatedly. The icon is
In All mode, “All Songs” means to play all songs in the
disk repeatedly. The icon is
In Shuffle mode, “One Song” means to stop after
playing one song at random. The icon is
In Shuffle mode, “One Folder” means to stop after
playing all songs at random under one directory. The
icon is
;
In Shuffle mode, “All Songs” means to stop after
playing all songs at random in the disk. The icon is
Press the “Left/Right” button to switch among
;
;
;
;
;
;
;
;
31

English Manual
“Normal/All/Shuffle”. Press the “+/-“ button to switch
among “One Song/One Folder/All Songs”. Different
icon displays when different playback mode is set,
press the “Menu” button to confirm and return to the
main menu.
26
Use “Setting/Bass Boost” to set the bass boost, which
is classified into 15 levels. After entering the setting
menu, press the “Right/Left” button to adjust the bass
boost level. Press the “Menu” button to confirm and exit
the setting menu.
Use “Setting/Treble Boost” to set the treble boost,
which is classified into 15 levels. After entering the
32

MusePod
setting menu, press the “Right/Left” button to adjust the
treble boost level. Press the “Menu” button to confirm
and exit the setting menu.
27
Use “Setting/3D Effect” to set the 3D surrounding
effects. After entering the setting menu, press the
“Right/Left” button to set the surrounding or cancel.
Press the “Menu” button to confirm and exit the setting
.
menu
Use “Rec Setting/Enc Bitrate” to set the bitrate of
encoding, which ranges from 64Kpbs to 320Kbps and
is displayed by scroll bar. Press the “Left/Right” button
33

English Manual
to increase and decrease. Press the “Menu” button to
confirm and return to the main menu.
Use “Rec Setting/Voc Bitrate” to set the sampling rate
of recording, which ranges from 32Kpbs to 128Kbps
and is displayed by scroll bar. Press the “Left/Right”
button to increase and decrease. Press the “Menu”
button to confirm and return to the main menu.
Rec Setting/Synchonrous
Use “Rec Setting/Synchronous” to set the synchronous.
After entering the setting menu, press the “Left/Right”
button to select to turn the Sync function on or off. If
34

MusePod
“ON” is selected, then different songs will be recorded
to different files when using Line-In. If “OFF” is selected,
then all songs will be recorded to one file.
Use “Information” to display the information of the hard
drive, such as the total disk capacity, used space,
remaining space and the version of player. Press the
“Left” button to return to the main menu.
USB Host Function
With USB Host function, you can use the HDD MP3
player to read the files in other USB devices. When
using the USB Host cable to connect other device, the
message “Try to get device. Please Wait……” will
display. At the same time, the file that is currently being
played will be closed and enter the connection mode.
29
35

English Manual
After the connection is established, the player will
display the file lists of the external USB Device. In the
first line, “Host” will display to replace the previous MP3
(REC, FM). In the list, the first line shows the name of
the device, followed by the directory and files in the
device. Press the “Left/Right” button to enter or exit the
directory. Press the “+/-” button to select the directory
or files under the current directory. Press and hold the
“Play” button after selecting an audio file will copy it to
the USB Data directory (this directory will be generated
by the player automatically). Press and hold the “A-B”
button will copy all files in the external USB Device to
the USBData directory. Different directories will be
created to contain the files in different devices. All files
in one device will be stored in one directory, as shown
below:
When copying files, the whole directory will be copied if
the folder is selected and switch to the copy screen.
36

MusePod
After the copy is completed, it will return to the file list.
Before the copy starts, the player will check if the
remaining space is enough to contain the files to be
copied. If not, then “No Enough Space” will display. If
the player finds the folder to be copied is blank, then
“Error, No File” will display for 2 seconds and then
disappear. If there is a file with the same name in the
player, then “Overwrite? Yes No” will display. Use the
“Vol+/Vol-“ button to select “Yes/No”. Press the “Menu”
button to confirm and exit. After disconnecting and
returning to the file list of the player, the USBData
folder will display by default. At the same time, the Host
icon changes to MP3 icon.
37

English Manual
Cautions
Avoid using the player in the following condition:
Excessive heat (above 40Degree);
Direct sunlight or heating appliances;
Humid environment such as bathroom;
Environment with too much dust;
Protection of the player:
Avoid falling off or shock;
The player can be used when you are walking or
running. However, falling off or shocking may cause
damage to the player.
Do not disassemble the player.
Hardware damage may be caused.
Do not plug into any foreign objects.
Short circuit may be caused to damage the player.
Use of earphone:
Excessive high volume may damage your hearing.
Please avoid continuous long-time playback in high
volume. If you feel any uncommon noise in you ear,
please lower the volume or take a rest.
Please do not wear the earphone when driving or
38

MusePod
riding a bike. Accident may be caused. Stay
cautious or stop using the player in the danger
condition.
Troubleshooting
1. Buttons don’t work
Check if the “Hold” button is “On”. If yes, switch to
“Off” and try again.
2. LCD display error
Check if the proper language is selected in the “ID3
Language”.
3. Files cannot be downloaded after the player
connects to computer.
Check if the computer mainboard supports USB2.0
device. System upgrade may be needed.
If you are using Window 98 operation system, you
need to install the driver first.
Check if the player has free memory
4. The player cannot be charged.
Check if the AC adapter is properly connected.
The fully charged battery cannot be further charged.
39

English Manual
5. The player cannot be powered on.
Check if the batter is charged.
6. There is noise in playback
Plug the earphone firmly. Check if the earphone pin
is dirty (clean with soft dry cloth). Or the MP3 file is
damaged.
7. File transfer to the player fails
Check the connection between the player and PC
Check the battery capacity.
8. The PC doesn’t work well sometimes when
connecting and disconnecting the player.
It’s mainly caused by plugging and unplugging the
USB port when in the file transmission. Therefore, it
is recommended not to disconnect the device during
the file transmission, to avoid any abnormality in the
PC end. Use the safe removal of device in the PC
end.
9. Some MP3 files cannot be played in the player.
As there are various compression format and
compression rate available, some music file formats
are not supported by the player. Usually the player
will skip these files. When you encounter files format
40

MusePod
that are not supported, please take one of the
following two measures:
Delete the music files that are not supported.
Select the MPEG Layer 3 coding when
compressing.
10. “USB Device Error” displays when the USB Host
connects to USB device sometimes.
Currently, the USB Host function only supports the
standard USB Mass Storage devices. More
specifically, only the FAT/FAT16 Mass Storage
devices are supported. Otherwise, the system
will display the error message.
11. The hard drive MP3 player contains a 1.8 inch hard
drive. As the hard drive cannot be shocked,
therefore, please protect the hard drive from falling
off when in use.
12. When we encode MP3 file from other sound device,
why looks like pausing in recording?
Now if the other sound device did not have some
content or sounds, the HDD player will looks it
invalid sound source, it will work until it wait valid
sound.
13. How to deal with so many folder in the Hard disk?
Please do not copy different file to the default
41

42
English Manual
folder, now there is 6 folders in default and also the
folder can not delete(if you delete, it will create
aumotically next times.)
Firmware folder is for existing firmware when you
want to update your player.
ENCODE folder for existing Encoding file from Line
In or FM radio.
Playlist folder for existing Playlist file.
USBDATA folder for existing USB host copying file.
VOISE RECORD folder for existing recording file
by MIC.
TEXTFILE folder for exsiting TXT file to view
e-book.

Accessory
MusePod
Installation CD
User manual
Standard earphone
AC adapter
Line_IN cable USB cable
USB Device adapter USB adapter for
connecting to computer
43

English Manual
r
r
Specification
Memory capacity 20G 1.8 inch Toshiba hard
Battery 1300 MAH/3.7 V
LCD 128*128 4 gray scale display
USB port USB2.0 high speed transfe
USB Host USB1.1 port (USB2.0 device
FM channel range 87.5MHz-108.0MHz
Charge time Battery charge time:3 hours
Play time 12Hours playback only
SN rate 90Bb
Earphone output power 5MW+5MW
Output frequency range 20Hz-20KHz
Record bit rate 32Kbps-320Kbps
Music file format MP3,WMA
Record file format VOC,MP3
Support ID3 language of
the music file
Support compression 8Kbps-320Kbps(MP3)/VBR
44
drive (built-in)
rechargeable lithium battery
with blue backlight
(16 Mbyte/s)
compatible)
(achieve 80% battery afte
1-hour fast charge)
Simplified Chinese,
traditional Chinese,Korean
Japanese,English

http:/www.acer-euro.com
 Loading...