


Acer MP-340
Acer MP150
User’s Manual
Ver 1.0

Copyright
Copyright 2006 by Acer Inc., All rights reserved. No part of this publication may be
reproduced, transmitted, transcribed, stored in a retrieval system, or translated into any
language or computer language, in any form or by any means, electronic, mechanical,
magnetic, optical, chemical, manual or otherwise, without the prior written permission of
Acer Computer GmbH
Disclaimer
Acer Inc. makes no representations or warranties, either expressed or implied, with respect
to the contents hereof and specifically disclaims any warranties, merchantability or fitness
for any particular purpose. Any software described in this manual is sold or licensed "as is".
Should the programs prove defective following their purchase, the buyer (and not this
company, its distributor, or its dealer) assumes the entire cost of all necessary servicing,
repair, and any incidental or consequential damages resulting from any defect in the
software. Further, Acer Computer GmbH, reserves the right to revise this publication and to
make changes from time to time in the contents hereof without obligation to notify any
person of such revision or change.
All brand and product names mentioned in this manual are trademarks and/or registered
trademarks of their respective holders.

Table of Contents
I Safety Instruction............................................................................................4
II Product Introduction ......................................................................................4
1 Major features ......................................................................................... 4
2 Keys and Functions.................................................................................5
3 Pack and Accessories............................................................................. 5
4 Charging batteries................................................................................... 5
5 Installation of USB drive..........................................................................6
6 The linkage and safe remove of USB cable............................................ 7
III Basic Functions............................................................................................ 8
1 Basic operation........................................................................................8
2 Play music...............................................................................................8
3 Video playing.........................................................................................10
4 Picture viewing......................................................................................10
5 Microphone Recording.......................................................................... 11
6 E-book...................................................................................................12
7 Files Operation...................................................................................... 12
8 Menu Setting.........................................................................................12
9 Format conversion of video files............................................................13
IV Common Problems and Solutions..............................................................15
V Specifications.............................................................................................. 16
3

I
Safety Instruction
1) Make sure a close reading of this Safety Instruction.
2) .Be sure to well keep this brochure for further need
3) Please keep MP3 in a dry place.
4) Please keep it out of sunshine.
5) Any liquid should never be poured into this device or destruction or electric leakage
might occur
6) If one of the following cases happens, please contact a professional:
the pouring of any liquid into the device
the device is dampened
abnormal working of the device or no working can be obtained under the
manual’s guide
the drop or damage of the device
7) No use of MP150 in such cases:
when driving or riding
when doing a high risky job
when walking on the street
any case that needs full attention
8) If you want to format the disk of MP150, please select the format of FAT16.
9) No liquid or spraying detergent can be used for cleaning, and only a wet soft cloth is
enough.
10) Please adjust the volume to proper when the earphone is connected in case of any
listening hurt.
11) Attention: Explosion might happen due to any improper use of batteries. Please see
the instructions in chapter of “Battery”
12) The used batteries should be recycled rather than disposed as common rubbish.
II
Product Introduction
Thank you for choosing Acer’s MP150, which is a high-quality and portable MP3 player with
chargeable Li-Polymer battery. You can play different formatted audio files or converted
video files (with conversion tool provided) and enjoy the perfect listening and watching
experience. It is also a portable USB storing device which enables you to store and manage
your personal data.
1 Major features
Display –1.5" OLED screen can display clearly the pictures and video files.
Video playing –It supports SFM video files.
Audio playing –It supports MP3/WMA /WAV audio files
Lyric Synchronization—Songs will play with lyrics.
Photo viewing –It supports JPG and BMP files and the user can view
pictures by copying them to MP150.
Text reading – It has e-book function that supports. text files (ANSI and
Unicode).
Recording – It supports audio recording(microphone recording)
USB 2.0 Port–It supports USB 2.0’s high-speed and full-speed functions.
SD Card Slot –It supports SD cards.
Battery–The built-in rechargeable Li-polymer battery is durable.
Video files conversion – the accessory software can convert any
unreadable file formats into readable ones.
4
Multiple languages –It supports multi-languages, such as English, German,
French, Italian, Spanish and Dutch.
Firmware upgradation – The firmware can be upgraded.
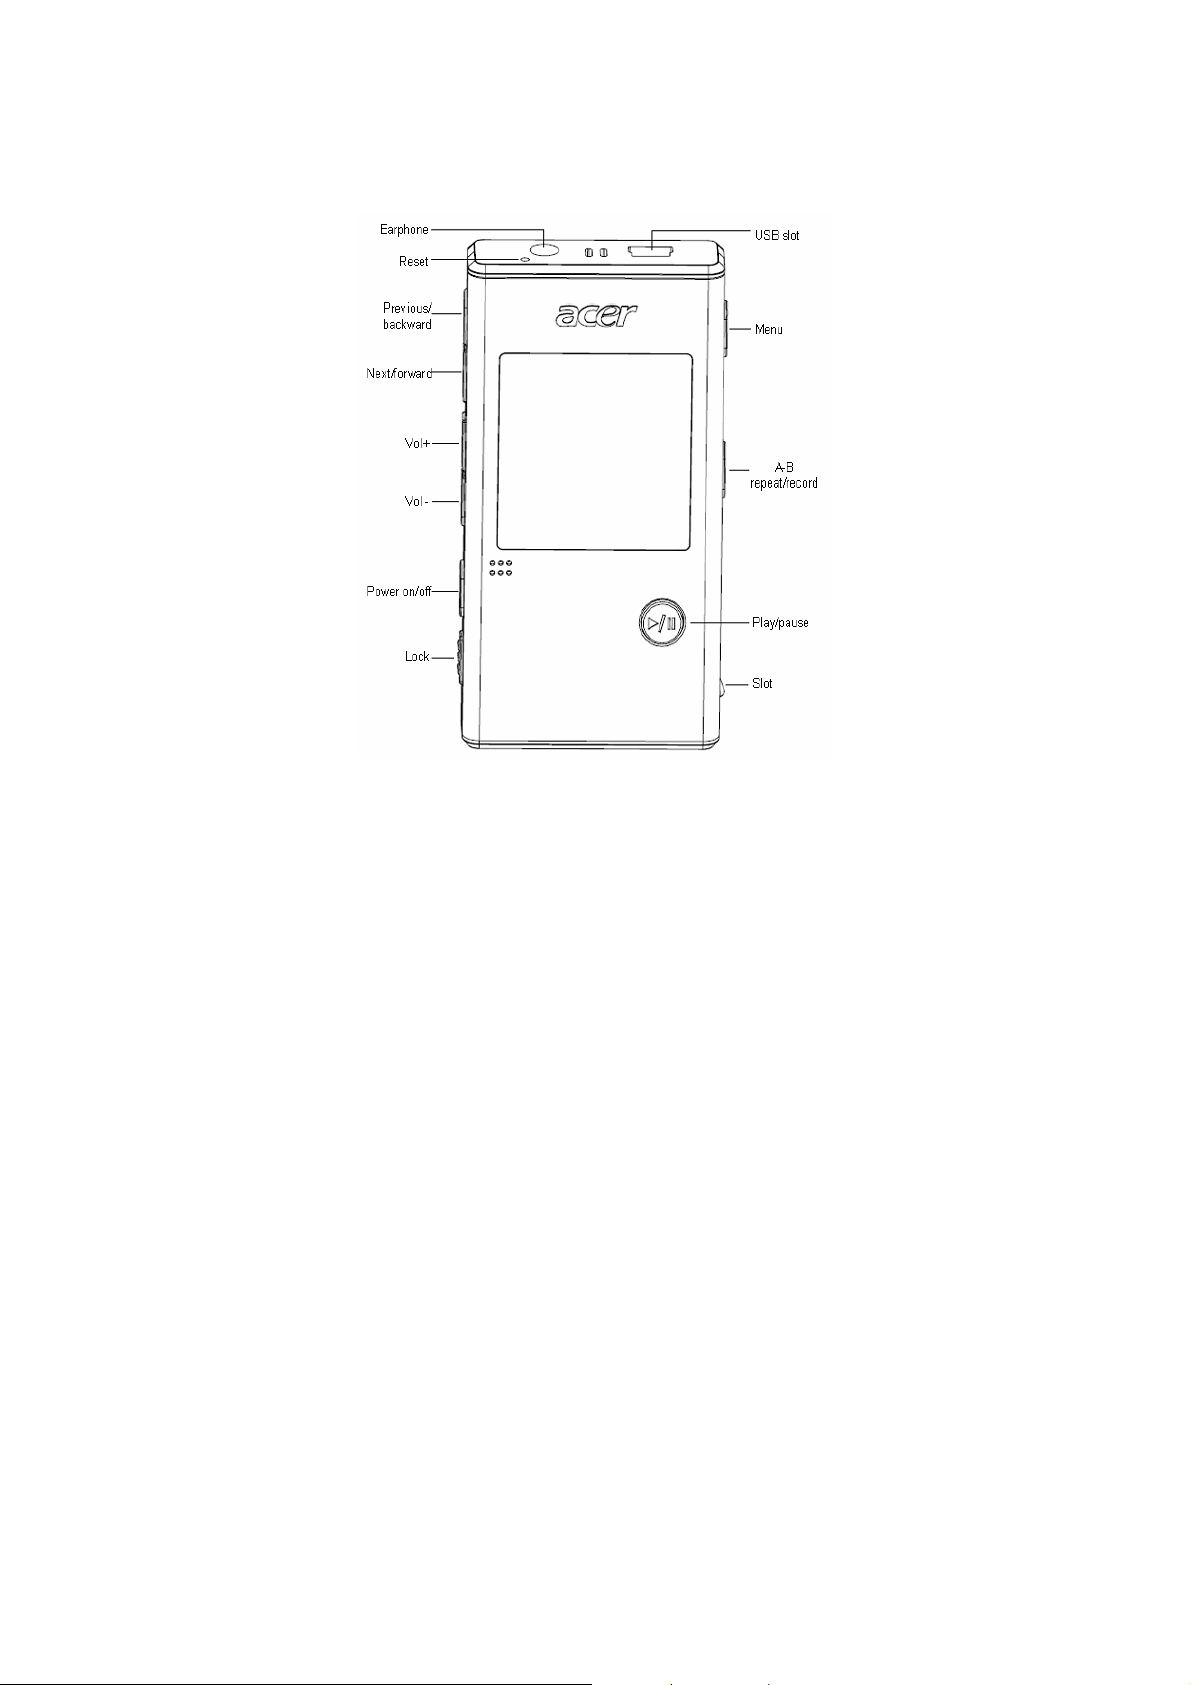
2 Keys and Functions
3 Pack and Accessories
Please be sure that the pack and accessories include the following pieces:
; Acer MP150 player
; User’s manuel
; Installing CD
; Power adapter
; USB line
; Stereo earphone
4 Charging batteries
1) This device has the built-in Li battery and the user can charge the battery by using
the accessory charger. No matter turning it on or off, the battery will be charging
when the charger connects it to the live power.
2) If the battery indicator shows one grid or no grid, it means lacking the power and
charging is needed.
3) In order to last the battery life, it is recommended to discharge the battery
completely before charging during the first two times of charging.
4) If there is a long rest time for the device, in case of the damage made by overuse of
battery, please make sure that you charge and discharge the device at least once a
month
5
5 Installation of USB drive
The USB drive installation is only needed for windows 98 and windows 98 se computers.
The steps are as follows:
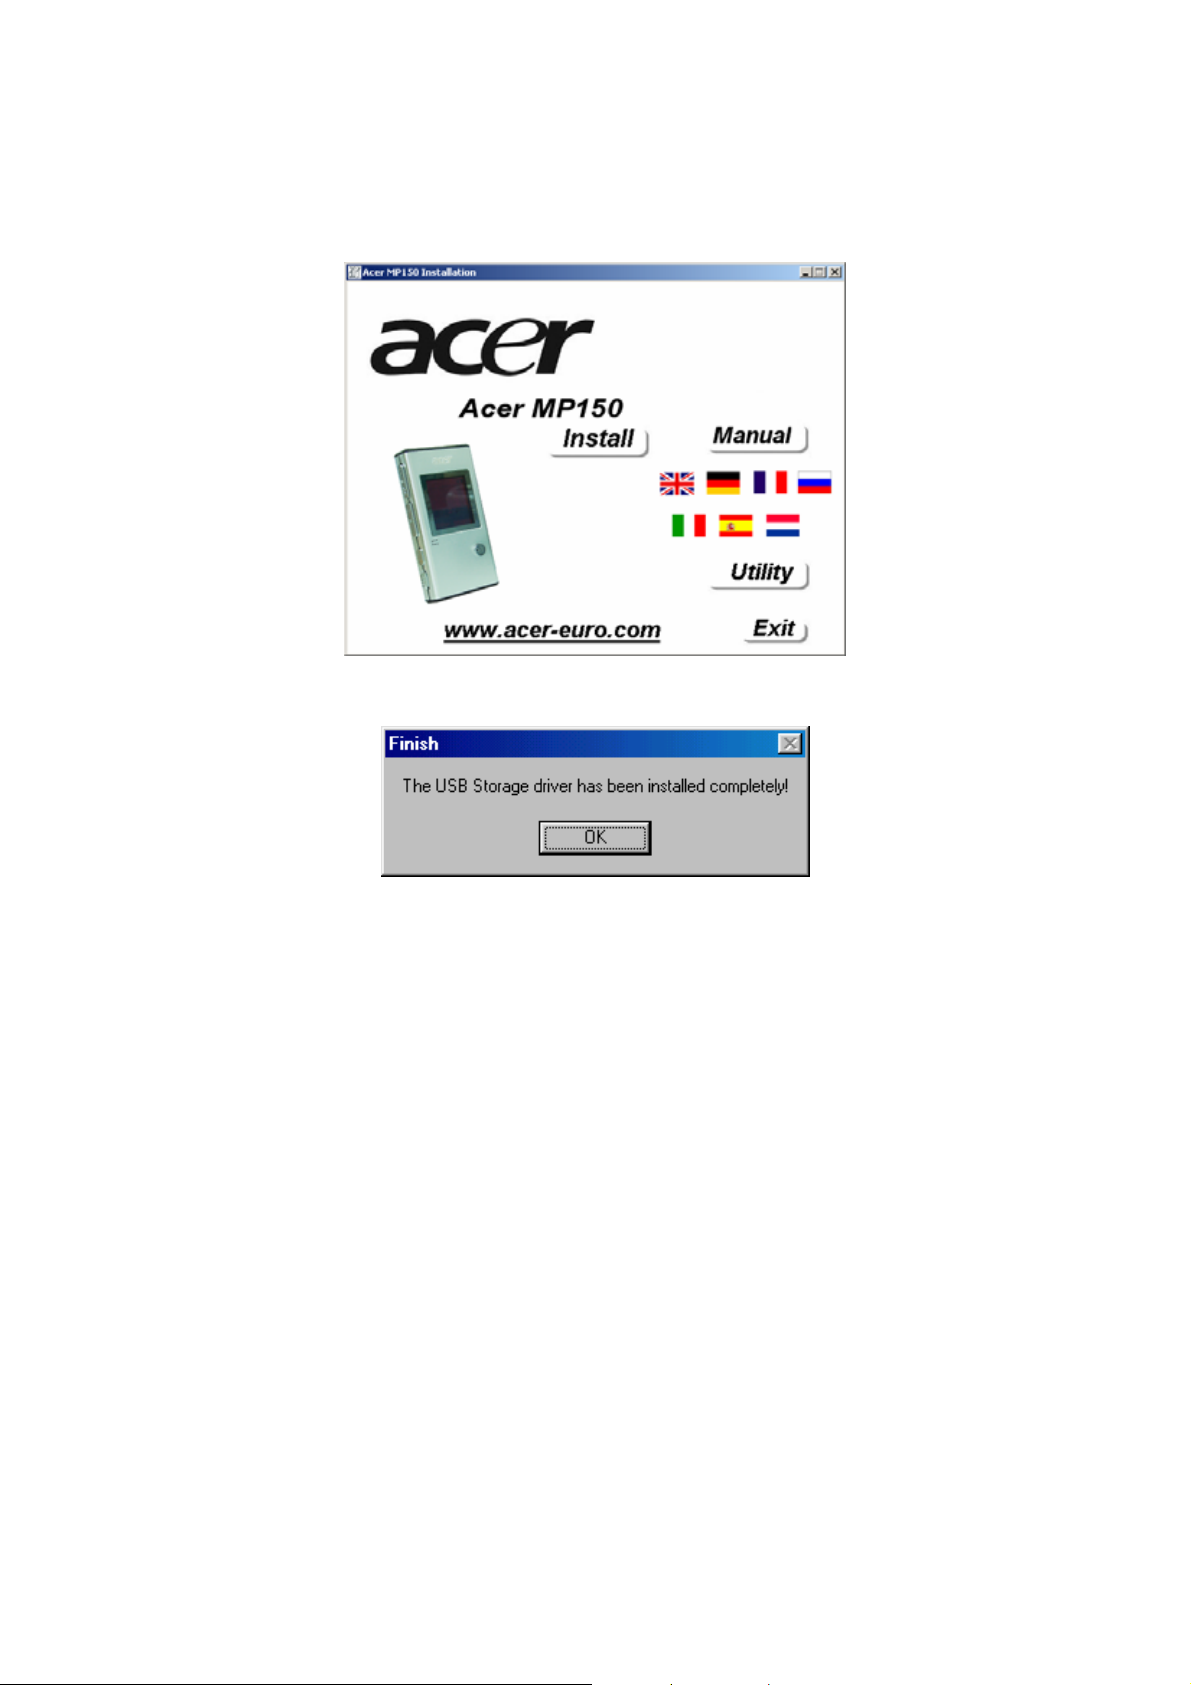
1) Insert the accessory CD into the CD drive and it will work automatically. The
interface shows as follows. In the process of installing, consistently click “next” till
“finish”.
2) A dialogue box of whether “restart the system” will eject and select “ok” to restart
the computer, then the installation is finished.
Confirm the installation of USB drive.
1) Connect MP150 player by the USB cable to the computer
2) Choose “Control Panel”,”Syetem”, and enter “Device Manager”, it will show as
follows;
6

6 The linkage and safe remove of USB cable
6.1 Link the USB cable
Link the MP3 player with the computer by USB cable, and the screen of MP3 will show the
following picture. It means the next step of copying data can start.
When the player is transferring data, no direct break between the player and computer is
allowed, otherwise the data might miss. Please safely remove the player device from the
computer.
6.2 Safely remove the USB cable from the computer
1) Right-click the “Plug and play” button in taskbar and choose “Safely remove the
device”
2) Select the device you want to unplug or eject and then click [stop] ;
3) Confirm devices to be stopped and choose [OK] to continue;
4) Click [close] to end the whole operation
Attention: Any abnormal interrupt of the linkage of the device to the computer might cause
hurt to the product.
7

III
Basic Functions
1 Basic operation
Turn on and off the player
1) Turn on: Long press “Power” key the screen will show the Acer Logo (shown as
follows) and enter the main menu interface. The defaulted choice is “music”.
2) Turn off: Long press “Power” till the Power off logo appears (shown as follows). If
any unknown reason causes the player into dead status, normally press “RESET”
key to restore it.
2 Play music
The defaulted mode is “Music” after entering the main menu as in Pic 1. Press “ENTER” to
the interface of music list, (it is the playing status) as in Pic 2. Press again “Enter” to pause
the music, see Pic 3
Pic1
Pic 2 Pic 3
1) Display of the music playing modes
2) How to choose music (the function to select songs while listening to a song)?
8

Under music playing status, long press “Enter”, a “Select Memory” dialogue box will
appear immediately , see Pic 4. Press “ “or” “key to choose “LOCAL”or”Card”, and
press “ENTER” to get into the root directory of Music. Press “ “or” “key to choose
the wanted music folder and press “ENTER” to get into the sub directory of music
folder and press “ENTER” again to go to the Music file list. Press” “or” “key to
choose the needed music file and press “ENTER” to confirm playing the music.
Attention: long press “ENTER” means return to upper directory. Repeat “ENTER” will
help back to the main menu. See the main menu in Pic 1.
3) How to adjust the volume?
When playing the music, press “VOL+”or”VOL-”to add or decrease the volume.
4) How to set EQ, playing modes and A-B replay?
EQ: The player has built in 7 sound effects, namely Normal, Rock, Jazz,
Classical, Pop, Bass and Treble. Under music playing status, short press
MODE, a setting window will pop out, see Pic 5. Press key to choose among
different EQs, then short press “ENTER” to confirm it. Press “ “or” “ to
choose “Exit” and short press it to return to the play interface.
Playing modes: This player has equipped 3 music playing modes
(Normal , Repeat One , Repeat All ) Normal: Play the first music file till
the last in a certain directory. Repeat One: Repeat one song; Repeat All:
Repeat all the songs in music file. When in the music playing or pause status,
short press “MODE”, a setting window will pop out, see Pic 5. Press “ “or”
“ to choose “Repeat” and short press “ENTER” for confirmation. The three
modes will appear and press “ “or” “to select one and short press
“ENTER” for confirmation. Press “ “or” “to select “Exit” and short press
“ENTER” to return to the playing interface.
Pic 4 Pic 5 Pic 6
When music is playing, gently press “REC” button once to determine the
beginning of the period you want to repeat. The screen will show “A-”, see
Pic 7; Gently press “REC” again to set the end of the section. The screen will
show “A-B”,see Pic 8. Then this period of the music will be repeated over
and over. One more press “REC” will end the repetition.
Pic 7 Pic 8
5) Lyrics Synchronization
If a *.MP3 file and a *.LRC file of the same music are copied into the player, the lyrics
will appear the same time when the music is playing, see Pic 8.
Attention: the MP3 file and the LRC file of the same music must be under the same name.
For example, only these files that are named “Eyes On Me.MP3 “and “Eyes On Me.LRC”
are copied into the player, can the lyrics synchronization be realized.
9

6) How to delete the songs?
Under the Music list, press “ “or” “key to choose the music file that needs to be
deleted, and short press “MODE”, a window of “Property, delete and exit” appears.
Press” “or” “key to choose “delete” and short press “ENTER”. A dialogue box
“sure to delete” pop up and press “ “or” “ to choose “Yes” and press “ENTER” to
delete the chosen file.
3 Video playing
Select “Video” under the main menu, as in Pic 9 and press “ENTER”, a window of “Select
Memory” show up. Press “ “or” “to select “LOCAL”or”Card”and press “ENTER” to the
root directory of VIDEO. Press “
“ENTER” to the sub directory and press “ENTER” to the VIDEO file list. Press “
“or” “to select the wanted video file and press
“or”
“to the needed VIDEO file and press “ENTER” to confirm it. During the procee of video
playing, press “ “or” “can play the previous or the next video file. The player only
supports SFM files and special VIDEO conversion tool is provided for format conversion.
The latter part has more.
1) How to adjust volume?
When playing the video, press “VOL+”or”VOL-”to add or decrease the volume.
2) Check the file property
Under the VIDEO file list, short press “MODE”, and a window of “Property, delete and
exit” appears. Press “ “or” “to select “Property “ and short press “ENTER” to
check the size of the chosen file. Select “Exit” to return to the file list.
3) Delete the VIDEO file
Under the VIDEO file list, short press “MODE” and a window of “Property, delete and
exit” appears. Press “ “or” “to select “Delete” and short press “ENTER”. A
dialogue box “Sure to delete” pops up and press “ “or” “to select “Yes” and press
“ENTER” to delete the chosen file. Press “Exit” to return to the VIDEO file list.
4) Exit the VIDEO playing
Under VIDEO file list, long press “ENTER” to exit to the main menu.
Pic 9 Pic 10
4 Picture viewing
Select “Photo” under the main menu (see Pic 10)and press “ENTER”, a prompt window of
“Select Memory” appears, press “ “or” “to select “LOCAL”or”Card”and press “ENTER”
to the root directory of PHOTO. Press “ “or” “to choose the right Photo folder and
press “ENTER” to the sub directory of PHOTO. Press “ENTER” again to the PHOTO file list
(it supports “bmp” and “jpg” formats). Press “ “or” “to select the needed picture and
press “ENTER” to display it. (see Pic 13) When viewing the pictures, press “ “or” “to
view the previous or the next picture. Short press “MODE”, a window of “Manual Play, Auto
Play, Exit” will jump out and press “ “or” “to choose “Manual Play” and short press
“ENTER” for confirmation. Then a window of “Enable, Disable, Exit” will show up and press
“ “or” “to choose” Enable” and press “ENTER” to confirm the manual displaying; or
10

press “ “or” “ to choose “Disable” and pr ess “ENTER” to confirm the autoplay. Long
press “ENTER” to return to the picture file list.
1) Check the property of photos
Under the picture file list, short press “MODE”, a window of “Property, delete and exit”
will show up and press “ “or” “to choose “Property” and short press “ENTER” to
check the property of the chosen picture. Select “Exit” to return to the picture file list.
2) Delete the picture
Under the picture file list, short press “MODE”, a window of “Property, delete and exit”
will show up and press “ “or” “to choose “delete” and short press “ENTER”, a
window of “sure to delete” pops up. Press “
“or” “to choose “Yes” and press
“ENTER” to delete the chosen picture. Select “Exit” to return to the picture file list.
3) Exit viewing photos
Under the picture file list, long press “ENTER” to return to the main menu.
Attention: when viewing the pictures that are not “BMP” or “JPG” supported by the player,
the system will prompt the window of “error format”.
5 Microphone Recording
Select “Record” under the main menu, as in Pic 11 and short press “ENTER”, a prompt
window of “Record Menu” shows up and press “
“or” “to choose “Record” among
“Listen, Record, Record Setting, Exit”. Short press “ENTER” and a prompt window of
“Select Memory” appears and press “ “or” “to choose “Local” between “Local” and
“Card” and short press “ENTER” to begin recording, see pic 12,(the display of MIC voice
recording) Short press “ENTER” to pause the recording and long press “REC” to stop
recording and save the file automatically, see Pic 13. Short press “ENTER” again to return
to the prompt window of “Record Menu”.
1) Recording setting
Select “Record” under the main menu and short press “ENTER”, a prompt window of
“Record Menu” shows up and press “ “or” “to choose “Record Setting” among
“Listen, Record, Record Setting, Exit”. Short press “ENTER”, a prompt window of
“Record Setting”jump out and press “
“or” “to choose “Long time” or “Fine REC”
and short press “ENTER” for confirmation. Then return to the prompt window of
“Record MENU”.
2) Playing recording file
When the recording voice source is selected as “MIC”, the recorded file will be
automatically saved in the “VOICE” file under music file list. Under the main menu,
select “Recorded” and short press “ENTER”, a prompt window of “Record Menu” will
show up. Press “
“or” “to choose “listen” among “Listen, Record, Record Setting,
Exit”. Short press “ENTER” and a prompt window of “Select Memory” appears, press
“ “or” “to choose “Local” between “Local” and “Card”. Short press “ENTER” to
play the recording file.
Pic 11 Pic12 Pic13
11

6 E-book
Select “E-book” under the main menu as in Pic 14 and press “ENTER”, a prompt window of
“Select Memory” appears immediately. Press” “or” “to choose “Local” or “Card” and
press “ENTER” to get into the root directory of E-Book. Press “ “or” “to choose the
needed E-Book folder and press “ENTER” to the sub directory and press “ENTER” to the
file list. Press “ “or” “to choose the needed E-Book file and press “ENTER” for
confirmation. When reading the E-Book, press “ “or” “to choose the displayed content.
Short press “MODE”, a prompt window of “Manual Play, Auto Play, Exit” shows up and
press “ “or” “to choose “Manual Play” and press “ENTER” for confirmation. Then a
window of “Enable, Disable, Exit” will show up and press “ “or” “to choose” Enable”
and press “ENTER” to confirm the manual displaying; or press “ “or” “ to choose
“Disable” and press “ENTER” to confirm the autoplay. Long press “ENTER” to return to the
picture file list.
1) check the property of files
Under the e-book file list, short press “MODE”, a window of “Property, delete and exit”
will show up and press “ “or” “to choose “Property” and short press “ENTER” to
check the property of the chosen file. Select “Exit” to return to the file list.
2) Delete the e-book file
Under the e-book file list, short press “MODE”, a prompt window of “Property, delete
and exit” will show up and press “
“ENTER”, a window of “sure to delete” pops up. Press “
“or” “to choose “delete” and short press
“or” “to choose “Yes” and
press “ENTER” to delete the chosen file. Select “Exit” to return to the e-book file list.
3) Exit e-book
Under the e-book file list, long press “ENTER” to return to the main menu.
Pic14 Pic 15
7 Files Operation
Select “Files” under the main menu, see Pic 15 and press”ENTER”, a prompt window of
“Select memory” shows up. Press “ “or” “to choose “Local” or “Card” and press
“ENTER” to the root directory of files. Press “
press “ENTER” to the sub directory of the folder. Press “
“or” “to choose the needed folder and
“or” “to choose the wanted
file and press “ENTER” to play it.
8 Menu Setting
Select “SETTING”under the main menu as in Pic 16. Short press “ENTER” to go to the
system setting, see Pic 17. It includes 6 settings, namely “LCD Setting, Language, Power
Off, Sys Info, Memory Info, Load Default”. Press “ “or” “to choose any setting and
press “ENTER” to go to the detailed setting interface.
12

Pic16 Pic17
1) LCD Setting
Under “SETTING”, Press “ “or” “to choose “LCD Setting” and short press
“ENTER” to the screen setting interface. Press “ “or” “to set the screen saver time
and short press “ENTER” to return to “setting” interface.
2) Language setting
Under “SETTING”, Press “ “or” “to choose “Langugae” and short press “ENTER”
to the language setting interface. Press “ “or” “to set the language and short
press “ENTER” to return to “setting” interface.
3) Power off setting
Under “SETTING”, Press “ “or” “to choose “Power Off” and short press “ENTER”
to the Power Off setting interface. Press “ “or” “to set the Power Off time and
short press “ENTER” to return to “setting” interface.
4) System Information
Under “SETTING”, Press “ “or” “to choose “SYS Info” and short press “ENTER”
to the system information interface(company name, type, software edition). Short press
“ENTER” to return to “setting” interface.
5) Storage Information
Under “SETTING”, Press “ “or” “to choose “memory Info” and short press
“ENTER” to the memory information interface(Total volume and rest volume of Local
Memory and Memory Card). Short press “ENTER” to return to “setting” interface.
6) Load Default
Under “SETTING”, Press “ “or” “to choose “Load Default” and short press
“ENTER”. A prompt window of “Load Default ? Yes or No ?” appears, press “ “or”
“to choose “Yes or No” and short press “ENTER” for confirmation.
9 Format conversion of video files
1) About the tool
It is used to convert the video files to SFM files that can be played in this player.
2) Software Operation
a) Introduction
To operate the software, first click “start”-”program”menu, and select
“MP3”-”FilmCre.exe”, and open the tool interface. As in Pic 18:
13

Pic18
b) Add video files
After the operation of the software, click “start” to add video files (or the
will-be converted files. Video files appear as follows are will-be converted
files if without any specification) and click the button;
A video file path is ejected and click right small button beside
“review”and select the proper file type. Correctly choose a video file.
After adding a file, a “save as” will show the path of this video file. Click the
little button on the right of “save as”to choose the saving place.
3) Choice of the conversion length and start conversion
select the beginning point of the will-be converted file
select its ending point
Click “start converting” to operate conversion.(Pay attention to: converting
progress bar and video interface)
4) Platforms
Windows98, Windows Me, Windows2000, Windows XP. Windows Media Player 9.0
and up; DirectX 9.0 and up.
14

IV
Common Problems and Solutions
The following part is some of the common problems in dealing with the product. Please
check it first before contacting the Customer Service Center.
1. Q: The player cannot be started and LCD doesn’t show anything, why?
A: Make sure that the battery is fully charged.
2. Q: why are the keys not functioning?
A:
1) Check if there is a “Hold” sign on LCD.
2) If there is a “Hold” sign, please push Hold button up and unlock the keys.
3. Q: The downloaded files whose capacities are smaller than the rest storage room of the
player cannot be downloaded to the player.
A: The memory chip is taking 16kb or 32 kb as a memory unit and even a 1Byte file will
take up a unit. Therefore some files whose capacities are smaller than the rest storage
room cannot be downloaded to the player.
4. Q: The player turns off suddenly, why?
A:
1) Please check the [power off] under [setting] in main menu.
2) Please check if there is enough battery power.
5. Q: LCD screen shuts suddenly, why?
A: Please check if a screen saver is set
6. Q: Video, audio files cannot be played and pictures cannot be seen, why?
A:
1) The file formats must meet the requirement of this player
2) Make sure the file formats are supported by this product
3) If the file format is not supported by this product, pleas e use the format conversion
software to convert the format into readable one.
7. Q: There is no voice or little voice when playing music or video, why?
A: Please check the volume status, and adjust the volume button.
15

V
Specifications
Category Parameter specification
Built-in Storage
System
File System FAT16
Key Definition
Language Multi-Language Menu and Filename Display
User interface
Display Interface 1.5’’ color OLED
Audio Output
USB2.0 Device
File View Mode List View &Icon
Battery Rechargeable Li-Polymer 3,7V/570mAh
Playback Time Video: 4 hours, Audio: 8 hours (average)
Power Saving Auto Power off, Screen saver
Audio Line out Stereo
Earphone 30mW, 32Ohm, 1 outlet
128/256/512/1024MB Flash(For choice)
SD/MMC Card
Power, Up, Down, VOL+, VOL-, Enter, Mode, Lock,
REC
USB 2.0/ USB 1.1 interface
Operation System:
Windows98/98SE/ME/2000/XP
Mac OS 9.0 and Later
General
Dimensions
Operation Temperature
83
×47×3.5 mm
0
°C to 40°C
16

http://www.acer-euro.com
 Loading...