

Page 1

Acer MP120
User’s Manual
Ver 1.0
Page 2

Copyright
Copyright 2006 by Acer Inc., All rights reserved. No part of this publication may be
reproduced, transmitted, transcribed, stored in a retrieval system, or translated into any
language or computer language, in any form or by any means, electronic, mechanical,
magnetic, optical, chemical, manual or otherwise, without the prior written permission of
Acer Computer GmbH
Disclaimer
Acer Inc. makes no representations or warranties, either expressed or implied, with respect
to the contents hereof and specifically disclaims any warranties, merchantability or fitness
for any particular purpose. Any software described in this manual is sold or licensed "as is".
Should the programs prove defective following their purchase, the buyer (and not this
company, its distributor, or its dealer) assumes the entire cost of all necessary servicing,
repair, and any incidental or consequential damages resulting from any defect in the
software. Further, Acer Computer GmbH, reserves the right to revise this publication and to
make changes from time to time in the contents hereof without obligation to notify any
person of such revision or change.
All brand and product names mentioned in this manual are trademarks and/or registered
trademarks of their respective holders.
All brand and product names mentioned in this manual are trademarks and/or registered
trademarks of their respective holders.
Page 3

Contents
I Safety Declaration............................................................................................. 2
II Product Description .......................................................................................... 2
1. Main Features.................................................................................................. 2
2. Button Location................................................................................................ 3
3. Packaging / Accessories...................................................................................3
4. Installation of USB Driver................................................................................. 4
5. USB Connection and Safe Removal.................................................................5
III Functions ........................................................................................................... 5
1. Basic Operations..............................................................................................5
2. MUSIC Mode....................................................................................................6
3. REC Mode......................................................................................................11
4. Voice Mode.................................................................................................... 12
5. FM Radio Mode (Optional) ............................................................................ 13
6. System Setup................................................................................................ 15
IV FAQ................................................................................................................... 19
V Product Specifications.................................................................................... 19
1
Page 4

I Safety Declaration
1. Please carefully and thoroughly read this safety guide
2. Please keep this manual secure for future reference.
3. Please keep the unit dry
4. Please avoid exposing this unit to sunlight.
5. Don’t pour any liquid into this unit; otherwise it will cause damage or electric shock.
6. Please contact with a professional for handling this: MP120 Player if the following
situations occur:
Liquid penetrates into this unit
The unit is affected by damp
The operation of this unit is not normal, or the user can’t return to normal
operational status by consulting this manual
The unit is dropped or is damaged
7. Please don’t use MP120 Player in the following situations:
While driving a vehicle
Carrying out dangerous work
Walking on the street
Any situation that needs full concentration
8. If you want to format the disk of MP120 Player, please select FAT to format it.
9. Please don’t use liquid or spraying agent to clean this unit. Please use soft, wet cloth
to wipe this unit.
10. During listening with earphones, please adjust to suitable volume to avoid hearing
from being damaged.
11. Note: Improper use of battery may cause explosion! Please correctly use the battery
as per instruction stated in Section: Battery!
12. Don’t throw used battery into the waste bin, it should be recycled.
II Product Description
Thank you for purchasing this Acer MP120 product. This product shows the main menu,
sub-menus, song names, lyrics and ID3 information. Its perfect sound quality, high reliability
and elegant appearance all work together to make it a masterpiece. We sincerely hope that
this product will bring you the best experience you can expect in this digital era.
1. Main Features
Display – STN LCD display, with 7 colorful backlight
Audio play – Supports a broad range of music formats, including MP1, MP2, MP3,
WMA, and WAV, as well as WMDR10 WMA files
FM radio stereo – Powerful automatic and manual channels searching (optional)
Driver-free U-disk–Without any management program needed, you can perform file
operations through “Removable Disk” in “My Computer”. No driver is required on
Windows 2000 and higher.
Record/Repeat–This unit allows you to record external audio sources through the
microphone and save them as audio files of WAV and ACT formats. In addition, you can
select segment repeat or comparison repeat to enjoy real digital repeat.
7 EQ modes–Natural, rock, pop, classic, soft, jazz, and DBB
Multiple playing modes–Normal, repeat one, folder, repeat folder, repeat all, random,
and Intro
Timed shutdown–You can set the sleep mode and power saving mode for more
convenient use.
Full animation menu–Intuitive animation menu, together with corresponding texts,
offers greatest ease of use!
2
Page 5
Multi-Languages–Supports many languages, including simplified Chinese, traditional
Chinese, English, French, German, Italian, Dutch and Spanish
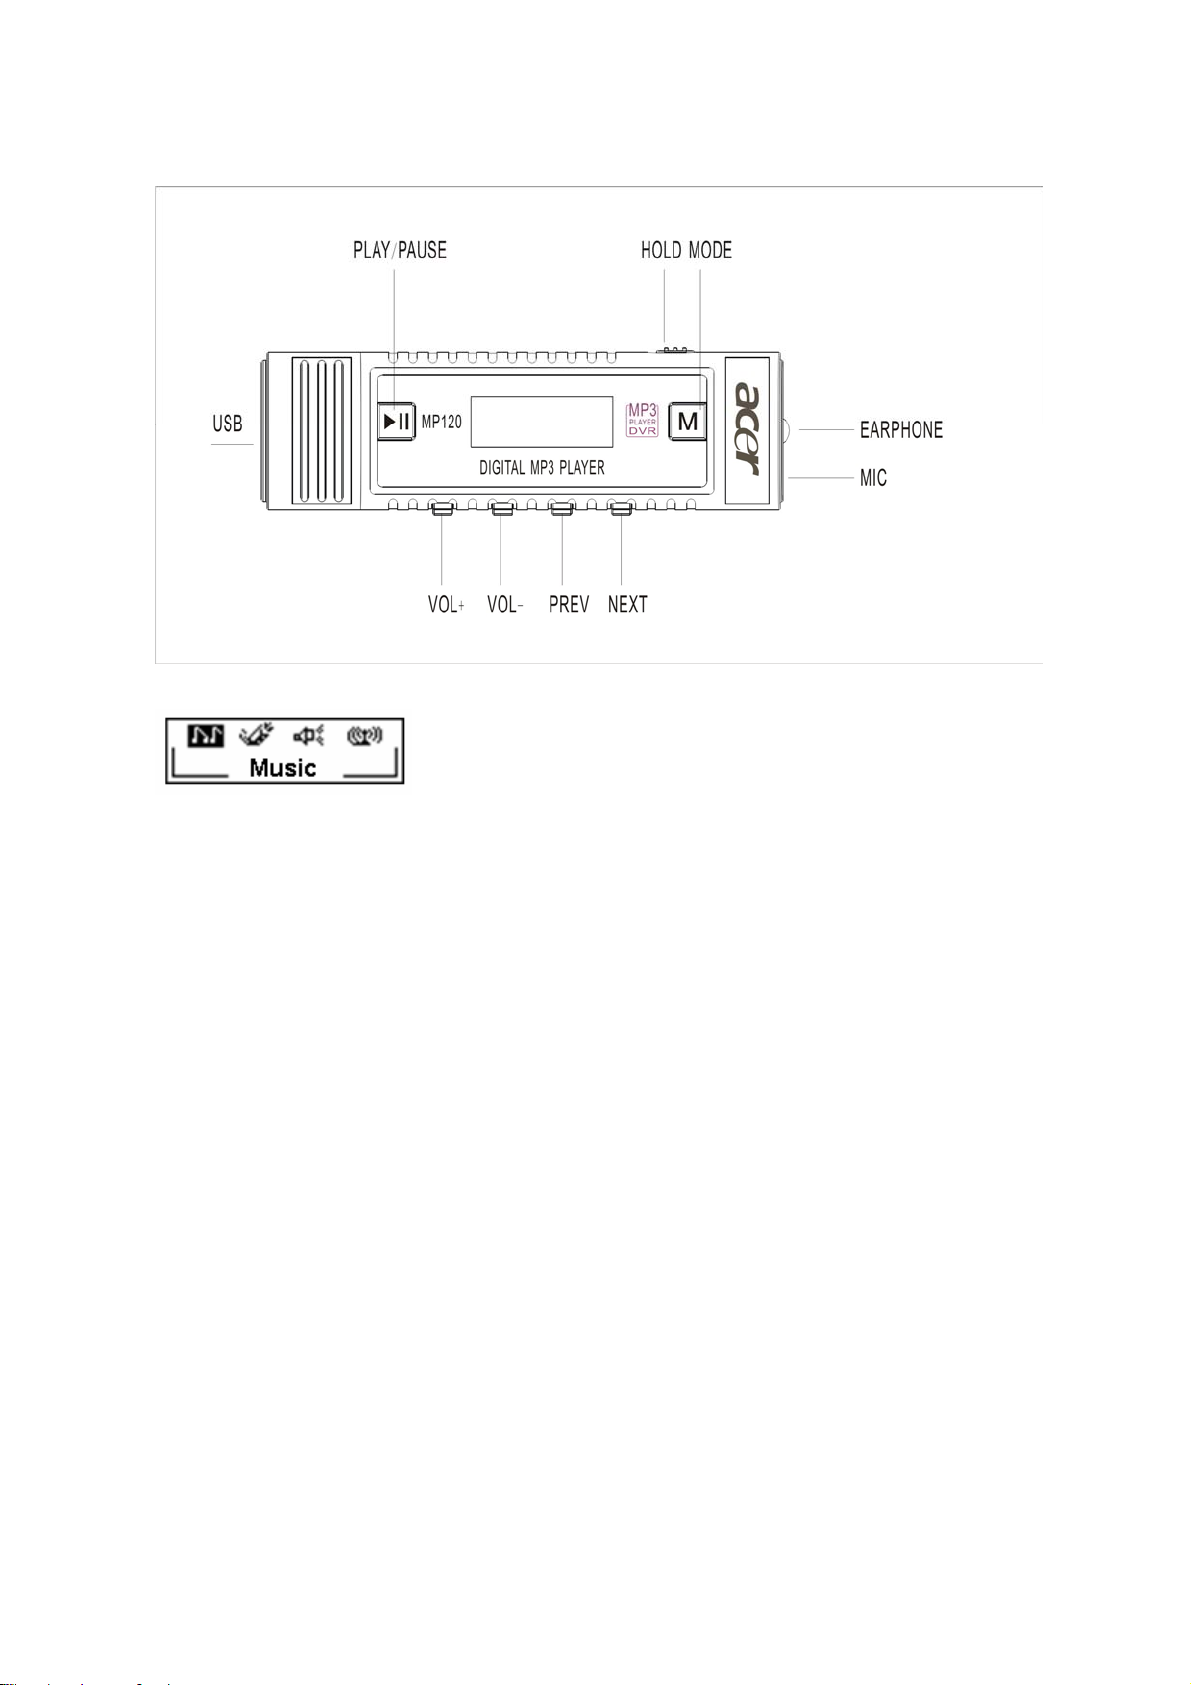
2. Button Location
2.1 Main Menu
2.2 Keys, Switch and Ports
This player provides six keys and one switch:
z PLAY/PAUSE key: Allows you to power-on (long pressing), play, pause, stop, and
power-off (long pressing)
z PREV key: Allows you to select the previous song (short pressing) or move fast forward
(long pressing).
z NEXT key: Allows you to select the next song (short pressing) or move fast backward
(long pressing).
z VOL+ key: Allows you to increase the volume.
z VOL- key: Allows you to decrease the volume.
z MODE key: Allows you to change the mode.
z HOLD switch: Allows you to lock the keys.
Note: You can short press, long press or hold a key, where:
c Short press: You press the key and release it in less than two seconds.
d Long press: You press the key and release in more than two seconds.
e Hold: You press the key and do not release it until the desired effect is achieved.
2.3 PORT
z USB: Standard USB port
z EARPHONE: Standard earphone jack
2.4 Recording
z Mic: input
3. Packaging / Accessories
Please confirm the packaging and accessories have the contents below:
9 Acer MP120 Player
3
Page 6
9 Environment Friendly Card
9 Installation CD
9 AAA LR03 Battery
9 QSG
9 FM Earphone
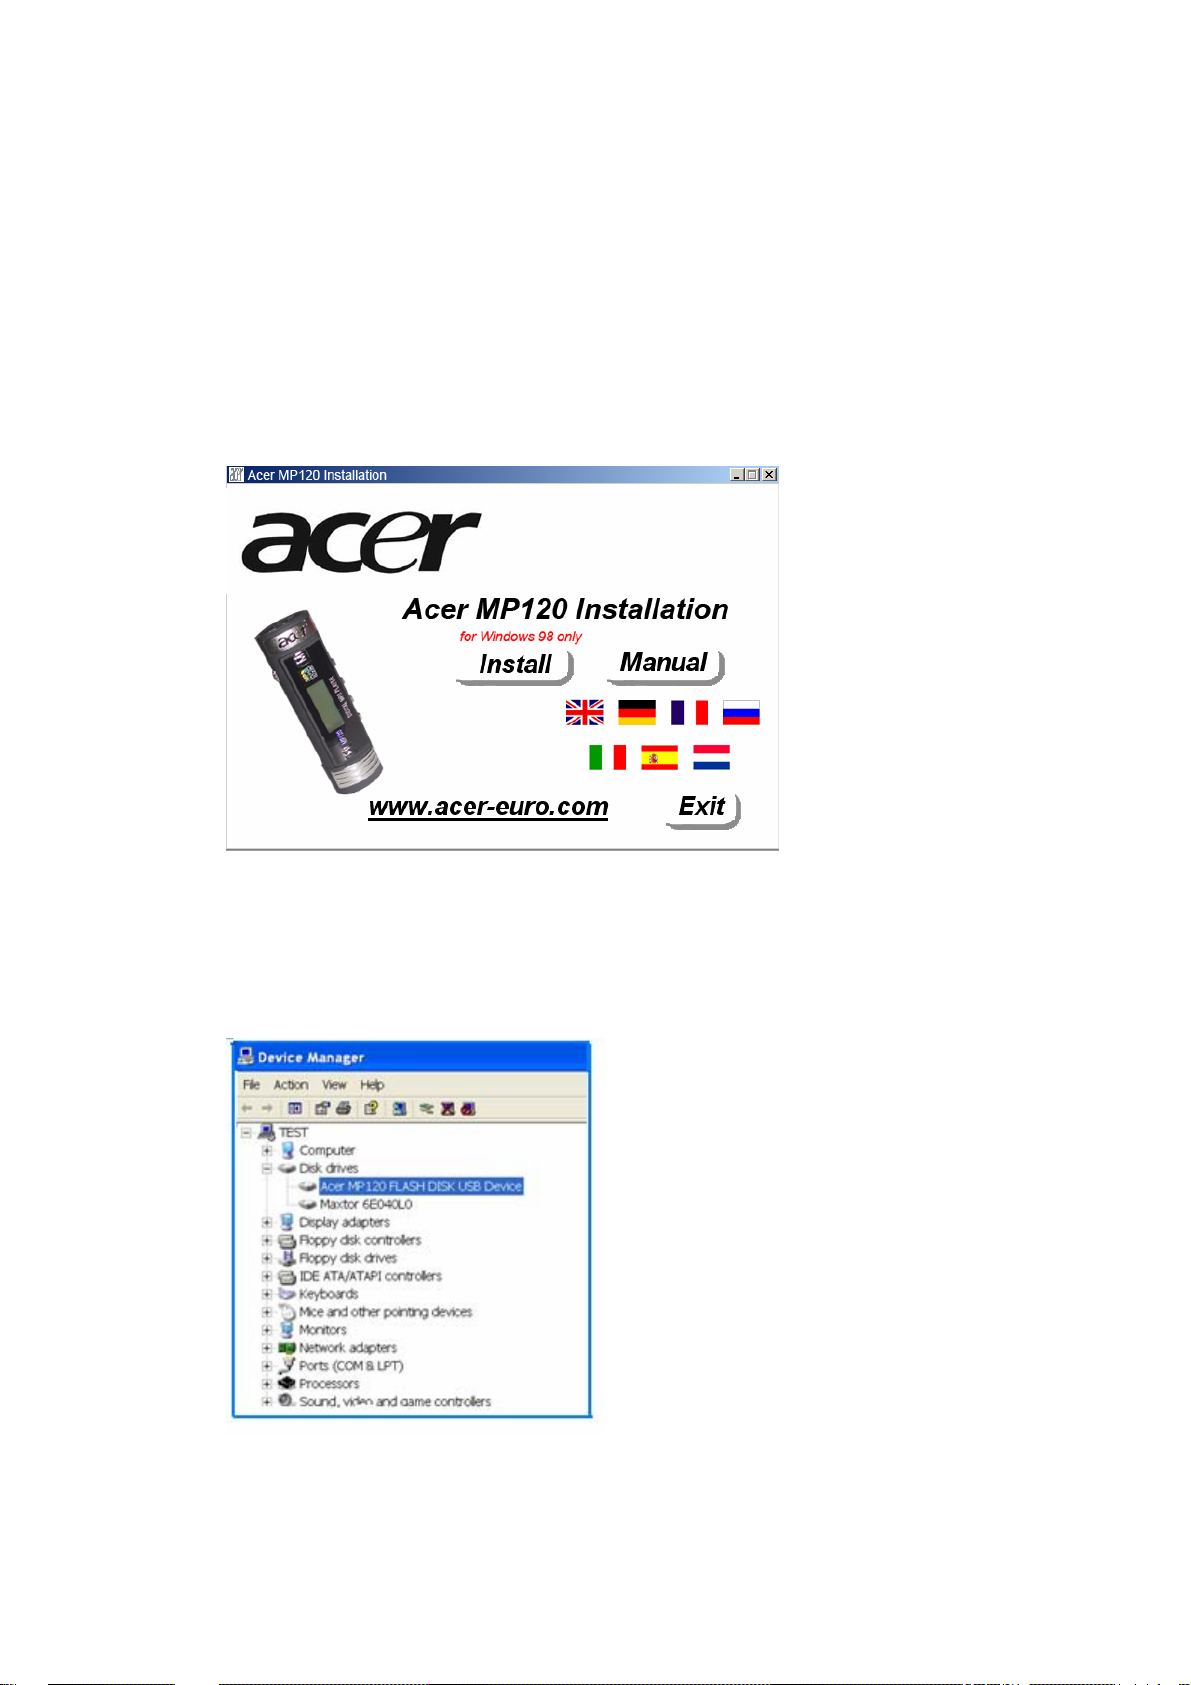
4 . Installation of USB Drive
The installation is only needed for windows98 and windows 98 se computers. The steps are as
follows:
Insert the accessory CD into the CD drive and it will work automatically. The interface
shows as follows.
Click <Install>, and finish the installation of the drive with clues. The restart of the
computer is needed afterward.
Confirmation of the installation of USB drive
Connect MP120 by the USB cable to the computer
Choose “Control Panel”,”Syetem”, and enter “Device Manager”, it will show as follows;
Choose “Disk drives” and the installed USB drive will display
Attention: if it doesn’t show as upward, then please uninstall your USB drive and reinstall it.
4
Page 7
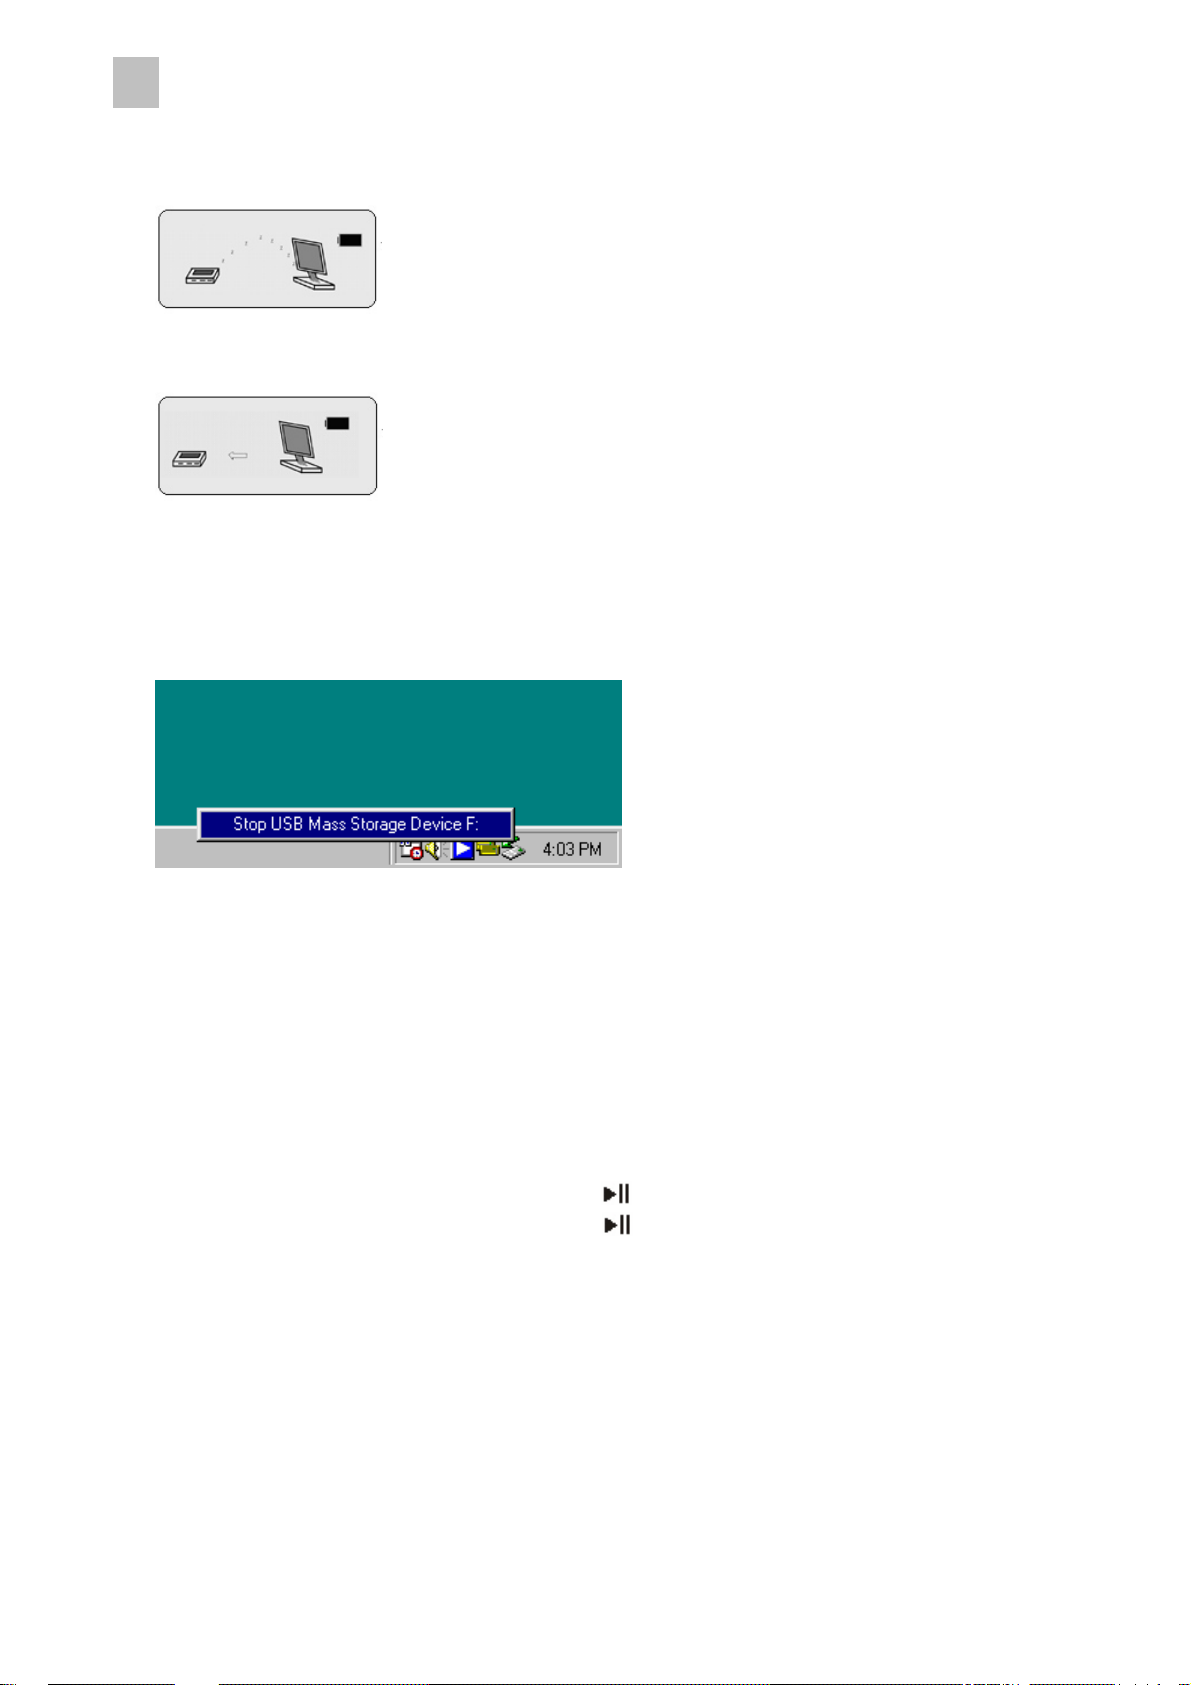
5.USB Connection and Safe Removal
5.1.1 When the MP3 Player is connected to computer, the LCD will show the
following picture:
And when the MP3 Player is writing & reading data, the LCD will show the following
graphic:
You should not disconnect the MP3 Player from the PC while it’s reading or writing, or else
it will cause your data lost.
5.1.2 Safe Removal of USB from Your Computer
1) Select the Plug-n-Play Device icon from the Windows Taskbar, right-click on it, and
select Safely Remove Hardware.
2) Select the hardware device you want to stop, and click on the Stop button.
3) Select the drive you want to stop and click OK.
4) Click Close to complete this process.
Caution: Failing to disconnect this product from your computer by the standard procedure
may damage this product.
III Functions
1. Basic Operations
1.1 Turning On/Off
Press “Power on/Play/pause/Stop/Power off “( ) button 2-3sec to turn on.
Press “Power on/Play/pause/Stop/Power off” ( ) button 3-5sec to turn off while playing.
In the standby mode, the player will shut down automatically when the machine is not being
operated for 30 seconds.
1.2 Function Selection
In the main menu, you can navigate through various modes by short pressing of the NEXT
or PREV key. Then, you can short press the MODE key to access the selected mode, after
which the appropriate contents appear on the display.
5
Page 8

2. MUSIC Mode
In the MUSIC mode, the system can play MP3 files and WMA files, with syn chronous lyrics.
2.1 Interface Description
2.2 MUSIC Playing Status
2.2.1 Basic Function
In the MUSIC standby status, you can press the PLAY key to start playing music, as shown
in the following diagram:
In the MUSIC playing status:
z Short pressing the PLAY key pauses the playing of the music.
z Long pressing the PLAY key stops the playing of the music.
z Holding the NEXT or PREV key moves fast forward or backward in the current song to
select a music segment. Short pressing the NEXT or PREV key moves fast forward or
backward to another song. In the standby status, a short pressing moves to the next or
previous song.
z Short pressing the MODE key accesses MUSIC setup.
z Short pressing the VOL key accesses the volume control interface.
2.2.2 Volume Control
After you access volume setup in the MUSIC playing status, you can short press the VOL+
or VOL- key to access the volume control options. When you change the volume, the
volume icon changes accordingly.
2.3 MUSIC Setup
6
Page 9

When the unit is playing music, you can access MUSIC setup by short pressing the MODE
key.
2.3.1 Repeat Mode Setup
In the MUSIC playing status, access Repeat mode setup and short press the NEXT or
PREV key to select the repeat mode you want, and then short press the ENTER key to
confirm. There are the following options: Normal, Repeat One, Folder, Repeat Folder,
Repeat All, Random and Intro.
Normal: After the songs in the current folder have all been played, the player will continue to
play those in the next holder, and continue like this until all the songs in all the folders are
finished.
Repeat One: Play an individual song repeatedly.
Folder: Play all the songs in the selected folder.
Repeat Folder: Play all the songs in the selected folder repeatedly.
Repeat All: Play all songs repeatedly.
Random: Play all songs in the current folder in a random order.
Intro: Play the first 10 seconds of all songs in the current folder in order.
2.3.2 Sound Effect Setup
In the MUSIC playing status, access EQ setup, and press the NEXT or PREV key to select
the EQ effect. Press ENTER to confirm your selection. There are the following options:
NOR (natural), ROCK, POP, CLAS (CLASSIC), SOFT, JAZZ, and DBB, as shown in the
following diagram:
7
Page 10

2.3.3 A-B Mode
In the MUSIC status, select A-B mode. “A” starts flashing. Press NEXT to mark the
beginning of the range to be repeated. “A” stops flashing, while “B” starts flashing. Press the
NEXT key again to mark the end of the range. Now, the A-B range will be repeated. If you
press the NEXT key for a third time, you go to Comparison/Following. Pressing the MODE
key completes the selection process and returns to the normal playing status.
2.3.4 Repeat
When the unit is playing a MP3 song, you can access the A-B Repeat status and then press
the NEXT key to access the Repeat status. Now, you can short press the MODE key to
return to the normal playing status. If you short press the NEXT key, you return to the A-B
Repeat status.
2.3.5 Setting Repeat Times
For the specific procedure, see Sound Effect Setup.
Repeat times determine how many times the A-B range will be repeated.
2.3.6 Setting Repeat Interval
For the specific procedure, see Sound Effect Setup.
Repeat interval is the interval in seconds between two adjacent repetitions.
2.4 MUSIC Pause Status
The MUSIC pause status is shown in the following diagram:
Now:
Short pressing the PLAY key resumes the playing of the music.
Long pressing the PLAY key stops the playing of the music.
Holding the PLAY key accesses the power-off energy-saving status.
Short pressing the VOL key accesses the volume control interface.
Pressing the NEXT/PREV key selects the next/previous song.
Long pressing the NEXT/PREV key navigates through the files forward/backward.
Short pressing the MODE key accesses the MUSIC folder setup interface.
8
Page 11

Long pressing the MODE key returns to the main menu.
2.4.1 MUSIC Folder Setup
After you access MUSIC folder setup, you see the following interface:
Play list:
It lists the files to play.
Artists:
It lists the artists.
Genre:
It lists the genres.
Composers:
It lists the composers:
License Inf:
It provides the license information.
Local folder:
Select this item and select the folder you want to access by pressing the NEXT/PREV key,
and then press the MODE key to access it.
Delete file:
Select this item and press the ENTER key. Press the PREV/NEXT key to select YES, and
then short press the MODE key to confirm your deletion.
Delete all:
This item is the same as Delete file, except that it deletes all the files instead of one file only .
After the system deletes all the files, it returns to the MUSIC standby status.
Exit:
Select this item to exit the menu.
2.5 Lyrics Display
In the MUSIC playing status, the system automatically accesses the lyrics display interface
if the current song has lyrics. The system continues to play the current song while
displaying the appropriate lyrics according to the progress of the song. When the song is
finished, the unit continues to play the subsequent song according to the play mode setting.
9
Page 12

If the subsequent song has lyrics, the system still shows the lyrics display interface. If the
song has no lyrics, the unit returns to the normal play interface.
2.5.1 Normal Playing Status
c Interface Description
Chinese lyrics: When a line of characters in the LRC file needs to be displayed on multiple
screens, the synchronous time tag is calculated for each screen by averaging. Note: Every
half Chinese character is placed in the next line.
English lyrics: It is treated in a similar way as Chinese lyrics. When a word needs to be
displayed in two lines, the “-" hyphen is used to connect two lines. However, every two-letter
words are placed in the next line.
d Functions of keys
Short pressing the PLAY key: pauses the playing of the song and accesses the lyrics pause
interface
Long pressing the PLAY key: stops the playing of the song
Holding the PLAY key: accesses the power-off energy-saving mode
Short pressing the VOL key: accesses the volume control interface
Short pressing the MODE key: accesses MUSIC setup
Long pressing the MODE key: returns to the main menu
Short pressing the NEXT/PREV key: selects the next/previous song, and displays the lyrics
interface, if there is any, or returns to the playing interface.
Holding the NEXT/PREV key: moving the next/previous song fast forward/backward
2.5.2 Playing Pause Status
In the lyrics pause status, the current song is paused, with the current playing progress
retained, and the lyric on the current screen is also displayed.
c Interface Description
d Functions of keys
Short pressing the PLAY key: resumes the playing of the song
Long pressing the PLAY key: stops the playing of the music and enters the power-off
energy-saving status
Short pressing the MODE key: accesses MUSIC setup
Long pressing the MODE key: returns to the main menu
Short pressing the VOL key: accesses the volume control interface
Pressing the NEXT/PREV key: selects the next/previous song
Long pressing the NEXT/PREV key: navigates through the next/previous songs
2.5.3 Lyrics Synchronization
The unit automatically searches for the LRC file of the same name in the folder of the
current song.
10
Page 13

The total length of the lyric of one song should not exceed 100 screens.
The player supports *.LRC files to display the lyrics synchronously with the song. You can
download lyrics from http://www.51lrc.com.
How to use LRC files?
Keep the name of a LRC file the same as that of the appropriate song file.
For example, for the song name of William Castle-Zhou Jielun.mp3, the corresponding LRC
file name should be William Castle-Zhou Jielun.lrc.
2.6 Folder Function
z This unit supports eight levels of folders.
z The sequence of the folders is the sequence of the items in the root holder.
z No music files:
If the unit finds no music files, it will indicate such to you.
2
.
7
H
O
L
D
F
u
n
c
t
i
o
n
2
.
7
H
O
L
D
F
u
2
.
7
H
O
L
D
n
F
u
n
c
t
i
o
n
c
t
i
o
n
Using the HOLD function can prevent a malfunction of the player by accidentally pressing a
wrong button. Move the HOLD switch on the side of the player to HOLD. A lock icon on the
LCD panel is displayed for the setting. Move the switch to HOLD OFF and a lock icon on
the display disappears, like this:
Note: If the machine is power off and locked, before you power on the machine, you should
unlock it.
3. REC Mode
3.1 Interface Description
From the main menu, select Record. The following screen appears:
Short pressing the PLAY key: starts recording
Short pressing the MODE key: accesses REC setup
Long pressing the MODE key: returns to the main menu
Local folder: Select the folder you want to access.
REC type: Select the REC type you need. There are four options: Quality REC, Long-time
REC, Quality Sound Control, and Long-time Sound Control.
Quality REC: wav format, good quality
Long-time REC: act format, ordinary quality
Quality sound control: wav format (sound control recording, where it will stop recording
when there is no sound)
Long-time sound control: act format
Exit: Return to the REC standby interface.
3.2 REC Start Status
11
Page 14

c REC start
In the RED standby status, short press the PLAY key to start records, when the screen
starts timing.
Short pressing the PLAY key: pauses recording
Long pressing the PLAY key: stops and saves recording
Long pressing the MODE key: saves the recording and returns to the main menu
d REC pause
Short pressing the PLAY key: continues recording
Long pressing the PLAY key: stops and saves recording
Long pressing the MODE key: saves the recording and returns to the main menu
3.3 Lower Power
In the recording status, if the power is low, the system will automatically save the current
recording file, stops recording, and prompts accordingly. In this case, you should replace
the battery.
Caution: If the battery in the Acer MP120 is in low power or no battery is in the unit for a
long time, the Acer MP120 may fail to normally play the DRM songs again.
4. Voice Mode
4.1 Interface Description
Select Voice from the main menu and short press the MODE key to access the interface as
shown below:
4.2 Stop Status
Short pressing the Play key: starts playing the file
Long pressing the PLAY key: accesses the power-off energy-saving status.
Short pressing the VOL key: accesses the volume control interface
Short pressing the MODE key: accesses REC play folder setup
Long pressing the MODE key: returns to the main menu
Short pressing the NEXT/PREV key: selects the next/previous file
Long pressing the NEXT/PREV key: navigates through the files forward/backward.
RED play folder setup:
Local folder:
Select this item and select the folder you want to access by pressing the NEXT/PREV key,
and then press the ENTER key to access it.
Delete file:
In the MUSIC stop status, short press the MODE key to access the Delete sub-menu.
Select Delete file and press the ENTER key. Press the PREV/NEXT key to select YES, and
then short press the ENTER key to confirm your deletion.
Delete all:
This item is the same as Delete file, except that it deletes all the files instead of one file only .
After the system deletes all the files, it returns to the MUSIC standby status.
Exit:
12
Page 15

Select this item to exit the menu.
4.3 REC Play Status
Short pressing the PLAY key: pauses playing
Long pressing the PLAY key: accesses the power-off energy-saving mode
Short pressing the VOL key: accesses the volume control interface
Short pressing the MODE key: accesses REC play setup
Long pressing the MODE key: returns to the main menu
Short pressing the NEXT/PREV key: selects the next/previous file
Long pressing the NEXT/PREV key: navigates through the files forward/backward.
REC play setup:
Repeat mode: It is same as that of MUSIC. For details, see MUSIC Repeat Mode Setup.
A-B mode: It is the same as MUSIC. For details, see MUSIC A-B Mode Setup.
Exit: Exits the playing interface.
4.4 REC Play Pause Status
Pressing the PLAY key: resumes playing the file
Long pressing the PLAY key: accesses the power-off energy-saving mode
Short pressing the MODE key: accesses REC play setup
Short pressing the VOL key: accesses the volume control interface
Long pressing the MODE key: returns to the main menu
Short pressing the NEXT/PREV key: selects the next/previous file
Long pressing the NEXT/PREV key: navigates through the files forward/backward
4.5 Abnormal Display of VOICE Mode
When no files are recorded or all the files have been deleted, this unit will prompt that no file
exists.
When an invalid song is met, the system will indicate such to you.
5
.
F
M
R
a
d
i
o
M
o
d
e
(
O
p
t
i
o
n
a
l
)
5
.
F
M
R
a
d
i
o
M
o
d
e
(
O
p
t
5
.
F
M
R
a
d
i
o
M
o
d
e
i
(
O
p
t
i
o
n
a
l
)
o
n
a
l
)
Anytime long press the mode key to enter the main menu and select the FM Radio item
from the Main menu, as the following graphic.
The device will enter the FM Radio Mode as the following graphic:
The “
” icon means stereo.
“02/20” means that the current channel if the first one of a total of 20 channels.
“87.8 MHZ” means the frequency of the current channel.
5.1 FM menu mode
In the FM Radio Mode, you can enter the FM menu by press the Mode key any time, and
there are 8 items in the FM menu as the following:
13
Page 16

5.2 Save
When you search a good broadcast manual, you can save the broadcast by select this item
and press the mode key to save it.
Notice that anytime when you save a broadcast it will add a station to the broadcast station
list.
5.3 Search mode
When you select this item, you will enter a search mode selection submenu, where you can
change the search mode as Auto Search, freq mode and station mode.
Search mode select
When you select the search mode in the FM menu and press mode key to confirm the
selection you will enter the search mode submenu, there are 4 items in this submenu as the
follow:
When you select this item and confirmed the machine will search the broadcast automatic,
and it will store all the broadcast station it searched.
When you select this item it will enter a frequency search interface as the follow:
Notice that anytime when you enter the Freq Mode or when you are listening the radio, you
can use the Next key or Prev key to change the frequency, when a broadcast is searched
the icon will appear to clew you to save the broadcast station. And if there is no
broadcast is searched, the icon will not appear.
As you want to save a broadcast station you should press the mode key to enter the FM
menu mode and select the save item.
When you select this item it can only change the broadcast station directly by press Next or
14
Page 17

Prev key when you are listening radio.
This item is for exiting the search mode submenu.
5.4 Record
When you select this item, this unit records the current program of the channel as a
recorded file.
5.5 Delete
When you select this item and press mode key to confirm, it will delete the selected
broadcast station automatic.
5.6 Delete all
When you select this item and press mode key to confirm, it will delete all selected
broadcast station you saved automatic.
5.7 Normal Band
When you select this item the frequency boundary is from 87 MHz to 108 MHz.
5.8 Japan Band
When you select this item the frequency boundary is from 76 MHz to 90 MHz.
5.9 Exit
This item is for exiting the Select Band submenu.
To exit the radio mode, please press the mode key to enter the main menu, and then select
the music mode or voice mode.
6. System Setup
Select System from the main menu and press the MODE key to access the interface, as
shown in the following diagram:
Short pressing the NEXT/PREV key: selects the next/previous work mode
Long pressing the NEXT/PREV key: navigates through the next/previous work modes
Short pressing the MODE button: accesses the selected mode
Long pressing the MODE key: returns to the main menu
Long pressing the PLAY key: accesses the power-off energy-saving mode
6.1 System Time
The system time is the recording time.
When you short press the VOL- key, the year starts flashing. Now, you can press the
PREV/NEXT key to modify the year. Others can be modified in the same way.
Short press the MODE button to confirm your modification.
15
Page 18

6.2 On-line Preparation
Select USB on-line preparation and specify the unit to be a Media Device or USB Disk.
After that, when you connect this unit as a USB device to your computer, it works as the
type of device you have specified.
6.3 Backlight Time
In this mode, you can modify the backlight color.
After you access this item, short press the PREV/NEXT key to select the backlight color.
Then short press the MODE key to confirm your modification and exit the menu at the same
time.
6.4 Language Selection
In this mode, you can select the language used.
6.5 Power-off Setup
You can select automatic entry to the power-saving mode or sleep mode.
For the specific procedure, see Sound Effect Mode.
Note: When the sleep mode is set, it only functions once. Once the unit is turned off, the
time setting is automatically cleared. To use this function again, you must make another
setting.
6.6 Repeat Setup
You can select the manual mode or auto mode.
Where: “Manual mode” means that sentences cannot be broken during A-B repeat, and you
can only set break point manually.
“Automatic mode” means that sentences can be broken during A-B repeat. (This function
can be used to read English texts not accompanied by music)
For the specific procedure, see Sound Effect Mode.
6.7 Contrast Adjustment
In this mode, you can set the contrast.
For the specific procedure, see Sound Effect Mode.
6.8 On-line Mode
In this mode, you can set the mode of connection to a PC.
Multiple-disk: In this mode, all disk partitions are displayed on the PC.
Single common disk: In this mode, only the partitioned non-encrypted disk is displayed on
the PC.
16
Page 19

Single encrypted disk: In this mode, only the partitioned encrypted disk is displayed on the
PC.
After the setting, the selected disk is shown on the PC when the unit is connected to a PC.
6.9 Storage Information
The number indicates the total space of the disk, and the percentage indicates those
already used against the total.
6.10 Firmware Version
You can view the current firmware version of the player.
6.11 Firmware Upgrade
This tool is used for update the firmware of your MP3 Player.
1. Open the Firmware update Tool.
2. Select a firmware file and Press the “begin upgrading” button, it will update your firmware
automatic and it will show the update information clearly.
Note: Please select the right firmware file to update, or else it will cause your machine damaged and you
can’t use it anyway.
6.12 Exit
Select this item to return to the main menu.
F
A
Q
F
A
IV F
1
1
1
Q
A
Q
T
h
e
p
l
a
y
e
r
d
o
e
s
n
o
t
t
u
r
n
o
n
:
T
h
e
p
l
a
y
e
r
d
o
e
s
n
o
t
t
u
T
h
e
p
l
a
y
e
r
d
o
e
s
n
r
o
t
t
u
r
n
o
n
:
n
o
n
:
- Check if the player has the batteries installed.
- Turn on your computer, connect the player to the USB port and turn on the player.
- If the above step does not resolve the problem, then do a “Firmware upgrade” and
format the player, you can find and download the firmware from our website.
a
n
y
t
h
i
n
g
:
2
L
C
D
d
i
s
p
l
a
y
d
o
e
s
n
o
t
s
h
o
w
a
n
y
2
L
C
D
d
i
s
p
l
a
y
d
o
e
s
n
o
t
s
h
o
2
L
C
D
d
i
s
p
l
a
y
d
o
e
s
n
o
w
t
s
h
o
w
t
a
n
y
t
h
i
n
g
:
h
i
n
g
:
- Press the Play/Pause button to turn on the player.
- If the above step does not resolve the problem, then do a “Firmware upgrade” and
format the player.
3
F
o
r
t
h
e
3
F
o
3
F
o
r
t
h
e
r
t
h
e
W
W
W
i
n
i
n
i
n
d
o
w
9
8
u
s
e
r
–
W
h
e
n
P
C
d
o
e
s
n
’
t
r
e
c
o
g
n
i
z
e
t
h
e
p
l
a
y
e
r
.
d
o
w
9
8
u
s
e
r
–
W
h
e
n
P
C
d
o
e
s
n
’
t
r
e
c
o
g
n
i
z
e
t
h
e
p
d
o
w
9
8
u
s
e
r
–
W
h
e
n
P
C
d
o
e
s
n
’
t
r
e
c
o
g
n
i
z
e
l
t
h
e
p
a
y
e
r
.
l
a
y
e
r
.
- If your operating system is Windows 98, please connect the player to the USB port of
PC first and after it recognizes it as a new hardware, then install the driver.
- If your PC doesn’t recognize the player, please repeat #1 step.
- If the above step does not resolve the problem, then run the “Firmware Download”
program and format the player again.
4
W
h
e
n
s
h
a
l
l
w
e
c
h
a
n
g
e
t
h
e
b
a
t
t
e
r
y
?
4
W
h
e
n
s
h
a
l
l
w
e
c
h
a
n
g
e
t
h
e
b
a
4
W
h
e
n
s
h
a
l
l
w
e
c
h
a
n
g
e
t
t
h
e
b
a
t
t
e
r
y
?
t
e
r
y
?
- The icon for coulometer on the LCD is empty and blinking.
- The player powers off by itself while playing or powers off quickly when you turn on.
17
Page 20

V Product Specifications
The index parameter
Index Parameter specification
Hard disk
Interface
Storage medium
Power
IBM PC, compatible PC, notebook with USB interface
Universal Serial Bus 1.0/1.1 (USB 1.0/1.1)
Flash memory
Supply by USB interface without connect power, when play
songs, need 1xAAA
Transfer speed
Operation System
Earphone Output
Record Time
Bit Rate Support
Max. Writing: 1000KB/S, Max. Reading: 1000 KB/S
Windows98/Me/2000/XP
32 ohm earphone, 5mW output
Max 30 hours,128M
MPEG1 Layer1:32K-320K bps;
MPEG1 Layer2: 32K-320K bps;
MPEG1 Layer3:32K-320K bps;
MPEG2 Layer3: 8K-320K bps;
WMA 8K-320K bps, Support DRM10
FMRadio Frequency
Support (optional)
Capacity
LCD Display
Operating Conditions
Japan: 76 MHz-90 MHz
Normal: 87 MHz-108 MHz
64MB/128MB/256MB/512M/1GB/2GB
96×26 dots with 7 colors backlight
0ºC~ +40ºC
Common Conditions
Size
Life-span
Driver
-40ºC ~ +60ºC
92mm x 28mm x 24.5mm
Writing over one million times, reading doesn’t influence
the life; data can be stored over ten years
Installation only be needed under Windows98, other
operation systems don’t need to install, such as Windows
Me, Windows 2000 and above
18
Page 21

Http: //www.acer-euro.com
 Loading...