

Acer K10 User Manual [fi]
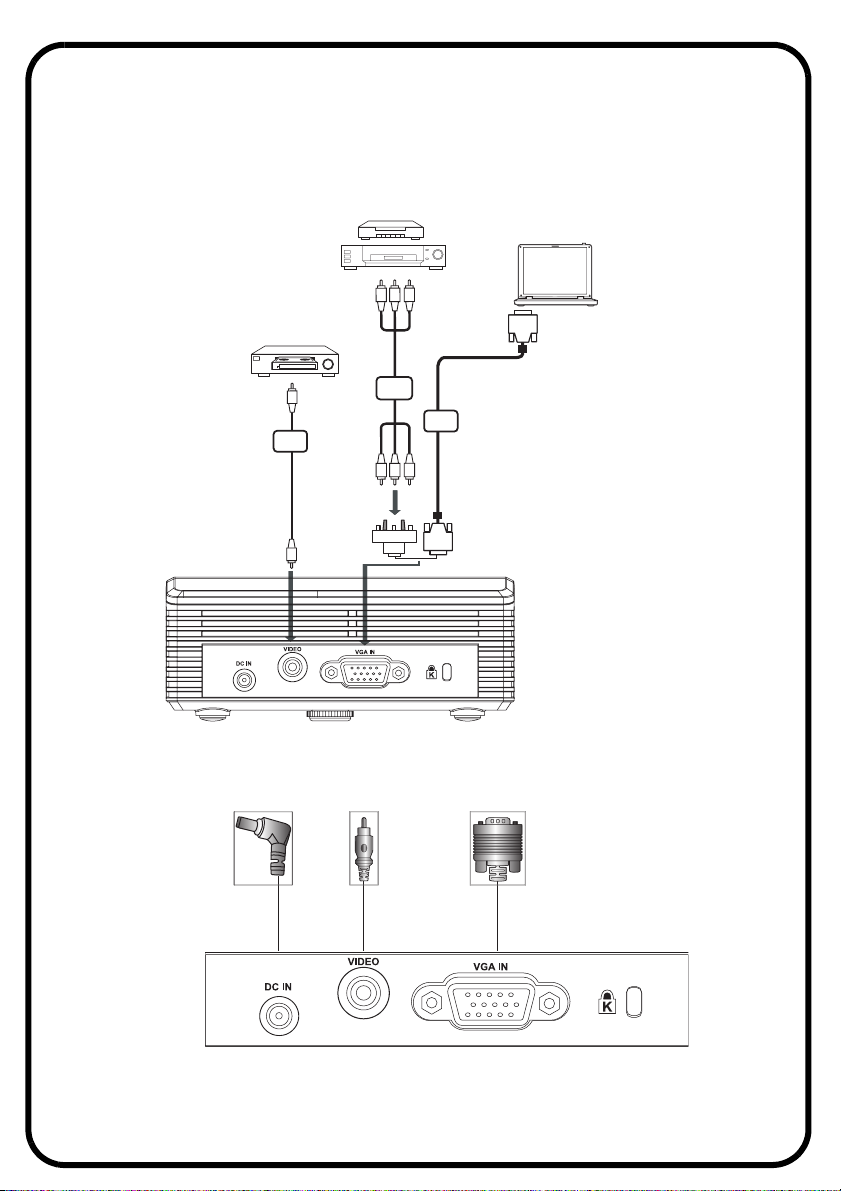
INSTALLATION
DVD player, Set-top Box
HDTV receiver
Video Output
Y
1
Y
INTERFACE CONNECTOR
RBG
2
RBG
HDTV adapter
VGA, DVI
D-Sub
3
D-Sub
Note: Connector interface is subject to model’s specifications
SuomiEnglish
Quick Start
X INSTALLATION
1. Composite video cable
2. VGA to component/HDTV adapter
3. VGA cable
Note: Connector interface is subject to model's specifications
Y INTERFACE CONNECTOR
Connecting to a Computer
1. Ensure the projector and your computer
are turned off.
2. Connect one end of the VGA cable to the
“VGA IN” connector on the projector;
connect the other end to the VGA
connector on the computer and tighten
the screws.
3. Connect one end of the AC adapter into
one end of the power cord.
4. Connect the other end of the AC adapter
into the DC IN connector on the
projector; connect the other end of the
power cord to an electrical outlet.
Powering On the Projector
1. Turn on the projector first and then the
computer.
2. Adjust the position and focus.
3. Run your presentation.
Powering Off the Projector
1. Press the power button twice.
2. Do not remove AC power cord from
outlet until the projector fan shut down.
Pikakäynnistys
X ASENNUS
1. Komposiittivideokaapeli
2. VGA komponentti-/HDTV-adapterille
3. VGA-kaapeli
Ohje: Liitinsovitus on mallin spesifikaatioista riippuvainen
Y SOVITTIMEN LIITIN
Tietokoneeseen kytkeminen
1. Varmista, että projektori ja tietokoneesi
ovat pois päältä.
2. Liitä VGA-kaapelin toinen pää
projektorin “VGA IN”-liittimeen; liitä
toinen pää tietokoneen VGA-liittimeen
ja kiristä ruuvit.
3. Liitä AC-sovittimen toinen pää
virtajohdon toiseen päähän.
4. Litä toinen pää AC-sovittimen
projektorin DC IN -liitimeen; liitä
virtajohdon toinen pää
sähköpistorasiaan.
Projektorin virran käynnistäminen
1. Laita projektori ensin päälle ja sitten
tietokone.
2. Säädä sijaintiasema ja tarkkuus.
3. Aja esityksesi.
Projektorin virran katkaiseminen
1. Paina virtapainiketta kahdesti.
2. Älä irrota AC-virtajohtoa pistorasiasta
ennen kuin projektorin tuuletin
pysähtyy.
 Loading...