

Page 1

CONTENT
2 INTRODUCTION
2 Overview
2 Package Contents
3 GETTING TO KNOW THE CAMERA
3 Front View
4 Rear View
7 LCD Monitor Icons
11 GETTING STARTED
11 Attaching the Camera Strap (Optional
Accessory)
11 Inserting and Removing the Battery
(Optional Accessory)
12 Charging the Battery
13 Using an AC Power Adapter (Optional
Accessory)
13 Inserting and Removing an SD Memory
Card (Optional Accessory)
14 Setting the Date and Time
14 Choosing the Display Language
15 Setting Image Resolution and Quality
16 PHOTOGRAPHY MODE
16 [ ] Auto Mode
17 Recording Voice Memos
18 Using the Digital Zoom
19 Setting the Flash
19 Setting the Self-timer
20 Setting the Focus
21 Exposure Compensation/Backlight
Correction
22 [SCN] Scene Mode
23 [P] Program (Automatic Exposure)
Photography Mode
23 [Tv] Shutter Speed Priority
Photography Mode
24 [Av] Aperture Priority Mode
25 [M] Manual Mode
] User Setting Mode
26 [
] Video Mode
26 [
27 [ ] Panorama Mode
] Anti-Shake Mode
27 [
28 Recording a Subject onto an Existing
Background Image (Pre-Shot)
29 Combining Shots of Two People into a
Single Image (Coupling Shot)
30 [ ] PLAYBACK MODE
30 Playing Back Still Images
30 Playing Back Video Clips
31 Attaching Voice Memos
32 Thumbnail Display
33 Zoom Playback
33 Slideshow Display
34 Protecting Images
35 DPOF Settings
36 Copying Files from Internal Memory to
a Memory Card
37 Changing the Camera Start Logo Image
] Deleting Images
38 [
40 CONNECTING TO A PICTBRIDGE
COMPLIANT PRINTER
42 MENU OPTIONS
42 Photography Menu (Capture tab)
45 Photography Menu (Function tab)
47 Photography Menu (AE/AWB tab)
49 Playback Menu
50 Setup1 Menu
51 Setup2 Menu
52 TRANSFERRING RECORDED
IMAGES AND VIDEOS TO YOUR
COMPUTER
53 Connecting the Camera to Your Computer
54 Downloading Images and Video Files
55 CAMERA SPECIFICATIONS
EN-1
Page 2

INTRODUCTION
Overview
Congratulations on your purchase of the new digital camera.
Capturing high-quality digital images is fast and easy with this state-of-the-art smart
camera. Equipped with an 10.1-megapixel CCD, this camera is capable of capturing
images with a resolution of up to 3648 x 2736 pixels.
Package Contents
Carefully unpack your kit box and ensure that you have the following items:
J Digital Camera
J USB cable
J User’s manual
Optional Accessories:
J SD memory card
J AC power adapter
J Rechargeable lithium-ion battery
J A/V cable
J Software CD-ROM
J Camera pouch
J Camera strap
EN-2
Page 3
GETTING TO KNOW THE CAMERA
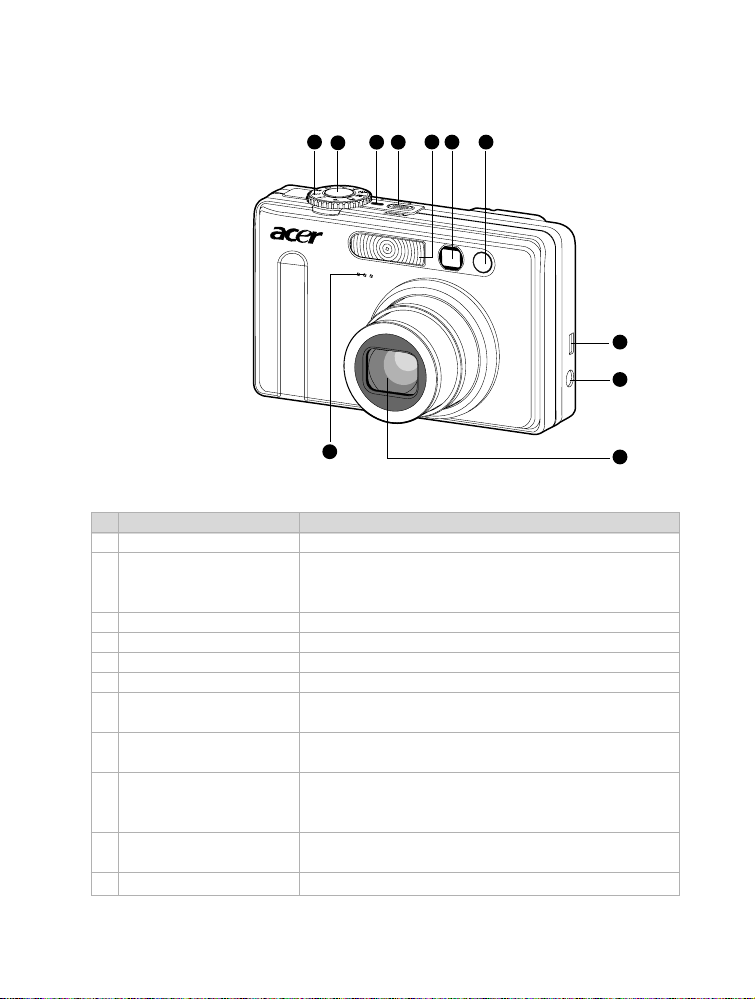
Front View
1
3
2
11
6 7
4
5
8
9
10
# Name Description
1 Mode dial Sets the camera mode.
Focuses and locks both focus & exposure when
2 Shutter button pressed halfway down. Captures the image when
pressed all the way down.
3 Power indicator Lights on when the camera power is turned on.
4 POWER (Power) button Turns the camera power on and off.
5 Flash Provides flash illumination.
6 Viewfinder window Allows you to frame the subject of the image.
Self-timer LED
7
(AF auxiliary light) is captured.
USB or A/V OUT terminal
8
Blinks green during Self-timer mode until the image
Allows you to connect a USB cable or an A/V cable to
the camera.
Allows you to connect an AC power adapter to
9 DC IN 5V terminal operate the camera without battery, or to charge
rechargeable lithium-ion battery.
10 Lens
3x optical zoom lens allows you to capture telephoto
and wide-angle images.
11 Microphone For recording audio with video clips and voice annotation.
EN-3
Page 4
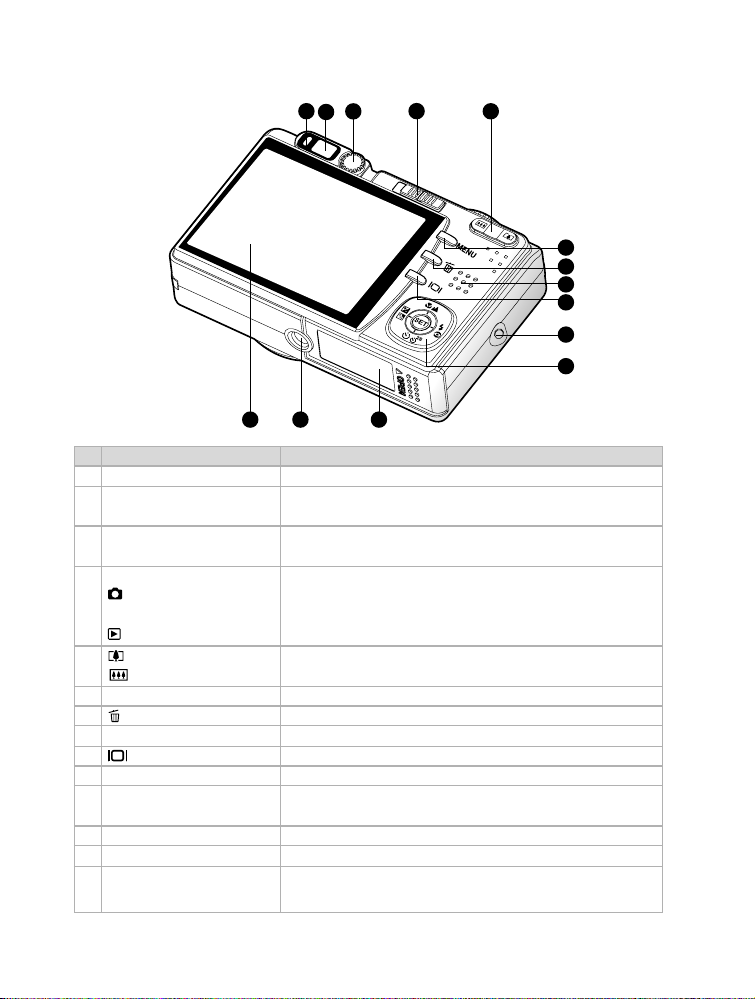
Rear View
123
# Name Description
1 Status LED Indicates the cameras operational status.
2 Viewfinder window
3 Diopter adjustment dial
Allows you to compose your subject using the optical
viewfinder.
Provides a clearer image when using the optical
viewfinder.
Mode switch Sets the camera mode.
Photography mode Selects this when capturing still images or recording
4
video clips.
Playback mode Performs image playback and deletion.
(Zoom in) button Zooms the lens to telephoto position.
5
(Zoom out) button Zooms the lens to wide-angle position.
6 MENU (Menu) button Toggles On-Screen Display (OSD) menu on and off.
7 (Delete) button Allows you to delete an image.
8 Speaker Produces camera sounds and plays recorded audio.
9 (Display) button Changes the information displayed on the LCD monitor.
10 Strap holder Camera strap attachment.
11 SET /Direction button
Allows you to scroll through menus and images, and
then select your choices.
12 Battery/SD card cover Access to the battery and memory card.
13 Tripod socket For tripod mounting.
14 LCD monitor
For image preview/review. Displays control menus,
camera settings, and operational icons.
4
121314
5
6
7
8
9
10
11
EN-4
Page 5
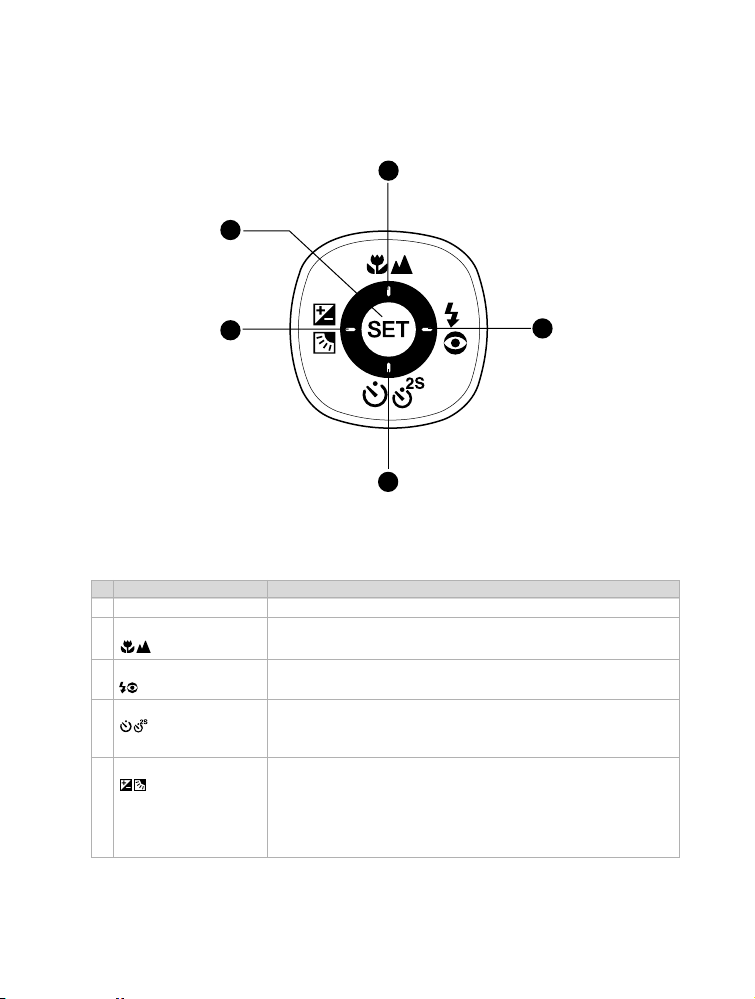
SET /Direction button
1
2
5
3
4
# Name Description
1 SET button Enters the menu page and confirms the chosen setting.
S button Scrolls upwards.
2
(Focus) button Allows you to choose the appropriate focus setting.
X button Scrolls right.
3
(Flash) button Allows you to choose the appropriate flash setting.
T button Scrolls downwards.
4 (Self-timer) button Allows you to toggle the self-timer on and off, selects the
W button Scrolls left.
(Exposure Allows you to toggle the exposure compensation/
5 compensation/ backlight correction on and off.
Backlight correction)
button
desired self-timer mode.
EN-5
Page 6
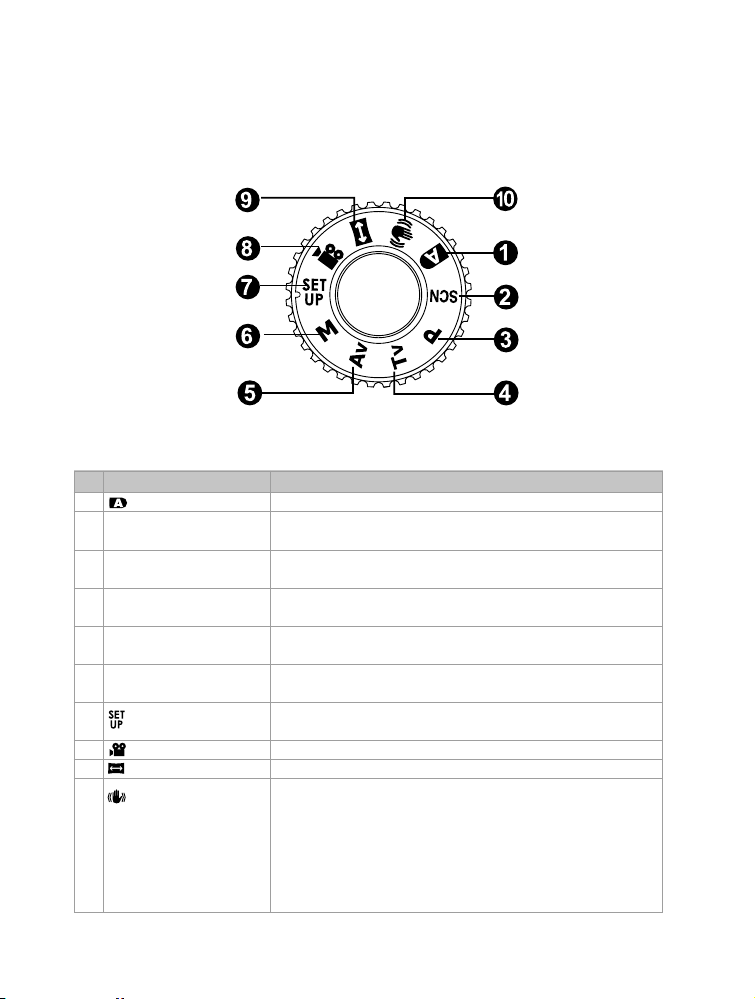
Mode dial
# Name Description
1. Auto The camera automatically sets for exposure, etc.
2. SCN Scene Mode Point-and-shoot simplicity when capturing images under
3. P Program In program mode the shutter speed and aperture will be
(auto exposure) set automatically, but other parameters may be set manually.
4. Tv Shutter Speed You may specify the shutter speed while the camera sets
Priority the corresponding aperture value.
5. Av Aperture Priority
6. M Manual For full manual control over exposure, aperture and
7. User Setting
8. Video For recording video clips.
9. Panorama Allows you to capture panorama (stitch-assist) shots.
10. Anti-Shake
16 special conditions.
You may specify the aperture value while the camera sets the
corresponding shutter speed.
other settings.
This mode allows you manually set the setting parameters
and all these settings will be memorized.
DSP anti-shake could minimize (not 100% reduce) the
jitter from shaky hands that causes many photos to look
blurred by shifting the lens unit.
This mode offsets unintentional hand movement while
you are taking pictures to give you clear, sharp images
even when taking handheld telephoto shots or shooting
at night.
EN-6
Page 7
00053
10S
20:5001/06/2006
LCD Monitor Icons
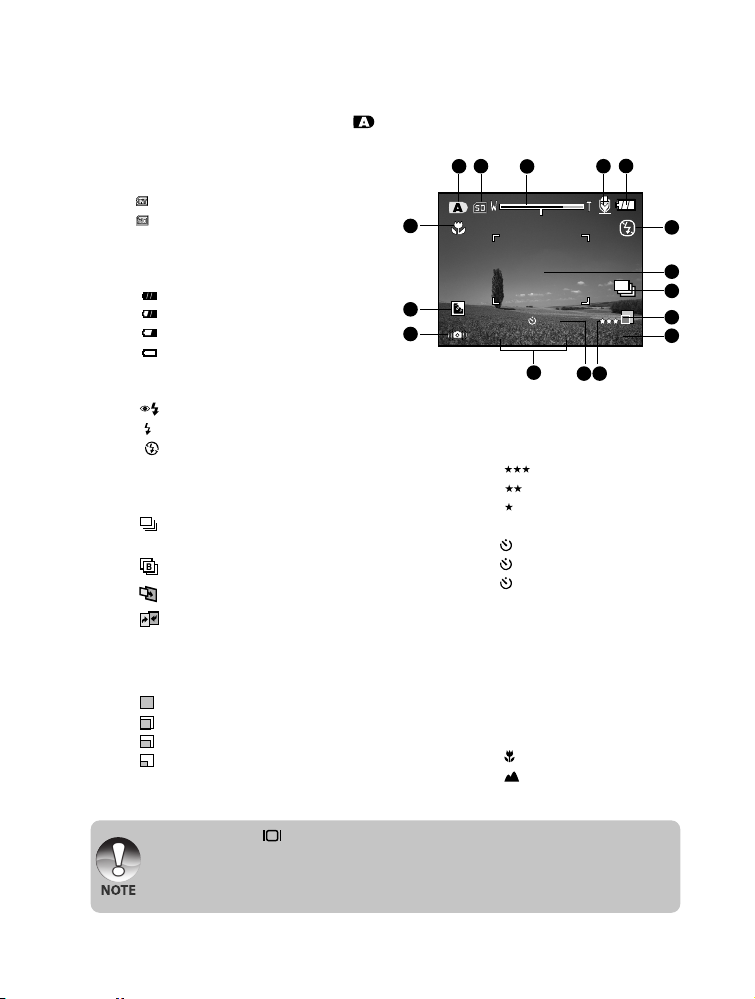
For Photography modes: [ ], [ SCN ]
1. Mode icon
2. Storage media
] Internal memory (no card)
[
] SD memory card
[
3. Zoom status
4. Voice memo
5. Battery condition
[ ] Full battery power
[ ] Medium battery power
[ ] Low battery power
[ ] No battery power
6. Flash mode
[Blank] Auto flash
[ ] Red-eye Reduction
[ ] Forced Flash
[ ] Flash Off
7. Main focus area
8. Capture mode icon
[Blank] Single
[ ] Continuous
[ AEB] Auto Exposure Bracketing
[
] Burst
] Pre-Shot
[
] Coupling Shot
[
* In [SCN] mode, Night Portrait and
Fireworks can use single capture only.
9. Image size resolution
[ ] 3648 x 2736
[ ] 2816 x 2112
[ ] 2048 x 1536
[ ] 640 x 480
10. Available number of shots
2
1
16
15
14
11. Image quality
[ ] Fine
[ ] Normal
[ ] Economy
12. Self-timer icon
[ 10s] 10 sec.
[ 2s ] 2 sec.
[ 10+2s ] 10+2 sec.
13. Date and time
14. Slow shutter warning
* Poor lighting conditions.
15. Backlight correction
16. Focus setting
[Blank] Normal Auto Focus
[ ] Macro
[ ] Infinity
12 11
5
4
3
13
Images will be vulnerable to
vibration.
6
7
8
9
10
J Pressing the button changes the LCD display in the sequence of: display with
icons, helpline, display without icons.
J To prevent a blur image we recommend that you use a tripod for capturing images
when slow shutter warning icon appears.
EN-7
Page 8
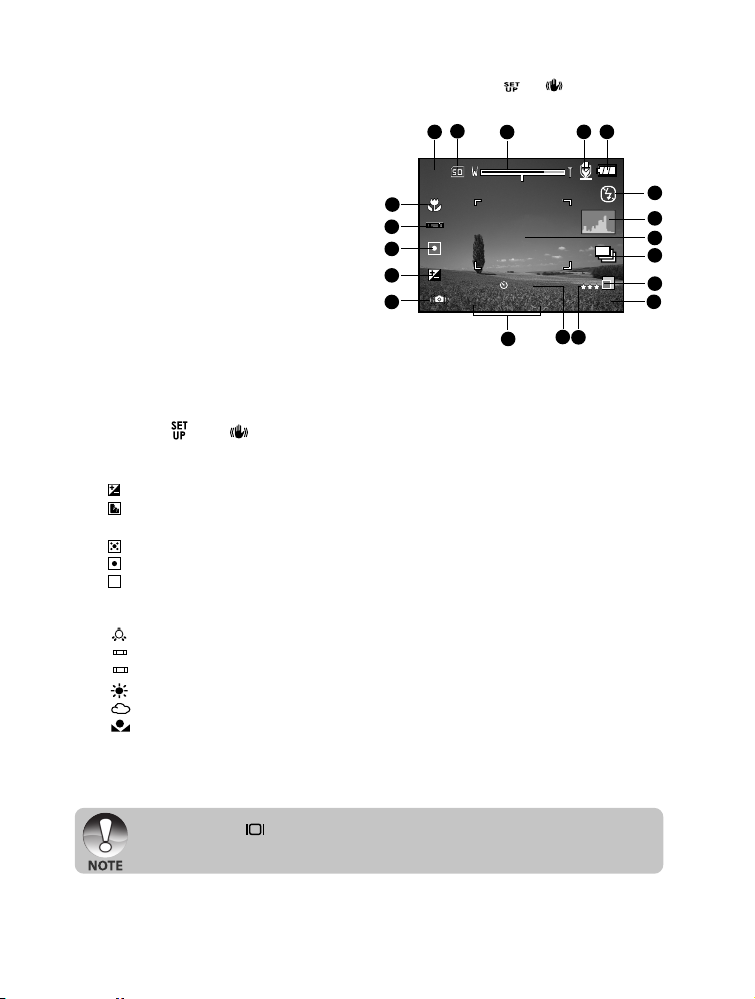
For Photography modes: [P], [Tv], [Av], [M], [ ], [ ]
00053
10S
0.0
F2.81 / 125
Tv
2
1. Mode icon
2. Storage media
3. Zoom status
4. Voice memo
5. Battery condition
6. Flash mode
7. Histogram
8. Main focus area
9. Capture mode icon
10. Image resolution
11. Available number of shots
12. Image quality
13. Self-timer icon
14. Shutter speed / Aperture
* In [P] , [
] and [ ] modes, Shutter speed / Aperture icon appears at half shutter
(S1) condition.
15.
Slow shutter warning
16. [ ] Exposure compensation
[
] Backlight correction
17. Metering
[
] Multi
[
] Spot
[
] Average
18. White balance
[Blank] Auto
[
] Incandescent
[
] Fluorescent 1
1
[
] Fluorescent 2
2
[
] Day Light
[
] Cloudy
[
] Manual
19. Focus setting
20. ISO
2
1
19
18
17
16
15
3
14
5
4
6
7
8
9
10
11
13
12
J Pressing the button changes the LCD display in the sequence of: display with
icons, display with icons and histogram, helpline, display without icons.
EN-8
Page 9
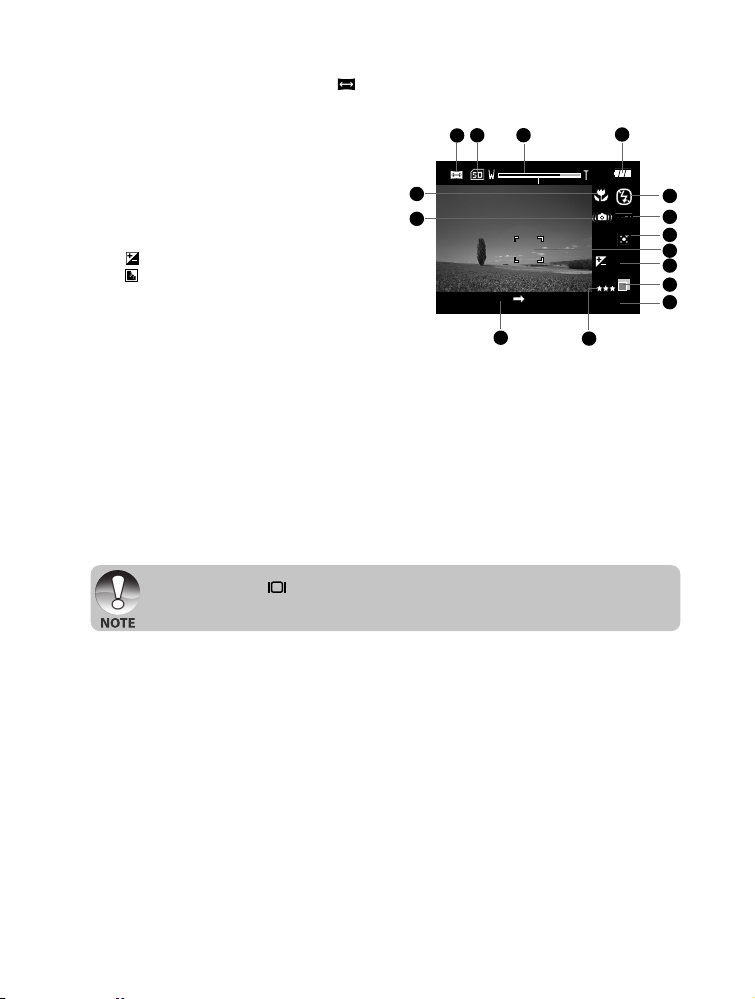
For Photography mode: [ ]
00053
1
0.0
2
ISO
200
1. Mode icon
2. Storage media
3. Zoom status
4. Battery condition
5. Flash mode
6. White balance
7. Metering
8. Main focus area
9. [ ] Exposure compensation
[ ] Backlight correction
10. Image resolution
11. Available number of shots
12. Image quality
13. Image to be captured indicator
14. Focus setting
15. Slow shutter warning
16. ISO
J Pressing the button changes the LCD display in the sequence of: display with
icons, display without icons.
2
1
14
15
3
13
4
5
6
7
8
9
10
11
12
EN-9
Page 10
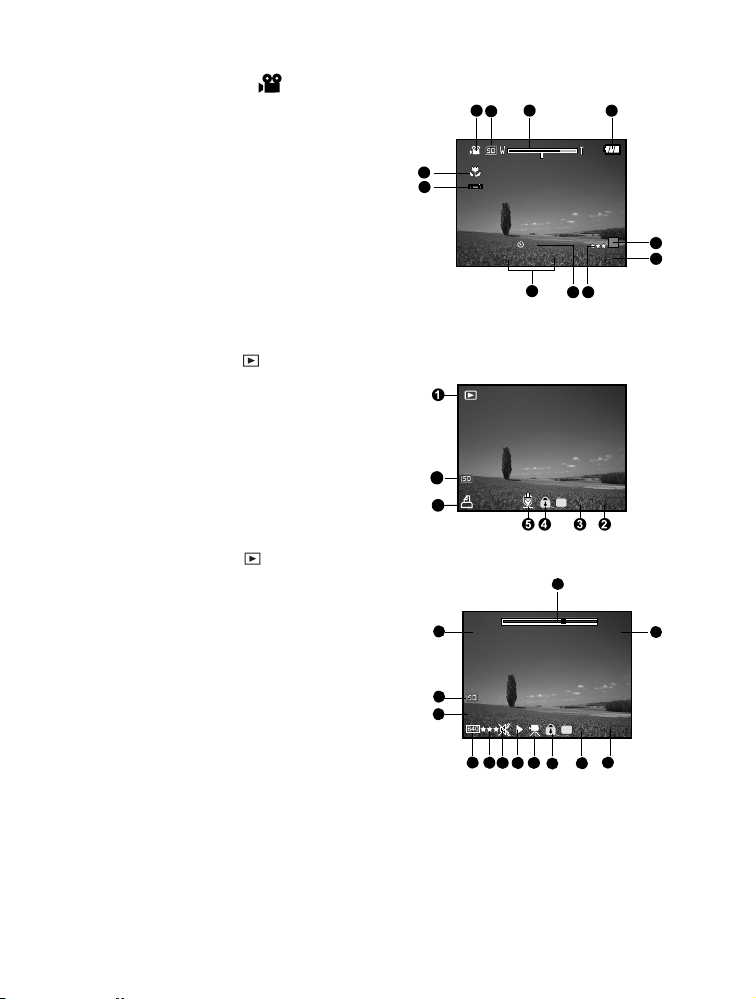
For Video mode [ ]
6
6
7
979-0008
1
10:1313:0901/06/2006
10S
2
980-0011
Total
Play
0:10
0:06
2
1
1. Mode icon
3
2. Storage media
3. Zoom status
4. Battery condition
5. Video resolution
6. Available recording time/Elapsed time
11
10
7. Video quality
8. Self-timer icon
9. Date and time
10. White balance icon
9
7
11. Focus setting
8
Playback mode [ ] -Still image playback
1. Mode icon
2. File number
3. Folder number
4. Protect icon
5. Voice memo
6. DPOF icon
7. Storage media
Playback mode [ ]-Video playback
1. Video status bar
2. Elapsed time
3. File number
4. Folder number
5. Protect icon
13
6. Mode icon
7. Play mode
8. Sound off icon (When the S button is pressed during video
playback)
9. Image quality
10. Image resolution
11. Frame rate
12. Storage media
12
25
11
FPS
10
9
13. Total recorded time
1
78
4
5
6
2
35 46
EN-10
Page 11
GETTING STARTED
1
2
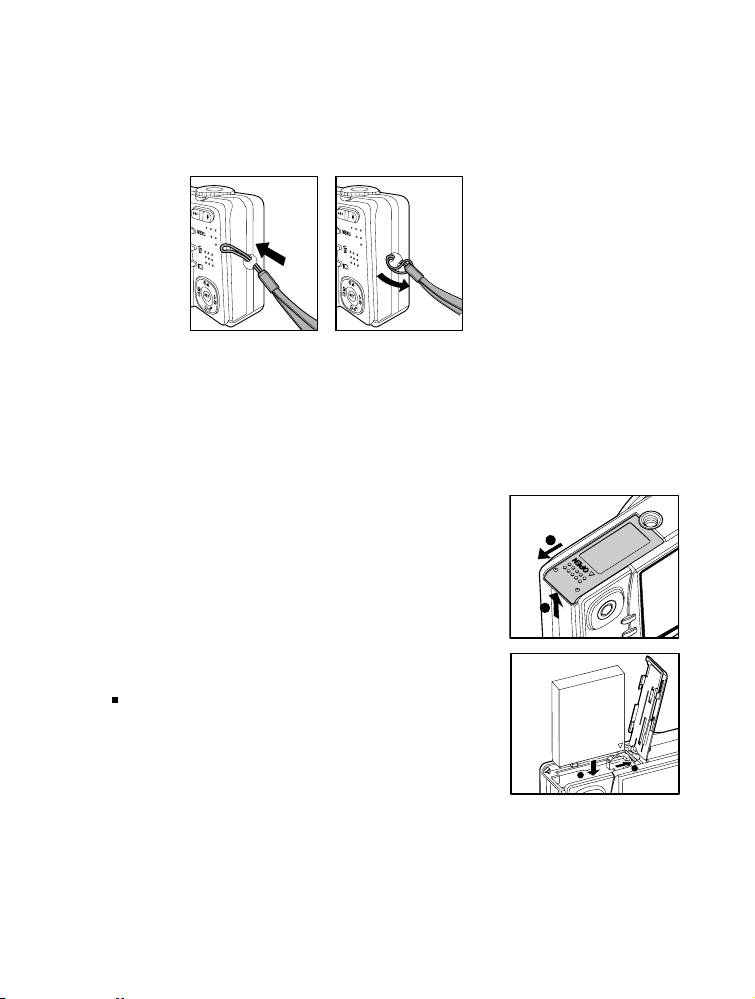
Attaching the Camera Strap (Optional Accessory)
Attach the camera strap as shown in the illustration.
Inserting and Removing the Battery (Optional Accessory)
We highly recommend using specified rechargeable lithium-ion battery (3.7V) to realize
the full capability of your camera. Charge the battery fully before using the camera.
Make sure that the power of the camera is off before inserting or removing the battery.
Inserting the Battery
1. Open the battery / SD memory card cover in
the direction of the [OPEN] arrow.
2. Insert the battery in the correct orientation
shown.
Tilt the battery lock lever, and then insert
the battery in the direction of the arrow.
3. Close the battery / SD memory card cover.
1
2
Removing the Battery
Open the battery / SD memory card cover and then release the battery lock lever.
When the battery has come out a little, slowly pull it out the rest of the way.
EN-11
Page 12
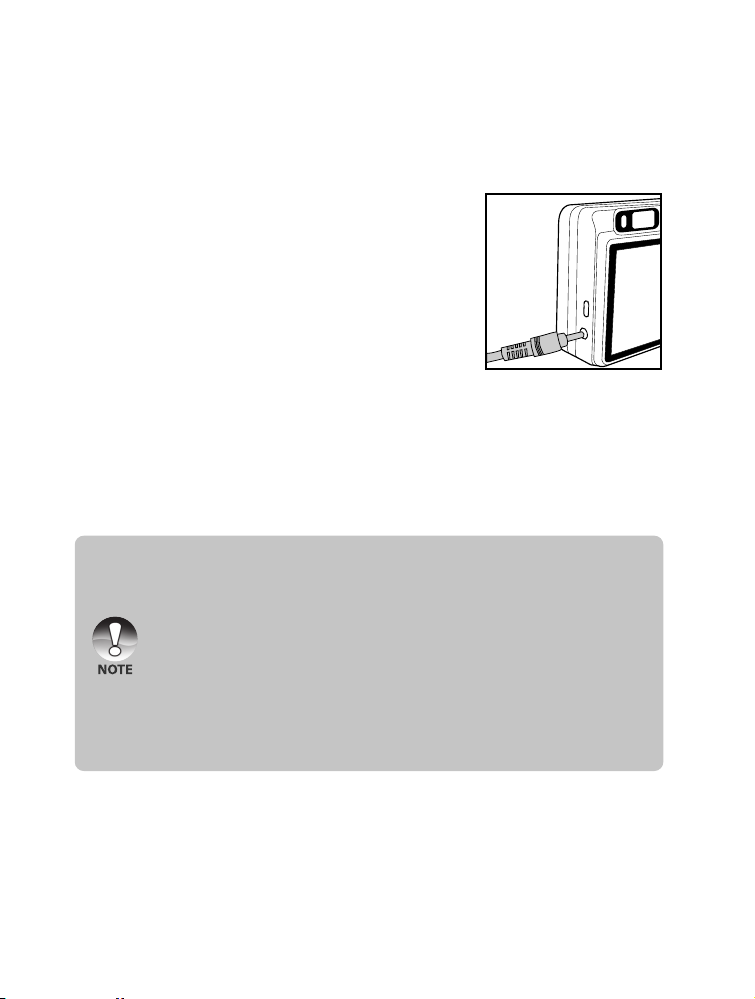
Charging the Battery
Using the optional AC power adapter may charge the battery or operate the camera
as power supply. Make sure that the power of the camera is off and then insert the
battery before starting.
1. Insert one end of the AC power adapter into
the DC IN 5V terminal of the camera.
2. Insert the other end of the AC power adapter
into a wall outlet.
J The status LED flashes green when
charging is started and lights green when
charging is completed. The LED lights red
when a charging error has occurred.
J It is recommended to fully discharge the
battery before recharging.
J Charging time varies according to the
ambient temperature and the status of
battery.
J This camera must be used with specified AC power adapter. Damage caused
by the use of an incorrect adapter is not covered under the warranty.
J Always make sure that the camera is off before removing the battery.
J The battery may feel warm after it has been charged or immediately after
being used. This is normal and not a malfunction.
J When using the camera in cold conditions, keep the camera and battery
warm by storing it in a warm place such as an interior pocket between shots.
J If you open the battery cover without removing the battery, the battery
power will not be disconnected.
J If you remove the battery, you have to insert the battery within 2 hours in
order to make sure that the date and time will not be reset.
EN-12
Page 13
Using an AC Power Adapter (Optional Accessory)
Using an AC power adapter prevents the camera from automatically powered off while
transferring files to your computer.
Perform the steps in the preceding section “Charging the Battery”.
Make sure to use only the AC power adapter specified for the digital camera.
Damage caused by the use of an incorrect adapter is not covered under the
warranty.
Inserting and Removing an SD Memory Card (Optional
Accessory)
The digital camera comes with approx. 32 MB of internal memory (25 MB available for
image storage), allowing you to store captured still images or video clips in the digital
camera. However, you can also expand the memory capacity by using an optional SD
memory card so that you can store more files.
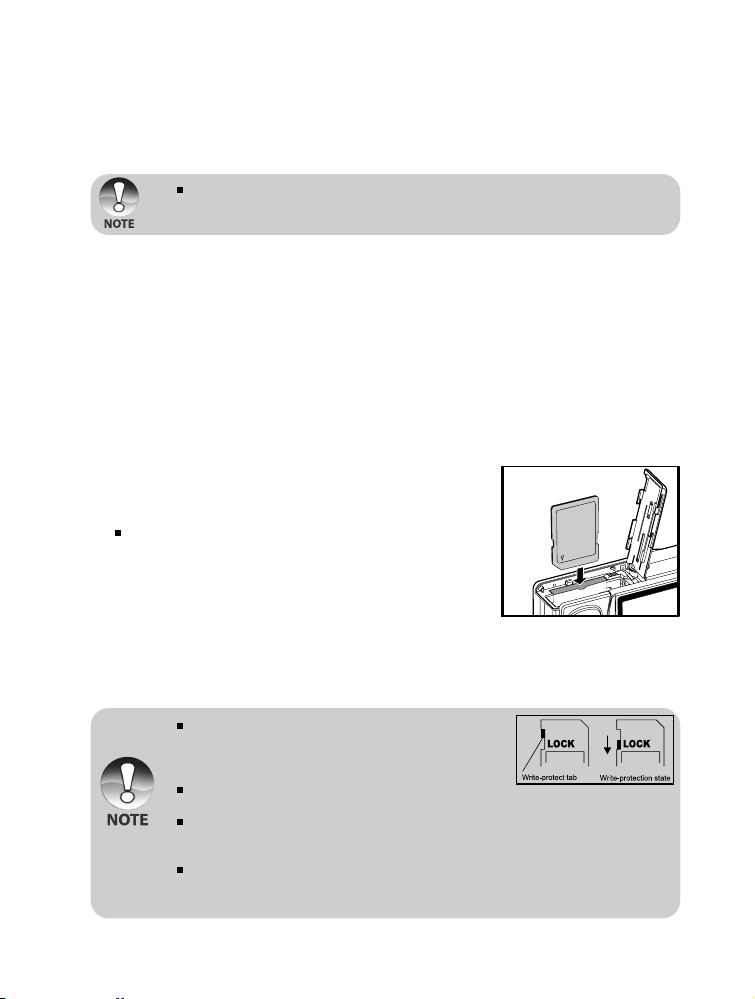
Inserting an SD memory card
1. Open the battery / SD memory card cover.
2. Insert the SD memory card in the correct
orientation shown.
Hold the SD memory card with its front side
(printed arrow) facing the rear side of the
camera, and then insert the card as
far as it can go.
3. Close the battery / SD memory card cover.
Removing an SD memory card
Open the battery / SD memory card cover, press lightly on the edge of the SD memory
card and it will eject.
To prevent valuable data from being accidentally
erased from an SD memory card you can slide
the write-protected tab (on the side of the SD
memory card) to “LOCK”.
However, to save, edit or erase data on an SD
memory card, you must unlock the card.
Be sure to format an SD memory card with this digital camera before using it.
Refer to section in this manual titled “Formatting an SD Memory Card or
Internal Memory” for further details.
To prevent the damage of an SD memory card, please turn off the power
when inserting or removing the SD memory card. If inserting or removing the
SD memory card with power on, the camera turns off automatically.
EN-13
Page 14
Setting the Date and Time
The date/time needs to be set if/when:
Camera is turned on for the first time.
Camera is turned on after leaving the camera without the battery for an extended
period of time.
When the date and time information is not displayed on the LCD monitor, follow these
steps to set the correct date and time.
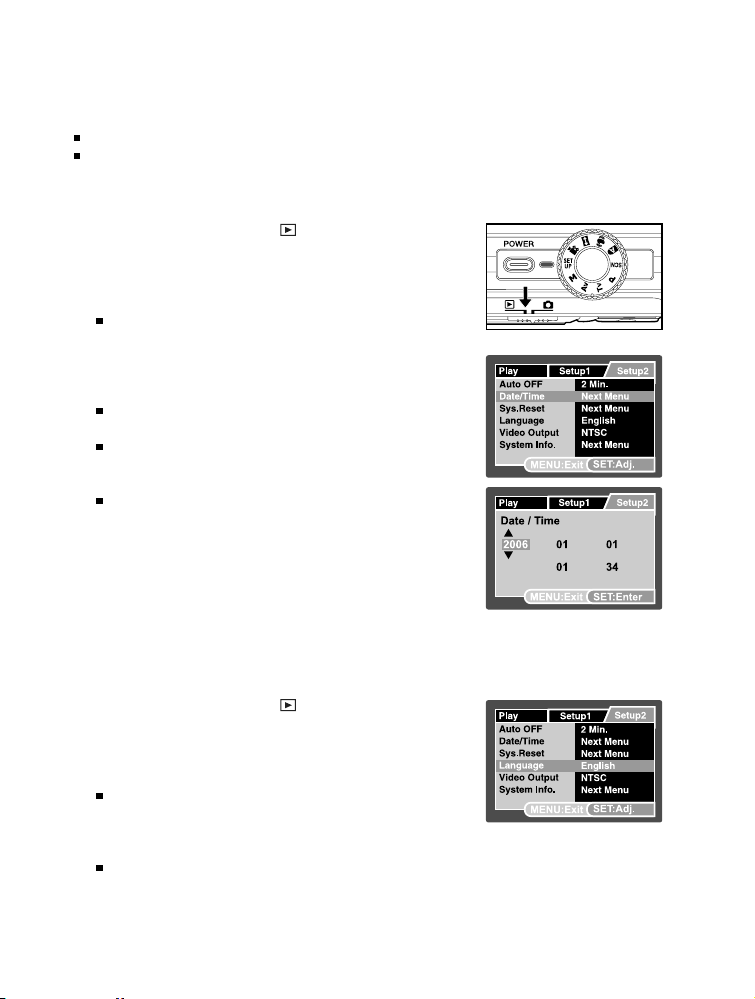
1. Slide the mode switch to [ ], and press the
MENU button.
2. Select [Setup2] with the X button.
3. Select [Date/Time] with the S / T buttons,
and press the SET button.
The Date/Time setting screen will be
displayed.
4. Select the item’s field with the W / X buttons
and adjust the value for the date and time
with the S / T buttons.
The date and time is set in the order yearmonth-day-hour-minute.
The time is displayed in 24-hour format.
5. After confirming all settings are correct, press
the SET button.
The setting will be stored and the screen
will return to the [Setup2] menu.
6. To exit from the [Setup2] menu, press the
MENU button.
Choosing the Display Language
Choose an On-Screen Display (OSD) language for information to be displayed on the
LCD monitor.
1. Slide the mode switch to [ ], and press the
MENU button.
2. Select [Setup2] with the X button.
3. Select [Language] with the S / T buttons,
and press the SET button.
The language setting screen will be
displayed.
4. Select the displayed language with the S /
T buttons and press the SET button.
The setting will be stored.
5. To exit from the [Setup2] menu, press the
MENU button.
EN-14
Page 15
Setting Image Resolution and Quality
Resolution and quality settings determine the pixel size (dimension), image file size,
and compression ratio for your images. These settings affect the number of images
that can be stored. As you get to know the camera, it is recommended that you try
each quality and resolution setting to get an appreciation for the effects that these
settings will have on your images.
Higher resolution and higher quality images offer the best photographic results, but
produce large file sizes. Therefore, few images will take up a lot of memory space.
High resolution and quality settings are recommended for printed output and situations
requiring the finest detail. Lower resolution/quality images take up less memory space
and may be quite suitable for sharing images via e-mail, in a report, or on a web page.
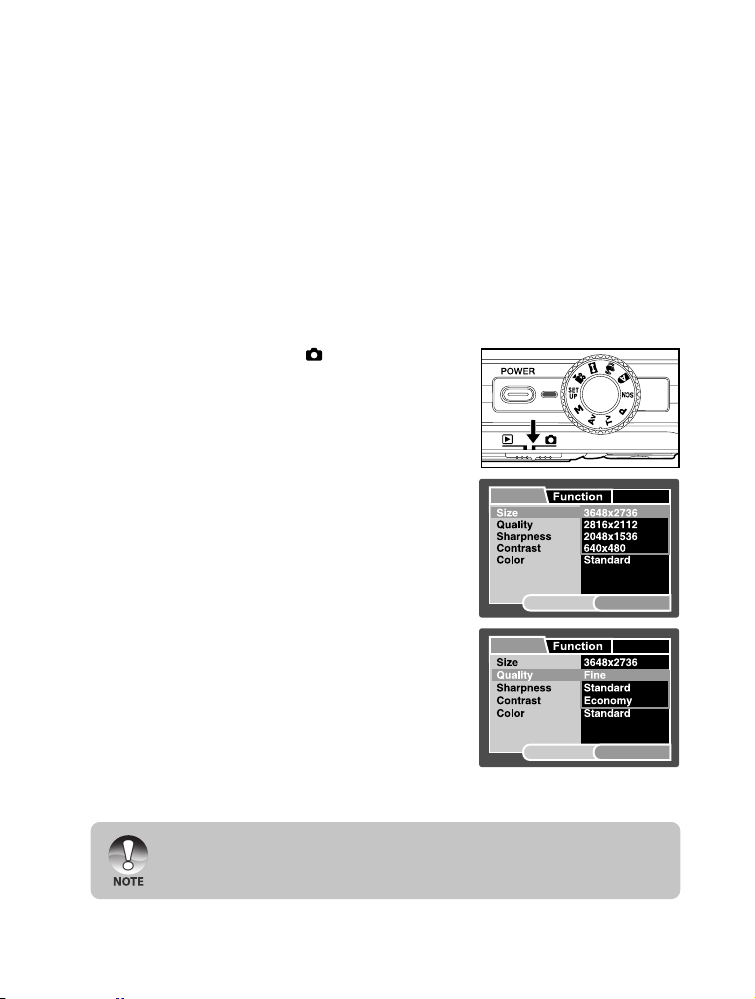
To change image resolution or image quality, perform these steps below:
1. Slide the mode switch to [ ] and set the
mode dial to one of the photography modes.
2. Press the MENU button.
J [Capture] of the photography menu is
displayed.
3. Select [Size] with the S / T buttons, and
press the SET button.
4. Select the desired setting with the S / T
buttons, and press the SET button.
5. Select [Quality] with the S / T buttons, and
press the SET button.
6. Select the desired setting with the S / T
buttons, and press the SET button.
7. To exit from the photography menu, press
the MENU button.
Capture AE/AWB
SET:Adj.MENU:Exit
Capture AE/AWB
SET:Adj.MENU:Exit
J Frame rate of video recording would be different depending on the SD
memory card access speed.
If using a low access speed SD memory card, it influences the frame rate
and recording time.
EN-15
Page 16

PHOTOGRAPHY MODE
[ ] Auto Mode
Auto photography mode is the most commonly used photography mode. Images can
be captured simply because the exposure (the combination of shutter speed and
aperture setting) is determined automatically to suit the photographic conditions.
You can use either the optical viewfinder and/or the 2.5" LCD monitor to compose your
images. Capturing images using the optical viewfinder will conserve the battery power. If
the battery power is low, it is recommended that you only compose images using the
viewfinder. Using the LCD monitor, you can compose images more accurately, but at the
cost of the battery consumption. Always use the LCD display for close-up macro shots.
1. Press the POWER button to turn on the camera.
2. Slide the mode switch to [ ] and set the
mode dial to [ ].
3. Compose your image in the LCD monitor.
J If you are composing your image in the
viewfinder, turn the “diopter adjustment
dial” until the image appears clearly within
the viewfinder.
4. Press the shutter button down halfway.
J Pressing the shutter button down halfway
automatically focuses and adjusts the
exposure.
J The focus-area frame turns blue and the
status LED lights green when the camera
is focused and exposure is determined.
J When the focus or exposure is not
suitable, the frame of the focus area turns
yellow and the status LED flashes red.
5. Press the shutter button down fully to capture
the image.
J If the photographic preview is set to “On”,
images (the captured image) will be displayed
while the image is being recorded onto the
memory.
J When the voice memo is set to “On”,
[VOICE RECORDING] will be displayed
on the screen immediately after the image
is captured and voice memo recording will
start.
J Press the shutter button one more time
during recording, or wait for 30 seconds,
[VOICE RECORD END] will be displayed
and the recording will end. A [ ] icon is
displayed with images that have been
recorded with a voice memo.
EN-16
2
1
Page 17
Recording Voice Memos
A voice memo can be recorded once for 30 seconds at still image mode immediately
following a still image capture.
1. Slide the mode switch to [ ] and set the
mode dial to one of the photography modes,
except for [ ] and [ ] modes.
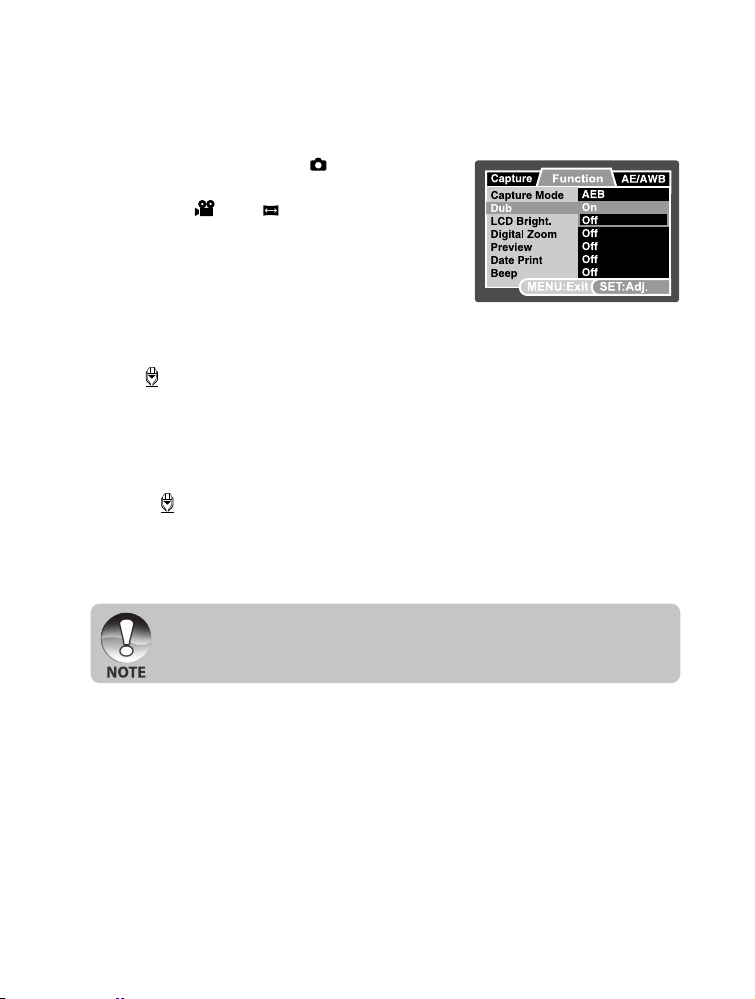
2. Press the MENU button, and select the
[Function] menu with the X button.
J [Function] menu is displayed.
3. Select [Dub] with the S / T buttons, and
press the SET button.
4. Select [On] with the S / T buttons, and press
the SET button.
5. Press the MENU button to exit from the menu.
J [ ] icon is displayed on the screen.
6. Compose the image, press the shutter button down halfway, then press it down
fully.
J [VOICE RECORDING] is displayed on the screen immediately, and the voice
memo recording starts.
7. Press the shutter button one more time during recording, or wait for 30 seconds.
J [VOICE RECORD END] will be displayed and the recording will end.
J A [ ] icon is displayed with images that have been recorded with a voice
memo.
J Voice memo is only available in [Single] capture mode.
J Voice memo is automatically fixed at [Off] in [Continuous], [AEB], [Burst],
[Pre-Shot] or [Coupling Shot] capture mode.
EN-17
Page 18

Using the Digital Zoom
Using a combination of 3 times optical zoom and 10.4 times digital zoom permits zoom
photography up to 31.2 times to suit the subject and the distance. While digital zoom
can be a useful feature, the more an image is enlarged (zoomed), the more pixelated
(grainier) the image will appear.
1. Slide the mode switch to [ ] and set the
mode dial to one of the photography modes,
except for [ ] mode.
2. To enable the digital zoom:
a. Press the MENU button.
b. Select [Function] with the X button.
c. Select [Digital Zoom] with the S / T
buttons, and press the SET button.
d. Select [On] with the S / T buttons again,
and press the SET button.
e. Press the MENU button to exit from the
menu screen.
f. To activate the digital zoom, press and
hold the button completely until the
image on the LCD monitor expands.
3. Press the shutter button to capture a “zoomed”
image.
EN-18
Optical zoom 1X to 3X
J The zoom setting is automatically cancelled by either turning the camera off
or the activation of the Auto OFF function.
Digital zoom 1X to 10.4X
Page 19

Setting the Flash
Set the flash for capturing images. The flash firing mode can be set to suit for the
photographic conditions.
1. Slide the mode switch to [ ].
2. Toggle the button to select the desired flash
mode.
Setting the Self-timer
This setting allows images to be captured with the self-timer.
1. Slide the mode switch to [ ] and set the mode
dial to one of the photography modes.
2. Toggle the button to select the setting.
Each press of the button moves the icon
one step through the sequence and
displays it on the screen.
For [Single] capture mode.
OFF [ 10s] 10 sec. [ 2s ] 2 sec.
[ 10+2s ] 10+2 sec.
For [ ], [ ], [Continuous], [AEB], [Burst],[Pre-Shot] and [Coupling Shot]
capture modes.
OFF [ 10s ] 10 sec. [ 2s ] 2 sec.
3. Compose the image, press the shutter button down halfway, then press it down
fully.
The self-timer LED flashes and the image will be captured after the preset time
has elapsed.
The countdown is displayed on the LCD monitor.
To cancel the self-timer during operation, press the SET button.
The self-timer setting is automatically cancelled after an image is captured.
Use of the [ 2s] or [ 10s] self-timer setting is effective in preventing
motion-blur that can result when the shutter button is pressed at long
exposure times. Use a tripod for best results.
EN-19
Page 20

Setting the Focus
Images can be captured with the distance to the subject set by Normal Auto Focus,
[ ] Macro or [ ] Infinity.
1. Slide the mode switch to [ ] and set the
mode dial to one of the photography modes.
The available focus settings will depend
on the selected photography mode.
2. Toggle the button to select the desired
focus mode.
The table below will help you choose the appropriate focus mode:
Focus mode Description
[Blank] Normal Auto Select normal auto focus for most occasions when you want the
Focus camera to automatically determine the focus setting.
] Macro Selects this when you want to capture a close up image.
[
] Infinity Select the infinity-focus setting when you want to capture images
[
Wide: Approximately 0.3m to infinity.
Tele: Approximately 0.5m to infinity.
Wide: Approximately 0.05m to infinity.
Tele: Approximately 0.3m to infinity.
of subjects at a distance of infinity.
EN-20
J When you capture a close-up image at macro mode, the resolution of the
corner image may be inferior. This is normal and not a malfunction.
Page 21

Exposure Compensation/Backlight Correction
Images can be captured with the overall scene intentionally made brighter or darker.
These settings are used when a suitable brightness (exposure) cannot otherwise be
obtained in circumstances where the difference in brightness between the subject
and the background (the contrast) is large, or when the subject that you wish to
capture is very small within the scene. Exposure can be set in 1/3 EV units.
1. Slide the mode switch to [ ] and set the
mode dial to [P], [Tv], [Av], [ ], [ ] or [ ]
and press the button.
Each press of the button displays
the setting in the order of [ ] Backlight
Correction and [ ] Exposure Compensation.
2. Set the exposure value with the S / T
buttons.
Press the S button to increase the value.
Press the T button to decrease the value.
The setting range of the exposure compensation is as follows:-2.0, -1.7, -1.3, -1.0,
-0.7, -0.3, 0, +0.3, +0.7, +1.0, +1.3, +1.7, +2.0.
Press the button to confirm the setting.
The larger the value, the brighter the image. The smaller the value, the darker
the image. The set value is displayed on the screen.
Effective Subjects and Set Values
+ (positive) compensation
* Printed matter comprising black text on whitish paper
* Backlighting
* Bright scenes or strong reflected light such as ski slopes
* When the sky accounts for a large area on the screen
- (negative) compensation
* People illuminated by a spotlight, in particular, against dark background
* Printed matter comprising white text on blackish paper
* Weak reflecting bodies such as evergreen trees or darkish leaves
Backlight correction (+1.3 EV, fixed)
* When the background is bright and the subject is dark.
* When subjects (people) have a light source such as the sun to their backs.
For [ ] mode, only backlight correction can be set.
EN-21
Page 22

[SCN] Scene Mode
By simply selecting one of the following 16 modes, you can capture the image with most
appropriate settings.
1. Slide the mode switch to [ ] and set the mode
dial to [SCN].
a. Press the MENU button.
b. Select [Scene Mode] with the S / T
buttons, and press the SET button.
c. Select the desired scene mode with the
S/T buttons, and press the SET button.
2. Compose the image, press the shutter button
down halfway, and then press it down fully.
The table below will help you choose the appropriate scene mode:
Scene mode Description
[ ] Sports Select this mode when you want to capture fast-moving subjects.
[ ] Portrait Select this mode when you want to capture an image that makes
[ ] Night Portrait Select this mode when you want to capture people with an
[ ] Night Select this mode when you want to capture dark scenes such
[ ] Candlelight Select this mode when you want to capture photos of candlelit
[ ] Fireworks
[ ] Landscape Select this mode when you want to capture landscape photos
[ ] Natural Green
[ ] Sunrise
[ ] Sunset
[ ] Macro Select this mode for close-up photography.
[ ] Black & White Select this mode when you want to capture a black & white image.
[ ] Sepia Select this mode when you want to capture a sepia image.
[ ] Splash Water Select this mode when you want to capture photos of splashing water.
[ ] Flowing Water
[ ] Pets
the person stand out against a defocused (blurred) background.
evening or night scene background.
as night views.
scene, without spoiling the atmosphere.
Select this mode when you want to capture fireworks clearly
with optimal exposure. The shutter speed becomes slower, so
using a tripod is recommended.
with bright color.
Select this when you want to capture the green scenery background
such as forest.
Select this mode when you want to capture photos of a scene
at sunrise. This mode helps keep the deep hues in the scene.
Select this mode when you want to capture photos of a scene
at sunset. This mode helps keep the deep hues in the scene.
Select this mode when you want to capture the soft flowing
water. Shutter speed is automatically slowed down while
maintaining proper exposure, which produces an image with
the water blurred into smooth flowing lines along with a sharply
focused background.
Select this mode when you want to capture your pets. Shoot
from the eye level of your pets.
EN-22
Page 23

[P] Program (Automatic Exposure) Photography Mode
The camera automatically sets the shutter speed and the aperture to suit the brightness
of the subject. This allows you to capture image with ease just like when the [ ]
mode is selected.
1. Slide the mode switch to [ ] and set the
mode dial to [P].
2. Compose the image, press the shutter button
down halfway, then press it down fully.
J Exposure compensation and backlight correction can be set.
[Tv] Shutter Speed Priority Photography Mode
In this mode, images are captured with the priority given to shutter speed. The
aperture is automatically set according to the shutter speed. If you set a fast shutter
speed, you can capture images of moving subjects that look as if they are still. If you
set a slow shutter speed, you can capture images that give the impression that the
subject is in motion.
1. Slide the mode switch to [ ] and set the mode dial
to [Tv].
2. Press the button.
3. Adjust the shutter speed with the S / T buttons.
J Press the S button to select faster shutter speeds.
J Press the T button to select slower shutter speeds.
J The setting range of the shutter speed is as follows:
1/1500, 1/1250, 1/1000, 1/820, 1/650,1/500, 1/400,
1/320,1/250, 1/200,1/160, 1/125, 1/100, 1/80,
1/64, 1/50,1/40, 1/32, 1/25, 1/20, 1/16, 1/13, 1/10,
0.13s, 0.16s, 0.2s, 0.25s, 0.3s, 0.4s, 0.5s, 0.6s,
0.8s, 1.0s.
J The shutter speed and corresponding aperture
value ardisplayed on the screen. If an appropriate
combination cannot be set, the aperture value is
displayed in red, but images can be captured
regardless.
4. Compose the image, press the shutter button down
halfway, and then press it down fully.
J In the flash photography mode, when [ ] and [ ] are set, the fastest
shutter speed is 1/500 second.
EN-23
Page 24

[Av] Aperture Priority Mode
In this mode, images are captured with the priority given to aperture. The shutter
speed is automatically set according to the aperture. The aperture will affect the
depth-of-field of the camera.
If you set a small aperture (higher F value), you can capture portrait images with an
out-of-focus background. Alternatively, if you set a large aperture (lower F value),
both close objects and distant objects will be in focus, for example when capturing
landscape images.
1. Slide the mode switch to [ ] and set the
mode dial to [Av].
2. Press the button.
3. Adjust the aperture with the S / T buttons.
J Press the S button to increase the value.
J Press the T button to decrease the value.
J The setting range of the aperture value is
as follows:
F6.7, F5.6, F4.8, F4.0, F3.5, F2.8 (Wide).
F4.8, F5.6, F6.7, F8.0, F9.5, F11.0 (Tele).
J The aperture value and corresponding
shutter speed are displayed on the screen.
If an appropriate combination cannot be
set, the shutter speed is displayed in red,
but images can be captured regardless.
4. Compose the image, press the shutter button
down halfway, and then press it down fully.
EN-24
J The aperture value varies depending on the position of the zoom lens.
Page 25

[M] Manual Mode
In manual mode, the aperture value and the shutter speed can be varied individually.
1. Slide the mode switch to [ ] and set the
mode dial to [M].
2. Toggle the button to select the shutter
speed or aperture.
3. Adjust the shutter speed or aperture with the
S / T buttons.
4. Compose the image, press the shutter button
down halfway, and then press it down fully.
J In the flash photography mode, when [ ] and [ ] are set, the fastest
shutter speed is 1/500 second.
EN-25
Page 26

[ ] User Setting Mode
This mode allows you manually set the setting parameters and all these settings will
be memorized.
1. Slide the mode switch to [ ] and set the
mode dial to [ ].
2. Compose the image, press the shutter button
down halfway, then press it down fully.
[ ] Video Mode
This mode allows you to record video clips at a resolution of 640 x 480 pixels. Voice
can also be recorded.
1. Slide the mode switch to [ ] and set the
mode dial to [ ].
2. Compose the scene with the zoom button.
J Optical and digital zoom can be used while
composing the scene.
3. Fully press down the shutter button.
J The recording of the video clip will start.
J Pressing the shutter button again will end
the recording.
J The recording time depends on the
storage size and the subject of the image
to be recorded.
J Zoom function cannot be used during
video recording.
EN-26
J When recording video clips, the flash cannot be used.
J If the access speed of your SD memory card is not enough for recording
video clips in the currently selected quality, a warning icon [
and then the movie recording will stop. In this case, select a video quality
lower than the current one.
] will appear,
Page 27

[ ] Panorama Mode
This mode is designed to make it easier to take a series of shots then stitch them
together with software to make a single photo. You can capture a photographic
subject that won’t fit into a single frame, such as a landscape, and stitch it together
later with a program such as Cool 360 or Photoshop application.
1. Slide the mode switch to [ ] and set the
mode dial to [ ].
2. Shoot the first image.
J The next image appears beside the
previous image.
3. Orient the camera so that the second frame
overlaps a small portion of the photographic
subject of the first image and press the shutter
button to capture the next image.
4. Follow the same steps to capture subsequent
images in the sequence.
5. Finish the sequence by pressing the SET
button after the last image has been
recorded.
[ ] Anti-Shake Mode
The anti-shake function works according to the luminance of the target object. This
function uses special image data processing for getting high sensitivity of CCD. High
sensitivity can use higher shutter speed compared with normal mode, so it reduces
influence of hand shaking. From the resolution point of view, it becomes worse than
normal mode. Maximum size of image becomes 6 megapixels (2816 x 2112).
1. Slide the mode switch to [ ] and set the
mode dial to [ ].
2. Compose the image, press the shutter button
down halfway, then press it down fully.
EN-27
Page 28

Recording a Subject onto an Existing Background Image
(Pre-Shot)
Pre-Shot helps you get the background you want, even if you need to ask someone
else to record the image for you. Basically, Pre-Shot is a two-step process.
1. You compose the background you want and press the shutter button, which causes
a semi-transparent image of the background to remain on the monitor screen.
2. Ask someone else to record a shot of you against your original background, telling
him/her to compose the image by using the semi-transparent monitor screen
image as a guide.
The camera stores the image produced by step 2 only.
Depending on how the image is actually composed in step 2, its background
may not be exactly the same as the one you composed in step 1.
Freeze the background
on the monitor screen.
1. Slide the mode switch to [ ] and set the mode dial to one of the photography
modes, except for [ ], [ ] and [ ].
a. Press the MENU button.
b. Select [Function] with the X button.
c. Select [Capture Mode] with the S / T buttons, and press the SET button.
d. Select [Pre-Shot] with the S / T buttons, and press the SET button.
2. Compose the background you want on the monitor screen, and then press the
shutter button to temporarily record it as a reference image.
This operation causes a semi-transparent image of the background to appear
on the monitor screen, but the displayed image is not actually saved in camera
memory.
3. Now you can stand in front of the background and ask someone else to snap your
picture, using the semi-transparent background on the monitor screen as a
composition guide.
4. After composing the final image (using the semi-transparent background as a
guide), the person with the camera should press the shutter button to record.
Note that the semi-transparent background image you temporarily record in
step 2 is for composition purposes only. The final image contains only what is
in front of the camera when the shutter button is pressed in step 4.
Record the image, using
the background on the
monitor screen as a guide.
Only the second image
is recorded.
EN-28
Page 29

Combining Shots of Two People into a Single Image
(Coupling Shot)
The Coupling Shot mode lets you record images of two people and combine them into
a single image. This makes it possible for you to include yourself in group images,
even when there is no one else around to record the image for you.
First Image
This is the part of the
image that does not
include the person who is
recording the first image.
1. Slide the mode switch to [ ] and set the mode dial to one of the photography
modes, except for [ ], [ ] and [ ].
a. Press the MENU button.
b. Select [Function] with the X button.
c. Select [Capture Mode] with the S / T buttons, and press the SET button.
d. Select [Coupling Shot] with the S / T buttons, and press the SET button.
2. Align the focus frame on the screen with the subject you want on the left side of
the image.
3. Press the shutter button to record the left side of the image.
4. Next compose the subject you want in the right side of the image, taking care to
align the actual background with the semi-transparent image of the background of
the first image, which is shown on the screen.
5. When everything is aligned correctly, record the right side of the image.
Second Image
Making sure that the
background of the image
is aligned correctly,
record the image of the
person who recorded the
first image.
Combined Images
EN-29
Page 30

[ ] PLAYBACK MODE
Playing Back Still Images
You can play back the still images on the LCD monitor.
1. Slide the mode switch to [ ].
J The last image appears on the screen.
2. The images can be displayed in reverse or
forward with the W / X buttons.
J To view the previous image, press the W
button.
J To view the next image, press the X
button.
Image Display Information
You can switch the information display by pressing
the button when playing back images. Each
press of the button switches the information
display state in the following order:
J Pressing the S / T buttons during image playback will rotate the image 90
degrees.
J The S button rotates the image clockwise, whereas the T button rotates the
image counterclockwise. A press of the button opposite to the direction in
which the image was rotated will return the image to the normal display.
J A [ ] icon is displayed with the video data. Video clips cannot be rotated.
J A [ ] icon is displayed with images which have an audio memo recorded.
J Press the SET button to play back voice memos.Press it again to stop
voice memo playback.
Playing Back Video Clips
You can play back recorded video clips on the LCD monitor. You can also play back
voice.
1. Slide the mode switch to [ ].
J The last image appears on the screen.
2. Select the desired video clip with the W / X buttons.
J A [ ] icon is displayed with the video data.
3. Press the SET button to play back a video clip.
J Pressing the X / W buttons during playback initiates fast forward/fast reverse.
EN-30
Page 31

Button Operations
During Playback
(Forward play)
X button
W button
S button
Pressing the X button will
sequentially invoke 2x fast-forward,
4x fast-forward, regular play.
(Reverse play)
Pressing the W button will
sequentially invoke 2x fast-reverse,
4x fast- feed reverse, regular play.
During a Pause
1-frame feed
Reverse 1 frame
Sound On/Off
During a Stop
The next image
is displayed.
The previous
image is
displayed.
T button
SET button
Stop (The display returns to the 1st frame playback).
Pause Cancel pause
J Video clips cannot be displayed rotated or enlarged.
Regular forward
play
Attaching Voice Memos
A maximum of 30 seconds of audio can be recorded like a memo annotation for each still image.
The voice memo can be recorded only once.
1. Slide the mode switch to [
J The last image appears on the screen.
2. Select the image where you want to attach the voice memo with the W / X buttons.
3. Press the MENU button.
4. Select [Setup1] with the X button.
5. Select [Voice Memo] with the S / T buttons, and press the SET button.
6 Select [On] with the S / T buttons, and press the SET button.
7. Press the MENU button to exit from the menu.
8. Press the shutter button.
J [VOICE RECORDING] is displayed on the screen and recording starts.
9. To stop recording voice memo during recording, press the shutter button again.
J [VOICE RECORD END] will be displayed and the recording will end.
J A [ ] is displayed with images that have been recorded with a voice memo.
Playing back voice memo
Pressing the SET button displays [VOICE PLAYBACK] and plays back the voice memo.
Pressing it again stops voice memo playback.
J Voice memo is only available for still images.
J If a voice memo has already been recorded (either by dub recording or attaching
voice memo afterwards), the voice memo can not be replaced or recorded again.
].
EN-31
Page 32

Thumbnail Display
This function allows you to view 9 thumbnail images on the LCD monitor at the same
time which can help to quickly search for the image that you want.
1. Slide the mode switch to [ ].
J The last image appears on the screen.
2. Press the button.
J The images are displayed in the thumbnail
display.
J Images that have been selected with the
S / T / W / X buttons will be indicated by
a green frame.
J When there are ten or more images, scroll
the screen withthe S / T buttons.
3. Press the S / T / W / X buttons to select the
image to be displayed at regular size.
4. Press the SET button.
J The selected image is displayed at its regular
size.
Page Jump Function
This function allows you to select the image to be displayed immediately from a lot of
recorded images.
1. Slide the mode switch to [ ].
2. Press the button to enter thumbnail
display.
3. Press the button to enter page jump
function and the image is indicated by a red
frame.
4. For page selection, follow the steps below:
J Pressing the S button jumps to the first
image.
J Pressing the T button jumps to the last
image.
J Pressing the W button jumps to the
previous thumbnail page.
J Pressing the X button jumps to the next
thumbnail page.
5. Press the button to resume normal
thumbnail display.
J To select the image to be displayed at
regular size, follow the steps 3-4 in the
above section.
EN-32
J A [ ], [ ], [ ], [ ] icon will be displayed in a thumbnail display.
Page 33

Zoom Playback
103-0006
This mode also allows you to enlarge your image on the selected portion of the image to
check for small details.
1. Slide the mode switch to [ ].
2. Press the W / X buttons to select the image
you want to enlarge.
J You can also select the image you want
to enlarge from the thumbnail display.
3. Adjust the zoom ratio with the / buttons.
J Pressing the button enlarges the image.
J To return to normal magnification, press
the button.
J The magnification factor is displayed on
the LCD monitor.
J The image is displayed enlarged, and a
white frame and green frame are displayed
on the LCD monitor.
J The white frame indicates the entire image, while the green frame shows the
location of the currently enlarged area.
4. Press the S / T / W / X buttons to select the area to enlarge.
5. To return to regular display, toggle the button until the regular display appears
on the screen.
J Pressing the button magnifies the image from 1x —>2x—> 4x—>8x.
J Pressing the button reduces the image from 8x—>4x —>2x—> 1x.
Slideshow Display
The slideshow function enables you to play back your still images automatically in
sequential order as a slideshow. This is very useful and entertaining feature for
reviewing captured images and for presentations.
1. Slide the mode switch to [ ].
2. Press the MENU button.
J The playback menu is displayed.
3. Select [Slide Show] with the S / T buttons, and
press the SET button.
J The slideshow starts.
4. To stop the slide show during playback, press
the SET button.
J The image is displayed on screen when you
press the SET button.
J The Auto OFF function does not operate during slide show.
J All still images in the folder are automatically played back.
EN-33
Page 34

Protecting Images
Set the data to read-only to prevent images from being erased by mistake.
Protecting Images
1. Slide the mode switch to [ ].
2. Select the image that you want to protect
with the W / X buttons.
3. Press the MENU button.
J The playback menu is displayed.
4. Select [Protect] with the S / T buttons, and
press the SET button.
5. Select [Single] or [All] with the S / T buttons,
and press the SET button.
6. Select [Set] with the S / T buttons, and press
the SET button.
J Protection is applied to the image and
the camera returns to the playback mode.
J The protect icon [ ] is displayed with
protected images.
When [All] has been selected, [
displayed with all the images.
Canceling the Protection
To cancel protection, display the image that you want to remove the image protection.
1. Select [Protect] with the S / T buttons from the playback menu, and press the
SET button.
2. Select [Single] or [All] with the S / T buttons, and press the SET button.
3. Select [Cancel Protect] with the S / T buttons, and press the SET button.
J The removal of image protection is executed and the camera returns to the
playback mode.
Protecting multiple images simultaneously
1. Select [Protect] with the S / T buttons from the playback menu, and press the
SET button.
2. Select [Select] with the S / T buttons, and press the SET button.
J The images are displayed in the thumbnail display.
3. Select the image you want to protect with the S / T / W / X buttons, and press the
button.
J The protect icon [ ] is displayed with protected images. Selecting a protected
image and pressing the
is repeated to select multiple images.
4. Press the SET button.
J Protection and cancellation the protection are executed and the camera returns
to playback mode.
J Formatting an SD memory card (or internal memory) overrides protection, and
erases all images regardless of their protected status.
] is
button again will cancel the protection. This procedure
EN-34
Page 35

DPOF Settings
DPOF is the abbreviation for Digital Print Order Format, which allows you to embed
printing information on your memory card. You can select the images to be printed
and how many prints to make with the DPOF menu in the camera and insert the
memory card to the card compatible printer. When the printer starts printing, it will read
the embedded information on the memory card and print the specified images.
1. Set the mode dial to [ ].
2. Select the image that you want to set DPOF with
the W / X buttons.
3. Press the MENU button.
J The playback menu is displayed.
4. Select [DPOF] with the S / T buttons, and
press the SET button.
J The DPOF setting screen is displayed.
5. Select [Single] or [All] with the S / T buttons,
and press the SET button.
J [Single]: Sets DPOF for each individual
J [All]: Sets DPOF for all images at once.
image.
6. Select [Print Num.] with the S / T buttons, and
press the SET button.
J This displays the number of prints setting
screen.
7. Set the number of prints with the S / T
buttons, and press the SET button.
J You can set up to 9 prints for each image.
8. Select [Date] with the S / T buttons, and
press the SET button.
J The date setting screen appears.
Setup1
Setup2
EN-35
Page 36

9. Select date to [On] or [Off] with the S / T buttons, and press the SET button.
979-0008
1
J [On]: The date of the photograph will also be printed.
J [Off]: The date of the photograph will not be printed.
10. Select [Print Enable] with the S / T buttons, and press the SET button.
11.Select [Execute] with the S / T buttons, and press the SET button.
J This creates a file containing the DPOF
information, and when the operation is
finished, the screen returns to the
playback mode.
J The DPOF icon [ ] is displayed on each
image that have set up DPOF settings.
J The date that is printed on the photo is the date set on the camera. To
print the correct date on the photo, set the date on the camera before
you photograph the image. Refer to section in this manual titled “Setting
the Date and Time” for further details.
J For DPOF settings on images stored in the internal memory, be sure to
copy those files to an SD memory card first. Refer to section in this
manual titled “Copying Files from Internal Memory to a Memory Card” for
further details.
Copying Files from Internal Memory to a Memory Card
This function allows you to copy your files from the digital still camera’s internal
memory to a memory card. Of course, you can only do this if you have a memory card
installed and some files in internal memory.
1. Set the mode dial to [ ].
2. Select the image that you want to copy to a
memory card with the W / X buttons.
3. Press the MENU button.
J The playback menu is displayed.
4. Select [Copy] with the S / T buttons, and
press the SET button.
5. Select [Execute] with the S / T buttons, and
press the SET button.
J To not copy, select [Cancel] with the S / T
buttons, and press the SET button.
EN-36
Page 37

Changing the Camera Start Logo Image
You can specify the start logo image for your camera. You can select the new start
logo image among the captured still images.
1. Slide the mode switch to [ ].
2. Select the image that you want to protect with
the W / X buttons.
3. Press the MENU button.
J The playback menu is displayed.
4. Select [Setup1] with the X button.
5. Select [Start Logo] with the S / T buttons, and
press the SET button.
6. Select [User Image] with the S / T buttons, and
press the SET button.
7. Select [Execute] with the S / T buttons, and
press the SET button.
J This new start logo image will be activated
on the next time you turn on the camera.
J User selected image is saved in the root directory of the internal memory.
In case of formatting the internal memory, the user selected start logo
image will be lost and replaced with the default start logo image.
J If user replaces start up image through USB (Mass storage device
class), and that image is not fit in data format, the start up screen will be
broken.
J “NO IMAGE” message is displayed when “User Image” is selected and
no images are stored in the SD memory card or internal memory.
J “MEDIA FULL” message is displayed when the free space on the internal
memory is insufficient for saving user-selected image.
J If the image recorded voice memo is selected to be the start logo image,
the voice memo function will fail.
J The capacity for saving user image is only one. The previous start logo
image will not be recovered if you select another one as a new start logo
image.
EN-37
Page 38

[ ] Deleting Images
Immediate Erasure (Quick Delete Function)
The quick delete function enables you to delete the last-captured image during
capture.
1. Slide the mode switch to [ ] and set the
mode dial to one of the photography modes.
2. Press the button.
J The last image and quick delete menu
appear on the screen.
3. Press the button again to delete the
image.
J You may also press the SET button to
confirm the deletion.
J To not delete, select [Cancel], and press
the SET button.
Delete This File?
EN-38
Page 39

103-0006
Deleting in Playback Mode
103-0006
Deleting a single image/Deleting all images
1. Slide the mode switch to [ ].
J The last image will be displayed on the
screen.
2. Select the image you want to erase with the
W / X buttons.
3. Press the button.
J The deletion menu will be displayed.
4. Select [Single] or [All] with the S / T buttons,
and press the SET button.
J [Single]: Erases the selected image or the
last image.
J [All]: Erases all of the images except
for the protected images.
J [Select]: Erases a number of selected
images.
5. Select [Execute] with the S / T buttons, and
press the SET button.
J To not erase, select [Cancel], and press
the SET button.
J Deleting an image will not affect sequential image numbering. For
example, if you delete image number 240, the next captured image will
be numbered 241 even though 240 no longer exists. In other words, an
image-number is retired when an image is deleted and will not be reused
or reassigned to another subsequently captured image.
Deleting selected images
This deletes a number of selected images.
1. Slide the mode switch to [ ].
2. Press the button.
J The deletion menu will be displayed.
3. Select [Select] with the S / T buttons, and
press the SET button.
J The images are displayed in the thumbnail
display.
4. Select the image you want to erase with the S
/ T / W / X buttons, and press the button.
J The [ ] icon will be displayed. One more
press of the button will cancel the
operation. Repeat this procedure and select
all the images that you want to erase.
5. Press the SET button.
100-0010100-0011
EN-39
Page 40

CONNECTING TO A PICTBRIDGE COMPLIANT
PRINTER
If a printer that supports PictBridge is available, images can be printed by connecting
the digital still camera directly to the PictBridge-compatible printer without using a
computer.
Connecting the camera to the printer
1. Connect one end of the USB cable to your
camera.
2. Connect the other end of the USB cable to
the USB port on the printer.
3. Turn on your camera.
4. The [USB] screen is displayed. Select
[PRINTER] with the S/T buttons, and press
the SET button.
Printing images
When the camera is properly connected to a PictBridge compliant printer, the PictBridge
menu is displayed on the monitor.
1. Select the item you want to configure with
the S/T buttons, and press the SET button.
J [Images]: Select whether you want to print
J [Date Print]:According to the printer type,
J [Paper Size]:Select the desired paper size
J [Layout]: Select the desired printing
J [Print]: After all settings are configured,
2. If you select [Images] in the previous step, the
figure shown on the right hand side will appear.
Select [Single] or [All] with the S/T buttons,
and press the SET button.
J [Single]: Select to print one specific image.
J [All]: Select to print all images.
J [Exit]: Exit from Images option.
specific image or all images.
You may also select printing
number for specific image.
select whether you want to
print the image with date imprint
or not.
according to the printer type.
layout according to the printer
type.
select this item to start printing.
EN-40
Page 41

3. If you select [Single] in the previous step, the
figure shown on the right hand side will appear.
J Select the image that you want to print with
the W /X buttons.
J Select the [Print Num.] (up to 99) with the S/T
buttons.
J After selecting the desired image and printing
number, press the SET button to confirm.
4. Select [Exit] with the S /T buttons, and press the
SET button.
5. Select [Print] with the S /T buttons, and press
the SET button to start printing.
6. The printing starts and the figure shown on the
right hand side appears.
J The [Complete] will be displayed temporarily,
reminding you that the printing procedure is
finished.
J If a print error is detected, the [Print Error] will
be displayed.
The image printing may be failed if the power to the camera is cut off.
We recommend that you use the AC power adapter/charger when connecting
the camera to the printer.
EN-41
Page 42

MENU OPTIONS
Photography Menu (Capture tab)
This menu is for basic settings used when capturing images in the photography
modes. These settings are retained even if the camera is turned off or the Auto OFF
function is activated.
Available menu options in each photography mode:
Auto
Capture Function
Size Capture Mode
Quality Dub
Sharpness LCD Bright.
Contrast Digital Zoom
Color Preview
Date Print
Beep
Program / Tv / Av / M / User Setting
Capture Function AE/AWB
Size Capture Mode White Balance
Quality Dub Manual WB
Sharpness LCD Bright. ISO
Contrast Digital Zoom Metering
Color Preview Focus Area
Date Print Flash Offset
Beep
Video
Capture Function AE/AWB
Quality LCD Bright. White Balance
Contrast Digital Zoom Manual WB
Color Beep
Panorama
Capture Function AE/AWB
Size LCD Bright. White Balance
Quality Beep Manual WB
Sharpness ISO
Contrast Metering
Color Flash Offset
Scene
Capture Function
Scene Mode Capture Mode
Size Dub
Quality LCD Bright.
Digital Zoom
Preview
Date Print
Beep
EN-42
Page 43

Anti-Shake
Capture Function AE/AWB
Size Dub White Balance
Quality LCD Bright. Manual WB
Sharpness Digital Zoom Metering
Contrast Preview Focus Area
Color Date Print Flash Offset
Beep
1. Slide the mode switch to [ ] and set the
mode dial to one of the photography modes.
2. Press the MENU button.
J [Capture] menu is displayed.
3. Select the desired [Capture] option item with
the S / T buttons, and press the SET button
to enter its respective menu.
4. Select the desired setting with the S / T
buttons, and press the SET button.
5. To exit from the menu, press the MENU
button.
Capture
Capture
Scene Mode
Size
Quality
AE/AWB
AE/AWB
Sport
3648x2736
Fine
SET:Adj.MENU:Exit
SET:Adj.MENU:Exit
EN-43
Page 44

Scene Mode
Refer to section in this manual titled “Scene Mode” for further details.
Size (resolution)
This sets the resolution of the still-image that will be captured.
*[ ] 3648 x 2736
*[ ] 2816 x 2112
*[ ] 2048 x 1536
*[ ] 640 x 480
Quality
This sets the quality (compression rate) at which the image is captured.
* Fine / Normal / Economy
J [Economy] setting is not available for [ ] mode.
Sharpness
The camera can automatically emphasize the borders between light and dark areas
of the image. This will make the image’s edges look sharper. In some scenes you may
prefer sharper edge detail. In other scenes you may prefer softer edge detail.
This sets the sharpness of the image that will be captured.
* Hard / Normal / Soft
Contrast
This sets the difference between the bright and dark portions of the images that will
be captured.
* Hard / Normal / Soft
Color
This sets the color of the image that will be photographed.
Standard / Vivid / Sepia / Monochrome / Red / Green / Blue / Yellow / Purple
*
EN-44
Page 45

Photography Menu (Function tab)
1. Slide the mode switch to [ ] and set the
mode dial to one of the photography modes.
2. Press the MENU button, and select the
[Function] menu with the X button.
J The [Function] tab of the photography
menu is displayed.
3. Select the desired [Function] option item with
the S / T buttons, and press the SET button
to enter its respective menu.
4. Select the desired setting with the S / T
buttons, and press the SET button.
5. To exit from the photography menu, press the
MENU button.
Capture Mode
This sets the recording method at the time of capturing images.
*[Blank] Single: Capture an image at a time.
*[ ] Continuous: Permits continuous photography of 3 images max.
*[AEB] AEB: Permits 3 consecutive images in the order of standard
*[ ] Burst: Permits continuous photography while pressing holding the
* [ ] Pre-Shot: Pre-shot helps you get the background you want, even if
* [ ] Coupling Shot: The Coupling Shot mode lets you record images of two
exposure, underexposure and overexposure compensation.
shutter button. As long as you hold the shutter button
pressed, images are captured until the memory capacity
is exhausted.
you need to ask someone else to record the image for you.
Basically, Pre-shot is a two-step process.
people and combine them into a single image. This makes
it possible for you to include yourself in group images,
even when there is no one else around to record the
image for you.
J In [Continuous], [AEB], [Burst], [Pre-Shot] and [Coupling Shot] capture mode,
the voice memo is automatically fixed at [Off].
Dub
Refer to section in this manual titled “Recording Voice Memos” for further details.
* On / Off
J When [Preview] is set to [Off], [Dub] setting is also fixed at [Off].
EN-45
Page 46

LCD Bright.
Select a brightness level for the LCD monitor. The
LCD becomes brighter with the S button and
darker with the T button. The adjustment range
is from -5 to +5.
Digital Zoom
This sets whether or not to use digital zoom at the time of photography.
* On / Off
Preview
This sets whether or not to display the captured image on the screen immediately after
the image is captured.
* On / Off
J When [Preview] is set to [Off], [Dub] setting is also fixed at [Off].
Date Print
The date and time of recording can be printed
directly on the still images. This function must be
activated before the image is captured.
* On / Off
Beep
Enables or disables the sounds (beeps)
associated with camera button functions.
* On / Off
EN-46
Page 47

Photography Menu (AE/AWB tab)
1. Slide the mode switch to [ ] and set the
mode dial to one of the photography modes.
2. Press the MENU button, and select the [AE/
AWB] menu with the X button.
J The [AE/AWB] tab of the photography
menu is displayed.
3. Select the desired [AE/AWB] option item with
the S / T buttons, and press the SET button
to enter its respective menu.
4. Select the desired setting with the S / T
buttons, and press the SET button.
5. To exit from this menu, press the MENU
button.
White Balance
This sets the white balance capturing under a variety of lighting conditions and
permits images to be captured that approach the conditions that are seen by the
human eye.
*
[ Blank ] Auto
[ ] Incandescent
*
[ 1 ] Fluorescent 1
*
[ 2 ] Fluorescent 2
*
[ ] Day Light
*
[ ] Cloudy
*
[ ] Manual
*
Manual WB
This manually sets the white balance and stores it. Use of this is convenient when the
white balance does not offer a good match.
Before select [Execute] determine the subject (such as a white paper) that will be used to
set the white balance.
Cancel / Execute
*
EN-47
Page 48

ISO
This sets the sensitivity for capturing images. When the sensitivity is raised (and the ISO
figure is increased), photography will become possible even in dark locations, but the
more pixelated (grainier) the image will appear.
* 64 / 100 / 200 / 400 / Auto
J In the [Auto] setting, the ISO value is automatically selected from ISO 64 to
ISO 200.
J In the [ ] mode, the ISO function cannot be used. And the ISO setting will
be automatically set between ISO 64 and ISO 400.
J [Auto] setting is not available for [Tv], [Av] and [M] mode.
Metering
This sets the metering method for calculating the exposure.
* [ ] Multi: The entire area of the screen is measured, and the exposure is
calculated.
* [ ] Spot: A very small portion of the center of the screen is measured, and
the exposure is calculated.
* [ ] Average: The exposure is measured all of the image area.
Focus Area
This sets the focusing area.
* Multi: The function of auto focus finds the best proper position from 9 blocks of
focus area.
* Center: The function of auto focus adjusts focus at the center of image.
Flash Offset
This sets the flash strength. The flash power becomes strong when selecting “+”
values. The flash power becomes soft when selecting “-“ values.
* +2 / +1 / 0 / -1 / -2
EN-48
Page 49

Playback Menu
In the [ ] mode, set which settings are to be used for playback.
1. Slide the mode switch to [ ].
2. Press the MENU button.
J The playback menu is displayed.
3. Select the desired option item with the S / T
buttons, and press the SET button to enter
its respective menu.
4. Select the desired setting with the S / T
buttons, and press the SET button.
5. To exit from the menu, press the MENU button.
Slide Show
Refer to section in this manual titled “Slideshow Display” for further details.
DPOF
Refer to section in this manual titled “DPOF Settings” for further details.
Protect
Refer to section in this manual titled “Protecting Images” for further details.
Copy
Refer to the section in this manual titled “Copying Files from Internal Memory to a
Memory Card” for further details.
LCD Bright.
Refer to section in this manual titled “LCD Bright.” in Photography Menu (Function tab)
for further details.
EN-49
Page 50

Setup1 Menu
Set your camera’s operating environment.
1. Slide the mode switch to [ ].
2. Press the MENU button, and select the
Play
[Setup1] menu with the X button.
J The [Setup1] menu is displayed.
3. Select the desired setting with the S / T
buttons, and press the SET button to enter
its respective menu.
4. Select the desired setting with the S / T
buttons, and press the SET button.
5. To exit from the menu, press the MENU
button.
Voice Memo
Refer to section in this manual titled “Attaching Voice Memos” for further details.
Media Info.
This displays the free capacity of the SD memory card (or internal memory). If the SD
memory card is not inserted, free capacity of internal memory is displayed.
Fr. No. Reset
This creates a new folder. The photographed images are recorded to the newly
created folder from number 0001.
* Cancel / Execute
Format
This function formats the internal memory (or memory card) and deletes all stored still
images / video clips and data.
* Cancel / Execute
Beep
Refer to section in this manual titled “Beep” in Photography Menu (Function tab) for
further details.
Setup1
Setup2
SET:Adj.MENU:Exit
Start Logo
Refer to section in this manual titled “Changing the Camera Start Logo Image” for
further details.
EN-50
Page 51

Setup2 Menu
1. Slide the mode switch to [ ].
2. Press the MENU button, and select the
[Setup2] menu with the X button.
J The [Setup2] menu is displayed.
3. Select the desired [Setup2] option item with
the S / T buttons, and press the SET button
to enter its respective menu.
4. Select the desired setting with the S / T
buttons, and press the SET button.
5. To exit from the menu, press the MENU
button.
Auto OFF
If no operation is performed for a specific period of time, the power to the camera is
automatically turned off. This feature is useful to reduce battery wear.
* 2 Min. / 3 Min. / 5 Min.
Date/Time
Refer to section in this manual titled “Setting the Date and Time” for further details.
Sys. Reset
This returns all basic settings to the camera’s default settings. The time setting will not
be reset.
* Cancel / Execute
Language
Refer to section in this manual titled “Choosing the Display Language” for further
details.
Video Output
This sets video output system of the video equipment that you are going to connect
to the camera.
* NTSC / PAL
System Info.
This displays the firmware version of the camera.
EN-51
Page 52

TRANSFERRING RECORDED IMAGES AND
VIDEOS TO YOUR COMPUTER
System Requirements (Windows)
J Pentium 166 MHz or higher
J Windows 2000/XP
J 128MB RAM
J 128MB hard disk space
J CD-ROM drive
J Available USB port
System Requirements (Macintosh)
J PowerPC G3/G4
J OS 9.0 or later
J 128MB RAM
J 128MB hard disk space
J CD-ROM drive
J Available USB port
EN-52
Page 53

Connecting the Camera to Your Computer
1. Connect one end of the USB cable to the
USB terminal of the camera.
2. Connect the other end of the USB cable to
an available USB port on your computer.
3. Turn on your camera.
J The [USB] screen appears.
4. Select [PC] and press the SET button.
5. From the Windows desktop, double click on
“My Computer”.
6. Look for a new “Removable disk” icon.
Typically, the camera will be assigned drive
letter “e” or higher.
7. Double click on the removable disk and locate
the DCIM folder.
8. Double click on the DCIM folder to open it to
find more folders.
J Your recorded images and video clips will
be inside these folders.
J Copy & Paste or Drag-N-Drop image and
video files to a folder on your computer.
Mac users: Double-click the “untitled” or “unlabeled” disk drive icon on our desktop.
iPhoto may automatically launch.
J The data saved to the internal memory (memory card) may be damaged if the
power to the camera is cut off during image transfer. We recommend that
you use the AC power adapter when connecting the camera to the PC.
EN-53
Page 54

Downloading Images and Video Files
When the camera is turned on and connected to your computer, it is considered to be
a disk drive, just like a floppy disk or CD. You can download (transfer) images by
copying them from the “Removable disk” (“untitled” or “unlabeled” disk on a Macintosh)
to your computer hard drive.
Windows
Open the “removable disk” and subsequent folders by double clicking on them. Your
images are inside these folder(s). Select the images that you want, and then choose
“Copy” from the “Edit” menu. Open the destination location (folder) and choose “Paste”
from the “Edit” menu. You may also drag and drop image files from the camera to a
desired location.
Macintosh
Open the “untitled” disk icon, and the destination location on your hard disk. Drag and
drop from the camera to the desired destination.
J Do not open the battery cover during USB cable connection.
J Memory card users may prefer to use a memory card reader (highly
recommended).
J A video playback application is not included with the package. Make sure
that a video playback application has been installed in your computer.
J If you cannot download images/video clips stored in the internal memory,
you may copy those files to an SD memory card first and then transfer to
your computer. Refer to section in this manual titled “Copying Files from
Internal Memory to a Memory Card” for further details.
EN-54
Page 55

CAMERA SPECIFICATIONS
Item Description
Image sensor 1/1.7” CCD sensor (10.1 megapixels)
Image resolution
LCD monitor 2.5” full color TFT LCD (230K pixels)
Recording media 32 MB internal memory (25 MB available for image storage)
File format
Lens
Stabilization Anti-Shake system
Shutter speed 1 - 1/1500 sec. (Tv, Manual)
Digital zoom
Flash effective range 0.5m – 2.7m (Wide/ISO=200)
Terminal
Power supply
Dimension Approx. 91 x 57 x 27mm (without protruding parts)
Weight Approx. 150g (without battery and SD memory card)
* Design and specifications are subject to change without notice.
* DSP anti-shake could minimize (not 100% reduce) the jitter from shaky hands that
causes many photos to look blurred by shifting the lens unit. This mode offsets
unintentional hand movement while you are taking pictures to give you clear,
sharp images even when taking handheld telephoto shots or shooting at night.
* If the video cannot be playback in the WMP 9.0, please you have to update the
renewed of WMP 9.0 from the Microsoft website.
* If the access speed of your memory card is not high enough (over 2MB/Sec for
random write - 20x SD memory card compliant), the video clip will automatic stop or
some unexpected situation may occur while recording. In this case, change into a
high-speed memory card or select standard quality.
<Still image>
3648 x 2736, 2816 x 2112, 2048 x 1536, 640 x 480
<Video clip>
640 x 480 (25 fps)
Supports SD memory card (up to 2 GB) (optional)
JPEG, DCF 1.1, EXIF 2.2, DPOF, Motion JPEG
3x optical zoom lens
Aperture range: 2.8(W) – 4.8(T)
Focal length: 7.5mm - 22.5mm (equivalent to 35mm -105mm
on a 35mm camera)
0.5 - 1/1500 sec. (except Tv, Manual)
10.4x (Capture mode)
2x, 4x & 8x (Playback mode)
DC IN 5V terminal
USB 2.0 Compliant / A/V OUT terminal
Rechargeable Lithium-ion battery (3.7V) (optional)
AC power adapter (5V/2A) (optional)
EN-55
 Loading...