

Page 1

p-series
CoPilot and CoPilot Premium
personal navigation device
user manual
Page 2

CoPilot and CoPilot Premium Satellite Navigation
Kit for Acer p610, p630, p660 or p680 personal
navigation device
Your CoPilot or CoPilot Premium kit contains the following:
SD storage card pre-loaded with maps
1 x installation CD
2 x data CDs
Car charger and connector cable
Car mount
FM9 cable*
*Optional accessory
CCooPPiilloott aanndd CCooPPiilloott PPrreemmiiuumm KKiittss
ii
CoPilot and CoPilot Premium
CoPilot and CoPilot Premium Kits
Acer p-series
Page 3

CCoonntteennttss
Getting started 1
GPS 3
CoPilot screen controls 4
CoPilot Home screen 5
CoPilot Menus 6
Navigating to a destination 8
Entering an Address 10
Entering a Home Address 12
Entering a Work Address 12
Entering a Favourite Destination 13
Entering a Recent Destination 14
Entering a Contact 15
Navigating to a Point Of Interest 16
Navigating to a Postcode 18
Pick on Map 19
Navigating to an Intersection 20
Latitude/longitude 21
Saved Trip 22
Trip editing and waypoints 23
Optimising and re-arranging Stops 24
Detour feature 25
Selective routing 26
Contents
iiii
CoPilot and CoPilot PremiumAcer p-series
Page 4

iiiiii
CoPilot and CoPilot Premium
Safety camera alerts 27
TMC traffic service 28
Driving views 30
Driver safety 30
Where am I? 31
Itinerary 31
Next Turn 31
Destination 31
3D 31
Day/night map display 32
Customise your map displays 32
Navigation modes 33
Routing settings 34
Guidance settings 36
Map settings 38
POI alert settings 40
Regional Settings 41
Favourite settings 42
Recent stop settings 43
My Place Settings 44
CoPilot desktop software 45
Data Download Wizard 46
Acer Support Services 50
Contents
Acer p-series
Page 5
GGeettttiinngg SSttaarrtteedd
Please refer to the separate Acer p-series personal navigation
device (PND) user manual for instructions on setting up
your hardware
Switch on your Acer personal navigation device (PND)
Insert the CoPilot navigation SD card into the SD card slot
found on the right side of the PND
Press the 'Navigator' button to start CoPilot navigation.
The launch screen will be displayed.
NB: It may take several seconds for CoPilot to load.
Getting Started
CoPilot and CoPilot PremiumAcer p-series
11
Page 6
22
CoPilot and CoPilot Premium
Getting Started
Acer p-series
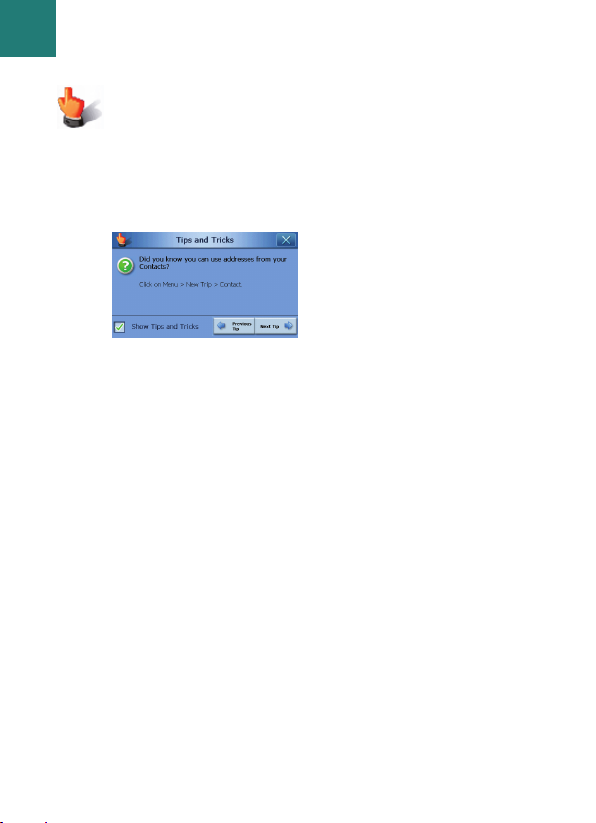
Tips and tricks
Each time you start CoPilot, a useful hint or tip will be
displayed. Press ‘Next Tip’ to read additional tips and tricks
or press ‘X’ to close this feature.
Deselect the ‘Show tips and tricks’ box in the bottom left
corner of the screen to switch off this feature.
Setup is now complete. You are now ready to enter a
destination for the first time.
Page 7

GGPPSS
GPS Performance
Your Acer p-series PND has an integrated GPS receiver to
locate your position on a map. The first time you use the GPS
receiver it may take several minutes to determine your position.
Please note there is no GPS signal inside buildings, tunnels,
garages, multi-storey and basement car parks.
Connecting the optional TMC cable (certain models
only)
If you have the optional GNS FM9 TMC cable you can receive
real-time traffic information via TMC.
*
Connect one end of the FM9 TMC cable to the mini USB car
charger, and plug the other end into the charging slot in the
base of your Acer navigation system. Secure the wired antenna
in the car using the rubber stickers provided.
If a TMC Traffic signal is available CoPilot will display traffic
incidents on your route automatically and can recommend an
alternate route if required.
*TMC cable only available with certain models. The availability of TMC traffic
service varies by country
GPS
33
CoPilot and CoPilot PremiumAcer p-series
Page 8
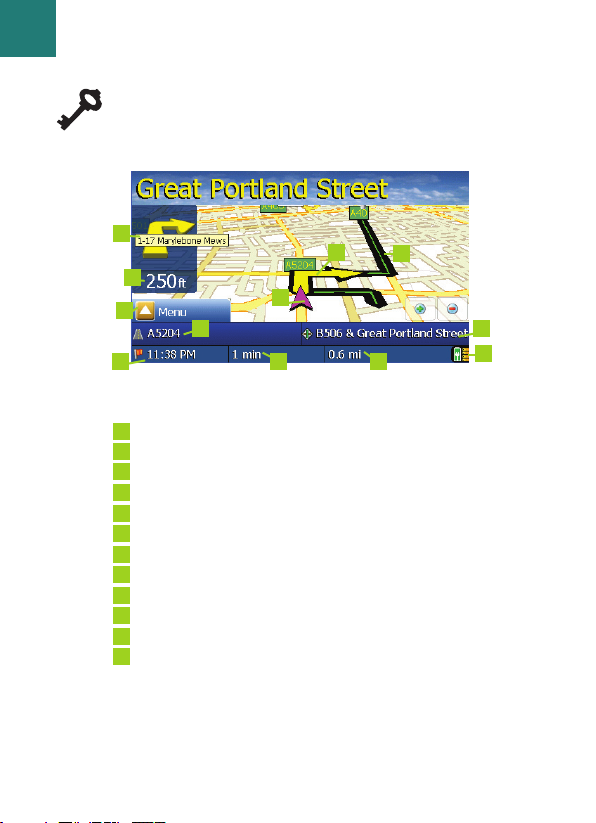
CCooPPiilloott SSccrreeeenn CCoonnttrroollss
CoPilot Menu button
Distance to next turn
Estimated time of arrival (ETA)
Distance to destination
Travel Time
Customisable field 1
Customisable field 2
Next turn instruction
Route highlighting
Turn arrow
GPS display status
Your position on map
6
5
4
3
2
1
12
11
9
8
7
10
1
2
3
5 4
6
7
9
10
11
12
8
44
CoPilot and CoPilot Premium
CoPilot Screen Controls
Acer p-series
Page 9
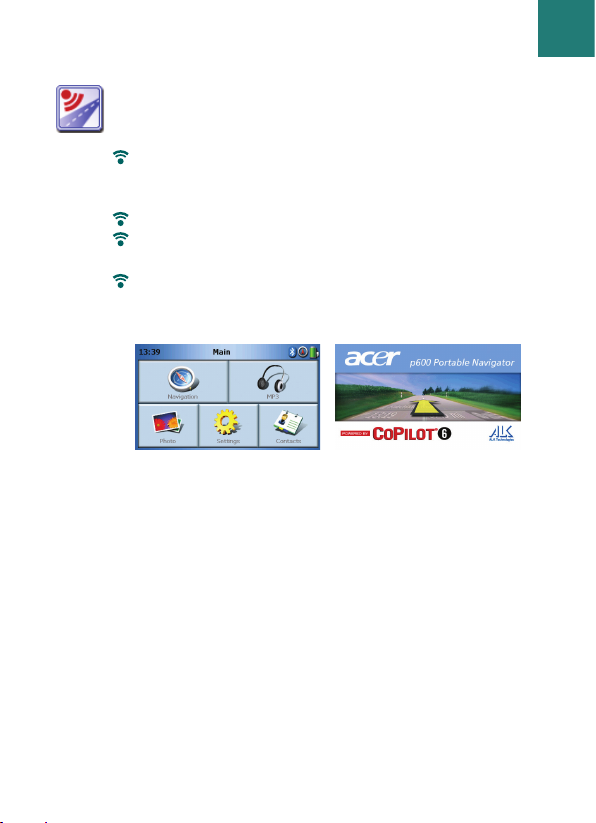
CCooPPiilloott HHoommee SSccrreeeenn
Take a look at the CoPilot Home Screen
The CoPilot Home screen is displayed when you first launch
CoPilot, or it can be accessed by selecting Menu > Home Screen.
Home screen menu options are:
New Trip to enter a new destination
Edit Trip* to add, edit or delete a destination(s)
Favourites provides you with quick and easy access to your
top 50 destinations
Return Trip provides guidance from your current location
back to the initial destination where your journey
commenced
My Place pre-programme one preferred or frequently
visited destination as ‘My Place’
Settings to customise your Routing options or change
Guidance or Map options. Plus, additional settings to
modify your Favourites, Recent Stops and My Place, as well
as settings to enable/disable Points of Interest (POIs)
GPS provides information on your GPS status
Tutorial to help you get started. Learn how to enter a
destination to start navigating.
*Exclusive to CoPilot Premium
1
Home and Navigation screens are the same
CoPilot Navigation screen CoPilot Premium Home screen
CoPilot Home Screen
55
CoPilot and CoPilot PremiumAcer p-series
Page 10
S
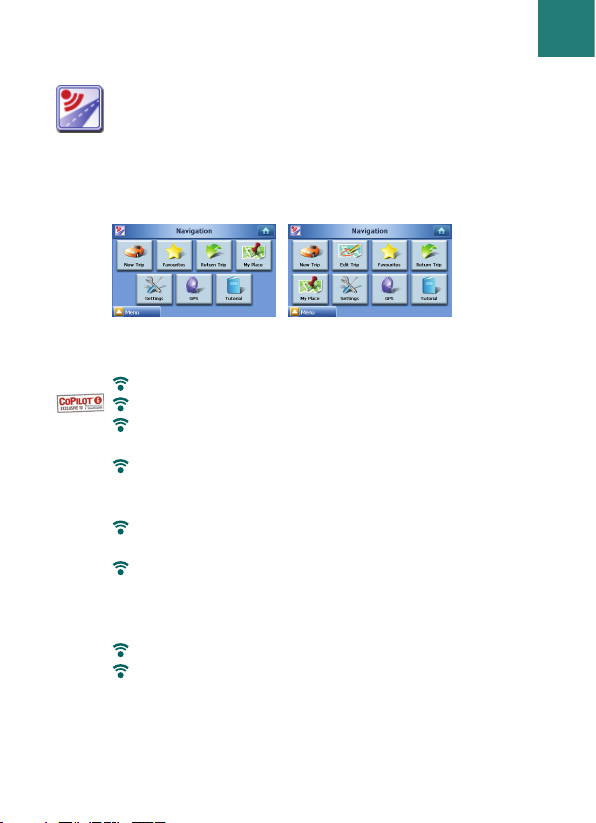
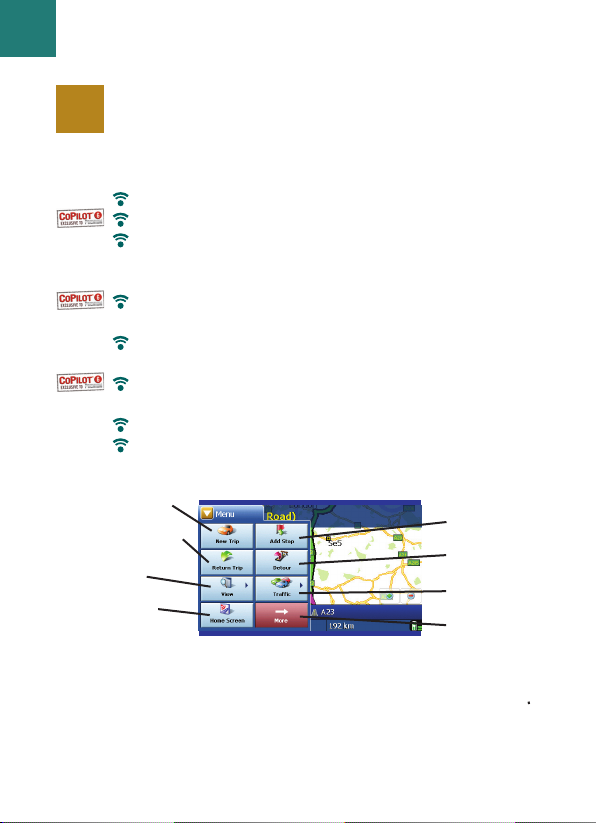
CCooPPiilloott MMeennuuss
CoPilot Menu Button
+
Press the ‘Menu’ button to access the following sub-menus:
New Trip to enter a new destination
Add Stop* to enter additional destinations
Return Trip provides guidance from your current location
back to the initial destination where your journey
commenced
Detour* feature to calculate and preview an alternative
route.
View allows you to change between a choice of 6 driving
views and day/night mode maps
Traffic
* incidents along your planned route are reported
into CoPilot using a TMC data feed (optional)
Home to return to the CoPilot Home screen
More to view sub-menu page 2
*Exclusive to CoPilot Premium
+
Menu and sub-menus vary between CoPilot and CoPilot Premium
1
Home and Navigation screens are the same
CoPilot Premium Menu - Page 1
Add Stop*
Detour*
Traffic*
More
New Trip
Return Trip
View
Home
66
CoPilot and CoPilot Premium
CoPilot Menus
Acer p-series
Page 11
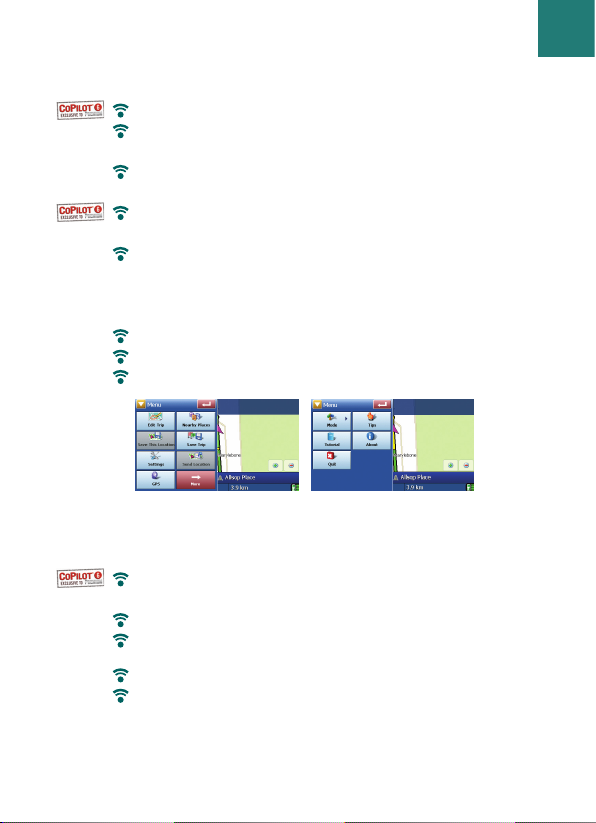
Sub-menu page 2
+
Edit Trip* to add, edit or delete a destination(s)
Nearby Places to search for a Point of Interest (POI) near
your current location
Save This Location to store your current GPS position as a
destination
Save Trip* allows you to store a complete itinerary and
later retrieve the destination(s) entered
Settings to customise your Routing options or change
Guidance or Map options. Plus, additional settings to
modify your Favourites, Recent Stops and My Place, as well
as settings to enable/disable Points of Interest (POIs)
Send Location
1
to a mobile phone via Bluetooth
GPS provides information on your GPS status
More* to view further sub-menus
Sub-menu page 3
+
Mode CoPilot has Guidance mode. CoPilot Premium also
offers Walking* and Planning* modes.
Tips provides useful hints on using your CoPilot
Tutorial to help you get started. Learn how to enter a
destination to start navigating.
About to read about the version of your CoPilot license.
Quit to close and exit the CoPilot program.
*Exclusive to CoPilot Premium
+
Menu and sub-menus vary between CoPilot and CoPilot Premium
1
Exclusive to p630, p660, and p680 PNDs
CoPilot Premium
Menu - Page 2
CoPilot Premium
Menu - Page 3
CoPilot Menus
77
CoPilot and CoPilot PremiumAcer p-series
Page 12
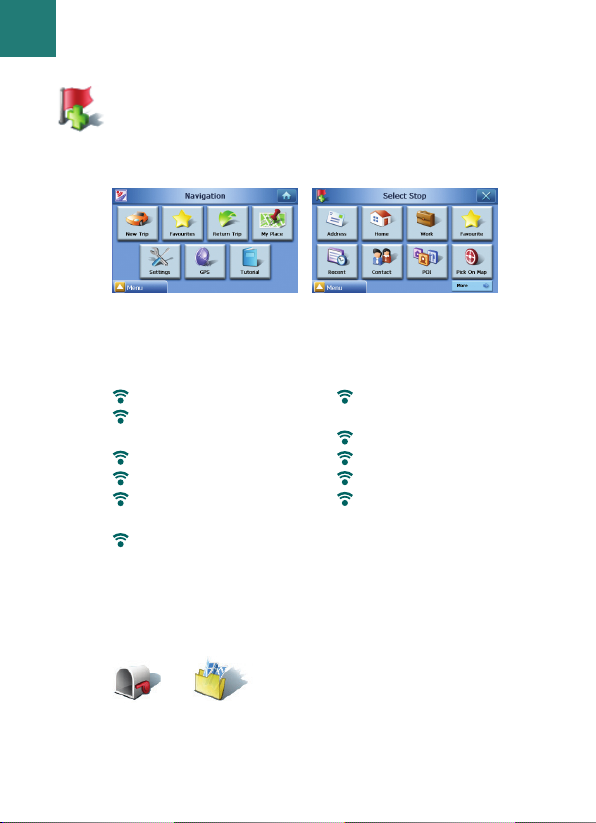
Select ‘New Trip’ from the ‘Navigation’ screen.
The ‘Select Stop’ screen will be displayed and provides you
with several different ways to enter a destination.
In CoPilot you can enter a single destination using one of the
options in the ‘Select Stop’ screen.
*Exclusive to CoPilot Premium
1
Home and Navigation screens are the same
Enter an Address
Your Home or
Work address
Favourites
Recent places
A Contact from your
address book
A Point of Interest (POI)
A UK or Netherlands
Postcode*
Pick On Map
Intersection/cross roads
A Latitude/Longitude
Enter a previously
Saved Trip*
NNaavviiggaattiinngg ttoo aa DDeessttiinnaattiioonn
CoPilot Home screen CoPilot Select Stop screen
Postcode* Saved trip*
88
CoPilot and CoPilot Premium
Navigating to a Destination
Acer p-series
Page 13
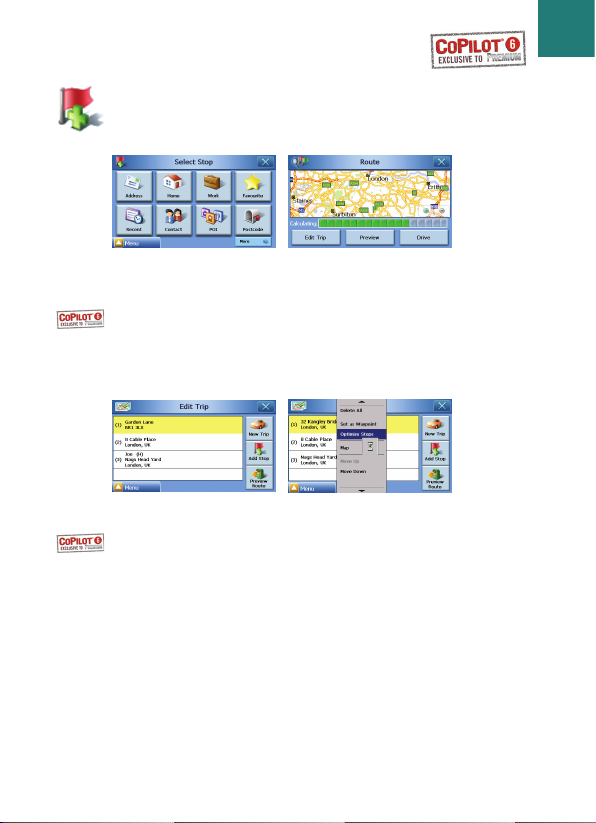
The CoPilot Premium product allows you to enter multiple
destinations and optimise your journey. Simply enter a
destination using one of the options in the ‘Select Stop’ screen.
In the ‘Route’ screen, press ‘Edit Trip’*. An ‘Edit Trip’* screen will
be displayed, press ‘Add Stop’* to enter additional destinations.
To optimise your journey, select a destination in the ‘Edit Trip’*
screen and press ‘Optimise Stops’* from the pop-up menu.
The destination(s) entered for your journey will be displayed
in the ‘Edit Trip’* screen.
Once you have finished entering your destinations, select
‘Preview Route’ followed by ‘Drive’ from the ‘Route’ screen.
*Exclusive to CoPilot Premium
CoPilot Premium
Select Stop screen
CoPilot Premium
Route screen
Edit Trip* screen Optimising Stops
Navigating to a Destination
99
CoPilot and CoPilot PremiumAcer p-series
Page 14
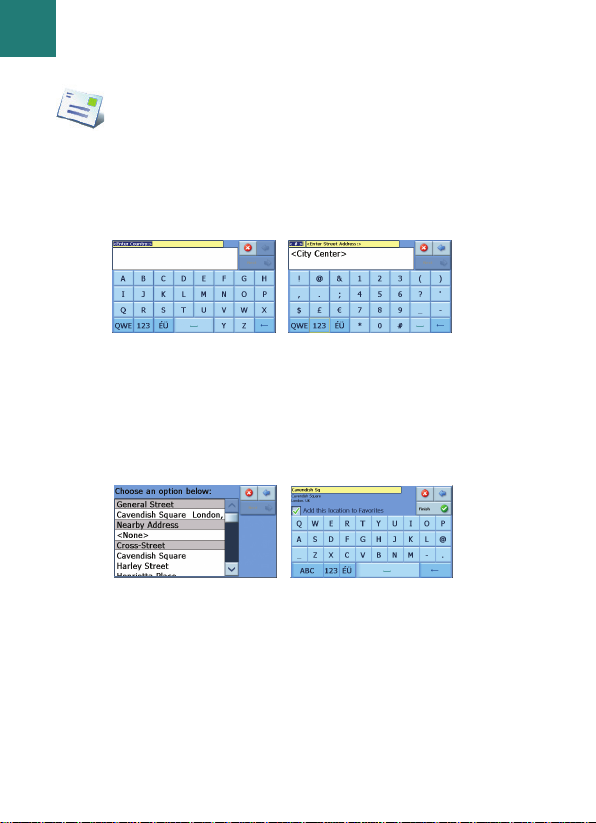
Entering an Address
1) From the ‘Select Stop’ screen, press the ‘Address’ button.
2) On the following screen enter the Country and press ‘Next’.
3) On the next screen, enter the City/Postcode and press ‘Next’.
4) In the street address screen, first enter a House Number in
the top left box. Then enter the required Street Name in
the right hand box. Press ‘Next’.
CoPilot may display a list of address matches. If an exact match
is not found, a cross street, nearby address or a street in a
nearby city will be displayed.
Please select one of these and press ‘Next’ to continue.
You will be offered the opportunity to create a name for your
destination, either type in a name or press ‘Finish’.
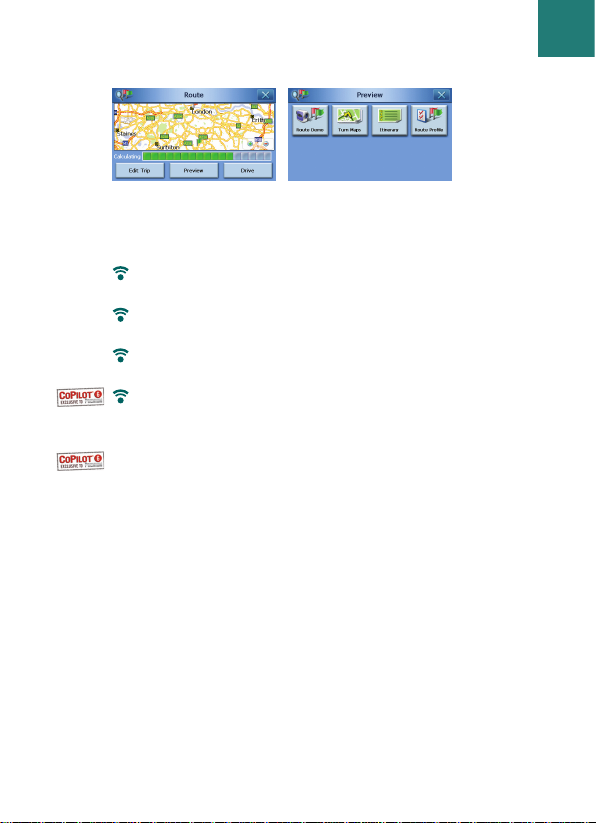
The ‘Route’ screen will be displayed. You can check the
destination and intended route on a map to ensure that it is
the correct location by pressing ‘Preview’.
Country screen Street address screen
Address match screen Name this location screen
1100
CoPilot and CoPilot Premium
Navigating to a Destination
Acer p-series
Page 15
CoPilot and CoPilot PremiumAcer p-series
You can preview the location and route using one of the
below options:
Route Demo - view CoPilot navigate to the destination
entered to give you an indication of your journey ahead
Turn Maps - displays maps of all the turns you will need to
make for your journey
Itinerary - view detailed turn by turn instructions for your
journey
Route Profile* - allows you to define settings that affect
CoPilot routing options
Alternatively, from the ‘Route’ screen you can press ‘Edit Trip’*.
In the ‘Edit Trip’* screen, press ‘Add Stop’ to enter additional
destinations or select a destination to ‘Delete’ or ‘Delete All’
destinations entered.
Press ‘Preview Route’* followed by ‘Drive’ from the ‘Route’
screen to begin receiving navigation guidance.
*Exclusive to CoPilot Premium
Route screen Route preview screen
Navigating to a Destination
1111
Page 16

Entering a Home Address
In the ‘Select Stop’ screen, press the ‘Home’ button.
The first time you use this button, you will be prompted to
enter your home address to pre-programme this button.
Enter your home address the same way you enter a new
address (described on pg. 10).
The next time you use the ‘Home’ button to obtain guidance
to/from home to a destination, simply press the ‘Home’
button from the ‘Select Stop’ to enter it as a destination. This
will display your home address in the ‘Route’ screen, then
press ‘Drive’.
Entering a Work Address
In the ‘Select Stop’ screen, press the ‘Work’ button.
The first time you use this button, you will be prompted to
enter your work address.
Enter your work address the same way you enter a new
address (described on pg. 10).
The next time you press Work, your work address will be
entered as a destination in the ‘Route’ screen, then press
‘Drive’.
1122
CoPilot and CoPilot Premium
Navigating to a Destination
Acer p-series
Page 17
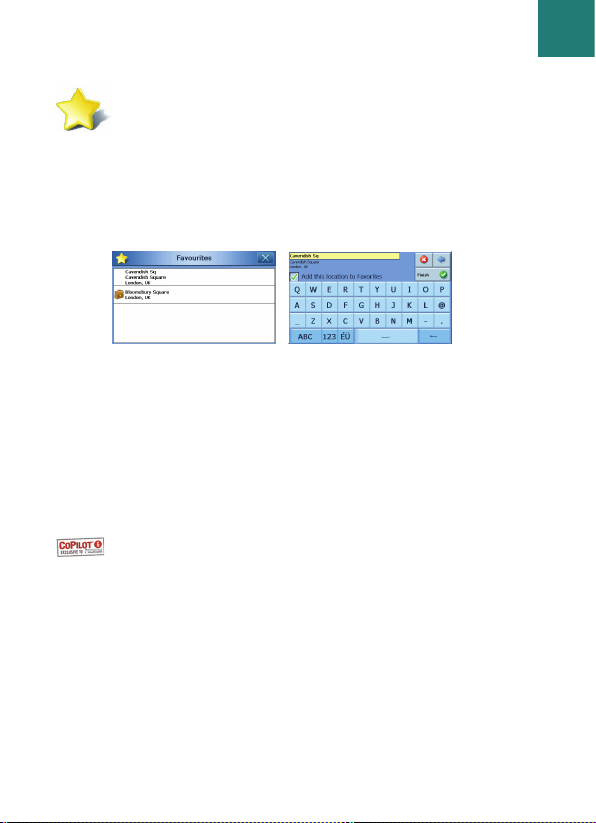
Entering a Favourite Destination
In the ‘Select Stop’ screen, press the ‘Favourite’ button.
A scrollable list will appear, providing you with quick and easy
access to your top 50 destinations.
Select a Favourite from the list to enter it as a destination and
press ‘Drive’ in the ‘Route’ screen.
How to create a Favourite
To add a destination to your Favourites list enter an address,
in the same way you enter a new address (described on pg. 10).
In the ‘Name This Location’ screen, select the ‘Add this location
to Favourites’ tick box to add the destination to your
Favourites list.
Alternatively, when the destination is displayed in the ‘Edit
Trip’* screen, please select the destination and select ‘Add to
Favourites’ from the pop-up menu.
Managing Your Favourites list
To delete a Favourite destination select Menu > More*
+
> Settings
> Favourites then select the destination and press ‘Delete’.
To edit a Favourite, press ‘Edit’ and re-enter the Country,
City/Postcode, Street Name and Number of the destination.
*Exclusive to CoPilot Premium
+
Menu and sub-menus vary between CoPilot and CoPilot Premium
Favourites list
Name this location screen
Navigating to a Destination
1133
CoPilot and CoPilot PremiumAcer p-series
Page 18

Entering a Recent Destination
In the ‘Select Stop’ screen, press the ‘Recent’ button.
A scrollable list will appear, providing you with quick
and easy access to the last 50 destinations that you entered.
Note: When your Recent list is filled (50), each new address
will replace an address that has been inactive for the longest
period of time.
Select a Recent destination from the list to enter it as a
destination and press ‘Drive’ in the ‘Route’ screen.
Managing your Recent destinations list
To delete a Recent destination select Menu > More*
+
> Settings
> Recent Stops then select the destination and press ‘Delete’.
Alternatively, press ‘Delete All’ to erase all recent stops.
To add one of your recent destinations to your Favourites
list select Menu > More*
+
> Settings > Recent Stops then select
the destination and press ‘Add to Favourites’.
*Exclusive to CoPilot Premium
+
Menu and sub-menus vary between CoPilot and CoPilot Premium
Recent destinations
1144
CoPilot and CoPilot Premium
Navigating to a Destination
Acer p-series
Page 19

Entering a Contact
Navigate to a ‘Contact’ listed in your Acer PND's Contacts
address book.
Press the ‘Contact’ button in the ‘Select Stop‘ screen.
Type the first letter of your contact’s name. A list of
Contacts starting with that letter will appear. Select the
Contact’s name and press ‘Next’.
If necessary, CoPilot will prompt you to correct any part of the
address it does not recognise.
You will be offered the opportunity to create a name for your
destination, either type in a name or press ‘Finish’.
In the ‘Name This Location’ screen, select the ‘Add this location
to Favourites’ tick box to add the destination to your
Favourites list.
The Contact address will be displayed as a destination in the
‘Route’ screen. Select ‘Drive’.
Contact as a destination
Navigating to a Destination
1155
CoPilot and CoPilot PremiumAcer p-series
Page 20

Navigating to a Point of Interest
In the ‘Select Stop’ screen, press the ‘POI’ button.
Points of Interest (POIs) are important, useful and popular
locations. You can use CoPilot to locate and navigate to any
one of thousands of Points of Interest.
POIs are listed by category and type to assist your search.
To search for a POI, select a ‘Category’ and ‘Type’ and enter a
name (optional). Press ‘Next’.
You can search for a POI ‘along current route’ or ‘near current
location’ if you have a GPS signal.
Alternatively, you can type in a city and search for a POI near
that city. Press ‘Next’.
Enter a Country and a City/Postcode. Press ‘Next’.
CoPilot will search for POIs based on your search criteria.
A list of POI matches will be displayed. Select the desired POI
from the list.
Find a POI screen POI - searching near city
1166
CoPilot and CoPilot Premium
Navigating to a Destination
Acer p-series
Page 21

In the POI matches screen you have several choices, you can
press:
‘Map’ to preview the location of the selected POI on a
map. In the map screen, press the +/- buttons to zoom in
and out of the view. Press ‘X’ to return to the POI matches
screen.
‘Expand’ to run another search within a larger search area.
‘Finish’ to enter it as a destination, then select ‘Drive’ from
the ‘Route’ screen.
POI Alerts
To report and view POIs (by desired category) for any journey
on a map while driving, select Menu > More*
+
> Settings >
POI Alerts. Select the ‘Enable’ tick box then define the POIs
to be reported by selecting each desired POI tick box.
In the Menu > More*
+
> Settings > Map screen, select set
‘Show POIs’ as either ‘Always' or ‘When Stopped’.
*Exclusive to CoPilot Premium
+
Menu and sub-menus vary between CoPilot and CoPilot Premium
POI matches POI map preview
Navigating to a Destination
1177
CoPilot and CoPilot PremiumAcer p-series
Page 22

Navigating to a full UK or Netherlands Postcode*
In the ‘Select Stop’ screen, press the ‘Postcode’ button.
Use the keyboard to enter a full UK or Netherlands postcode.
Press ‘Next’.
Enter the House Number and Street Name or simply select
‘Postcode Center’. Press ‘Next’.
You will be offered the opportunity to create a name for your
destination, either type in a name or leave this field blank.
Select the ‘Add this location to Favourites’ tick box if you
would like to add the destination to your Favourites list.
Press ‘Finish’. The address will be added as a destination in the
‘Route’ screen. Select ‘Drive’.
*Exclusive to CoPilot Premium
1188
CoPilot and CoPilot Premium
Navigating to a Destination
Acer p-series
Page 23

Pick on Map
In the ‘Select Stop’ screen, press the ‘Pick on Map’ button.
Select a starting area by entering an Address, Favourite,
Contact or POI, then select a location on the map.
To help you find your desired location you can pan around
the map by tapping the map screen and moving it with your
finger. Additionally, press the +/- buttons to zoom in and out of
the preview.
You can enter a destination by selecting a point on a map and
pressing ‘Add as Stop’.
Enter a name for the location if required, or leave this field
blank.
Select the ‘Add this location to Favourites’ tick box if you
would like to add the destination to your Favourites list.
Press ‘Add Stop’. The location will be entered as a destination
in the ‘Route’ screen. Select ‘Drive’.
Pick on map screen
Navigating to a Destination
1199
CoPilot and CoPilot PremiumAcer p-series
Page 24

Navigating to an Intersection
In the ‘Select Stop’ screen, press ‘More’ then the ‘Intersection’
button to enter the intersection of two roads.
Use the keyboard, to enter the Country. In the following screen
type in the City/Postcode. Enter the name of the ‘First Street’.
Press ‘Next’.
Enter or select from the list the name of the ‘Second Street’
which intersects the ‘First Street’. Press ‘Next’.
You will be offered the opportunity to create a name for your
destination, either type in a name or leave this field blank.
Select the ‘Add this location to Favourites’ tick box if you
would like to add the destination to your Favourites list.
Press ‘Finish’. The address will be added as a destination in the
‘Route’ screen. Select ‘Drive’.
First street
2200
CoPilot and CoPilot Premium
Navigating to a Destination
Acer p-series
Second street
Page 25

Latitude/Longitude
In the ‘Select Stop’ screen, first press the ‘More’ button then
select the ‘Lat/Long’ button.
Select a metric from the drop-down pick list and then use the
keyboard to enter the latitude/longitude points. Press ‘Next’.
You will be offered the opportunity to create a name for your
destination, either type in a name or leave this field blank.
Select the ‘Add this location to Favourites’ tick box if you
would like to add the destination to your Favourites list.
Press ‘Finish’. The latitude/longitude points will be entered as
a destination in the ‘Route’ screen. Select ‘Drive’.
Latitude/longitude screen
Navigating to a Destination
2211
CoPilot and CoPilot PremiumAcer p-series
Page 26

Saved Trip*
How to create and save a trip
You can save a trip by entering a destination or multiple
destinations
* in the same way you enter a new address
(described on pg. 10).
Once you have finished entering your complete itinerary,
select the ‘Edit Trip’* button in the ‘Route’ screen.
In the ‘Edit Trip’* screen, select Menu > More* > Save Trip*.
Enter a name for this itinerary and press ‘✓’.
All destinations included in the original journey will be
entered, preserving the stop order of the original saved trip.
The trip itinerary will also be included.
To enter a saved trip as a destination
To retrieve a saved trip, from the ‘Home’ screen select ‘New
Trip’. In the ‘Select Stop’ screen, press More > Saved Trip. Select
the desired saved trip and press ‘Next’.
The trip will be loaded in the ‘Route’ screen. Select ‘Drive’.
*Exclusive to CoPilot Premium
1
Home and Navigation screen are the same
2222
CoPilot and CoPilot Premium
Navigating to a Destination
Acer p-series
Page 27

TTrriipp EEddiittiinngg aanndd WWaayyppooiinnttss**
Editing* your planned journeys in CoPilot Premium
The ‘Edit Trip’* screen displays the destination(s) entered for
your journey. Press Menu > More > Edit Trip* to display this
screen from the guidance screens at any time.
From the ‘Edit Trip’* screen you can edit* the current trip,
add additional stops, or preview route.
Select any destination on your itinerary to open a pop-up
menu that lets you delete the destination or all destinations,
display the destination on a map, or move it up or down to
change the order of the destinations.
How to use Waypoints*
You can also designate a destination entered as a ‘waypoint’
by selecting ‘Set as Waypoint’ from the pop-up menu.
Waypoints are not considered as destinations in the Itinerary,
their purpose is to guide you along a road you specify, CoPilot
Premium will calculate a route which guides you through the
waypoint towards your destination.
Waypoints appear with “>>” instead of a destination number
on the list of destinations. To change a Waypoint back to a
destination, choose ‘Set as Stop’ from the pop-up menu.
CoPilot Premium ignores Waypoints when calculating the
Estimated Time of Arrival (ETA) and distance to a destination.
*Exclusive to CoPilot Premium
Trip Editing and Waypoints*
2233
CoPilot and CoPilot PremiumAcer p-series
Page 28

Optimising your journey
CoPilot Premium can work out the best way around multiple
destinations for journeys that require you to stop/pass
through various locations.
Simply enter multiple destinations in the ‘Edit Trip’* screen.
To optimise your stops select any destination on your itinerary
and press ‘Optimise Stops’ from the pop-up menu.
The destinations entered for your journey will be displayed in
an optimised order in the ‘Edit Trip’* screen. Select ‘Preview
Route’ followed by ‘Drive’ from the ‘Route’ screen.
Re-arranging Stops
To re-arrange the order in which destinations are listed in your
trip, select one of the destinations in the ‘Edit Trip’* screen and
select ‘move up’ or ‘move down’ from the pop-up menu to
change the stop order.
*Exclusive to CoPilot Premium
Note: You must have at least three destinations entered
in the ‘Edit Trip’* screen to optimise your journey.
OOppttiimmiissiinngg aanndd RRee--aarrrraannggiinngg SSttooppss**
Optimise Stops
2244
CoPilot and CoPilot Premium
Optimising and Re-arranging Stops*
Acer p-series
Page 29

DDeettoouurr FFeeaattuurree**
Once you have entered your destination(s) in the ‘Edit Trip’*
screen and selected Preview Route > Drive, CoPilot Premium
will calculate the best route and provide you with turn-byturn guidance to the destination(s).
While driving along your route, if you face unexpected traffic
congestion, road works/closures or any other unforeseen
circumstances that causes delay along your route, you can use
CoPilot Premium’s detour feature to calculate and preview an
alternative route.
You can make an informed decision about whether you would
prefer to travel along the original route or alternative route.
How to use the detour feature
1. You must first enter in your destination(s) and press ‘Drive’.
2. Select Menu > View > Itinerary to show the turn by turn
directions of your journey, based on the original route set
by CoPilot.
3. Press Menu > Detour to calculate an alternative route.
4. Review the new itinerary, based on the alternative route
calculated by CoPilot.
5. Review the road name, plus the ETA and distance to
destination fields of both routes to help you compare and
determine your preferred route.
6. If you decide to use the new alternative route, just keep
driving. To return to the original route defined by CoPilot
select Menu > Cancel Detour.
*Exclusive to CoPilot Premium
Detour Feature*
2255
CoPilot and CoPilot PremiumAcer p-series
Page 30

SSeelleeccttiivvee RRoouuttiinngg
You can choose to avoid specific roads in the automatically
calculated itinerary or adjust the route using waypoints
*.
1) Customise your Trip Itinerary
+
Set CoPilot to Guidance Mode by selecting Menu > More*
> More* > Mode* > Guidance*.
Enter your destination(s) in the ‘Edit Trip’* screen and select
Preview Route* > Drive
Press Menu > View > Itinerary to display the itinerary map
which shows all road names, turn instructions and the
distance between each turn.
Select and hold a road that you want to avoid and select
the ‘Avoid’ button. CoPilot will calculate a new route that
avoids the selected road. This step can be repeated.
To return to the original route, press the ‘Cancel Avoid’
button.
2) Set Waypoints*
You can define CoPilot Premium’s route by setting
destinations as ‘Waypoints’ as described on p. 23). CoPilot
Premium will guide you through the waypoint towards
your destination.
*Exclusive to CoPilot Premium
+
Menus and screens vary between CoPilot and CoPilot Premium
Note: If there is no other possible road or the alternative
route is too impractical, a new route will NOT be
generated.
2266
CoPilot and CoPilot Premium
Selective Routing
Acer p-series
Page 31

Safety Camera Alerts*
CoPilot can warn you as you approach one of the preloaded
safety camera locations while driving.
How to switch-on safety camera alerts:
Press Menu > More > Settings > More > Safety Alerts
Select the 'Enable' tick box
Use the arrow buttons to choose how far or close to a
speed camera location that you wish to receive a warning.
Press ‘✓’.
How to download updated safety camera locations:
You can download a list of updated safety camera locations
from the Internet from time to time.
Please visit www.alk.com/acer where you will find the latest
available file to download with detailed instructions about
how to load the locations into your navigation system.
Driving with Safety Camera Alerts
As you approach one of the loaded safety camera locations,
your current speed, the road's speed limit and the distance to
the safety camera will be displayed on-screen and with a
spoken warning.
*Exclusive to CoPilot Premium
Local speed limit
Distance to safety camera
Your current speed
Safety Camera Alerts*
2277
CoPilot and CoPilot PremiumAcer p-series
Page 32

What is the Traffic Message Channel?
The Traffic Message Channel (TMC) is a specific application
of the FM Radio Data System (RDS) used for broadcasting
real-time traffic information. If a TMC traffic signal is available
CoPilot will display traffic incidents on your route automatically
and can recommend an alternate route if required.
Using TMC Traffic in CoPilot Premium
Set up the TMC receiver (see the instructions on page 3)
Select Menu > Traffic > Settings to adjust the alert settings
within CoPilot and define how you would prefer CoPilot to
handle TMC traffic messages.
Get Incidents
'Always' is recommended - CoPilot will automatically check
your route for traffic incidents
'Never' lets you can check for traffic incidents manually
Default Incident Action
'Ignore' - CoPilot will NOT avoid a reported incident
automatically
'Avoid' - CoPilot will avoid reported incidents automatically
TTMMCC TTrraaffffiicc SSeerrvviiccee**
Get Incidents - Always
Default Incident Action Ignore
Traffic settings screen
2288
CoPilot and CoPilot Premium
TMC Traffic Service*
Acer p-series
Page 33

You can also search for traffic incidents manually:
1) Check route
In CoPilot, press 'Menu' > 'Traffic' > 'Check Route' to search
for traffic incidents along your current route.
2) Find traffic
Press 'Menu' > 'Traffic' > 'Find Traffic' to search for all traffic
incidents.
Highlight and select a traffic incident to open a pop-up menu
which offers you 4 options:
1. 'Details' to view information regarding the location and
type of traffic incident
2. 'Map' to display the reported traffic incident on a map
3. 'Avoid' the traffic incident by allowing CoPilot to automatically
re-route you around it.
4. 'Ignore' the alert and continue to drive along your planned
route through the traffic congestion.
*TMC is an optional service. You need a compatible TMC receiver to use
the TMC traffic service. TMC traffic service is not available in all countries
in Europe. Please refer to the additional TMC Traffic Description and
Coverage document for full details. TMC traffic service is available on
the p660 and p680 PNDs and available as an optional upgrade for the
p630.
TMC Traffic Service*
2299
CoPilot and CoPilot PremiumAcer p-series
Page 34

CoPilot has six different driving views which can be accessed
by pressing Menu > View. In each view, turn instructions are
displayed on-screen and spoken, while in map views, the next
turn is highlighted by a yellow arrow.
Choose the view you prefer or the one which suits your
driving conditions:
DDrriivviinngg VViieewwss
Where am I
Next turn
Destination
Night Mode
Driver
safety
3D
Itinerary
Day Mode
Driver Safety
Driver Safety is the default view, which
displays a simple turn instruction arrow with
concise next turn instructions.
An auto-zoom map will appear as you
approach a turn or if you are driving below
your preset speed.
This is the recommended view for safe driving
as it's designed to display the information
you need at a glance with minimum driver
distraction.
3300
CoPilot and CoPilot Premium
Driving Views
Acer p-series
Page 35

Where am I?
Allows you to see your current position on a
2D map.
Itinerary
Provides detailed turn by turn instructions
for your trip.
Next Turn
Displays your current location and the next
turn on a 2D map.
Destination
Displays your current position and the next
stop on a 2D map.
3D
Displays a birds eye view of your current
position on a map and the way ahead.
Distance markers show the distance to the
next turn, and a clear yellow arrow highlights
the way at each turn.
Driving Views
3311
CoPilot and CoPilot PremiumAcer p-series
Page 36

Day/night map display
Trust your CoPilot to guide you to the door at night - safely
and in comfort. CoPilot’s night mode uses the time set on
your Acer PND to automatically display night time 2D or 3D
maps to reduce glare and eye strain while driving using
CoPilot at night.
To set-up night mode select, Menu > More* > Settings > Map
Style > Automatic.
To manually select or to switch between day and night mode
maps, press Menu > View and select the day mode/night
mode button.
Customise your map display
At the base of the map screens are three fixed indicators to
show your estimated time of arrival (ETA), Travel Time and
Distance to Destination, plus two customisable fields.
To customise the data fields, displayed above the ETA, Travel
Time and Distance to Destination indicators, please select
Menu > More* > Settings > Guidance and select one of the
following custom display options for the left and right custom
displays then press ‘✓’:
Day mode
view
Night mode
view
Destination
Current road
Nearest crossroad
Nearest major road
Nearest town
Current Time
ETA
Speed
Elevation
Heading
3322
CoPilot and CoPilot Premium
Driving Views
Acer p-series
Page 37

NNaavviiggaattiioonn MMooddeess
CoPilot satellite navigation software
CoPilot has 1 navigation mode:
Guidance Mode provides spoken and on-screen driving
directions plus other information relevant to your journey
such as Estimated Time of Arrival (ETA), road name of the
next turn and the distance to turn.
CoPilot Premium satellite navigation software
In addition to Guidance mode, the CoPilot Premium product
has two extra navigation modes accessed by selecting
Menu > More
* > More* > Mode*.
2)
Planning Mode* lets you plan your journey in advance.
Simply key in a destination and view the itinerary and
detailed street maps of any location - wherever you are.
3)
Walking Mode* lets you find the way on foot using your
PDA. CoPilot displays a straight line 'as the crow flies' to your
destination at all times and indicates the straight line distance
to that location.
*Exclusive to CoPilot Premium
Guidance mode
Planning mode
Walking mode
Navigation Modes
3333
CoPilot and CoPilot PremiumAcer p-series
Page 38

From the Navigation screen, select Settings > Routing (or
Menu > More
*
+
> Settings > Routing) to change settings that
affect CoPilot routing options.
1. Basic Routing Options (CoPilot and CoPilot
Premium)
Vehicle type
In the Routing screen, the vehicle type options are ‘Automobile’
or ‘RV’. RV routes favour major roads and avoid sharp turns
and U-turns wherever possible.
Routing type
Define whether you would prefer CoPilot to calculate
‘Quickest’ or ‘Shortest’ routes by selecting Navigation >
Settings > Routing > Routing Type (or Menu > More
*
+
Settings > Routing > Routing Type). Additionally, you can set
CoPilot to ‘Avoid Major Roads’.
Toll road avoidance
You can set CoPilot to calculate routes which avoid/use toll
roads by selecting, Navigation > Settings > Routing > Toll
Roads (or Menu > More
*
+
> Settings > Routing > Toll Roads)
and then define how CoPilot handles toll roads by choosing
one the following 3 options:
Always Avoid
Use If Necessary
No Restriction
*Exclusive to CoPilot Premium
+
Menu and sub-menus vary between CoPilot and CoPilot Premium
1
Home and Navigation screen are the same
RRoouuttiinngg SSeettttiinnggss
3344
CoPilot and CoPilot Premium
Routing Settings
Acer p-series
Page 39

London congestion charge warnings
If you are driving in London, you can set up CoPilot to alert
you when your destination approaches/passes through the
London Congestion Zone. You will have the option to either
drive through the charging zone or re-route around it.
To set-up London Congestion Zone alerts, select:
Navigation > Settings > Routing (or Menu > More
*
+
> Settings
> Routing) and then select the ‘London Congestion Zone
Warning’ tick box. Press ‘✓’.
Take breaks
Set CoPilot to alert you to take a break at regular intervals for
a specified duration of time. Select the ‘Take Breaks’ tick box
and set the time periods you require.
2. Advanced Routing Options for CoPilot Premium*
To set, customise and save your routing preferences:
1. In the ‘Routing Options’ field, press the ‘Advanced’ button.
2. Press ‘New’ to create a routing profile. Enter a name and
press ‘✓’.
3. Populate the Vehicle Type, Routing Type, Toll Road, London
Congestion Zone Warning and Take Breaks options as
described above.
4. Define your road preferences for each of the 5 road types -
Motorways, dual carriageways, primary, secondary and local
roads. CoPilot Premium can bias in favour or against individual
road types. Note CoPilot may not necessarily avoid a road
type completely if there is no suitable alternative.
5. You can set the average speed for each of the road types.
6. Press ‘✓’ to save your settings.
*Exclusive to CoPilot Premium
+
Menu and sub-menus vary between CoPilot and CoPilot Premium
1
Home and Navigation screen are the same
Routing Settings
3355
CoPilot and CoPilot PremiumAcer p-series
Page 40

GGuuiiddaannccee SSeettttiinnggss
From the Navigation screen, select Settings > Guidance (or
Menu > More
*
+
> Settings > Guidance) to change settings that
affect CoPilot guidance options.
Speak Turn Warning
Set CoPilot to provide voice guided instructions when you
approach a turn. Select one or all of the distance tick boxes to
receive voice guided turn instructions.
Just Ahead
CoPilot will alert you with a voice instruction before you
reach every turn. By default, you will be alerted 5 seconds
before you approach a turn. To change and define this setting,
select the ‘Just Ahead’ tick box and set the desired time frame
using the pick list.
Custom Display
To customise the two data fields, displayed at the base of the
guidance maps, press Navigation > Settings > Guidance (or
Menu > More
*
+
> Settings > Guidance) and select one of the
custom display options for the left and right custom displays
then press ‘✓’. See pg. 32 for more information.
*Exclusive to CoPilot Premium
+
Menu and sub-menus vary between CoPilot and CoPilot Premium
1
Home and Navigation screen are the same
Guidance setting screen speak turn warning at
Guidance setting screen - just ahead
plus left and right custom displays
3366
CoPilot and CoPilot Premium
Guidance Settings
Acer p-series
Page 41

Display route arrow
A yellow turn arrow will be displayed in CoPilot’s guidance
maps to indicate the direction of your next turn. By default,
this option is turned on. Select and untick the ‘display route
arrow’ for this yellow instruction arrow NOT to appear in
CoPilot’s guidance maps.
Amplify Speech Volume
If you would prefer the CoPilot voice instructions to be
amplified, select the ‘amplify speech volume’ tick box.
Display GPS Arrow Trail
Select this tick box to display a trail of arrows that tracks
your position as you drive and move along the map.
Safety View Display
Use the up/down arrow buttons to define the speed at which
you would prefer the driver safety view to be displayed.
*Exclusive to CoPilot Premium
+
Menu and sub-menus vary between CoPilot and CoPilot Premium
1
Home and Navigation screen are the same
Guidance setting screen display route arrow
Guidance setting screen - display GPS
arrow trail and safety view display
Guidance screen - safety view
displays at speeds above
Guidance Settings
3377
CoPilot and CoPilot PremiumAcer p-series
Page 42

MMaapp SSeettttiinnggss
From the Navigation screen, select Settings > Map (or Menu >
More
*
+
> Settings > Map) to change your map settings.
Units
Set the unit for measuring distance as either ‘miles’ or
‘kilometres’.
Map Rotation
CoPilot will display the driver’s position on a map in one of
the following orientations:
1. Heading up - the driver’s position will always be reported
moving up the map towards the destination
2. North up - the map will always maintain North at the top
as you drive.
Stylus Control
Use the stylus supplied with the Acer p-series PND, to either:
1. Box Zoom - select a location on the map and draw a box
around it to zoom into the map area.
2. Drag map - select a location on the map and use the stylus
to drag the map in any direction to show map data
surrounding the location.
*Exclusive to CoPilot Premium
+
Menu and sub-menus vary between CoPilot and CoPilot Premium
1
Home and Navigation screen are the same
Map screen - units,
map rotation and stylus
control
3388
CoPilot and CoPilot Premium
Map Settings
Acer p-series
Page 43

Show POIs
Define whether or not you would like CoPilot to display POIs
on a map by selecting one of the below 3 options:
Never
When stopped (when vehicle is stationary)
Always (while driving and when the vehicle is stationary)
Display POIs
Determine the source type of POIs displayed by selecting one
of the following 3 options:
Default POIs - the Points of Interest preloaded as standard
Imported POIs - Points of Interest that you have copied to
the storage card ‘Save’ folder.
All POIs - both the default and imported POIs
Map Style
Define whether you would prefer to view CoPilot’s 2D and 3D
maps in day or night mode. Alternatively, select automatic for
CoPilot to use the time set on your Acer PND.
Display Turn Restrictions
CoPilot can display roads which have vehicle restrictions e.g.
one way streets.
Route Over
Route Over highlighting outlines your route in black on the
map for more visibility. This option is turned on by default.
Note: The CoPilot software compared to the CoPilot
Premium software has limited POIs and offers the following
categories only: Airport, Bus Station, City Hall, Commuter
Rail Station, Ferry Terminal, Hospital, Police Station, Rental
Car Agency, Rest Area and Train Station.
Map Settings
3399
CoPilot and CoPilot PremiumAcer p-series
Page 44

PPOOII AAlleerrtt SSeettttiinnggss
POI Alerts
To report and view Points Of Interest on a map, select
Navigation > Settings > POI Alerts (or Menu > More
*
+
>
Settings > Map) then select the ‘Enable’ tick box.
Reporting POIs
Define the distance ahead that POIs are reported along your
route, using the distance pick list.
Set CoPilot to report POIs which are actually ‘on route’ or
‘near route’.
Define the POIs to be reported along your route, by selecting
each desired POI tick box.
Message Timeout
CoPilot will display a simple POI message on your PDA's
screen to alert you as you approach POIs. Use the pick list to
define the duration that you would prefer the message to be
displayed on your screen.
*Exclusive to CoPilot Premium
+
Menu and sub-menus vary between CoPilot and CoPilot Premium
1
Home and Navigation screen are the same
POI Alerts
Report POI this far ahead
Message timeout
4400
CoPilot and CoPilot Premium
POI Alert Settings
Acer p-series
Page 45

RReeggiioonnaall SSeettttiinnggss
CoPilot Keyboard
CoPilot has an inbuilt wide finger keyboard to make typing
information into CoPilot easier.
You can switch between CoPilot’s ABC and QWERTY keyboard.
To use an AZERTY keyboard, select Navigation > Settings >
Regional Settings (or Menu > More
*
+
> Settings > Regional
Settings) then select the AZERTY keyboard layout tick box.
*Exclusive to CoPilot Premium
+
Menu and sub-menus vary between CoPilot and CoPilot Premium
1
Home and Navigation screen are the same
Regional Settings
4411
CoPilot and CoPilot PremiumAcer p-series
Page 46

FFaavvoouurriittee SSeettttiinnggss
To change your ‘Favourite’ destinations created and saved in
CoPilot, select Navigation > Settings > Favourites (or Menu >
More
*
+
> Settings > Favourites).
In the ‘Favourites’ settings screen a list of all your favourite
destinations will be displayed.
To delete a ‘Favourites’ destination, select a destination and
press ‘Delete’.
To delete all ‘Favourites’ press ‘Delete All’ and select ‘Yes’
when prompted to confirm the deletion.
To edit* a ‘Favourite’, press ‘Edit’* and re-enter the Country,
City/Postcode, Street Name and Number of the destination.
To change your 'Home' or 'Work' address, select a preferred
address from the 'Favourites' list and press either the 'Home'
or 'Work' button.
*Exclusive to CoPilot Premium
+
Menu and sub-menus vary between CoPilot and CoPilot Premium
1
Home and Navigation screen are the same
Work
Delete
Delete All
Add to favourites
Favourite
Home
Edit
4422
CoPilot and CoPilot Premium
Favourite Settings
Acer p-series
Page 47

RReecceenntt SSttooppss SSeettttiinnggss
To change your ‘Recent stops’ visited select Navigation >
Settings > Recent Stops (or Menu > More
*
+
> Settings >
Recent Stops).
To delete a ‘Recent’ destination, select the destination and
press ‘Delete’.
To delete all ‘Recent’ destinations press ‘Delete All’ and select
‘Yes’ when prompted to confirm the deletion.
To add one of your ‘Recent’ destinations to your ‘Favourites’
list, select the destination and press ‘Add to Favourites’.
*Exclusive to CoPilot Premium
+
Menu and sub-menus vary between CoPilot and CoPilot Premium
1
Home and Navigation screen are the same
Delete
Delete All
Add to Favourites
Recent Stops Settings
4433
CoPilot and CoPilot PremiumAcer p-series
Page 48

MMyy PPllaaccee SSeettttiinnggss
To change the destination pre-programmed as ‘My Place’,
select Navigation > Settings > My Place (or Menu > More
*
+
>
Settings > My Place).
To re-programme ‘My Place’, select one of the four options
for re-entering the destination:
A. Address
B. Home
C. Work
D. Point of Interest (POI)
*Exclusive to CoPilot Premium
+
Menu and sub-menus vary between CoPilot and CoPilot Premium
1
Home and Navigation screen are the same
4444
CoPilot and CoPilot Premium
My Place Settings
Acer p-series
Page 49

You can use the supplied desktop PC software CDs if you
need to re-load your storage card with CoPilot, via a desktop
computer or an SD storage card reader.
If you have purchased an optional European maps upgrade
license you can also use this software to download European
maps to your SD card.
CoPilot desktop software is supplied on 3 CDs:
Install Disc - Europe
EU Maps Disc 1 (data disc 1 - maps of Europe)
EU Maps Disc 2 (data disc 2 - maps of Europe)
Installing CoPilot desktop software
1. Insert ‘Install Disc - Europe’ into your PC or laptop’s CD or
DVD drive. Setup will begin.
2. Select your preferred language and press ‘OK’.
3. The InstallShield Wizard will begin. Press ‘Next’.
4. The ‘installation key code’ will be displayed. Do not change
this information, press ‘Next’.
5. The license agreement screen will be displayed. Read the
information and press ‘Yes’.
6. CoPilot will install to C:\Program Files\CoPilot. In the
‘choose destination location’ dialogue screen, press ‘Next’.
7. When prompted, insert the discs labelled: EU Maps Disc 1
(data disc 1 - maps of Europe) and EU Maps Disc 2 (data
disc 2 - maps of Europe)
8. Press ‘Finish’. Installation is complete.
Note: If you experience difficulty installing CoPilot desktop
software, it may be necessary to disable any fire-wall or virus
protection software on your desktop computer/laptop.
CCooPPiilloott DDeesskkttoopp SSooffttwwaarree
CoPilot Desktop Software
4455
CoPilot and CoPilot PremiumAcer p-series
Page 50

4466
CoPilot and CoPilot Premium
Data Download Wizard
Acer p-series
DDaattaa DDoowwnnllooaadd WWiizzaarrdd
The Data Download Wizard enables you to select the map
data that you wish to download to your SD card.
How to perform a Data Download Wizard (DDW)
1) Make sure your Acer p-series PND is NOT connected to your
computer.
2) Start the CoPilot desktop software on your Desktop PC:
Start > Programs > CoPilot. The Data Download Wizard will
start automatically.
3) You will be asked to select a drive letter to download the
map data to. Use the drop down arrow to select 'C:' and press
'Next'
4) The following screen will display 3 ways to choose a map
data area that you want to download.
a) City radius - download a circular map area around a specific
town or city.
Click on 'City Radius'
Key-in the name of the required city or town and press
'Enter'. A list of matching locations will be displayed.
Select the correct location
Choose the "Distance around the City" you wish to
download, for example 100 miles and click 'Next'
The map area to be downloaded will be highlighted by
a yellow circle. Press 'Next'
Page 51

Data Download Wizard
4477
CoPilot and CoPilot PremiumAcer p-series
You will now be prompted to assign a name to the map
area. Either accept the name displayed or create your
own name and press 'Next'
Continue to step 5 below to download the map data to
your SD card
b) Map area - select and download an area of the map
Click on 'Map Area'
Key-in the name of the required city or town at the
center of the required map area and press 'Enter'.
A list of matching locations will be displayed. Select
the correct location and click 'Next'
As described on-screen, select the data area by drawing
a box with the mouse. You can zoom in and out using
the on-screen buttons.
The map area to be downloaded will be highlighted in
yellow. Press 'Next'
You will now be prompted to assign a name to the map
area. Either accept the name displayed or create your
own name and press 'Next'
Continue to step 5 below to download the map data to
your SD card
c) Region - download map data for an entire country or region
Click on 'Region'
Select the map region that you activated when you
set-up your Acer p-series navigation system (note: if
you have purchased an European upgrade license you
can select other or multiple regions). Click 'Next'.
You will be reminded that you can only download 1
region if you do NOT have a Pan European maps
license. Click 'OK'
Click 'Next' on the following screen
Page 52

4488
CoPilot and CoPilot Premium
Data Download Wizard
Acer p-series
You will now be prompted to assign a name to the map
area. Either accept the name displayed or create your
own name and press 'Next'
Continue to step 5 below to download the map data to
your SD card
5) Download the map area(s) to your desktop computer's C:
drive
Press the 'download' icon. Wait a few seconds while
CoPilot loads the map areas
In the next screen, ensure the map area you wish to
download appears in the 'area name' section on the
right hand side of the screen. Please ensure that 'Create
QuickStart' is NOT ticked. Press 'Download'
Once the download is complete a warning will be
displayed asking you to wait a few seconds. Press 'OK'
You can now close the CoPilot desktop software
6) Copy the map area from your computer to your SD storage
card
There are two ways to do this:
a) Using an SD Storage card reader (recommended)
If you have a SD storage card reader you can copy the map
area directly to your SD storage card rather than using the
synchronisation cable
Open 'My Computer' on your desktop computer and
locate the C: drive. You will see a folder called 'CoPilot'
Copy the 'CoPilot' folder to the SD card using the card
reader, replacing the existing CoPilot folder
Page 53

b) Using the p-series navigation system synchronisation cable
Connect your Acer p-series navigation system to your
desktop computer using the supplied synchronisation
cable. (see the p-peries manual for more information
about connecting to your PC)
Open 'My Computer' on your desktop computer and
locate the C: drive. You will see a folder called 'CoPilot'
Copy the 'CoPilot' folder to the ‘SDMMC’ folder on the
p-series navigation system (the system will be displayed
on your computer as 'Mobile Device'
You will receive a warning about replacing the existing
'CoPilot' folder. Click 'Yes to All'
The new map area will be copied to your Acer p-series
navigation system
Data Download Wizard
4499
CoPilot and CoPilot PremiumAcer p-series
Page 54

AAcceerr SSuuppppoorrtt SSeerrvviicceess
For CoPilot issues only. Contact Acer separately for hardware issues
Country Telephone Website
Acer Support Services
UK 08708505764 www.acer.co.uk
B 027131548
F 0141919545 www.acer.fr
D 06951709050 www.acer.de
E 0914069158 www.acer.es
I 0269633497 www.acer.it
P 0214154124 www.acer.es
NL 0203469132 www.acer.nl
DK 038487087 www.acer.dk
S 0858770494 www.acercomputer.se
N 023162213 www.acer.no
FIN 0972519066 www.acercomputer.fi
For more information about CoPilot Navigation and map
upgrades visit
CoPilot and CoPilot Premium
5500
www.alk.com/acer
Acer p-series
Page 55

Notes
5511
CoPilot and CoPilot PremiumAcer p-series
NNootteess
Page 56

www.alk.eu.com
 Loading...