

Page 1

Contents
English
Français
Deutsch
Italiano
Español
Português
Nederlands
Norsk
Dansk
Svenska
Suomi
Русский
Polski
Magyar
Čeština
Slovenčina
Slovenski
Hrvatski
Română
Български
Eesti
Latviski
Lietuviškai
Ελληνικά
Türkçe
日本語
한국어
繁體中文
简体中文
Bahasa Indonesia
ไทย
Page 2

Page 3

Quick Guide
Series
Page 4

Series
© 2010 All Rights Reserved
Aspire One Series Quick Guide
Original Issue: 04/2010
Aspire One Series Notebook PC
Model number: __________________________________
Serial number: ___________________________________
Date of purchase: ________________________________
Place of purchase: ________________________________
Page 5

Quick Guide
Federal Communications Commission
Declaration of Conformity
This device complies with Part 15 of the FCC Rules. Operation is subject to the following two conditions: (1) this device may not
cause harmful interference, and (2) this device must accept any interference received, including interference that may cause
undesired operation.
The following local Manufacturer / Importer is responsible for this declaration:
Product name: Notebook PC
Brand: Acer
Model number: MS2296
Machine type: AO 753 series
Name of Responsible Party: Acer America Corporation
Address of responsible party: 333 West San Carlos St., San Jose
CA 95110, U. S. A.
Contact person: Acer Representative
Phone No.: 1-254-298-4000
Fax No.: 1-254-298-4147
April 30, 2010
Page 6

Series
CE Declaration of Conformity
We,
Acer Incorporated
8F, 88, Sec. 1, Hsin Tai Wu Rd., Hsichih, Taipei Hsien 221, Taiwan
Contact Person: Mr. Easy Lai, e-mail:easy_lai@acer.com.tw
And,
Acer Europe SA
Via Cantonale, Centro Galleria 2 6928 Manno Switzerland
Hereby declare that:
Product: Notebook Computer
Trade Name: Acer
Model Number: MS2296
Machine Type: AO753 series
Is compliant with the essential requirements and other relevant provisions of the following EC directives, and that all the
necessary steps have been taken and are in force to assure that production units of the same product will continue comply with
the requirements.
EMC Directive 2004/108/EC as attested by conformity with the following harmonized standards:
• EN55022,AS/NZSCISPR22,ClassB
• EN55024
• EN61000-3-2ClassD
• EN61000-3-3
Low Voltage Directive 2006/95/EC as attested by conformity with the following harmonized standard:
• EN60950-1
Council Decision 98/482/EC (CTR21):
(Applicable to product with pan- European single terminal connection to the Public Switched Telephone Network (PSTN).)
RoHS Directive 2002/95/EC on the Restriction of the Use of certain Hazardous Substances in Electrical and Electronic Equipment
Page 7
Quick Guide
• Themaximumconcentrationvaluesoftherestrictedsubstancesbyweightinhomogenousmaterialare:
Lead
Mercury
Hexavalent Chromium
0.1%
0.1%
0.1%
Directive 2009/125/EC with regard to establishing a framework for the setting of ecodesign requirements for energy-related
product.
R&TTE Directive 1999/5/EC as attested by conformity with the following harmonized standard:
• Article3.1(a)HealthandSafety
- EN60950-1
- EN62311
• Article3.1(b)EMC
- EN301 489-1
- EN301 489-3 (Applicable to non-bluetooth wireless keyboard mouse set).
- EN301 489-7
- EN301 489-17
- EN301 489-24
• Article3.2SpectrumUsages
- EN300 440-2 (Applicable to non-bluetooth wireless keyboard mouse set).
- EN300 328
- EN301 511
- EN301 893 (Applicable to 5GHz high performance RLAN).
- EN301 908-1
- EN301 908-2
Polybrominated Biphenyls (PBB’s)
Polybrominated Diphenyl Ethers (PBDE’s)
Cadmium
0.1%
0.1%
0.01%
Year to begin affixing CE marking 2010.
Easy Lai /Manager
Regulation Center, Acer Inc.
April 30, 2010
Date
Page 8
Series
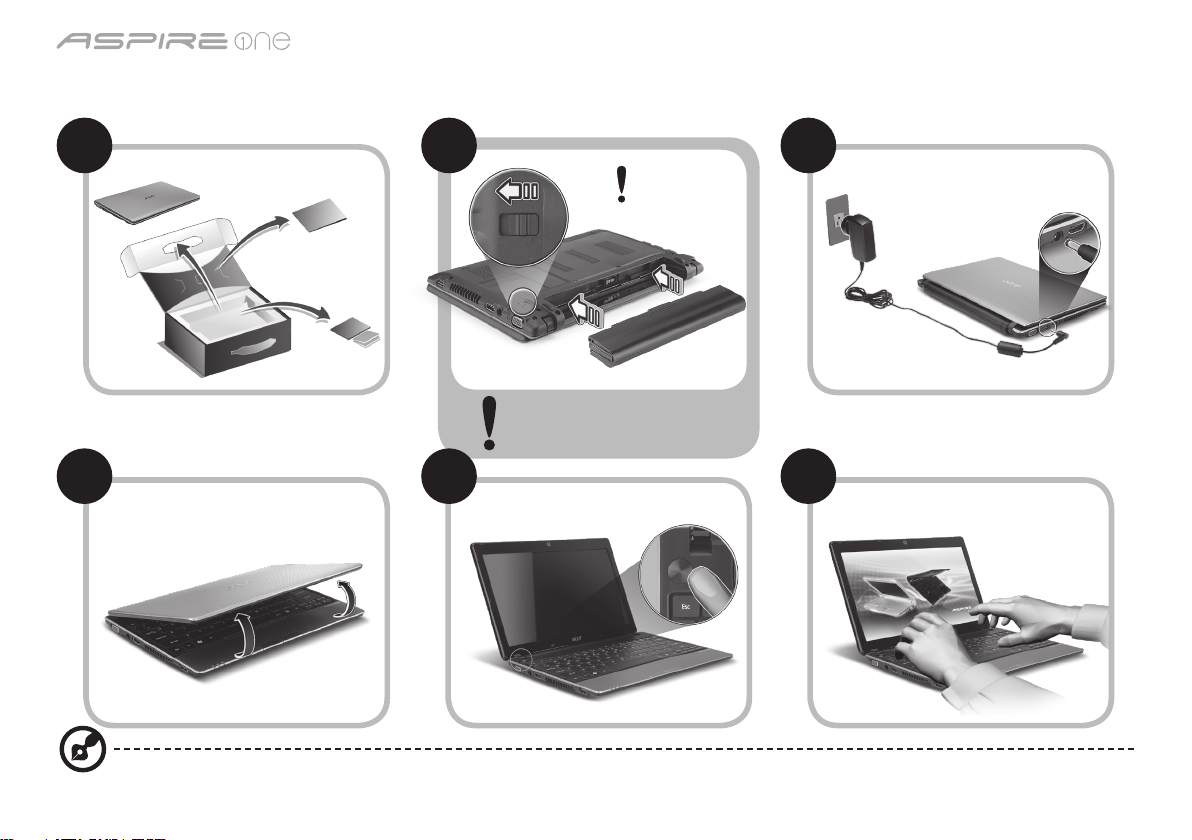
Just for starters
1 2 3
2-2
3-2
2-1
Ensure that the battery is
properly locked in place, as
illustrated in 2-2.
4 5 6
Illustrations are for reference only. Actual product specifications may vary.
1
3-1
Page 9

Quick Guide
First things first
We would like to thank you for making an Acer notebook your choice for meeting your mobile computing needs.
Your guides
To help you use your Acer notebook, we have designed a set of guides*:
First off, the Quick Guide helps you get started with setting up your computer.
For more on how your computer can help you to be more productive, please refer to the AcerSystem User Guide. This guide
contains detailed information on such subjects as system utilities, data recovery, expansion options and troubleshooting. In
addition it contains warranty information and the general regulations and safety notices for your notebook. It is available in
Portable Document Format (PDF) and comes preloaded on your notebook.
Note: Viewing the file requires Adobe Reader. If Adobe Reader is not installed on your computer, clicking on AcerSystem
User Guide will run the Adobe Reader setup program first. Follow the instructions on the screen to complete the
installation. For instructions on how to use Adobe Reader, access the Help and Support menu.
* IMPORTANT NOTICE: Please note that the guides mentioned herein, whether in printed or electronic form, are for your
reference only and except as provided in the specific warranty information contained in the AcerSystem User Guide
nothing contained in these guides shall constitute a representation or warranty by Acer with regard to the product you
purchased. Acer expressly disclaims any liability for errors contained in the guides.
2
Page 10
Series
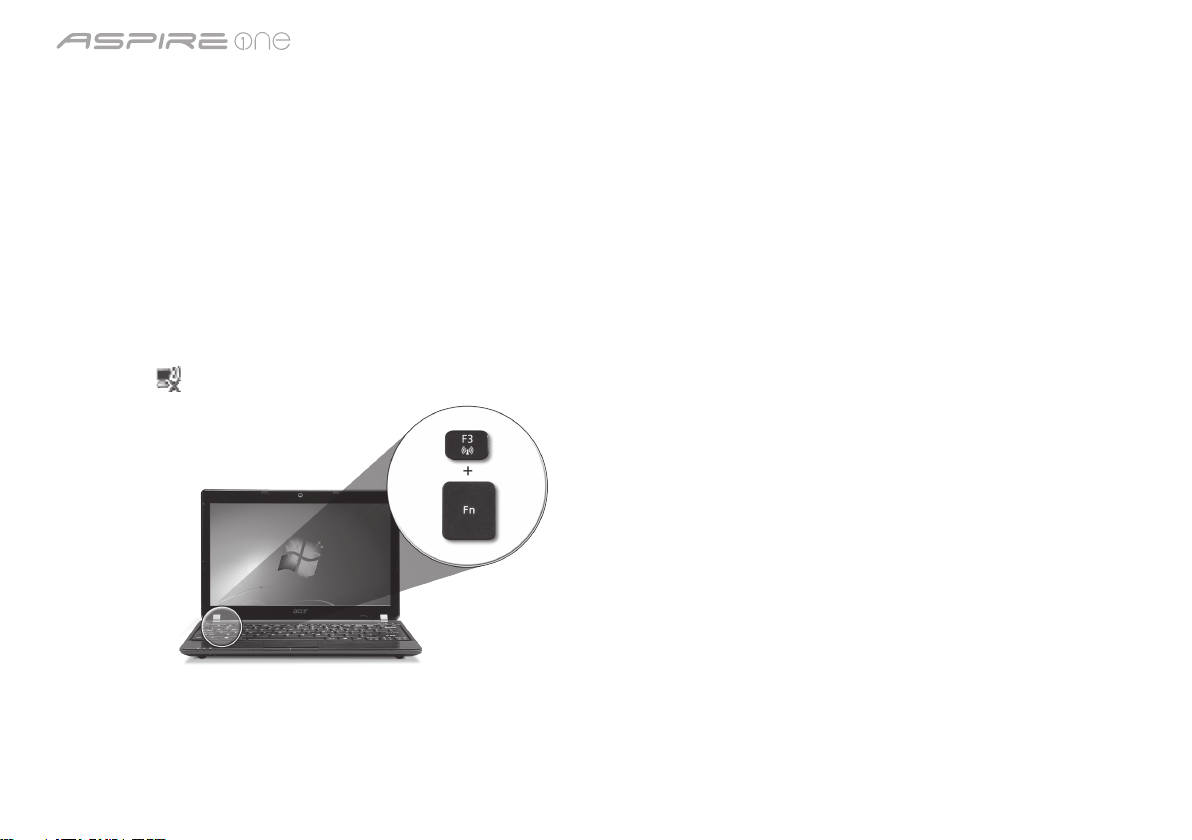
Network configuration
This guide will help you configure your LAN and wireless network settings to enable you to connect to the Internet.
Setting up LAN connection
Simply plug in the LAN cable to the Ethernet (RJ-45) port. Please refer to "Right view" on page 6 for the location of the Ethernet
port.
Setting up a wireless connection
1. Press <Fn> + <F3> to access the communication manager. Here you can turn on the Wi-Fi connection by clicking on the red
button next to Wi-Fi.
Note: 3G and Bluetooth are also accessible through the communication manager. Communication devices vary by model.
2. Click the icon on your system tray and choose the wireless access point you want to connect to.
Inserting a 3G SIM card (only for certain models)
Remove the battery and carefully insert a 3G SIM card into the 3G SIM card slot. Please refer to "Rear & base views" on page 6
for the location of the 3G SIM card slot.
3
Page 11
Quick Guide
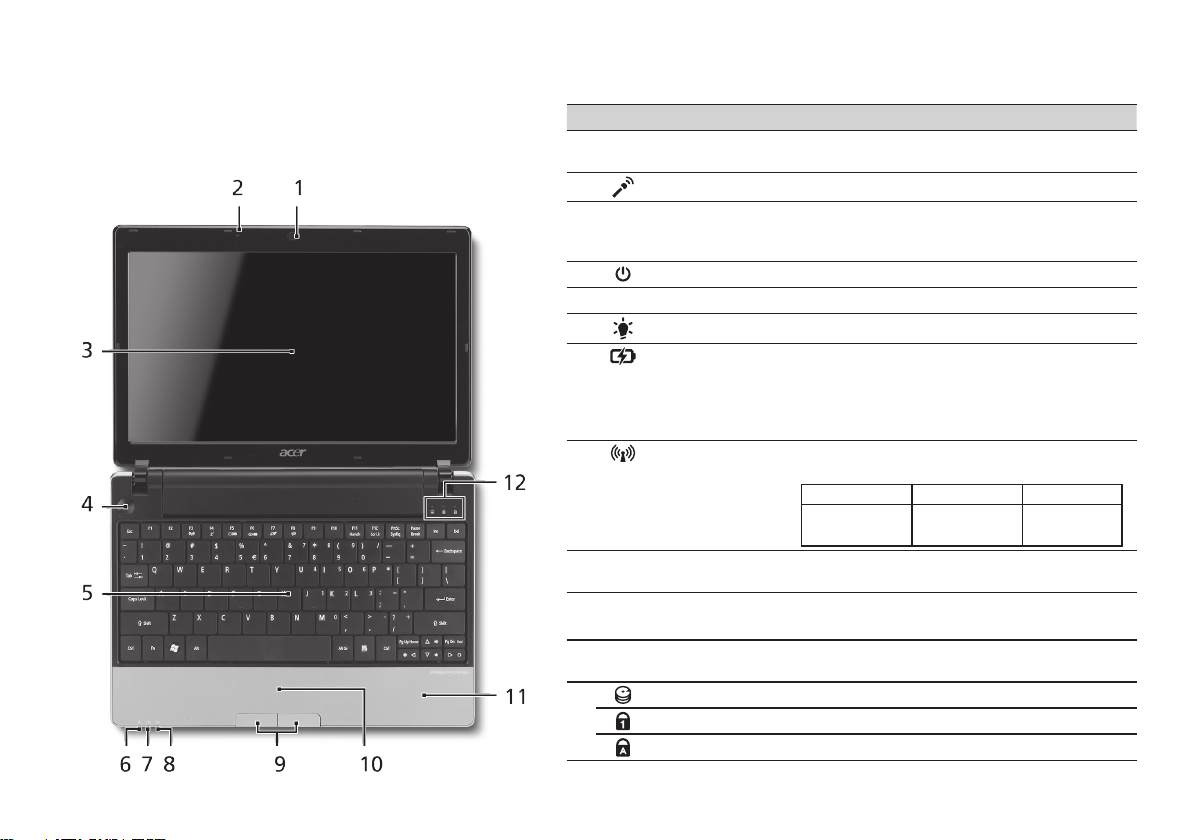
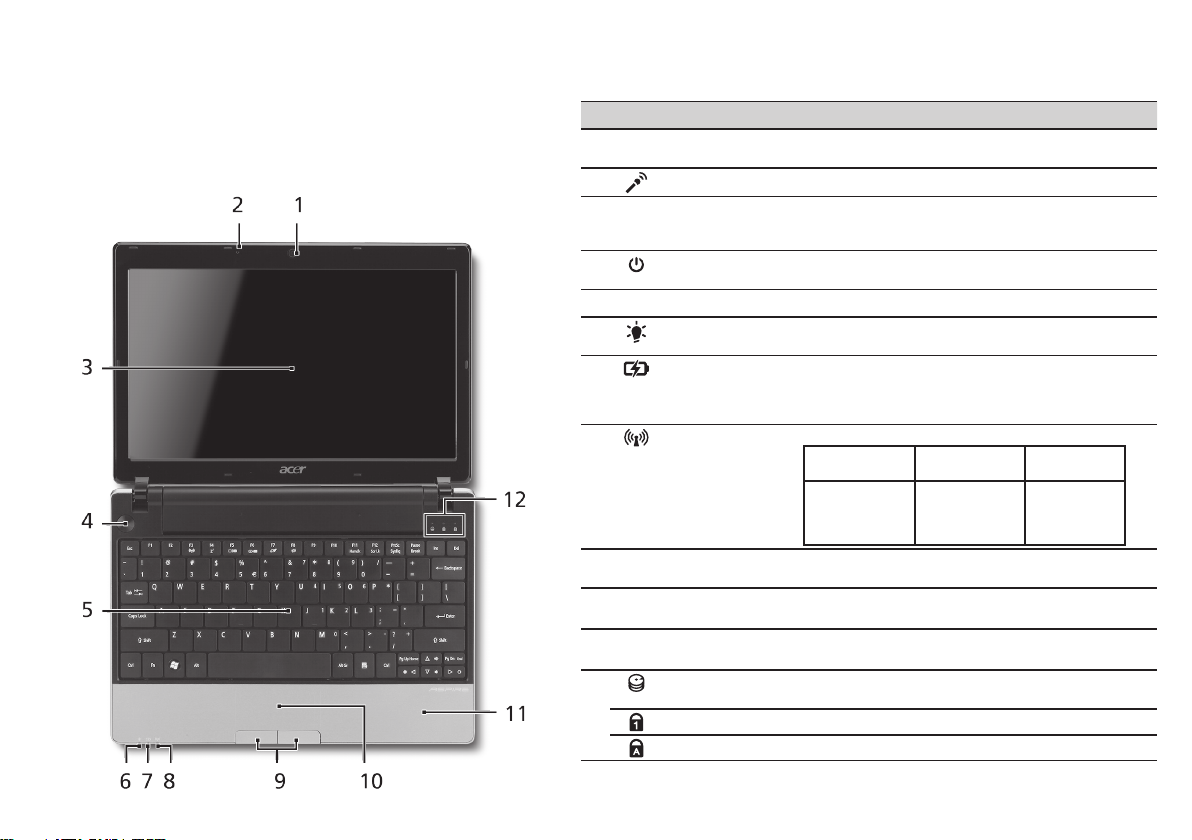
Your Aspire One tour
After setting up your computer as illustrated in the Just
for starters section, let us show you around your new Acer
notebook.
Top view
# Icon Item Description
1
2
3
4
5
6
7
8
9
10
11
12
1. The front panel indicators are visible even when the computer cover is closed.
Acer Crystal Eye
webcam
Microphone Internal microphone for sound recording.
Display screen Also called Liquid-Crystal Display (LCD),
Power button Turns the computer on and off.
Keyboard For entering data into your computer.
Power indicator1Indicates the computer's power status.
Battery indicator1Indicates the computer's battery status.
Communication
indicator
Click buttons (left
and right)
Touchpad Touch-sensitive pointing device which
Palmrest Comfortable support area for your hands
HDD indicator Indicates when the hard disk drive is active.
Num Lock Lights up when Num Lock is activated.
Caps Lock Lights up when Caps Lock is activated.
1
4
Web camera for video communication
(configuration may vary by model).
displays computer output (configuration
may vary by model).
1. Charging: The light shows amber when
the battery is charging.
2. Fully charged: The light shows blue when
in AC mode.
Indicates the status of 3G/Wireless LAN
communication.
Blue light on Orange light on Not lit
3G on / WiFi on
3G on / WiFi off
The left and right buttons function like the
left and right mouse buttons.
functions like a computer mouse.
when you use the computer.
3G off / WiFi on 3G off / WiFi off
Page 12
Series
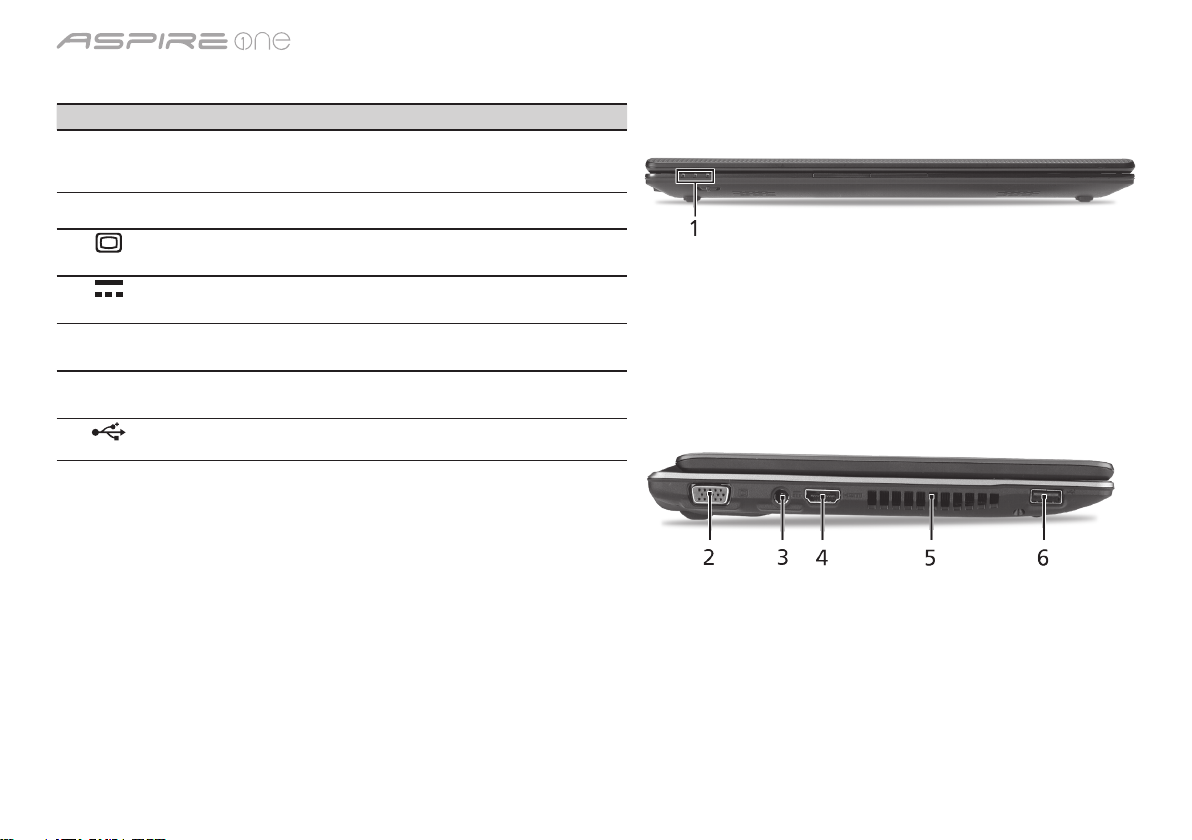
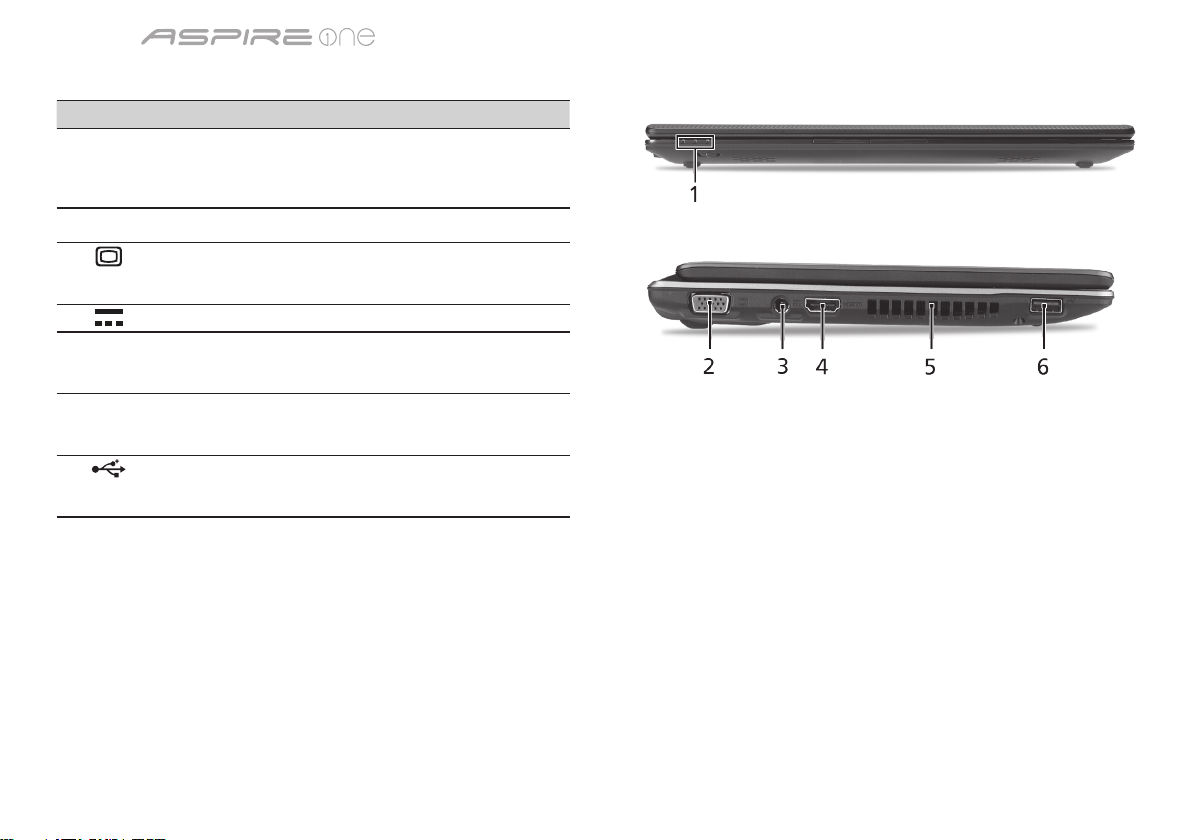
Closed front view
# Icon Item Description
1
Status indicators Light-Emitting Diodes (LED) that light up to
show the status of the computer's functions
and components.
Left view
2
3
4
5
6
External display
(VGA) port
DC-in jack Connects to an AC adapter.
HDMI HDMI port Supports high definition digital video
Ventilation slots Enable the computer to stay cool, even
USB 2.0 port Connects to USB 2.0 devices (e.g., USB
Connects to a display device (e.g., external
monitor, LCD projector).
connections.
after prolonged use.
mouse, USB camera).
5
Page 13

Quick Guide
Right view
# Icon Item Description
7
8
9
10
11
Multi-in-1 card reader Accepts Secure Digital (SD), MultiMediaCard
Microphone-in jack Accepts inputs from external microphones.
Headphone/speaker/
line-out jack with
S/PDIF support
USB 2.0 port Connects to USB 2.0 devices (e.g., USB
Kensington lock slot Connects to a Kensington-compatible
Ethernet (RJ-45) port Connects to an Ethernet 10/100/1000-based
(MMC), Memory Stick (MS), Memory Stick
PRO (MS PRO), xD-Picture Card (xD).
Note: Push to remove/install the card. Only
one card can operate at any given time.
Connects to audio line-out devices
(e.g., speakers, headphones).
mouse).
computer security lock.
network.
Rear & base views
12
13
14
15
16
Battery bay Houses the computer's battery pack.
Battery release latch Releases the battery for removal.
Hard disk bay Houses the computer's hard disk
Memory compartmen Houses the computer's main memory.
Ventilation slots and
cooling fan
Battery lock Locks the battery in position.
(secured with screws).
Enable the computer to stay cool, even
after prolonged use.
Note: Do not cover or obstruct the opening
of the fan.
6
Page 14

Series
Environment
Temperature:
Operating: 5 °C to 35 °C
Non-operating: -20 °C to 65 °C
Humidity (non-condensing):
Operating: 20% to 80%
Non-operating: 20% to 80%
7
Page 15

Gamme
Guide rapide
Page 16

Gamme
© 2010 Tous droits réservés
Guide rapide de la gamme Aspire One
Première publication : 04/2010
Ordinateur notebook de la gamme Aspire One
Modèle : ______________________________________
No. de série : __________________________________
Date d'achat : _________________________________
Lieu d'achat : __________________________________
Page 17

Guide rapide
Federal Communications Commission
Declaration of Conformity
This device complies with Part 15 of the FCC Rules. Operation is subject to the following two conditions: (1) this device may not
cause harmful interference, and (2) this device must accept any interference received, including interference that may cause
undesired operation.
The following local Manufacturer / Importer is responsible for this declaration:
Product name: Notebook PC
Brand: Acer
Model number: MS2296
Machine type: AO 753 series
Name of Responsible Party: Acer America Corporation
Address of responsible party: 333 West San Carlos St., San Jose
CA 95110, U. S. A.
Contact person: Acer Representative
Phone No.: 1-254-298-4000
Fax No.: 1-254-298-4147
April 30, 2010
Page 18
Gamme
CE Declaration of Conformity
We,
Acer Incorporated
8F, 88, Sec. 1, Hsin Tai Wu Rd., Hsichih, Taipei Hsien 221, Taiwan
Contact Person: Mr. Easy Lai, e-mail:easy_lai@acer.com.tw
And,
Acer Europe SA
Via Cantonale, Centro Galleria 2 6928 Manno Switzerland
Hereby declare that:
Product: Notebook Computer
Trade Name: Acer
Model Number: MS2296
Machine Type: AO753 series
Is compliant with the essential requirements and other relevant provisions of the following EC directives, and that all the
necessary steps have been taken and are in force to assure that production units of the same product will continue comply with
the requirements.
EMC Directive 2004/108/EC as attested by conformity with the following harmonized standards:
• EN55022,AS/NZSCISPR22,ClassB
• EN55024
• EN61000-3-2ClassD
• EN61000-3-3
Low Voltage Directive 2006/95/EC as attested by conformity with the following harmonized standard:
• EN60950-1
Council Decision 98/482/EC (CTR21):
(Applicable to product with pan- European single terminal connection to the Public Switched Telephone Network (PSTN).)
RoHS Directive 2002/95/EC on the Restriction of the Use of certain Hazardous Substances in Electrical and Electronic Equipment
Page 19
Guide rapide
• Themaximumconcentrationvaluesoftherestrictedsubstancesbyweightinhomogenousmaterialare:
Lead
Mercury
Hexavalent Chromium
0.1%
0.1%
0.1%
Directive 2009/125/EC with regard to establishing a framework for the setting of ecodesign requirements for energy-related
product.
R&TTE Directive 1999/5/EC as attested by conformity with the following harmonized standard:
• Article3.1(a)HealthandSafety
- EN60950-1
- EN62311
• Article3.1(b)EMC
- EN301 489-1
- EN301 489-3 (Applicable to non-bluetooth wireless keyboard mouse set).
- EN301 489-7
- EN301 489-17
- EN301 489-24
• Article3.2SpectrumUsages
- EN300 440-2 (Applicable to non-bluetooth wireless keyboard mouse set).
- EN300 328
- EN301 511
- EN301 893 (Applicable to 5GHz high performance RLAN).
- EN301 908-1
- EN301 908-2
Polybrominated Biphenyls (PBB’s)
Polybrominated Diphenyl Ethers (PBDE’s)
Cadmium
0.1%
0.1%
0.01%
Year to begin affixing CE marking 2010.
Easy Lai /Manager
Regulation Center, Acer Inc.
Apr. 30, 2010
Date
Page 20

1
Gamme
Pour partir du bon pied
1 2
3
2-2
2-1
Assurez que la batterie est
correctement verrouillée en
place, comme illustré à 2-2.
4 5 6
3-2
3-1
Les illustrations sont mises uniquement à titre de référence. Les caractéristiques réelles des produits peuvent changer.
Page 21

Guide rapide
2
Pour commencer
Nous désirons vous remercier d’avoir fait d’un notebook Acer votre choix pour répondre à vos besoins informatiques mobiles.
Vos guides
Pour vous aider à utiliser votre notebook Acer, nous avons conçu plusieurs guides* :
Tout d’abord, le Guide rapide vous aide à configurer votre ordinateur.
Pour plus d’information sur l’aide que peut vous apporter votre ordinateur pour être plus productif, veuillez vous reporter
au Guide utilisateur AcerSystem. Ce guide contient des informations détaillées sur des sujets tels que les utilitaires systèmes,
la récupération des données, les options d’extension et le dépannage. De plus, il contient des informations de garantie et les
réglementations générales et les avis de sécurité pour votre notebook. Il est disponible au format PDF (Portable Document
Format) et est préchargé sur votre notebook.
Remarque : L'affichage du fichier nécessite Adobe Reader. Si Adobe Reader n’est pas installé dans votre ordinateur, le clic
sur Guide utilisateur AcerSystem va exécuter le programme d’installation d’Adobe Reader. Suivez les instructions à l’écran
pour terminer l’installation. Pour des instructions sur l’utilisation de Adobe Reader, accédez au menu Aide et Support.
* AVIS IMPORTANT : Veuillez noter que les guides mentionnés ici, que ce soit imprimés ou au format électronique, sont
pour votre référence seulement et à l’exception de ce qui est indiqué dans les informations spécifiques à la garantie
contenue dans AcerSystem User Guide, rien de ce qui est contenu dans ces guides ne constitue une déclaration ou
garantie par Acer en ce qui concerne le produit que vous avez acheté. Acer rejette expressément toute responsabilité
pour les erreurs contenues dans les guides.
Page 22

3
Gamme
Configuration réseau
Ce guide vous aide à configurer les paramètres de votre réseau local et de votre réseau sans fil pour pouvoir vous connecter à
Internet.
Configurer la connexion réseau
Branchez simplement le câble réseau dans le port Ethernet RJ-45. Veuillez vous reporter « Vue droite » à la page 6 pour
l’emplacement du port Ethernet.
Configurer une connexion sans fil
1. Appuyez <Fn> + <F3> pour accéder au gestionnaire de communication. Ici vous pouvez activer la connexion Wi-Fi en cliquant
sur le bouton rouge à côté de Wi-Fi.
Remarque : 3G et Bluetooth sont également accessibles via le gestionnaire de communication. Les périphériques de
communication varient en fonction du modèle.
2. Cliquez sur l’icône sur votre barre des tâches et choisissez le point d’accès sans fil auquel vous souhaitez vous connecter.
Insérer une carte SIM 3G (seulement pour certains modèles)
Retirez la batterie et insérez avec soin une carte SIM 3G dans le connecteur de carte SIM 3G. Veuillez consulter « Vue arrière &
Vue de la base » à la page 6 pour l’emplacement du connecteur de carte SIM 3G.
Page 23
Guide rapide
4
Visite guidée de votre Aspire One
Après avoir configuré votre ordinateur comme illustré la
section Pour partir du bon pied, nous allons vous faire
explorer votre nouveau notebook Acer.
Vue supérieure
# Icône Élément Description
1
2
3
4
5
6
7
8
9
10
11
12
1. Les indicateurs du panneau avant sont visibles même lorsque l’écran LCD est fermé.
Webcam Acer
Crystal Eye
Microphone Microphone interne pour l’enregistrement sonore.
Écran d’affichage Également appelé écran LCD (Liquid Crystal
Bouton Marche/
Arrêt
Clavier Pour l’entrée des informations dans votre ordinateur.
Indicateur
d’alimentation
Indicateur de
1
batterie
Indicateur de
communication
Boutons
(gauche et droit)
Touchpad Périphérique de pointage sensible au touché qui
Repose mains Zonedesupportconfortablepourvosmains
Indicateur du
disque dur
Verr Num Est allumé lorsque Verr Num est activée.
Verr Maj Est allumé lorsque Verr Maj est activée.
Webcam pour communication video (la
configuration peut varier en fonction des modèle).
Display), affiche les données de l’ordinateur (la
configuration peut varier en fonction des modèle).
Met l’ordinateur sous tension et hors tension.
Indique l’état d’alimentation de l’ordinateur.
1
Indique l’état de la pile de l’ordinateur.
1. Charge : La lumière est orange lorsque la pile se
recharge.
2. Pleine charge : La diode est bleue en mode secteur.
Indique l’état de la communication réseau sans fil/3G.
1
Lumière bleue
allumée
3G activé/
WiFi activé
3G activé/
WiFi désactivé
Le bouton gauche et le bouton droit fonctionnent
comme le bouton gauche et le bouton droit d’une souris.
fonctionne comme une souris.
lorsque vous utilisez l’ordinateur.
Indique l’activité du disque dur.
Lumière orange
allumée
3G désactivé/
WiFi activé
Pas allumé
3G désactivé/
WiFi désactivé
Page 24
5
Gamme
Vue frontale fermée
# Icône Élément Description
1
Indicateurs d’état Diodes électroluminescentes (DEL)
qui s’allume pour indiquer l’état
des fonctions et composants de
l’ordinateur.
Vue gauche
2
3
4
5
6
Port d’affichage
(VGA) externe
Prise d’alimentation Se connecte à l’adaptateur secteur.
HDMI Port HDMI Prend en charge les connexions
Fentes de ventilation Permettent à l’ordinateur de rester
Port USB 2.0 Se connecte à des périphériques
Se connecte à un périphérique
d’affichage (p.ex. un moniteur
externe, un projecteur LCD).
vidéo numériques à haute
définition.
froid, même après une longue
utilisation.
USB 2.0 (p.ex. une souris USB, une
caméra USB).
Page 25

Guide rapide
6
Vue droite
# Icône Élément Description
10
11
7
8
9
Lecteur de cartes
multiples en un
Prise d’entrée
microphone
Prise de sortie audio/
haut-parleur/casque
avec prise en charge
de S/PDIF
Port USB 2.0 Se connecte à des périphériques USB 2.0
Fente pour cadenas
Kensington
Port Ethernet RJ-45 Se connecte à un réseau Ethernet
Accepte une carte mémoire Secure Digital
(SD), MultiMediaCard (MMC), Memory Stick
(MS), Memory Stick Pro (MS PRO), et xDPicture (xD).
Remarque : Poussez pour retirer/installer la
carte. Seule une carte peut fonctionner à un
moment donné.
Accepte les entrées de microphones externes.
Se connecte à des périphériques audio en
sortie (p.ex. haut-parleurs ou un casque
stéréo).
(p.ex. une souris USB).
Se connecte à un cadenas de sécurité pour
ordinateur Kensington.
10/100/1000 Base.
Vue arrière & Vue de la base
12
13
14
15
16
Baie de la batterie Contient la batterie de l’ordinateur.
Loquet de libération
de la batterie
Baie du disque dur Contient le disque dur de l'ordinateur
Compartiment
mémoire
Fentes de ventilation
et ventilateur de
refroidissement
Verrou de la batterie Verrouille la batterie en position.
Libère la batterie pour le retrait.
(fixé avec des vis).
Contient la mémoire principale de
l’ordinateur.
Permettent à l’ordinateur de rester froid,
même après une longue utilisation.
Remarque : Ne couvrez pas et ne bloquez
pas l’ouverture du ventilateur.
Page 26

Gamme
Environnement
Température :
En marche : 5°C à 35°C
À l’arrêt : -20°C à 65°C
Humidité (sans condensation) :
En marche : 20% à 80%
À l’arrêt : 20% à 80%
7
Page 27

Kurzanleitung
Serie
Page 28

Serie
© 2010 Alle Rechte vorbehalten
Kurzanleitung für Aspire One Serie
Originalausgabe: 04/2010
Notebook-PC der Aspire One Serie
Modellnummer: _______________________________
Seriennummer: ________________________________
Kaufdatum: ___________________________________
Kaufort: ______________________________________
Page 29

Kurzanleitung
Federal Communications Commission
Declaration of Conformity
This device complies with Part 15 of the FCC Rules. Operation is subject to the following two conditions: (1) this device may not
cause harmful interference, and (2) this device must accept any interference received, including interference that may cause
undesired operation.
The following local Manufacturer / Importer is responsible for this declaration:
Product name: Notebook PC
Brand: Acer
Model number: MS2296
Machine type: AO 753 series
Name of Responsible Party: Acer America Corporation
Address of responsible party: 333 West San Carlos St., San Jose
CA 95110, U. S. A.
Contact person: Acer Representative
Phone No.: 1-254-298-4000
Fax No.: 1-254-298-4147
April 30, 2010
Page 30

Serie
CE Declaration of Conformity
We,
Acer Incorporated
8F, 88, Sec. 1, Hsin Tai Wu Rd., Hsichih, Taipei Hsien 221, Taiwan
Contact Person: Mr. Easy Lai, e-mail:easy_lai@acer.com.tw
And,
Acer Europe SA
Via Cantonale, Centro Galleria 2 6928 Manno Switzerland
Hereby declare that:
Product: Notebook Computer
Trade Name: Acer
Model Number: MS2296
Machine Type: AO753 series
Is compliant with the essential requirements and other relevant provisions of the following EC directives, and that all the
necessary steps have been taken and are in force to assure that production units of the same product will continue comply with
the requirements.
EMC Directive 2004/108/EC as attested by conformity with the following harmonized standards:
• EN55022,AS/NZSCISPR22,ClassB
• EN55024
• EN61000-3-2ClassD
• EN61000-3-3
Low Voltage Directive 2006/95/EC as attested by conformity with the following harmonized standard:
• EN60950-1
Council Decision 98/482/EC (CTR21):
(Applicable to product with pan- European single terminal connection to the Public Switched Telephone Network (PSTN).)
RoHS Directive 2002/95/EC on the Restriction of the Use of certain Hazardous Substances in Electrical and Electronic Equipment
Page 31

Kurzanleitung
• Themaximumconcentrationvaluesoftherestrictedsubstancesbyweightinhomogenousmaterialare:
Lead
Mercury
Hexavalent Chromium
0.1%
0.1%
0.1%
Directive 2009/125/EC with regard to establishing a framework for the setting of ecodesign requirements for energy-related
product.
R&TTE Directive 1999/5/EC as attested by conformity with the following harmonized standard:
• Article3.1(a)HealthandSafety
- EN60950-1
- EN62311
• Article3.1(b)EMC
- EN301 489-1
- EN301 489-3 (Applicable to non-bluetooth wireless keyboard mouse set).
- EN301 489-7
- EN301 489-17
- EN301 489-24
• Article3.2SpectrumUsages
- EN300 440-2 (Applicable to non-bluetooth wireless keyboard mouse set).
- EN300 328
- EN301 511
- EN301 893 (Applicable to 5GHz high performance RLAN).
- EN301 908-1
- EN301 908-2
Polybrominated Biphenyls (PBB’s)
Polybrominated Diphenyl Ethers (PBDE’s)
Cadmium
0.1%
0.1%
0.01%
Year to begin affixing CE marking 2010.
Easy Lai /Manager
Regulation Center, Acer Inc.
Apr. 30, 2010
Date
Page 32

1
Serie
Für den Anfang
1 2
3
2-2
2-1
Stellen Sie sicher, dass der Akku
wie in Abbildung 2-2 gezeigt an
seinem Platz festsitzt.
4 5 6
3-2
3-1
Abbildung nur Referenz und kann zum Produkt variieren. Das tatsächliche Produkt kann sich von den Abbildungen
unterscheiden.
Page 33

Kurzanleitung
2
Das Wichtigste zuerst
Wir möchten uns bei Ihnen dafür bedanken, dass Sie sich in Bezug auf mobilen Computerbedarf für ein Acer-Notebook
entschieden haben.
Hilfen
Als Hilfe für Sie bei der Verwendung des Acer-Notebooks haben wir einen Satz von Richtlinien aufgestellt*:
ZuallerersthilftIhnendieKurzanleitungdabei,IhrenComputerdasersteMalinBetriebzunehmen.
Für weitere Informationen dazu, wie Ihnen Ihr Computer helfen kann, noch produktiver zu arbeiten, lesen Sie bitte
die AcerSystem Benutzeranleitung. Dieses Benutzerhandbuch enthält detaillierte Informationen zu Themen wie z. B.
Systemprogramme, Datenwiederherstellung, Erweiterungsoptionen und Problembehebung. Darüber hinaus enthält es
Informationen zur Garantie und allgemeine Bestimmungen und Sicherheitshinweise zu Ihrem Notebook. Das Benutzerhandbuch
steht in PDF (Portable Document Format) zur Verfügung und ist bereits in Ihrem Notebook installiert.
Hinweis:ZumBetrachtenderDateimußAdobeReaderinstalliertsein.WennAdobeReadernichtaufIhremComputer
installiert ist, wird durch Klicken auf AcerSystem Benutzerhandbuch zuerst das Setup-Programm von Adobe Reader
ausgeführt. Folgen Sie zur Durchführung der Installation den Anweisungen auf dem Bildschirm. Hinweise über die
Verwendung von Adobe Reader finden Sie im Menü Hilfe und Support.
* WICHTIGER HINWEIS: Denken Sie daran, dass die beschriebenen Anleitungen, ob in ausgedruckter oder
elektronischer Form, nur zur Erläuterung dienen. Mit Ausnahme der Informationen zur Garantie, die in der AcerSystem
Benutzeranleitung enthalten ist, gibt Acer mit diesen Anleitungen keine Versprechungen oder Garantien hinsichtlich
des von Ihnen gekauften Produktes. Acer übernimmt ausdrücklich keine Haftung für Fehler, die in diesen Anleitungen
enthalten sein können.
Page 34

3
Serie
Netzkonfiguration
Diese Anleitung hilft Ihnen bei der Konfiguration Ihrer LAN- und Drahtlos-Netzeinstellungen, damit Sie eine Verbindung mit
dem Internet herstellen können.
Herstellung einer LAN-Verbindung
SchließenSieeinfachdasLAN-KabelandenEthernet(RJ-45)-Anschlussan.Siehe„Rechte Seite“ auf Seite 6, um den Ort der
Ethernet-Schnittstelle zu erfahren.
Einrichten einer Drahtlosverbindung
1.DrückenSieauf<Fn>+<F3>,umaufdenKommunikationsmanagerzuzugreifenDortkönnenSieanschließenddieWLAN-
Verbindung durch Klicken auf die rote Schaltfläche neben WLAN aktivieren.
Hinweis: Über den Kommunikationsmanager gelangen Sie auch nach 3G und Bluetooth. Kommunikationsgeräte können sich
je nach Modell unterscheiden.
2. Klicken Sie auf das Symbol aufderSystemleisteundwählenSiedenDrahtlos-Zugriffspunktaus,zudemSieeine
Verbindung herstellen möchten.
Einsetzen einer 3G-SIM-Karte (Nur für bestimmte Modelle)
Entfernen Sie den Akku und setzen Sie eine 3G-SIM-Karte vorsichtig in den 3G-SIM-Karteneinschub hinein. Unter „Rückseite &
Unterseite“ auf Seite 6 erfahren Sie den Ort des 3G SIM-Karteneinschubs.
Page 35

Kurzanleitung
4
Eine Tour durch das Aspire One
Nachdem Sie Ihren Computer wie im Abschnitt Für den
Anfang gezeigt aufgestellt haben, lassen Sie uns nun Ihr
neues Acer-Notebook vorstellen.
Ansicht von oben
# Symbol Element Beschreibung
1
2
3
4
5
6
7
8
9
10
11
12
1. Die Statusanzeigen auf der Vorderseite sind selbst dann zu sehen, wenn die
Computerklappe geschlossen ist.
Acer Crystal Eye
Webcam
Mikrofon Internes Mikrofon für die Tonaufnahme.
Anzeigebildschirm Wird auch als LCD (Liquid-Crystal-Display)
Ein/Aus-Taste Schaltet den Computer ein und aus.
Tastatur Dient der Eingabe von Daten in den Computer.
Stromanzeige
Akkuanzeige
Anzeige für
Kommunikation
Anklicktasten
(links und rechts)
Touchpad BerührungssensiblesZeigegerät,dasdiegleichen
Handablage Bequemer Ablagebereich für Ihre Hände
HDD-Anzeige Leuchtet auf, wenn die Festplatte aktiv ist.
Num Lock Leuchtet auf, wenn die Num Lock-Funktion
Caps Lock Leuchtet auf, wenn die Caps Lock-Funktion
Web-Kamera für Videokommunikation
(konfiguration kann sich von Modell zu Modell
unterscheiden).
bezeichnet.ZeigtdieAusgabedesComputersan
(konfiguration kann sich von Modell zu Modell
unterscheiden).
1
ZeigtdenEin/Aus-StatusdesComputersan.
1
ZeigtdenAkkustatusdesComputersan.
1. Aufladung: Die Leuchte erscheint gelb, wenn
der Akku aufgeladen wird.
2. Voll aufgeladen: Die Leuchte erscheint blau,
wenn Netzstrom verwendet wird.
Leuchtet auf, um den Status der WLAN-
1
Kommunikation anzuzeigen.
Blaue Leuchte ein Orangefarbene
3G ein/WiFi ein
3G ein/WiFi aus
Die linken und rechten Tasten funktionieren wie
die linken und rechten Tasten einer Maus.
Funktionen besitzt wie eine Computer-Maus.
während der Bedienung des Computers.
aktiviert ist.
aktiviert ist.
Leuchte ein
3G aus/WiFi ein 3G aus/WiFi aus
Leuchtet nicht
Page 36

5
Serie
Geschlossene Vorderseite
# Symbol Element Beschreibung
1
Statusanzeigen Diese LEDs (Light-Emitting
Diodes) leuchten auf, um Ihnen
den Status der Funktionen und
Komponenten des Computers
anzuzeigen.
Linke Seite
2
3
4
5
6
Anschluss für externe
Anzeige (VGA)
DC-Eingangsbuchse HierschließenSiedasNetzteil
HDMI HDMI-Anschluss Unterstützt digitale High-
Belüftungsschlitze Schützt den Computer vor
USB 2.0-Anschluss HierschließenSieUSB2.0-Geräte
Dient dem Anschluss eines
Anzeigegerätes (z. B. einem
externen Monitor oder LCDProjektor).
an.
Definition-Video-Verbindungen.
Überhitzung, selbst bei längerem
Einsatz.
(z. B. USB-Maus oder USBKamera) an.
Page 37

Kurzanleitung
6
Rechte Seite
# Symbol Element Beschreibung
10
11
7
8
9
Mehrere-in-1Kartenleser
Mikrofon-EingangsBuchse
Buchse für Kopfhörer/
Lautsprecher/
Ausgang mit S/PDIFUnterstützung
USB 2.0-Anschluss HierschließenSieUSB2.0-Geräte
Steckplatz für
Kensington-Schloss
Ethernet (RJ-45)Anschluss
Eignet sich für Secure Digital (SD),
MultiMediaCard (MMC), Memory Stick
(MS), Memory Stick PRO (MS PRO) und
xD-Picture Card (xD).
Hinweis: Drücken Sie hier, um die Karte
zu entfernen/einzusetzen. Es kann
nicht mehr als eine Karte gleichzeitig
verwendet werden.
Eignet sich für Eingaben aus externen
Mikrofonen.
ZumAnschlussvonAudioausgabe-
Geräten (z.B. Lautsprechern,
Kopfhörern).
(z. B. USB-Maus) an.
Hier können Sie ein Kensington-
kompatibles Sicherheitsschloss für den
Computer anbringen.
ZumAnschlusseinesEthernet
10/100/1000-basierten Netzwerks.
Rückseite & Unterseite
12
13
14
15
16
Akkufach Enthält den Akku des Computers.
Verriegelung des Akkus Entsperrt den Akku für die Herausnahme.
Festplattenfach Enthält die Computer-Festplatte (durch
Speicherfach Enthält den Hauptspeicher des Computers.
Belüftungsschlitze und
Ventilator
Akkuverschluss Sichert den Akku an seiner Position.
Schrauben gesichert).
Schützt den Computer vor Überhitzung,
selbst bei längerem Einsatz.
Hinweis:VerdeckenoderschließenSie
nicht die Öffnungen des Ventilators.
Page 38

Serie
Umgebung
Temperatur:
Betrieb: 5°C bis 35°C
Nichtbetrieb: -20°C bis 65°C
Luftfeuchtigkeit (nicht kondensierend):
Betrieb: 20% bis 80%
Nichtbetrieb: 20% bis 80%
7
Page 39

Serie
Guida rapida
Page 40

Serie
© 2010 Tutti i diritti riservati
Guida rapida per Serie Aspire One
Prima edizione: 04/2010
PC Notebook Serie Aspire One
Numero di modello: ___________________________
Numero di serie: _______________________________
Data di acquisto: ______________________________
Luogo d'acquisto: _____________________________
Page 41

Guida rapida
Federal Communications Commission
Declaration of Conformity
This device complies with Part 15 of the FCC Rules. Operation is subject to the following two conditions: (1) this device may not
cause harmful interference, and (2) this device must accept any interference received, including interference that may cause
undesired operation.
The following local Manufacturer / Importer is responsible for this declaration:
Product name: Notebook PC
Brand: Acer
Model number: MS2296
Machine type: AO 753 series
Name of Responsible Party: Acer America Corporation
Address of responsible party: 333 West San Carlos St., San Jose
CA 95110, U. S. A.
Contact person: Acer Representative
Phone No.: 1-254-298-4000
Fax No.: 1-254-298-4147
April 30, 2010
Page 42

Serie
CE Declaration of Conformity
We,
Acer Incorporated
8F, 88, Sec. 1, Hsin Tai Wu Rd., Hsichih, Taipei Hsien 221, Taiwan
Contact Person: Mr. Easy Lai, e-mail:easy_lai@acer.com.tw
And,
Acer Europe SA
Via Cantonale, Centro Galleria 2 6928 Manno Switzerland
Hereby declare that:
Product: Notebook Computer
Trade Name: Acer
Model Number: MS2296
Machine Type: AO753 series
Is compliant with the essential requirements and other relevant provisions of the following EC directives, and that all the
necessary steps have been taken and are in force to assure that production units of the same product will continue comply with
the requirements.
EMC Directive 2004/108/EC as attested by conformity with the following harmonized standards:
• EN55022,AS/NZSCISPR22,ClassB
• EN55024
• EN61000-3-2ClassD
• EN61000-3-3
Low Voltage Directive 2006/95/EC as attested by conformity with the following harmonized standard:
• EN60950-1
Council Decision 98/482/EC (CTR21):
(Applicable to product with pan- European single terminal connection to the Public Switched Telephone Network (PSTN).)
RoHS Directive 2002/95/EC on the Restriction of the Use of certain Hazardous Substances in Electrical and Electronic Equipment
Page 43

Guida rapida
• Themaximumconcentrationvaluesoftherestrictedsubstancesbyweightinhomogenousmaterialare:
Lead
Mercury
Hexavalent Chromium
0.1%
0.1%
0.1%
Directive 2009/125/EC with regard to establishing a framework for the setting of ecodesign requirements for energy-related
product.
R&TTE Directive 1999/5/EC as attested by conformity with the following harmonized standard:
• Article3.1(a)HealthandSafety
- EN60950-1
- EN62311
• Article3.1(b)EMC
- EN301 489-1
- EN301 489-3 (Applicable to non-bluetooth wireless keyboard mouse set).
- EN301 489-7
- EN301 489-17
- EN301 489-24
• Article3.2SpectrumUsages
- EN300 440-2 (Applicable to non-bluetooth wireless keyboard mouse set).
- EN300 328
- EN301 511
- EN301 893 (Applicable to 5GHz high performance RLAN).
- EN301 908-1
- EN301 908-2
Polybrominated Biphenyls (PBB’s)
Polybrominated Diphenyl Ethers (PBDE’s)
Cadmium
0.1%
0.1%
0.01%
Year to begin affixing CE marking 2010.
Easy Lai /Manager
Regulation Center, Acer Inc.
Apr. 30, 2010
Date
Page 44

1
Serie
Per i principianti
1 2
3
2-2
2-1
Verificare che la batteria sia
bloccata in posizione, come
illustrato in 2-2.
4 5 6
3-2
3-1
Le illustrazioni sono di solo riferimento. Le specifiche dei prodotti possono differire.
Page 45

Guida rapida
2
Avvertenze preliminari
Grazie per aver scelto il notebook Acer, la scelta ideale per poter lavorare in piena libertà anche in movimento.
Le guide disponibili
Sono state realizzate delle guide per assistere l’utente nell’uso del notebook Acer*:
Innanzitutto, la Guida rapida aiuta a semplificare la configurazione del computer.
Per altre nozioni su come il vostro computer può aiutarvi a diventare ancora più produttivi, consultate la AcerSystem User
Guide. Questa guida contiene informazioni dettagliate su argomenti come utilità del sistema, ripristino dei dati, opzioni di
espansione e ricerca guasti. Contiene inoltre informazioni sulla garanzia, le norme e gli standard di riferimento e le avvertenze
per la sicurezza del vostro notebook. È disponibile nel formato PDF e viene fornita già caricata nel notebook.
Nota: Per visualizzare il file, è necessario che sul computer sia installato Adobe Reader. Se Adobe Reader non è installato
sul computer, fare clic su AcerSystem User Guide per eseguire il programma di installazione di Adobe Reader. Per
completare l'installazione, attenersi alle istruzioni visualizzate sullo schermo. Per istruzioni sull'uso di Adobe Reader,
consultare il menu Guida in linea e supporto tecnico.
* AVVISO IMPORTANTE: Notare che le guide menzionate in precedenza, sia informa stampata che elettronica, sono
solo per riferimento e a eccezione delle informazioni specifiche sulla garanzie contenute nella AcerSystem User Guide,
nulla di ciò che è contenuto nelle presenti guide costituisce una rappresentazione o una garanzia da parte di Acer
con riferimento al prodotto acquistato. Acer declina espressamente qualsiasi responsabilità per errori contenuti nelle
presenti guide.
Page 46

3
Serie
Configurazione rete
Questa guida aiuta ad eseguire la configurazione delle impostazioni di rete LAN e wireless per poter eseguire l’accesso a
Internet.
Configurazione della connessione LAN
Semplicemente collegare il cavo LAN alla porta Ethernet (RJ-45). Fare riferimento a "Vista da destra" a pagina 6 per la posizione
della porta Ethernet.
Configurare una connessione wireless
1. Premere<Fn> + <F3> per accedere a Manager Comm. Da qui è possibile attivare la connessione Wi-Fi facendo clic sul pulsante
rosso accanto a Wi-Fi.
Nota: È possibile effettuare l’accesso a 3G e a Bluetooth anche da Manager Comm. I dispositivi di comunicazione possono
variare da un modello all’altro.
2. Fare clic sull’icona nella barra delle applicazioni e scegliere l’access point wireless a cui connettersi.
Inserire una carta 3G SIM (solo per alcuni modelli)
Rimuovere la batteria e inserire con attenzione la carta 3G SIM nello slot carta 3G SIM. Per la posizione dello slot carta 3G SIM,
fare riferimento a "Vista posteriore & base" a pagina 6.
Page 47

Guida rapida
4
Presentazione di Aspire One
Dopo aver configurato il computer come illustrato nella
sezione Per i principianti, far riferimento alla presente
documentazione per la presentazione del nuovo notebook
Acer.
Vista dall’alto
# Icona Elemento Descrizione
1
2
3
4
5
6
7
8
9
10
11
12
1. Gli indicatori del pannello frontale sono visibili anche quando il coperchio del computer
è chiuso.
Webcam Acer
Crystal Eye
Microfono Microfono interno per la registrazione di audio.
Display Grande display a cristalli liquidi (Liquid-
Tasto di accensione Accende/spegne il computer.
Tastiera Per l’immissione di dati sul computer.
Indicatore di
alimentazione
Indicatore batteria1Indicano lo stato della batteria del computer.
Indicatore
comunicazione
Tasti clic
(sinistra e destra)
Touchpad Dispositivo di puntamento sensibile al tocco con
Poggiapolsi Comoda area su cui poggiare i polsi durante
Indicatore disco rigido Si accende quando l'hard disk è attivo.
Bloc Num Si illumina quando Bloc Num è attivato.
Bloc Maiusc Si illumina quando Bloc Maiusc è attivato.
Webcam per comunicazioni video (la configurazione
può variare in relazione al modello).
Crystal Display; LCD), per una visualizzazione
confortevole (la configurazione può variare in
relazione al modello).
Indicano lo stato di accensione/alimentazione
1
del computer.
1. In carica: Luce di colore giallo quando la
batteria è in ricarica.
2. Completamente carica: Luce di colore blu
quando è nella modalità AC.
Indica lo stato della trasmissione wireless LAN/3G.
1
Luce blu Luce arancione Spento
3G attivo/WiFi attivo
3G attivo/WiFi disattivo
I tasti destra e sinistra hanno le stesse funzioni
dei tasti destra e sinistra del mouse.
funzioni simili a quelle di un comune mouse.
l’utilizzo del computer.
3G disattivo/
WiFi attivo
3G disattivo/
WiFi disattivo
Page 48

5
Serie
Vista frontale in dettaglio
# Icona Elemento Descrizione
1
Indicatori di stato LED (Light-Emitting Diodes) che si
illuminano per mostrare lo stato
di funzioni e componenti del
computer.
Vista da sinistra
2
3
4
5
6
Porta display esterno
(VGA)
Jack CC-in Per il collegamento all’adattatore
HDMI Porta HDMI Supporta collegamento per video
Aperture per la
ventilazione
Porta USB 2.0 Effettua il collegamento ai
Effettua il collegamento a un
dispositivo di visualizzazione (ad
es., monitor esterno, proiettore
LCD).
CA.
digitali ad alta definizione.
Permettono il raffreddamento
del computer, anche dopo un uso
prolungato.
dispositivi USB 2.0 (ad es., mouse
USB, fotocamera USB).
Page 49

Guida rapida
6
Vista da destra
# Icona Elemento Descrizione
10
11
7
8
9
Lettore di schede
multiplo
Jack ingresso
microfono
Jack auricolari/
altoparlante/line-out
con supporto S/PDIF
Porta USB 2.0 Connette a dispositivi USB 2.0 (p.e., mouse
Slot blocco Kensington Per il collegamento al blocco di sicurezza
Porta Ethernet (RJ-45) Effettua il collegamento a una rete con
Supporta Secure Digital (SD),
MultiMediaCard (MMC), Memory Stick (MS),
Memory Stick Pro (MS PRO), e xD-Picture
Card (xD).
Nota: Premere per rimuovere/installare
la scheda. è possibile utilizzare una sola
scheda di memoria alla volta.
Accetta ingressi proveniente da microfoni
esterni.
Effettua il collegamento ai dispositivi audio
line-out (ad es., altoparlanti, auricolari).
USB).
dei computer Kensington-compatibili.
Ethernet 10/100/1000.
Vista posteriore & base
12
13
14
15
16
Alloggiamento della
batteria
Gancio di rilascio della
batteria
Alloggiamento per il
disco rigido
Vano per la memoria Contiene la memoria principale del
Aperture per la
ventilazione e ventola
di raffreddamento
Blocco batteria Blocca la batteria al suo posto.
Contiene il pacco batteria del computer.
Per togliere la batteria.
Alloggia il disco rigido del computer (fissato
con viti).
computer.
Permettono il raffreddamento del
computer, anche dopo un uso prolungato.
Nota: Non coprire e non ostruire l’apertura
della ventola.
Page 50

Serie
Condizioni operative
Temperatura:
Di esercizio: 5°C e 35°C
Non di esercizio: -20°C e 65°C
Umidità (senza condensa):
Di esercizio: 20% e 80%
Non di esercizio: 20% e 80%
7
Page 51

Serie
Guía rápida
Page 52

Serie
© 2010 Reservados todos los derechos
Guía rápida de la Serie Aspire One
Versión original: 04/2010
Ordenador portátil Serie Aspire One
Número de modelo: ___________________________
Número de serie: ______________________________
Fecha de compra: ______________________________
Lugar de compra: ______________________________
Page 53

Guía rápida
Federal Communications Commission
Declaration of Conformity
This device complies with Part 15 of the FCC Rules. Operation is subject to the following two conditions: (1) this device may not
cause harmful interference, and (2) this device must accept any interference received, including interference that may cause
undesired operation.
The following local Manufacturer / Importer is responsible for this declaration:
Product name: Notebook PC
Brand: Acer
Model number: MS2296
Machine type: AO 753 series
Name of Responsible Party: Acer America Corporation
Address of responsible party: 333 West San Carlos St., San Jose
CA 95110, U. S. A.
Contact person: Acer Representative
Phone No.: 1-254-298-4000
Fax No.: 1-254-298-4147
April 30, 2010
Page 54

Serie
CE Declaration of Conformity
We,
Acer Incorporated
8F, 88, Sec. 1, Hsin Tai Wu Rd., Hsichih, Taipei Hsien 221, Taiwan
Contact Person: Mr. Easy Lai, e-mail:easy_lai@acer.com.tw
And,
Acer Europe SA
Via Cantonale, Centro Galleria 2 6928 Manno Switzerland
Hereby declare that:
Product: Notebook Computer
Trade Name: Acer
Model Number: MS2296
Machine Type: AO753 series
Is compliant with the essential requirements and other relevant provisions of the following EC directives, and that all the
necessary steps have been taken and are in force to assure that production units of the same product will continue comply with
the requirements.
EMC Directive 2004/108/EC as attested by conformity with the following harmonized standards:
• EN55022,AS/NZSCISPR22,ClassB
• EN55024
• EN61000-3-2ClassD
• EN61000-3-3
Low Voltage Directive 2006/95/EC as attested by conformity with the following harmonized standard:
• EN60950-1
Council Decision 98/482/EC (CTR21):
(Applicable to product with pan- European single terminal connection to the Public Switched Telephone Network (PSTN).)
RoHS Directive 2002/95/EC on the Restriction of the Use of certain Hazardous Substances in Electrical and Electronic Equipment
Page 55

Guía rápida
• Themaximumconcentrationvaluesoftherestrictedsubstancesbyweightinhomogenousmaterialare:
Lead
Mercury
Hexavalent Chromium
0.1%
0.1%
0.1%
Directive 2009/125/EC with regard to establishing a framework for the setting of ecodesign requirements for energy-related
product.
R&TTE Directive 1999/5/EC as attested by conformity with the following harmonized standard:
• Article3.1(a)HealthandSafety
- EN60950-1
- EN62311
• Article3.1(b)EMC
- EN301 489-1
- EN301 489-3 (Applicable to non-bluetooth wireless keyboard mouse set).
- EN301 489-7
- EN301 489-17
- EN301 489-24
• Article3.2SpectrumUsages
- EN300 440-2 (Applicable to non-bluetooth wireless keyboard mouse set).
- EN300 328
- EN301 511
- EN301 893 (Applicable to 5GHz high performance RLAN).
- EN301 908-1
- EN301 908-2
Polybrominated Biphenyls (PBB’s)
Polybrominated Diphenyl Ethers (PBDE’s)
Cadmium
0.1%
0.1%
0.01%
Year to begin affixing CE marking 2010.
Easy Lai /Manager
Regulation Center, Acer Inc.
Apr. 30, 2010
Date
Page 56

1
Serie
Sólo para principiantes
1 2
3
2-2
2-1
Asegúrese de que la batería queda
bien fijada en su sitio, tal y como se
muestra en la figura 2-2.
4 5 6
3-2
3-1
Las ilustraciones son sólo una referencia. Las especificaciones reales del producto pueden ser diferentes.
Page 57

Guía rápida
2
Primero lo más importante
Le agradecemos que haya elegido el ordenador portátil de Acer para satisfacer sus necesidades de informática móvil.
Sus guías
Para ayudarle a utilizar su ordenador portátil de Acer, hemos diseñado un conjunto de guías*:
En primer lugar, la Guía Rápida le ayuda a empezar a configurar su ordenador.
Si desea más información sobre cómo puede su ordenador ayudarle a ser más productivo, consulte AcerSystem User Guide. Esta
guía contiene información detallada sobre temas como utilidades del sistema, recuperación de datos, opciones de ampliación y
solución de problemas. Además, contiene información sobre garantías y las normativas generales y advertencias de seguridad
para su ordenador portátil. Está disponible en PDF (Formato de Documento Portátil) y viene precargada en su ordenador
portátil.
Nota: Para ver los archivos debe tener Adobe Reader instalado en su ordenador. Si no tiene instalado Adobe Reader en
su ordenador, haga clic en AcerSystem User Guide para ejecutar en primer lugar el programa de instalación de Adobe
Reader. Siga las instrucciones en pantalla para completar la instalación. Para obtener instrucciones sobre cómo utilizar
Adobe Reader, acceda al menú de Soporte y Ayuda.
* AVISO IMPORTANTE: Tenga en cuenta que las guías mencionadas, en forma electrónica o impresa, sirven únicamente
de referencia y salvo que se especifique en la información de garantía específica que se incluye en AcerSystem User
Guide, nada de lo contenido en estas guías constituirá una representación o garantía de Acer en relación con el producto
adquirido. Acer rechaza expresamente cualquier responsabilidad por errores contenidos en las guías.
Page 58

3
Serie
Configuración de red
Esta guía le ayudará a configurar los ajustes de red inalámbrica y LAN para que pueda conectarse a Internet.
Configurar una conexión LAN
Basta con conectar el cable LAN al puerto de Ethernet (RJ-45). Consulte "Vista derecha" en la página 6 para la ubicación del
puerto Ethernet.
Configurar una conexión inalámbrica
1. Pulse <Fn> + <F3> para acceder al administrador de comunicación. Aquí puede activar la conexión Wi-Fi haciendo clic en el
botón rojo que hay junto a Wi-Fi.
Nota: También se puede acceder a 3G y Bluetooth a través del administrador de comunicación. Los dispositivos de
comunicación varían según el modelo.
2. Haga clic en el icono en la bandeja del sistema y seleccione el punto de acceso inalámbrico que desee conectar.
Insertar una tarjeta SIM 3G (sólo en determinados modelos)
Extraiga la batería e inserte con cuidado una tarjeta SIM 3G en la ranura para tarjeta SIM 3G. Consulte "Vista trasera & Vista de
la base" en la página 6 para ver dónde se encuentra la ranura para tarjeta SIM 3G.
Page 59

Guía rápida
4
Presentación de su Aspire One
Después de configurar su ordenador tal y como se indica en
la sección Sólo para principiantes, permítanos enseñarle su
nuevo ordenador portátil de Acer.
Vista superior
# Icono Elemento Descripción
1
2
3
4
5
6
7
8
9
10
11
12
1. Los indicadores del panel frontal son visibles aunque se cierre la tapa del ordenador.
Webcam Acer Crystal
Eye
Micrófono Micrófono interno para la grabación del sonido.
Visualización en
pantalla
Botón de encendido Enciende o apaga el ordenador.
Teclado Para introducir datos en su ordenador.
Indicador de
encendido
Indicador de batería1Proporciona información sobre el estado de la batería.
Indicador de
comunicación
Botones de clic
(izquierdo y derecho)
Teclado táctil Dispositivo apuntador táctil que funciona como
Soporte para las
palmas
Indicador de disco duro Indica si la unidad de disco duro está activa.
Bloq Núm Se enciende al activar el bloqueo del teclado numérico.
Bloq mayús Se enciende al activar el bloqueo de mayúsculas.
1
Cámara Web para comunicación de vídeo (la
configuración puede variar según el modelo).
También denominada pantalla de cristal líquido (LCD)
es el dispositivo de salida visual del ordenador (la
configuración puede variar según el modelo).
Proporciona información sobre el estado de
energía del ordenador.
1. Carga: La luz se vuelve ámbar cuando se carga
la batería.
2. Carga completa: La luz se vuelve azul en modo
de CA.
Indica el estado de la comunicación LAN
1
inalámbrica/3G.
Luz azul encendida Luz naranja
Función 3G activada/
WiFi activada
Función 3G activada/
WiFi desactivada
Los botones izquierdo y derecho funcionan como
los botones izquierdo y derecho del ratón.
un ratón de ordenador.
Área de soporte que permite reposar
cómodamente las palmas de las manos cuando se
utiliza el ordenador.
encendida
Función 3G
desactivada/
WiFi activada
Apagado
Función 3G
desactivada/
WiFi desactivada
Page 60

5
Serie
Vista frontal cerrada
# Icono Elemento Descripción
1
Indicadores de
estado
Diodos luminosos (LED) que
se encienden para mostrar
el estado de las funciones y
componentes del ordenador.
Vista izquierda
2
3
4
5
6
Puerto de
visualización externo
(VGA)
Conector de entrada
de DC
HDMI Puerto HDMI Compatible con conexiones de
Ranuras de
ventilación
Puerto USB 2.0 Permite conectar a dispositivos
Permite conectar a un dispositivo
de visualización (p.ej., monitor
externo, proyector de LCD).
Permite conectar a un adaptador
de CA.
vídeo digital de alta definición.
Permite que el ordenador
esté frío, incluso tras un uso
prolongado.
USB 2.0 (p.ej., ratón USB, cámara
USB).
Page 61

Guía rápida
6
Vista derecha
# Icono Elemento Descripción
10
11
7
8
9
Lector de tarjetas
multifunción
Conector de entrada
para micrófono
Conector de salida/
auriculares/altavoz
compatible con S/PDIF
Puerto USB 2.0 Permite conectar a dispositivos USB 2.0
Ranura de bloqueo
Kensington
Puerto Ethernet
(RJ-45)
Admite la tarjeta Secure Digital (SD),
MultiMedia (MMC), Memory Stick (MS),
Memory Stick PRO (MS PRO), xD-Picture
(xD).
Nota: Presionar para extraer/instalar
la tarjeta. Sólo puede funcionar una
tarjeta en un momento dado.
Permite la entrada de audio de
micrófonos externos.
Conexión para dispositivos de salida de
audio (p.ej., altavoces, auriculares, etc.).
(p.ej., ratón USB).
Permite conectar a un candado de
seguridad para ordenador compatible
con Kensington.
Permite conectar a una red basada en
Ethernet 10/100/1000.
Vista trasera & Vista de la base
12
13
14
15
16
Compartimiento de la
batería
Pestillo de liberación
de la batería
Compartimento del
disco duro
Compartimiento de
memoria
Ranuras de ventilación
y ventilador de
refrigeración
Bloqueo de la batería Permite que la batería quede trabada.
Aloja la batería del ordenador.
Libera la batería para poder sacarla.
Contiene el disco duro del ordenador
(fijado con tornillos).
Contiene la memoria principal de
ordenador.
Permite que el ordenador esté frío,
incluso tras un uso prolongado.
Nota: No tape ni obstruya la apertura
del ventilador.
Page 62

Serie
Medio ambiente
Temperatura:
Encendido: entre 5°C y 35°C
Apagado: entre -20°C y 65°C
Humedad (sin condensación):
Encendido: entre 20% y 80%
Apagado: entre 20% y 80%
7
Page 63

Série
Guia rápido
Page 64

Série
© 2010 Todos os Direitos Reservados
Guia rápido da Série Aspire One
Edição Original: 04/2010
Computador Portátil Série Aspire One
Número de modelo: ___________________________
Número de série: ______________________________
Data da aquisição: _____________________________
Local de aquisição: _____________________________
Page 65

Guia rápido
Federal Communications Commission
Declaration of Conformity
This device complies with Part 15 of the FCC Rules. Operation is subject to the following two conditions: (1) this device may not
cause harmful interference, and (2) this device must accept any interference received, including interference that may cause
undesired operation.
The following local Manufacturer / Importer is responsible for this declaration:
Product name: Notebook PC
Brand: Acer
Model number: MS2296
Machine type: AO 753 series
Name of Responsible Party: Acer America Corporation
Address of responsible party: 333 West San Carlos St., San Jose
CA 95110, U. S. A.
Contact person: Acer Representative
Phone No.: 1-254-298-4000
Fax No.: 1-254-298-4147
April 30, 2010
Page 66

Série
CE Declaration of Conformity
We,
Acer Incorporated
8F, 88, Sec. 1, Hsin Tai Wu Rd., Hsichih, Taipei Hsien 221, Taiwan
Contact Person: Mr. Easy Lai, e-mail:easy_lai@acer.com.tw
And,
Acer Europe SA
Via Cantonale, Centro Galleria 2 6928 Manno Switzerland
Hereby declare that:
Product: Notebook Computer
Trade Name: Acer
Model Number: MS2296
Machine Type: AO753 series
Is compliant with the essential requirements and other relevant provisions of the following EC directives, and that all the
necessary steps have been taken and are in force to assure that production units of the same product will continue comply with
the requirements.
EMC Directive 2004/108/EC as attested by conformity with the following harmonized standards:
• EN55022,AS/NZSCISPR22,ClassB
• EN55024
• EN61000-3-2ClassD
• EN61000-3-3
Low Voltage Directive 2006/95/EC as attested by conformity with the following harmonized standard:
• EN60950-1
Council Decision 98/482/EC (CTR21):
(Applicable to product with pan- European single terminal connection to the Public Switched Telephone Network (PSTN).)
RoHS Directive 2002/95/EC on the Restriction of the Use of certain Hazardous Substances in Electrical and Electronic Equipment
Page 67

Guia rápido
• Themaximumconcentrationvaluesoftherestrictedsubstancesbyweightinhomogenousmaterialare:
Lead
Mercury
Hexavalent Chromium
0.1%
0.1%
0.1%
Directive 2009/125/EC with regard to establishing a framework for the setting of ecodesign requirements for energy-related
product.
R&TTE Directive 1999/5/EC as attested by conformity with the following harmonized standard:
• Article3.1(a)HealthandSafety
- EN60950-1
- EN62311
• Article3.1(b)EMC
- EN301 489-1
- EN301 489-3 (Applicable to non-bluetooth wireless keyboard mouse set).
- EN301 489-7
- EN301 489-17
- EN301 489-24
• Article3.2SpectrumUsages
- EN300 440-2 (Applicable to non-bluetooth wireless keyboard mouse set).
- EN300 328
- EN301 511
- EN301 893 (Applicable to 5GHz high performance RLAN).
- EN301 908-1
- EN301 908-2
Polybrominated Biphenyls (PBB’s)
Polybrominated Diphenyl Ethers (PBDE’s)
Cadmium
0.1%
0.1%
0.01%
Year to begin affixing CE marking 2010.
Easy Lai /Manager
Regulation Center, Acer Inc.
Apr. 30, 2010
Date
Page 68

1
Série
Para começar
1 2
3
2-2
2-1
Certifique-se de que a bateria
está fixa no respectivo lugar, tal
como indicado em 2-2.
4 5 6
3-2
3-1
As ilustrações são apenas uma referência. As especificações reais do produto podem variar.
Page 69

Guia rápido
2
Primeiro que tudo
Gostaríamos de lhe agradecer por ter escolhido um computador portátil Acer para preencher as suas necessidades de
computador móvel.
Os seus manuais
Para o ajudar a usar o seu computador portátil Acer, preparámos uma série de manuais*:
Antes de mais, o Guia Rápido ajuda-o a ligar e configurar o seu computador.
Para mais detalhes sobre como o seu computador o pode ajudar a ser mais produtivo, consulte o AcerSystem User Guide
(Manual do Utilizador AcerSystem). Esse manual contém informações pormenorizadas sobre temas como utilitários do
sistema, recuperação de dados, opções de expansão e solução de problemas. Além disso, contém a informação da garantia
e as regulamentações gerais e notas de segurança para o seu computador portátil. Está disponível no formato PDF (Portable
Document Format) e vem já instalado no seu computador.
Nota: É necessário o Adobe Reader para visualizar o ficheiro. Se o Adobe Reader não estiver instalado no seu computador,
ao clicar em AcerSystem User Guide é executado o programa de instalação do Acrobat Reader. Siga as instruções do ecrã
para finalizar a instalação. Para obter instruções sobre como utilizar o Adobe Reader, vá ao menu Ajuda e Suporte.
* AVISO IMPORTANTE: Os guias aqui mencionados, seja em formato impresso ou electrónico, são apenas de natureza
informativa e, exceptuando quando referido nas informações de garantia específicas, incluídas no AcerSystem User
Guide, nada do que consta destes guias constitui uma representação ou garantia da Acer relativamente ao produto que
adquiriu. A Acer declina expressamente qualquer responsabilidade por erros contidos nos guias.
Page 70

3
Série
Configuração de rede
Este guia ajudá-lo(a)-á a configurar as definições da sua LAN e rede sem fios para que possa ligar-se à Internet.
Configurar uma ligação LAN
Basta ligar o cabo LAN ao porto Ethernet (RJ-45). Consulte "Vista direita" na página 6 para saber a localização do porto
Ethernet.
Configurar uma ligação sem fios
1. Prima <Fn> + <F3> para aceder ao gestor de comunicação. Aqui poderá activar a ligação WI-Fi clicando no botão vermelho
junto de Wi-Fi.
Nota: Também pode aceder a 3G e Bluetooth através do gestor de comunicação. Os dispositivos de comunicação variam
consoante o modelo.
2. Clique no ícone no seu tabuleiro de sistema e escolha o ponto de acesso sem fios ao qual se deseja ligar.
Inserir um cartão SIM 3G (apenas em certos modelos)
Retire a bateria e insira com cuidado o cartão SIM 3G na respectiva ranhura. Consulte “Vista traseira & Vista da base” na página
6 quanto à localização da ranhura para o cartão SIM 3G.
Page 71

Guia rápido
4
Visita guiada ao seu Aspire One
Depois de configurar o seu computador como ilustrado na
secção Para começar, deixe-nos dar-lhe a conhecer o seu
novo portátil Acer.
Vista de cima
# Ícone Item Descrição
1
2
3
4
5
6
7
8
9
10
11
12
1. Os indicadores no painel dianteiro são visíveis mesmo com a tampa do monitor fechada.
Webcam Acer
Crystal Eye
Microfone Microfone interno para gravação de som.
Ecrã Também chamado ecrã de cristais líquidos
Botão de alimentação Liga e desliga o computador.
Teclado Para introduzir informações no seu computador.
Indicador de
alimentação
Indicador da bateria1Indica o estado da bateria do computador.
Indicador de
comunicação
Botões de clique
(esquerdo e direito)
Teclado táctil Dispositivo apontador sensível ao toque, que
Descanso de mãos Área confortável de apoio para as suas mãos
Indicador HDD Indica quando o disco rígido está activo.
Num Lock Acende-se quando a função Num Lock é activada.
Caps Lock Acende-se quando a função Caps Lock é activada.
1
Webcam para comunicação por vídeo
(a configuração pode variar consoante o
modelo).
(LCD), permite visualizar a informação do
computador (a configuração pode variar
consoante o modelo).
Indica o estado da alimentação do
computador.
1. A carregar: A luz é âmbar quando a bateria
está a carregar.
2. Carga completa: A luz é azul no modo CA.
Indica o estado de comunicação Sem Fios LAN/3G.
1
Luz azul ligada Luz laranja ligada Sem luz
3G ligado/
WiFi ligado
3G ligado/
WiFi desligado
Os botões esquerdo e direito funcionam como
os botões esquerdo e direito de um rato.
funciona como um rato de computador.
enquanto utiliza o computador.
3G desligado/
WiFi ligado
3G desligado/
WiFi desligado
Page 72

5
Série
Vista frontal, fechado
# Ícone Item Descrição
1
Indicadores de
estado
Díodos Emissores de Luz (LED) que
se acendem para mostrar o estado
das funções e componentes do
computador.
Vista esquerda
2
3
4
5
6
Ligação a ecrã
externo (VGA)
Tomada de entrada CCLiga a um adaptador CA.
HDMI Porta HDMI Suporta ligações de vídeo digital
Ranhuras de
ventilação
Entrada USB 2.0 Liga a dispositivos USB 2.0 (por ex.
Liga a um dispositivo de
visualização (por exemplo, monitor
externo, projector LCD).
de alta definição.
Permite ao computador manter-
se fresco, mesmo após uso
prolongado.
rato USB, câmara USB).
Page 73

Guia rápido
6
Vista direita
# Ícone Item Descrição
10
11
7
8
9
Leitor de cartões váriosem-um
Conector de entrada do
microfone
Tomada de auscultador/
altifalante/saída
compativel com S/PDIF
Entrada USB 2.0 Liga a dispositivos USB 2.0 (por ex. rato
Ranhura de bloqueio
Kensington
Entrada Ethernet
(RJ-45)
Aceita cartõesSecure Digital (SD),
MultiMediaCard (MMC), Memory Stick
(MS), Memory Stick PRO (MS PRO),
xD-Picture Card (xD).
Nota: Empurre para remover/instalar o
cartão. Apenas pode ser utilizado um
cartão de cada vez.
Aceita entradas de microfones externos.
Liga a dispositivos de saída de áudio
(por exemplo, altifalantes, auscultadores).
USB).
Liga a um cadeado de segurança
Kensington (ou compatível).
Liga a uma rede Ethernet de base
10/100/1000.
Vista traseira & Vista da base
12
13
14
15
16
Baía da bateria Contém a bateria do computador.
Patilha de libertação da
bateria
Compartimento do
disco rígido
Compartimento da
memória
Ranhuras de ventilação
e ventoinha de
arrefecimento
Bloqueio da bateria Bloqueia a bateria, mantendo-a no sítio.
Liberta a bateria para remoção.
Aloja o disco rígido do computador (seguro
por parafusos).
Aloja a memória principal do computador.
Permite ao computador manter-se fresco,
mesmo após uso prolongado.
Nota: Não tape nem obstrua a abertura da
ventoinha.
Page 74

Série
Ambiente
Temperatura:
Funcionamento: 5°C a 35°C
Não em funcionamento: -20°C a 65°C
Humidade (não condensação):
Funcionamento: 20% a 80%
Não em funcionamento: 20% a 80%
7
Page 75

Snelgids
Serie
Page 76

Serie
© 2010 Alle rechten voorbehouden
Snelgids voor de Aspire One Serie
Oorspronkelijke uitgave: 04/2010
Aspire One Serie Notebook PC
Modelnummer: ________________________________
Serienummer: _________________________________
Aankoopdatum: _______________________________
Plaats van aankoop: ___________________________
Page 77

Snelgids
Federal Communications Commission
Declaration of Conformity
This device complies with Part 15 of the FCC Rules. Operation is subject to the following two conditions: (1) this device may not
cause harmful interference, and (2) this device must accept any interference received, including interference that may cause
undesired operation.
The following local Manufacturer / Importer is responsible for this declaration:
Product name: Notebook PC
Brand: Acer
Model number: MS2296
Machine type: AO 753 series
Name of Responsible Party: Acer America Corporation
Address of responsible party: 333 West San Carlos St., San Jose
CA 95110, U. S. A.
Contact person: Acer Representative
Phone No.: 1-254-298-4000
Fax No.: 1-254-298-4147
April 30, 2010
Page 78

Serie
CE Declaration of Conformity
We,
Acer Incorporated
8F, 88, Sec. 1, Hsin Tai Wu Rd., Hsichih, Taipei Hsien 221, Taiwan
Contact Person: Mr. Easy Lai, e-mail:easy_lai@acer.com.tw
And,
Acer Europe SA
Via Cantonale, Centro Galleria 2 6928 Manno Switzerland
Hereby declare that:
Product: Notebook Computer
Trade Name: Acer
Model Number: MS2296
Machine Type: AO753 series
Is compliant with the essential requirements and other relevant provisions of the following EC directives, and that all the
necessary steps have been taken and are in force to assure that production units of the same product will continue comply with
the requirements.
EMC Directive 2004/108/EC as attested by conformity with the following harmonized standards:
• EN55022,AS/NZSCISPR22,ClassB
• EN55024
• EN61000-3-2ClassD
• EN61000-3-3
Low Voltage Directive 2006/95/EC as attested by conformity with the following harmonized standard:
• EN60950-1
Council Decision 98/482/EC (CTR21):
(Applicable to product with pan- European single terminal connection to the Public Switched Telephone Network (PSTN).)
RoHS Directive 2002/95/EC on the Restriction of the Use of certain Hazardous Substances in Electrical and Electronic Equipment
Page 79

Snelgids
• Themaximumconcentrationvaluesoftherestrictedsubstancesbyweightinhomogenousmaterialare:
Lead
Mercury
Hexavalent Chromium
0.1%
0.1%
0.1%
Directive 2009/125/EC with regard to establishing a framework for the setting of ecodesign requirements for energy-related
product.
R&TTE Directive 1999/5/EC as attested by conformity with the following harmonized standard:
• Article3.1(a)HealthandSafety
- EN60950-1
- EN62311
• Article3.1(b)EMC
- EN301 489-1
- EN301 489-3 (Applicable to non-bluetooth wireless keyboard mouse set).
- EN301 489-7
- EN301 489-17
- EN301 489-24
• Article3.2SpectrumUsages
- EN300 440-2 (Applicable to non-bluetooth wireless keyboard mouse set).
- EN300 328
- EN301 511
- EN301 893 (Applicable to 5GHz high performance RLAN).
- EN301 908-1
- EN301 908-2
Polybrominated Biphenyls (PBB’s)
Polybrominated Diphenyl Ethers (PBDE’s)
Cadmium
0.1%
0.1%
0.01%
Year to begin affixing CE marking 2010.
Easy Lai /Manager
Regulation Center, Acer Inc.
Apr. 30, 2010
Date
Page 80

1
Serie
Aan de slag
1 2
3
2-2
2-1
Zorgdatdeaccucorrectis
geplaatst, zoals is aangegeven
in 2-2.
4 5 6
3-2
3-1
Illustraties zijn alleen ter verwijzing. Daadwerkelijke productspecificaties kunnen afwijken.
Page 81

Snelgids
2
Om te beginnen
Bedankt dat u hebt gekozen voor een notebook van Acer als oplossing voor uw mobiele computereisen.
Uw gidsen
Om u te helpen met het werken op het Acer notebook hebben we een aantal gidsen ontworpen*:
Allereerst helpt de Snelgids u bij het instellen van uw computer.
Als u meer wilt weten over hoe uw computer u kan helpen productiever te werken, raadpleeg dan de AcerSystem User Guide.
Deze Gebruikershandleiding bevat gedetailleerde informatie over onderwerpen zoals systeemfuncties, gegevensherstel,
uitbreidingsopties en probleem oplossen. Daarnaast bevat het informatie over garantie en de algemene voorwaarden en
veiligheid voor uw notebook. Het is als Portable Document Format (PDF) beschikbaar en is al van te voren op uw notebook
gezet.
Opmerking: Als u het bestand wilt inzien, dient Adobe Reader te zijn geïnstalleerd. Als Adobe Reader nog niet op uw
computer is geïnstalleerd, wordt, als u op AcerSystem User Guide klikt, eerst het installatieprogramma van Adobe Reader
gestart. Volg de instructies op het scherm om het programma te installeren. Gebruiksaanwijzingen bij Adobe Reader
vindt u in het menu Help en Ondersteuning.
* BELANGRIJKE MEDEDELING: Neem voor kennisgeving aan dat de hier genoemde gidsen, hetzij gedrukt of in
elektronische vorm, slechts ter naslag dienen en dat niets in deze gidsen een vertegenwoordiging of garantie van de
kant van Acer impliceert met betrekking tot het door u gekochte product, met uitzondering van de specifieke garantieinformatie in de AcerSystem User Guide. Acer wijst uitdrukkelijke elke aansprakelijkheid af voor fouten in de gidsen.
Page 82
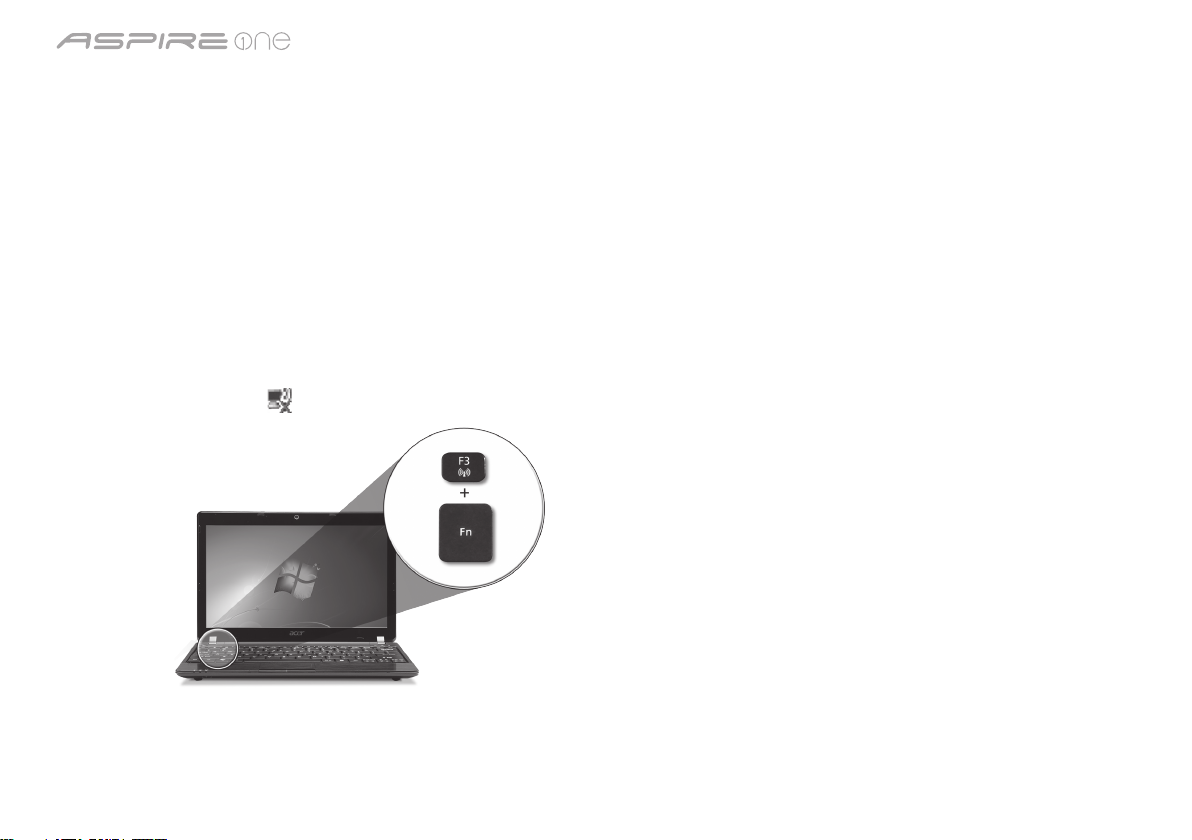
3
Serie
Netwerkconfiguratie
Deze handleiding helpt u bij het configureren van de instellingen voor LAN en draadloos netwerk zodat u verbinding met
internet kunt maken.
Lan-verbinding instellen
Steekgewoondelan-kabelindeethernetpoort(RJ-45).Zie"Rechterkant" op pagina 6 voor de plek van de ethernet-poort.
Een draadloze verbinding instellen
1. Druk op <Fn> + <F3> om communicatiebeheer te openen. Hier kunt u de Wi-Fi-verbinding inschakelen door op de rode knop
naast Wi-Fi te drukken.
Opmerking: Via communicatiebeheer zijn ook 3g en Bluetooth toegankelijk. Communicatieapparaten kunnen verschillen per
model.
2. Klik op het pictogram in het systeemvak en kies het draadloos toegangspunt waarmee u verbinding wilt maken.
Een 3G-simkaart plaatsen (alleen voor bepaalde modellen)
Verwijderdebatterijenplaatsvoorzichtigeen3g-sim-kaartinde3g-sim-kaartsleuf.Zie"Achterkant & Onderkant" op pagina 6
voor de plek van de 3g-sim-kaartsleuf.
Page 83
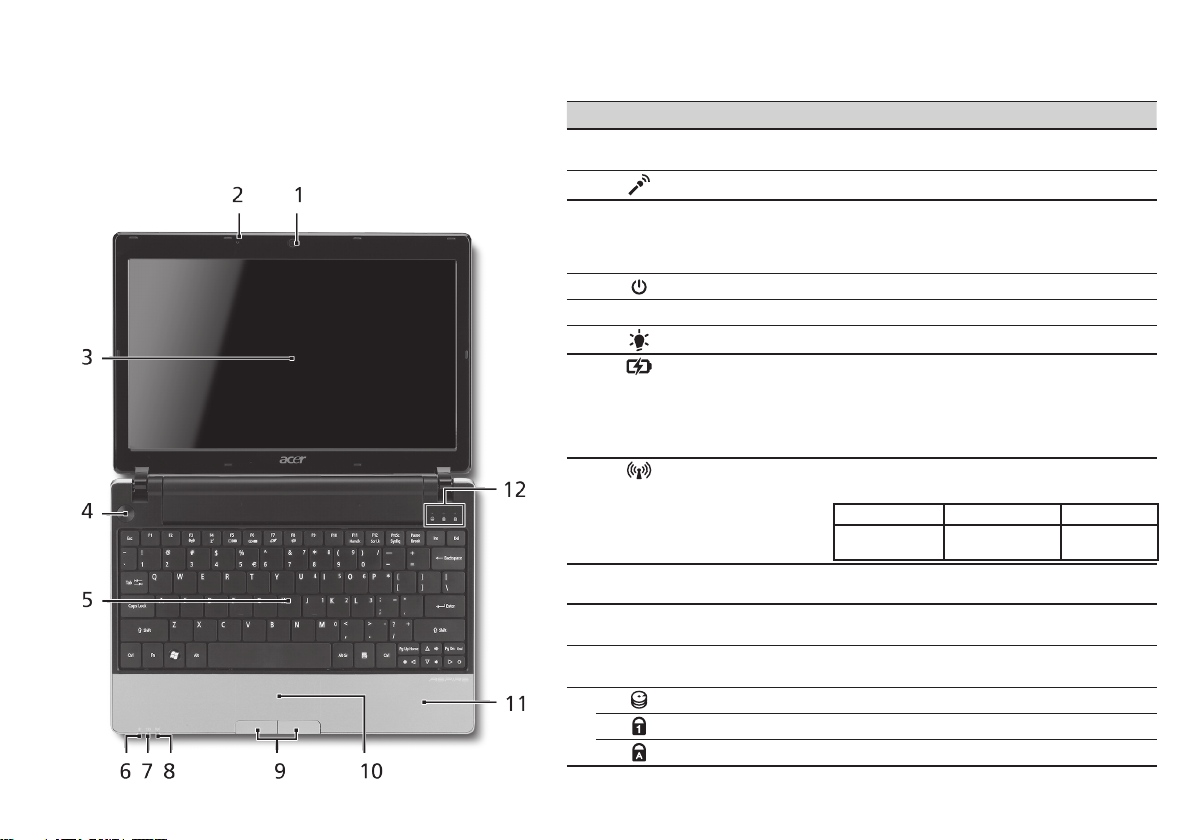
Snelgids
4
Rondleiding door de Aspire One
Na het instellen van de computer zoals aangegeven in het
onderdeel Aan de slag, bent u nu klaar voor een rondleiding
door het nieuwe Acer notebook.
Bovenkant
# Pictogram Item Beschrijving
1
2
3
4
5
6
7
8
9
10
11
12
1. De statusindicatoren aan de voorkant zijn zelfs zichtbaar als het scherm gesloten is.
Acer Crystal Eye
webcam
Microfoon Interne microfoon voor geluidsopname.
Beeldscherm Ook wel Liquid-Crystal Display (LCD)
Aan/uit knop Schakelt de computer aan en uit.
Toetsenbord Om gegevens in te voeren in de computer.
Stroomindicator1Geeft de vermogenstatus van de computer aan.
Accu-indicator
Communicatieindicator
Kliktoetsen (links
en rechts)
Touchpad Tastgevoelig aanwijsapparaat dat
Polssteun Comfortabele ondersteuning voor uw
HDD-indicator Licht op wanneer de harde schijf actief is.
Num Lock Brandt wanneer het Num Lock is ingeschakeld.
Caps Lock Brandt wanneer het Caps Lock is ingeschakeld.
1
Webcam voor videocommunicatie
(configuratie kan per model verschillen).
genoemd, geeft de output van de
computer weer (configuratie kan per
model verschillen).
1
Geeft de batterijstatus van de computer
aan.
1. Opladen: Het licht is oranje wanneer de
accu wordt opgeladen.
2. Volledig opgeladen: Het licht is blauw
in de AC-modus.
Geeft de status van draadloze lan/3gcommunicatie aan.
Blauw lampje aan Oranje lampje aan Brandt niet
3G aan/WiFi aan
3G aan/WiFi uit
De toetsen links en rechts functioneren als
de linker en rechter muistoetsen.
functioneert als een computermuis.
handen wanneer u de computer gebruikt.
3G uit/WiFi aan 3G uit/WiFi uit
Page 84
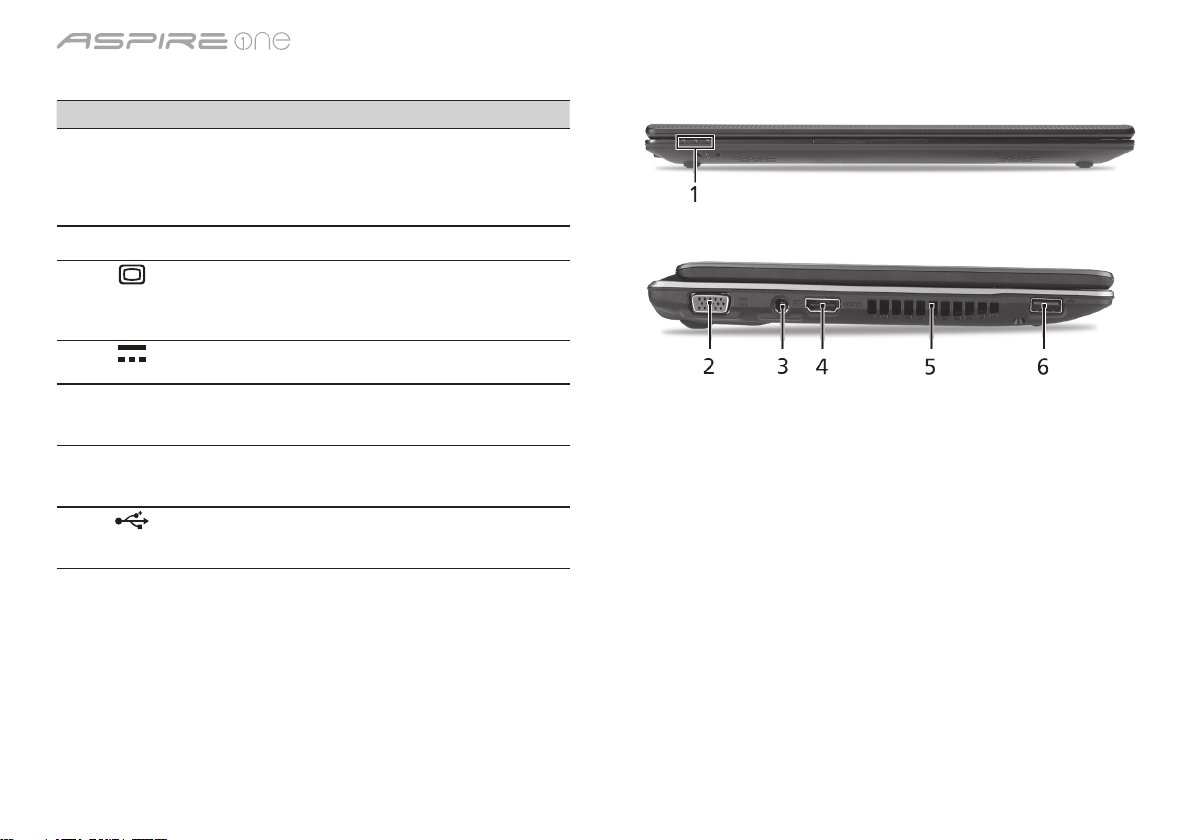
5
Serie
Voorkant gesloten
# Pictogram Item Beschrijving
1
Statusindicatoren Light-Emitting Diodes
(leds) die oplichten om
de status van functies
en componenten van de
computer aan te geven.
Linkerkant
2
3
Hdmi Hdmi-poort Ondersteunt high-
4
5
6
Externe weergavepoort
(VGA)
Gelijkstroomaansluiting Aansluiting voor een
Ventilatie-sleuven Zorgendatdecomputer
Usb 2.0-poort Aansluiting voor usb
Aansluiting voor een
beeldscherm (bijv. een
externe monitor, LCDprojector).
adapter.
definition digitale
videosignalen.
koel blijft, zelfs na
langdurig gebruik.
2.0-apparaten (bijv. usbmuis, usb-camera).
Page 85

Snelgids
6
Rechterkant
# Pictogram Item Beschrijving
10
11
7
8
9
Meer-in-éénkaartlezer
Aansluiting voor
Microfoon-in
S/PDIF-ondersteuning
voor hoofdtelefoon/
luidspreker/lijn-uit
Usb 2.0-poort Aansluiting voor usb 2.0-apparaten
Sleuf voor Kensingtonslot
Ethernetpoort (RJ-45) Aansluiting voor een op Ethernet
Accepteert Secure Digital (SD),
MultiMediaCard (MMC), Memory Stick
(MS), Memory Stick PRO (MS PRO) en
xD-Picture Card (xD).
Opmerking: Duwen om de kaart te
verwijderen/plaatsen. Er kan één kaart
tegelijk worden gebruikt.
Aansluitingen voor externe microfoon.
Aansluiting voor lijn-uit
audioapparaten (bijv. luidsprekers,
hoofdtelefoon).
(bijv. usb-muis).
Aansluiting voor een Kensingtoncompatibel computerbeveiligingsslot.
10/100/1000-gebaseerd netwerk.
Achterkant & Onderkant
12
13
14
15
16
Batterijnis Bevat de batterij van de computer.
Batterijvergrendeling Maakt de batterij los.
Harde schijf nis Bevat de harde schijf van de computer
Geheugenvak Bevat het hoofdgeheugen van de
Ventilatiesleuven en
koelventilator
Batterijgrendel Vergrendelt de accu op z’n plaats.
(vastgeschroefd).
computer.
Zorgendatdecomputerkoelblijft,
zelfs na langdurig gebruik.
Opmerking: Dek de opening van de
ventilator nooit af.
Page 86

Serie
Omgeving
Temperatuur:
In gebruik: 5°C tot 35°C
Niet in gebruik: -20°C tot 65°C
Vochtigheidsgraad (geen condensvorming):
In gebruik: 20% tot 80%
Niet in gebruik: 20% tot 80%
7
Page 87

Hurtigguide
-serien
Page 88

-serien
© 2010 Med enerett
Hurtigguide for Aspire One-serien
Opprinnelig utgave: 04/2010
Notebook-PC i Aspire One-serien
Modellnummer: _______________________________
Serienummer: _________________________________
Innkjøpsdato: _________________________________
Innkjøpssted: __________________________________
Page 89

Hurtigguide
Federal Communications Commission
Declaration of Conformity
This device complies with Part 15 of the FCC Rules. Operation is subject to the following two conditions: (1) this device may not
cause harmful interference, and (2) this device must accept any interference received, including interference that may cause
undesired operation.
The following local Manufacturer / Importer is responsible for this declaration:
Product name: Notebook PC
Brand: Acer
Model number: MS2296
Machine type: AO 753 series
Name of Responsible Party: Acer America Corporation
Address of responsible party: 333 West San Carlos St., San Jose
CA 95110, U. S. A.
Contact person: Acer Representative
Phone No.: 1-254-298-4000
Fax No.: 1-254-298-4147
April 30, 2010
Page 90

-serien
CE Declaration of Conformity
We,
Acer Incorporated
8F, 88, Sec. 1, Hsin Tai Wu Rd., Hsichih, Taipei Hsien 221, Taiwan
Contact Person: Mr. Easy Lai, e-mail:easy_lai@acer.com.tw
And,
Acer Europe SA
Via Cantonale, Centro Galleria 2 6928 Manno Switzerland
Hereby declare that:
Product: Notebook Computer
Trade Name: Acer
Model Number: MS2296
Machine Type: AO753 series
Is compliant with the essential requirements and other relevant provisions of the following EC directives, and that all the
necessary steps have been taken and are in force to assure that production units of the same product will continue comply with
the requirements.
EMC Directive 2004/108/EC as attested by conformity with the following harmonized standards:
• EN55022,AS/NZSCISPR22,ClassB
• EN55024
• EN61000-3-2ClassD
• EN61000-3-3
Low Voltage Directive 2006/95/EC as attested by conformity with the following harmonized standard:
• EN60950-1
Council Decision 98/482/EC (CTR21):
(Applicable to product with pan- European single terminal connection to the Public Switched Telephone Network (PSTN).)
RoHS Directive 2002/95/EC on the Restriction of the Use of certain Hazardous Substances in Electrical and Electronic Equipment
Page 91

Hurtigguide
• Themaximumconcentrationvaluesoftherestrictedsubstancesbyweightinhomogenousmaterialare:
Lead
Mercury
Hexavalent Chromium
0.1%
0.1%
0.1%
Directive 2009/125/EC with regard to establishing a framework for the setting of ecodesign requirements for energy-related
product.
R&TTE Directive 1999/5/EC as attested by conformity with the following harmonized standard:
• Article3.1(a)HealthandSafety
- EN60950-1
- EN62311
• Article3.1(b)EMC
- EN301 489-1
- EN301 489-3 (Applicable to non-bluetooth wireless keyboard mouse set).
- EN301 489-7
- EN301 489-17
- EN301 489-24
• Article3.2SpectrumUsages
- EN300 440-2 (Applicable to non-bluetooth wireless keyboard mouse set).
- EN300 328
- EN301 511
- EN301 893 (Applicable to 5GHz high performance RLAN).
- EN301 908-1
- EN301 908-2
Polybrominated Biphenyls (PBB’s)
Polybrominated Diphenyl Ethers (PBDE’s)
Cadmium
0.1%
0.1%
0.01%
Year to begin affixing CE marking 2010.
Easy Lai /Manager
Regulation Center, Acer Inc.
Apr. 30, 2010
Date
Page 92

1
-serien
Før vi begynner
1 2
3
2-2
2-1
Kontroller at batteriet er
låst på plass som vist i 2-2.
4 5 6
3-2
3-1
Bildene er kun til illustrasjon. De faktiske produkt spesifikasjonene kan variere.
Page 93

Hurtigguide
2
Begynne med begynnelsen
Vi vil gjerne takke deg for at du har valgt en Acer-notebook til dine mobile databehandlingsbehov.
Dine veiledere
Som hjelp til bruk av Acer-notebooken har vi utarbeidet et sett av guider*:
Den første er hurtigguiden, som hjelper deg i gang med oppsettet av datamaskinen.
Hvis du vil vite mer om hvordan datamaskinen kan hjelpe deg med å bli mer produktiv, vennligst slå opp i AcerSystem User
Guide. Denne guiden innholder detaljert informasjon om emner som systemverktøy, datagjenvinning, utbyggingsalternativer
og feilsøking/problemløsing. I tillegg finner du garantiopplysninger, generell informasjon og sikkerhetsmerknader for
notisbokmaskinen din. Boken er tilgjengelig som PDF-fil (Portable Document Format) og leveres forhåndslastet på maskinen.
Merk: Visning av filen krever Adobe Reader. Hvis Adobe Reader ikke er installert på datamaskinen, vil klikking på
AcerSystem User Guide føre til at installeringsprogrammet for Adobe Reader kjøres først. Følg instruksjonene på skjermen
for å fullføre installeringen. Hvis du vil ha instruksjoner i bruk av Adobe Reader, se menyen Hjelp og støtte.
* VIKTIG MERKNAD: Vennligst merk at guidene som nevnes her, enten de er i trykt eller elektronisk form, er beregnet
på dine referanseformål. Med unntak av det som er nevnt i den bestemte garantiinformasjonen i AcerSystem User
Guide, er det ingenting i disse guidene som utgjør en påstand eller en garanti fra Acer om produktet du har kjøpt. Acer
fraskriver seg uttrykkelig ethvert ansvar for feil som måtte forekomme i disse guidene og håndbøkene.
Page 94

3
-serien
Nettverkskonfigurasjon
Denne guiden vil hjelpe deg med å konfigurere innstillinger for LAN og trådløst nettverk slik at du kan koble deg til Internett.
Sette opp en LAN-tilkobling
Plugg inn LAN-kabelen i Ethernet-porten (RJ-45). Se "Høyre visning" på side 6 hvis du vil finne Ethernet-portens plassering.
Sette opp en trådløs tilkobling
1. Trykk på <Fn> + <F3> for å få tilgang til kommunikasjonsstyring. Her kan du slå på Wi-Fi-tilkoblingen ved å klikke på den
røde knappen ved siden av Wi-Fi.
Merk: 3G og Bluetooth er også tilgjengelige gjennom kommunikasjonsstyring. Kommunikasjonsenheter kan variere avhengig
av modell.
2. Klikk på ikonet i systemskuffen, og velg det trådløse tilgangspunktet du vil koble deg til.
Sette inn et 3G SIM-kort (bare for visse modeller)
Fjern batteriet og sett forsiktig inn et 3G SIM-kort i 3G SIM-kortsporet. Under "Bakre visning & Bunnvisning" på side 6 kan du se
3G SIM-kortsporets plassering.
Page 95

Hurtigguide
4
Din Aspire One-omvisning
Etter at du har satt opp datamaskinen som illustrert i
avsnittet Før vi begynner, vil vi nå gjerne vise deg den nye
Acer-notebooken.
Visning ovenfra
# Ikon Element Beskrivelse
1
2
3
4
5
6
7
8
9
10
11
12
1. Frontpanelindikatorene er synlige selv når datamaskindekselet er lukket.
Acer Crystal
Eye-webkamera
Mikrofon Intern mikrofon for lydinnspilling.
Skjerm Kalles også LCD-skjerm (Liquid-Crystal
Av/på-knapp Slår datamaskinen av og på.
Tastatur Legger inn data i datamaskinen.
Strømindikator1Angir datamaskinens strømstatus.
Batteriindikator1Angir datamaskinens batteristatus.
Kommunikasjonsindikator
Klikkeknapper
(venstre og høyre)
Pekeplate Pekeenhet som reagerer på berøring og
Håndleddshviler Komfortabelt støtteområde for hendene når
Harddiskindikator Lyser når harddisken er aktiv.
Num Lock Lyser når Num Lock er aktivert.
Caps Lock Lyser når Caps Lock er aktivert.
1
Webkamera til videokommunikasjon
(konfigurasjonen kan variere mellom
modellene).
Display; LCD), viser utdata fra datamaskinen
(konfigurasjonen kan variere mellom
modellene).
1. Lading: Lampen lyser gult når batteriet
lades.
2. Helt oppladet: Lampen lyser blått i
nettstrømmodus.
Angir statusen for trådløs LAN/3Gkommunikasjon.
Blått lys på Oransjelys på Ikke tent
3G på/WiFi på
3G på/WiFi av
Venstre og høyre knapp fungere på samme
måte som venstre og høyre museknapp.
fungerer som en mus.
du bruker datamaskinen.
3G av/WiFi på 3G av/WiFi av
Page 96

5
-serien
Lukket frontvisning
# Ikon Element Beskrivelse
1
Statusindikatorer Lamper (LED) som tennes for å
vise statusen for datamaskinens
funksjoner og komponenter.
Venstre visning
2
3
4
5
6
Port for ekstern skjerm
(VGA)
Strømtilkobling Kobler til en batterieliminator.
HDMI HDMI-port Støtter høydefinisjons digitale
Ventilasjonsåpninger Gir datamaskinen mulighet til å
USB 2.0-port Kobler til USB 2.0-enheter
Kobler til en skjermenhet (f.eks.
ekstern skjerm, LCD-projektor).
videoforbindelser.
holde seg kjølig, selv etter lang
tids bruk.
(f.eks. USB-mus, USB-kamera).
Page 97

Hurtigguide
6
Høyre visning
# Ikon Element Beskrivelse
7
8
9
10
11
Multi-i-1-kortleser Godtar Secure Digital (SD),
Mikrofonplugg Mottar inndata fra eksterne mikrofoner.
Hodetelefon/
høyttaler/line-out-port
med S/PDIF-støtte
USB 2.0-port Kobler til USB 2.0-enheter (f.eks. USB-
Spor for Kensingtonlås
Ethernet-port (RJ-45) Kobler til et Ethernet 10/100/1000-basert
MultiMediaCard (MMC), Memory Stick
(MS), Memory Stick Pro (MS PRO), og
xD-Picture Card (xD).
Merk: Skyv inn for å fjerne/installere
kortet. Bare ett kort kan være i bruk til
enhver tid.
Kobler til utdataenheter for lyd (f.eks.
høyttalere, hodetelefon).
mus).
Kobler til en Kensington-kompatibel
sikkerhetslås for datamaskinen.
nettverk.
Bakre visning & Bunnvisning
12
13
14
15
16
Batterirom Huser datamaskinens batterier.
Batterifrigivelsesbolt Frigir batteriet for fjerning.
Harddiskplass Huser datamaskinens harddisk (sikret med
Minnerom Huser datamaskinens hovedminne.
Ventilasjonsåpninger
og kjølevifte
Batterilås Låser batteriet på plass.
skruer).
Gir datamaskinen mulighet til å holde seg
kjølig, selv etter lang tids bruk.
Merk: Ikke dekk til eller blokker viftens
åpning.
Page 98

-serien
Miljø
Temperatur:
Drift: 5°C til 35°C
Ikke i bruk: -20°C til 65°C
Luftfuktighet (ikke-kondenserende):
Drift: 20% til 80%
Ikke i bruk: 20% til 80%
7
Page 99

Hurtig-guide
Seriens
Page 100

Seriens
© 2010 Alle rettigheder forbeholdes
Aspire One Seriens Hurtig-guide
Oprindeligt udgivet: 04/2010
Aspire One seriens notebook-pc
Modelnummer: ________________________________
Serienummer: _________________________________
Købsdato: _____________________________________
Købt hos: _____________________________________
 Loading...