

Acer AL1515 User Manual

Table of Contents
English
Preface............................................................................................................................... 2
FCC Statement Warning ....................................................................................................................... 2
Canadian DOC Notice .......................................................................................................................... 2
Important Safety Instructions ................................................................................................................ 3
Chapter 1 Installation ....................................................................................................... 4
Unpacking............................................................................................................................................. 4
Connecting the LCD Monitor and Base ................................................................................................ 4
Viewing Angle Adjustment................................................................................................................... 4
Detaching LCD Monitor from Its Stand................................................................................................ 5
Interface for Arm Applications............................................................................................................. 5
Connecting the Display......................................................................................................................... 5
Connecting the AC Power ..................................................................................................................... 5
Connecting the Audio Cable (For AL1515 m and AL1515 bm) ........................................................... 6
Power Management System.................................................................................................................. 6
Chapter 2 Display Controls............................................................................................... 7
General Instructions .............................................................................................................................. 7
Front Panel Control............................................................................................................................... 8
How To Adjust A Setting...................................................................................................................... 9
Adjusting The Picture ........................................................................................................................... 9
Chapter 3 Technical Information................................................................................... 11
Specifications...................................................................................................................................... 11
Standard Timing Table........................................................................................................................ 13
Troubleshooting.................................................................................................................................. 15
1

Preface
This manual is designed to assist users in setting up and using the LCD Monitor. Information in this
document has been carefully checked for accuracy; however, no guarantee is given to the correctness of
the contents. The information in this document is subject to change without notice. This document
contains proprietary information protected by copyright. All rights are reserved. No part of this manual
may be reproduced by any mechanical, electronic or other means, in any form, without prior written
permission of the manufacturer.
FCC Statement Warning
This equipment has been tested and found to comply with the limits for a Class B digital device,
pursuant to Part 15 of the FCC Rules. These limits are designed to provide reasonable protection
against harmful interference in a residential installation. This equipment generates, uses, and can
radiate radio frequency energy, and if not installed and used in accordance with the instruction, may
cause harmful interference to radio communications. However, there is no guarantee that interference
will not occur in a particular installation. If this equipment does cause harmful interference to radio or
television reception, which can be determined by turning the equipment off and on, the user is
encouraged to try to correct the interference by one or more of the following measures:
• Reposition or relocate the receiving antenna.
• Increase the separation between the equipment and the receiver.
• Connect the equipment into an outlet on a circuit different from that to which the receiver is
connected.
• Consult the dealer or an experienced monitor technician for help.
Warning
Use only shielded signal cables to connect I/O devices to this equipment. You are cautioned that
changes or modifications not expressly approved by the party responsible for comliance could void
your authority to operate the equipment.
Canadian DOC Notice
This Class B digital apparatus meets all requirements of the Canadian
Interference-Causing Equipment Regulations.
Cet appareil numérique de la classe B repecte toutes les exigences du Règlement sur le
matériel brouilleur du Canada.
2

Important Safety Instructions
Please read the following instructions carefully. This manual should be retained for future use.
1. To clean LCD Monitor screen;
-- Power off LCD Monitor and unplug the AC Cord.
-- Spray a non-solvent cleaning solution onto a rag.
-- Gently clean the screen with dampened rag.
2. Do not place the LCD Monitor near a window. Exposing the monitor to rain water, moisture or
sunlight can severely damage it.
3. Do not apply pressure to the LCD screen. Excess pressure may cause permanent damage to the
display.
4. Do not remove the cover or attempt to service this unit by yourself. Servicing of any nature should
be performed by an authorized technician.
5. Store LCD Monitor in a room with a room temperature of -20° ~ 60°C (or -4° ~ 140°F). Storing the
LCD Monitor outside this range could result in permanent damage.
6. If any of the following occurs, immediately unplug your monitor and call an authorized technician.
* Monitor to PC signal cable is frayed or damaged.
* Liquid spilled into LCD Monitor or the monitor has been exposed to rain.
* LCD Monitor or the case is damaged.
7. Only use the supplied main lead to connect the monitor. For a nominal current up to 6A and a
device weight above 3 kg, a line not lighter than H05VV-F, 3G, 0.75 mm
2
must be used.
3
Chapter 1 Installation
Unpacking
Before unpacking the LCD Monitor, prepare a suitable workspace for your Monitor and computer. You
need a stable and clean surface near a wall power outlet. Make sure that LCD Monitor has enough
space around it for sufficient airflow. Though the LCD Monitor uses very little power, some ventilation
is needed to ensure that the Monitor does not become too hot.
AL1515 AL1515 b AL1515 m AL1515 bm
AUDIO
After you unpack the LCD Monitor, make sure that the following items were included in the box:
* LCD Monitor
* User's Manual
* Quick Guide
* 1.8M Monitor-to-PC VGA Cable
* 1.8M Stereo Jack Audio Cable (for AL1515 m and AL1515 bm)
* 1.8M Power Cord
* Base
If you find that any of these items is missing or appears damaged, contact your dealer immediately.
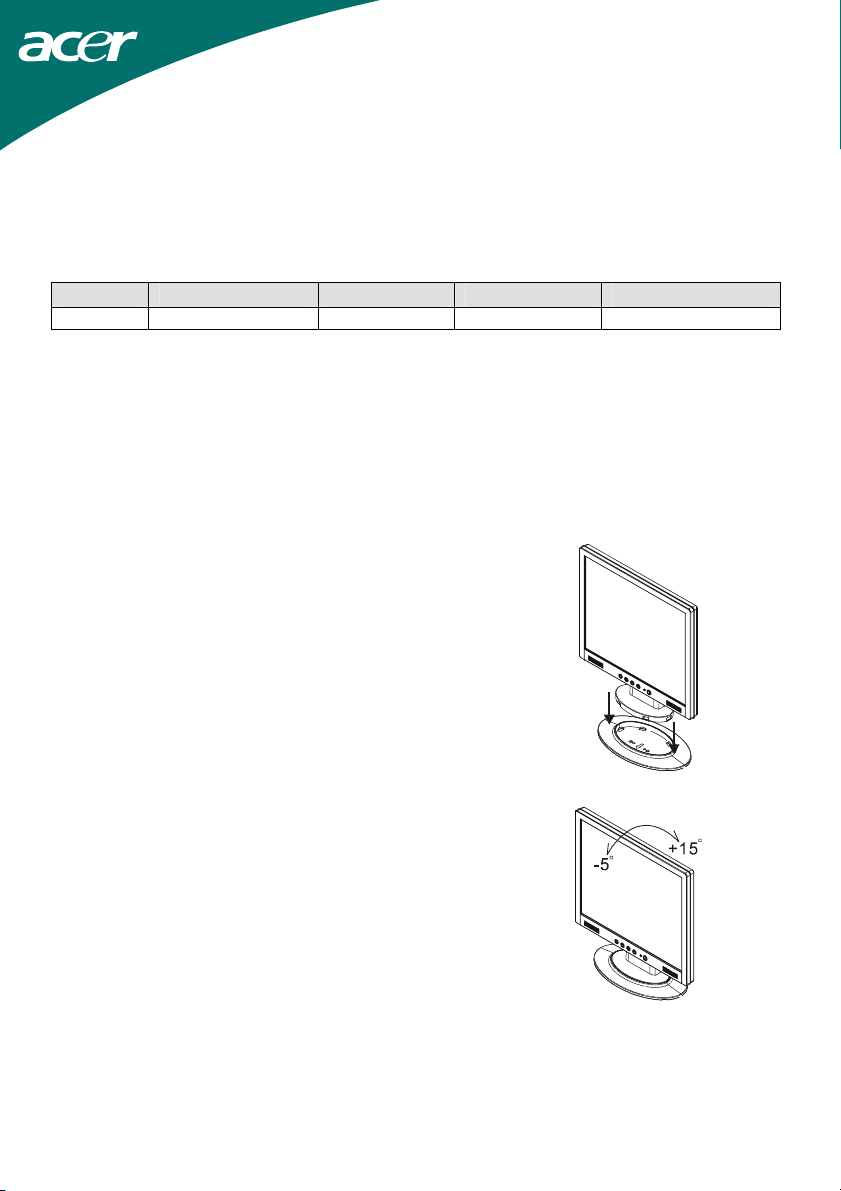
Connecting the LCD Monitor and Base
1. Take the base from the package, and place it on a stable
surface (e.g., desk or table).
2. Ensure that the arrow on the base faces forward.
3. Place the LCD securely on the base as shown in the
illustration.
No No Yes Yes
Figure 1-1
Viewing Angle Adjustment
The LCD Monitor is designed to allow users to have
a comfortable viewing angle. The viewing angle can
be adjusted from -5°to +15°.(See fig. 1-2)
Figure 1-2
Warning
Do not force the LCD Monitor over its maximum viewing angle settings as stated above. Attempting
this will result in damaging the Monitor and Monitor stand.
4
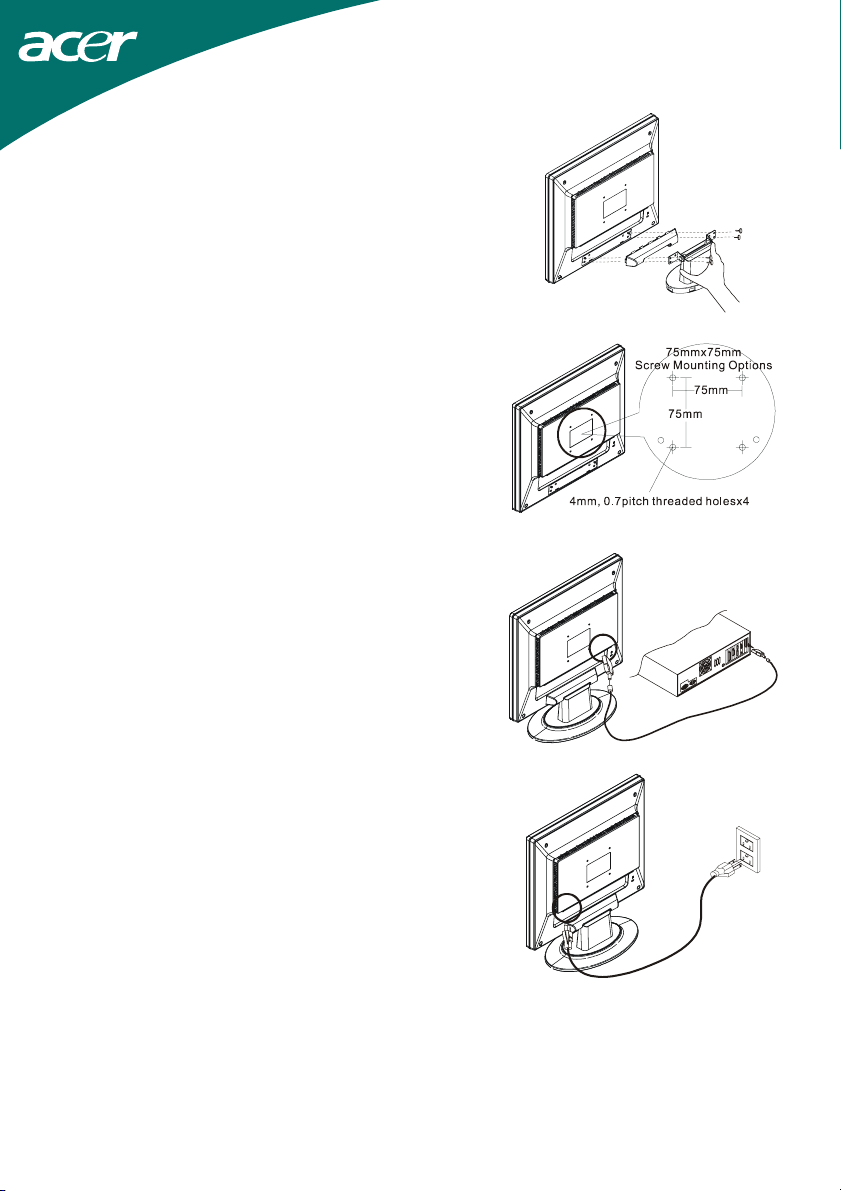
Detaching LCD Monitor from Its Stand
Unscrew screws the swivel base support column and pull
down the hinge to release.
Interface for Arm Applications
Before installing to mounting device, please refer to
Fig.1-3.
The rear of this LCD display has four integrated 4 mm, 0.7
pitches threaded nuts, as well as four 5 mm access holes in
the plastic covering as illustrated in Figure 1-4. These
specifications meet the VESA Flat Panel Monitor
Physical Mounting Interface Standard (paragraphs 2.1
and 2.1.3, version 1, dated 13 November 1997).
Connecting the Display
1. Power off your computer.
2. Connect one end of the signal cable to the LCD
Monitor’s VGA port.(See Fig 1-5)
3. Connect the other end of the signal cable to the VGA
port on your PC.
4. Make sure connections are secure.
Figure 1-3
Figure 1-4
Connecting the AC Power
1. Connect the power cord to the LCD Monitor.(See Fig.
1-6)
2. Connect the power cord to an AC power source.
5
Figure 1-5
Figure 1-6
 Loading...