

Page 1

VM1185T
Skype Wi-Fi Phone
User Guide
The whole world
can talk for free.
Skype.Com
WA6102-ZZ
Page 2

Page 3

User Guide
Guide
Skype Wi-Fi Phone
IEEE 802.11b/g Wireless Phone
Page 4

VM1185T
E032006-R01
150xxxxxxxxxxxxx
Page 5

Compliances
Federal Communication Commission Interference Statement
This equipment has been tested and found to comply with the limits for a Class B digital
device, pursuant to Part 15 of the FCC Rules. These limits are designed to provide
reasonable protection against harmful interference in a residential installation. This
equipment generates, uses and can radiate radio frequency energy and, if not installed
and used in accordance with the instructions, may cause harmful interference to radio
communications. However, there is no guarantee that interference will not occur in a
particular installation. If this equipment does cause harmful interference to radio or
television reception, which can be determined by turning the equipment off and on, the
user is encouraged to try to correct the interference by one of the following measures:
• Reorient or relocate the receiving antenna
• Increase the separation between the equipment and receiver
• Connect the equipment into an outlet on a circuit different from that to which the receiver
is connected
• Consult the dealer or an experienced radio/TV technician for help
This device complies with Part 15 of the FCC Rules. Operation is subject to the following
two conditions: (1) This device may not cause harmful interference, and (2) this device
must accept any interference received, including interference that may cause undesired
operation.
FCC Caution: Any changes or modifications not expressly approved by the party
responsible for compliance could void the user's authority to operate this equipment.
IMPORTANT NOTE:
FCC Radiation Exposure Statement
This equipment complies with FCC radiation exposure limits set forth for an uncontrolled
environment. End users must follow the specific operating instructions for satisfying RF
exposure compliance.
This transmitter must not be co-located or operating in conjunction with any other antenna
or transmitter.
IEEE 802.11b or 802.11g operation of this product in the U.S.A. is firmware-limited to
channels 1 through 11.
Japan VCCI Class B
i
Page 6

EC Conformance Declaration
Marking by the above symbol indicates compliance with the Essential Requirements of
the R&TTE Directive of the European Union (1999/5/EC). This equipment meets the
following conformance standards:
• EN 60950-1 (IEC 60950-1) - Product Safety
• EN 300 328 - Technical requirements for 2.4 GHz radio equipment
• EN 301 489-1, EN 301 489-17 - EMC requirements for radio equipment
This device is intended for use in the following European Community countries:
• Austria • Belgium • Denmark
• Finland • France • Germany
• Italy • Luxembourg • Netherlands
• Norway • Spain • Sweden
• Switzerland • United Kingdom • Portugal
• Greece • Ireland • Iceland
Requirements for indoor vs. outdoor operation, license requirements and allowed
channels of operation apply in some countries as described below:
• In Italy the end-user must apply for a license from the national spectrum authority to
operate this device outdoors.
• In Belgium outdoor operation is only permitted using the 2.46 - 2.4835 GHz band:
Channel 13.
• In France outdoor operation is only permitted using the 2.4 - 2.454 GHz band: Channels
1 - 7.
ii
Page 7

Contents
Chapter 1: Introduction 1-1
Package Checklist 1-1
Hardware Description 1-2
AC Power Charger 1-3
Mini USB Cable 1-3
Chapter 2: Installing the Battery 2-1
Charging the Battery 2-2
Powering On the Phone 2-3
Chapter 3: Getting Started 3-1
First-Time Startup 3-1
Understanding the Phone’s LCD Display 3-3
The Main Menu 3-5
The Power Key Menu 3-6
Creating a New Skype Account 3-7
Setting Up a Contact List 3-8
Making a Call 3-9
Call and Event Lists 3-9
Chapter 4: Managing Contacts 4-1
Adding a Contact 4-1
Searching for Contacts 4-3
The Contacts List Options Menu 4-5
Blocking a Contact 4-5
Chapter 5: Personal Skype Settings 5-1
Setting Your Profile 5-1
Changing Your Password 5-2
Privacy Settings 5-4
Phone Notifications 5-5
Chapter 6: Wi-Fi Network Settings 6-1
Finding Wi-Fi Networks 6-1
iii
Page 8

Contents
Preferred Networks 6-3
Setting Access to Open Networks 6-4
Chapter 7: General Settings 7-1
Changing the Display Language 7-1
Changing Display Settings 7-2
Setting the Time and Date 7-3
Displaying Phone Settings 7-5
Appendix A: Specifications A-1
Appendix B: Skype End User License Agreement B-1
iv
Page 9

Chapter 1: Introduction
The VM1185T is a Wi-Fi (IEEE 802.11b/g) wireless phone that enables you to make
Skype calls without using a computer. The phone enables you to use your normal
Skype account with complete mobility, allowing you to roam and talk within any
Wi-Fi hotspot, or at any location where you have an Internet connection through a
nearby access point.
Package Checklist
The VM1185T Skype Wi-Fi Phone package includes these items:
•One Skype Wi-Fi Phone (VM1185T)
• One Lithium-Ion battery
•One headset
•One mini USB cable
•One AC power charger
• This Quick Start Guide
• Management Guide CD
Inform your dealer if there are any incorrect, missing or damaged items. If
possible, retain the carton, including the original packing materials. Use them to
repack the product in case there is a need to return it.
1-1
Page 10
Introduction
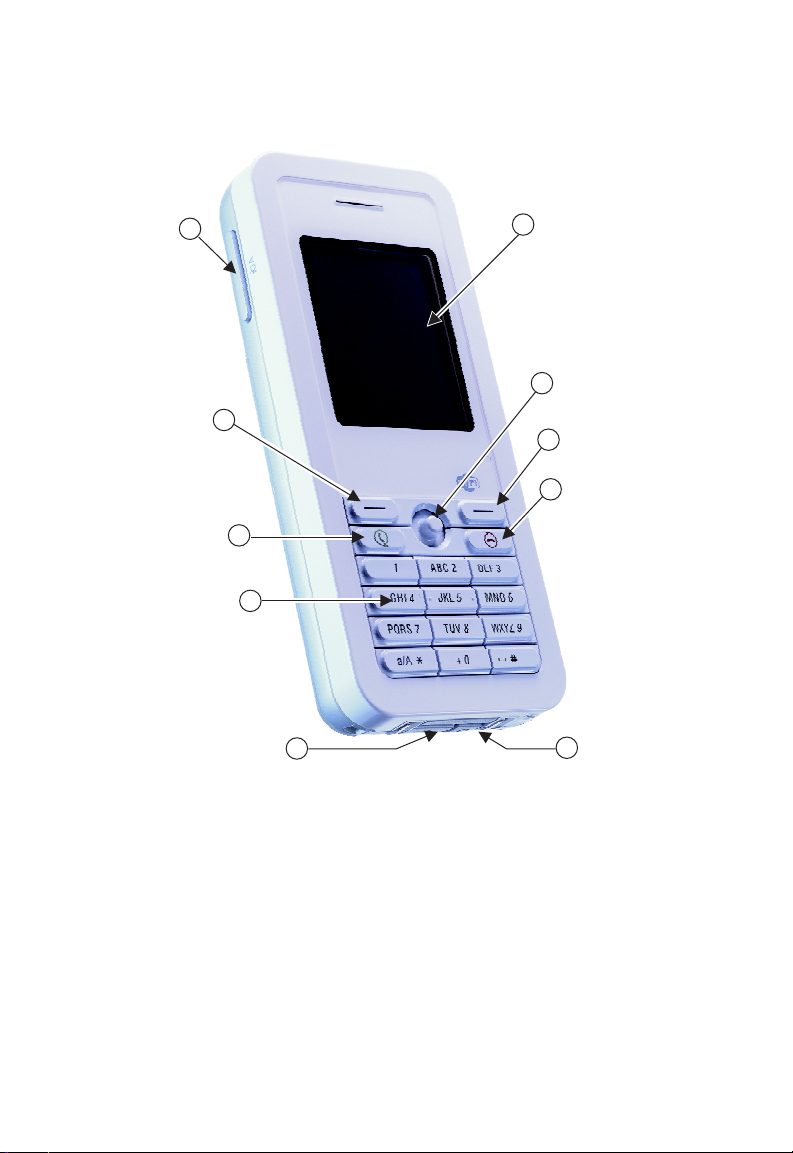
Hardware Description
Volume
10
Button
Left
Soft Key
Send
Alphanumeric
Keypad
9
8
Key
7
USB/Power
Charge Port
LCD
1
Display
Navigation
2
Key
Right
3
Soft Key
End/Power
4
Key
Headset
6
5
Jack
Before preparing the Skype Wi-Fi Phone for use, first become familiar with its
main keys, buttons, and other hardware features.
1.LCD Display — Color software menu display.
2. Navigation Key — Four-direction software navigation key. Pressing the key
down selects the current option.
3.Right Soft Key — Negative action key. Cancels or returns to previous menu.
4.End/Power Key — Ends an active call. Turns the power on and off.
• Press for more than two seconds to power the phone on.
• When on, press for two to four seconds to access the Power Key menu.
• Press for more than four seconds to power the phone off.
1-2
Page 11

Hardware Description
5.Headset Jack — Jack for headset connection.
6.USB/Power Charge Port — Power charger connection for charging battery.
7.Alphanumeric Keypad — Includes 0-9, A-Z, *, and # keys.
• The [a/A *] key selects upper- or lower-case characters, numbers, or
hexadecimal.
• The [ 1 ] key selects common punctuation marks during text input.
• The [ # ] key selects special characters and symbols during text input.
8.Send Key — Calls a selected contact.
9.Left Soft Key — Positive action key. Selects menu option.
10. Volume Button — Adjusts volume of the speaker.
Keypad Lock — The phone keypad can be locked by pressing the Left Soft Key
together with the [a/A *] key. Pressing the two keys again unlocks the keypad.
AC Power Charger
The Skype Wi-Fi Phone will charge an installed battery when connected to the AC
power charger, and the power charger is connected to a power source. The
power charger automatically adjusts to any voltage between 100-240 volts at 50
or 60 Hz. No voltage range settings are required.
Mini USB Cable
The Skype Wi-Fi Phone includes a mini USB cable that can be used to charge the
phone’s battery from a connected PC.
1-3
Page 12

Introduction
1-4
Page 13
Chapter 2: Installing the Battery
After unpacking the Skype Wi-Fi Phone, you must first install and charge the
included battery pack before turning on the phone.
Caution: Use only the Lithium-Ion battery pack supplied with the phone. Do not
try to install any other battery. To obtain replacement batteries, contact
your local dealer.
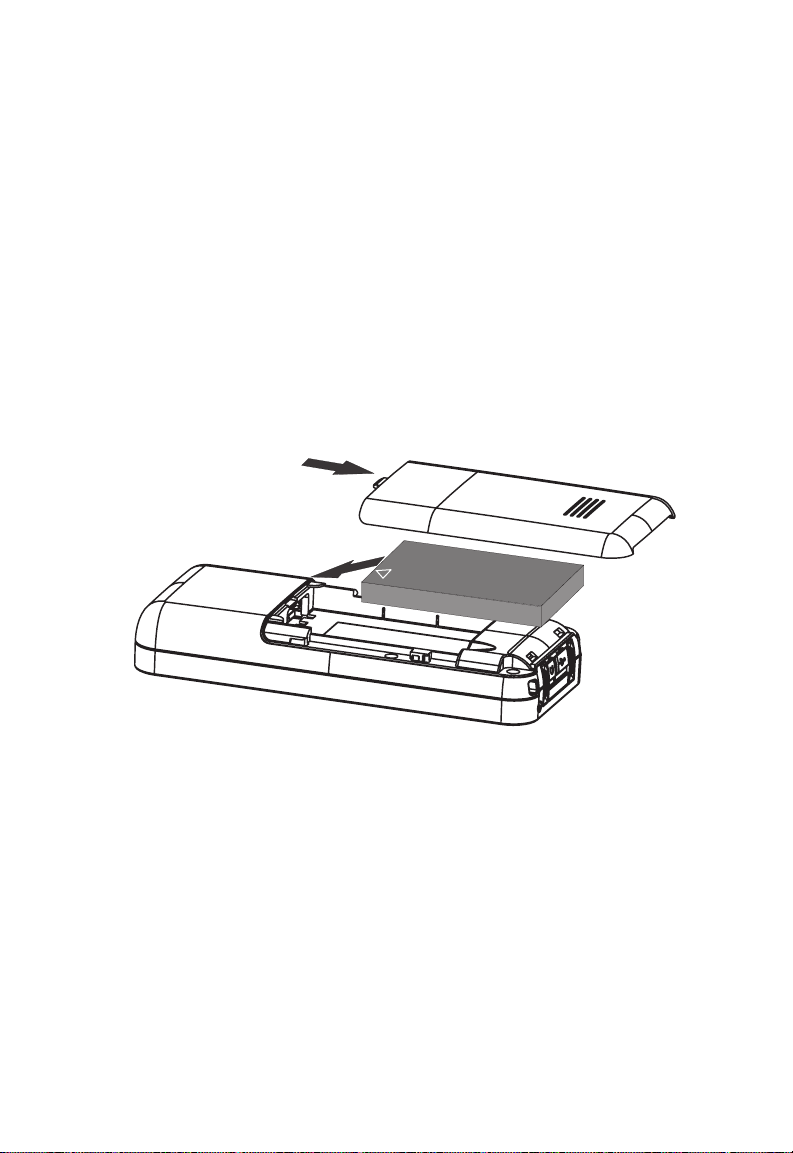
1. Remove Battery Compartment Cover — Place the phone face down. Push
and slide down the battery compartment cover until it becomes free.
2. Install Battery — Place the battery into the compartment. Be sure the text
label on the battery is facing out and the battery’s three metal contacts
point to the top of the phone.
3. Replace Battery Compartment Cover — Slide the battery compartment
cover back onto the phone until it clicks firmly into place.
2-1
Page 14
Installing the Battery
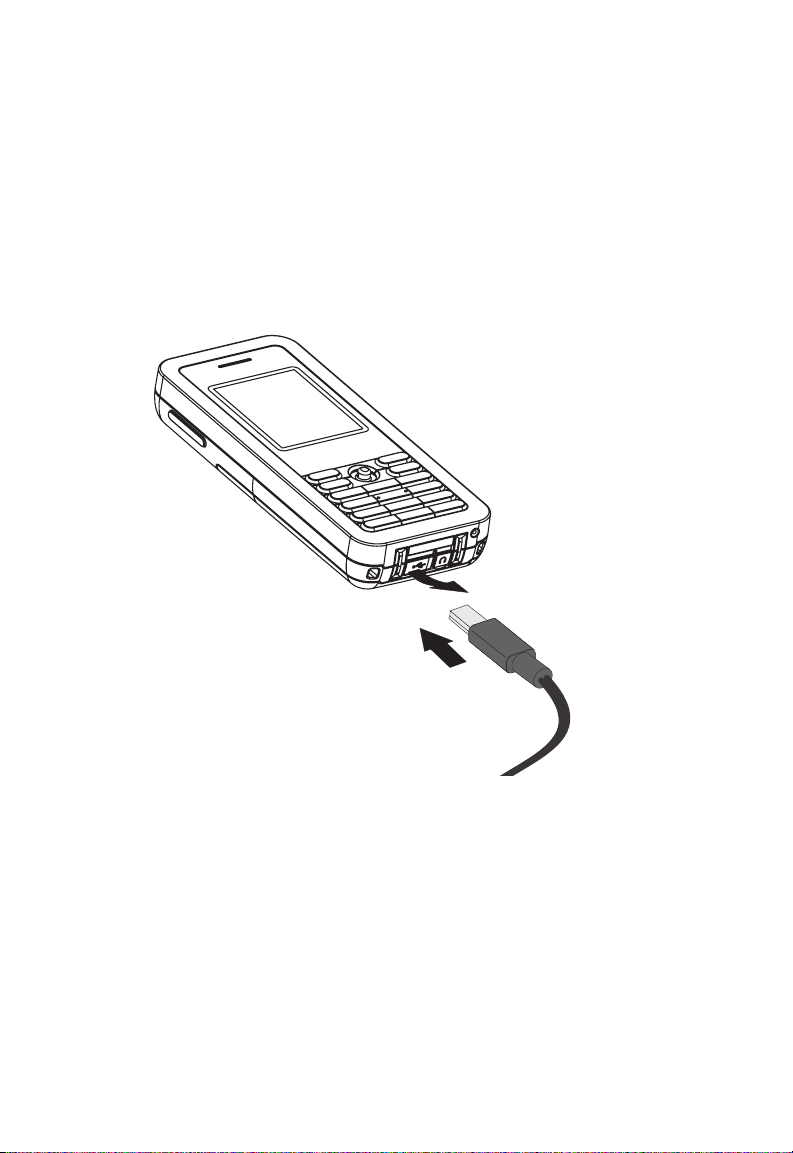
Charging the Battery
1. Connect the AC Power Charger — Lift up the rubber cover on the mini USB
charger port and connect the power charger to the port. Then, plug the
charger into an AC electrical outlet.
Note: The power charger automatically adjusts to any voltage between 100-240 volts
at 50 or 60 Hz.
2.
Fully Charge Battery — For the first time use, allow three hours to fully
charge the battery before turning on the phone.
Lift Cover
Connect
Charger
3. Disconnect the Power Charger — When the battery is fully charged, remove
the power charger from the phone and push down the charger port’s rubber
cover.
Note: When you next have to charge the phone’s battery, you do not have to power
off the phone. Just connect the charger as described above and wait until the
LCD display indicates the battery is fully charged.
2-2
Page 15
Powering On the Phone
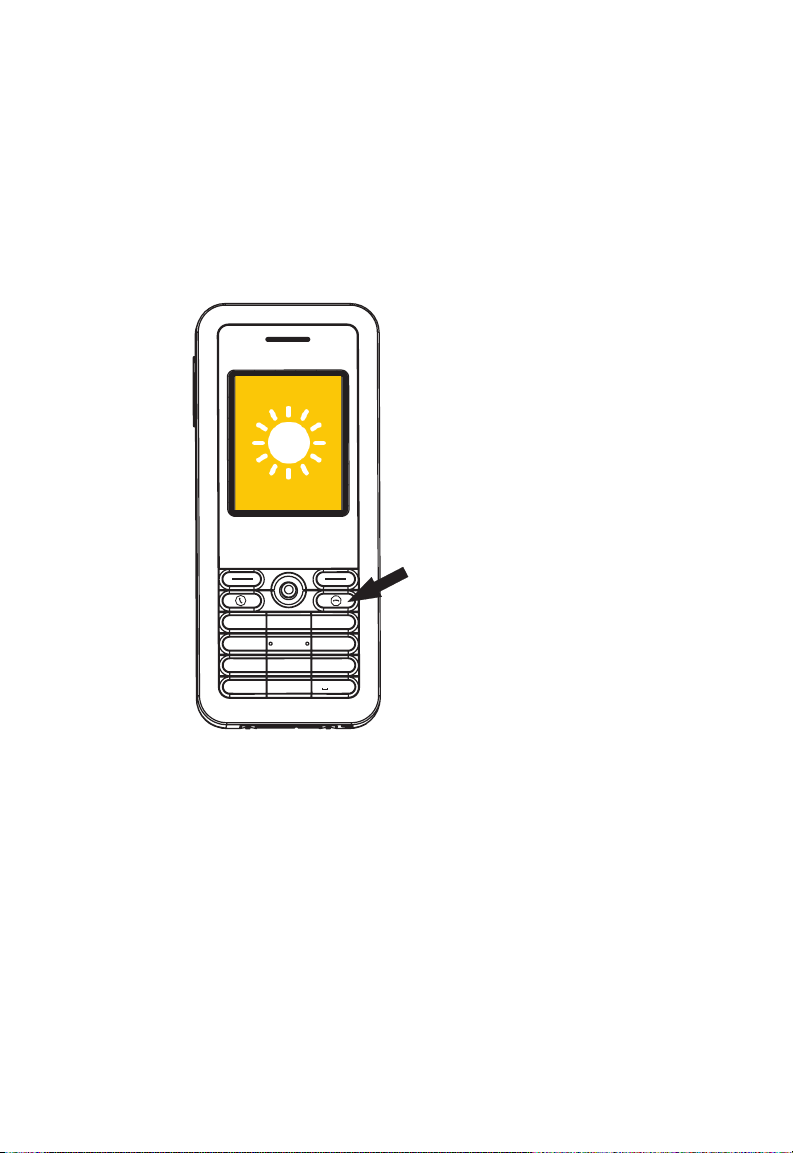
Powering On the Phone
Push and hold down the End/Power key for more than two seconds to power on
the phone. The LCD display turns on showing an image of a white sun on a yellow
background.
Allow 30 seconds for the phone to start up.
Go to Chapter 3 “Getting Started” to learn how to set up a Wi-Fi network
connection and start using the phone.
Power On
ABC
2
GHI
PQRS
a/A
1
4
7
*
JKL
TUV
DEF
3
MNO
6
5
8
WXYZ
9
+
0
#
2-3
Page 16

Installing the Battery
2-4
Page 17
Chapter 3: Getting Started
The Skype Wi-Fi Phone requires a wireless connection to a Wi-Fi access point to
operate. In addition, the access point network must provide access to the
Internet to make Skype calls.
You can set the phone to connect to specific wireless networks or search for
“open” networks, such as public hotspots. Wireless network information is stored
in the phone’s memory as “Preferred Networks” that are searched for each time
the phone is powered on.
When powering on the Skype Wi-Fi Phone for the first time, there are no
Preferred Networks in the phone’s memory. You need to select a wireless
network and sign into your Skype account before you can start making calls.
First-Time Startup
When the Skype Wi-Fi Phone is used for the first time, follow these steps to set
up the phone and make a network connection:
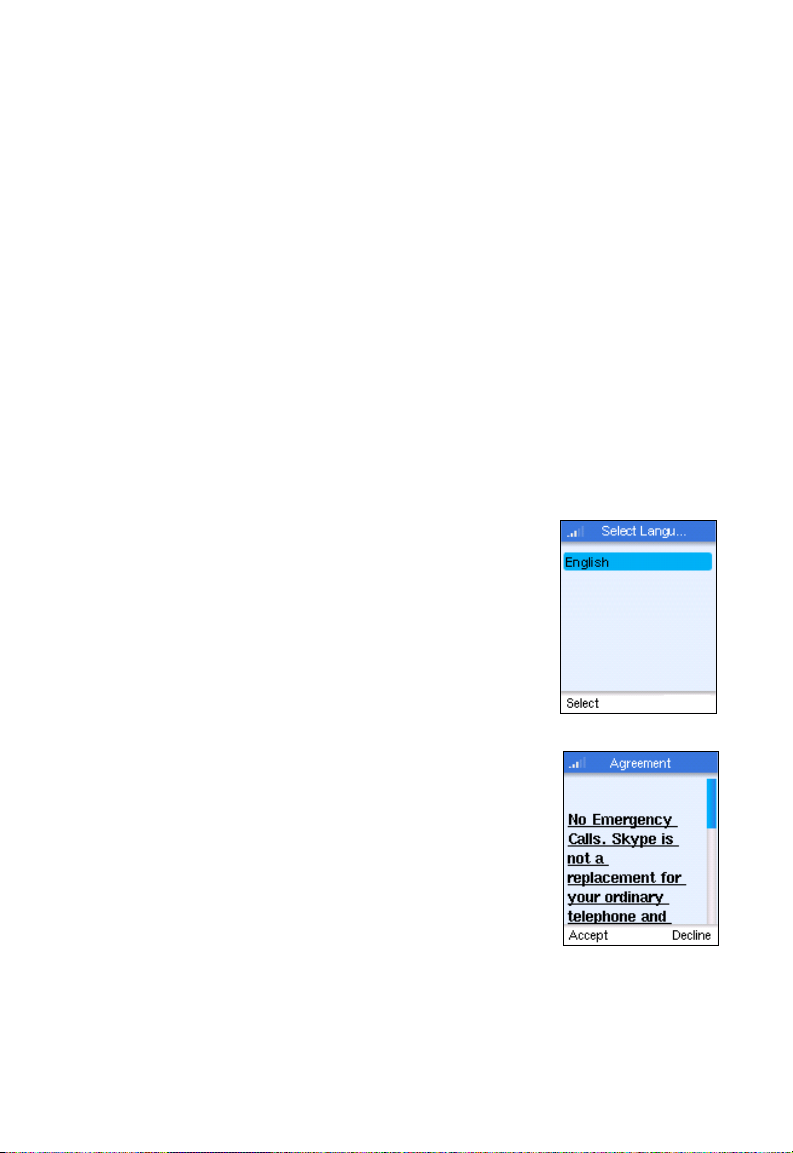
1. Select the language of the display. The default is
English.
2. Read and accept the Skype Agreement statement. .
“No Emergency Calls. Skype is not a replacement for
your ordinary telephone and cannot be used for
emergency calling.
I have read and accept the Skype’s terms and
conditions at www.skype.com/eula and
www.skype.com/tos and in my device user guide.”
See Appendix B for the full text of the Skype
Agreement.
You must accept the Agreement to use the phone.
Press the Left Soft Key to accept the Agreement.
3-1
Page 18
Getting Started
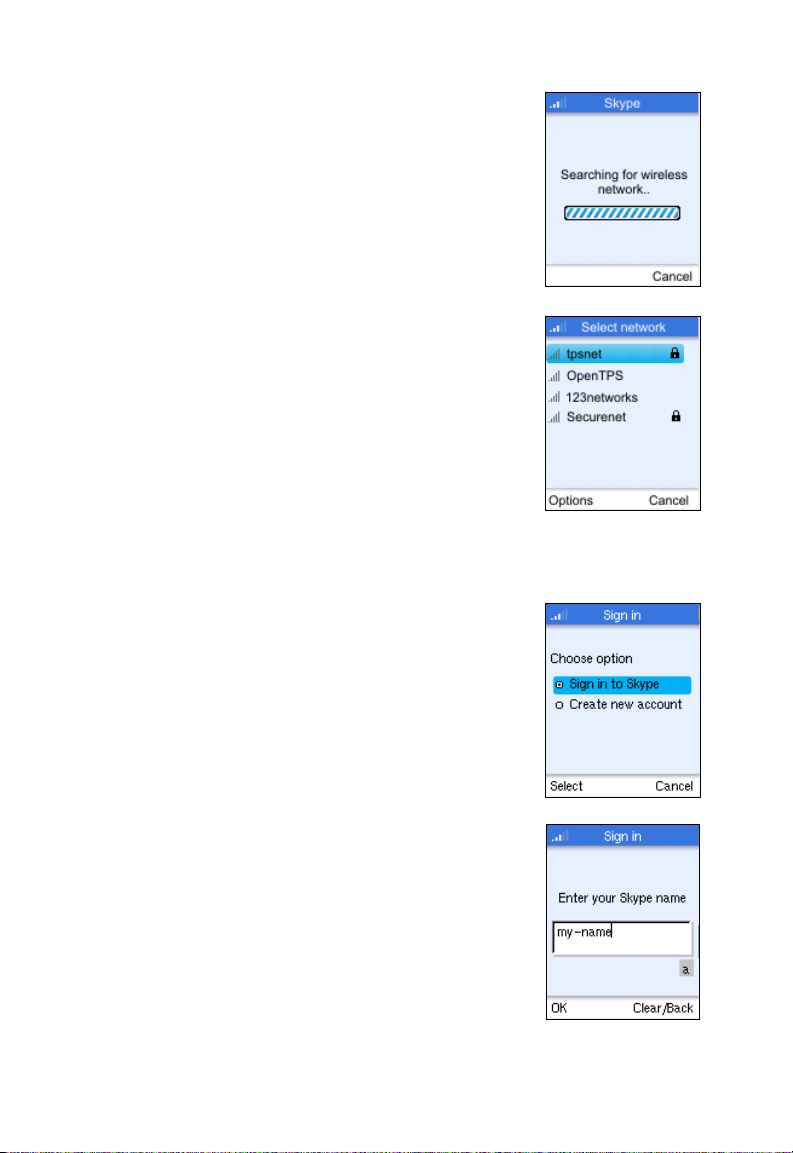
3. The phone scans for nearby wireless networks and
lists those that it finds.
Normally, you need to be within 90 m (300 ft) of a
network’s wireless access point to be able to connect
to it. If the network you want to connect to is not on
the list, move to another location and try again.
4. From the wireless networks list, select the wireless
network that you want to connect to and press the
Left Soft Key to access Options menu. Then select
“Connect.”
If a security key is required, the phone prompts for the
key value. Security keys should be provided by the
wireless network operator.
The access point information is stored in the phone’s
memory as a “Preferred Network” and will be used
next time the phone is powered on.
5. If you already have a Skype account, sign in with your
user name and password.
Note: If you are already signed into your Skype account from
your PC, you should sign out first before using the
phone. You cannot sign into your Skype account from
two devices at the same time.
You can also create a new account using the phone.
See “Creating a New Skype Account” on page 3-7.
When your Skype login is successful, you can start
making calls. Your current list of contacts should
display in the Contacts screen.
3-2
Page 19
Understanding the Phone’s LCD Display
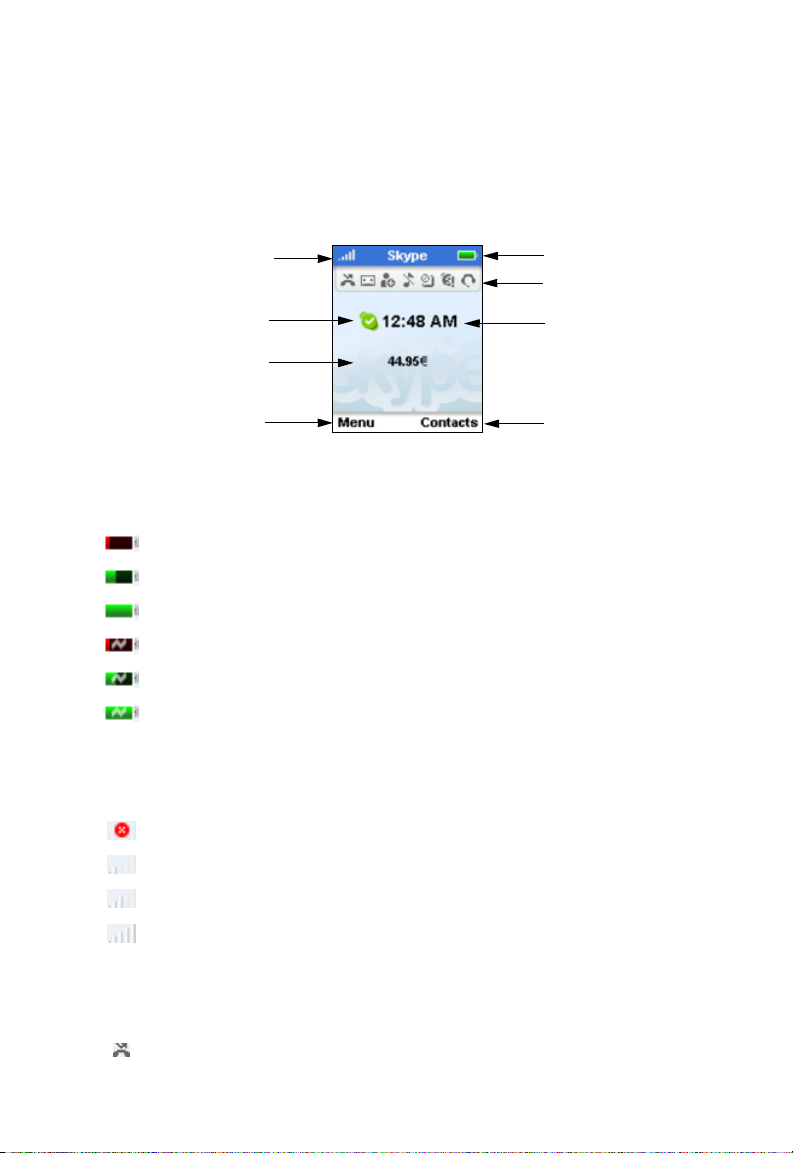
Understanding the Phone’s LCD Display
The Skype Wi-Fi Phone’s color LCD display provides various status indicators and
access to the menu-based interface. The illustration below shows the main
screen and its elements.
Wireless Signal Status
Skype Online Status
Skype Credit
Left Soft Key Action
Battery Status — Indicates the status of the battery. The following states may be
displayed:
The battery is at a very low level and should be charged immdiately.
The battery is at a partially charged level.
The battery is fully charged.
The battery is charging from a low level.
The battery is charging, reaching a partially charged level.
The battery is charging, reaching a fully charged level.
Wireless Signal Status — Indicates the strength of the Wi-Fi network signal. The
following states may be displayed:
There is no detectable wireless signal.
Battery Status
Notifications
Current Time
Right Soft Key Action
There is a weak wireless signal.
There is a good wireless signal.
There is a strong wireless signal.
Phone Notifications — The notification icons alert you of certain events or
settings. The following icons may be displayed:
Missed Call. A missed call is listed on the Call List screen.
3-3
Page 20

Getting Started
New Voicemail. A voicemail has been received, but has not yet been
heard.
Authorization Request. An new request has been received and is listed
on the pending authorizations screen.
Silent. The silent mode is active. No ring tones or alerts will be heard.
Keypad Locked. The keypad is currently locked.
Services Expiry. Your Skype Credit for one or more services is close to
expiry.
Headset Attached. The headset is currently attached to the phone.
Skype Online Status — Indicates your current Skype online status. The following
states may be displayed:
Online. The normal status when you are signed in to Skype.
Offline. When you are not signed in to Skype.
Do Not Disturb. You can set this status to indicate that you are busy.
Skype Me. Makes your Skype name availalbe for anyone to call.
Invisible. Indicates to others that you are offline, but you are still signed
in to Skype and can make calls.
Current Time — The current time set on the phone. You can set the phone’s time
and date by using the Menu to select “Settings” and then “Time and Date.”
Skype Credit — Your current Skype Credit balance.
Right Soft Key Action — The action that happens when you press the Right Soft
Key. Typically, the Right Soft Key cancels the last action or returns to the previous
menu. From the main screen, this provides access to your Contacts list.
Left Soft Key Action — The action that happens when you press the Left Soft
Key. Typically, the Left Soft Key selects the current menu item or confirms a
setting. From the main screen, this provides access to the user menu.
3-4
Page 21

Understanding the Phone’s LCD Display
The Main Menu
The main menu provides access to all your Skype and phone settings. The
menus are easy to move through using the four-way Navigation key. Just move
the Navigation key up or down to highlight a menu item, then push down on the
key to select it.
The following table outlines the phone menu structure.
Skype Wi-Fi Phone Main Menu
Menu Description
Contacts Your contacts list and their Skype status
Calls/Events Lists missed calls, incoming and outgoing calls,
Add Contact Adds a Skype or SkypeOut number to your contacts list
Search Searches for Skype contacts online
Services Sets up Skype credit, SkypeIn, and Voicemail
Settings Access to other phone settings
My Profile Allows you to change your Skype profile information
Network Network search, Preferred networks, and open network
General Change your Skype password, set auto sign in, and reset
Voicemail Records your Voicemail message and changes settings
Privacy Sets Skype privacy settings for calls
Notifications To set display notifications for incoming calls
Tones Sets the phone’s ring tones and volume
Time and Date Sets the time and date
Manage Blocked Users View current blocked contacts
Phone Settings Sets the display brightness and contrast, and the display
Information Displays current phone information, including network
Advanced Access to advanced network connection settings
Voicemails, and authorizations
connection settings
the phone
for Voicemail calls
timeout
connection status, software version, and hardware
version
3-5
Page 22

Getting Started
The Power Key Menu
Another menu is available on the phone that provides quick access to power off
the phone, change your Skype status, view Wi-Fi netwofk information, and other
frequently needed settings.
To access the Power Key menu, press the End/Power key for more than two
seconds and then release it. Be sure not to press the key for more than four
seconds, which immediately switches the phone off.
The menu lists items depending on your current network connection and Skype
sign in status. If you are not connected to a network and not signed in to Skype,
only a few menu items are displayed. If you are connected and signed in, the full
menu displays.
Skype Wi-Fi Phone Power Key Menu
Menu Description
Switch Off Powers off the phone
Silent Sets the ring tone volume to off
Change Status Changes your Skype online status
My Profile Allows you to change your Skype profile information
Sign In/Out Signs in or out from Skype
Network Information Displays network connection information
Find/View Networks Displays list of detected Wi-Fi networks
Wifi Information Displays Wi-Fi access point information
3-6
Page 23

Creating a New Skype Account
Creating a New Skype Account
If you have not previously set up a Skype account, you need to create one before
using the phone. When the Skype sign-in screen displays after a power on, you
are given the option to create a new account.
To creat a new Skype account, follow these steps:
1. From the Sign-in option screen, select “Create new
account.”
2. Enter a Skype name for your account. Names must be
from 6 to 30 characters.
You can use any mixture of lower or upper case
letters, numbers, and punctuation marks. However,
you cannot use spaces or start your name with a
number or punctuation mark. The [a//A *] key selects
upper-case input. The [ 1 ] key selects common
punctuation marks, and the [ # ] key allows other
symbols to be selected.
A check is made to see if your entered name is
already in use by someone else. If the name is already in use, you will have
to try another name.
3. Enter a password of between 4 and 20 characters.
You can use any mixture of lower or upper case
letters, numbers, and punctuation marks. However,
you cannot use spaces or start your name with a
number or punctuation mark. Also, you cannot have a
password that is the same as your Skype name.
You need to enter your password a second time to
confirm it.
3-7
Page 24

Getting Started
4. When your new account has been created, you can
sign in and start using the phone.
See “Setting Up a Contact List” on page 3-8 and
“Making a Call” on page 3-9.
Setting Up a Contact List
If you created a new Skype account, you need to set up your own contact list
before starting to make calls. Follow these steps:
1. Press the Left Soft Key to select the menu.
2. Use the Navigation key to scroll down and select “Add
Contact.”
3. From the Add Contact menu, select “Skype” to set up
a Skype name, or “Skype Out Number” to set up a
SkypeOut name and number.
4. After entering your contact name and/or number,
press the Left Soft Key to add the contact to your list.
3-8
Page 25

Making a Call
Making a Call
To make a Skype-to-Skype call, follow these steps:
1. Press the Right Soft Key to select Contacts.
2. Use the Navigation key to scroll down and select the contact name you want
to call.
3. Press the Send button to make the call.
4. When you have finished the call, press the End button.
Call and Event Lists
All missed calls, incoming and outgoing calls, voicemails, and request
authoriations are logged by the phone. You can access the list of logged calls
from the main menu. Follow these steps:
1. Press the Left Soft Key to select the menu.
2. Use the Navigation key to scroll down and select
“Calls/Events.”
3. From the Call List menu, select the list you want to
display.
3-9
Page 26

Getting Started
4. From the list of calls, select the call you are looking for.
5. Press the Left Soft Key to display the options menu.
3-10
Page 27

Chapter 4: Managing Contacts
Your Skype contact list displays all the names you can make calls to. If you are
new to Skype and have just created a new account, your contact list will be
empty. You need to find the names of users and add them to your list.
Skype protects the privacy of users by requiring authorization of names that are
added to a contact list. When you want to add a contact to your list, an
Authorization Request is sent to the user. The user can accept or deny the
request. When a request is accepted, you can see when the contact is online and
make calls to them. You can also view their personal profile details.
Skype allows you to also block contacts that you have previously authorized.
When you block a contact, you will always appear offline to them and they will not
be able to call you.
Adding a Contact
To add a new contact name to your contact list, you can either search for the
name or enter the name directly. Follow these steps:
1. Press the Left Soft Key to select the menu.
2. Use the Navigation key to scroll down and select “Add
Contact.”
3. From the Add Contact menu, select “Skype” to set up
a Skype name, or “Skype Out Number” to set up a
Skype Out name and number.
4-1
Page 28

Managing Contacts
4. After entering your contact name and/or number,
press the Left Soft Key.
5. The name is added to your contact list, but it still
requires authorization from the user.
6. Edit the text to send with your Authorization request.
Press the Left Soft Key when you are finished.
7. An authorization request is sent to the entered name.
If the name is not valid, an error message is displayed.
4-2
Page 29

Searching for Contacts
8. When the authorization request has been sent, a
confirmed message is displayed.
If you check your contacts list, you see the new name
with the grey status icon, which indicates it is pending
authorization by the user.
Searching for Contacts
You can search for contacts to add to your list by selecting “Search” on the main
menu. Follow these steps:
1. Select “Search” from the main menu.
2. Enter the name you want to search for. Text that is
entered is used to search Skype names, full names,
and e-mail addresses.
Press the Left Soft Key to start the search.
4-3
Page 30

Managing Contacts
3. A search may take some time to complete. You can
stop a search at any time by pressing the Left Soft
Key.
4. When the search completes or is stopped, the result
list is displayed.
5. You can scroll down through the list to find specific
names. Press the Left Soft Key to access the options
menu. The following options are available:
More Results — Displays the next 20 names in the list.
Search Again — Repeats the search.
Call — Calls the selected name.
Add to Contacts — Adds the selected name to your
contacts list.
View Profile — Displays the selected name’s profile.
4-4
Page 31

The Contacts List Options Menu
The Contacts List Options Menu
To access the Contacts list options menu, select a contact name in the list and
then press the Left Soft Key.
The menu allows you to perform the following actions
specific to the contact.
• Call — Calls the contact.
• Send Voicemail — Sends a voicemail message to the
contact.
• View Profile — Displays the contact’s profile details. The
details that are displayed are set by the contact.
• Advanced — Provides access to a menu of other actions.
• Rename — Changes the name of the contact as
displayed in your Contacts list.
• Remove — Removes the contact from your list.
• Block / Unblock — Blocks or unblocks the contact.
• Request Authorization — Sends a new request
authorization to the contact.
• Add a Contact — Adds a new contact to your list. This
performs the same procedure as “Add Contact” on the
main menu.
• Search for Users — Performs a Skype search. This
performs the same procedure as “Search” on the main
menu.
Blocking a Contact
To block a name on your contact list, follow these steps:
1. Press the Right Soft Key to select Contacts.
2. Use the Navigation key to scroll down and select the
name you want to block.
4-5
Page 32

Managing Contacts
3. Use the Left Soft Key to select Options.
4. From the Options menu, select “Advanced.”
5. Use the Navigation key to scroll down to “Block /
Unblock” and then press the Left Soft Key.
The contacts list returns and the name has the
blocked status indicated.
4-6
Page 33

Chapter 5: Personal Skype Settings
The Skype Wi-Fi Phone allows you to change your personal profile details,
password, privacy, and notification settings.
Setting Your Profile
Entering details in your Skype profile is optional. You can fill in all the public and
private profile details or leave them blank. For the public profile details that all
Skype users can see, you may want to fill in at least country and city details to
help contacts confirm your identity.
To set your profile details, follow these steps:
1. Press the Left Soft Key to select the menu.
2. Use the Navigation key to scroll down and select
“Settings.”
3. From the Settings menu, select “My Profile.”
4. Select “Details shown to all.” (You can also select
“Private details” to change your e-mail address.)
5-1
Page 34

Personal Skype Settings
5. Select the profile detail you want to change.
6. Press the Left Soft Key to edit the details.
Changing Your Password
To change your Skype sign-in password, follow these steps:
1. Press the Left Soft Key to select the menu.
2. Use the Navigation key to scroll down and select
“Settings.”
3. From the Settings menu, select “General.”
5-2
Page 35

Changing Your Password
4. From the General Settings menu, select “Change
Password.”
5. First enter your current password, then press the Left
Soft Key.
6. Enter your new password, then press the Left Soft Key.
5-3
Page 36

Personal Skype Settings
Privacy Settings
Skype not only protects your privacy by showing your online presence only to
your contacts, it offers other privacy settings that restrict calls to only those that
you want to receive.
To change your Skype privacy settings, follow these steps:
1. Press the Left Soft Key to select the menu.
2. Use the Navigation key to scroll down and select
“Settings.”
3. From the Settings menu, select “Privacy.”
4. From the Privacy menu, select “Calls.”
5-4
Page 37

Phone Notifications
5. Change your privacy setting to restrict calls to those
only from your contacts, or to authorize each call
individually.
Phone Notifications
Notifications are displayed by the phone to alert you to certain events or
settings. You can set the phone to prevent some notifications from being
displayed.
To change your Skype notifications settings, follow these steps:
1. Press the Left Soft Key to select the menu.
2. Use the Navigation key to scroll down and select
“Settings.”
3. From the Settings menu, select “Notifications.”
5-5
Page 38

Personal Skype Settings
4. Select the notification settings you want to change
and press the Left Soft Key.
5. When your changes are complete, press the Right Soft
Key to return to the previous menu.
5-6
Page 39

Chapter 6: Wi-Fi Network Settings
The Skype Wi-Fi Phone automatically searches for Wi-Fi networks on start up. You
can select a specific network to connect to, or set the phone to connect to any
“open” network.
Networks that you have previously connected to are saved as “Preferred”
networks. On start up, the phone will look for Preferred networks first and try to
make a connection. If no networks can be found, an error message is displayed.
Finding Wi-Fi Networks
You can search for Wi-Fi networks that are within range of your location. The
results list displays the network name and the strength of the radio signal. When
possible, you should try to connect to networks with a strong signal.
To search for networks, follow these steps:
1. Press the Left Soft Key to select the menu.
2. Use the Navigation key to scroll down and select
“Settings.”
3. From the Settings menu, select “Network.”
6-1
Page 40

Wi-Fi Network Settings
4. From the Network Settings menu, select “Wireless
networks in range.”
Note: You can also search for networks from the Power Key
menu.
Wait while the phone searches for Wi-Fi networks.”
5.
6. Wait while the phone searches for Wi-Fi networks.”
A list of detected networks displays. Select the
network you want to connect to. Networks listed with
the padlock icon are secure networks.
Press the Left Soft Key for the Options menu.
If no networks are found by the search, an error message
is displayed. You should change your location before trying
again. Normally, you need to be within 90 m (300 ft) of a
network’s wireless access point to be able to connect to it.
6-2
Page 41

Preferred Networks
Preferred Networks
The preferred networks information stored in the phone enables you to
automatically connect to networks you normally use. Once you have set up a
network’s name and security, the phone will use the information during start up
to search and connect automatically.
To access settings for preferred networks, follow these steps:
1. Select “Settings” from the main menu and then
“Network.”
2. From the Network Settings menu, select “Preferred
networks.”
3. From the preferred networks list, select a network
name and then press the Left Soft Key for the Options
menu.
6-3
Page 42

Wi-Fi Network Settings
4. From the preferred networks list, select a network
name and then press the Left Soft Key for the Options
menu.
Add Current — Adds the current connected network
to the preferred list. Open networks can be added in
this way.
Define New Network — Manually defines a preferred
network. Enter the network name, then set up other
settings and security options as instructed by the
network operator.
Move Up/Down/to Top — Moves the preferred network name up or down in
the list, or to the top of the list.
Properties — Lists the networks settings. You can select specific settings to
make changes.
Remove Network — Deletes the network from the preferred list.
Remove all networks — Deletes all networks from the preferred list.
Setting Access to Open Networks
By default, the phone tries to connect to preferred networks first and then, when
set, to any open network.
To set the phone to automatically find and connect to open public hotspots,
follow these steps:
1. Select “Settings” from the main menu and then
“Network.”
6-4
Page 43

Setting Access to Open Networks
2. From the Network Settings menu, select
“Auto-connect to open networks.”
3. Use the Navigation key to Select “Yes” and then press
the Left Soft Key.
6-5
Page 44

Wi-Fi Network Settings
6-6
Page 45

Chapter 7: General Settings
Many phone settings are available through the user menu. Use the Navigation
key to move through the menus and the Left Soft Key to select items that you
want to change.
Changing the Display Language
To change the display language, follow these steps:
1. Press the Left Soft Key to select the menu.
2. Use the Navigation key to scroll down and select
“Settings.”
3. From the Settings menu, select “General.”
4. From the General Settings menu, select “Language.”
7-1
Page 46

General Settings
5. Select the display language you want to use and then
press the Left Soft Key.
Changing Display Settings
To change the display contrast, brightness, and timeout, follow these steps:
1. Press the Left Soft Key to select the menu.
2. Use the Navigation key to scroll down and select
“Settings.”
3. From the Settings menu, select “Phone Settings.”
7-2
Page 47

Setting the Time and Date
4. From the Phone Settings menu, select the item you
want to change.
5. Move the Navigation Key left or right to change the Brightness and Contrast
setting, or up and down to change the Timeout setting. Press the Left Soft
Key to confirm the settings.
Setting the Time and Date
To change time and date settings, follow these steps:
1. Press the Left Soft Key to select the menu.
2. Use the Navigation key to scroll down and select
“Settings.”
7-3
Page 48

General Settings
3. From the Settings menu, select “Time and Date.”
4. From the Time and Date menu, select the item you
want to change.
5. Move the Navigation Key left and right or up and down to change the
settings. Press the Left Soft Key to confirm the settings.
7-4
Page 49

Displaying Phone Settings
Displaying Phone Settings
To display a list of current phone and network settings, follow these steps:
1. Press the Left Soft Key to select the menu.
2. Use the Navigation key to scroll down and select
“Settings.”
3. From the Settings menu, select “Information.”
4. Scroll down through the list to view the setting details.
Note: You can reset all the phone’s settings from the
Settings> General>reset menu.
7-5
Page 50

General Settings
7-6
Page 51

Appendix A: Specifications
Battery Life
Use Time: 4 hrs
Standby Time: 80~100 hrs
Li-Ion 3.7V minimum 1100mAH
Physical Size
115 x 49 x 18 mm
Temper at u re
Operating: 0 to 40 °C (32 to 104 °F)
Storage: -20 to 70 °C (-4 to 158 °F)
Humidity
10% to 85% (non-condensing)
Maximum 802.11b/g Channels
FCC/IC: 1-11
ETSI: 1-13
France: 10-13
MKK: 1-14
Operating Frequency
2.4 ~ 2.4835 GHz (US, Canada, ETSI)
2.4 ~ 2.497 GHz (Japan)
Data Rate
802.11g: 6, 9, 11, 12, 18, 24, 36, 48, 54 Mbps (automatic fall back)
802.11b: 1, 2, 5.5, 11 Mbps (automatic fall back)
Modulation Type
802.11g: CCK, BPSK, QPSK, OFDM
802.11b: CCK, BPSK, QPSK
RF Output Power
802.11b: 16 dBm
802.11g: 12 dBm
Antenna Gain
5.5 dBi
Emissions
FCC Part 15B Class B
VCCI Class B
EN61000-3-2
EN61000-3-3
A-1
Page 52

Specifications
Radio Signal Certification
FCC Part 15C
EN 300-328
EN 301 489-1
EN 301 489-17
ARIB STD-T66
ARIB STD-33
DGT LP0002
Temper at u re
IEC 68-2-14
Vibration
IEC 68-2-36, IEC 68-2-6
Shock
IEC 68-2-29
Drop
IEC 68-2-32
Safety
UL/cUL (UL 60950-1)
IEC 60950-1 (CB)
Standards
IEEE 802.11b, g
Wi-Fi 1 1b/g, WPA
A-2
Page 53

Appendix B: Skype End User License Agreement
IMPORTANT – PLEASE READ CAREFULLY
Before reading the articles below, please note the following preliminary terms,
which use some of the definitions specified in Article 1 below:
No Emergency Calls: by entering into this Agreement You acknowledge and
agree that the Skype Software does not and does not intend to support or carry
emergency calls. Please also see article 7 below.
Entering into this Agreement: This End User License Agreement constitutes a
valid and binding agreement between Skype Software Sarl and You, as a user, for
the use of the Skype Software. You must enter into this Agreement by clicking on
the ACCEPT button in order to install and use the Skype Software. You hereby
agree and acknowledge that this Agreement covers all Your use of Skype
Software, whether it be from this installation or from any other terminals where
Skype Software has been installed, by You or by third parties. Furthermore, by
installing and continuing to use the Skype Software You agree to be bound by
the terms of this Agreement and any new versions hereof.
Electronic Signatures and Agreement(s): You acknowledge and agree that by
clicking on the ACCEPT button or similar buttons or links as may be designated
by Skype to show Your approval of any foregoing texts and/or to download and
install the Skype Software, You are entering into a legally binding contract. You
hereby agree to the use of electronic communication in order to enter into
contracts, place orders and other records and to the electronic delivery of
notices, policies and records of transactions initiated or completed through the
Skype Software. Furthermore, You hereby waive any rights or requirements under
any laws or regulations in any jurisdiction which require an original
(non-electronic) signature or delivery or retention of non-electronic records, to
the extent permitted under applicable mandatory law.
Jurisdiction’s Restrictions: if You are residing in a jurisdiction which restricts the
use of internet-based applications according to age, or which restricts the ability
to enter into agreements such as this agreement according to age and You are
under such a jurisdiction and under such age limit, You may not enter into this
Agreement and download, install or use the Skype Software. Furthermore, if You
are residing in a jurisdiction where it is forbidden by law to offer or use software
for internet telephony, You may not enter into this Agreement and You may not
download, install or use the Skype Software. By entering into this Agreement You
explicitly state that You have verified in Your own jurisdiction if Your use of the
Skype Software is allowed.
B-1
Page 54

Skype End User License Agreement
Article 1 Definitions
In this Agreement the following capitalized definitions are being used, singular as
well as plural.
1.1 Affiliate: any corporation, company or other entity that directly or indirectly
controls, is controlled by, or is under common control with, Skype. For the
purpose of this definition, the word "control" shall mean the direct or indirect
ownership of more than fifty percent (50%) of the outstanding voting stock of the
corporation, company, or other entity.
1.2 Agreement: this End User License Agreement, as may be renewed, modified
and/or amended from time to time.
1.3 Emergency Services: means services that connect a user to emergency
services personnel or public safety answering points pursuant to applicable local
and or national regulatory requirements.
1.4 Documentation: any online or otherwise enclosed documentation provided
by Skype.
1.5 Effective Date: the date on which this Agreement is entered into by clicking
on the ACCEPT button as stated above.
1.6 IP Rights: any and all intellectual property rights, including but not limited to
copyrights, trademarks and patents, as well as know how and trade secrets
contained in or relating to the Skype Software, the Documentation, the Skype
Website or the Skype Promotional Materials.
1.7 Password: refers to a code You select, which, in combination with the User ID,
gives You access to Your User Account;
1.8 Skype: refers to the company established under the laws of Luxembourg,
Skype Software Sarl, with its address at 15 rue Notre Dame, L-2240 Luxembourg,
Luxembourg, reg.no (B100467), VAT no. (LU20180239).
1.9 Skype API: application program interface consisting of the set of routines
utilized by the Skype Software to provide the Skype Software functionality for a
given platform or operating system, Skype API being included in or linked to the
Skype Software.
1.10 Skype Online Material: the Skype banner available for download on the
Skype Website, consisting of a Skype logo and a link to the Skype Website.
1.11 Skype Promotional Materials: any and all trademarks, names, signs, logos,
banners, Skype Online Material and any other materials, in whatever form, owned
and/or used by Skype for the promotion of its company, its products and
activities.
1.12 Skype Software: the software distributed by Skype for internet telephony
applications, including without limitation the Skype API, UI and Documentation,
as well as any future programming fixes, updates and upgrades thereof.
B-2
Page 55

1.13 Skype Staff: the officers, directors, employees and agents of Skype or its
Affiliates, or any other persons hired by Skype or its Affiliates.
1.14 Skype Website: any and all elements, contents and the ‘look and feel’ of the
website available – among other URL’s - under the URL www.skype.com, from
which website the Skype Software can be downloaded.
1.15 Terms of Service: means the agreement between Skype Communications
Sarl and You for the use of the VoIP service;
1.16 UI: the user interface of the Skype Software.
1.17 User Account: refers to the account with User ID and Password that You
create for Your use of the Skype Software;
1.18 User ID: refers to an identification code You selected, which in combination
with the Password, gives access to Your User Account;
1.19 VoIP Service: means the payable services provided under the Terms of
Service
1.20 You: you, the end user of the Skype Software, also used in the form “Your”
where applicable.
Article 2 License and Restrictions
2.1 License. Subject to the terms of this Agreement, Skype hereby grants You a
limited, personal, non-commercial, non-exclusive, non-sublicensable,
non-assignable, free of charge license to download, install and use the Skype
Software on Your computer, phone or PDA for the sole purpose of personally
using the internet telephony applications provided by Skype and any other
applications that may be explicitly provided by Skype. For the avoidance of
doubt, You are allowed to use Skype Software at work, in accordance with the
terms of this Agreement.
2.2 No Granting of Rights to Third Parties. You will not sell, assign, rent, lease,
distribute, export, import, act as an intermediary or provider, or otherwise grant
rights to third parties with regard to the Skype Software or any part thereof.
2.3 No Modifications. You will not undertake, cause, permit or authorize the
modification, creation of derivative works, translation, reverse engineering,
decompiling, disassembling or hacking of the Skype Software or any part
thereof.
2.4 Third Parties. You acknowledge and agree that the Skype Software may be
incorporated into, and may incorporate itself, software and other technology
owned and controlled by third parties. Any such third party software or
technology that is incorporated in the Skype Software falls under the scope of
this Agreement. Any and all other third party software or technology that may be
distributed together with the Skype Software will be subject to you explicitly
accepting a license agreement with that third party. You acknowledge and agree
that you will not enter into a contractual relationship with Skype or its Affiliates
B-3
Page 56

Skype End User License Agreement
regarding such third party software or technology and you will look solely to the
applicable third party and not to Skype or its Affiliates to enforce any of your
rights.
2.5 New Versions of the Skype Software. Skype, in its sole discretion, reserves
the right to add additional features or functions, or to provide programming fixes,
updates and upgrades, to the Skype Software. You acknowledge and agree that
Skype has no obligation to make available to You any subsequent versions of the
Skype Software. You also agree that you may have to enter into a renewed
version of this Agreement, in the event you want to download, install or use a new
version of the Skype Software. Furthermore, You acknowledge and agree that
Skype, in its sole discretion, may modify or discontinue or suspend Your ability to
use any version of the Skype Software, and/or disable any Skype Software You
may already have accessed or installed without any notice to You, for the repair,
improvement, and/or upgrade of the underlying technology or for any other
justifiable reason, including but not limited to, cirucmstances where You, at
Skype’s discretion, are in breach of this Agrement, creating problems, possible
legal liabilities, acting inconsistently with the letter or spirit of our policies, which
can be found at www.skype.com/company/legal/terms/etiquette.html, or
engaging in fraudulent, immoral or illegal activities, or for other similar reasons.
Skype will not accept any liability in relation to the direct or indirect damages
caused by (1) the release and/or the absence of release of new versions of the
Skype Software and (2) by the suspension or termination of the license or this
Agreement by Skype and/or by You.
2.6 Paid Services. This Agreement applies to downloading, installing and using
the Skype Software, free of charge. The use of any paid services which may be
offered by Skype or its Affiliates, is subject to the additional Terms of Service that
are published on the Skype Website.
Article 3 Definitions to License Restrictions and Additional Terms
3.1 Distribution of Skype Software. You are not allowed to distribute the Skype
Software under this Agreement. For the right to distribute You will have to agree
to and meet with the Distribution Terms as published on the Skype Website.
3.2 Distribution of Skype API. Under this Agreement You are not allowed to use
the Skype API in connection with applications that You (or any third party)
distribute or intend to distribute. If you wish to distribute Your application, which
uses Skype API, You will have to agree to and meet with the API Terms of Use as
published on the Skype Website.
3.3 Use of Skype API. You may make use of the Skype API, subject to license
terms in Clause 2.1 and for the sole purpose of enabling Your application to
connect with the Skype Software, provided that:
3.3.1 All such use of Skype API is carried out for legitimate purposes and shall in
no way and to no extent adversely affect the functionality or performance of the
Skype Software or services provided by Skype;
B-4
Page 57

3.3.2 You will not remove, overtake, hide or otherwise make the UI inaccessible
for end users;
3.3.3 You will monitor the Skype Website in order to ensure that You are aware of
any changes in the applicable legal documents. In the event You cannot agree on
any changes in any applicable legal document, You will immediately cease any
and all use of the Skype API and, where applicable, any and all use of the Skype
Software; and
3.3.4 You acknowledge and agree that Your use of the Skype API will be at Your
own risk and account.
3.4 Any other Exceptions. If You are interested in doing anything else than
permitted under this Agreement or by the Distribution Terms or the Skype API
Terms of Use, You will have to obtain Skype’s previous written consent and
explicitly agree upon any further (commercial) terms.
3.5 Skype Promotional Materials. Nothing in this Agreement will give You any
right to use the Skype Promotional Materials.
Article 4 Utilization of Your computer
4.1 Utilization of Your computer. You hereby acknowledge that the Skype
Software may utilize the processor and bandwidth of the computer (or other
applicable device) You are utilizing, for the limited purpose of facilitating the
communication between Skype Software users.
4.2 Protection of Your computer (resources). You understand that the Skype
Software will use its commercially reasonable efforts to protect the privacy and
integrity of the computer resources (or other applicable device) You are utilizing
and of Your communication, however, You acknowledge and agree that Skype
cannot give any warranties in this respect.
Article 5 Confidentiality and Privacy
5.1 Skype’s Confidential Information. You agree to take all reasonable steps at all
times to protect and maintain any confidential information regarding Skype, its
Affiliates, the Skype Staff, the Skype Software and the IP Rights, strictly
confidential.
5.2 Your Confidential Information and Your Privacy. Skype is committed to
respecting Your privacy and the confidentiality of Your personal data. The
“Privacy Policy” that is published on the Skype Website at www.skype.com/go/
privacy applies to the use of Your personal data, the traffic data as well as the
content contained in Your communication(s). We do not sell or rent Your personal
information to third parties for their marketing purposes without Your explicit
consent and we use Your information only as described in the Privacy Policy. We
store and process Your information on computers that may be located outside
Your country that are protected by physical as well as technological security
B-5
Page 58

Skype End User License Agreement
devices. You can access and modify the information You provide in accordance
with the Privacy Policy. If You object to Your information being transferred or used
in this way please do not use our services.
Article 6 IP Rights and Translations
6.1 Exclusive Ownership. You acknowledge and agree that any and all IP Rights
to or arising from the Skype Software are and shall remain the exclusive property
of Skype and/or its licensors. Nothing in this Agreement intends to transfer any
such IP Rights to, or to vest any such IP Rights in, You. You are only entitled to the
limited use of the IP Rights granted to You in this Agreement. You will not take
any action to jeopardize, limit or interfere with the IP Rights. You acknowledge
and agree that any unauthorized use of the IP Rights is a violation of this
Agreement as well as a violation of intellectual property laws, including without
limitation copyright laws and trademark laws. You acknowledge and understand
that all title and IP Rights in and to any third party content that is not contained in
the Skype Software, but may be accessed through use of the Skype Software, is
the property of the respective content owners and may be protected by
applicable copyright or other intellectual property laws and treaties.
6.2 With the exception of IP Rights of Skype and/or its licensors in Skype
Software (including the Skype API), You retain the intellectual property rights You
may have in the applications, materials, products or processes You create which
are based on or utilize the Skype API. You hereby release and covenant not to
hold liable Skype or its Affiliates, or any of their licensees, assigns or successors,
for any and all damages, liabilities, causes of action, judgments or claims (a)
pertaining to any intellectual property You develop that is based on, uses, or
relates to the Skype API; and (b) which otherwise may arise in connection with
Your use of, reliance on, or reference to the Skype API. As between You and
Skype, Skype and its licensors retain the IP Rights in and to the Skype Software
(including the Skype API) and any derivative works thereto created by or for
Skype or its licensors.
6.3 No Removal of Notices. You agree that You will not remove, obscure, make
illegible or alter any notices or indications of the IP Rights and/or Skype’s rights
and ownership thereof, whether such notice or indications are affixed on,
contained in or otherwise connected to such materials.
6.4 Translations. You acknowledge and agree that the intellectual property rights
regarding any translations made by You of any information on or accessible
through the Skype Website or as otherwise requested of You by Skype at any
time prior to or subsequent of the Effective Date will be and remain the sole and
exclusive property of Skype without any compensation to You.
Article 7 Communication and Your Use of the Skype Software
7.1 Communication. Installing Skype Software enables You to communicate with
other Skype Software users.
B-6
Page 59

7. 2 N o Wa r r a n t i e s . Skype cannot guarantee that You will always be able to
communicate with other Skype Software users, nor can Skype guarantee that
You can communicate without disruptions, delays or communication-related
flaws or that all Your communication shall always be delivered to other Skype
Software users. Skype will not be liable for any such disruptions, delays or other
omissions in any communication experienced when using Skype Software.
7.3 No Responsibility of Content. You acknowledge and understand that the
content of the communication spread by the use of the Skype Software is
entirely the responsibility of the person from whom such content originated. You,
therefore, may be exposed to content that is offensive, harmful to minors,
indecent or otherwise objectionable. Skype will not be liable for any type of
communication spread by means of the Skype Software.
7.4 No Emergency Services. You expressly agree and understand that the Skype
Software is not intended to support or carry emergency calls to any type of
hospital, law enforcement agency, medical care unit or any other kind of
Emergency Service. Skype, its Affiliates or Skype Staff are in no way liable for
such emergency calls.
7.4.1 Alternative Arrangements. By agreeing to this Agreement You understand
that additional arrangements must be made to access Emergency Services. To
access Emergency Services, You acknowledge and accept Your responsibility to
purchase, separately from Skype Software, traditional wireless or wireline
telephone service that offers access to Emergency Services.
7.4.2 No Compulsion to Offer Emergency Services. You recognize and agree
that Skype is not required to offer Emergency Services pursuant to any
applicable local and or national rules, regulation or law. You further recognize
that Skype is not a replacement for Your primary telephone service.
7. 5 L a w f u l p u r p o s e s . You acknowledge and agree to use the Skype Software
solely for lawful purposes. In this respect You may not, without limitation (a)
intercept or monitor, damage or modify any communication which is not
intended for You, (b) use any type of spider, virus, worm, trojan-horse, time bomb
or any other codes or instructions that are designed to distort, delete, damage or
disassemble the Skype Software or the communication, (c) send any unsolicited
commercial communication not permitted by applicable law, or (d) expose any
other user to material which is offensive, harmful to minors, indecent or
otherwise objectionable.
Article 8 Term and (Consequences of) Termination
8.1 Term. This Agreement will be effective as of the Effective Date and will remain
effective until terminated by either Skype or You as set forth below.
8.2 Termination by Skype. Without limiting other remedies, Skype may limit,
suspend, or terminate this license and Your use of Skype Software, prohibit
access to Skype Website and delete Your User Account and/or User ID, with
immediate effect, if we think that You are in breach of this Agreement, creating
B-7
Page 60

Skype End User License Agreement
problems, possible legal liabilities, acting inconsistently with the letter or spirit of
our policies, which can be found at www.skype.com/company/legal/terms/
etiquette.html, infringing someone else’s intellectual property rights, engaging in
fraudulent, immoral or illegal activities, or for other similar reasons. Skype shall
effect such termination by providing notice to You to the email address You have
provided, and/or by preventing Your access to the respective User Account. We
reserve the right to cancel User Accounts that have been inactive for more than
one (1) year.
8.3 Termination by You. You may terminate this Agreement with immediate effect
at any time, with or without cause and without recourse to the courts, provided
that You will meet with the conditions as set forth in Article 8.4 below.
8.4 Consequences of Termination. Upon termination of this Agreement, You (a)
acknowledge and agree that all licenses and rights to use the Skype Software
shall terminate, and (b) will cease any and all use of the Skype Software, and (c)
will remove the Skype Software from all hard drives, networks and other storage
media and destroy all copies of the Skype Software in Your possession or under
Your control.
8.5 No liability. Skype will not be liable in relation to any damage caused by the
termination of this Agreement.
Article 9 Your Representations and Warranties; Indemnification of Skype
9.1 Representations. You represent and warrant that You are authorized to enter
into this Agreement and comply with its terms. Furthermore, You represent and
warrant that You will at any and all times meet with Your obligations hereunder, as
well as any and all laws, regulations and policies that may apply to the use of the
Skype Software.
9.2 Indemnification. You agree to indemnify, defend and hold Skype, Affiliates
and the Skype Staff harmless from and against any and all liability and costs,
including reasonable attorneys’ fees incurred by said parties, in connection with
or arising out of Your (a) violation or breach of any term of this Agreement or any
applicable law or regulation, whether or not referenced herein, or (b) violation of
any rights of any third party, or (c) use or misuse of the Skype Software, or (d)
use and/or modification of the Skype API or (e) communication spread by means
of the Skype Software.
9.3 U.S. Withholding Tax. United States-based end users and/or customers only:
Skype and all affiliated non-U.S. Skype entities (including, but not limited to,
Skype Software S.A., Skype Technologies, S.A., and Skype Communications Sarl)
intend to fully comply with all applicable U.S. federal tax rules and regulations as
provided by the Internal Revenue Code of 1986 (the “Code”) and the Treasury
Regulations promulgated thereunder. Skype, Inc. (Skype’s U.S.-based affiliate)
has been appointed to assist all U.S.-based end users and/or customers in
complying with any and all U.S. tax obligations arising as a result of Your use of
the Skype Software, VoIP Service and/or Skype API. You hereby agree to appoint
B-8
Page 61

Skype, Inc. as Your withholding agent for purposes of the withholding provisions
of Chapter 3 of the Code, section 3406 and other withholding provisions of the
Code, and the reporting provisions of Chapter 6 of the Code. Your agreement
does not modify in any way Your defenses provided under U.S. tax law to avoid
tax for any payments made to Skype’s non-US entities. If You would like any
information with respect to Your rights and obligations concerning any and all
potential U.S. federal income tax liability and/or reporting responsibilities or if You
wish to receive additional information (including applicable Forms W-8BEN
(“Certificate of Foreign Status of Beneficial Owner for United States
Withholding”), You may contact Skype at taxation@skype.net.
9.4 Export Restrictions. You acknowledge that the Skype Software may be
subject to international rules that govern the export of software. You agree to
comply with all applicable international and national laws that apply to the Skype
Software as well as end-user, end-use and destination restrictions issued by
national governments.
Article 10 Disclaimer of Warranties
10.1 No warranties. THE SKYPE SOFTWARE IS PROVIDED “AS IS”, WITH NO
WARRANTIES WHATSOEVER; SKYPE DOES NOT, EITHER EXPRESSED, IMPLIED OR
STATUTORY, MAKE ANY WARRANTIES, CLAIMS OR REPRESENTATIONS WITH
RESPECT TO THE SKYPE SOFTWARE, INCLUDING, WITHOUT LIMITATION,
WARRANTIES OF QUALITY, PERFORMANCE, NON-INFRINGEMENT,
MERCHANTABILITY, OR FITNESS FOR USE OR A PARTICULAR PURPOSE. SKYPE
FURTHER DOES NOT REPRESENT OR WARRANT THAT THE SKYPE SOFTWARE
WILL ALWAYS BE AVAILABLE, ACCESSIBLE, UNINTERRUPTED, TIMELY, SECURE,
ACCURATE, COMPLETE AND ERROR-FREE OR WILL OPERATE WITHOUT PACKET
LOSS, NOR DOES SKYPE WARRANT ANY CONNECTION TO OR TRANSMISSION
FROM THE INTERNET, OR ANY QUALITY OF CALLS MADE THROUGH THE SKYPE
SOFTWARE.
10.2 Specific Disclaimer of Liability for Emergency Services. Skype does not
provide Emergency Services in conjunction with the Skype Software. Neither
Skype nor its officers or employees may be held liable for any claim, damage, or
loss, and You hereby waive any and all such claims or causes of action, arising
from or relating to the use of Skype Software to contact Emergency Services
personnel. You shall defend, indemnify, and hold harmless Skype, Skype Staff
and Affiliates and agents and any other service provider who furnishes services
to You in connection with the Skype Software, from any and all claims, losses,
damages, fines, penalties, costs and expenses (including, without limitation,
attorneys fees) by, or on behalf of, You relating to the absence, failure or outage
of Skype Software provided hereunder, including specifically any claims arising
out of the failure of Skype to offer Emergency Services.
10.3 Your own Risk. You acknowledge and agree that the entire risk arising out of
the use or performance of the Skype Software remains with You, to the maximum
extent permitted by law.
B-9
Page 62

Skype End User License Agreement
10.4 Jurisdiction’s Limitations. As some jurisdictions do not allow some of the
exclusions or limitations as set forth above, some of these exclusions or
limitations may not apply to You. In such event the liability will be limited as far as
legally possible under the applicable legislation.
Article 11 Limitation of Liability
11.1 No Liability. The Skype Software is being provided to You free of charge.
ACCORDINGLY, YOU ACKNOWLEDGE AND AGREE THAT SKYPE, ITS AFFILIATES
AND THE SKYPE STAFF WILL HAVE NO LIABILITY IN CONNECTION WITH OR
ARISING FROM YOUR USE OF THE SKYPE SOFTWARE, AS SET FORTH BELOW.
11.2 Limitation of Liability. IN NO EVENT SHALL SKYPE, ITS AFFILIATES OR THE
SKYPE STAFF BE LIABLE, WHETHER IN CONTRACT, WARRANTY, TORT (INCLUDING
NEGLIGENCE), PRODUCT LIABILITY OR ANY OTHER FORM OF LIABILITY, FOR ANY
INDIRECT, INCIDENTAL, SPECIAL OR CONSEQUENTIAL DAMAGES (INCLUDING
WITHOUT LIMITATION ANY LOSS OF DATA, INTERRUPTION, COMPUTER FAILURE
OR PECUNIARY LOSS) ARISING OUT OF THE USE OR INABILITY TO USE THE
SKYPE SOFTWARE, EVEN IF SKYPE, ITS AFFILIATES OR THE SKYPE STAFF HAVE
BEEN ADVISED OF THE POSSIBILITY OF SUCH DAMAGES.
11.3 Remedy. YOUR ONLY RIGHT OR REMEDY WITH RESPECT TO ANY PROBLEMS
OR DISSATISFACTION WITH THE SKYPE SOFTWARE IS TO DEINSTALL AND CEASE
USE OF SUCH SKYPE SOFTWARE.
11.4 Jurisdiction’s Limitations. As some jurisdictions do not allow some of the
exclusions or limitations as set forth above, some of these exclusions or
limitations may not apply to You. In such event the liability will be limited as far as
legally possible under the applicable legislation.
Article 12 General Provisions
12.1 New versions of the Agreement. Skype reserves the right to modify this
Agreement at any time by providing such revised Agreement to You or by
publishing the revised Agreement on the Skype Website. The revised Agreement
shall become effective within thirty (30) days of such publishing or provision to
You, unless You expressly accept the revised Agreement earlier by clicking on the
accept button. The express acceptance by You, or Your continued use of the
Skype Software after expiry of the notice period of thirty (30) days, shall
constitute Your acceptance to be bound by the terms and conditions of the
revised Agreement. You can find the latest version of this Agreement at
www.skype.com/company/legal/eula. Skype reserves the right to make changes
to this Agreement from time to time.
12.2 Entire Agreement. The terms and conditions of this Agreement constitute
the entire agreement between You and Skype with respect to the subject matter
hereof and will supersede and replace all prior understandings and agreements,
in whatever form, regarding the subject matter.
B-10
Page 63

12.3 Partial Invalidity. Should any term or provision hereof be deemed invalid,
void or enforceable either in its entirety or in a particular application, the
remainder of this Agreement shall nonetheless remain in full force and effect.
12.4 No waiver. The failure of Skype at any time or times to require performance
of any provisions hereof shall in no manner affect its right at a later time to
enforce the same unless the same is explicitly waived in writing and signed by
Skype.
12.5 No Assignment by You. You are not allowed to assign this Agreement or any
rights hereunder.
12.6 Assignment by Skype. Skype is allowed to at its sole discretion assign this
Agreement or any rights hereunder to any Affiliate, without giving prior notice.
12.7 Applicable Law. This Agreement shall be governed by and construed in
accordance with the laws of Luxembourg without giving effect to the conflict of
laws or provisions of Luxembourg or Your actual state or country of residence.
12.8 Competent Court. Any legal proceedings arising out of or relating to this
Agreement will be subject to the jurisdiction of the courts of the district of
Luxembourg.
12.9 Language. The original English version of this Agreement may have been
translated into other languages. In the event of inconsistency or discrepancy
between the English version and any other language version of this Agreement,
the English language version shall prevail.
B-11
Page 64

Skype End User License Agreement
B-12
Page 65

Page 66

VM1185T
E032006-CS-R01
149xxxxxxxxxxxx
 Loading...