

Page 1

ABIT RADEON Series
(R9800XT, R9600XT-VIO, R9600, R9600SE)
3D Graphics Card
User’s Manual
4200-0401-03
Rev. 1.10
Page 2

Copyright and Warranty Notice
The information in this document is subject to change without notice and does
not represent a commitment on part of the vendor, who assumes no liability or
responsibility for any errors that may appear in this manual.
No warranty or representation, either expressed or implied, is made with
respect to the quality, accuracy or fitness for any particular part of this
document. In no event shall the manufacturer be liable for direct, indirect,
special, incidental or consequential damages arising from any defect or error
in this manual or product.
Product names appearing in this manual are for identification purpose only
and trademarks and product names or brand names appearing in this document
are property of their respective owners.
This document contains materials protected under International Copyright
Laws. All rights reserved. No part of this manual may be reproduced,
transmitted or transcribed without the expressed written permission of the
manufacturer and authors of this manual.
If you do not properly set the Graphics Accelerator settings causing the
motherboard to malfunction or fail, we cannot guarantee any responsibility.
Page 3

Table Of Contents
CHAPTER 1. INTRODUCTION ....................................... 1-1
1-1. R9800XT...................................................................................... 1-1
1-2. R9600XT-VIO .............................................................................1-4
1-3. R9600/R9600SE........................................................................... 1-6
CHAPTER 2. HARDWARE SETUP ................................. 2-1
2-1. CARD INSTALLATION .................................................................... 2-1
New Systems: ....................................................................................2-1
Systems with Existing VGA Card: ....................................................2-1
2-2. DEVICES CONNECTION ................................................................. 2-2
2-3. CONNECTING TO COMPUTER’S POWER SUPPLY .............................2-3
2-4. CHANGING NTSC/PAL SETTING.................................................. 2-4
For R9600XT-VIO/R9600/R9600SE: ...............................................2-4
For R9800XT:....................................................................................2-4
CHAPTER 3. DRIVER INSTALLATION........................ 3-1
CHAPTER 4. DISPLAY PROPERTIES ........................... 4-1
4-1. SETTINGS ......................................................................................4-1
4-2. GENERAL ......................................................................................4-2
4-3. ADAPTER ...................................................................................... 4-3
4-4. MONITOR ......................................................................................4-3
4-5. TROUBLESHOOT............................................................................ 4-4
4-6. COLOR MANAGEMENT.................................................................. 4-4
4-7. DISPLAYS ...................................................................................... 4-5
Attributes: ..........................................................................................4-5
Adjustments: ......................................................................................4-6
Advanced: ..........................................................................................4-6
4-8. COLOR ....................................................................................... 4-7
4-9. OPTIONS ....................................................................................... 4-9
4-10. OVERLAY .................................................................................... 4-10
Clone Mode Options:.......................................................................4-11
User’s Manual
Page 4

4-11. 3D CONTROL PANEL................................................................... 4-12
Custom settings for Direct3D/OpenGL:..........................................4-13
SMARTSHADER[tm] Effects:........................................................4-14
4-12. SMARTGART[tm] ....................................................................4-15
4-13. VPU RECOVER ...........................................................................4-16
4-14. OVERDRIVE[tm]...................................................................... 4-16
CHAPTER 5. HYDRAVISIONTM...................................... 5-1
Accessing HYDRAVISION:..............................................................5-1
MultiDesk: .........................................................................................5-2
APPENDIX A. Install PowerDVD............................................... A-1
APPENDIX B. Install DirectX..................................................... B-1
APPENDIX C. BIOS Flashing Utility......................................... C-1
APPENDIX D. How to Get Technical Support ........................... D-1
ABIT RADEON Series
Page 5
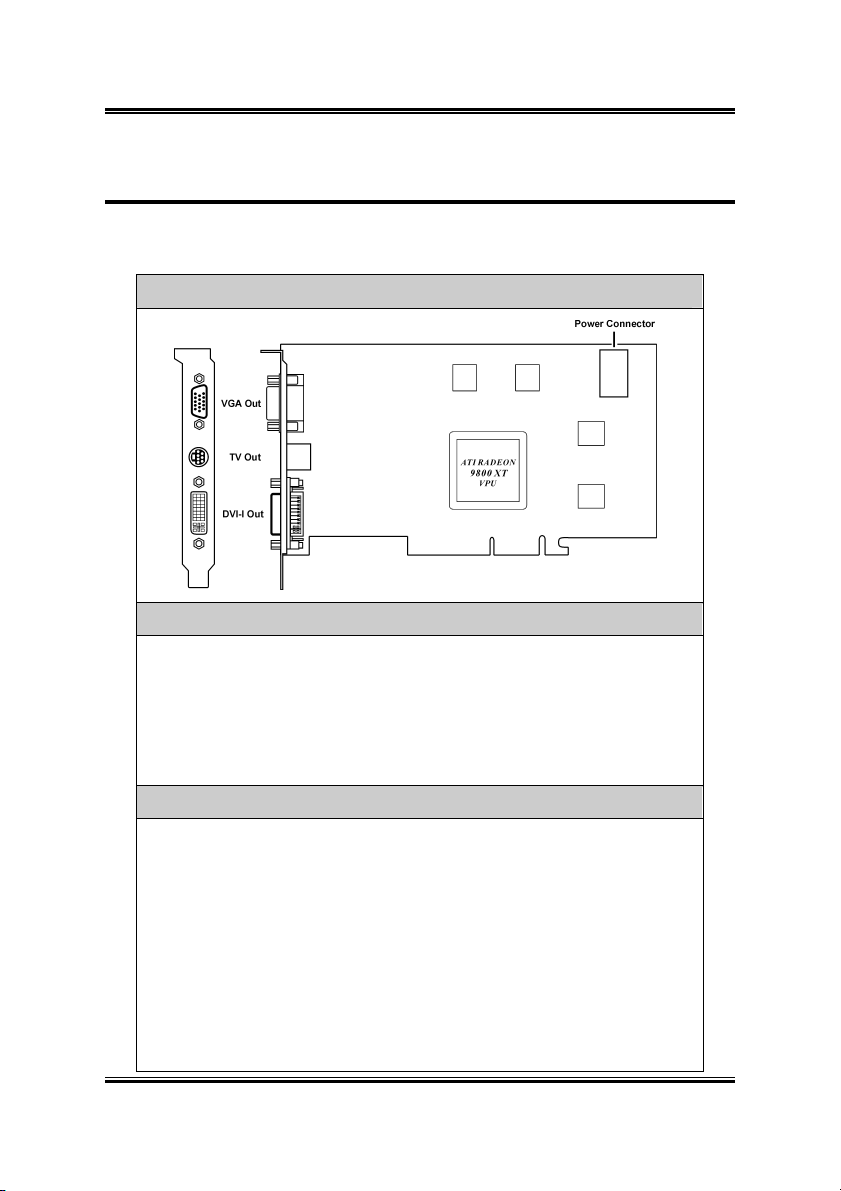
Introduction 1-1
Chapter 1. Introduction
1-1. R9800XT
Card Layout
Package List
R9800XT Graphics Card Power Extension Cable
S-AV Adapter User’s Manual
S-Video Cable Multi-language QIG
Composite (RCA) Cable Installation CD: Driver/PowerDVD
DVI-I to D-Sub Adapter Half-life2 free download coupon
Features & Specifications
Powered by RADEON™ 9800 XT Visual Processing Unit (VPU)
On-board 256MB DDR Memory
256-bit DDR memory interface
8 parallel rendering pipelines
4 parallel geometry engines
Full Floating Point Precision in real time
AGP 8X support
MPEG-2 decoding with motion compensation, iDCT and color space
conversion
User’s Manual
Page 6

1-2 Chapter 1
All-format DTV/HDTV decoding
YPrPb component output
Adaptive de-interlacing and frame rate conversion
Dual integrated display controllers
Dual integrated 10-bit per channel 400 MHz DACs
Integrated 165 MHz TMDS transmitter (DVI 1.0 compliant and
HDCP ready)
Integrated TV Output support up to 1024x768 resolution
SMARTSHADER
Full support for Microsoft
shaders in hardware
™
2.1
®
DirectX® 9.0 programmable vertex and pixel
2.0 Vertex Shaders support vertex programs up to 65,280 instructions with
flow control
2.0 Pixel Shaders support up to 16 textures per rendering pass
New F-buffer technology supports pixel shader programs with unlimited
instructions
128-bit, 64-bit & 32-bit per pixel floating point color formats
Multiple Render Target (MRT) support
Shadow volume rendering acceleration
Complete feature set also supported in OpenGL
®
via extensions
SMOOTHVISION™ 2.1
2x/4x/6x full scene anti-aliasing modes
Adaptive algorithm with programmable sample patterns
2x/4x/8x/16x anisotropic filtering modes
Adaptive algorithm with bi-linear (performance) and tri-linear (quality)
options
HYPER Z™ III+
3-level Hierarchical Z-Buffer with early Z test
Lossless Z-Buffer compression (up to 24:1)
Fast Z-Buffer Clear
Z cache optimized for real-time shadow rendering
TRUFORM™ 2.0
2nd generation N-Patch higher order surface support
Discrete and continuous tessellation levels per polygon
Displacement mapping
ABIT RADEON Series
Page 7

Introduction 1-3
VIDEOSHADER™
Seamless integration of pixel shaders with video
FULLSTREAM™ video de-blocking technology
Noise removal filtering for captured video
Operating Systems Support: Windows® XP/2000/Me
System Requirements
Recommends a 300-Watt power supply
®
Intel
Pentium® 4, AMD® Athlon® or higher with AGP 8X (0.8v), 4X
(1.5V) bus
128MB of system memory
Installation software requires CD/DVD ROM drive
User’s Manual
Page 8

1-4 Chapter 1
1-2. R9600XT-VIO
Card Layout
Package List
R9600XT-VIO Graphics Card
VIVO Adapter Multi-language QIG
S-Video Cable Installation CD: Driver/PowerDVD
Composite (RCA) Cable DVI-I to D-Sub Adapter
Power Director
Powered by RADEON™ 9600 XT Visual Processing Unit (VPU)
On-board 256MB DDR Memory
128-bit DDR memory interface
4 parallel rendering pipelines
2 parallel geometry engines
Full Floating Point Precision in real time
AGP 8X support
MPEG-2 decoding with motion compensation, iDCT and color space
conversion
All-format DTV/HDTV decoding
YPrPb component output
Adaptive de-interlacing and frame rate conversion
Dual integrated display controllers
ABIT RADEON Series
TM
2.55ME Video Editing Software
Features & Specifications
User’s Manual
Page 9

Introduction 1-5
Dual integrated 10-bit per channel 400 MHz DACs
Integrated 165 MHz TMDS transmitter (DVI 1.0 compliant and
HDCP ready)
Integrated TV Output support up to 1024x768 resolution
Video Input supports up to 800x600 resolution
Optimized for Pentium
SMARTSHADER
Programmable pixel and vertex shaders
®
4 SSE2 and AMD Athlon™ 3Dnow!
™
2.0
16 textures per pass
Pixel shaders up to 160 instructions with 128-bit floating point precision
Vertex shaders up to 1024 instructions with flow control
Multiple render target support
Shadow volume rendering acceleration
High precision 10-bit per channel frame buffer support
Supports DirectX
®
9.0 and the latest version of OpenGL®
SMOOTHVISION™ 2.1
2x/4x/6x full scene anti-aliasing modes
Adaptive algorithm with programmable sample patterns
2x/4x/8x/16x anisotropic filtering modes
Adaptive algorithm with bi-linear (performance) and tri-linear (quality)
options
HYPER Z™ III+
Lossless Z-Buffer compression (up to 24:1)
Fast Z-Buffer Clear
TRUFORM™ 2.0
2nd generation N-Patch higher order surface support
Discrete and continuous tessellation levels per polygon
Displacement mapping
VIDEOSHADER™
Seamless integration of pixel shaders with video
FULLSTREAM™ video de-blocking technology
Noise removal filtering for captured video
Operating Systems Support: Windows® XP/2000/Me
System Requirements
Intel® Pentium® 4, AMD® Athlon® or higher with AGP 8X (0.8v), 4X
(1.5V) bus
128MB of system memory
Installation software requires CD/DVD ROM drive
User’s Manual
Page 10
1-6 Chapter 1
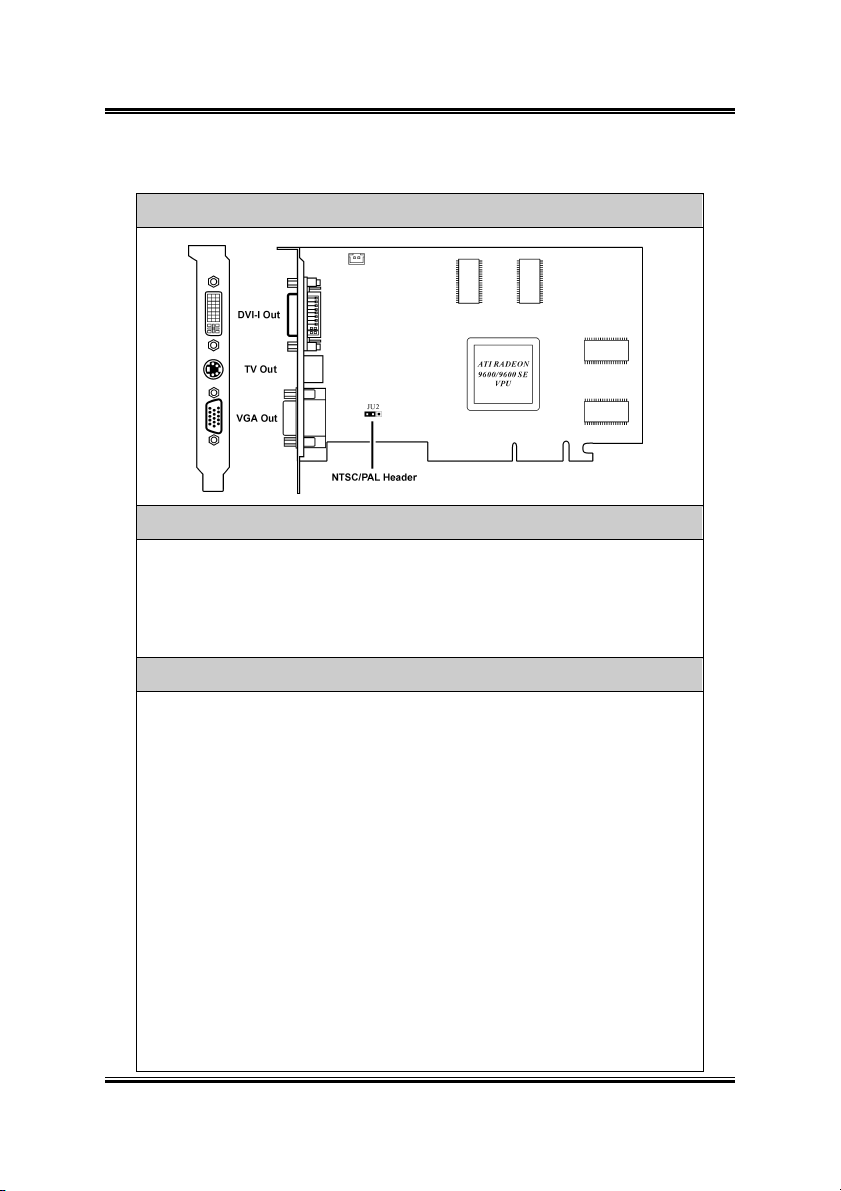
1-3. R9600/R9600SE
Card Layout
Package List
R9600/R9600SE Graphics Card DVI-I to D-Sub Adapter
S-AV Adapter User’s Manual
S-Video Cable Multi-language QIG
Composite (RCA) Cable Installation CD: Driver/PowerDVD
Features & Specifications
R9600:
Powered by RADEON
™
9600 Visual Processing Unit (VPU)
On-board 256MB DDR Memory
128-bit DDR memory interface
R9600SE:
Powered by RADEON
™
9600 SE Visual Processing Unit (VPU)
On-board 128MB DDR Memory
64-bit DDR memory interface
4 parallel rendering pipelines
2 parallel geometry engines
Full Floating Point Precision in real time
AGP 8X support
MPEG-2 decoding with motion compensation, iDCT and color space
conversion
ABIT RADEON Series
Page 11

Introduction 1-7
All-format DTV/HDTV decoding
YPrPb component output
Adaptive de-interlacing and frame rate conversion
Dual integrated display controllers
Dual integrated 10-bit per channel 400 MHz DACs
Integrated 165 MHz TMDS transmitter (DVI 1.0 compliant and
HDCP ready)
Integrated TV Output support up to 1024x768 resolution
Optimized for Pentium
SMARTSHADER
Programmable pixel and vertex shaders
®
4 SSE2 and AMD Athlon™ 3Dnow!
™
2.0
16 textures per pass
Pixel shaders up to 160 instructions with 128-bit floating point precision
Vertex shaders up to 1024 instructions with flow control
Multiple render target support
Shadow volume rendering acceleration
High precision 10-bit per channel frame buffer support
Supports DirectX
®
9.0 and the latest version of OpenGL®
SMOOTHVISION™ 2.1
2x/4x/6x full scene anti-aliasing modes
Adaptive algorithm with programmable sample patterns
2x/4x/8x/16x anisotropic filtering modes
Adaptive algorithm with bi-linear (performance) and tri-linear (quality)
options
HYPER Z™ III+
Lossless Z-Buffer compression (up to 24:1)
Fast Z-Buffer Clear
TRUFORM™ 2.0
2nd generation N-Patch higher order surface support
Discrete and continuous tessellation levels per polygon
Displacement mapping
VIDEOSHADER™
Seamless integration of pixel shaders with video
FULLSTREAM™ video de-blocking technology
Noise removal filtering for captured video
User’s Manual
Page 12

1-8 Chapter 1
Operating Systems Support: Windows® XP/2000/Me
System Requirements
Intel® Pentium® 4, AMD® Athlon® or higher with AGP 8X (0.8v), 4X
(1.5V) bus
128MB of system memory
Installation software requires CD/DVD ROM drive
ABIT RADEON Series
Page 13
Hardware Setup 2-1
Chapter 2. Hardware Setup
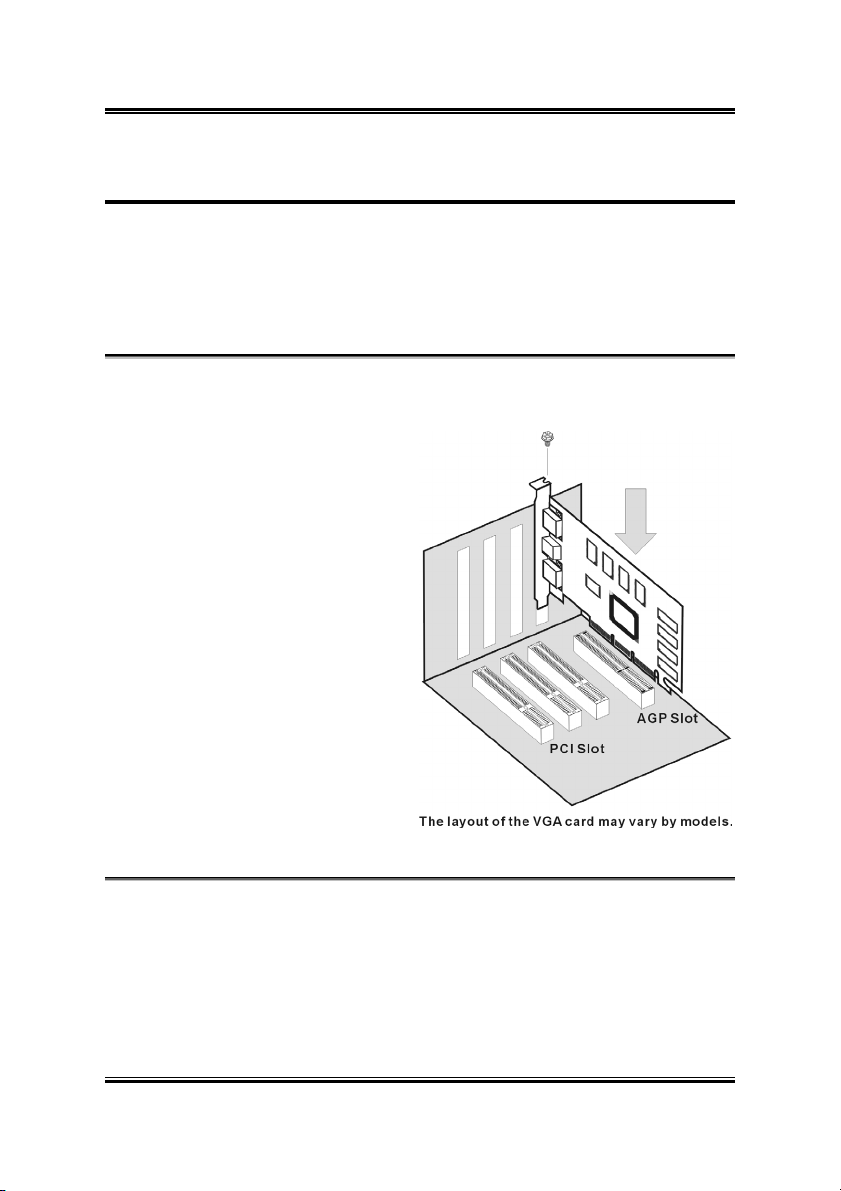
2-1. Card Installation
This graphics card can only be installed in a motherboard with AGP slot. Please
handle this card with care and make sure to unplug the power supply of your system
before installation.
New Systems:
1.
Unplug all power cords of your computer.
2.
Remove computer chassis cover.
3.
Locate the AGP slot on your
motherboard.
4.
Remove the metal bracket
corresponding to the AGP slot.
Keep the screw.
5.
Align this card to the AGP slot.
Hold the card’s edges and insert
it into the slot without using
excessive force or pressing any
components on the card. Make
sure it is firmly and completely
fixed into the slot.
6.
Secure this card’s mounting
bracket to the back panel of
computer chassis with the screw
removed from the metal bracket.
7.
Replace the chassis cover.
Systems with Existing VGA Card:
1.
Change the display driver to Standard VGA.
2.
Shut down your computer and unplug all power cords.
3.
Replace the existing VGA card with this new card.
Your graphics card is now installed. Before restarting your computer, connect PC
monitor or other display devices to this card (see “Devices Connection”).
User’s Manual
Page 14
2-2 Chapter 2
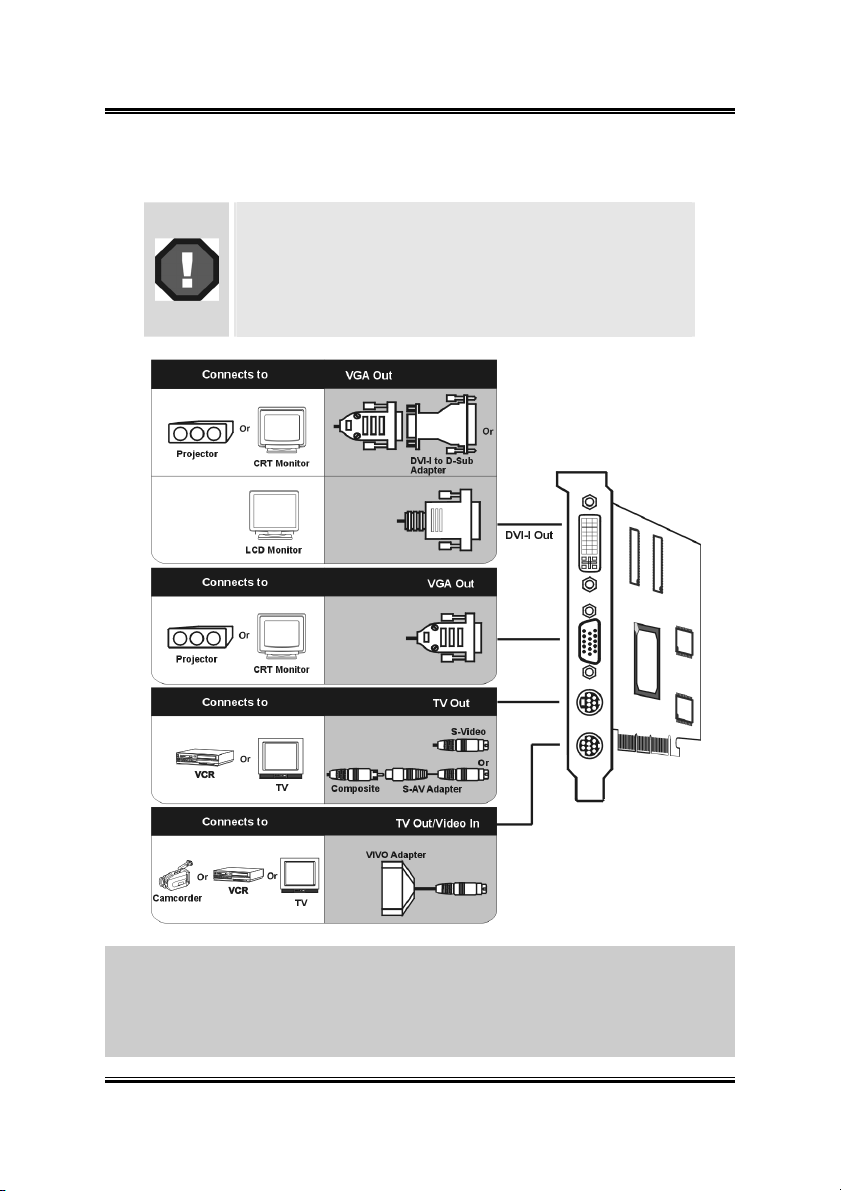
2-2. Devices Connection
The following illustration shows all possible connector
combinations. Your specific Graphics Card may not
have all the shown connectors.
4pin/7pin TV-out and 9pin TV-out/Video-in ports are
both shown here to illustrate the connections. Your
Graphics Card will have one or the other, not both.
NOTE: The 9pin TV-out/Video-in port allows you to output/input the image to/from a TV
or video device. This type of connector can be used for either RCA cable or S-Video
cable if the optional VIVO adapter is plugged in. Simply plug one end of the RCA cable
or S-Video cable into the proper connector provided by the VIVO adapter, and the other
end to the video input/output connector on your TV or video device. For the correct
connection, please refer to the TV’s and video devices’ manuals for more information.
ABIT RADEON Series
Page 15
Hardware Setup 2-3
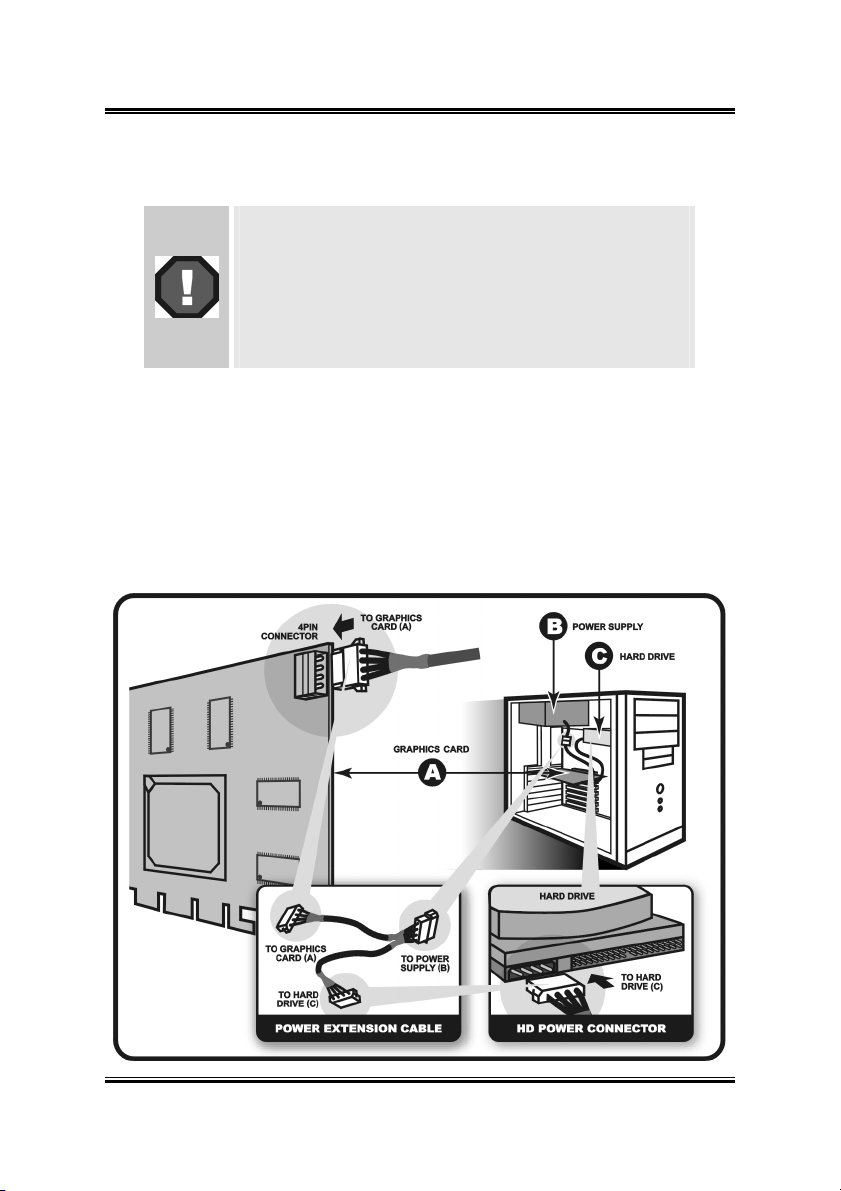
2-3. Connecting to computer’s power supply
The R9800XT requires connection to your PC’s internal
power supply for operation. Consult your system builder or
OEM to ensure your system has an adequate power supply.
Otherwise we recommend a 300-Watt power supply or
greater to ensure normal system operation.
Please note that the system will not boot, if the R9800XT is
not connected to the power supply.
Find a hard disk drive power cable, and connect it to your graphics card. If there is no
available one, use the supplied power extension cable to connect R9800XT to the
computer’s hard drive power connector. Please follow the instructions shown below.
Remove the power cable from the HD power connector. 1.
2.
Connect (A) of the power extension cable to your graphics card.
3.
Connect (B) to the power supply connector.
4.
Connect (C) to the HD power connector.
User’s Manual
Page 16

2-4 Chapter 2
2-4. Changing NTSC/PAL Setting
The RADEON Series Graphics Card provides both NTSC and PAL support. The
default setting is NTSC. To change the setting to PAL, please refer to the following
illustration and description.
For R9600XT-VIO/R9600/R9600SE:
For R9800XT:
ABIT RADEON Series
Page 17

Driver Installation 3-1
Chapter 3. Driver Installation
The screen displays in this manual may not exactly reflect the screenshots on your
screen. The contents of the Installation CD that came with this card are subject to
change at any time without notice. The latest driver for this board is also
downloadable from our Web site at http://www.abit.com.tw.
The installation procedures and screenshots in this section are based on Windows XP
operating system. For those of other OS, please follow its on-screen instruction.
Insert the Installation CD into CD-ROM drive, it should execute the installation
program automatically. If not, double-click the execution file at the main directory of
this CD to enter the installation menu.
1. After entering the installation menu,
move your curser to [Drivers] tab. Click
[ATI Official CATALYST Drivers].
2. The welcome screen appears, click
“Next>” to start installation.
3. Click “Yes” to continue.
4. Select the component you want to
install to enter further installation.
User’s Manual
Page 18

3-2 Chapter 3
Click “Continue Anyway”. 5.
Click “Continue Anyway”. 6.
7. Choose “Yes, I want to restart my
computer now”, and click “Finish” to
complete setup.
ABIT RADEON Series
Page 19

Display Properties 4-1
Chapter 4. Display Properties
This section provides an explanation of each Display Properties tab.
To use the Display Properties, access the Windows
double-click Display to enter, or you may right-click the Windows
“Properties” “Settings” “Advanced” to enter.
NOTE: The screenshots in this section are based on the Windows XP operating
system. Features presented in the following pages may not be supported in all
operating systems and may appear differently.
4-1. Settings
This tab displays icons that represent
your monitors. If more than one icon is
displayed, click each one to see the large
number in the corresponding monitor.
The settings for that monitor appear in
Display, Screen resolution, and Color
quality.
Display: Displays all installed
PCI and AGP video adapters. The
adapter for your primary monitor
is in position 1.
Screen resolution: Displays the
current screen resolution settings
for the monitor whose video
adapter appears in Display. Drag
the slider to specify the screen
resolution you want. The higher the number of pixels, the more information you
can display on your screen.
Color quality: Displays the current color settings for the monitor whose video
adapter appears in Display. To use a different color setting, click the arrow, and
then click the setting you want.
Use this device as the primary monitor: Select this option to specify that the
monitor corresponding to the icon you selected above is the primary monitor.
The primary monitor will display the logon dialog box when you start your
computer. In addition, most programs will display windows on the primary
monitor when you initially open them.
®
Control Panel and then
®
desktop, click
User’s Manual
Page 20

4-2 Chapter 4
Extend my Windows desktop onto this monitor: Select this option to specify
that your desktop will be extended onto the monitor corresponding to the icon
you selected above. This check box is unavailable for your primary monitor
because additional monitors are all extensions of the primary monitor.
Identify: Click this button to display a number on the monitors that correspond
with the icons shown above.
Troubleshoot: Click this button to start the Display Troubleshooter.
Advanced: Click this button to open the Properties dialog box for the video
adapter that appears in Display.
4-2. General
DPI setting: Lists the available
DPI (dots per inch) sizes for the
selected monitor. Increasing the
DPI increases the size of
everything on your screen.
Decreasing the DPI decreases the
size of everything on your screen.
To use a different size, click a
DPI size in the list or choose
Other, which allows you to
customize the DPI setting for your
monitor.
Restart the computer before
applying the new display
settings: Specifies that you want
your computer to restart
automatically when you change
system display settings.
Apply the new display settings without restarting: Specifies that you want
your computer to apply changes to system color settings without restarting.
Some programs might not display colors correctly without being restarted after
you make changes. To avoid this problem, close the program, change the color
settings, and then open the program again.
Ask me before applying the new display settings: Specifies whether
Windows should display a prompt to restart every time you change system
color settings.
ABIT RADEON Series
Page 21

Display Properties 4-3
4-3. Adapter
This tab shows what type of display
adapter you are currently using.
Properties: Click this button to
display device and driver
properties for this video adapter.
List All Modes: Click this button
to view all of the video modes
available for this adapter.
4-4. Monitor
Properties: Click this button to
display device and driver
properties for this video adapter.
Screen refresh rate: Lists the
refresh rates available for the
selected monitor listed under
Display on the Settings tab. A
higher refresh frequency reduces
flicker on your screen.
Hide modes that this monitor
cannot display: Specifies
whether the list under Refresh
Frequency will include modes
that are not supported by your
monitor. Choosing a mode that is
inappropriate for your monitor
may cause severe display
problems and could damage your
hardware. You must be logged on as a member of the Administrator group in
order to view unsupported modes.
User’s Manual
Page 22

4-4 Chapter 4
4-5. Troubleshoot
Hardware acceleration: Adjusts
the levels of hardware
acceleration controlled by device
drivers. Dragging the slider from
Full to None gradually disables
portions of hardware acceleration
and enables you to detect which
areas might be causing you to
have problems with your graphics
hardware.
Enable write combining:
Specifies whether "write
combining" is turned on or off.
Write combining improves video
performance by speeding up the
display of information to your
screen. However, increased speed
can cause screen corruption, so if
you experience problems with your display, clear the check box.
4-6. Color Management
This tab lists all the color profiles
currently associated with this monitor.
Click a profile to make it the active
profile. Otherwise, the default profile is
the active profile.
ABIT RADEON Series
Page 23

Display Properties 4-5
4-7. Displays
The Displays tab provides multiple
monitor features. Here you can
enable/disable display devices and swap
the assignment of Primary and
Secondary displays.
Scheme: Lists all the displays
schemes you have saved, as well as
several preset schemes.
Hotkey: Displays the hotkey for
the current selection in the Scheme
list.
: Click this button to
enable/disable the display device. A
desktop image appears on the
monitor icon when this button is in
the “Enable” position.
Monitor icon: Click this to launch
the following Monitor Properties
Page (if available): Monitor Attributes page, Monitor Adjustment page and
Monitor Advanced page.
Attributes:
Use DDC information: Click this
button if your monitor is equipped
with a Display Data Channel
(DDC) – a data channel used by
newer monitors to communicate
their properties (such as maximum
resolution and refresh rate) to the
associated video adapter.
Maximum Resolution: Displays
the maximum resolution values
available for your monitor.
Maximum Refresh Rate: Displays
the maximum refresh rate available
for your monitor.
Warning: Consult your monitor
user’s manual before adjusting
maximum refresh rates. Applying the wrong maximum refresh rate may
seriously damage your monitor.
User’s Manual
Page 24

4-6 Chapter 4
Adjustments:
Screen Position: This control
panel allows you to position your
monitor display. The four arrows
under Screen Position shift your
display left, right, up, or down.
Screen Size: This option allows
you to adjust the size of your
monitor display.
The (+) and (–) buttons under
Vertical Screen Size
increase/decrease the vertical size
of your display.
The (+) and (–) buttons under
Horizontal Screen Size
increase/decrease the horizontal
size of your display.
Advanced:
Synchronization: This option
allows you to adjust the
Horizontal, Vertical and
Composite synchronization of
your monitor. Consult your
monitor specifications for the
recommended settings.
Horizontal/Vertical button:
Click this button to adjust
horizontal/vertical
synchronization of your monitor.
Composite button: Placing a
check here combines the
horizontal and vertical
synchronization signals supplied
by your graphics card to your
monitor.
Warining: Composite sync should be checked only if you are using a
composite sync monitor. Consult your monitor user’s manual for information on
your monitor type.
ABIT RADEON Series
Page 25

Display Properties 4-7
4-8. Color
The Color Properties page allows you to configure Gamma, Brightness, and Contrast
color settings for both your desktop and full screen 3D environments. You can also
save settings to a color Profile for easy recall later. In addition, you can assign unique
hotkey combinations that allow you to adjust Gamma, Brightness, and Contrast color
settings within your full screen 3D applications.
Desktop radio button: Select
Desktop to configure your
desktop color settings.
Full Screen 3D radio button:
Select Full Screen 3D to
configure the color settings for
your 3D application. Note that the
configured settings will only be
apparent within a full screen 3D
application environment.
Profiles for: Indicates whether
the profile in current use is for
your Desktop or a Full Screen 3D
environment.
Profiles dropdown list: Lists all
of the Desktop or Full Screen 3D
profiles that you have saved.
Selecting a profile from the list loads those custom color settings for either your
Desktop or your full screen 3D application (depending on the state of the radio
buttons). To create a new profile, simply type in a name and click Save.
Save: Click this button to save your current color settings to a Desktop or Full
Screen 3D profile, using the name you specified in the list box. To restore these
settings later, simply select the Profile name from the list and click Apply or
OK.
Delete: Deletes the profile that is selected in the Profiles list box.
All Colors checkbox: Check this box to adjust the Gamma, Brightness or
Contrast for Red, Green, and Blue simultaneously. Note that any individual
color settings made are lost if All Colors is selected, and the color settings
revert back to the previous All Colors settings.
Red/Green/Blue radio buttons: Adjusts the Gamma, Brightness or Contrast
only for the selected color component (Red, Green, or Blue). Note that any
individual color settings made are lost if you select All Colors again.
User’s Manual
Page 26

4-8 Chapter 4
Gamma slider: Increases or decreases the gamma correction of your Desktop
or full screen 3D application. Changing the gamma alters the curvature of the
color curve.
Brightness slider: Increases or decreases the color brightness of your Desktop
or full screen 3D application. Changing the brightness adjusts the vertical
position of the color curve.
Contrast slider: Increases or decreases the color contrast of your Desktop or
full screen 3D application. Changing the contrast adjusts the slope of the color
curve.
Reset buttons: Click this to restore the individual slider setting to its default
value, then click Apply or OK.
Color preview box: The color image indicates visually how the Gamma,
Brightness and Contrast sliders affect the final color settings of your display
device. In Desktop mode, clicking on this with your mouse pointer will change
the image.
Hotkeys: Click this button to open the Color Hotkeys Settings dialog. There
you can assign hotkeys for adjusting your color settings within a full screen 3D
application environment. To activate this button, you must select the Full
Screen 3D radio button.
Defaults: Click this to restore all of the color settings to the default values, then
click Apply or OK.
ABIT RADEON Series
Page 27

Display Properties 4-9
4-9. Options
The Options tab provides detailed driver information and access to the card’s
specifications. You can also enable or disable the ATI taskbar icon.
Version Information: Provides
the driver version number, 2D
version number and the driver
build information.
Details: Clicking this button
provides the graphics card’s
hardware details and driver
information.
Reactivate all warning messages:
Allows you to reactivate any
disabled graphics warning
messages.
Enable ATI taskbar icon
application: Unchecking this
allows you to disable the ATI
taskbar applications and removes
the ATI icon from your system
tray.
Show ATI icon on taskbar: Unchecking this allows you to remove the ATI
icon from your system tray without disabling the ATI icon applications.
Disable quick resolution feature: Quick resolution feature is accessible by
leftclicking the ATI icon in the system tray. Checking this option disables this
feature.
Reduce DVI frequency on high-resolution displays: Resolves display
corruption or no image at high resolutions (for example 1280x1024 @75Hz)
using a digital DVI display. (This setting has no effect when using a
DVI-to-VGA adapter.)
Alternate DVI operational mode: Use this option if you are experiencing
display corruption on your DVI flat panel.
User’s Manual
Page 28

4-10 Chapter 4
4-10. Overlay
The Overlay tab allows you to configure the brightness, contrast, saturation, hue and
gamma properties of your video overlay.
NOTE: Video overlay allows for the viewing of streaming video on your PC.
However, there is only one video overlay, which is only available on the Primary
display. The video overlay controls are automatically activated during playback of
any video file type that supports overlay adjustments.
Brightness: Use this slider to
adjust the brightness of the video
image.
Contrast: Use this slider to adjust
the contrast in the video image.
Saturation: Use this slider to
adjust the vividness of the color.
Sliding it all the way to the left
removes all color and produces a
black and white picture.
Hue: Use this slider to adjust the
pureness or tint of the red, green
and blue components of the color.
Gamma: Use this slider to adjust
the overall intensity of the video
image.
Clone mode options: Click this
button to access Clone Mode overlay settings. These settings only apply to
video content when viewed in dual-controller Clone mode.
Defaults: Clicking this button allows you to reset the Overlay settings to
default values.
ABIT RADEON Series
Page 29

Display Properties 4-11
Clone Mode Options:
Standard: Video content is
displayed on your Primary display
only.
Theater Mode: Video content is
displayed on your Primary and
Secondary displays. Video
content is displayed on your
Secondary display(s) is always in
full screen mode.
NOTE: Your computer must be
set for 16-bit color depth or
higher to use this mode.
Same on all: Video content is
displayed on your Primary and
Secondary display is exactly the
same manner. For example, all
displays will show video output in full screen mode.
Theater Mode Settings: These settings are available when Theater Mode is
selected.
Same as source video: The aspect ratio of the source video is maintained for
full screen display.
NOTE: This option may result in black bars on either the horizontal or vertical
sides of the video display.
Full Screen Video: The source video is scaled so that your display is showing
full screen.
NOTE: If the source video contains horizontal black bars, as do some DVD
movies, the full screen video will also contain black bars.
4:3 [Standard TV]: Select this option if the aspect ratio of the display device
showing full screen video has the standard 4:3 aspect ratio (standard TVs and
monitors).
16:9 [Widescreen]: Select this option if the aspect ratio of the display device is
showing full screen video has a 16:9 aspect ratio (widescreen HDTVs).
User’s Manual
Page 30

4-12 Chapter 4
4-11. 3D Control Panel
Using this control panel, you can fine-tune the settings for Direct3D and OpenGL
applications.
3D Settings For: Click the check
Main slider: Allows you to select
Use custom settings: When this
Custom: When Use custom settings is checked, the Custom option will be
Profiles for: Allows users to save their current 3D configuration into a profile.
Compatibility: Allows you to access advanced settings that can solve
Defaults: Click this button to reset the Direct3D/OpenGL settings to default
box to specify which 3D
application settings you want to
adjust.
the kind of application experience
you’d like to have. Moving the
slider to the left will maximize
application performance, while
moving the slider to the right will
optimize 3D image quality.
box is checked, the Main slider is
disabled, allowing you to move
each individual slider in the
Custom Settings section below.
Setting the individual sliders
gives you finer control over your
application experience. Using Custom Settings is recommended for advanced
users only.
available to select. You may click this button to enter the Direct3D or OpenGL
custom settings control panel.
Loaded profiles will be displayed under the current settings tab.
compatibility issues for a few specific Direct3D/OpenGL applications.
values.
ABIT RADEON Series
Page 31

Display Properties 4-13
Custom settings for Direct3D/OpenGL:
Anti-Aliasing: This option improves image quality by removing jagged edges
from 3D images, resulting in smoother, more natural-looking lines and
contours.
Anti-Aliasing slider: Anti-Aliasing can be applied using different number of
samples (2X, 4X, 6X). More samples provide more realistic 3D images.
Anisotropic Filtering checkbox: Anisotropic filtering uses a texture filtering
technique that blends multiple texture samples together. Selecting Application
Preference will result in sharper textures, with a negligible reduction in the
application’s performance.
Anisotropic Filtering slider: The number of samples taken when anisotropic
filtering is performed can vary. By moving this slider to the right, the number of
samples taken increases and the quality of the final image increases. 16X
provides maximum detail, crisplooking images as a result of the largest number
of texture samples possible.
Texture Preference slider: Selecting this decides whether your application
should use high quality or high performance textures. Moving the slider to the
right delivers the highest quality experience. Moving the slider to the left
emphasizes a high performance solution while still providing good visuals.
Mipmap Detail Level slider: Allows you to choose the texture quality of the
mipmaps the application will use. Mipmaps are a collection of different sized
textures of the same image. As the user moves closer to a 3D object the image
quality should increase, requiring a higher quality texture of the same image.
User’s Manual
Page 32

4-14 Chapter 4
The base mipmap is the highest quality texture, and all subsequent mipmaps are
smaller sized textures of the same image. Moving the slider to the right
improves image quality, and moving the slider to the left degrades image
quality.
Wait for Vertical Sync: Wait for vertical sync will lower the frame rate of full
screen games but reduce the image tearing that can occur with the higher frame
rate. Selecting Application Preference allows the application to decide
whether or not it should display its frames at the refresh rate of the monitor.
Selecting Always Off allows the application to run at its highest possible frame
rate, regardless of the monitor’s refresh rate which is typically less than the
frame rate at which the application will run.
TRUFORM[tm]: TRUFORM uses High Order Surface geometry to generate
more detailed and realistic terrain and character models for applications that
support this technology. Select Application Preference to enable TRUFORM.
Select Always Off to disable TRUFORM.
SMARTSHADER[tm] Effects:
This item allows you to select the
SMARTSHADER[tm] Effect you want
to apply to your game.
ABIT RADEON Series
Page 33

Display Properties 4-15
4-12. SMARTGART[tm]
SMARTGART is a suite of testing and diagnostics tools that perform a variety of bus
tests to determine the optimal settings for your graphics accelerator installed in your
computer.
SMARTGART automatically configures your graphics device to the optimal settings.
SMARTGART does not actually disable any AGP functionality in your computer’s
hardware. It simply instructs the display driver not to use a specific AGP function if
that specific AGP function hasn’t passed the SMARTGART diagnostics test.
Warning: Changing the AGP settings could result in system instability.
Set AGP Speed: Experienced
users can manually change the
AGP speed. You will need to
reboot your computer for this
change to take effect. The
possible AGP speed is dependent
on the motherboard chipset and
design. Your computer’s available
AGP speeds are shown in the
SMARTGART dialog.
Fast Write: Fast Write allows the
CPU to transfer data directly to
the graphics accelerator.
NOTE: This setting is disabled
for many computers because the
motherboard is not capable of
supporting this feature.
Retest All: Click this button to
retest all graphic bus capabilities. All tests and diagnostics are initiated
immediately following a system restart. Any settings that have previously been
set to Off will be turned on, providing the test passes.
NOTE: Problems can arise if the user enables a secondary graphics accelerator
(in a multiple monitor environment) after the operating system has loaded. The
problem exists because the secondary graphics card is enabled after the
SMARTGART diagnostic test have been run. To ensure system stability you
should restart the computer after the secondary graphics accelerator is enabled
so that both graphics accelerators can be tested with SMARTGART.
User’s Manual
Page 34

4-16 Chapter 4
4-13. VPU Recover
Enable VPU Recover: Place a
check here to enable VPU
Recover. When the option is not
checked, other controls in the
VPU Recover control panel are
grayed out.
Prepare an error report if VPU
Recover is activated, for
submission to ATI Technologies:
Place a check here to allow VPU
Recover, once it is activated, to
generate an error report that you
can send to ATI via email.
4-14. OVERDRIVE[tm]
The OVERDRIVE™ control panel
provides users with a safe and intelligent
graphics processor clocking utility.
OVERDRIVE™ constantly monitors
the graphics processor, pushing its
frequency to the maximum, while
always ensuring that the processor
temperature stays at a safe level. If the
temperature of the graphics processor
ever gets too hot, OVERDRIVE™ will
automatically decrease the clock until a
safe temperature is reached.
Enable OVERDRIVE[tm]:
Click this check box to enable
OVERDRIVE™ feature.
ABIT RADEON Series
Page 35

HYDRAVISIONTM 5-1
Chapter 5. HYDRAVISIONTM
HYDRAVISIONTM enables you to quickly and easily tailor your computer desktop to
the way you work, so you can manage increased amounts of information and improve
your productivity.
Accessing HYDRAVISION:
After installation of display drivers, you
will find the ATI icon on the Windows
taskbar’s status area.
1.
Right-click the ATI icon.
2.
Select HYDRAVISION.
3.
Click HYDRAVISION Properties.
NOTE: Besides clicking the ATI icon to
launch HYDRAVISION Desktop
Manager, another way to do this is to
click “Start” “All Programs”
“ATI HydraVision” “HydraVision
Properties”.
The HYDRAVISION Desktop Manager
allows you to modify your display
options. You can access the Desktop
Management and Hot Keys Dialogs by
clicking on the appropriate tab in the
Desktop Manager.
Along the bottom of each
HYDRAVISION Dialog are four
buttons: OK, Cancel, Apply and Help.
OK: Click this button to
implement the changes you’ve
made in the HYDRAVISION
Dialog and exit the Desktop
Manager. Changes take effect
immediately unless you see a
message prompting you to restart
your computer.
User’s Manual
Page 36

5-2 Chapter 5
Cancel: Click this button to discard all changes made to any section of the
HYDRAVISION Dialog and close the Desktop Manager.
Apply: Click this button to implement your changes without closing the
Desktop Manager.
Help: Click this button to open HYDRAVISION’s online help. You can also
get context-sensitive on-screen help by moving your mouse over the relevant
text for each control. For using each HYDRAVISION function, please refer to
this online help.
MultiDesk:
HYDRAVISION supports multiple desktops. With MultiDesk, one active desktop
will always be visible, while up to eight active desktops can reside in the background.
When MultiDesk is running, the MultiDesk icon in the system tray displays the
number assigned to the current desktop.
MultiDesk is installed with HYDRAVISION. However, multiple desktop support and
HYDRAVISION can be loaded/unloaded and operated independently of each other.
Accessing MultiDesk:
MultiDesk can be accessed in several
ways. You may click on the MultiDesk
Properties button in the Desktop
Management tab or right-click the
MultiDesk Icon on the Windows
taskbar’s status area.
NOTE: For detailed information on
how to operate MultiDesk, please click
the Help button in the MultiDesk
Properties tab.
ABIT RADEON Series
Page 37

Install PowerDVD A-1
Appendix A. Install PowerDVD
The PowerDVD is a simple-to-use DVD player combining all the features you would
expect to find in a standard consumer DVD player, in addition to some very advanced
functionality, such as full VCD 2.0 support, full precision video decoding, a choice of
user interfaces, and video display options. You can play DVD titles or Video CDs PowerDVD automatically determines the type of disc in the DVD drive and uses the
correct playback method.
The installation procedures and screen shots in this section are based on Windows XP
operating system. For those of other OS, please follow its on-screen instruction.
Insert the Installation CD into CD-ROM drive, it should execute the installation
program automatically. If not, double-click the execution file at the main directory of
this CD to enter the installation menu.
1. After entering the installation menu,
move your curser to [Utility] tab. Click
[CyberLink PowerDVD 5.0].
2. The welcome screen appears. Click
“Next>” to start installation.
3. Click “Yes” to continue.
4. Setup will install PowerDVD into
your computer. Click “Next>” to
continue.
User’s Manual
Page 38

A-2 Appendix A
one from the existing folders list. Click
“Next>” to continue.
5. Enter your name, the name of the
company for whom you work, and the
product serial number. Click “Next>” to
continue.
8. Select your default PowerDVD skin,
and click “Next>” to continue.
6. Setup will install PowerDVD in the
following folder. To install to this folder,
click “Next>”. To install to a different
folder, click “Browse…” and select
9. Click “Next>” to continue.
another folder.
10. Select the options you need, and
then click “Finish>” to complete the
Type a new folder name, or select
7.
setup.
ABIT RADEON Series
Page 39

Install DirectX B-1
Appendix B. Install DirectX
For the best gaming capability, we suggest that you install the latest DirectX driver.
Some newer games will also ask you to install the DirectX driver before you start
them.
The installation procedures and screen
shots in this section are based on
Windows XP operating system. For
those of other OS, please follow its
on-screen instruction.
Insert the Installation CD into
CD-ROM drive, it should execute the
installation program automatically. If
not, double-click the execution file at
the main directory of this CD to enter
the installation menu.
2. The welcome screen appears. Read
the license agreement carefully. Select
“I accept the agreement”, and click
“Next>” to continue.
1. After entering the installation menu,
move your curser to [Utility] tab. Click
[DirectX 9.0b].
3. Click “Next>” to start installation.
User’s Manual
Page 40

B-2 Appendix B
4. Click “Finish” to end the
installation.
NOTE: Some games written for older
DirectX versions may not work
properly under DirectX 9. Please make
sure your application support DirectX 9
before installation. Also note that the
DirectX 9 cannot be uninstalled in the
normal way.
ABIT RADEON Series
Page 41

BIOS Flashing Utility C-1
Appendix C. BIOS Flashing Utility
You may update the newest drivers or BIOS files from your dealer or directly
download from our WEB site at http://www.abit.com.tw.
NOTE: When you use the flash utility to flash the BIOS, the screen will be blank for
about 10 seconds. This is a normal situation, not a malfunction. Do not reboot your
computer during this period, or you may cause the flash to fail.
®
You may flash the BIOS under Windows
Windows® Environment:
1.
Insert the Installation CD into CD-ROM drive, it should execute the
installation program automatically. If not, double-click the execution file at
the main directory of this CD to enter the installation menu.
2.
After entering the installation
menu, move your curser to
[Utility] tab. Click [ATI Flash].
The screen on the right hand
side will appear.
3.
Click Load Image button to
load the BIOS file.
4.
Click Program button to start flashing the loaded BIOS file.
5.
When the flash is complete, click Restart System button to reboot your
computer system to make flash take effect.
or DOS environment.
User’s Manual
Page 42

C-2 Appendix C
DOS Environment:
1.
Reboot your computer into DOS environment.
Insert the Installation CD into your CD-ROM drive.
2.
Copy all files to a new directory from path D:\Utility\Flash\DOS. (D: refers to
the CD-ROM drive letter)
3.
Copy the new BIOS binary file to the new directory.
4.
Change to the new directory and type the following command:
atiflash -p [Num] [File].rom
([Num] refers to adapter number; [File] refers to the name of BIOS binary file.)
Then press the “Enter” key. The program will begin flashing your display card
BIOS.
5.
When the flash is complete (the screen will display images again), you must
reboot your computer system to make flash take effect.
The following commands are for the ATI Flash ROM programming utility, for your
reference only.
ex :
atiflash -p 0 bios.rom
----- ATIFlash 1.29 (OEM version) Help ----Format: ATIFLASH [command] [parameter1] [parameter2] [parameter3] <option/s>
[command]:
-i Display information of ATI PCI adapters in the system.
-p <Num> <File> [r] Write BIOS image in file <File> to flash ROM in Adapter
<Num>. Reboot after write if [r] flag is specified
-pm <Num> <File> [r] Write BIOS image for MAC
-s <Num> <File> [Size] Save BIOS image from adapter <Num> to file <File>.
First [Size] kbytes of ROM content is saved if [Size]
is specified.
<option/s>:
-loadimg Searches BIOS image from current directory & loads
first image found that matches BIOSP/N of the current
ROM content, regardless of BIOS revision.
Usage: "-p <Num> -loadimg"
-load505 Same function as '-loadimg' flag, but checks for
specific P/N 113-50501-102. Usage: "-p <Num> -load505"
-f Force flashing regardless of security checkings (e.g.
AsicID & BIOS file info check OR boot-up card).
--h obscure flag to enable help.
*<Num> = adapter number, <File> = filename, [Size] = data block size in KBytes
*Use command -i to see the adapter numbers in the system.
DOS errorlevel returned 0-pass 1-failure 2-rom already programmed
ABIT RADEON Series
Page 43

How to Get Technical Support D-1
Appendix D. How to Get Technical Support
(From our website) http://www.abit.com.tw
(In North America) http://www.abit-usa.com
(In Europe) http://www.abit.nl
Thank you for choosing ABIT products. ABIT sells all our products through
distributors, resellers and system integrators; we have no direct sales to end-users.
Before sending email for tech support please check with your resellers or integrators if
you need any services, they are the ones who sold you your system and they should
know best as to what can be done, how they serve you is a good reference for future
purchases.
We appreciate every customer and would like to provide the best service to you.
Providing fast service to our customers is our top priority. However we receive many
phone calls and a huge amount of email from all over the world. At the present time it
is impossible for us to respond to every single inquiry. Therefore it is quite possible
that if you send an email to us that you may not receive a response.
We have done many compatibility tests and reliability tests to make sure our products
have the best quality and compatibility. In case you need service or technical support,
please understand the constraint we have and always check with the reseller who
sold the product to you first.
To expedite service, we recommend that you follow the procedures outlined below
before contacting us. With your help, we can meet our commitment to provide the
best service to the greatest number of ABIT customers:
1. Check the Manual. It sounds simple but we have taken a lot of care in making a
well-written and thorough manual. It is full of information that doesn't only
pertain to motherboards. The CD-ROM included with your board will have the
manual as well as drivers. If you don't have either one, go to our Program
Download Area of the Website or FTP server.
2. Download latest BIOS, software or drivers. Please go to our Program
Download area on our Website to check to see if you have the latest BIOS. They
are developed over periods of time to fixes bugs or incompatibilities. Also please
make sure you have the latest drivers from your peripheral cards makers!
3. Check the ABIT Technical Terms Guide and FAQ on our Website. We are
trying to expand and make the FAQs more helpful and information rich. Let us
know if you have any suggestions. For hot topics check out our HOT FAQ!
User’s Manual
Page 44

D-2 Appendix D
4. Internet Newsgroups. They are a great source of information and many people
there can offer help. ABIT's Internet News group,
alt.comp.periphs.mainboard.abit
information and discuss experiences they have had with ABIT products. Many
times you will see that your question has already been asked before. This is a
public Internet news group and it is reserved for free discussions. Here is a list of
some of the more popular ones:
alt.comp.periphs.mainboard.abit
comp.sys.ibm.pc.hardware.chips
alt.comp.hardware.overclocking
alt.comp.hardware.homebuilt
alt.comp.hardware.pc-homebuilt
5. Ask your reseller. Your ABIT authorized distributor should be able to provide
the fastest solution to your technical problem. We sell our products through
distributors who sell to resellers and stores. Your reseller should be very familiar
with your system configuration and should be able to solve your problem much
more efficiently than we could. After all, your reseller regards you as an important
customer who may purchase more products and who can urge your friends to buy
from him or her as well. They integrated and sold the system to you. They should
know best what your system configuration is and your problem. They should have
reasonable return or refund policies. How they serve you is also a good reference
for your next purchase.
, is an ideal forum for the public to exchange
6. Contacting ABIT. If you feel that you need to contact ABIT directly you can
send email to the ABIT technical support department. First, please contact the
support team for the branch office closest to you. They will be more familiar with
local conditions and problems and will have better insight as to which resellers
offer what products and services. Due to the huge number of emails coming in
every day and other reasons, such as the time required for problem reproduction,
we will not be able to reply to every email. Please understand that we are selling
through distribution channels and don't have the resources to serve every end-user.
However, we will try to do our best to help every customer. Please also remember
that for many of our technical support team English is a second language, you will
have a better chance of getting a helpful answer if your question can be
understood in the first place. Be sure to use very, simple, concise language that
clearly states the problem, avoid rambling or flowery language and always list
your system components. Here is the contact information for our branch offices:
ABIT RADEON Series
Page 45

How to Get Technical Support D-3
North America and South America:
ABIT Computer (U.S.A.) Corporation
45531 Northport Loop West,
Fremont, California 94538, U.S.A.
Tel: 1-510-623-0500
Fax: 1-510-623-1092
sales@abit-usa.com
technical@abit-usa.com
http://www.abit-usa.com
U.K. and Ireland:
ABIT Computer (U.K.) Corporation Ltd.
Unit 3, 24-26 Boulton Road,
Stevenage, Herts SG1 4QX, U.K.
Tel: 44-1438-228888
Fax: 44-1438-226333
sales@abitcomputer.co.uk
technical@abitcomputer.co.uk
Germany, Benelux (Belgium, Netherlands, Luxembourg),
Denmark, Norway, Sweden, Finland, and Switzerland:
AMOR Computer B.V. (ABIT's European Office)
Van Coehoornstraat 7,
5916 PH Venlo, The Netherlands
Tel: 31-77-3204428
Fax: 31-77-3204420
sales@abit.nl
technical@abit.nl
http://www.abit.nl
Austria, Czech, Romania, Bulgaria, Yugoslavia, Slovakia,
Slovenia, Croatia, Bosnia, Serbia, and Macedonia:
Asguard Computer Ges.m.b.H
Schmalbachstrasse 5,
A-2201 Gerasdorf/Wien, Austria
Tel: 43-1-7346709
Fax: 43-1-7346713
asguard@asguard.at
User’s Manual
Page 46

D-4 Appendix D
Japan:
ABIT Computer (Japan) Co. Ltd.
Fax: 81-3-5396-5110
http://www.abit4u.jp
Shanghai:
ABIT Computer (Shanghai) Co. Ltd.
Tel: 86-21-6235-1829
Fax: 86-21-6235-1832
http://www.abit.com.cn
Russia:
ABIT Computer (Russia) Co. Ltd.
Fax: 7-095-937-2837
techrussia@abit.com.tw
http://www.abit.ru
France, Italy, Spain, Portugal, and Greece:
ABIT Computer France SARL
Tel: 33-1-5858-0043
Fax: 33-1-5858-0047
http://www.abit.fr
All other territories not covered above please contact Taiwan Head Office:
When contacting our headquarters please note we are located in Taiwan and we
are 8+ GMT time. In addition, we have holidays that may be different from those
in your country.
ABIT Computer Corporation
No.323, Yang Guang St., Neihu, Taipei, 114, Taiwan
Tel: 886-2-8751-8888
Fax: 886-2-8751-3382
sales@abit.com.tw
market@abit.com.tw
technical@abit.com.tw
http://www.abit.com.tw
ABIT RADEON Series
Page 47

How to Get Technical Support D-5
7. RMA Service. If your system has been working but it just stopped, but you have
not installed any new software or hardware recently, it is likely that you have a
defective component. Please contact the reseller from whom you bought the
product. You should be able to get RMA service there.
8. Reporting Compatibility Problems to ABIT. Because of tremendous number of
email messages we receive every day, we are forced to give greater weight to
certain types of messages than to others. For this reason, any compatibility
problem that is reported to us, giving detailed system configuration information
and error symptoms will receive the highest priority. For the other questions, we
regret that we may not be able to reply directly. But your questions may be posted
to the Internet news group in order that a larger number of users can have the
benefit of the information. Please check the news group from time to time.
9. How to Get Technical Support: If you encounter any problems and need help
from our technical staff, please take the time to fill out the Technical Support
Form and send it to your dealer or our technical support mailbox. The mailbox
address is: technical@abit.com.tw
possible. You must provide specific information on your equipment. Also please
describe in detail the problems you encountered. It’s helpful and enables our
technicians to analyze your problems more quickly.
Information on items marked with an asterisk “*” on the Technical Support Form
are required.
. We will try to solve your problem as soon as
Thank you
ABIT Computer Corporation
http://www.abit.com.tw
User’s Manual
Page 48

D-6 Appendix D
Technical Support Form
Company Name: Phone Number:
Contact Person: Fax Number:
E-mail Address:
VGA Card Product Name
GPU
Memory
□TV-Out □DVI □VIO
*
*
*
BIOS
O/S
Driver
*
*
*
M/B maker/model
CPU Type
Chipset
Hardware name Type Specifications
HDD
CD-ROM
Drive
System Memory Size
(SDRAM)
Monitor maker/model
Problem Description:
IDE1
IDE2
IDE1
IDE2
*
Intel: □PII □PIII □P4
AMD: □Socket A Other: _________________________
□Intel □VIA □SiS □ALi
Chipset code name description: _________________________
* *
*
*
ABIT RADEON Series
 Loading...