

Page 1
Turbo 6S
6926
Bedienungsanleitung - DE (02-07)
Instructions for use - EN (08-13)
Instrucciones de uso - ES (14-19)
Instructions de service - FR (20-25)
Istruzioni per l’uso - IT (26-31)
Gebruikshandleiding - NL (32-37)
Instrukcja obsługi - PL (38-43)
Návod k použití - CZ (44-49)
Инструкция по эксплуатации - RU (50-55)
Használati útmutató - HU (56-61)
Návod na použitie - SK (62-67)
ACHTUNG: Für späteres Nachlesen unbedingt aufbewahren !
NB: Keep these instructions for future reference!
ATENCIÓN: ¡Guardarlas sin falta para una lectura posterior!
ATTENTION : À conserver absolument pour une consultation ultérieure!
ATTENZIONE: Da conservare per future consultazioni!
LET OP: Bewaar deze handleiding zorgvuldig, opdat u ze ook later nog kunt raadplegen!
UWAGA: Zachowaj koniecznie do późniejszego czytania!
POZOR : Pro pozdější referenci bezpodmínečně uschovat!
ВНИМАНИЕ: Не выбрасывать, сохранить для прочтения в дальнейшем!
Figyelmeztetés: Őrizze meg ezt a tájékoztatót a jövőbeni hivatkozásokhoz.
Upozornenie: Uschovajte tieto pokyny pre ďalšie použitie!
Page 2
• Kombikinderwagen mit umsetzbarem Aufsatz
• Teleskopschieber höhenverstellbar
• Rückenlehne 4-fach verstellbar
• Vorderräder schwenk- und feststellbar
• Verdeck mit Magnet-Sichtfenster
Pflege- und Gebrauchshinweise
• Die zur Herstellung unserer Produkte verwendeten Materialien entsprechen der AZO-Anforderung, EN71-2 und EN71-3,
sowie Lichtechtheit für Bekleidung. Wir raten Ihnen trotzdem das Modell nicht längere Zeit intensiv der Sonne auszusetzen.
Abrieb, Ausbluten der Farben und Verblassen bei starker Sonneneinstrahlung begründen keinen Reklamationsanspruch.
Der Stoffbezug dieses Artikels ist waschbar. Sie können die Bezüge mit der Hand oder mit der Maschine auf Kaltwäsche
(Feinwaschmittel) waschen.
• Ein absoluter Regenschutz für unsere Modelle wird nur durch ein im Handel erhältliches ABC-Design Regenverdeck
erreicht.
• Alle Gestelle unserer Modelle sind nach EN1888 : 2005 getestet und entsprechen dieser. Die beweglichen Teile müssen, um
die Sicherheit Ihres Modells dauerhaft zu erhalten, gelegentlich geölt oder bei Bedarf nachgenietet werden.
ACHTUNG: Zur Ölung bitte nur Silikon-Öl oder Silikon-Spray verwenden.
• Zur Sicherheit und Werterhaltung Ihres Produkts tragen regelmäßige Pege und Wartung in hohem Maße bei.
Umwelteinüsse, wie Salzgehalt in der Luft, Streusalz oder saurer Regen, sowie falsche Unterbringung fördern die
Korrosion.
• Wir empfehlen eine regelmäßige Pege aller lackierten Teile. In gravierenden Einzelfällen gleich nach der Verunreinigung
die Lackoberfläche reinigen.
• Überprüfen Sie von Zeit zu Zeit lockere Teile und Verschlussteile und ziehen Sie sie falls nötig fest.
Sicherheitshinweise
Lesen Sie diese Hinweise sorgfältig vor der Benutzung und bewahren Sie sie auf. Wenn Sie diese Hinweise nicht beachten,
kann die Sicherheit Ihres Kindes beeinträchtigt werden.
ACHTUNG:
• Dieser Wagen ist für Kinder ab einem Alter von 6 Monaten (mit Tragetasche/Tragewanne ab der Geburt) und mit einem
Gewicht bis maximal 15 kg bestimmt
• Das Einkaufsnetz kann bis zu einem Gewicht von 2 kg beladen werden.
• Dieser Wagen ist für die Benutzung eines Kindes konstruiert.
• Verwenden Sie ausschließlich zugelassene Zubehörteile Ihres Herstellers.
• Beim Befahren von Stufen oder Treppen oder falls Ihr Kinderwagen gehoben oder getragen wird, sollten Sie Ihr Kind
grundsätzlich aus dem Wagen nehmen.
• Bei Verwendung einer Tragetasche vergewissern Sie sich, dass sie korrekt am Wagen befestigt ist.
WARNUNG:
• Lassen Sie Ihr Kind nicht unbeaufsichtigt.
• Nur Matratzen bis zu einer Dicke von 50 mm einlegen.
• Verwenden Sie einen Sicherheitsgurt, sobald Ihr Kind selbständig sitzen kann.
• Diese Sitzeinheit ist für Kinder unter 6 Monaten nicht geeignet.
• Am Schieber befestigte Lasten beeinträchtigen die Standfestigkeit des Wagens.
• Es ist vor Gebrauch zu überprüfen, dass der Kinderwagenaufsatz oder die Sitzeinheit korrekt eingerastet ist.
• Dieses Erzeugnis ist nicht geeignet zum Joggen oder Skaten.
• Führen Sie keine Veränderungen durch, die die Sicherheit in Frage stellen.
• Halten Sie dieses Produkt vor Feuer und anderen Hitzequellen fern.
Hinweise für den Reklamationsfall
• Natürliche Abnutzungserscheinungen (Verschleiß) und Schäden durch übermäßige Beanspruchung stellen keinen
Reklamationsanspruch dar.
• Schäden, die durch unsachgemäße Verwendung entstehen, stellen keinen Reklamationsanspruch dar.
• Schäden, die durch fehlerhafte Montage oder Inbetriebsetzung entstehen, stellen keinen Reklamationsanspruch dar.
• Schäden, die durch unsachgemäße Änderungen am Produkt entstehen, stellen keinen Reklamationsanspruch dar.
• Roststellen die durch fehlende Wartung oder unsachgemäße Behandlung vorkommen können, stellen keinen Mangel dar.
• Kratzer sind normale Verschleißerscheinungen und stellen keinen Mangel dar.
• Feucht gewordene Textilteile, die nicht getrocknet wurden können schimmeln und stellen keinen produktionsbedingten
Mangel dar.
• Durch Sonneneinstrahlung, Schweißeinuss, Reinigungsmittel, Abrieb oder zu häuges Waschen ist ein Ausbleichen nicht
auszuschließen und somit kein Mangel.
• Abgefahrene Räder sind natürliche Verschleißerscheinungen und stellen keinen Reklamationsanspruch dar.
• Gewicht: 16,0 kg
• Geprüft nach EN 1888 : 2005
• Kompatibel mit Autositz ABC Design „Rider“
• Kompatibel mit ABC Design „Kiddie Ride On“
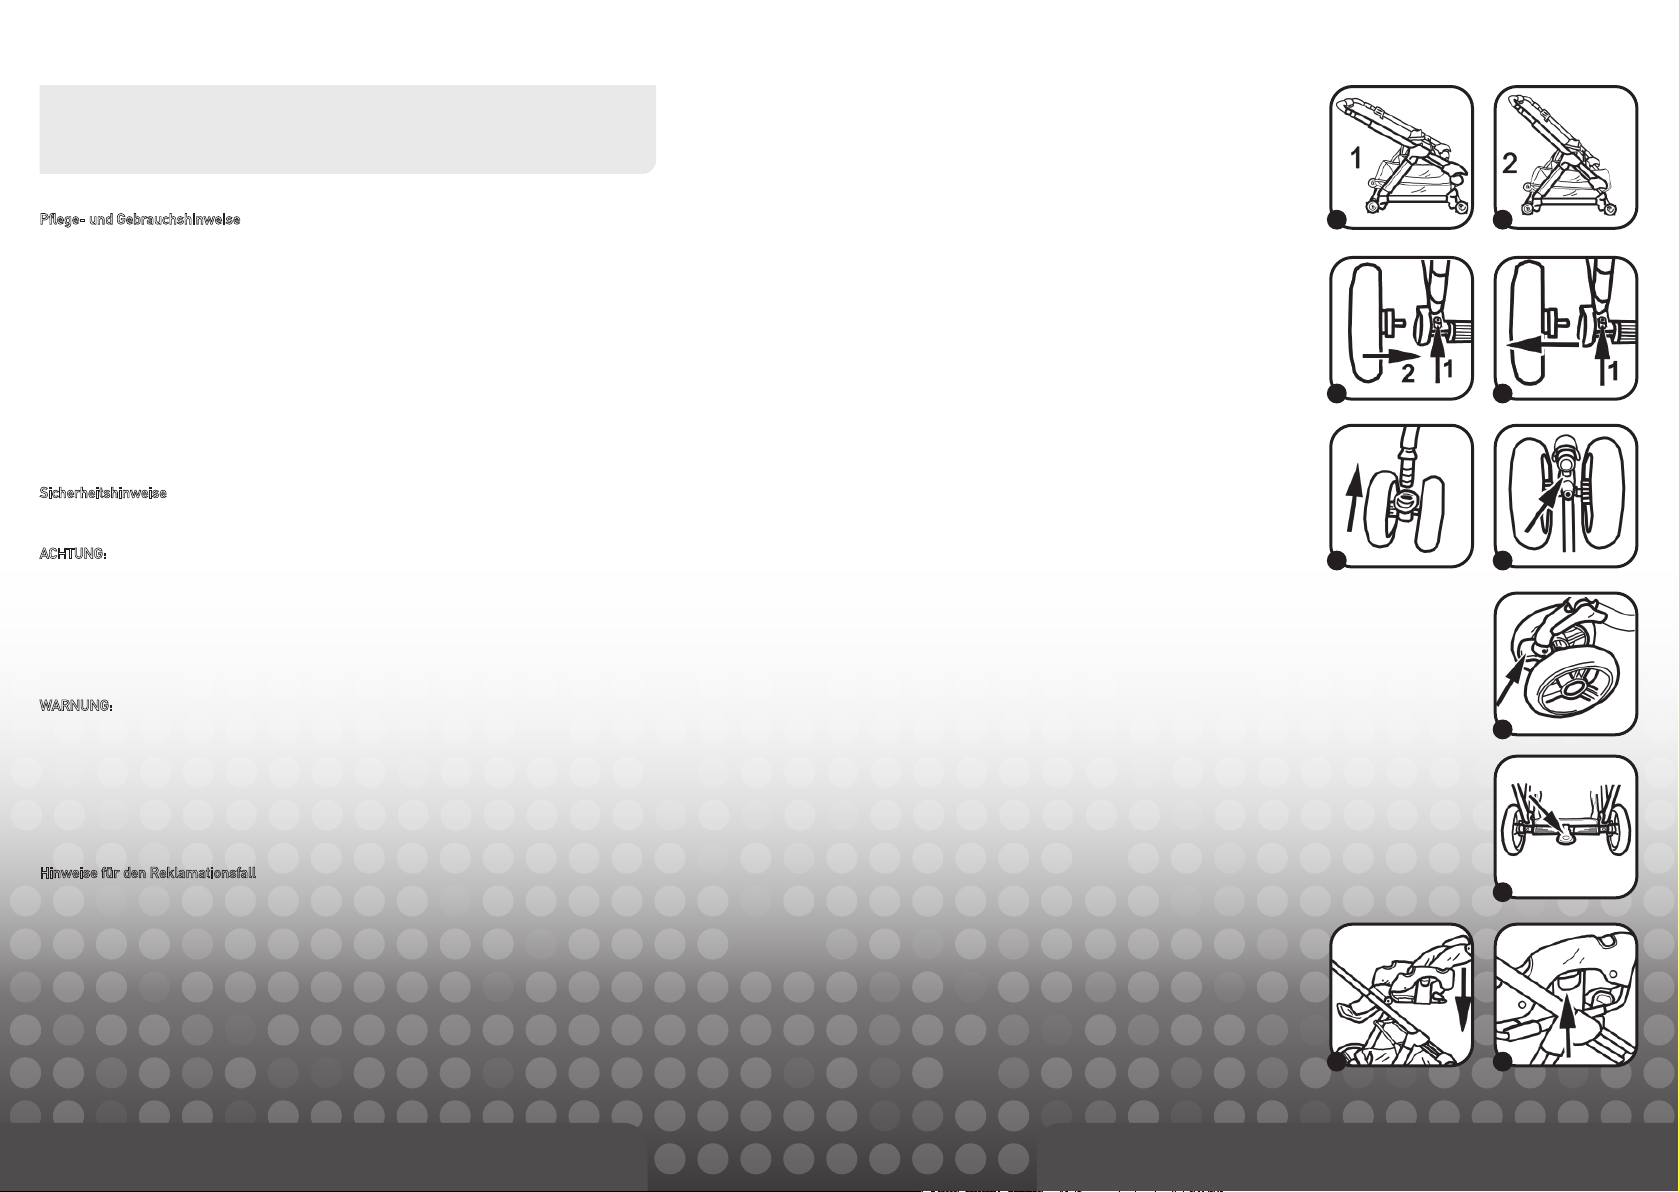
1. Öffnen des Wagens
Ziehen Sie den Griff des Sportwagens (1) so weit nach oben bis das
Gestell einrastet (2).
WARNUNG: Vergewissern Sie sich vor Gebrauch, dass alle
Verriegelungen geschlossen sind.
2. Montage der Räder
Drücken Sie den Knopf (1) und stecken Sie dann das Hinterrad in die
Führung (2) bis es fest einrastet.
Um die Räder abzunehmen, drücken Sie den Knopf (1), damit das Rad
entriegelt wird.
Jetzt können Sie das Rad von der Achse abziehen.
Um die Vorderradblöcke zu montieren, müssen Sie die Radblöcke auf
die Gabel schieben bis sie einrasteten.
Um die Radblöcke abzunehmen, drücken Sie den Knopf unten am
Radblockgelenk und ziehen Sie den Radblock ab.
3. Feststellen und schwenken der Räder
Drücken Sie den Hebel zum Feststellen der Räder nach unten.
Drücken Sie den Hebel für die Schwenkposition nach oben.
4. Feststellen und Lösen der Bremse
Um die Bremse festzustellen, drücken Sie den Hebel nach
unten.
Um die Bremse zu lösen, drücken Sie den Hebel nach oben.
5. Anbringen und Umsetzen des Sitzes
Um den Sitz anzubringen, setzen Sie ihn auf das Gestell bis er
einrastet
Um den Sitz umzusetzen, drücken Sie die Knöpfe an den beiden
Adaptern und heben Sie den Sitz an.
1
2
2
5
1
2
2
3
4
5
DE - 02
DE - 03
Page 3

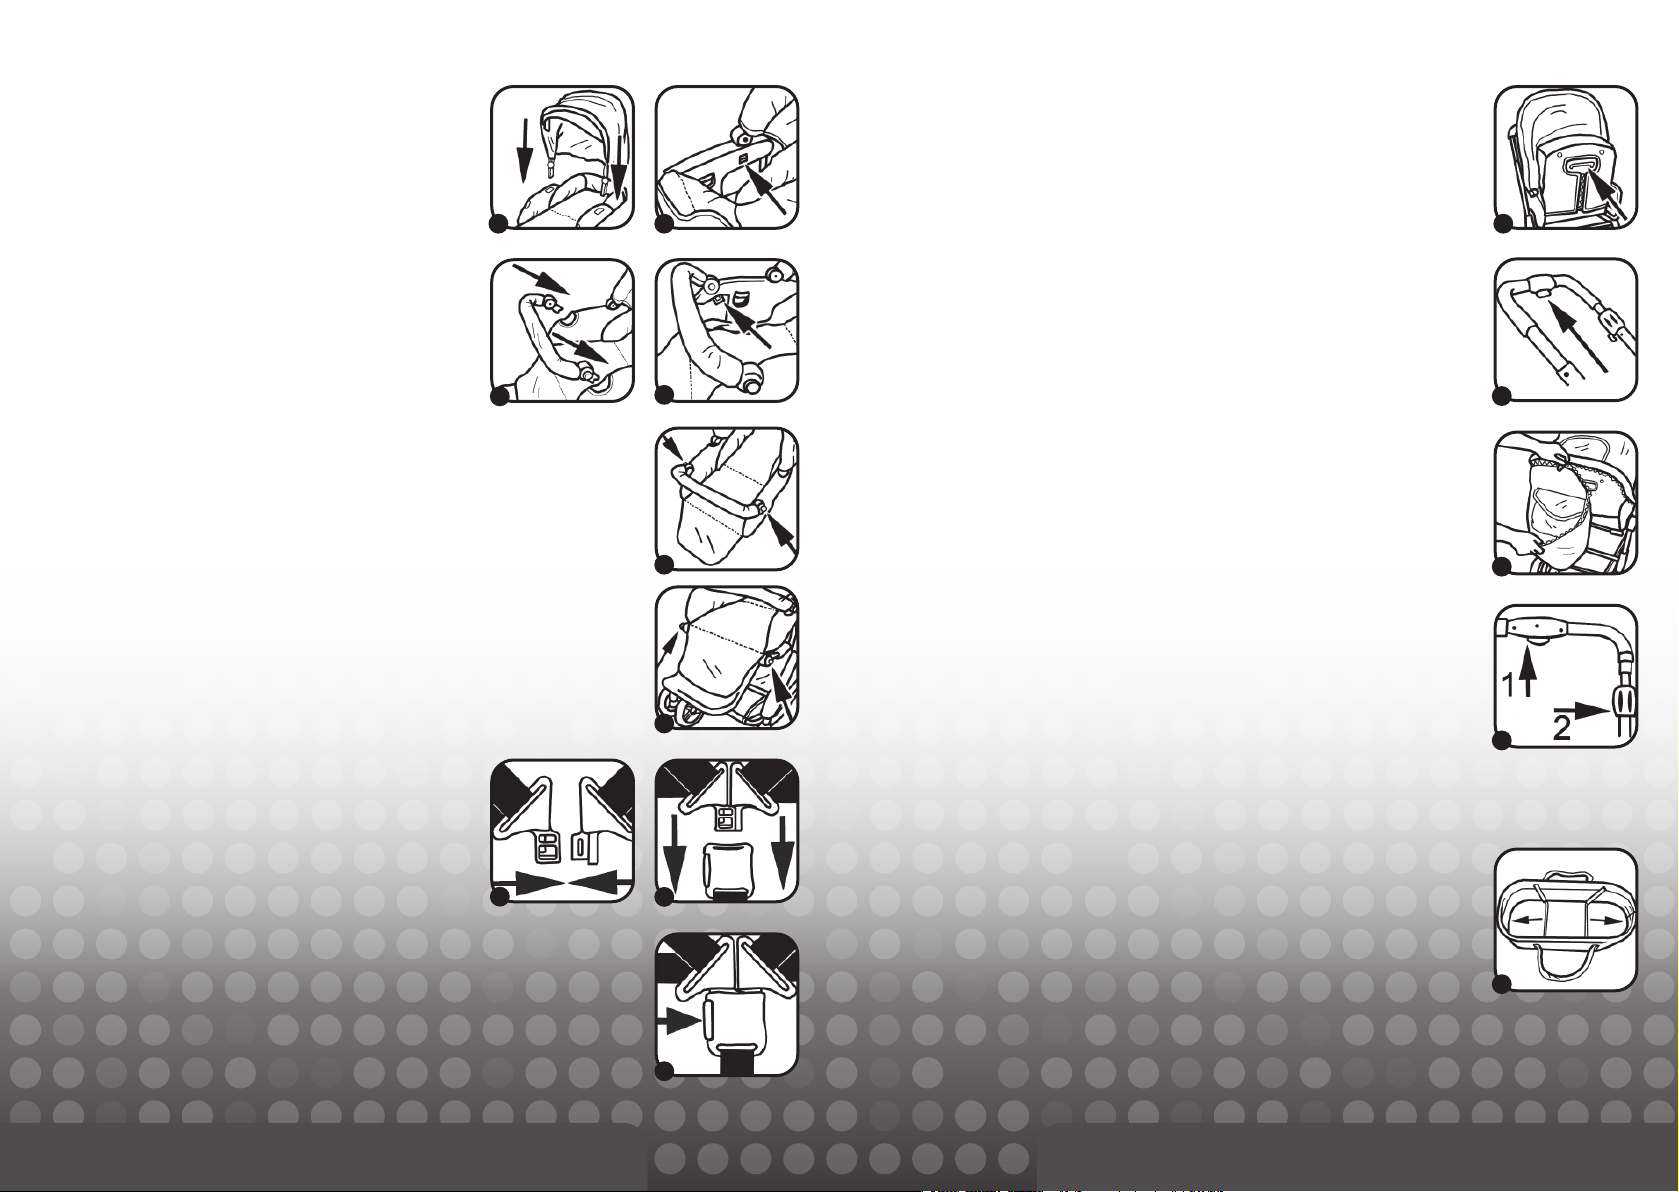
6. Anbringen und Abnehmen des Verdecks
Stecken Sie das Verdeck von oben in die Halterung
Um das Verdeck abzunehmen drücken Sie auf beiden Seiten den Knopf
am Verdeck.
11. Verstellen der Rückenlehne
Um die Sitzeinheit zu verstellen, ziehen Sie den Bügel an der Rückseite der Rückenlehne
nach oben und verstellen Sie dann die Sitzeinheit in der Höhe. Wenn Sie die gewünschte
Position erreicht haben lassen Sie den Bügel los damit die Position einrastet.
7. Befestigen und Abnehmen des Schutzbügels
Um den Schutzbügel zu befestigen, schieben Sie Ihn auf beiden Seiten
in die Plastikfassung.
Um den Schutzbügel vom Wagen abzunehmen müssen Sie die Knöpfe
auf beiden Seiten nach innen drücken und dann den Schutzbügel nach
vorne abziehen.
Um den Schutzbügel in der Höhe zu verstellen, müssen Sie die beiden
seitlichen Knöpfe gedrückt halten und anschließend den Bügel nach
oben oder nach unten drücken.
8. Verstellen der Beinstütze
Um die Beinstütze zu verstellen müssen Sie die Knöpfe auf beiden
Seiten nach innen drücken und dann die Höhe einstellen.
Lassen Sie dann die Knöpfe wieder los damit die Beinstütze einrastet.
9. Schließen des Gurtes
Um den Gurt zu schließen, stecken Sie die beiden oberen Plastikteile
ineinander.
Schieben Sie anschließend die verbundenen Teile in die untere
Plastikalterung.
Stellen Sie den Gurt so ein, dass das Kind in seiner vorgesehenen
Position gehalten wird.
10. Öffnen des Gurtes
Um den Gurt zu öffnen, drücken Sie den seitlichen Knopf.
WARNUNG: Verwenden Sie den Schrittgurt immer in Verbindung mit
dem Beckengurt.
6 6
7
9
11
12. Verstellen des Schiebers
Um den Schieber in der Höhe zu verstellen, drücken Sie den Knopf nach oben.
Wenn der Schieber in der gewünschten Höhe ist, lassen Sie den Knopf wieder los damit,
der Schieber einrastet.
7
13. Abnehmen des Sonnendachs
Öffnen Sie den Reißverschluss an der Seite des Daches.
7
14. Zusammenklappen des Wagens
Um den Wagen zusammenzuklappen, bringen Sie den Schieber wie unter Punkt 12 erklärt
in die unterste Position und halten dabei den Knopf (1) gedrückt.
8
9
10
Nun drehen Sie den Knopf (2) nach links und drücken den Schieber nach unten.
So können Sie den Wagen problemlos zusammenfalten.
Bemerkung: Zum Aufklappen gehen Sie wie in Punkt 1
“Öffnen des Wagens“ vor.
WARNUNG: Vergewissern Sie sich vor Gebrauch, dass alle Verriegelungen geschlossen
sind.
15. Aufklappen der Tragewanne
Heben Sie die Seitenwände der Tragetasche an.
Spannen Sie die Seitenwände indem Sie die beiden Bügel nach außen in die Halterungen
drücken.
Vergewissern Sie sich, dass die Bügel fest eingerastet sind.
12
13
14
15
DE - 04
DE - 05
Page 4
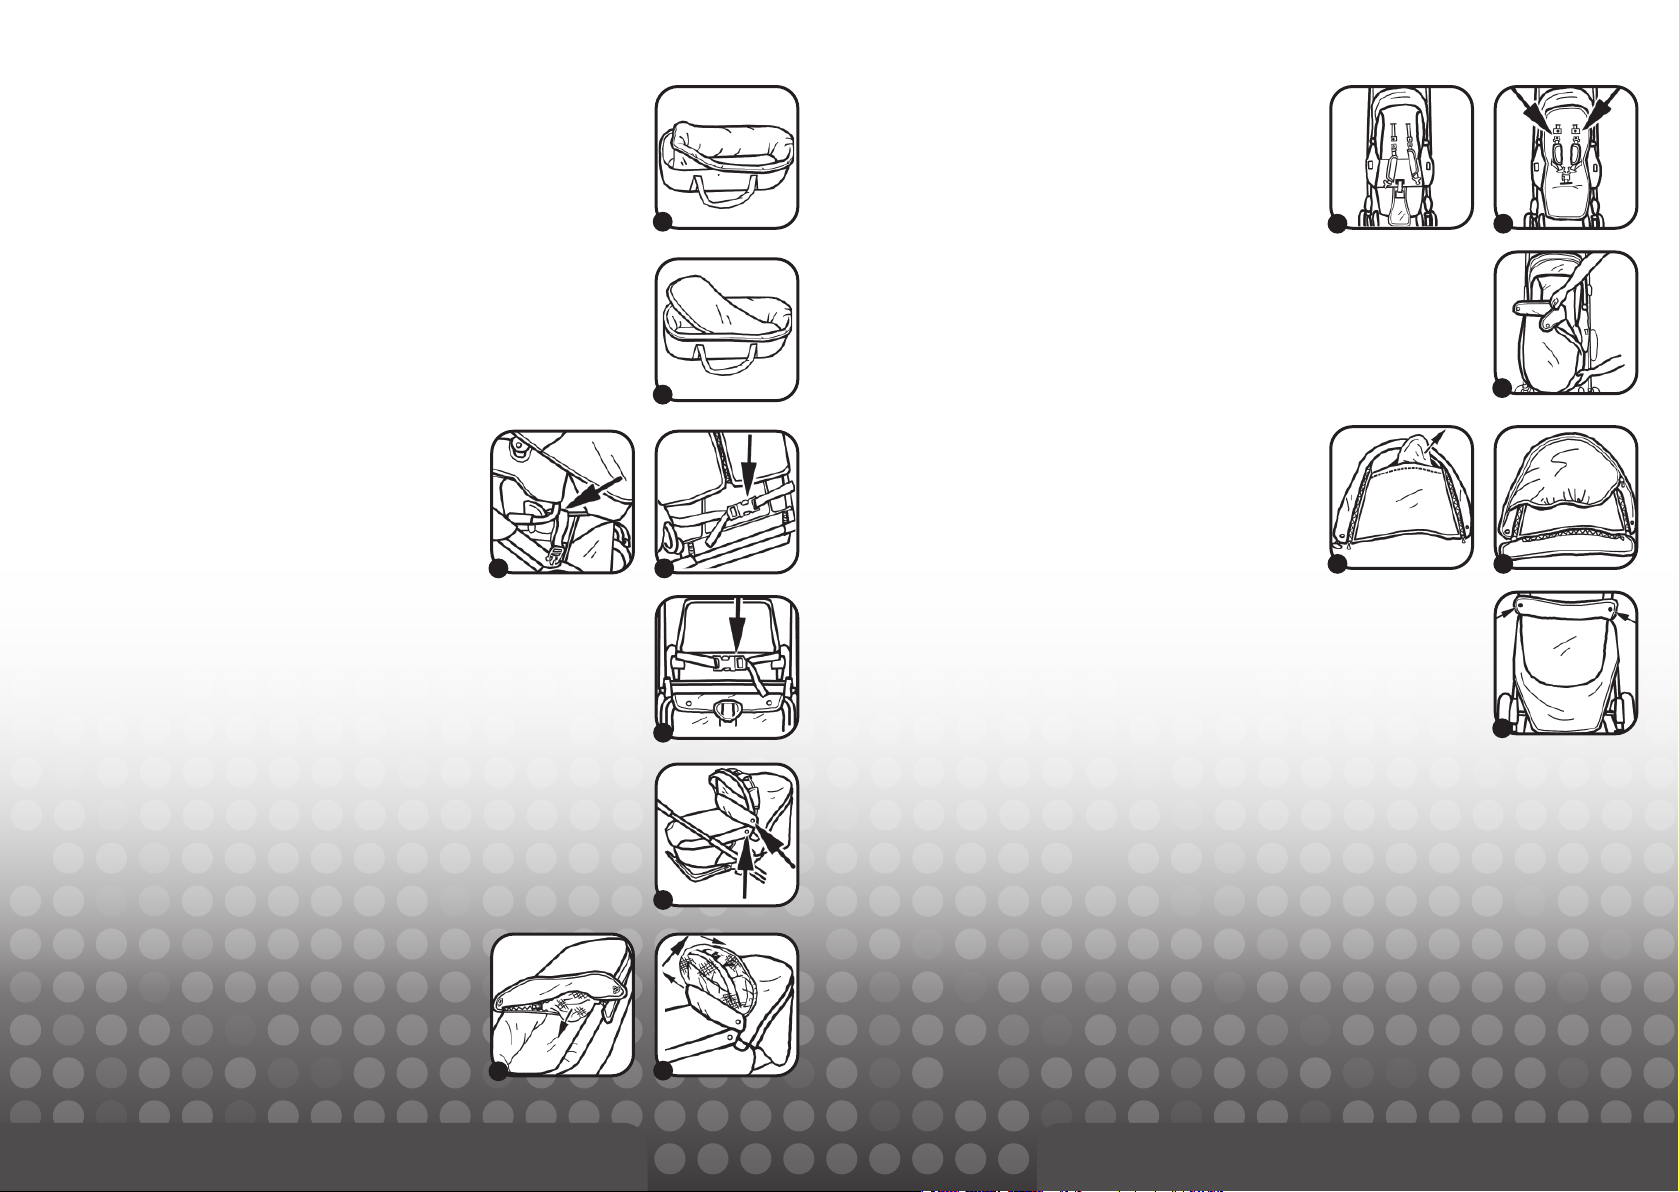
16. Anbringen des Einhangs an der Wanne
Legen Sie den Einhang in die Wanne, wobei der obere Teil über den
Wannenrand geklappt werden muss.
17. Einlegen der Matratze
Legen Sie die Matratze in den Bezug.
Drücken Sie die Matratze auf den Taschenboden
Wichtig: Die Matratze ist keilförmig achten Sie beim einlegen drauf,
dass der erhöhte Teil auf der Kopfseite ist.
21. Anbringen des Fußsacks
Öffnen Sie den Gurt und legen Sie die Einlage auf den Sitz.
Ziehen Sie anschließend die fünf Gurtenden durch die dafür
vorgesehenen Öffnungen am Bezug.
16
17
Nun können Sie die Beindecke mit dem Reißverschluss an der
Einlage befestigen.
21
21
21
18. Befestigen der Wanne am Wagen
Bringen Sie die Rückenlehne in Liegeposition. Legen Sie die Tasche
auf die Liegefläche.
Ziehen Sie den Gurt, der an der Hinterseite der Wanne angebracht
ist, durch die Öffnung am Bezug der Sitzeinheit.
Schließen Sie nun die Gurtschnallen an der Rückseite der
Rückenlehne und ziehen Sie den Gurt fest an.
Schnallen Sie den Gurt am Fußende der Wanne um die
hochgeklappte Fußstütze. Schließen Sie den Gurt und ziehen Sie
ihn fest an.
19. Anbringen der Beindecke
Stülpen Sie den geschlossenen Teil der Beindecke über das
Fußende der Tragetasche.
Ziehen Sie die Beindecke über die Tragetasche.
Befestigen Sie die Enden der Beindecke mit den dafür
vorgesehenen Druckknöpfen an Wanne und Verdeck
20. Befestigen des Moskitonetzes
Öffnen Sie den Reißverschluss am oberen Ende der Beindecke und
ziehen Sie das Moskitonetz heraus.
Spannen Sie das Moskitonetz über das Verdeck und befestigen
Sie es daran. Anschließend befestigen Sie die Beindecke am
Moskitonetz.
22. Anbringen der Beindecke
Nehmen Sie das Unterteil des Fußsacks aus der Tasche.
Verbinden Sie Ober- und Unterteil des Fußsacks mit dem
Reißverschluss.
18
20
18
18
19
20
Befestigen Sie den Fußsack am Kinderwagen, indem Sie die
Beindecke mit den dafür vorgesehenen Druckknöpfen am Verdeck
xieren.
22
22
22
DE - 06
DE - 07
Page 5

• Combination travel system with convertible attachment
• Height-adjustable telescopic handle
• Four-position backrest
• Swivel mode and locked setting on front wheels
• Hood featuring magnetic-action viewing panel
• Weight: 16,0 kg
• Tested for conformity with EN 1888 : 2005
• Compatible with ABC Design “Rider” car seat
• Compatible with ABC Design “Kiddie Ride-On” buggy board
1. Opening the pushchair
Pull the handle on the stroller (1) upwards until the frame clicks
into place (2).
CAUTION: Ensure that all the catches are engaged before use.
Care instructions
• The materials used to manufacture our products comply with the AZO requirement, EN71-2 and EN71-3, and light fastness
standards for textiles. Nevertheless, we advise you not to leave the product exposed to bright sunlight for any length of time. No
claims may be made for wear and tear or if the colours fade when exposed to strong sunlight. The fabric covers on this product
can be washed by hand or on a cold cycle in the washing machine (mild detergent).
• An ABC Design rain canopy is available in retail stores offering complete protection against the rain.
• All the frames on our products have been tested for conformity with EN1888 : 2005 and have met the required standards. In
order to maintain the safety of the product it is necessary to oil the moving parts or tighten the rivets as and when required.
NB: Please do not use any product for lubrication other than silicone oil or silicone spray lubricant.
• Regular care and upkeep have a major part to play in maintaining the safety and value of the product. Exposure to such things
as salt in the air, road-gritting salt or acid rain will encourage the onset of corrosion, as will inappropriate storage of the product.
• We recommend regular maintenance of all coated parts. In serious cases of soiling please clean the surface coating
immediately.
• Check for loose parts and fastenings from time to time and tighten if necessary.
Safety instructions
Read these instructions carefully before use and keep them for future reference. Failure to read these instructions may
compromise the safety of your child.
NB:
• This model is suitable for infants from 6 months (from birth with carrycot) and up to a maximum weight of 15 kg.
• The net bag can carry up to 2 kg.
• This pushchair is designed to transport a child.
• Do not use any accessories other than those approved by the manufacturer.
• You are advised to take your child out of the pushchair as a matter of principle when negotiating steps or ights of stairs or if the
pushchair needs to be lifted or carried.
• If you are using a carrier, ensure that it is correctly attached to the pushchair.
CAUTION:
• Do not leave your child unattended.
• The only mattresses suitable for use are those up to 50 mm thick.
• Use a safety harness as soon as your child can sit independently.
• This seat is not suitable for babies under 6 months old.
• Loads attached to the handle affect the stability of the pushchair.
• Before use, check that the pushchair attachment or seat is correctly engaged in position.
• This product is not suitable for jogging or skating.
• Do not make any modications to the product which compromise its safety.
• Keep this product away from re and other sources of heat.
Customer complaints
• No claims may be made for natural wear and tear or for damage caused by undue demands on the product or by exceeding the
permissible load.
• No claims may be made for damage caused by improper use.
• No claims may be made for damage caused by incorrect assembly or operation.
• No claims may be made for damage caused by improper modications to the product.
• Areas of rust may appear through lack of maintenance or improper care and do not constitute a fault with the product.
• Scratch marks are normal signs of wear and do not constitute a fault with the product.
• Mildew is likely to appear on textiles which are not dried out after getting wet and cannot be attributed to shortcomings in
production conditions.
• The product may fade if exposed to sunlight, perspiration and detergents, or if subject to abrasion or excessive washing,
therefore fading cannot be attributed to a fault with the product.
• No claims may be made for wheels which become worn out as a natural result of wear and tear.
2. Fitting the wheels
Press the button (1) and insert the rear wheel in the slot (2) until it
engages.
To remove the wheels, press the button (1) to release the wheels.
The wheels can then be removed from the axle.
Mount the front wheels by sliding the wheel assemblies onto the
prongs until they click into place.
To remove the wheel assemblies, press the button underneath the
blocks and remove the assemblies.
3. Wheel locking and swivel settings
Push the lever downwards to lock the wheels.
Push the lever upwards for swivel position.
4. Operating the brake
Press the lever down to engage the brake.
Press the lever up to disengage the brake.
5. Attaching and converting the seat
Attach the seat by placing it on the frame until it clicks into place.
To convert the seat, press the buttons on both adapters and lift up
the seat.
1
2
2
1
2
2
3
4
EN - 08
5
5
EN - 09
Page 6
6. Attaching and removing the hood
Lower the hood down onto the attachment
To remove the hood, press the buttons in on both sides of the hood.
11. Adjusting the backrest
To adjust the backrest, pull the retainer on the rear of the backrest upwards and then adjust
the height. When you have reached the required position, let go of the retainer to allow the
backrest to remain in that position.
7. Fitting and removing the guard rail
Fit the guard rail by inserting it in the plastic mounts on both sides.
To remove the guard rail from the pushchair, press in the buttons on
both sides and pull the guard rail off away from the pushchair.
To adjust the height of the guard rail, press and hold down the buttons
on each side and push the bar up or down.
8. Adjusting the leg rest
To adjust the leg rest, press in the buttons on both sides and then
adjust the height.
Let go of the buttons again so that the leg rest clicks into place.
9. Fastening the harness
To fasten the harness, bring the top two plastic catches together and
interlock them.
Then insert the interlocked catches into the bottom part of the
fastening.
Adjust the harness to a setting where the baby is held in the correct
position.
10. Unfastening the harness
To open the harness, press the button on the side.
CAUTION: Always use the shoulder harness and lap belt together.
6 6
7
9
11
12. Adjusting the handle
Push the button upwards to adjust the height of the handle.
When the handle is at the required height, let go of the button again so that the handle will
remain locked in this position.
7
13. Removing the sun canopy
Undo the zip fastener on the side of the canopy.
7
14. Folding the pushchair
To fold the pushchair, bring the handle to its lowest position as described in point 12, holding
the button (1) down as you do so.
Now rotate the knob (2) to the left and push the handle down.
8
9
Now you can fold up the pushchair.
Note: To unfold the pushchair, follow the instructions in point 1 “Opening the pushchair”.
CAUTION: Ensure that all the catches are engaged before use.
15. Opening the carrycot
Lift the side panels of the carrier.
Extend and secure the side panels by pushing the two retainers outwards into the mountings.
Make sure that the retainers are securely engaged.
12
13
14
15
EN - 10
10
EN - 11
Page 7

16. Attaching the cot bumper
Lay the bumper in the cot, folding the top part over the edge of the
carrycot.
17. Inserting the mattress
Insert the mattress in the cover.
Lay the mattress on the base.
NB: The mattress is wedge-shaped. Make sure that the raised part
is at the head end.
21. Fitting the foot muff
Undo the strap and position the liner on the seat.
Pull the ve straps through the openings provided in the cover.
Now you can fasten the apron with the zip fastener on the liner.
16
17
21
21
21
18. Fitting the cot on the pram
Recline the back of the seat. Position the carrycot on the pram.
Take hold of the strap which is tted to the rear of the cot and pull it
through the opening provided in the seat cover.
Fasten and tighten the belt on the rear of the backrest.
Flip up the footrest at the lower end of the cot and secure the strap
around the footrest. Fasten and tighten the strap.
19. Fitting the apron
Fit the closed end of the apron over the lower end of the carrycot.
Extend the apron over the cot.
Secure the ends of the apron with the snap fasteners provided on
the cot and cover
20. Attaching the mosquito net
Unzip the top end of the apron and pull out the mosquito net.
Pull the mosquito net over the cover and fasten it to the cover. Then
fasten the apron to the mosquito net.
22. Fitting the apron
Take the lower part of the foot muff out of the bag.
Zip the top and bottom parts of the foot muff together.
Secure the foot muff to the pushchair by attaching the apron to the cover
18
18
18
19
using the snap fasteners provided.
22
22
22
EN - 12
20
20
EN - 13
Page 8
• Cochecito combi con pieza sobrepuesta cambiable
• Manillar telescópico de altura ajustable
• Respaldo ajustable en 4 posiciones
• Ruedas delanteras giratorias y bloqueables
• Capota con ventana con cierre magnético
Indicaciones de cuidado y de uso
• Los materiales utilizados para la fabricación de nuestros productos cumplen las normas relativas al uso de colorantes
azoicos, EN71-2 y EN71-3, así como la solidez a la luz para revestimientos. No obstante, aconsejamos no exponer
intensivamente el modelo al sol durante un periodo prolongado. Un desgaste por el roce, sangrado de los colores y una
decoloración en caso de irradiación solar no justican una reclamación. La tapicería de este artículo es lavable. Las fundas
se pueden lavar a mano o a máquina en frío (detergente suave).
• Una protección total contra la lluvia para nuestros modelos se consigue solamente mediante nuestra capota de ABC-Design
que se puede adquirir en el comercio.
• Todos los armazones de nuestros modelos han sido comprobados según EN1888 : 2005 y corresponden a ella. Para
mantener la seguridad de su modelo a largo plazo, se tendrán que engrasar o en caso de necesidad volver a remachar las
piezas movibles.
ATENCIÓN: Para engrasarlas rogamos que utilice solamente aceite o spray de silicona.
• Para mantener la seguridad y el valor de su producto es recomendable un cuidado y mantenimiento regulares. Las
influencias ambientales tales como el contenido de sal en el aire, sal para esparcir o lluvia ácida así como guardarlo
incorrectamente fomentan la corrosión.
• Recomendamos un cuidado regular de todas las piezas lacadas. En casos individuales agravantes se deberán limpiar las
supercies pintadas justo después de haberse ensuciado.
• Compruebe de vez en cuando las piezas y cierres sueltos y en caso necesario apriételas.
Indicaciones de seguridad
Lea cuidadosamente estas indicaciones antes del uso y guárdelas. La inobservancia de estas instrucciones puede perjudicar
la seguridad de su hijo.
ATENCIÓN:
• Este cochecito está destinado para niños a partir de una edad de 6 meses (con saco potabebés/cuna portabebés a partir de
su nacimiento) y de un peso de máximo 15 kg.
• Se puede cargar la bolsa de redecilla hasta un peso de 2 kg.
• Este cochecito está construido para ser usado por un niño.
• Utilice solamente accesorios autorizados por su fabricante.
• Al transitar por escalones o escaleras, o cuando se tiene que levantar o llevar su cochecito para niños, se debería sacar
siempre a su hijo del cochecito.
• Al usar un saco portabebés asegúrese de que esté correctamente jado en el cochecito.
ADVERTENCIA:
• No deje a su hijo sin vigilancia.
• Utilizar solamente colchones con un grosor de hasta 50 mm.
• Utilice un cinturón de seguridad en cuanto su hijo sepa sentarse por sí mismo.
• Esta unidad de silla no es adecuada para niños de menos de 6 meses.
• Las cargas colgadas de las empuñaduras perjudican la estabilidad del cochecito.
• Antes de usarlo se deberá comprobar si el capazo portabebés o la unidad de silla ha engatillado correctamente.
• Este producto no es adecuado para la práctica del footing o del skating.
• Rogamos que no realice ninguna modicación que pudiera comprometer la seguridad.
• Mantenga este producto alejado del fuego u otras fuentes de calor.
Indicaciones para el caso de reclamación
• La aparición de desgastes naturales (desgaste) y daños por un uso excesivo no representan ningún derecho a reclamación.
• Los daños causados por un uso inadecuado no representan ningún derecho a reclamación.
• Los daños causados por un montaje o puesta en funcionamiento incorrectos no representan ningún derecho a reclamación.
• Los daños causados por una modicación inadecuada en el producto no representan ningún derecho a reclamación.
• Los puntos de oxidación causados por falta de mantenimiento o trato inadecuado no representan ningún defecto.
• Los arañazos son apariencias de desgaste normales y no representan ningún defecto.
• Las piezas textiles que se han mojado y no han sido secadas pueden cubrirse de moho y no representan un defecto del
producto.
• Por irradiación solar, sudor, productos de limpieza, desgaste por el roce o un lavado frecuente no se puede excluir un
descoloramiento, así que esto no es ningún defecto.
• Los neumáticos desgastados son apariencias de desgaste normales y no representan ningún derecho a reclamación.
• peso: 16,0 kg
• homologado según EN 1888 : 2005
• Compatible con la silla para automóviles ABC Design “Rider”
• Compatible con ABC Design “Kiddie Ride On”
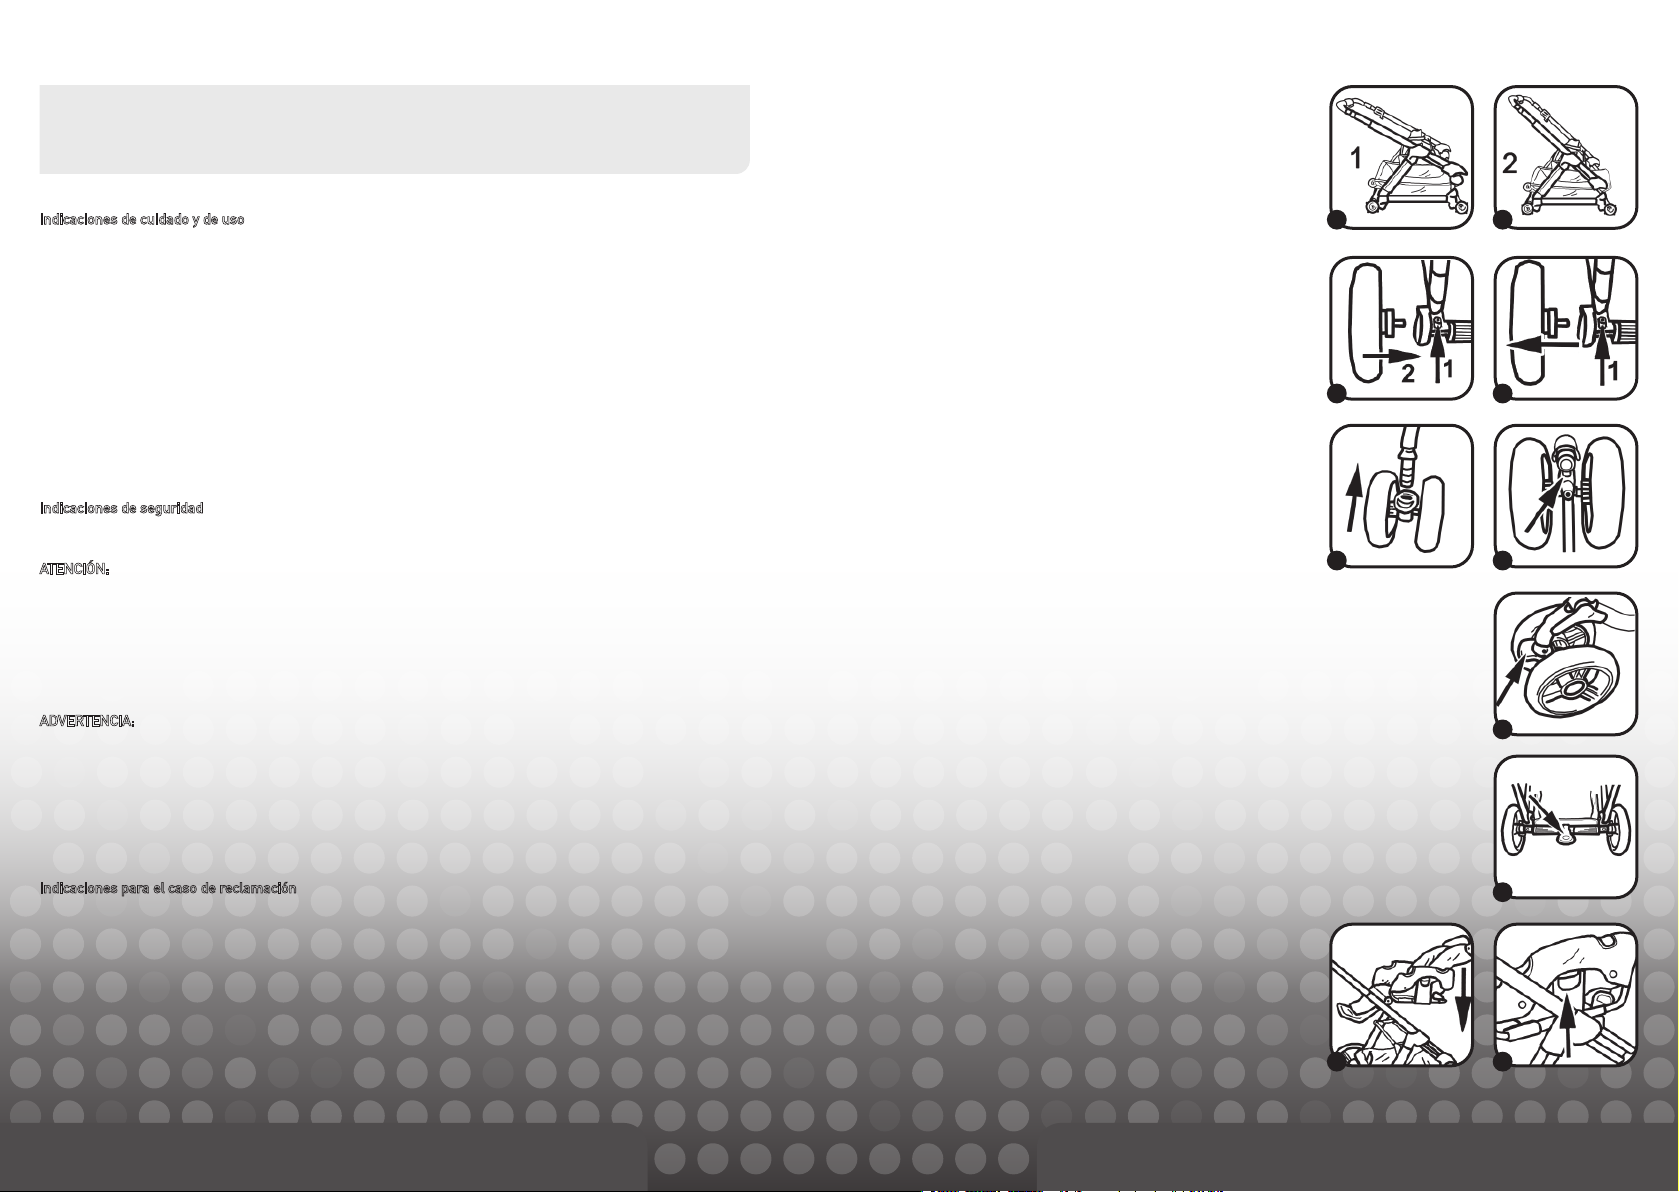
1. Abrir el cochecito
Tire del manillar de la silla de paseo (1) hacia arriba hasta que el
armazón engatille (2).
ADVERTENCIA: Antes de su uso asegúrese de que todos los
enganches estén bien cerrados.
2. Montaje de las ruedas
Pulse el botón (1) e introduzca la rueda posterior en la guía (2) hasta
que quede bien engatillada.
Para quitar las ruedas pulse el botón (1) para desbloquear la rueda.
Ahora se puede retirar la rueda del eje.
Para montar los bloques de las ruedas delanteras se tendrá que
colocar los bloques de las ruedas sobre la horquilla hasta que
engatillen.
Para quitar los bloques de las ruedas pulse el botón debajo de la
articulación y retire el bloque de las ruedas.
3. Bloquear y liberar las ruedas
Para bloquear las ruedas, empuje la palanca hacia abajo.
Empuje la palanca hacia arriba para la posición de giro.
4. Apretar y soltar el freno
Para apretar el freno empuje la palanca hacia
abajo.
Para soltar el freno empuje la palanca hacia arriba.
5. Colocar y cambiar la dirección de la silla
Para montar la silla colóquela sobre el armazón hasta que engatille.
Para cambiar la dirección de la silla pulse los botones de los dos
adaptadores y levante la silla.
1
2
2
5
1
2
2
3
4
5
ES - 14
ES - 15
Page 9

6. Colocar y desmontar la capota
Introduzca la capota desde arriba en el dispositivo jador
Para retirar la capota, pulse los botones a ambos lados de la capota.
11. Ajustar el respaldo
Para ajustar el respaldo Si ha alcanzado la posición deseada, suelte el estribo para que el
respaldo engatille en esta posición.
7. Fijar y quitar el estribo de protección
Para jar el estribo de protección introdúzcalo en los soportes de
plástico de ambos lados.
Para quitar el estribo de protección se deberá pulsar los botones
en ambos lados hacia adentro y, a continuación, sacar el estribo de
protección tirando de él hacia delante.
Para ajustar la altura del estribo de protección, se deberán mantener
pulsados los dos botones laterales, y a continuación empujar el
estribo hacia arriba o abajo.
8. Ajustar el reposapiernas
Para ajustar los reposapiernas se debe presionar los botones de
ambos lados hacia dentro y a continuación ajustar la altura.
A continuación, suelte los botones para que el resposapiernas
engatille.
9. Cerrar el cinturón
Para cerrar el cinturón enganche entre si las dos piezas de plástico
superiores.
A continuación, introduzca las piezas unidas en la hebilla de plástico
inferior.
Ajuste el dispositivo de ajuste del cinturón de tal forma para que el
niño quede sujeto en su posición prevista.
10. Abrir el cinturón
Para abrir el cinturón pulse el botón lateral.
ADVERTENCIA: Utilice el cinturón de entrepierna siempre junto con el
cinturón de pelvis.
6 6
7
9
11
12. Ajustar el manillar
Para ajustar la altura del manillar, empuje el botón hacia arriba.
Cuando el manillar se encuentre en la altura deseada vuelva a soltar el botón para que el
manillar engatille.
7
13. Quitar la capota parasol
Abra la cremallera del lado de la capota.
7
14. Plegar el cochecito
Para plegar el cochecito ponga el manillar en su posición inferior como se explica en el punto
12, manteniendo pulsado el botón (1).
Ahora gire el botón (2) hacia la izquierda y presione el manillar hacia abajo.
8
9
10
Ahora se puede plegar el cochecito sin problemas.
Observación: Para abrir el cochecito proceda como se indica
en el punto 1 “Abrir el cochecito”.
ADVERTENCIA: Antes de su uso asegúrese de que todos los enganches estén bien cerrados.
15. Abrir la cuna de transporte
Levante las paredes laterales de la cuna de transporte.
Tense las paredes laterales empujando los dos estribos hacia fuera en los dispositivos
jadores.
Asegúrese de que los estribos estén bien engatillados.
12
13
14
15
ES - 16
ES - 17
Page 10

16. Colocar la pieza suspendida en la cuna
Coloque la pieza suspendida en la cuna plegando la parte superior
por encima del borde de la cuna.
17. Colocar el colchón
Coloque el colchón sobre el tapizado.
Empuje el colchón sobre el suelo de la cuna
Importante: El colchón es en forma de cuña. Preste atención a que la
parte elevada se encuentre en el lado de la cabeza.
21. Colocar el saco para los pies.
Abra la correa y coloque el forro sobre el asiento.
A continuación pase los cinco extremos de la correa a través de las
aberturas previstas de la funda.
16
17
Ahora se puede jar la manta para los pies con la cremallera en el
forro.
21
21
21
18. Fijar la cuna al cochecito
Ponga el respaldo en la posición de tumbado. Coloque la bolsa sobre
la supercie de tumbado.
Pase la correa, que se encuentra en la parte posterior de la cuna, a
través de la abertura de la funda de la unidad del asiento.
Ahora, cierre las hebillas de la correa en la parte posterior del
respaldo y tense la correa.
Coloque la correa al pie de la cuna por debajo del reposapiés
plegado hacia arriba. Cierre la correa y ténsela.
19. Colocar el recubrepiernas
Ponga la parte cerrada del recubrepiernas sobre el extremo de los
pies de la cuna de transporte.
Coloque el recubrepiernas sobre la cuna de transporte.
Fije los extremos de la manta para las piernas con los botones de
presión previstos en la cuna y la capota.
20. Fijar la red contra mosquitos
Abra la cremallera en el extremo superior de la manta para las
piernas y saque la red contra mosquitos.
Tienda la red contra mosquitos por encima de la capota y fíjela en
la misma. A continuación je la manta para las piernas en la red
contra mosquitos.
22. Colocar el recubrepiernas
Saque de la bolsa la parte inferior del saco para los pies.
Una la parte superior e inferior del saco para los pies con la
cremallera.
18
20
18
18
19
20
Fije el saco para los pies en el cochecito, jando la manta para los
pies con los botones de presión previstos en la capota.
22
22
22
ES - 18
ES - 19
Page 11

• Poussette enfant combinée avec caisson convertible
• Guidon télescopique réglable en hauteur
• Dossier réglable 4 fois
• Roues avant orientables et xables
• Capote avec fenêtre de vue magnétique
Consignes d’entretien et d’utilisation
• Les matériaux employés pour la fabrication de nos produits satisfont aux exigences des normes AZO, EN71-2 et EN71-3 ainsi
qu’à l’exigence de stabilité à la lumière des revêtements. Nous conseillons malgré tout de ne pas exposer le modèle au soleil
de façon intensive durant une période prolongée. L’abrasion, la déteinte des couleurs et la décoloration en cas de rayonnement
solaire important ne peuvent justier de réclamation. La housse en tissu de cet article est lavable. Vous pouvez laver les
housses soit à la main soit en machine à froid (lessive pour linge n).
• Nos modèles ne peuvent être protégés ablement contre la pluie qu’avec la capote pour pluie ABC Design qui est disponible
dans le commerce.
• Tous les châssis de nos modèles sont testés selon les normes EN 1888 : 2005 et satisfont aux exigences de ces dernières. Les
éléments mobiles doivent être huilés de temps à autre et les rivets remplacés si nécessaire an de maintenir durablement la
sécurité de votre modèle.
ATTENTION : Veuillez employer uniquement de l’huile silicone ou un spray silicone pour huiler ces éléments.
• Une maintenance et un entretien réguliers contribuent considérablement à la sécurité et au maintien de la valeur de votre
produit. Les inuences atmosphériques, telles qu’atmosphère salée, sel de déneigement ou encore pluie acide, ainsi qu’une
mauvaise mise à l’abri, développent la corrosion.
• Nous recommandons un entretien régulier de toutes les pièces peintes. En cas d’encrassements particulièrement importants,
nettoyer la surface peinte immédiatement.
• Contrôler de temps à temps les pièces de fermeture et autres pour s’assurer qu’elles ne sont pas desserrées et les resserrer si
bien besoin est.
Consignes de sécurité
Veuillez lire cette notice attentivement avant l’utilisation et conservez-la. La non-lecture de cette consigne peut porter atteinte à la
sécurité de votre enfant.
ATTENTION :
• Cette poussette convient aux enfants à partir d’un âge de 6 mois (avec le landau dès la naissance) et jusqu’à un poids maximum
de 15 kg.
• Le let à provisions peut être chargé d’un poids jusqu’à 2 kg.
• Ce landau a été conçu pour transporter un enfant.
• Employez uniquement les pièces d’accessoires autorisées de votre fabricant.
• Pour monter ou descendre les marches et escaliers ou lorsque votre landau doit être soulevé ou porté, vous devez toujours
sortir l’enfant du landau.
• En cas d’utilisation d’une nacelle porte-bébé, veillez à ce que celle-ci soit xée correctement au landau.
AVERTISSEMENT :
• Ne laissez jamais votre enfant sans surveillance.
• Utilisez seulement des matelas d’une épaisseur inférieure à 50 mm.
• Utilisez une ceinture de sécurité dès que votre enfant s’assoit tout seul.
• Cette assise ne convient pas pour les enfants de moins de 6 mois.
• Les charges xées au guidon nuisent à la stabilité du landau.
• S’assurer avant l’utilisation que la nacelle ou le siège soit bien enclenché.
• Ce produit ne convient pas pour faire du jogging ou du roller.
• Veuillez ne procéder à aucune modication susceptible de nuire à la sécurité.
• Tenez ce produit à l’écart du feu et d’autres sources de chaleur.
Consignes en cas de réclamation
• Les traces d’utilisation naturelles (usure) et les endommagements résultant d’une sollicitation abusive ne peuvent faire l’objet
de réclamation.
• Les endommagements résultant d’un usage non conforme ne peuvent faire l’objet de réclamation.
• Les endommagements résultant d’une mise en service ou d’un montage défectueux ne peuvent faire l’objet de réclamation.
• Les endommagements résultant d’un usage non conforme ne peuvent faire l’objet de réclamation.
• Les points de rouille dus à un manque éventuel de maintenance ou à une manipulation non conforme ne sont pas considérés
comme des défauts.
• Les rayures sont des traces d’usure normale et ne sont pas considérées comme des défauts.
• Les éléments textiles qui ont pris l’humidité et n’ont pas été séchés ensuite peuvent moisir ; ceci ne peut pas être considéré
comme défaut de production.
• Une décoloration éventuelle due aux rayons du soleil, à l’effet de la sueur, aux produits d’entretien, à l’abrasion ou à un lavage
trop fréquent ne peut pas être exclue et n’est donc pas considérée comme défaut.
• Les roues usées sont des phénomènes d’usure naturelle et ne justient aucun droit de réclamation.
• Poids : 13,8 kg
• contrôlé selon EN 1888 : 2005
• Compatible avec le siège auto ABC design « Rider »
• Compatible avec le « Kiddie Ride On » ABC Design
1. Ouverture de la poussette
Tirez la poignée de la poussette sport (1) vers le haut jusqu’à ce que
le châssis s’enclenche (2).
AVERTISSEMENT : Assurez-vous avant l’utilisation que tous les
verrouillages sont fermés.
2. Montage des roues
Appuyez sur le bouton (1), puis enfoncez la roue arrière dans la
glissière (2) jusqu’à ce qu’elle soit solidement enclenchée.
Pour retirer les roues, appuyez sur le bouton (1) an que la roue soit
déverrouillée.
Vous pouvez alors retirer la roue de l’essieu.
Pour monter les blocs de roue avant, enfoncez les deux blocs de
roue sur la fourche jusqu’à enclenchement.
Pour retirer les blocs de roue, appuyez sur le bouton situé sous
l’articulation du bloc de roue et retirez le bloc de roue.
3. Fixation et orientation des roues
Baissez le levier pour xer les roues.
Levez le levier pour la position orientable.
4. Fixation et desserrage des freins
Pour xer les freins, baissez le levier.
Pour desserrer les freins, levez le levier.
5. Montage et conversion du siège
Pour xer le siège, positionnez-le sur le châssis jusqu’à ce qu’il
s’enclenche.
Pour convertir le siège, appuyez sur les boutons des deux
adaptateurs et soulevez le siège.
1
2
2
5
1
2
2
3
4
5
FR - 20
FR - 21
Page 12

6. Montage et démontage de la capote
Enfoncez la capote dans le support par le haut.
Pour ôter la capote, appuyez sur les boutons situés des deux
côtés de la capote.
11. Réglage du dossier
Pour régler le dossier, tirez l’anse située au dos du dossier vers le haut et réglez-la en
hauteur. Lorsque vous avez atteint la position souhaitée, lâchez l’anse pour que le dossier
s’enclenche dans cette position.
7. Fixation et retrait de l’anse de protection
Pour xer l’anse de protection, faites-la glisser des deux côtés
dans l’enveloppe plastique.
Pour retirer l’anse de protection de la poussette, enfoncez les
boutons des deux côtés vers l’intérieur, puis retirez l’anse de
protection vers l’avant.
Pour régler la hauteur de l’anse de protection, maintenez les
deux boutons latéraux enfoncés et poussez l’anse vers le haut ou
vers le bas.
8. Réglage du repose-jambes
Pour régler le repose-jambes, enfoncez les boutons des deux
côtés vers l’intérieur, puis régler la hauteur.
Relâchez ensuite les boutons pour que le repose-jambes
s’enclenche.
9. Bouclage de la ceinture
Pour boucler la ceinture, imbriquez les deux pièces supérieures
en plastique l’une dans l’autre.
Enfoncez ensuite les pièces imbriquées dans la boucle inférieure
en plastique.
Réglez la ceinture de manière à maintenir l’enfant dans la
position prévue.
10. Ouverture de la ceinture
Pour ouvrir la ceinture, appuyez sur le bouton latéral.
AVERTISSEMENT : Employez la sangle d’entrejambe toujours en
combinaison avec la ceinture ventrale.
6 6
7
9
11
12. Réglage du guidon
Pour régler la hauteur de guidon, levez le bouton.
Lorsque le guidon se trouve à la hauteur souhaitée, relâchez le bouton pour que le guidon
s’enclenche.
7
13. Démontage du pare-soleil
Ouvrez la fermeture éclair sur le côté du pare-soleil.
7
14. Pliage de la poussette
Pour plier la poussette, descendez le guidon jusqu’à la position la plus basse comme
expliqué au point 12 et maintenez le bouton (1) enfoncé.
Tournez le bouton (2) vers la gauche et poussez le guidon vers la bas.
8
9
Vous pouvez ainsi plier la poussette sans problème.
Remarque : Pour déplier la poussette, procédez comme au point 1
« Ouverture de la poussette ».
AVERTISSEMENT : Assurez-vous avant l’utilisation que tous les verrouillages sont fermés.
15. Dépliage du landau
Soulevez les parois latérales du sac de transport.
Tendez les parois latérales en enfonçant les deux anses dans les xations vers l’extérieur.
Assurez-vous que les anses sont correctement enclenchées.
12
13
14
15
FR - 22
10
FR - 23
Page 13

16. Positionnement de la suspension sur le landau
Placez la suspension dans le landau de sorte que la partie supérieure
soit rabattue par-dessus la bordure du landau.
17. Mise en place du matelas
Mettez le matelas dans la housse.
Enfoncez le matelas sur le fond du sac.
21. Mise en place du chauffe-pieds
Ouvrez la sangle et posez le matelas sur le siège.
Passez les cinq sangles à travers les trous du matelas.
Fixez la couverture de jambes au matelas au moyen de la fermeture
16
éclair.
21
21
18. Fixation du coufn sur la poussette
Réglez le dossier en position allongée. Posez le coufn sur la surface
plane.
Passez la sangle xée au dos du coufn à travers le trou de la housse
du siège.
Fermez la boucle de la sangle au dos du dossier et serrez la sangle.
Passez la sangle située au pied du coufn autour du repose-pieds
relevé. Fermez la sangle et serrez-la.
19. Positionnement de la couverture de jambes
Retournez la partie fermée de la couverture de jambes sur l’extrémité
côté pieds du sac de transport.
Tirez la couverture de jambes sur le sac de transport.
Fixez les extrémités de la couverture de jambes au coufn et à la
capote avec les boutons-pression prévus à cet effet.
20. Fixation de la moustiquaire
Ouvrez la fermeture éclair située en haut de la couverture de jambes
et sortez la moustiquaire.
Passez la moustiquaire par-dessus la capote et xez-la à celle-ci.
Fixez ensuite la couverture de jambes à la moustiquaire.
17
22. Mise en place de la couverture de jambes
Sortez la partie inférieure du chauffe-pieds de la poche.
Reliez la partie supérieure et la partie inférieure du chauffe-pieds en
fermant la fermeture éclair.
18
20
18
18
19
20
Fixez le chauffe-pieds à la poussette en xant la couverture de
jambes à la capote avec les boutons-pression prévus à cet effet.
22
21
22
22
FR - 24
FR - 25
Page 14

• carrozzina con seggiolino di riporto reversibile
• maniglione telescopico regolabile in altezza
• schienale reclinabile in 4 posizioni
• ruote anteriori piroettanti e bloccabili
• capottina con nestrella a chiusura magnetica
Istruzioni d’uso e manutenzione
• I materiali utilizzati per la realizzazione dei nostri prodotti sono conformi ai requisiti AZO, EN71-2 e EN71-3 nonché ai requisiti
di resistenza alla luce per i capi d’abbigliamento. Vi consigliamo comunque di non esporre il prodotto ai raggi solari per tempi
prolungati. Scolorimenti, alterazioni di colore e sbiadimenti causati da forte irraggiamento solare non costituiscono giusticato
motivo di reclamo. Il rivestimento in tessuto di questo articolo è lavabile. Potete lavare la fodera a mano o in lavatrice con il
programma di lavaggio a freddo (detersivo per delicati).
• Una protezione sicura contro la pioggia è garantita per i nostri modelli soltanto mediante specica capottina antipioggia ABC
Design reperibile in commercio.
• Tutte le intelaiature dei nostri modelli sono testate e omologate a norma EN1888 : 2005. Per garantire una lunga durata del
vostro passeggino, è necessario oliare e all’occorrenza ribattere di tanto in tanto gli elementi mobili.
ATTENZIONE: Per oliare, utilizzare esclusivamente olio o spray siliconico.
• Una regolare pulizia e manutenzione del vostro passeggino contribuiscono in modo rilevante a garantirne la sicurezza e a
mantenerlo in buono stato. Gli agenti atmosferici, come il contenuto salino dell’aria, il sale sparso in inverno sulle strade, le
piogge acide e la sistemazione in un luogo non adatto, favoriscono la corrosione.
• Suggeriamo di pulire regolarmente tutte le parti verniciate. Nei casi più gravi, pulire le superci verniciate subito dopo che si
sono sporcate.
• Di tanto in tanto vericare che non vi siano parti o chiusure allentate, se necessario provvedere a stringerle.
Avvertenze per la sicurezza
Leggete attentamente le seguenti istruzioni prima dell’uso e conservatele per future consultazioni. L’inosservanza di queste
istruzioni può compromettere la sicurezza del vostro bambino.
ATTENZIONE:
• Questo modello è idoneo per bambini a partire dall’età di 6 mesi (con navicella/port-enfant a partire dalla nascita) e con peso
massimo di 15 kg.
• La rete porta-spesa può essere caricata con un peso massimo di 2 kg.
• Questo passeggino è specicamente costruito per l’utilizzo da parte di un bambino.
• Utilizzate esclusivamente accessori omologati dal produttore.
• Nel salire o scendere gradini o scale o se occorre sollevare o portare a mano il passeggino, è necessario togliere il bambino dal
passeggino.
• In caso di utilizzo della borsa portaoggetti, assicuratevi che sia correttamente ssata al passeggino.
AVVERTENZE:
• Non lasciate il vostro bambino incustodito.
• Inserite solo materassini con uno spessore massimo di 50 mm.
• Utilizzate la cintura di sicurezza non appena il vostro bambino è in grado di stare seduto da solo.
• Questo seggiolino non è adatto per bambini al di sotto dei 6 mesi di età.
• I carichi ssati sul cursore compromettono la stabilità del passeggino.
• Prima dell’uso è necessario vericare che l’alzata o l’unità seggiolino sia correttamente inseriti e agganciati.
• Questo prodotto non è adatto per praticare jogging o pattinaggio.
• Non apportate modiche che possano compromettere la sicurezza.
• Tenete questo prodotto lontano da amme o da altre fonti di calore.
Informazioni in caso di reclamo
• Naturali segni di usura e danni da eccessiva sollecitazione non costituiscono giusticato motivo di reclamo.
• I danni causati da un uso improprio del prodotto non costituiscono giusticato motivo di reclamo.
• I danni causati da un montaggio o da un primo utilizzo inappropriato del prodotto non costituiscono giusticato motivo di
reclamo.
• I danni causati da modiche improprie al prodotto non costituiscono giusticato motivo di reclamo.
• I punti di ruggine che possono comparire per mancanza di manutenzione o per uso improprio del prodotto, non costituiscono un
difetto.
• Eventuali graf rappresentano normali segni di usura e non costituiscono un difetto.
• Le parti di tessuto bagnate e non opportunamente asciugate, possono essere attaccate da muffe, che non costituiscono un
difetto intrinseco del prodotto.
• In seguito all’esposizione ai raggi solari, all’azione del sudore, all’uso di detergenti, all’usura o ai lavaggi troppo frequenti non si
possono escludere scolorimenti, che pertanto non costituiscono un difetto.
• Il consumo delle ruote è un normale segno di usura e pertanto non costituisce motivo di reclamo.
• Peso: 16,0 kg
• Omologato EN 1888 : 2005
• compatibile con seggiolino auto „Rider“ di ABC Design
• compatibile con carrello „Kiddie Ride On“ di ABC Design
1. Apertura della carrozzina
Tirare il maniglione del passeggino (1) verso l’alto no all’apertura
e allo scatto del telaio (2).
AVVERTENZA: Prima dell’utilizzo, assicuratevi che tutti gli
agganci siano correttamente chiusi.
2. Montaggio delle ruote
Premere il bottone (1) e inserire la ruota posteriore nella guida (2)
no allo scatto che ne indica il corretto bloccaggio.
Per lo smontaggio, premere il bottone (1) per sbloccare la ruota.
A quel punto è possibile estrarre la ruota dal suo asse.
Per montare il blocco ruote anteriore, è necessario spingerlo sulla
forcella no allo scatto.
Per smontare il blocco ruote, premere il bottone situato in basso
sullo snodo del blocco ruote ed estrarre il blocco ruote.
3. Blocco e sblocco delle ruote
Spingere verso il basso la levetta per bloccare le ruote.
Spingere verso l’alto la levetta per abilitare il movimento
piroettante.
4. Blocco e sblocco del freno
Per bloccare il freno, spingere la levetta verso il basso.
Per sbloccare il freno, spingere la levetta verso l’alto.
5. Montaggio e orientamento del seggiolino
Per montare il seggiolino, inserirlo sul telaio no allo scatto.
Per modicarne il senso di marcia, premere i bottoni situati sui
due adattatori e sollevare il seggiolino.
1
2
2
5
1
2
2
3
4
5
IT - 26
IT - 27
Page 15

6. Montaggio e rimozione della capottina
Inserire la capottina dall’alto negli appositi agganci.
Per smontare la capottina, premere i pulsanti sui lati della
capottina.
11. Regolazione dello schienale
Per la regolazione dello schienale, tirare verso l’alto la staffa su retro dello schienale e
regolare l’altezza. Al raggiungimento della posizione desiderata, rilasciare la staffa per
bloccare lo schienale in posizione.
7. Fissaggio e rimozione della protezione anteriore anticaduta
Per ssare la protezione anteriore anticaduta, inserirla e spingerla
su entrambi i lati nelle apposite sedi.
Per smontare la protezione anteriore anticaduta, premere verso
l’interno i pulsanti su entrambi i lati del passeggino ed estrarre la
protezione.
Per regolare in altezza la protezione anteriore anticaduta, è
necessario tenere premuti i due pulsanti laterali ed inne spingere
la protezione verso l’alto o verso il basso.
8. Regolazione del poggiagambe
Per regolare il poggiagambe, premere verso l’interno i pulsanti su
entrambi i lati del passeggino e regolare l’altezza desiderata.
Rilasciare i pulsanti per permettere il bloccaggio in posizione del
poggiagambe.
9. Aggancio della cintura
Per agganciare la cintura, inserire l’uno nell’altro i due agganci in
plastica superiori.
Inne inserire gli agganci ssati entro l’aggancio in plastica
inferiore.
Regolare la cintura in modo che il bambino possa essere
mantenuto nella posizione corretta.
10. Sgancio della cintura
Per sganciare la cintura, premere sul pulsante laterale.
AVVERTENZA: Utilizzare sempre la cintura centrale insieme alla
cintura subaddominale.
6 6
7
9
11
12. Regolazione del maniglione
Per regolare l’altezza del maniglione, premere il bottone verso l’alto.
Al raggiungimento dell’altezza desiderata, rilasciare il bottone no allo scatto del maniglione
in posizione.
7
13. Rimozione della capottina parasole
Aprire la cerniera sul lato della capottina.
7
14. Chiusura della carrozzina
Per ripiegare il telaio della carrozzina, abbassare il maniglione nella posizione inferiore come
spiegato al punto 12, tenendo premuto il bottone (1).
Quindi ruotare il cursore (2) verso sinistra e spingere il maniglione verso il basso.
8
9
10
Ora è possibile ripiegare il telaio della carrozzina senza problemi.
Nota: Per aprire la carrozzina, procedere come descritto al punto 1 “Apertura della
carrozzina“.
AVVERTENZA: Prima dell’utilizzo, assicuratevi che tutti gli agganci siano correttamente
chiusi.
15. Apertura della navicella port-enfant
Alzare le pareti laterali della navicella.
Fissare le pareti laterali spingendo le due staffe verso l’esterno entro i supporti.
Assicurarsi che le staffe siano correttamente bloccate.
12
13
14
15
IT - 28
IT - 29
Page 16

16. Inserimento dell’imbottitura interna
Inserire l’imbottitura interna ripiegandone la parte superiore sul
bordo esterno della navicella.
17. Inserimento del materassino
Inserire il materassino nella fodera coprimaterasso.
Adagiare il materassino sul fondo della navicella.
Importante: Il materassino è cuneiforme. Nell’inserirlo nella
navicella, assicurarsi che la parte più alta sia sistemata sul lato
della testa.
21. Fissaggio del sacco coprigambe
Aprire la cintura e distendere il trapuntino di base sul seggiolino.
Quindi far passare le cinque estremità delle cinture nelle aperture
predisposte sul trapuntino di base.
16
17
Ora è possibile ssare il coprigambe al trapuntino di base chiudendo
la cerniera.
21
21
21
18. Fissaggio della navicella alla carrozzina
Abbassare completamente lo schienale. Posare la navicella sulla
supercie di appoggio.
Far passare la cintura situata sul lato posteriore della navicella
attraverso l’apertura nella fodera del seggiolino.
Chiudere ora gli agganci sul retro dello schienale e stringere bene
la cintura.
Agganciare la cintura situata nella zona dei piedi della navicella
attorno al poggiapiedi sollevato. Chiudere gli agganci e stringere
la cintura.
19. Applicazione del coprigambe
Sistemare la parte chiusa del coprigambe sul lato dei piedi della
navicella.
Tendere il coprigambe sulla navicella.
Fissare le estremità del coprigambe alla navicella e alla capottina
utilizzando gli appositi bottoni.
20. Fissaggio della zanzariera
Aprire la cerniera sul bordo superiore del coprigambe ed estrarre
la zanzariera.
Tirare e ssare la zanzariera sulla capottina. Inne ssare il
coprigambe alla zanzariera.
22. Applicazione del coprigambe
Estrarre la parte inferiore del sacco coprigambe dalla tasca.
Unire la parte superiore e la parte inferiore del sacco coprigambe
tramite la cerniera.
18
20
18
18
19
20
Fissare il sacco coprigambe al passeggino agganciando il coprigambe
alla capottina tramite gli appositi bottoni.
22
22
22
IT - 30
IT - 31
Page 17

• Combi travel-system met omkeerbaar zitje
• In hoogte verstelbare telescopische duwstang
• Vier standen rugleuning
• Vergrendelbare zwenkwielen voorzijde
• Kijkvenster met magneetsluiting in zonnekap
Onderhouds- en gebruiksinstructies
• De materialen die voor de vervaardiging van onze producten worden gebruikt, voldoen aan de AZO-voorschriften, EN 71-2 en
EN 71-3, en aan de eisen voor lichtechtheid van bekleding. Toch raden wij u aan om het model niet gedurende lange tijd aan
intensief zonlicht bloot te stellen. Slijtage of het uitlopen en verbleken van kleuren ten gevolge van sterk zonlicht zijn geen
geldige reden tot reclamatie. De stoffen overtrek van dit artikel is wasbaar. U kunt de overtrek zowel met de hand als in de
machine op lage temperatuur wassen (wasmiddel voor jne was).
• Absolute regenbescherming bieden onze modellen slechts in combinatie met de in de handel verkrijgbare regenkappen van
ABC Design.
• Alle onderstellen van onze modellen zijn getest volgens EN 1888:2005 en goed bevonden. Om de veiligheid van het model
blijvend te garanderen, dienen de beweeglijke onderdelen af en toe te worden geolied en indien nodig opnieuw te worden
vastgeklonken.
LET OP! Gebruik voor het oliën uitsluitend siliconenolie of siliconenspray.
• Een goed en regelmatig onderhoud is bijzonder belangrijk voor de veiligheid en het waardebehoud van uw product. Milieu-
invloeden zoals het zoutgehalte in de lucht, strooizout of zure regen, alsmede een verkeerde opberging kunnen tot corrosie
leiden.
• Wij adviseren een regelmatig onderhoud van alle gelakte onderdelen. In ernstige gevallen dienen de lakoppervlakken direct na
de verontreiniging te worden schoongemaakt.
• Controleer losse en slijtageonderdelen regelmatig en draai ze indien nodig weer vast aan.
Veiligheidsinstructies
Lees deze instructies aandachtig door vóór het gebruik en bewaar de handleiding zorgvuldig. Als u de instructies niet in acht
neemt, kan de veiligheid van uw kind in het gedrang komen.
LET OP!
• Deze wagen is geschikt voor kinderen vanaf 6 maanden (met draagtas/reiswieg vanaf de geboorte) en met een gewicht van
maximaal 15 kg.
• Het boodschappennet kan tot een gewicht van 2 kg worden geladen.
• Deze wagen is gebouwd voor het vervoer van één kind.
• Gebruik uitsluitend goedgekeurde accessoires van de fabrikant.
• Bij het nemen van treden of trappen, of wanneer uw kinderwagen wordt opgetild of gedragen, moet u uw kind altijd uit de
wagen nemen.
• Bij gebruik van een draagtas dient u zich ervan te verzekeren dat deze correct aan de wagen bevestigd is.
WAARSCHUWING!
• Laat uw kind nooit zonder toezicht.
• Gebruik uitsluitend matrassen tot een dikte van 50 mm.
• Gebruik een veiligheidsriem, zodra uw kind zelfstandig kan zitten.
• Deze ziteenheid is niet geschikt voor kinderen onder de 6 maanden.
• Aan de duwstang bevestigde lasten verminderen de stabiliteit van de wagen.
• Voor elk gebruik dient te worden gecontroleerd of de opbouw van de kinderwagen of de ziteenheid correct is vastgeklikt.
• Dit artikel is niet geschikt om te joggen of skaten.
• Breng geen veranderingen aan die de veiligheid in gevaar kunnen brengen.
• Hou dit product verwijderd van vuur en andere hittebronnen.
Instructies met betrekking tot reclamaties
• Natuurlijke slijtageverschijnselen en schade door overmatige belasting vormen geen redenen tot reclamatie.
• Schade die door een onvakkundig gebruik is ontstaan, is geen reden tot reclamatie.
• Schade die door een verkeerde montage of ingebruikname is ontstaan, is geen reden tot reclamatie.
• Schade die door onvakkundige veranderingen aan het product is ontstaan, is geen reden tot reclamatie.
• Roestvlekken, die door een onvoldoende onderhoud of onvakkundige behandeling kunnen ontstaan, vormen geen gebreken.
• Krassen zijn normale slijtageverschijnselen en geen productgebreken.
• Vochtig geworden textiel dat niet wordt gedroogd, kan beschimmelen. Dit is geen productgebrek.
• Onder invloed van zonlicht, zweet, reinigingsmiddelen, slijtage of veelvuldig wassen kan de stof verbleken. Dit is onvermijdelijk
en vormt geen gebrek.
• Versleten banden zijn een normaal verschijnsel en vormen geen reden tot reclamatie.
• Gewicht: 16,0 kg
• Gekeurd volgens EN 1888:2005
• Compatibel met ABC Design “Rider” autostoeltje
• Compatibel ABC Design “Kiddie Ride-On” buggy board
1. De kinderwagen uitklappen
Trek de duwstang van de wagen (1) omhoog totdat het frame vastklikt
(2).
Waarschuwing: Controleer voor gebruik van de kinderwagen of alle
vergrendelingen goed gesloten zijn.
2. De wielen bevestigen
Druk op de knop (1) en steek de achterwielen in de achteras (2) tot ze
vastzitten.
Druk, om de wielen af te nemen, op de knop (1) om de wielen te
ontgrendelen.
De wielen kunnen nu uit de as gehaald worden.
Bevestig de voorwielen door het wielblok op de as te schuiven totdat
ze op hun plaats klikken.
Druk, om de voorwielen af te nemen, op de knop onder het
voorwielblok en schuif het wielblok van de as af.
3. Het zwenken en vastzetten van de voorwielen
Druk de hendel naar beneden om de wielen vast te zetten.
Druk de hendel omhoog voor de zwenkpositie van de wielen.
4. De rem bedienen
Druk, om de rem vast te zetten, de hendel naar beneden.
Ontgrendel de rem door de hendel omhoog te halen.
5. Plaatsen en omdraaien van de buggyzit
Bevestig de buggyzit door het op het frame te plaatsen en aan te
drukken totdat het op zijn plaats klikt.
Druk, om de buggyzit om te draaien, op de knoppen van beide
adapters en til het zitje op. Draai het zitje om en klik het terug op het
frame.
1
2
2
5
1
2
2
3
4
5
NL - 32
NL - 33
Page 18

6. Het dak aanbrengen en verwijderen
Steek het dak bovenaan in de houder.
Om het dak te verwijderen, dient u de knoppen aan beide zijden van
het dak in te drukken.
11. Verstellen van de rugleuning
Om de rugleuning te verstellen, trekt u de beugel aan de achterzijde van de rugleuning naar
boven en stelt u de leuning op de gewenste hoogte in. Als u de gewenste positie hebt bereikt,
laat u de beugel weer los, om de rugleuning in deze positie te vergrendelen.
7. Bevestigen en verwijderen van de veiligheidsbeugel
Plaats de veiligheidsbeugel door het in de kunststof houders aan
beide zijden te klikken.
Druk, om de beugel te verwijderen, de knoppen aan beide zijden in
en neem de beugel weg.
Om de beschermbeugel in de hoogte te verstellen, dient u de beide
knoppen aan de zijkanten ingedrukt te houden en vervolgens de
beugel naar boven of naar beneden te duwen.
8. Aanpassen van de beensteun
Houd, om de beensteun te verstellen, de knoppen aan beide zijden
ingedrukt en pas de hoogte aan.
Laat de knoppen los zodat de beensteun op zijn plaats klikt.
9. Sluiten van de gordel
Om de gordel te sluiten, dient u de beide bovenste plastic onderdelen
in elkaar te schuiven.
Schuif de zo verbonden onderdelen aansluitend in de onderste plastic
houder.
Stel de gordel zo in, dat uw kind in de gewenste positie wordt
gehouden.
10. Openen van de gordel
Om de gordel te openen, dient u de knop aan de zijkant in te drukken.
LET OP! Gebruik de kruisgordel altijd in combinatie met de
heupgordel.
6 6
7
9
11
12. Verstellen van de duwstang
Knijp de knop in om de hoogte van de duwstang aan te passen.
Laat de knop los wanneer de duwstang op de gewenste hoogte staat.
7
13. Verwijderen van het zonnedak
Open de ritssluiting aan de zijkant van het dak.
7
14. Inklappen van de kinderwagen
Breng, om de kinderwagen in te klappen, de duwstang naar de laagste positie zoals beschreven
bij punt 12. Houd de knop (1) ingedrukt.
Draai nu de knop (2) naar links en duw de duwstang naar beneden.
8
9
10
De kinderwagen kan nu ingeklapt worden.
NB: Volg om de kinderwagen uit te klappen, punt 1 van de handleiding “Uitklappen van de
kinderwagen”.
Waarschuwing: Controleer voor gebruik van de kinderwagen of alle vergrendelingen goed
gesloten zijn.
15. Uitklappen van de reiswieg
Til de zijwanden van de draagwieg iets omhoog.
Span de zijwanden op door de twee metalen beugels naar buiten in de houders te drukken.
Zorg ervoor dat de beugels stevig vast zitten.
12
13
14
15
NL - 34
NL - 35
Page 19

16. Plaatsen van de reiswiegbekleding
Leg de bekleding in de reiswieg, vouw het bovenste deel over de
rand van de reiswieg.
17. Plaats de matras
Schuif de matras in de hoes.
Leg de matras op de bodem.
NB: De matras is wigvormig. Zorg ervoor dat het verhoogde deel
aan het hoofdeinde wordt geplaatst.
21. De voetenzak aanbrengen
Open de riem en leg de inleg op de zitting.
Trek vervolgens de vijf riemen door de daarvoor bedoelde openingen
in de bekleding.
16
17
Nu kunt u het beendekje met de ritssluiting aan de inleg bevestigen.
21
21
21
18. De bak aan de wagen bevestigen
Breng de rugleuning in ligstand. Leg de tas op het ligvlak.
Trek de riem die aan de achterzijde van de bak is aangebracht, door
de opening in de overtrek van de ziteenheid.
Sluit nu de gesp aan de achterzijde van de rugleuning en trek de
riem stevig aan.
Gesp de riem vervolgens aan het voeteinde van de bak vast rond de
opgeklapte voetsteun. Sluit de riem en trek hem stevig aan.
19. Bevestigen van het reisdekje
Plaats het gesloten deel van het reisdekje over het voeteneinde van
de reiswieg.
Trek het dekje over de reiswieg.
Bevestig de uiteinden van het beendekje door middel van de
daarvoor bedoelde drukknopen aan de bak en het dak.
20. Het muggennet bevestigen
Open de ritssluiting aan de bovenrand van het beendekje en trek
het muggennet eruit.
Span het muggennet over het dak en bevestig het eraan. Maak het
muggennet vervolgens aan het beendekje vast.
22. Het beendekje aanbrengen
Neem het onderste deel van de voetenzak uit de tas.
Verbind het bovenste en onderste deel van de voetenzak door middel
van de ritssluiting.
18
20
18
18
19
20
Bevestig de voetenzak aan de kinderwagen, door het beendekje met
de daarvoor bedoelde drukknopen aan het dak vast te maken.
22
22
22
NL - 36
NL - 37
Page 20

• Wózek dziecięcy głęboko-spacerowy z
możliwością wożenia dziecka przodem i tyłem do
kierunku jazdy
• Teleskopowa regulacja wysokości rączki
• Oparcie na plecy rozkładane 4-stopniowo
• Kółka przednie obrotowe z możliwością blokady
Wskazówki dotyczące konserwacji i użytkowania
• Materiały stosowane do produkcji naszych wyrobów odpowiadają wymogom dla producentów AZO, EN71-2 i EN71-3, oraz
odporności na światło dla odzieży. Mimo to radzimy nie poddawać modelu przez dłuższy czas intensywnemu działaniu
promieni słonecznych. Ścieranie, utrata barw i wyblaknięcie przy silnym nasłonecznieniu nie stanowią podstawy do
reklamacji. Tekstylne pokrowce tego artykułu nadają się do prania. Mogą one być prane ręcznie lub na zimno w maszynie
(łagodne środki piorące).
• Absolutną ochronę przed deszczem dla naszych modeli zapewnia tylko dostępna w handlu budka przeciwdeszczowa w
ABC-Design.
• Wszystkie stelaże naszych modeli testowane są według EN1888 : 2005 i odpowiadają tym normom. W celu trwałego
bezpieczeństwa posiadanego modelu części ruchome należy od czasu do czasu smarować a w razie potrzeby dodatkowo
nitować.
UWAGA: Do smarowania stosować tylko olej silikonowy lub spray silikonowy.
• Do bezpieczeństwa i zachowania wartości Twego produktu w dużej mierze przyczynia się regularna pielęgnacja i
konserwacja. Wpływy środowiska, jak np. zawartość soli w powietrzu, sól do posypywania ulic, kwaśny deszcz oraz
nieprawidłowe przechowywanie przyspieszają korozję.
• Radzimy regularną pielęgnację wszystkich elementów lakierowanych. W szczególnych przypadkach oczyścić lakierowaną
powierzchnię natychmiast po zabrudzeniu.
• Sprawdzaj od czasu do czasu poluzowane części i elementy blokujące i gdy jest to konieczne - dokręć je.
Wskazówki dotyczące bezpieczeństwa
Przed użyciem zapoznaj się uważnie z treścią niniejszych wskazówek i zachowaj je. Nieprzestrzeganie niniejszych wskazówek
może zagrażać bezpieczeństwu Twojego dziecka.
UWAGA:
• Ten wózek przeznaczony jest dla dzieci od 6 miesiąca życia (z torbą/gondolą) o ciężarze maksymalnym do 15 kg.
• Do siatki na zakupy może być wkładany maksymalny ciężar wynoszący 2 kg.
• Wózek ten skonstruowany jest z myślą o jednym dziecku.
• Używaj wyłącznie oryginalnych akcesoriów producenta.
• Przy wjeżdżaniu na stopnie, schody lub przy podnoszeniu lub noszeniu wózka, dziecko powinno być z niego zasadniczo
wyjmowane.
• Upewnij się, czy torba której używasz jest prawidłowo umocowana na wózku.
OSTRZEŻENIE:
• Nie pozostawiaj dziecka bez opieki.
• Używaj tylko materacy o grubości do 50 mm.
• Gdy Twoje dziecko potra już siedzieć samodzielnie, zapinaj je pasem bezpieczeństwa.
• Siedzisko nie nadaje się dla dzieci poniżej 6 miesięcy.
• Ciężary umocowane na rączce mają negatywny wpływ na stabilność wózka.
• Przed użyciem należy sprawdzić, czy gondola lub siedzisko zostały prawidłowo zatrzaśnięte.
• Produkt ten nie nadaje się do joggingu lub jeżdżenia na łyżworolkach.
• Nie przeprowadzaj żadnych zmian mogących mieć negatywny wpływ na bezpieczeństwo.
• Nie stawiaj produktu w pobliżu ognia lub innych źródeł ciepła.
Wskazówki dotyczące reklamacji
• Naturalne oznaki zużycia (zużycia naturalnego) i szkody powstałe na skutek nadmiernego obciążenia nie stanowią podstawy
do reklamacji.
• Szkody powstałe wskutek niewłaściwego użytkowania nie stanowią podstawy do reklamacji.
• Szkody powstałe wskutek nieprawidłowego montażu lub uruchomienia, nie stanowią podstawy do reklamacji.
• Szkody powstałe wskutek niewłaściwie przeprowadzonych zmian na produkcie, nie stanowią podstaw do reklamacji.
• Rdza mogąca wystąpić ze względu na brak konserwacji lub niewłaściwe obchodzenie się z produktem, nie stanowi wady.
• Zadrapania są oznakami normalnego zużycia i nie stanowią wady.
• Elementy tekstylne poddane działaniu wilgoci i nie wysuszone, mogą pleśnieć, co nie stanowi wady produkcyjnej.
• Poprzez wpływ promieni słonecznych, potu, środków czyszczących, ścieranie lub zbyt częste pranie nie można wykluczyć
wyblaknięcia, które tym samym nie stanowi wady produktu.
• Starte koła są oznakami naturalnego zużycia i nie stanowią podstawy do reklamacji.
• Budka z okienkiem zapinanym na magnes
• Waga: 13,8 kg
• Kontrola wg EN 1888 : 2005
• Kompatybilny z fotelikiem samochodowym ABC Design „Rider“
• Kompatybilny z ABC Design „Kiddie Ride On“
1. Otwieranie wózka
Pociągnij uchwyt wózka (1) tak wysoko do góry, aż stelaż się
zablokuje (2).
OSTRZEŻENIE: Przed użytkowaniem upewnij się, czy wszystkie
blokady są zamknięte.
2. Montaż kółek
Naciśnij przycisk (1), a następnie nasadź tylne kółko na widełki
(2) aż się zatrzaśnie.
Aby zdjąć kółka, naciśnij przycisk (1), który odblokowuje kółko.
Teraz możesz je zdjąć z osi.
Aby zamontować bloki kółek przednich, musisz wsunąć bloki
na widełki, aż się zatrzasną.
Aby zdjąć bloki kółek, naciśnij przycisk znajdujący się u dołu
przegubu bloku kółek i ściągnij ten blok.
3. Unieruchamianie i obracanie kółek
Dla unieruchomienia kółek wciśnij dźwignię na dół.
Dla przestawienia do pozycji obrotowej wciśnij dźwignię do
góry.
4. Blokada i luzowanie hamulca
Aby zablokować hamulec, wciśnij dźwignię do dołu.
Aby zluzować hamulec, naciśnij dźwignię do góry.
5. Mocowanie i przestawianie siedziska
Aby zamocować siedzisko, nasadź je na stelaż aż się zatrzaśnie.
Aby przestawić siedzisko, naciśnij przyciski na obu adapterach i
podnieś siedzisko do góry.
1
2
2
5
1
2
2
3
4
5
PL - 38
PL - 39
Page 21

6. Zakładanie i zdejmowanie budki
Nasadź budkę od góry w mocowania.
W celu zdjęcia budki, naciśnij po obu stronach przyciski
znajdujące się na budce.
11. Regulacja oparcia na plecy
W celu regulacji oparcia na plecy, pociągnij do góry pałąk znajdujący się z tyłu oparcia
i ustaw żądaną wysokość. Po uzyskaniu żądanej pozycji, puść pałąk, tak aby oparcie na
plecy zatrzasnęło się w tej pozycji.
7. Mocowanie i zdejmowanie pałąka ochronnego
Aby umocować pałąk ochronny, wsuń go z obu stron w plastikową
oprawę.
Aby zdjąć pałąk ochronny z wózka, musisz wcisnąć do środka
przyciski po obu stronach, a następnie wyciągnąć pałąk w
kierunku do przodu.
W celu regulacji wysokości pałąka ochronnego, wciśnij i
przytrzymaj oba przyciski z jego boków, a następnie pociągnij
pałąk do góry lub do dołu.
8. Regulacja podnóżka
Aby przestawić podnóżek, musisz wcisnąć do środka przyciski po
obu stronach, a potem ustawić wysokość.
Następnie puść przyciski, aby podnóżek się zablokował.
9. Zapinanie pasa bezpieczeństwa
Aby zapiąć pas bezpieczeństwa, zepnij ze sobą oba górne
plastikowe elementy.
Tak połączone elementy wsuń następnie do dolnej plastikowej
sprzączki.
Ustaw pas w taki sposób, aby dziecko znajdowało się w
odpowiedniej pozycji.
10. Odpinanie pasa bezpieczeństwa
W celu odpięcia pasa bezpieczeństwa, naciśnij na boczny przycisk.
UWAGA: Używaj pasa krokowego zawsze w połączeniu z pasem
biodrowym.
6 6
7
9
11
12. Regulacja rączki
Aby przestawić wysokość rączki, wciśnij przycisk do góry.
Gdy rączka znajdzie się w żądanej pozycji, puść przycisk, a rączka zatrzaśnie się.
7
13. Zdejmowanie osłony przeciwsłonecznej
Otwórz suwak znajdujący się z boku osłony.
7
14. Składanie wózka
Aby złożyć wózek, przestaw rączkę tak, jak opisano w punkcie 12 na najniższą pozycję,
przytrzymując przy tym wciśnięty przycisk (1).
Przekręć przycisk (2) w lewo i wciśnij rączkę do dołu.
8
9
Teraz możesz bez problemu złożyć wózek.
Uwaga: W celu rozłożenia postępuj, jak w punkcie 1
“Otwieranie wózka“.
OSTRZEŻENIE: Upewnij się przed użytkowaniem, czy wszystkie blokady są zamknięte.
15. Nakładanie gondolki-nosidełka
Podnieś boczne ścianki nosidełka.
Napnij ścianki boczne, wciskając oba pałąki w kierunku na zewnątrz w mocowania.
Upewnij się, czy pałąki się odpowiednio zazębiły.
12
13
14
15
PL - 40
10
PL - 41
Page 22

16. Mocowanie tapicerki nosidełka w gondoli
Włóż nosidełko do gondoli, przy czym górna część musi być
wyłożona ponad krawędzią gondoli.
17. Wkładanie materaca
Oblecz materacyk w poszewkę.
Dociśnij materacyk do dna nosidełka.
Ważne: Materac ma kształt klina, przy wkładaniu zwróć uwagę, aby
wyższa część leżała po stronie głowy.
21.Mocowanie pokrowca na nóżki
Otwórz pas i połóż wkład na siedzenie.
Następnie przeciągnij pięć końcówek pasów przez przewidziane do
tego celu otwory w pokrowcu.
16
17
Przy pomocy suwaka połącz pokrowiec na nóżki z wkładką.
21
21
21
18. Mocowanie gondoli na wózku
Ustaw oparcie na plecy w pozycji leżącej. Połóż torbę na
powierzchnię przeznaczoną do leżenia.
Przeciągnij pas, znajdujący się z tyłu gondoli przez otwór na
pokrowcu siedziska.
Zamknij zapinki klamry pasa z tyłu oparcia na plecy i mocno
dociągnij pas.
Zapnij pas w części nożnej gondoli wokół złożonego podnóżka.
Zamknij pas i mocno go dociągnij.
19. Mocowanie pokrowca na nóżki
Zamkniętym końcem pokrowca na nóżki okryj dolną część gondoli.
Naciągnij pokrowiec na gondolę.
Przyczep końcówki okrycia na nóżki do przeznaczonych do tego
celu zatrzasków znajdujących się na gondoli i budce.
20. Mocowanie siatki przeciw komarom
Otwórz suwak znajdujący się w górnej części osłony na nóżki i
wyciągnij siatkę przeciw komarom.
Naciągnij siatkę na budce i unieruchom ją. Następnie przyczep
osłonę na nóżki do siatki.
22. Mocowanie pokrowca na nóżki
Wyjmij z torby dolny element pokrowca na nóżki.
Górną i dolną część pokrowca na nóżki połącz ze sobą przy pomocy
suwaka.
18
20
18
18
19
20
Umocuj pokrowiec na nóżki na wózku, przypinając osłonę na nóżki
przy pomocy przewidzianych do tego celu zatrzasków znajdujących
się na budce.
22
22
22
PL - 42
PL - 43
Page 23

• Kombi kočárek s otočnou sportovní nástavbou
• Výškově stavitelná rukojeť
• Nastavitelná opěrka zad do 4 poloh
• Přední otočná kolečka s možností aretace
• Střecha s magnetem nad okénkem
Upozornění k péči a použití
• K výrobě našich produktů použité materiály odpovídají požadavkům AZO, EN71-2 a EN71-3 jakož i stálobarevnosti oblečení
na světle. Doporučujeme Vám však přesto nevystavovat model delšímu intenzivnímu oslunění. Otěr, rozmazání a vyblednutí
barev pod vlivem silného oslunění neopravňují k žádnému nároku na reklamaci. Textilní potah tohoto artiklu je možné prát.
Můžete prát potahy ručně nebo v pračce studeným programem (za použití jemného pracího prášku).
• Absolutní ochrany našich modelů proti dešti lze dosáhnout pouze použitím dešťového krytu ABC-Design, který je k dostání
v obchodě.
• Všechny rámy našich modelů jsou zkoušeny podle EN1888 : 2005 a odpovídají této normě. Pohyblivé díly je nutné k udržení
trvalé bezpečnosti Vašeho modelu příležitostně naolejovat nebo podle potřeby znovu snýtovat.
POZOR: K olejování používat pouze silikonový olej nebo silikonový sprej.
• K bezpečnosti a povětrnostní odolnosti Vašeho produktu přispívá do velké míry pravidelná péče a údržba. Okolní vlivy jako
např. obsah soli ve vzduchu, posypová sůl nebo kyselý déšť, jakož i neřádná úschova, napomáhají korozi.
• Doporučujeme pravidelnou péči všech lakovaných dílů. V závažných ojedinělých případech vyčistit lakovaný povrch hned
po znečištění.
• Čas od času kontrolujte uvolněné díly a uzávěry a pokud nutné je utáhněte.
Bezpečnostní upozornění
Před použitím si tato upozornění pečlivě přečtěte a uschovejte si je. Nebudete-li brát na tato upozornění zřetel, může být
ohrožena bezpečnost Vašeho dítěte.
ACHTUNG:
• Tento kočárek je určen pro děti od věku 6 měsíců (s nosnou taškou/vaničkou od narození) a tělesné váhy do maximálně 15
kg.
• Nákupní síť lze naplnit až do zatížení 2 kg.
• Tento kočárek je konstruován pro jedno dítě.
• Používejte výhradně dovolené příslušenství od Vašeho výrobce.
• Před jízdou přes stupně nebo po schodištích, nebo v případě, že je nutné kočárek zvednout nebo přenést, dítě zásadně z
kočárku vyjmout.
• Při používání odnosné tašky se přesvědčte, že je na kočárku řádně připevněna.
VÝSTRAHA:
• Neponechávejte Vaše dítě bez dozoru.
• Vkládejte pouze matrace do tloušťky 50 mm.
• Jakmile je Vaše dítě schopno se samostatně posadit, používejte bezpečnostní pás.
• Tato sedačková jednotka není způsobilá pro děti mladší než 6 měsíců.
• Na držadle připevněné zátěže narušují stabilitu kočárku.
• Před použitím musíte překontrolovat, zda je nástavec kočárku nebo sedačková jednotka řádně aretována.
• Tento výrobek není způsobilý pro jogging nebo bruslení.
• Neprovádějte žádné změny, které by byly pochybné pro bezpečnost.
• Nepřibližujte tento produkt k ohni nebo jiným tepelným zdrojům.
Upozornění pro případ reklamace
• Přirozené opotřebení a škody následkem nadměrné námahy neopravňují žádný nárok na reklamaci.
• Škody, ke kterým dojde následkem neodborného použití, neopravňují žádný nárok na reklamaci.
• Škody, ke kterým dojde následkem nesprávné montáže nebo uvedení do provozu, neopravňují žádný nárok na reklamaci.
• Škody, ke kterým dojde následkem neodborné změny produktu, neopravňují žádný nárok na reklamaci.
• Rezavá místa, která mohou vzniknout v důsledku zanedbání údržby nebo neodborné manipulace, nepředstavují vady.
• Škrábance jsou normální opotřebení a nepředstavují žádné vady.
• Zvlhlé a neosušené textilní části, mohou plesnivět a nepředstavují žádnou výrobně podmíněnou vadu.
• Vlivem oslunění, potu, čisticích prostředků, otěru nebo častým praním nelze vyloučit vyblednutí barev, které tudíž
nepředstavuje žádnou vadu.
• Ojetá kola představují přirozené opotřebení a neopravňují žádný nárok na reklamaci.
• Hmotnost: 16,0 kg
• Zkoušený podle EN 1888 : 2005
• Kompatibilní s autosedačkou ABC Design „Rider“
• Kompatibilní s ABC Design „Kiddie Ride On“
1. Rozložení kočárku.
Zatáhněte rukojeť sportovního kočárku (1) směrem nahoru jak je
to možné až dojde k zajištění konstrukce (2).
POZOR: Nezapomeňte vždy před použitím zkontrolovat, že je
kočárek správně rozložen a zajištěn.
2. Nasazení koleček.
Zmáčkněte pojistku (1) a nasaďte zadní kolečka do pouzdra (2) a
zatlačte kolečko směrem dovnitř, až zacvakne.
Pokud chcete kolečka sundat, zmáčkněte pojistku (1), až dojde
k uvolnění kolečka. Nyní zatáhněte kolečko z pouzdra směrem
ven.
Pokud chcete namontovat přední kola, musíte nasadit pouzdro na
konstrukci a zatlačit ji směrem nahoru, až zacvakne.
Pokud chcete přední kola sundat, zmáčkněte pojistku směrem
dolu a zatáhněte jej směrem dolů.
3. Aretace předních otočných koleček.
Zatáhněte táhlo na obou kolech směrem nahoru, pokud chcete,
aby byla kolečka pevná a neotáčela se.
Pokud chcete, aby byla kolečka otočná, zatlačte táhlo na obou
kolech směrem dolů.
4. Ovládání brzd.
K zabrzdění kočárku zatlačte brzdovou páku směrem dolů.
K odbrzdění kočárku nadzvedněte brzdovou páku směrem
nahoru. POZOR:! Nepoužívejte hrubé síly, aby nedošlo
k poškození brzdového mechanismu.
5. Nasazení a otočení sportovní nástavby.
Pokud chcete sedadlo nasadit na podvozek kočárku, umístěte jej
na konstrukci a zatlačte směrem dolů, až zacvakne.
Pokud chcete sportovní nástavbu otočit do druhého směru,
zmáčkněte pojistky na obou stranách adaptéru a otočte nástavbu
na druhou stranu a zacvakněte ji zpět, až dojde k jejímu zajištění.
1
2
2
5
1
2
2
3
4
5
CZ - 44
CZ - 45
Page 24

6. Připevnění a odstranění boudy
Zastrčte boudu shora do držáku
K odstranění boudy stiskněte na obou stranách tlačítko na boudě.
11. Změna polohy opěradla
Za účelem změny polohy opěradla vytáhněte oblouk na zadní straně opěradla nahoru a
změňte výšku opěradla. Když dosáhnete požadované polohy, oblouk pusťte, aby opěradlo
v této poloze zaskočilo.
7. Připevnění a sundání sportovní madla.
Pokud chcete připevnit sportovní madlo, nasaďte ho do otvorů a
zatlačte jej, až dojde k zajištění.
Pokud chcete sundat sportovní madlo, musíte nejdříve stisknout
současně na obou stranách pojistky směrem dovnitř, a potom
můžete vytáhnout sportovní madlo směrem dopředu.
Za účelem výškového přestavení hrazdičky musíte přidržet obě
boční tlačítka stisknutá a hrazdičku současně vytáhnout nahoru
nebo zatlačit dolů.
8. Nastavení opěrky nohou.
Opěrku nohou lehce nadzvedněte, zmačkněte současně oba
pojistné knoíky na stranách opěrky a nastavte požadovanou
polohu. Zapohybujte lehce s opěrkou, až se opět zajistí pomocí
pojistek.
9. Sepnutí pásu
K sepnutí pásu stiskněte oba horní plastové díly dohromady.
Poté zasuňte spojené díly do dolního plastového držáku.
Nastavte pás tak, aby bylo dítě přidržováno v předurčené pozici.
10. Otevření pásu
K otevření pásu stiskněte boční tlačítko.
VÝSTRAHA: Používejte pás v rozkroku vždy ve spojení s břišním
pásem.
6 6
7
9
11
12. Výškově stavitelná rukojeť.
Pokud chcete nastavit požadovanou výšku rukojeti, zmáčkněte pojistku uprostřed
rukojeti směrem nahoru a nastavte požadovanou výšku rukojeti. Lehce zapohybujte
s rukojetí a nechte ji se zajistit. Překontrolujte, zda je rukojeť opět zajištěna.
7
13. Sejmutí kšiltu proti slunci
Rozepněte zip na straně kšiltu proti slunci.
7
14. Složení kočárku.
Pokud chcete složit kočárek, musíte zmáčknout pojistku na rukojeti (1) směrem nahoru.
Nyní zatlačte rukojeť směrem dolů kam až je to možné. Nyní musíte otočit černou
pojistku (2) směrem doleva a pojistku (1) zmáčknout opět směrem nahoru. Nyní je možno
zatlačit rukojeť ještě níže, čímž dojde k uvolnění pojistek ve spodní straně konstrukce a
8
9
bezproblémově složit kočárek.
Upozornění: Pro rozložení kočárku postupujte opět dle bodu 1 tohoto návodu.
POZOR: Před použitím kočárku se vždy ujistěte, že veškeré pohyblivé části jsou správně
zajištěny.
15. Rozložení hluboké korby.
Nadzvedněte boční strany hluboké korby. Natáhněte boční strany a současně zatlačte na
obě pojistky na vnější straně, až zacvaknou do držáků. Ujistěte se, že jsou obě pojistky
zacvaknuté.
12
13
14
15
CZ - 46
10
CZ - 47
Page 25

16. Nasazení vložky do hluboké korby.
Nasaďte vložku do hluboké korby, přetáhněte ji kolem celého
obvodu přes horní okraj a zajistěte ji 4 druky na spodní straně
vložky.
17. Vložení matrace.
Dejte matraci do potahu a položte ji na dno hluboké korby pro dítě
a zatlačte ji směrem dolů, až pevně dolehne na dno korby.
Upozornění: Matrace je ve tvaru klínu, dbejte na to, aby vyšší strana
byla na straně hlavičky dítěte.
21. Připevnění nánožníku
Rozepněte pás a položte vložku na sedačku.
Poté provlékněte konce pěti pásů příslušnými otvory v potahu.
Nyní můžete potah připevnit zipem k vložce.
16
17
21
21
21
18. Připevnění vloženého lůžka na kočárek
Nastavte opěradlo do lehátkové polohy. Postavte tašku na
lehátkovou plochu.
Provlékněte pás, který se nachází na zadní straně vloženého lůžka
otvorem v potahu sedačkové jednotky.
Nyní sepněte přezky pásu na zadní straně opěradla a pás pevně
napněte.
Opásejte pás na konci pro nohy kolem odklopené podnožky. Pás
sepněte a pevně napněte.
19. Nasazení nánožníku.
Nasaďte nánožník na spodní díl hluboké korby a natáhněte ho přes
vanu.
Pomocí patentů připevněte konce potahu k vloženému lůžku a
boudě.
20. Připevnění síťoviny
Rozepněte zip na horním konci potahu a vytáhněte síťovinu.
Napněte síťovinu přes boudu a připevněte ji k ní. Poté připevněte
potah k síťovině.
22. Připevnění potahu
Vyjměte spodní díl nánožníku z tašky.
Spojte vrchní a spodní díl nánožníku zipem.
Připevněte nánožník ke kočárku tím způsobem, že upevníte potah
18
18
18
19
pomocí patentů k boudě kočárku.
22
22
22
CZ - 48
20
20
CZ - 49
Page 26

• Комбинированная система перемещения со
съемным приложением
• Выдвигающаяся ручка, регулируемая по высоте
• Четыре положения фиксации спинки сидения
• Режим вращения передних колес и их
фиксированное положение
Указания по уходу и использованию
• Использованные для изготовления нашей продукции материалы соответствуют требованию AZO, EN71-2 и EN71-3,
а также светоустойчивости для одежды. Но мы все равно рекомендуем не подвергать это изделие интенсивному
воздействию солнечных лучей в течение продолжительного времени. Износ, заполаскивание и выцветание красок
от сильного солнечного воздействия не являются основанием для рекламации. Чехол этого изделия можно стирать.
Чехлы можно стирать руками или в стиральной машине при минимальной температуре (стиральный порошок для
цветного белья).
• Абсолютная защита от дождя для наших изделий обеспечивается только складным тентом ABC-Design, который
можно приобрести в магазинах.
• Все рамы наших изделий проверены по EN1888 : 2005 и соответствуют им. Подвижные части для обеспечения
безопасности модели следует время от времени смазывать маслом или при необходимости дополнительно
заклепывать.
ВНИМАНИЕ: Для смазывания используйте силиконовое масло или силиконовый спрей.
• Регулярный уход и техническое обслуживание изделия способствуют его надежности и безопасности, а также в
значительной степени сохраняют его ценность. Влияние окружающей среды, например, высокое содержание соли в
воздухе, соль для посыпки улиц или кислотный дождь, а также неправильное размещение способствуют коррозии.
• Мы рекомендуем регулярный уход за всеми лакированными деталями. В случае сильного загрязнения немедленно
очистить лакированную поверхность.
• Время от времени проверяйте детали, которые могут отойти и изнашивающиеся детали и подтягивайте их при
необходимости.
Указания по безопасности
Прочитайте эти указания внимательно перед использованием изделия и не выбрасывайте их. Если не следовать этим
указаниям, безопасность вашего ребенка может оказаться под угрозой.
ВНИМАНИЕ:
• Эта коляска предназначена для детей с возраста в 6 месяцев (с сумкой для переноски/ванной для переноски с
рождения) и весом не больше 15 кг.
• В сетку для покупок можно загружать вес до 2 кг.
• Эта коляска сконструирована для использования для детей.
• Используйте исключительно сертифицированные принадлежности изготовителя.
• При движении по ступенькам или лестницам или если коляска поднимается и переносится ребенок в коляске
оставаться не должен.
• При использовании сумки доля переноски, убедитесь в том, что она правильно закреплена на коляске.
ПРЕДУПРЕЖДЕНИЕ:
• Не оставляйте ребенка без присмотра.
• Использовать только матрасы толщиной до 50 мм.
• Как только ребенок сможет самостоятельно сидеть, используйте ремень безопасности.
• Это сиденье не подходит для детей до возраста в 6 месяцев.
• Закрепленные на ручках грузы отрицательно влияют на устойчивость коляски.
• Перед использованием проверить, чтобы сидение было правильно защелкнуто.
• Это изделие не подходит для бега трусцой или езды на скейте.
• Не предпринимайте никаких изменений на изделии, которые ставят под вопрос его надежность и безопасность.
• Держите это изделие на расстоянии от огня или других источников нагрева.
Указания на случай рекламации
• Естественные явления изнашивания (износ) и поломки из-за чрезмерных нагрузок не являются причиной для
рекламации.
• Поломки вследствие неправильного использования не являются причиной для рекламации.
• Поломки вследствие неправильного монтажа или приведения в действие не являются причиной для рекламации.
• Поломки вследствие неправильного изменения изделия не являются причиной для рекламации.
• Ржавчина, которая может возникнуть вследствие недостаточного ухода или неправильного использования,
дефектом не является.
• Царапины являются нормальными проявлениями износа и не являются дефектом.
• Влажные части из ткани, которые не были высушены, могут плесневеть, что не является связанным с производством
дефектом.
• Вследствие воздействия солнечного света, пота, чистящих средств, истирания или слишком частой стирки нельзя
исключать выцветание, таким образом оно не является дефектом.
• Износ колес является нормальным проявлением износа и не является поводом для рекламации.
• Привлекательная черта капюшона – окошко для присмотра за
ребенком
• Вес: 16,0 кг
• Проверено по EN 1888 : 2005
• Совместимо с креслом для автомобиля «Rider» от ABC Design
• Совместимо с приставке для коляски «Kiddie Ride-On» от ABC Design
1. Сборка складного кресла
Потянуть ручку коляски вверх (1) до тех пор, пока корпус не
зафиксируется со щелчком на нужном месте (2).
ПРЕДУПРЕЖДЕНИЕ: Перед использованием убедитесь в том,
что все крепления надежно зафиксированы.
2. Закрепление колес
Нажмите кнопку (1) и вставьте заднее колесо в проем (2) до его
фиксации на месте.
Для снятия колес нажмите кнопку (1), чтобы крепление
разжало колеса.
Затем колеса можно снять с оси.
Прикрепите передние колеса, вставив в колеса штыри таким
образом, чтобы они зафиксировались со щелчком на нужном
месте.
Для снятия колес нажмите кнопку под блоками и удалите
колеса.
3. Фиксация колес и настройка режима вращения колес
Потяните рычажок вниз, чтобы колеса зафиксировались.
Потяните рычажок наверх, чтобы установить положение
вращения колес.
4. Использование тормозов
Опустите рычаг для того, чтобы поставить коляску на тормоза.
Поднимите рычаг для снятия коляски с тормозов.
5. Прикрепление сидения и смена его положения
Прикрепите сидение, разместив его на корпусе таким образом,
чтобы оно со щелчком закрепилось на месте.
Для смены положения сидения нажмите кнопки на обоих
держателях и потяните сидение вверх.
1
2
2
5
1
2
2
3
4
5
RU - 50
RU - 51
Page 27

6. Монтаж и снятие верха
Вставьте верх сверху в крепление
Чтобы снять верх, нажмите кнопку на крыше с обеих сторон.
11. Переустановка спинки
Чтобы переустановить спинку, потяните скобу на задней стороне спинки вверх и
переустановите ее по высоте. После достижения нужного положения отпустите скобу,
чтобы спинка зафиксировалась.
7. Прикрепление и снятие защитного поручня
Прикрепите защитный поручень, вставив его в
пластмассовые отверстия с обеих сторон складного кресла.
Для снятия защитного поручня со складного кресла нажмите
кнопки с обеих сторон и вытащите защитный поручень.
Чтобы передвинуть защитную скобу по высоте, удерживайте
обе боковые кнопки в нажатом положении и передвинуть
скобу вверх или вниз.
8. Регулировка подставки для ног
Для регулировки подставки для ног нажмите кнопки с обеих
сторон и установите нужную высоту.
Затем отпустите кнопки, в результате чего подставка для ног
со щелчком встанет в нужное положение.
9. Застегивание ремня
Чтобы застегнуть ремень, вставьте обе верхние
пластмассовые части друг в друга.
Затем соединенные части вставьте в нижнее пластмассовое
крепление.
Настройте ремень таким образом, чтобы ребенок
удерживался в предусмотренном положении.
10. Расстегивание ремня
Для расстегивания ремня нажмите кнопку сбоку.
ПРЕДУПРЕЖДЕНИЕ: Используйте этот ремень только вместе с
поясным ремнем.
6 6
7
9
11
12. Регулировка ручки
Вытолкните кнопку вверх, чтобы отрегулировать высоту ручки.
Когда ручка приведена в нужное положение, отпустите кнопку, чтобы ручка
зафиксировалась в этом положении.
7
13. Снятие солнечной крыши
Откройте молнию на боку крыши.
7
14. Складывание складного кресла
Чтобы сложить складное кресло, приведите ручку в ее наиболее низкое положение, как
это описано в пункте 12, удерживая в это время кнопку (1) в нажатом состоянии.
Затем вращайте рукоятку (2) влево и протолкните ручку вниз.
8
9
Теперь вы можете сложить складное кресло.
Внимание: чтобы разложить складное кресло, следуйте инструкции, приведенной в
пункте 1 «Сборка складного кресла».
ПРЕДУПРЕЖДЕНИЕ: Перед использованием убедитесь в том, что все крепления надежно
зафиксированы.
15. Сборка переносной кроватки
Поднимите боковые панели кроватки.
Раздвиньте и закрепите боковые панели, выталкивая оба фиксатора наружу в
держатели.
Убедитесь в том, что фиксаторы надежно закреплены.
12
13
14
15
RU - 52
10
RU - 53
Page 28

16. Прикрепление бампера к кроватке
Разместите бампер в кроватке, загибая верхнюю часть через
край переносной кроватки.
17. Размещение матраца
Поместите матрац в чехол.
Разместите матрац на основании.
Внимание: Матрац имеет клиновидную форму. Убедитесь в том,
что приподнятая часть находится в стороне изголовья.
21. Размещение мешка для ног
Отстегните ремень и положите вкладку на сиденье.
Затем протяните пять концов ремня через предусмотренные
для этого отверстия на обивке.
16
17
Теперь покрывало для ног можно закрепить на вкладке с
помощью молнии.
21
21
21
18. Крепление ванны на коляске
Переведите спинку в лежачее положение. Положите сумку на
поверхность.
Протяните ремень, который расположен на задней стороне
ванны, через отверстие на обивке сиденья.
Закрепите замки ремня на обратной стороне спинки и сильно
затяните ремень.
Пристегните ремень к стороне ванны у ног вокруг опоры для ног.
Застегните ремень и сильно затяните его.
19. Прикрепление накидки
Прикрепите замкнутый край накидки к нижнему краю
переносной кроватки.
Распределите накидку по поверхности кроватки.
Прикрепите концы покрывала для ног с помощью
предназначенных для этого кнопок на ванне и на верхе.
20. Крепление сетки от насекомых
Откройте молнию на верхнем конце покрывала для ног и
вытащите сетку от насекомых.
Натяните сетку от насекомых на верхе и закрепите ее. Затем
закрепите покрывало для ног на сетке от насекомых.
22. Размещение покрывала для ног
Выньте нижнюю часть мешка для ног из сумки.
Соедините верхнюю и нижнюю часть мешка для ног
молнией.
18
20
18
18
19
20
Закрепите мешок для ног на коляске. Для этого
зафиксируйте покрывало для ног на верхе с помощью
предназначенных для этого кнопок.
22
22
22
RU - 54
RU - 55
Page 29

• Kombi babakocsi megfordítható ülőrésszel
• magassága teleszkóposan állítható
• 4 fokozatba dönthető háttámla
• bolygósítható és rögzíthető elülső kerekek
• tető mágneses ablakkal
Ápolási és használati tájékoztatás
• A termékeink gyártásához használt anyagok megfelelnek az EN 71-2 és EN 71-3 AZO-követelménynek, valamint a ruházatra
vonatkozó színhelyességnek. Ennek ellenére azt javasoljuk, hogy a modellt ne tegyék ki hosszabb időre napnak. A
színek kopása, kivérzése és fakulása erős napbesugárzás esetén nem alapozza meg a reklamációs igényt. A jelen árucikk
textilhuzata mosható. A huzatot kézzel vagy géppel, hideg vízzel (nom mosószer) moshatja.
• Modelljeinkhez az abszolút esővédelmet csak a kereskedelemben kapható, ABC-formatervezésű esőfedéssel lehet elérni.
• Modelljeink minden tartószerkezetét az EN 1988 : 2005 szerint tesztelték, és azok megfelelnek ennek a szabványnak. A
mozgó részeket a modell tartós megtartása érdekében alkalmanként olajozni kell, valamint igény szerint el kell végezni az
utánszegecselést.
FIGYELEM: Az olajozáshoz kérjük, csak szilikonolajat vagy szilikonsprayt használjanak.
• A termék biztonságához és értékmegőrzéséhez nagymértékben hozzájárul a rendszeres ápolás és karbantartás. Az olyan
környezeti befolyások, mint sótartalom a levegőben, útsó vagy savas eső, valamint a hibás elhelyezés növeli a korróziót.
• Javasoljuk az összes lakkozott rész rendszeres ápolását. Egyedi, súlyos esetben azonnal a szennyeződés után tisztítsa meg a
lakk felszínét.
• Ellenőrizze időről időre a laza alkatrészeket és zárórészeket, és szükség esetén húzza meg azokat.
Biztonsági tájékoztatás
Olvassa el a jelen tájékoztatást a használat előtt gondosan és őrizze meg. Ha ezeket az utasításokat nem követi, gyermeke
biztonsága romolhat.
FIGYELEM:
• Ez a kocsi a gyermekek számára készült 6 hónap feletti életkorra (hordtáskával/mózeskosárral születéstől) és maximul 15
kilogrammos súlyhoz.
• A bevásárló háló 2 kg súlyig terhelhető.
• Ezt a kocsit egy gyermek használatára tervezték.
• Kizárólag a gyártó engedélyezett tartozékrészeit használja.
• Lépcsőfokon, lépcsőn való haladáskor, vagy ha a gyerekkocsit megemelik vagy hordják, a gyermeket alapvetően ki kell
venni a kocsiból.
• Hordtáska használatánál győződjön meg róla, hogy az korrektül a kocsira van rögzítve.
FIGYELMEZTETÉS:
• Gyermekét soha ne hagyja felügyelet nélkül.
• Csak max. 50 mm vastagságú matracokat tegyen be.
• Használja a biztonsági övet, amikor gyermeke már önállóan tud ülni.
• Ez az ülőegység 6 hónapos kor alatti gyermekek számára nem alkalmas.
• A tolórészre rögzített terhek rontják a kocsi állási szilárdságát.
• A használat előtt ellenőrizni kell, hogy a gyermekkocsi-rátét vagy az ülőegység megfelelően beakadt-e
• Ez a termék nem alkalmas kocogáshoz vagy gördeszkázáshoz.
• Ne végezzen olyan módosítást, ami a biztonságot kérdésessé tenné.
• A terméket tartsa távol tűztől és más hőforrástól.
Tájékoztatások reklamáció esetére
• A természetes elhasználódás miatti jelenségek (kopás) és a túlzott igénybe vétel miatti károk nem képeznek reklamációs
igényt.
• Azok a károk, melyek szakszerűtlen kezelés miatt keletkeznek, nem képeznek reklamációs igényt.
• Azok a károk, melyek hibás szerelés vagy üzembe helyezés miatt keletkeznek, nem képeznek reklamációs igényt.
• Azok a károk, melyek a terméken szakszerűtlen módosítás miatt keletkeznek, nem képeznek reklamációs igényt.
• Azok a rozsdás helyek, melyek a hiányzó karbantartás vagy a szakszerűtlen kezelés miatt fordulhatnak elő, nem jelentenek
hiányosságot.
• A karcolások normális kopási jelenségek és nem jelentenek hiányosságot.
• A nedvesség vált textilrészek, melyeket nem szárítottak meg, penészesedhetnek, és azok nem jelentenek termelés miatti
hiányosságot.
• A napsugárzás, izzadtságbefolyás, tisztítószer, kopás vagy túl gyakori mosás miatt a kifakulás nem zárható ki, és így az nem
hiányosság.
• A lekopott kerekek természetes kopási jelenséget jelentenek, és nem képeznek reklamációs igényt.
• Súly: 16,0 kg
• Ellenőrizve az EN 1888 : 2005 szerint
• az ABC Design „Rider“ autósüléssel kompatibilis
• az ABC Design „Kiddie Ride On“-nal kompatibilis
1. A babakocsi kinyitása
Húzza felfelé a sportkocsi fogantyúját (1) mindaddig, míg a váz
kattanással a helyére nem kerül (2).
FIGYELMEZTETÉS: használat előtt győződjön meg arról, hogy
minden retesz zárva van.
2. A kerekek felszerelése
Nyomja meg a gombot (1), és dugja be a hátsó kereket a
vezetőelembe (2), míg az kattanással xen a helyére nem kerül.
A kerék levételéhez nyomja meg a gombot (1), így a kerék rögzítése
kiold.
Most lehúzhatja a kereket a tengelyről.
Az elülső kerékblokk felszereléséhez tolja fel a kerékblokkokat a
villára, míg kattanással a helyükre nem.
A kerékblokkok levételéhez nyomja a kerékblokk csuklóján alul
lévő gombot, és húzza le a kerékblokkot.
3. A kerekek rögzítése és bolygósítása
A kerekek rögzítéséhez nyomja lefelé a kart.
Bolygósításhoz nyomja felfelé a kart.
4. A fékek meghúzása és kioldása
A fékek rögzítéséhez nyomja lefelé a kart.
A fékek kioldásához nyomja lefelé a kart.
5. Az ülés elhelyezése és áthelyezése
Az ülés elhelyezéséhez helyezze azt a vázra, míg kattanással a
helyére nem kerül.
Az ülés áthelyezéséhez nyomja meg a két adapteren található
gombokat, és emelje le az ülést.
1
2
2
5
1
2
2
3
4
5
HU - 56
HU - 57
Page 30

6. A fedél felerősítése és levétele
Tolja be a fedelet felülről a tartójába.
Fedél levételéhez nyomja meg a gombot a fedél mindkét oldalán.
11. A háttámla átállítása
A háttámla átállításához húzza fel a háttámla hátoldalán található kart és állítsa be a
magasságot. Amennyiben elérte a kívánt helyzetet, engedje el a kart, hogy a háttámla
ebben a helyzetben be tudjon reteszelődni.
7. A védőkar rögzítése és levétele
A védőkar rögzítéséhez tolja azt mindkét oldalon a műanyag
tartóelembe.
A védőkarnak a kocsiról való levételéhez nyomja befelé a két
oldalon lévő gombokat, majd előrefelé húzza le a védőkart.
A biztonsági korlát magasságának beállításához a mindkét
oldalon található gombokat kell megnyomni, s azt követően a
korlátot fel, vagy letolni.
8. A lábtámasz beállítása
A lábtámasz beállításához a gombokat mindkét oldalon nyomja
be, majd állítsa be a magasságot.
Ezután engedje el a gombokat, így a lábtámasz a helyére ugrik.
9. Az övek lezárása
Az övek lezárásához dugja össze a két felső műanyagrészt.
Ezután csúsztassa az összedugott feleket az alsó műanyag
rögzítőbe.
Úgy állítsa be az öveket, hogy a gyermek a számára szánt
helyzetben maradjon.
10. Az övek kioldása
Az övek kioldásához nyomja meg az oldalon található gombot.
Figyelmeztetés: A lábak közti övet mindig a biztonsági övvel
együtt használja.
6 6
7
9
11
12. A tolókar beállítása
A tolókar magasságának beállításához nyomja fel a gombot.
Ha a tolókar a kívánt magasságban van, engedje el a gombot, így a tolókar kattanással
rögzül az adott helyzetben.
7
13. A napvédő tető levétele
Húzza szét a tető oldalán található cipzárt.
7
14. A babakocsi összecsukása
A babakocsi összecsukásához állítsa a tolókart a 12. pontban leírtak szerint a legalsó
helyzetbe, és közben tartsa nyomva a gombot (1).
Ekkor fordítsa el balra a gombot (2), és nyomja lefelé a kart.
8
9
Most egyszerűen összecsukhatja a babakocsit.
Megjegyzés: kinyitáshoz az 1. pont: „A babakocsi kinyitása” szerint járjon el.
FIGYELMEZTETÉS: használat előtt győződjön meg arról, hogy minden retesz zárva van.
15. A hordozó felhajtása
Emelje fel a hordtáska oldalfalait.
Feszítse ki az oldalfalakat úgy, hogy a két vasalatot a tartókba nyomja.
Győződjön meg arról, hogy a vasalatok szilárdan a helyükre kerültek.
12
13
14
15
HU - 58
10
HU - 59
Page 31

16. A bélés elhelyezése a hordozóban
Helyezze a bélést a hordozóba úgy, hogy a felső részének túl kell
lógnia a hordozó szélén.
17. A matrac behelyezése
Húzza rá a huzatot a matracra.
Tolja be a matracot a hordozó aljába.
Fontos: a matrac ék alakú. A behelyezéskor ügyeljen arra, hogy a
magasított része legyen a fej felőli oldalon.
21. A lábzsák felhelyezése
Oldja ki a szíjat és fektesse a betétet az ülésre.
Ezután húzza át az öt övvéget az erre a célra kialakított nyílásokon.
Most összekapcsolhatja a lábtakarót és a bélést a cipzárral.
16
17
21
21
21
18. A teknő felerősítése a kocsira
A háttámlát hozza vízszintes helyzetbe. Fektesse a táskát a
síkfelületre.
Húzza át a kocsi hátoldalán található szíjat az ülő-modul huzatán
található nyíláson.
Csatolja be a szíjcsatokat a háttámla hátoldalán és húzza a szíjat
feszesre.
Csatolja a szíjat a teknő lábánál a felhajtott lábtartóra. Csatolja be
a szíjat és húzza azt feszesre.
19. A lábtakaró elhelyezése
Húzza rá a lábtakaró zárt részét a hordozó láb felőli végére.
Húzza át a lábtakarót a hordozón.
Erősítse fel a lábtakarót mindkét végénél a fedélen és a teknőn
található, arra előkészített patent-gombokkal.
20. A szúnyogháló felerősítése
Húzza szét a cipzárt a lábtakaró felső végén és húzza ki a
szúnyoghálót.
Húzza fel a szúnyoghálót a fedélre, és erősítse azt arra. Ezután
kapcsolja össze a szúnyoghálót a lábtakaróval.
22. A lábtakaró felhelyezése
Vegye ki a táskából a lábzsák alsó részét.
A cipzárral húzza össze a lábzsák alsó és felső részét.
Erősítse fel a lábzsákot a gyermekkocsira, a fedélen található, arra
18
20
18
18
19
20
előkészített patent-gombokkal.
22
22
22
HU - 60
HU - 61
Page 32

• Kombi detský kočík s otočnou sedacou časťou
• teleskopicky nastaviteľná výška
• opierka chrbta polohovateľná do 4 polôh
• otočné predné kolesá s možnosťou aretácie
• strieška s magnetickým uchytením okienka
Údržba
• Materiály použité pri výrobe týchto produktov sú v súlade s požiadavkami AZO, EN71-2 a EN-71-3, taktiež noriem pre
stálofarebnosť textilu. Napriek tomu odporúčame nenechávať výrobok dlhší čas na silnom slnku. Opotrebovanie,
roztrhnutie alebo vyblednutie látky spôsobené silným slnkom sa nemôžu uplatňovať ako reklamácia. Textilný poťah výrobku
môže byť praný ručne alebo v studenom cykle práčky (jemné saponáty).
• Kryt proti dažďu ABC Design je možné dokúpiť a poskytuje kompletnú ochranu proti dažďu.
• Všetky konštrukcie našich výrobkov boli testované v zhode s EN1888:2005 a splnili požadované normy. Aby sa zachovala
bezpečnosť výrobkov, je nevyhnutné mazať pohyblivé časti a doťahovať spojenia tak, ako je to vyžadované.
Upozornenie: Prosíme nepoužívať na mazanie iný prípravok, ako silikónový olej alebo silikónový spray.
• Pravidelná starostlivosť a údržba hrajú dôležitú úlohu z hľadiska bezpečnosti a hodnoty výrobku. Pôsobenie takých látok
ako soľ na vzduchu, posypová soľ alebo kyslý dážď podporujú sklon ku korózii a sú nevhodné pre skladovanie výrobku.
• Odporúčame pravidelnú údržbu všetkých lakovaných častí. V prípade silného znečistenia ihneď očistite povrch týchto častí.
• Skontrolujte pravidelne úplnosť častí a ich dotiahnutie a ak je to potrebné, tak ich dotiahnite.
Bezpečnostné pokyny
Prečítajte si pozorne tieto pokyny pred použitím a uschovajte ich pre ďalšie použitie. Nedodržanie týchto pokynov môže znížiť
bezpečnosť Vášho dieťaťa.
Upozornenie:
• Tento model je vhodný pre deti od 6 mesiacov (s prenosnou taškou či vaničkou od narodenia) až do maximálnej hmotnosti
15 kg.
• Nosnosť košíka je do 2 kg.
• Tento kočík je vyrobený na prevoz dieťaťa.
• Nepoužívajte iné príslušenstvo ako to, ktoré schválil výrobca.
• Odporúčame zásadne vybrať dieťa z kočíka v prípade prekonávania schodov či schodiska, alebo keď kočík je potrebné
dvihnúť či prenášať.
• Ak používate nosič, uistite sa, že je správne pripojený ku kočíku.
UPOZORNENIE:
• Nenechávajte dieťa bez dozoru.
• Nevkladajte matrac s hrúbkou väčšou ako 50 mm.
• Používajte bezpečnostné popruhy ihneď, ako vie dieťa samo sedieť.
• Sedačka nie je vhodná pre deti mladšie ako 6 mesiacov.
• Akékoľvek bremeno pripevnené k rukoväti ovplyvňuje stabilitu hlbokého/športového kočíka.
• Skontrolujte, či je pripevňovacie zariadenie lôžka alebo sedačky pred použitím správne zapojené.
• Tento výrobok nie je vhodný na behanie alebo korčuľovanie.
• Nerobte žiadne zmeny na výrobku, ktoré môžu znížiť jeho bezpečnosť.
• Udržiavajte kočík mimo blízkosti ohňa a iných zdrojov tepla.
Reklamácie
• Záruka sa nevzťahuje na prirodzené opotrebovanie alebo poškodenie používaním alebo na vady spôsobené nadmerným
opotrebením alebo prekročením povoleného zaťaženia.
• Záruka sa nevzťahuje na vady spôsobené nevhodným používaním.
• Záruka sa nevzťahuje na vady spôsobené nevhodným zložením alebo manipuláciou.
• Záruka sa nevzťahuje na vady spôsobené nevhodnou úpravou výrobku.
• Pri nedostatočnej údržbe či starostlivosti sa môžu vyskytnúť miesta korózie, ktoré sa nepovažujú za vadu výrobku.
• Škrabance sú normálne znaky opotrebenia, ktoré sa nepovažujú za vadu výrobku.
• Niekedy sa môže vyskytnúť plieseň na textilných častiach, ktoré neboli dostatočne vysušené po navlhnutí – toto nemôže byť
považované za vadu výrobku.
• Výrobok môže vyblednúť pôsobením slnka, potu alebo prípravkov, pôsobením trenia alebo častým praním, potom toto
vyblednutie nemôže byť považované za vadu výrobku.
• Záruka sa nevzťahuje na opotrebované kolesá ako prirodzený následok používania.
• Hmotnosť: 16,0 kg
• Kontrolovaný podľa normy EN 1888 : 2005
• kompatibilný s detskou autosedačkou ABC Design Rider
• kompatibilný so závesným stúpadlom ABC Design Kiddie Ride On
1. Rozloženie detského kočíka
Rukoväť športového kočíka ťahajte smerom hore (1), kým rám
nezaklapne na miesto (2).
UPOZORNENIE: Pred používaním sa presvedčte, či sú všetky
západky zavreté.
2. Montáž kolies
Stlačte tlačidlo (1) a zadné koleso zasuňte do vodiaceho prvku (2),
kým stabilne nezaklapne na miesto.
Pri demontáži kolesa stlačte tlačidlo (1) a uchytenie kolesa povolí.
Teraz môžete koleso stiahnuť z osi.
Pri montáži bŕzd predných kolies nasuňte kolesové brzdy na
vidlicu, kým nezaklapnú na miesto.
Pri demontáži kolesových bŕzd stlačte tlačidlo na spodnej časti kĺbu
brzdy a kolesovú brzdu stiahnite.
3. Uchytenie otočných kolies
Pri uchytení kolies stlačte páčku smerom dole.
Otáčavosť kolies zabezpečíte zdvihnutím páčky smerom hore.
4. Zabrzdenie a odbrzdenie
Pri zabrzdení stlačte páčku smerom dole.
Pri odbrzdení páčku nadvihnite smerom hore.
5. Inštalácia a premiestnenie sedadla
Pri inštalácii sedadla umiestnite sedadlo na rám tak, aby zaklaplo
na miesto.
Pri premiestnení sedadla stlačte tlačidlá na oboch adaptéroch
a sedadlo snímte.
1
2
2
5
1
2
2
3
4
5
SK - 62
SK - 63
Page 33

6. Namontovanie a odstránenie striešky
Stlačte striešku do držiaka.
Pre odstránenie striešky stlačte gombík na oboch stranách
striešky.
11. Prestavenie zadnej opierky
Pre prestavenie zadnej opierky páku na zadnej strane opierky vytiahnite hore a nastavte
výšku. Po nastavení požadovanej polohy pustite páku, aby sa zadná opiekra zablokovala v
tejto polohe.
7. Montáž a demontáž opierky rúk
Pri montáži opierky rúk vsuňte opierku na oboch stranách do
držiaka.
Pri snímaní opierky rúk z kočíka zatlačte tlačidlá na oboch
stranách a opierku rúk potiahnite dopredu.
Pre nastavenie výšky bezpečnostnej opierky stlačte gombíky na
oboch stranách, potom opierku posuňte hore alebo dole.
8. Nastavenie opierky nôh
Pri nastavení opierky nôh zatlačte tlačidlá na oboch stranách
a nastavte výšku.
Potom tlačidlá pustite a opierka nôh zaklapne na miesto.
9. Zapnutie bezpečnostných pásov
Bezpečnostné pásy zapnite spojením dvoch horných plastových
praciek.
Spojené pracky zasuňte do dolnej plastovej spony.
Bezpečnostné pásy nastavte tak, aby dieťa ostalo v polohe, v akej
ste ho umiestnili.
10. Rozpnutie bezpečnostných pásov
Stlačte tlačidlo na boku spony a bezpečnostné pásy sa rozopnú.
Upozornenie: Pás medzi nohami vždy používajte spolu
s bezpečnostnými pásmi.
6 6
7
9
11
12. Nastavenie rukoväte
Výšku rukoväte môžete nastaviť zatlačením gombíka na rukoväti.
Keď je rukoväť v želanej výške, gombík pustite a rukoväť zaklapne v danej polohe.
7
13. Odstránenie slnečnej striešky
Otvorte zips na strieške.
7
14. Zloženie detského kočíka
Pri zložení detského kočíka rukoväť nastavte do najnižšej polohy podľa popisu v bode 19,
pričom tlačidlo držte stlačené (1).
Potom otočte gombík (2) doľava a rukoväť tlačte nadol.
8
9
Teraz môžete detský kočík jednoducho zložiť.
Poznámka: Pri rozložení postupujte podľa inštrukcií v 1. bode s názvom Rozloženie
detského kočíka.
UPOZORNENIE: Pred používaním sa presvedčte, či sú všetky západky zavreté.
15. Nastavenie prenosnej tašky na dieťa
Zdvihnite bočné steny prenosnej tašky na dieťa. Bočné steny napnite tak, aby sa obidva
kovové prvky dali zasunúť do držiakov.
Presvedčte sa, či sú kovové prvky pevne na mieste.
12
13
14
15
SK - 64
10
SK - 65
Page 34

16. Vloženie vložky do prenosnej tašky na dieťa
Vložku vložte do prenosnej tašky na dieťa tak, aby horná časť
prevísala cez okraj prenosnej tašky.
17. Pripevnenie striešky k vložke do prenosnej tašky na dieťa
4 patentné gombíky na spodnej časti striešky silno pritlačte
k párom na vložke.
21. Namontovanie nánožníka
Vypnite pás a umiestite vložku na sedadlo.
Potom koniec pásov pretiahnite cez otvory.
Teraz spojte nánožník a vložku so zipsom.
16
21
21
18. Namontovanie vaničky na kočík
Zadnú opierku nastavte do vodorovnej polohy. Umiestite tašku na
rovnú plochu
Pás umiestený na zadnej časti kočíka pretiahnite cez otvor na
poťahu sedacej časti.
Zapnite pásy na zadnej strane zadnej opierky a natiahnite ich.
Pretiahnite pás pri vaničke na opierku nôh. Zapnite a napnite pás.
19. Založenie nánožníka
Uzavretú časť nánožníka natiahnite na prenosnú tašku na dieťa na
strane nôh, potom
nánožník prestrite na prenosnú tašku na dieťa.
Kryt na kočík namontujte s patentými gombíkmi, ktoré sú
umiestené na vaničke.
20. Namontovanie sieťky proti hmyzu
Otvorte zips na hornej strane krytu a vyberte sieťku.
Natiahnite sieťku na striešku a xujte ju. Potom sieťku spojte s
krytom kočíka.
17
22. Namontovanie krytu nánožníka
Vyberte z tašky spodnú časť nánožníka.
So zipsom uzatvorte hornú a spodnú časť nánožníka.
Namontujte nánožník na kočík, patentnými gombíkmi
18
18
18
19
umiestenými na strieške.
22
21
22
22
SK - 66
20
20
SK - 67
Page 35

ABC Design GmbH
Dr. Rudolf-Eberle-Str. 29
D-79774 Albbruck
 Loading...