

Page 1

Hazel Isox Base
Page 2

Bedienungsanleitung - DE (01-03)
Instructions for use - EN (04-06)
Instrucciones de uso - ES (07-09)
Instructions de service - FR (10-12)
Istruzioni per l’uso - IT (13-15)
Gebruikshandleiding - NL (16 -18)
Instrukcjaobsługi - PL (19-21)
Návodkpoužití - CZ (22-24)
Инструкцияпоэксплуатации - RU (25-27)
Használati útmutató - HU (28-30)
Návodnapoužitie - SK (31-33)
Upute za upotrebu - HR (34-36)
Instruções de uso - PT (37-39)
ACHTUNG: Für späteres Nachlesen unbedingt aufbewahren!
NB: Keep these instructions for future reference!
ATENCIÓN: ¡Guardarlas sin falta para una lectura posterior!
ATTENTION: À conserver absolument pour une consultation ultérieure!
ATTENZIONE: Da conservare per future consultazioni!
LET OP: Bewaar deze handleiding zorgvuldig, opdat u ze ook later nog kunt raadplegen!
UWAGA: Zachowaj koniecznie do późniejszego czytania!
POZOR: Pro pozdější referenci bezpodmínečně uschovat!
ВНИМАНИЕ: Не выбрасывать, сохранить для прочтения в дальнейшем!
FIGYELMEZTETÉS: Őrizze meg ezt a tájékoztatót a jövőbeni hivatkozásokhoz!
UPOZORNENIE: Uschovajte tieto pokyny pre ďalšie použitie! Čuvajte ove upute za buduću upotrebu!
NAPOMENA: Držite ove upute za buduću referencu!
Obs: Guarde este manual de instruções para futuras consultas!
Page 3

1
1
2
3
4
5
6
7
8
11
9
10
12
Page 4
2a 2b 2c
3a 3c3b
3d
4a 4b 4c
3d 3e
Page 5
5 6a
6e 6e
6b
6d6d6c
Page 6

- Isox Base
- Kompatibel mit Kindersitz ABC Design „Hazel“ (Gruppe 0+)
- Gewicht: 6,8 kg
- Geprüft nach ECE R44/04
Pege- und Gebrauchshinweise
- WARNUNG: Nehmen Sie die Base für die Reinigung aus dem Auto.
- Reinigen Sie die Kunststoteile mit einem Tuch mit lauwarmem Wasser und Seife.
- Verwenden Sie keine aggressiven Reinigungsmittel.
- WARNUNG: Verwenden Sie niemals Scheuermittel. Auch nicht für bewegliche Teile der Base.
Sicherheitshinweise
Lesen Sie diese Hinweise sorgfältig vor der Benutzung und bewahren Sie sie auf. Wenn Sie diese Hinweise
nicht beachten, kann die Sicherheit Ihres Kindes beeinträchtigt werden.
ACHTUNG:
- Die Sicherheit des Kindersitzes wird vom Hersteller nur garantiert, wenn er vom Erstkäufer benutzt wird. Es
empehlt sich aus diesem Grunde nicht, einen Sitz aus zweiter Hand (second Hand) zu kaufen.
- Der Kindersitz sollte 5 Jahre nach dem Kauferwerb nicht mehr benutzt werden. Die Qualität des Sitzes kann
unter Umständen durch starke Inanspruchnahme unwahrnehmbar beeinträchtigt werden.
WARNUNG:
- Lassen Sie Ihr Kind niemals unbeaufsichtigt im Kindersitz bzw. im Fahrzeug
zurück.
- Der Kindersitz darf nicht auf Autositzen mit Airbagsicherung benutzt werden. Ggf. Airbag deaktivieren (Fragen Sie Ihren Autohändler)
- Benutzen Sie den Kindersitz nur auf in Fahrtrichtung gerichteten Autositzen.
- Verwenden Sie den Kindersitz nur entgegen der Fahrtrichtung – Nicht in
Fahrtrichtung.
- Verwenden Sie den Kindersitz nur auf Autositzen mit Isox-Befestigungspunkten (zwischen Sitzäche und Rückenlehne). Bitte beachten Sie die Vorschriften Ihres Landes.
- Stellen Sie zur Sicherheit Ihres Babys keine Gegenstände in den Fußraum
vor den Isox-Adapter.
- Ein locker angebrachter Kindersitz kann bei einer Notbremsung oder bei
einem Unfall die Autoinsassen verletzen.
- Vergewissern Sie sich, dass alle Gepäckstücke und Gegenstände, die im
Falle eines Unfalles oder bei starkem Bremsen die Insassen verletzen könn-
ten, ausreichend gesichert sind.
- Nehmen Sie keinerlei Änderungen an Ihrem Kindersitz vor. Die Sicherheit
des Sitzes könnte dadurch beeinträchtigt werden.
- Um die Sicherheit Ihres Kindes zu gewährleisten, lesen Sie bitte diese Gebrauchsanweisung sorgfältig durch, und halten Sie sich genau an die vorgegebenen Montageanweisungen.
- Um Ihr Kind keiner unnötigen Wärmebelastung auszusetzen, sollte der
Kindersitz wenn er nicht gebraucht wird, nicht der prallen Sonne ausgesetzt
werden.
- Nach einem Unfall (auch bei geringer Aufprallgeschwindigkeit mit über 10
km/h) können Beschädigungen am Auto-Kindersitz aufgetreten sein, die
nicht unbedingt oensichtlich sind. In diesem Fall muss der Auto-Kindersitz
ausgetauscht werden. Bitte entsorgen Sie ihn fachgerecht.
- Kontrollieren Sie regelmäßig alle wichtigen Teile auf Beschädigungen. Vergewissern Sie sich, dass die mechanischen Bauteile einwandfrei funktionie-
ren.
- Achten Sie darauf, dass der Kindersitz nicht durch Einklemmen in der Fahrzeugtüre, drehbare Autositze, auf den Kindersitz abgestellte Gegenstände
(z.B. Gepäck) oder ähnliches beschädigt wird.
- Lassen Sie einen beschädigten Kindersitz (z.B. nach einem Sturz) unbedingt von uns Prüfen.
DE - 01
Page 7

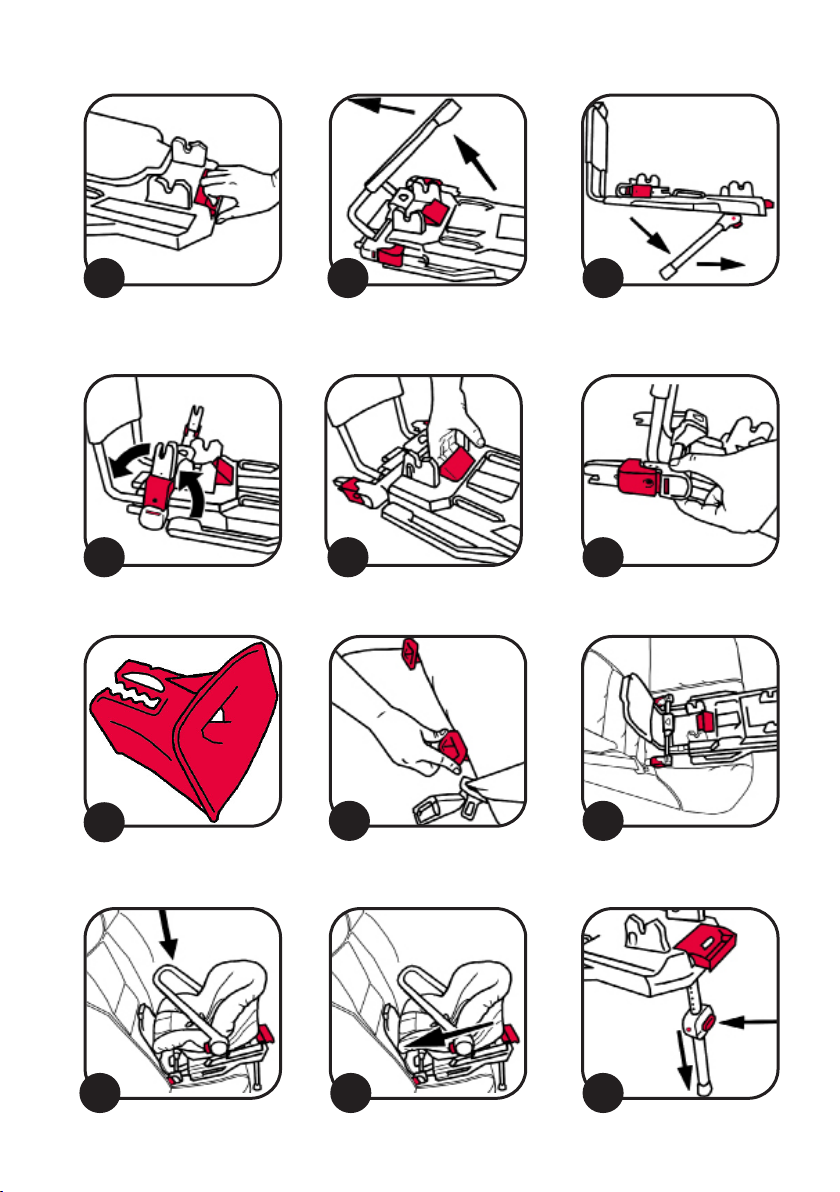
1. Teile und Ausstattung
1. Dämpfungsbügel
2. Isox-Befestigungsaufnahme
3. Lösevorrichtung
4. Entriegelung Dämpfungsbügel
5. Entriegelung Befestigungsarme
6. Entriegelung Befestigungsaufnahme
7. Aufnahmeadapter Kindersitz
8. Farbindikator Kindersitzbefestigung
9. Entriegelung Kindersitz
10. Standfuß
11. Verstellknopf
12. Schutzkappe
2. Aufbau
a. Ziehen Sie die Entriegelung des Kindersitzes (9) nach außen.
b. Klappen Sie den Dämpfungsbügel (1) nach oben, bis er einrastet und der grüne Entriegelungshebel (4)
hervorsteht.
c. Klappen Sie nun den Standfuß (10), der sich unter der Base bendet, heraus.
3. Installation der Base im Fahrzeug:
a. Klappen Sie die Isox-Befestigungsaufnahme (2) nach vorne.
b. Betätigen Sie die Entriegelung der Befestigungsaufnahme (6). Die Schiene mit den beiden Befestigungsarmen fährt nun automatisch in die vorderste Position.
c. Ziehen Sie die Lösevorrichtung (3) an den Befestigungsarmen nach hinten, so dass der dortige Farbindikator rot anzeigt.
Hiermit stellen Sie sicher, dass beide Haken der Befestigungsarme geönet und einsatzbereit sind.
d. Führen Sie die beiden mitgelieferten Schutzkappen zwischen Sitzpolster und Rückenlehne über die IsoxBefestigungspunkte in Ihrem Fahrzeug.
e. Führen Sie nun die beiden Befestigungsarme durch die Schutzkappen und befestigen Sie diese an den beiden Isox-Befestigungspunkten in Ihrem Fahrzeug.
ACHTUNG: Vergewissern Sie sich, dass die Befestigungsarme korrekt eingerastet sind. Auf beiden Seiten muss der grüne Sicherungsknopf sichtbar sein.
4. Installation des Kindersitzes auf der Base:
a. Setzen Sie den Kindersitz auf die Aufnahmeadapter (7) an der Base und drücken Sie ihn nach unten, bis er
einrastet.
ACHTUNG: Vergewissern Sie sich, dass der Kindersitz korrekt eingerastet ist.
Der Farbindikator zur Kindersitzbefestigung (8) muss grün anzeigen.
b. Schieben Sie nun den Kindersitz an den Dämpfungsbügel, bis dieser satt sitzt.
c. Drücken Sie den roten Verstellknopf (11) am Standfuß und verlängern Sie diesen, bis er sicher auf dem
Fahrzeugboden steht. Der Farbindikator muss grün anzeigen.
ACHTUNG: Der Standfuß (10) darf nie in der Luft hängen oder mit Gegenständen unterlegt werden.
Achten Sie jedoch darauf, dass der Standfuß die Base nicht von der Sitzäche abhebt.
DE - 02
Page 8

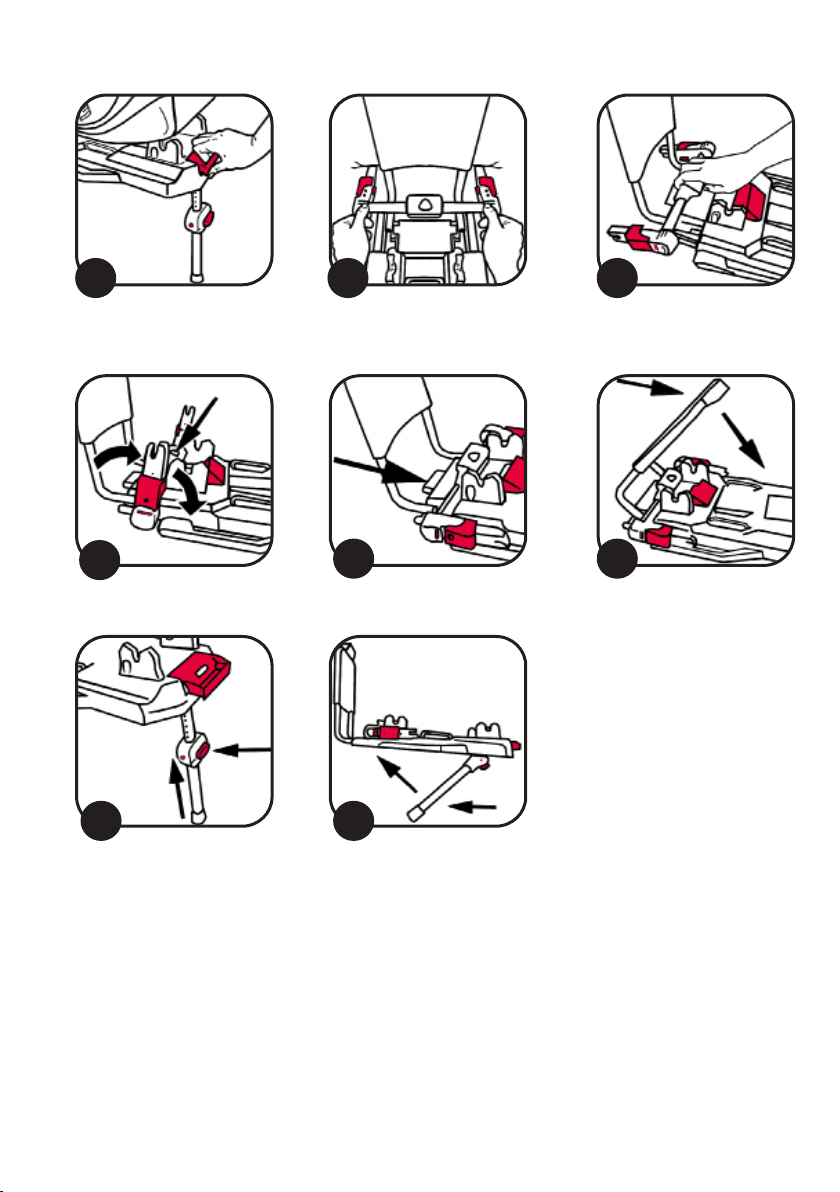
5. Abnehmen des Kindersitzes:
Ziehen Sie den Entriegelungshebel (9) an der Vorderseite der Base und heben Sie anschließend den Kindersitz
an.
6. Abnehmen der Base:
a. Ziehen Sie die Lösevorrichtung (3) auf beiden Seiten bis der Farbindikator rot anzeigt.
Nun können Sie die Base von der Isox-Vorrichtung Ihres Fahrzeugs abziehen.
b. Ziehen Sie nun die Befestigungsaufnahme nach hinten.
Dies geht am einfachsten wenn sie das Plastikteil für die Entriegelung der Befestigungsarme (5) greifen und
die Schiene nach hinten ziehen.
c. Klappen Sie nun die Befestigungsarme nach hinten, indem Sie die Entriegelung (5) drücken und die Arme
nach hinten klappen.
d. Drücken Sie nun die Entriegelung des Dämpfungsbügels (4) und klappen Sie diesen ein.
e. Drücken Sie den roten Verstellknopf am Standfuß und verstellen diesen auf die kürzeste Position.
Klappen Sie den Standfuß anschließend ein.
DE - 03
Page 9

- Isox Base
- compatible with ABC Design “Hazel” child seat (Group 0+)
- Weight: 6,8 kg
- Tested for conformity with ECE R44/04
Care instructions
- CAUTION: Take the base out of the car for cleaning.
- Wipe the plastic parts down with a cloth soaked in warm soapy water.
- Do not use abrasive cleaning agents.
- CAUTION: Never use scouring agents - not even on movable parts of the Base.
Safety instructions
Read these instructions carefully before use and keep them for future reference. Failure to read these instructions may compromise the safety of your child.
NB:
- The safety of the child seat is only guaranteed by the manufacturer when it is used by the initial purchaser.
It is therefore not advisable to buy a second-hand seat.
- The child seat is no longer t for use ve years after purchase. It is possible, under certain circumstances,
for the quality of the seat to be imperceptibly aected if subject to very frequent usage.
CAUTION:
- Never leave your child alone in the child seat / in the vehicle.
- The child seat may not be used on car seats with airbags. Disable the airbag if necessary (consult your car dealer).
- The child seat is only for use in car seats which face the direction of travel.
- The child seat must always face against the direction of travel - not in the
direction of travel.
- The child seat may only be used on car seats with Isox anchor points
(between seat and backrest). Please comply with the regulations in force in
your country.
- Do not place any objects in the footwell in front of the Isox adapter in the
interests of your baby’s safety.
- An unsecured child seat may injure the passengers in the event of an
emergency stop or an accident.
- Ensure that all items of luggage and objects which could injure passengers
in the event of an accident or a sudden application of the brakes are adequately secured.
- Do not make any modications to the child seat. This could adversely aect
the safety of the seat.
- Please read these instructions for use carefully and follow the installation
instructions meticulously in the interests of your child’s safety.
- When not in use, the child seat should not be left in the blazing sun, the
residual heat from which might later cause unnecessary discomfort to your
baby.
- In an accident (even at low speed above 10 km/h) the child safety seat
could suer damage which is not necessarily obvious. In this case you must
replace the child seat. Please dispose of it properly.
- Check all the main parts regularly for signs of damage. Make sure that the
mechanical parts are in perfect working order.
- Make sure that the child seat does not get caught in the door of the vehicle
or damaged by rotating car seats or by objects placed on the child seat (e.g.
luggage), etc.
- Always arrange for us to inspect your child seat if it gets damaged (e.g.
after being dropped).
EN - 04
Page 10

1. Parts and ttings
1. Cushioning plate
2. Isox attachment tting
3. Catch
4. Cushioning plate release mechanism
5. Attachment arms release mechanism
6. Attachment tting release mechanism
7. Child seat adapter tting
8. Child seat attachment colour indicator
9. Child seat release mechanism
10. Support leg
11. Adjustment button
12. Protective caps
2. Assembly
a. Pull out the child seat release mechanism (9).
b. Pull the cushioning plate up (1) until it clicks into place and the green release lever (4) is sticking out.
c. Now open out the support leg (10) which is under the Base.
3. Installing the Base in the vehicle:
a. Pull up the Isox attachment tting (2).
b. Pull up the release mechanism for the attachment tting (6). The rail with both attachment arms will now
move automatically to the foremost position.
c. Pull the catch (3) on the attachment arms backwards until the colour indicator is red.
This is an indication that both catches on the attachment arms are open and ready for use.
d. Take the two protective caps supplied and place them between the seat cushion and the backrest over the
Isox attachment points in your vehicle.
e. Now guide the two attachment arms through the protective caps and secure them on the two Isox attachment points in your vehicle.
NB: Make sure that the attachment arms are correctly engaged. The green
safety button must be visible on both sides.
4. Installing the child seat on the Base:
a. Place the child seat on the adapter ttings (7) on the Base and push it down until it engages in position.
NB: Make sure that the child seat is correctly engaged!
The colour indicator for the child seat attachment (8) must be green.
b. Now push the child seat in until it is resting on the cushioning plate.
c. Press the red adjustment button (11) on the support leg and extend it to the length required for it to sit
rmly and securely on the oor of the vehicle. The colour indicator must be green.
NB: The support leg (10) must never be allowed to hang freely nor may objects be placed underneath it.
Do make sure, however, that the support leg is not lifting the Base o the
seat.
EN - 05
Page 11

5. Removing the child seat:
Pull the release lever (9) on the front of the Base and then lift the child seat up.
6. Removing the Base:
a. Pull the catch (3) on both sides until the colour indicator is red.
Now you can take the Base o the Isox tting in your vehicle.
b. Now pull the attachment tting to the rear.
The easiest way to do this is to take hold of the plastic release mechanism for the attachment arms (5) and to
pull the rail backwards.
c. Now move the attachment arms back by pressing the release mechanism (5) and folding the arms back.
d. Press the release mechanism on the cushioning plate (4) and fold it in.
e. Press the red adjustment button on the support leg and set it to the shortest possible length.
Then fold in the support leg.
EN - 06
Page 12

- Isox Base
- Compatible con la silla para bebés para automóviles ABC Design “Hazel” (grupo 0+)
- Peso: 6,8 kg
- Homologada bajo la normativa ECE R44/04
Indicaciones de cuidado y de uso
- ADVERTENCIA: Para limpiar la silla retire la base del automóvil.
- Limpie las partes de plástico con un paño con agua tibia y jabón.
- No utilice productos de limpieza agresivos.
- ADVERTENCIA: No utilice nunca productos abrasivos. Tampoco para las piezas móviles de la base.
Indicaciones de seguridad
Lea cuidadosamente estas indicaciones antes del uso y guárdelas. La inobservancia de estas instrucciones
puede perjudicar la seguridad de su hijo.
ATENCIÓN:
- El fabricante solamente garantiza la seguridad de la silla para bebés cuando la utiliza el comprador original.
Por esta razón no es aconsejable comprar la silla de segunda mano.
- No se deberá usar la silla para bebés para automóviles 5 años después de su compra. La calidad de la silla
puede verse perjudicada de forma imperceptible bajo ciertas circunstancias por un uso intensivo.
ADVERTENCIA:
- No deje nunca a su hijo solo sin vigilancia en la silla para bebés o en el
coche.
- No se deberá utilizar la silla para bebés en asientos que disponen de un
airbag. En caso necesario desactivar el airbag (consulte su concesionario de
automóviles).
- Utilice la silla para bebés solamente en asientos del automóvil que están
orientados en el sentido de la marcha.
- Utilice la silla para bebés solamente en contra del sentido de la marcha; no
en el sentido de la marcha.
- Utilice la silla para bebés solamente en asientos con puntos de sujeción
Isox (entre la supercie del asiento y el respaldo). Rogamos que observe
los reglamentos de su país.
- Para la seguridad de su bebé, no coloque ningún objeto en el espacio para
los pies delante del adaptador Isox.
- Una silla para bebés colocada ojamente puede herir a los ocupantes del
automóvil en caso de un frenado repentino o un accidente.
- Asegúrese de que todos los objetos y cada bulto del equipaje estén sucientemente asegurados ya que en caso de un accidente o un frenazo fuerte
éstos podrían herir a los ocupantes del vehículo.
- No realice ninguna modicación en su silla para bebés. Podría perjudicarse
la seguridad de la silla.
- Para garantizar la seguridad de su hijo, lea cuidadosamente estas instrucciones de uso y cumpla exactamente las instrucciones de uso indicadas.
- Para no exponer a su hijo a una innecesaria carga térmica, no se debería
exponer la silla para bebés al pleno sol cuando no se la necesita.
- En un accidente (incluso a baja velocidad por encima de 10 km/h) la silla
de seguridad del bebé puede sufrir un daño que no es necesariamente obvio.
En este caso, deberá sustituirse el asiento infantil. Elimínelo, por favor, de
forma correcta.
- Compruebe regularmente todas las piezas importantes por si presentan daños. Asegúrese de que los componentes mecánicos funcionen correctamente.
- Preste atención a que la silla para bebés no resulte dañada al quedar aprisionada por la puerta del vehículo, por asientos giratorios, por objetos colocados sobre la silla para bebés (p. ej., equipaje) o similares.
- Haga que nosotros sometamos sin falta la silla para bebés dañada (p. ej.
después de una caída) a una revisión.
ES - 07
Page 13

1. Piezas y equipamiento
1. Estribo de amortiguación
2. Alojamiento de sujeción Isox
3. Dispositivo de desbloqueo
4. Desbloqueo del estribo de amortiguación
5. Desbloqueo de los brazos de jación
6. Desbloqueo del alojamiento de la jación
7. Adaptadores de alojamiento para la silla para bebés
8. Indicador de color de la jación de la silla para bebés para automóviles
9. Desbloqueo de la silla para bebés
10. Pie de apoyo
11. Botón de ajuste
12. Tapa de protección
2. Montaje
a. Empuje el dispositivo de desbloqueo de la silla para bebés (9) hacia fuera.
b. Rebata el estribo de amortiguación (1) hacia arriba hasta que engatille y que sobresalga la palanca de
desbloqueo verde (4).
c. Ahora, saque hacia fuera el pie de apoyo (10) que se encuentra debajo de la base.
3. Instalación de la base en el automóvil:
a. Abata el alojamiento de sujeción Isox (2) hacia delante.
b. Accione el dispositivo de desbloqueo del alojamiento de la jación (6). Ahora, el raíl con los dos brazos de
jación se desplaza automáticamente a su posición más delantera.
c. Empuje el dispositivo de desbloqueo (3) de los brazos de jación hacia atrás para que el indicador de color
correspondiente muestre el color rojo.
Con ello usted se asegura que los dos ganchos de los brazos de jación estén abiertos y listos para el uso.
d. Introduzca las dos tapas protectoras suministradas entre el almohadillado del asiento y el respaldo sobre
los puntos de sujeción Isox de su vehículo.
e. Ahora, lleve los dos brazos de jación a través de las tapas de protección y fíjelos en los dos puntos de
sujeción Isox de su vehículo.
ATENCIÓN: Asegúrese de que los brazos de jación estén bien engatillados.
En los dos lados se debe poder ver el botón de seguridad verde.
4. Instalación de la silla para bebés sobre la base:
a. Coloque la silla para bebés sobre los adaptadores de alojamiento (7) de la base y empújela hacia abajo
hasta que engatille.
ATENCIÓN: Asegúrese de que la silla para bebés esté engatillada correctamente. El indicador de color de la jación de la silla para bebés (8) debe
mostrar el color verde.
b. Ahora desplace la silla para bebés al estribo de amortiguación hasta que esta esté rmemente asentada.
c. Presione el botón de ajuste rojo (11) del pie de apoyo y alárguelo hasta que este se encuentre sobre el
fondo del vehículo de forma segura. El indicador de color debe mostrar el color verde.
ATENCIÓN: El pie de apoyo (10) no debe nunca colgar en el aire ni debe haber objetos debajo del mismo.
Preste atención a que el pie de apoyo no levante la base del asiento.
ES - 08
Page 14

5. Desmontar la silla para bebés:
Tire de la palanca de desbloqueo (9) del lado frontal de la base y a continuación, eleve la silla para bebés.
6. Retirar la base:
a. Tire del dispositivo de desbloqueo (3) de ambos lados hasta que el indicador de color muestre el color rojo.
Ahora se puede retirar la base del dispositivo Isox de su vehículo.
b. Ahora empuje el alojamiento de la jación hacia atrás.
Esto va más fácilmente si usted coge la pieza de plástico para el desbloqueo de los brazos de jación (5) y
empuja el raíl hacia atrás.
c. Ahora abata los brazos de jación hacia atrás, presionando el dispositivo de desbloqueo (5) y abatiendo los
brazos hacia atrás.
d. Ahora presione el dispositivo de desbloqueo del estribo de amortiguación (4) y pliéguelo.
e. Presione el botón de ajuste rojo del pie de apoyo y ajuste este a su posición más corta.
A continuación, pliegue el pie de apoyo.
ES - 09
Page 15

- Isox Base
- compatible avec le siège pour enfant ABC Design « Hazel » (groupe 0+)
- Poids : 6,8 kg
- Conforme à la norme ECE R44/04
Entretien et utilisation
- MISE EN GARDE : Pour le nettoyage, sortez la Base de la voiture.
- Nettoyez les pièces en plastique avec un chion, de l'eau tiède et du savon.
- N'utilisez pas de produits de nettoyage agressifs.
- MISE EN GARDE : N'utilisez en aucun cas des produits abrasifs même pour les parties mobiles de la Base.
Consignes de sécurité
Lisez attentivement ces consignes avant utilisation et conservez-les précieusement ! Si vous ne respectez pas
ces consignes, vous risquez de compromettre la sécurité de votre enfant.
ATTENTION :
- Le fabricant ne garantit la sécurité du siège pour enfant que lorsque celui-ci est utilisé par le premier acquéreur. Il est donc déconseillé d'acheter un siège d'occasion.
- N'utilisez pas le siège pour enfant plus de 5 ans à compter de la date d'achat. Une utilisation intense peut
réduire la qualité du siège sans que vous vous en aperceviez.
MISE EN GARDE:
- Ne laissez jamais votre enfant dans le siège pour enfant ou la voiture sans
surveillance.
- Il est interdit d'utiliser le siège pour enfant sur des sièges de voiture qui
sont équipés d'airbags. Le cas échéant, désactivez l'airbag (renseignez-vous
auprès de votre concessionnaire automobile).
- Utilisez le siège pour enfant uniquement sur des sièges de voiture qui sont
tournés dans le sens de marche de la voiture.
- Utilisez le siège pour enfant uniquement dans le sens opposé au sens de
marche de la voiture – jamais dans le sens de marche de la voiture.
- Utilisez le siège pour enfant uniquement sur des sièges de voiture qui sont
équipés de points de xation Isox (entre la surface d'assise et le dossier).
Respectez les règlements de votre pays.
- Ne posez aucun objet au fond de la voiture devant l'adaptateur Isox pour
ne pas compromettre la sécurité de votre enfant.
- Un siège pour enfant mal xé risque de blesser les occupants de la voiture
en cas de freinage d'urgence ou d'accident.
- Vériez que tous les bagages et objets qui risquent de blesser les occupants en cas d'accident ou de freinage brusque sont correctement sécurisés.
- Ne modiez en aucun cas votre siège pour enfant. Toute modication risque
de compromettre la sécurité du siège.
- Pour garantir la sécurité de votre enfant, lisez attentivement cette notice
d'utilisation et suivez scrupuleusement les consignes de montage qui y sont
données.
- Pour ne pas exposer inutilement votre enfant à la chaleur, placez le siège
pour enfant à l'abri du soleil lorsqu'il est inutilisé.
- En cas d’accident (même à une faible réduite supérieure à 10 km/heure), le
siège auto pour enfant pourrait sourir de dommages qui ne sont pas nécessairement évidents. Dans ce cas, le siège auto doit être remplacé. Veuillez
éliminer l’ancien siège auto de manière appropriée.
- Contrôlez régulièrement que toutes les pièces importantes ne sont pas
endommagées. Vériez que les éléments mécaniques fonctionnent parfaitement.
- Veillez à ne pas écraser le siège pour enfant avec la porte de la voiture, des
sièges de voiture pivotants, des objets posés sur le siège pour enfant (bagages, etc.) ou autres, an de ne pas l'endommager.
- Envoyez-nous impérativement votre siège pour enfant lorsque celui-ci a été
endommagé (à la suite d'une chute, etc.) pour que nous puissions le contrô-
ler.
FR - 10
Page 16

1. Pièces et équipement de l'Isox Base
1. Barre d'amortissement
2. Logement pour xation Isox
3. Dispositif de déverrouillage
4. Poignée de déverrouillage de la barre d'amortissement
5. Poignée de déverrouillage des bras de xation
6. Poignée de déverrouillage du logement de xation
7. Adaptateurs pour siège pour enfant
8. Indicateur de couleur de xation du siège pour enfant
9. Poignée de déverrouillage du siège pour enfant
10. Pied
11. Bouton de réglage
12. Capuchon de protection
2. Montage
a. Tirez la poignée de déverrouillage du siège pour enfant (9).
b. Basculez la barre d'amortissement (1) vers le haut jusqu'à ce qu'elle s'enclenche et que la poignée verte de
déverrouillage (4) dépasse.
c. Dépliez le pied (10) qui se trouve sous la Base.
3. Installation de la Base dans la voiture
a. Basculez le logement pour xation Isox (2) en avant.
b. Actionnez la poignée de déverrouillage du logement de xation (6). La barre munie des deux bras de xation s'avance automatiquement jusqu'à la position la plus avancée.
c. Tirez le dispositif de déverrouillage (3) en arrière sur les bras de xation de sorte que l'indicateur de couleur qui s'y trouve soit rouge.
Ceci garantit que les deux crochets des bras de xation sont ouverts et prêts.
d. Glissez les deux manchons protecteurs fournis avec le siège entre la surface d'assise et le dossier et placezles sur les points de xation Isox de votre voiture.
d. Enfoncez les deux bras de xation dans les manchons protecteurs et xez-les aux deux points de xation
Isox de votre voiture.
ATTENTION : Vériez que les bras de xation sont correctement enclenchés.
Le bouton vert de sécurité doit être visible des deux côtés.
4. Installation du siège pour enfant sur la Base
a. Posez le siège pour enfant sur les adaptateurs (7) de la Base et appuyez jusqu'à ce qu'il s'enclenche.
ATTENTION : Vériez que le siège pour enfant est correctement enclenché.
L'indicateur de couleur de xation du siège pour enfant (8) doit être vert.
b. Plaquez parfaitement le siège pour enfant contre la barre d'amortissement.
c. Appuyez sur le bouton de réglage rouge (11) du pied et allongez le pied jusqu'à ce qu'il repose correctement au fond de la voiture. L'indicateur de couleur doit être vert.
ATTENTION : Le pied (10) ne doit en aucun cas être suspendu en l'air ou être
posé sur des objets.
Vériez que le pied ne soulève pas la Base de la surface d'assise.
FR - 11
Page 17

5. Retrait du siège pour enfant
Tirez la poignée de déverrouillage (9) située à l'avant de la Base et soulevez le siège pour enfant.
6. Démontage de la Base
a. Tirez le dispositif de déverrouillage (3) des deux côtés jusqu'à ce que l'indicateur de couleur soit rouge.
Vous pouvez à présent retirer la Base du dispositif Isox de votre voiture.
b. Tirez le logement de xation en arrière.
Saisissez simplement la pièce en plastique pour déverrouiller les bras de xation (5) et tirez la barre en arriè-
re.
c. Basculez les bras de xation en arrière en appuyant sur la poignée de déverrouillage (5).
d. Appuyez sur la poignée de déverrouillage de la barre d'amortissement (4) et repliez la barre.
e. Appuyez sur le bouton rouge de réglage du pied et raccourcissez le pied le plus possible.
Repliez le pied.
FR - 12
Page 18

- Isox Base
- Compatibile con seggiolino ABC Design „Hazel“ (Gruppo 0+)
- Peso: 6,8 kg
- Omologazione ECE R44/04
Istruzioni d'uso e manutenzione
- AVVERTENZA: Per pulire Isox Base, estrarla dall’auto
- Pulire le parti in plastica con un panno inumidito con acqua tiepida e sapone.
- Non utilizzare detergenti aggressivi.
- AVVERTENZA: Non utilizzare mai abrasivi, nemmeno per le parti mobili.
Avvertenze per la sicurezza
Leggete attentamente le seguenti istruzioni prima dell’uso e conservatele per future consultazioni.
L’inosservanza di queste istruzioni può compromettere la sicurezza del vostro bambino.
ATTENZIONE:
- La sicurezza del seggiolino è garantita dal fabbricante solo in caso di utilizzo da parte del primo acquirente.
Per questo motivo, è sconsigliabile l’acquisto di un seggiolino di seconda mano.
- Il seggiolino non dovrebbe essere più utilizzato dopo 5 anni dalla data di acquisto. La qualità del seggiolino
potrebbe essere inavvertibilmente compromessa dall’utilizzo intensivo.
AVVERTENZA:
- Non lasciate mai il vostro bambino incustodito nel seggiolino o nell’auto
stessa.
- Il seggiolino non deve essere utilizzato sui sedili auto dotati di airbag.
All’occorrenza, disabilitare la funzione dell’airbag (consultate il vostro autorivenditore) .
- Utilizzate il seggiolino soltanto sui sedili dell’auto rivolti in direzione di marcia.
- Utilizzate il seggiolino solo rivolto in senso contrario a quello di marcia –
Non in direzione di marcia.
- Utilizzate il seggiolino solo su sedili auto provvisti di punti di ssaggio Isox
(tra piano sedile e schienale). Rispettate le norme vigenti nel vostro Paese.
- Per la sicurezza del vostro bambino, non appoggiate oggetti nella zona del
piedistallo dell’adattatore Isox.
- In caso di brusca frenata o di incidente, un seggiolino non correttamente
ssato può provocare il ferimento degli occupanti dell’auto.
- Vericate che tutti i bagagli e gli oggetti che in caso di incidente o di brusca frenata potrebbero provocare il ferimento degli occupanti dell’auto siano
sucientemente assicurati.
- Non apportate alcun tipo di modica al vostro seggiolino. Questo potrebbe
compromettere la sicurezza del seggiolino.
- Per garantire la sicurezza del vostro bambino, leggete attentamente questo
manuale di istruzioni per l'uso e seguite in modo esatto le istruzioni per il
montaggio in esso riportate.
- Per evitare di esporre inutilmente il vostro bambino al calore, il seggiolino
non deve essere lasciato in pieno sole quando non viene utilizzato.
- In un incidente (anche a bassa velocità superiore a 10 km / h) il seggiolino
potrebbe subire un danno che non è necessariamente evidente. In tal caso il
seggiolino deve essere sostituito. Eseguite un adeguato smaltimento.
- Controllate regolarmente che tutti i componenti importanti del seggiolino
siano integri. Assicuratevi che le parti meccaniche siano correttamente funzionanti.
- Fate attenzione a non danneggiare il seggiolino incastrandolo nella portiera dell’auto, nei sedili girevoli, oppure appoggiandovi degli oggetti (ad es.
bagagli) o in situazioni simili.
- In caso di seggiolino danneggiato (ad esempio dopo una caduta), fatelo
assolutamente controllare da noi.
IT - 13
Page 19

1. Componenti e dotazione
1. Staa di ammortizzazione
2. Sede per ssaggio Isox
3. Meccanismo di sblocco
4. Sblocco staa di ammortizzazione
5. Sblocco bracci di ancoraggio
6. Sblocco sede per ssaggio
7. Adattatori per alloggiamento seggiolino
8. Indicatore colorato di bloccaggio seggiolino
9. Sblocco seggiolino
10. Piedistallo
11. Pulsante di regolazione
12. Cappuccio di protezione
2. Montaggio
a. Tirare verso l’esterno il meccanismo di sblocco (9) del seggiolino.
b. Aprire la staa di ammortizzazione (1) verso l’alto no allo scatto in posizione e alla fuoriuscita della leva di
sblocco verde (4).
c. Aprire quindi il piedistallo (10) situato sotto la Base.
3. Installazione nel veicolo:
a. Ribaltare le sedi per i ssaggi Isox (2).
b. Azionare il meccanismo di sblocco (6) delle sedi per i ssaggi. La guida con i due bracci di ancoraggio si
porta automaticamente nella posizione avanzata.
c. Tirare indietro il meccanismo di sblocco (3) posto sui bracci di ancoraggio in modo che l’indicatore indichi il
colore rosso.
Questo assicura che i due ganci dei bracci di ancoraggio siano aperti e pronti per alloggiare i ssaggi.
d. Inlare le due protezioni fornite in dotazione sui punti di ssaggio Isox tra l’imbottitura della seduta e lo
schienale dell'auto.
e. Inlare i due bracci di ancoraggio attraverso le protezioni e ssarli quindi ai due punti di ssaggio Isox
dell'auto.
ATTENZIONE: Assicurarsi che i bracci di ancoraggio siano correttamente bloccati. Su entrambi i lati deve essere ben visibile il bottone di sicurezza verde.
4. Alloggiamento del seggiolino sulla Base:
a. Appoggiare il seggiolino sull’adattatore di alloggiamento (7) sulla Base e premere verso il basso no allo
scatto.
ATTENZIONE: Assicurarsi che il seggiolino sia scattato correttamente in posizione. L’indicatore di bloccaggio seggiolino (8) deve indicare il colore verde.
b. Spingere ora il seggiolino sulla staa di ammortizzazione no a quando è ben ssato.
c. Premere il pulsante di regolazione rosso (11) sul piedistallo e aprire il piedistallo no all'appoggio stabile sul
fondo del veicolo. L’indicatore deve essere verde.
ATTENZIONE: Il piedistallo (10) non deve mai essere chiuso, sospeso o avere
oggetti alla base.
Vericare in ogni caso che il piedistallo non sollevi la Base dal piano del sedi-
le.
IT - 14
Page 20

5. Rimozione del seggiolino:
Tirare la leva di sblocco (9) sul lato anteriore della Base e sollevare quindi il seggiolino.
6. Rimozione della Base:
a. Tirare il meccanismo di sblocco (3) su entrambi i lati no a quando l’indicatore segna il colore rosso.
Ora è possibile rimuovere la Base dal dispositivo Isox del veicolo.
b. Tirare indietro le sedi per i ssaggi.
Per facilitare l’operazione, aerrare la parte in plastica per lo sblocco dei bracci di ancoraggio (5) e tirare
indietro la guida.
c. Richiudere i bracci di ancoraggio premendo il meccanismo di sblocco (5).
d. Premere quindi il meccanismo di sblocco della staa di ammortizzazione (4) e richiuderla.
e. Premere il bottone rosso sul piedistallo e regolarlo nella posizione più arretrata.
Inne, chiudere il piedistallo.
IT - 15
Page 21

- Isox Base
- compatibel met het kinderautostoeltje ABC Design Hazel (groep 0+)
- Gewicht: 6,8 kg
- Gekeurd volgens ECE R44/04
Onderhouds- en gebruiksinstructies
- WAARSCHUWING! Neem de Base voor het reinigen uit de auto.
- Reinig de kunststof onderdelen met een doek met lauwwarm water en zeep.
- Gebruik geen afressieve reinigingsmiddelen.
- WAARSCHUWING! Gebruik nooit schuurmiddelen. Ook niet voor de beweeglijke onderdelen van de Base.
Veiligheidsinstructies
Lees deze instructies vóór het gebruik aandachtig door en bewaar de handleiding zorgvuldig. Als u de instructies niet in acht neemt, kan de veiligheid van uw kind in het gedrang komen.
LET OP!
- De veiligheid van het kinderautostoeltje kan door de fabrikant alleen worden gegarandeerd, als het door de
eerste koper wordt gebruikt. Daarom is het raadzaam om nooit een stoeltje tweedehands te kopen.
- Een kinderautostoeltje mag vanaf 5 jaar na de aankoopdatum niet meer worden gebruikt. De kwaliteit van
het stoeltje kan in bepaalde omstandigheden door sterke belasting onzichtbaar worden aangetast.
WAARSCHUWING!
- Laat uw kind nooit zonder toezicht in het kinderautostoeltje of in de auto
achter.
- Het kinderautostoeltje mag niet op een autostoel met airbagbeveiliging
worden gebruikt. Deactiveer indien nodig de airbag (vraag dit aan uw autodealer).
- Gebruik het kinderautostoeltje alleen op een autostoel die in de rijrichting
is opgesteld.
- Gebruik het kinderautostoeltje uitsluitend tegen de rijrichting in – nooit met
de rijrichting mee.
- Gebruik het kinderautostoeltje alleen op autostoelen met Isox-bevestigingspunten (tussen zitting en rugleuning). Neem de in uw land geldende
voorschriften in acht.
- Plaats voor de veiligheid van uw baby geen voorwerpen in de voetruimte
voor de Isox-adapter.
- Een los kinderautostoeltje kan bij een noodstop of een ongeval de inzittenden verwonden.
- Zorg ervoor dat alle bagagestukken en voorwerpen die bij een ongeval of
sterk afremmen de inzittenden zouden kunnen verwonden, voldoende beveiligd zijn.
- Voer geen wijzigingen uit aan het kinderautostoeltje. De veiligheid van het
stoeltje kan hierdoor worden aangetast.
- Om de veiligheid van uw kind te garanderen, dient u de gebruiksinstructies
zorgvuldig door te lezen en moet u de montage-instructies strikt volgen.
- Om u kind niet onnodig bloot te stellen aan warmte, mag u het kinderautostoeltje niet in de volle zon plaatsen, als het niet in gebruik is.
- Na een ongeluk (zelfs bij een lage snelheid van net boven 10 km/uur) kan
het kinderautostoeltje beschadigd zijn, zelfs wanneer dit niet zichtbaar is.
In dergelijke gevallen moet het autokinderzitje worden vervangen. Voer het
zitje volgens de geldende voorschriften af.
- Controleer alle belangrijke onderdelen regelmatig op beschadiging. Verzeker u ervan dat de mechanische onderdelen vlekkeloos functioneren.
- Let erop dat het stoeltje niet wordt beschadigd door een verdraaibare autostoel of door voorwerpen op het kinderautostoeltje (bijv. bagage) of doordat
het tussen het portier klem raakt.
- Laat een beschadigd kinderautostoeltje (bijv. na een val) altijd door ons
controleren.
NL - 16
Page 22

1. onderdelen en uitrusting
1. Dempingsbeugel
2. Isox-bevestigingshouder
3. Loszetmechanisme
4. Ontgrendeling dempingsbeugel
5. Ontgrendeling bevestigingsarmen
6. Ontgrendeling bevestigingshouder
7. Bevestigingsadapter kinderautostoeltje
8. Kleurindicator bevestiging kinderautostoeltje
9. Ontgrendeling kinderautostoeltje
10. Standvoet
11. Verstelknop
12. Beschermkappen
2. Opbouw
a. Trek de ontgrendeling van het kinderautostoeltje(9) naar buiten.
b. Klap de dempingsbeugel (1) naar boven tot hij vastklikt en de groene ontgrendelingshendel (4) uitsteekt.
c. Klap nu de standvoet (10), die zich onder de Base bevindt, uit.
3. Installatie van de Base in de auto
a. Klap de Isox-bevestigingshouder (2) naar voren.
b. Bedien de ontgrendeling van de bevestigingshouder (6). De rail met de beide bevestigingsarmen schuift nu
automatisch in de voorste positie.
c. Trek het loszetmechanisme (3) aan de bevestigingsarmen naar achteren, zodat de kleurindictator daar rood
aangeeft.
Zo weet u zeker dat beide haken van de bevestigingsarmen geopend en gebruiksklaar zijn.
d. Schuif de beide bijgeleverde beschermkappen tussen zitkussen en rugleuning over de Isox-bevestigingspunten in uw auto.
e. Steek nu de beide bevestigingsarmen door de beschermkappen en bevestig deze aan de beide Isox-bevestigingspunten in uw auto.
LET OP! Verzeker u ervan dat de bevestigingsarmen correct zijn vastgeklikt.
Aan beide zijden moet de groene beveiligingsknop zichtbaar zijn.
4. Installatie van de kinderstoel op de Base
a. Plaats het kinderautostoeltje op de bevestigingsadapters (7) aan de Base en duw het naar beneden, tot het
vastklikt.
LET OP! Verzeker u ervan dat het kinderautostoeltje correct is vastgeklikt.
De kleurindicator voor de bevestiging van het kinderautostoeltje (8) moet
groen zijn.
b. Schuif nu het kinderautostoeltje tegen de dempingsbeugel, tot deze goed aansluit.
c. Druk de rode verstelknop (11) aan de standvoet in en verleng deze tot hij stabiel op de autobodem staat.
De kleurindicator moet groen zijn.
LET OP! De standvoet (10) mag nooit in de lucht hangen of met voorwerpen
ondersteund worden.
Maar let er wel op dat de standvoet de Base niet van de zitting optilt.
NL - 17
Page 23

5. Afnemen van het kinderautostoeltje
Trek aan de ontgrendelingshendel (9) aan de voorzijde van de Base en til vervolgens het kinderautostoeltje
op.
6. Afnemen van de Base
a. Trek aan beide zijden aan het loszetmechanisme (3) tot de kleurindicator rood aangeeft.
Nu kunt u de Base uit de Isox-inrichting van uw auto trekken.
b. Trek vervolgens de bevestigingshouder naar achteren.
Dit gaat het gemakkelijkste, als u het plastic onderdeel voor de ontgrendeling van de bevestigingsarmen (5)
vastneemt en de rail naar achteren trekt.
c. Klap nu de bevestigingsarmen naar achteren, door de ontgrendeling (5) in te drukken en de armen naar
achteren te klappen.
d. Druk vervolgens de ontgrendeling van de dempingsbeugel in (4) en klap deze in.
e. Druk op de rode verstelknop aan de standvoet en zet deze in de kortste positie.
Klap aansluitend de standvoet in.
NL - 18
Page 24

- Isox Base
- kompatybilna z fotelikiem dziecięcym ABC Design „Hazel“ (grupa wielkowa 0+)
- Ciężar: 6,8 kg
- Zbadane zgodnie z ECE R44/04
Wskazówki pielęgnacji i użytkowania
- Ostrzeżenie: Do czyszczenia należy wyjąć bazę z samochodu.
- Części z tworzywa sztucznego oczyścić ścierką z ciepłą woda i mydłem.
Nie używać żadnych agresywnych środków czyszczących.
- Ostrzeżenie: Nigdy nie używać środków szorujących. Także do ruchomych części bazy.
Wskazówki bezpieczeństwa
Przed rozpoczęciem użytkowania produktu należy przeczytać uważnie poniższe wskazówki i przechować je
do późniejszego wglądu. Nieprzestrzeganie tych wskazówek może wpłynąć niekorzystnie na bezpieczeństwo
dziecka.
UWAGA:
- Bezpieczeństwo gondoli wózka dziecięcego jest zagwarantowane przez producenta tylko wtedy, kiedy jest
użytkowana przez pierwszego nabywcę. Nie zaleca się z tego względu kupna fotelika z drugiej ręki (second
hand).
- Fotelik dziecięcy nie powinien być użytkowany po upływie 5 lat od dnia zakupu. Jakość fotelika w tych
okolicznościach może być w sposób nie możliwy do ustalenia zmniejszona na skutek silnego zużycia..
OSTRZEŻENIE:
- Nigdy nie zostawiaj swojego dziecka bez nadzoru w foteliku lub w
samochodzie..
- Fotelik dziecięcy nie może być użytkowany na fotelach samochodowych
wyposażonych w poduszki powietrzne.. W danym przypadku należy
deaktywować poduszki powietrzne (zapytaj swojego sprzedawcę samochodu).
- Używaj fotelika dziecięcego wyłącznie na siedzeniach samochodowych skierowanych w kierunku jazdy..
- Fotelika dziecięcego używaj wyłącznie w kierunku przeciwnym do jazdy –
nie w kierunku jazdy.
- Fotelika dziecięcego używaj wyłącznie na siedzeniach samochodowych z
punktami mocowania Isox (pomiędzy siedziskiem i oparciem siedzenia).
Należy przestrzegać przepisów obowiązujących w kraju użytkowania.
- Dla bezpieczeństwa dziecka nie kładź żadnych przedmiotów w obszarze nóg
przed adapterem Isox.
- Luźno umieszczony fotelik dziecięcy w przypadku nagłego hamowania awaryjnego lub w razie wypadku może spowodować obrażenia pasażerów pojazdu..
- Upewnij się, czy są wystarczająco zabezpieczone wszystkie jednostki
bagażu i przedmioty, które mogłyby spowodować obrażenia pasażerów w
razie wypadku lub podczas silnego hamowania.
- Nie dokonuj żadnych zmian w swoim foteliku dziecięcym. Bezpieczeństwo
fotelika mogłoby zostać przez to zmniejszone..
- W celu zagwarantowania bezpieczeństwa Twojego dziecka, przeczytaj
dokładnie niniejszą instrukcję użytkowania i postępuj dokładnie zgodnie z
określonymi instrukcjami montażu.
- Aby nie wystawiać dziecka na niepotrzebne oddziaływanie ciepła, fotelik
dziecięcy, gdy nie jest używany, nie powinien być wystawiony na prażące
słońce.
- Po wypadku (nawet przy małej prędkości zderzenia 10 km / h) fotelik może
mieć uszkodzenia w miejscach, które nie zawsze są widoczne. W tym przypadku należy wymienić fotelik na nowy. Starego należy się pozbyć.
- Regularnie sprawdzaj wszystkie części, czy nie są uszkodzone. Upewnij się,
czy części mechaniczne funkcjonują sprawnie.
- Uważaj, aby fotelik dziecięcy nie został uszkodzony przez zakleszczenie się
w drzwiach pojazdu, przez obracające się siedziska samochodowe, odstawione na foteliku dziecięcym przedmioty (np. bagaż) lub tym podobne.
- Uszkodzony fotelik dziecięcy (np. po wypadku) bezwzględnie odeślij nam do
sprawdzenia.
PL - 19
Page 25

1. Części Isox Base i wyposażenie
1. Pałąk amortyzujący
2. Zamocowanie Isox
3. Urządzenie zwalniające
4. Odblokowanie pałąka amortyzującego
5. Odblokowanie ramion mocowania
6. Odblokowanie zamocowania
7. Adaptery mocowania fotelika dziecięcego
8. Sygnalizator koloru zamocowania fotelika dziecięcego
9. Odblokowanie fotelika dziecięcego
10. Noga oparcia
11. Przycisk regulacji
12. Pokrywa ochronna
2. Montaż
a. Pociągnij odblokowanie fotelika dziecięcego (9) na zewnątrz.
b. Odchyl pałąk amortyzujący (1) do góry aż do zatrzaśnięcia i wysunięcia się zielonej dźwigni odblokowania
(4).
c. Odchyl teraz nogę oparcia (10), która znajduje się pod bazą.
3. Instalacja bazy w pojeździe:
a. Odchyl mocowanie Isox (2) do przodu.
b. Uruchom odblokowanie mocowania (6). Szyna z obydwoma ramionami przesuwa się teraz automatycznie w
przednie skrajne położenie.
c. Pociągnij urządzenie zwalniające (3) na ramionach do tyłu, aby widoczny był czerwony sygnalizator koloru.
Upewnij się przy tym, czy obydwa haki ramion są otwarte i gotowe do użycia.
d. Załóż obydwie dostarczone osłony pomiędzy tapicerkę siedzenia i oparcie siedzenia na punkty mocowania
Isox w pojeździe.
e. Wprowadź teraz obydwa ramiona przez osłony i przymocuj je do obydwu punktów mocowania Isox w
pojeździe.
UWAGA: Upewnij się, czy ramiona mocowania prawidłowo zatrzasnęły się. Z
obydwu stron musi być widoczny zielony przycisk bezpieczeństwa.
4. Instalacja fotelika dziecięcego na bazie:
a. Umieść fotelik dziecięcy na adapterze mocowania (7) na bazie i wciśnij go w dół aż do zatrzaśnięcia.
UWAGA: Upewnij się, czy fotelik dziecięcy prawidłowo zatrzasnął się.
Sygnalizator koloru zamocowania fotelika dziecięcego (8) musi być zielony.
b. Dosuń teraz fotelik dziecięcy do pałąka amortyzującego, aż głęboko osadzi się.
c. Naciśnij czerwony przycisk regulacji (11) na nodze oparcia i wydłuż ją, aż pewnie oprze się o podłogę. Sygnalizator koloru musi być zielony.
UWAGA: Noga oparcia (10) nie może wisieć w powietrzu i nie można pod nią
nic podkładać.
Zwróć uwagę na to, aby noga nie odpychała bazy od powierzchni siedziska.
PL - 20
Page 26

5. Zdjęcie fotelika dziecięcego:
Wyciągnij dźwignię odblokowania (9) z przodu bazy i podnieś fotelik dziecięcy.
6. Zdjęcie bazy:
a. Wyciągnij urządzenie zwalniające (3) z obydwu stron, aż sygnalizator koloru będzie czerwony.
Teraz można wyciągnąć bazę z zamocowania Isox pojazdu.
b. Pociągnij zamocowanie do tyłu.
Najłatwiej zrobić to w ten sposób - chwyć część plastikową do odblokowania ramion (5) i pociągnij szynę do
tyłu.
c. Odchyl teraz ramiona mocowania do tyłu naciskając odblokowanie (5) i odchylając ramiona do tyłu.
d. Nacisnij teraz odblokowanie pałąka (4) i złóż go.
e. Nacisnij czerwony przycisk regulacji na nodze oparcia i skróć ją.
Na zakończenie złóż nogę oparcia.
PL - 21
Page 27

- Isox Base
- kompatibilní s dětskou sedačkou ABC Design „Hazel“ (skupina 0+)
- hmotnost: 6,8 kg
- přezkoušena podle ECE R44/04
Upozornění k péči a použití
- VÝSTRAHA: K čištění vyjměte Base z auta.
- Díly z umělé hmoty čistěte hadrem, vlažnou vodou a mýdlem.
- Nepoužívejte žádné agresivní čisticí prostředky.
- VÝSTRAHA: Nikdy nepoužívejte prostředky na drhnutí. Ani k čištění pohyblivých částí Base.
Bezpečnostní upozornění
Před použitím si tato upozornění svědomitě přečtěte a uschovejte si je. Nedbalost těchto upozornění může mít
za následek narušení bezpečnosti Vašeho dítěte.
POZOR:
- Bezpečnost dětské sedačky je výrobcem zaručena jen tehdy, když je používána prvním kupcem. Z tohoto
důvodu se nedoporučuje kupovat sedačku z druhé ruky (second hand).
- Dětská sedačka se po uplynutí 5 let od nákupu nemá dále používat. Kvalita sedačky může za určitých okolností v důsledku častého použití utrpět újmu, aniž by to bylo zřejmé.
VÝSTRAHA:
- Neponechávejte Vaše dítě v dětské sedačce resp. ve vozidle samotné bez
dozoru.
- Dětská sedačka se nesmí používat na automobilových sedadlech vybavených airbagem. V daném případě airbag deaktivovat (obraťte se na Vašeho
autorizovaného obchodníka)
- Používejte dětskou sedačku jenom na sedadlech vozidla instalovaných ve
směru jízdy.
- Používejte dětskou sedačku jenom v protisměru jízdy - ne ve směru jízdy.
- Používejte dětskou sedačku jenom na sedadlech vozidla s upevňovacími
body Isox (mezi sedadlem a opěradlem). Mějte prosím na zřeteli předpisy
platné ve Vaší zemi.
- Pro bezpečnost Vašeho dítěte nestavte před Isox adaptér žádné předměty
do prostoru pro nohy.
- Nepevně instalovaná dětská sedačka může v případě nouzového brzdění
nebo nehod zranit cestující v autě.
- Přesvědčte se, že jsou všechna zavazadla a předměty, které by mohly
v případě nehody nebo při prudkém zabrzdění cestující ve vozidle zranit,
dostatečně zajištěny.
- Neprovádějte na Vaší dětské sedačce žádné změny. Mohly by uškodit
bezpečnosti sedačky.
- Aby byla zaručena bezpečnost Vašeho dítěte, přečtěte si prosím pečlivě
tento návod k použití, a dodržujte přesně předepsaná upozornění k montáži.
- Aby nebylo Vaše dítě zbytečné tepelně zatíženo, nevystavujte dětskou
sedačku pokud se nepoužívá prudkému slunci.
- Při nehodách (i při nízké rychlosti nad 10 km/h) může dětská autosedačka
utrpět poškození, které nemusí být nutně zřetelné. V případě nehody je nutné autosedačku vyměnit. Prosíme, řádně ji zlikvidujte.
- Kontrolujte pravidelně nepoškozenost všech důležitých dílů. Ujistěte se, že
mechanické součástky bezvadně fungují.
- Dbejte na to, aby se dětská sedačka nepoškodila uskřípnutím ve dveřích
vozidla, otočnými sedadly vozidla, na dětské sedačce odstavenými předměty
(např. zavazadlo) apod.
- Nechte poškozenou dětskou sedačku (např. po pádu) u nás bezpodmínečně
překontrolovat.
CZ - 22
Page 28

1. součásti a vybavení
1. Tlumicí třmen
2. Upínací přípravek pro upevnění Isox
3. Uvolňovací zařízení
4. Odjištění tlumicího třmenu
5. Odjištění upevňovacích ramen
6. Odjištění upínacího přípravku pro upevnění
7. Upínací adaptér pro dětskou sedačku
8. Barevný indikátor upevnění dětské sedačky
9. Odjištění dětské sedačky
10. Podstavec
11. Stavěcí knoík
12. Ochranný kryt
2. Montáž
a. Táhněte odjištění dětské sedačky (9) směrem ven.
b. Odklopte tlumicí třmen (1) nahoru, až zaskočí a zelená odjišťovací páčka (4) bude vyčnívat.
c. Nyní odklopte podstavec (10), který se nachází pod Base.
3. Instalace Base ve vozidle:
a. Sklopte upínací přípravek pro upevnění Isox (2) dopředu.
b. Stiskněte odjištění upínacího přípravku pro upevnění (6). Lišta s oběma upevňovacími rameny se nyní uvede automaticky do přední pozice.
c. Stáhněte uvolňovací zařízení (3) na upevňovacích ramenech dozadu, aby zdejší barevný indikátor ukazoval
červenou.
Tak zajistíte, aby byly oba háky upevňovacích ramen otevřeny a připraveny k použití.
d. Zaveďte oba přiložené ochranné kryty mezi polstrování sedadla a opěradlo přes upevňovací body Isox ve
Vašem vozidle.
e. Nyní prostrčte obě upevňovací ramena ochranným kryty a připevněte je k oběma upevňovacím bodům
Isox ve Vašem vozidle.
POZOR: Přesvědčte se, že upevňovací ramena řádně zaskočila. Na obou
stranách musí být vidět zelený zabezpečovací knoík.
4. Instalace dětské sedačky na Base:
a. Postavte dětskou sedačku na upínací adaptér (7) na Base a stlačte ji dolů, až zaskočí.
POZOR: Přesvědčte se, že dětská sedačka řádně zaskočila.
Barevný indikátor pro upevnění dětské sedačky (8) musí ukazovat zelenou.
b. Nyní přisuňte dětskou sedačku k tlumicímu třmenu, až se dobře usadí.
c. Stiskněte červený stavěcí knoík (11) na podstavci a prodlužte jej tak, aby stál bezpečně na podlaze vozidla. Barevný indikátor musí ukazovat zelenou.
POZOR: Podstavec (10) nesmí nikdy viset ve vzduchu nebo být podložen
jinými předměty.
Dbejte však na to, aby podstavec nenadzvedl Base od plochy sedadla.
CZ - 23
Page 29

5. Odebrání dětské sedačky:
Zatáhněte za odjišťovací páčku (9) na přední straně Base a poté dětskou sedačku nadzvedněte.
6. Odebrání Base:
a. Zatáhněte za uvolňovací zařízení (3) na obou stranách, až bude barevný indikátor ukazovat červenou.
Nyní můžete Base ze zařízení Isox ve Vašem vozidle stáhnout.
b. Nyní stáhněte upínací přípravek pro upevnění dozadu.
To lze provést nejjednodušeji když uchopíte plastový díl pro odjištění upevňovacích ramen (5) a budete táhnout lištu dozadu.
c. Nyní sklopte upevňovací ramena dozadu stisknutím odjištění (5) a sklopením ramen dozadu.
d. Nyní stiskněte odjištění tlumicího třmenu (4) a zaklopte jej.
e. Stiskněte červený stavěcí knoík na podstavci a sesuňte jej do nejkratší pozice.
Na závěr podstavec zaklopte.
CZ - 24
Page 30

- Isox Base
- совместимо с детским сиденьем ABC Design „Hazel“ (группа 0+)
- Вес: 6,8 кг
- Проверено по ECE R44/04
Указания по уходу и использованию
- ПРЕДУПРЕЖДЕНИЕ: Выньте основание для чистки из автомобиля.
- Пластмассовые детали протрите тряпкой, для этого используйте теплую воду и мыло.
- Не используйте агрессивные чистящие средства.
- ПРЕДУПРЕЖДЕНИЕ: Никогда не используйте абразивные чистящие средства. Это также касается
подвижных деталей основания.
Указания по безопасности
Внимательно прочитайте эти указания перед использованием изделия и не выбрасывайте их. Если не
следовать этим указаниям, безопасность вашего ребенка может оказаться под угрозой.
ВНИМАНИЕ:
- Безопасность сиденья для ребенка изготовитель гарантирует только в том случае, если оно
используется первым покупателем. По этой причине не рекомендуется покупать сиденья б/у.
- Детское сиденье можно использовать только в течение 5 лет после его покупки. Качество сиденья
при определенных обстоятельствах может в определенной степени ухудшиться из-за интенсивного
использования.
ПРЕДУПРЕЖДЕНИЕ:
- Никогда не оставляйте младенца без присмотра на сиденье или в
автомобиле.
- Детское сиденье нельзя использовать на оборудованных подушкой
безопасности сиденьях. При необходимости отключите подушку
безопасности (проконсультируйтесь по этому поводу в автосалоне).
- Используйте детское сиденье только на автомобильных сидениях,
которые направлены в сторону движения.
- Используйте детское сиденье только в противоположном движению
направлении – но не в направлении движения.
- Используйте сиденье для ребенка только на автомобильных сиденьях с
точками крепления Isox (между поверхностью для сидения и спинкой).
Соблюдайте действующие в вашей стране предписания.
- Для безопасности вашего младенца не ставьте никаких предметов
внизу салона перед переходником Isox.
- Непрочно закрепленное сиденье может поранить ребенка в случае
аварийного торможения или аварии.
- Убедитесь в том, что весь багаж и другие предметы, которые в случае
аварии могут поранить водителя или пассажиров, в достаточной мере
закреплены.
- Ничего не меняйте в сиденьи для ребенка. Это может привести к
ухудшению безопасности сиденья.
- Для обеспечения безопасности ребенка внимательно прочитайте эту
инструкцию по эксплуатации и тщательно соблюдайте указания по
монтажу сиденья.
- Чтобы защитить ребенка от излишнего тепла, не подвергайте сиденье
воздействию солнечных лучей, когда оно не используется.
- Обращаем Ваше внимание, что при ДТП (даже на скорости 10
км/ч), кресло может получить скрытые повреждения. В этом случае
автомобильное детское сиденье следует заменить. Пожалуйста,
правильно утилизируйте повреждённое сиденье.
- Регулярно проверяйте все важные детали на наличие повреждений.
Убедитесь в том, что механические детали работают безупречно.
- Следите за тем, чтобы не повредить детское сиденье вследствие
его зажимания дверью салона, поворотными сиденьями, различными
предметами (напр., багажом), если их ставить на сиденье, и т.п.
- Обязательно обратитесь к нам для того, чтобы проверить поврежденное
сиденье (напр., после его падения).
RU - 25
Page 31

1. Детали и оснащение
1. Демпфирующая скоба
2. Крепление Isox
3. Освобождающее приспособление
4. Деблокиратор демпфирующей скобы
5. Деблокиратор крепежных кронштейнов
6. Деблокиратор зажима для крепления
7. Переходник для крепления детского сиденья
8. Цветовой индикатор крепления детского сиденья
9. Деблокиратор детского сиденья
10. Опорная ножка
11. Кнопка регулирования
12. Защитный колпачок
2. Монтаж
a. Потяните за деблокиратор детского сиденья (9) наружу.
b. Откиньте демпфирующую скобу (1) вверх до щелчка, после этого зеленый рычаг деблокирования (4)
должен находиться в выступающем положении.
c. Затем выдвиньте опорную ножку (10), которая находится под основанием.
3. Монтаж основания в автомобиле:
a. Откиньте зажим Isox для крепления (2) вперед.
b. Нажмите на деблокиратор зажима для крепления (6). Шина с обеими кронштейнами автоматически
передвинется в самое переднее положение.
c. Потяните освобождающее приспособление (3) на кронштейнах назад, чтобы цветовой индикатор
указывал на красный цвет. Это указывает на то, что оба крюка кронштейнов открыты и готовы к работе.
d. Вставьте оба защитных колпачка из комплекта поставки между сиденьем и спинкой над точками для
крепления Isox в автомобиле.
e. Теперь проведите оба кронштейна через защитные колпачки и закрепите их на точках для крепления
Isox.
ВНИМАНИЕ: Убедитесь в том, что кронштейны правильно
зафиксировались. С обеих сторон должна быть видна зеленая
предохранительная кнопка.
4. Монтаж сиденья на основании:
a. Установите сиденье на переходник (7) на основании и надавите на него, чтобы он зафиксировался со
щелчком.
ВНИМАНИЕ: Убедитесь в том, что детское сиденье правильно
зафиксировалась. Цветовой индикатор крепления детского сиденья (8)
должен указывать на зеленый цвет.
b. Теперь придвиньте детское сиденье к демпфирующей скобе, чтобы оно плотно прилегало.
c. Нажмите красную кнопку регулирования (10) на опорной ножке и удлините ее так, чтобы она надежно
стояла на полу салона автомобиля. Цветовой индикатор должен показывать зеленый цвет.
ВНИМАНИЕ: Опорная ножка (11) не должна висеть в воздухе, под нее
нельзя подставлять различные предметы в качестве подставки.
Но следите за тем, чтобы опорная ножка не приподнимала основание над
поверхностью для сидения.
RU - 26
Page 32

5. Снимание детского сиденья:
Потяните за рычаг деблокирования (9) на передней стороне основания и приподнимите детское сиденье.
6. Снимание основания:
a. Потяните за освобождающее приспособление (3) на обеих сторонах, продолжайте тянуть, пока
цветовой индикатор не покажет красный цвет.
Теперь основание можно снять с приспособления Isox автомобиля.
b. Теперь потяните зажим для крепления назад.
Проще всего это сделать, если для разблокирования крепежных кронштейнов (5) захватить
пластмассовую деталь и потянуть шину назад.
c. Теперь откиньте кронштейны назад, для этого нажмите на деблокиратор (5) и откиньте кронштейны
назад.
d. Нажмите на деблокиратор демпфирующей скобы (4) и сложите ее.
e. Нажмите красную кнопку на опорной ножке и переустановите ее в самое короткое положение.
После этого сложите опорную ножку.
RU - 27
Page 33

- Isox Base
- kompatibilis az ABC Design „Hazel“ (Gruppe 0+) gyermeküléssel
- Súly: 6,8 kg
- Az ECE R44/04 szerint bevizsgálva
Ápolási és használati utasítások
- FIGYELMEZTETÉS: A tisztításhoz vegye ki a Base-t az autóból.
- A műanyag részeket kendővel, langyos vízzel és szappannal tisztítsa.
- Ne használjon agresszív tisztítószert.
- FIGYELMEZTETÉS: Soha ne használjon súrolószert. A Base mozgatható részeihez sem.
Biztonsági előírások
Olvassa el a jelen tájékoztatást a használat előtt gondosan és őrizze meg. Ha ezeket az utasításokat nem
követi, gyermeke biztonsága romolhat.
FIGYELEM:
- A gyermekülés biztonságát a gyártó csak akkor garantálja, ha azt a legelső vásárló használja. Ezért ajánlatos gyermeküléseket újonnan vásárolni és nem másodkézből (second Hand).
- A gyermekülést a vásárlás után eltelt 5 év múltával már ne használja. Az ülés minősége az erős
igénybevételtől akár észrevehetetlenül is korlátozódhat.
FIGYELMEZTETÉS:
- Soha ne hagyja gyermekét felügyelet nélkül a gyermekülésben, illetve a
járműben.
- A gyermekülést nem szabad olyan üléseknél használni, amelyekhez AirBagbiztosítás tartozik. Esetlegesen az Airbag-et deaktiválni kell (Kérdezze meg
autókereskedőjét).
- A gyermekülést csak a menetiránnyal szembe néző autóüléseken használja.
- Csak a menetiránnyal háttal használja a gyermekülést - ne a menetiránnyal
szemben.
- A gyermekülést csak olyan üléseknél használja, amelyekhez Isox-biztosító-csatlakozó tartozik (az ülés lapja és támlája között). Kérjük, vegye
gyelembe az országa előírásait.
- Biztosítsa, hogy a kisgyermeke balesetvédelme érdekében, hogy az IsoxAdapter előtti lábtérben ne legyenek tárgyak.
- Egy lazán feltett gyermekülés vészfékezéskor, vagy baleset esetén a bent
ülőket is megsebezheti.
- Bizonyosodjon meg arról, hogy a csomagok és tárgyak elegendően biztosítottak, hogy egy esetleges vészfékezés, vagy baleset esetén az utasoknak
ne okozhassanak sérüléseket.
- Ne eszközöljön változtatásokat a gyermekülésen. Ezzel az ülés biztonsága
korlátozódhat.
_ Gyermeke biztonsága érdekében alaposan olvassa át ezt a használati
utasítást és pontosan tartsa be az itt megadott szerelési utasításokat.
- Annak érdekében, hogy gyermekét ne érje szükségtelenül hőterhelés,
amennyiben a gyermekülés használaton kívül van, vegye el azt a tűző nap-
ról.
- Baleset esetén (akár alacsony, 10 km/h-nál magasabb sebesség esetén) a
biztonsági gyermekülésen lehetnek olyan sérülések, melyek nem feltétlenül
egyértelműek, láthatóak. Baleset, ütközés esetén a gyermekülést minden
esetben ki kell cserélni, kérjük az előírásoknak megfelelően dobja ki.
- Rendszeresen ellenőrizze a fontosabb részeket, hogy sérülteke-e. Bizonyosodjon meg arról, hogy a mechanikus elemek kifogástalanul működnek.
- Ügyeljen arra, hogy a gyermekülés a járműajtóba beszorulva, forgatható
autóülések által, vagy a gyermekülésre helyezett tárgyak által (pl. csomagok) és hasonlók, ne sérüljön meg.
- Sérült gyermekülést (pl. leejtés után) okvetlenül vizsgáltatsson át velünk.
HU - 28
Page 34

1. elemek és felszerelés
1. Csillapítóív
2. Isox-rögzítőfelvevő
3. Kioldó szerkezet
4. Csillapítóív kireteszelés
5. Rögzítő karok kireteszelése
6. Rögzítés-felvevő kireteszelése
7. A gyermekülés felvevő adaptere
8. A gyermekülés rögzítésének szín-mutatója(jelző)
9. A gyermekülés kireteszelője
10. Lábazat
11. Elállító gomb
12. Védőkupak
2. Felépítés
a. Húzza a gyermekülés kireteszelőjét (9) ki.
b. Hajtsa fel a csillapítóívetl (1), amí az be nem reteszel és a zöld kireteszelő emelő (4) nem áll ki.
c. A lábazatot (10) hajtsa ki, ami a Base alján található.
3. A Base beszerelése az autóba:
a. Hajtsa az Isox-rögzítő-felvevőket (2) előre.
b. A rögzítő-felvevőket (6) reteszelje ki. A rögzítő karok sínje önműködően a legelső helyzetbe megy.
c. Húzza a kioldó berendezést (3) a rögzítő karokon hátra, ameddig az ottani színmutató(jelző) piros nem
lesz.
Ezzel biztsítja, hogy a rögzítő karok mindkét horga nyitva van és használatra készen áll.
d. Tegye mindkét a termékkel leszállított védősapkát a járműben az ülés lapja és támlája közé, az Isoxrögzítőpontok fölé.
e. Vezesse át mindkét rögzítőkart a védősapkákon és rögzítse azokat a jármű mindkét Isox- rögzítőpontján.
FIGYELEM: Bizonyosodjon meg arról, hogy a rögzítőkarok tényleg
bereteszelődtek. Mindkét oldalon láthatónak kell lennie a zöld biztonsági
gombnak.
4. A gyermekülés szerelése a Base-re:
a. Helyezze a gyermekülést a felvevő adapterre (7) a Base-en és nyomja le azt, amíg az a helyére be nem
reteszelődik.
FIGYELEM: Bizonyosodjon meg arról, hogy az autóülés tényleg
bereteszelődött.
A gyermekülés rögzítőjének szín-mutatójának(jelző) (8) zöldnek kell lennie.
b. Tolja a gyermekülést a csillapítóívre, amíg az biztosan nem fekszik fel arra.
Nyomja meg a piros állító gombot (11) a lábazaton és hosszabbítsa meg azt, amíg az a jármű padlóján biztosan nem áll. A színmutatónak zöldnek kell lennie.
FIGYELEM: A lábazatot (10) soha nem szabad alápolcolni, vagy annak nem
szabad a levegőben lógni.
Minden esetre ügyeljen arra, hogy a lábazat a Base-t ne emelje fel az ülés
felületéről.
HU - 29
Page 35

5. A gyermekülés levétele:
A kireteszelő kart (9) a Base elülső oldalán húzza meg és azután emelje ki a gyermekülést.
6. A Base levétele:
a. Addig húzza a kioldó berendezést (3) mindkét oldalon, amíg a színjelző pirosat nem mutat.
Ekkor a Base-t a jármű Isox-szerkezetéből ki lehet húzni.
b. Ekkor húzza hátra a rögzítő-felvevőt.
Ezt úgy lehet a legegyszerűbben megoldani, hogy a rögzítő karok (5) kireteszelőjének műanyag részétmegfogja és a sínt hátra húzza.
c. Hajtsa most a rögzítő karokat hátra, azzal nyomja meg a kireteszelőt (5) és a karokat hajtsa hátra.
d. Nyomja meg a csillapítóív (4) kireteszelőjét és hajtsa be azt.
e. Nyomja meg a piros átállító gombot a lábazaton és állítsa azt a legrövidebb lábhelyzetre.
Csukja be a lábazatot.
HU - 30
Page 36

- Základňa Isox Base
- kompatibilná s detskou sedačkou ABC Design „Hazel“ (skupina 0+)
- Hmotnosť: 6,8 kg
- Testovaná podľa ECE R44/04
Pokyny pre ošetrovanie a používanie
- VAROVANIE: Ak chcete základňu vyčistiť, musíte ju z vozidla vybrať.
- Plastové diely čistite handričkou s vlažnou vodou a mydlom.
- Nepoužívajte agresívne čistiace prostriedky.
- VAROVANIE: Nikdy nepoužívajte abrazívne prostriedky, ani pre pohyblivé časti základne.
Bezpečnostné pokyny
Pred použitím si najprv dôkladne prečítajte tieto pokyny a uschovajte ich. Ak tieto pokyny nebudete
dodržiavať, môže dôjsť k ohrozeniu bezpečnosti vášho dieťaťa.
UPOZORNENIE:
- Bezpečnosť detskej sedačky garantuje výrobca len v tom prípade, keď ju bude používať prvý kupujúci. Z
tohto dôvodu neodporúčame kupovať sedačku z druhej ruky (second hand).
- Po uplynutí doby 5 rokov od kúpy by sa detská sedačka už nemala používať. Pri náročnom používaní môže
dôjsť k nepostrehnuteľnému narušeniu kvality sedačky.
VAROVANIE:
- Dieťa nenechávajte nikdy samo bez dozoru na detskej sedačke alebo vo
vozidle.
- Detská sedačka sa nesmie používať na autosedadlách, ktoré sú vybavené
airbagom. V prípade potreby airbag deaktivujte (opýtajte sa svojho predajcu
vozidla).
- Detskú sedačku používajte len na autosedadlách, ktoré sú orientované v
smere jazdy.
- Pri používaní musí byť detská sedačka namontovaná v polohe proti smeru
jazdy – nie v smere jazdy!
- Detskú sedačku používajte len na autosedadlách, ktoré sú vybavené kotviacimi bodmi Isox (medzi sedacou plochou a operadlom). Dodržiavajte
predpisy platné vo vašej krajine.
- Kvôli bezpečnosti vášho dieťaťa nestavajte do priestoru pre nohy pred adaptér Isox žiadne predmety.
- Voľne pripevnená detská sedačka môže pri prudkom núdzovom brzdení
alebo pri nehode zraniť pasažierov auta.
- Dbajte na to, aby boli dostatočne zaistené všetky kusy batožiny a iné
predmety, ktoré by v prípade nehody alebo pri prudkom brzdení mohli zraniť
pasažierov.
- Na detskej sedačke nerobte žiadne zmeny, lebo by mohla byť negatívne
ovplyvnená bezpečnosť sedačky.
- Pre zaistenie bezpečnosti vášho dieťaťa si dôkladne prečítajte tento návod
na používanie a striktne dodržiavajte predpísané montážne pokyny.
- Pri nepoužívaní by detská sedačka nemala byť vystavená silnému
slnečnému žiareniu, aby vaše dieťa nebolo vystavované zbytočnému tepelnému stresu.
- Pri nehodách (aj pri nízkej rýchlosti nad 10 km / h) môže detská
autosedačka utrpieť poškodenie, ktoré nemusia byť nutne zreteľné. V prípade
nehody je nutné autosedačku vymeniť. Prosíme, riadne ju zlikvidujte
- Pravidelne kontrolujte všetky dôležité časti, či nie sú poškodené. Uistite sa,
že mechanické komponenty pracujú správne.
- Uistite sa, že detská sedačka nemôže byť poškodená privrznutím do dverí
vozidla, otočnými sedadlami alebo na nej naskladanými predmetmi (napr.
batožinou) a pod.
- V prípade, že došlo k poškodeniu detskej sedačky (napr. po páde), dajte
nám ju bezpodmienečne na preskúšanie.
SK - 31
Page 37

1. diely a vybavenie
1. Tlmiaci oblúk
2. Montážne uchytenie Isox
3. Uvoľňovací prvok
4. Odblokovanie tlmiaceho oblúka
5. Odblokovanie upevňovacích ramien
6. Odblokovanie montážneho uchytenia
7. Montážny adaptér detskej sedačky
8. Farebný indikátor upevnenia detskej sedačky
9. Odblokovanie detskej sedačky
10. Podstavná noha
11. Nastavovacie tlačidlo
12. Ochranný kryt
2. Montáž
a. Potiahnite odblokovanie detskej sedačky (9) smerom von.
b. Vyklopte tlmiaci oblúk (1) nahor tak, aby zaskočil a aby zelená odblokovacia páčka (4) vyčnievala.
c. Podstavnú nohu (10), ktorá sa nachádza pod základňou, vyklopte.
3. Montáž základne vo vozidle:
a. Montážne uchytenie Isox (2) vyklopte smerom dopredu.
b. Stlačte odblokovanie montážneho uchytenia (6). Lišta s oboma upevňovacími ramenami sa automaticky
presunie do krajnej prednej polohy.
c. Zatiahnite uvoľňovací prvok (3) na upevňovacích ramenách smerom dozadu tak, aby príslušný farebný
indikátor zmenil farbu na červenú.
Tým je zaistené, že oba háky upevňovacích ramien sú otvorené a pripravené na použitie.
d. Obe dodané ochranné krytky vložte medzi sedadlo a operadlo na tie miesta, kde sa vo vašom vozidle
nachádzajú kotviace body Isox.
e. Teraz prestrčte obe upevňovacie ramená cez ochranné krytky a pripojte ich na oba upevňovacie body Isox
vo vašom vozidle.
UPOZORNENIE: Uistite sa, že upevňovacie ramená sú správne zaskočené.
Na oboch stranách musí byť viditeľné zelené istiace tlačidlo.
4. Montáž detskej sedačky na základni:
a. Umiestnite detskú sedačku na montážne adaptéry (7) na základni a zatlačte ju dole až zaskočí.
UPOZORNENIE: Uistite sa, že detská sedačka správne zaskočila.
Farebný indikátor upevnenia detskej sedačky (8) musí mať zelenú farbu.
b. Prisuňte teraz detskú sedačku na tlmiaci oblúk tak, aby naň dobre priliehala.
c. Stlačte červené nastavovacie tlačidlo (11) na podstavnej nohe a predĺžte nohu tak, aby bezpečne doliehala
na podlahu vozidla. Farebný indikátor musí mať zelenú farbu.
UPOZORNENIE: Podstavná noha (10) nesmie nikdy visieť vo vzduchu a tiež
nesmie byť podložená žiadnymi predmetmi.
Súčasne dbajte ale aj na to, aby podstavná noha základňu nezdvíhala zo
sedacej plochy autosedadla.
SK - 32
Page 38

5. Odstránenie detskej sedačky:
Zatiahnite za odblokovaciu páčku (9) na prednej strane základne a potom detskú sedačku nadvihnite.
6. Odstránenie základne:
a. Zatiahnite uvoľňovací prvok (3) na oboch stranách tak, aby farebný indikátor zmenil farbu na červenú.
Teraz môžete základňu odpojiť od ukotvenia Isox vo vašom vozidle.
b. Montážne uchytenie ťahajte smerom dozadu.
To urobíte najjednoduchšie tak, že chytíte plastový diel pre odblokovanie upevňovacích ramien (5) a lištu
pritom ťahajte smerom dozadu.
c. Teraz sklopte upevňovacie ramená dozadu tak, že najprv stlačíte odblokovač (5) a potom ramená sklopíte
smerom dozadu.
d. Teraz stlačte odblokovanie tlmiaceho oblúka (4) a oblúk sklopte.
e. Stlačte červené nastavovacie tlačidlo na podstavnej nohe a nohu nastavte na najkratšiu dĺžku.
Potom podstavnú nohu sklopte.
SK - 33
Page 39

- Isox Base
- kompatibilis az ABC Design „Hazel“ (Gruppe 0+) gyermeküléssel
- Súly: 6,8 kg
- Az ECE R44/04 szerint bevizsgálva
Ápolási és használati utasítások
- FIGYELMEZTETÉS: A tisztításhoz vegye ki a Base-t az autóból.
- A műanyag részeket kendővel, langyos vízzel és szappannal tisztítsa.
- Ne használjon agresszív tisztítószert.
- FIGYELMEZTETÉS: Soha ne használjon súrolószert. A Base mozgatható részeihez sem.
Biztonsági előírások
Olvassa el a jelen tájékoztatást a használat előtt gondosan és őrizze meg. Ha ezeket az utasításokat nem
követi, gyermeke biztonsága romolhat.
FIGYELEM:
- A gyermekülés biztonságát a gyártó csak akkor garantálja, ha azt a legelső vásárló használja. Ezért ajánlatos gyermeküléseket újonnan vásárolni és nem másodkézből (second Hand).
- A gyermekülést a vásárlás után eltelt 5 év múltával már ne használja. Az ülés minősége az erős
igénybevételtől akár észrevehetetlenül is korlátozódhat.
FIGYELMEZTETÉS:
- Soha ne hagyja gyermekét felügyelet nélkül a gyermekülésben, illetve a
járműben.
- A gyermekülést nem szabad olyan üléseknél használni, amelyekhez AirBagbiztosítás tartozik. Esetlegesen az Airbag-et deaktiválni kell (Kérdezze meg
autókereskedőjét).
- A gyermekülést csak a menetiránnyal szembe néző autóüléseken használja.
- Csak a menetiránnyal háttal használja a gyermekülést - ne a menetiránnyal
szemben.
- A gyermekülést csak olyan üléseknél használja, amelyekhez Isox-biztosító-csatlakozó tartozik (az ülés lapja és támlája között). Kérjük, vegye
gyelembe az országa előírásait.
- Biztosítsa, hogy a kisgyermeke balesetvédelme érdekében, hogy az IsoxAdapter előtti lábtérben ne legyenek tárgyak.
- Egy lazán feltett gyermekülés vészfékezéskor, vagy baleset esetén a bent
ülőket is megsebezheti.
- Bizonyosodjon meg arról, hogy a csomagok és tárgyak elegendően biztosítottak, hogy egy esetleges vészfékezés, vagy baleset esetén az utasoknak
ne okozhassanak sérüléseket.
- Ne eszközöljön változtatásokat a gyermekülésen. Ezzel az ülés biztonsága
korlátozódhat.
_ Gyermeke biztonsága érdekében alaposan olvassa át ezt a használati
utasítást és pontosan tartsa be az itt megadott szerelési utasításokat.
- Annak érdekében, hogy gyermekét ne érje szükségtelenül hőterhelés,
amennyiben a gyermekülés használaton kívül van, vegye el azt a tűző napról.
- U slučaju nesreće (čak i prilikom male brzine iznad 10 km/sat) dječja auto
sjedalica može biti oštećena iako bez vidljivih naznaka oštećenja. U tom
slučaju potrebno je zamijeniti auto sjedalicu novom. Molimo da staru autosjedalicu propisno odložite u otpad.
- Rendszeresen ellenőrizze a fontosabb részeket, hogy sérülteke-e. Bizonyosodjon meg arról, hogy a mechanikus elemek kifogástalanul működnek.
- Ügyeljen arra, hogy a gyermekülés a járműajtóba beszorulva, forgatható
autóülések által, vagy a gyermekülésre helyezett tárgyak által (pl. csomagok) és hasonlók, ne sérüljön meg.
- Sérült gyermekülést (pl. leejtés után) okvetlenül vizsgáltatsson át velünk.
HR - 34
Page 40

1. elemek és felszerelés
1. Csillapítóív
2. Isox-rögzítőfelvevő
3. Kioldó szerkezet
4. Csillapítóív kireteszelés
5. Rögzítő karok kireteszelése
6. Rögzítés-felvevő kireteszelése
7. A gyermekülés felvevő adaptere
8. A gyermekülés rögzítésének szín-mutatója(jelző)
9. A gyermekülés kireteszelője
10. Lábazat
11. Elállító gomb
12. Zaštitna kapa
2. Felépítés
a. Húzza a gyermekülés kireteszelőjét (9) ki.
b. Hajtsa fel a csillapítóívetl (1), amí az be nem reteszel és a zöld kireteszelő emelő (4) nem áll ki.
c. A lábazatot (10) hajtsa ki, ami a Base alján található.
3. A Base beszerelése az autóba:
a. Hajtsa az Isox-rögzítő-felvevőket (2) előre.
b. A rögzítő-felvevőket (6) reteszelje ki. A rögzítő karok sínje önműködően a legelső helyzetbe megy.
c. Húzza a kioldó berendezést (3) a rögzítő karokon hátra, ameddig az ottani színmutató(jelző) piros nem
lesz.
Ezzel biztsítja, hogy a rögzítő karok mindkét horga nyitva van és használatra készen áll.
d. Tegye mindkét a termékkel leszállított védősapkát a járműben az ülés lapja és támlája közé, az Isoxrögzítőpontok fölé.
e. Vezesse át mindkét rögzítőkart a védősapkákon és rögzítse azokat a jármű mindkét Isox- rögzítőpontján.
FIGYELEM: Bizonyosodjon meg arról, hogy a rögzítőkarok tényleg
bereteszelődtek. Mindkét oldalon láthatónak kell lennie a zöld biztonsági
gombnak.
4. A gyermekülés szerelése a Base-re:
a. Helyezze a gyermekülést a felvevő adapterre (7) a Base-en és nyomja le azt, amíg az a helyére be nem
reteszelődik.
FIGYELEM: Bizonyosodjon meg arról, hogy az autóülés tényleg
bereteszelődött.
A gyermekülés rögzítőjének szín-mutatójának(jelző) (8) zöldnek kell lennie.
b. Tolja a gyermekülést a csillapítóívre, amíg az biztosan nem fekszik fel arra.
Nyomja meg a piros állító gombot (11) a lábazaton és hosszabbítsa meg azt, amíg az a jármű padlóján biztosan nem áll. A színmutatónak zöldnek kell lennie.
FIGYELEM: A lábazatot (10) soha nem szabad alápolcolni, vagy annak nem
szabad a levegőben lógni.
Minden esetre ügyeljen arra, hogy a lábazat a Base-t ne emelje fel az ülés
felületéről.
HR - 35
Page 41

5. A gyermekülés levétele:
A kireteszelő kart (9) a Base elülső oldalán húzza meg és azután emelje ki a gyermekülést.
6. A Base levétele:
a. Addig húzza a kioldó berendezést (3) mindkét oldalon, amíg a színjelző pirosat nem mutat.
Ekkor a Base-t a jármű Isox-szerkezetéből ki lehet húzni.
b. Ekkor húzza hátra a rögzítő-felvevőt.
Ezt úgy lehet a legegyszerűbben megoldani, hogy a rögzítő karok (5) kireteszelőjének műanyag részétmegfogja és a sínt hátra húzza.
c. Hajtsa most a rögzítő karokat hátra, azzal nyomja meg a kireteszelőt (5) és a karokat hajtsa hátra.
d. Nyomja meg a csillapítóív (4) kireteszelőjét és hajtsa be azt.
e. Nyomja meg a piros átállító gombot a lábazaton és állítsa azt a legrövidebb lábhelyzetre.
Csukja be a lábazatot.
HR - 36
Page 42

• Base Isox
• Compatível com a cadeira do “Grupo O +” para automóveis ABC Design “Hazel”
• Peso 6,8 Kg
• Homologada em conformidade com a norma europeia ECE R44/04
Instruções para limpeza e manutenção
ADVERTÊNCIA: Para limpar a Base Isox retire-a do automóvel.
Para a limpeza das partes de plástico utilize apenas um pano húmido em água morna e sabão.
Nunca utilize produtos de limpeza agressivos.
ADVERTÊNCIA: Nunca utilize detergentes abrasivos, muito menos nas peças móveis da Base Isox.
Indicações de segurança
Leia cuidadosamente estas instruções antes de usar e guarde-as para futuras consultas. Siga estas instruções
para não comprometer a segurança do seu bebé.
ATENÇÃO:
• O fabricante garante a segurança desta peça, apenas quando comprada em primeira mão. Por esta razão,
não compre a Base Isox em segunda mão.
• Não use a Base Isox após 5 anos da sua compra. A qualidade da peça pode estar alterada por um uso
intensivo, mesmo que aparentemente nada o indique.
ADVERTÊNCIAS:
• Nunca deixe o bebé sozinho na Base Isox e Cadeira sem vigilância, por
motivo algum, dentro do automóvel.
• Nunca utilize esta Base Isox e Cadeira num banco equipado com airbag.
Se necessário desactive o airbag: verique no stand da marca ou no manual
de instruções do automóvel se é possível desligar o airbag.
• A Base Isox só deve ser instalada estando o banco do carro virado para o
sentido da marcha.
• A cadeira auto deve ser colocada na Base Isox no sentido contrário à marcha; nunca no sentido da marcha.
• Antes da montagem, certique-se que o automóvel está equipado com os
respectivos pontos de ancoragem Isox situados entre o encosto e o assento
do banco. Por favor consulte a regulamentação vigente no seu país.
• Para a segurança do bebé, não coloque nenhum objecto no espaço para os
pés, que ca diante da Base Isox.
• Nunca deixe a Base Isox sem estar xa, pois pode magoar ou ferir os
passageiros em caso de acidente ou travagem brusca.
• Certique-se que todos os objectos e bagagens estão colocados e/ou
presos de forma segura, pois em caso de acidente ou travagem brusca podem ferir os passageiros.
• Nunca introduza quaisquer alterações na Base Isox e Cadeira, podem
comprometer a segurança do bebé.
• Leia cuidadosamente estas instruções antes de usar e siga-as escrupulosamente para não comprometer a segurança do bebé.
• Se o automóvel for deixado ao sol, é aconselhável tapar a cadeira auto,
para evitar o excesso de calor.
• Caso o veículo tenha sofrido um impacto (mesmo em baixas velocidades
acima de 10 km/h), é possível que a cadeirinha para carro sofra danos que
não possam ser detectados apenas pela aparência. Neste caso a cadeira de
criança para automóvel tem de ser substituída. Elimine-a de forma adequa-
da.
• Verique com regularidade os componentes da Base Isox, de forma a que
todas as partes mecânicas estejam em bom funcionamento.
• Verique que a Base Isox não que presa à porta ou em assentos moduláveis. Não coloque objectos pesados na Base Isox (por ex. bagagem).
• Faça-nos chegar a sua Base Isox, para uma revisão, se sofreu algum dano
(após uma queda, por exemplo).
PT - 37
Page 43

1. Descrição dos componentes
1. Placa de amortecimento
2. Conectores Isox (braços de xação de montagem do sistema xação Isox)
3. Dispositivo de desbloqueio
4. Desbloqueio da placa de amortecimento
5. Desbloqueio dos braços de xação
6. Manípulo de desbloqueio do sistema Isox
7. Adaptadores para colocação da cadeira auto
8. Indicador vermelho/verde da correcta instação da cadeira auto
9. Desbloqueio da cadeira auto
10. Pé de apoio
11. Botão de ajuste do pé de apoio
12. Tampas protectoras para conectores Isox Manual de instruções BASE ISOFIX com imagens
Pág. 2 de 3
2. Montagem
a) Puxe para fora o dispositivo de desbloqueio (9) da cadeira.
b) Coloque a placa de amortecimento (1) até cima, até engatar e verique que a alavanca de desbloqueio
mostre a cor verde (4).
c) Puxe para fora o pé de apoio (10) que se encontra debaixo da base.
3. Instalação da Base Isox no automóvel
a) Levante e vire os conectores Isox (2) para a frente.
b) Puxe o manípulo de desbloqueio (6) dos conectores Isox (do sistema de xação). Assim os conectores
cam automaticamente expostos.
c) Empurre o dispositivo de bloqueio (3) dos conectores (braços de xação) para trás até que o indicador de
cor mostre a cor vermelha. Assim, os conectores estão abertos e prontos a usar.
d) Coloque as duas tampas protectoras fornecidas nos pontos de ancoragem Isox existentes entre o encosto
e o banco do veículo.
e) Coloque os dois conectores (braços de xação de montagem) nas tampas protectoras da base e xe-os
nos dois conectores Isox do seu veículo.
ATENÇÃO: assegure-se que os conectores da Base Isox estão bem xos,
vericando se os dois indicadores mostram a cor verde.
4. Para montar a cadeira na Base Isox
a) Coloque a cadeira sobre os adaptadores respectivos (7) na base (virada no sentido contrário à marcha),
empurrando para baixo até encaixar.
ATENÇÃO: verique se a cadeira está correctamente colocada na base.
A xação da cadeira será assinalada pelo indicador (8), que cará verde se o encaixe for correcto.
Manual de instruções BASE ISOFIX com imagens Pág. 3 de 3
b) Empurre com energia a cadeira contra a placa de amortecimento até que que rmemente colocada.
c) Pressione o botão vermelho (11) de ajuste do pé de apoio e alargue-o até que pouse no fundo do chão do
veículo de forma segura. O indicador de cor deve ser verde, indicando que está correctamente instalado.
ATENÇÃO: o pé de apoio (10) não pode nem car no ar nem ter objectos
PT - 38
Page 44

debaixo dele. Certique-se que o pé de apoio não levanta a base do assento.
5. Para desmontar a cadeira da base Isox
Tire a alavanca de desbloqueio (9) na frente da base Isox e de seguida eleve a cadeira (puxe para cima para
desencaixar).
6. Retire a Base Isox
a) Tire o dispositivo de desbloqueio (3) de ambos os lados, até que o indicador de cor mostre a cor vermelha.
Agora, pode tirar a base do dispositivo Isox do veículo.
b) Empurre a barra de xação até trás. Será mais fácil, se pegar na peça de plástico de desbloqueio dos braços de xação (5) e empurrá-la para trás.
c) Depois, abata os braços de xação para trás, pressionando o dispositivo de desbloqueio (5), abatendo os
braços completamente até trás.
d) De seguida pressione o sistema de desbloqueio da placa de amortecimento (4) e dobrea.
e) Pressione o botão vermelho de ajuste do pé de apoio e coloque este na sua posição mais curta. Depois,
dobre o pé de apoio.
PT - 39
Page 45

ABC Design GmbH
Article for baby and child
Dr. Rudolf-Eberle Str. 29
D - 79774 Albbruck
Tel. +49 (0)77539393-0
Email. info@abc-design.de
www.abc-design.com 2017
 Loading...