


Service Manual
ABC Syringe Infusion Pump Model 4100
Atlanta BioMedical Corporation
305 Shawnee North Drive
Suite 250
Suwanee, GA 30024
(770) 904-3766
Always Best Care
©Copyright by Atlanta BioMedical Corporation. All rights reserved. Contents of this publication may not be reproduced in any form without the written permission of Atlanta BioMedical Corporation. Printed in the USA.
Page 1 of 75 ABC Syringe Infusion Pump Model 4100 Service Manual P/N 6-011-0002-8
ABC Model 4100 Service Manual Table of Contents
Section 1: Introduction / Warnings / Cautions……………….. 3 Section 2: Functional Testing………………………………… 5 Section 3: Programming …………………………………….. 11 Section 4: Spare Parts and Tool Equipment List…………….. 19 Section 5: Calibration………………………………………… 22 Section 6: Alarm / Error Codes/Troubleshooting…………….. 26 Section 7: Service / Repair…………………………………… 29 Section 8: Theory of Operation………………………………. 64
Page 2 of 75 ABC Syringe Infusion Pump Model 4100 Service Manual P/N 6-011-0002-8
Section 1: ABC Model 4100 Service Manual
Introduction / Warnings / Cautions
This manual contains the technical service information for the ABC Model 4100 Syringe Infusion Pump. The purpose of this manual is to provide the necessary technical information for servicing, troubleshooting and repair of the Model 4100. Testing including all calibration checks shold be performed at least yearly or whenever a pump has been dropped or damaged.
This manual is intended for use by trained biomedical technicians, who are authorized by their medical facility to perform service and repair of medical devices.
Do not modify the Model 4100, perform any repairs not contained in this manual, or install substitute parts. Unauthorized modifications or repairs will void the warranty.
All information contained in this service manual is current as of the effective dated listed and is subject to change without notice. Contact ABC regarding any technical or repair service and access to repair training videos. Service schools are conducted periodically.
To obtain technical assistance or repair service, contact:
Atlanta BioMedical Corporation 305 Shawnee North Drive, Suite 250 Suwanee, GA 30024
770-904-3766
WARNING ! Do not operate the Model 4100 if it has been dropped or any physical damage is noticed.
WARNING ! Attempts to repair or service the Model 4100 by technicians without the proper qualifications or training may create a hazard which could result in serious injury to the user or patient.
WARNING ! Use only the approved parts and procedures as listed for the repair and servicing of the Model 4100. Failure to follow this service manual may create a hazard which could result in serious injury to the user or patient.
CAUTION: Always disconnect the AC power to the Model 4100 and remove the battery when performing service or repair. Use only the line cord as supplied by Atlanta BioMedical Corporation.
CAUTION: When the Model 4100 is opened for service, you must work at an electrostatic controlled workstation.
Page 3 of 75 ABC Syringe Infusion Pump Model 4100 Service Manual P/N 6-011-0002-8
ABC 4100 Service Manual:
CLEANING CAUTIONS: Always clean the Model 4100 prior to service or repair.
The Model 4100 may be cleaned externally with the following: Isopropyl Alcohol
Clorox Cleaner with Bleach Sporicidin® Solution ASP® Cidex OPA Solution Soap/water
PDI® Super Sani Cloth
Metrex® Cavi Wipes
s BioMed LLC Steriplex SD wipes AHP® Virox Accel TB Wipes PDI Sani-Cloth AF3
Diversey Virex II 256 Diversey Ovivir Tb Wipes
Insure that the battery pack is installed in the Model 4100 prior to cleaning. Tighten battery thumbscrew by hand. DO NOT overtighten.
Clean by pouring or spraying the cleaner onto a soft cloth, not directly onto the Model 4100, then wipe the unit clean.
Do not use strong detergents, organic solvents or solutions containing ammonium chloride to clean any portion of the Model 4100.
Do not immerse the Model 4100.
Avoid spills and inadvertent fluid entry into the Model 4100 housings.
Do not autoclave or gas sterilize the Model 4100.
BATTERY/DISPOSAL INSTRUCTIONS
The battery pack is user replaceable, and should be disposed by the user in an environmentally correct manner in accordance with local and governmental regulations.
At the end of useful life, the ABC 4100 device has several components which require environmentally correct disposal, e.g. the circuit boards and battery pack. The user should follow local and governmental regulations upon disposal of the device.
The battery pack has an estimated useful life of at least 500 cycles under normal conditions. The battery should be recharged if the pump is not used for 3-4 months to preserve its estimated useful life.
Page 4 of 75 ABC Syringe Infusion Pump Model 4100 Service Manual P/N 6-011-0002-8
Section 2: ABC Model 4100 Service Manual
Functional Testing
1.Install the battery.
2.Press the Power ON key and the unit will proceed through a power on sequence displaying the software version/date and the S/N, the LEDs should flash and then the display should indicate MAIN MENU PAGE 1 of 3.
3.The battery LED should be flashing yellow.
4.Connect the line cord and check that the unit battery LED is flashing green or steady green if battery fully charged. Disconnect the line cord and check battery LED is flashing yellow. .
5.Press the Menu key twice to get to MAIN MENU PAGE 3 of 3, select/enter <9> SYSTEM CHECK. The display should indicate reading for POS, SIZE, BATT, FORCE and PLUNGER DETECTED.
6.Completely squeeze the clutch lever and move the track all the way in, the POS reading inches should be less than .100 IN. Move the track all the way out and the reading should be greater than 5.570 IN.
7.The SIZE readings will change when the syringe clamp is moved up and down. Check the size by loading a syringe that the unit is set for and simply check that the size is recognized by the unit when setting up an infusion as in step 14
8.The BATTERY voltage will indicate the voltage charge of the battery.
9.The FORCE is a reading of the force sensor, with no syringe loaded (no force) the reading should be close to 0 LB. Apply some finger pressure to the transducer plate and the force reading should increase.
10.The PLUNGER DETECTED with no syringe loaded should be NO. Load a syringe and the PLUNGER DETECTED should be YES. Remove the syringe and it should change back to NO.
11.TEST LED/ALARM. Press the Select key and the LEDs should flash and the audio alarm should sound. Note that the System Malfunction LED and audio alarm should be activated for a very short interval at the end of the test.
Check/note the battery voltage during this test, if the voltage is less than 4.8V the battery may need to be charged.
12.Press the Stop key to exit the SYSTEM CHECK and go back to MAIN MENU PAGE 3 of 3, then press the Menu key to get to MAIN MENU PAGE 1 of 3.
Page 5 of 75 ABC Syringe Infusion Pump Model 4100 Service Manual P/N 6-011-0002-8
13.Select/Enter ML/HR mode, then Select/Enter a syringe, ie BD, MONO, NEOM as the syringe MANUFACTURER.
14.Load a BD,, MONO or NEOM 60 syringe, the MFR of the syringe loaded must match what the unit is set to, confirm that the unit recognizes the size. Enter 0 for DELIVER LIMIT (if option set to yes) and 0 for BOLUS (if option set to yes), enter the max rate, should be 1500 for BD or NEOM 60 and1497 for MONO 60 as default values. Then press and hold the Prime key to prime, the priming should only be approximately 5 seconds and the audio alarm should then turn on and the display should indicate RELEASE prime KEY. Then press the Deliver key to run the unit at the max rate for a full delivery. The Near Empty alarm should be on since delivering at max rate. Check that the unit runs to SYRINGE EMPTY with audio alarm. The syringe should be empty .
If any other alarms or errors occurred, refer to the alarm/error chart.
This functional testing tested all the basic functions of the unit. The next section lists more detailed testing.
1.Power on the unit.
2.Syringe size recognition test.
Program the unit for BD syringe, then load a BD 10 mL syringe and check for syringe recognition. Press the Go Back key, remove the 10 mL syringe. Then incorrectly load a BD 5 mL syringe by loading on top of the syringe finger tab. Check that the unit does not recognize the syringe and indicated invalid size. Load the 5 mL syringe correctly and check syringe recognition. Remove the 5 mL syringe. Correctly load other syringes and check size recognition. Press the Go Back key 3 times to get to MAIN MENU PAGE 1 of 3. If there are any problems with syringe recognition, then perform SIZE calibration. Alternatively, test size recognition with the syringes that your facility uses.
3.Plunger force test.
With force gage.
Press the Menu key twice to get to MAIN MENU PAGE 3 of 3, select/enter <9> SYSTEM CHECK. The display should indicate SYSTEM CHECK with FORCE listed.
Move the track all the way out and load the spacer onto the plunger retainer. Then load the force gage onto the unit. Turn on the force gage and zero the reading. With no force on the plunger the unit should read 0 +/- 0.30 Lbs. Slowly turn the knob on the force fixture to apply force to the plunger until 5 Lbs is indicated on the force gage, then check the
Page 6 of 75 ABC Syringe Infusion Pump Model 4100 Service Manual P/N 6-011-0002-8

reading on the unit, the reading should be 5 +/- 0.50 Lbs. Then check the reading at 10 Lbs, unit should read 10 +/- 0.75 Lbs and then 15 Lbs, unit should read 15 +/- 0.75 Lbs. If there are any problems with the force readings, then perform FORCE calibration.
With syringe.
Reference appendix III Occlusion Force chart in the Operations Manual.
Prepare a syringe, half filled with water and load onto the unit.
Set up program the unit for the syringe being used. Deliver/start the infusion at maximum rate and then occlude the syringe.
The unit will run to an occlusion condition. Note the reading in lbs in the lower right corner of the LCD, this is the occlusion point.
Note: the unit may be set up and tested for any of the occlusion forces listed in the table (LOW, NORM, MID or HIGH). Reference section 8.2.4 in the Operations Manual for temporary adjusting the occlusion plunger force.
4.Plunger driver test:
Load a BD 60 syringe, set a delivery limit of 50 mL and a rate of 1500 ml/hr. Prime the syringe to approximately the 55 mL mark on the syringe. Measure with a caliper the distance between the right edge of the clear syringe clamp and the transducer plate, record this reading.
Start the delivery and allow the unit to deliver until the DELIVERY LIMIT alarm occurs. Measure the same distance between the syringe clamp and the transducer plate. Subtract this reading from the first reading, this difference should be 3.473 to 3.615 inches.
Page 7 of 75 ABC Syringe Infusion Pump Model 4100 Service Manual P/N 6-011-0002-8

e.g. 4.495 minus 0.945 equals 3.550
Flow rate accuracy with displacement measurement: use this chart for any of the other syringes and flow rates
B-D |
|
|
|
|
|
|
|
|
Size |
1 |
3 |
5 |
10 |
20 |
30 |
60 |
|
VINC |
0.44049 |
1.47036 |
2.86731 |
4.15229 |
7.23958 |
9.29884 |
14.10862 |
|
MONO |
|
|
|
|
|
|
|
|
Size |
1 |
3 |
6 |
12 |
20 |
35 |
60 |
140 |
VINC |
0.43574 |
1.56762 |
3.16632 |
4.86790 |
8.09352 |
11.08376 |
14.08168 |
28.72713 |
TERU |
|
|
|
|
|
|
|
|
Size |
1 |
3 |
5 |
10 |
20 |
30 |
60 |
|
VINC |
0.44086 |
1.59779 |
3.37154 |
4.97965 |
8.09982 |
10.6451 |
16.8932 |
|
BDMF |
|
|
|
|
|
|
|
|
Size |
1 |
3 |
5 |
10 |
|
|
|
|
VINC |
0.46512 |
1.59575 |
2.73973 |
4.28266 |
|
|
|
|
ABC |
|
|
|
|
|
|
|
|
Size |
140 |
|
|
|
|
|
|
|
VINC |
28.72713 |
|
|
|
|
|
|
|
NEOM |
|
|
|
|
|
|
|
|
Size |
1 |
3 |
6 |
12 |
20 |
35 |
60 |
100 |
VINC |
0.440676 |
1.615878 |
3.167121 |
4.854816 |
8.22083 |
11.0169 |
14.11519 |
23.04796 |
ACAC / Medela |
|
|
|
|
|
|
|
|
Size |
5 |
10 |
30 |
60 |
|
|
|
|
VINC |
2.87746 |
4.21167 |
9.23006 |
14.0093 |
|
|
|
|
Unit for VINC is ml/inch.
VL (ml, Volume to be delivered) = Rate(ml/HR) x Time(HR)
Displacement (inch) = VL(ml) / VINC(ml/inch)
Procedure to determine expected displacement:
(1) Find VINC with given Syringe Manufacturer/Size.
Page 8 of 75 ABC Syringe Infusion Pump Model 4100 Service Manual P/N 6-011-0002-8
(2)Determine Volume to be delivered (using Volume Limit) by multiplying Rate with Time.
(3)Find the expected Displacement by dividing VL with VINC.
Testing:
(1)Load syringe and set up rate and volume limit.
(2)Prime the syringe.
(3)Measure the initial track position.
(4)Start Stopwatch and Delivery.
(5)Check Stopwatch reading when delivery is stopped to verify the Delivery Time.
(6)Measure the track position and calculate the displacement the by the difference between the beginning and ending track position readings. Confirm that the displacement is within specification +/-3% of the displacement, ie BD 60 syringe, VL=50mL. 50/14.10862=3.544. +/-3% 3.438 to 3.650.
Alternatively: Flow accuracy testing may be performed with a balance/scale or graduated cylinder/pipet per your facility procedures. The flow accuracy is +/- 3% excluding syringe variations.
5.Leakage current test.
Connect the unit to the leakage current tester. Power on the unit.
Measure the leakage current to any of the exposed metal screws of the unit, the reading should be less than 100uA in both the normal and reversed settings.
Pole Clamp and Handle Testing
1.Test that the handle operates. The handle should pull up, rotate forward, then pull up to the Carry position. Then push the handle down, rotate to the back and push down to the Store position.
2.Check that the base of the handle (attached to the pump) is not damaged or cracked. Check that the hex head screw is in place at the bottom of the base.
3.Attach the pole clamp to a pole and tighten the thumb screw to secure it on the pole.
4.Place the handle into the Carry position. Then carry the pump to the pole clamp. Place the locking tabs into position and gently push down on the Handle to rock the Pump into the locked position.
5.Check that the Handle locked into both the top and bottom of the metal spring on the clamp.
Page 9 of 75 ABC Syringe Infusion Pump Model 4100 Service Manual P/N 6-011-0002-8
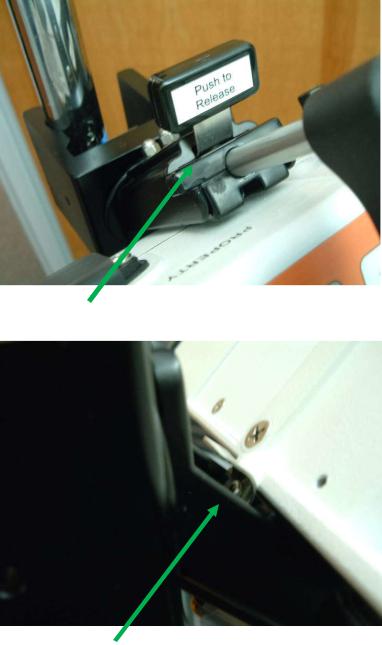
Locked at the top, spring is locked over post.
Locked at the bottom, spring is locked over the screw head.
6. Check that the pump/clamp will rotate 360 degrees in 90 degree increments in any direction (CW or CCW) by applying a gentle force in the desired direction.
Page 10 of 75 ABC Syringe Infusion Pump Model 4100 Service Manual P/N 6-011-0002-8
Section 3: ABC Model 4100 Service Manual
Programming
3.1 Setting the Real Time Clock
From the MAIN MENU PAGE 1 OF 3, go to MAIN MENU PAGE 3 OF 3, then <7> REAL-TIME CLOCK and Enter.
Use code 6543 and Enter
Screen will list (the current clock settings)
REAL-TIME CLOCK
YEAR (YY)=15 MONTH (MM)=06 DAY (DD)=10 0-AM, 1-PM=00 HOUR (HH)=07 MINUTE (MN)=05
ENTER: YY
15
PROGRAM # OR USE ▲▼ THEN PRESS <ENTER>
Change the appropriate settings as necessary.
3.2 Programming the Options
From the MAIN MENU PAGE 1 OF 3, go to MAIN MENU PAGE 3 OF 3, then <3> PUMP DEFAULTS and Enter. Refer to the Operations Manual for full explanation of the options.
Use code 4321 and Enter.
There are 3 programming options pages and one page of Alarm/Alert options.
The options are:
OPTIONS: Page 1 of 3
<1> SYRINGE MFGER <2> USE B-D 1CC LL <3> DELIVER LIMIT
Page 11 of 75 ABC Syringe Infusion Pump Model 4100 Service Manual P/N 6-011-0002-8
<4> BOLUS ENABLED <5> STAND-BY MODE <6> RATE ALARM <7> PLUNGER FORCE <8> LOCK STAND-BY <9> LAST SETTING <0> ID. OPTIONS
Use the Menu key to go to the next options screen
OPTIONS: Page 2 of 3
<1> KEEP TOTAL VOLUME <2> MULT. SYRINGE
<3> USE ALL MODES <4> DISPLAY CLOCK <5> REVERSE MOTOR <6> AUTO VOL@ V/T <7> ENTERAL CHECK <8> LOCK START-UP <9> LOCK CRTE PROG <0> LOCK TEMP ADJ
Use the Menu key to go to the next options screen
OPTIONS: PAGE 3 OF 3 |
|
<1> LOCK KEY PAD |
note: the unlock code is 8655 (UNLK) |
SW 1.12 and higher |
|
<2> TOTAL UNIT mX |
|
<3> USE BOLUS TIME |
|
<4> EMP=STOP ALARM |
|
SW 1.13 and higher |
|
<5> MANUAL BOLUS |
|
<6> MAN.BOL DUR.LMT |
|
Use the Menu key to go to the ALARM/ALERT OPTIONS screen
<1> ALARM VOLUME <2> ALARM FREQ. <3> ALARM DELAY <4> STOP ALARM <5> EMPTY ALARM
<6> LOW BATT ALARM <7> NEAR-EMP ALARM <8> NEAR-EMP DELAY
Page 12 of 75 ABC Syringe Infusion Pump Model 4100 Service Manual P/N 6-011-0002-8
<9> BOLUS COMPLETE
Use the number keys to select an option, then again a number key to select an item and then the scroll keys to select and then confirm with the Enter Key. Press the Stop key to exit back to the options page.
Note: The last two lines of the LCD display operational instructions and status information.
From page 1 of 3 on the options page, press <1> to select the IV syringe manufacturer, the choices are:
<1> B-D
<2> MONOJECT <3> TERUMO <4> B-D GLASS <5> ABC
Note: with SW V1.13, to program a custom syringe, a unit from ABC with the syringe programmed must be used and then copy custom data will be used per section 3.3
Press the Menu key to select the ENTERAL SYRINGE(s), the choices are: <1> ETBD B-D&ETIP
<2>ETMN MONO&ETIP <3>BAXA NeoThrive <4>NEOM NeoMed <5>AMP Ameritus <6>VYGO Vygon
<7>ACAC Medela If SW 1.13 MDLA Medela <8>MEDI Medicina
Note: with SW V1.13, to program a custom enteral syringe, same as above note.
Then <4> key for NEOM, then the arrow keys or the Select to choose Yes or No and then confirm the entry with the Enter key. Press the Stop key to exit back to the options page. In this manner, if your facility only uses NeoMed syringes, you can choose Yes for NEOM and No for the other syringes and then the unit will only be set for NeoMed syringes.
On page 1 of 3 on the options page, press <2> to use BD 1cc luer lock syringe, the choices are YES or NO, this can be chosen using the scroll keys or the Select key. Use the Enter key to confirm your choice. If your facility uses BD 1 cc luer lock syringes then this should be set to YES. This will avoid any size recognition errors with the BD 3 cc syringe which has an outside diameter similar to the BD 1 cc luer lock syringe.
Example: From the alarm/alert options page, press the <1> key to select alarm volume, then the scroll keys to change between normal, low and high, then the Enter key to confirm the entry. A brief test sound will occur after confirmation.
Page 13 of 75 ABC Syringe Infusion Pump Model 4100 Service Manual P/N 6-011-0002-8
The factory default options can be set with the following instructions. Go to MAIN MENU PAGE 3 OF 3, then <5> BIO MED SERVICE, press the Enter key. Enter the biomed access code, 9876, and press the Enter key. Then <5> FACTORY DEFAULTS. Note that the unit will return to MAIN MENU PAGE 3 OF 3 where choice <1> is VIEW OPTIONS.
3.3 Duplicate the options configuration and saved programs.
You will use one unit that already has the options as the teacher unit and the other units that need the options will be the student units. Connect the communication cable P/N 001-5217 to the Comm. port on the back of each unit.
Set up a student unit as follows:
From MAIN MENU PAGE 3 OF 3, THEN <5> BIOMED SERVICE then Enter.
Used code 9876 then Enter.
Then <3> TEACHER / STUDENT
Then <3> STUDENT, the screen will list STUDENT at the top and WAITING at the bottom.
Set up the teacher unit (unit with the options) as follows:
From MAIN MENU PAGE 3 OF 3, THEN <5> BIOMED SERVICE then Enter.
Used code 9876 then Enter.
Then <3> TEACHER / STUDENT
Then <1> TEACHER, the screen will list TEACHER at the top and SENDING DATA at the bottom.
The STUDENT unit should now list RECEIVED DATA [CONN] at the bottom.
At the TEACHER unit, the screen will list:
Page 14 of 75 ABC Syringe Infusion Pump Model 4100 Service Manual P/N 6-011-0002-8
at the TEACHER unit, |
<1> COPY OPT. & PROT. |
|
<3> COPY OPTIONS |
|
<5> COPY PROTOCOLS |
If SW V1.13 <7> COPY CUSTOM DATA
Then press the appropriate key to copy what is needed to be sent to the STUDENT.
Press the Stop key 3 times on the STUDENT unit to exit and get back to MAIN MENU PAGE 3 OF 3.
You can verify the options are the same as follows.
From MAIN MENU PAGE 3 OF 3.
<1> VIEW OPTIONS then Enter.
The bottom of the screen will list a CRC code, this code should match between the TEACHER and STUDENT units.
You can also see and page through the options by pressing the Menu key.
Use the Stop key to exit out of VIEW OPTIONS.
3.4 Software Update
This will allow updating the software from one master Model 4100 to another Model 4100. The master 4100 must be programmed by Atlanta BioMedical.
Connect the Communication Cable between the master 4100 and the 4100 to be updated.
Master 4100: Power ON the unit and then press the Menu key twice to get to MAIN MENU PAGE 3 OF 3. Press key <5> BIOMED SERVICE, then the Enter key. Key in code 7319, then Enter key. Screen should indicate:
CLONE CODE
<1> CLONE APPLICATION
<3> CLONE BASE
USE # TO SELECT ITEM
EXIT:<Stop>
Page 15 of 75 ABC Syringe Infusion Pump Model 4100 Service Manual P/N 6-011-0002-8
4100 to be updated: Operate in DC/Battery power. Hold down the Menu key and then Power ON. Screen should indicate:
BASE VERSION= 01.01 |
(or newer version) |
REV. DATE= 09/01/2011 |
(or newer date) |
CRC=EA57 S/N=8000#### (or newer CRC) #### S/N of unit 1. UPDATE/VERIFY CODE
USE # TO SELECT ITEM
REMOVE POWER TO EXIT
Press the 1 key. Screen will indicate:
UDPATE/VERIFY/CODE
EXIT:<STOP>
Master 4100: Press the 1 key to CLONE APPLICATION.
The master 4100 will indicate SENDING DATA.
The 4100 being programmed will indicate date being received.
The programming will take approximately 2-3 minutes. When programming is complete, the 4100 that was being programmed will sound the audio alarm briefly. Then the middle of the screen will indicate:
#=2 CRC;COM=B001 B001 B001 7B65 7B65 7B65
The master 4100 will now indicate:
CLONE CODE
<1> CLONE APPLICATION
<3> CLONE BASE
USE # TO SELECT ITEM
EXIT:<Stop>
Page 16 of 75 ABC Syringe Infusion Pump Model 4100 Service Manual P/N 6-011-0002-8
Power OFF the 4100 that was just programmed. Power ON this 4100. The screen will indicate:
ABC 4100
SYRINGE
PUMP
VERSION= ##.# (version just programmed)
MM/DD/YYYY (date of this version)
S/N=8000####
SELF-TEST
Then the unit will proceed to MAIN MENU PAGE 1 OF 3. Programming is complete.
If the unit indicates: WRONG BASE VERSION!!
THEN PRESS <Enter>
Press the Enter key on the 4100. The unit will indicate:
UPDATE/VERIFY CODE B
WAITING
EXIT:<Stop>
At the master 4100: Press the <3> key to CLONE BASE. This programming will take approximately 15-20 seconds and when complete the unit will indicate:
UPDATE/VERIFY CODE B
CAF19200 E
BASE CRC=B001
WAITING
EXIT:<Stop>
Power OFF the 4100. Power ON the 4100 and then unit will proceed through the power on self test and go to MAIN MENU PAGE 1 OF 3. (as described above). Programming is complete. Disconnect the communication cable from the 4100 that was just updated.
Must complete next section 3.5 to set the configuration mode.
3.5Configuration modes (SW 1.12 and higher)
This is used to set the unit for ABC IV only mode, ABC Enteral mode or Medela Enteral mode.
Go to MAIN MENU PAGE 3 OF 3. Then key in <5> BIOMED SERVICE
Page 17 of 75 ABC Syringe Infusion Pump Model 4100 Service Manual P/N 6-011-0002-8
Key in 7 3 1 9 then the Enter key
ABC IV only mode: Simultaneously press the Select and Go Back keys ABC Enteral mode: Simultaneously press the Select and down arrow key Medela Enteral mode: simultaneously press the Select and Reset keys
Must power off pump to affect the change.
3.6 Save and recall current options. (SW V 1.10 and higher)
From MAIN MENU PAGE 3 OF 3.
Press the <5> key BIOMED SERVICE then the Enter key.
Enter ACCESS LOCK 9 8 7 6 then the Enter key.
Simultaneously press the Select and Decimal point key, there should be a single audio beep. (this saved the options)
To recall the options
From MAIN MENU PAGE 3 OF 3.
Press the <5> key BIOMED SERVICE then the Enter key.
Enter ACCESS LOCK 9 8 7 6 then the Enter key.
Simultaneously press the Select and 0 keys, there should be a single audio beep. (this recalled the options)
Page 18 of 75 ABC Syringe Infusion Pump Model 4100 Service Manual P/N 6-011-0002-8

Section 4: ABC Model 4100 Service Manual
Spare Parts and Tool Equipment List |
|
|
Spare Part List |
|
|
Spare parts list: |
Part No |
Notes |
AC Inlet Assembly |
001-5209 |
|
Battery Pack |
p/n 001-5104 |
|
Bottom Housing |
p/n 001-5101 |
|
Assembly |
|
|
Bottom with Saddle |
p/n 001-5222 |
|
Box (shipping) |
p/n 001-9202 |
|
Clutch Lever |
p/n 001-0408 |
|
Cover, Transducer |
p/n 001-6062 |
|
Housing |
|
|
Enteral Label Left |
p/n 001-0123 |
|
(Purple) |
|
|
Enteral Label Right |
p/n 001-0124 |
|
(Orange) |
|
|
Enteral Label Right |
p/n 001-0122 |
|
(Purple) |
|
|
Enteral Label, Left |
p/n 001-0125 |
|
(Orange) |
|
|
Force Sensor Assembly |
p/n 001-5114 |
|
Fuse .080A (240V unit) |
p/n 203-0105 |
|
Fuse .125A (120V unit) |
p/n 203-0104 |
|
Ground Ring |
p/n 001-0432 |
|
Handle Assembly |
p/n 001-5991 |
|
Inserts Set (shipping) |
p/n 001-9200, 001-9201 |
|
Keypad |
p/n 001-0117 |
|
Lens |
p/n 001-0116 |
|
LCD |
p/n 001-5117 |
|
Line Cord (220V) |
p/n 200-0062 |
|
Line Cord 6 ft (US Hosp |
p/n 200-0061 |
|
Grade) |
|
|
Line Cord 8 ft (US Hosp |
p/n 200-0063 |
|
Grade) |
|
|
Line Cord locking 10 ft |
p/n 200-0064 |
|
(US Hosp Grade) |
|
|
Main PCB Assembly |
p/n 001-5110 |
|
Motor Assembly |
p/n 001-5116 |
|
Opto Sensor/ Motor |
p/n 221-0401 |
|
Overlay (Orange ABC) |
p/n 001-0190 |
|
Overlay (Orange Medela) |
p/n 001-0192 |
|
Overlay (Purple ABC) |
p/n 001-0191 |
|
Page 19 of 75 ABC Syringe Infusion Pump Model 4100 Service Manual P/N 6-011-0002-8

Overlay (White ABC) |
p/n 001-0118 |
Plunger – Retainer |
p/n 001-5218 |
Assembly |
|
Pole Clamp Rotational |
p/n 001-5990 |
Potentiometer Assembly |
p/n 001-5202 |
Programming Cable |
p/n 001-5217 |
(Cloning |
|
Pump Handle |
p/n 001-5991 |
Retainer Cluster Gear |
p/n 001-0040 |
Rotating Pole Clamp |
p/n 001-5990 |
Rubber Foot |
p/n 001-0431 |
Screw Battery Case |
p/n 001-0142 |
Seal/ Battery Case |
p/n 111-0700 |
Seal/ Battery Thumb |
p/n 111-0701 |
Screw |
|
Seal/ Case |
p/n 001-0050 |
Seal/ Cup |
p/n 001-0044 |
Seal/ Transducer |
p/n 001-0413 |
Seal/ Transducer Housing |
p/n 001-0022 |
Seal/Cover AC Inlet |
p/n 001-0113 |
Seal/Plug Comm. Port |
p/n 111-0750 |
Speaker Assembly |
p/n 001-5211 |
Spring Pole Clamp |
p/n 001-0318 |
Syringe Flange Retainer |
p/n 001-6010 |
Top Cable Assembly |
p/n 001-5206 |
Top Housing Assembly |
p/n 001-5900 |
Top PCB Assembly |
p/n 001-5111 |
Track with Clutch |
p/n 001-5219 |
Track/Transducer |
p/n 001-5112 |
Assembly |
|
Contact Atlanta BioMedical Corporation at 770-904-3766 for pricing.
Page 20 of 75 ABC Syringe Infusion Pump Model 4100 Service Manual P/N 6-011-0002-8
Tool Equipment List
 Too Description
Phillips #0, #1 and #2 screwdrivers
 ¼ inch open end wrench and nut driver
3/16, 1/4 nut driver
 5/16 open end wrench
9mm open end wrench
 19mm open end wrench
5/64, 1/8, 3/32, 5/32 hex driver
 T10, T15 Torx driver
Caliper 6 inch
 Steel rule 6 inch, with graduations in 1/10 inches
Syringes: BD 1 Slip Tip, BD 5, BD 20, BD 60, Mono 140 Force gage: Mecmesin Model CFG 200 p/n 860-022
Available at Scalesonline.com, Davis.com, Instrumart.com et al
Force fixture holder and hardware :
supplied by ABC (minus the gage) ABC P/N 001-5500  Programming cable ABC P/N 001-5217
Centering Tool ABC P/N 001-0590
 Note
Note
 For position calibration For size calibration
For force calibration along with force fixture holder (below)
Contact Atlanta BioMedical Corporation at 770-904-3766 for pricing on force fixture.
Page 21 of 75 ABC Syringe Infusion Pump Model 4100 Service Manual P/N 6-011-0002-8
Section 5: ABC Model 4100 Service Manual
Calibration
This section is used to calibrate the syringe pump force, size and position.
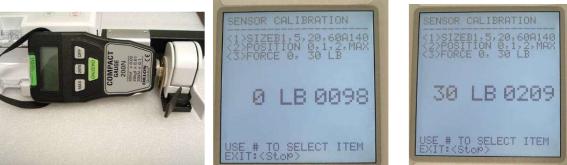
Force calibration
From the main menu screen, page 1 of 3, press the menu key twice to get to MAIN MENU PAGE 3 OF 3. Press the <5> key (BIOMED SERVICE), then the Enter key. Enter the biomed access code, 9876, and press the Enter key. Then key <1> (SENSOR CALIBRATION). Next press key <3> to enter force calibration.
Screen should be at force calibration, displaying 0 LB and hex numbers, e.g., 0075 to 009F. If necessary adjust the DIP switch settings for 0075 to 009F.(see pix on p. 55) Place the spacer onto the transducer plate. Manually squeeze the spacer onto the plate a few times and check that the hex numbers increase. Then with NO force applied, press the Enter key. Screen should now list 30 LB and hex numbers as above, e.g., 0098. Place the track to the full outside position, keep the spacer in place. Turn the force gage on by pressing it’s ON/ZERO key. Place the force gage onto the track and check that the force gage is reading 0 lbs. Then turn the knob on the gage clockwise to apply force to the transducer plate, turn until the gage reads 30 lbs. Then press the Enter key. Turn the knob counterclockwise and then remove the force gage and spacer from the unit. Press the Stop key to exit force calibration. Press the Stop key a second time to exit the sensor calibration mode.
Screen views are samples only
. Force preset 75 to 9F hex: 75 76 77 78 79 7A 7B 7C 7D 7E 7F 80 81 82 83
84 85 86 87 88 89 8A 8B 8C 8D 8E 8F 90 91 92 93 94 95 96 97 98 99 9A 9B 9C 9D 9E 9F
Force test:
Go to MAIN MENU PAGE 3 of 3, then <9> SYSTEM CHECK. Force readings will be displayed. Check the force sensor by setting 5 lbs on the gage and then check that the displayed reading is 5 +/- 0.50 Lbs. Repeat for 10 and 15 lbs. The displayed readings should be within 0.75 lbs. If not, repeat the force calibration above. Press the Stop key to get to MAIN MENU PAGE 3 of 3.
Page 22 of 75 ABC Syringe Infusion Pump Model 4100 Service Manual P/N 6-011-0002-8
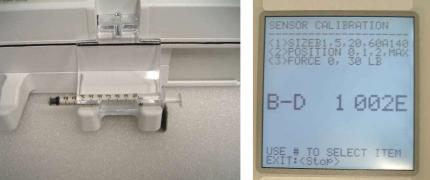
Size calibration
From MAIN MENU PAGE 3 of 3, Press the <5> key (BIOMED SERVICE), then the Enter key. Enter the biomed access code, 9876, and press the Enter key. Then key <1> (SENSOR CALIBRATION). Press the <1> key for SIZE calibration. Unit will be displaying B-D 1 and hex numbers e.g. 0000. Properly load the BD 1 ml Slip Tip syringe onto the unit. Exercise the syringe clamp a few times and then place the clamp down on the syringe. The hex reading should be between 25-50, if not see page 33 step 3 Press the Enter key. Warning: Make sure to use the BD 1 Slip Tip, NOT the BD 1 Luer Lock. The barrel sizes are different and will result in incorrect size calibration.
Load the BD 5 ml syringe and repeat above, followed by the BD 20 ml, BD 60 cc and lastly the Mono 140 cc syringe. Press the Stop key to exit SIZE calibration. Press the Stop key a second time to exit the SENSOR CALIBRATION mode.
BD 1mL slip tip |
screen view is sample only |
Size preset: 25 26 27 28 29 2A 2B 2C 2D 2E 2F 30 31 32 33 34 35 36 37 38 39 3A 3B 3C 3D 3E 3F 40 41 42 43 44 45 46 47 48 49 4A 4B 4C 4D 4E 4F 50.
Size test:
Go to MAIN MENU PAGE 1 of 3. Select any appropriate syringe manufacturer. Load each syringe size and check that the size is recognized. If not, repeat the size calibration procedure above.
Page 23 of 75 ABC Syringe Infusion Pump Model 4100 Service Manual P/N 6-011-0002-8
 Loading...