

Page 1

ABBYY FlexiCapture
A Guide to Creating
Machine-Readable Forms
© 2011 ABBYY. All rights reserved.
Page 2

ABBYY FlexiCapture
2
Dynamic Data Capture System
Table of Contents
What is a Form? ................................................................................................................ 3
Machine–Readable Forms ................................................................................................. 4
Form Completion Methods ........................................................................................................................................................................................................... 4
Elements of Machine–Readable Forms.................................................................................................................................................................................. 4
Text ........................................................................................................................................................................... 4
Entry Field ................................................................................................................................................................ 4
Checkmark Field....................................................................................................................................................... 5
Checkmark Group .................................................................................................................................................... 5
Reference Mark ......................................................................................................................................................... 5
Line Separator .......................................................................................................................................................... 5
Form Identifier ......................................................................................................................................................... 5
Picture ...................................................................................................................................................................... 5
Table ......................................................................................................................................................................... 6
Group of elements .................................................................................................................................................... 6
Types of Machine–Readable Form .................................................................................... 7
Dropout Forms ...................................................................................................................................................................................................................................... 7
Choosing the Right Color ........................................................................................................................................... 8
Black–and–White Forms with Raster Backgrounds ..................................................................................................................................................... 8
Black–and–White Forms with Raster Borders ................................................................................................................................................................. 8
Black–and–White Linear Forms ................................................................................................................................................................................................ 8
Choosing the Right Type of Form ............................................................................................................................................................................................. 8
General Requirements for Machine–Readable Forms ..................................................... 10
Form Background ............................................................................................................................................................................................................................. 10
Reference Mark ................................................................................................................................................................................................................................... 10
Checkmark Field ................................................................................................................................................................................................................................ 11
Text Marking ........................................................................................................................................................................................................................................ 11
Element Positioning ........................................................................................................................................................................................................................ 11
Print Quality ......................................................................................................................................................................................................................................... 12
Form Completion.............................................................................................................................................................................................................................. 12
Recommended Colors for Dropout Forms....................................................................................................................................................................... 13
© 2011 ABBYY. All rights reserved.
Page 3
ABBYY FlexiCapture
3
Dynamic Data Capture System
What is a Form?
Questionnaires, social security forms, polling slips, warranty cards are all different types of
form used to collect different types of information.
How do forms differ from other types of documents?
1. A form always has a set number of fields
2. Each field may contain only a certain type of information, e.g. a "Last
Name" field contains only last names (if completed correctly) and a "Date" field
contains only dates.
Forms are used when information must be gathered from a large number of respondents.
Manual information gathering is a long and tiresome process where typos and errors are
almost inevitable, and machine–readable forms are used to automate this process.
Automated forms processing consists of the following stages:
1. Setting up the form–processing application (creating a template and
specifying the fields to be recognized).
2. Acquiring form images (scanning).
3. Processing the form images (recognizing the images and validating
the extracted data).
4. Exporting the extracted data to an external information system.
Automated forms processing is most effective on forms that meet certain requirements
which are discussed in this chapter.
© 2011 ABBYY. All rights reserved.
Page 4
ABBYY FlexiCapture
4
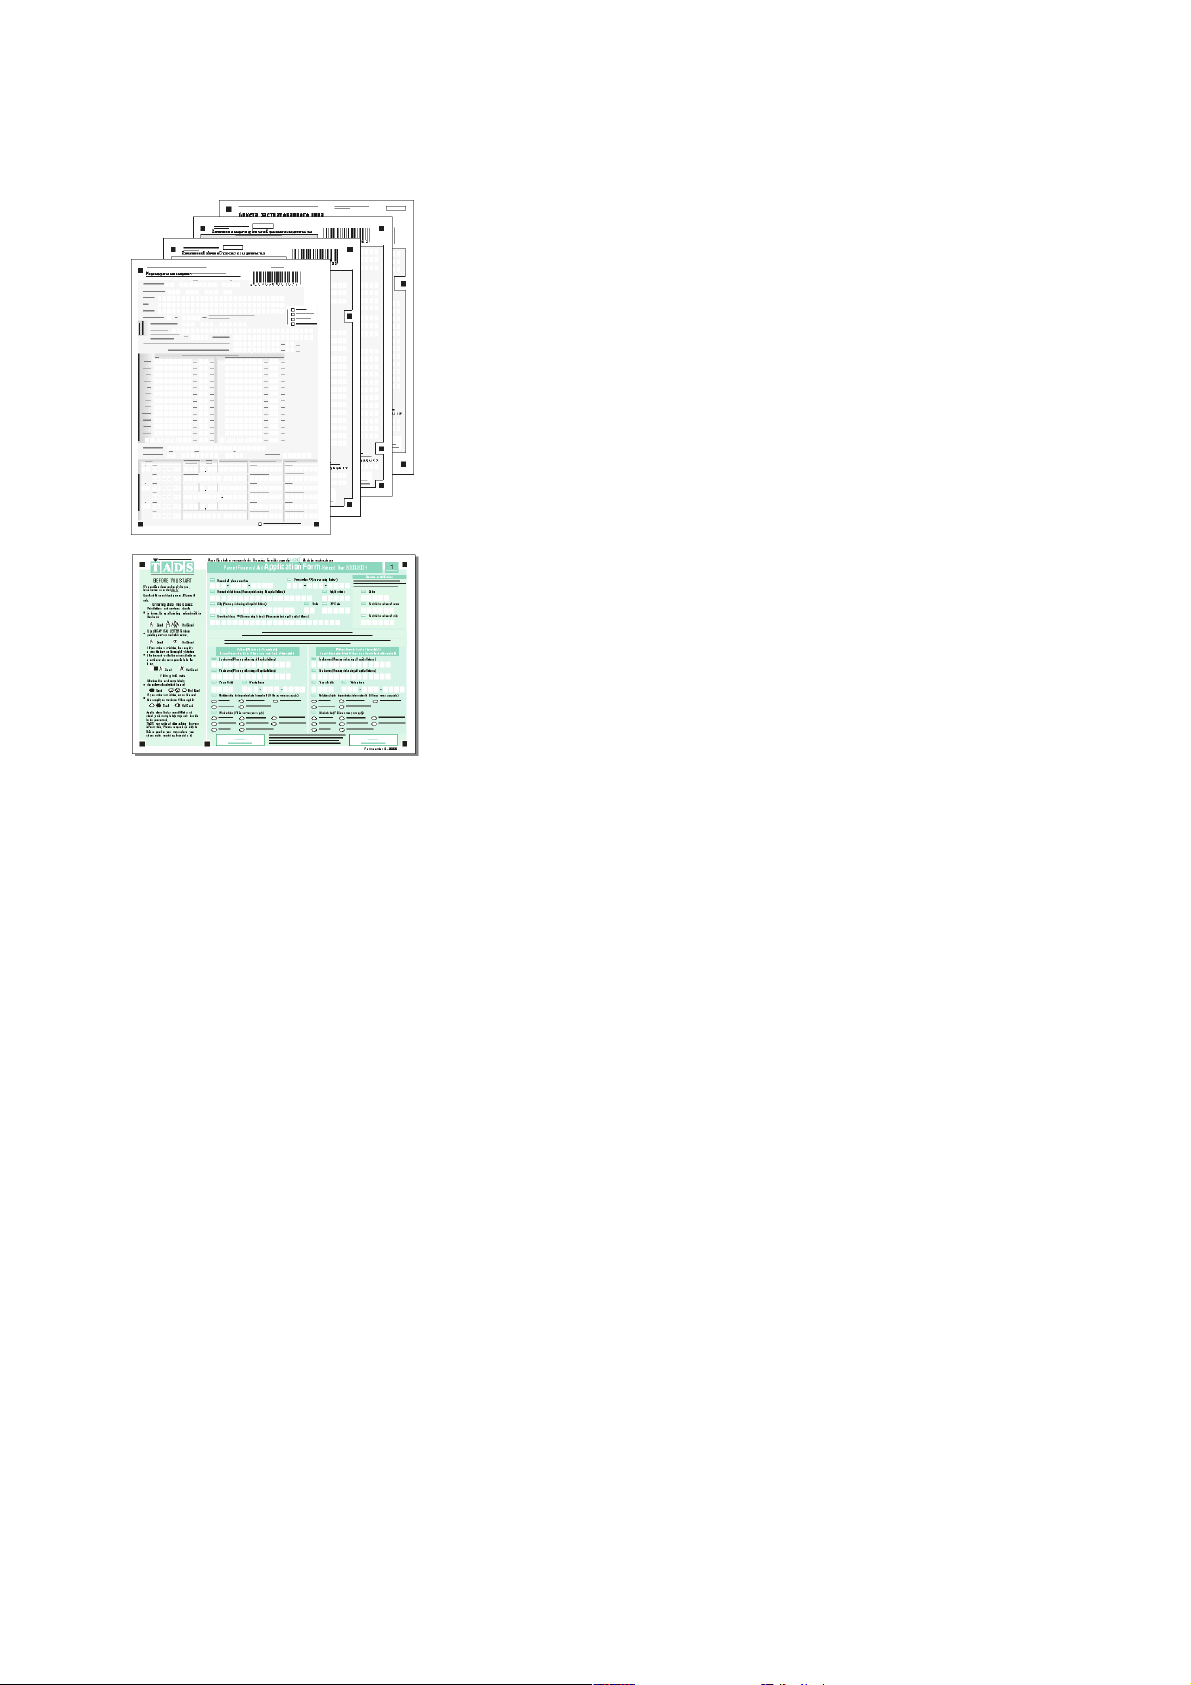
Text over a Line
Text is entered over a line.
Letters in Frames
Letters are entered into conjoined frames.
Letters in Separate Frames
Letters are entered into isolated frames.
Letters on a Comb
Letters are entered over a comb.
Text in a Frame
Text is entered in a frame.
Text in a Frame with a Comb
Text is entered in a frame with a comb.
Dynamic Data Capture System
Machine–Readable Forms
To be able to read information on the forms, a form–processing application must do the following:
1. Determine the location of form elements.
2. Separate field contents from field borders, text marking, backgrounds, explanatory text, etc.
Machine–readable forms enable the program to carry out these tasks.
In order for the first task to be carried out successfully, the forms must correspond to the form pattern or template, i.e. the
location of all form elements must be identical on all forms of the same type.
In order for the second task to be carried out successfully, the forms must be designed with automated input in mind, i.e. so
that the program can easily distinguish between the data to be captured and such non–recognizable form elements as field borders,
text marking, backgrounds, or explanatory text.
Form Completion Methods
A form may be completed in one of the following ways:
● by hand
● using a dot–matrix printer
● using a typewriter
● at a printing shop (here belong also forms completed using inkjet or laser printers with a resolution of
no less than 300 dpi)
● using a combination of the above
Elements of Machine–Readable Forms
The following elements may be present on a form:
Text
Tex t is an element of a machine–readable form that contains descriptive text: form title, field names, explanations, etc.
Entry Field
An entry field is an element of a machine–readable form into which text is entered by the person who completes the form. To facilitate text entry, entry fields may contain special text marking. Entry fields are usually accompanied by text that describes or explains the
nature of the data to be entered.
Possible text marking types are listed in the table below.
© 2011 ABBYY. All rights reserved.
Page 5
ABBYY FlexiCapture
5
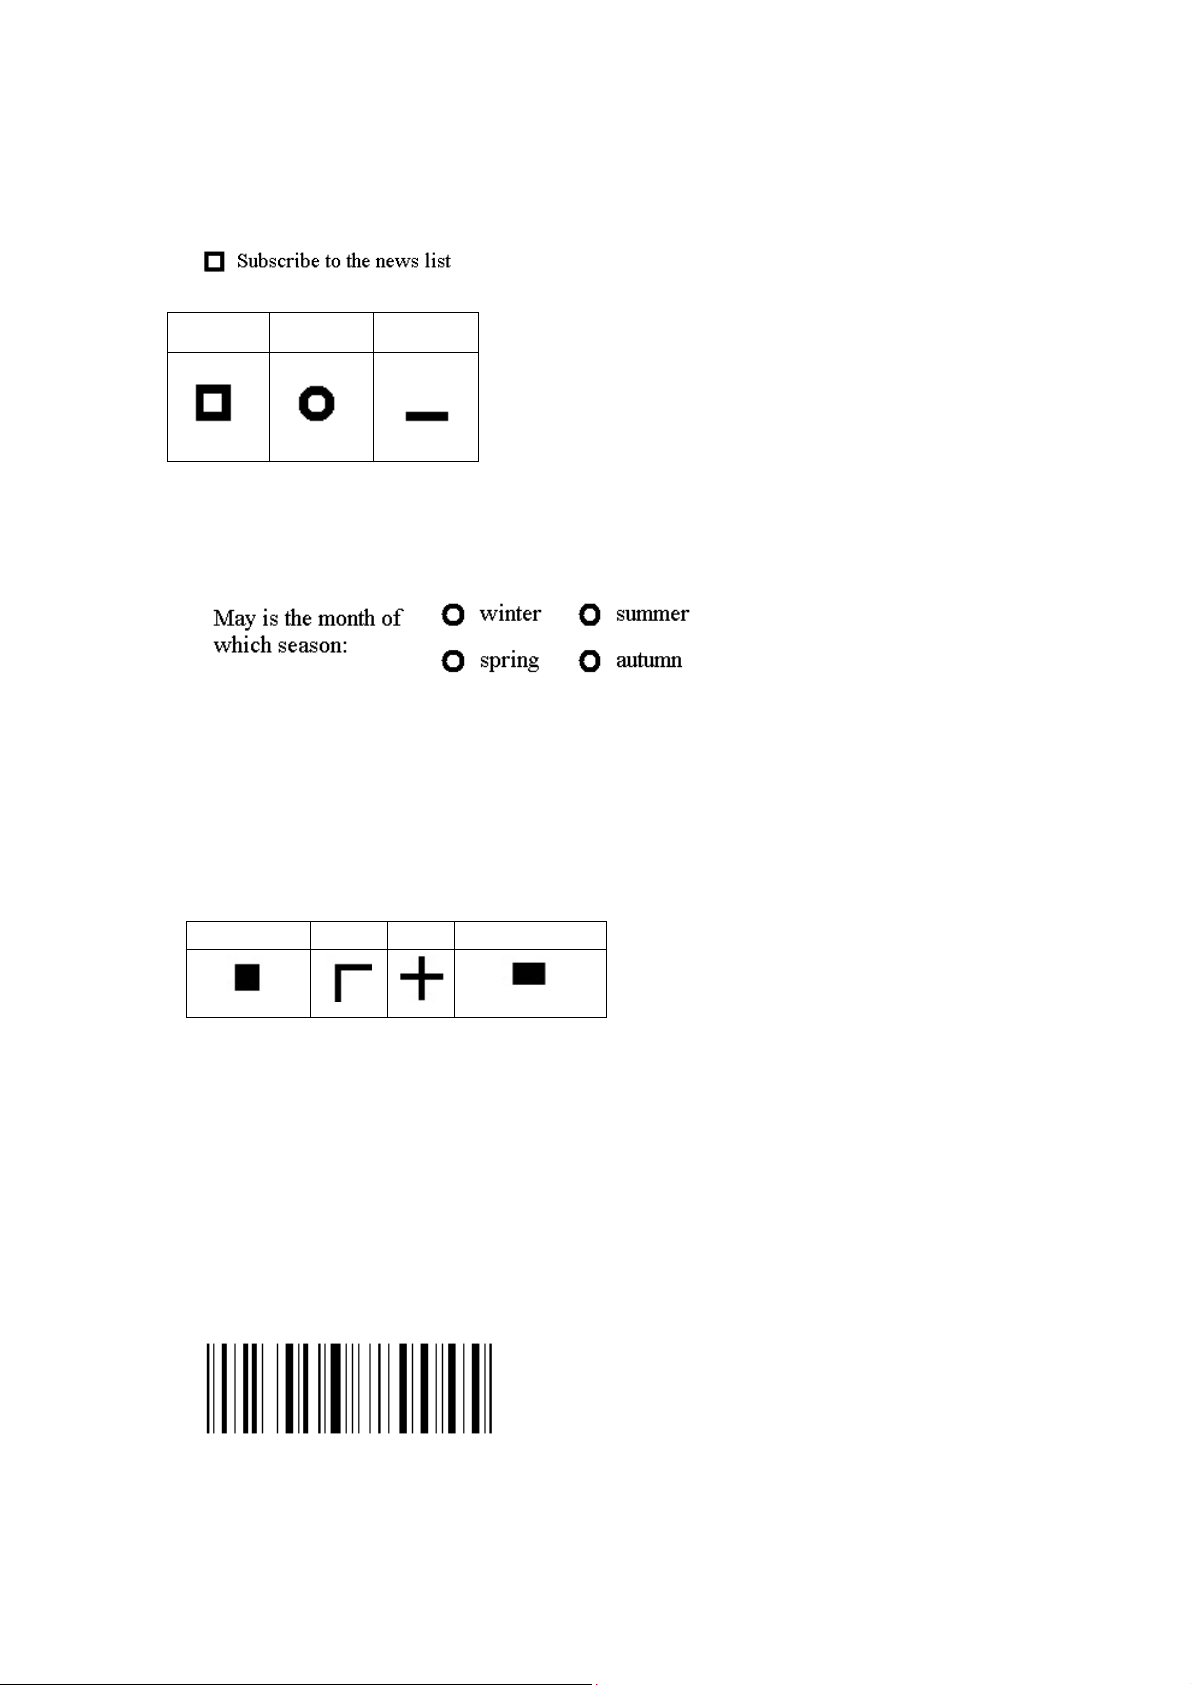
Black Square
Corner
Cross
Timing Mark
Dynamic Data Capture System
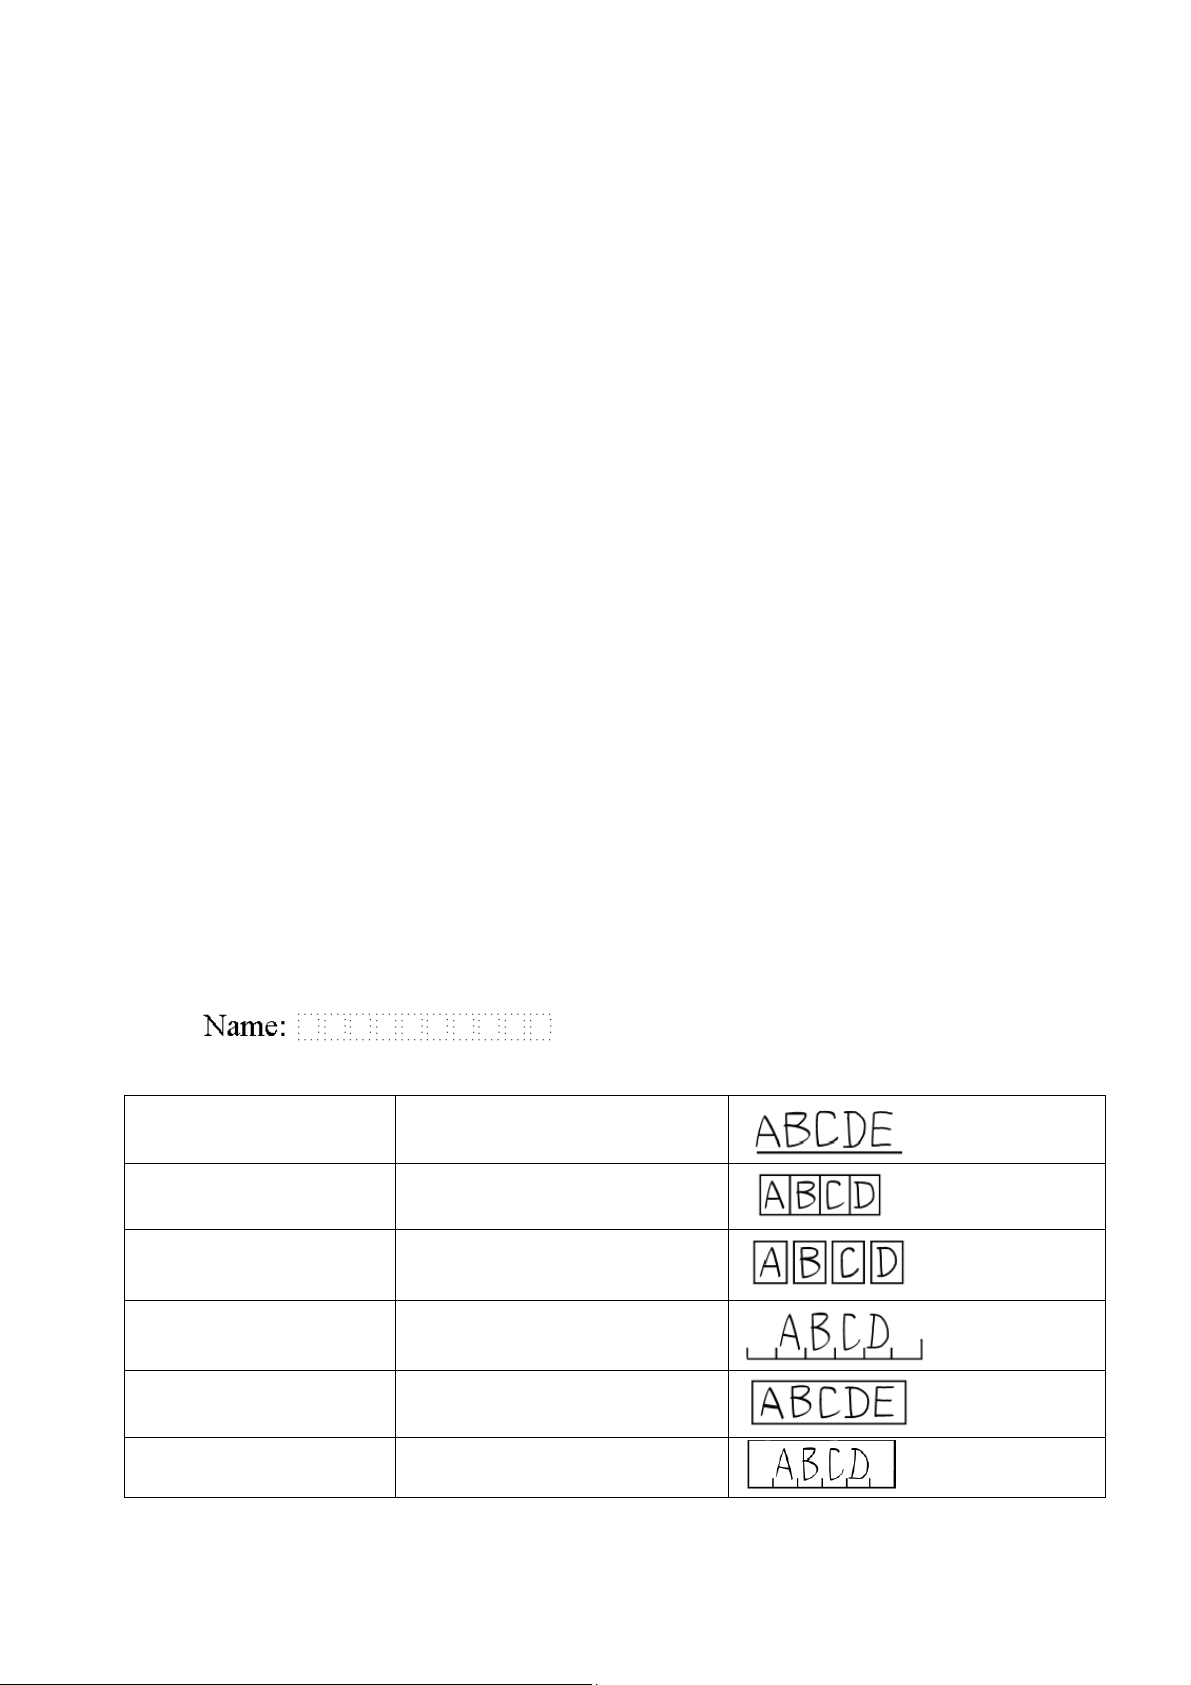
Checkmark Field
A checkmark field is an element of a machine–readable form (usually a square that is called a "check box") in which a mark should
be made by the person who completes the form.
A checkmark field usually has an accompanying text which explains the use of the checkmark.
Possible shapes of checkmark fields are shown in the table below.
Square Circle Underline
Other shapes are also possible, e.g. polygons, ovals, etc.
Checkmark Group
A checkmark group is an element of a machine–readable form that unites several checkmark fields of which only one must be
checked. Checkmark groups are usually accompanied by explanatory text that explains the nature of the choice to be made
Reference Mark
A reference mark is an element of a machine–readable form that is used to facilitate the matching of form images with templates
and to determine the orientation of forms during automated processing.
Before the program can start recognizing the contents of the form, it must match the form with its template. All machine–readable
forms of the same type must conform to one template, i.e. the location of all form elements must be exactly the same on all forms. The
program will attempt to match the form with its template relying on the number and location of the reference marks on the form. If
the program manages to match the reference marks on the form with the reference marks on the template, it will know exactly where
to look for fields containing data to be recognized.
Standard reference marks are listed in the table below.
For best recognition results, it is advisable to have standard reference marks on the form, but in some cases line separators, explanatory
text or barcodes can also be used as reference marks. However, standard reference marks are more reliable and should always be your
first choice.
Line Separator
A line separator is an element of a machine–readable form in the shape of a vertical or horizontal black line.
Line separators are used for partitioning forms into several logical segments.
Form Identifier
A form identifier is an element of a machine–readable form that is used for selecting the right template if several templates have the
same arrangement of reference marks.
We recommend using barcodes as form identifiers.
A barcode is a set of vertical black and white lines of differing widths used for encoding information.
Some other elements on the form can also be used as form identifiers.
Picture
A picture is an element of a machine–readable form that should not be recognized and should be exported as an image file.
© 2011 ABBYY. All rights reserved.
Page 6

ABBYY FlexiCapture
6
Dynamic Data Capture System
For example, the part of the form where a stamp or signature should be put is a picture.
Table
A table contains columns with same-type elements.
Table columns can contain elements of the following types:
● text;
● entry field;
● date;
● number;
● checkmark.
A table can contain a line with column headers.
Group of elements
Group of elements – an element of a machine-readable form that serves to combine several logically linked elements in a group.
© 2011 ABBYY. All rights reserved.
Page 7

ABBYY FlexiCapture
7
Dynamic Data Capture System
Types of Machine–Readable Form
Machine–readable forms are designed with automated input in mind, i.e. the program should be able to easily distinguish be-
tween the data to be captured and the non–recognizable form elements, such as field borders, text marking, backgrounds, or explanatory text.
This can be achieved in one of two ways:
1. The form must be designed in such a way as to make the field borders, background and text marking disappear after scanning, or
2. The form must be designed in such a way as to make the field borders, background and text marking stand out clearly after
scanning.
If the first approach is used, only the reference marks, explanatory text, and entered data will remain on the form after scanning. As a
result, the program will not have to separate the data from form elements, which will make recognition more easy and reliable.
In this case, the following types of forms are used: color dropout forms, black–and–white forms with raster backgrounds, black–and–
white forms with raster borders, and black–and–white linear forms.
If the second approach is used, the reference marks, explanatory text, entered data, as well as text marking and field borders will remain on the form after scanning. The program will look for information that is surrounded by field borders and text marking. An absence of these form elements will have an adverse effect on the quality of recognition.
In this case, black–and–white linear forms are used.
Dropout Forms
Dropout forms have a light color background with white rectangles serving as character cells, checkmark fields, etc.
For example, gray drop–out forms. Their background is gray.
Color drop–out forms include forms on which only element borders are colored.
A character cell is a small rectangle into which only one character should be entered (e.g. a letter or a digit). The color of the background is very important because it must disappear during scanning. The background is usually light red–orange or green. For the list
of recommended colors, see in “Recommended Colors for Dropout Forms”.
Ideally, all form elements, with the exception of the reference marks, should disappear
during scanning, leaving only the field contents to be recognized on the form image.
Explanatory text can be either retained (if printed in black) or filtered out together
with the background. For explanatory text to disappear during scanning, it must be
printed in the same color as the form’s background but with greater saturation.
When deciding whether to print explanatory text in black or in background color, the
following should be taken into account:
● The size of the image file will be larger if the explanatory text is retained.
● There should be at least 1.5–2 mm of space between the explanatory text
printed in black and other elements on the form. The gap between the explanatory text and the corresponding checkmark field must not be less than 2/3
of the size of the checkmark field. If the explanatory text is printed in background color, spaces between the text and other form elements are not so crucial.
Forms with explanatory text printed in black are more legible. We recommend printing explanatory text in black especially if there are no reference marks on the form.
Tip When creating a template for a form with explanatory text printed in background color, be sure to scan the form in color or in grayscale mode to make the explanatory text and elements on the form clearly
visible.
Dropout forms must be scanned using a color lamp or filter. The color of the lamp is selected depending on the color of the background.
Forms with red or green backgrounds must be scanned either:
● on a color scanner using color filtering software;
● on a non–color scanner using a red or green lamp (hardware color filtering);
© 2011 ABBYY. All rights reserved.
Page 8

ABBYY FlexiCapture
8
Criteria
Dropout Form
Black–and–White Raster Form
Black–and–White Linear Form
Disadvantage
Advantage
Disadvantage
Advantage
Disadvantage
Advantage
Design
Easy to design using
Text editors offer
crucial.
Easy to design
Dynamic Data Capture System
● on a non–color scanning using a white lamp and a red or green filter (filtering quality in this case is much lower, as the
background may not disappear completely, or field contents may be inadvertently removed); or
● on a non–color scanner using a white lamp without any filters.
When scanning with a white lamp, some lighter backgrounds can be removed without filtering: the weak saturation of the
background will ensure its disappearance during scanning. In this case, the color and saturation of the background must be
selected by trial–and–error for each particular scanner.
Note. Many color scanners also have software filtering used to filter out blue colors. However, we do not recommend using shades
of blue on your forms, as forms are likely to be completed using not only black but also blue ink. Field contents written in blue ink will
disappear in this case.
Choosing the Right Color
Red–orange colors are preferable to green because they represent the greatest possible contrast to blue, which results in better scanning and recognition quality if the forms are completed using blue ink.
In “Recommended Colors for Dropout Forms” you will find the recommended colors for form processing, i.e. those most likely to
disappear during scanning with almost any scanner. A “dropout” color list for a particular scanner (in Pantone or any other format)
can also be obtained from your scanner manufacturer/dealer.
Black–and–White Forms with Raster Backgrounds
Fields on such forms are simply white spaces (usually rectangles) on a raster background. The background is made up of individual
dots. The recommended size of the dots is no more than 0.1 mm, with the distance between each dot about 1 mm. The size of the dots
and distance between the dots are crucial, because a raster background is removed during despeckling rather than during scanning: the
program will treat the dots as garbage and remove them. Consequently, the dots should not be glued together on scanned images.
Black–and–White Forms with Raster Borders
These forms have no background. All field borders (borders of character cells, checkmark fields and other form elements) are made up
of raster lines, i.e. sequences of small black dots. Raster dot size is usually 0.39–0.5 pt. The recommended size is 0.39 pt, with the distance between the raster dots being at least five times larger than the dot size. The size of the dots and distance between the dots are
crucial, because a raster background is removed during despeckling rather than during scanning: the program will treat the dots as
garbage and remove them. Consequently, the dots should not be glued together on scanned images.
Black–and–White Linear Forms
These forms usually have no background. All field borders (character cells, checkmark fields and other form elements) are made up of
solid black lines. Field borders do not disappear as a result of scanning or despeckling.
Note. Forms of this type must be completed very neatly. If the forms are completed carelessly, letters may overlap the field borders,
thus reducing recognition quality. This is because whenever the field content overlaps the field borders, it is extremely difficult for the
application to separate the borders from the text. Ideally, the entered text should not touch upon the field borders.
Choosing the Right Type of Form
Besides the design and processing requirements for each type of form, other criteria also need to be taken into consideration when
choosing a form type: printing costs and methods, the number of copies required, the resulting image size, scanning modes, the required degree of recognition accuracy, form processing speed, overall appearance of the forms, how neatly they will be completed, etc.
The table below summarizes the advantages and disadvantages of each form type.
Complexity
any graphics editor.
© 2011 ABBYY. All rights reserved.
limited tools for
designing this type
of form. The size of
raster dots is
using any graphics editor
Page 9

ABBYY FlexiCapture
9
Criteria
Dropout Form
Black–and–White Raster Form
Black–and–White Linear Form
Disadvantage
Advantage
Disadvantage
Advantage
Disadvantage
Advantage
Printing
Difficult to print
in–house.
Easy to print in–
Easy to print in–
Printing
If professional
compared
If professional
forms.
If professional
forms
Image Size
Image file sizes are
smaller.
Image file sizes are
larger.
Image file sizes are
larger.
Scanning
Only special scan-
used.
Limited range of
Limited range of
Processing
Higher average
Average processing
Errors are more
Recognition
Very high
High recognition
Recognition quali-
High recognition
Location of
Explanatory text
side fields (as long
ground).
Explanatory text
Explanatory text
Form
Low contrast settings of background
form legibility.
Aesthetically
Less eye–catching
Less eye–catching
Good legibility.
Neatness of
Less sensitive to text
Small characters
rge enough not
garbage.
Less sensitive to
Very sensitive to
Dynamic Data Capture System
Costs
Mode
Speed
Quality
large quantities of
good quality forms
printing services are
used, printing costs
are higher
with black–and–
white forms.
ning modes (color
filtering) may be
processing speed.
recognition quality.
brightness and
contrast settings.
time is longer, because the images
need to be despeckled.
house.
printing services
are used, printing costs are
lower compared
with dropout
quality.
brightness and
contrast settings.
likely if characters
are glued together
or overlap field
borders.
ty largely depends
on how neatly the
form has been
filled out.
house.
printing services
are used, printing costs are
lower compared
with dropout
quality if the
form has been
filled out correctly.
explanatory
text
Appearance
and
Legibility
Completion
and explanatory
text may have an
adverse effect on
may be placed anywhere, including
in
it is printed using
the same color as
the form back-
pleasing
overlapping field
borders.
and other form
elements must be
carefully arranged
on the form.
design. Lower legibility.
must be written
very carefully and
be la
to be removed as
text overlapping
field borders.
and other form
elements must be
carefully arranged
on the form.
design.
text overlapping
field borders.
© 2011 ABBYY. All rights reserved.
Page 10

ABBYY FlexiCapture
10
Dynamic Data Capture System
General Requirements for Machine–Readable Forms
Let us now consider the general requirements a form must meet in order to be machine–readable.
Form Background
1. Use dropout forms or forms with raster field borders if possible.
2. Use a color that vanishes during scanning when creating a dropout form. See the list of recommended colors in “Recom-
mended Colors for Dropout Forms”.
3. Always ensure that a distance exists between the explanatory text and the field contents. In the case of dropout forms we
recommend that any information be printed in the same color as the form background (except where explanatory text is
used as a reference mark instead of or in conjunction with black squares). By printing information in the same color as the
background, you are then free to place it anywhere on the form, including inside the form fields.
4. Do not use blue colors for forms which are to be completed by hand. The blue background may merge with the blue ink
which is likely to be used to complete the forms, which will have an adverse effect on recognition quality.
Reference Mark
1. Standard reference marks are recommended for use on machine–readable forms (i.e. black squares, corners, Crosses). The
recommended number of reference marks is five: four reference marks in each corner of the form (they should form a rectangle if imaginary lines are drawn between each pair) and one square on one of the sides of the imaginary rectangle.
2. If, for some reason, standard reference marks cannot be used, we recommend that the following combinations of elements
be used as reference marks:
a) at least two vertical line separators and two horizontal line separators
b) at least four text elements and one form identifier element
c) other combinations are also possible
3. The distance between the edge of a reference mark and the nearest form element should not be less than 3 mm.
4. The distance between a reference mark and the edge of the page should not be less than 8 mm.
5. Reference marks should be printed using a dark color (black is recommended) so that they do not disappear during scan-
ning.
In addition to the general requirements listed above, each reference mark type has its own specific requirements:
Black Squares
Black squares on the same form type should all be of the same size i.e. between 4x4 mm and 8x8 mm. The recommended size is 5x5
mm. Rectangles are not permitted.
Crosses and Corners
1. The size of an imaginary square that could be drawn around a reference mark of this type must be within the range from
4x4 to 8x8 mm. The recommended size is 5x5 mm.
2. The size of reference marks of one type must be the same within one form.
3. All the sides of a reference mark must be of equal size.
4. The line thickness used for reference marks on the same form must be the same and be within the range from 0.3 to 1 mm.
The recommended thickness is 0.5 mm.
Text (if used as reference marks)
The font size should not be less than 7 pt (headers – no less than 14 pt).
Line Separators (if used as reference marks)
Line thickness should not be less than 1 pt. The recommended thickness is 1–1.5 pt.
Barcodes (if used as reference marks)
1. The barcode width (the distance between the leftmost and the rightmost bars) should not be less than 47–50 mm.
2. The barcode height should not be less than 12–15 mm (digits not included).
3. The barcode orientation (direction of the bars) should be the same as the page orientation (it is recommended to scan the
pages in the direction of the bars).
4. The EAN 13 barcode format is recommended.
5. The recommended distance between a barcode and any other form element is no less than 10 mm.
© 2011 ABBYY. All rights reserved.
Page 11

ABBYY FlexiCapture
11
Dynamic Data Capture System
Checkmark Field
1. The recommended field sizes are 3.5x3.5 mm, 4x4 mm, 4.5x4.5 mm, or 5x5 mm (if circular checkmark fields are used, they
must fit into squares of recommended sizes).
2. The recommended line width for checkmark field borders is 0.4 mm (irrespective of the size of the field).
Text Marking
Raster dot size:
1. If the field borders are raster dots, the thickness of the raster line (i.e. the raster size) must be 0.39 pt.
2. The optimal distance between the raster dots is five times their size.
Important! The dots most likely to be glued together are dots in the corners of character cells.
Tip. If your software does not allow you to specify the distance between each raster dot, you must choose a line style which has dots
located at sufficient distance from each other to prevent them from becoming glued together on the scanned image, and from remaining on the image after image despeckling, as big dots are not interpreted by the OCR system as garbage and are not removed from the
image during despeckling.
Character cell size:
1. The recommended size of character cells is 4x5 mm; the use of smaller sizes requires a
greater degree of accuracy from those completing the form, and this is very difficult to achieve. Large
character cells are also not advisable as this encourages the use of abnormally large letters. Ideally,
the character cell size should reflect the average letter size.
2. The distance between field lines should be no less than 2.5 – 3 mm, and the distance between two adjacent character cells in the same line should be no less than 1–1.2 mm.
Line thickness:
If the borders are black lines (“text in a frame”, “letters in separate frames”, or “letters in frames”),
the line thickness should be 1 pt.
Combs:
1. The recommended distance between the notches in a comb is 5 mm.
2. The distance between between the horizontal lines of two combs, when positioned one below the other, should be no less than 7.5 – 8 mm.
3. The notch height must be around 0.9 – 1.2 mm.
4. The thickness of both the notches and horizontal lines should be 1 pt.
5. If frames with a comb are used, the minimum distance between frames should
be 2.5 – 3 mm.
Element Positioning
1. Be sure to provide sufficient margins on your form. Otherwise, form elements which are located too close to the sides of the
form may disappear during scanning, which will result in a loss of data.
2. The space between neighboring form elements should not be less than 2 mm.
3. The space between a checkmark field and explanatory text should not be less than 2/3 of the checkmark field size.
4. Make sure that the explanatory text does not overlap entry field borders.
5. If explanatory text is printed in black ink, make sure there is a distance of at least 1.5–2 mm between the explanatory text
and the other elements. This distance is not so crucial for explanatory text printed in the same ink as the background.
© 2011 ABBYY. All rights reserved.
Page 12

ABBYY FlexiCapture
12
Dynamic Data Capture System
Print Quality
When you print blank forms, keep in mind the following requirements:
1. The forms must be printed either professionally or using a printer. We recommend that color forms be printed professional-
ly. If this is impossible, test the form color on a scanner before starting your print run.
2. All the copies of the form must be printed using the same source document, as the field location on each form must be iden-
tical.
3. The minimum margin size (i.e. the distance between the edge of the page and the nearest form element) should be at least 8
mm (12 mm margins are recommended).
4. The permitted linear deviation of form elements is no more than 0.15% ( i.e. 0.5 mm for an А4–size page).
5. If you print your forms using a printer, do not print them with a resolution less than 600 dpi
6. We recommend printing the forms with the help of the same printer or different printers of the same model.
Tip. We do not recommend copying machine-readable forms with the help of copying equipment. Use of such equipment can
slightly change dimensions of elements on the form or their arrangement, for example, table or entry fields borders may become thicker, or color depth may change, which might be detrimental for recognition quality.
.
Form Completion
Pens and ink
Forms are best completed neatly, in capital letters, using a black ball–point, gel or capillary pen (dark blue and violet are also acceptable). Soft–tip/felt–tip pens are not to be recommended as characters are likely to be very thick, causing recognition problems. Recognition is worst in the case of forms completed by pencil or using a light ink.
Letter size and style
For best recognition results, forms should be completed in block capital letters. The letters must fill out all character cells but must not
overlap cell borders.
If character cells are visually marked on the forms (i.e. the following text marking types are used: letters in frames, letters in separate
frames), the person filling out the form will be less likely to join the letters together.
The following text marking types present greater problems for recognition: text in a frame with a comb, letters on a comb. Here only
the width of the character cell is predefined, while the absence of side borders makes joining letters together possible. In the case of
the comb without a frame, the letters can be written either too small or too large.
If text in a frame or text over a line are used, there is no evident restriction on the width of the character cells. The letters may be
joined together, which will have an adverse effect on recognition quality. In the case of text over a line there are no restrictions on
character height. Therefore this marking type is not recommended for forms requiring a high degree of recognition accuracy.
Another important requirement is that the letters do not overlap the field borders. This is not so crucial for dropout or black–and–
white raster forms, because field borders will disappear during scanning and despeckling. But if letters overlap field borders on black–
and–white linear forms, this may result in a significant decrease in recognition quality.
Sample
To encourage correct completion, we recommend including a note on your form similar to the one below.
© 2011 ABBYY. All rights reserved.
Page 13

ABBYY FlexiCapture
13
Dynamic Data Capture System
Recommended Colors for Dropout Forms
The table below contains dropout color samples and their corresponding Pantone numbers. These background colors disappear if
forms are scanned:
● using any scanner;
● using a color scanner with software red color filtering or using a non–color scanner with a red lamp/red filter
© 2011 ABBYY. All rights reserved.
 Loading...