

Page 1

ABBYY® FineReader 15
User’s Guide
© 2019 ABBYY Production LLC. All rights reserved.
Page 2

ABBYY® FineReader 15 User’s Guide
Information in this document is subj ect to change without notice and does not bear any commitment on the part of ABBYY.
The software described in this document is supplied under a license agreement. The software may only be used or copied in strict accordance
with the terms of the agreement. It is a breach of the "On legal protection of software and databases" law of the Russian Federation and of
international law to copy the software onto any medium unless specifically allowed in the license agreement or nondisclosure agreements.
No part of this document may be reproduced or transmitted in any from or by any means, electronic or other, for any purpose, without the
express written permission of ABBYY.
2
Page 3

ABBYY® FineReader 15 User’s Guide
Contents
Introducing ABBYY FineReader ............................................................................................................... 8
About ABBYY FineReader ................................................................................................................................................ 9
What's New in ABBYY FineReader 15....................................................................................................................... 11
The New Task window ............................................................................................................................ 13
Viewing and editing PDFs ............................................................................................................................................. 15
Quick conversion .............................................................................................................................................................. 17
Creating PDF documents ................................................................................................................................... 20
Creating Microsoft Word documents ............................................................................................................ 22
Creating Microsoft Excel spreadsheets ......................................................................................................... 24
Other formats ......................................................................................................................................................... 26
Advanced conversion ..................................................................................................................................................... 26
Comparing documents .................................................................................................................................................. 30
Scanning and saving documents ............................................................................................................................... 33
Scanning to the OCR Editor .............................................................................................................................. 36
Scanning to PDF .................................................................................................................................................... 38
Scanning to Microsoft Word ............................................................................................................................. 40
Scanning to Microsoft Excel .............................................................................................................................. 42
Scanning to image files ....................................................................................................................................... 44
Scanning to other formats ................................................................................................................................. 46
PDF Editor ................................................................................................................................................ 47
Viewing PDF documents ............................................................................................................................................... 48
Viewing modes ....................................................................................................................................................... 49
Navigating PDF documents .............................................................................................................................. 52
Background recognition ..................................................................................................................................... 54
Keyword search ...................................................................................................................................................... 55
Copying content from PDF documents ........................................................................................................ 57
PDF security features ........................................................................................................................................... 58
Reviewing PDF documents ........................................................................................................................................... 59
Comments ................................................................................................................................................................ 59
Marking up text ..................................................................................................................................................... 60
Drawing shapes ...................................................................................................................................................... 62
Adding a Text block annotation to a PDF document .............................................................................. 65
Collaborating on PDF documents ................................................................................................................... 66
Adding stamps ....................................................................................................................................................... 71
Working with PDF content ........................................................................................................................................... 74
Inserting and editing text ................................................................................................................................... 75
Inserting and editing pictures .......................................................................................................................... 83
Inserting and editing hyperlinks ...................................................................................................................... 84
Recognizing text .................................................................................................................................................... 86
3
Page 4

ABBYY® FineReader 15 User’s Guide
Contents
Working with pages ............................................................................................................................................. 87
Adding bookmarks ............................................................................................................................................... 91
Adding headers and footers ............................................................................................................................. 93
Adding watermarks .............................................................................................................................................. 96
Adding file attachments ..................................................................................................................................... 97
Viewing metadata ................................................................................................................................................. 98
Enhancing page images ...................................................................................................................................... 99
Filling out forms ............................................................................................................................................................. 100
Signing PDF documents ............................................................................................................................................. 101
Digital signature .................................................................................................................................................. 102
Text signature ....................................................................................................................................................... 104
Picture signature ................................................................................................................................................. 105
Protecting PDF documents with passwords ........................................................................................................ 105
Passwords and permissions ............................................................................................................................ 106
Deleting confidential information from PDF documents .................................................................... 107
Creating PDF documents ............................................................................................................................................ 108
Creating PDF documents from selected pages ....................................................................................... 108
Using a virtual printer to create PDF documents ................................................................................... 108
Saving and exporting PDF documents .................................................................................................................. 109
Saving PDF documents ..................................................................................................................................... 110
Saving in PDF/A ................................................................................................................................................... 111
Saving in other formats .................................................................................................................................... 113
Reducing the size of your PDF documents ............................................................................................... 113
Sending PDF documents to the OCR Editor ............................................................................................. 114
E-mailing PDF documents ............................................................................................................................... 114
Printing PDF documents .................................................................................................................................. 115
OCR Editor ............................................................................................................................................. 116
Launching the OCR Editor .......................................................................................................................................... 116
OCR Editor interface ..................................................................................................................................................... 117
Obtaining documents .................................................................................................................................................. 121
Opening images and PDFs .............................................................................................................................. 122
Scanning paper documents ............................................................................................................................ 123
Recognizing documents ............................................................................................................................................. 124
OCR projects ......................................................................................................................................................... 125
Group work with OCR projects ...................................................................................................................... 130
Improving OCR results ................................................................................................................................................ 131
If your document image has defects and OCR accuracy is low ........................................................ 132
If areas are detected incorrectly .................................................................................................................... 135
Editing area properties .............................................................................................................................. 139
If the complex structure of a paper document is not reproduced .................................................. 140
4
Page 5

ABBYY® FineReader 15 User’s Guide
Contents
If you are processing a large number of documents with identical layouts ................................ 141
If tables and pictures are not detected ...................................................................................................... 142
If a barcode is not detected ............................................................................................................................ 145
If an incorrect font is used or some characters are replaced with "?" or "□" ............................... 146
If your printed document contains non-standard fonts ...................................................................... 147
If your document contains many specialized terms .............................................................................. 150
If the program fails to recognize certain characters ............................................................................. 151
If vertical or inverted text was not recognized ........................................................................................ 153
Checking and editing texts ........................................................................................................................................ 154
Checking recognized text ................................................................................................................................ 155
Using styles ........................................................................................................................................................... 158
Editing hyperlinks ............................................................................................................................................... 159
Editing tables ........................................................................................................................................................ 160
Removing confidential information ............................................................................................................. 160
Copying content from documents ......................................................................................................................... 161
Saving OCR results ........................................................................................................................................................ 162
Saving in PDF ....................................................................................................................................................... 164
Saving editable documents ............................................................................................................................ 165
Saving tables ........................................................................................................................................................ 167
Saving e-books .................................................................................................................................................... 168
Saving in HTML .................................................................................................................................................... 169
Saving images ...................................................................................................................................................... 170
Sending OCR results to the PDF Editor ...................................................................................................... 171
E-mailing OCR results ....................................................................................................................................... 172
Sending OCR results to Kindle ....................................................................................................................... 173
Integration with other applications .................................................................................................... 173
Integration with Windows Explorer ........................................................................................................................ 174
Integration with Microsoft SharePoint .................................................................................................................. 177
Automating and scheduling OCR ........................................................................................................ 178
Automating document processing with ABBYY FineReader ......................................................................... 179
ABBYY Hot Folder .......................................................................................................................................................... 182
ABBYY Compare Documents ............................................................................................................... 187
Launching ABBYY Compare Documents .............................................................................................................. 188
Comparing documents ............................................................................................................................................... 189
The main window .......................................................................................................................................................... 191
Improving comparison results .................................................................................................................................. 192
Viewing comparison results ...................................................................................................................................... 194
Saving comparison results ......................................................................................................................................... 196
5
Page 6

ABBYY® FineReader 15 User’s Guide
Contents
ABBYY Screenshot Reader ................................................................................................................... 197
Reference ............................................................................................................................................... 201
How to set ABBYY FineReader 15 as your default PDF viewer .................................................................... 202
Types of PDF documents ............................................................................................................................................ 204
Scanning tips ................................................................................................................................................................... 206
Taking photos of documents .................................................................................................................................... 209
Options dialog box ....................................................................................................................................................... 212
Format settings .............................................................................................................................................................. 215
PDF settings .......................................................................................................................................................... 215
DOC(X)/RTF/ODT settings ............................................................................................................................... 220
XLS(X) settings ..................................................................................................................................................... 223
PPTX settings ........................................................................................................................................................ 224
CSV settings .......................................................................................................................................................... 224
TXT settings ........................................................................................................................................................... 225
HTML settings ...................................................................................................................................................... 226
EPUB/FB2 settings .............................................................................................................................................. 227
DjVu settings ........................................................................................................................................................ 228
Supported OCR and document comparison languages ................................................................................ 230
Supported document formats .................................................................................................................................. 237
Document features to consider prior to OCR .................................................................................................... 240
Image processing options .......................................................................................................................................... 243
OCR options .................................................................................................................................................................... 246
Working with complex-script languages .............................................................................................................. 249
Supported interface languages ................................................................................................................................ 253
Current date and time on stamps and in headers and footers ................................................................... 254
Fonts required for the correct display of texts in supported languages .................................................. 257
Regular expressions ...................................................................................................................................................... 259
Installing, activating, and registering ABBYY FineReader ............................................................... 261
System requirements ................................................................................................................................................... 262
Installing and starting ABBYY FineReader ............................................................................................................ 263
Activating ABBYY FineReader ................................................................................................................................... 264
Registering ABBYY FineReader ................................................................................................................................. 266
Data privacy ..................................................................................................................................................................... 266
Appendix ............................................................................................................................................... 266
Glossary ............................................................................................................................................................................. 267
Keyboard shortcuts ....................................................................................................................................................... 273
Technical support ................................................................................................................................. 284
6
Page 7

ABBYY® FineReader 15 User’s Guide
Contents
Third-party software ............................................................................................................................ 284
7
Page 8

ABBYY® FineReader 15 User’s Guide
Introducing ABBYY FineReader
This chapter provides an overview of ABBYY FineReader and its features.
Chapter contents
·
About ABBYY FineReader
·
What's New in ABBYY FineReader
9
11
8
Page 9

ABBYY® FineReader 15 User’s Guide
About ABBYY FineReader
ABBYY FineReader 15is a universal PDF tool for managing documents in the digital workplace. Powered
by ABBYY’s AI-based OCR and document-conversion technologies, FineReader unlocks the information
contained within a document to increase business productivity. FineReader makes it easy and efficient
to digitize, retrieve, edit, convert, protect, share, and collaborate on all kinds of PDF and paper
documents in the modern working world.
What you can do with ABBYY FineReader 15:
·
Work with any type of PDF, including scanned documents
o Edit text (even whole paragraphs, also within table cells), hyperlinks ,andpictures
75 84 83
throughout a document.
o Search by keywords in the text, comments, bookmarks, and metadata within a document.
o Rearrange, add, delete and enhance (rotate, crop, deskew) pages in PDFs.
o Copy text, tables, and pictures from PDFs, scans, or photos in a few clicks.
o Export PDFs into Microsoft Word, Excel, or another editable format .
o Add comments and annotations to documents.
o Add watermarks , headers and footers, bates numbering, and stamps to PDFs.
o Apply and verify digital signatures .
o Protect PDFs with passwords and encryption.
106
o Remove sensitive information from documents through redaction.
55
87 99
57
109
59
96 93 71
102
107
o Create / combine PDF documents , including industry standards PDF/A for long-term
archiving and PDF/UA for accessibility.
o Fill out PDF forms .
o View and print PDFs.
o Identify differences in the text from two versions of the same document, whether the
111
100
48 115
187
110
versions be PDFs, scans, images, Microsoft Word documents, or any combination of
supported digital files.
o Save and share these differences as a Microsoft Word document in Track Changes mode.
·
Scan and convert documents
196
13
o Scan and convert PDF and paper documents into editable and searchable formats (including
Microsoft Word, Microsoft Excel, searchable PDF, PDF/A, PDF/UA, and many more) to further
edit, reuse, or store them.
9
Page 10

ABBYY® FineReader 15 User’s Guide
o Convert paper documents, document images, and PDFs quickly and accurately - while
retaining their original layout, formatting, and structure - with the advanced OCR Editor.
o Improve quality and correct distortions in the digital images of documents
(scans/photographs) before converting them, either automatically or manually.
o Quickly check how recognized text matches up with the original document and make any
necessary changes with a built-in text editor and verification tools before saving.
o Improve the accuracy of converting documents with advanced tools: adjust or specify
document areas, train the program to recognize unusual or decorative fonts, and create user
dictionaries and languages for specific terminology, abbreviations, codes, etc.
·
Compare texts to identify differences between two versions of the same document*
187
o ABBYY FineReader 15 can compare two versions of the same document even if they are in
two different formats. For example, you can compare a scanned document and the same
document in Microsoft Word (in either DOC and DOCX formats).
o Save and share the differences as a simple list of changes, as an entire Microsoft Word
document in Track Changes mode, or as an entire PDF with highlighted text mark-ups and
comments.
·
Automate your personal document conversion routines with ABBYY Hot Folder *
182
o ABBYY Hot Folder is a conversion scheduling tool included with ABBYY FineReader 15 that
watches for documents in user-defined folders and converts them on a schedule with pre-set
parameters.
·
Take a snapshot of any part of the screen with ABBYY Screenshot Reader
197
o If a screenshot contains text or tables, it can also be extracted and saved as an editable
format.**
* This feature is not available with all versions of ABBYY FineReader 15. Please visitour home pagefor
more information.
** In order to use ABBYY Screenshot Reader, you must first register your copy of ABBYY FineReader 15.
10
Page 11

ABBYY® FineReader 15 User’s Guide
What's New in ABBYY FineReader 15
Editing PDFs
·
Editing text within paragraphs
Now, editing text in PDFs of any kind – including scanned documents – can be done within a
whole block of text. When you add or delete text, it automatically flows from line to line, which
provides you with a convenience and freedom similar to editing in a word processor like
Microsoft Word.
·
Reformatting text
You can also change the text formatting (font type and size, typeface, color, line spacing, text
alignment, and direction) either for the whole paragraph or for only a selection of text.
·
Editing page layout
You can even change the layout of any page in a PDF. Add or delete paragraphs, change their
positioning or order, and make them wider, narrower, higher, or lower to align them with rest
of the page. Throughout the process, the text will automatically flow into the layout to fit with
the changes you make.
·
Editing table cells
Each cell in a table can now be edited individually, as a separate paragraph, and it will not
affect content in the other cells in the same row.
Viewing PDFs
·
Faster viewer
FineReader’s PDF viewer has become 1.5x faster. Opening any kind of PDF is now as quick as
you would expect.
Converting PDFs
·
Detecting text-layer quality
Detect the quality of a text layer when working with digital PDFs. If the text layer in a page is
problematic (corrupted, encoding problems, etc.), FineReader applies OCR to convert the
whole page rather than extracting the text layer. This allows for the most accurate results when
converting digitally-created PDFs into editable formats.
·
Detecting text in fields and annotations
When converting an interactive PDF form or a PDF with annotations into an editable format,
FineReader ensures that the text from fields and certain kinds of annotations (such as a Text
Box or Typewriter) is accurately and reliably extracted.
·
Improved layout retention
Reconstructing paragraphs when converting digital PDFs into editable formats has been
improved as well.
11
Page 12

ABBYY® FineReader 15 User’s Guide
Comparing documents
·
Export in Track Changes mode
Now, you can export the comparison results as a Microsoft Word document highlighting the
differences in Track Changes mode, the mode commonly used in organizations, particularly in
the legal field.
·
Even more accurate comparisons
Thanks to the improvements in converting digital PDFs, you can compare such documents with
any other type of supported format even more precisely than before.
·
New comparison language
Comparing documents in Armenian is now possible, with 38 comparison languages in total.
Improved OCR
ABBYY’s latest OCR technology provides improvements to a variety of features in ABBYY FineReader 15:
more reliable detection of headers and footers; more accurate document conversion in Japanese and
Korean; improved retention of table structure when saving to Excel in languages written from right to
left; and better automatic tagging when saving to tagged PDFs (including PDF/UA).
Improvements for organizations
·
Remote User licenses
Based on access for named users, Remote User licenses allow organizations to use FineReader
with desktop and application virtualization solutions, such as Microsoft Remote Desktop
Services (RDS), Citrix XenApp, and Citrix Virtual Apps and Desktops. Please refer to
FineReader’s Administrator Guide for detailed information.
·
Improved product customization with GPO
The list of possibilities to customize FineReader for specific users/workstations using GPO
(Group Policy Objects) has increased to include the following options:
o Define the maximum number of workstation CPUs used by FineReader.
o Set a user inactivity timeout to force the release of licenses for workstations that use
concurrent licenses.
o Take advantage of ADMX/ADML templates.
We would like to extend our sincere appreciation for all the users who have contributed feedback and
helped us broaden FineReader’s capabilities to make it more useful in daily work.
12
Page 13
ABBYY® FineReader 15 User’s Guide
The New Task window
When you launch ABBYY FineReader, a New Task window opens, where you can easily open, scan,
create, or compare documents. If you don’t see the New Task window (e.g. if you closed it or if you
initiated an ABBYY FineReader task by right-clicking a file in Windows Explorer), you can always open it
by clicking the button on the main toolbar.
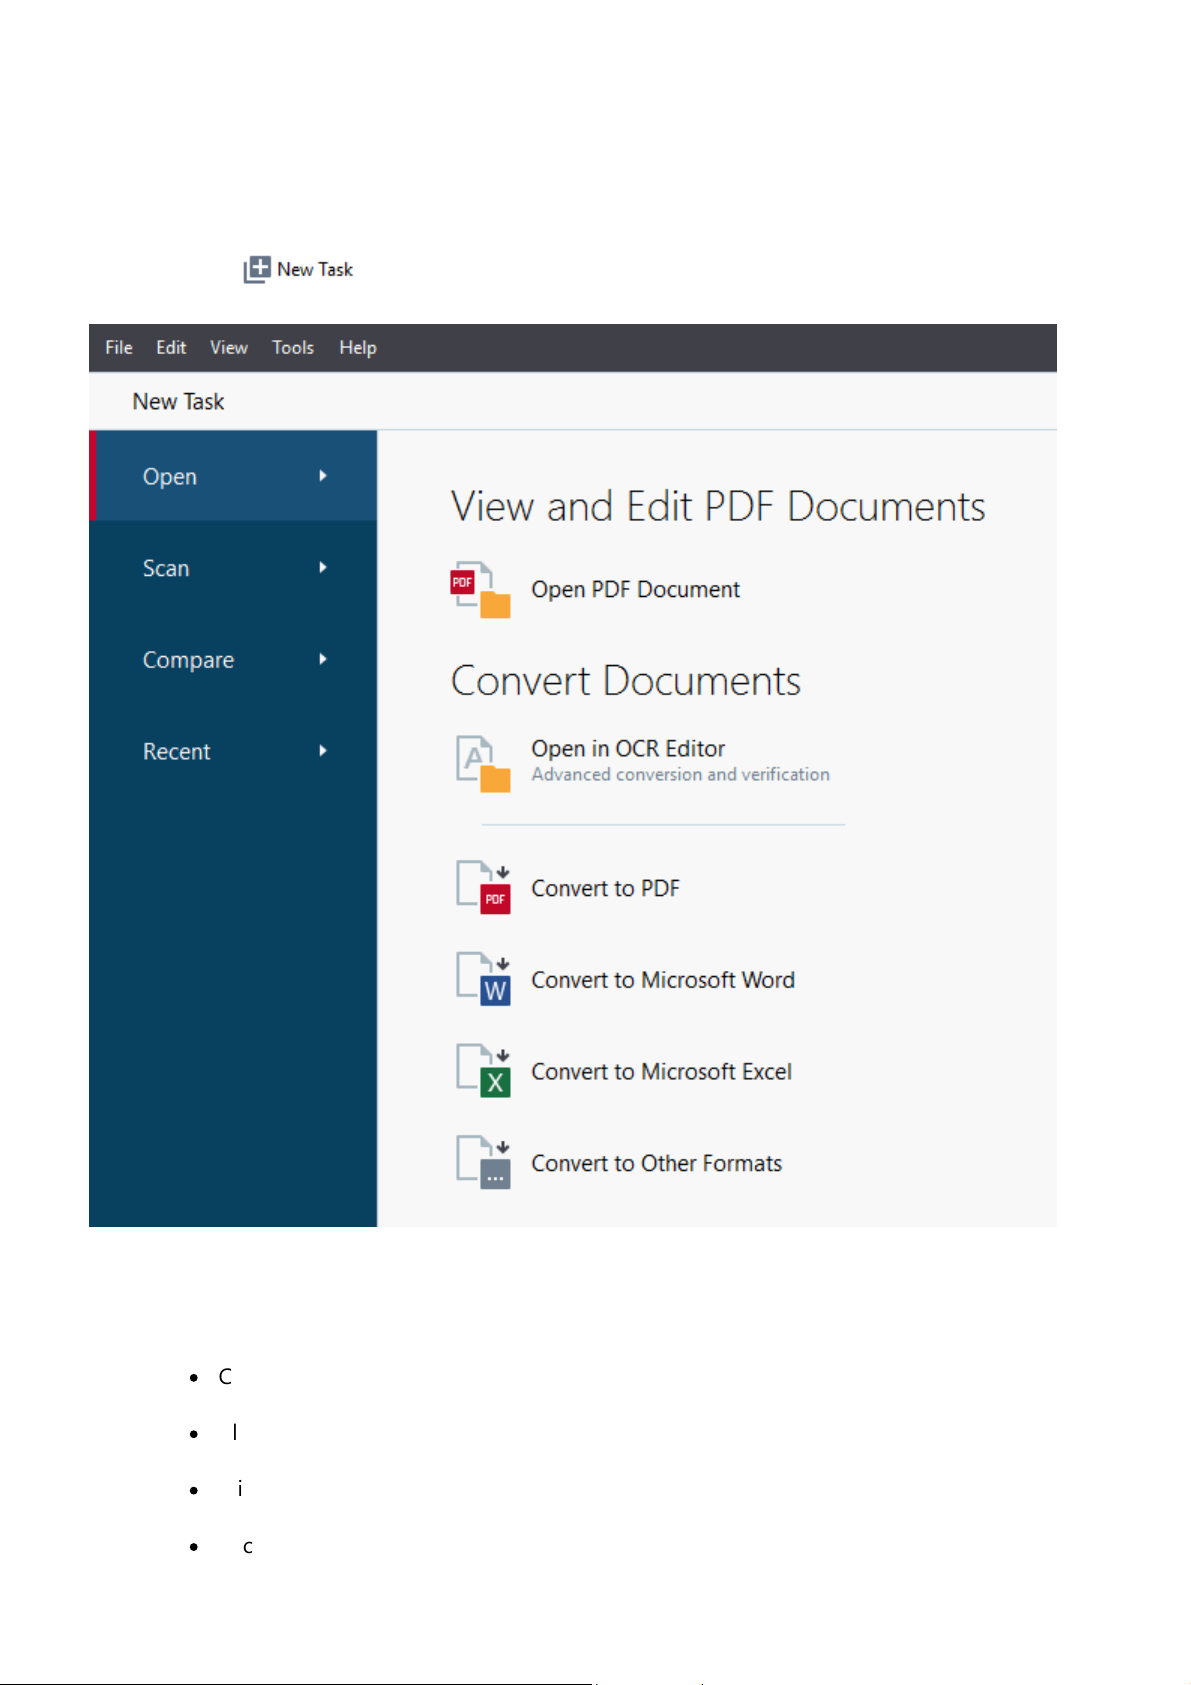
To start processing a document, select a task:
1. In the left-hand pane:
·
Click Open if you already have documents that you need to process.
·
Click Scan if you need to scan paper documents first.
·
Click Compare if you want to compare two versions of the same document.
·
Click Recent to resume work on a previously saved PDF document or OCR project.
13
Page 14
ABBYY® FineReader 15 User’s Guide
2. In the right-hand pane, select the appropriate task.
For your convenience, when you hover the mouse cursor over a task, a pop-up window appears
listing the most common scenarios covered by that task.
The settings for all ABBYY FineReader tasks are specified in the Options dialog box. To open this
212
dialog box, click Options at the bottom of the left-hand pane.
Chapter contents
·
Viewing and editing PDF documents
·
Quick conversion
·
Advanced conversion
·
Comparing documents
·
Scanning and saving documents
17
26
30
15
33
14
Page 15

ABBYY® FineReader 15 User’s Guide
Viewing and editing PDFs
With ABBYY FineReader, you can easily view, edit, comment, and search inside any type of PDF
documents, even those that were obtained by simply scanning a paper document and so do not
contain any searchable or editable text.
Viewing PDF documents and adding your comments
On the New Task screen, click the Open tab and then click Open PDF Document. The selected
document will be opened in the PDF Editor for viewing and commenting .
48 59
Use the Pages , Bookmarks , Search and Comments buttons to navigate around the
52 91 55 66
document.
ABBYY FineReader offers the following commenting tools:
·
Add Note
·
Highlight , Underline, Strikethrough, and Insert Text
·
Draw Shape, Line, or Arrow
59
60
62
15
Page 16

ABBYY® FineReader 15 User’s Guide
If you don't see the commenting tools, click the button.
Editing PDF documents
ABBYY FineReader offers the following editing tools:
See also: Editing text , Inserting and editing pictures .
Protecting PDF documents
75 83
105
With ABBYY FineReader, you can:
See also: Digital signatures , Removing confidential information from PDF documents , Passwords
and permissions .
Filling out forms
106
100
102 107
ABBYY FineReader allows you to fill out, save, and print interactive forms.
When you open a PDF that contains an interactive form, the form fields are highlighted, inviting you to
select a value from the drop-down list or type in some information.
If you encounter a form that cannot be filled out by simply typing text in the empty fields, use the
Export tool to type the necessary information over the form. See also: Filling out forms .
For more information on working with PDF documents, see Working with PDF documents .
100
47
16
Page 17

ABBYY® FineReader 15 User’s Guide
Quick conversion
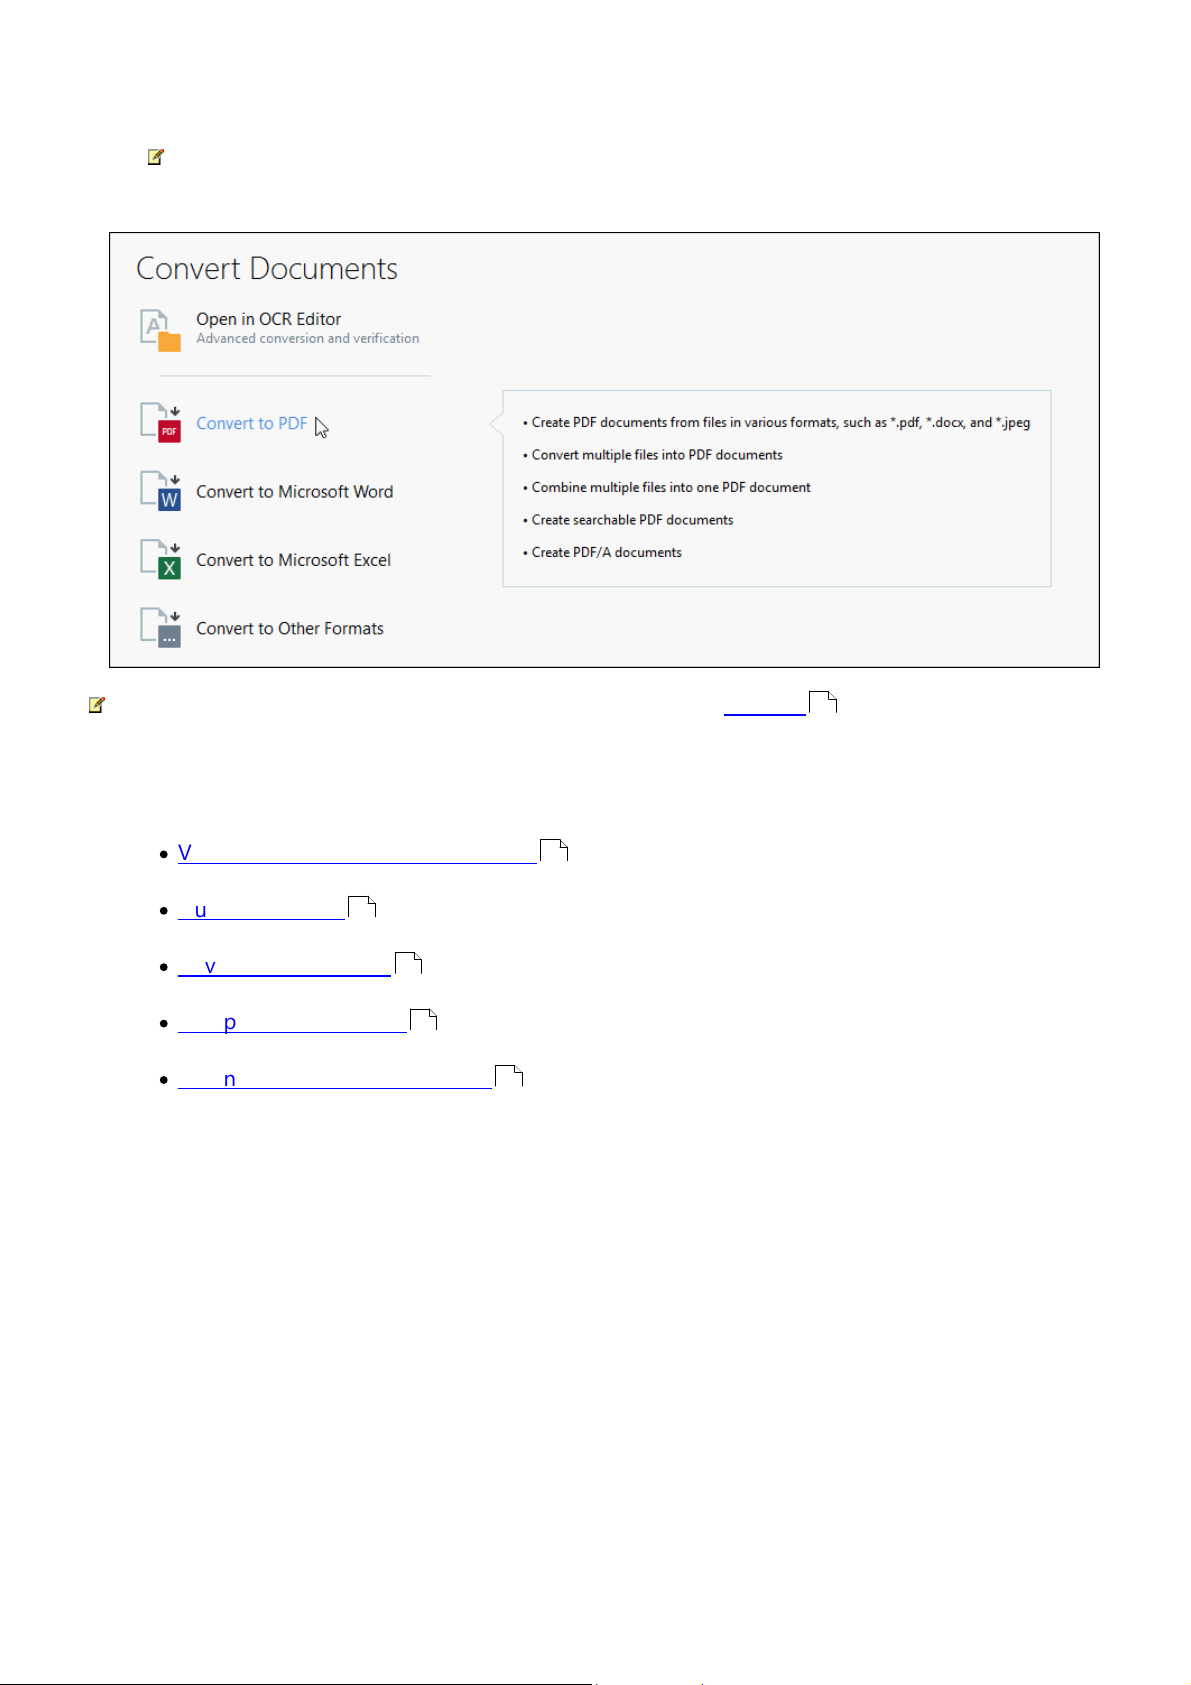
You can use the built-in tasks on the Open tab of the New Task screen to convert PDF documents or
images or create a new PDF from files in various formats.
Converting one or more files
1. Click the Open tab and then click a desired task:
·
Convert to PDF creates PDF documents from *.docx, *.html, *.jpeg, and other files. You
can also use this task to combine multiple files into one PDF document.
·
Convert to Microsoft Word creates Word documents from PDF and image files. You can
also use this task to combine multiple files into one Microsoft Word document.
·
Convert to Microsoft Excel® creates Excel spreadsheets from PDF and image files. You
can also use this task to combine multiple files into one Excel document.
·
Convert to Other Formats converts PDF and image files into popular formats, including
*.odt, *.pptx, *.epub, *.html, and many more.
17
Page 18

ABBYY® FineReader 15 User’s Guide
2. In the dialog box that opens, select one or more files to convert.
3. Specify conversion settings.
These settings determine the appearance and properties of the output document.
4. Add or remove files if necessary.
5. Click the Convert to <format> button.
6. Specify a destination folder for the output file.
When the task is completed, the resulting file will be placed into the folder that you specified.
Combining files
1. Click the Open tab and then click a desired task.
2. In the dialog box that opens, select the files that you want to convert.
3. Specify conversion settings.
18
Page 19
ABBYY® FineReader 15 User’s Guide
4. Add or remove files if necessary.
5. Arrange the files in the desired order and select the Combine all files into one document
option.
6. Click the Convert to <format> button.
7. Specify a name and a destination folder for the output file.
When the task is completed, the resulting file will be placed into the folder that you specified.
Use advanced conversion for large documents with complicated layouts.
26
See also: :
·
Creating PDF documents
·
Creating Microsoft Word documents
·
Creating Microsoft Excel spreadsheets
·
Other formats
26
20
22
24
19
Page 20

ABBYY® FineReader 15 User’s Guide
Creating PDF documents
In the New Task window, you can:
·
Create PDF documents from files in various formats.
·
Convert multiple files to PDF.
·
Combine multiple files into one PDF.
·
Create searchable PDF documents.
·
Create PDF/A-compliant documents.
Converting one or more files
1. Click the Open tab and then click Convert to PDF.
2. In the dialog box that opens, select one or more files to convert.
3. Specify conversion settings. These settings determine the appearance and properties of the
output document.
3.1.Image quality The quality of the pictures and the size of the resulting file can be tweaked
using the options in the Image quality drop-down menu:
·
Best quality
Select this option to retain the quality of the pictures and the page image. The original
resolution will be preserved.
·
Balanced
Select this option to reduce the size of the output PDF file without too much loss in
picture quality.
·
Compact size
Select this option to obtain a small-sized PDF file at the expense of picture quality.
·
Custom...
Select this option to customize picture saving. In the Custom Settings dialog box,
specify desired values and click OK.
3.2.Full-text search Use this drop-down menu to enable or disable full-text searches in the
output document:
·
As in original document The text on the images will not be recognized. Users will be
able to search inside the output document only if the original document has a text
layer.
·
Search inside text and images The text on the images will be recognized. Users will be
able to search inside the output document.
20
Page 21

ABBYY® FineReader 15 User’s Guide
·
Disable full-text search The document will be converted to image-only PDF. Users will
not be able to search inside the output document.
3.3.Create PDF/A documents Select this option to create a PDF/A-compliant document. A
PDF/A-2b document will be created by default. Click More options... to select another
version of PDF/A.
3.4.Use MRC compression Select this option to apply Mixed Raster Content (MRC)
compression to reduce file size without noticeable loss in image quality.
3.5.OCR languages Select the language(s) of your document. See also: OCR languages .
3.6.Image preprocessing settings... Here you can specify some additional manipulations to
be preformed on your scans and image files to improve their appearance and the quality
of conversion. See also: Image processing options .
3.7.More options... Open the PDF tab of the Format Settings dialog box.
4. Add or remove files if necessary.
5. Click the Convert to PDF button.
6. Specify a destination folder for the output file.
When the task is completed, the resulting PDF document will be placed into the folder that
you specified.
Combining files
1. Click the Open tab and then click Convert to PDF.
240
244
215 215
2. In the dialog box that opens, select the files that you want to convert.
3. Specify conversion settings .
20
4. Add or remove files if necessary.
5. Arrange the files in the desired order and select the Combine all files into one document
option.
6. Click the Convert to PDF button.
7. Specify a name and a destination folder for the output file.
When the task is completed, the resulting PDF document will be placed into the folder that
you specified.
21
Page 22

ABBYY® FineReader 15 User’s Guide
Creating Microsoft Word documents
In the New Task window, you can create Microsoft Word documents from PDF documents and images
and from files in any of the supported formats . You can also convert and combine multiple files into
one Microsoft Word document.
Converting one or more files
1. Click the Open tab and then click Convert to Microsoft Word.
2. In the dialog box that opens, select one or more files to convert.
3. Specify conversion settings. These settings determine the appearance and properties of the
output document.
3.1.Keep formatting.
Select the appropriate setting depending on how you plan to use the output document:
237
·
Exact copy
The output document will look almost exactly like the original, but will offer limited
editing options.
·
Editable copy
The appearance of the output document may slightly differ from the original, but the
document can be easily edited.
·
Formatted text
The font types, font sizes, and paragraph formatting will be retained. The output text
will be placed in one column.
·
Plain text
Only the paragraph formatting will be retained. The output text will be placed in one
column and a single font will be used throughout.
3.2.OCR languages Select the language(s) of your document. See also: OCR languages .
240
3.3.Keep pictures Select this option if you want to preserve the pictures in the output
document.
3.4.Keep headers, footers, and page numbers Select this option to preserve the headers,
footers, and page numbers.
3.5.More options... Opens the DOC(X)/RTF/ODT tab of the Format Settings dialog
220 215
box.
4. Add or remove files if necessary.
5. Click the Convert to Word button.
22
Page 23

ABBYY® FineReader 15 User’s Guide
6. Specify a destination folder for the output file.
When the task is completed, the resulting Microsoft Word document will be placed into the
folder that you specified.
Combining files
1. Click the Open tab and then click Convert to Microsoft Word.
2. In the dialog box that opens, select the files that you want to convert.
3. Specify conversion settings .
22
4. Add or remove files if necessary.
5. Arrange the files in the desired order and select the Combine all files into one document
option.
6. Click the Convert to Word button.
7. Specify a name and a destination folder for the output file.
When the task is completed, the resulting Microsoft Word document will be placed into the
folder that you specified.
23
Page 24

ABBYY® FineReader 15 User’s Guide
Creating Microsoft Excel spreadsheets
In the New Task window, you can create Microsoft Excel documents from PDF documents and images
and from files in any of the supported formats . You can also convert and combine multiple files into
one Excel document.
Converting one or more files
1. Click the Open tab and then click Convert to Microsoft Excel.
2. In the dialog box that opens, select one or more files to convert.
3. Specify conversion settings. These settings determine the appearance and properties of the
output document.
3.1.Keep formatting.
Select the appropriate setting depending on how you plan to use the output document.
237
·
Formatted text
The font types, font sizes, and paragraph formatting will be retained.
·
Plain text
Only the paragraphs will be retained. A single font will be used throughout.
3.2. OCR languages Select the language(s) of your document. See also: OCR languages .
3.3. Keep pictures (XLSX only) Select this option if you want to preserve the pictures in the
output document.
3.4. Create a separate sheet for each page (XLSX only) Select this option if you want to
create a separate Microsoft Excel spreadsheet from each page of the original document(s).
3.5. More options... Opens the XLS(X) tab of the Format Settings dialog box.
223 215
4. Add or remove files if necessary.
5. Click the Convert to Excel button.
240
6. Specify a destination folder for the output file.
When the task is completed, the resulting Microsoft Excel file will be placed into the folder
that you specified.
Combining files
1. Click the Open and then click Convert to Microsoft Excel.
2. In the dialog box that opens, select the files that you want to convert.
3. Specify conversion settings .
4. Add or remove files if necessary.
24
24
Page 25

ABBYY® FineReader 15 User’s Guide
5. Arrange the files in the desired order and select the Combine all files into one document
option.
6. Click the Convert to Excel button.
7. Specify a name and a destination folder for the output file.
When the task is completed, the resulting Microsoft Excel document will be placed into the
folder that you specified.
25
Page 26

ABBYY® FineReader 15 User’s Guide
Other formats
In the New Task window, you can convert PDF documents and images into popular formats (*.pptx,
*.odt, *.html, *.epub, *.fb2, *.rtf, *.txt, *.csv, *.djvu) and combine multiple files into one document.
Converting one or more files
1. Click the Open tab and then click Convert to other formats.
2. In the dialog box that opens, select one or more files to convert.
3. Specify conversion settings. These settings determine the appearance and properties of the
output document.
3.1.Select output format Select a format into which to convert your file.
3.2.OCR languages Select the language(s) of your document. See also: OCR languages .
3.3.More options... Opens the corresponding tab of the Format Settings dialog box.
4. Add or remove files if necessary.
5. Click the Convert to <format> button.
6. Specify a destination folder for the output file.
When the task is completed, the resulting file will be placed into the folder that you specified.
Combining files
1. Click the Open tab and then click Convert to other formats.
2. In the dialog box that opens, select the files that you want to convert.
3. Specify conversion settings .
4. Add or remove files if necessary.
240
215
26
5. Arrange the files in the desired order and select the Combine all files into one document
option.
6. Click the Convert to <format> button.
7. Specify a name and a destination folder for the output file.
When the task is completed, the resulting document will be placed into the folder that you
specified.
Advanced conversion
ABBYY FineReader includes an OCR Editor , which provides advanced OCR and conversion features.
The OCR Editor allows you to check recognition areas and verify recognized text, preprocess images in
116
26
Page 27

ABBYY® FineReader 15 User’s Guide
order to improve OCR accuracy, and much more.
27
Page 28
ABBYY® FineReader 15 User’s Guide
The OCR Editor also offer powerful features for fine-tuning OCR and conversion to get the best possible
results. For example, you can edit recognition areas , check recognized text , and train ABBYY
135 155 147
FineReader to recognize non-standard characters and fonts.
1. There are several ways to open the OCR Editor:
·
Open the New Task window by clicking File > New Task, click the Open tab, and then
13
click the Open in OCR Editor task.
·
Open the New Task window and click Tools > OCR Editor.
·
Open the New Task window, and click File > Open in OCR Editor....
2. In the Open Image dialog box, select the files you want to open.
If you are using the default settings, ABBYY FineReader will automatically analyze and
recognize the files you opened. You can change these settings on the Image Processing tab
of the Options dialog box (click Tools > Options... to open this dialog box).
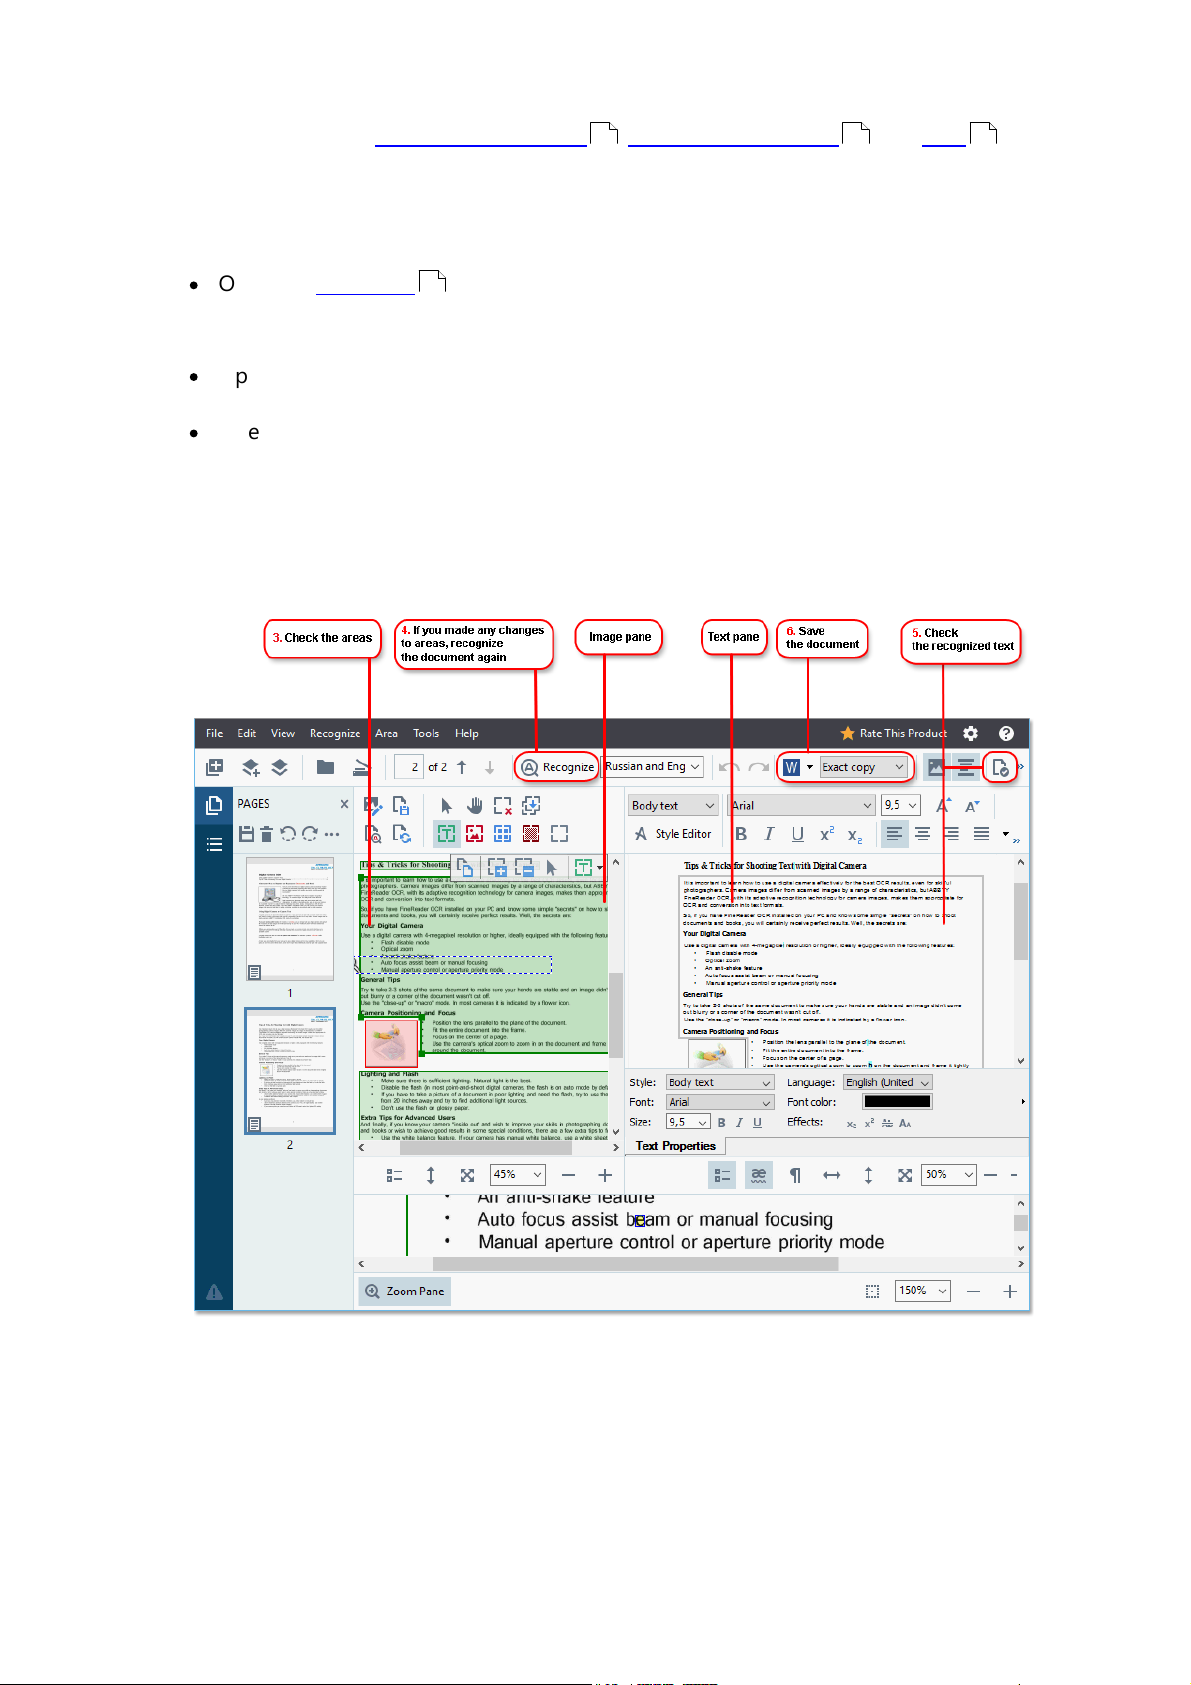
3. After you open a document, its image will be displayed in the Image pane, and text, picture,
table and barcode areas will be marked on the image. Check that the areas have been
detected correctly and edit them if necessary.
28
Page 29

ABBYY® FineReader 15 User’s Guide
ABBYY FineReader analyzes documents to detect areas that contain text, pictures, tables,
and barcodes.
Sometimes, areas in complex documents may be detected incorrectly. In most cases it is
easier to correct automatically detected areas than to draw all areas manually.
You can find tools for drawing and editing areas on the toolbar above the Image pane
and on the toolbars that appear above text, picture, background picture, and table areas
when you select them.
You can use these tools to:
·
Add and delete areas
·
Change the type of an area
·
Adjust area borders and move entire areas
·
Add rectangular parts to areas or delete them
·
Change the order of areas
4. If you made any changes to areas, click the Recognize button on the main toolbar to
recognize the document again.
5. Check the recognized text in the Text pane and correct it if necessary.
6. Save the recognized document . You can select the format in which to save your document
162
from the drop-down list of the Save/Send button on the main toolbar (click the arrow next to
the button to open the drop-down list).
For more information about the OCR Editor and its features, see Working with the OCR Editor .
116
29
Page 30

ABBYY® FineReader 15 User’s Guide
Comparing documents
(This functionality is not available in some versions of ABBYY FineReader 15. See also:
http://www.ABBYY.com/FineReader.)
ABBYY FineReader includes ABBYY Compare Documents, an application that lets you compare two
versions of a document, even if these versions are in different formats. ABBYY FineReader's document
comparison tool lets you detect significant inconsistencies in a text and, for example, prevent the
approval or publication of the wrong version of a document.
There are several ways to start ABBYY Compare Documents:
·
Open the New Task window, click the Compare tab, and then click Open ABBYY Compare
13
Documents.
·
Click the Start button in Windows and click ABBYY FineReader 15 > ABBYY Compare
Documents (in Windows 10, click the Start button, click the All Programs item on the
start menu, and then click ABBYY FineReader 15 > ABBYY Compare Documents)
·
Click Compare Documents on the Tools menu.
·
Right-click a file in Windows Explorer and click Compare documents... on the shortcut
174
menu.
Follow the instructions below to compare two documents.
30
Page 31

ABBYY® FineReader 15 User’s Guide
1. Open ABBYY Compare Documents, open one of the versions that you want to compare in the
left-hand pane and the other one in the right-hand pane.
2. In the COMPARE pane, select the languages of the document from the drop-down list.
31
Page 32

ABBYY® FineReader 15 User’s Guide
3. Click the Compare button to compare the documents.
4. Review the differences detected by ABBYY Compare Documents.
The differences between the two versions will be highlighted in each version and listed in the
right-hand pane, providing you with a clear picture of the changes made to the document.
This makes it easy to see which text was added, removed or edited in each version. Both
pages are scrolled simultaneously and the identical fragments are always displayed side by
side. Differences can be removed from the list or copied to the Clipboard.
Differences that were removed from the list will not be saved to the difference report.
You can save the comparison results:
·
As a Microsoft Word files where the differences will be shown using the Track Changes
feature.
·
As a PDF document with comments.
·
As a Microsoft Word table containing the differences.
For more information on comparing two versions of the same document, see ABBYY Compare
Documents .
187
32
Page 33

ABBYY® FineReader 15 User’s Guide
Scanning and saving documents
You can use the tasks on the Scan tab of the New Task window to create digital documents in various
formats. You will need a scanner or a digital camera to obtain document images.
1. Click the Scan tab and then click a task:
·
Scan to OCR Editor opens scans in the OCR Editor .
·
Scan to PDF creates PDF documents from images obtained from a scanner or digital
116
camera.
·
Scan to Microsoft Word creates Microsoft Word documents from images obtained from
a scanner or digital camera.
·
Scan to Microsoft Excel creates Microsoft Excel documents from images obtained from a
scanner or digital camera.
·
Scan to Image Files creates image-only documents from images obtained from a scanner
or digital camera.
33
Page 34

ABBYY® FineReader 15 User’s Guide
·
Scan to Other Formats creates documents in popular formats, such as *.odt, *.pptx,
*.epub, and *.html, from images obtained from a scanner or digital camera.
2. Select a device and specify scanning settings .
206
3. Click the Preview button or click anywhere inside the image.
4. Review the image. If you are not satisfied with the quality of the image, change the scanning
settings and click the Preview button again.
5. Specify the settings specific to the selected format.
These settings determine the appearance and properties of the output document.
6. Click the Scan to <format> button.
7. When scanning starts, a dialog box with a progress bar and tips will be displayed.
8. After a page has been scanned, a dialog box prompting you to decide what to do next will be
displayed.
Click Scan Again to scan more pages using the current settings or click Finish Scanning to
close the dialog box.
9. Depending on the task you selected in step 1, the scanned images will be:
·
Processed and added to an OCR project in the OCR Editor .
·
Processed and converted to PDF. Specify the folder where you want to save the resulting
116
document. The document will remain open in the OCR Editor.
·
Processed and converted to the selected format. Specify the folder where you want to
save the resulting document. The document will remain open in the OCR Editor.
34
Page 35

ABBYY® FineReader 15 User’s Guide
See also: :
·
Scanning to the OCR Editor
·
Scanning to PDF
·
Scanning to Microsoft Word
·
Scanning to Microsoft Excel
·
Scanning to image files
·
Scanning to other formats
38
36
40
42
44
46
35
Page 36

ABBYY® FineReader 15 User’s Guide
Scanning to the OCR Editor
You can open images from a scanner or camera in the OCR Editor, where you will be able to:
·
Draw and edit recognition areas manually
·
Check recognized text
·
Train ABBYY FineReader to recognize non-standard characters and fonts
·
Use other advanced tools to ensure the best possible OCR result.
1. Open the New Task window, click the Scan tab, and then click the Scan to OCR Editor task.
2. Select a device and specify scanning settings .
206
3. Click the Preview button or click anywhere inside the image.
4. Review the image. If you are not satisified with the quality of the image, change the scanning
settings and click the Preview button again.
5. Specify preprocessing and automation settings.
5.1.Automatically process page images as they are added
This option enables or disables automatic processing of newly added pages. If automatic
processing is enabled, you can select general document processing options and image
preprocessing settings to be used when scanning and opening images:
·
Recognize page images
Enable this option if you want FineReader to automatically preprocess newly added
images using the settings specified in the Preprocessing Settings dialog box (click the
Image preprocessing settings (apply to conversion and OCR) link below to open
this dialog box). Analysis and OCR will also be performed automatically.
·
Analyze page images
Performs image preprocessing and document analysis automatically, but OCR has to be
started manually.
·
Preprocess page images
Preprocesses images automatically. Analysis and OCR have to be started manually.
5.2.OCR languages
Use this option to specify the languages of the document. See also: OCR languages .
240
36
Page 37

ABBYY® FineReader 15 User’s Guide
5.3.Image preprocessing settings...
Opens the Preprocessing Settings dialog box where you can specify image preprocessing
settings such as detection of page orientation and automatic preprocessing settings.
These settings can significantly improve source images, resulting in greater OCR accuracy.
See also: Image processing options .
5.4.More options...
244
Opens the Image Processing tab of the Options dialog box. You can also open this
213
dialog box by clicking Options... on the Tools menu.
6. Click Scan.
7. A progress dialog box will be displayed, showing a progress bar and tips.
8. After the page has been scanned, a dialog box prompting you to decide what to do next will
appear.
Click Scan Again to scan subsequent pages using the current settings or Finish Scanning to
close the dialog box.
9. After the scanning process is completed, the scanned images will be added to an OCR project
in the OCR Editor and processed using the preprocessing and automation settings you
specified earlier.
For more information about the OCR Editor and its features, see Working with the OCR Editor .
116
37
Page 38

ABBYY® FineReader 15 User’s Guide
Scanning to PDF
The Scan to PDF task in the New Task window lets you create PDF documents from images obtained
from a scanner or a digital camera.
1. Open the New Task window, click the Scan tab, and then click Scan to PDF.
2. Select a device and specify scanning settings .
206
3. Click the Preview button or click anywhere inside the image.
4. Review the image. If you are not satisfied with the quality of the image, change the scanning
settings and click the Preview button again.
5. Specify conversion settings. These settings determine the appearance and properties of the
output document.
5.1.Image quality This option determines the quality of images and pictures, which affects
the size of the resulting output file. The following quality settings are available:
·
Best quality
Select this option to retain the quality of the pictures and the page image. The original
resolution will be preserved.
·
Balanced
Select this option to reduce the size of the output PDF file without too much loss in
picture quality.
·
Compact size
Select this option to obtain a small-sized PDF file at the expense of picture quality.
·
Custom...
Select this option to customize picture saving. In the Custom Settings dialog box,
specify the desired values and click OK.
5.2.Create PDF/A documents
Select this option to create a PDF/A-compliant document.
5.3.Use MRC compression
Select this option to apply Mixed Raster Content (MRC) compression to reduce file size
without noticeable loss in image quality..
5.4.Recognize text on images
Select this option if you want OCR to start automatically.
5.5.OCR languages
Use this option to specify the languages of the document. See also: OCR languages .
240
38
Page 39

ABBYY® FineReader 15 User’s Guide
5.6.Image preprocessing settings...
Use this option to specify image preprocessing settings, such as detection of page
orientation and automatic preprocessing settings. These settings can significantly improve
source images, resulting in greater OCR accuracy. See also: Image processing options .
5.7.More options...
Opens the PDF section of the Format Settings of the Options dialog box, where
you can specify additional settings (you can also open this dialog box by clicking
Options... on the Tools menu).
6. Click Scan to PDF.
7. A dialog box will be displayed, showing a progress bar and tips.
8. After the page has been scanned, a dialog box prompting you to decide what to do next will
appear.
Click Scan Again to scan more pages using the current settings or click Finish Scanning to
244
215 215
close the dialog box.
9. After the scanning is completed, the scanned images will be processed using the settings you
specified, converted to PDF, and opened in the OCR Editor.
10.Specify the folder where you want to save the resulting PDF.
39
Page 40

ABBYY® FineReader 15 User’s Guide
Scanning to Microsoft Word
The Scan to Microsoft Word task in the New Task window lets you create Microsoft Word documents
from images obtained from a scanner or a digital camera.
1. Open the New Task window, click the Scan tab, and then click the Scan to Microsoft Word
task.
2. Select a device and specify scanning settings .
206
3. Click the Preview button or click anywhere inside the image.
4. Review the image. If you are not satisfied with the quality of the image, change the scanning
settings and click the Preview button again.
5. Specify conversion settings. These settings determine the appearance and properties of the
output document.
5.1.Preserve formatting
Select the appropriate setting depending on how you plan to use the output document.
·
Exact copy
The output document will look almost exactly like the original, but will offer limited
editing options..
·
Editable copy
The appearance of the output document may slightly differ from the original, but the
document can be easily edited.
·
Formatted text
The font types, font sizes, and paragraph formatting will be retained. The output text
will be placed in one column.
·
Plain text
Only the paragraph formatting will be retained. The output text will be placed in one
column and a single font will be used throughout.
5.2.OCR languages
Select the language(s) of your document. See also: OCR languages .
240
5.3.Keep pictures
Select this option if you want to preserve the pictures in the output document.
5.4.Keep headers, footers, and page numbers
Select this option to preserve the headers, footers, and page numbers.
40
Page 41

ABBYY® FineReader 15 User’s Guide
5.5.Image preprocessing settings...
Specify image preprocessing settings, such as detection of page orientation and automatic
preprocessing settings. These settings can significantly improve source images, resulting in
greater OCR accuracy. See also: Image processing options .
5.6.More options...
Opens the DOC(X)/RTF/ODT section of the Format Settings tab of the Options
dialog box, where you can specify additional settings (you can also open this dialog box
by clicking Options... on the Tools menu).
6. Click Scan to Word.
7. A dialog box will be displayed, showing a progress bar and tips.
8. After the page has been scanned, a dialog box prompting you to decide what to do next will
appear.
Click Scan Again to scan more pages using the current settings or click Finish Scanning to
244
220 215
close the dialog box.
9. Specify the folder where you want to save your Microsoft Word document.
When the task is completed, a Microsoft Word document will be created in the folder that you
specified. All of the document's pages will also be opened in the OCR Editor.
41
Page 42

ABBYY® FineReader 15 User’s Guide
Scanning to Microsoft Excel
The Scan to Microsoft Excel task in the New Task window lets you create Microsoft Excel documents
from images obtained from a scanner or a digital camera.
1. Open the New Task window, click the Scan tab, and then click the Scan to Microsoft Excel
task.
2. Select a device and specify scanning settings .
206
3. Click the Preview button or click anywhere inside the image.
4. Review the image. If you are not satisfied with the quality of the image, change the scanning
settings and click the Preview button again.
5. Specify conversion settings. These settings determine the appearance and properties of the
output document.
5.1.Preserve formatting.
Select the appropriate setting depending on how you plan to use the output document.
·
Formatted text
The font types, font sizes, and paragraph formatting will be retained.
·
Plain text
Only the paragraphs will be retained. A single font will be used throughout.
5.2.OCR languages
Select the language(s) of your document. See also: OCR languages .
240
5.3.XLSX settings:
·
Keep pictures
Select this option if you want to preserve the pictures in the output document.
·
Create a separate sheet for each page
Select this option if you want to create a separate Microsoft Excel spreadsheet from
each page of the original document(s).
5.4.Image preprocessing settings...
Use this option to specify image preprocessing settings, such as detection of page
orientation and automatic preprocessing settings. These settings can significantly improve
source images, resulting in greater OCR accuracy. See also: Image processing options .
5.5.More options...
Opens the XLS(X) section of the Format Settings tab of the Options dialog box,
223 215
where you can specify additional settings (you can also open this dialog box by clicking
Options... on the Tools menu).
244
42
Page 43

ABBYY® FineReader 15 User’s Guide
6. Click Scan to Excel.
7. A dialog box will be displayed, showing a progress bar and tips.
8. After the page has been scanned, a dialog box prompting you to decide what to do next will
appear.
Click Scan Again to scan more pages using the current settings or click Finish Scanning to
close the dialog box.
9. Specify the folder where you want to save your Microsoft Excel document.
When the task is completed, a Microsoft Excel document will be created in the folder that you specified.
All of the document's pages will also be opened in the OCR Editor.
43
Page 44

ABBYY® FineReader 15 User’s Guide
Scanning to image files
The Scan to Image Files task in the New Task window lets you create image-only documents from
images obtained from a scanner or a digital camera.
1. Click the Scan tab and then click the Scan to Image Files task.
2. Select a device and specify scanning settings .
206
3. Click the Preview button or click anywhere inside the image.
4. Review the image. If you are not satisfied with the quality of the image, change the scanning
settings and click the Preview button again.
5. Specify conversion settings. These settings determine the appearance and properties of the
output document.
5.1.Select image format
Use this setting to select the desired image file format.
5.2.Compression
If you selected the TIFF format, you will be able to compress scanned images. Image
compression reduces file size.
Using different compression methods results in different data compression rates and may
result in data loss (loss of image quality). There are two factors you should consider when
choosing a compression method: the quality of images in the output file and its size.
ABBYY FineReader lets you use the following compression methods:
·
PACKBITS
Does not cause data loss and is well suited for compressing black-and-white scans.
·
JPEG (JFIF format)
This method is used to compress grayscale and color images such as photographs. It
compresses images significantly, but at the cost of some data loss. This leads to
reduced image quality (blurriness and loss of color saturation).
·
ZIP
Does not cause data loss and works best on images that contain large single-color
areas such as screenshots and black-and-white images.
·
LZW
Does not cause data loss and works best on images with vector graphics and grayscale
images.
5.3.Image preprocessing settings...
Specify image preprocessing settings, such as detection of page orientation and automatic
preprocessing settings. These settings can significantly improve source images, resulting in
greater OCR accuracy. See also: Image processing options .
244
44
Page 45

ABBYY® FineReader 15 User’s Guide
6. Click Scan to <format>.
7. A dialog box will be displayed, showing a progress bar and tips.
8. After the page has been scanned, a dialog box prompting you to decide what to do next will
appear.
Click Scan Again to scan more pages using the current settings or click Finish Scanning to
close the dialog box.
9. Specify the folder where you want to save your output file.
When the task is completed, output files in the specified format will be created in the folder that you
specified. All of the document's pages will also be opened in the OCR Editor.
45
Page 46

ABBYY® FineReader 15 User’s Guide
Scanning to other formats
The Scan to Other Formats task in the New Task window lets you create documents in popular
formats (*.pptx, *.odt, *.html, *.epub, *.fb2, *.rtf, *.txt, *.csv, and *.djvu) from images obtained from a
scanner or a digital camera.
1. Open the New Task window, click the Scan tab, and then click the Scan to Other Formats
task.
2. Select a device and specify scanning settings .
206
3. Click the Preview button or click anywhere inside the image.
4. Review the image. If you are not satisfied with the quality of the image, change the scanning
settings and click the Preview button again.
5. Specify conversion settings. These settings determine the appearance and properties of the
output document.
5.1.Select output format
Use this option to select the desired format for the output file.
5.2.OCR languages
Select the language(s) of your document. See also: OCR languages .
240
5.3.Image preprocessing settings...
Specify image preprocessing settings, such as detection of page orientation and automatic
preprocessing settings. These settings can significantly improve source images, resulting in
greater OCR accuracy. See also: Image processing options .
244
5.4.More options...
Opens the section with the settings of the selected format on the Format Settings tab
215
of the Options dialog box, where you can specify additional settings (you can also open
this dialog box by clicking Options... on the Tools menu).
6. Click Scan to <format>.
7. A dialog box will be displayed, showing a progress bar and tips.
8. After the page has been scanned, a dialog box prompting you to decide what to do next will
appear.
Click Scan Again to scan more pages using the current settings or click Finish Scanning to
close the dialog box.
9. Specify the folder where you want to save your output file.
When the task is completed, output files in the specified format will be created in the folder that you
specified. All of the document's images will also be opened in the OCR Editor.
46
Page 47

ABBYY® FineReader 15 User’s Guide
PDF Editor
The PDF Editor is an easy-to-use tool that lets you view and search PDF documents, rearrange, add or
delete pages, copy text and pictures, edit text, and add comments to documents. You don't need to
convert your PDF to an editable format, even if it only contains scans without a text layer.
Chapter contents
·
Viewing PDF documents
·
Reviewing PDF documents
·
Working with PDF content
·
Filling out forms
·
Signing PDF documents with a digital signature
·
Protecting PDF documents with passwords
·
Creating PDF documents
·
Saving and exporting PDF documents
100
48
59
74
108
109
101
105
47
Page 48

ABBYY® FineReader 15 User’s Guide
Viewing PDF documents
The PDF Editor allows you to view and search PDF documents and copy text, pictures, and tables inside
them.
To open a PDF document in the PDF Editor:
·
Open the New Task window, click the Open tab and then click the Open PDF Document
13
task.
·
Open the New Task window and click File > Open PDF Document....
The document will be displayed in the PDF Editor.
To customize the way the document is displayed, use the following settings.
·
The viewing modes change the way pages are displayed and scrolled.
See also: Viewing modes .
49
48
Page 49

ABBYY® FineReader 15 User’s Guide
·
The zoom feature lets you zoom in to and out of the document.
·
Actual Size displays the page at a scale of 100%.
·
Fit to Width changes the scale at which the document is displayed so that the width of the
document fits to the width of the screen.
·
Best Fit changes the scale at which the document is displayed so that the height of the
document fits to the height of the screen.
·
Zoom Out/Zoom In lets you adjust the scale manually.
To show/hide the toolbar with PDF tools, click the PDF Tools button on the main toolbar.
Chapter contents
·
Viewing modes
·
Navigating PDF documents
·
Background recognition
·
Keyword search
·
Copying content from PDF documents
·
PDF security features
49
52
54
55
57
58
Viewing modes
The PDF Editor has four viewing modes that determine how document pages are displayed and
scrolled:
One-Page View displays one page and hides all the other pages.
One-Page Scrolling displays pages one after the other, so that when you get to the bottom of one
page, the top of the next page is visible.
Two-Page View displays pages side-by-side, with odd-numbered pages on the left and even-numbered
pages on the right.
Two-Page Scrolling displays two pages side-by-side with subsequent pages appearing as you scroll
down.
49
Page 50

ABBYY® FineReader 15 User’s Guide
If you want to display even pages on the left and odd pages on the right in one of the two-page
viewing modes, click View > View mode > Odd Pages on the Right.
There are several ways to change the viewing mode:
·
Click one of the buttons on the toolbar at the bottom of the screen:
·
Click View > View mode and select one of the viewing modes.
·
Use the following keyboard shortcuts: Ctrl+1, Ctrl+2, Ctrl+3, and Ctrl+4.
Full-screen mode
The PDF Editor has a full-screen viewing mode, in which the document takes up the entire screen space
and no panels or toolbars are visible.
To enter full-screen mode, do one of the following:
·
Click the button on the toolbar at the bottom of the screen.
·
Click View > Full Screen.
·
Press F11.
In the full-screen mode, you can:
·
Scroll the document.
·
View comments (place the mouse pointer over a commented area to display the comment).
·
Change viewing modes and scaling.
To display the bottom toolbar with viewing options, move the mouse pointer to the bottom
edge of the screen.
·
Go to specific pages in the document.
See also: Navigating PDF documents .
53
You can also right-click the document in full-screen view and use the commands on the shortcut menu
to:
·
Add comments and text insertion points
·
Create bookmarks
·
75
Edit text and pictures
59
91
To exit the full-screen mode, press F11 or Esc.
50
Page 51

ABBYY® FineReader 15 User’s Guide
Hiding toolbars and panes when reading PDF documents
When reading a document in the PDF Editor, you may want to hide some or all of the toolbars and
panes in order to leave as much screen space for the document as possible. The menu bar, the main
toolbar, and the toolbar at the bottom of the screen can't be hidden separately, but you can use the
full-screen mode if you want to hide all toolbars and panes.
You can hide the following toolbars and panes:
·
To hide the navigation pane, press F5 or click View and disable the Show Navigation Pane
option.
·
To hide the PDF toolbar, press F6 or click View and disable the Show PDF Tools option.
·
To hide the Comments pane, press F7 or click View and disable the Show Comments Pane
option.
The PDF Editor with the navigation pane, PDF toolbar, and comment pane hidden:
51
Page 52

ABBYY® FineReader 15 User’s Guide
Navigating PDF documents
The PDF Editor offers a number of tools for navigating PDF documents.
·
The Pages pane lets you navigate pages quickly, change the order of pages, add pages to the
document, or delete them.
·
The Bookmarks pane contains tools for creating, editing, and navigating bookmarks.
·
The Search pane lets you search and highlight text.
·
The Attachments pane lets you view and edit attachments.
·
The Digital Signatures pane lets you view and delete digital signatures.
The keyboard shortcuts for showing and hiding these panes are listed in Keyboard shortcuts .
Viewing a specific page
The PDF Editor provides several tools that make it easier to navigate long documents.
To navigate between pages:
280
52
Page 53

ABBYY® FineReader 15 User’s Guide
·
Use the buttons on the main toolbar.
·
Click View > Go to Page and then click Next Page, Previous Page, First Page or Last Page.
To quickly open a specific page:
·
Type the number of the desired page in the box on the main toolbar and press
Enter.
·
Click View > Go to Page > Page Number..., type the number of the desired page, and click
OK.
Navigating pages in the full-screen view
To open a specific page in full-screen view, do the following:
1. Move the mouse pointer to the bottom edge of the screen to bring up the toolbar.
2. Type the number of the desired page in the box on the toolbar at the bottom of
the screen.
3. Press Enter.
53
Page 54

ABBYY® FineReader 15 User’s Guide
Background recognition
The PDF Editor allows you to search and copy text and pictures in PDF documents without a text layer,
such as scanned documents and documents created from image files. This is possible thanks to an OCR
process that runs in the background.
Background recognition is enabled by default and starts automatically when you open a PDF
document.
The background recognition process does not change the contents of the PDF file. Instead, it adds a
temporary text layer that will not be available when you open the document in other applications.
If you want to make the document searchable in other applications, you will need to save the text
layer created by the background recognition process. To do this, click File > Recognize Document >
Recognize Document... See also: Recognizing text .
Important! If the search or copy functions don't work properly, check that the right OCR languages
are selected for the document. See also: Document features to consider prior to OCR .
86
240
To disable background recognition, clear the Enable background recognition in the PDF Editor
option in the Options dialog box.
212
The background recognition process cannot run on computers with a single-core processor.
54
Page 55

ABBYY® FineReader 15 User’s Guide
Keyword search
The PDF Editor allows you to find and highlight information in PDF files. Comments, metadata, and
bookmarks will be searched along with the text in the document itself, and the results will be displayed
in a separate panel. Search results will also be highlighted in the document, and you will be able to
apply various effects to these results.
1. Click the tab in the pane on the left or click View > Search to open the Search pane.
2. Type the word or phrase you want to find.
Words or phrases that match your query will be highlighted in the document.
The search results will be arranged into groups and you will be able to highlight entire
groups.
3. You can change search options by clicking on the arrow in the search box and selecting any
of the following:
·
Exact Match will find only words that are an exact match of the words you typed in the
search box.
·
Match Case will find only words that match the capitalization in your query.
You can highlight, cross out, and underline search hits in the text. To do this, in the Search pane,
60
select the words you want to highlight, cross out or underline and then click the respective tool.
You can also redact search hits. See Removing confidential information from PDF documents .
107
To change the color used for text markup, click the arrow next to the respective tool and select the
desired color on the color palette that appears.
55
Page 56

ABBYY® FineReader 15 User’s Guide
By default, the markup tools in the Search pane use the same colors as the markup tools on the PDF
Tools toolbar.
To navigate to the next/previous search hit, use the buttons. You can also select the next
search result by pressing F3.
56
Page 57

ABBYY® FineReader 15 User’s Guide
Copying content from PDF documents
The PDF Editor allows you to copy text, pictures, and tables from PDF documents to other applications.
These features can be used in PDF documents of any type, even those that contain only scans.
Complete the following steps to copy text:
1. Select the text that you want to copy.
2. Right-click the selected text and click Copy Text on the shortcut menu or click one of the
icons on the pop-up toolbar that appears above the text.
3. Paste the text into the desired application.
To copy text from a page that already has a text layer (whether original or created by the
background recognition process), select the text, right-click it, and click Copy Text on the shortcut
menu.
Complete the following steps to copy a table:
1. Select the table that you want to copy.
2. Right-click the selected table and click Copy Table on the shortcut menu or click one of the
icons on the pop-up toolbar that appears above the table.
You can use the pop-up toolbar above the table to edit the table before copying it. You can
add vertical and horizontal separators to the table, remove separators, and split or combine
table cells.
No changes will be made to the table in the original file.
After editing the table, click Copy Table again.
3. Paste the table into the desired application.
If the copied content is significantly different from the original document:
57
Page 58

ABBYY® FineReader 15 User’s Guide
Click the image to enlarge it
·
If the document does not have a text layer, check that the right OCR languages are
selected.
·
If the page with the content you want to copy has a poor quality text layer, replace the text
layer with a new one.
Now try copying the content again.
Complete the following steps to copy a page fragment as an image:
1. Select the area you wish to copy.
2. Right-click the selected area and click Copy Image on the shortcut menu or click one of the
icons on the pop-up toolbar that appears above the area. If the selected area contains text,
this text will not be recognized and will be copied as part of the image.
3. Paste the image into the desired application.
PDF security features
240
Some PDF documents can harm your computer.
ABBYY FineReader has a number of features that make working with PDF documents safer. The
program will ask for your confirmation when you perform the following potentially dangerous actions:
·
Opening attachments
·
Opening links
·
Submitting form data.
100
If you trust the creator of the document, click Allow; otherwise, click Cancel.
You can also protect your computer from malicious JavaScript code by disabling JavaScript in PDF
documents. To disable JavaScript, open the Options dialog box, click the Other tab, and clear the
Enable JavaScript in PDF documents opened in the PDF editor option. No when you open a PDF
document with JavaScript the following notification will appear at the top of the window:
If you trust the person or entity who sent you the PDF document, you can enable JavaScript by selecting
one of the following options from the JavaScript Settings drop-down list:
·
Enable JavaScript for This Document Only to enable JavaScript while the current document
is open.
·
Enable JavaScript for All Documents to open the Options dialog box, where you can enable
JavaScript for all documents.
58
Page 59

ABBYY® FineReader 15 User’s Guide
Reviewing PDF documents
The PDF Editor includes a number of features for reviewing PDF documents. While reading a document,
you can add comments, highlight important fragments, make notes, draw shapes to highlight specific
areas, and place stamps on pages.
Chapter contents
·
Adding comments
·
Marking up text
·
Drawing shapes
·
Adding text to PDF documents
·
Adding stamps
·
Collaborating on PDF documents
59
60
62
65
71
66
Comments
The PDF Editor offers tools for adding notes to any part of a PDF document, making discussing and
reviewing PDF documents much simpler.
1. If the PDF Tools toolbar is hidden, open it by clicking the PDF Tools button on the main
toolbar.
2. Click the tool on the PDF Tools toolbar.
3. If you don't like the default note color, select another one on the toolbar that appears above
the document.
4. Click where you want the note to appear on the page and type the note.
You can change the color of an existing note using its shortcut menu.
To find out how to open notes, reply to notes or delete them, see Collaborating on PDF documents .
66
59
Page 60

ABBYY® FineReader 15 User’s Guide
Highlight
Underline
Strikethrough
Add Note to Insert Text
Marking up text
The PDF Editor allows you to indicate what changes should be made to a document. Any editing marks
that you add will not alter the text itself but merely indicate what changes must be made and where.
Annotations related to editing text are only available in documents with a text layer or documents
that have been recognized by the background recognition process.
ABBYY FineReader includes the following markup tools:
You can add a comment to any type of annotation by double-clicking the annotation. For more on
comments, see Collaborating on PDF documents .
66
To highlight, underline, or cross out a text fragment:
·
Select a markup tool on the main toolbar and then select the desired text fragment, or
·
Select the desired text fragment and then select a markup tool on the main toolbar.
To indicate an insertion point:
·
Click the tool on the PDF Tools toolbar and click the place where you think text needs to be
inserted.
To change the color of an annotation:
·
Right-click the annotation and select the desired color on the shortcut menu or
·
Click a markup tool on the main toolbar and then click one of the color boxes on the toolbar
that appears above the document.
You can use the search feature to mark up specific text fragments without reading through the entire
document to find them.
60
Page 61

ABBYY® FineReader 15 User’s Guide
1. Open the Search pane.
2. Type the word or phrase you want to find.
3. In the Search pane, select the search hits you want to mark up and click the desired markup
tool. If you want to choose a different color, click the arrow next to the markup tool instead of
clicking the tool itself and then click the desired color on the color palette that appears.
By default, the markup tools in the Search pane use the same colors as the markup tools on the
PDF Tools toolbar.
61
Page 62

ABBYY® FineReader 15 User’s Guide
Drawing shapes
The PDF Editor allows you to draw various markings on the page of a PDF document. You can also add
comments to the various shapes that you have drawn.
1. On the PDF Tools toolbar, click .
2. Select the appropriate drawing tool from the drop-down menu.
·
Ink
Draws a line when you hold down the left mouse button, letting you draw any shape.
62
Page 63

ABBYY® FineReader 15 User’s Guide
·
Line
Draws a straight line. If you want to draw a vertical, horizontal or diagonal (sloped at an
angle of 45°) line, hold down the Shift key.
·
Arrow
Draws an arrow. If you want to draw a vertical, horizontal or diagonal (sloped at an angle
of 45°) line, hold down the Shift key.
·
Rectangle
Draws a rectangle. If you want to draw a square, hold down the Shift key.
·
Oval
Draws an oval. If you want to draw a circle, hold down the Shift key.
·
Polygon
Draws a polygon. Click where you want to place the initial vertex of the polygon. To
complete the polygon, click the initial vertex.
·
Cloud
Draws a cloud. Click where you want to place the initial vertex of the cloud. To complete
the cloud, click the initial vertex.
·
Polyline
Draws a jagged line. Click the page to start drawing, click again when you want to draw
the next segment, and double-click where you want the jagged line to end.
·
Text Box
Draws a rectangle with a nested text annotation. For more details, see Adding a Text block
annotation to a PDF document .
65
3. Once you have finished drawing the shape, double-click it if you want to type a comment.
If you are using the Ink tool, you will need to disable the drawing tools before you can type
a comment.
To draw a set of shapes using the Ink tool and add a comment to the entire set:
·
Hold down the Shift key and draw the figure. You can release the mouse button, but only
release the Shift key when you are finished drawing.
·
Disable the drawing tools, double click one of the shapes in the set, and type your
comment.
63
Page 64

ABBYY® FineReader 15 User’s Guide
4. Drawing tools have several settings you can change.
To change these options:
·
Right-click a shape you drew on the page and use the commands on its shortcut menu.
·
Selecting the desired settings on the PDF Tools toolbar before drawing a shape.
For more on using and editing comments, see Collaborating on PDF documents .
66
64
Page 65

ABBYY® FineReader 15 User’s Guide
Adding a Text block annotation to a PDF document
The PDF Editor allows to add blocks of text to any type of PDF .
A text block is an annotation. Text in a text block is not the body text of a PDF document.
For more information about adding body text to a PDF document, see Inserting and editing text .
To add a text block to a PDF document, do the following:
1. Click the icon on the toolbar and select from the drop-down list.
A toolbar with text editing tools will appear beneath the PDF Tools toolbar.
2. Click where you want to add text. You can drag the mouse pointer without releasing the
mouse button to change the size of the text block.
3. Type your text. You can choose a font type, font size, and font color.
75
4. Change the size of the text block if necessary.
5. To draw a border around the text block, select the color and thickness of the border.
6. You can also change the background color of the text block or use the Detect background
color option to use the background color of the page.
By default, transparent background is used.
You can use the PDF Editor to fill out forms that do not have interactive fields. To do this, simply type
text over the form using the Export tool.
When you add a text block, a new comment containing text from the block will appear in the
Comments pane. You can change the status of the comment in the same way you can change the
status of an annotation. See also: Collaborating on PDF documents .
66
65
Page 66

ABBYY® FineReader 15 User’s Guide
Collaborating on PDF documents
The PDF Editor allows you to see and reply to comments made by other reviewers, even if they were
created in applications other than ABBYY FineReader. You can also change the status of a comment to
inform a reviewer that you have accepted or rejected their suggestion.
To view a list of all comments in the document, open the Comments pane by clicking the
button on the main toolbar.
There are other ways to open the Comments pane:
·
Right-click an annotation, stamp or comment and click Show Comments Pane on the
shortcut menu.
·
Click View and select Show Comments Pane.
·
Press F7.
Adding a comment to an annotation
66
Page 67

ABBYY® FineReader 15 User’s Guide
·
Double-click the annotation to which you want to add a comment, or
·
Right-click the annotation and select the Add Comment command on the shortcut menu.
If the Comments pane is hidden, a comment box where you can type the comment will appear. If the
Comments pane is visible, the comment box associated with the annotation will be highlighted.
·
Select the annotation that contains the comment you want to see.
If the Comments pane is hidden, a comment box where you can type the comment will appear. If the
Comments pane is visible, the comment box associated with the annotation will be highlighted.
If you want a comment to always be visible, double-click its annotation. To hide a comment, click the
button in the upper-right corner of the comment box.
1. Select the annotation that contains the comment to which you want to reply.
2. Click Reply in the comment's box or press Ctrl+Enter and type your reply.
Opening a comment
Replying to a comment
Deleting an annotation or its associated comment or reply
67
Page 68

ABBYY® FineReader 15 User’s Guide
To delete an annotation:
·
Select the annotation you want to delete and press Del or right-click the annotation and click
Delete on the shortcut menu.
The comment associated with the annotation will also be deleted.
·
Select a comment box in the Comments pane and press Del or right-click the comment box
and click Delete.
The annotation associated with the comment will also be deleted.
To delete a comment in the Comments pane:
·
Right-click anywhere inside the comment box and select Delete on the shortcut menu.
All replies associated with the comment will also be deleted.
To delete all comments and annotations:
·
Click Edit > Delete Comments and Markup...
To delete a reply:
·
Right-click the reply and select Delete Reply on the shortcut menu.
In the same manner, you can delete a reply on the Comments pane.
You can assign statuses to comments you have read or flag those comments which you want to revisit
later.
To flag a comment:
·
Click the box next to the comment in the Comments pane or right-click the comment and
click Flag on the shortcut menu.
To change the status of a comment:
·
Right-click a comment or its annotation, click Status on its shortcut menu, and select the
desired status.
·
Click the button in the comments box and select the desired status.
Flagging a comment or changing its status
Properties of annotations and comments
68
Page 69

ABBYY® FineReader 15 User’s Guide
In the Properties... dialog box of an annotation or comment, you can change the author or the subject
and see how the status of the annotation or comment changed over time. If you have changed the
name of the author, you can click the Set Default button to use the new name for any annotations and
comments you make in the future.
To open the Properties dialog box of an annotation or comment:
·
Right-click the annotation, stamp or comment and click Properties... on the shortcut menu.
The Comments pane
69
Page 70

ABBYY® FineReader 15 User’s Guide
The Comments pane displays all annotations added to the document, with or without comments, and
all text blocks, stamps, and editorial marks.
·
To navigate the comments, use the buttons.
·
You can search for a specific comment, reply or author using the search box at the top of the
Comments pane.
To sort the comments:
·
On the Comments pane, click and then select the desired sorting option from the
menu.
You can filter the comments by type, author, flag status, or comment status.
To filter the comments:
·
On the Comments pane, click to open the filter menu and then click Show All
Comments, Hide Current Comments, or select the criteria you want to use to filter the
comments.
You can filter the comments by:
1. Type
2. Author
3. Page
4. Date
5. Flag Status
6. Status
To reset the filter, click Reset.
If you just want to see the authors and dates of the comments, click to hide the text of the
comments. To display the text again, click .
70
Page 71

ABBYY® FineReader 15 User’s Guide
Adding stamps
The PDF Editor allows you to stamp PDF documents in the same manner as you stamp paper
documents. You can select a stamp from the list of available stamps or create your own, adding any
desired text, the date and time of stamping, or an image.
To stamp a page:
1. On the PDF Tools toolbar, click and select the desired stamp.
If the stamp you want to use is not available in the menu, click Other stamp.
2. Stamp the page.
3. Move the stamp to the desired location if necessary.
You can add comments to stamps and change their statuses in the same manner as you add comments
to annotations. See also: Collaborating on PDF documents .
66
How to create a stamp
71
Page 72

ABBYY® FineReader 15 User’s Guide
The PDF Editor allows you to create textual stamps and stamps from images.
To create a stamp from an image:
1. On the PDF Tools toolbar, click > Create Stamp from Image....
2. In the dialog box that opens, type a name for your stamp in the Name field.
3. Click Open Image to open an image from your hard disk or click Paste Image from
Clipboard if you have previously copied an image to the Clipboard.
4. Use the Stamp size slider if you need to adjust the size of the image.
5. Click Save.
To create a text stamp:
1. On the PDF Tools toolbar, click > Create Text Stamp....
2. In the dialog box that opens, type a name for your stamp in the Name field.
3. In the Stamp text field, type the text that you want to appear on the stamp.
4. From the Add Date/Time drop-down list, select the date and time format that you want to
use.
When you stamp a page, the stamp will contain the date and time of the stamping in the
format you specified.
All text elements will be added to the stamp at the position of the cursor in the Stamp
text field. You can change the order of the stamp elements in this field, add explanatory text,
and set up the date and time formats. For more on dates and times, see Current date and
time on stamps and in Bates numbers .
5. In the Font and border group of options, select a font type, font size, and font effects for
the text in the stamp and a color for the stamp.
6. Enable the Add border option if you want the stamp to have a border.
7. The View box contains a preview of the stamp, so you can see the effects of the changes you
make.
8. Click Save.
254
267
How to edit stamps
72
Page 73

ABBYY® FineReader 15 User’s Guide
1. On the PDF Tools toolbar, click > Manage Stamps....
2. In the dialog box that opens, select a stamp and click Edit....
3. Specify the desired settings and click Use.
To remove a stamp from your document, do one of the following:
·
Select the stamp in the document and press Del.
·
Right-click the stamp in the document and select Delete... on the shortcut menu.
·
Select the comment for the stamp in the Comments pane and press Del.
To remove a stamp from the list:
1. On the PDF Tools toolbar, click > Manage Stamps....
2. In the dialog box that opens, select the stamp and click Delete....
How to delete a stamp
73
Page 74

ABBYY® FineReader 15 User’s Guide
Working with PDF content
The PDF Editor allows you to modify the contents of PDF documents without the need to convert PDF
documents to editable formats.
Chapter contents
·
Inserting and editing text
·
Inserting and editing pictures
·
Inserting and editing hyperlinks
·
Recognizing text
·
Working with pages
·
Adding bookmarks
·
Adding headers and footers
·
Adding watermarks
·
Adding file attachments
·
Viewing metadata
·
Enhancing page images
86
87
91
96
97
98
99
75
83
84
93
74
Page 75

ABBYY® FineReader 15 User’s Guide
Inserting and editing text
The PDF Editor in ABBYY FineReader 15 allows you to insert and edit text in any* PDF document:
75
Page 76

ABBYY® FineReader 15 User’s Guide
·
PDF documents created using other applications
·
scanned documents
·
searchable PDF documents
The following features are available:
·
adding new text
·
deleting text
·
correcting typos
·
copying and pasting text from the clipboard
·
editing the formatting of text inside existing text blocks
·
changing the text block size
·
moving text blocks on a page
·
correcting page orientation, skewing, distorted text, and other defects found in scanned
documents
* except PDF documents containing vector graphics text
Inserting new text
New text can be added to a page in the following ways:
·
Add a new text block using the Add Text tool .
This is the most convenient way to insert:
o a large volume of text
o an isolated text block
·
Edit an existing text block .
76 75
78
This is the most convenient way to insert text if you need to add a relatively small volume of
text to an already existing text block.
·
Add text using the Header and Footer tool .
93 93
This is the most convenient way to insert text if you need to add identical text to several pages
at once.
Adding new text using the Add Text tool
76
Page 77

ABBYY® FineReader 15 User’s Guide
To add a new text block to a PDF document:
1. Click the button to enter the text editing mode. Alternatively, you can select Tools
> Edit Text and Pictures, or use the Ctrl + E hotkey.
Tip: if the toolbar is not visible, click in the upper-right corner.
Note: you might have to wait some time for the program to prepare the document for
editing. During this time, a page preparation indicator will be displayed in the left part of the
Text pane.
The Text pane will appear under the toolbar, and text and images on the page will be marked
as separate blocks:
Note: when working with scanned documents and searchable PDF documents, it is important
to specify the correct languages, especially when background recognition is disabled. For
more details, seeDocument features to consider prior to OCR .
240
Tip: before starting your work with scanned documents and searchable PDF documents, it is
sometimes best to correct the page orientation, skew, distorted text, and other defects .
81
2. Click the button found in the Text pane. Alternatively, you can use the Ctrl + T
hotkey. This will enable the editing tools found on the Text pane.
77
Page 78

ABBYY® FineReader 15 User’s Guide
3. Place the cursor in the particular spot where you want a new text block to be added and mark
out a rectangular shape of the appropriate size for your new text block or left-click once for a
text block of a default shape.
Note: the size of the new text block cannot be larger than the page itself.
Note: you can create new text blocks over other objects.
4. Enter your text into the text block that you have just created.
Note: when adding a large volume of text, take care to not go over the edges of the page
itself.
5. Finish adding the text. To do this, left-click the area outside of the text block or press the Esc
key.
6. Save the changes you have made to the document by clicking the button in the upperleft part of the PDF editor window. Alternatively, you can click File > Save or use the Ctrl + S
hotkey.
7. To exit the text editing mode, click the button or use the Ctrl + E hotkey.
Editing existing text
To edit text in a PDF document:
78
Page 79

ABBYY® FineReader 15 User’s Guide
1. Click the button on the toolbar to enter the text editing mode. Alternatively, click
Tools > Edit Text and Pictures or use the Ctrl + E hotkey.
Tip: if the toolbar is not visible, click the button in the upper-right part of the
PDF Editor window.
Note: you might have to wait some time for the program to prepare the text for editing.
During this time, a page preparation indicator will be displayed in the left part of the Text
pane.
The Text pane will appear under the toolbar, and text and images on the page will be marked
as separate blocks:
Note: when working with scanned documents and searchable PDF documents, it is important
to specify the correct languages, especially when background recognition is disabled. For
more details, see Document features to consider prior to OCR .
240
Tip: before starting your work with scanned documents and searchable PDF documents, it is
sometimes best to correct the page orientation, skew, distorted text, and other defects .
2. Edit the text in the PDF document.
You can:
81
79
Page 80

ABBYY® FineReader 15 User’s Guide
·
Add new text to an existing text block
To do this, place the cursor where you want the text block to be created and type the
appropriate text or paste the text from the clipboard.
The program will pick a suitable font automatically.
Note: to use a built-in font, it must first be installed on your system. Built-in fonts are
denoted in the list by a pair of square brackets.
·
Delete text from an existing text block
To do this, select the text you want to delete and delete it.
·
Delete a text block entirely
To do this:
o Hold down the Ctrl button and left-click the text block.
Alternatively, you can select a text block by left-clicking inside it, place the cursor on
one of the block's edges, and select it by left-clicking it when the cursor's appearance
changes to .
o Delete the text block by pressing Delete.
·
Change the formatting of text
To do this, select the appropriate text inside a text block and edit it using the tools located
in the Text pane:
·
Change the size of a text block
To do this, first select the appropriate text block by left-clicking inside it. The text block
edges will now have little square icons on them.
80
Page 81

ABBYY® FineReader 15 User’s Guide
Place the cursor on top of one of the square icons. When the cursor's appearance changes
to , hold down the left mouse button and drag the cursor so that the text block’s size
changes to the size that you want.
Note: when changing a text block’s size, take care to not go over the edges of the page.
·
Move text blocks around on a page
To do this, hold down the Ctrl button and place the mouse cursor on top of a text block.
Hold down the left mouse button together with the Ctrl button and drag the block to the
appropriate place while holding down both the Ctrl button and the left mouse button.
Alternatively, you can select a text block by left-clicking inside it, place the cursor on one of
its edges, and move it by holding down the left mouse button when the cursor's
appearance changes to .
Note: when moving a text block, take care to not go over the visible edges of the page.
3. Finish editing the text. To do this, left-click outside the text block or press the Esc button.
4. Exit the text editing mode by clicking the button or using the Ctrl + E hotkey.
5. Save the changes you have made to the document by clicking the button in the upperleft part of the PDF editor window. Alternatively, you can click File > Save or use the Ctrl + S
hotkey.
Improving text editing in scanned documents
Before starting to edit scanned documents and searchable PDF documents, you can do the following to
improve the editing of text:
81
Page 82

ABBYY® FineReader 15 User’s Guide
·
Correct the page orientation, skew, distorted text, and other defects
To make cosmetic changes to the appearance of a scanned document, click the Correct
Skew and Page Orientation button in the Text toolbar and choose Correct Skew and
Orientation for Current Page (for a particular page or for the whole document).
Note: the Correct Skew and Page Orientation button appears in the Text pane only for
those pages, where the program has detected text skewing.
·
Re-recognize a page / document
If a page contains a text layer, it will be used when editing the text. To recognize a page
from scratch, click the Text Layer button in the toolbar and select Recognize Page and
Replace Existing Text Layer... (for a particular page or for the whole document).
This will open the Recognize Document dialog box.
Select the appropriate languages from the drop-down list in its upper half.
Mark the checkboxes next to Correct page orientation and Deskew images and correct
image resolution in the lower part of the window.
Click Recognize.
82
Page 83

ABBYY® FineReader 15 User’s Guide
Inserting and editing pictures
The PDF Editor allows you to insert pictures into PDF documents of any type.
1. Click the button on the PDF Tools toolbar.
2. In the dialog box that opens, select a picture and click Open.
3. Move the picture to the desired location on the page.
You can move, rotate, delete, and resize pictures. When you move a picture, it may overlap with
other objects on the page. To bring an overlapping picture to the foreground, right-click it and
select Bring Picture to Front.
To delete a picture:
·
To delete a picture in a PDF document created in another application, right-click the picture
and click Delete on the shortcut menu.
·
You can delete a part of the document image and anything that it may contain, including
pictures. To do this, click the tool on the PDF Tools toolbar and select the area you
want to erase.
The Erase tool deletes pictures and text, automatically selecting the appropriate background
color to fill the empty space.
83
Page 84

ABBYY® FineReader 15 User’s Guide
In the Link Editor:
·
Select Page in this document and enter the number of the page that the link should open, or
·
Click Select specific destination... and place the mouse cursor where you want to direct users who
click the link.
In the Link Editor:
·
Select Web address, e-mail address, file or other resource and type the URL of the page you want
to link to (e.g. http://www.abbyy.com).
In the Link Editor:
·
Select Web address, e-mail address, file or other resource and type the recipient's e-mail address
preceded by "mailto:" (e.g. mailto:office@abbyy.com).
In the Link Editor:
·
Select Web address, e-mail address, file or other resource and enter the path to the file that the
link should open preceded by "file://" (e.g. file://D:/MyDocuments/ABBYYFineReader.pdf).
Inserting and editing hyperlinks
ABBYY FineReader allows you to insert hyperlinks into PDF documents of any type and edit existing
hyperlinks.
When you point the mouse cursor to a hyperlink, its address is shown in a pop-up box. To follow the
link, simply click it.
To insert a hyperlink into a PDF document:
1. Type the text to be used as a hyperlink.
2. Either click Edit > Add Link... or select the text, right-click it, and then clickAdd Link... on the
shortcut menu.
·
Linking to a specific text fragment in the current document
·
Linking to a web page
·
Linking to an e-mail address
·
Linking to a file
To edit a hyperlink:
84
Page 85

ABBYY® FineReader 15 User’s Guide
1. Select the hyperlink you want to edit.
2. Right-click the selected link and click Edit Link... on the shortcut menu.
3. In the Link Editor, do one of the following:
·
Change the number of the page that the link should open
·
Click Select specific destination... and place the mouse cursor where you want to direct users
who click the link
·
Change the URL, e-mail address, or path to a file or other resource .
You can copy the URL, e-mail address or the path to a file or other resource into the Clipboard. To do
this, right click the link, select Copy Link, and copy the URL, e-mail address, or path.
To delete a hyperlink from a PDF document:
1. Select the hyperlink you want to delete.
2. Right-click the selected link and click Remove Link on the shortcut menu.
85
Page 86

ABBYY® FineReader 15 User’s Guide
Recognizing text
Background recognition is a process that adds a temporary text layer to a document, enabling you
54
to mark up, copy, and search its text. You can make these capabilities available to other users by adding
a permanent text layer to PDF documents. Documents with text layers are practically indistinguishable
from their originals. You can also replace an existing text layer in a searchable PDF document.
1. On the main toolbar, click the arrow next to the button and select Recognize
Document... from the drop-down list. Alternatively, click File > Recognize Document >
Recognize Document... or press Ctrl+Shift+R.
2. In the dialog box that opens, specify the appropriate OCR languages. See also: Document
features to consider prior to OCR .
240
3. To improve the quality of OCR, enable image processing. Image processing may change the
appearance of your document.
·
Correct page orientation - The program will detect text orientation and correct if
necessary.
·
Deskew images and correct image resolution - The program will detect and correct any
skew, select the appropriate image resolution, and make some other changes to improve
the images.
4. Click the Recognize button.
5. As a result, the output document will contain a searchable text layer.
You can also add a text layer when adding pages to a PDF document from a file or when scanning
paper documents. To do this, select the Recognize text on images option in the Image Processing
Settings dialog box (click > > Image Processing Settings to open this dialog box) and
specify the languages of the document. See also: Working with pages .
89
If you want to check recognized text, train the program to recognize non-standard fonts and
characters, or use some other advanced features of ABBYY FineReader, click the arrow next to the
button and then click Recognize and Verify in OCR Editor. Alternatively, click File >
Recognize Document > Recognize and Verify in OCR Editor. See also: Sending PDF documents to
the OCR Editor .
114
86
Page 87

ABBYY® FineReader 15 User’s Guide
1. On the main toolbar, click the button.
2. Click Add from File....
Alternatively, click Add Pages from File... in the shortcut menu of the Pages pane or from
the drop-down menu that appears if you click the button.
3. In the dialog box that opens, select the file or files that you want to add to the PDF
document and specify the numbers of the pages that you want to add. The files you select
must be in any of the supported formats . You can also specify where you want the new
pages to be added (e.g. before the first page, before the current page, etc.).
4. Click the Settings... button and specify the desired image processing options .
5. Click the Open button
The selected files will be converted into PDF and inserted into the current PDF document.
1. On the main toolbar, click the button.
2. Click Add from Scanner....
3. Select a device and specify scanning settings .
4. Click the View button or click anywhere in the scanning area to view the image.
5. If required, click the Settings... button and specify the desired image processing options .
6. Click the Scan button.
The scanned pages will be inserted into the current PDF document.
Working with pages
The PDF Editor allows you to delete or add pages to a PDF document, change their order, and insert
blank pages.
Adding pages from a file...
237
Adding scanned pages...
206
89
89
Inserting blank pages...
87
Page 88

ABBYY® FineReader 15 User’s Guide
1. In the Pages pane, select the page before or after which you want to insert a blank page.
2. Right-click the page, click Add Blank Page on the shortcut menu, and then click Before
Current Page or After Current Page.
Alternatively, click > Add Blank Page. A blank page will be added after the currently
selected page.
·
In the Pages pane, select one or more pages and drag them to the desired place in the
document.
1. In the Pages pane, select the pages you wish to replace.
2. Select Replace Pages... in the Edit menu, in the context menu of the page or by pressing the
button of the Pages pane.
3. In the opened dialog box, select the PDF document with new pages.
4. In the page replacement dialog box, specify the range of pages to be replaced in the current
document and the range of pages in the new document.
·
In the Pages pane, select one or more pages, right-click them, click Rotate Pages on the
shortcut menu, and then click Rotate Right or Rotate Left. Alternatively, click the the
button at the top of the pane and then click Rotate Pages > Rotate Right (or Rotate Left).
Changing the order of pages...
Replacing pages...
Rotating pages...
Cropping pages...
88
Page 89

ABBYY® FineReader 15 User’s Guide
1. In the Pages pane, select one or several pages.
2. Select Crop Pages... on the main toolbar, in the Edit menu, in the context menu of the page
or by pressing the button of the Pages pane.
3. On the cropping frame pane:
·
Select the cropping mode: Separate frame for each page or Single frame for all pages
·
Select the size of the cropping frame
·
Use the option that lets the program automatically determine the size of the cropping
frame.
The option of automatic framing sets the boundaries of the cropping frame on the
edges of a text and reduces blank areas on document pages.
4. Move the frame edges to set the cropping frame manually.
5. After you set the cropping frame:
·
Select the document pages to be cropped
·
Click Crop
·
In the Pages pane, select one or more pages, right-click them, and click Delete Pages... on
the shortcut menu or press the Del key.
·
In the Pages pane, select the desired pages, right-click them, and then click Create PDF from
Selected Pages on the shortcut menu.
The created document will be opened in a new window.
Deleting pages...
Creating a PDF document from selected pages...
Image processing options
The PDF Editor offers multiple image processing options to improve the quality of images and OCR.
You can specify image processing options when scanning paper documents or when creating PDF
documents from image files.
·
Image quality The quality of the pictures and the size of the file are determined by the value
you select from the drop-down list in the Image quality group of options:
89
Page 90

ABBYY® FineReader 15 User’s Guide
o Best quality
Select this item to preserve the quality of the page images and pictures. The original
resolution of the source images will be preserved.
o Balanced
Select this option to reduce the size of the PDF file while keeping the quality of the page
images and pictures at a reasonably high level.
o Compact size
Select this option to obtain a small-sized PDF file. This may adversely affect the quality of the
page images and pictures.
o Custom...
Select this option if you want to specify custom options for saving page images and pictures.
In the dialog box that opens, specify desired saving options and click OK.
·
Recognize text on images Select this option if you want to add a text layer to the document.
You will get a searchable PDF document that looks almost exactly like the original.
·
Use MRC compression (specify OCR languages below) Select this option if you want to
apply the MRC compression algorithm to recognized pages. MRC compression reduces the
size of the output file while preserving the visual quality of the page images.
·
Apply ABBYY PreciseScan to smooth characters on image Select this option if you want to
apply ABBYY PreciseScan technology. ABBYY PreciseScan smoothes characters on a document
so that they do not become pixilated when you zoom in.
·
OCR languages Be sure to select the right OCR languages. See also: Document features to
consider prior to OCR .
240
90
Page 91

ABBYY® FineReader 15 User’s Guide
Adding bookmarks
The PDF Editor allows you to add bookmarks to PDF documents of any type.
You can create a bookmark in the Bookmarks pane or using a shortcut menu.
1. To create a bookmark in the Bookmarks pane:
a. Click the button on the vertical bar to the left or click View > Bookmarks. The
Bookmarks pane will open.
b. Click and type a name for your bookmark.
c. By default, the newly created bookmark will point to the start of the current page.
2. To create a bookmark using a shortcut menu:
a. Select a text fragment, a picture, or any other place in the document that you want to
bookmark.
b. Right-click the selection and click Add Bookmark... on the shortcut menu.
c. Type a name for your bookmark in the Bookmarks pane.
If you bookmark a text fragment, the selected text will be used as the name of the
bookmark.
d. The newly created bookmark will point to the text fragment, picture or other place in the
document that you selected.
To select a different destination for your bookmark, click Set Destination on the shortcut menu
of the bookmark and then click where you want the bookmark to be inserted in your document.
Bookmarks can be nested. A new bookmark will have the same nesting level as the previously
selected bookmark. If a new bookmark is the first bookmark in the document, it is placed at the
root level.
Alternatively, you can create a bookmark by clicking Edit > Add Bookmark....
Rearranging bookmarks…
91
Page 92

ABBYY® FineReader 15 User’s Guide
1. Select a bookmark in the Bookmarks pane.
2. Hold down the left mouse button and drag the bookmark to a desired location.
To create a nested bookmark, drag it onto an existing parent bookmark, wait for the icon of
the parent bookmark to change, and release the left mouse button. Alternatively, right-click a
bookmark and use the Move one level left and Move one level right commands on the
shortcut menu.
Rearranging bookmarks or changing their nesting levels will not affect the appearance of the
document.
1. Select a bookmark in the Bookmarks pane.
2. Click the button or click Rename on the shortcut menu of the bookmark.
3. Type in a new name.
1. Select a bookmark in the Bookmarks pane.
2. Click the button or click Delete on the shortcut menu of the bookmark.
You can delete several bookmarks at a time if they are positioned at the same nesting level.
Holding down the Ctrl key, select the bookmarks you want to delete and click Delete.
When you delete a parent bookmark, all of its child bookmarks are also deleted.
Renaming bookmarks…
Deleting bookmarks…
92
Page 93

ABBYY® FineReader 15 User’s Guide
Adding headers and footers
The PDF Editor allows you to add headers and footers to pages in PDF documents. Headers and footers
are recurrent text at the top or bottom of the pages where you can put page numbers, the name of the
author, the date or time of creation, or Bates numbers to be used for document indexing.
To add a header or footer to your document:
1. Click the button.
2. Select the desired type of header or footer from the drop-down menu.
Creating headers/footers...
93
Page 94

ABBYY® FineReader 15 User’s Guide
1. Click the button and then click Create Header and Footer...
2. In the dialog box that opens, choose one of the six possible locations on the page. For
greater precision, enter the exact distance between the header or footer and the
corresponding edge of the page.
You can select the units used for measuring the distance between the header/footer and
he edge of the page from the Measurement units drop-down list below the preview pane.
3. In the Text field, type the text you want to be placed at the top or bottom of all of the pages
of your document.
4. To add page numbers, date, time, or Bates numbers:
·
Click the Page Number button and select the desired page numbering format from the
drop-down list that opens.
The number of each page in the selected format will appear at the top or bottom of the
respective page.
·
Click the Bates Number button.
By default, numbering starts at 1 and all document pages are numbered. To change the
default setting, click Continue from...
Numbering will start at the number you specify in the Start at field and will increment
either for each page or for each document, depending on your settings. Click Save to
apply the changes.
·
Click the Date/Time button and select the desired date or time format.
Each time you click the Bates Number button or an item in the Page Number of
Date/Time drop-down list, the corresponding item will be added into the Text field after
the mouse cursor. You can change the order of the items in this field, add your own
explanatory text, or customize the date or time format. For more information about date
and time formats, see "Current date and time on stamps and in headers and footers ."
5. In the Font section, select the desired font, font size, font effects , and font color.
6. In the Pages section, specify whether your header/footer should appear on all of the pages
or only on some of them.
267
254
94
Page 95

ABBYY® FineReader 15 User’s Guide
·
Select All if you want your header/footer to appear on all of the pages, or select Page
range and specify a specific range of pages.
·
You can put headers/footers only on odd or even pages. To do this, create a
header/footer and select Odd Pages or Even Pages from the Apply to drop-down list.
7. Click Save and Add to save your changes and add the newly created header/footer to your
document.
You can create a new header/footer from an existing one. To do this, click the
button and select Manage Headers and Footers.... In the Manage
Headers and Footers dialog box, select an existing header/footer and click Copy....
1. Click the button and select Manage Headers and Footers...
2. In the Manage Headers and Footers dialog box, select the header/footer you want to
modify and click Edit....
3. Make the necessary changes and click Save.
1. Click the button and select Manage Headers and Footers...
2. In the Manage Headers and Footers dialog box, select a header/footer you want to delete
and click Delete.
Editing headers/footers...
Deleting a header/footer from the list...
95
Page 96

ABBYY® FineReader 15 User’s Guide
Adding watermarks
The PDF Editor allows you to add watermarks into PDF documents. A watermark is some text placed
above or beneath the page content. You can use watermarks, for example, to indicate the author of a
text or to identify pages containing confidential information.
To add a watermark:
1. Click and then click the Add Watermark... item.
2. In the dialog box that opens, select one of the nine possible locations on the page.
You can further adjust the positioning of the watermark by changing the vertical and
horizontal offset values.
3. In the Text field, enter the text you want to appear on the pages.
You can select the font, font size, and font effects for your watermark text in the settings in
the Font section.
4. Adjust the orientation and transparency of the watermark:
a. In the Rotate field, specify a rotation angle (you can also use the slider to the right of the
field).
b. In the Transparency field, enter a transparency value (you can also use the slider to the
right of the field).
5. Choose where you want to place your watermark — Above page content or In the
background beneath page content.
6. Specify if the watermark should appear on all of the pages or only on selected pages in the
document:
a. Select All if the watermark should be placed on all the pages.
b. Select Selected if the watermark should be placed only on the currently selected page.
c. Select Page range if the watermark should be placed on a range of pages. If you select
this option, you must specify a page range in the field below.
7. Review the watermark in the preview pane of the Add Watermark dialog box and, if you are
satisfied with the result, click Save and Add.
You can add multiple different watermarks into the same document.
96
Page 97

ABBYY® FineReader 15 User’s Guide
To delete watermarks from a document, click and then click the Delete Watermark item.
This command deletes all of the watermarks from the document.
Adding file attachments
Files of any format can be attached to a PDF document.
To view attached files:
·
Click the button in the pane to the left, or click View > Attachments.
You can open, save, rename or delete attached files.
In the Attachments pane:
·
Select a file.
·
On the toolbar, click the tool that corresponds to the action you want
to perform. Alternatively, click the corresponding command on the shortcut menu.
97
Page 98

ABBYY® FineReader 15 User’s Guide
Viewing metadata
The PDF Editor allows you to view the title and author of a PDF document and some other information.
This information is called metadata. Some of the metadata are specified by the author and some are
generated automatically. You can also search documents by metadata.
To view metadata, click File > Document Properties... to open the Document Properties dialog box.
You can change or save any metadata created by the author, provided that the PDF document is not
password-protected:
·
Title contains the title of the document.
·
Author contains the author of the document.
·
Subject contains the subject of the document.
·
Keywords contains keywords that you can use when searching documents.
The original metadata are preserved when you convert files in various formats to PDF, provided that
you have not chosen to delete the metadata and have not specified new export options that will
override the existing options.
The metadata of a document also contain the following information about the document and the file:
·
File name contains the name of the file.
·
Location contains the path to the folder where the document is stored.
·
File size contains the size of the file.
·
Page size contains the size of the current page.
·
Pages contains the number of pages in the document.
·
PDF producer contains the name of the application where the document was created
·
Application contains the name of the application where the document content was created.
·
PDF version contains the version of PDF.
If the metadata of a document contain information about the compliance with the PDF/A or
PDF/UA standard, this will be displayed in the Document Properties window.
·
Tagged PDF contains information about document tags.
·
Fast Web View specifies if the document supports Fast Web View technology, which speeds
up loading documents online.
·
Created contains the date and time when the document was created.
·
Modified contains the date and time when the document was last changed.
98
Page 99

ABBYY® FineReader 15 User’s Guide
ABBYY FineReader allows you to view, edit, find and delete metadata.
55 107
Enhancing page images
The PDF Editor can enhance the quality of PDF documents created from image files. Depending on the
type of an input image, the program will select the appropriate image enhancement algorithms. Besides
automatic image enhancement, the PDF Editor can correct page orientation, skew, distorted text lines
and other defects, and make characters look smoother with ABBYY PreciseScan technology.
You can specify enhancement options in the Image Enhancement dialog box (click Edit > Enhance
Page Images... to open this dialog box).
·
Correct page orientation Select this option if you want the program to detect and correct
page orientation automatically.
For best recognition results, a page should have the standard orientation, i.e. with horizontal
text lines and top-to-bottom reading order. Otherwise, the document may be recognized
incorrectly.
·
Deskew images and correct image resolution Select this option if you want the program to
run a number of image processing routines on your images.
Depending on the type of an input image, the program will select the image corrections to
apply, such as skew correction, correction of trapezoid distortions, or adjustment of image
resolution.
This operation may take some time to complete.
·
Apply ABBYY PreciseScan to smooth characters on images Select this option if you want to
apply ABBYY PreciseScan technology, making the characters less pixelated when you zoom in.
Be sure to select the right OCR languages. See also: Document features to consider prior to OCR .
240
99
Page 100

ABBYY® FineReader 15 User’s Guide
Filling out forms
The PDF Editor allows you to view, fill out, save, and print interactive forms.
1. If a document contains a form, the following message is displayed:
You can disable field highlighting by clearing the Highlight fields check box in this
message.
If no fields are highlighted on a PDF form, you can still fill out such a form using the
Export tool.
See also: Adding text to a PDF document .
65
2. To fill out a form, select values form drop-down lists or type in text from the keyboard.
With ABBYY FineReader you can also:
·
Load data into a form
Click Edit > Form Data > Load Form Data from File.... In the dialog box that opens, select
the *.fdf file that contains the data and click Open. The form will be populated with the data
from the *.fdf file.
·
Save form data
Click Edit > Form Data > Save Form Data to File.... In the dialog box that opens, provide a
name for your *.fdf file and click Save. The data from the form will be saved to the *.fdf file you
created.
·
Clear form fields
Click Edit > Form Data > Reset Form. All of the form fields will be cleared.
If JavaScript is disabled in the program settings, some of the elements in PDF forms may be unavailable.
For example, data format checks may be unavailable. You can enable JavaScript by clicking Options >
Other > Enable JavaScript in PDF documents opened in the PDF editor.
See also: PDF security features .
58
100
 Loading...