

Page 1

ABBYY® FineReader 10
Home Edition
User’s Guide
© 2010 ABBYY. All rights reserved.
Page 2

ABBYY FineReader 10 Home Edition User’s Guide
Information in this document is subject to change without notice and does not bear any commitment on the part of
ABBYY.
The software described in this document is supplied under a license agreement. The software may only be used or
copied in strict accordance with the terms of the agreement. It is a breach of the "On legal protection of software and
databases" law of the Russian Federation and of international law to copy the software onto any medium unless
specifically allowed in the license agreement or nondisclosure agreements.
No part of this document may be reproduced or transmitted in any from or by any means, electronic or other, for any
purpose, without the express written permission of ABBYY.
© 2010 ABBYY. All rights reserved.
ABBYY, the ABBYY logo, ABBYY FineReader, ADRT are either registered trademarks or trademarks of ABBYY
Software Ltd.
Fonts Newton, Pragmatica, Courier © 2001 ParaType, Inc.
Font OCR-v-GOST © 2003 ParaType, Inc.
© 2007 Microsoft Corporation. All rights reserved.
Microsoft, Outlook, Excel, PowerPoint, Visio, Windows Vista, Windows are either registered trademarks or trademarks
of Microsoft Corporation in the United States and/or other countries.
© 1991-2008 Unicode, Inc. All rights reserved.
OpenOffice.org is property of Sun Microsystems, Inc.
JasPer License Version 2.0:
© 2001-2006 Michael David Adams
© 1999-2000 Image Power, Inc.
© 1999-2000 The University of British Columbia
All other trademarks are the property of their respective owners.
2
Page 3

ABBYY FineReader 10 Home Edition User’s Guide
Contents
Overview.........................................................................................................................4
Working with ABBYY FineReader 10 Home Edition....................................................5
From Image to Text................................................................................................................................. 5
Scanner Interfaces..................................................................................................................................6
Editing Document Photos........................................................................................................................ 7
Saving Page Images............................................................................................................................... 8
Software Improvement Program.............................................................................................................9
Running ABBYY FineReader 10 Home Edition from Another Application ............................................. 9
Improving Conversion Quality............................................................................................................... 10
Tips................................................................................................................................13
Scanning Tips .......................................................................................................................................13
Taking Photos of Documents................................................................................................................ 14
Appendix.......................................................................................................................17
Supported Saving Formats ................................................................................................................... 17
Supported Image Formats .................................................................................................................... 17
Glossary................................................................................................................................................18
Keyboard Shortcuts............................................................................................................................... 18
Using Help............................................................................................................................................. 19
How to Buy an ABBYY Product..................................................................................22
ABBYY Offices and Technical Support Contacts ................................................................................. 22
About ABBYY........................................................................................................................................ 23
Activating and Registering ABBYY FineReader 10 Home Edition...........................24
Activation............................................................................................................................................... 24
Registration...........................................................................................................................................25
Privacy Policy........................................................................................................................................ 25
Technical Support........................................................................................................26
3
Page 4

ABBYY FineReader 10 Home Edition User’s Guide
Overview
ABBYY FineReader 10 Home Edition is an easy–to–use application that converts document scans and photos into
various text formats.
The application uses cutting edge technologies developed by ABBYY, which ensure very accurate optical character
recognition and retain the original formatting of your documents. With this application, you will never have to re–type
your paper documents and then restore their formatting in a word processor.
This latest version includes new features for working with digital photos. Additionally, the automatic image processing
feature has been improved: besides the automatic detection of page orientation available in the previous version, the
application will now automatically split an image of facing pages into t wo separ ate images, remove noise, and correct
blur and trapezoid distortions which may occur on digital photos of documents.
Replace your scanner with a digital camera or smartphone! Simply take a snapshot of your document, convert it with
ABBYY FineReader 10 Home Edition, and get an editable version on your computer.
4
Page 5
ABBYY FineReader 10 Home Edition User’s Guide
Working with ABBYY FineReader 10 Home Edition
This chapter provides instructions on converting images with ABBYY FineReader 10 Home Edition.
Chapter contents:
• From Image to Text
• Scanner Interfaces
• Editing Document Photos
• Saving Page Images
• Running ABBYY FineReader 10 Home Edition from Another Application
• Improving Conversion Quality
From Image to Text
With ABBYY FineReader 10 Home Edition, you can quickly get an electronic version of a paper document or convert
a document image into editable and searchable text.
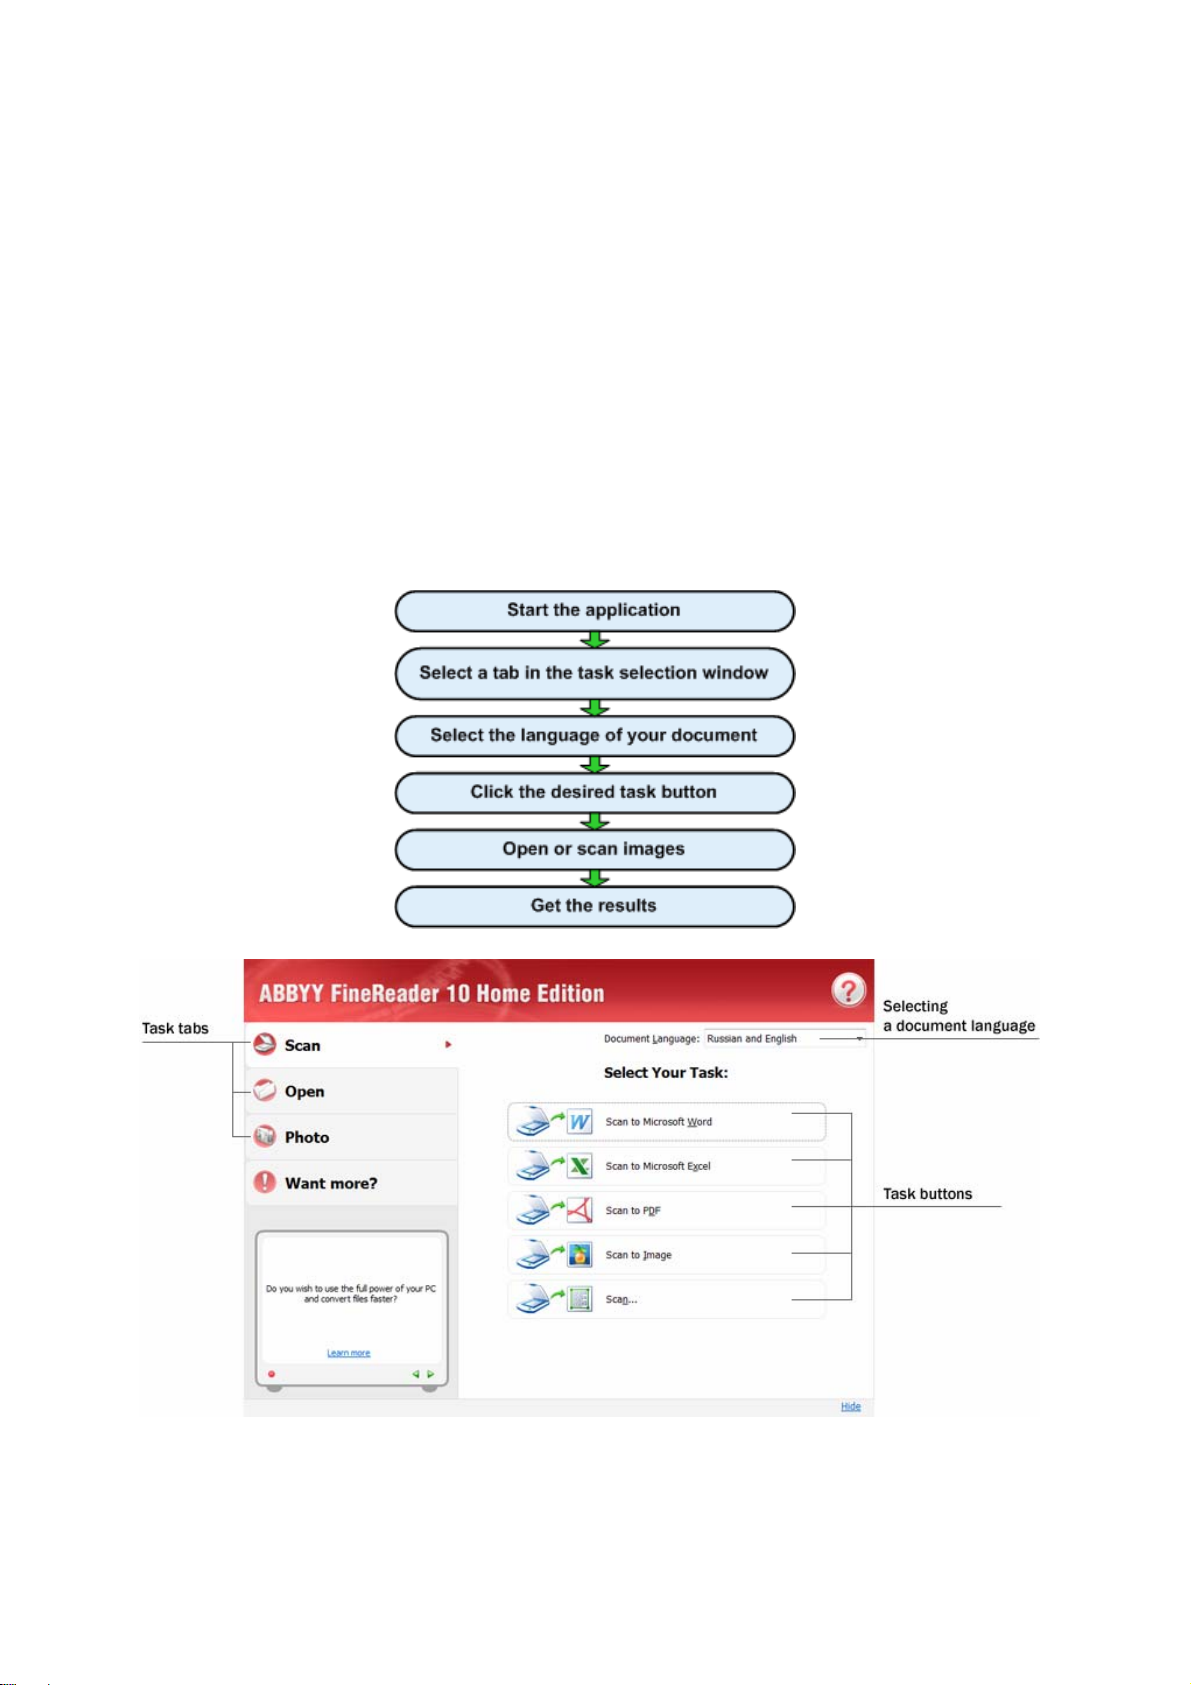
The flow chart below shows the steps required to convert a document:
Working with the application:
5
Page 6

ABBYY FineReader 10 Home Edition User’s Guide
1. Start ABBYY FineReader 10 Home Edition.
The main window will open, together with a New Task window, where you can quickly s elect and start a task.
2. There are four tabs in the New Task window:
Scan – This tab lists the image processing tasks for images obtained directly from a scanner. These tasks
require a scanner to be properly connected to your computer. The scanner must support the WIA or TWAIN
scanning interface.
Open – This tab lists the image processing tasks for images stored on your hard disk, on a removable
storage medium, or on a network drive.
Photo – This tab lists the image processing tasks for images contained directly from a digital camera or
digital photos stored on your computer. To get images from a camera, the camera must be connected to your
computer and must support the WIA interface.
Want more? – This tab provides information about ABBYY FineReader Professional Edition. You may want
to consider buying this application if you need to OCR large numbers of complex documents.
Click the tab that contains the task you need to perform.
3. In the Document Language list, select the language of your document
See the section named "If there are too many errors in the converted text" for additional information on
selecting the right language.
4. Click the button of the desired task.
5. Feed the images to the program (i.e. either scan paper documents or select document images already stored
on your computer).
Note: If you select the Photo task, the Photo Editor will be launched. See the "Editing Document Photos"
section for instructions on editing document photos.
6. The selected images will appear in the main window and will then be converted into the format of your
choice.
Note: Selecting the Scan… or Open Photo… task will not convert your images into a text format. The
images will appear in the main window with the various areas marked on them. For more about areas, see
the section named "If document formatting has not been retained."
Note:
1. You can use the tools on the main window toolbar to change the conversion settings. You can also save an
image in another image format (see the "Saving Page Images" section for details).
2. If you find the resulting document unsatisfactory, follow the recommendations provided in the "Improving
Conversion Quality" section.
3. The tasks available in the New Task window may vary depending on your version of the program and on
other software installed on your computer.
4. When you are converting mages in ABBYY FineReader 10 Home Edition, the application will displa y tips and
advice on document recognition, as well as news from ABBYY. You may disable this feature by clearing the
check box next to the corresponding item in the Help menu. With some types of license, you may not be able
to urn off this feature.
Scanner Interfaces
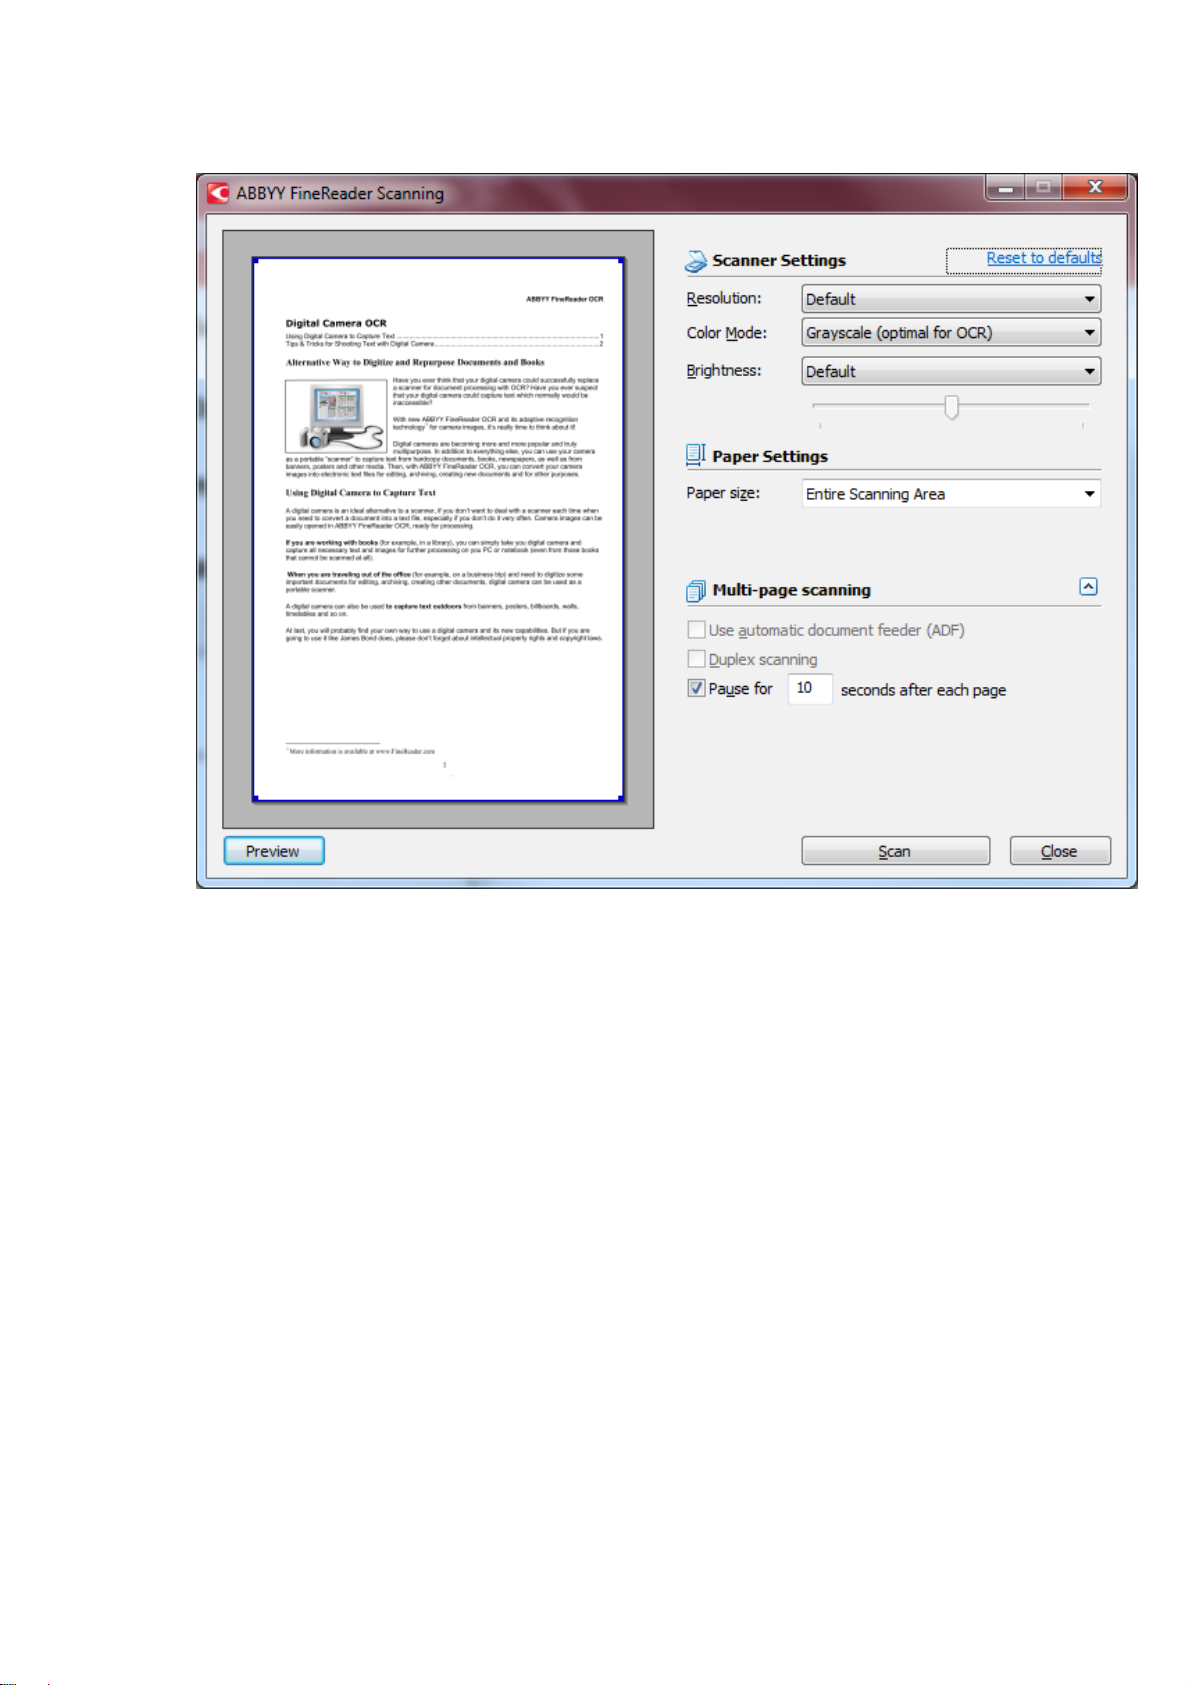
By default, ABBYY FineReader 10 Home Edition uses a built–in scanning dialog box named ABBYY FineReader
Scanning. If this dialog box is incompatible with your scanner, the dialog box provided by the driver of your scanner
will be used.
1. ABBYY FineReader Scanningdialog box
In this dialog box, you can make the following settings:
• Image resolution, scanning mode (grayscale, black and white, or color), and brightness.
• Paper size (you can select one of the standard sizes or specify a custom size).
• Scanning options for multi–page documents:
a. Use automatic document feeder (ADF)
b. Enable duplex scanning (if supported by your scanner)
6
Page 7
ABBYY FineReader 10 Home Edition User’s Guide
c. Pause bet ween pages
2. TWAIN and WIA interfaces
Scanning settings can also be made in the scanning dialog box provided by the driver of your scanner. See the
documentation of your scanner for a description of this dialog box.
Important! Please consult the documentation supplied with your scanner for instructions on how to connect the
scanner to your PC. Be sure to install the software supplied with your scanner.
See the "Scanning Tips" section for advice on selecting the right scanning options.
Editing Document Photos
Some document photos may have defects that prevent good quality OCR. These defects include optical distortions
that make the page look like a trapezium rather than like a rectangle, blurred letters that occur if you shake the
camera when taking the picture, and noise introduced by the image sensor of your camera.
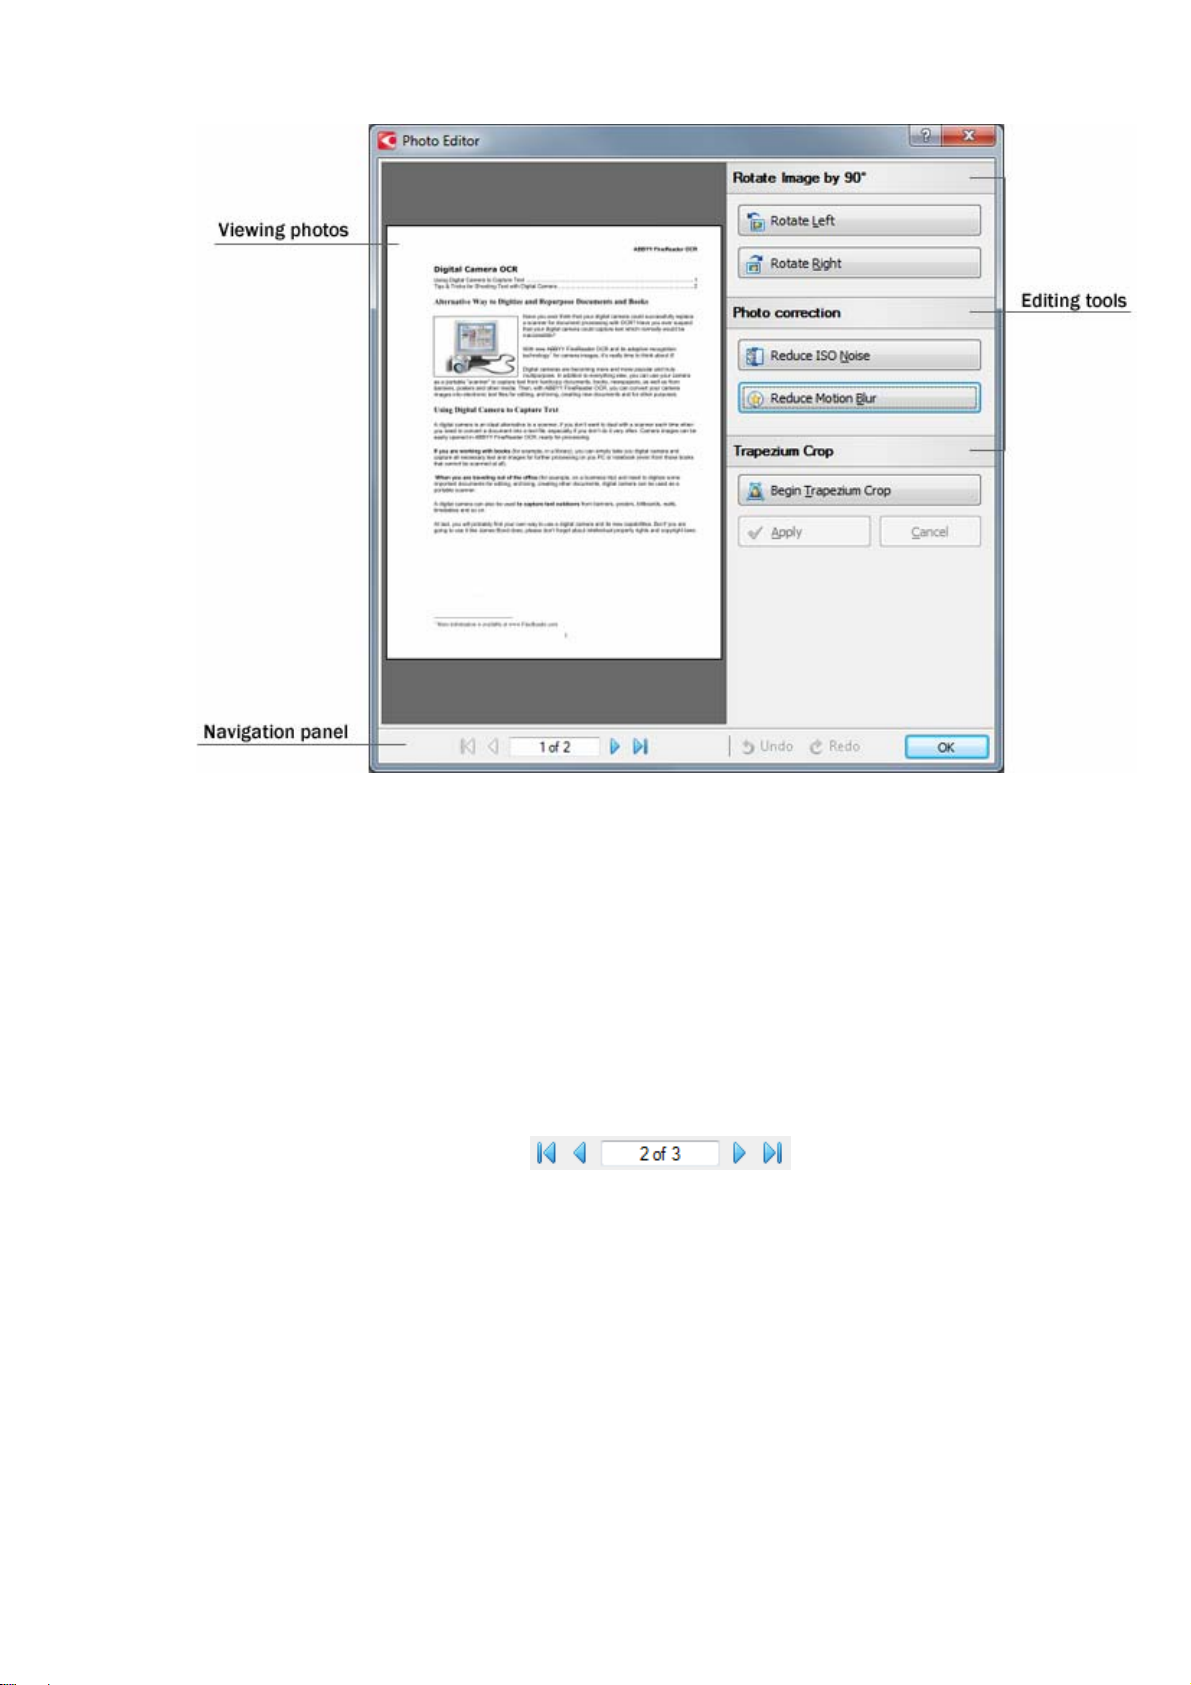
The software includes a Photo Editor where you can edit your images to m ake them more suitable for OCR.
7
Page 8
ABBYY FineReader 10 Home Edition User’s Guide
Editing images in the Photo Editor:
1. The Photo Editor is launched automatically when you start an image processing task (for example, when
you start a task from the Photo tab in the New Task window). See the "From Image to Text" section for more
information about tasks.
2. Edit your image:
• If the program failed to detect the orientation of the page, use the Rotate Left or Rotate Right buttons
to restore the normal orientation of the text.
• Use the Reduce ISO Noise and Remove Motion Blur buttons to clear up any noise and sharpen the
image.
• To correct any optical distortions, click the Begin Trapezium Crop button and then drag the corners of
the trapezium to turn it into a rectangle. Click Apply for the changes to take affect or Cancel to discard
the changes and close this tool.
3. Make all the necessary changes. Use the
Photo Editor.
4. When you are finished editing the images, click OK to start the OCR process.
buttons at the bottom of the
Saving Page Images
ABBYY FineReader 10 Home Edition allows you not only to convert images into text files, but also to save scanned or
opened images in various image formats.
To scan and save an image:
1. Start ABBYY FineReader Home Edition.
2. In the New Task dialog box, click the Scan tab and then click the Scan to Image button.
3. The ABBYY FineReader Scanning dialog box opens. Scan your documents and close this dialog box. See
the "Scanner Interface" section for more information about the scanning settings.
8
Page 9

ABBYY FineReader 10 Home Edition User’s Guide
4. The scanned images will appear in the main window and the Save As dialog box will automatical ly open.
5. Specify a name for the image file, select an image format and destination folder, and click Save.
Note: To save the images opened in the main window, select Save Images… from the File menu and then specify
the saving options. For more information about running a task, see the "From Image to Text" section.
Software Improvement Program
ABBYY makes every effort to make its software useful and user–friendly at the same time. To achieve this goal, we
need to be aware of how users interact with our software and which features they use most often.
For this purpose, ABBYY has started a Software Improvement Program, which is completely anonymous and requires
no effort on your part. If you agree to participate in the Program, ABBYY FineReader 10 Home Edition will periodically
send to ABBYY information about the options selected in your copy of the application, together with the release
number, build number, the type of your license, the name of the operating system used on your computer, and your
region. No personal data will be sent to ABBYY.
Note: To send the above information to ABBYY, your computer must be connected to the Internet.
If you wish to take part in the Software Improvement Program:
• When installing the application, select the corresponding item in the setup dialog b ox, or
• Select I wish to participate in the Software Improvement Program in the Help menu.
Note: You can opt out of the Software Improvement Program at any moment by clearing the check box next to the I
wish to participate in the Software Improvement Program item in the Help menu.
For the latest information about the Software Improvement Program, please visit our Web site at www.abbyy.com.
Running ABBYY FineReader 10 Home Edition from Another Application
When you install ABBYY FineReader 10 Home Edition, you can choose to integrate the program with the Microsoft
Office applications installed on your computer and with Windows Explorer. Additionally, STI integration adds ABBYY
FineReader 10 Home Edition to the list of scanning applications available on your computer.
If you choose to integrate ABBYY FineReader 10 Home Edition with other applications:
• If Microsoft Office 2007 or 2010 is installed on your computer, an ABBYY FineReader 10 tab is added to
Microsoft Word, Microsoft Excel, and Microsoft Outlook. If Microsoft Office 2003 is installed on your
computer, an ABBYY FineReader 10 Home Edition toolbar is added.
In Microsoft Word and Microsoft Excel, you will be able to scan, open, and convert images and photos into a
new Microsoft Word or Microsoft Excel document. In Microsoft Outlook, you will be able to convert e–mail
attachments into various editable formats.
• In Windows Explorer, an ABBYY FineReader 10 Home Edition item will appear in the pop–up menu when
you right–click a file in any of the supported image formats. Selecting one of the sub–items will convert the
image file into the respective format.
• Pressing the Scan or similarly named button on your scanner will open the list of available scanning
applications, which will include ABBYY FineReader 10 Home Edition. Selecting this item will scan the
document directly into ABBYY FineReader 10 Home Edition.
To convert an image from within Microsoft Word or Microsoft Excel...
1. In Microsoft Word or Microsoft Excel, click the appropriate button on the ABBYY FineReader 10 Home Edition
ribbon:
•
•
2. When a dialog box with conversion settings appears, select the langu age of your document and click Convert.
- Scans, recognizes, and converts an image.
/ - Recognizes and converts images and photos into a new document.
9
Page 10

ABBYY FineReader 10 Home Edition User’s Guide
3. Next, scan your documents or open existing document images. If you click the button, the Photo Editor
will be launched, where you can adjust the photos prior to recognition. See the "Editing Document Phot os"
section for details.
4. Once the conversion is completed, the recognition results will be displayed in a new document.
To convert an image from within Microsoft Outlook...
1. In Microsoft Outlook, click the Convert button on the ABBYY FineReader 10 Home Edition ribbon.
2. Select the files to convert, the language of your document, and a destination format and click Convert.
3. The images will be converted into the selected format.
To convert an image from Windows Explorer...
1. In Windows Explorer, select a file or files in any of the supported image formats.
2. Right-click the file(s), select ABBYY FineReader 10 Home Edition, and then select the appropriate sub-item.
3. Select the language of your document and a destination format and click Convert.
4. The images will be converted into the selected format.
If you do not see the ABBYY FineReader 10 tab in a Microsoft Office application or if there is no ABBYY FineReader
10 Home Edition item in Windows Explorer, this means that you chose not to integrate ABBYY FineReader 10 Home
Edition during setup.
In this case you will need to uninstall the program and then install it again with the integration options en abled should
you wish to integrate it.
Improving Conversion Quality
When you click Convert, the program recognizes the text on the image and converts it into a format of your choice.
The quality of recognition and conversion is greatly affected by the quality of the image an d the selected recognition
language.
When recognizing an image, the program detects image areas that contain text, pictures, and tables. T he program
then uses this information to reproduce the layout of the original document.
To achieve better recognition quality:
1. In the main program window
• Ensure that the correct page orientation is selected
See "Rotating Images" for more information.
• Adjust the detected image areas or select them manually if your document has a complex layout.
See "If document formatting has not been retained..." for more information.
• Ensure that the correct language is selected in the Document Language list
See "If there are too many errors in the converted text..." for more information.
• Make sure that the correct format is selected in the Convert To field.
2. Click Convert.
Rotating Images
For the text to be recognized correctly, your images must have the usual reading orientation, i.e. the text must start at
the top and the lines must be horizontal. When images are loaded, the application autom atically detects the
orientation of the pages. If the application fails to detect the orientation of a page correctly, you can manually rotate
the image.
To rotate an image:
1. Open the page you wish to rotate.
Use the navigation tools at the bottom of the main program window to navigate the pages:
.
2. On the How can I improve OCR quality? pane, select one of the tools:
10
Page 11

ABBYY FineReader 10 Home Edition User’s Guide
•
Rotates the image 90 degrees to the right.
• (Rotate Left)
Rotates the image 90 degrees to the left.
Note: The Photo Editor is launched automatically when you start working on digital photos. You can rotate images in
the Photo Editor as well.
(Rotate Right)
If document formatting has not been retained...
When recognizing a document, the program attempts to detect the following areas on the image: Text, Picture, and
Table. The program relies on this analysis to determine which areas to convert and how. The areas are enclosed in
color frames in the main window, each area type having its own color.
Sometimes you may need to adjust the areas manually. You can select, delete, move areas, and change their types.
Use the Tab key to navigate through the areas.
To select an area manually:
1. On the How can I improve OCR quality? pane, select one of the tools:
• (Draw Text Area)
The program will convert this area into text.
•
The program will save this area as a picture.
(Draw Picture Area).
•
The program will reproduce the table contained in this area.
2. Use your mouse to draw a frame around an area.
Changing area types...
1. Right-click an area.
2. On the shortcut menu, select Change Area Type and then select the desired type
Adjusting area borders...
1. Click the area border and hold down the left mouse button. The mouse pointer will turn into a two-headed
arrow.
2. Drag the pointer in the desired direction.
3. Release the mouse button.
Note: If you click an area corner, you can move both the horizontal and vertical borders of the area at the same
time.
Moving an area...
• Select the desired area and, while holding down the CTRL button, move the area to the desired location.
Deleting an area...
• Select the (Delete Area) tool and click the area you wish to delete, or
(Draw Table Area).
• Right-click the area and select Delete Area from the shortcut menu, or
• Select the area you wish to delete and press DEL.
If there are too many errors in the converted text...
Recognition and conversion quality may be affected by the qualit y of the image a nd by the recognition language you
selected when setting up the task.
If the text contains too many errors or is illegible, be sure to select the right language in the Document Language list.
11
Page 12

ABBYY FineReader 10 Home Edition User’s Guide
To select a language:
1. From the Document Language drop–down list, select More languages…
The Language Editor dialog box will appear.
2. Select Specify languages manually and then select the desired language by placing a check next to its
name.
For a complete list of available languages, see the "Supported Languages" section.
If your document contains text in more than one language, try selecting the Autoselect item in the Document
Language list. The program will attempt to select the correct language automatically from the list of likely languages.
What are the likely languages?
From the above list, the program will use only those languages for which a dictionary is available.
Important! The number of languages used by the Autoselect feature may vary, depending on your version of the
program.
12
Page 13

ABBYY FineReader 10 Home Edition User’s Guide
Tips
This chapter provides additional advice on scanning documents and taking pictures of documents for subsequent
OCR.
Chapter contents:
• Scanning Tips
• Taking Photos of Documents
Scanning Tips
You can set the scanning options in the ABBYY FineReader Scanning dialog box or in the scanner driver dialog box.
See the "Scanner Interface" section for more information about the dialog box.
• Make sure that your scanner is connected properly and switched on.
Consult your scanner documentation to ensure it is set up correctly. Be sure to install the software provided
with your scanner. Some scanner models must be switched on before you power up the computer.
• Place your documents face down on the scanner, making sure they are properly adjusted. Skewed images
may be converted incorrectly.
• Printed documents are best scanned in grayscale at 300 dpi.
Conversion quality depends on the quality of the original document and scanning parameters. Poor image
quality may have an adverse effect on the quality of conversion. Be sure to select the scanning parameters
appropriate for your document.
More information about some of the scanning options is available in these sections:
• Selecting the Right Resolution
• Tuning Brightness
Selecting the Right Resolution
The quality of conversion is affected by scanning resolution. Poor quality scans may pro duce inferior results.
Recommended scanning resolution is 300 dpi.
Important! ABBYY FineReader 10 Home Edition shows best OCR performance when vertical and horizontal
resolutions are the same.
Very high resolution settings (over 600 dpi) result in greater recognition and conversion times without any noticeable
increase in recognition quality. Very low resolution settings (below 150 dpi) ma y adversely affect the quality of
recognition and conversion.
Font size and resolution:
• 300 dpi for typical texts printed in fonts of size 10 pt or larger
• 400–600 dpi for texts printed in smaller fonts of 9 pt or smaller
Tuning Brightness
Scanned images must be legible. Wrong brightness settings may adversely affect the quality of recognition and
conversion.
In most cases the medium brightness value of 50% will be suitable.
If the resulting image contains too many letters that are "torn apart" or "stuck together," troubleshoot using the table
below.
If your image looks like this Do the following
This is a good quality image.
characters are "torn apart" or very light
• Lower the brightness to make the image darker.
• Scan in grayscale. Brightness will be tuned automatically.
13
Page 14

ABBYY FineReader 10 Home Edition User’s Guide
characters are distorted or stuck together
• Increase the brightness to make the image brighter.
• Scan in grayscale. Brightness will be tuned automatically.
Taking Photos of Documents
• Camera Requirements
• Lighting
• Taking Photos
• When you need to take another photo
Camera Requirements
Your camera should meet the following requirements in order to obtain document images that can be reliably
recognized.
Recommended camera characteristics
Minimum requirements
Note: For detailed information about your camera, please refer to the documentation supplied with your device.
• Image sensor: 5 million pixels for A4 pages. Smaller sensors may be sufficient for taking pictures of smaller
documents such as business cards.
• Flash disable feature
• Manual aperture control, i.e. availability of Av or full manual mode
• Manual focusing
• An anti–shake system or use of a tripod
• Optical zoom
• Image sensor: 2 million pixels for A4 pages
• Variable focal distance. Fixed–focus cameras (lens focused on infinity) should not be used to photograph
documents. These types of camera are commonly built into mobile phones and PDAs.
Lighting
Lighting greatly affects the quality of the resulting photo.
Best results can be achieved with bright and evenly distributed light, preferably daylight. On a bright sunny day, you
can increase the aperture number to get a sharper picture.
Using flash and additional light sources
• When using artificial lighting, use two light sources positioned so as to avoid shadows or glare.
• If there is enough light, turn the flash off to prevent sharp highlights and shadows. When using the flash in
poor lighting conditions, be sure to take photos from a distance of approximately 50 cm.
Important! The flash must not be used to take pictures of documents printed on glossy paper. Compare an image
with galre with a good quality image:
14
Page 15

ABBYY FineReader 10 Home Edition User’s Guide
If the image is too dark
• Set a lower aperture value to open up the aperture.
• Set a higher ISO value.
• Use manual focus, as automatic focus may fail and cause blur.
Compare an image that is too dark with a good quality image:
Taking Photos
To obtain good quality photos of documents, be sure to position the camera correctly and follow these simple
recommendations.
• Use a tripod whenever possible.
• The lens should be positioned parallel to the page and look to wards the center of the doc ument. The
distance between the camera and the document should be selected so that the entire page fits within the
frame when you zoom in. In most cases this distance will be between 50 and 60 cm.
• Even out the paper document or book pages (especially in the case of thick books). The text lines shoul d not
be skewed by more than 20 degrees, otherwise the text may not be converted properly.
• To get sharper images, focus on a part of the image between the center of the document and one of its
edges.
• Enable the anti–shake system, as longer exposures in poor lighting conditions may cause blur.
• Use the automatic shutter release feature. This will prevent the camera from moving when you press the
shutter release button. The use of automatic shutter release is recommended even if you use a tripod.
When you need to take another photo
Please make sure that your camera meets the technical requirements and follow the simple recommendations
provided in the "Lighting" and "Taking Photos" sections.
How to improve an image, if:
• the image is too dark and too soft
Solution: Try to use brighter lighting. Otherwise, set a lower aperture value, i.e. open up the aperture.
• the image is not sharp enough
Solution: Autofocus may not work properly in poor lighting or when taking pictures from a close distance. Try
15
Page 16

ABBYY FineReader 10 Home Edition User’s Guide
using brighter lighting. If this does not help, try focusing the camera manually.
In the case of small blur, try using the Remove Motion Blur tool in the Photo Editor. See the "Editing
Images" section for details.
• only part of the image is blurry
Solution: Try setting a higher aperture value. Take pictures from a greater distance at maximum optical
zoom. Focus on a point between the center and the edge of the image.
• flash causes glare
Solution: Turn off the flash or try using other light sources and increasing the distance between the camera
and the document.
16
Page 17

ABBYY FineReader 10 Home Edition User’s Guide
Appendix
Chapter contents
• Supported Languages
• Supported Saving Formats
• Supported Image Formats
• Glossary
• Keyboard Shortcuts
• Using Help
Supported Saving Formats
ABBYY FineReader 10 Home Edition can save recognized texts in the following formats:
• Microsoft Word 97–2003 Document (DOC)
• Microsoft Word 2007–2010 Document (DOCX)
• Microsoft Excel 97–2003 Worksheet (XLS)
• Microsoft Excel 2007–2010 Workbook (XLSX)
• Rich Text Format (RTF)
(*)
• Portable Document Format (PDF)
• HyperText Markup Language (HTM)
• Plain Text (TXT)
(*)
– Some versions of ABBYY FineReader Home Edition distributed as part of a promotional campaign may not
support this format.
Supported Image Formats
The table below lists the image formats supported in ABBYY FineReader 10 Home Edition.
Format File Extension Open Save
Bitmap bmp, dib, rle + +
DCX dcx + –
GIF gif + –
JBIG2 jb2, jbig2 + –
JPEG jpg, jpeg + +
JPEG 2000 jp2, j2k + +
PCX pcx + –
PNG png + +
TIFF tif, tiff + +
17
Page 18

ABBYY FineReader 10 Home Edition User’s Guide
Glossary
A
ABBYY Screenshot Reader is an application that makes screenshots of selected areas and either saves them as
image files or recognizes the text inside.
activation The process of switching the application from demonstration mode to full mode.
activation code A code obtained by the user when activating his/her copy of ABBYY FineReader 10 Home Edition.
The activation code is used to activate the program on the computer that generated the Product ID.
area A section on an image enclosed by a frame. Before performing OCR, ABBYY FineReader 10 Home Edition
detects text, picture, and table areas in order to determine which sections of the image should be recognized and in
what order.
Automatic Document Feeder (ADF) A device that automatically feeds documents to a scanner. A scanner with an
ADF can scan multiple pages without user intervention.
D
dots per inch (dpi) A standard of measurement for the resolution of images.
driver A software program that controls a computer peripheral (a scanner, a monitor, etc).
L
license file A file obtained by the user when activating his/her copy of ABBYY FineReader 10 Home Edition. The
license file is used to activate the program on the computer that generated the Product ID.
P
page layout refers to the positioning of text fragments, tables, and pictures in a document. It also describes the
paragraphs, fonts, columns, text direction, letter colors, and text backgrounds used in a document.
picture area An area that contains a picture. This type of area may enclose an actual picture or any other object that
should be displayed as a picture (e.g. a section of text).
Product ID The parameter that is automatically generated based on the hardware configuration when activating
ABBYY FineReader 10 Home Edition on a particular computer.
R
resolution A scanning parameter that determines what dpi setting to use for scanning. Resolution of 300 dpi should
be used for texts set in 10 pt fonts and larger, 400 to 600 dpi is preferable for texts of smaller font sizes (9 pt and
less).
S
scanner A device for inputting images into a computer.
shortcut menu is a menu which appears when you right–click an object. For example, you can right click an image
area or any other part of an image to open its shortcut menu.
T
table area An area that contains a table or text that is structured as a table. When the application reads this type of
area, it draws vertical and horizontal separators inside the area to form a table. The table is then recreated in the
output text.
text area An area that contains text. Note that text areas should only contain single–column text.
U
Unicode A standard developed by the Unicode Consortium (Unicode, Inc.). The standard is a 16–bit
international encoding system for processing texts written in the main world languages. The standard is easily
extended. The Unicode Standard determines the character encoding, as well as properties and procedures used in
processing texts written in a certain language.
Keyboard Shortcuts
File menu
To Press
convert an image again CTRL+Enter
Edit menu
To Press
undo the last action CTRL+Z
redo the last action CTRL+Y
18
Page 19

ABBYY FineReader 10 Home Edition User’s Guide
copy the selected fragment to the Clipboard CTRL+C
Page menu
To Press
select all areas CTRL+A
delete the selected area DEL
delete all areas CTRL+DEL
View menu
To Press
open the next page CTRL+Page Down
open the previous page CTRL+P age Up
Help menu
To Press
open Help F1
Using Help
Keyboard shortcuts for the Help window
To Press
display the Help window F1
switch between a Help topic and the Contents,
Search, or Index panes
display the Options menu to access any Help
toolbar commands
F6
ALT+O
hide or show the pane with the Contents,
Search, and Index tabs
display one of the previously viewed topics ALT+O and then press B to go back or F to go forward
return to the specified home page ALT+O and then press H
stop the Help window from opening a Help topic
(useful if you want to stop a Web page from
downloading)
ALT+O and then press T
ALT+O and then press S
19
Page 20

ABBYY FineReader 10 Home Edition User’s Guide
open the Internet Options dialog box for
Microsoft Internet Explorer, where you can
change the accessibility settings
refresh the topic (when viewing a Web page) ALT+O and then press R
print all topics in the current book or the selected
topic only
close the Help window ALT+F4
ALT+O and then press I
ALT+O and then press P
Using the Contents, Search, and Index pane
Press F6 to switch from the Help topic to the Contents, Search, and Index pane.
To Press
switch to the next tab CTRL+TAB
switch to the Contents tab
switch to the Search tab
switch to the Index tab
ALT+C
ALT+S
ALT+N
open a selected book or Help topic ENTER
select the next book or Help topic DOWN ARROW
select the previous book or Help topic UP ARROW
display a shortcut menu SHIFT+F10
Using the topic pane
Press F6 to switch from the Contents, Search, and Index pane to the open Help topic.
To Press
go to the next Help topic ALT+RIGHT ARROW
go to the previous Help topic ALT+LEFT ARROW
select the next hidden text or hyperlink TAB
select the previous hidden text or hyperlink SHIFT+TAB
perform an action for the selected hidden text or hyperlink ENTER
scroll toward the beginning or end of a Help topic UP ARROW or DOWN ARROW
scroll toward the beginning or end of a Help topic in large
increments
go to the beginning or end of a Help topic HOME or END
PAGE UP or PAGE DOWN
20
Page 21

ABBYY FineReader 10 Home Edition User’s Guide
print the current Help topic CTRL+P
select the entire Help topic CTRL+A
copy the selected items to the Clipboard CTRL+C
display a shortcut menu SHIFT+F10
Keyboard shortcuts for browsing search results
To select a topic, use the UP or DOWN arrow keys and then press ENTER to open the topic in the Help window.
21
Page 22

ABBYY FineReader 10 Home Edition User’s Guide
How to Buy an ABBYY Product
You can buy ABBYY products from our online store or from our partners (see http://www.abbyy.com for the list of
ABBYY partners).
For detailed information about ABBYY products
• visit our Web site at http://www.abbyy.com
• call us at +7 495 783 37 00, or send a fax to +7 495 783 26 63
• write to us at sales@abbyy.com
ABBYY Offices and Technical Support Contacts
North/Central Americas
Western Europe
Eastern Europe and the
Mediterranean
Customers from the USA, Canada, Mexico, and Central American countries, please
contact:
ABBYY USA
Phone: +1 408 457 9777
Fax: +1 408 457 9778
Address: 880 North McCarthy Blvd., Suite #220, Milpitas, CA 95035, USA
E–mail: sales@abbyyusa.com
Support e–mail: support@abbyyusa.com
Web: http://www.abbyyusa.com
Customers from Austria, Benelux, Denmark, France, Germany, Greece, Italy, Ireland,
Norway, Portugal, Spain, Sweden, Switzerland, the United Kingdom or other Western
European countries, please contact:
ABBYY Europe GmbH
Phone: +49 89 511 159 0
Fax: +49 89 511 159 59
Address: Elsenheimerstrasse 49, 80687 Munich, Germany
E–mail: sales_eu@abbyy.com
Support e–mail: support_eu@abbyy.com
Web: http://www.abbyy.com
Customers from Albania, Bosnia and Herzegovina, Bulgaria, Croatia, the Czech
Republic, Hungary, Israel, Macedonia, Moldova, Montenegro, Poland, Romania,
Serbia, Slovakia, Turkey or Ukraine, please contact:
ABBYY Ukraine
Phone: +380 44 490 9999
Fax: +380 44 490 9461
Address: P.O. Box 23, 02002 Kiev, Ukraine
E–mail: sales@abbyy.ua
Support phone: +380 44 490 9463
Support e–mail: support@abbyy.ua
Web: http://www.abbyy.ua
Asia, Baltic, Middle
East, South America,
Africa
Japan
Customers from Asia, Baltic, Middle East, South America, Africa, please contact:
ABBYY 3À
Phone: +7 495 783 3700
Fax: +7 495 783 2663
Address: P.O. Box 20, Moscow 127273, Russia
E–mail:sales_3A@abbyy.com
Support e–mail: support@abbyy.com
http://www.abbyy.com
http://www.abbyy.cn
http://www.abbyy.com.br
Customers from Japan, please contact:
ABBYY Japan
Phone:+81 42 796 6125
Fax: +81 42 796 6125
Address: 658–1 Tsuruma, Machida–shi, Tokyo 194–0004
22
Page 23

ABBYY FineReader 10 Home Edition User’s Guide
E–mail: sales@abbyyusa.com
Support e–mail: support@abbyyusa.com
http://www.abbyy.com
All other regions
Customers from the countries not mentioned above, please contact:
ABBYY Russia
Phone: +7 495 783 3700
Fax: +7 495 783 2663
Address: P.O. Box 32, Moscow 127273, Russia
E–mail: sales@abbyy.com
Support e–mail: support@abbyy.ru
Web: http://www.abbyy.ru
http://www.abbyy.com
About ABBYY
Russian–based ABBYY is one of the world's leading developers of optical character recognition (OCR), intelligent
character recognition (ICR), and language software.
ABBYY products include:
• ABBYY FineReader, an optical character recognition program. It is an ideal solution for those requiring
exceptional recognition quality and text layout preserved. ABBYY FineReader quickly and precisely
transforms printed documents, PDF files, and digital photos into editable formats. The results can be edited
in Microsoft Office applications, sent vie e–mail, or published on the Internet.
• ABBYY PDF Transformer, a versatile and easy–to–use program for working with PDF documents. With this
application, you can convert PDF files into editable formats, create PDF files from Microsoft Office
documents, and combine PDF files into one document.
• ABBYY Lingvo, a set of dictionaries, encyclopedias, and professional translation services for PCs, PDAs,
and smartphones. The software includes the most up–to–date dictionaries and enables you to translate texts
quickly and accurately using the pop–up translation function and online dictionaries. Language learning aids
include audio pronunciations, a grammar guide, and Lingvo Tutor.
• ABBYY FlexiCapture, a powerful data capture system that works with all types of documents, including
various types of forms (questionnaires, applications, etc.). The software is highly scalable and supports
distributed processing. Both printed and hand–printed texts can be captured.
• ABBYY Recognition Server, a high–performance server application for document recognition. It can
function independently or as an integral part of electronic document management systems and digital
archives.
• ABBYY products for developers include products for developers of dataflow systems, enabling them to
integrate recognition, full–text search, and morphology analysis functions into their applications.
Throughout the world, organizations working with printed documents use ABBYY software to automate labor–
intensive work and optimize business processes. ABBYY's products are used in large–scale government projects, for
example by Australian Taxation Office, the Tax Inspection of the Republic of Latvia, the Ministry of Education of the
Russian Federation, the Ministry of Education of Ukraine, and the Government of Montgomery County, USA.
Technologies developed by ABBYY are licensed by BancTec, Canon, EMC/Captiva, Hewlett–Packard, Microsoft,
NewSoft, Notable Solutions, and Samsung Electronics. Optical character recognition software is bundled with
equipment of the world's leading manufacturers: BenQ, Epson, Fujitsu, Fuji Xerox, Microtek, Panasonic, Plustek,
Toshiba, Xerox and others.
The company is headquartered in Moscow, with regional offices in Germany, USA, Japan, Ukraine, and T aiwan.
For more information on ABBYY and its products, please visit www.abbyy.com.
23
Page 24

ABBYY FineReader 10 Home Edition User’s Guide
Activating and Registering ABBYY FineReader 10 Home Edition
Software piracy hurts software manufacturers and end users alike—using an illegal produ ct is never safe. Legal
software ensures that third party companies cannot introduce detrimental code changes. ABBYY makes every effort
to protect its intellectual property rights and the security of its customers through a variety of anti–piracy measures.
ABBYY's software includes special protection technology which prevents unauthorized use of software copies by
users who have not entered into a license agreement with ABBYY.
To be able to run ABBYY FineReader 10 Home Edition in full mode, you need to activate it.
Registration is optional for most types of license and provides a number of benefits.
Chapter contents:
• Activation
• Registration
• Privacy Policy
Activation
After you install ABBYY FineReader 10 Home Edition, you need to activate the program to be able to run it in full
mode. In restricted mode, some of the features will be unavailable. The set of disabled features may vary depending
on your version and region.
To activate ABBYY FineReader 10 Home Edition:
1. From the Help menu, select Activate ABBYY FineReader….
2. Follow the instructions of the Activation Wizard.
If you choose to activate your copy over the Internet, the program will receive the activation code automatically. If
you choose to activate your copy by phone, by e–mail, or on the Web site, simply enter the activation code or
provide the path to the license file in the corresponding dialog box of the Activation Wizard.
Once you have activated your copy, ABBYY FineReader 10 Home Edition will run on this computer in full mode.
Note: If you have a time–limited license, you will only be able to use the program for the time period specified in your
license.
More about activation methods:
• Over the Internet
Activation is carried out automatically and takes only seconds to complete. This method requires an active
Internet connection.
• On the Web site
Use this method if you need to activate your copy from a different computer. This method requires an active
Internet connection.
• By e–mail
The program will automatically generate an e–mail message which will include the data required to activate
your copy of ABBYY FineReader 10 Home Edition. After you send this e–mail message to ABBYY, you will
receive a license file in reply.
Important! Be sure not to alter the subject field and the body of the generated e–mail message to ensure a quick
reply from the activation system.
• By phone
Select your country in the corresponding dialog box of the Activation Wizard. T he wizard will show the
telephone numbers of the nearest ABBYY office or partner in your area. Communicate the serial number and
the Product ID displayed in the Activation Wizard to the technical support specialist.
Note: This activation method is not available for some types of license.
The Activation Wizard creates a unique Product ID parameter based on your hardware configuration at the time of
activation. This parameter does not include any personal information, information about the make of your computer,
installed software, user settings, or data stored on your computer. The Activation Wizard transfers the Product ID to
the activation system, together with the serial number, the name and version of the software product, and the interface
language. This information will be used to select the appropriate language and content of the activation results
message and will not be used for any other purposes.
You can re–install ABBYY FineReader 10 Home Edition on the computer on which it was activated as often as you
wish, without activating it again. The ABBYY FineReader Activation Wizard detects and tolerates changes to your PC
configuration. Minor upgrades will not require re–activation. If major upgrades are made to the system (i.e. formatting
the hard disk or re–installing the operating system), you may need to obtain a new activation code.
24
Page 25

ABBYY FineReader 10 Home Edition User’s Guide
Registration
ABBYY invites you to become a registered user of ABBYY FineReader 10 Home Edition.
Important! Registration may be obligatory for some versions of the product.
To register your copy, do one of the following:
• Fill out the registration form when activating the program.
• From the Help menu, select Register Now… and fill out the registration form.
• Register your copy on the ABBYY Web site.
Registration benefits:
1. Free technical support.
2. E–mail notifications about new ABBYY releases.
3. BONUS APPLICATION! When you register ABBYY FineReader 10 Home Edition, you get ABBYY
Screenshot Reader for free. ABBYY Screenshot Reader creates screenshots of any part of the computer
screen and performs OCR on areas that contain text.*
__________________________
* ABBYY Screenshot Reader is available to registered users of certain ABBYY software products. For the full list of
products and terms of use, please visit http://www.abbyy.com.
Privacy Policy
You agree to transfer your personal data to ABBYY during registration of ABBYY FineReader 10 Home Edition. You
also agree that ABBYY can collect, process, and use the data provided by you on condition of confidentialit y an d
under applicable law in accordance with the End–User License Agreement. The personal information you provide will
be used within ABBYY group of companies only, and will not be disclosed to any third party unless provided for by
applicable law or by the End–User the License Agreement.
ABBYY may send you e–mail messages containing product news, pricing information, special offers, and other
company and product information only if you agree to receive such information from ABBYY by selecting the
correspondent option during registration. You can delete your e–mail ad dress from the list of subscribers at any time
by contacting ABBYY.
25
Page 26

ABBYY FineReader 10 Home Edition User’s Guide
Technical Support
If you have any questions regarding the use of ABBYY FineReader 10 Home Edition, please consult all the
documentation you have (the User's Guide and Help) before contacting the technical support service. You may also
wish to browse the technical support section on the ABBYY Web site at www.abbyy.com/support — you may find the
answer to your question there.
To contact our technical support, please see the "ABBYY Offices and Technical Support Contacts" page.
Our technical support service specialists will need the following information to answer your question com petently:
• your first and last name
• the name of your company or organization (if you are a legal entity)
• your telephone number (or fax or e–mail)
• the serial number of your ABBYY FineReader 10 Home Edition package
• build number (see Help>About… >Build)
• a general description of your problem and the full text of the error message (if any)
• the type of your computer and processor
• the version of your Windows operating system
• any other information you consider important
You can gather some of the above information automatically:
1. Select Help>About…
2. In the About ABBYY FineReader dialog box, click the System Info… button.
A dialog box will open displaying some of the above information
Important! Only registered users are eligible for free technical support. You can register your copy of the application
on the ABBYY Web site or by selecting Help>Register Now…
Note: Should you have any questions about how to use ABBYY FineReader 10 Home Edition, please contact your
nearest ABBYY Office.
26
 Loading...