

Page 1

Radio Wireless Wheel Mouse
User’s Guide
MODEL: RFW-25
Trademark Recognition
Windows, Office 97 and MS-IntelliMouse are registered trademarks of Microsoft Corp.
MN-RFW25-NC
Page 2

THIS DEVICE COMPLIES WITH PART 15 OF THE FCC RULES. OPERATION IS
SUBJECT TO THE FOLLOWING TWO CONDITIONS: (1) THIS DEVICE MAY
NOT CAUSE HARMFUL INTERFERENCE AND (2) THIS DEVICE MUST ACCEPT
ANY INTERFERENCE RECEIVED, INCLUDING INTERFERENCE THAT MAY
CAUSE UNDESIRED OPERATION.
Federal Communications Commission Requirements
The equipment has been tested and found to comply with the limits for Class B Digital
Device, pursuant to part 15 of the FCC Rules. These limits are designed to provide reasonable
protection against harmful interference in a residential installation. This equipment generates,
uses and can radiate radio frequency energy and, if not installed and used in accordance with
the instruction, may cause harmful interference to radio communication. However, there is no
guarantee that interference will not occur in a particular installation. If this equipment does
cause harmful interference to radio or television reception, which can be determined by
turning the equipment off and on, the user is encouraged to try to correct the interference by
one or more of the following measures:
l Reorient of relocate the receiving antenna.
l Increase the separation between the equipment and receiver.
l Connect the equipment into an outlet on a circuit different from that to which the
receiver is connected.
l Consult the dealer or an experienced radio/TV technician for help.
The changes or modifications not expressly approved by the party responsible for compliance
could void the user's authority to operate the equipment.
— 1 —
Page 3
Introduction
Congratulations on your purchase! Your new RF-Mouse is easy to install and offers you a host of useful features. The
Radio receiver can be conveniently placed to give you the freedom you need while working. The vertical wheel
allows you to scroll, or zoom in and out in a document. You can program the mouse buttons to launch the NetJump
or LuckyJump for a quick start to programs you run frequently. And, your RF-Mouse has a unique ID code, so other
RF (Radio Frequency) pointing devices won’t affect your system.
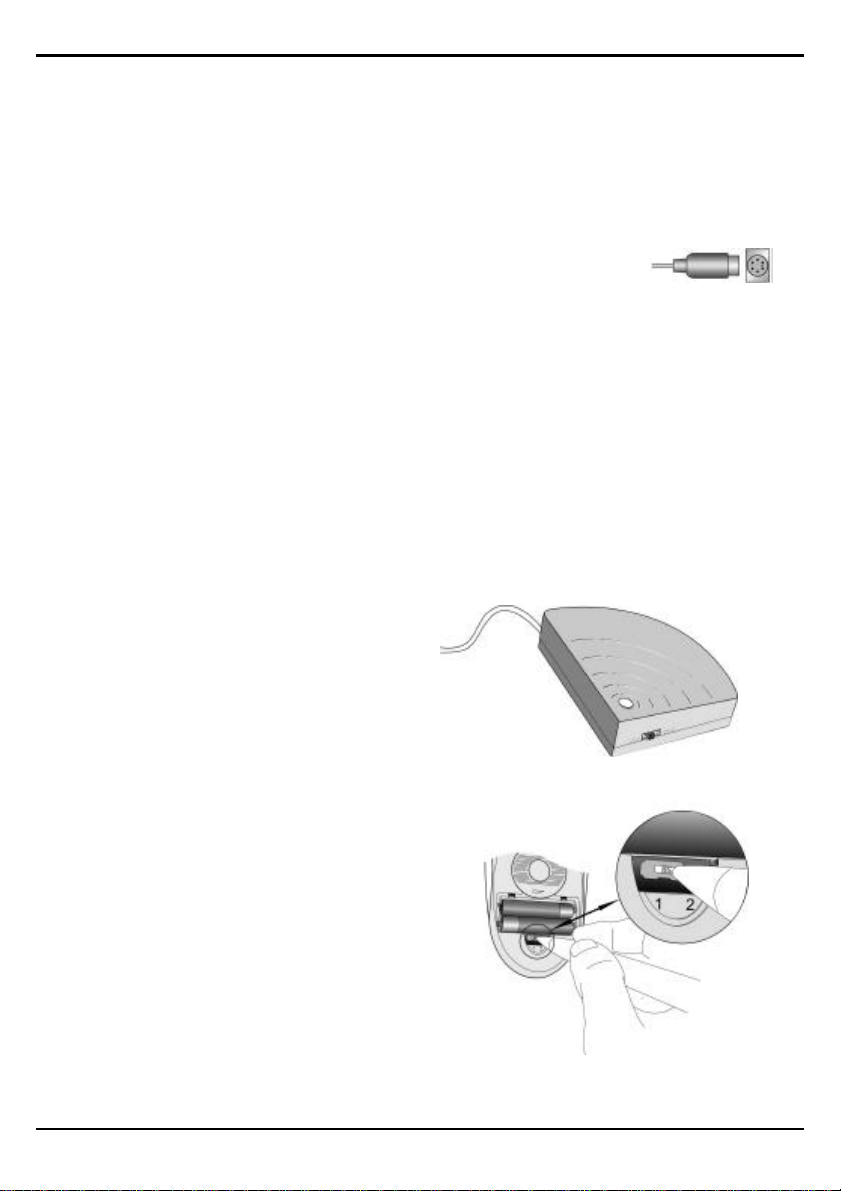
Connecting the RF-Mouse Receiver
The RF-Mouse receiver connects to your computer in the same way as a conventional
mouse allowing you to place the receiver wherever is convenient on your desktop.
1. Locate the round 6-pin PS/2 mouse port on the back of your computer.
2. Insert the PS/2 connector into the PS/2 port.
Locating the RF-Mouse Receiver
Your RF-Mouse has limitations on the range or distance from the receiver. To make sure that your mouse sends
and receives properly, refer to the following:
1. For optimal performance, place the receiver at least 8 inches (20 centimeters) away from other
electrical devices, such as the computer, the monitor, or external storage drives.
2. The RF-Mouse should be no farther than 3.3 feet (1.0 meter) from the mouse receiver. This will
ensure optimal communication between the mouse and receiver.
3. If you are working on a metallic surface, try using a mouse pad and turning the receiver face down for
better reception.
4. Switch frequency channels to prevent interference from other RF pointing devices. (See the following
section for more information.)
Selecting the Frequency Channel
The RF-Mouse operates on two frequency channels. To
prevent interference when using two RF Mice in close
proximity a different frequency channel should be used
for each mouse. Refer to the following to change the
frequency channel for your mouse:
1. Set the frequency channel on the receiver to 1 or
2.
2. Remove the battery cover from the mouse (see the
following Inserting the Batteries section).
3. Set the frequency channel on the mouse to 1 or 2.
(The frequency channel for mouse and receiver
must be the same.)
— 2 —
Page 4
Inserting the Batteries
The RF-Mouse uses two AAA batteries. For best performance, use only
alkaline batteries. Refer to the following to insert the batteries:
1. Press the tab on the bottom of the mouse cover as shown here and
remove the cover.
2. Insert the two AAA batteries. (The correct polarity is indicated on
the battery compartment casing.)
3. Replace the cover.
Checking the Batteries power
To check the battery power, right-click the mouse icon in the Taskbar.
Choose the “Check RF-Mouse Status” option to display the RF-Mouse Status
window. The current battery percentage charge is shown.
Installing the Mouse Software
Before you can take advantage of the many features your mouse offers, you must install the driver. The driver is on
the installation diskette that came packaged with your mouse.
Windows 95/98/2000/NT4.0/Me installation
1. Connect the mouse to your computer.
2. Insert the installation diskette into your floppy disk drive.
3. Click the Start button and then click Run.
4. In the Run dialog window, type A:\setup, where “A” is the letter of your floppy disk drive.
5. Click OK and follow the instructions on your screen to complete the installation.
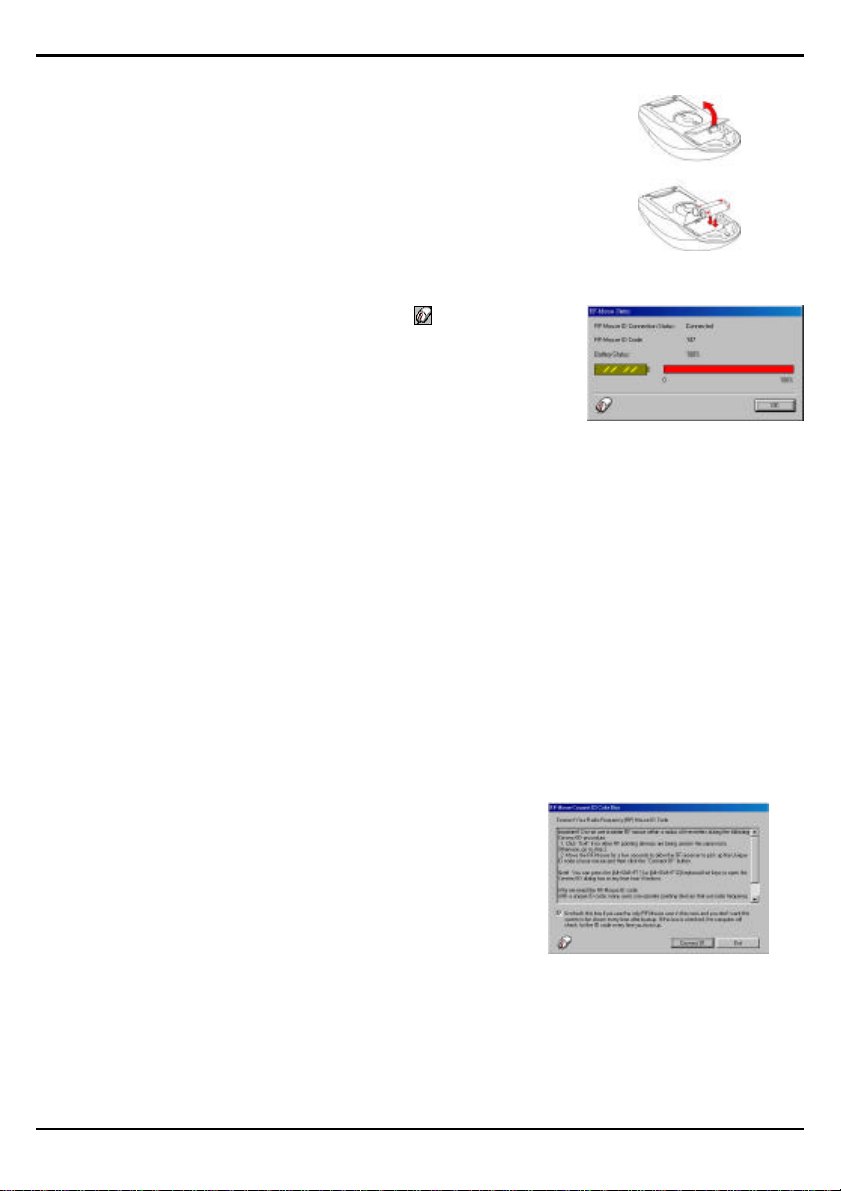
The RF-Mouse ID code
Each RF-Mouse is assigned a unique ID code at manufacture, so the receiver only picks up the signal from your mouse
and prevents other RF-Mouse radio signals from operating on your computer. This feature can also be disabled, allowing
other RF-pointing devices to operate your computer.
Connecting the RF-Mouse ID Code
When the driver installation is finished your computer reboots and the RFMouse window (shown on the right) appears.
CONNECT ID: Move the RF-Mouse for a few seconds to establish a
connection, then click Connect ID. The unique ID code of your mouse is
recognized and another RF pointing device will not function on your computer.
Exit: Click Exit if no other RF pointing devices are within 3 meters range or if
you want other RF pointing devices to be able to access your computer.
Changing the RF-Mouse ID Code
You can use a new RF-Mouse on your computer without changing the Radio receiver; you just need to change the ID code.
Refer to the following:
1. Press [Shift + Alt + F11] or [Shift + Alt + F12] to call up the RF-Mouse ID Code window.
2. Move the RF-Mouse for a few seconds to establish a connection, then click Connect ID.
3. The new ID code is Connected and the RF-Mouse window closes.
— 3 —
Page 5

4. Click Exit to close the RF-Mouse ID code window.
Identifying Components
The mouse is designed to fit snugly into your hand. The scroll wheel is positioned on the top allowing for easy
operation with the index finger. Standard mouse buttons are positioned to either side of the scroll wheels and can be
reached comfortably with the index and ring fingers. A third button is placed under the vertical wheel and can be
easily clicked by pushing down on the wheel.
The following pages will tell you how to configure the scroll wheels and buttons to suit your specific needs.
Cleaning the Mouse
Clean the mouse regularly to ensure efficient operation. Refer to the following:
1. Rotate the housing cover counterclockwise until it unlocks and remove it.
2. Remove the tracking ball.
3. Wash the tracking ball with warm water and soap then allow it to dry.
4. Use a cotton swab and alcohol to clean the tracking rollers in the housing.
5. Replace the tracking ball and the housing cover.
6. Rotate the housing cover clockwise until it locks in place.
— 4 —
Page 6

I
!
W
I
W
With iWheelWorks driver/software installed, your Mouse is transformed into much more than just a pointing device.
See how easy scrolling through long documents or panning in drawing applications becomes when using the scroll
wheels. Office users should love this feature—use the vertical wheel to scroll through your document then just press
the [Ctrl] key and use the same wheel to zoom in for a close look. It even works in print preview! The third button
can be programmed to launch NetJump or LuckyJump—two customizable toolbars that open all those useful programs
that you need so often with just one click. And, in easy-to-follow steps, create your own Command Menu and with
one click put all your favorite programs right under the cursor!The following table provides an overview of the mouse
functions.
HHEEEEL
L
W
OORRKKSS DDOOEESS TTHHEE HHEEAAVVYY WWOORRK
W
K
Function Description Here’s how to do it
Vertical
Scroll
Horizontal
Scroll
AutoScroll
Zoom
LuckyJump
NetJump
Command
Menu
Lets you scroll up or
down in the current
application window.
Lets you scroll to the
left or right in the
current application
window.
Use AutoScroll in
Office 97-compatible
applications to scroll
through large
documents.
Lets you zoom in or
out when using
applications that
support zoom
function.
With one click you
can choose from a
range of commonly
used commands to
launch.
Lets you choose from
commands commonly
used for Web
browsing.
Create your own
Command Menu for
launching all your
favorite programs.
To scroll up, move the vertical wheel forward; to scroll down,
move the wheel back. See Wheel Tab on page 7 for more
information.
To scroll left, move the horizontal wheel forward; to scroll right,
move the wheel back. See Wheel Tab on page 7 for more
information.
Activate AutoScroll from LuckyJump or NetJump. The
AutoScroll icon appears over the vertical scrollbar. Move the
mouse in the direction you want to scroll. The farther you move
the AutoScroll icon from the starting point, the faster the
scrolling. To stop AutoScroll, press any mouse button.
In the Mouse Properties window select the Wheel tab and
check the “Wheel Zoom for Office 97/2000” option (if you
don’t check this option you can hold the [Ctrl] key while
zooming with either scroll wheel). Then use the horizontal
wheel to zoom in and out. See Wheel Tab on page 7 for more
information.
In the Mouse Properties window select the Buttons tab and
then assign LuckyJump in the drop-down menu for the desired
button. See Settings Tab and Executing LuckyJump
Commands on page 7 and Take Your mouse on a Test Run on
page 10 for more information.
In the Mouse Properties window select the Buttons tab and
then assign NetJump in the drop-down menu for the desired
button. See Settings Tab and Executing NetJump Commands
on page 7 and Take Your mouse on a Test Run on page 10 for
more information.
In the Mouse Properties window select the Settings tab and
then click New/Update. Follow the instructions on your screen.
See Creating Your Own Command Menu on page 8 for more
information.
!
— 5 —
Page 7

M
OOUUSSEE
M
P
RROOPPEERRTTIIEESS
P
S
EETTTTIINNG
S
GSS
From the Mouse Properties window you can customize many settings for your mouse
including button assignments, scroll wheels and cursor movement. To open the Mouse
Properties window double-click on the mouse icon in the system tray. The Mouse
Properties window has six tabs that are described below.
Buttons Tab
Button Assignments: Click the down arrow to select the preferred
function for each button. (See the Settings Tab for more information.)
Double Click Speed: Increase the speed for executing a double-
click.
Button Configuration: Configure your mouse for left- or right-
hand use. The default setting for buttons 1 and 2 will be reversed.
Ø Note!
The particular mouse you purchased may differ somewhat from
the illustration shown in the Buttons tab. The third button on
some models is positioned under the vertical scroll wheel instead
of at the side as shown here.
Pointers Tab
The Pointers tab lets you change the way the cursor appears. Click the
down arrow under Scheme and choose the setting you want. The
available pointers for each scheme are shown in the pane below. You can
browse to additional pointers, then create your own scheme using the
Save As button.
System Tray
Motion Tab
Pointer Speed: Lets you adjust how fast the cursor moves on the
screen.
SnapTo Button: Check this box to automatically have the cursor
move to the default button in each new dialog box or window.
Sonar: When this box is checked, pressing and releasing the [Ctrl] key
will highlight the cursor.
Trails: Check this box when you want your cursor to display pointer
trails. This option is useful when using an LCD display that can make
the cursor difficult to see.
— 6 —
Page 8

Wheel Tab
Wheel Mode: Select the Enhanced Dual Wheel 4D Wheel function
mode radio button to enable both vertical and horizontal wheels. When the
MS-IntelliMouse Compatible mode radio button is selected only the vertical
wheel will function.
Swap Vertical and Horizontal Wheel: Check this box to swap the
functions of the Horizontal and Vertical Wheels.
Vertical Wheel/Horizontal Wheel: Check the Reverse scrolling
direction box to change the scrolling direction when you turn the scroll
wheel. Select the Scroll or Scroll one “page” per scroll unit radio button to
set the scrolling speed to suit your work habits.
Wheel Zoom for Office 97/2000: Check this box to use the
horizontal wheel to zoom in and out when using applications that support
this function. You can still use the wheel to scroll horizontally by
positioning the cursor over the horizontal scroll bar. When this option is
unchecked, you must press the [Ctrl] key while turning the horizontal wheel
to use the zoom function.
Settings Tab
Command List: Shows all the available commands (including User-
defined Command Menus) that you can assign to either the NetJump or
LuckyJump grids.
NetJump (top grid): The NetJump grid groups commonly used Web-
browsing commands. To change a command, select a new one from the
Command List and click on the icon in the grid that you want to change.
LuckyJump (bottom grid): The LuckyJump grid groups all-purpose
commands. To change a command, select a new one from the Command
List and click on the icon in the grid that you want to change.
User-defined Command Menu: Here you can create your own
command menu to suit your specific needs. Click on New/Update… and
follow the onscreen instructions.
Apply Net/LuckyJump or the User-defined Command Menu you define here
from the Buttons tab.
Executing NetJump Commands
NetJump combines commonly used tasks for Web browsing into one convenient grid and puts them right under the
cursor. To use NetJump, open the Mouse Properties window and select the Buttons tab. Assign NetJump in the
drop-down menu of the button you want. Click OK to close the Mouse Properties window. Now click the assigned
button to open the NetJump grid and execute your command. (See the Settings Tab section above for instructions on
customizing NetJump.)
Executing LuckyJump Commands
LuckyJump combines commonly used tasks for Windows environments into one convenient grid and puts them right
under the cursor. To use LuckyJump, open the Mouse Properties window and select the Buttons tab. Assign
LuckyJump in the drop-down menu of the button you want. Click OK to close the Mouse Properties window.
Now click the assigned button to open the LuckyJump grid and execute your command. (See the Settings Tab
section above for instructions on customizing LuckyJump.)
— 7 —
Page 9

T
U
R
SSEER
-
DDEEFFIINNEEDD
-
HHEE
T
U
Along with the LuckyJump and NetJump menus you can also create Command Menus to suit your specific work
habits. You may want to create a specific command menu for a particular application and then assign it each time
you work in that application.
C
OOMMMMAANNDD
C
Creating a Command Menu
Follow these instructions to create a new Command Menu:
1. Double-click the mouse icon in the system tray. In the Mouse Properties window select the Settings
tab.
2. Click New/Update… to open the User-defined Options window.
3. Click Add. The Add Menu window appears.
4. Enter a name (e.g., Test Command Menu) for the new
Command Menu. Click Select Icon to choose a new
icon or click OK to accept the default icon. The Userdefined Options window appears with the new Test
Command Menu shown.
5. The Command Type: pane lets you change the kind
of command to add. With the default
Application/Document selected, click <Add New
Command. (See Choosing Commands from the
Command Type Menu on page 8 for more
information.)
6. In the Application/Document window, type the path
or browse to the application you want to add and click
OK. The command will be added to the Test
Command Menu pane.
7. Repeat steps 6 and 7 to add more commands. (Click
Insert Separator to group command families as
shown below. Select commands or separators you
don’t need and click Delete Command to remove
them.)
8. Click OK when you are finished. You are returned to
the Settings tab. Your new Test Command Menu is
listed at the bottom of the Net/LuckyJump Settings
Command List.
9. Add the Test Command Menu to the Net/LuckyJump
grid or go to the Buttons tab and assign it directly to
the mouse button you prefer.
M
M
EEN
NUU
Choosing Commands from the Command Type Menu
The Command Type menu lets you choose different types of commands to add when creating a new Command menu.
To add a command from the Command Type menu, select the type of command, click <Add New Command and
follow the instructions on your screen. The type of commands and a brief description of how to add a new command
are described below.
— 8 —
Page 10

Command
Type Description
Application/
Document
File Folder
This field lets you add your favorite programs to run or open a
document or file that you specify. Enter the path or browse to
the application/document that you want to open.
This field opens the folder you specify in Windows Explorer.
Enter the path or browse to the folder you want to open.
Command Type
Menu
Home Page
Mail To
Keyboard
Sequence
Generic
Command
The Home Page command takes you to the URL address you
specify. Enter the URL address of the Web site you want to
visit. (Requires an online connection.)
Send e-mail from your default e-mail program to the specified
e-mail address. Enter the e-mail address that you wish to mail
to. (Requires an online connection.)
Assign text and keyboard shortcuts for one-click playback in
all programs. Refer to The Keyboard Sequence Command
below for detailed instructions on this command.
Choose from a list of commonly used commands, such as
Print, Save, or Open.
The Keyboard Sequence Command
This function lets you add Text commands and Shortcut commands to your Test Command Menu. Use Text
commands to enter commonly used phrases in all your text editing applications. Shortcut commands can be used in
all applications just as you use conventional keyboard shortcuts.
Adding a Keyboard Sequence Text Command
The Keyboard Sequence command is very useful when working in text editing applications or when sending e-mail.
You can assign any number of commonly used phrases and then just enter them with one click into your document.
Refer to the following to add a Keyboard Sequence Text command.
1. Double-click the mouse icon in the system tray. In the
Mouse Properties window select the Settings tab.
2. Click New/Update… to open the User-defined Options
window.
3. Select Keyboard Sequence in the Command Type pane and
click <Add New Command.
4. In the Keyboard Sequence window type a name for the
command. Under Mode, select the Text radio button and then
type in your message.
5. Click OK when you are finished.
6. Repeat steps 3 to 5 to add more Text commands to your Test
Command Menu.
7. When you have finished adding commands, close the User-
defined Options window and the Mouse Properties window.
8. Open a text editor or e-mail messenger and place the cursor
where you want the message added. Select the Keyboard
Sequence Text command from your Test Command Menu.
9. Your message is added to your document.
— 9 —
Page 11

Adding a Keyboard Sequence Shortcut Command
In Office applications many users are accustomed to using keyboard commands such as the copy command, [Ctrl] +
[C] or the paste command [Ctrl] + [V] directly from the keyboard. However, to spare you from having to remember
all these keyboard shortcuts you can add them to your Test Command Menu. Refer to the following to add a
Keyboard Sequence command.
1. Double-click the mouse icon in the system tray. In the Mouse
Properties window select the Settings tab.
2. Click New/Update… to open the User-defined Options window.
3. Select Keyboard Sequence in the Command Type pane and click <Add
New Command.
4. In the Keyboard Sequence window type a name for the command. Click
Record and then type in the keyboard sequence. To apply the “Underline”
command as shown below, type: [Ctrl] + [Shift] + [W].
5. Click Stop when you are finished and then click OK.
6. Repeat steps 3 to 5 to add more Keyboard Sequence commands to your Test
Command Menu.
7. When you have finished adding commands, close the User-defined Options
window and the Mouse Properties window.
8. Open your Office application and select some text. Select the Underline
Keyboard Sequence command from your Test Command Menu.
9. The text you selected is now underlined.
T
For this “Test Run” the LuckyJump grid will be customized to demonstrate how much easier working with the
mouse can be. Refer to the following to customize either the LuckyJump or NetJump grid:
1. Double-click the mouse icon in the system tray. In the Mouse Properties
window select the Settings tab.
2. You will see the default settings for LuckyJump. Scroll to Help in the
Command List and select it.
3. Move the cursor to the LuckyJump grid and click the bottom-left Documents
item. Notice the cursor changes to a “Pointing finger” and the Documents
icon is replaced with the Help icon.
4. Now scroll to the end of the Command List and assign the Test Command
Menu to the LuckyJump grid in the same way. (See Creating Your Own
Command Menu on page 8 if you have not already created a Test Command
Menu.)
5. Continue customizing the LuckyJump menu by assigning commands from the
Command List to the LuckyJump grid.
6. After you have added all the commands you want, click on the Buttons tab
and assign LuckyJump to the button you want. (In most cases you will assign
LuckyJump to the third button. Most users prefer to leave the default Context
Sensitive Help setting on the second button.)
7. Click OK to close the Mouse Properties window.
8. Now, just press the mouse button assigned to LuckyJump and the LuckyJump
grid opens right under the mouse cursor. (Move the mouse over each item in
the grid for a description.)
Some of the commands in LuckyJump are described in more detail below.
AAKKEE
T
Y
Y
OOUURR
M
OOUUSSEE OONN AA
M
T
T
EESSTT
— 10 —
R
UNN
U
R
Page 12

Volume Control
Choose Volume Control from the LuckyJump grid. The volume control
screen appears.
Click on the slide bars or use the scroll wheels to set the balance and level for
each control. This is a convenient way to adjust the volume no matter what
application you are working in.
E-mail
Choose E-mail from the LuckyJump grid. Microsoft Outlook Express opens
ready for you to send or receive e-mail.
Or if you prefer to send e-mail from your default Web browser, then assign a
shortcut in LuckyJump for instant online access.
Test Command Menu
Choose Test Command Menu from the LuckyJump grid. The Command
Menu list that you previously learned to create appears (see Creating Your
Own Command Menu on page 8).
Now you’re just one click away from all your Office applications, games,
and keyboard shortcuts.
Ø Tip!
If you use these applications very often you can bring them all
one click closer by assigning your Test Command Menu directly
to the mouse button. See Buttons Tab on page 6.
Help is always at Hand
Choose Help from the LuckyJump grid. No matter what application you are
working in, the Help file associated with that application opens.
— 11 —
Help
 Loading...