

Page 1

BatteryFREE
Office 2Wheel Wireless Optical Mouse
User’s Manual
Model:NB-99D
www.a4tech.com
Page 2

THIS DEVICE COMPLIES WITH PART 15 OF THE FCC RULES. OPERATION IS SUBJECT TOTHE FOLLOWING TWO
CONDITIONS: (1) THIS DEVICE MAY NOT CAUSE HARMFUL INTERFERENCE AND (2) THIS DEVICE MUST ACCEPT ANY
INTERFERENCE RECEIVED, INCLUDING INTERFERENCE THAT MAY CAUSE UNDESIRED OPERATION.
Federal Communications Commission Requirements
The equipment has been tested and found to comply with the limits for Class B Digital Device, pursuant to part 15
of the FCC Rules. These limits are designed to provide reasonable protection against harmful interference in a
residential installation. This equipment generate s, uses and can radiate radio frequency energy and, if not installed
and used in accordance with the instruction, may cause harmful interference to radio communication. However,
there is no guarantee that interference will not occur in a particular installation. If this equipment does cause harmful
interference to radio or television reception, which can be determined by turning the equipment off and on, the user
is encouraged to try to correct the interference by one or more of the following measures:
z Reorient of relocate the receiving antenna.
z Increase the separation between the equipment and receiver.
z Connect the equipment into an outlet on a circuit different from that to which the receiver is connected.
z Consult the dealer or an experienced radio/TV technician for help.
THE CHANGES OR MODIFICATIONS NOT EXPRESSLY APPROVED BY THE PARTY RESPONSIBLE FOR COMPLIANCE
COULD VOID THE USER’S AUTHORITY TO OPERATE THE EQUIPMENT.
This device complies with Part 15 of the FCC Rules. Operation is subject to the following two conditions:
(1). this device may not cause harmful interference, and
(2). this device must accept any interference received, including interference that may cause undesired operation.
Page 3
Introduction
Congratulations on your purchase.
Your new BatteryFREE Wireless Optical Mouse will of fer you wireless freedom, yet no battery i
Whilst saving you the cost of batteries, it assures wrist comfort, light, easy operation and no- RF interference.
Same time, just one click on “2X Button” straightly opens files and programs easily. Save times and improve efficiency.
s required.
HOW TO USE YOUR 2X TWO WHEELS MOUSE
Just One click “2X Button”
straightly open files and
programs easily, click once
instead of twice, without any
driver
With click the 6th button to
display a 2X-wheeljump menu, it
provides you the marked 4
different functions sets for the 2
wheel.
nd
Page 4

SETTING UP YOUR MOUSE PAD AND MOUSE
1. Plug the Mouse Pad’s USB plug to your computer’s USB port.
2. PWR LED on the Mouse Pad will be flashing in “RED”
3. Put the MOUSE onto the center of the MOUSE PAD.
4. PWR LED on the Mouse Pad will stop flashing become steady “RED”
5. Press the button “TUNE” to obtain the frequency for best performance. Do not move the mouse while the RUN
LED is flashing in “GREEN”
6. You may move the mouse around once the RUN LED stopped flashing in “GREEN”
7. If the cursor doesn’t move smoothly, please repeat steps 5 to 7.
8. RUN LED should light up with steady “GREEN” while mouse is circulating on the mouse pad.
NOTE:
1. Do not use this product on any metal table or surface. The metal surface may interfere with the cross induction
and have an adverse effect on the mouse operation.
2. Keep working temperature under 0 to 50 degree Celsius (0°– 50°C).
3. Frequency: 121 KHz-128KHz
4. Keep your credit cards and ATM cards away from RFID Mouse Pad to prevent the card’s magnetic stripe f rom
losing its efficiency.
5. Our RFID Mouse Pad will not erase any data in the memory stick. So don’t worry if your memory stick is close to
the inductive RFID mouse pad.
Installing the software 2X-Wheel
By installing the 2X-Wheel, it enables various functions provided for the scrolling wheel(s) and buttons.
Page 5

STEP ONE: HOW TO INSTALL 2X-WHEEL (For Windows Me / 2000 / 2003 / XP / X64 )
1. MUST: Please uninstall any previous mouse driver before installing the 2X-Wheel
2. MUST:
3. Insert the included Compact Disc (CD) into your CD-ROM
4. Click “Install Driver”
5. Select model: BatteryFREE 2X Two Wheel NB-90D
6. Click the button on the right to install driver
7. Follow the on screen instruction to complete your installation
8. Restart your computer after the driver has been installed
9.You will see a mouse icon “
Make sure you have completely finished setting up your mouse pad and mouse
” appear on the bottom right of
your task bar (near the clock area)
10. Double click on the mouse icon “
” will bring you the mouse property (figure on the right)
11. If the mouse image appears in the mouse propertie s menu look s exactly the sa me as the mouse on hand, then
this means that you have successfully installed the 2X-Wheel driver
Mouse Properties Window
Page 6

STEP TWO: HOW TO PROGRAM YOUR MOUSE SETTINGS
1. Button is the first tab appears in your mouse properties
2. The mouse image that appears in the first section “Button Assignments” is a
key to numbers listed to the right.
3. For example, # 1 button has been assigned as “Main Button” by default and
it’s not programmable.
4. # 2 button has been assigned as “Right Button” which works as right click
for your mouse
5. # 3 button has been assigned as “Pan” function by default. It’s a vertical
scrolling wheel if you scroll it. Also known as “Wheel Button” because it’s a #3
button if you click it.
nd
6. #2
# 3rd # 4th Buttons can be set as any of 58 available commands and settings if you click the scrolling bar listed on
the” button” tab to obtain the dropping –down shortcuts command menu ,from where ,you can assign the shortcuts
command for the button you want.
7. The 2
nd
Wheel on the right side of the mouse comes in 4 different functions and will be explained late r.
Page 7

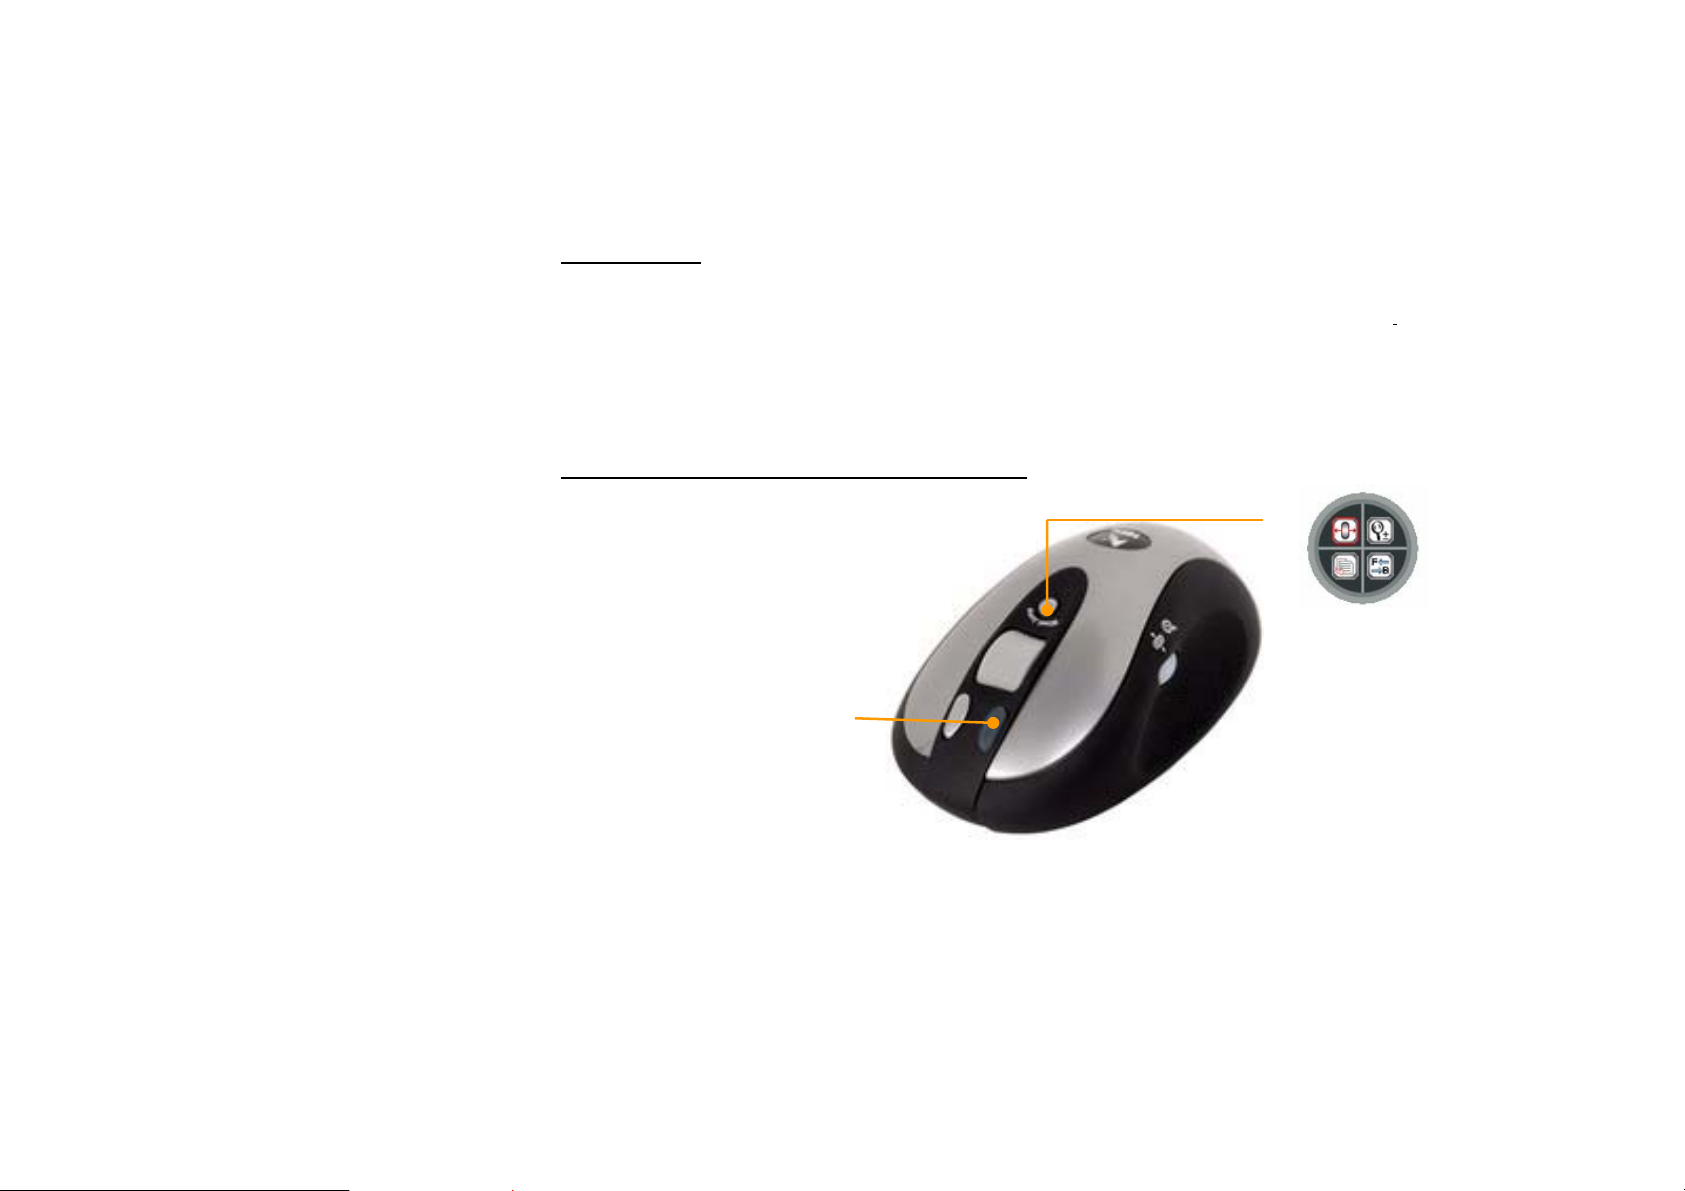
STEP THREE: LEARN HOW TO SET THE 2
ND
WHEEL
There are 2 ways to set 2nd Wheel
1. Click the 6
th
“2X-WheelJump” button located on your physical Mouse Body . A
ring shape icon with four square shape ones built-in will pop up for you to set four
different functions for the 2
function icons , you can assign the corresponding function for the 2
nd
wheel (figure on the right). Just click any of four
nd
wheel at a
time , they are : horizontal scrolling function ,zoom in/out function,
backward/forward the page , previous /next documents in turn.
2. Click
” appearing on the bottom right of your task bar (near the clock area)
and it will bring you the mouse Properties window
(figure on the right ) and choose and click “ wheel “ button to open “ Mouse
Wheel content “ dialogue ,here , you can set the wheel function features listed
in the wheel window as your need (figure on the right ).
2X-Wheel menu
Page 8

There are 4 selections in the 2X-Wheel menus for 2nd wheel. You may choose up to 1 selection at a time.
For example if
has been selected, then the wheel will work as horizontal scrolling.
Zoom In / Out function
Backward / Forward the page
Previous / Next Document
TECH SUPPORT
For tech support, please visit our website at http://support.a4tech.com/
or email us at support@a4tech.com
Page 9

SECIFICATION
Wireless Battery Free Optical Mouse
Manufacturer:
A-FOUR TECH CO., LTD.
Use of the equipment: For PC’s Mouse
Equipment category:
Wireless Battery Free Optical Mouse
Mode of operation: Simmplex
Frequency / Frequency range: 121 ~ 128KHz
Maximum transmitter output power:
2.5 mW
Number of channels and channel separation: Scan frequency to lock a working point for Wireless
Battery Free Mouse . Working frequency of Every Mouse maybe be different , working point from
121 KHz to 128KHz.
Modulation:
ASK
Information on antenna:
It don’t included with antenna. The signal transfer by Induction Coil .
Duty cycle: 240 uS
Power supply:
PowerPad: USB port . 5V , max: 300mA (Included with Induction coil. ) Wireless Battery Free
Optical Mouse: Faradism , max: 5V ,90mA (Induction Coil designed to mouse.)
 Loading...