

Page 1

8 in Right
8 Functions in Right Button
User’
s Manual
www.a4tech.com
Page 2
1
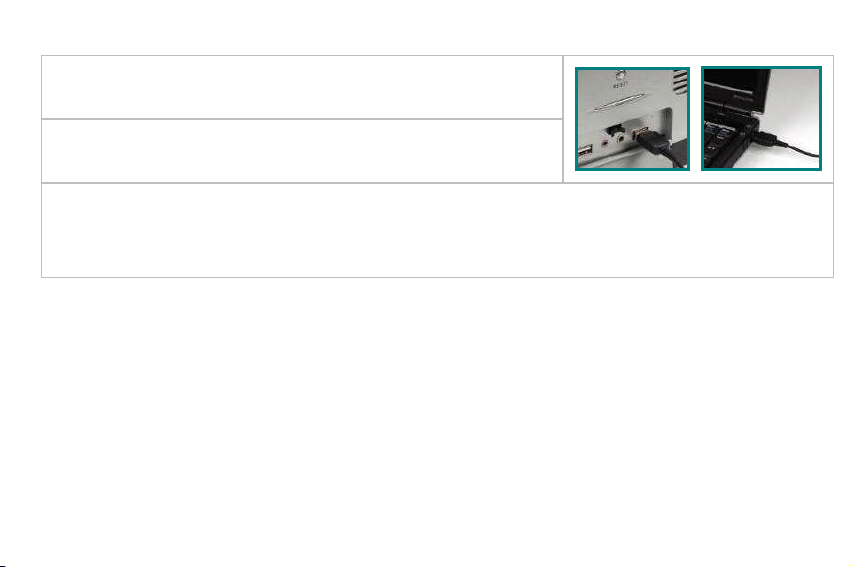
Hardware Installation
Step 1:
Plug the USB connector to the USB Port on your
desktop computer or
n
otebook
.
Step 2:
The
mouse will automatically be recognized by your
computer.
Step 3:
If you can
’
t find or see your cursor on the screen, follow the steps below:
1.
Unplug and re
-
plug the mouse.
2.
Test the device on another USB port or computer.
The mouse is plug_and_play
. Nodriver is required. If you would like to customize the “Right
B
utton”
to
have up to
8
functions
at the same time,
such as “Zoom In, Zoom Out, Scroll Left, Scroll Right,
Copy /Paste, Back, Forward…etc.”
you have to
d
ownload the “8 in Right” software
fromA4Tech’s
website
at
http://www.a4tech.com/8d/
to
install the driver
.
Page 3

2
Software Installation
(Note: The driver is applicable to Windows 2000, XP, XP (x64), 2003(x64) and VISTA)
A
.
Before installing the mouse‘s “
8 in Right
”
software
,
uninstall
any
mouse’s software.
B.
Download the
“
8 in Right
”
software from A4Tech
’
s website at
http://www.a4tech.com/8d/
to
startinstallation.
C.
Follow the on
-
screen steps to
finish software installation
.D.The icon “
” will appear on your
desktop
, then you have
successfully installed the
software.
OR
Go to START, and then select
PROGRAM. If you see “
8 in Right
” in the
progr
am list, then you have successfully
installed the
software.(
Otherwise,
installation is
failed
and you have to
remove
the driver and re
-
install
)E.When the installation is completed, restart your computer
.
To remove the driver, follow the steps:
Page 4

3
Go t
o START, then select PROGRAMS>>
8 in Right
>>Uninstall
“
8 in Right
”
.
Programming the “
Right B
utton”
to
Get 8 Functions
“
Right Button
”
can be customized to have
up to
8
functions
at the same time, s
uch as “Zoom In,
Zoom Out, Scroll Left, Scroll Right, Copy
/Paste,
Back, Forward
…
etc.”-all
at your fingertip.
Operation Procedure
Step 1
:
Double
c
lick on
icon
in the right corner of
your desktop
.ORGo to START >>
PROGRAM >>
8 in Right.
Then you’ll see the “
Mouse Gesture
”
menu pop
upas“Figure. A” show
s.Fig. A
(
Mouse Gesture Menu
)
Page 5

4
Step 2:
Now
, you
may
program the “
Right
B
utton”
onthe“F
igure. A”
to
get 8
functions
at the
same time
.ORselect
“
Right Button
”
>> click
“OK”in“Figure. A”
to perform the function of mouse
“
Right
Button
”,and then
the “”icon will appear
in the right corner of
your
desktop
.
Fig. A
(
Mouse Gesture Menu
)
Page 6

5
Step3:
C
lick any
one of
8
arrow
-
like icon
s,and then you’ll see “
Task
Pull-down Menu”
pop up
and
30 functions
are available for
option.
Task P
ull-down
M
enu
Page 7

6
Step 4:
S
elect and click
“”arrows
in“Mouse Gesture
”
menu
,
and select
“”from the
“”option
respectively
;
>> Select and click
“”arrows in
“Figure. A”
,
and
select
“”and“”
from
the "
” option
respectively
;>>Select
and
click“”
arrows in
“Figure. A”,
and select
“
” and “
” from the “
” option
.
Step 5:
Click “OK” in “Fig. A
(
Mouse Gesture Menu
)”to finish settings.
Step
6:
Press mouse “Right” button, and move the mouse in one of any 8 directions as indicated
below
, t
hen the preset functions will be executed instantly
.
Right Button
Right
Page 8

7
Let’s check
“
Zoom In
”
function
in “
ACDSee, PPT,
and PDF”
P
ress the “
Right Button
” and move the mouse
to draw the lines as the
arrow direction shows on any
position of browse file
, then
you can enl
arge the image size whether to do some editing to the image or just to
view the image more clearly.
You also may
easily control
the
sensitivity of
“
Zoom In
” function by
setting the
proper
numeric value
.
a. Start:
Press the “Right
Button
”
b. Track of th
e drawing line
:
D
raw
the line
s as
the
arrow
direction
.
c. End:
Release the “
Right Button
”
Note:
length of the drawing line can
be defined
by
setting the
proper
numeric value.
Reminder:
If
s
tep
b
is omitted, it will
perform "mouse right button" function
onl
y.
Page 9

8
Benefits:
Th
ese
example
s
show how to integrate the “
8 in Right
”, when the “
Right B
utton”
is
pressed and move your mouse in
8
different directions; you may instant
ly
perform
the preset
functions such as “Zoom In, Zoom Out,
Leftwards
, Rightwards, Back
,
Forward
”, up to
8
functions
. It
is user
-
friendly and unprecedented handy tools to use.
Page 10

9
Programming Length of the D
rawing
L
ine
4 of simple gestures are specially designed to offer user
-
definable sensitivity. For instance, you may
define the 4 si
mple gestures on the
“
Right Button
”
with
the functions, then j
ust press the “
Right
Button
”
and move the mouse
to draw the line
as the
arrow direction
on your screen
,
then
that preset function will be executed instantly. You also may
easily control
lengt
h of the drawing line
by
setting the
proper
numeric value.
Operation Procedure:
Step 1:
T
ick
the “
Continuous
Movements” box
on the
“
Mouse Gesture
”
menu.
Then
you’ll see the
“
Figure.B
”
.
Fig. A
(
Mouse Gesture Menu
) Fig.B
Page 11

10
Step 2:
Click“
Sensitivity
”on“
Figure.B
”
to select the proper numeric value for controlling length of
the drawing line
.
Now, you may perform the preset functions
ofthe “
Right Button
”
by drawing line.
Page 12

11
How to Switch the Function of
“
8 in Right
”&“
Right Button
”
Step 1:
Right
c
lick on
icon
in the right corner of
your desktop
.
Fig. A
Step 2:
Select
“”>>””,then you’ll see the “
Keyboard
”
image pop
upas“Figure.
B
” show
s
.
>>Click and
select any key on the
“
Keyboard
”
image
and you can
see the icons in the r
ight corner of your desktop will be swapped from each other.
Page 13

12
Reminder
:
1.
If
you
see the
“”icon
appear
in the right corner of your desktop, the function
sof“
Mouse
Right Button
”&“
8 in Right
”
will be activated at the same time.
2.
If you see t
he“”
icon
appear
in the right corner of your desktop,
only the
“
Mouse Right
Button
”
function
will be activated while the
“
8 in Right
”
function
will be disabled.
Fig.B
Page 14

13
Testing the Report Rate of the Mouse
When the “
Test
Report Rate” is selected in “Figur
e.
A”,
and
you’ll see the “Mouse Report Rate” menu
pop up
as
“Figure. B” shows.
Then
you
may test
the
mouse report rate
.
“Mouse Report Rate (MRR)”
is the frequency of
mouse data being transmitted to the computer in
one second. For instance, 500Hz represe
nts the
mouse data being transmitted 500 times to the
computer in one second. (In general, the MRR of a
standard USB mouse is 125Hz and a standard
PS/2 mouse is 100Hz). All of
A4tech New
K3, K4,
K5, K6, K7
,gaming
X7 and
2.4G wireless G7
series
is
full USB
, the report rate
ranging between
500Hz~1,000Hz,
which ensures better mouse
performance
and accuracy
.
Fig. A
(
Mouse Gesture Menu
)
Fig.
C
Page 15

14
4X Report
Rate with Full Speed, More Smooth
ly
!
Designed with
extreme fast report rate
up to 2ms with Full
-
spe
ed USB (Maximum
500Hz
reports/sec),
them
ouse allows you to
operate
4
times faster than
a
normal low speed USB mouse
(8ms, 125Hz).
**Usage, features and specifications of all A4 TECH products are subject to change without
notification.
TECH SUPPORT
For t
ech support, please visit our website at
http://support.a4tech.com/
or email us at
support@a4tech.com
.
 Loading...