

Page 1

User’
s Manual
www.a4tech.com
Page 2
Hardware Installation
Step 1:
Plug the USB connector to the USB Port on your desktop
computer or
n
otebook
.
Step 2:
The mouse will automatically b
e recognized by your computer.
Step 3:
If you can
’
t find or see your cursor on the screen, follow the steps below:
1.
Unplug and re
-
plug the mouse.
2.
Test the device on another USB port or computer.
The mouse is plug_and_play. No
d
river is required. If
you would like to customize the”
2X
” button
to
have up to
16
functions
at the same time, s
uch as “Zoom In, Zoom Out, Scroll Left, Scroll Right, Copy /Paste, Previous Page,
Next Page…
etc”, p
lease install the driver (enclosed
on the
CD) first.
Software Insta
llation
(Note: The driver is applicable to Windows 2000, XP, XP (x64), 2003(x64) and VISTA)
A.
Before installing the mouse‘s “
16 in 1
”
software
,
uninstall
any
mouse’s software.
B.
Insert the enclosed software (CD) to start installation.
C.
Follow the on
-screen steps to
finish software installation
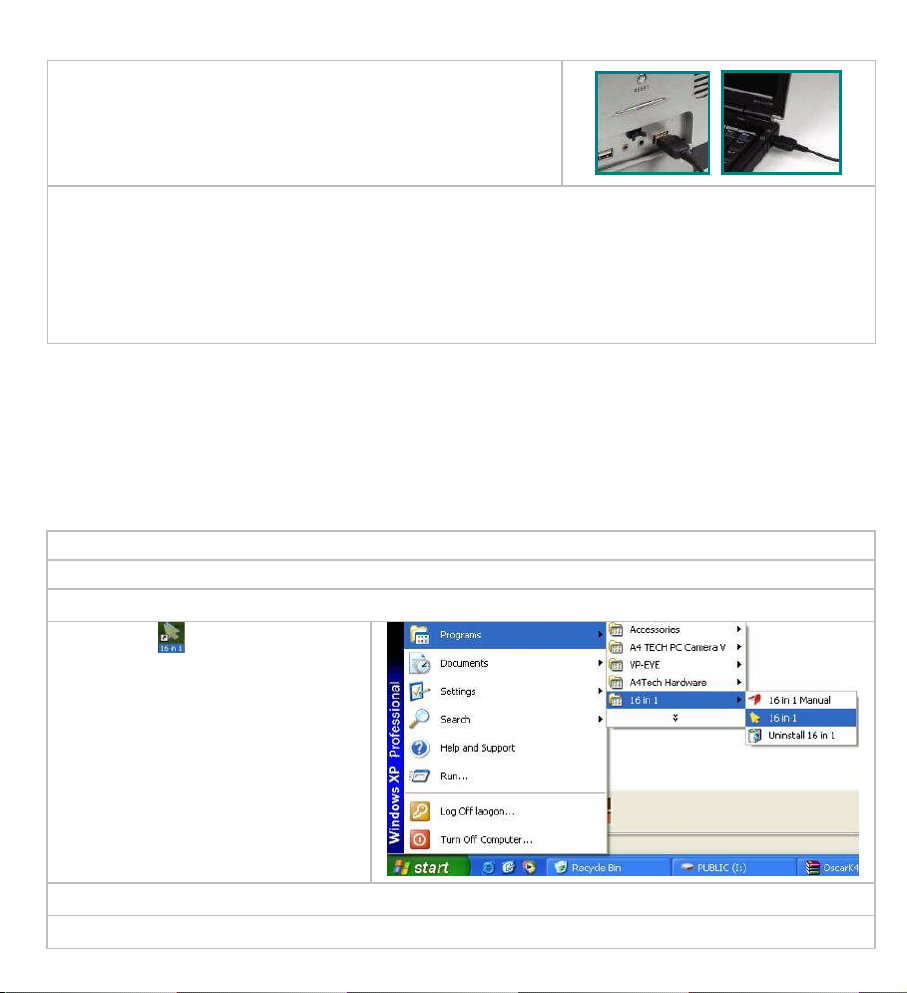
.D.The icon “
” will appear on your
desktop, then you have
successfully installed the
software.
OR
Go to START, and then select
PROGRAM. If you see “
16 in 1
” in the
program list, then you have
successfully inst
alled the
Software
.(Otherwise,
installation is
failed
and
you have to
remove the driver and
re-install
)E.When the installation is completed, restart your computer
.
To remove the driver, follow the steps: Go to START, then select PROGRAMS>>
16 in 1
>>
Uninstall
16 in 1
.
Page 3

Programming the “
2X”B
utton
to
Get Active 16 Functions
“2X”
button
can be customized to
have up to
16 functions
at the same time, s
uc
h as “Zoom In, Zoom Out, Scroll
Left, Scroll Right, Copy /Paste, Previous Page, Next Page…
etc.”-allatyour fingertip.
Operation Procedure
Step 1
:
Double
c
lick on
icon
in the right
corner of
your desktop
;ORGo to START >>
All
PROGRAM >>
16 in 1
>>
16 in 1.
Then you’ll see the
“
Mouse Gesture
”
menu pop up
as“F
igure. A” show
s
on the
below
.
Fig. A
Mouse
Gesture Menu
Step 2:
Now
, you can program the “
2X”button
onthe“F
igure. A”.
Step3:Click any
one of arrow
-
like icon
,
then
you’ll see “
Task
Pull-down Menu”
pop
up and
many function
s
are available
for
option.
Task P
ull-down
M
enu
Page 4

Step 4:
S
elect and click
“”arrowsin“Mouse Gesture
”
menu
,
and select
“
Scroll Up, Scroll
Down, Scroll Left, Scrol
l Right
”
from the
“”option
respectively
;
>> Select and click
arrows in
“Figure. A”
,
and
select
“
Back”and“Forward
”
from the
"
” option
respectively
;>>Select
and click
“”arrows in
“Figure. A”,
and select
“Zoom In” and “Zoom Out” from the
“
” option
;
Step 5:
Click “OK” in “Figure. A”
to finish settings.
Step6:Press the
“
Designated
”
button on the mouse and move the mouse towards
“
”and“”
directions
to
perform “
“
Scroll Up
-\Scroll Down
-\Scroll Left
-\Scrol
l Right
”,“
Back-\
Forward
”ordirectly
enlarge
\
shrink
your email font size
or pictures
to match your eyesight needs.
Available Mouse Gesture list:
For the mouse gestures, there are total 16 functions available
and ready for option. And among them, 8 of
simple gestures are specially designed to offer user
-
definable sensitivity. For instance, you may define the 8
simple gestures on the
“2XB
utton”with
the functions as shown above, then j
ust press
the “2XB
utton”and
move the mouse
to draw
the line as the arrow shows
on your screen
,
then that function will be executed
instantly. You also may
easily control
f
unction
sensitivity
by
setting the
proper
numeric value
.
Note:
Universal 8 directions can be adjusted to get
desired
sensitivity. They
also can be customized
according to your needs
.2XScroll Up
Scroll
Down
Scroll
Left
Scroll
Right
Back
Zoom In
Zoom
Out
Forward
Page 5

Let’s check
“
Zoom In
”
function
in “
ACDSee, PPT,
and
PDF”
When
press
the “2X”
button
and
move the mouse
to draw
the line
s
as the
arrow
direction
shows
on any
position of browse file
,
then
you can enlarge the image size whether to do some editing to the image or just
to view the image more clearly.
You also
may
easily control
the“Zoom In
”
function
sensitivity
by
setting
the
proper
numeric value
.
a.
Start:
Press the“2X” button
b. Track of the drawing line
:Draw
the line
s as
the
arrow
direction
.
c. End:
Release the “2X” button
NOTE:
1.
Click
in the m
ain menu, a flash window will pop up. Then you can learn
more about how to use the active 16 functions in the Flash Demo.
2. L
ength of the drawing line
s
can be defined
by
setting the
proper
numeric value.
If step b is omitted, it will
perform “Designated
Button” default function.
Benefits:
Th
ese
example
s
show how to integrate the “
Mouse Gestures
”, when the “
2X
” button
is pressed
and move your mouse in 16 different directions; you may perform instant functions such as “Zoom In, Zoom
Out,
Leftwards
, Rightwar
ds,
Previous Page, Next Page”, up to 16 functions
. It is user
-
friendly and
unprecedented handy tools to use.
Programming the “
2X”B
utton
to Get
Double
-
Clicking
When the
“
Select 2X Click
”
is selected in
“Figure.
A”
, then j
ust one click on “2X”
b
utton dire
ctly
opens files and programs
, s
avestime and
improves efficiency.
Fig. A
Page 6

Programming the “
2X”B
utton
to Get
Treble
-
Clicking
When the
“
Select 3X Click
”
is selected in
“Figure. A”
, then
one click on the
“2X”button,
3
bullet
s will be shot
rapidl
y
to increase target accuracy during the game play
.
Test
ing the Report Rate of the Mouse
When the “Report Rate Setting” is selected in “Figure. A”, then
you’ll see the “Mouse Report Rate”
menu pop up
as
“Figure. B” shows. Now
you
may test
the mouse report
rate.“Mouse Report Rate (MRR)”
is the frequency of mouse data being transmitted to the computer in
one second. For instance, 500Hz represents the mouse data being transmitted 500 times to the
computer in one second. (In general, the MRR of a standard USB
mouse is 125Hz and a standard
PS/2 mouse is 100Hz). All of
A4tech New
K3, K4, K5, K6, K7 and X7 series is
full USB , the report
rate
ranging between 500Hz~1,000Hz,
which
offers unprecedented
mouse performance
and
accuracy
.
Fig.B
**Usage, features and s
pecifications of all A4 TECH products are subject to change without notification.
TECH SUPPORT
For tech support, please visit our website at
http://support.a4tech.com/
or email us at
support@a4tech.com
 Loading...