

Page 1
OWL400/410
V1.00
Long Range Outdoor AP/Bridge/CPE
Page 2

Quick Installation Guide
OWL400/410
OWL400/410 Long Range Outdoor AP/ Bridge/ CPE ENGLISH
OWL400/410OWL400/410
Copyright Notice
This document is protected by USA copyright laws and other laws and is the property of
4IPNET, INC. You may not copy, reproduce, distribute, publish, display, perform, or
modify any part of this publication in any form or by any means without prior written
permission from 4IPNET, INC. You may not alter or remove any copyright or other notice
from copies of the content. All other brand and product names are claimed or
registered marks of their respective companies or organizations.
All rights reserved.
Copyright © 4IPNET, INC.
i
Page 3

Regulatory Information
Safety Information
All models of OWL400 and OWL410, have been evaluated to, and conforms to the product safety specifications of
EN:60950-1:2006+A11:2009
Caution:
This product was qualified under test conditions that included the use of the power supplying equipment. To ensure
regulatory and safety compliance, use only the provided power supplying equipment and install them properly.
To prevent electrical shock, this device may require a grounding conductor in the line cord. Connect the unit to a grounding
type ac wall outlet using the power supplying equipment supplied with the unit.
To avoid the risk of electric shock and for a safety outdoor installation, you may need other items, such as surge arrestors.
To avoid the risk of electric shock from lightening, do not install or use this product during an electrical storm.
Operate and install this product as described in this manual. This device must be installed and used in strict accordance
with the manufacturer's instructions.
Do not open the device casing. Do not perform any servicing other than that contained in the installation and
troubleshooting instructions. Refer all servicing to qualified service personnel.
FCC Certification
OWL400 and OWL410 use the same circuitry and housing except the antenna type. They both are evaluated and certified
according to FCC Rules Part 15 subpart C under one granted FCC-ID: SCD020063.
FCC Caution
This device complies with Part 15 of the FCC Rules. Operation is subject to the following two conditions: (1) This device may not
cause harmful interference, and (2) this device must accept any interference received, including interference that may cause
undesired operation.
Caution:
Any changes or modifications not expressly approved by the party responsible for compliance could void the user’s
authority to operate this equipment.
FCC Radiation Exposure Statement:
This equipment complies with FCC radiation exposure limits set forth for an uncontrolled environment. This equipment should be
installed and operated with minimum distance 20cm between the radiator & your body.
FCC Class B Statement
This equipment has been tested and found to comply with the limits for a Class B digital device, pursuant to Part 15 of the FCC
Rules. These limits are designed to provide reasonable protection against harmful interference in a residential installation. This
equipment generates and uses radio frequency energy and, if not installed and used in accordance with the instructions, may
cause interference to radio communications. However, there is no guarantee that interference will not occur in a particular
Page 4
Quick Installation Guide
OW
OWL400/410
L400/410 Long Range Outdoor AP/ Bridge/ CPE ENGLISH
OWOW
L400/410L400/410
installation. If this equipment does cause interference to radio or television reception, which can be determined by turning the
equipment off and on, the user is encouraged to try to correct the interference by one or more of the following measures:
Reorient or relocate the receiving antenna or cable input device.
Increase the separation between the equipment and receiver.
Connect the equipment into an outlet on a circuit different from that to which the receiver is connected.
Consult the dealer or an experienced radio/TV technician for help.
Declaration of Conformity with Regard to the 1999/5/EC (R&TTE Directive) for
European Community, Switzerland, Norway, Iceland, and Liechtenstein
Models: OWL400, OWL410
The devices have been tested and passed the requirements of the following standards, and hence fulfills the EMC and safety
requirements of R&TTE Directive within the CE marking requirement.
Copyright © 4IPNET, INC.
iii
Page 5
Quick Installation Guide
Taiwan NCC Statement
根據 NCC 低功率電波輻射性電機管理辦法 規定:
經型式認證合格之低功率射頻電機
經型式認證合格之低功率射頻電機,,,,非經許可
第十二條
第十二條
第十二條第十二條
第十四條
第十四條
第十四條第十四條
經型式認證合格之低功率射頻電機經型式認證合格之低功率射頻電機
變更原設計之特性及功能
變更原設計之特性及功能。。。。
變更原設計之特性及功能變更原設計之特性及功能
低功率射頻電機之使用不得影響飛航安全及干擾合法通信
低功率射頻電機之使用不得影響飛航安全及干擾合法通信;;;;經發現有干擾現象時應立即停用
低功率射頻電機之使用不得影響飛航安全及干擾合法通信低功率射頻電機之使用不得影響飛航安全及干擾合法通信
無干擾時方得繼續使用
無干擾時方得繼續使用。。。。
無干擾時方得繼續使用無干擾時方得繼續使用
前項合法通信
前項合法通信,,,,指依電信法規定作業之無線電通信
前項合法通信前項合法通信
低功率射頻電機須忍受合法通信或工業
低功率射頻電機須忍受合法通信或工業、、、、科學及醫療用電波輻射性電機設備之干擾
低功率射頻電機須忍受合法通信或工業低功率射頻電機須忍受合法通信或工業
指依電信法規定作業之無線電通信。。。。
指依電信法規定作業之無線電通信指依電信法規定作業之無線電通信
OW
OWL400/410
L400/410 Long Range Outdoor AP/ Bridge/ CPE ENGLISH
OWOW
L400/410L400/410
非經許可,,,,公司
非經許可非經許可
公司、、、、商號或使用者均不得擅自變更頻率
商號或使用者均不得擅自變更頻率、、、、加大功率或
公司公司
商號或使用者均不得擅自變更頻率商號或使用者均不得擅自變更頻率
經發現有干擾現象時應立即停用,,,,並改善至
經發現有干擾現象時應立即停用經發現有干擾現象時應立即停用
科學及醫療用電波輻射性電機設備之干擾。。。。
科學及醫療用電波輻射性電機設備之干擾科學及醫療用電波輻射性電機設備之干擾
加大功率或
加大功率或加大功率或
並改善至
並改善至並改善至
Copyright © 4IPNET, INC.
iv
Page 6

Quick Installation Guide
OW
OWL400/410
L400/410 Long Range Outdoor AP/ Bridge/ CPE ENGLISH
OWOW
L400/410L400/410
Preface Package Contents
The 802.11 n/a compliant OWL400/410 is a Long
Range Outdoor AP/ Bridge/ CPE device that can be
used for dual purposes. First, it can be deployed as
a traditional fixed wireless Access Point (AP).
Secondly, it can be used as a Customer Premises
Equipment (CPE) that connects to the outdoor
wireless network of Wireless Internet Service
Provider (WISP).
The metal sealed OWL400/410 is compact in size
and weatherproof. Coming with a mounting kit, it
can be mounted on a pole or wall. It is suitable for
both indoor and outdoor usage with its 200mW
1. OWL400/410 x 1
2. Quick Installation Guide (QIG) x 1
3. CD-ROM
(with User’s Manual and QIG)
4. Power Sourcing Equipment (PSE) x 1
5. Mounting Kit x 1
It is recommended to keep the original
packing material for possible future shipment
when repair or maintenance is required. Any
returned product should be packed in its
original packaging to prevent damage during
delivery.
x 1
output power, which is higher than a typical indoor
AP (100mW).
This Quick Installation Guide (including FAQ
Instruction Guide) provides instructions for getting
started with OWL400/410.
Copyright © 4IPNET, INC.
- 1 -
Page 7
Quick Installation Guide
OW
OWL400/410
L400/410 Long Range Outdoor AP/ Bridge/ CPE ENGLISH
OWOW
L400/410L400/410
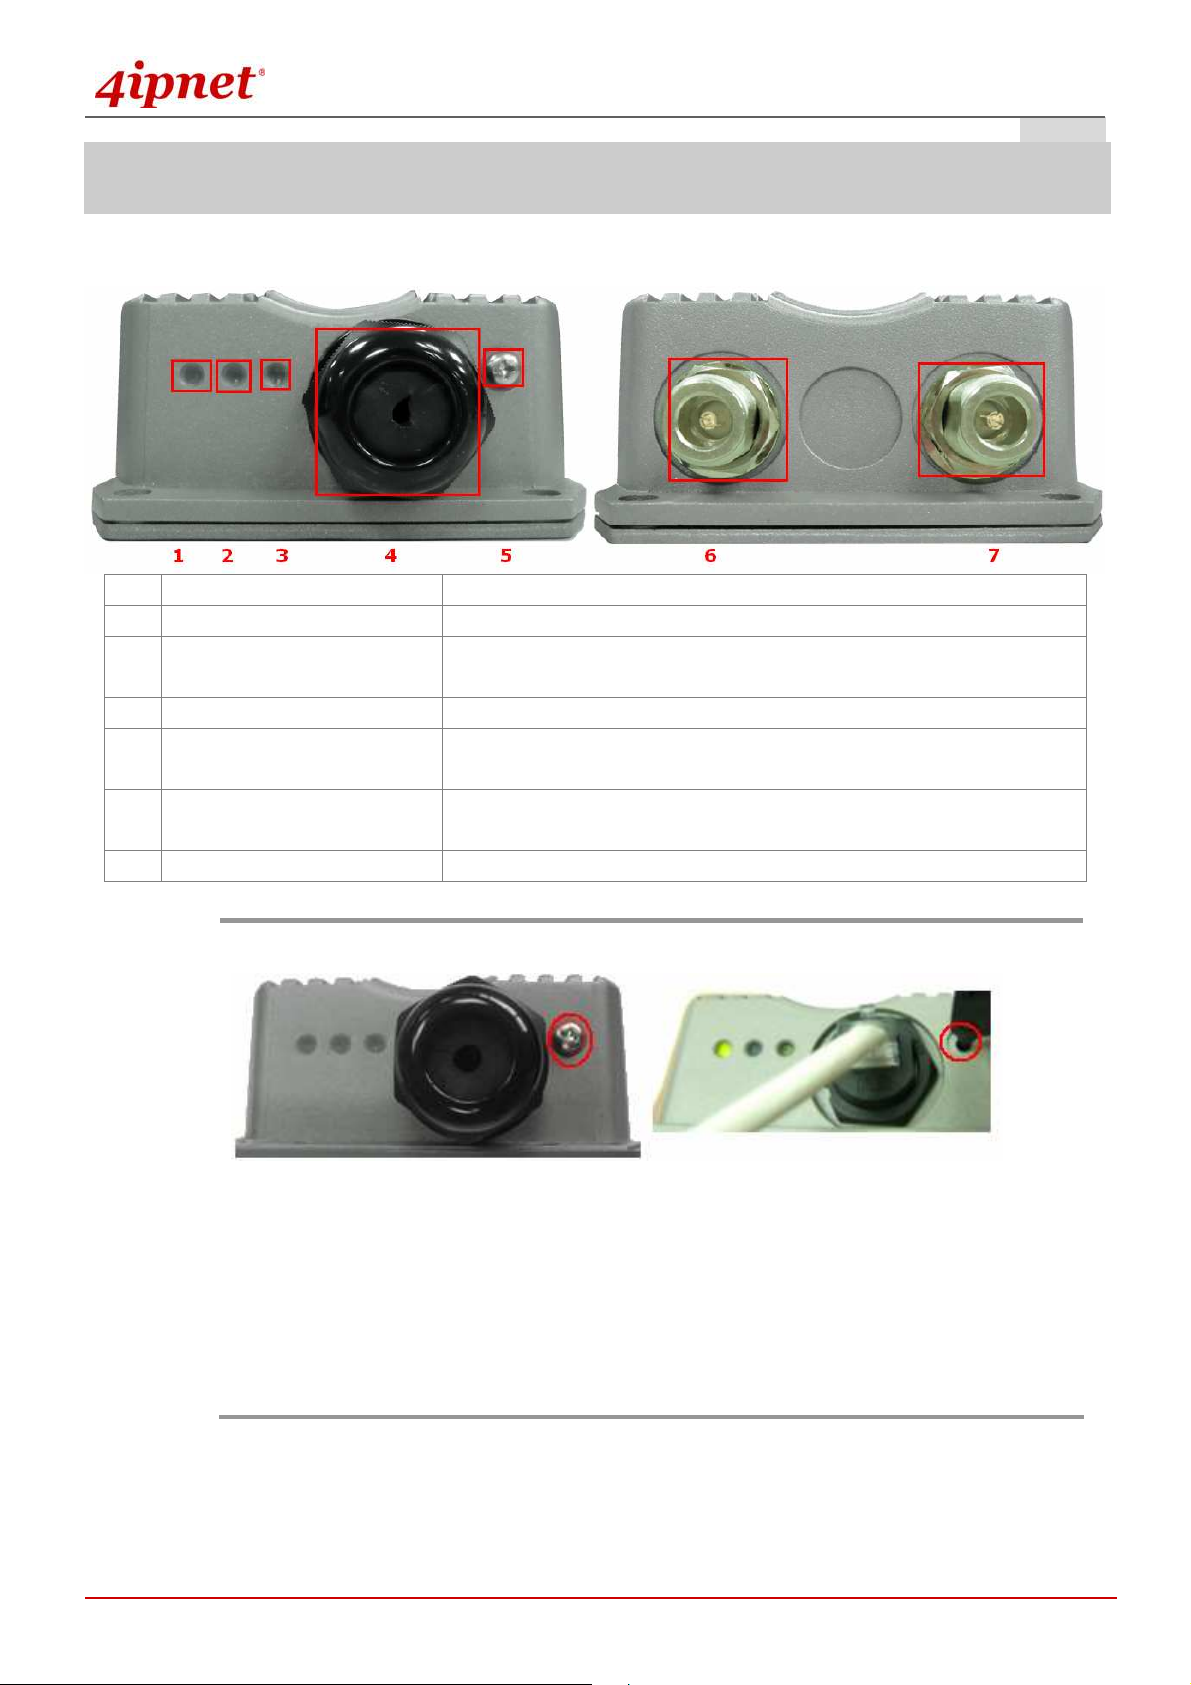
System Overview
OWL400
1 Power Green LED ON indicates power on, and OFF indicates power off
2 WLAN Green LED ON indicates system ready
3 LAN Green LED ON indicates connection; BLINKING indicates
transmitting data; OFF indicates no connection
4 PoE Connector For connecting to the Power Sourcing Equipment (PSE)
5 Reset Press more than 5 seconds and release to reset the system to its
default settings
6 Primary N-type Antenna
Connector
7 N-type Connector For connecting to an antenna
For connecting to an antenna
Reset Back to Factory Default:
Note:
Unscrew the screw beside the PoE hole. Press and hold the button for seconds. You can
use a toothpick to help you reach the button.
The system is meant to be used in only one mode at a time. Before you start with any
configuration, you should first decide which mode to use it in. Please prevent constant
switching from one mode to another during usage as it is easy for users to misconfigure the
settings.
Copyright © 4IPNET, INC.
- 2 -
Page 8

Quick Installation Guide
OW
OWL400/410
L400/410 Long Range Outdoor AP/ Bridge/ CPE ENGLISH
OWOW
L400/410L400/410
OWL410
1 Power Green LED ON indicates power on, and OFF indicates power off
2 WLAN Green LED ON indicates system ready
3 LAN Green LED ON indicates connection; BLINKING indicates
transmitting data; OFF indicates no connection
4 PoE Connector For connecting to the Power Sourcing Equipment (PSE)
5 Reset Press more than 5 seconds and release to reset the system to its
default settings
6 Built-in patch antenna 14 dBi (Horizontal: 25 degree; Vertical: 25 degree)
Copyright © 4IPNET, INC.
- 3 -
Page 9
Quick Installation Guide
OW
OWL400/410
L400/410 Long Range Outdoor AP/ Bridge/ CPE ENGLISH
OWOW
L400/410L400/410
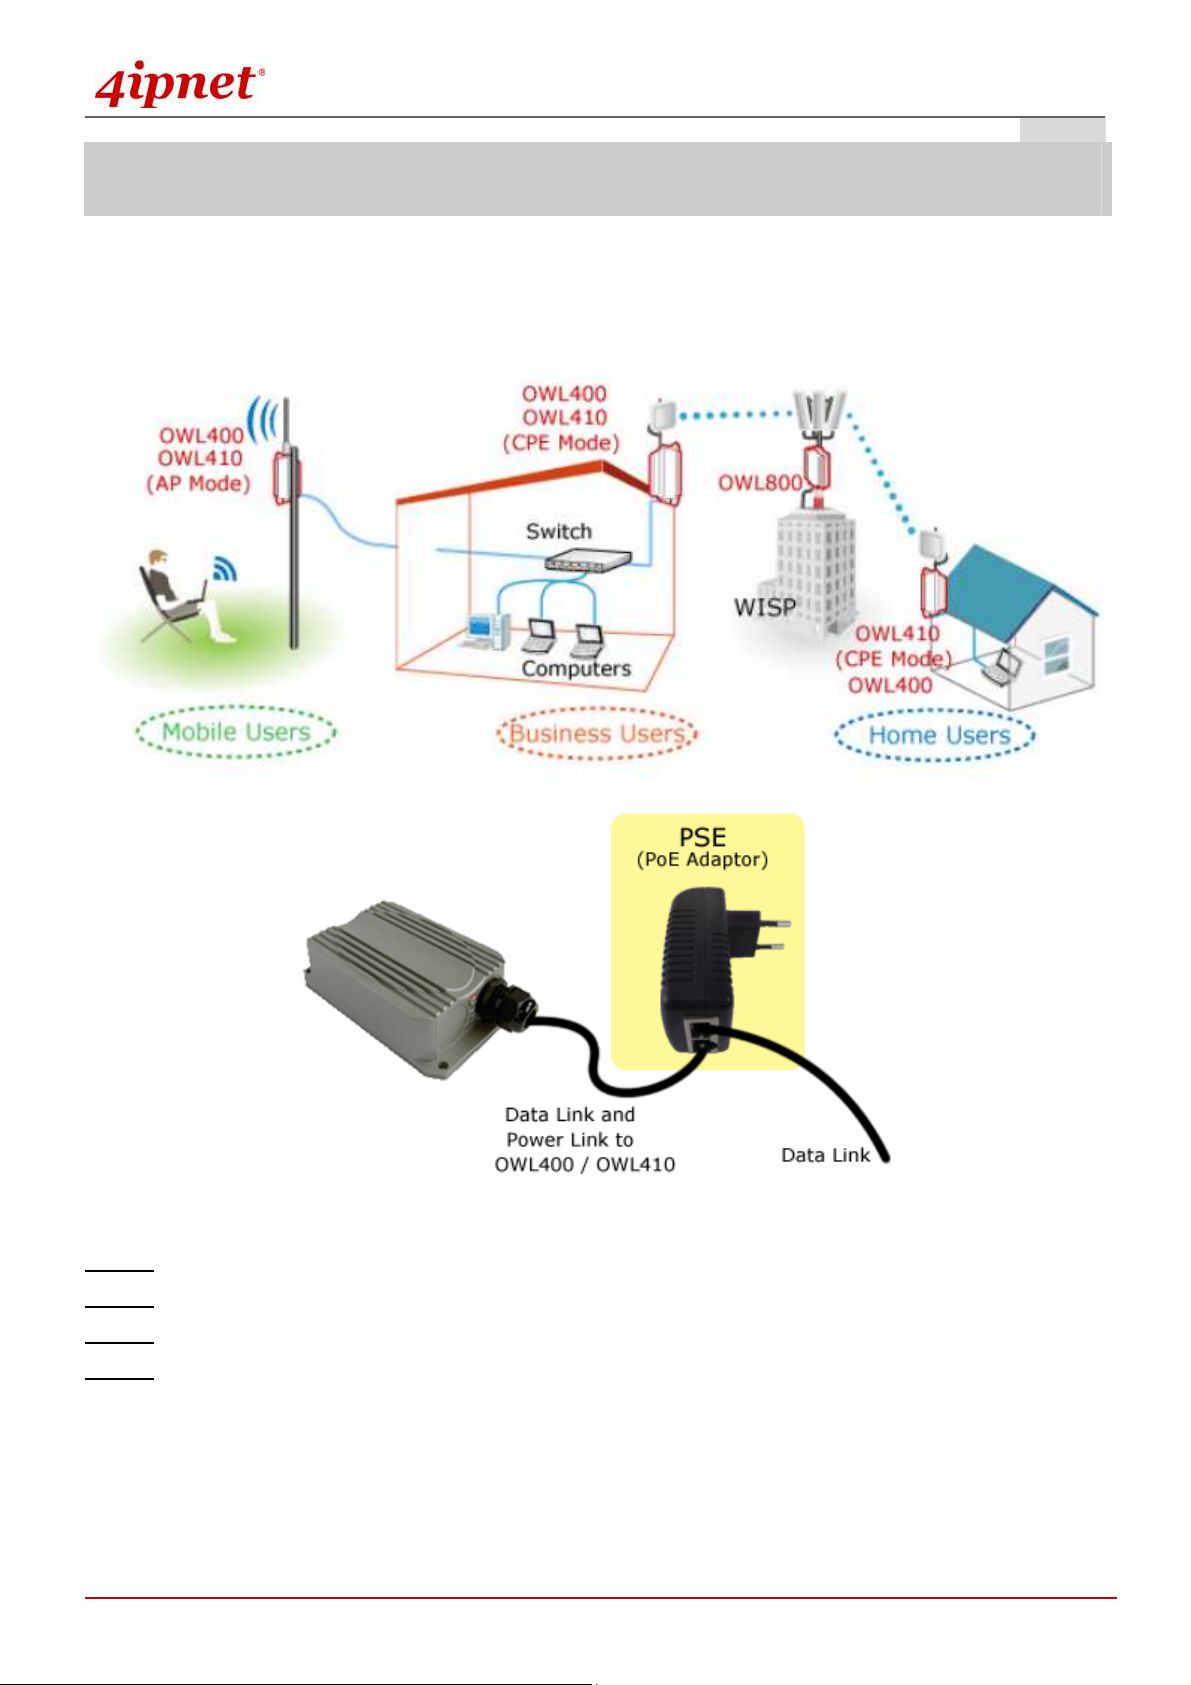
Hardware Installation
OWL400/410
The following diagram is a basic network topology which can be used for testing and configuring the
OWL400/410.
Installation Steps:
Step 1. Connect the antennas to the connectors (applicable for OWL400 only).
Step 2. Connect the Ethernet Port of OWL400/410 to POWER & DATA OUT Port of the PSE.
Step 3. Connect one end of an Ethernet cable to the Data Port of PSE and the other end to the computer.
Step 4. Plug the PSE in order to supply power to the OWL400/410.
Copyright © 4IPNET, INC.
- 4 -
Page 10

Quick Installation Guide
OW
OWL400/410
L400/410 Long Range Outdoor AP/ Bridge/ CPE ENGLISH
OWOW
L400/410L400/410
Getting Started
4ipnet OWL400/410 supports web-based configuration. OWL400/410 is a dual-mode system, AP Mode as the
default mode for the first time entering the system, which also can be configured as either an access point (AP
Mode) or a gateway (CPE Mode) based on your needs. It is required to follow the respective installation
procedures provided to properly set up the desired mode for this system.
• Default IP Address of Web Management Interface:
The default IP address and Subnet Mask for the AP mode and CPE mode are as follows:
Mode AP Mode CPE Mode
IP Address
Subnet Mask
192.168.1.1 192.168.1.1
255.255.255.0 255.255.255.0
• Default User Name and Password:
There is only one management account for AP mode, root. In addition, there are two system management
accounts for CPE mode to maintain the system, root and admin, and each has different levels of management
capabilities. The root account is empowered with full privileges while the admin account is with partial ones.
The default user name and password for both the root and admin account are as follows:
Mode AP Mode
Management
Account
User Name
Password
Root
Account
root root admin
admin admin admin
CPE Mode
Root
Account
Admin
Account
Copyright © 4IPNET, INC.
- 5 -
Page 11

Quick Installation Guide
OW
OWL400/410
L400/410 Long Range Outdoor AP/ Bridge/ CPE ENGLISH
OWOW
L400/410L400/410
Step 1:
IP Segment Setup for Administrator PC
Set a static IP address on the same subnet mask as OWL400/410 in TCP/IP of the administrator PC, such as
the following example. Do not duplicate the IP address used here with the IP address of OWL400/410 or any
other devices within the same network.
>> Example of IP Segment:
The valid range of IP address is 1 ~ 254. However, 1 must be avoided as it is already used by OWL400/410.
Below depicts an example of using 100 (the underlined value can be changed as desired).
IP Address: 192.168.1.100
Subnet Mask: 255.255.255.0
Step 2: Launch Web Browser
Launch a web browser to access the web management interface of AP mode by entering the default IP
address, http://192.168.1.1/, in the URL field, and then press Enter.
Using an incorrect default IP address will result in no Login page
shown in the web browser. Please make sure a correct IP
address is used for the desired mode.
Step 3: System Login
The system manager Login Page will then appear.
Enter “root” in the User name field and “admin” in the Password field, and then click Login to log in.
Copyright © 4IPNET, INC.
- 6 -
Page 12

Quick Installation Guide
OW
OWL400/410
L400/410 Long Range Outdoor AP/ Bridge/ CPE ENGLISH
OWOW
L400/410L400/410
Step 4: Login Success
After a successful login to OWL400/410, a System Overview page of web management interface will appear,
To logout, simply click on the Logout button at the upper right hand corner of the interface.
By default, AP mode is enabled. Therefore, the
Note:
administrator must access the system via the AP
mode login page for the first time. The administrator is
then able to switch between modes afterwards.
Copyright © 4IPNET, INC.
- 7 -
Page 13

Quick Installation Guide
Common Settings
<AP Mode – Default Mode>
Step 1: Mode Confirmation
OW
OWL400/410
L400/410 Long Range Outdoor AP/ Bridge/ CPE ENGLISH
OWOW
L400/410L400/410
Ensure the Operating Mode is currently in AP mode.
Click on the Status button and then select the System Overview tab. The Operating Mode is at the
System section on the System Overview page.
Copyright © 4IPNET, INC.
- 8 -
Page 14

Quick Installation Guide
OW
OWL400/410
L400/410 Long Range Outdoor AP/ Bridge/ CPE ENGLISH
OWOW
L400/410L400/410
Step 2: Change Password
Click on the Utilities button and then select the Password tab.
Enter a new password in the New Password field and retype it in the Re-enter New Password field.
Click SAVE to save the changes.
Copyright © 4IPNET, INC.
- 9 -
Page 15

Quick Installation Guide
Step 3: Network Settings
OW
OWL400/410
L400/410 Long Range Outdoor AP/ Bridge/ CPE ENGLISH
OWOW
L400/410L400/410
【Settings here are for example only】
Click on the System button and then select the Network tab.
Enable Static, and then enter the related information in the fields marked with red asterisks.
Click SAVE to save the settings.
Copyright © 4IPNET, INC.
- 10 -
Page 16
Quick Installation Guide
OW
OWL400/410
L400/410 Long Range Outdoor AP/ Bridge/ CPE ENGLISH
OWOW
L400/410L400/410
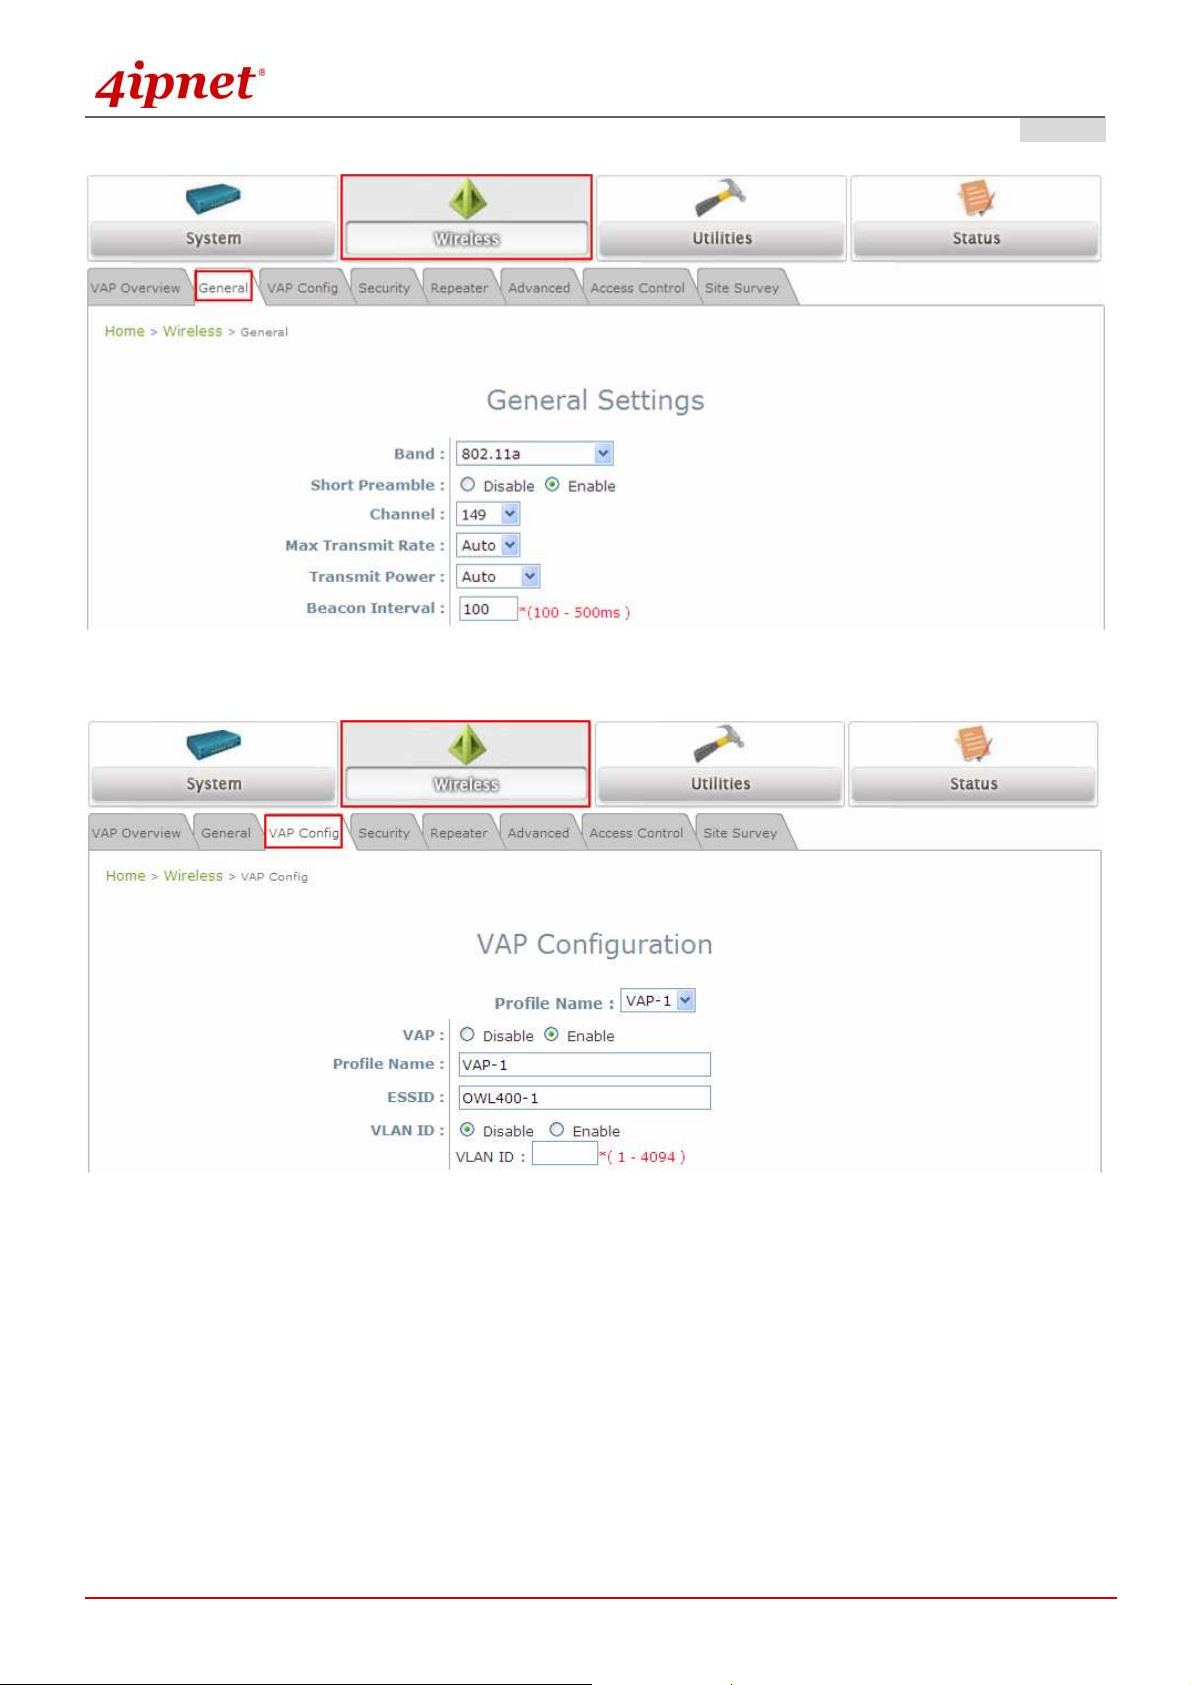
Step 4: SSID Settings
Click on the Wireless button and then select the General tab.
Band: Select an appropriate band from the drop-down list box.
Click on the Wireless button and then select the VAP Config tab.
ESSID: Enter respective ESSID for each VAP in the ESSID field or use the default. ESSID (Extended
Service Set Identifier) is a unique identifier used for networking devices to get associated with
OWL400/410.
Click SAVE to save the settings.
Copyright © 4IPNET, INC.
- 11 -
Page 17
Quick Installation Guide
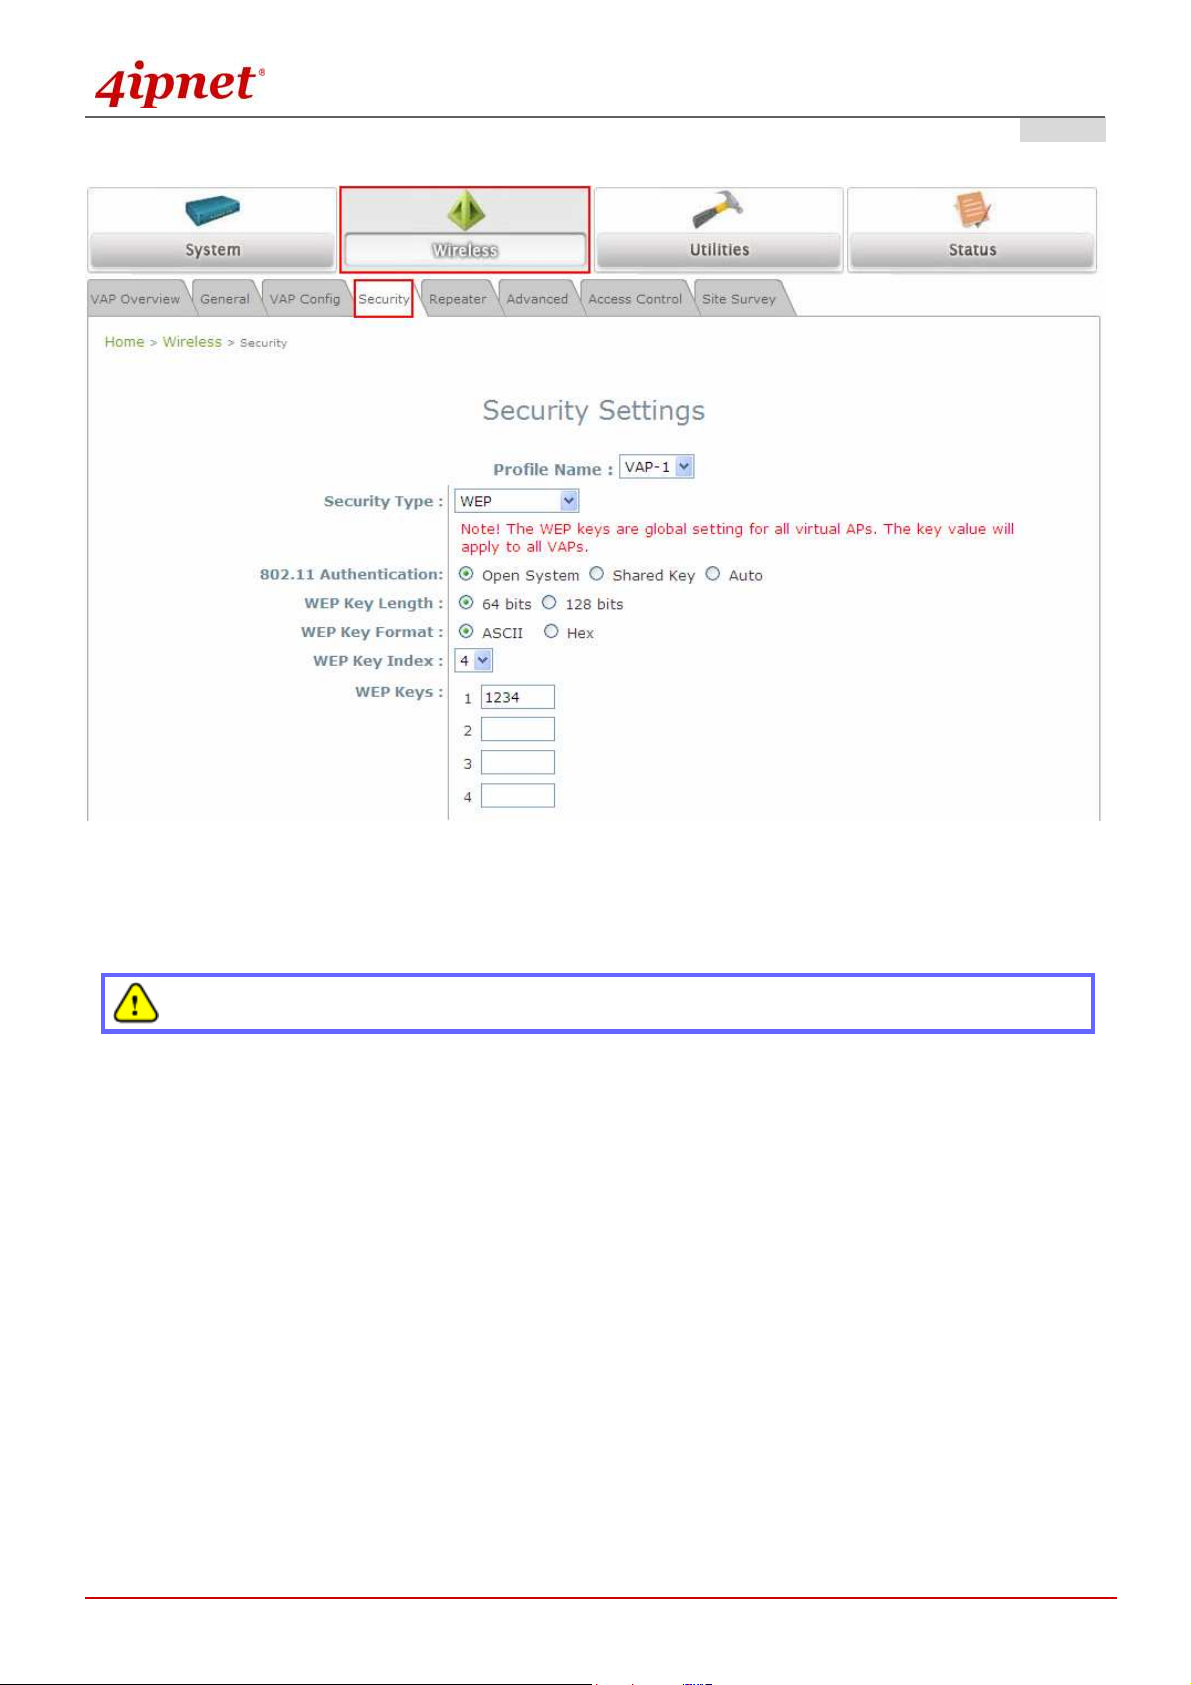
Step 5: Security Settings
OW
OWL400/410
L400/410 Long Range Outdoor AP/ Bridge/ CPE ENGLISH
OWOW
L400/410L400/410
Click on the Wireless button and then select the Security tab.
Select the desired VAP Profile and Security Type from the drop-down list boxes. The above figure depicts
an example of selecting VAP-1 and WEP.
Enter the information required in the blank fields.
You must use the same information provided here to configure the network devices that are to be
associated with OWL400/410.
Click
SAVE to save all settings configured so far;
all updated settings will take effect upon reboot.
Congratulations!
The AP mode is now successfully configured.
Copyright © 4IPNET, INC.
- 12 -
Page 18

Quick Installation Guide
<CPE Mode>
Step 1: Mode Confirmation
OW
OWL400/410
L400/410 Long Range Outdoor AP/ Bridge/ CPE ENGLISH
OWOW
L400/410L400/410
Ensure the Operating Mode is currently in CPE mode.
Click on the Status button and then select the System Overview tab. The Operating Mode is at the
System section on the System Overview page.
Copyright © 4IPNET, INC.
- 13 -
Page 19

Quick Installation Guide
Step 2: Change Password
OW
OWL400/410
L400/410 Long Range Outdoor AP/ Bridge/ CPE ENGLISH
OWOW
L400/410L400/410
Click on the Utilities button and then select the Password tab.
Change Root Account Password
•
Enter the old password in the Old Password field; default password is “admin”.
•
Enter a new password in the New Password field and retype it in the Re-enter New Password field.
Change Admin Account Password
•
Enter a new password in the New Password field and retype it in the Re-enter New Password field.
Click SAVE to save the changes.
Copyright © 4IPNET, INC.
- 14 -
Page 20

Quick Installation Guide
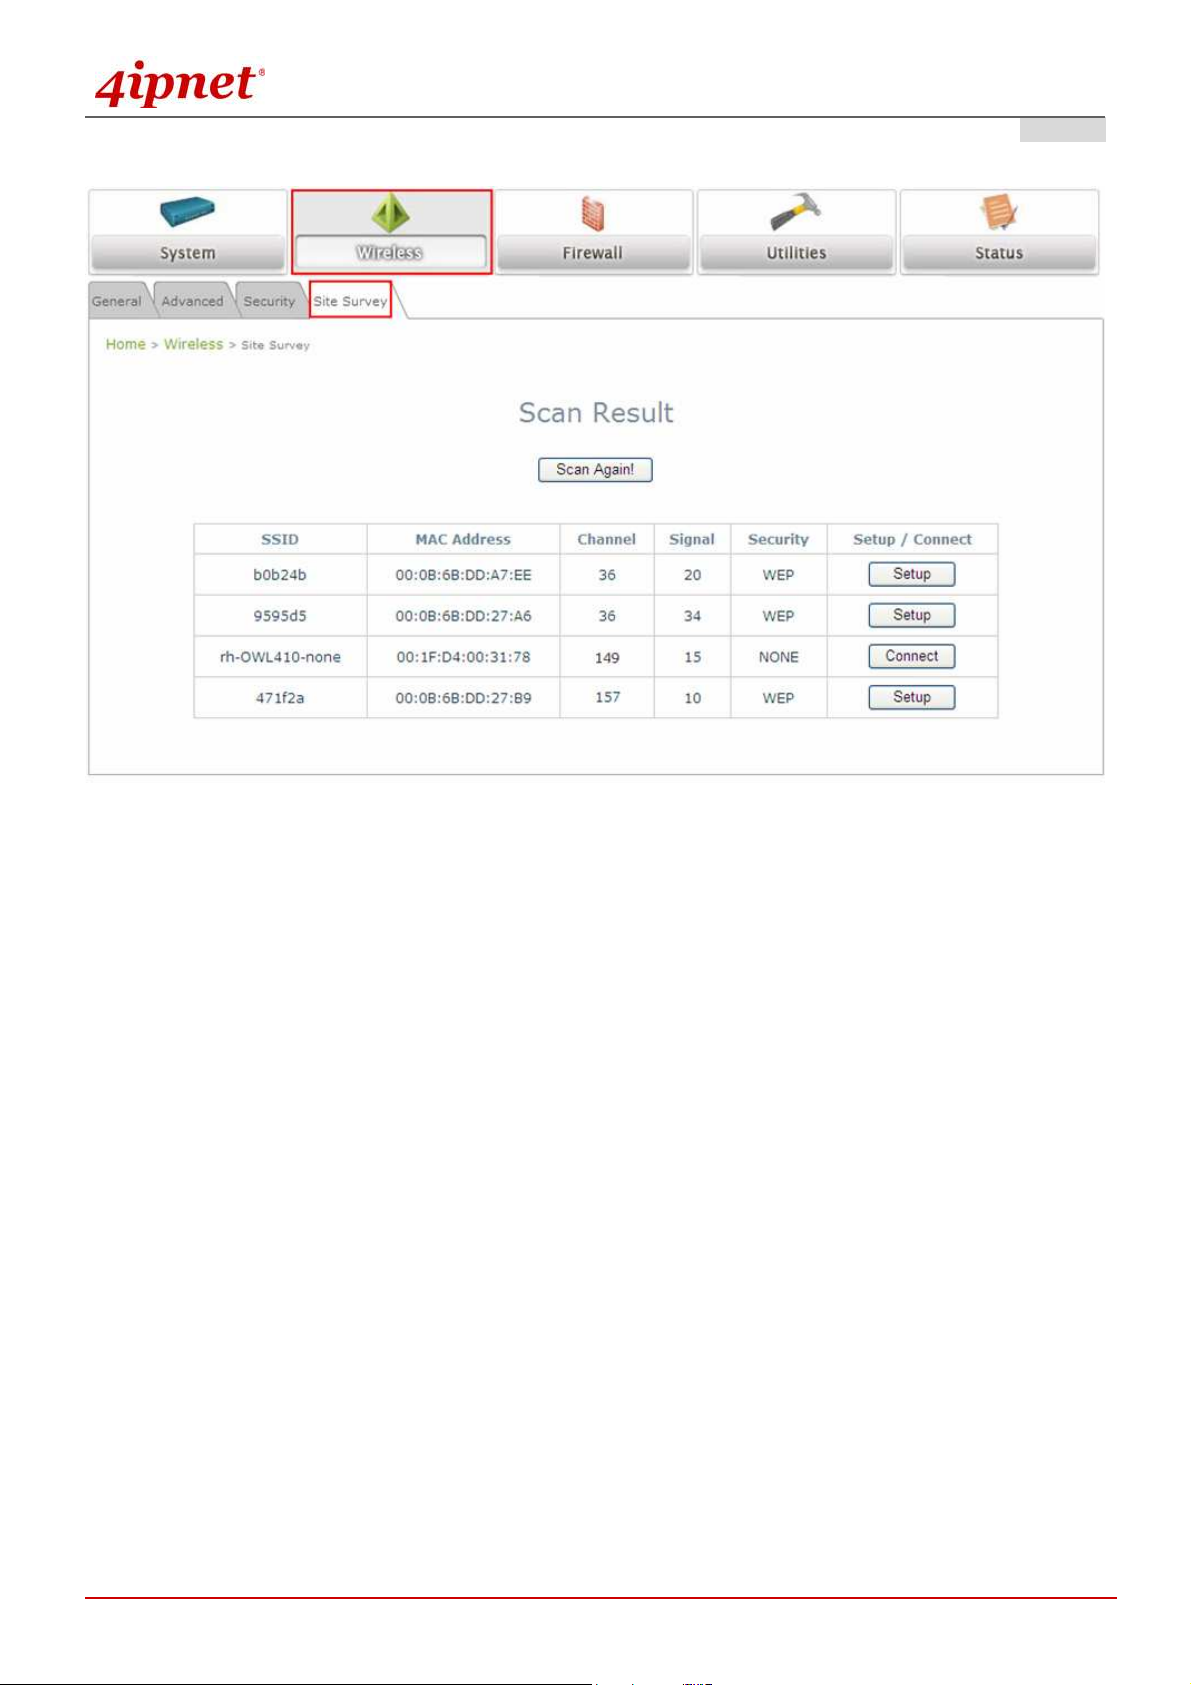
Step 3: Site Survey
OW
OWL400/410
L400/410 Long Range Outdoor AP/ Bridge/ CPE ENGLISH
OWOW
L400/410L400/410
【The scan result displayed here is an example only.】
Click on the Wireless button and then select the Site Survey tab.
The system will automatically scan and display all APs in its coverage area.
Click Scan Again if the APs to be associated with are not listed on the Scan Result list.
Step 4: Select AP to be Associated
Select an AP to be associated with from the Scan Result list provided in Step 3.
Copyright © 4IPNET, INC.
- 15 -
Page 21
Quick Installation Guide
Step 5: Security Settings
OW
OWL400/410
L400/410 Long Range Outdoor AP/ Bridge/ CPE ENGLISH
OWOW
L400/410L400/410
The above figure depicts an example of selecting one SSID (encrypted via one security type).
Click Setup, and then a related encryption configuration box will appear.
Enter the information required in the configuration box. Information to be entered must be exactly the
same as configured in this selected AP.
Click Connect to start the connection.
Copyright © 4IPNET, INC.
- 16 -
Page 22

Quick Installation Guide
Step 6: Network Interface Configuration
OW
OWL400/410
L400/410 Long Range Outdoor AP/ Bridge/ CPE ENGLISH
OWOW
L400/410L400/410
【Settings here are for example only】
Click on the System button and then select Network tab.
For WAN configuration, determine the way to obtain the IP address. For example,
enable Static, and then enter the related information in the fields marked with red asterisks.
Click Save to save the settings.
Copyright © 4IPNET, INC.
- 17 -
Page 23
Quick Installation Guide
OW
OWL400/410
L400/410 Long Range Outdoor AP/ Bridge/ CPE ENGLISH
OWOW
L400/410L400/410
Step 7: LAN Configuration
Click on the System button and then select the Network tab.
The LAN Configuration section is on the same page as the WAN Configuration section.
Provide the information to the required field by entering IP address/Netmask of the LAN port.
Click SAVE to save all settings configured so far; all updated settings will take effect upon reboot.
Congratulations!
The CPE mode is now successfully configured.
After OWL400/410's network configuration completes, please remember to change the IP Address of
your PC Connection Properties back to its original settings in order to ensure that your PC functions
properly in its real network environments.
It is strongly recommended to make a backup copy of configuration settings.
For further configuration and backup information, please refer to the User’s Manual.
P/N: V10020110307
Copyright © 4IPNET, INC.
- 18 -
 Loading...