


OWL400/410 V1.00
Long Range Outdoor AP/Bridge/CPE

User’s Manual
OWL400/410 Long Range Outdoor AP/ Bridge/ CPE ENGLISH
Copyright Notice
The contents of this publication may not be reproduced in any part or as a whole, stored, transcribed in an information retrieval system, translated into any language, or transmitted in any form or by any means, mechanical, magnetic, electronic, optical, photocopying, manual, or otherwise, without the prior written permission of 4IPNET, INC.
Disclaimer
4IPNET, INC. does not assume any liability arising out the application or use of any products, or software described herein. Neither does it convey any license under its parent rights not the parent rights of others. 4IPNET further reserves the right to make changes in any products described herein without notice. The publication is subject to change without notice.
Trademarks
4IPNET (4ipnet) is a registered trademark of 4IPNET, INC. Other trademarks mentioned in this publication are used for identification purposes only and may be properties of their respective owners.
ii |
Copyright © 4IPNET, INC. |

|
|
|
User’s Manual |
|
|
|
OWL400/410 Long Range Outdoor AP/ Bridge/ CPE |
ENGLISH |
|
|
|
Table of Contents |
|
|
Table of Contents................................................................................................................................ |
|
iii |
||
1. |
Introduction.................................................................................................................................. |
1 |
||
|
1.1 |
Overview ............................................................................................................................................ |
1 |
|
|
1.2 |
Functionalities .................................................................................................................................... |
3 |
|
|
1.3 |
Document Conventions ...................................................................................................................... |
4 |
|
2. |
System Overview......................................................................................................................... |
5 |
||
|
2.1 |
Package Contents................................................................................................................................ |
5 |
|
|
2.2 |
Specifications ..................................................................................................................................... |
5 |
|
|
2.3 |
Panel Function Description ................................................................................................................ |
6 |
|
3. |
Installation ................................................................................................................................... |
7 |
||
|
3.1 |
Hardware Installation ......................................................................................................................... |
7 |
|
|
3.2 |
Basic Configuration............................................................................................................................ |
8 |
|
|
3.2.1 Introduction to Web Management Interface.................................................................................................. |
8 |
||
|
|
< AP Mode – Default Mode >......................... ................................................................................... |
8 |
|
|
|
< CPE Mode > .................................................................................................................................. |
11 |
|
|
3.2.2 |
Quick Configuration ................................................................................................................................... |
13 |
|
|
|
< AP Mode – Default Mode>.......................... ................................................................................. |
13 |
|
|
|
< CPE Mode > .................................................................................................................................. |
18 |
|
4. |
AP Mode Configuration............................................................................................................ |
24 |
||
|
4.1 |
System .............................................................................................................................................. |
26 |
|
|
4.1.1 |
System Information..................................................................................................................................... |
27 |
|
|
4.1.2 |
Operating Mode .......................................................................................................................................... |
29 |
|
|
4.1.3 |
Network Settings......................................................................................................................................... |
30 |
|
|
4.1.4 |
Management Services ................................................................................................................................. |
31 |
|
|
4.2 |
Wireless ............................................................................................................................................ |
33 |
|
|
4.2.1 |
Virtual AP Overview ................................................................................................................................... |
34 |
|
|
4.2.2 |
General Settings .......................................................................................................................................... |
35 |
|
|
4.2.3 |
VAP Configuration...................................................................................................................................... |
37 |
|
|
4.2.4 |
Security Settings ......................................................................................................................................... |
38 |
|
|
4.2.5 |
Repeater Settings ........................................................................................................................................ |
42 |
|
|
4.2.6 |
Advanced Wireless Settings........................................................................................................................ |
45 |
|
|
4.2.7 |
Access Control Settings .............................................................................................................................. |
46 |
|
|
4.2.8 |
Site Survey .................................................................................................................................................. |
48 |
|
|
4.3 |
Utilities ............................................................................................................................................. |
49 |
|
|
4.3.1 |
Change Password ........................................................................................................................................ |
50 |
|
|
4.3.2 |
Network Utilities......................................................................................................................................... |
51 |
|
|
4.3.3 |
Configuration Save & Restore .................................................................................................................... |
52 |
|
|
4.3.4 |
System Upgrade .......................................................................................................................................... |
53 |
|
|
4.3.5 |
Reboot......................................................................................................................................................... |
54 |
|
|
4.4 |
Status ................................................................................................................................................ |
55 |
|
|
4.4.1 |
System Overview ........................................................................................................................................ |
56 |
|
|
4.4.2 |
Associated Client Status.............................................................................................................................. |
58 |
|
|
4.4.3 |
Repeater Information .................................................................................................................................. |
59 |
|
|
4.4.4 |
Event Log.................................................................................................................................................... |
60 |
|
|
4.5 |
Online Help ...................................................................................................................................... |
61 |
|
5. |
CPE Mode Configuration.......................................................................................................... |
62 |
||
|
5.1 |
System .............................................................................................................................................. |
64 |
|
|
5.1.1 |
System Information..................................................................................................................................... |
65 |
|
|
5.1.2 |
Operating Mode .......................................................................................................................................... |
67 |
|
|
5.1.3 |
Network Settings......................................................................................................................................... |
68 |
|
|
5.1.4 |
Management Services ................................................................................................................................. |
71 |
|
|
|
iii |
Copyright © 4IPNET, INC. |
|

|
|
User’s Manual |
|
OWL400/410 Long Range Outdoor AP/ Bridge/ CPE ENGLISH |
|
5.2 |
Wireless ............................................................................................................................................ |
73 |
5.2.1 |
General Settings .......................................................................................................................................... |
74 |
5.2.2 |
Advanced Wireless Settings........................................................................................................................ |
75 |
5.2.3 |
Security Settings ......................................................................................................................................... |
76 |
5.2.4 |
Site Survey .................................................................................................................................................. |
78 |
5.3 |
Firewall............................................................................................................................................. |
79 |
5.3.1 |
IP/ Port Forwarding..................................................................................................................................... |
80 |
5.3.2 |
Demilitarized Zone ..................................................................................................................................... |
82 |
5.4 |
Utilities ............................................................................................................................................. |
83 |
5.4.1 |
Change Password ........................................................................................................................................ |
84 |
5.4.2 |
Network Utilities......................................................................................................................................... |
85 |
5.4.3 |
Configuration Save & Restore .................................................................................................................... |
86 |
5.4.4 |
System Upgrade .......................................................................................................................................... |
87 |
5.4.5 |
Reboot......................................................................................................................................................... |
88 |
5.5 |
Status ................................................................................................................................................ |
89 |
5.5.1 |
System Overview ........................................................................................................................................ |
90 |
5.5.2 |
Event Log.................................................................................................................................................... |
92 |
5.5.3 |
DHCP Leases .............................................................................................................................................. |
93 |
5.5.4 |
UPnP Status................................................................................................................................................. |
94 |
5.6 |
Online Help ...................................................................................................................................... |
95 |
Appendix A. |
System Management Account Privileges.......................................................... |
96 |
iv |
Copyright © 4IPNET, INC. |
User’s Manual
OWL400/410 Long Range Outdoor AP/ Bridge/ CPE ENGLISH
1.Introduction
1.1Overview
This manual is intended for system integrators, field engineers and network administrators to set up 4ipnet OWL400/410 Long Range Outdoor AP/ Bridge/ CPE in their network environments. It contains step-by-step procedures and graphic examples to guide users with networking knowledge to complete the installation.
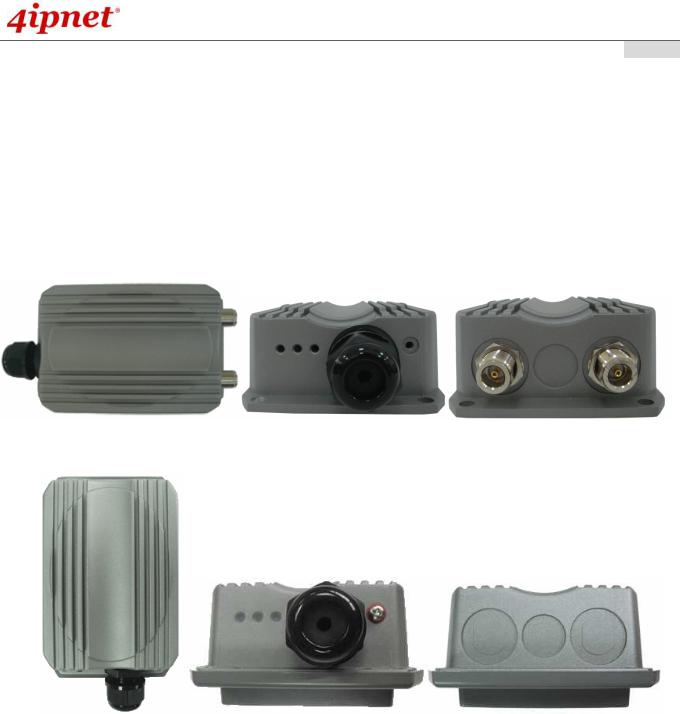
OWL400 (with N-type connector)
OWL410 (with built-in 10dBi patch antenna)
The 802.11 n/a compliant OWL400/410 is a multi-mode Last-Mile Broadband solution for Wireless Internet Service Provider (WISP). It can be deployed as a traditional fixed wireless Access Point (AP mode) or it can be used as an outdoor Customer Premises Equipment (CPE mode) that connects to the outdoor wireless network of Wireless Internet Service Provider (WISP).
The metal sealed OWL400/410 is compact in size and weatherproof. Coming with a mounting kit, it can be mounted on a pole or wall. It is suitable for both indoor and outdoor usage with its 200mW output power, which is higher than a typical indoor AP (100mW).
The following is a network diagram for a typical WISP application.
1 |
Copyright © 4IPNET, INC. |

User’s Manual
OWL400/410 Long Range Outdoor AP/ Bridge/ CPE ENGLISH
The OWL400/410 can be deployed in various environments, for example:
∙Hot zones such as business districts, office complexes, airports, hotels, conference centers, recreation areas, and shopping malls.
∙Wireless CPE for Multi Dwelling Unit (MDU) /Multi Tenant Unit (MTU), such as apartments, dormitories, and office complexes.
∙Outdoor access point for school campuses, enterprise campuses, or manufacture plants.
∙Indoor access point for hotels, factories, or warehouses where metal industrial grade devices are preferred.
∙Public hotspot operation for café, parks, convention centers, shopping malls, or airports.
∙Wireless coverage for indoor and outdoor ground for private resorts, acre estate/home's yards, or gulf course communities.
2 |
Copyright © 4IPNET, INC. |

User’s Manual
OWL400/410 Long Range Outdoor AP/ Bridge/ CPE ENGLISH
1.2 Functionalities
The metal sealed OWL400/410 is compact in size and weatherproof. Coming with a mounting kit, it can be mounted on a pole or wall. Specifically developed for outdoor use, the fully-hardened, IP68-rated OWL400/410 can withstand wind, rain, lightning, power surges, and extreme temperature.
∙Acts as a ”Wireless Modem” to bring wireless bandwidth to home and office buildings.
∙Wireless Bandwidth Allocation (uplink/downlink) delivered to each building depending on different subscription plans.
∙Full range of wireless security mechanisms such as WEP, WPA and WPA2 (802.11i) that are important for enterprise wireless deployments.
∙Acts as a Home Router for IP Sharing and firewall, all-in-one installation solution - no need for extra router.
∙Purposely built rugged access point for harsh outdoor / industrial conditions.
∙Weatherproof and watertight from its rugged aluminum housing (IP68 Approved).
∙Power over Ethernet (PoE) built-in for single cable installation.
∙On board Ethernet surge protection.
∙Multiple operation modes :
o AP Base Station Mode
o WISP CPE Mode
o WDS Bridge Mode
o Universal Repeater Mode
3 |
Copyright © 4IPNET, INC. |

User’s Manual
OWL400/410 Long Range Outdoor AP/ Bridge/ CPE ENGLISH
1.3 Document Conventions
Represents essential steps, actions, or messages that should not be ignored.
Note: Contains related information that corresponds to a topic.
Indicates that clicking this button will save the changes you made, but you must reboot the system upon the completion of all configuration settings for the changes to take effect.
Indicates that clicking this button will clear what you have set before the settings are applied.
4 |
Copyright © 4IPNET, INC. |

User’s Manual
OWL400/410 Long Range Outdoor AP/ Bridge/ CPE ENGLISH
2.System Overview
2.1Package Contents
The standard package of OWL400/410 includes: |
|
|
∙ |
OWL400/410 |
x 1 |
∙ Quick Installation Guide (QIG) |
x 1 |
|
∙ CD-ROM (with User’s Manual and QIG) |
x 1 |
|
∙ Power Sourcing Equipment (PSE) |
x 1 |
|
∙ |
Mounting Kit |
x 1 |
It is highly recommended to use all the components supplied to ensure best performance of the system.
2.2 Specifications
∙Hardware Specifications
Die cast Metal case: weather proof, compliant with IP68 Standard
LED Indication: Power x 1; Ethernet x 1; Wireless x 1
Ethernet Port: 10/100 Base-T with Auto MDI/MDX, surge protected
∙Physical and Power
PoE: DC 48V/0.4A
Form Factor: Wall or Pole Mountable
Dimensions (W x D x H): 6.5” x 3.8” x 1.9” (165 x 96 x 48 mm)
Weight: 1.6 lbs (0.72 kg)
5 |
Copyright © 4IPNET, INC. |
User’s Manual
OWL400/410 Long Range Outdoor AP/ Bridge/ CPE ENGLISH
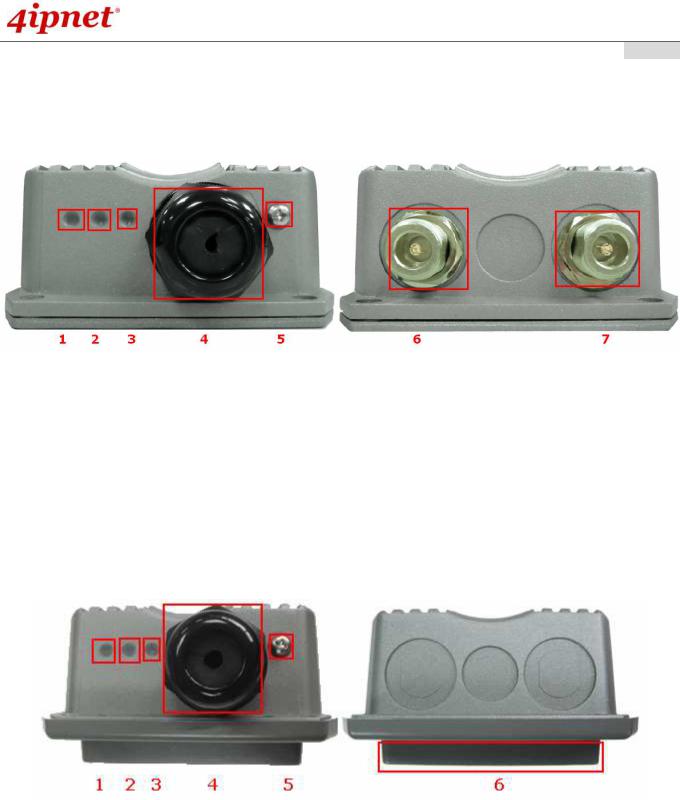
2.3 Panel Function Description
OWL400
1 |
Power |
Green LED ON indicates power on, and OFF indicates power off |
2 |
WLAN |
Green LED ON indicates system ready |
3 |
LAN |
Green LED ON indicates connection; BLINKING indicates transmitting |
|
|
data; OFF indicates no connection |
4 |
PoE Connector |
For connecting to the Power Sourcing Equipment (PSE) |
5 |
Reset |
Press more than 5 seconds and release to reset the system to its |
|
|
default settings |
6 |
Primary N-type Antenna |
For connecting to an antenna |
|
Connector |
|
7 |
N-type Connector |
For connecting to an antenna |
OWL410
1 |
Power |
Green LED ON indicates power on, and OFF indicates power off |
2 |
WLAN |
Green LED ON indicates system ready |
3 |
LAN |
Green LED ON indicates connection; BLINKING indicates transmitting |
|
|
data; OFF indicates no connection |
4 |
PoE Connector |
For connecting to the Power Sourcing Equipment (PSE) |
5 |
Reset |
Press more than 5 seconds and release to reset the system to its |
|
|
default settings |
6 |
Built-in patch antenna |
14 dBi (Horizontal: 25 degree; Vertical: 25 degree) |
6 |
Copyright © 4IPNET, INC. |
User’s Manual
OWL400/410 Long Range Outdoor AP/ Bridge/ CPE ENGLISH
3.Installation
3.1Hardware Installation
The following diagram is a basic network topology which can be used for testing and configuring the OWL400/410.
Installation Steps:
Step 1. Connect the antennas to the connectors (applicable for OWL400 only).
Step 2. Connect the Ethernet Port of OWL400/410 to POWER & DATA OUT Port of the PSE.
Step 3. Connect one end of an Ethernet cable to the Data Port of PSE and the other end to the computer.
Step 4. Plug the PSE in order to supply power to the OWL400/410.
7 |
Copyright © 4IPNET, INC. |

User’s Manual
OWL400/410 Long Range Outdoor AP/ Bridge/ CPE ENGLISH
3.2 Basic Configuration
3.2.1 Introduction to Web Management Interface
OWL400/410 provides a user friendly web management interface for configuration. As OWL400/410 is a dual-mode system which can be configured as either an access point (AP Mode) or a gateway (CPE Mode) based on your needs, it is required to follow the respective installation procedures provided to properly set up the desired mode for this system.
∙ Default IP Address of Web Management Interface:
The default IP address and Subnet Mask for the AP mode and CPE mode are as follows:
Mode |
AP Mode |
CPE Mode |
IP Address |
192.168.1.1 |
192.168.1.1 |
Subnet Mask |
255.255.255.0 |
255.255.255.0 |
In addition, there are two system management accounts for AP & CPE mode to maintain the system, root and admin, and each has different levels of management capabilities. The root account is empowered with full privileges while the admin account is with partial ones. And there is only one management account for AP mode, root. For more information on the privileges of these two accounts, please refer to Appendix A. System Management Account Privileges.
∙ Default User Name and Password:
The default User name and Password for both the root and admin account are as follows:
Mode |
AP Mode |
CPE Mode |
|
|
|
|
|
Management Account |
Root Account |
Root Account |
Admin Account |
|
|
|
|
User Name |
root |
root |
admin |
|
|
|
|
Password |
admin |
admin |
admin |
|
|
|
|
< AP Mode – Default Mode >
Step 1: IP Segment Set-up for Administrator PC
Set a static IP address on the same subnet mask as OWL400/410 in TCP/IP of the administrator PC, such as the following example. Do not duplicate the IP address used here with the IP address of OWL400/410 or any other devices within the same network.
>> Example of IP Segment:
The valid range of IP address is 1 ~ 254. However, 1 must be avoided as it is already used by OWL400/410. Below depicts an example of using 100 (the underlined value can be changed as desired).
∙IP Address: 192.168.1.100
∙Subnet Mask: 255.255.255.0
8 |
Copyright © 4IPNET, INC. |
User’s Manual
OWL400/410 Long Range Outdoor AP/ Bridge/ CPE ENGLISH
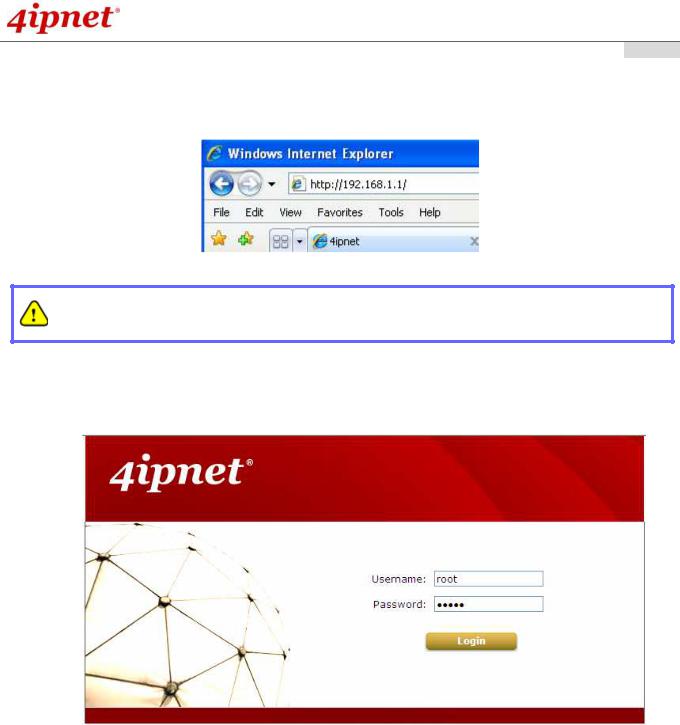
Step 2: Launch Web Browser
Launch a web browser to access the web management interface of AP mode by entering the default IP
address, http://192.168.1.1/, in the URL field, and then press Enter.
Using an incorrect default IP address will result in no Login page shown on the web browser. Please make sure a correct IP address is used; refer to Section 3.2.1 Instruction to Web Management Interface for detailed default IP addresses.
Step 3: System Login
The system manager Login Page will then appear.
Enter “root” in the User name field and “admin” in the Password field, and then click Login to log in.
9 |
Copyright © 4IPNET, INC. |

User’s Manual
OWL400/410 Long Range Outdoor AP/ Bridge/ CPE ENGLISH
Step 4: Login Success
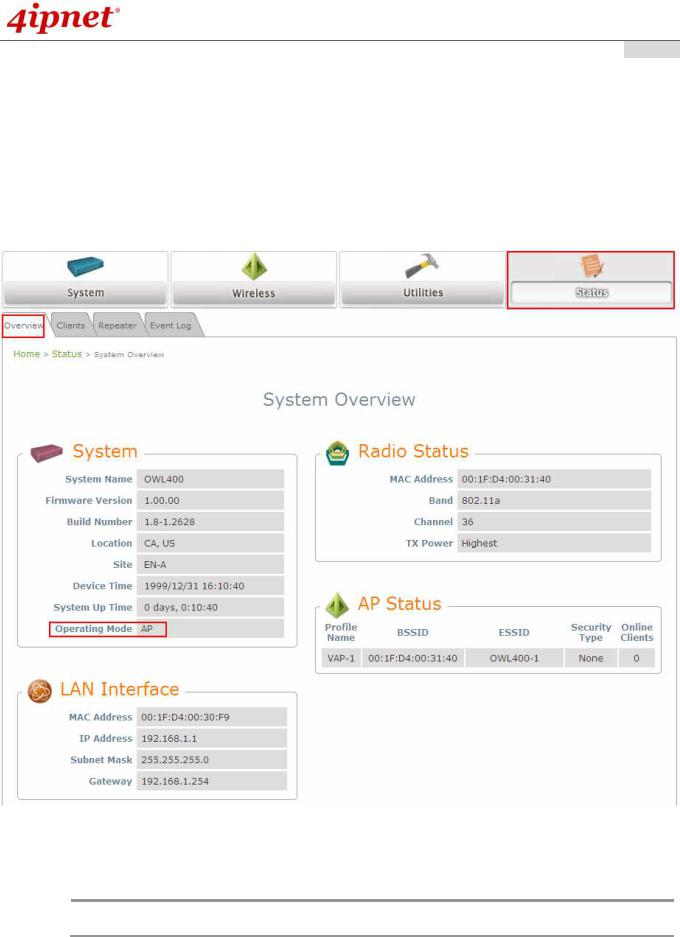
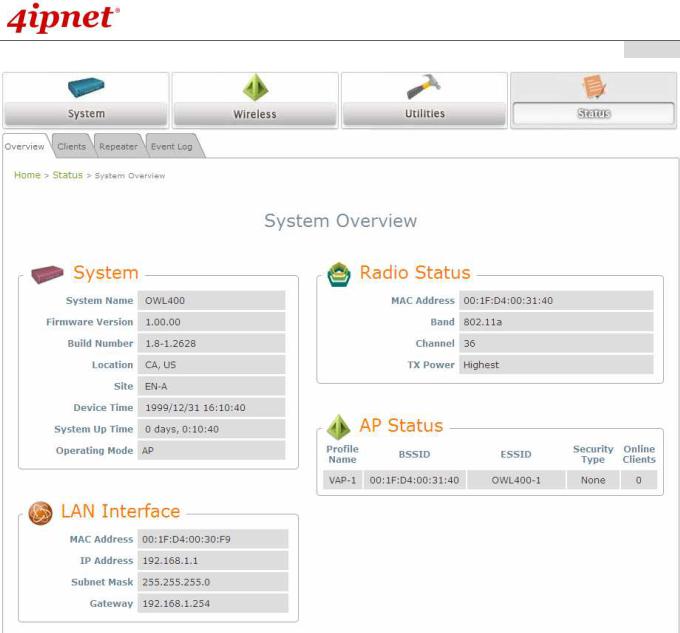
The System Overview page will appear after a successful login.
To logout, simply click on the Logout button on the top right hand corner of the management interface.
10 |
Copyright © 4IPNET, INC. |
User’s Manual
OWL400/410 Long Range Outdoor AP/ Bridge/ CPE ENGLISH
< CPE Mode >
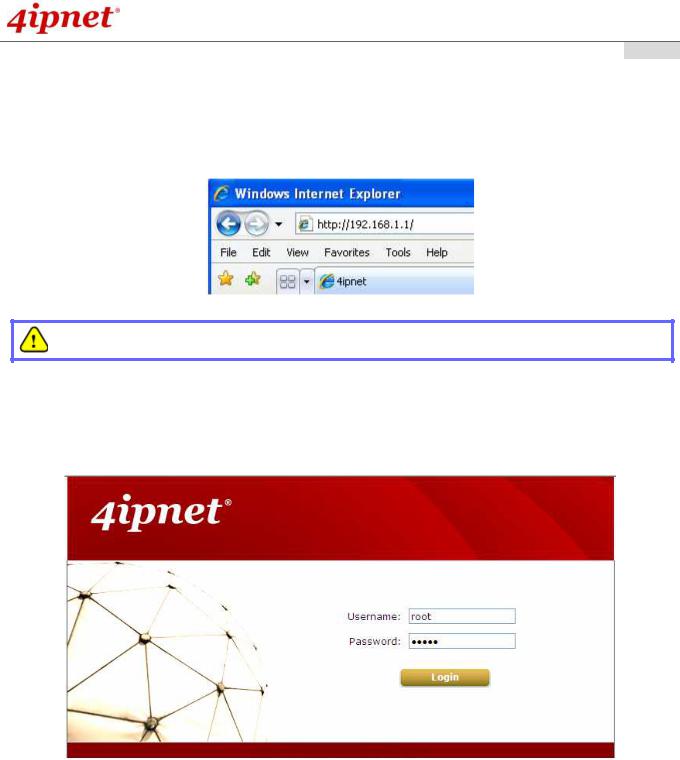
Step 1: Launch Web Browser
Launch a web browser to access the web management interface of CPE mode by entering the default IP address, http://192.168.1.1/, in the URL field, and then press Enter.
Using an incorrect default IP address will result in no Login page shown on the web browser. Please make sure a correct IP address is used.
Step 2: System Login
The system manager Login Page will then appear.
Enter “root” in the User name field and “admin” in the Password field, and then click Login to log in. Below depicts an example of using the root manager account.
Step 3: Login Success
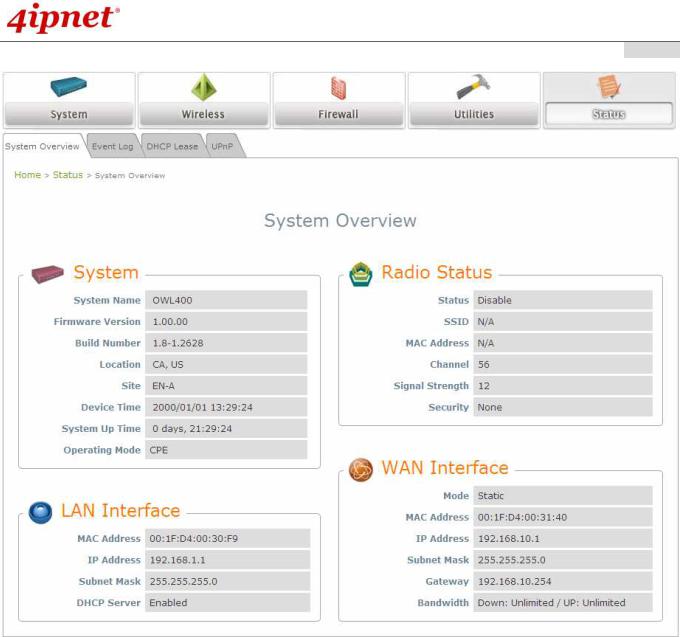
After a successful login into OWL400/410, a System Overview page of web management interface will appear.
To logout, simply click on the Logout button at the upper right hand corner of the interface.
11 |
Copyright © 4IPNET, INC. |
User’s Manual
OWL400/410 Long Range Outdoor AP/ Bridge/ CPE ENGLISH
12 |
Copyright © 4IPNET, INC. |
User’s Manual
OWL400/410 Long Range Outdoor AP/ Bridge/ CPE ENGLISH
3.2.2 Quick Configuration
OWL400/410 is a dual-mode system which can be configured as either an access point (AP Mode) or a gateway (CPE Mode) based on deployment needs. This section provides a step-by-step configuration procedure for installing CPE mode and AP mode respectively.
< AP Mode – Default Mode>
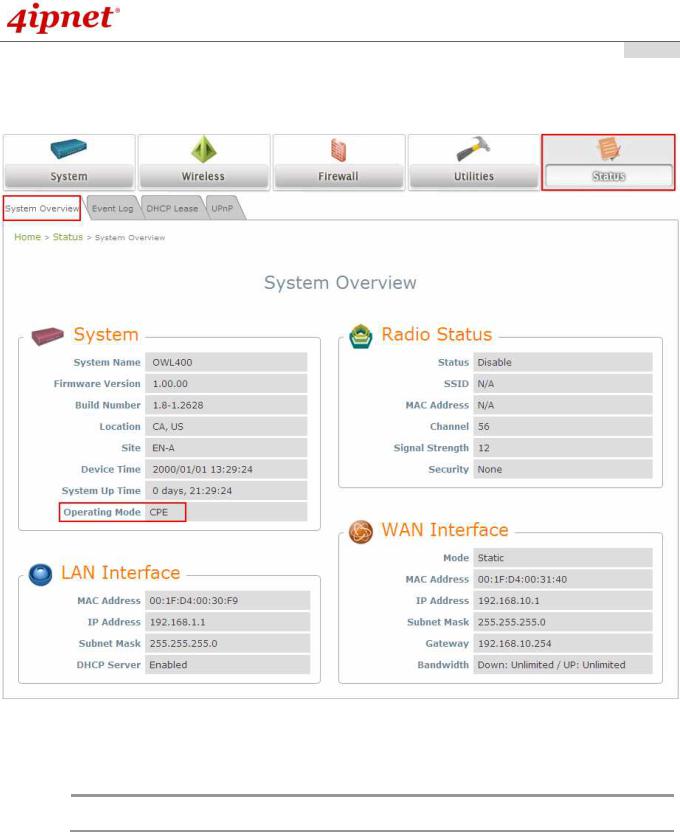
Step 1: Mode Confirmation
Ensure that the Operating Mode is currently at AP mode.
Click on the Status button and then select the System Overview tab. The Operating Mode is at the System section on the System Overview page.
Note:
For more information on switching to AP mode, if it is not currently active, please refer to AP Mode Section 4.1.2 Operating Mode.
13 |
Copyright © 4IPNET, INC. |

User’s Manual
OWL400/410 Long Range Outdoor AP/ Bridge/ CPE ENGLISH
Step 2: Change Password
Click on the Utilities button and then select the Password tab.
Enter a new password in the New Password field and retype it in the Re-enter New Password field.
Click SAVE to save the changes.
14 |
Copyright © 4IPNET, INC. |
User’s Manual
OWL400/410 Long Range Outdoor AP/ Bridge/ CPE ENGLISH
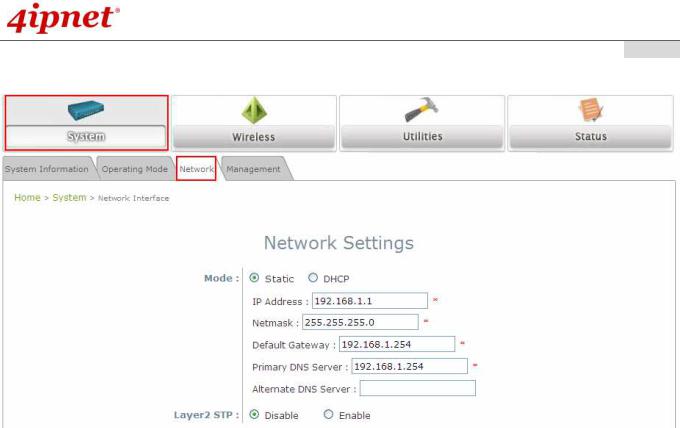
Step 3: Network Settings
Settings here are for example only.
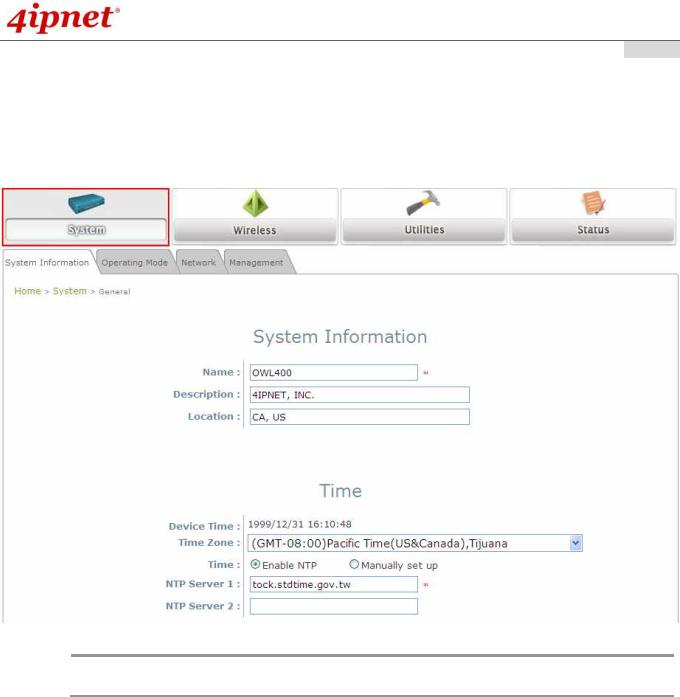
Click on the System button and then select the Network tab.
Enable Static, and then enter the related information in the fields marked with red asterisks.
Click SAVE to save the settings.
15 |
Copyright © 4IPNET, INC. |

User’s Manual
OWL400/410 Long Range Outdoor AP/ Bridge/ CPE ENGLISH
Step 4: SSID Settings
Click on the Wireless button and then select the General tab.
Band: Select an appropriate band from the drop-down list box.
Click on the Wireless button and then select the VAP Config tab.
ESSID: Enter respective ESSID for each VAP in the ESSID field or use the default. ESSID (Extended Service
Set Identifier) is a unique identifier used for networking devices to get associated with OWL400/410.
Click SAVE to save the settings.
16 |
Copyright © 4IPNET, INC. |
User’s Manual
OWL400/410 Long Range Outdoor AP/ Bridge/ CPE ENGLISH
Step 5: Security Settings
Click on the Wireless button and then select the Security tab.
Select the desired VAP Profile and Security Type from the drop-down list boxes. The above figure depicts an example of selecting VAP-1 and WEP.
Enter the information required in the blank fields.
You must use the same information provided here to configure the network devices that are to be associated with OWL400/410.
Click SAVE to save all settings configured so far. All updated settings will take effect upon reboot.
Congratulations!
The AP mode is now successfully configured.
17 |
Copyright © 4IPNET, INC. |
User’s Manual
OWL400/410 Long Range Outdoor AP/ Bridge/ CPE ENGLISH
< CPE Mode >
Step 1: Mode Confirmation
Ensure that the Operating Mode is currently at CPE mode.
Click on the Status button and then select the System Overview tab. The Operating Mode is at the System section on the System Overview page.
Note:
For more information on switching to CPE mode, if it is not currently active, please refer to Section 5.1.2 Operating Mode.
18 |
Copyright © 4IPNET, INC. |
User’s Manual
OWL400/410 Long Range Outdoor AP/ Bridge/ CPE ENGLISH
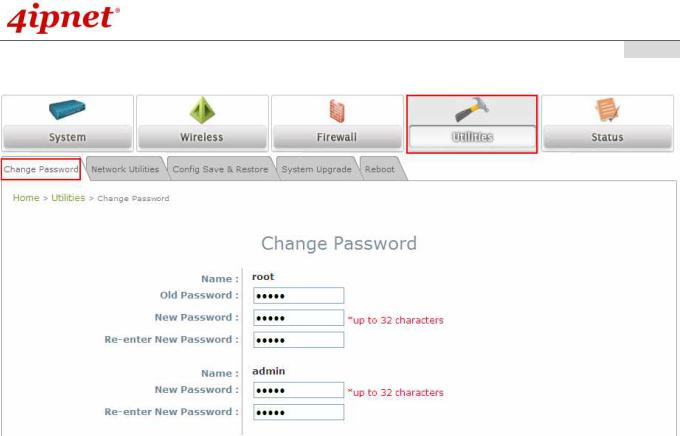
Step 2: Change Password
Click on the Utilities button and then select the Change Password tab.
Change Root Account Password
∙Enter the old password in the Old Password field, which default password is “admin” .
∙Enter a new password in the New Password field and retype it in the Re-enter New Password field.
Change Admin Account Password
∙Enter a new password in the New Password field and retype it in the Re-enter New Password field.
Click SAVE to save the changes.
19 |
Copyright © 4IPNET, INC. |
User’s Manual
OWL400/410 Long Range Outdoor AP/ Bridge/ CPE ENGLISH
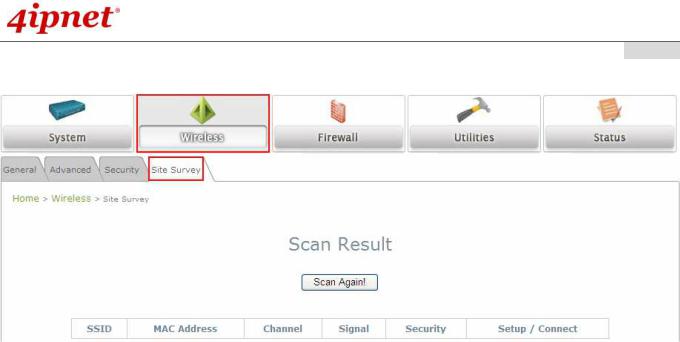
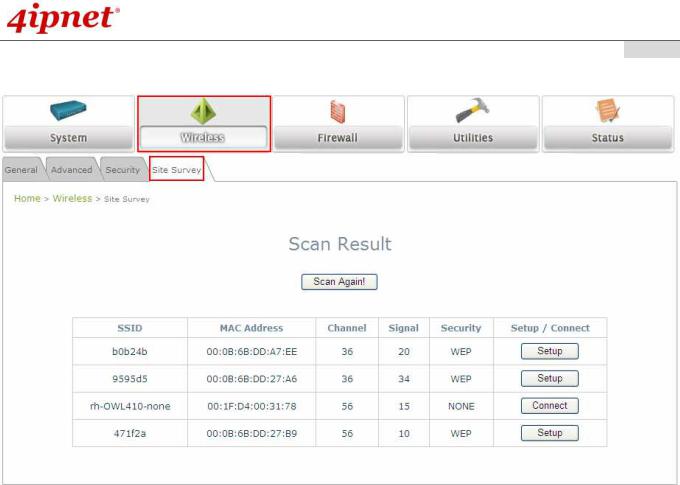
Step 3: Site Survey
The scan result displayed here is an example only.
Click on the Wireless button and then select the Site Survey tab.
The system will automatically scan and display all APs in the same OWL400/410's coverage area.
Click Scan Again if the APs to be associated with are not listed on the Scan Result list.
Step 4: Select AP to be Associated
Select an AP to be associated with from the Scan Result list provided in Step 3.
20 |
Copyright © 4IPNET, INC. |
User’s Manual
OWL400/410 Long Range Outdoor AP/ Bridge/ CPE ENGLISH
Step 5: Security Settings
The above figure depicts an example of selecting one SSID (encrypted via one security type).
Click Setup, and then a related encryption configuration box will appear.
Enter the information required in the configuration box. Information to be entered must be exactly the same as configured in this AP.
Click Connect to start the connection.
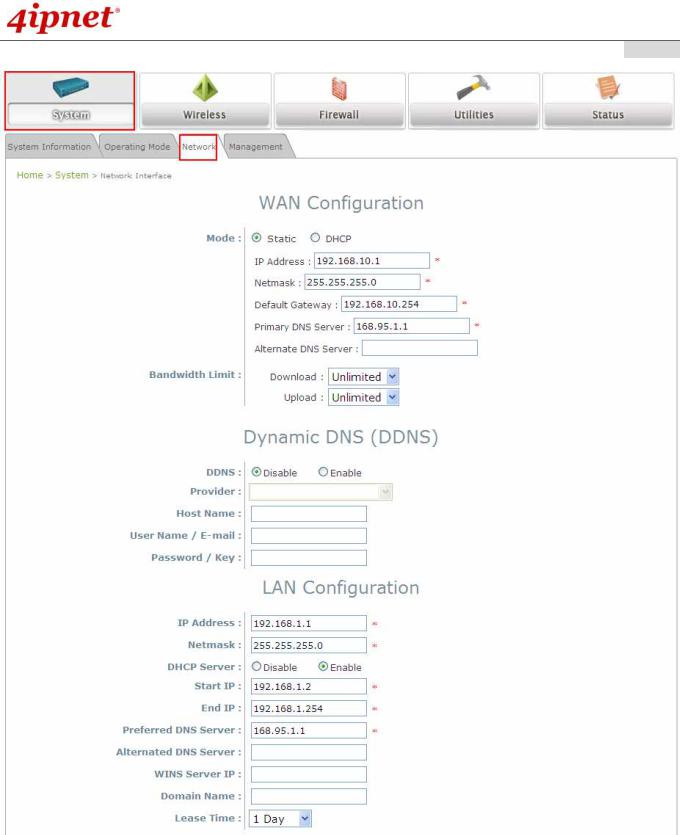
Step 6: Network Interface Configuration
Click on the System button and then select the Network tab.
21 |
Copyright © 4IPNET, INC. |
User’s Manual
OWL400/410 Long Range Outdoor AP/ Bridge/ CPE ENGLISH
Settings here are for example only.
WAN Configuration
Enable Static, and then enter the related information in the fields marked with red asterisks.
Click SAVE to save the settings.
Dynamic DNS Configuration
The Dynamic DNS section is on the same page as WAN Configuration section.
22 |
Copyright © 4IPNET, INC. |

User’s Manual
OWL400/410 Long Range Outdoor AP/ Bridge/ CPE ENGLISH
When enabled, choose the service Provider with provided Host Name, User Name/E-mail, and
Password/Key.
Click SAVE to save all settings configured so far. All updated settings will take effect upon reboot.
LAN Configuration
The LAN Configuration section is on the same page as WAN Configuration section.
Provide the information to the required field by entering IP address/Netmask of the LAN port.
Click SAVE to save all settings configured so far. All updated settings will take effect upon reboot.
Congratulations!
The CPE mode is now successfully configured.
23 |
Copyright © 4IPNET, INC. |

User’s Manual
OWL400/410 Long Range Outdoor AP/ Bridge/ CPE ENGLISH
4.AP Mode Configuration
When AP mode is activated, the system can be configured as an Access Point or an Access Point with Repeater depending on deployment needs. This chapter will guide you through setting up the AP mode with graphical illustrations. The following table shows all the functions of OWL400/410 in its AP mode.
OPTION |
System |
Wireless |
Utilities |
Status |
|
|
|
|
|
|
System |
Virtual AP |
Change |
System |
|
Information |
Overview |
Password |
Overview |
|
|
|
|
|
|
Operating Mode |
General Settings |
Network Utilities |
Associated |
|
Client Status |
|||
|
|
|
|
|
|
|
|
|
|
|
Network |
VAP |
Configuration |
Repeater |
|
Settings |
Configuration |
Save & Restore |
Information |
|
|
|
|
|
|
Management |
Security Settings |
System Upgrade |
Event Log |
|
Services |
|||
|
|
|
|
|
FUNCTION |
|
|
|
|
|
Repeater |
Reboot |
|
|
|
|
|
||
|
|
Settings |
|
|
|
|
|
|
|
|
|
|
|
|
|
|
Advanced |
|
|
|
|
Wireless Settings |
|
|
|
|
|
|
|
|
|
Access Control |
|
|
|
|
Settings |
|
|
|
|
|
|
|
|
|
Site Survey |
|
|
|
|
|
|
|
|
|
AP Mode Functions |
|
|
24 |
Copyright © 4IPNET, INC. |
User’s Manual
OWL400/410 Long Range Outdoor AP/ Bridge/ CPE ENGLISH
AP Mode Main Page
25 |
Copyright © 4IPNET, INC. |
User’s Manual
OWL400/410 Long Range Outdoor AP/ Bridge/ CPE ENGLISH
4.1 System
This section provides information for configuring the following functions: System Information, Operating Mode,
Network Settings, and Management Services.
Note:
A system restart is required when a reminding message appears after clicking the SAVE button; all settings entered and saved will take effect only after the system restart.
26 |
Copyright © 4IPNET, INC. |
 Loading...