

3B SCIENTIFIC® PHYSICS
Stereo Mikroskop W30662 und W30663
Bedienungsanleitung
12/02 ALF
®
1
2
3
4
5
6
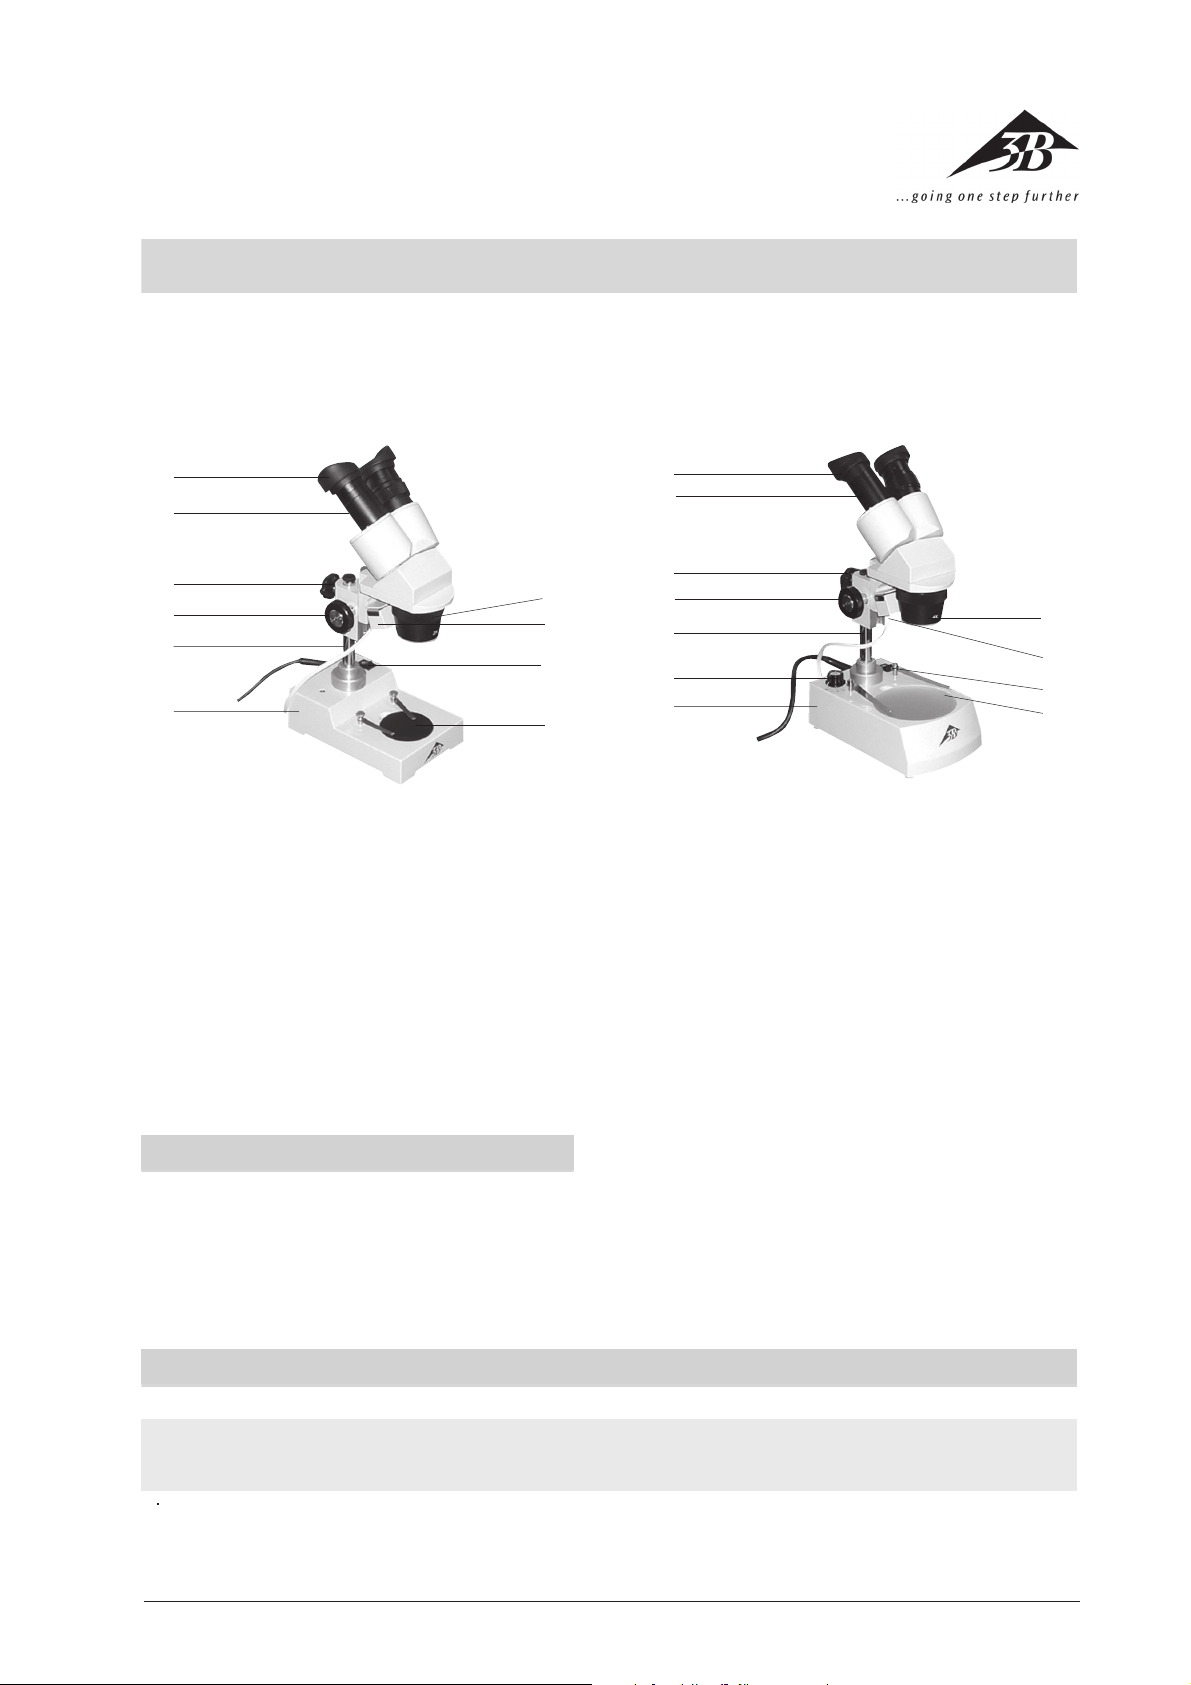
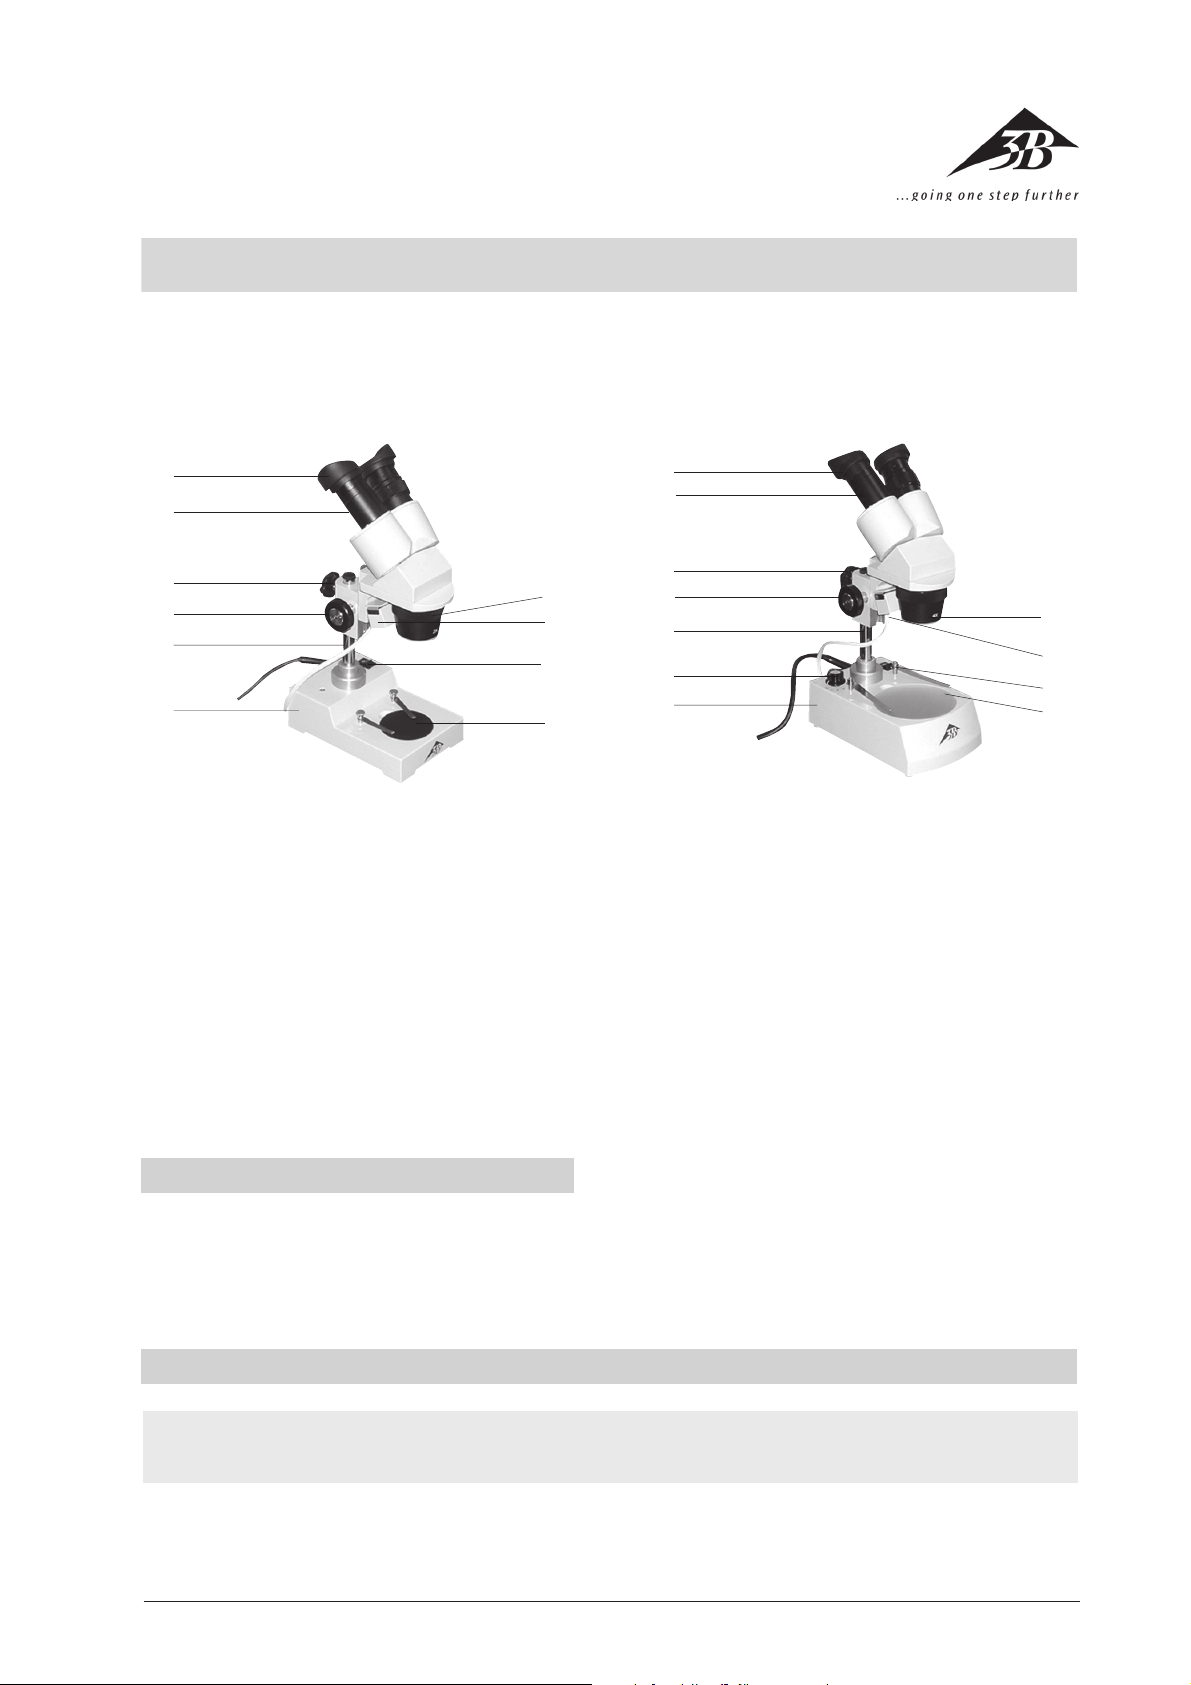
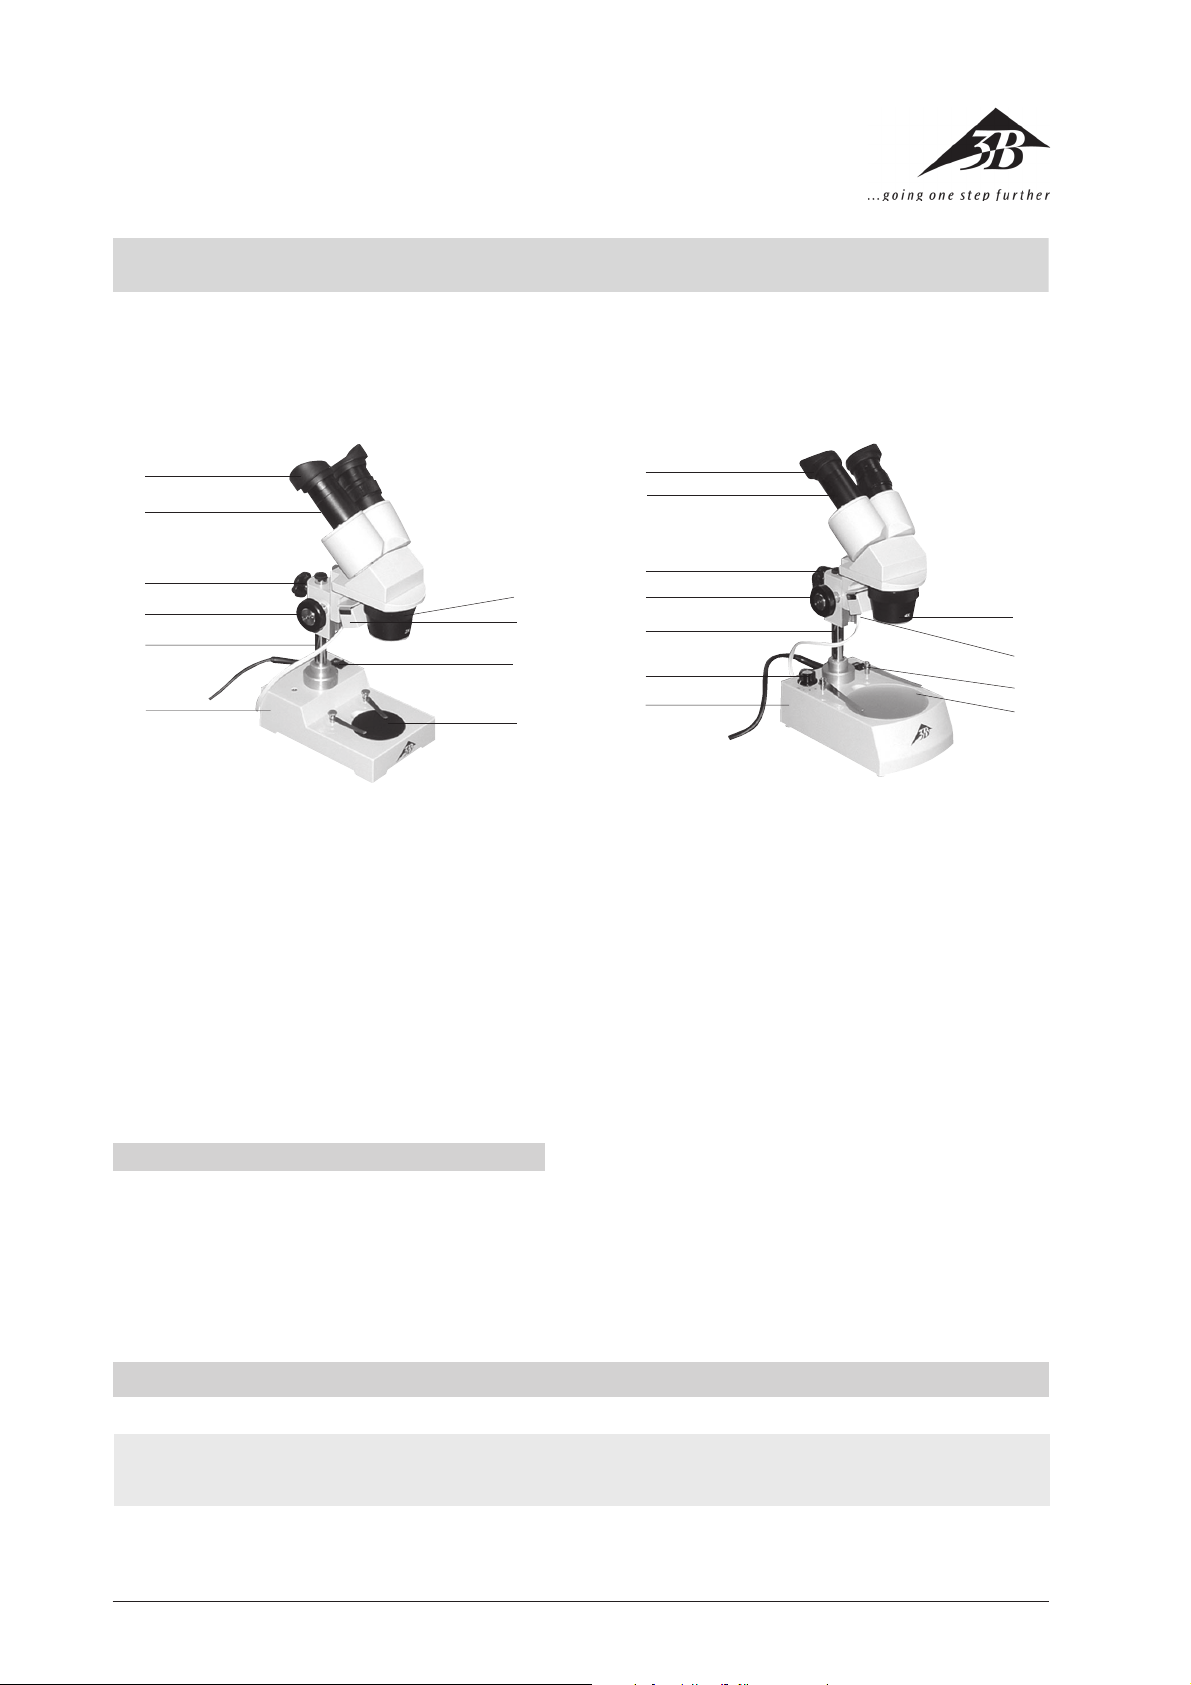
1 Okular mit Gummi-Augenmuscheln
2 Tubus
3 Klemmschraube
4 Triebknopf für Fokussierung
5 Stativsäule
6 Stativfuß
7 Objektscheibe
8 Netzschalter
9 Auflichtgehäuse
bl Objektivrevolver
bl
9
8
7
1
2
3
4
5
6
7
Okular mit Gummi-Augenmuscheln
1
2 Tubus
3 Klemmschraube
4 Triebknopf für Fokussierung
5 Stativsäule
6 Drehschalter für Beleuchtung
7 Stativfuß
8 Objektscheibe
9 Netzschalter
bl Auflichtgehäuse
bm Objektivrevolver
bm
bl
9
8
Das Stereo-Mikroskop ermöglicht 3-dimensionale Betrachtung von Objekten in 20- und 40-facher Vergrößerung.
1. Sicherheitshinweise
• Elektrischer Anschluss des Mikroskops darf nur an
geerdeten Steckdosen erfolgen.
• Vor Pflege- und Wartungsarbeiten ist immer der
Netzstecker zu ziehen.
• Das Mikroskop darf mit keinen Flüssigkeiten in Kontakt kommen.
2. Beschreibung, technische Daten
Kat.-Nr. W30662 W30663
Stativ Metallstativ, Stativsäule fest mit Metallstativ, Stativsäule fest mit
Fuß verbunden. Scharfstellung über Fuß verbunden. Scharfstellung über
beidseitig am Stativ angeordnete Triebknöpfe beidseitig am Stativ angeordnete Triebknöpfe
Objektscheibe Fuß mit herausnehmbarer Objektscheibe Fuß mit herausnehmbarer Objektscheibe
(Kunststoff, schwarz/weiß) 60 mm (Kunststoff, schwarz/weiß und Glas) 95 mm
Ø sowie 2 Präparateklemmen Ø sowie 2 Präparateklemmen
• Das Mikroskop keinen mechanischen Belastungen
aussetzen.
• Optische Teile des Mikroskops nicht mit den Fingern berühren.
• Zur Reinigung des Mikroskops keine aggressiven
Reiniger oder Lösungsmittel verwenden.
• Objektive und Okulare zum Reinigen nicht auseinander nehmen.
• Bei Beschädigungen oder Fehlern das Mikroskop
nicht selbst reparieren.
1

Kat.-Nr. W30662 W30663
Tubus Binokularer Schrägeinblick 45°, Stereokopf Binokularer Schrägeinblick 45°, Stereokopf
um 360° drehbar, Augenabstand zwischen um 360° drehbar, Augenabstand zwischen
55 mm und 75 mm einstellbar, ein Okular 55 mm und 75 mm einstellbar, ein Okular
mit Dioptrienausgleich ±5 mm mit Dioptrienausgleich ±5 mm
Okulare Auswechselbares Weitfeld-Okular WF 10x mit Auswechselbares Weitfeld-Okular WF 10x mit
Okularsicherung, Gummi-Augenmuscheln Okularsicherung, Gummi-Augenmuscheln
Objektive Objektivrevolver mit Objektiv 2x / 4x Objektivrevolver mit Objektiv 2x / 4x
Vergrößerung 20x/40x 20x/40x
Beleuchtung Auflichtbeleuchtung, 12 V/10 W-Lampe Auflicht-, Durchlicht- und Mischlichtbe-
einschaltbar über Kippschalter, leuchtung, 12 V/10 W-Lampen, einschaltbar
Netzanschluss 115 V bzw. 230 V, 50/60 Hz, über Kippschalter, Lichtkombination wählbar
2 Sicherungen T 0,125 mit Drehschalter, Netzanschluss 115 V bzw. 230 V,
50/60 Hz, 2 Sicherungen F 0,16
Abmessungen 170 x 300 x 115 mm 190 x 300 x115 mm
Masse 2,4 kg 2,9 kg
Lieferumfang Komplett mit Staubschutzhülle Komplett mit Staubschutzhülle
3. Auspacken und Zusammenbau
Das Mikroskop wird in einem Karton aus Styropor geliefert. Nach Entfernen des Klebebands den Behälter
vorsichtig öffnen. Dabei darauf achten, dass nichts
herausfällt. Um Kondensation auf den optischen Bestandteilen zu vermeiden, das Mikroskop so lange in
der Verpackung belassen, bis es die Raumtemperatur
angenommen hat. Das Mikroskop mit beiden Händen
entnehmen (eine Hand an der Stativsäule und eine am
Fuß) und auf eine ebene Fläche stellen. Das Mikroskop
ist komplett zusammengebaut außer den Augenmuscheln, die auf die Okulare gesetzt werden und der
Objektscheibe, die nach Entfernen des Papiers auf die
Öffnung im Stativfuß platziert wird. Im Lieferumfang
des Mikroskops W30663 befindet sich zusätzlich eine
Objektscheibe aus Glas für Durchlicht- und Mischlichtbeleuchtung.
4. Bedienung
4.1 Allgemeine Hinweise
• Das Mikroskop auf einen ebenen Tisch stellen.
• Das zu betrachtende Objekt in die Mitte der
Objektscheibe platzieren und mit den Klemmen
festklemmen.
• Netzkabel anschließen und Beleuchtung anschalten.
• Bei Verwendung von Durchlicht- oder Mischlichtbeleuchtung die schwarz/weiße Objektscheibe
durch die Glasplatte ersetzen.
• Position I des Drehschalters ist für Durchlicht,
Position II für Auflicht und Position III für Mischlicht.
• Mit dem Tubus Augenabstand einstellen, bis nur
ein Lichtkreis sichtbar ist.
• Bildschärfe mittels der Triebknöpfe einstellen.
Falls nötig Fixierschraube an der Stativsäule lösen und durch Heben oder Senken der kompletten Optik Grobeinstellung vornehmen.
• Durch Drehen des Objektivrevolvers gewünschte
Vergrößerung einstellen.
4.2 Objektivwechsel
• Seitliche Schrauben am Objektivgehäuse mit einem kleinen Schraubenzieher lösen.
• Objektiv herausnehmen und durch ein anderes
ersetzen.
• Schrauben wieder anziehen.
4.3 Lampen- und Sicherungswechsel
4.3.1 Lampenwechsel
• Stromversorgung ausschalten, Netzstecker ziehen
und Mikroskop abkühlen lassen.
• Zum Wechseln der Lampe des Auflichts seitliche
Schraube am Lampengehäuse lösen und Gehäuse abnehmen.
• Lampe herausnehmen und durch neue ersetzen.
• Lampengehäuse wieder festschrauben.
• Zum Wechseln der Lampe des Durchlichts Objekt-
scheibe entnehmen.
• Lampe herausnehmen und durch neue ersetzen.
• Objektscheibe wieder auf die Öffnung setzen.
4.3.2 S ic herungswechsel
• Stromversorgung ausschalten und unbedingt
Netzstecker ziehen.
• Sicherungshalter an der Rückseite des Mikroskops
mit einem flachen Gegenstand (z.B. Schraubenzieher) herausschrauben.
• Sicherung ersetzen und Halter wieder einschrauben.
5. Aufbewahrung, Reinigung
• Das Mikroskop an einem sauberen, trockenen und
staubfreien Platz aufbewahren.
• Bei Nicht-Benutzung das Mikroskop immer mit der
Staubschutzhülle abdecken.
• Das Mikroskop keinen Temperaturen unter 0°C und
über 40°C sowie keiner relativen Luftfeuchtigkeit
über 85% aussetzen.
• Nach Gebrauch sofort die Beleuchtung ausschalten.
• Bei starker Verschmutzung das Mikroskop mit einem
weichen Tuch und ein wenig Ethanol reinigen.
• Die optischen Bestandteile mit einem weichen
Linsentuch reinigen.
3B Scientific GmbH • Rudorffweg 8 • 21031 Hamburg • Deutschland • www.3bscientific.com • Technische Änderungen vorbehalten
2
3B SCIENTIFIC® PHYSICS
Stereo Microscope W30662 and W30663
Instruction Manual
12/02 ALF
®
1
2
3
4
5
6
1 Eyepiece with eye-shields
2 Tube
3 Lock-screw
4 Adjustment knob for fine and coarse focusing
5 Pillar
6 Stand
7 Object plate
8 Switch
9 Top-light housing
bl Objectiv barrel
bl
9
8
7
1
2
3
4
5
6
7
1 Eyepiece with eye-shields
2 Tube
3 Lock-screw
4 Adjustment knob for fine and coarse focusing
5 Pillar
6 Rotary switch for illumination
7 Stand
8 Object plate
9 Switch
bl Top-light housing
bm Objectiv barrel
bm
bl
9
8
The stereo microscope allows three-dimensional viewing of objects in 20x and 40x magnification.
1. Safety notes
• For power supply use only electrical sockets with
ground contact.
• Always unplug the mains plug before cleaning or
maintenance.
2. Description, technical data
Cat. no. W30662 W30663
Stand Metal stand, column firmly connected with Metal stand, column firmly connected with
base, pinion knobs attached on both sides base, pinion knobs attached on both sides
of the stand for coarse and fine focusing of the stand for coarse and fine focusing
Object plate Base with detachable object plate Base with detachable object plate
(plastic, black/white) (plastic, black/white and glass)
60 mm Ø and 2 specimen clips 95 mm Ø and 2 specimen clips
• Be careful not to spill any liquids on the microscope.
• Do not mishandle or impose unnecessary force on
the microscope.
• Avoid hand contact with optics.
• Do not clean the unit with volatile solvents or abra-
sive cleaners.
• Do not disassemble objective or eyepieces to attempt to clean them.
• Do not attempt to service the microscope yourself
3

Cat. no. W30662 W30663
Tube Binocular inclined 45°, Binocular inclined 45°,
stereo head rotation 360°, interocular stereo head rotation 360°, interocular
distance adjustable between 55 mm and distance adjustable between 55 mm and
75 mm, diopter compensation ±5 mm 75 mm, diopter compensation ±5 mm
Eyepieces Exchangeable widefield eyepiece Exchangeable widefield eyepiece
WF 10x with eyepiece lock, WF 10x with eyepiece lock,
rubber eyepiece cups rubber eyepiece cups
Objectives Revolving nosepiece with objectives 2x / 4x Revolving nosepiece with objectives 2x / 4x
Magnification 20x / 40x 20x / 40x
Illumination Top-light illumination,12 V/10 W, Top-, transmitted- and mixed-light
with toggle switch, power supply illumination, 12 V/10 W lamps,
115 V resp. 230 V 50/60 Hz, 2 fuses T 0.125 toggle switch to turn ON, rotary switch to
select light combination, power supply
115 V resp. 230 V 50/60 Hz, 2 fuses F 0.16
Dimensions 170 mm x 300 mm x 115 mm 190 mm x 300 mm x 115 mm
Weight 2.4 kg 2.9 kg
Supplied Complete with dust cover Complete with dust cover
3. Unpacking and assembly
The microscope is packed in a molded styrofoam
container. Take the container out of the carton remove
the tape and carefully lift the top half off the container.
To avoid condensation on the optical components,
leave the microscope in the original packing to allow it
to adjust to room temperature. Using both hands (one
around the pillar and one around the base), lift the
microscope from the container and put it on a stable
desk. The microscope is fully assembled except for the
eye-shields. Position them over the eyepieces for
viewing comfort and to block out any ambient light. In
addition, the object plate must be inserted into the
stage opening in the base. Please note that you must
remove the protective paper. With the microscope
W30663 you will find also a glass object plate for
transmitted- and mixed-light illumination.
4. Operation
4.1 General information
• Set the microscope on a level table.
• Place the object to be observed in the center of
the object plate. Use the clips to fasten it into
place.
• Connect the mains cable to the net and turn on
the switch to get the object illuminated.
• When using transmitted- or mixed-light illumination replace black and white plate with the glass
plate.
• On the rotary switch position I is for transmittedlight, position II is for top-light and position III is
for mixed-light.
• Adjust the interpupillary distance between the
eyepieces by grasping the two prism-housings with
both hands and moving them until one circle of
light can be seen.
• Focus the object by turning the side knobs. It might
be necessary to loosen the lock-screw and raise
or lower the entire stereo head-bracket until the
outline of the object is found in the field of view.
Be sure to tighten the lock-screw to fix the height
of the stereo head on the pillar.
4.2 Changing the objective
• Loosen the lock-screw on the objective mount with
a small screwdriver and pull out the objective assembly horizontally until it clears the objective
housing.
• Insert an alternate objective by sliding it into the
objective mount.
• Secure it by tightening the lock-screw.
4.3 Changing the lamps and fuses
4.3.1 Changing the lamps
• Turn off the power switch, unplug the mains plug
and let the lamp cool down.
• Do not touch the bulb with the bare hand.
• To change the lamp of the top light loosen the
lock-screw for the lamp-housing and remove the
lamp screen.
• Remove the lamp by pressing it downward out of
the clamp socket.
• Insert the new lamp and seat it firmly in place by
lightly pressing it upwards.
• Remount the lamp screen.
• To change the lamp of bottom light remove the
cover from the base opening.
• Change the lamp in a similar way as described
above.
• Remount the cover.
4.3.2 Changing the fuses
• Turn off the power switch and unplug the mains
plug.
• Unscrew the fuse holder on the back of the stand
base with a screwdriver.
• Replace the fuse and reinsert the holder in its
socket.
4

5. Storage and cleaning
• Keep the microscope in a clean, dry and dust free
place.
• When not in use always cover the microscope with
the dust cover.
• Do not expose it to temperatures below 0°C and
above 40°C and a max. relative humidity of over
85%.
• Always turn off the light immediately after use .
• Use a soft linen cloth and some ethanol to clean
the microscope.
• Use a soft lens tissue to clean the optics.
3B Scientific GmbH • Rudorffweg 8 • 21031 Hamburg • Germany • www.3bscientific.com • Technical amendments are possible
5
3B SCIENTIFIC® PHYSICS
Microscope stéréoscopique W30662 et W30663
Instructions d’utilisation
12/02 ALF
®
1
2
3
4
5
6
1 Oculaire avec bonnettes en caoutchouc
2 Tube
3 Vis de fixation
4 Bouton de mise au point
5 Colonne de potence
6 Pied de potence
7 Plaque d’objet
8 Commutateur principal
9 Module d’éclairage par réflexion
bl Revolver d’objectifs
bl
9
8
7
1
2
3
4
5
6
7
1 Oculaire avec bonnettes en caoutchouc
2 Tube
3 Vis de fixation
4 Bouton de mise au point
5 Colonne de potence
6 Commutateur rotatif pour l’éclairage
7 Pied de potence
8 Plaque d’objet
9 Commutateur principal
bl Module d’éclairage par réflexion
bm Revolver d’objectifs
bm
bl
9
8
Le microscope stéréoscopique permet d’observer des
objets en 3 dimensions agrandis 20 et 40 fois
1. Consignes de sécurité
• Ne brancher le microscope qu’à des prises de courant mises à la terre.
• Avant d’effectuer des travaux d’entretien et de
maintenance, retirer toujours la fiche secteur.
• Le microscope ne doit jamais entrer en contact avec
des liquides.
2. Description, caractéristiques techniques
N° de cat. W30662 W30663
Potence Potence métallique, colonne fixée au pied. Potence métallique, colonne fixée au pied.
Réglage de la netteté avec Réglage de la netteté avec
les boutons latéraux les boutons latéraux
Plaque d’objet Support avec plaque d’objet amovible Support avec plaque d’objet amovible
(plastique, noir / blanc) (plastique, noir / blanc et verre)
Ø 60 mm et 2 agrafes Ø 95 mm et 2 agrafes
• Ne jamais exposer le microscope à des contraintes
mécaniques.
• Ne pas toucher les parties optiques du microscope
avec les doigts.
• Pour le nettoyage du microscope, ne pas utiliser de
nettoyants ni de solvants agressifs.
• Pour le nettoyage, ne pas démonter les objectifs ni
les oculaires.
• En cas d’endommagement ou de défaut, ne pas
réparer soi-même le microscope.
6
 Loading...