

Page 1
3B SCIENTIFIC® PHYSICS
Stereo Mikroskop W30660 und W30661
Bedienungsanleitung
12/02 ALF
®
1
2
3
4
5
6
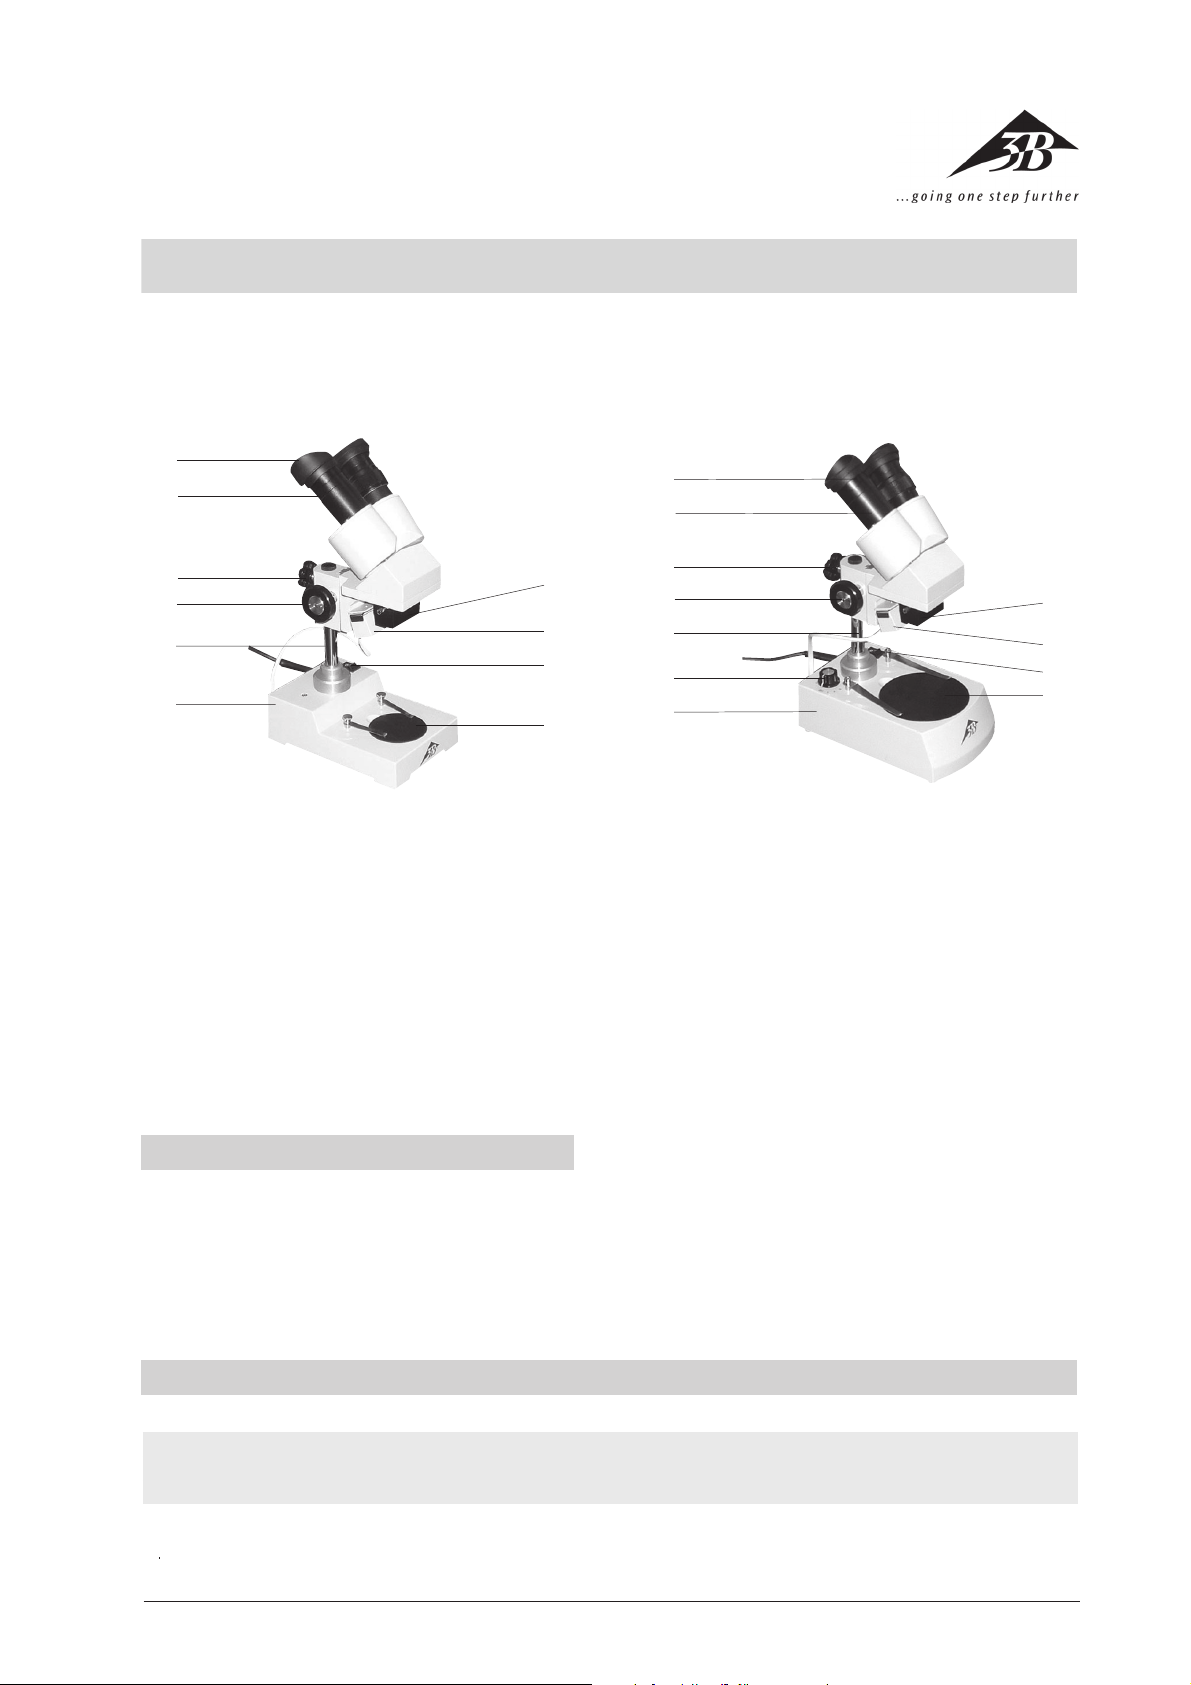
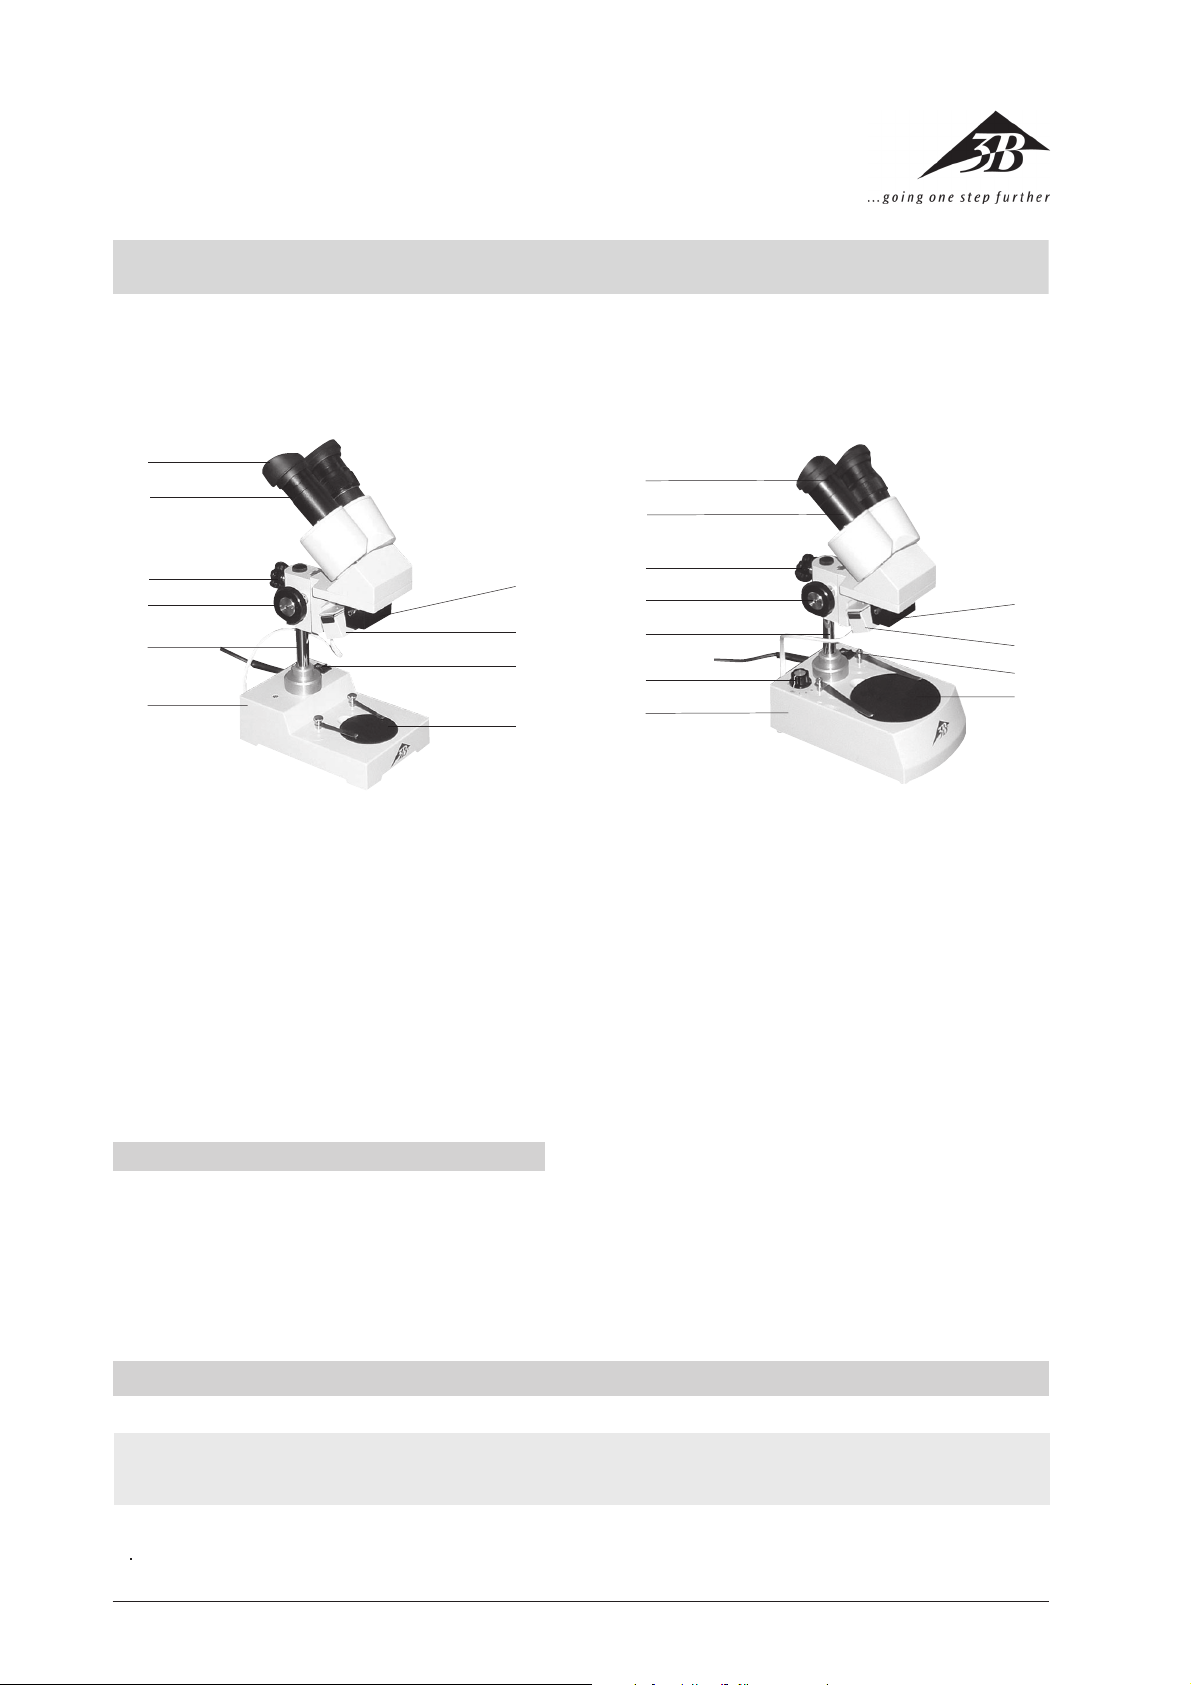
1 Okular mit Gummi-Augenmuscheln
2 Tubus
3 Klemmschraube
4 Triebknopf für Fokussierung
5 Stativsäule
6 Stativfuß
7 Objektscheibe
8 Netzschalter
9 Auflichtgehäuse
bl Objektiv
bl
9
8
7
1
2
3
4
5
6
7
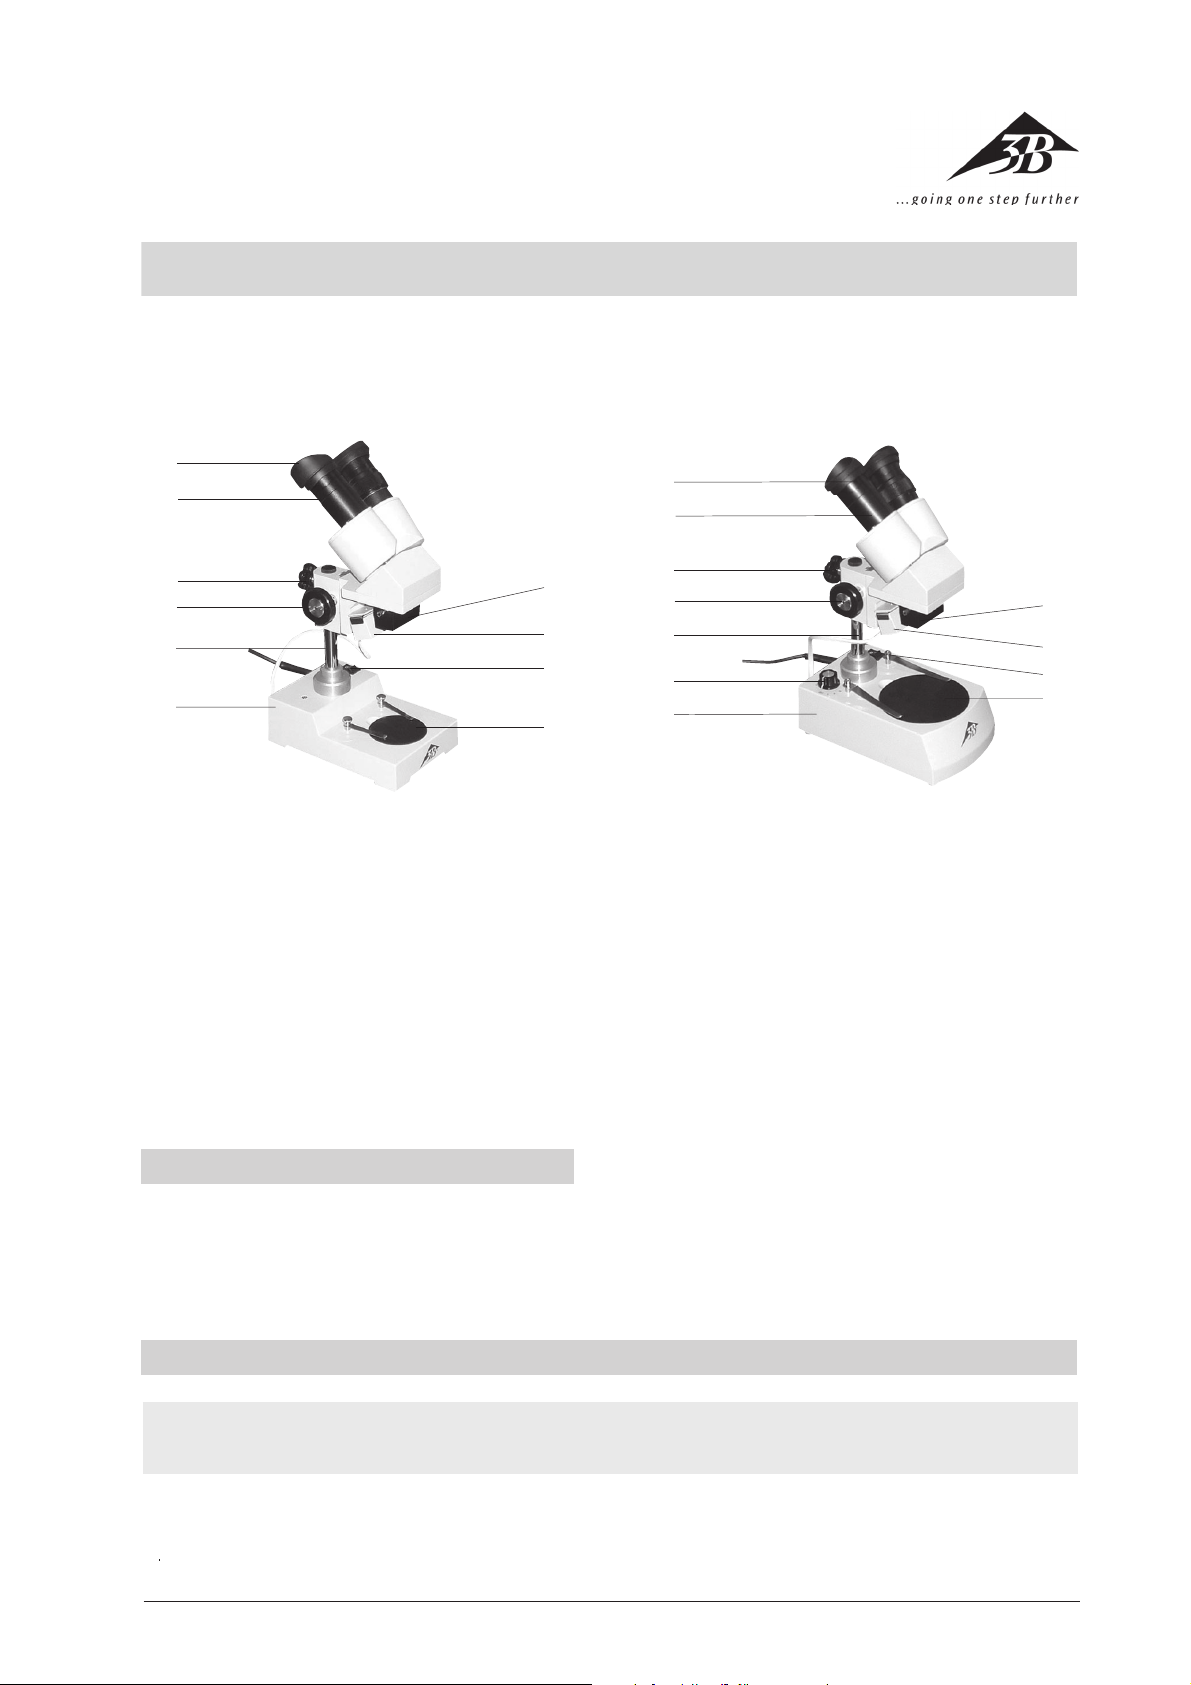
1 Okular mit Gummi-Augenmuscheln
2 Tubus
3 Klemmschraube
4 Triebknopf für Fokussierung
5 Stativsäule
6 Drehschalter für Beleuchtung
7 Stativfuß
8 Objektscheibe
9 Netzschalter
bl Auflichtgehäuse
bm Objektiv
bm
bl
9
8
Das Stereo-Mikroskop ermöglicht 3-dimensionale Betrachtung von Objekten in 20-facher Vergrößerung.
1. Sicherheitshinweise
• Elektrischer Anschluss des Mikroskops darf nur an
geerdeten Steckdosen erfolgen.
• Vor Pflege- und Wartungsarbeiten ist immer der
Netzstecker zu ziehen.
• Das Mikroskop darf mit keinen Flüssigkeiten in Kontakt kommen.
2. Beschreibung, technische Daten
Kat.-Nr. W30660 W30661
Stativ Metallstativ, Stativsäule fest mit Metallstativ, Stativsäule fest mit
Fuß verbunden. Scharfstellung über Fuß verbunden. Scharfstellung über
beidseitig am Stativ angeordnete Triebknöpfe beidseitig am Stativ angeordnete Triebknöpfe
Objektscheibe Fuß mit herausnehmbarer Objektscheibe Fuß mit herausnehmbarer Objektscheibe
(Kunststoff, schwarz/weiß) (Kunststoff, schwarz/weiß und Glas)
60 mm Ø sowie 2 Präparateklemmen 95 mm Ø sowie 2 Präparateklemmen
• Das Mikroskop keinen mechanischen Belastungen
aussetzen.
• Optische Teile des Mikroskops nicht mit den Fingern berühren.
• Zur Reinigung des Mikroskops keine aggressiven
Reiniger oder Lösungsmittel verwenden.
• Objektive und Okulare zum Reinigen nicht auseinander nehmen.
• Bei Beschädigungen oder Fehlern das Mikroskop
nicht selbst reparieren.
1
Page 2

Kat.-Nr. W30660 W30661
Tubus Binokularer Schrägeinblick 45°, Binokularer Schrägeinblick 45°, Stereokopf um
Stereokopf um 360° drehbar, Augenabstand 360° drehbar, Augenabstand zwischen 55 mm
zwischen 55 mm und 75 mm einstellbar, und 75 mm einstellbar, ein Okular mit
ein Okular mit Dioptrienausgleich ±5 mm Dioptrienausgleich ±5 mm
Okulare Auswechselbares Weitfeld-Okular WF 10x mit Auswechselbares Weitfeld-Okular WF 10x mit
Okularsicherung, Gummi-Augenmuscheln Okularsicherung, Gummi-Augenmuscheln
Objektive Objektiv 2x mit Schlittenführung und Objektiv 2x mit Schlittenführung und
Schnellwechseleinrichtung Schnellwechseleinrichtung
Vergrößerung 20x 20x
Beleuchtung Auflichtbeleuchtung, 12 V/10 W-Lampe Auflicht-, Durchlicht- und Misch-
einschaltbar über Kippschalter, lichtbeleuchtung, 12 V/10 W-Lampen,
Netzanschluss 115 bzw. 230 V, 50/60 Hz, einschaltbar über Kippschalter, Licht
2 Sicherungen T 0,125 kombination wählbar mit Drehschalter,
Netzanschluss 115 bzw. 230 V, 50/60 Hz,
2 Sicherungen F 0,16
Abmessungen 170 x 300 x 115 mm 190 x 300 x115 mm
Masse 2,4 kg 2,9 kg
Lieferumfang Komplett mit Staubschutzhülle Komplett mit Staubschutzhülle
3. Auspacken und Zusammenbau
Das Mikroskop wird in einem Karton aus Styropor geliefert. Nach Entfernen des Klebebands den Behälter vorsichtig öffnen. Dabei darauf achten, dass nichts herausfällt. Um Kondensation auf den optischen Bestandteilen zu vermeiden, das Mikroskop so lange in der Verpackung belassen, bis es die Raumtemperatur angenommen hat. Das Mikroskop mit beiden Händen entnehmen
(eine Hand an der Stativsäule und eine am Fuß) und auf
eine ebene Fläche stellen. Das Mikroskop ist komplett
zusammengebaut außer den Augenmuscheln, die auf
die Okulare gesetzt werden und der Objektscheibe, die
nach Entfernen des Papiers auf die Öffnung im Stativfuß platziert wird. Im Lieferumfang des Mikroskops
W30661 befindet sich zusätzlich eine Objektscheibe aus
Glas für Durchlicht- und Mischlichtbeleuchtung.
4. Bedienung
4.1 Allgemeine Hinweise
• Das Mikroskop auf einen ebenen Tisch stellen.
• Das zu betrachtende Objekt in die Mitte der
Objektscheibe platzieren und mit den Klemmen
festklemmen.
• Netzkabel anschließen und Beleuchtung anschalten.
• Bei Verwendung von Durchlicht- oder Mischlicht-
beleuchtung die schwarz/weiße Objektscheibe
durch die Glasplatte ersetzen.
• Position I des Drehschalters ist für Durchlicht,
Position II für Auflicht und Position III für Mischlicht.
• Mit dem Tubus Augenabstand einstellen, bis nur
ein Lichtkreis sichtbar ist.
• Bildschärfe mittels der Triebknöpfe einstellen.
Falls nötig Fixierschraube an der Stativsäule lösen und durch Heben oder Senken der kompletten Optik Grobeinstellung vornehmen.
4.2 Objektivwechsel
• Seitliche Schraube am Objektivgehäuse mit einem
kleinen Schraubenzieher lösen.
• Objektiv seitlich herausziehen und durch ein anderes ersetzen.
• Schraube wieder anziehen.
4.3 Lampen- und Sicherungswechsel
4.3.1 Lampenwechsel
• Stromversorgung ausschalten, Netzstecker ziehen
und Mikroskop abkühlen lassen.
• Zum Wechseln der Lampe des Auflichts seitliche
Schraube am Lampengehäuse lösen und Gehäuse abnehmen.
• Lampe herausnehmen und durch neue ersetzen.
• Lampengehäuse wieder festschrauben.
• Zum Wechseln der Lampe des Durchlichts Objekt-
scheibe entnehmen.
• Lampe herausnehmen und durch neue ersetzen.
• Objektscheibe wieder auf die Öffnung setzen.
4.3.2 Sicherungswechsel
• Stromversorgung ausschalten und unbedingt
Netzstecker ziehen.
• Sicherungshalter an der Rückseite des Mikroskops
mit einem flachen Gegenstand (z.B. Schraubenzieher) herausschrauben.
• Sicherung ersetzen und Halter wieder einschrauben.
5. Aufbewahrung, Reinigung
• Das Mikroskop an einem sauberen, trockenen und
staubfreien Platz aufbewahren.
• Bei Nicht-Benutzung das Mikroskop immer mit der
Staubschutzhülle abdecken.
• Das Mikroskop keinen Temperaturen unter 0°C und
über 40°C sowie keiner relativen Luftfeuchtigkeit
über 85% aussetzen.
• Nach Gebrauch sofort die Beleuchtung ausschalten.
• Bei starker Verschmutzung das Mikroskop mit ei-
nem weichen Tuch und ein wenig Ethanol reinigen.
• Die optischen Bestandteile mit einem weichen
Linsentuch reinigen.
3B Scientific GmbH • Rudorffweg 8 • 21031 Hamburg • Deutschland • www.3bscientific.com • Technische Änderungen vorbehalten
2
Page 3
3B SCIENTIFIC® PHYSICS
Stereo Microscope W30660 and W30661
Instruction Manual
12/02 ALF
®
1
2
3
4
5
6
1 Eyepiece with eye-shields
2 Tube
3 Lock-screw
4 Adjustment knob for fine and coarse focusing
5 Pillar
6 Stand
7 Object plate
8 Switch
9 Top-light housing
bl Objective
bl
9
8
7
1
2
3
4
5
6
7
1
Eyepiece with eye-shields
2 Tube
3 Lock-screw
4 Adjustment knob for fine and coarse focusing
5 Pillar
6 Rotary switch for illumination
7 Stand
8 Object plate
9 Switch
bl Top-light housing
bm Objective
bm
bl
9
8
The stereo microscope allows three-dimensional
viewing of objects in 20x magnification.
1. Safety notes
• For power supply use only electrical sockets with
ground contact.
• Always unplug the mains plug before cleaning or
maintenance.
2. Description, technical data
Cat. no. W30660 W30661
Stand Metal stand, column firmly connected with Metal stand, column firmly connected with
base, pinion knobs attached on both sides base, pinion knobs attached on both sides
of the stand for coarse and fine focusing of the stand for coarse and fine focusing
Object plate Base with detachable object plate Base with detachable object plate
(plastic, black/white) (plastic, black/white and glass)
60 mm Ø and 2 specimen clips 95 mm Ø and 2 specimen clips
• Be careful not to spill any liquids on the microscope.
• Do not mishandle or impose unnecessary force on
the microscope.
• Avoid hand contact with optics.
• Do not clean the unit with volatile solvents or abra-
sive cleaners.
• Do not disassemble objective or eyepieces to attempt to clean them.
• Do not attempt to service the microscope yourself
3
Page 4

Cat. no. W30660 W30661
Tube Binocular inclined 45°, Binocular inclined 45°,
stereo head rotation 360°, interocular stereo head rotation 360°, interocular
distance adjustable between 55 mm and distance adjustable between 55 mm and
75 mm, diopter compensation ±5 mm 75 mm, diopter compensation ±5 mm
Eyepieces Exchangeable widefield eyepiece Exchangeable widefield eyepiece
WF 10x with eyepiece lock, WF 10x with eyepiece lock,
rubber eyepiece cups rubber eyepiece cups
Objectives Slide-in objective 2x with quick-change device Slide-in objective 2x with quick-change device
Magnification 20x 20x
Illumination Top-light illumination,12 V/10 W, Top-, transmitted- and mixed-light
with toggle switch, power supply illumination, 12 V/10 W lamps,
115 V resp. 230 V 50/60 Hz, 2 fuses T 0.125 toggle switch to turn ON, rotary switch to
select light combination, power supply
115 V resp. 230 V 50/60 Hz, 2 fuses F 0.16
Dimensions 170 mm x 300 mm x 115 mm 190 mm x 300 mm x 115 mm
Weight 2.4 kg 2.9 kg
Supplied Complete with dust cover Complete with dust cover
3. Unpacking and assembly
The microscope is packed in a molded styrofoam
container. Take the container out of the carton remove
the tape and carefully lift the top half off the container.
To avoid condensation on the optical components,
leave the microscope in the original packing to allow it
to adjust to room temperature. Using both hands (one
around the pillar and one around the base), lift the
microscope from the container and put it on a stable
desk. The microscope is fully assembled except for the
eye-shields. Position them over the eyepieces for
viewing comfort and to block out any ambient light. In
addition, the object plate must be inserted into the
stage opening in the base. Please note that you must
remove the protective paper. With the microscope
W30661 you will find also a glass object plate for
transmitted- and mixed-light illumination.
4. Operation
4.1 General information
• Set the microscope on a level table.
• Place the object to be observed in the center of
the object plate. Use the clips to fasten it into
place.
• Connect the mains cable to the net and turn on
the switch to get the object illuminated.
• When using transmitted- or mixed-light illumination replace black and white plate with the glass
plate.
• On the rotary switch position I is for transmittedlight, position II is for top-light and position III is
for mixed-light.
• Adjust the interpupillary distance between the
eyepieces by grasping the two prism-housings with
both hands and moving them until one circle of
light can be seen.
• Focus the object by turning the side knobs. It might
be necessary to loosen the lock-screw and raise
or lower the entire stereo head-bracket until the
outline of the object is found in the field of view.
Be sure to tighten the lock-screw to fix the height
of the stereo head on the pillar.
4.2 Changing the objective
• Loosen the lock-screw on the objective mount with
a small screwdriver and pull out the objective assembly horizontally until it clears the objective
housing.
• Insert an alternate objective by sliding it into the
objective mount.
• Secure it by tightening the lock-screw.
4.3 Changing the lamps and fuses
4.3.1 Changing the lamps
• Turn off the power switch, unplug the mains plug
and let the lamp cool down.
• Do not touch the bulb with the bare hand.
• To change the lamp of the top light loosen the
lock-screw for the lamp-housing and remove the
lamp screen.
• Remove the lamp by pressing it downward out of
the clamp socket.
• Insert the new lamp and seat it firmly in place by
lightly pressing it upwards.
• Remount the lamp screen.
• To change the lamp of bottom light remove the
cover from the base opening.
• Change the lamp in a similar way as described
above.
• Remount the cover.
4.3.2 Changing the fuses
• Turn off the power switch and unplug the mains
plug.
• Unscrew the fuse holder on the back of the stand
base with a screwdriver.
• Replace the fuse and reinsert the holder in its
socket.
4
Page 5

5. Storage and cleaning
• Keep the microscope in a clean, dry and dust free
place.
• When not in use always cover the microscope with
the dust cover.
• Do not expose it to temperatures below 0°C and
above 40°C and a max. relative humidity of over
85%.
• Always turn off the light immediately after use .
• Use a soft linen cloth and some ethanol to clean
the microscope.
• Use a soft lens tissue to clean the optics.
3B Scientific GmbH • Rudorffweg 8 • 21031 Hamburg • Germany • www.3bscientific.com • Technical amendments are possible
5
Page 6
3B SCIENTIFIC® PHYSICS
Microscope stéréoscopique W30660 et W30661
Instructions d’utilisation
12/02 ALF
®
1
2
3
4
5
6
1 Oculaire avec bonnettes en caoutchouc
2 Tube
3 Vis de fixation
4 Bouton de mise au point
5 Colonne de potence
6 Pied de potence
7 Plaque d’objet
8 Commutateur principal
9 Module d’éclairage par réflexion
bl Objectif
bl
9
8
7
1
2
3
4
5
6
7
1
Oculaire avec bonnettes en caoutchouc
2 Tube
3 Vis de fixation
4 Bouton de mise au point
5 Colonne de potence
6 Commutateur rotatif pour l’éclairage
7 Pied de potence
8 Plaque d’objet
9 Commutateur principal
bl Module d’éclairage par réflexion
bm Objectif
bm
bl
9
8
Le microscope stéréoscopique standard permet d’observer des objets en 3 dimensions agrandis 20 fois.
1. Consignes de sécurité
• Ne brancher le microscope qu’à des prises de courant mises à la terre.
• Avant d’effectuer des travaux d’entretien et de
maintenance, retirer toujours la fiche secteur.
• Le microscope ne doit jamais entrer en contact avec
des liquides.
2. Description, caractéristiques techniques
N° de cat. W30660 W30661
Potence Potence métallique, colonne fixée au pied. Potence métallique, colonne fixée au pied.
Réglage de la netteté avec Réglage de la netteté avec
les boutons latéraux les boutons latéraux
Plaque d’objet Support avec plaque d’objet amovible Support avec plaque d’objet amovible
(plastique, noir / blanc) (plastique, noir / blanc et verre)
Ø 60 mm et 2 agrafes Ø 95 mm et 2 agrafes
• Ne jamais exposer le microscope à des contraintes
mécaniques.
• Ne pas toucher les parties optiques du microscope
avec les doigts.
• Pour le nettoyage du microscope, ne pas utiliser de
nettoyants ni de solvants agressifs.
• Pour le nettoyage, ne pas démonter les objectifs ni
les oculaires.
• En cas d’endommagement ou de défaut, ne pas
réparer soi-même le microscope.
6
Page 7

N° de cat. W30660 W30661
Tube Observation binoculaire inclinée 45°, Observation binoculaire inclinée 45°,
tête stéréoscopique orientable à 360°, tête stéréoscopique orientable à 360°,
écart des yeux réglable entre 55 et 75 mm, écart des yeux réglable entre 55 et 75 mm,
un oculaire avec compensation un oculaire avec compensation
dioptrique ±5 mm dioptrique ±5 mm
Oculaires Oculaire à grand champ WF 10x remplaçable, Oculaire à grand champ WF 10x remplaçable,
protecteur d’oculaire, bonnettes protecteur d’oculaire, bonnettes
en caoutchouc en caoutchouc
Objectif Objectif 2x avec guide-chariot et Objektiv 2x mit Schlittenführung und
dispositif de rechange rapide dispositif de rechange rapide
Agrandissement 20x 20x
Eclairage Eclairage par réflexion, lampe 12 V / 10 W, Eclairage par réflexion, à transmission et
par interrupteur à bascule, mixte, lampes 12 V / 10 W,
raccord secteur 115 V / 230 V, 50/60 V, par interrupteur à bascule, combinaison
2 fusible T 0,125 de lumière réglable avec commutateur rotatif,
raccord secteur 115 V / 230 V, 50/60 V,
2 fusible F 0,16
Dimensions 170 x 300 x 115 mm 190 x 300 x115 mm
Masse 2,4 kg 2,9 kg
Matériel fourni Complet avec housse de protection Complet avec housse de protection
3. Déballage et assemblage
Le microscope est livré dans un carton en polystyrène.
Après avoir retiré le ruban adhésif, ouvrir le carton avec
précaution. Veiller à ce que les parties optiques (objectifs et oculaires) ne tombent pas. Pour éviter de la
condensation sur les composants optiques, laisser le
microscope dans l’emballage, jusqu’à ce qu’il ait la température ambiante. Retirer le microscope avec les deux
mains (une main au bras de la potence et l’autre au
pied), puis le poser sur une surface plane. Le microscope est entièrement monté, sauf les bonnettes, qui
doivent être placées sur les oculaires, et la plaque d’objet, qui est placée sur l’ouverture dans le pied de la
potence après retrait du morceau de papier. Le microscope W30661 est livré en outre avec une plaque d’objet en verre pour l’éclairage à transmission et mixte.
4. Commande
4.1 Remarques générales
• Poser le microscope sur une table plane.
• Placer l’objet d’étude au milieu de la table du mi-
croscope et le fixer avec les agrafes.
• Brancher le câble secteur et allumer l’éclairage.
• En cas d’utilisation de lumière transmise ou mix-
te, remplacer la plaque d’objet noir / blanc par la
plaque en verre.
• La position I du commutateur rotatif est pour la
lumière transmise, la position II pour la lumière
par réflexion et la position III pour la lumière
mixte.
• Avec le tube, régler l’écart des yeux, jusqu’à ce
qu’on ne voie plus qu’un cercle lumineux.
• Ajuster la netteté de l’image avec les boutons de
réglage. Au besoin, desserrer la vis de fixation de
la colonne de la potence et procéder au réglage
rapide en montant ou en abaissant l’optique
complète.
4.2 Changement d’objectif
• Serrer la vis latérale du module d’objectif à l’aide
d’un petit tournevis.
• Retirer l’objectif par le côté et le remplacer par
un autre.
• Resserrer la vis
4.3 Remplacement de lampe et de fusible
4.3.1 Remplacement de lampe
• ouper l’alimentation électrique, retirer la fiche
secteur et laisser le microscope refroidir.
• Pour remplacer la lampe de l’éclairage par réflexion, desserrer la vis latérale du module de
lampe et retirer le module.
• Retirer la lampe et la remplacer par une neuve.
• Visser de nouveau le module de la lampe.
• Pour remplacer la lampe pour l’éclairage trans-
mis, retirer la plaque d’objet.
• Retirer la lampe et la remplacer par une neuve.
• Remettre la plaque sur l’ouverture.
4.3.2 Remplacement de fusible
• Couper l’alimentation électrique et retirer impérativement la fiche secteur.
• Le porte-fusible se trouve sous le microscope.
• Dévisser le porte-fusible avec un objet plat (par
ex. tournevis).
• Remplacer le fusible et visser de nouveau le portefusible.
7
Page 8

5. Rangement, nettoyage
• Ranger le microscope à un endroit propre, sec et
exempt de poussière.
• Si le microscope n’est pas utilisé, le recouvrir de
la housse.
• Ne pas exposer le microscope à des températures
inférieures à 0°C et supérieures à 40°C ainsi qu’à
une humidité relative de l’aide supérieure à 85%.
• Après son utilisation, éteindre immédiatement
l’éclairage.
• S’il est fortement encrassé, nettoyer le microscope
avec un chiffon doux et un peu d’éthanol.
• Nettoyer les composants optiques avec un chiffon
doux pour lentilles.
3B Scientific GmbH • Rudorffweg 8 • 21031 Hamburg • Allemagne • www.3bscientific.com • Sous réserve de modifications techniques
8
Page 9

3B SCIENTIFIC® PHYSICS
Microscopio stereoscopico W30660 e W30661
Istruzioni d’uso
12/02 ALF
®
1
2
3
bl
4
9
5
6
8
7
1 Oculare con mascherine in gomma
2 Tubo
3 Vite di fissaggio
4 Manopola di messa a fuoco
5 Montante dello stativo
6 Base di supporto
7 Vetrino portaoggetti
8 Interruttore di rete
9 Alloggiamento illuminazione dall’alto
bl Obiettivo
Il microscopio stereoscopico consente l’osservazione
tridimensionale degli oggetti con ingrandimento a 20
volte.
1. Norme di sicurezza
• L’allacciamento elettrico del microscopio può essere effettuato solo ad una presa collegata a terra.
• Prima di effettuare lavori di cura o manutenzione
è necessario staccare sempre la spina.
• Il microscopio non deve entrare in contatto con sostanze liquide.
1
2
3
4
5
6
bm
bl
9
8
7
1
Oculare con mascherine in gomma
2 Tubo
3 Vite di fissaggio
4 Manopola di messa a fuoco
5 Montante dello stativo
6 Commutatore rotante per illuminazione
7 Base di supporto
8 Vetrino portaoggetti
9 Interruttore di rete
bl Alloggiamento illuminazione dall’alto
bm Obiettivo
• Non sottoporre il microscopio a sollecitazioni meccaniche.
• Non toccare con le dita le parti ottiche del microscopio.
• Non impiegare detergenti o soluzioni aggressive per
la pulizia del microscopio.
• Non separare gli obiettivi e gli oculari per effettuarne la pulizia.
• In caso di danneggiamento o di difetti del microscopio non cercare di effettuare la riparazione autonomamente.
2. Descrizione, dati
N° cat. W30660 W30661
Stativo Stativo in metallo, montante dello stativo Stativo in metallo, montante dello stativo
fissato saldamente al piede. Regolazione fissato saldamente al piede. Regolazione
definizione attraverso le manopole definizione attraverso le manopole
disposte sui due lati dello stativo disposte sui due lati dello stativo
Vetrino Piede con vetrino portaoggetti estraibile Piede con vetrino portaoggetti estraibile
portaoggetti (plastica, bianco/nero) (plastica, bianco/nero e vetro)
60 mm Ø e 2 pinze per bloccaggio 95 mm Ø e 2 pinze per bloccaggio
del preparato del preparato
9
Page 10

N° cat. W30660 W30661
Tubo Tubo binoculare inclinato a 45°, Tubo binoculare inclinato a 45°
testata del microscopio stereoscopico testata del microscopio stereoscopico
girevole a 360°, distanza interoculare girevole a 360°, distanza interoculare
tra 55 mm e 75 mm, un oculare con tra 55 mm e 75 mm, un oculare con
compensazione diottrica ±5 mm compensazione diottrica ±5 mm
Oculari Oculare a campo largo sostituibile WF 10x Oculare a campo largo sostituibile WF 10x
con fusibile dell’oculare, con fusibile dell’oculare,
mascherine in gomma mascherine in gomma
Obiettivi Obiettivo 2x con guide di posizionamento Obiettivo 2x con guide di posizionamento
e dispositivo di sostituzione rapida e dispositivo di sostituzione rapida
Ingrandimento 20x 20x
Illuminazione Illuminazione dall’alto, lampada a 12 V/10 W Illuminazione dall’alto, in luce trasmessa
regolabile con interruttore a levetta, e mista, lampade a 12 V/10 W,
collegamento di rete 115 V o 230V, 50/60 Hz, regolabile con interruttore a levetta,
2 fusibile T 0,125 combinazione luminosa selezionabile con
commutatore rotante, collegamento di rete
115 V o 230V, 50/60 Hz,
2 fusibile F 0,16
Dimensioni 170 x 300 x 115 mm 190 x 300 x115 mm
Peso 2,4 kg 2,9 kg
La fornitura Microscopio completo Microscopio completo
comprende con rivestimento antipolvere con rivestimento antipolvere
3. Disimballo e assemblaggio
Il microscopio viene fornito in un cartone in Styropor.
Aprire con precauzione il contenitore una volta rimosso il nastro adesivo. Durante tale operazione prestare
attenzione affinché i pezzi dell’ottica (obiettivi e oculari) non cadano. Per evitare la formazione di condensa sui componenti ottici lasciare il microscopio nella
confezione finché non abbia raggiunto la temperatura
ambiente. Estrarre il microscopio con entrambe le mani
(una mano sul braccio dello stativo e una sul piede) e
collocarlo su una superficie piana. Il microscopio è
completamente montato, ad eccezione delle
mascherine che vengono poste sugli oculari e del vetrino portaoggetti, che viene collocato sull’apertura nel
piede dello stativo una volta rimossa la carta. Nella
fornitura del microscopio W30661 è compreso inoltre
un vetrino portaoggetti in vetro per l’illuminazione in
luce trasmessa e mista.
4. Comandi
4.1 Indicazioni generali
• Collocare il microscopio su un tavolo dalla superficie piana.
• Collocare l’oggetto da osservare al centro del tavolino portaoggetti e bloccarlo con le pinze.
• Collegare il cavo di rete e attivare l’illuminazione.
• Quando si impiega l’illuminazione con luce
trasmessa o mista sostituire il vetrino portaoggetti
in bianco/nero con la piastra in vetro.
• La posizione I del commutatore rotante è per la
luce trasmessa, la posizione II per la luce dall’alto
e la posizione III per la luce mista.
• Regolare con il tubo la distanza interoculare finché non sarà visibile un unico cerchio luminoso.
• Regolare la definizione dell’immagine attraverso
le manopole. Se necessario allentare la vite di fissaggio sul montante dello stativo ed effettuare la
regolazione macrometrica sollevando o abbassando l’intera ottica.
4.2 Sostituzione dell’obiettivo
• Allentare la vite laterale sull’alloggiamento
dell’obiettivo con un piccolo cacciavite.
• Estrarre l’obiettivo lateralmente e sostituirlo con
un altro.
• Serrare nuovamente la vite.
4.3 Sostituzione della lampada e dei fusibili
4.3.1 Sostituzione della lampada
• Disconnettere l’alimentazione elettrica, estrarre
la spina e lasciar raffreddare il microscopio.
• Non toccare la lampada con le dita.
• Per sicurezza estrarre gli oculari.
• Per sostituire la lampada appoggiare il microsco-
pio su un lato.
• Svitare e ribaltare, tirando verso il basso, la piastra inferiore del microscopio.
• Lo zoccolo della lampada è fissato alla piastra.
• Estrarre la lampada alogena e inserire quella nuo-
va.
• Richiudere e fissare la piastra inferiore.
4.3.2 Sostituzione dei fusibili
• Disconnettere l’alimentazione elettrica ed estrarre assolutamente la spina.
10
Page 11

• Il portafusibili si trova sul lato inferiore del microscopio.
• Svitare il portafusibili con un oggetto piatto (ad
es. un cacciavite).
• Sostituire il fusibile e riavvitare il supporto
5. Conservazione, pulizia
• Conservare il microscopio in un luogo pulito, asciut-
to e privo di polvere.
• Durante il periodo di non utilizzo coprire sempre il
microscopio con la custodia antipolvere.
• Non esporre il microscopio a temperature inferiori
a 0°C e superiori a 40°, né ad un’umidità relativa
superiore all’85%.
• Dopo l’uso spegnere immediatamente la lampada.
• In caso di sporco notevole ripulire il microscopio
con un panno morbido e un poco di etanolo.
• Pulire le componenti ottiche con un panno morbido per lenti.
3B Scientific GmbH • Rudorffweg 8 • 21031 Hamburg • Germania • www.3bscientific.com • Con riserva di modifiche tecniche
11
Page 12

3B SCIENTIFIC® PHYSICS
Microscopio estéreo W30630 y W30631
Instrucciones de uso
12/02 ALF
®
1
2
3
4
5
6
1 Ocular con anteojera de goma
2 Tubo
3 Tornillo de sujeción
4 Botón de ajuste de focalización
5 Columna del estativo
6 Base del estativo
7 Portaobjetos
8 Interruptor
9 Carcasa de luz incidente
bl Objetivo
bl
9
8
7
1
2
3
4
5
6
7
1 Ocular con anteojera de goma
2 Tubo
3 Tornillo de sujeción
4 Botón de ajuste de focalización
5 Columna del estativo
6 Conmutador giratorio de iluminación
7 Base del estativo
8 Portaobjetos
9 Interruptor
bl Carcasa de luz incidente
bm Objetivo
bm
bl
9
8
El microscopio estéreo permite la observación tridimensional de objetos amplificados hasta 20 veces.
1. Aviso de seguridad
• El microscopio sólo se puede conectar a
tomacorrientes con puesta a tierra.
• Antes de realizar trabajos de mantenimiento o
reparación, se debe desconectar el enchufe de la
red.
• El microscopio no debe entrar en contacto con
ningún tipo de líquido.
2. Descripción, datos técnicos
No. Cat. W30660 W30661
Estativo Estativo de metal, columna del estativo Estativo de metal, columna del estativo
fijada a la base. Ajuste de nitidez por fijada a la base. Ajuste de nitidez por
medio de botones montados a ambos medio de botones montados a ambos
lados del estativo lados del estativo
Portaobjetos Base con portaobjetos extraíble Base con portaobjetos extraíble
(plástico, blanco/negro) (plástico, blanco/negro y cristal)
60 mm Ø así como 2 abrazaderas de sujeción 95 mm Ø así como 2 abrazaderas de sujeción
• El microscopio no debe ser sometido a ningún tipo
de carga mecánica.
• No tocar con los dedos las piezas ópticas del
microscopio.
• No se debe usar ningún elemento agresivo ni
disolventes para limpiar el microscopio.
• No desmontar los objetivos y oculares para
limpiarlos.
• En caso de daños o de que el microscopio
presentara fallos, no trate de repararlo Ud. mismo.
12
Page 13

No. Cat. W30660 W30661
Tubo Enfoque binocular oblicuo 45°, Enfoque binocular oblicuo 45°,
cabezal estéreo con giro de 360°, cabezal estéreo con giro de 360°,
distancia interocular regulable entre distancia interocular regulable entre
55 mm y 75 mm, 55 mm y 75 mm, un ocular con
un ocular con compensación un ocular con compensación
de dioptrías de ±5 mm de dioptrías de ±5 mm
Oculares Ocular reemplazable de campo Ocular reemplazable de campo
amplio WF 10x con seguro, amplio WF 10x con seguro,
anteojeras de goma anteojeras de goma
Objetivos Objetivo 2x** con guías ranuradas y Objetivo 2x con guías ranuradas y
dispositivo de cambio rápido dispositivo de cambio rápido
Ampliación 20 aumentos 20 aumentos
Iluminación Iluminación incidente, lámpara de 12 V/10 W luminación incidente, por trasluz y luz mixta,
accionada por conmutador basculante, lámpara de 12 V/10 W,
conexión a la red 115 V o 230 V, 50/60 Hz, accionada por conmutador basculante,
2 fusibles T 0,125 combinación de luz seleccionable por
conmutador giratorio, conexión
a la red 115 V o 230 V, 50/60 Hz,
2 fusibles F 0,16
Dimensiones 170 x 300 x 115 mm 190 x 300 x115 mm
Peso 2,4 kg 2,9 kg
Suministro Equipo completo con envoltura de Equipo completo con envoltura de
protección contra el polvo protección contra el polvo
3. Descripción, datos técnicos
El microscopio se suministra embalado en un cartón de
estiropor. Una vez retirada la cinta adhesiva, abra
cuidadosamente el paquete. Al hacerlo tenga cuidado
de que no caiga ningún objeto. Para evitar la presencia
de condensado sobre los componentes ópticos, el
microscopio debe permanecer dentro del embalaje el
tiempo que sea necesario para que adote la temperatura
ambiente. Saque el microscopio tomándolo con ambas
manos (tome con una el brazo del estativo y con la otra
la base), y colóquelo sobre una superficie plana. El
microscopio está montado por completo, con excepción
de las anteojeras que se colocan sobre los oculares, y
del portaobjetos, el cual se posiciona sobre la base del
estativo una vez que se lo ha extraído del papel. El
suministro del microscopio W30661 contiene, además,
un portaobjetos de vidrio para iluminación al trasluz y
luz mixta.
4. Servicio
4.1 Notas generales
• Coloque el microscopio sobre una mesa plana.
• Posicione el objeto de observación en el centro
de la platina y fíjelo con las abrazaderas de
sujeción.
• Conecte el cable a la red y encienda la iluminación.
• Si usa iluminación al trasluz o la de luz mixta,
reemplace el portaobjetos blanco y negro por la
placa de cristal.
• Posición I del conmutador giratorio: trasluz,
posición II: luz incidente y posición III: luz mixta.
• Ajuste la distancia interocular, con el tubo, hasta
que sólo sea visible un círculo luminoso.
• Ajuste la nitidez de la imagen por medio de los
botones de ajuste. De ser necesario, afloje el
tornillo de fijación de la columna del estativo, y
realice el ajuste grueso elevando o bajando la
óptica completa.
4.2 Cambio de objetivos
• Retire los tornillos laterales de la carcasa del
objetivo usando un destornillador pequeño.
• Retire el objetivo y reemplácelo por otro.
• Vuelva a ajustar los tornillos.
4.3 Recambio de lámparas y fusibles
4.3.1 Recambio de lámparas
• Desconecte la alimentación de corriente, retire el
enchufe de la red y espere a que el microscoipio
se enfríe.
• Para cambiar la lámpara de luz incidente, retire
los tornillos laterales y extraiga la carcasa.
• Retire la lámpara y reemplácela por una nueva.
• Vuelva a atornillar la carcasa de la lámpara.
• Para cambiar la lámpara de trasluz retire el
portaobjetos.
• Retire la lámpara y reemplácela por una nueva.
• Vuelva a insertar el portaobjetos en la abertura.
4.3.2 Recambio de fusibles
• Desconecte la alimentación de corriente. Es
imprescindible que también desconecte el
enchufe de la red.
• En la parte posterior del microscopio desatornille
13
Page 14

el portafusibles con un objeto plano (p. ej. un
destornillador).
• Reemplace el fusible y vuelva a atornillar el
portafusibles.
5. Mantenimiento, limpieza
• El microscopio debe permanecer en un lugar limpio,
seco y libre de polvo.
• Si se lo mantiene fuera de uso, se debe cubrir
siempre con la envoltura protectora contra el polvo.
• No someta el microscopio a temperaturas bajo 0°C
o sobre 40°C, ni a una humedad relativa del aire
superior al 85%.
• Tras el uso, desconecte siempre la iluminación.
• Si el microscopio se encuentra muy sucio, se debe
limpiar con un paño suave y un poco de etanol.
• Limpie los componentes ópticos con un paño suave
para lentes.
3B Scientific GmbH • Rudorffweg 8 • 21031 Hamburg • Alemania • www.3bscientific.com • Se reservan las modificaciones técnicas
14
Page 15

3B SCIENTIFIC® PHYSICS
Microscópio estéreo W30660 e W30661
Manual de instruções
12/02 ALF
®
1
2
3
4
5
6
1 Ocular com concha ocular de borracha
2 Tubo
3 Rosca de fixação
4 Botão rotativo para focalização
5 Coluna do tripé
6 Base do tripé
7 Platina porta-objeto
8 Interruptor
9 Compartimento para iluminação zenital
bl Objetiva
bl
9
8
7
1
2
3
4
5
6
7
1 Ocular com concha ocular de borracha
2 Tubo
3 Rosca de fixação
4 Botão rotativo para focalização
5 Coluna do tripé
6 Botão de regulagem da iluminação
7 Base do tripé
8 Platina porta-objeto
9 Interruptor
bl Compartimento para iluminação zenital
bm Objetiva
bm
bl
9
8
O microscópio estéreo possibilita a observação de
objetos em três dimensões com um aumento de 20
vezes.
1. Indicações de segurança
• O microscópio só deve ser conectado à rede elétrica por
meio de uma tomada equipada de um pólo terra.
• Antes de efetuar qualquer atividade de manutenção deve-se sempre tirar o fio da tomada elétrica.
• O microscópio jamais deve entrar em contato com
qualquer líquido.
2. Descrição, dados técnicos
Cat.-Nr. W30660 W30661
Tripé Tripé inteiramente metálico, braço fixado Tripé inteiramente metálico, braço fixado
permanentemente na base, regulagem permanentemente na base, regulagem
do foco pelos botões rotativos que se do foco pelos botões rotativos que se
encontram a ambos lados do tripé encontram a ambos lados do tripé
Platina Base com placa porta-objeto removível Base com placa porta-objeto removível
porta-objeto (matéria plástica, preto e branco) (matéria plástica, preto e branco e vidro)
60 mm Ø assim como 2 grampos 95 mm Ø assim como 2 grampos
para preparações para preparações
• Não exercer qualquer pressão mecânica sobre o microscópio.
• Nunca toque com os dedos nas partes óticas do microscópio.
• Não utilize produtos de limpeza agressivos ou
solventes para limpar o microscópio.
• Não desmontar ou separar as objetivas dos oculares ao efetuar a limpeza.
• Em caso de danificação ou defeito do microscópio,
não o conserte por si mesmo.
15
Page 16

Cat.-Nr. W30660 W30661
Tubo Vista oblíqua binocular de 45°, Vista oblíqua binocular de 45°,
cabeça estéreo rotativa até 360°, distância cabeça estéreo rotativa até 360°, distância
dos olhos ajustável entre 55 mm e 75 mm, dos olhos ajustável entre 55 mm e 75 mm,
um ocular com compensação de dioptria um ocular com compensação de dioptria
de ±5 mm de ±5 mm
Oculares Ocular Weitfeld WF 10x substituível Ocular Weitfeld WF 10x substituível
com seguro para o ocular, concha ocular com seguro para o ocular, concha ocular
de borracha de borracha
Objetivas Objetiva 2x com deslocação por trilho Objetiva 2x com deslocação por trilho
e sistema para troca rápida e sistema para troca rápida
Ampliação 20x 20x
Iluminação Lâmpada de iluminação zenital, lâmpada Iluminação zenital, de fundo por transparência
de 12 V/10 W acionada por um interruptor, e mista, 12 V/10 W, lâmpada de 12 V/10 W,
alimentação elétrica 115 V ou 230V, 50/60 Hz acionada por um interruptor, combinação
2 fusível T 0,125 de iluminações selecionável através de
de um botão rotativo,
alimentação elétrica 115 V ou 230V, 50/60 Hz,
2 fusível F 0,16
Dimensões 170 x 300 x 115 mm 190 x 300 x115 mm
Massa 2,4 kg 2,9 kg
Fornecimento Completo, com capa contra a poeira Completo, com capa contra a poeira
3. Retirada da embalagem e montagem
O microscópio é entregue numa caixa de isopor. Depois de haver retirado a fita adesiva, abra a caixa com
cuidado. Assegure-se de que nenhum elemento ótico
(objetivas e oculares) caia fora da caixa. Para evitar a
formação de condensação nas partes óticas, deixe o
microscópio na embalagem o tempo suficiente até que
este tenha adquirido a temperatura ambiente.
Retire o microscópio com as duas mãos (uma mão no
braço do tripé e a outra na base) e coloque-o sobre
uma superfície plana. O microscópio está integralmente montado com exceção das conchas oculares, que
são instaladas sobre os oculares, e das platinas portaobjetos, que devem ser colocadas nas aberturas encontradas na base do tripé depois de ter-se retirado o
papel. O fornecimento do microscópio W30661 inclui
uma placa porta-objeto de vidro suplementar para iluminação de fundo por transparência ou para iluminação mista.
4. Operação
4.1 Indicações gerais
• Instalar o microscópio sobre uma superfície plana.
• Colocar o objeto a ser observado no meio da platina porta-objeto e fixar com os grampos.
• Pôr o fio de alimentação na tomada e ligar a iluminação.
• Quando utilizar a luz de fundo por transparência
ou a iluminação mista, deverá substituir a placa
preta e branca pela placa de vidro.
• A posição I do botão rotativo aciona a luz de fun-
do, a posição II aciona a luz zenital e a posição III
é para a iluminação mista.
• Ajuste a distância dos olhos com o tubo até que
só um círculo de luz seja visível.
• Ajuste a focalização por meio do botão rotativo.
Caso for necessário, afrouxe a rosca de fixação na
coluna do tripé e efetue o ajuste ótico grosseiro
completo levantando ou descendo.
4.2 Troca de objetivas
• Afrouxe os parafusos laterais no compartimento
da objetiva com uma pequena chave de fenda.
• Retire a objetiva lateralmente e substitua-a por
outra.
• Volte a apertar os parafusos.
4.3 Troca da lâmpada e do fusível
4.3.1 Troca da lâmpada
• Desligue a alimentação elétrica, retire o fio da
tomada e espere até o microscópio esfriar.
• Para trocar a lâmpada de luz zenital, afrouxe os
parafusos nos lados do compartimento da lâmpada e extraia o compartimento.
••
• Retire a lâmpada e substitua-a pela nova.
••
••
• Fixe o compartimento com os parafusos.
••
• Para trocar a lâmpada de iluminação por trans-
parência, retire antes a platina porta-objeto.
••
• Retire a lâmpada e substitua-a pela nova.
••
••
• Reponha a placa porta-objeto na abertura.
••
4.3.2 Troca de fusíveis
• Desligue a alimentação elétrica e retire em todo
caso o fio da tomada.
16
Page 17

• Desenroscar o compartimento dos fusíveis com
um objeto plano (por exemplo, uma chave de
fenda.
• Troque o fusível e volte a instalar o suporte.
5. Armazenamento, limpeza
• Armazenar o microscópio num lugar limpo, seco e
sem poeira.
• Quando não utilizado, guarde sempre o microscó-
pio na sua capa de proteção contra a poeira.
• Não exponha o microscópio a temperaturas inferiores a 0°C ou superiores a 40°C, assim como a uma
humidade ambiente superior a 85%.
• Desligue a iluminação imediatamente após cada
utilização.
• Caso o microscópio esteja muito sujo, limpe com
um pano suave e um pouco de etanol (álcool).
• Limpe os elementos óticos com um pano especial
para lentes suave.
3B Scientific GmbH • Rudorffweg 8 • 21031 Hamburg • Alemanha • www.3bscientific.com • Sob reserva de modificações técnicas
17
 Loading...