

Page 1
3B SCIENTIFIC
Lehrgerät Akustik U8440012
Bedienungsanleitung
05/09 ELWE/ALF
®
PHYSICS
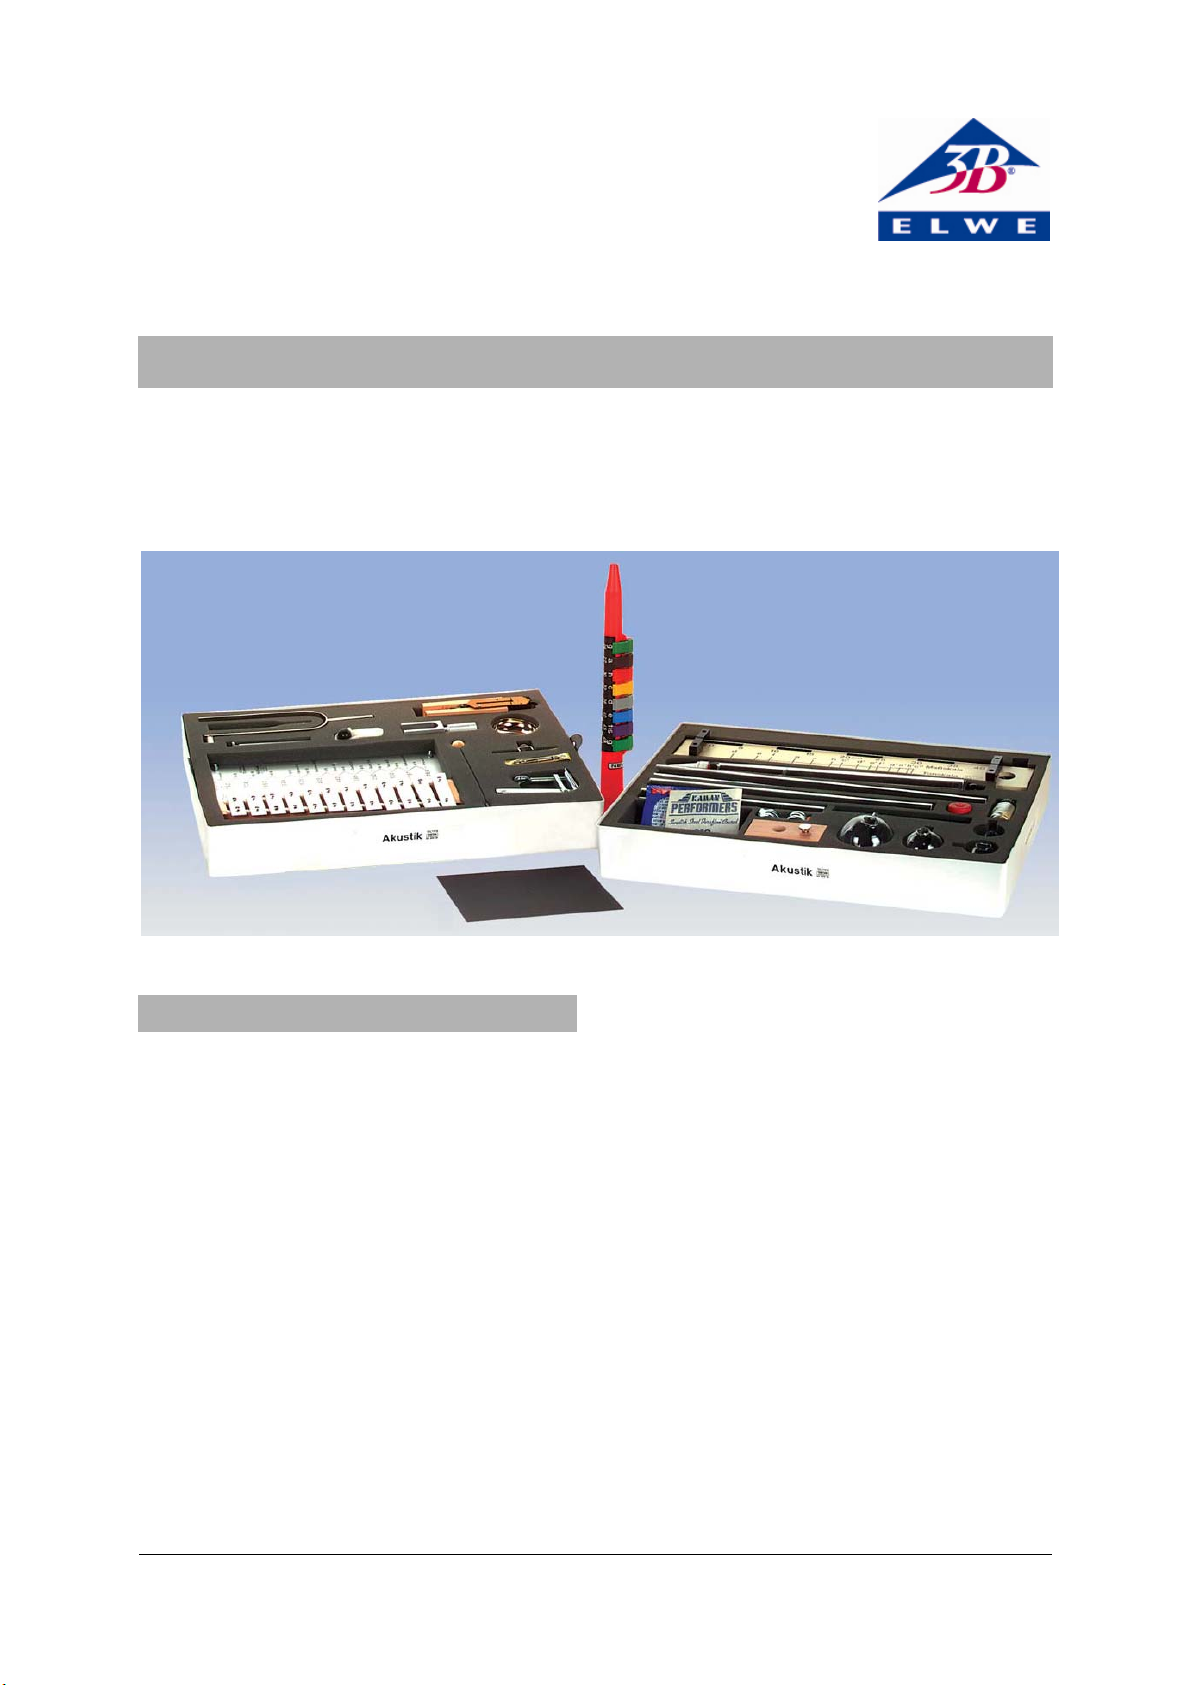
1. Beschreibung
Der Gerätesatz Lehrgerät Akustik ermöglicht die
Vermittlung eines weitgehend geschlossenen Überblicks über das Themengebiet Akustik. Mit dem
Lehrgerät können zahlreiche Versuche durchgeführt
werden.
Versuchsbeispiele:
1. Saitentöne
2. Der reine akustische Ton
3. Schwingende Luftsäulen
4. Die offene Luftsäule
5. Die Lippenpfeife
6. Schwingende Stäbe
7. Infraschall
8. Ultraschall
9. Die Schreibstimmgabel
10. Fortschreitende Wellen
11. Dopplereffekt
12. Chladni’sche Klangfiguren
13. Glockenschwingungen
14. Stehende Wellen
15. Obertöne
16. Messung der Wellenlänge
17. Der Resonanzboden
18. Der Resonanzkasten
19. Der Kugelresonator
20. Die Saiteninstrumente und ihre Gesetze
21. Die Tonleiter auf den Saiteninstrumenten
22. Messung der Saitenspannung
23. Abhängigkeit der Tonhöhe von der Saitenspannung
24. Blasinstrumente und ihre Gesetze
25. Die C-Dur-Tonleiter und ihre Intervalle
26. Wohlklang und Missklang
27. Der G-Dur-Dreiklang
28. Der vierstimmige G-Dur-Dreiklang
29. Die Dur-Tonleiter mit beliebigem Grundton
30. Einschaltung der halben Töne
Lieferung erfolgt im Kunststofftablett mit Schaumstoffeinsatz zur schonenden Aufbewahrung der Einzelteile.
1
Page 2
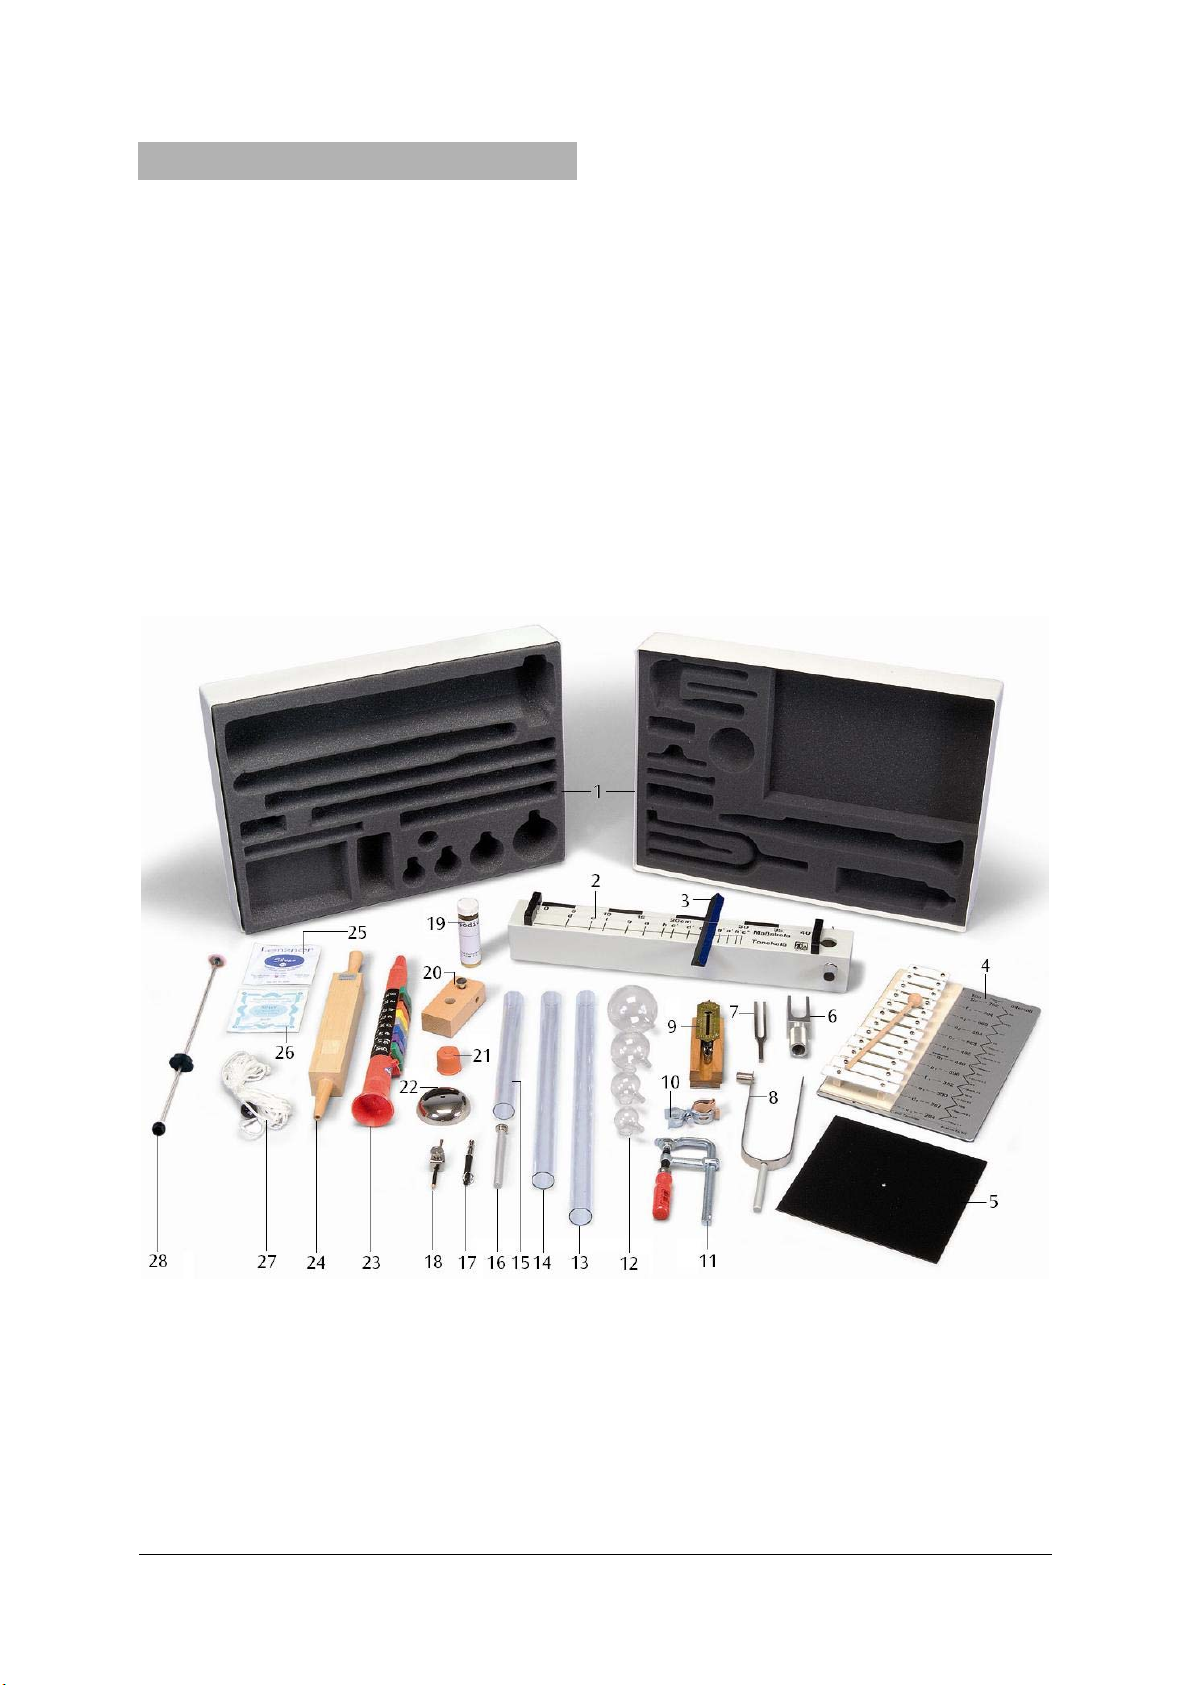
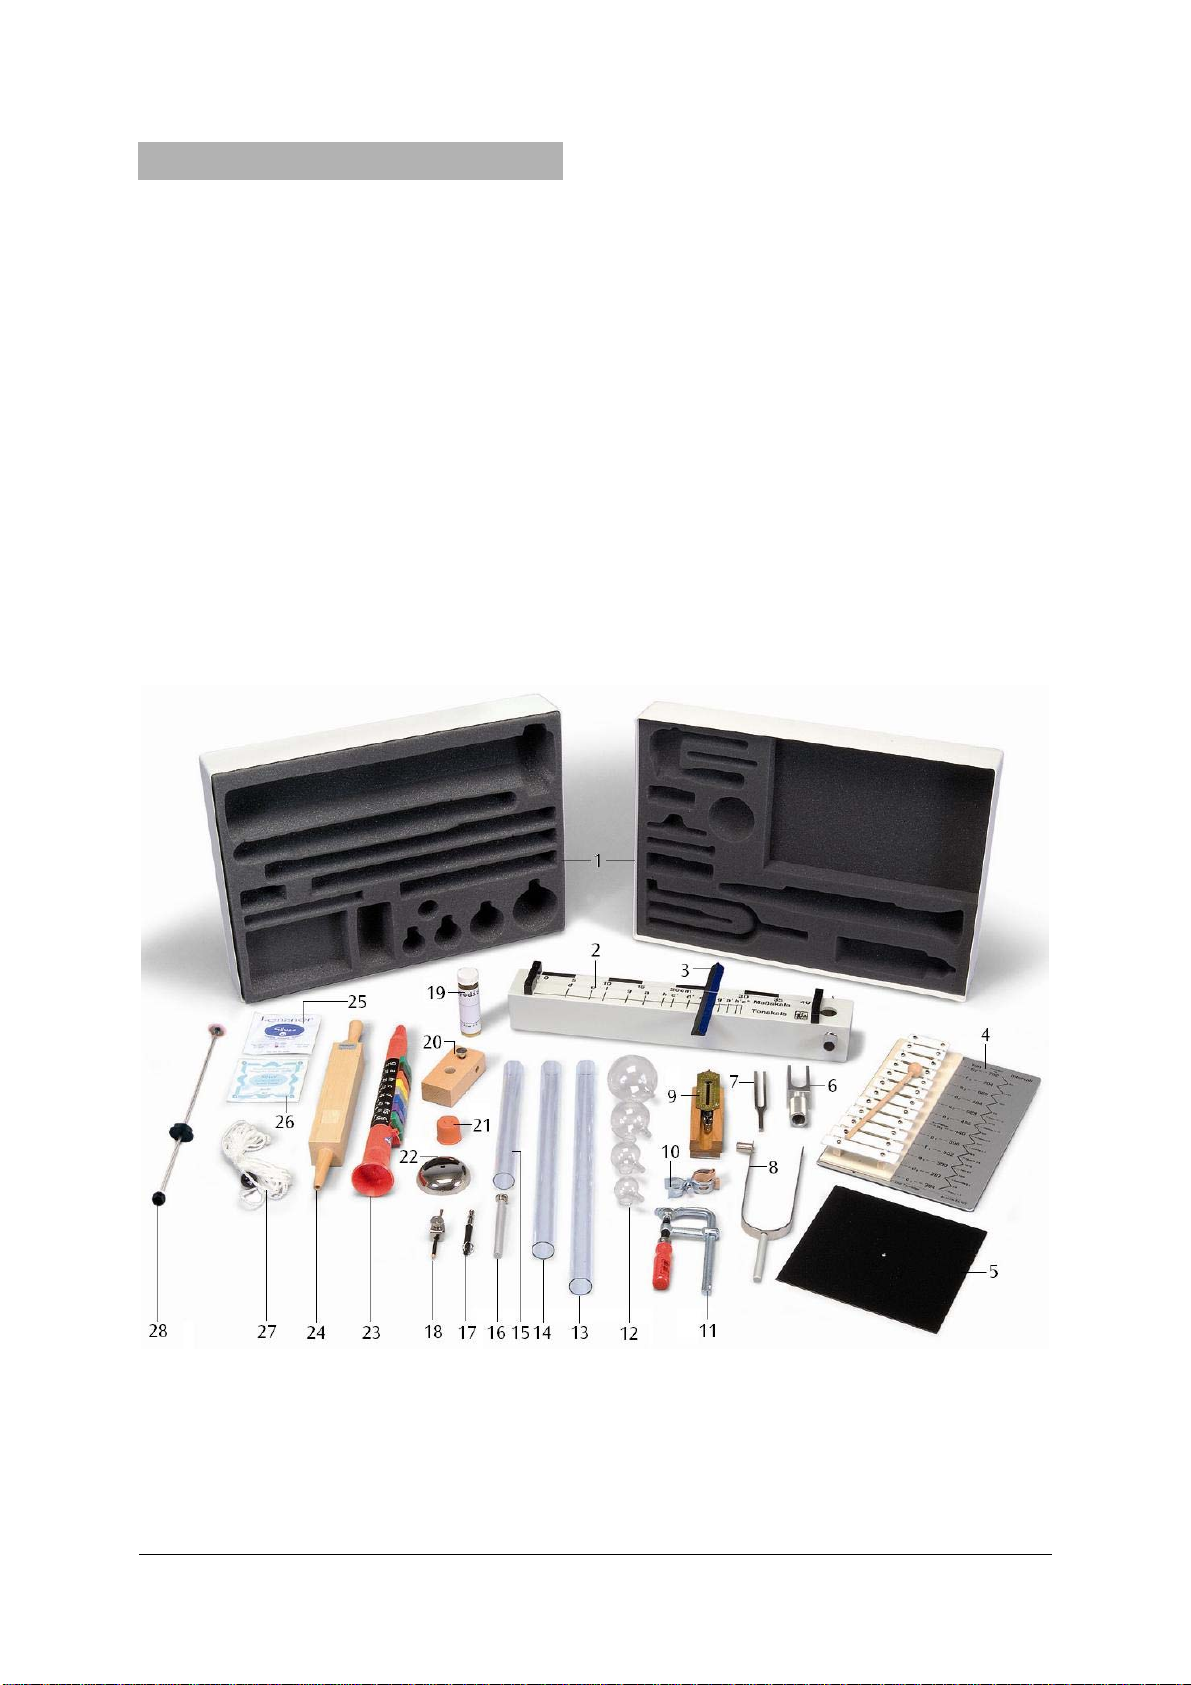
2. Lieferumfang
1 Tablett mit Schaumstoffeinsatz für
Lehrgerät "Akustik"
2 Monochord
3 Steg zum Monochord
4 Metallophon
5 Chladni-Platte
6 Stimmgabel, 1700 Hz
7 Stimmgabel, 440 Hz
8 Schreibstimmgabel, 21 Hz
9 Federwaage
10 Halteklammer
11 Tischklemme
12 Helmholtz-Resonator
Ø 70 mm
Ø 52 mm
Ø 40 mm
Ø 34 mm
13 Glasrohr für offene Luftsäule
14 Kundt’sche Röhre
15 Glasrohr für geschlossene Luftsäule
16 Stiel zu Chladni-Platte/ Glockenschale
17 Galtonpfeife
18 Schreibstift mit Halter
19 Lykopodiumpulver
20 Kunststoffklotz zu Tischklemme
21 Gummikappe
22 Glockenschale
23 Zungenpfeife
24 Lippenpfeife
25 Stahlsaite
26 Perlonsaite
27 Wellenseil
28 Abstimmschieber
2
Page 3

3. Technische Daten
Abmessungen: ca. 530 x 375 x 155 mm3
Masse: ca. 4,5 kg
4. Versuchsbeispiele
1. Saitentöne
• Die mäßig gespannte Saite des Monochords mit
dem Finger kräftig anzupfen.
• Dann durch Rechtsdrehen des Wirbels die
Saitenspannung erhöhen und abermals anzupfen.
Man vernimmt zuerst einen tiefen, anschließend
einen höheren Ton.
Erklärung: Schwingende Saiten erzeugen durch
abwechselnde Verdichtung und Verdünnung der
umgebenden Luft akustische Töne. Je höher die
Saitenspannung, desto schneller die Schwingung
und desto höher der Ton.
2. Der reine akustische Ton
• Die Stimmgabel (440 Hz) kräftig mit dem An-
schlaghammer des Metallophons anschlagen.
Man vernimmt einen reinen akustischen Ton ganz
bestimmter, unveränderlicher Tonhöhe, der langsam ausklingt.
Erklärung: Die Stimmgabel besteht aus einem
U-förmig gebogenen Stahlstück, das im Scheitelpunkt (Bogen) in einen Stiel übergeht. Da die
Stimmgabel nur in einer Schwingungsform zu
schwingen vermag (gegenläufige Bewegung der
Zinken von innen nach außen und umgekehrt)
erzeugt sie einen reinen Ton unveränderlicher
Höhe. Wegen der unveränderlichen Tonhöhe verwendet man die Stimmgabel zum Stimmen der
Musikinstrumente.
3. Schwingende Luftsäulen
• Das Glasrohr für geschlossene Luftsäule mittels
Tischklemme, Kunststoffklotz und Halteklammer am Arbeitstisch befestigen.
• Den Abstimmschieber in das Glasrohr einfüh-
ren.
• Die Stimmgabel (440 Hz) kräftig mit dem An-
schlaghammer des Metallophons anschlagen.
Durch mehr oder weniger starkes Ausziehen
des Abstimmschiebers die Länge der "geschlossenen Luftsäule" verändern.
Nur in einer Stellung des Abstimmschiebers kommt
die Luftsäule in starke Mitschwingung (Resonanz),
in allen anderen Stellungen bleibt sie stumm. Die
Resonanz ist durch eine Überhöhung der Lautstärke wahrnehmbar.
Erklärung: Geschlossene Luftsäulen kommen in
Mitschwingung, wenn ihre Länge einem Viertel der
erregenden. Wellenlänge entspricht. Die Stimmgabel schwingt mit 440 Schwingungen in der Sekunde. Nach der Beziehung
ndigkeitngsgeschwiFortplanzu
34000
440
eWellenläng =
s/cm
⋅
⋅
s/Schwing
cm,
⋅=
277
Frequenz
beträgt die Wellenlänge des erzeugten Tons 77,2
cm. Eine Viertelwellenlänge ist also 19,3 cm.
Der Abstand des Kolbens von der Rohröffnung
beträgt im Resonanzfall 19,3 cm.
4. Die offene Luftsäule
• Den Versuch mit dem Glasrohr für offene Luft-
säule durchführen.
Die offene Luftsäule von genau der doppelten Länge der geschlossenen kommt bei Vorhalten der
Stimmgabel in Mitschwingung, was durch eine
Überhöhung der Lautstärke wahrnehmbar ist.
Erklärung: Offene Luftsäulen kommen in Mitschwingung, wenn ihre Länge einer halben Wellenlänge oder einem Vielfachen einer halben Wellenlänge entspricht. An den Enden der offenen Luftsäule bilden sich Schwingungsbäuche, in der Mitte
ein Schwingungsknoten.
5. Die Lippenpfeife
• Die Lippenpfeife anblasen und durch Auszie-
hen des Stempels die Pfeifenlänge verändern.
Man vernimmt je nach Pfeifenlänge einen mehr
oder weniger tiefen Ton charakteristischer Klangfarbe.
Erklärung: Beim Einblasen eines gleichmäßigen
Luftstromes in die Mündung der Pfeife kommt die
in der Pfeifenröhre eingeschlossene Luft dadurch in
Schwingung, dass sich an der Lippe (Schneide) in
regelmäßiger Folge Luftwirbel ablösen. Der sich
ergebende Ton hängt von der Länge der Luftsäule
ab. Bei der geschlossenen Pfeife entspricht die
Pfeifenlänge (gemessen von der Schneidenkante bis
zum Boden) im Grundton einer Viertelwellenlänge.
An der Schneide bildet ich ein Bauch und am Boden ein Knoten.
6. Schwingende Stäbe
• Einige Stäbe des Metallophons mit dem beige-
gebenen Anschlaghammer anschlagen.
Beim Anschlagen der Metallstäbe entstehen wohlklingende Töne ganz charakteristischer Klangfarbe.
Je kürzer der Stab, desto höher der Ton.
Erklärung: Elastische Stäbe werden zu schwingungsfähigen Systemen, wenn sie an den Punkten
ihrer Schwingungsknoten aufliegen (etwa 22% der
Gesamtlänge von den Enden entfernt).
3
Page 4

7. Infraschall
• Die Schreibstimmgabel durch gleichzeitiges
Zusammendrücken beider Zinken und plötzliches Loslassen in Schwingung versetzen.
Die Stimmgabel führt langsame, mit dem Auge
noch gut wahrnehmbare Schwingungen aus. Wird
sie dicht ans Ohr gehalten, so vernimmt man einen
sehr tiefen (gerade noch hörbaren) Ton.
Erklärung: Die Zinken der Stimmgabel schwingen
gegenläufig hin und her und erzeugen in dar umgebenden Luft Verdichtungen und Verdünnungen.
Treffen diese auf das Ohr, so wird das Trommelfell
in Mitschwingung versetzt. Man hört einen Ton.
Die Stimmgabel schwingt mit etwa 20 Schwingungen in der Sekunde hin und her. Der tiefste, gerade
noch hörbare Ton hat etwa 16 Schwingungen in
der Sekunde. Schwingungen unter 16 Hertz sind
nicht mehr hörbar. Man bezeichnet sie als Infraschall (lat. infra = unterhalb).
8. Ultraschall
• Die Galtonpfeife anblasen.
Man vernimmt keinen Ton mehr sondern nur ein
zischendes Geräusch.
Ergebnis: Wegen ihrer geringen Länge erzeugt die
Galtonpfeife sehr hohe Töne, die für den Menschen
nicht mehr hörbar sind. Man bezeichnet sie als
Ultraschall (lat. ultra = über).
9. Die Schreibstimmgabel
• An den Zinken der Schreibstimmgabel den
Schreibstift befestigen.
• Die Stimmgabel durch Zusammendrücken der
Zinken in Schwingung versetzen und mit dem
Schreibstift gleichmäßig über ein Blatt Papier
auf einer nicht zu weichen Unterlage fahren.
Der Schreibstift zeichnet auf dem Papier eine wellenförmige Linie gleichbleibender Wellenlänge,
aber abnehmender Amplitude auf.
Erklärung: Schall entsteht durch periodische
Schwingung fester, flüssiger oder luftförmiger Körper. Der geometrische Ort der schwingenden Teilchen des Körpers in Abhängigkeit von der Zeit liegt
auf einer Wellenlinie (Sinuslinie). Bei einmaligem
Anstoß führen schwingende Körper eine "gedämpfte" Schwingung aus (stetige Abnahme der Amplitude). Erfolgt die Energiezufuhr dauernd (Dauerton
einer Autohupe, dauernd angeblasene Orgelpfeife),
so erhalten wir eine ungedämpfte Schwingung
gleichbleibender Amplitude (= Lautstärke).
10. Fortschreitende Wellen
• Die Schlaufe des Wellenseils durch einfaches
Verknoten an einer Türklinge befestigen.
• Das Seil mäßig straff spannen und mit der
Hand eine ruckartige, seitliche Bewegung ausführen.
Vom Bewegungszentrum (Hand) ausgehend, löst
sich eine Welle ab, die mit bestimmter Fortschreitungsgeschwindigkeit am Seil entlang läuft, am
festen Ende reflektiert wird und wieder zum Ausgangspunkt zurückkehrt.
Erklärung: Jeder feste, flüssige und luftförmige
Körper führt bei plötzlicher Erschütterung Schwingungen aus, die sich mit einer bestimmten Fortpflanzungsgeschwindigkeit im schwingenden Medium ausbreiten.
11. Dopplereffekt
• Die Leichtmetall-Stimmgabel (1700 Hz) kräftig
mit dem Anschlaghammer des Metallophons
anschlagen, sie kurze Zeit still halten und sie
dann in der Luft rasch hin und her schwenken.
In ruhendem Zustand erzeugt die Stimmgabel
einen kräftigen Ton gleichbleibender Höhe. In
bewegtem Zustand ändert sich die Tonhöhe dauernd. Erfolgt die Bewegung auf das Ohr zu, so erhöht sich der Ton, erfolgt sie vom Ohr weg, so erniedrigt er sich.
Erklärung: Durch den sich verringernden Abstand
der Schallquelle vom Ohr verkürzt sich der zeitliche
Abstand zweier Verdichtungen, da die 2. Verdichtung einen kürzeren Weg zum Ohr hat als die erste.
Das Ohr nimmt eine höhere Frequenz wahr. Der
Ton wird höher. Bei der Entfernung der Schallquelle vom Ohr werden die zeitlichen Abstände zwischen den Verdichtungen und Verdünnungen verlängert. Der Ton wird tiefer.
12. Chladni’sche Klangfiguren
• Die Chladni-Platte mittels Tischklemme und
Kunststoffklotz am Arbeitstisch befestigen. Die
Platte mit Vogelsand oder ähnlichem bestreuen, so dass dieser in dünner Schicht ein Drittel
der Platte bedeckt.
• Die Platte nun mit einem gut kollophonierten
Geigenbogen genau in der Mitte zwischen zwei
Ecken anstreichen unter gleichzeitiger, leichter
Berührung einer Ecke mit dem Finger der anderen Hand.
• Platte mehrmals kräftig anstreichen, so dass sie
in lebhafte, gut hörbare Schwingung gerät.
Beim Anstreichen der Platte vernimmt man einen
ganz bestimmten akustischen Ton. Die Sandkörner
geraten an manchen Stellen in lebhafte Mitschwingung, tanzen auf der Plattenoberfläche auf und
nieder und lagern sich in eigenartigen Klangfiguren
auf der Oberfläche ab.
Erklärung: Auf der Platte bilden sich "stehende
Wellen" aus. Die Platte schwingt beim Anstreichen
nicht einfach als Ganzes auf und nieder sondern
4
Page 5

⋅
gerät an bestimmten Stellen (den Bäuchen) in
Schwingung, während sie an anderen Stellen (den
Knoten) völlig ruht. Durch Berührung der Platte an
einer Ecke wurde an dieser Stelle ein Knoten erzwungen.
13. Glockenschwingungen
• Die Glockenschale mit der Öffnung nach oben
mittels Tischklemme und Kunststoffklotz am
Arbeitstisch befestigen.
• Den Rand der Glocke an verschiedenen Stellen
mit dem Anschlaghammer anschlagen (alternativ mit dem Geigenbogen anstreichen).
Die Tonhöhe hängt von der Anschlagstelle ab. Es ist
ohne weiteres möglich Unterschiede von einem
ganzen Ton zu erhalten. Wird die Glocke an bestimmten Stellen angeschlagen, so werden beide
Töne angeregt und man erhält die bekannten
„Schwebungen“ (periodisches An- und Abschwellen
der Lautstärke in mehr oder weniger rascher Folge).
Erklärung: Glocken sind verformte schwingende
Platten. Die Obertöne sind meist nicht harmonisch
zum Grundton. Auch Glocken teilen sich durch
Knotenlinien in einzelne schwingende Abteilungen.
14. Stehende Wellen
• Die Schlaufe des Wellenseils durch einfaches
Verknoten an einer Türklinge befestigen.
• Das Seil mäßig straff spannen und mit der
Hand langsame, kreisförmige Bewegungen
durchführen.
• Dann das Seil straffer spannen und die Kreis-
bewegungen schneller werden lassen.
Bei langsamer Bewegung entstehen an den Enden
des Seils jeweils Knoten und in der Mitte ein
Bauch. Bei schnellerer Bewegung entstehen 3 Knoten und 2 Bäuche und bei noch schnellerer Bewegung 4 Knoten und 3 Bäuche.
Erklärung: Durch die Reflexion an der Tür bilden
sich stehende Wellen aus. Wegen der Trägheit des
Auges sieht. man die ursprüngliche und die reflektierte Welle scheinbar gleichzeitig.
In der Grundschwingung schwingt das Seil in seiner
ganzen Länge in Form einer Halbwelle auf und
nieder. In der Mitte ist ein Bauch, an beiden Enden
sind Knoten. In der 1. Oberschwingung (Oktave)
schwingt das Seil in Form einer ganzen Welle (2
Bäuche und 3 Knoten). In der 2. Oberschwingung
haben wir 3 Bäuche und 4 Knoten usw.
15. Obertöne
• Die Lippenpfeife mit dem Mund zuerst
schwach und dann sehr stark anblasen.
Man vernimmt zuerst den Grundton und bei stärkerem Anblasen einen wesentlich höheren Ton.
Erklärung: Bei der gedackten Pfeife müssen sich
stehende Wellen stets in der Weise ausbilden, dass
sich am Boden ein Knoten und an der Schneide ein
Bauch befindet. Dies ist der Fall, wenn die Länge
der Pfeife genau 1/4 Wellenlänge entspricht. Es ist
aber auch der Fall, wenn die Entfernung der Öffnung vom Boden 3/4, 5/4, 7/4 usw. der Wellenlängen beträgt.
Neben dem Grundton entstehen also auch sämtliche ungeradzahligen Obertöne der harmonischen
Tonreihe in mehr oder weniger starkem Maße.
Nur dem mehr oder weniger starken Auftreten von
Obertönen ist es zuzuschreiben (und zu verdanken), dass jedes Musikinstrument eine ganz charakteristische Klangfarbe hat.
16. Messung der Wellenlänge
• Das Ende der genau 45 cm langen Kundt’schen
Röhre mit der Gummikappe verschließen und
mit einem Teelöffel eine kleine Menge Lykopodiumpulver in die schräg gehaltene Röhre
füllen, so dass sich eine nicht zu große Menge,
gleichmäßig verteilt, als feines gelbes Band in
der Röhre befindet.
• Glasrohr mittels Halteklammer, Tischklemme
und Plastikklotz am Arbeitstisch befestigen.
• Die Stimmgabel (1700 Hz) an einem Hammer-
stiel sehr kräftig anschlagen und einen Zinken
breitseits dicht vor die Rohröffnung halten.
Diese Schallanregung eventuell mehrmals wiederholen!
Das Lykopodiumpulver kommt an den Schwingungsbäuchen in lebhafte Mitschwingung, während
es an den Knoten völlig in Ruhe bleibt. Die Pulverteilchen fallen auf den Grund des Rohres und bilden dort periodische Anhäufungen, die sich längs
der Rohrachse 4 1/2 Mal wiederholen.
Erklärung: Die Leichtmetall-Stimmgabel hat eine
Frequenz von 1700 Schwingungen in der Sekunde.
Nach der einfachen Beziehung
keiteschwindiglgSchal
340
1700
eWellenläng =
s/m
⋅
Hz
20
⋅=
m,
Frequenz
beträgt die zugehörige Wellenlänge 20 cm. In eine:
Röhre von 45 cm Länge "passen" also 4½ Halbwellen oder 2 volle und eine Viertelwellenlänge, wie
der Versuch es zeigte. An der Öffnung der Röhre ist
immer ein Bauch, am Boden immer ein Knoten.
5
Page 6
17. Der Resonanzboden
• Die Stimmgabel a’ = 440 Hertz kräftig mit dem
Anschlaghammer des Metallophons anschlagen
und mit ihrem Stiel auf die Tischplatte stellen.
Der in freier Luft kaum hörbare Ton der Stimmgabel wird durch das Aufstellen auf die Tischplatte so
sehr verstärkt, dass er nunmehr im ganzen Raum
deutlich vernehmbar ist.
Erklärung: Durch den auf- und abschwingenden
Stiel der Stimmgabel wird die Tischplatte in Mitschwingung versetzt. Da die wirksame Tischfläche
wesentlich größer ist als die der Stimmgabel, wird
die Lautstärke des Tons erheblich verstärkt.
18. Der Resonanzkasten
• Die Stimmgabel a' = 440 Hertz kräftig anschla-
gen und mit ihrem Stiel auf den Resonanzkas-
ten des Monochords stellen.
Es tritt eine bedeutende Verstärkung des Tons ein.
Erklärung: Wie bei Versuch 17.
19. Der Kugelresonator
• Die Helmholtz-Resonatoren der Reihe nach mit
der kleinen Spitze ans Ohr halten.
Man vernimmt einen Ton, der umso tiefer ist je
größer der Durchmesser des Resonators ist.
Erklärung: Jeder gleichwie gestaltete Hohlraum
(Röhre, Hohlkugel) hat eine ganz bestimmte, nahezu obertonfreie Grundschwingung Diese Grundschwingung kann man erregen, wenn der Hohlraum an seiner Öffnung angeblasen oder auch nur
mit dem Fingerknöchel gegen den Hohlraum geklopft wird. Die Eigenschwingung wird aber auch in
erster Linie dann erregt, wenn im umgebenden
Lärm Töne enthalten sind, die mit der Grundschwingung des Resonators übereinstimmen. So
kann man mit dem Kugelresonator ein Klanggemisch auf seinen Gehalt an Teiltönen prüfen.
Herrscht in einem Raum absolute Stille, so bleibt
der Resonator stumm.
20. Die Saiteninstrumente und ihre Gesetze
• Den Quersteg hochkant unter die Saite des
Monochords schieben so dass die rechte Kante
genau mit der Zahl 20 der Maßskala zusam-
menfällt und die 40 cm lange Saite in zwei
gleich lange Abschnitte von je 20 cm Länge un-
terteilt wird.
• Die halbe Saitenlänge durch Anziehen des
Wirbels auf die Stimmgabel (440 Hz) a’ (Kam-
merton) abstimmen.
• Durch Anzupfen oder besser Anstreichen der
Saite die Tonhöhen bei 40 cm, 20 cm, 10 cm
und 5 cm Saitenlänge vergleichen.
Bei 20 cm Saitenlänge erhält man den Kammerton
a’ = 440 Hertz, bei 40 cm Saitenlänge den um eine
Oktave tieferen Ton a = 220 Hertz, bei 10 cm Saitenlänge den um eine Oktave höheren Ton a’’ = 880
Hertz und bei 5 cm Saitenlänge den um 2 Oktaven
höheren Ton a’’’ = 1760 Hertz.
Erklärung: Bei der doppelten Saitenlänge erhält
man einen um eine Oktave tieferen Ton, bei der
halben Saitenlänger die 1. und bei 1/4 Saitenlänge
die 2. Oktave. Die Frequenzen von Saiten verhalten
sich umgekehrt wie ihre Längen.
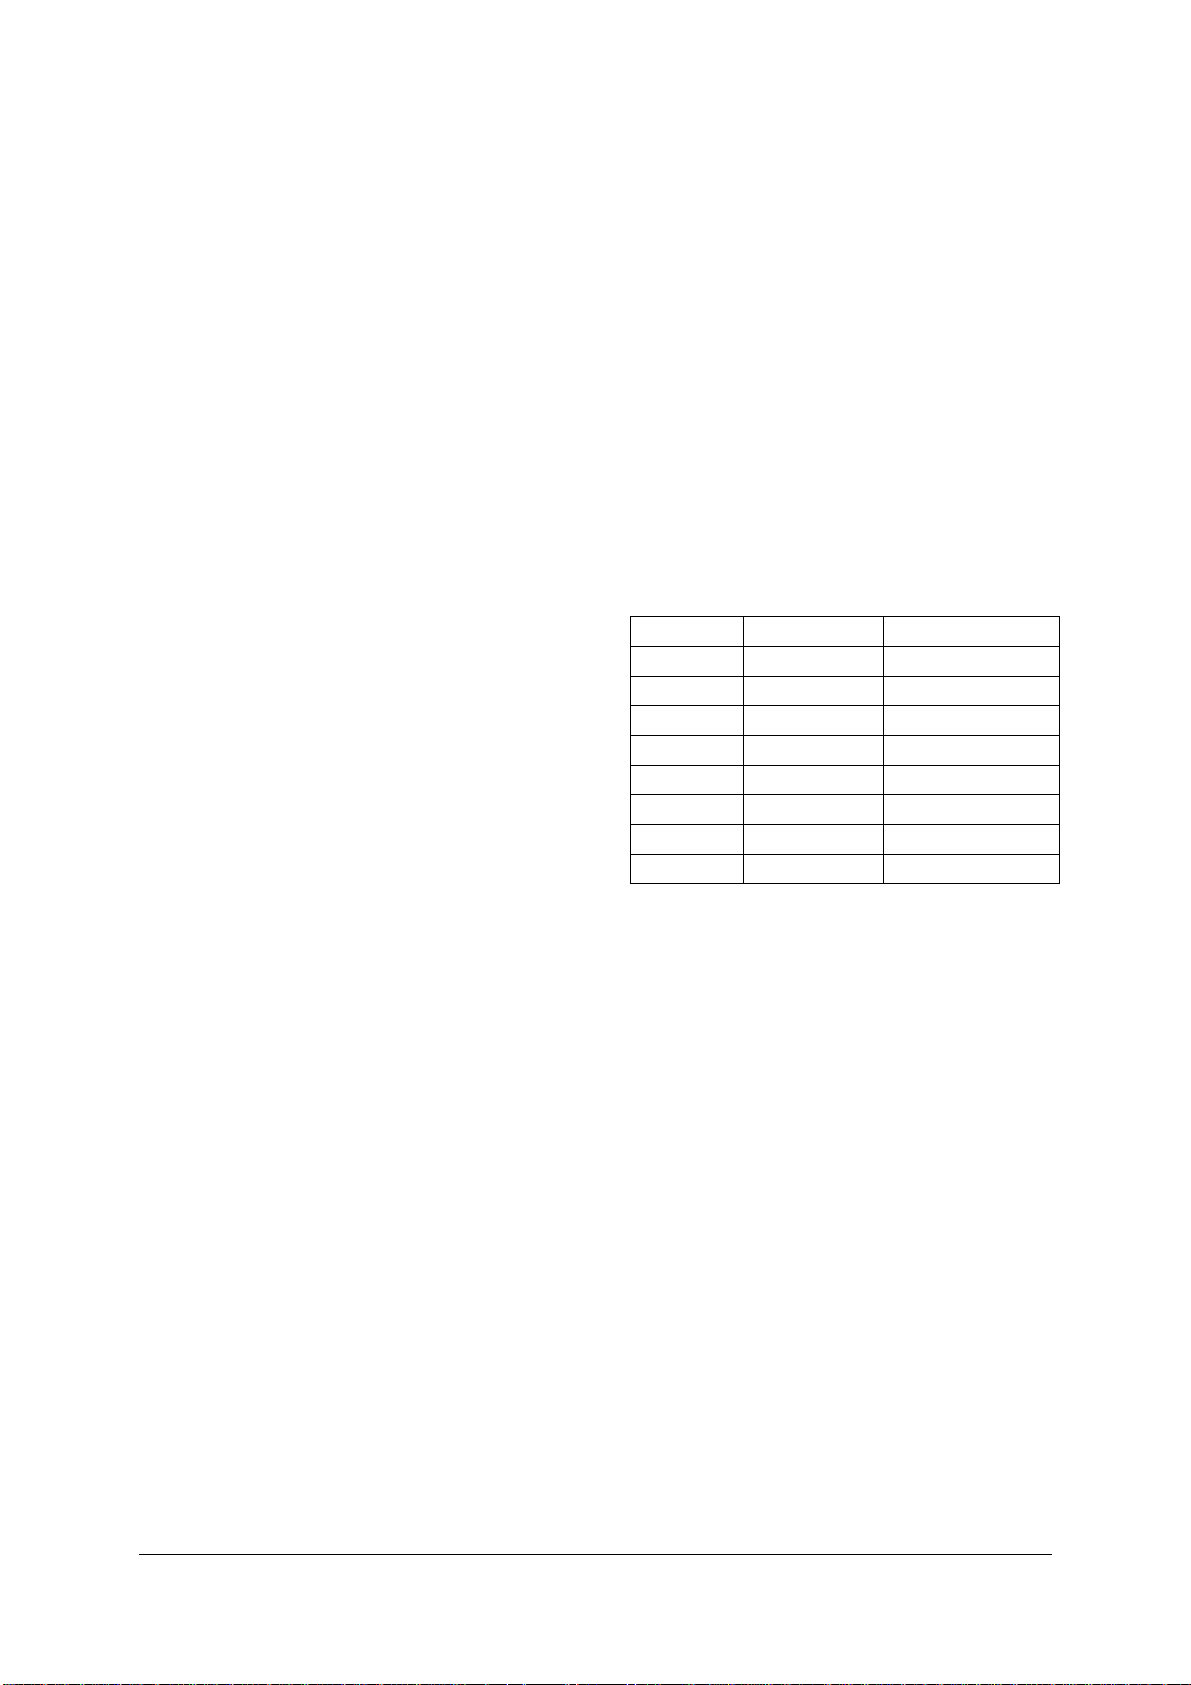
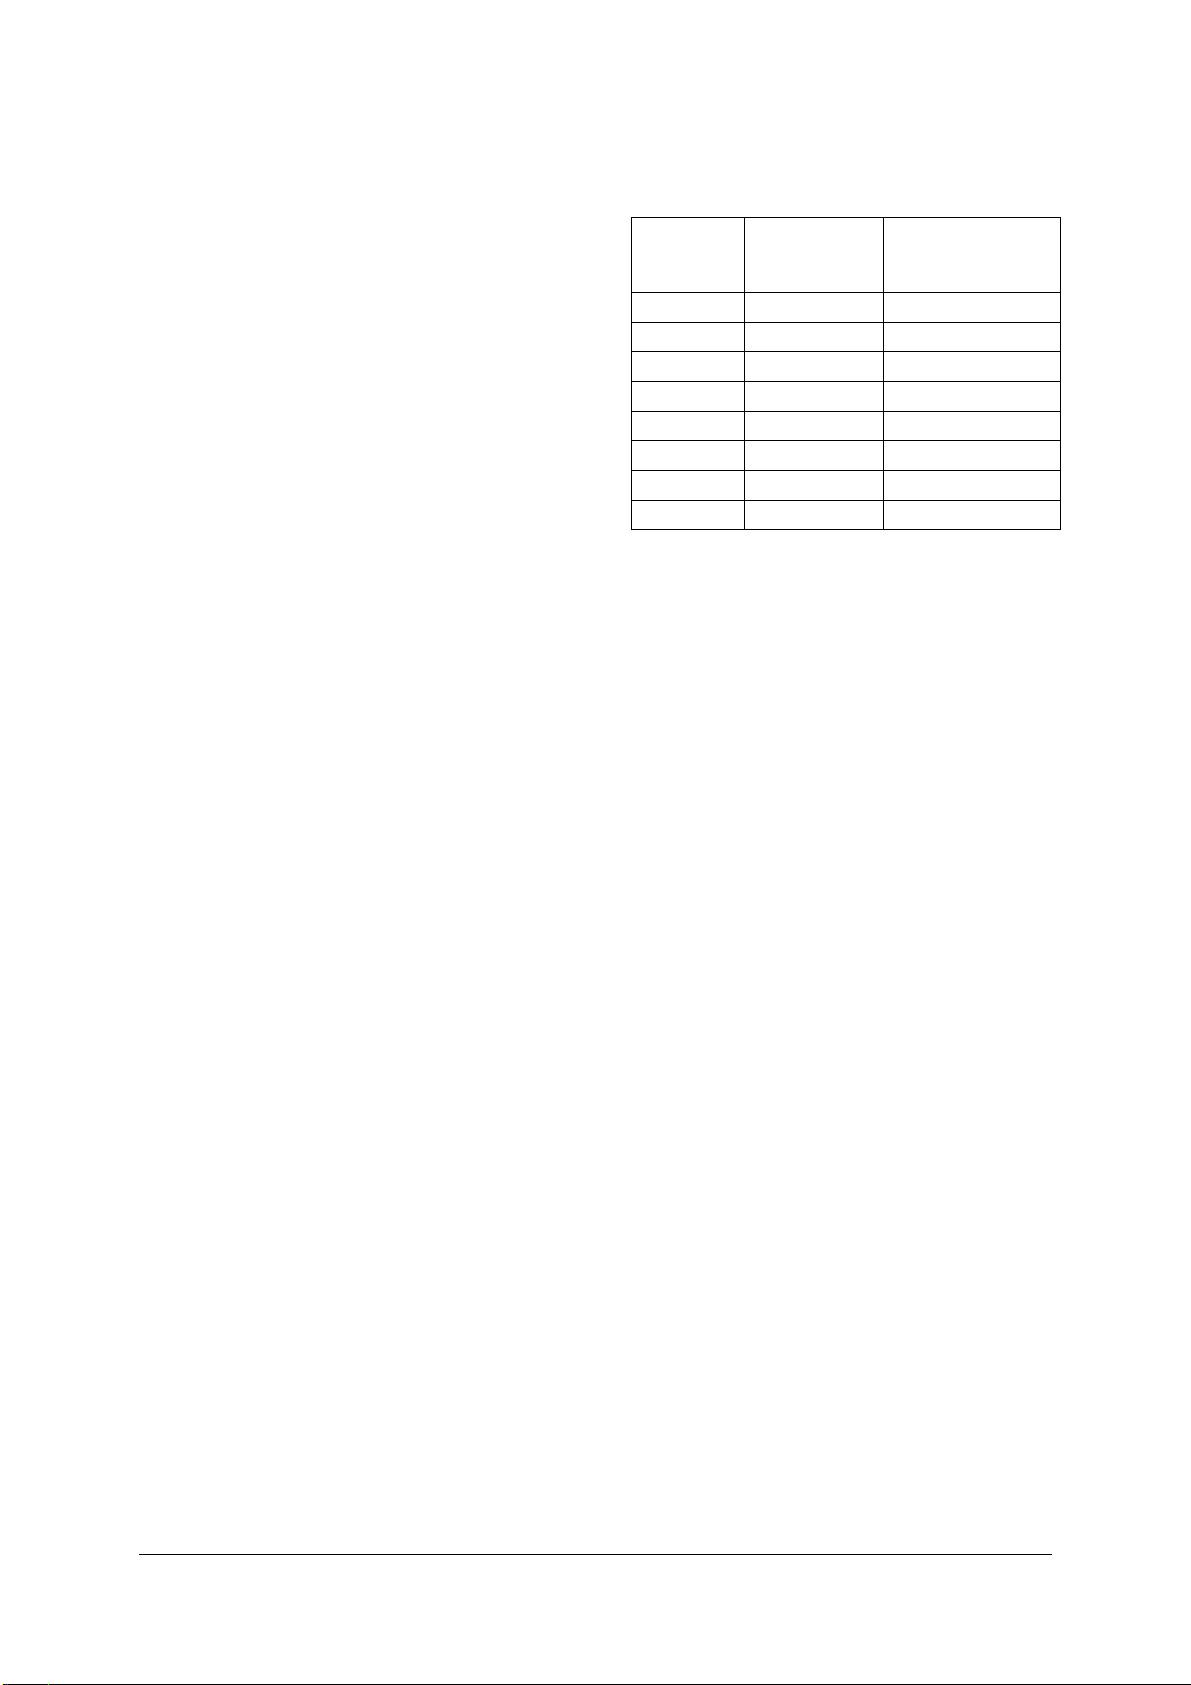
21. Die Tonleiter auf den Saiteninstrumenten
• Auf dem Monochord durch Verschieben des
Quersteges die dem menschlichen Ohr einge-
-
prägte
Tonleiter spielen und jeweils die Längen
des schwingenden Saitenstückes und das Verhältnis des schwingenden Saitenstückes zur Gesamtlänge der Saite (40 cm) ermitteln.
Ton Saitenlänge Längenverhältnis
c 40 cm 1
d 35,55 cm 8/9
e 32 cm 4/5
f 30 cm 3/4
g 26,66 cm 2/3
a 24 cm 3/5
h 21,33 cm 8/15
c’ 20 cm 1/2
Erklärung: Die Saite muss halb so lang sein, wenn,
unter sonst gleichen Bedingungen wie Saitenspannung, Saitendicke usw., die Oktave erreicht werden
soll. Bei den übrigen Tönen der Tonleiter ergeben
sich für das Verhältnis der schwingenden Saitenlängen zur ganzen Saitenlänge einfachste Verhältniszahlen. Je kleiner diese Zahlen sind, desto besser ist der Wohlklang. (Oktave 1:2, Quinte c/g 2:3
usw.)
22. Messung der Saitenspannung
• Die Federwaage auf das Monochord aufstecken
und das Ende der Perlonsaite in den Schlitz der
Federwaage einhängen.
• Durch Anziehen des Wirbels die Saite
unter Verwendung der Stimmgabel a’ =
440 Hertz auf den Kammerto n absti mmen.
• Mit der Federwaage die Saitenspannung
bestimmen.
Die Saitenspannung beträgt bei der Perlonsaite 5,5
kg.
6
Page 7

23. Abhängigkeit der Tonhöhe von der Saitenspannung
Ein Ergebnis von Versuch 22 war, dass, um den
Kammerton zu erhalten, die Perlensaite mit 5,5 kg
gespannt werden muss. Wie hoch ist die Saitenspannung bei dem um eine Oktave tiefer liegenden
Ton a (220 Hertz)?
• Den Wirbel lockern, bis der Ton a ertönt.
• Zur Kontrolle den Quersteg unter die Maßzahl
20 (halbe Saitenlänge) setzen und die halb e
Saitenlänge wieder auf den Kammerton abstimmen. Die ganze Saite schwingt dann mit
der halben Frequenz.
Die Saitenspannung geht auf 1,4 kg zurück.
Erklärung: Die Frequenz einer Saite ist proportional
zur Quadratwurzel aus dem spannenden Gewicht.
Wenn die Kraft, welche die Saite spannt, 4x, 9x, 16x
so groß ist, erhöht sich die Frequenz um das 2-, 3und 4-fache. 1/4 von 5,5 ist (rund) 1,4, wie gemessen wurde.
24. Blasinstrumente und ihre Gesetze
• Die Lippenpfeife mit dem Mund anblasen und
durch mehr oder weniger starkes Ausziehen
des Bodens die wirksame Länge der Pfeife ver-
ändern.
Bei kleiner Pfeifenlänge erhält man hohe, bei gro-
ßer tiefere Töne.
Erklärung: Beim Einblasen eines schwachen Luft-
stromes bilden sich stehende Wellen aus, wobei die
Pfeifenlänge einer Viertelwellenlänge entspricht.
Beim Einblasen eines stärkeren Luftstromes entstehen Obertöne, deren Frequenz ein ungeradzahliges
Vielfaches des Grundtones ist.
Bei der offenen Pfeife ist die Grundschwingung
doppelt so groß wie bei der geschlossenen.
25. Die C-Dur-Tonleiter und ihre Intervalle
• Zur Bestimmung der Intervalle wird jeweils die
höhere Frequenz durch die nächst niedrigere
geteilt.
Für das Intervall d/c =1188/1056 ist der gemeinsa-
me Teiler 132 man erhält also 9/8, 10/9, 16/15, 9/8,
10/9, 9/8 und 16/15.
Erklärung: Die Intervalle (Zwischenräume) der
einzelnen Töne der Tonleiter sind nicht gleich groß.
Man unterscheidet große ganze (9/8), kleine ganze
(10/9) und halbe Tonschritte (16/15).
26. Wohlklang und Missklang
• Auf der Zungenpfeife die verschiedensten Zu-
sammenklänge anblasen.
Ausgesprochene Wohlklänge (Konsonanzen) erhält
man bei der Oktave, der Quinte, der Quarte, der
großen und kleinen Terz. Missklänge (Dissonanzen)
sind die Sekunde und die Septime, sowie der Zu-
sammenklang unmittelbar nebeneinander liegender Töne.
27. Der G-Dur-Dreiklang
• Auf der Zungenpfeife die Töne g e d gleichzei-
tig anblasen.
Man vernimmt einen besonders wohlklingenden
Zusammenklang, den man als den G-Dur-Dreiklang
bezeichnet.
Erklärung: Sollen mehrere Töne einen wohlklingenden Zusammenklang, eine Konsonanz, bilden,
so müssen sie es paarweise tun. Der G-DurDreiklang setzt sich aus der großen Terz und der
kleinen Terz zusammen. Die Frequenzen der Töne
g h d stehen untereinander in einem besonders
einfachen Verhältnis und zwar 4:5:6.
Um dieses Zahlenverhältnis zu erhalten, müssen
die auf der Zungenpfeife angegebenen Grundfrequenzen jeweils durch 6 geteilt werden. (Um die
physikalisch korrekten Frequenzen zu erhalten,
müssen die aufgedruckten Grundfrequenzen mit 33
multipliziert werden).
Zwischen Zungenpfeife und Metallophon kann
zudem fertigungsbedingt eine Abweichung der
Stimmung hörbar sein.
28. Der vierstimmige G-Dur-Dreiklang
• Den G-Dur-Dreiklang durch die Oktave g' er-
gänzen. Also gleichzeitig g h d’ g’ spielen.
Man erhält den besonders vollen und wohlklingenden "vierstimmigen G-Dur-Dreiklang".
Erklärung: Im vierstimmigen Dreiklang sind folgende Konsonanzen enthalten:
Die Oktave 1:2
Die Quinte 2:3
Die große Terz 4:5
Die kleine Terz 5:6
29. Die Dur-Tonleiter mit beliebigem Grundton
• Auf dem Metallophon zuerst die C-Dur-
Tonleiter, beginnend mit c, anschließend die
G-Dur-Tonleiter, beginnend mit g, spielen.
Die C-Dur-Tonleiter von c' bis c" erklingt klangrein.
Bei der mit g' beginnenden G-Dur-Tonleiter tritt bei
f" ein schwerer Fehler auf. Der Ton ist um einen
halben Tonschritt zu tief.
Erklärung: Nach Versuch 25 müssen bei jeder Tonleiter folgende Intervalle auftreten:
9/8, 10/9 16/15, 9/8, 10/9, 9/8, 16/15.
Bei der Tonfolge g'...g" stehen auf der Grundplatte
des Metallophons aber folgende Intervalle:
10/9, 9/8, 16/15
, 9/8, 10/9, 16/15, 9/8
Die unterstrichenen Intervalle sind richtig, die
übrigen mehr oder weniger falsch.
7
Page 8

Die Intervalle 9/8 und 10/9 liegen einander aber so
nahe, dass sie nur schwer voneinander zu unterscheiden sind, daher ist der Fehler von g' bis h'
belanglos. Schwerwiegend dagegen ist der Fehler
zwischen e" und f". Hier beträgt das Intervall
16/15, während es in Wirklichkeit 9/8 betragen
sollte. Man hört daher f" um einen halben Ton zu
tief.
30. Einschaltung der Halbtonschritte
• Auf der Zungenpfeife die Tonleiter von g' bis g"
spielen, nachdem vorher sicher gestellt wurde,
dass der Ton a' der Zungenpfeife tatsächlich
auf den Kammerton abgestimmt ist. Dazu
Stimmgabel anschlagen und vergleichen.
Auf der Zungenpfeife ertönt die G-Dur-Tonleiter
völlig klangrein.
Erklärung: Anstelle des Tones f' ist ein neuer Ton,
das fis' eingeschaltet, der so berechnet ist,
dass das Intervall zwischen e’ und fis’ 9/8 und
das zwischen fis’’ und g’’ 16/15 beträgt. Dies geschieht dadurch, dass man die Frequenz des f
durch Multiplikation mit 25/24 erhöht.
Die durch Erhöhung der Töne hervorgerufenen
neuen Töne heißen: cis, dis, eis, fis, gis, ais, his.
Die Erhöhung wird in der Notenschrift durch ein
vorgesetztes Kreuz bezeichnet.
Die um einen halben Ton niedrigeren Töne erhält
man durch Multiplikation des höheren Tones
mit 24/25. Diese Töne werden in der Notenschrift
durch ein vorgesetztes b gekennzeichnet. Sie heißen: ces, des, es, fes, ges, as, b.
Mit nur geringen Fehlern werden auf dem Klavier
die Töne cis und des usw. einander gleichgesetzt.
Elwe Didactic GmbH • Steinfelsstr. 6 • 08248 Klingenthal • Deutschland • www.elwedidactic.com
3B Scientific GmbH • Rudorffweg 8 • 21031 Hamburg • Deutschland • www.3bscientific.com
Technische Änderungen vorbehalten
© Copyright 2009 3B Scientific GmbH
Page 9

3B SCIENTIFIC
Instruction sheet
05/09 ELWE/ALF
®
PHYSICS
Acoustics Kit U8440012
1. Description
This set of apparatus makes it possible to impart an
extensive and well-rounded overview on the topic
of acoustics. The set can be used for conducting
numerous experiments.
Sample experiments:
1. String tones
2. Pure acoustic tones
3. Vibrating air columns
4. Open air column
5. Whistle
6. Vibrating rods
7. Infrasound
8. Ultrasound
9. Tuning fork with plotter pen
10. Progressive waves
11. Doppler effect
12. Chladni figures
13. Chimes
14. Standing waves
15. Overtones
16. Measurement of wavelength
17. Soundboard
18. Resonator box
19. Spherical cavity resonator
20. Stringed instruments and the laws they obey
21. Scales on stringed instruments
22. Measurement of string tension
23. Relation between pitch and string tension
24. Wind instruments and the laws they obey
25. C major scale and its intervals
26. Harmony and dissonance
27. G major triad
28. Four-part G major chord
29. Major scales in an arbitrary key
30. Introduction of semitones
The set is supplied in a plastic tray with a foam
insert that facilitates safe storage of the individual
components.
1
Page 10
2. Contents
1 Trays with foam inserts for acoustics kit
2 Monochord
3 Bridge for monochord
4 Metallophone
5 Chladni plate
6 Tuning fork, 1700 Hz
7 Tuning fork, 440 Hz
8 Tuning fork with plotter pen, 21 Hz
9 Spring balance
10 Retaining clip
11 Table clamp
12 Helmholtz resonators
70 mm dia.
52 mm dia.v
40 mm dia.
34 mm dia.
13 Glass tube for open air column
14 Kundt’s tube
15 Glass tube for closed air column
16 Rod for Chladni plate/bell dome
17 Galton whistle
18 Plotter pen with holder
19 Lycopodium powder
20 Plastic block for clamp
21 Rubber top
22 Bell dome
23 Reed pipe
24 Whistle
25 Steel string
26 Nylon string
27 Resonance rope
28 Plunger
2
Page 11

3. Technical data
Dimensions: 530 x 375 x 155 mm3 approx.
Weight: 4.5 kg approx.
4. Sample experiments
1. String tones
• Pluck the monochord string hard when it is
moderately taut.
• Subsequently increase the tension on the string
by turning the peg to the right. Pluck the string
again.
At first, a low tone is heard. As the string is tight-
ened the tone gets higher.
Reasons: vibrating strings generate acoustic tones
by inducing alternating compression and rarefaction of the surrounding air. The greater the tension
in the string, the faster the vibrations are and the
higher the tone.
2. Pure acoustic tones
• Hit the 440 Hz tuning fork hard with the metal-
lophone beater.
A pure acoustic tone of a very specific, unchanging
pitch can be heard. This tone dies away very slowly.
Reasons: a tuning fork consists of a U-shaped steel
piece which merges into the stem at its vertex. As
the tuning fork only vibrates in one oscillation
mode (with both prongs either both moving apart
or both moving towards one another), it produces a
pure tone of an unchanging pitch. Owing to its
property of producing a constant pitch, tuning
forks are used for tuning musical instruments.
3. Vibrating air columns
• Attach the glass tube for demonstrating a
closed air column by means of the table clamp,
plastic block and retaining clip.
• Insert the tuning plunger into the glass tube.
• Hit the 440 Hz tuning fork hard with the metal-
lophone beater. By pulling out the plunger to a
greater or lesser degree it is possible to alter
the length of the closed air column.
There is only one plunger position at which the air
column resonates strongly. At any other position
there is no sound. Resonance can be detected by
the increase in sound volume.
Reasons: a closed air column starts resonating
when its length corresponds to one quarter of the
excitation wavelength. The tuning fork vibrates
with a frequency of 440 vibrations per second.
Applying the following equation:
Wavekength =
⋅
⋅
scm
/34000
pagationSpeedofpro
Frequency
sfreqExciting
/440
cm
⋅=
2.77
the wavelength of the tone produced is 77.2 cm.
One quarter of this wavelength is therefore
19.3 cm.
The distance between the plunger and the opening
at the end of the tube is 19.3 cm when resonance
occurs.
4. Open air column
• Conduct the same experiment with an open air
column (14).
The open air column, which is exactly double the
length of the closed air column, starts resonating
when the tuning fork is brought into its vicinity, as
can be heard by means of the increased volume.
Reasons: an open air column starts resonating
when its length is half that of the wavelength or
multiples of that length. Antinodes are formed at
the ends of the open air column and a node at the
middle.
5. Whistle
• Blow the whistle and change its length by
gradually drawing out the plunger.
Depending on the length of the whistle, its note
gets higher or lower but the character or timbre of
the note remains the same.
Reasons: blowing a uniform air stream into the
opening of a whistle causes the air trapped in the
pipe to vibrate and eddies then occur at regular
intervals air the air passes over the blade. The
resulting tone depends on the length of the air
column. In the case of a closed air column, the
length of the whistle (measured from the edge of
the blade to the base of the whistle) corresponds to
a quarter wavelength of the base tone. A node is
formed at the blade of the whistle and an antinode
is formed at the end of the pipe
6. Vibrating bars
• Use the striking hammer supplied to strike
several bars of the metallophone. When the
metal bars are struck, they produce a distinct,
melodious note, each of which has a similar
timbre. The shorter the length of the bar, the
higher the tone.
Reasons: elastic rods form systems capable of oscillating if they are resting upon a point where a node
is formed (about 22% of the total length between
the two ends).
3
Page 12

7. Infrasound
• Without the plotter pen attached, make the
tuning fork (21 Hz) vibrate by pressing its
prongs together and suddenly releasing them.
The tuning fork produces slow vibrations that can
be perceived by the naked eye. When held close to
the ear, a very deep (barely audible) tone can be
heard.
Reasons: the prongs of the tuning fork vibrate in
opposite directions and give rise to compressions
and rarefactions in the surrounding air. When this
reaches the ear, it makes the eardrum vibrate. A
tone is thus perceived.
The tuning fork vibrates at approximately 20 vibrations per second. The lowest note that can be perceived by human hearing has a frequency of approximately 16 vibrations per second. Vibrations
below 16 Hz are not audible to the human ear. The
sound produced by these vibrations is called infrasound. (Latin: infra = below).
8. Ultrasound
• Blow the Galton whistle.
No sound can be heard, simply a hiss.
Reasons: owing to its short length, the Galton whis-
tle produces very high tones which are not audible
to the human ear. This phenomenon is called ultrasound. (Latin: ultra = above).
9. Tuning fork with plotter pen
• Attach the pen (8) to the prongs of the tuning
fork (21 Hz).
• Make the tuning fork vibrate by pressing the
prongs together and move a sheet of paper as
uniformly as possible under the pen so that the
motion is plotted onto it. Make sure that the
surface on which the paper rests is not too soft.
The pen traces a wavy line of a constant wave-
length but decreasing amplitude on the paper.
Reasons: sound is produced by harmonic oscilla-
tions of solids, liquids or gases. The locus of the
oscillating particles of the body in relation to the
time traces a sine curve. When struck once, vibrating bodies exhibit a “damped” oscillation (continuous decrease in amplitude). If the supply of energy
is uninterrupted (constant sound of a car horn,
constant blowing of an organ pipe), the result is an
undamped oscillation of constant amplitude (loudness or volume).
10. Progressive waves
• Make a simple knot in the resonance rope and
attach it by the loop to the handle of a door.
• Make the wire moderately taut and jerk it
suddenly to the side.
From the centre of motion (the hand), a wave is
produced which runs along the wire with an increasing velocity, gets reflected at the fixed end
and returns to the point of origin.
Reasons: every solid, liquid and gas produces vibrations when disturbed suddenly. These vibrations
spread through a medium with a definite propagation velocity.
11. Doppler effect
• Strike the light-metal tuning fork (1700 Hz)
hard with the metallophone beater. Hold it
still for a short while and then rapidly move it
to and fro through the air.
In a state of rest, the tuning fork produces a clear
tone of uniform pitch. In a state of motion, the
pitch constantly changes. If the tuning fork is
moved towards the ear, the pitch rises, and if it is
moved away from the ear, the pitch decreases.
Reasons: when the distance between the source of
sound and the ear is decreasing, the time interval
between two compressions also decreases as a
second compression has to travel a shorter distance
to reach the ear compared to the first. The ear
registers a higher frequency. The tone thus gets
higher. When the source of sound is moved away
from the ear, the intervals between compressions
and rarefactions get longer. The tone thus becomes
deeper.
12. Chladni figures
• Use the table clamp and plastic block to attach
the Chladni plate to the workbench. Scatter
some bird sand or a similar material onto the
plate. Allow it to spread in a thin layer so as to
cover a third of the plate.
• With one hand, bow the plate exactly half way
between two corners with a good violin bow,
simultaneously touching one other corner
lightly with the finger of your other hand.
• Bow several strokes across the plate, preferably
quite forcefully so that the vibrations of the
plate are vigorous and well audible.
When the plate is being bowed, a very distinct
acoustic tone can be heard. At certain points, the
grains of sand experience lively resonance and
begin to bounce up and down on the surface of the
plate, accumulating in unusual figures on the surface.
Reasons: “standing waves” are formed on the plate.
When bowed, the plate does not vibrate uniformly
across its surface. At certain points (antinodes), the
plate begins to vibrate, whereas it is in a state of
complete rest at other points (nodes). By touching
the plate at one corner, the point is forced into
being a node.
4
Page 13

13. Chimes
Hz
⋅
• Secure the bell dome to the bench with its
open end facing upwards using the table
clamp and plastic block.
• Strike the edge of the bell at different points
with a hammer. (Alternatively, the edges can
also be bowed with a violin bow.)
The pitch depends on the point at which the bell
has been struck. It is easily possible to obtain differences of a whole tone. If the bell is struck at
definite points, both tones are excited and the
result is a familiar “beating” (periodic increase and
decrease in volume at varying speeds).
Reasons: bells are curved vibrating plates. The
overtones are mostly not in harmony with the
fundamental tone. Bells too exhibit specific vibrating regions while they are chiming
14. Standing waves
• Make a simple knot in the resonance wire and
attach it by the loop to the handle of a door.
• Make the wire moderately taut and gently
move it round in circles.
• Now make the wire tighter and spin it faster.
When moved gently, nodes arise at both ends of
the wire and an antinode is created in the middle
of the wire. When moved faster, three nodes and
two antinodes are formed, and when moved even
faster, four nodes and three antinodes are formed.
Reasons: owing to the reflection at the door handle, standing waves are formed. Due to persistence
of vision, the original and reflected waves appear
to be simultaneous. In its fundamental mode, the
whole of the wire vibrates in one length, thus describing one half-wave. One antinode is observed in
the middle of the wire with nodes at both ends. In
the case of a first harmonic (octave), the wire vibrates describes the form of a complete wave (two
antinodes and three nodes); for the second harmonic, there are three antinodes and 4 nodes; and
so on.
15. Overtones
• First blow the whistle gently, then blow it very
hard.
Initially, a fundamental tone is heard. When the
whistle is blown hard, a much higher tone can be
heard.
Reasons: since the whistle is closed at one end
standing waves are always formed with a node at
the base and an antinode at the blade opening.
This is the case when the length of the whistle is
exactly 1/4 of the wavelength. It is also the case if
the distance of the opening from the base is 3/4,
5/4, 7/4, etc. of the wavelength.
Apart from the fundamental tone, all the possible
odd overtones or harmonics from the harmonic
series are produced at varying degrees of intensity.
The fact that every musical instrument has a very
characteristic timbre can be attributed solely to the
presence of individual harmonics of this kind appearing to a greater or lesser degree.
16. Measurement of wavelength
• Seal off the end of the 45-cm glass tube (21)
with the rubber cap and, holding the tube at
an angle, put a small quantity of lycopodium
powder into the tube using a teaspoon. Carefully spread a moderate quantity of the powder
uniformly to form a fine yellow strip in the
tube.
• Attach the glass tube by means of the retaining
clip, table clamp and plastic block.
• Strike the tuning fork (1700 Hz) hard on the
handle of the hammer and hold one prong directly alongside the opening of the tube. If
necessary, repeat this acoustic excitation several times.
At the antinodes, the lycopodium powder begins to
resonate strongly, whereas it is absolutely static at
the nodes. The powder particles fall to the base of
the tube and form periodic clusters that repeat 4½
times along the axis of the tube.
Reasons: the light-metal tuning fork has a frequency of 1700 vibrations per second. According to
the following equation:
Wavelength =
sm
⋅
/340
1700
Speed
Frequenncy
m
⋅=
2.0
The corresponding wavelength is 20 cm. Thus, 4½
half-waves or 2 full waves and one quarter wave can
“fit” in a 45-cm-long tube, as demonstrated in the
experiment. At the opening of the tube, there is
always an antinode and there is always a node at
the base of the tube.
17. Soundboard
• Hit the tuning fork that produces the note
a’ = 440 Hertz hard using the metallophone
beater and push the stem down onto the table
top.
Simply by holding it on the table, the barely audible tone produced by the tuning fork is amplified
to such an extent that it is now clearly heard
throughout the room.
Reasons: owing to the rising and falling vibrations
in the shaft of the tuning fork, the surface of the
table begins to resonate. Since the effective table
surface is much larger than the tuning fork, the
loudness of the tone is considerably intensified.
5
Page 14
18. Resonator box
• Strike the A tuning fork (440 Hz) nice and hard
and place its stem on the resonator box of the
monochord.
There is a significant amplification of the tone.
Reasons: as explained in experiment 17.
19. Spherical cavity resonator
• One by one, bring the narrow tip of each of the
Helmholtz resonators close to your ear.
You hear a tone which gets deeper as the diameter
of the resonator becomes greater.
Reasons: every hollow space, regardless of its
shape, e.g. pipes, hollow spheres, has a very specific resonant frequency which is almost lacking
overtones. This harmonic can be produced by
blowing air across the opening of the hollow space
or simply by tapping the hollow space with your
knuckles. However, natural resonance is also created if the surrounding noise possesses tones which
match the harmonic of the resonator. In this way,
the spherical cavity resonator can be used to identify individual components of a mixed sound. If the
room is absolutely quiet, the resonator remains
silent.
20. String instruments and the laws they obey
• Insert the bridge vertically below the string of
the monochord so that its right edge exactly
coincides with the number 20 on the scale and
the 40-cm string is divided into two equal sec-
tions of 20 cm each.
• By tightening the peg, tune half the length of
the string to match the A tuning fork (440 Hz)
(standard pitch).
• By plucking, or preferably by bowing the
string, compare the pitch for string lengths of
40 cm, 20 cm, 10 cm and 5 cm.
For a string length of 20 cm, the note matches the
standard concert pitch A' = 440 Hz. For a string
length of 40 cm, the pitch is one octave lower at
A = 220 Hz. For length 10 cm, the pitch is one
octave higher A’’ = 880 Hz. Finally, when the length
of the string is 5 cm, the pitch is two octaves higher
A’’’ = 1760 Hz.
Reasons: when the string is twice as long, the pitch
is lowered by one octave. When string length is half
the length it is one octave higher and when the
length of the string is reduced to a quarter, the
note rises to the second octave. The frequency of a
string vibration is inversely proportional to the
string's length.
21. Scales on stringed instruments
• By moving the bridge, play the musical scale
that is tuneful to the human ear. In each case,
calculate the ratio of the vibrating section of
the string to the total length of the string
(40 cm).
Tone String length Ratio of the string
length to the total
length of the string
C 40 cm 1
D 35.55 cm 8/9
E 32 cm 4/5
F 30 cm 3/4
G 26.66 cm 2/3
A 24 cm 3/5
B 21.33 cm 8/15
C’ 20 cm 1/2
Reasons: under consistent conditions (e.g. string
length, string thickness, etc.), the sound is an octave higher when the string length is halved. In the
case of the other tones on the musical scale, the
relation between the vibrating section of the
string’s length and its total length also forms simple ratios. The smaller the ratio, the more pleasing
the harmony (octave 1:2, fifth C/G 2:3, etc.).
22. Measurement of string tension
• Attach the spring balance onto the monochord
and insert the end of the nylon string into the
eye of the spring balance.
• Pull the peg and, using the A' tuning
fork (440 Hz), tune the string to standard pitch.
• Use the spring balance to determine the ten-
sion of the string.
The string tension in the case of a nylon string is
5.5 kg.
23. Relation between pitch and string tension
One of the results of experiment 22 was that in order
to obtain a standard pitch, the tension on the nylon
string needs to be 5.5 kg. How much tension should
be applied in order to obtain a pitch that is one
octave lower (A = 200 Hz)?
• Loosen the peg till you hear the pitch of A.
• To make sure this is right, place the bridge
under the string at 20 cm on the scale (i.e. half
the total length of the string) and tune this
half-of the string to standard pitch. Removing
the bridge, the whole string will vibrate at half
the frequency.
The string tension has been reduced to 1.4 kg.
Reasons: the frequency of the string is proportional
to the square root of the tension. If the tensile
force on the string is higher by a multiple of 4, 9,
16, etc., the frequency is increased two-fold, three-
6
Page 15
fold, four-fold, etc. As measured earlier, 1/4 of 5.5
is 1.4 (rounded up).
24. Wind instruments and the laws they obey
• Blow the whistle. You can change the effective
length of the whistle by moving the plunger.
When the length is short, the whistle produces a
high tone and when it is longer, it produces a lower
tone.
Reasons: when a weak air current passes through
the whistle, standing waves are produced. In this
case, the length of the whistle corresponds to a
quarter wave length. When a strong air current
passes through the whistle, overtones are produced
whose frequency is an odd multiple of the fundamental tone.
In the case of an open whistle, the first harmonic is
twice the frequency of that for a closed whistle.
25. C major scale and its intervals
• To determine the intervals, the higher fre-
quency is divided by the lower frequency.
For the interval D/C = 1188/1056, the common
divisor is 132. We thus get ratios of 9/8, 10/9,
16/15, 9/8, 10/9, 9/8 and 16/15.
Reasons: the intervals between the individual tones
of a musical scale are not equal. Intervals can be
distinguished into the major tone (9/8), minor tone
(10/9) and half-tone (16/15).
26. Harmony and dissonance
• Play all possible combinations on the reed
pipe.
Pleasing harmonies (consonances) are produced at
the octave, the fifth note, the fourth, the major
third and minor third. Discordant notes (dissonances) emerge between the second and seventh
notes. The combination of tones produced by two
neighbouring tones is also called dissonance.
27. G major triad
• Simultaneously blow notes G, B and D on the
reed pipe.
A highly melodious combination is heard. This
combination of notes is termed the G major triad.
Reasons: consonance is produced if several notes
produce a melodious combination of pairs. The G
major triad is formed as a combination of the major third and the minor third. The frequencies of
the notes G, Band D have a very simple ratio to one
another, viz. 4:5:6.
In order to derive this ratio, the fundamental frequencies specified on the reed pipe should each be
divided by 6.
(To obtain a physically correct frequency, the fundamental frequencies printed on the pipe need to
be multiplied by 33).
It is also possible for the tuning of the reed pipe
and metallophone to differ audibly due to manufacturing processes.
28. Four-part G major chord
• Add to the G major triad the G’ octave as well.
To achieve this, simultaneously play G, B, D
and G’.
The result is a full and melodious “four-part G
major chord”.
Reasons: a four-part major chord features the fol-
lowing consonances:
Octave 1:2
Fifth 2:3
Major third 4:5
Minor third 5:6
29. Major scales in an arbitrary key
• First play the C major scale on the metallo-
phone. Begin with C. Subsequently play a simi-
lar scale starting from G.
A C major scale from C’ to C’’ sounds pleasantly
consonant. If you try to play a similar scale starting
at G’, though, there is a definite dissonance at F’’.
The note is a semitone too low.
Reasons: according to experiment 25, the following
intervals must be exhibited in every scale:
9/8, 10/9 16/15, 9/8, 10/9, 9/8, 16/15
For the sequence of notes G’…G’’, however, the
following intervals are specified on the base plate
of the metallophone:
10/9, 9/8, 16/15
, 9/8, 10/9, 16/15, 9/8
The underlined intervals are correct, the others are
incorrect in this sense.
The intervals 9/8 and 10/9 are so close to one another that it is extremely difficult to distinguish
between them. Hence, the divergence from the
ideal between G’ and B’ is irrelevant. However, the
“imperfection’ between E’’ and F’’ is easily noticeable. In this case, an interval of 16/15 occurs instead of 9/8. The F’ note is therefore a semitone too
deep.
30. Producing half-tones
• On the reed pipe, play the scale from G’ to G’’
making sure that the A’ note of the reed pipe is
genuinely tuned to standard pitch. Use the
tuning fork to compare the pitch.
A G major scale on the reed pipe is pleasantly con-
sonant.
Reasons: instead of the F’ note, a completely new
note, F#, is introduced. The interval between F’
7
Page 16

and F#’ is 9/8 and the interval between F#’’ and G’
is 16/15. This is achieved by taking the frequency of
the F note and increasing it by multiplying it by
25/24.
The new notes produced by sharpening the tones
are called C#, D#, F#, G# and A#. (E# and B# are
equivalent to F and C respectively).
This sharpening is denoted in musical notation by
a sharp sign appearing on the clave before the
note.
Flat notes, which are a semitone lower than the
conventional notes are produced by multiplying
the latter by 24/25. These notes are denoted in
musical notation by a flat sign preceding the note
on the clave. The new flat notes are called Db, Eb,
Gb, Ab and Bb.
In the tempered scale used on a piano, the notes
C# and Db, D# and Eb, F# and Gb etc. respectively
are played using the same key, since in each case
they are close enough to being identical.
Elwe Didactic GmbH Steinfelsstr. 6 08248 Klingenthal Germany www.elwedidactic.com
3B Scientific GmbH • Rudorffweg 8 • 21031 Hamburg • Germany • www.3bscientific.com
Subject to technical amendments
© Copyright 2009 3B Scientific GmbH
Page 17

3B SCIENTIFIC
Ensemble Acoustique U8440012
Instructions d'utilisation
05/09 ELWE/ALF
®
PHYSICS
1. Description
Le jeu d’appareils de l’uníté didacticielle Acoustique
permet l’enseignement de connaissances générales
complètes sur le thème de l’acoustique. L’unité
didacticielle permet de réaliser de nombreuses
expériences.
Exemples d’applications :
1. Sons de cordes
2. Le pur son acoustique
3. Colonnes d’air vibrantes
4. Colonne d’air ouverte
5. Sifflet à bec
6. Barres vibrantes
7. Infrasons
8. Ultrasons
9. Diapason avec pointe d’enregistrement
10. Ondes progressives
11. Effet Doppler
12. Figures de Chladni
13. Oscillations de cloches
14. Ondes stationnaires
15. Sons harmoniques
16. Mesure de la longueur d’onde
17. Fond de résonance
18. Caisse de résonance
19. Résonateur sphérique
20. Principes des instruments à cordes
21. Gammes des instruments à cordes
22. Mesure de la tension des cordes
23. Rapport entre lhauteur du son et tension de
corde
24. Principes des instruments à vent
25. La gamme en do majeur et ses intervalles
26. Consonnance et dissonance
27. Accord parfait en sol majeur
28. Accord parfait en sol majeur à quatre voix
29. Gamme majeure avec n’importe quel son
fondamental
30. Interposition des demi-tons
Livraison sur un plateau en plastique équipé
d’inserts en mousse protégeant chacune des pièces
pendant leur stockage.
1
Page 18

2. Fournitures
1 Plateau avec insert en mousse pour ensemble
acoustique
2 Sonomètre
3 Barrettes pour sonomètre
4 Métallophone
5 Plaque de Chladni
6 Diapason, 1700 Hz
7 Diapason, 440 Hz
8 Diapason avec pointe d’enregistrement, 21 Hz
9 Balance à ressort
10 Clip de fixation
11 Pince étau de table
12 Résonateurs de Helmholtz
Ø 70 mm
Ø 52 mm
Ø 40 mm
Ø 34 mm
13 Tube de verre pour colonne d’air ouverte
14 Tube de Kundt
15 Tube de verre pour colonne d’air fermée
16 Tige pour plaque de Chladni / dôme de cloche
17 Sifflet de Galton
18 Crayon avec support
19 Poudre de lycopode
20 Bloc en matière plastique pour pince étau de
table
21 Capuchon en caoutchouc
22 Dôme de cloche
23 Tuyau à anche
24 Sifflet à bec
25 Cordes en acier
26 Cordes en perlon
27 Corde vibrante
28 Curseur de syntonisation
2
Page 19

=
⋅
3. Caractéristiques techniques
Dimensions : env. 530 x 375 x 155 mm3
Masse : env. 4.5 kg
4. Exemples d’expériences
1. Sons de cordes
• Pincer vigoureusement avec le doigt la corde
moyennement tendue du sonomètre.
• Augmenter la tension de la corde en tournant
la cheville à droite et pincer à nouveau cette
dernière.
On perçoit tout d’abord un son grave puis un son
plus aigu.
Explication : les cordes vibrantes produisent des
sons acoustiques du fait de la compression et de la
raréfaction alternatives de l’air ambiant. Plus la
corde est tendue plus l’oscillation est rapide et plus
le son est aigu.
2. Le pur son acoustique
• Faites fortement vibrer le diapason (440 Hz) en
utilisant le marteau du métallophone.
On perçoit un son acoustique pur de hauteur de
son spécifique et invariable qui s’atténue
lentement.
Explication : le diapason est composé d’un morceau
d’acier courbé en U relié à une tige au point
culminant (coude). Etant donné que le diapason ne
vibre que selon un certain mode d’oscillations
(mouvement contraire des branches de l’intérieur
vers l’extérieur et inversement), il produit un son pur
de hauteur invariable. On utilise le diapason pour
accorder les instruments de musique en raison de
cette hauteur de son constante.
3. Colonnes d’air vibrantes
• Fixez le tube de verre pour la colonne d'air
fermée sur la table de travail en utilisant la
pince étau de table, le bloc en matière
plastique ainsi que le clip de fixation.
• Introduisez le curseur de syntonisation dans le
tube de verre.
• Faites fortement vibrer le diapason (440 Hz) en
utilisant le marteau du métallophone. Modifiez
la longueur de la « colonne d'air fermée » en
étirant plus ou moins fortement le curseur de
syntonisation.
La colonne d'air ne commence à résonner
(phénomène de résonance) que pour une seule
position du curseur de syntonisation, elle demeure
muette dans toutes les autres positions prises par
ce curseur. La résonance est perceptible par une
croissance de l'intensité sonore.
Explication : les colonnes d’air fermées
commencent à osciller lorsque leur longueur
correspond à un quart de la longueur d’onde
d’excitation. Le diapason vibre à un rythme de 440
vibrations par seconde. Selon l’équation
Longueurd' onde
34000 cm / s
⋅
440 Oscilations / s
Vitessede propagation
=
Frécuence
⋅
77,2 cm
la longueur d’onde du son produit est de 77,2 cm.
Le quart de la longueur d’onde correspond donc à
19,3 cm.
En présence d'un phénomène de résonance, la
distance entre le piston et l'ouverture du tube est
de 19,3 cm.
4. Colonne d’air ouverte
• Réaliser l’expérience avec le tube de verre (14)
à colonne d’air ouverte.
La colonne d’air ouverte dont la longueur est
exactement le double de celle de la colonne
fermée commence également à osciller lorsqu’on
tient un diapason à son ouverture, ce qui est
perceptible par une croissance de l'intensité
sonore.
Explication : les colonnes d’air commencent à
osciller lorsque leur longueur correspond à une
demi-longueur d’onde ou à un multiple de demilongueur d’onde. Des ventres d’oscillation se
forment aux extrémités de la colonne d’air ouverte
tandis qu’un noeud d’oscillation apparaît au
milieu.
5. Sifflet à bec
• Souffler dans le sifflet à bec et modifier la
longueur du sifflet en sortant le piston.
Suivant la longueur du piston, on perçoit un son
plus ou moins grave au timbre caractéristique.
Explication : en soufflant un courant d’air régulier
dans l’ouverture du sifflet, l’air enfermé dans le
corps du sifflet se met à vibrer de telle sorte que
des tourbillons d’air se détachent du bec (biseau) à
intervalles réguliers. Le son produit dépend de la
longueur de la colonne d’air. Pour le sifflet fermé,
la longueur de sifflet (mesurée à partir du bord du
biseau jusqu’au fond) correspond au son
fondamental d’un quart de longueur d’onde. Sur
l’arête se forme une surface ventrale et sur le fond
un nœud.
6. Barres vibrantes
• Frapper quelques barres du métallophone au
moyen du marteau de percussion fourni.
La percussion des barres métalliques au moyen du
marteau génère des sons harmonieux au timbre
très caractéristique. Plus la barre est courte, plus le
son est aigu.
3
Page 20

Explication : des barres élastiques se transforment
en systèmes mécaniques pouvant vibrer si elles
reposent sur les points de leurs nœuds vibratoires
(à une distance des extrémités égale à environ 22 %
de la longueur totale).
7. Infrason
• Faire osciller le diapason à pointe
d’enregistrement en exerçant une pression
simultanée sur les deux branches et en les
relâchant ensuite brusquement.
Le diapason exécute des oscillations lentes qui sont
encore bien perceptibles à l’œil. En collant le
diapason à l’oreille, on perçoit un son très grave
(encore à peine perceptible).
Explication : les branches du diapason vibrent en
sens opposé dans un va-et-vient et compriment et
raréfient l’air environnant Si ces compressions et
raréfactions tombent dans l’oreille, le tympan se
met à vibrer en même temps. On entend alors un
son.
Le diapason oscille à raison d’environ 20
oscillations à la seconde. Le son le plus grave qui
puissent encore être perçu possède environ 16
oscillations à la seconde. Les vibrations inférieures
à 16 Hertz ne sont plus perceptibles à l’ouïe. On les
désigne sous le terme d’infrasons (en latin infra
signifie en-dessous).
8. Ultrason
• Souffler dans le sifflet de Galton.
On ne perçoit plus aucun son mais seulement un
bruit comparable à un sifflement.
Résultat : en raison de sa longueur réduite, le
sifflet de Galton produit des sons très aigus qui ne
sont plus perceptibles pour l’oreille humaine. On
les désigne sous le terme d’ultrasons (en latin ultra
signifie au-dessus).
9. Diapason avec pointe d’enregistrement
• Fixer le crayon aux branches du diapason à
pointe d’enregistrement.
• Faire osciller le diapason en pressant les
branches l’une contre l’autre et déplacer le
crayon régulièrement sur une feuille de papier
posée sur un support suffisamment rigide.
Le crayon dessine sur le papier une ligne ondulée
constituée de longueurs d’ondes constantes mais
d’amplitude décroissante.
Explication : le son est généré par l’oscillation
périodique de corps solides, liquides ou gazeux. Le
lieu géométrique des particules vibrantes du corps
en fonction du temps se situe sur une ligne
ondulée (la ligne sinusoïde). En cas de choc unique,
les corps vibrants exécutent une oscillation
« amortie » (diminution constante de l’amplitude).
Si l’alimentation en énergie est constante (tonalité
continue d’un klaxon, tuyau d’orge constamment
alimenté en air), nous obtenons une oscillation
non amortie d’amplitude constantes (= puissance
sonore).
10. Ondes progressives
• Nouer la boucle de la corde vibrante à une
poignée de porte.
• Tendre moyennement la corde et exécuter un
mouvement latéral par à-coups avec la main.
Un ondulation est générée à partir du centre du
mouvement (la main) qui parcourt la corde avec
une certaine vitesse de progression, se réfléchit à
l’extrémité fixe et revient au point de départ.
Explication : tout corps solide, liquide et gazeux
génère des oscillations lors d’une secousse
soudaine ; ces oscillations se propagent sur le
support vibrant avec une certaine vitesse de
propagation.
11. Effet Doppler
• Frapper le diapason en métal léger (1700 Hz)
en utilisant le marteau du métallophone, le
maintenir brièvement au repos et l’agiter de
part et d’autre ensuite rapidement dans l’air.
Lorsqu’il est au repos, le diapason produit un son
fort d’une hauteur constante. Lorsqu’il se trouve en
mouvement, la hauteur du son varie constamment.
Si l’on effectue le mouvement en le rapprochant de
l’oreille, le son augmente, si le mouvement est
éloigné de l’oreille, le son diminue.
Explication : la diminution de la distance de la
source sonore par rapport à l’oreille raccourcit
l’intervalle temporel entre deux compressions étant
donné que la 2
ème
compression effectue un parcours
plus court vers l’oreille que la première. L’oreille
perçoit une fréquence plus élevée. Le son devient
plus aigu. Si l’on éloigne la source sonore de
l’oreille, les intervalles de temps entre les
compressions et les raréfactions sont prolongés. Le
son devient plus grave.
12. Figures de Chladni
• Fixer la plaque de Chladni au moyen de la
pince-étau et du bloc en matière plastique au
plan de travail. Répartir du sable anisé ou un
matériau similaire sur la plaque, de façon à ce
que celui-ci recouvre un tiers de la plaque
d’une fine couche.
• Faire glisser un archet de violon bien enduit de
colophane exactement au milieu de deux
extrémités en touchant régulièrement et
légèrement une extrémité avec le doigt de
l’autre main.
• Faire glisser l’archet plusieurs fois avec vigueur
sur la plaque de manière à ce que celle-ci
4
Page 21

commence à produire de fortes vibrations bien
perceptibles.
Lorsque l’archet glisse sur la plaque, on perçoit un
son acoustique très particulier. A certains endroits,
les grains de sable se mettent également à vibrer
fortement et sautent à la surface de la plaque pour
ensuite former des figures sonores étranges à la
surface.
Explication : des « ondes statiques » se forment sur
la plaque. La plaque ne vibre pas simplement dans
son ensemble au contact de l’archet mais se met à
vibrer à certains endroits (les ventres d’oscillation)
alors qu’à d’autres (les nœuds), elle est
complètement inerte. Le contact de la plaque à
une extrémité a provoqué un nœud à cet endroit.
13. Vibrations de cloches
• Fixez le dôme de cloche avec son ouverture
dirigée vers le haut sur la table de travail en
utilisant la pince étau de table ainsi que le bloc
en matière plastique.
• Frapper sur le bord de la cloche à divers
endroits avec le marteau (vous pouvez aussi
utiliser l’archet de violon à cet effet).
La hauteur du son dépend du point d’impact. Il est
tout à fait possible d’obtenir des différences pour
un son entier. Si on frappe sur la cloche à certains
endroits, les deux sons sont activés et l’on obtient
le « battement » bien connu (croissance et
décroissance périodique de l’intensité sonore dans
une succession plus ou moins rapide).
Explication : les cloches sont des plaques vibrantes
déformées. Les sons harmoniques ne sont la
plupart du temps pas en harmonie avec le son
fondamental. Les cloches se répartissent elles aussi
en différentes zones d’oscillations séparées par des
lignes de nœuds.
14. Ondes stationnaires
• Nouer la boucle de la corde vibrante à une
poignée de porte.
• Tendre moyennement la corde et exécuter des
mouvements lents circulaires avec la main.
• Augmenter ensuite la tension de la corde et
augmenter la vitesse des mouvements
circulaires.
Les mouvements lents provoquent l’apparition de
nœuds aux extrémités de la corde et d’un ventre
d’oscillation au milieu. Les mouvements plus
rapides génèrent trois nœuds et 2 ventres
d’oscillation et lorsqu’ils sont encore accélérés 4
nœuds et 3 ventres d’oscillation.
Explication : la réflexion sur la porte entraîne la
formation d’ondes statiques. L’inertie de l’oeil fait
que celui-ci perçoit apparemment l’onde source et
l’onde réfléchie simultanément.
Dans la composante fondamentale, la corde oscille
sur toute sa longueur sous la forme d’une demionde. Un ventre d’oscillation se trouve au milieu et
des nœuds aux deux extrémités. Dans la 1
ère
harmonique (octave), la corde vibre sous la forme
d’une onde entière (2 ventres d’oscillation et 3
nœuds). Dans la 2
ème
harmonique, nous avons 3
ventres d’oscillation et 4 nœuds, etc.
15. Sons harmoniques
• Souffler dans le sifflet à bec avec la bouche,
d’abord faiblement puis fortement.
On perçoit tout d’abord le son fondamental, puis
un son nettement plus aigu lorsque l’on souffle
plus fort.
Explication : pour ce sifflet couvert, des ondes
statiques doivent se former en permanence de
façon à ce que un nœud apparaisse au fond et un
ventre d’oscillation sur l’arête du bec. C’est le cas
lorsque la longueur du sifflet correspond
exactement à 1/4 de longueur d’onde. C’est
également le cas lorsque la distance de l’ouverture
par rapport au fond correspond à 3/4, 5/4, 7/4, etc.
des longueurs d’ondes.
Outre le son fondamental, un grand nombre de
sons harmoniques de nombre impair de la suite
sonore harmonique sont donc également produits
de manière plus ou moins accentuée.
Chaque instrument de musique ne doit son timbre
tout à fait caractéristique qu’à l’apparition plus ou
moins prononcée de sons harmoniques.
16. Mesure de la longueur d’onde
• Obturer l’extrêmité du tube de verre dont la
longueur exacte est de 45 cm avec le capuchon
en caoutchouc et remplir le tube d’une petite
quantité de poudre de lycopode au moyen
d’une cuiller à café en maintenant le tube
incliné, de façon à ce que la poudre soit bien
répartie en petite quantité et forme une fine
bande jaune à l’intérieur du tube.
• Fixez le tube de verre sur la table de travail en
utilisant le clip de fixation, la pince étau de
table ainsi que le bloc en matière plastique.
• Frapper très fortement le diapason (1700 Hz)
sur un manche de marteau et tenir le bord
d’une branche tout près de l’ouverture du
tube. Reproduire éventuellement plusieurs fois
ce son.
La poudre de lycopode se met à vibrer
vigoureusement près des ventres d’oscillation alors
qu’elle demeure complètement inerte aux nœuds.
Les particules de poudre tombent au fond du tube
et forment à cet endroit des amoncellements
périodiques qui se répètent 4,5 fois le long de l’axe
du tube.
5
Page 22

F
Explication : le diapason en métal léger possède
une fréquence de 1700 vibrations à la seconde.
Selon l’équation simple
Longueurd' onde
s/m
⋅
340
Hz
⋅
1700
Vitessedu son
=
récuence
m,
⋅=
20
la longueur d’onde correspondante est de 20 cm.
Dans un tube de 45 cm de long, il est donc possible
« d’emmagasiner » 4½ demi-ondes ou 2 ondes
pleines et un quart d’onde, comme l’a montré
l’expérience. On obtient toujours un ventre
d’oscillation à l’ouverture du tube et un nœud au
fond.
17. Fond de résonance
• Faites fortement vibrer le diapason a’ = 440
Hertz en utilisant le marteau du métallophone
et placez-le sur le plateau de table en utilisant
sa tige.
Le son du diapason à peine perceptible à l’air libre
est à ce point amplifié lorsque le diapason est posé
sur la table qu’on peut à présent l’entendre
clairement dans toute la pièce.
Explication : entraînée par les vibrations amplifiées
et désamplifiées du manche, la table se met à
vibrer. Etant donné que la surface effective de la
table est sensiblement plus grande que celle du
diapason, l’intensité du son s’accroît
considérablement.
18. Caisse de résonance
• Frapper avec force le diapason a’ = 440 Hertz
et le poser sur le manche sur la caisse de
résonnance du sonomètre..
On obtient une amplification significative du son.
Explication : même explication que pour
l’expérience 17.
19. Résonateur sphérique
• Tenir les résonateurs de Helmholtz l’un après
l’autre avec la petite pointe contre l’oreille.
On perçoit un son dont la gravité est
proportionnelle à la taille du diamètre du
résonateur.
Explication : chaque cavité quelle qu’elle soit (tube,
sphère creuse) possède une certaine composante
fondamentale, quasiment exempte de sons
harmoniques. Cette composante fondamentale
peut être activée en soufflant dans la cavité par
l’ouverture de cette dernière ou en frappant
seulement avec le doigt replié contre la cavité.
L’oscillation propre n’est cependant en premier
lieu également activée que lorsque le bruit
environnant contient des sons qui sont en
harmonie avec la composante fondamentale du
résonateur. Le résonateur sphérique permet donc
de vérifier le contenu en sons partiels d’un son.
Lorsqu’un silence absolu règne dans une pièce, le
résonateur demeure muet.
20. Principes des instruments à cordes
• Glisser la barrette sur chant sous la corde du
sonomètre de façon à ce que le bord droit
corresponde exactement au chiffre 20 de
l’échelle de mesure et que la corde de 40 cm
soit divisée en deux sections d’une longueur
égale à 20 cm chacune.
• Accorder la moitié de la longueur de la corde
au diapason (440 Hz) a’ (la du diapason) en
tournant la cheville.
• Comparer les hauteurs du son à 40 cm, 20 cm,
10 cm et 5 cm de longueur de corde en pinçant
la corde ou mieux, en utilisant un archet.
A une longueur de corde de 20 cm, on obtient le
ton-étalon a’ = 440 Hertz, à 40 cm, le ton a = 220
Hertz, plus grave d’un octave, à 10 cm le ton a’’ =
880 Hertz plus haut d’un octave et à une longueur
de corde de 5 cm, le ton a’’’ = 1760 Hertz, plus aigu
de 2 octaves..
Explication : pour une longueur de corde double,
on obtient un ton plus grave d’une octave, pour
une demi-longueur de corde la 1
un quart de longueur de corde, la 2
ère
octave et pour
ème
octave. Les
fréquences des cordes ont un comportement
inversement proportionnel à celui de leurs
longueurs.
21. Gammes des instruments à cordes
• Jouer la gamme connue à l’oreille humaine sur
le sonomètre en déplaçant la barrette et
calculer les longueurs respectives de la section
de corde vibrante et le rapport de cette section
à la longueur totale de la corde (40 cm).
Ton Longueur de
corde
Rapport de
longueur
Do 40 cm 1
Ré 35,55 cm 8/9
Mi 32 cm 4/5
Fa 30 cm 3/4
Sol 26,66 cm 2/3
La 24 cm 3/5
Si 21,33 cm 8/15
Do’ 20 cm 1/2
Explication : la longueur de la corde doit être
réduite de moitié si l’on veut atteindre l’octave
sous les mêmes conditions (tension, épaisseur de la
corde, etc.). Pour les autres tons de la gamme, on
obtient des indices très simples exprimant le
6
Page 23

rapport entre les longueurs de cordes vibrantes et
la longueur total de la corde. Plus ces chiffres sont
petits, plus le son est mélodieux. (Octave 1:2,
Quinte Do/sol 2:3 etc.)
22. Mesure de la tension des cordes
• Placer la balance à ressort sur le sonomètre et
suspendre l’extrêmité de la corde en perlon
dans la fente de la balance.
• Accorder la corde en utilisant le
diapason a’ = 440 Hertz au ton-étalon en
vissant la cheville.
• Déterminer la tension de la corde avec la
balance à ressort.
La tension de la corde est de 5,5 kg pour la corde
en perlon.
23. Rapport entre la hauteur du son et la tension
de la corde
L’expérience 22 a montré que pour obtenir le tonétalon, il fallait tendre la corde en perlon avec 5,5
kg. Quelle est la tension d’une corde pour un ton
La plus grave d’un octave (220 hertz) ?
• Dévisser la cheville jusqu’à ce que le ton se
produise.
• Placer la barrette sous le chiffre 20 (demi-
longueur de corde) pour vérifier et accorder à
nouveau la demi-longueur de corde au tonétalon (la du diapason). La corde entière vibre
alors à la mi-fréquence.
La tension de la corde est passée à 1,4 kg.
Explication : la fréquence d’une corde est
proportionnelle à la racine carrée du poids de
tension. Si la force qui tend la corde est multipliée
par 4, 9, 16, la fréquence augmente du double, du
triple et du quadruple. 1/4 de 5,5 est (environ) égal
à 1,4, comme l’indique la mesure prise.
24. Principes des instruments à vent
• Souffler dans le sifflet à bec avec la bouche et
modifier la longueur effective du sifflet en en
tirant plus ou moins le fond.
Pour une faible longueur de sifflet, on obtient des
sons aigus et pour une longueur plus importante
des sons plus graves.
Explication : si le flux d’air est faible, des ondes
statiques se forment, la longueur du sifflet
correspondant alors à une longueur de quart
d’onde. Si le flux d’air est plus important, on
obtient des sons harmoniques dont la fréquence
est un multiple impair du son fondamental.
Si le sifflet est ouvert, la composante fondamentale
est deux fois plus importante que celle du sifflet
fermé.
25. La gamme en do majeur et ses intervalles
• Pour déterminer les intervalles, il faut diviser
la fréquence la plus élevée par la fréquence la
plus basse la plus proche.
Pour l’intervalle la/do =1188/1056, le
dénominateur commun est 132, on obtient donc
9/8, 10/9, 16/15, 9/8, 10/9, 9/8 et 16/15.
Explication : les intervalles de chaque ton de la
gamme ne sont pas de taille identique. Nous
faisons une distinction entre de grands intervalles
composés de tons entiers (9/8), entre de petits
intervalles composés de tons entiers (10/9) et entre
des intervalles de demi-tons (16/15).
26. Consonnance et dissonance
• Jouer les différents accords sur le sifflet à bec.
On obtient de vraies consonnances pour l’octave, la
quinte, la quarte, la tierce majeure et la tierce
mineure. Les dissonances correspondent à la
seconde et la septième ainsi qu’à l’accord des tons
directement voisins.
27. Accord parfait en sol majeur
• Produire simultanément les tons sol mir ré sur
le sifflet à bec.
On perçoit un accord d’une consonnance particulière
que l’on désigne par accord parfait en sol majeur.
Explication : lorsque plusieurs tons sont supposés
former une consonnance, ils doivent le faire par
paire. L’accord parfait en sol majeur est composé
d’une tierce majeure et d’une tierce mineure. Le
rapport entre les fréquences des tons sol mi ré est
un rapport très simple, à savoir : 4:5:6.
Pour obtenir ce rapport numérique, il faut que les
fréquences fondamentales indiquées sur le sifflet à
bec soient respectivement divisées par 6.
(Les fréquences de base imprimées ont à être
multipliées par 33 afin d'obtenir fréquences
physiquement correctes).
Pour des raisons de fabrication, le tuyau à anche et
le métallophone peuvent en outre se différencier
par un écart de gamme audible.
28. Accord parfait en sol majeur à quatre voix
• Ajouter l’octave sol’ à l’accord parfait en sol
majeur. Jouer donc simultanément sol si do’ sol’.
On obtient « un accord parfait en sol majeur à
quatre voix » particulièrement complet et
consonnant.
Explication : L’accord parfait à quatre voix contient
les consonnances suivantes :
l’octave 1:2
la quinte 2:3
la tierce majeure 4:5
la tierce mineure 5:6
7
Page 24

29. Gamme majeure avec n’importe quel son
fondamental
• Sur le métallophone, jouer d’abord la gamme
en do majeur en commençant par do et
ensuite la gamme en sol majeur en
commençant par sol.
La gamme en do majeur de do’ à do’’ possède un
son pur. Une grave erreur apparaît à fa’ dans la
gamme en do majeur commençant par do’. Le ton
est d’un demi-ton trop grave.
Explication : selon l’expérience n° 25, pour chaque
gamme, il faut avoir les intervalles suivants :
9/8, 10/9 16/15, 9/8, 10/9, 9/8, 16/15.
La succession de tons sol’…sol’’ sur la plaque du
métallophone a cependant les intervalles suivants :
10/9, 9/8, 16/15
, 9/8, 10/9, 16/15, 9/8
Les intervalles soulignés sont corrects, les autres
plus ou moins erronés.
Les intervalles 9/8 et 10/9 sont juxtaposés mais trop
près, de telle sorte qu’ils se distinguent à peine l’un
de l’autre, ce qui explique que l’erreur de sol’ à si'
est peu importante. Par contre, l’erreur entre mi’’
et fa’’ est grave. L’intervalle est ici de 16/15, alors
qu’en réalité, il devrait être de 9/8. C’est la raison
pour laquelle on entend un fa’’ d’un demi-ton trop
grave.
30. Jouer des intervalles de demi-tons
• Jouer la gamme de sol’ à sol’’ sur le sifflet à bec
après s’être assure que le ton la’ du sifflet est
bien accordé avec le la du diapason. Pour cela,
faire vibrer le diapason et effectuer la
comparaison.
La gamme en sol majeur jouée sur le sifflet est
entièrement pure.
Explication : A la place du ton fa’, un nouveau ton
est interposé, le fa dièse’ qui est calculé de manière
à ce que l’intervalle entre mi’ et fis’ soit de 9/8 et
celui entre fa dièse’’ et sol’’ de 16/15. Ceci est dû au
fait que l’on augmente la fréquence du fa en la
multipliant par 25/24.
Les nouveaux tons résultant de l’augmentation des
tons sont appelés : do dièse, ré dièse, mi dièse, fa
dièse, sol dièse, la dièse, si dièse
On signale cette augmentation par l’ajout d’une
croix placée en avant sur la partition.
Les tons plus bas d’un demi-ton sont obtenus en
multipliant le ton plus élevé par 24/25. Ces tons
sont signalés sur la partition par l’ajout d’un b
placé en avant. On les appelle : do bémol, ré
bémol, mi bémol, fa bémol, sol bémol, la bémol, si
bémol.
Les tons do dièse et do bémol, etc. sont assimilés
sur le piano avec un nombre restreint d’erreurs.
Elwe Didactic GmbH ▪ Steinfelsstr. 6 ▪ 08248 Klingenthal ▪ Allemagne ▪ www.elwedidactic.com
3B Scientific GmbH ▪ Rudorffweg 8 ▪ 21031 Hambourg ▪ Allemagne ▪ www.3bscientific.com
Sous réserve de modifications technique
© Copyright 2009 3B Scientific GmbH
Page 25

Fisica 3B Scientific®
Apparecchio didattico per acustica U8440012
Istruzioni per l'uso
05/09 ELWE/ALF
1. Descrizione
Il kit “Apparecchio didattico per acustica” consente
di organizzare una vasta panoramica
sull’argomento acustica realizzando numerosi
esperimenti.
Esempi di esperimenti:
1. Note di una corda
2. La nota acustica pura
3. Colonnine d’aria oscillanti
4. La colonnina d’aria aperta
5. La canna labiale
6. Aste oscillanti
7. Infrasuoni
8. Ultrasuoni
9. Il diapason con punta scrivente
10. Onde progressive
11. Effetto Doppler
12. Figure sonore di Chladni
13. Oscillazioni delle campane
14. Onde stazionarie
15. Armoniche superiori
16. Misurazione della lunghezza d’onda
17. Il fondo di risonanza
18. La cassa di risonanza
19. Il risuonatore sferico
20. Gli strumenti a corda e le loro leggi
21. Le scale sugli strumenti a corda
22. Misurazione della tensione della corda
23. Dipendenza dell’altezza della nota dalla
tensione della corda
24. Gli strumenti a fiato e le loro leggi
25. La scala di do maggiore e i suoi intervalli
26. Armonia e dissonanza
27. L’accordo di terza di sol maggiore
28. L’accordo di terza di sol maggiore a quattro voci
29. La scala maggiore con qualsiasi tonica
30. Inserimento dei mezzi toni
Il kit è fornito in una confezione in plastica con
inserti in espanso per conservare con cura i singoli
componenti.
1
Page 26

2. Fornitura
1 Confezioni con inserto in espanso il kit
“Apparecchio didattico per acustica”
2 Monocordo
3 Asta per monocordo
4 Metallofono
5 Piastra di Chladni
6 Diapason, 1700 Hz
7 Diapason, 440 Hz
8 Diapason con punto scrivente, 21 Hz
9 Bilancia a molla
10 Morsetto di supporto
11 Morsetto da tavolo
12 Risuonatori di Helmholtz
Ø 70 mm
Ø 52 mm
Ø 40 mm
Ø 34 mm
13 Tubo di vetro per colonnina d’aria aperta
14 Tubo di Kundt
15 Tubo di vetro per colonnina d’aria chiusa
16 Asta per piastra di Chladni / calotta della
campana
17 Fischietto di Galton
18 Penna per scrittura con supporto
19 Polvere di licopodio
20 Blocco di plastica per morsetto da tavolo
21 Membrana di gomma
22 Calotta della campana
23 Canna ad ancia
24 Canna labiale
25 Corda di acciaio
26 Corda in perlon
27 Corda per onde
28 Pistone
2
Page 27

3. Dati tecnici
Dimensioni: ca. 530 x 375 x 155 mm3
Peso: ca. 4,5 kg
4. Esempi di esperimenti
1. Note di una corda
• Pizzicare con forza con il dito la corda
moderatamente tesa del monocordo.
• Quindi aumentare la tensione della corda
ruotando il cavicchio verso destra e pizzicarla
di nuovo.
Si percepisce prima una nota bassa, quindi una
nota più alta.
Spiegazione: le corde oscillanti producono note
acustiche provocando delle compressioni ed
espansioni alternate dell’aria circostante.
All’aumentare della tensione della corda cresce la
velocità di oscillazione, e quindi la nota risulta più
alta.
2. La nota acustica pura
• Colpire con forza il diapason (440 Hz) con il
martelletto del metallofono.
Si percepisce una nota acustica pura con altezza
del suono ben definita e invariabile, che si smorza
lentamente.
Spiegazione: il diapason è costituito da un
elemento d’acciaio piegato a forma di U che i
corrispondenza della sommità (arco) si trasforma in
un’asta. Potendo oscillare secondo una sola forma
di oscillazione (movimento opposto dei rebbi
dall’interno verso l’esterno e viceversa), il diapason
produce una nota pura di altezza invariabile. A
causa dell’altezza invariabile della nota prodotta, il
diapason è utilizzato per accordare gli strumenti
musicali.
3. Colonnine d’aria oscillanti
• Fissare il tubo di vetro per colonnina d’aria
chiusa mediante il morsetto da tavolo, il
blocco di plastica e il morsetto di supporto sul
tavolo da lavoro.
• Introdurre il pistone nel tubo di vetro.
• Colpire con forza il diapason (440 Hz) con il
martelletto del metallofono. Variare la
lunghezza della “colonnina d’aria chiusa”
estraendo di più o di meno il pistone.
La colonnina d’aria oscilla (risonanza) in una sola
posizione del pistone, in tutte le altre posizioni
rimane silenziosa. La risonanza è percepibile grazie
all‘aumento del volume.
Spiegazione: le colonnine d’aria chiuse entrano in
oscillazione quando la loro lunghezza corrisponde
a un quarto della. lunghezza d’onda da eccitare. Il
diapason compie 440 oscillazioni al secondo. In
base alla relazione
ondalunghezzad ='
ionedipropagazvelocità
frequenza
scm
⋅
/34000
⋅
la lunghezza d’onda della nota prodotta è pari a
77,2 cm. Pertanto la lunghezza di quarto d’onda è
pari a 19,3 cm.
La distanza del pistone dall’apertura del tubo in
caso di risonanza è pari a 19,3 cm.
4. La colonnina d’aria aperta
• Eseguire l’esperimento con il tubo di vetro (14)
con la colonnina d’aria aperta.
Quando si posiziona il diapason, la colonnina
d’aria aperta entra in oscillazione ad una
lunghezza pari esattamente al doppio di quella
chiusa, il che è percepibile grazie all'aumento del
volume.
Spiegazione: le colonnine d’aria aperte entrano in
oscillazione quando la loro lunghezza corrisponde
a mezza lunghezza d’onda o a un multiplo di
mezza lunghezza d’onda. Alle estremità della
colonnina d’aria aperta si formano dei ventri di
oscillazione, al centro un nodo di oscillazione.
5. La canna labiale
• Soffiare nella canna labiale e variarne la
lunghezza estraendo il pistone.
A seconda della lunghezza della canna si
percepisce una nota più o meno profonda con un
colore del suono caratteristico.
Spiegazione: soffiando un flusso d’aria uniforme
nella bocca della canna l’aria in essa contenuta
entra in oscillazione perché sul bordo (tagliente) si
producono in successione regolare dei vortici d’aria.
La nota prodotta dipende dalla lunghezza della
colonnina d’aria. Con la canna chiusa, la lunghezza
della canna (misurata dal bordo del tagliente al
fondo) corrisponde alla tonica di una lunghezza di
quarto d’onda. In corrispondenza del tagliente si
crea un ventre e sul fondo un nodo.
6. Aste oscillanti
• Percuotere alcune aste del metallofono con il
martelletto in dotazione.
Percuotendo le aste metalliche si producono delle
note armoniche con colore del suono molto
caratteristico. Più corta è l’asta più alta risulta la
nota.
Spiegazione: Le aste elastiche diventano sistemi in
grado di oscillare, se appoggiano sui punti dei loro
soscill
/440
cm
⋅=
2,77
3
Page 28

nodi di oscillazione (circa il 22% dell’intera
lunghezza tra le estremità).
7. Infrasuoni
• Far entrare in oscillazione il diapason con
punta scrivente premendo contemporaneamente i due rebbi uno verso l’altro e
lasciandoli andare all’improvviso.
Il diapason esegue delle oscillazioni lente ma ben
distinguibili a occhio nudo. Avvicinandolo
all’orecchio, si percepisce un suono molto basso
(ma ancora udibile).
Spiegazione: i rebbi del diapason oscillano su e giù
in senso opposto, producendo delle compressioni
ed espansioni dell’aria circostante che, quando
arrivano all’orecchio, determinano un’oscillazione
del timpano: si sente un suono.
Il diapason compie circa 20 oscillazioni al secondo.
La nota bassa ma ancora udibile ha circa 16
oscillazioni al secondo. Le oscillazioni inferiori a 16
Hertz non sono più udibili e sono definite
infrasuoni (lat. infra = sotto).
8. Ultrasuoni
• Soffiare nel fischietto di Galton.
Non si percepisce più un suono, ma solo un sibilo.
Risultato: a causa della sua lunghezza ridotta, il
fischietto di Galton produce suoni troppo alti, non
più udibili dall’uomo. Questi suoni vengono
definiti ultrasuoni (lat. ultra = sopra).
9. Il diapason con punta scrivente
• Fissare la penna per scrittura ai rebbi del
diapason con punta scrivente.
• Far entrare in oscillazione il diapason
premendo i rebbi l’uno contro l’altro, quindi
passare uniformemente con la penna per
scrittura su un foglio di carta posto su un piano
d’appoggio non troppo morbido.
La penna di scrittura disegna sul foglio una linea
ondulata con lunghezza d’onda costante, ma
ampiezza calante.
Spiegazione: l’oscillazione periodica di corpi solidi,
liquidi o aeriformi produce un suono. La posizione
geometrica delle particelle oscillanti del corpo in
funzione del tempo è situata su una linea ondulata
(sinusoide). Nel caso di un unico urto i corpi
oscillanti eseguono un'oscillazione "smorzata"
(diminuzione costante dell’ampiezza). Se l’apporto
di energia è continuo (suono prolungato di un
clacson, canna d’organo suonata in modo
prolungato) si ottiene un’oscillazione non smorzata
di ampiezza costante (= volume).
10. Onde progressive
• Fissare il cappio della corda per onde al
campanello di una porta con un semplice nodo.
• Tendere moderatamente la corda e con la
mano effettuare un brusco movimento laterale.
Un’onda parte dal centro del movimento (la mano),
scorre lungo la corda con una determinata velocità
di propagazione, viene riflessa in corrispondenza
dell’estremità fissa e torna al punto di partenza.
Spiegazione: se scosso all’improvviso, ogni corpo
solido, fluido o aeriforme compie delle oscillazioni
che si propagano nel mezzo oscillante con una
determinata velocità di propagazione.
11. Effetto Doppler
• Battere con forza il diapason in metallo
leggero (1700 Hz) con il martelletto del
metallofono, tenerlo fermo per breve tempo e
quindi muoverlo rapidamente su e giù in aria.
Quando è fermo, il diapason produce una forte
nota di altezza costante. Mentre si muove, l’altezza
della nota varia continuamente. Muovendo il
diapason verso l’orecchio la nota si alza,
allontanandolo dall’orecchio si abbassa.
Spiegazione: al diminuire della distanza tra la
sorgente sonora e l’orecchio l’intervallo temporale
tra le due compressioni diminuisce, perché per
raggiungere l’orecchio la seconda compressione
compie un percorso più breve della prima.
L’orecchio percepisce una frequenza superiore e la
nota diventa più alta. Allontanando la sorgente
sonora dall’orecchio l’intervallo temporale tra le
compressioni e le espansioni si allunga: la nota
diventa più bassa.
12. Figure sonore di Chladni
• Fissare la piastra di Chladni al tavolo di lavoro
utilizzando il morsetto da tavolo e blocco di
plastica. Coprire un terzo della piastra con uno
strato sottile di sabbietta per uccelli o simile.
• Ora sfregare la piastra con un archetto da
violino ben spalmato di colofonia proprio al
centro tra due angoli e contemporaneamente
toccare leggermente un angolo col dito
dell'altra mano.
• Sfregare più volte con forza la piastra in modo
che produca un’oscillazione intensa e ben
udibile.
Sfregando la piastra si percepisce una nota acustico
ben definita. In alcuni punti i granelli di sabbia
oscillano intensamente, danzando su e giù sulla
piastra e raccogliendosi in peculiari figure sonore
sulla sua superficie.
4
Page 29

Spiegazione: sulla piastra si formano delle "onde
stazionarie". Quando la si sfrega, la piastra non
oscilla uniformemente in alto e in basso: in
determinati punti (i ventri) entra in oscillazione,
mentre in altri (i nodi) rimane assolutamente ferma.
Toccando la piastra su un angolo, in tale punto si
produce forzatamente un nodo.
13. Oscillazioni delle campane
• Fissare la calotta della campana nel morsetto
da tavolo con l’apertura rivolta verso l’alto.
• Percuotere in diversi punti il bordo della
campana con il martelletto (in alternativa
sfregarlo con l’archetto da violino).
L’altezza della nota dipende dal punto in cui si
percuote il bordo. Si possono certamente ottenere
differenze di un’intera nota. Percuotendo la
campana in determinati punti si eccitano
entrambe le note ottenendo le famose
“fluttuazioni” (aumento e diminuzione periodica
del volume in una successione più o meno rapida).
Spiegazione: le campane sono piastre oscillanti
forgiate. Nella maggior parte dei casi le armoniche
superiori non sono armoniche rispetto alla tonica.
Anche le campane sono divise in singole sezioni
oscillanti mediante linee nodali.
14. Onde stazionarie
• Fissare il cappio della corda per onde al
campanello di una porta con un semplice nodo.
• Tendere moderatamente la corda ed eseguire
dei lenti movimenti circolari con la mano.
• Quindi tendere maggiormente la corda ed
eseguire dei movimenti circolari più veloci.
Col movimento lento si formano dei nodi in
corrispondenza delle estremità della corda e un
ventre al centro. Col movimento più veloce si
formano 3 nodi e 2 ventri, aumentando ancora la
velocità del movimento otteniamo 4 nodi e 3 ventri.
Spiegazione: con la riflessione sulla porta si creano
delle onde stazionarie. A causa dell’inerzia
dell’occhio sembra di vedere contemporaneamente
l’onda originaria e l’onda riflessa.
Nella prima armonica la corda oscilla su e giù per
la sua intera lunghezza sotto forma di una
semionda. Al centro c’è un ventre, alle due
estremità i nodi. Nella prima armonica (ottava) la
corda oscilla sotto forma di un’onda intera (2 ventri
e 3 nodi). Nella seconda armonica abbiamo 3
ventri e 4 nodi e via di seguito.
15. Armoniche superiori
• Soffiare con la bocca nella canna labiale
dapprima debolmente e poi con molta forza.
Inizialmente si percepisce la tonica, soffiando più
forte una nota nettamente più alta.
Spiegazione: con la canna chiusa, per avere un
nodo sul fondo e un ventre sul tagliente si devono
sempre formare delle onde stazionarie. È il caso in
cui la lunghezza della canna corrisponde
esattamente a 1/4 della lunghezza d’onda. Ma è
anche il caso in cui la distanza tra l’apertura e il
fondo è pari a 3/4, 5/4, 7/4 ecc. delle lunghezze
d’onda.
Oltre alla tonica, quindi, si formano anche in
misura più o meno forte tutte le armoniche dispari
della serie di note armonica.
Il fatto che ogni strumento musicale abbia un suo
colore di suono caratteristico va attribuito (e si
deve) solo al verificarsi di armoniche superiori più
o meno forti.
16. Misurazione della lunghezza d’onda
• Chiudere l’estremità del tubo di vetro lungo
esattamente 45 cm con la membrana di
gomma e, mantenendolo inclinato, con un
cucchiaino da tè versare nel tubo una piccola
quantità di polvere di licopodio in modo che
nel tubo si formi una sottile fascia gialla
uniformemente distribuita.
• Fissare il tubo in vetro al tavolo di lavoro
tramite un morsetto di supporto, un morsetto
da tavolo e un blocco in plastica.
• Battere con molta forza il diapason (1700 Hz)
sul manico di un martello e tenere un rebbio
sul fianco proprio davanti all’apertura del tubo.
Eventualmente ripetere più volte l’operazione!
La polvere di licopodio oscilla intensamente in
corrispondenza dei ventri di oscillazione, mentre
nei nodi resta completamente ferma. Le particelle
di polvere cadono sul fondo del tubo formandovi
cumuli periodici che si ripetono 4 volte e ½ lungo
l’asse del tubo.
Spiegazione: il diapason in metallo leggero ha una
frequenza di 1700 oscillazioni al secondo. In base
alla facile relazione
ondalunghezzad ='
lsuonovelocitàde
frequenza
s/m
⋅
340
Hz
⋅
1700
la relativa lunghezza d’onda è pari a 20 cm. In un
tubo lungo 45 cm, quindi, "ci stanno" 4 semionde e
½ o 2 lunghezze d’onda piene e una lunghezza di
quarto d’onda, come ha mostrato l’esperimento. In
corrispondenza dell’apertura del tubo c’è sempre
un ventre, sul fondo sempre un nodo.
m,
⋅=
20
5
Page 30

17. Il fondo di risonanza
• Battere con forza il diapason la’ = 440 Hertz
con il martelletto del metallofono e
posizionarlo con l’asta sul piano del tavolo.
Il suono del diapason, udibile a malapena in aria,
viene talmente intensificato quando lo si colloca sul
tavolo da risultare chiaramente percepibile in tutta
la stanza.
Spiegazione: oscillando su e giù, l’asta del diapason
fa entrare in oscillazione il piano del tavolo. Poiché
la superficie efficace del tavolo è molto maggiore
di quella del diapason, il volume del suono è
sensibilmente amplificato.
18. La cassa di risonanza
• Percuotere con forza il diapason la' = 440
Hertz e collocarlo con l’asta sulla cassa di
risonanza del monocordo.
Si verifica una significativa amplificazione del
suono.
Spiegazione: come per l’esperimento 17.
19. Il risuonatore sferico
• Avvicinare uno dopo l’altro i risuonatori di
Helmholtz all’orecchio dalla parte
dell’estremità più piccola.
Si percepisce una nota più bassa al crescere del
diametro del risuonatore.
Spiegazione: ogni cavità avente la medesima
struttura (tubo, sfera cava) possiede una prima
armonica esattamente definita, quasi priva di
armoniche superiori. La prima armonica può
essere eccitata soffiando nell’apertura della cavità
oppure anche solo picchiando con una nocca
contro la cavità stessa. Ma l’oscillazione propria
viene eccitata anche se il rumore circostante
contiene suoni corrispondenti alla prima armonica
del risuonatore. Il risuonatore sferico consente
quindi di verificare il contenuto di suoni parziali in
una combinazione di suoni. Se in una stanza c’è
silenzio assoluto, il risuonatore resta silenzioso.
20. Gli strumenti a corda e le loro leggi
• Spostare l’asta trasversale di taglio sotto la fune
del monocordo in modo che il bordo destro
coincida esattamente con il numero 20 della
scala di misura e la corda lunga 40 cm risulti
suddivisa in due sezioni uguali lunghe 20 cm
ciascuna.
• Accordare la mezza lunghezza della corda sul
diapason (440 Hz) la’ (la normale) serrando il
cavicchio.
• Pizzicando o, meglio, sfregando la corda
confrontare l’altezza del suono a 40 cm, 20 cm,
10 cm e 5 cm.
Con la corda lunga 20 cm si ottiene il la normale la’
= 440 Hertz, con la corda lunga 40 cm la nota più
bassa di un’ottava la = 220 Hertz, con la corda
lunga 10 cm la nota più alta di un’ottava la’’ = 880
Hertz e con la corda lunga 5 cm la nota più alta di
due ottave la’’’ = 1760 Hertz.
Spiegazione: con la corda di lunghezza doppia si
ottiene una nota più bassa di un’ottava, con la
corda lunga la metà la prima ottava e con la corda
lunga 1/4 la seconda ottava. Le frequenze della
corda hanno un comportamento opposto rispetto
alle lunghezze.
21. Le scale sugli strumenti a corda
• Spostando l’asta trasversale, suonare sul
monocordo la scala impressa nell’orecchio
umano e determinare le lunghezze della parte
di corda che oscilla e il rapporto tra parte
oscillante e lunghezza totale della corda (40 cm).
Nota Lunghezza
della corda
Rapporto tra le
lunghezze
do 40 cm 1
re 35,55 cm 8/9
mi 32 cm 4/5
fa 30 cm 3/4
sol 26,66 cm 2/3
la 24 cm 3/5
si 21,33 cm 8/15
do’ 20 cm 1/2
Spiegazione: a parità di condizioni quali tensione e
spessore, per ottenere l'ottava la corda deve essere
lunga la metà. Con le altre note della scala per il
rapporto tra le parti oscillanti e la lunghezza totale
della corda si ottengono indici molto semplici. Più
piccoli sono gli indici, migliore è l’armonia. (ottava
1:2, quinta do/sol 2:3 ecc.)
22. Misurazione della tensione della corda
• Inserire la bilancia a molla nel monocordo e
agganciare l’estremità della corda in perlon
alla fessura della bilancia a molla.
• Serrando il cavicchio accordare la
corda sul la normale utilizzando il
diapason la’ = 440 Hertz.
• Determinare la tensione della corda con la
bilancia a molla.
La tensione della corda in perlon è pari a 5,5 kg.
23. Dipendenza dell’altezza della nota dalla
tensione della corda
L’22 aveva mostrato che per ottenere il la normale la
corda in perlon deve presentare una tensione di 5,5 kg.
6
Page 31

Qual è la tensione della corda della nota la (220 Hertz)
più bassa di un’ottava?
• Allentare il cavicchio fino a ottenere la nota la.
• Per controllo, posizionare l’asta trasversale sul
valore 20 (mezza lunghezza della corda) e
accordare nuovamente la mezza lunghezza
della corda sul la normale. Tutta la corda
oscilla con una frequenza dimezzata.
La tensione della corda diminuisce a 1,4 kg.
Spiegazione: la frequenza di una corda è
proporzionale alla radice quadrata del peso che la
tende. Se la forza che tende la corda aumenta di 4,
9 o 16 volte, la frequenza risulta doppia, tripla o
quadrupla. 1/4 di 5,5 è (circa) 1,4, come la misura
effettuata.
24. Gli strumenti a fiato e le loro leggi
• Suonare con la bocca la canna labiale e
variarne la lunghezza efficace del piffero
estraendo più o meno il fondo.
Le lunghezze minori della canna producono note
alte, quelle maggiori note più basse.
Spiegazione: soffiando un debole flusso d’aria si
formano onde stazionarie e la lunghezza della
canna corrisponde a una lunghezza di quarto
d’onda. Soffiando un flusso d’aria più intenso si
producono armoniche superiori, la cui frequenza è
un multiplo dispari della tonica.
Con la canna aperta la prima armonica è alta
quanto l’armonica con la canna chiusa.
25. La scala di do maggiore e i suoi intervalli
• Per determinare gli intervalli si divide la
frequenza superiore per quella subito inferiore.
Per l’intervallo re/do = 1188/1056 il divisore
comune è 132, quindi si ottiene 9/8, 10/9, 16/15,
9/8, 10/9, 9/8 e 16/15.
Spiegazione: gli intervalli delle singole note della
scala non hanno la stessa grandezza. Si distingue
tra note intere maggiori (9/8), note intere minori
(10/9) e mezze note (16/15).
26. Armonia e dissonanza
• Eseguire i diversi accordi con la canna ad ancia.
Si ottengono armonie particolari (consonanze) con
l’ottava, la quinta, la quarta, la terza maggiore e
minore. Sono dissonanze la seconda e la settima e
gli accordi di note immediatamente successive.
27. L’accordo di terza di sol maggiore
• Suonare contemporaneamente le note sol e re
con la canna ad ancia.
Si percepisce un accordo particolarmente armonico,
chiamato accordo di terza di sol maggiore.
Spiegazione: per costituire un accordo armonico,
una consonanza, più note devono farlo a due a due.
L’accordo di terza di sol maggiore è composto dalla
terza maggiore e dalla terza minore. Le frequenze
delle note sol, si e re sono legate da un rapporto
particolarmente semplice, ovvero 4:5:6.
Per ottenere questo rapporto numerico le
frequenze fondamentali indicate nella canna ad
ancia devono essere divise per 6. (Per ottenere dal
punto di vista matematico la corretta frequenza, le
frequenze fondamentali stampate devono essere
moltiplicate per 33.)
Tra la canna ad ancia e il metallofono è possibile
percepire una deviazione dell’accordatura
intrinseca alla produzione.
28. L’accordo di terza di sol maggiore a quattro
voci
• Integrare l’accordo di terza di sol maggiore
con l’ottava sol', ovvero suonare
contemporaneamente sol, si, re’ e sol’.
Si ottiene un accordo particolarmente pieno e
armonico: l’“accordo di terza di sol maggiore a
quattro voci”.
Spiegazione: l’accordo di terza a quattro voci
contiene le seguenti consonanze:
l’ottava 1:2
la quinta 2:3
la terza maggiore 4:5
la terza minore 5:6
29. La scala maggiore con qualsiasi tonica
• Suonare sul metallofono prima la scala di do
maggiore iniziando col do, quindi la scala di
sol maggiore iniziando col sol.
La scala di do maggiore da do' a do" produce un
suono puro. Nella scala di sol maggiore che inizia
col sol' si verifica un errore grave in corrispondenza
del fa". La nota è troppo bassa di mezzo tono.
Spiegazione: in base all’esperimento 25, per ogni
scala devono presentarsi i seguenti intervalli:
9/8, 10/9 16/15, 9/8, 10/9, 9/8, 16/15.
Ma nella sequenza sol'...sol" sulla piastra di base
del metallofono ci sono i seguenti intervalli:
10/9, 9/8, 16/15
, 9/8, 10/9, 16/15, 9/8
Gli intervalli sottolineati sono corretti, gli altri sono
più o meno errati.
Gli intervalli 9/8 e 10/9 però sono così vicini da
essere difficilmente distinguibili l'uno dall'altro,
quindi l'errore da sol' a si' è irrilevante. Al
contrario, l’errore tra mi" e fa" è grave: l'intervallo
è pari a 16/15, mentre in realtà dovrebbe essere
9/8. Quindi si sente un fa" più basso di mezzo tono.
7
Page 32

30. Inserimento dei mezzi toni
• Con la canna ad ancia suonare la scala da sol' a
sol" dopo essersi assicurati che la nota la' sia
effettivamente accordata sul la normale. A tal
fine percuotere il diapason e confrontare le
note.
La canna ad ancia produce una scala di sol
maggiore assolutamente pura.
Spiegazione: al posto della nota fa' si è inserita una
nuova nota, il fa diesis', calcolata in questo
modo: l’intervallo tra mi’ e fa diesis’ è 9/8 e
l’intervallo tra fa diesis’’ e sol’’ è 16/15. Ciò avviene
moltiplicando per 25/24 la frequenza del fa.
Le nuove note ottenute aumentando le vecchie si
chiamano do diesis, re diesis, mi diesis, fa diesis,
sol diesis, la diesis, si diesis.
Nella notazione, l’aumento si indica anteponendo
il simbolo
#
.
Le note più basse di mezzo tono si ottengono
moltiplicando la nota più alta per 24/25. Nella
notazione sono indicate anteponendo il simbolo b
e si chiamano do bemolle, re bemolle, mi bemolle,
fa bemolle, sol bemolle, la bemolle e si bemolle.
Con pochi errori sul pianoforte le note do diesis e
re bemolle ecc. sono unificate.
Elwe Didactic GmbH • Steinfelsstr. 6 • 08248 Klingenthal • Germania • www.elwedidactic.com
3B Scientific GmbH • Rudorffweg 8 • 21031 Amburgo • Germania • www.3bscientific.com
Con riserva di modifiche tecniche
© Copyright 2009 3B Scientific GmbH
Page 33

3B SCIENTIFIC
Aparato didáctico Acústica U8440012
Instrucciones de uso
05/09 ELWE/ALF
®
PHYSICS
1. Descripción
El juego de aparatos didácticos de acústica hace
posible la enseñanza del campo temático
“Acústica“ como una unidad completa cerrada. Con
este juego de aparatos es posible realizar una
amplia variedad de experimentos.
Ejemplos de experimentos:
1. Tonos de cuerdas
2. El tono acústico puro
3. Columnas de aire vibrantes
4. La columna de aire abierta
5. Flauta labial
6. Varillas vibrantes
7. Infrasonido
8. Ultrasonido
9. El diapasón de registro
10. Ondas progresivas
11. El efecto Doppler
12. Figuras de Chladni
13. Oscilaciones de campana
14. Ondas estacionarias
15. Tonos armónicos
16. Medición de la longitud de onda
17. Fondo de resonancia
18. La caja de resonancia
19. El resonador volumétrico
20. Los Instrumentos de cuerdas y sus leyes
21. Las escala musical de los instrumentos de
cuerda
22. Medición de la tensión de la cuerda
23. La dependencia de l’altura del tono con la
tensión de la cuerda
24. Instrumentos de viento y sus leyes
25. La escala musical Do-Mayor y sus intervalos
26. La consonancia y disonancia
27. El tritonio G mayor
28. El tritono G mayor de cuatro voces
29. La escala musical mayor con tono fundamental
arbitrario
30. La introducción de tonos medios
La entrega se hace en un panel de plástico con
inserto de gomaespuma para el almacenamiento
cuidadoso de las componentes.
1
Page 34

2. Volumen de suministro
1 Panel con inserto de gomaespuma para
aparato didáctico „Acústica“
2 Monocordio
3 Puente para monocordio
4 Marimba
5 Placa de Chladni
6 Diapasón, 1700 Hz
7 Diapasón, 440 Hz
8 Diapasón de registro, 21 Hz
9 Balanza de muelle
10 Abrazadera soporte
11 Pinza de mesa
12 Resonador de Helmholtz
Ø 70 mm
Ø 52 mm
Ø 40 mm
Ø 34 mm
13 Tubo de vidrio para columna de aire abierta
14 Tubo de Kundt
15 Tubo de vidrio para columna de aire cerrada
16 Mango para placa de Chladni/ Copa vibradora
17 Silbato e Galton
18 Lápiz registrador
19 Polvo de licopodio
20 Bloque de plástico para la pinza de mesa
21 Tapa de goma
22 Copa vibradora
23 Flauta de lengüeta
24 Flauta labial
25 Cuerda de acero
26 Cuerda de perlón
27 Cuerda de ondas
28 Barra deslizables de sintonización
2
Page 35

3. Datos técnicos
Dimensiones: aprox.530 x 375 x 155
mm
3
Masa: aprox. 4,5 kg
4. Ejemplos de experimentos
1. Tonos de cuerdas
• Se tira fuertemente con el dedo de la cuerda
del monocordio levemente tensa.
• Girando la clavija hacia la derecha se aumenta
la tensión de la cuerda y al mismo tiempo se
tira de ella con el dedo.
Se escucha al principio un tono bajo y a
continuación uno más alto.
Explicación: Cuerdas vibrantes producen tonos
acústicos por medio de compresión de
descompresión del aire a su alrededor. Mientras
mayor sea la tensión de la cuerda más rápida será
la vibración y por lo tanto más alto será el tono
generado.
2. El tono acústico puro
• Se golpea fuertemente el diapasón (440 Hz)
con el martillo de tocar la marimba.
Se escucha un tono acústico puro de una altura
determinada constante que se extingue
lentamente.
Explicación: El diapasón se compone de una pieza
de acero doblada en forma de U, que en la curva
pasa a un mango. Como el diapasón sólo puede
vibrar en una sola frecuencia de vibración, se
produce un tono puro de altura constante
(movimientos de las horquillas contrarios entre sí,
de afuera hacia dentro y viceversa). Debido al tono
constante del diapasón, se usa este normalmente
para afinar instrumentos musicales
3. Columnas de aire vibrantes
• El tubo de vidrio para columnas de aire
cerradas se fija en la mesa de trabajo
utilizando la pinza de mesa, el bloque de
plástico y la abrazadera soporte
• Se introduce el deslizador de sintonia en el
tubo de vidrio.
• Se golpea fuertemente el diapasón (400 Hz)
con el martillo de tocar la marimba. Sacando
fuertemente más o menos el deslizador de
sintonía, se varía la longitud de la “la columna
de aire encerrada“.
Sólo en una posición del deslizador de sintonia
entra la columna de aire en oscilación de simpatía
fuerte (resonancia), en cualquier otra posición
permanece muda. La resonancia se puede percibir
por el fuerte aumento del volumen sonoro.
Explicación: Las columnas de aire cerradas pueden
entrar en resonancia cuando su longitud
corresponde a un cuarto de la longitud de onda
excitante. Cuando el diapasón vibra con 440
oscilaciones en un segundo
npropagació_de_Velocidad
440
34000
⋅
onda_de_Longitud =
⋅
s/cm
s/esOscilacion
277
⋅=
cm,
Frecuencia
la longitud de onda del tono producido es 77,2 cm.
Un cuarto de longitud de onda es de 19,3 cm.
La distancia del émbolo desde la apertura del tubo
es de 19,3 cm en caso de la resonancia.
4. La columna de aire abierta
• Se realiza el experimento con el tubo de vidrio
(14), con la columna de aire abierta.
La columna de aire abierta de una longitud igual al
doble de la longitud de la columna de aire cerrada
entra en resonancia al acercar un diapasón, lo cual
se percibe por el fuerte aumento del volumen
sonoro.
Explicación: Columnas de aire abiertas pueden
entrar en resonancia cuando su longitud
corresponde a la mitad de la longitud de onda o a
un múltiplo de ellas. En los extremos de la
columna abierta siempre se tiene una amplitud
máxima y en el centro un nodo de oscilación.
5. La flauta labial
• Se sopla la flauta labial y sacando el émbolo se
cambia la longitud de la flauta..
Dependiendo de la longitud de la flauta se percibe
un tono mayor o menor que el timbre
característico.
Explicación: Al soplar en la flauta una corriente de
aire constante, el aire encerrado en la boquilla
entra en vibración originando una secuencia de
remolinos de vientos regulares en el filo del labio.
El tono que se origina depende da la longitud de la
columna de aire. En la flauta cerrada, en el tono
fundamental, la longitud de la misma corresponde
a un cuarto de longitud de onda (medido desde el
fondo hasta el filo del labio). En el labio se origina
un máximo de amplitud mientras en el fondo un
nodo.
6. Varillas vibradoras
• Unas de las barristas metálicas de la marimba
(22) se golpean con el martillo entregado..
Al golpear las barristas metálicas se escuchan tonos
agradables de un timbre característico
determinado. Mientras más corta sea la barrita
metálica más alto es el tono.
Explicación: Barras elásticas se convierten en
sistemas capaces de oscilar cuando descansan en
3
Page 36

sus nudos de oscilación (aprox. al 22% de la
longitud total, desde uno de los extremos).
7. Infrasolido
• El diapasón de registro se deja vibrar
presionando lateralmente al mismo tiempo
ambos lados de la horquilla y dejándolas libres
al mismo tiempo..
El diapasón produce una vibración lenta
observable bien a simple vista. Si se acerca este al
oído de percibe un tono bajo y levemente auditivo.
Explicación: Las horquillas del diapasón oscilan
una contra la otra y producen compresiones y
descompresiones en el aire alrededor. Si las mismas llegan a oído, se produce una resonancia del
tímpano. Se alcanza a escuchar un tono. El
diapasón vibra con una 20 vibraciones en un
segundo. El tono más bajo apenas perceptible al
oído es de 16 vibraciones en un segundo.
Vibraciones por debajo de los 16 Hercios ya no son
audibles Estas se denominan bajo el nombre de
infrasonido.
8. Ultrasonido
• Se sopla en el silbato de Galton.
No se percibe ningún tono claro sino un ruido en
forma de silbido.
Resultado: Debido a su corta longitud el silbato de
Galton produce unos tonos muy altos, los cuales no
son audibles para los humanos. Estos se
denominan ultrasonidos.
9. El diapasón de registro
• Se fijan en la horquilla del diapasón de registro
un lápiz de escritura.
• Se aprietan lateralmente las horquillas del
diapasón para que entren en vibración y al
mismo tiempo se desplaza uniformemente el
lápiz de escritura sobre una hoja de papel
colocado sobre una base no muy blanda.
El lápiz de escritura describe sobre el papel una
línea en forma de onda de longitud de onda
constante pero con amplitud decreciente.
Explicación: El sonido se origina por oscilaciones
periódicas de cuerpos rígidos, líquidos o gaseosos.
El lugar de las partículas oscilantes del cuerpo se
mueve sobre una línea ondulada en dependencia
con el tiempo (línea senoidal). Si se golpea una sola
vez los cuerpos oscilantes realizan una oscilación
„amortiguada“ (disminución constante de la
amplitud). Si la entrada de energía es constante
(tono permanente de una bocina de automóvil,
sople constante de una flauta de órgano), se
obtiene una oscilación no amortiguada de
amplitud constante (sonoridad).
10. Ondas progresivas
• Haciendo un nudo sencillo se fija el lazo de la
cuerda ondas en el picaporte de una puerta.
• Se tensa la cuerda levemente y se ejecuta en
ella con la mano un movimiento lateral de
vaivén brusco.
Partiendo del centro del movimiento (la mano) se
expande una ola (un pulso), que se mueve a lo
largo de la cuerda con una velocidad pe
propagación determinada, se refleja en el extremo
y retorna al punto inicial. Explicación: Todo cuerpo
rígido, líquido o gaseoso, produce vibraciones en
caso de una sacudida repentina, las cuales se
expenden con una velocidad determinada en el
medio oscilante.
11. Efecto Doppler
• El diapasón de metal liviano (1700 Hz) se
golpea fuertemente con el martillo de tocar la
marimba y luego se mantiene fijo por un
tiempo y después se hacen con él movimientos
de vaivén.
En el estado de reposo el diapasón produce un
tono fuerte de altura constante. Al mover el
diapasón en vaivén la altura del tono cambia
constantemente. Si el movimiento es de
acercamiento al oído, el tono del sonido aumenta y
al alejarse el tono baja. Explicación: Al reducirse la
distancia de la fuente de sonido al oído se reducen
así los intervalos de tiempo entre dos
compresiones, porque la segunda compresión tiene
que recorrer una distancia más corta hasta el oído.
El oído percibe una frecuencia más alta. El tono se
hace mayor. Al retirarse la fuente de sonido del
oído los intervalos entre las compresiones y las
descompresiones se hace mayor y por ello el tono
se hace más bajo.
12. Figuras de Chladni
• La placa de Chladni se fija en la mesa de
trabajo por medio de la pinza de mesa y el
bloque de plástico. La placa se cubre de arena
fina hasta que se tenga una capa fina en una
tercera parte de la placa.
• La placa se roza con un arco de violín, bien
cubierto de colofonio, exactamente en el
centro entre dos esquinas tocando levemente
una de las esquins con un dedo de la otra
mano.
• Se roza la placa varias veces fuertemente hasta
que ésta entre en una vibración intensa bien
audible.
Al rozar la placa se percibe un tono acústico bien
determinado. Los granos de arena entran en una
resonancia fuerte y bailan en determinados lugares
de la placa formando una figura peculiar sobre la
superficie de la placa.
4
Page 37

Explicación: Sobre la placa se originas „ondas
estacionarias“. La placa no vibra hacia arriba y
abajo como un todo al ser rozada con el arco sino
que lo hace en determinadas posiciones (en los
vientres o amplitudes máximas) mientras que en
otros permanece en reposo (nodos de oscilación).
Al tocar la placa en una esquina se ha forzado un
nodo en este punto.
13. Oscilaciones de campana
• La campana se fija en la mesa de trabajo con
la apertura hacia arriba, utilizando la pinza de
mesa y el bloque de plástico.
• El borde de la campana se golpea con el
martillo en diferentes posiciones (también se
puede rozar con un arco de violín)
La altura del tono depende de la posición en que
se golpee. Es muy fácil obtener diferencias de hasta
un tono completo. Si la campana de golpea en
determinadas posiciones se pueden excitar ambos
tonos y así se obtienen las conocidas "pulsaciones“
(aumentos y disminuciones periódicas de la altura
del sonido en una secuencia más o menos rápida).
Explicación: Las campanas se pueden considerar
como placas oscilantes deformadas. Los armónicos
superiores no son armónicos con respecto al tono
fundamental. Las campanas también se dividen en
secciones oscilantes separadas por las líneas de
nodos.
14. Ondas estacionarias
• Se fija con un nudo sencillo el lazo de la
cuerda de ondas en el picaporte de una
puerta.
• La cuerda se debe tensar levemente y se hacen
movimientos circulares lentos con la mano.
• Luego se hace más tensa la cuerda y los
movimientos circulares se hacen más rápido.
Con el movimiento lento se origina un nodo en los
extremos de la cuerda y en el centro un vientre.
Con un movimiento más rápido se obtienen 3
nodos y 2 vientres y con un movimiento más
rápido de tienen 4 nodos y 3 vientres.
Explicación: Por reflexión en el picaporte de la
puerta se originan ondas estacionarias. Por la
inercia del ojo se observan al mismo tiempo onda
original y la reflejada.
En la oscilación fundamental la cuerda oscila en
toda su longitud en forma de media longitud de
onda. En el centro un vientre y en los extremos
nodos. En el primer armónico superior (octava) la
cuerda oscila como una longitud de onda completa
(2 vientres y 4 nodos). En el segundo armónico
superior se tiene 3 vientres y 4 nodos y así
sucesivamente.
15. Armónicos superiores
• Se sopla con la boca en la flauta labial,
primero débilmente y luego fuertemente.
Se percibe primero en tono fundamental y al
soplar más fuertemente se escucha un tono mucho
más alto.
Explicación: En la flauta cerrada las ondas
estacionarias se deben formar de tal forma que en
el fondo siempre se tenga un nodo y en el filo del
labio un vientre. Este es el caso cuando la longitud
de la flauta es ¼ de la longitud de onda. El mismo
caso se tiene cuando la distancia entre la apertura
y el fondo 3/4 5/4, 7/4 de la longitud de onda.
Junto al tono fundamental se generan también los
armónicos superiores impares de la escala musical,
más o menos con la misma intensidad..
Sólo a la aparición más o menos fuerte de los
armónicos superiores se le atribuye (y agradece) el
timbre muy característico de cada instrumento
musical.
16. Medición de la longitud de onda
• El extremo del tubo de vidrio (21) de una
longitud exacta de 45 cm se cierra con una
tapa de goma. Se toma una cantidad de polvo
de licopodio en una cucharilla de té y
manteniendo el tubo inclinado se llena este de
tal forma que a lo largo del tubo se reparta el
licopodio regularmente.
• El tubo de vidrio se fija en la mesa de trabajo
por medio de la abrazadera de soporte, la
pinza de mesa y el bloque de plástico.
• El diapasón (10) se golpea fuertemente contra
un mango de martillo y una de las horquillas
se coloca en su parte ancha frente a la
apertura del tubo. Esta excitación del sonido se
deberá posiblemente repetir varias veces.
En los vientres de la oscilación el polvo de
licopodio entra fuertemente en resonancia;
mientras que en los nodos permanece en reposo.
Las partículas del polvo se reparten a lo largo del
tubo en acumulaciones periódicas que repiten en
el eje del tubo en 4 / ½ veces..
Explicación: El diapasón de metal liviano tiene una
frecuencia de 1700 oscilaciones por segundo. De
acuerdo con la relación sencilla:
sonido_del_Velocidad
340
1700
onda_de_Longitud =
s/m
⋅
Hz
⋅
m,
⋅=
20
Frecuencia
La correspondiente longitud de onda es de 20 cm.
En un tubo de 45 cm de longitud caben 41/2
semiondas o dos ondas completas y un cuarto de
onda, como se puede ver en el experimento. En la
apertura del tubo siempre se tiene un vientre y en
el fondo un nodo.
5
Page 38

17. Fondo de resonancia
• Se golpea fuertemente el diapasón a’ = 440 Hz
con el martillo de tocar la marimba y el
extremo de su mango se pone en contacto
vertical con el tablero de la mesa.
El tono del diapasón poco perceptible en el aire
libre se intensifica al ponerlo en contacto con el
tablero de la mesa, así que es posible escucharlo
claramente en todo el espacio
Explicación: Por las oscilaciones del mango del
diapasón el tablero de la mesa entra en
resonancia. Como la superficie activa de la mesa es
mucho mayor que la del diapasón, la altura de
sonido es amplificada considerablemente.
18. Caja de resonancia
• El diapasón de “la’
= 440” Hercios se golpea
fuertemente y su mango se pone en contacto
con la caja de resonancia del monocordio.
Se percibe una fuerte amplificación del tono.
Explicación: Ver experimento 17.
19. Resonador volumétrico
• La punta de cada uno de los resonadores de
Helmholtz se acercan una tras la otro al oído.
Se percibe un tono que es menor mientras mayor
sea el diámetro del resonador.
Explicación: Cada cavidad (tubo, esfera hueca),
independientemente de cómo se sostenga, tiene
una frecuencia fundamental casi libre de
armónicos superiores. Esta oscilación fundamental
se puede excitar cuando se sopla sobre la apertura
de la cavidad o cuando se golpea con un dedo
sobre la superficie de la cavidad. La oscilación
propia se excita principalmente cuando el ruido
del ambiente lleva tonos que concuerdan con la
oscilación propia del resonador. Así que con el
resonador esférico o volumétrico es posible
analizar una mezcla de tonos y observar si se tiene
tonos parciales. Si el espacio está totalmente en
silencio, el resonador permanece mudo.
20. Los instrumentos de cuerdas y sus leyes
• El puente se enclava de pie bajo la cuerda el
monocordio de tal forma que el borde se
encuentre en el número 20 de la escala de
medida y la cuerda de 40 cm se encuentre
dividida en dos partes iguales de 20 cm..
• Apretando la clavija se afina la longitud media
de la cuerda hasta la frecuencia del diapasón
1
“la
” (diapasón normal).
• Tirando o mejor rozan la cuerda se comparan
las alturas de tono para 40 cm, 20 cm, 10 cm y
5 cm de longitud de cuerda.
Con una longitud de cuerda de 20 cm se obtiene la
frecuencia del diapasón normal la
1
= 440 Hz, con
40 cm de longitud de cuerda se obtiene una octava
más baja fa = 220 Hz, con 10 cm un tono de una
octava más alta la
dos octavas más altas, el tono la
2
= 880 Hz y con 5 cm se tienen
3
= 1760 Hz.
Explicación: Al doblar la longitud de la cuerda se
obtiene un tono una octava más baja, para la
mitad de la longitud de la cuerda se obtiene la 1ª
octava para ¼ de cuerda la 2ª. Octava. Las
frecuencias de las cuerdas se comportan
inversamente proporcional a sus longitudes.
21. La escala musical en los instrumentos de
cuerdas
• Cambiando la posición del puente se toca en el
monocordio la escala musical acostumbrada a
ser oída por las personas y se determina cada
vez la longitud de la cuerda oscilante y la
relación entre ella y la longitud total de la
cuerda de 40 cm.
Tono Longitud de
cuerda
Relación de
longitudes
do 40 cm 1
re 35,55 cm 8/9
mi 32 cm 4/5
fa 30 cm 3/4
sol 26,66 cm 2/3
la 24 cm 3/5
si 21,33 cm 8/15
do1 20 cm 1/2
Explicación: La longitud de la cuerda debe ser la
mitad cuando se ha de lograr la octava
manteniendo las otras condiciones iguales, es
decir: la tensión de la cuerda, el espesor etc. Para
los otros tonos de la escala musical se obtiene que
la relación de las cuerdas oscilantes con respecto a
la longitud total se comporta como una relación
sencilla de números enteros. Mientras menores son
los números, mejor es el timbre (Octava 1:2, Quinta
do/sol 2:3 etc.).
22. Medición de la tensión de la cuerda
• Se fija en el monocordio la balanza de muelle
y se cuelga en la ranura de ella el extremo de
la cuerda de perlón.
• Tirando de la clavija se afina la cuerda
al tono de diapasón normal tomando
como base el diapasón de la
• Con la balanza de muelle se determina la
’
= 440 Hz.
tensión de las cuerdas.
La tensión de la cuerda de perlón es de 5,5 kg.
6
Page 39

23. Dependencia de l’altura del tono con la
tensión de la cuerda.
Un resultado del experimento 22 es que para
obtener el tono de diapasón normal la tensión de la
cuerda de perlón debe ser de 5,5 kg. ¿Cuál será la
tensión de la cuerda para obtener el tono “la” (220
Hz) en una octava más baja?
• Se afloja la clavija hasta escuchar el tono “la”
• Para controlar se coloca el puente en la
posición 20 de la escala de medida y se afina la
mitad de la cuerda al tono de diapasón
normal. La cuerda completa vibra con la mitad
de la frecuencia.
La tensión de la cuerda se fija en 1,4 kg.
Explicación: La frecuencia de una cuerda es
proporcional a la raíz cuadrada de la tensión en la
cuerda. Cuando la fuerza de tensión de la cuerda
se multiplica por 4, 9, 16, la frecuencia aumenta en
2, 3, 4 veces: ¼ de 5,5 es aprox. 1,4.
24. Instrumentos de viento y sus leyes.
• La flauta labial se sopla con la boca y tirando
del fondo más menos fuertemente se cambia
la longitud efectiva de la flauta.
Con longitudes de flautas pequeñas se tienen tonos
altos con largas tonos bajos.
Explicación: Al soplar una corriente de aire tenue
se producen ondas estacionarias, siendo la
longitud de la flauta un cuarto de la longitud de
onda. Al soplar fuertemente se produce una
corriente de aire más fuerte dando lugar a la
producción de armónicos superiores cuyas
frecuencias son múltiplos impares del tono
fundamental..
Con la flauta abierta el tono fundamental es el
doble del correspondiente con la flauta cerrada.
25. La escala musical Do-mayor y sus intervalos
• Para determinar los intervalos se divide cada
vez la frecuencia mayor por la más baja
contigua.
Para el intervalo re/do = 1188/1056 el divisor
común es 132, es decir que se obtiene 9/8, 10/9,
16/15, 9/8, 10/9, 9/8 y 16/15.
Explicación: Los intervalos (espacios intermedios)
entre los tonos de la escala musical no son iguales.
Se diferencia entre pasos de tonos completos
grandes (9/8) pasos de tonos completos pequeños
(10/9) y pasos de semitonos (16/15).
26. Consonancia y disonancia
• Se soplan en la flauta lingual los tonos
compuestos más diferentes.
Tonos armónicos agradables (consonantes) se
obtienen con la octava, la quinta. La cuarta y con
las terceras grandes y pequeña. Tonos disonantes
(disonancias) son la segunda y la séptima y así
como tonos compuestos por tonos directamente
aledaños..
27. El tritono de Sol-mayor
• Se soplan en la flauta lingual al mismo tiempo
los tonos “sol – mi – re”.
Este se percibe o escucha como un tono compuesto
especialmente agradable, el cual se denomina
“tritono sol mayor”.
Explicación: Si varios tonos conforman un tono
compuesto especialmente agradable al oído, una
consonancia, estos se deben tocar de par en par. El
tritono “sol mayor” se compone de la tercia
pequeña y la tercia grande. Las frecuencias de los
tonos sol, si, re están entre sí en una relación
numérica muy sencilla 4:5:6.
Para lograr esta relación numérica se deben dividir
por 6 las frecuencias fundamentales indicadas en
la flauta lingual.
(Para obtener las frecuencias correctas desde un
punto de vista físico, las frecuencias básicas
impresas se deben multiplicar por 33).
Entre la flauta labial y la marimba puede además
ser perceptible una desviación en la concordancia
debida posiblemente a condiciones de fabricación.
28. El tritono Sol-mayor a cuatro voces.
• El tritono Sol-mayor se complementa con la
octava sol
tiempo “sol, si, do
1
. Es decir que se tocan al mismo
1
sol1”.
Se obtiene así “tritono-sol-mayor” muy agradable
al oído.
Explicación: En el tritono a cuatro voces se
encuentran las siguientes consonancias:
La octava 1:2
La quinta 2:3
La tercera grande 4:5
La tercer pequeña 5:6
29. La escala musical “Mayor” con cualquier
tono fundamental
• Se toca en la marimba la escala musical “Do-
mayor” iniciando con “do” y luego la “Solmayor” iniciando con “sol”.
La escala musical “Do-Mayor” de do
suena con un tono puro. La escala musical Solmayor que se inicia con sol
fuerte en “fa
2
”. El tono es un tono medio muy bajo.
1
muestra un error
1
hasta do2
Explicación: Según el experimento 25 en todas las
escalas musicales deben aparecen los siguientes
intervalos:
9/8, 10/9 16/15, 9/8, 10/9, 9/8, 16/15.
7
Page 40

En la placa fundamental de la marimba en la
secuencia tónica o escala musical “sol
1
… sol2” se
tienen los siguientes intervalos:
10/9, 9/8, 16/15
, 9/8, 10/9, 16/15, 9/8
Los intervalos subrayados son correctos, los otros
son más o menos falsos.
Los intervalos 9/8 y 10/9 se encuentran muy
contiguos, de tal forma que es muy difícil
diferenciarlos, por ello el error de sol
es importante. Mucho más grave eS el error entre
2
mi
y fa2. El intervalo aquí es de 16/15, mientras en
la realidad debería de ser 9/8. Por lo tanto fa
1
hasta si1 no
2
se
escucha un tono medio mucho más bajo.
30. Se introducen los pasos de semitonos
• Se toca en la flauta labial la escala musical de
1
sol
hasta sol2 después de estar seguro de que
el tono la
1
de la flauta labial se ha afina al
diapasón normal. Para ello se golpea el
diapasón y se compara.
En la flauta labial se escucha claramente la escala
musical de “sol-mayor”.
Explicación: En lugar del tono fa
nuevo tono, el fa#
forma que el intervalo entre mi
de 9/8 y el de fa#
1
, que se calcula de tal
2
y sol2 16/15. Esto sucede
1
se introduce un
1
y fa#1 sea
aumentado la frecuencia de fa multiplicando por
25/24..
Los nuevos tonos generados por el aumento de los
tonos básicos se denominan: do#, re#, mi#, fa#,
sol#, la#, si#.
El aumento se indica por medio de una cruz en las
notas escritas..
Las notas reducidas en un medio tono se obtienen
multiplicando el tono más alto por 24/25. En la
escritura de notas se caracterizan por una “b”
anticipada a la nota. Estas se llaman: b-do, b-re, bmi, b-fa, b-sol, b-la, b-si.
En el piano se igualan con un pequeño error los
tonos do# y b-re.
Elwe Didactic GmbH • Steinfelsstr. 6 • 08248 Klingenthal • Alemania • www.elwedidactic.com
3B Scientific GmbH • Rudorffweg 8 • 21031 Hamburgo • Alemania • www.3bscientific.com
Se reservan las modificaciones técnicas
© Copyright 2009 3B Scientific GmbH
Page 41

3B SCIENTIFIC
Aparelho didático para acústica U8440012
Instruções para o uso
05/09 ELWE/ALF
®
FÍSICA
1. Descrição
O jogo de aparelhos didáticos para acústica
permite uma apresentação de uma visão geral
bastante completa da área temática da acústica.
Com o aparelho didático podem ser realizadas
numerosas experiências.
Exemplos de experiência:
1. Sons de cordas
2. O som acusticamente puro
3. Colunas de ar vibrantes
4. A coluna de ar aberta
5. O apito de boca
6. As varas vibrantes
7. Infra-som
8. Ultrasom
9. O diapasão registrador
10. Ondas em propagação
11. Efeito Doppler
12. Figuras sonoras de Chladni
13. Vibração de sinos
14. Ondas estacionárias
15. Sobretons
16. Medição de longitude de onda
17. O fundo de ressonância
18. A caixa de ressonância
19. O ressonador esférico
20. Os instrumentos de cordas e as suas leis
21. A escala musical nos instrumentos de cordas
22. Medição da tensão das cordas
23. Dependência da altura do tom da tensão das
cordas
24. Instrumentos de sopro e suas leis
25. A escala do dó maior e seus intervalos
26. Tom harmônico e tom desarmônico
27. A tríade sol maior
28. A tríade sol maior de quatro vozes
29. A escala maior com tons fundamentais à
escolha
30. Associação de semitons
O fornecimento é feito numa placa de plástico com
amortecimento de espuma para o transporte
seguro de cada parte.
1
Page 42

2. Fornecimento
1 Tablete com espuma protetora para o aparelho
didático "Acústica"
2 Monocórdio
3 Ponte para Monocórdio
4 Metalofone
5 Placa de Chladni
6 Diapasão, 1700 Hz
7 Diapasão, 440 Hz
8 Diapasão marcador, 21 Hz
9 Balança de mola
10 Pinça suporte
11 Pinça de mesa
12 Ressonador de Helmholtz
Ø 70 mm
Ø 52 mm
Ø 40 mm
Ø 34 mm
13 Tubo de vidro para
a coluna de ar aberta
14 Tubo de Kundt
15 Tubo de vidro para
a coluna de ar fechada
16 Vara para placa de Chladni / sino em concha
17 Apito de Galton
18 Caneta com suporte
19 Pó de Licopódio
20 Talho de plástico para a pinça de mesa
21 Capa de borracha
22 Sino em concha
23 Apito de língua
24 Apito de boca
25 Corda de aço
26 Corda de perlon
27 Corda de ondas
28 Ajuste deslizável
2
Page 43

⋅
=
3. Dados técnicos
Dimensões: aprox. 530 x 375 x 155 mm3
Massa: aprox. 4,5 kg
4. Exemplos de experiências
1. Tons de cordas
• Puxar com força a corda medianamente tensa
do monocórdio com os dedos.
• Logo, aumentar a tensão da corda girando a
borboleta e puxar numerosas vezes.
Primeiro ouve-se um som baixo e logo um tom
mais alto.
Explicação: cordas em vibração produzem sons
acústicos por densificação e rarefação alternada do
ar ambiente. Quanto maior a tensão da corda, mais
rápida é a vibração e mais alto é o tom.
2. O som acusticamente puro
• Bater com força o diapasão (440 Hz) com o
martelinho de tocar do metalofone.
Ouve-se um som acusticamente puro com altura
definida e inalterada de tom que se esvanece
lentamente.
Explicação: O diapasão consiste num pedaço de
metal dobrado em forma de U, no ápice do arco do
qual se origina uma vara. Sendo que o diapasão só
vibra de uma forma (movimentos contrários das
pontas de dentro para fora e inversamente) ele
produz um tom puro de altura constante. Por
causa da constância da altura tonal do diapasão ele
é usado para afinar instrumentos musicais.
3. Colunas de ar vibrantes
• Fixar o tubo de vidro para a coluna de ar
fechada por meio da pinça de mesa, talho de
plástico e pinças de suporte, na mesa de
trabalho.
• Introduzir o ajuste deslizável no tubo de vidro.
• Bater com força o diapasão (440 Hz) com o
martelinho de tocar do metalofone. Alterar o
comprimento da “coluna de ar fechada” por
meio da extração mais ou menos forte do
ajuste deslizável.
Somente numa posição do ajuste deslizável a
coluna de ar chega a uma forte oscilação
compartilhada (Ressonância), em todas as outras
posições ela fica muda. A ressonância é perceptível
através de uma superelevação do volume de som.
Explicação: colunas de ar fechadas vibram quando
o seu comprimento corresponde à quarta parte do
comprimento da onda excitadora. O diapasão vibra
a 440 vibrações por segundo. Conforme a relação
Comprimento de onda
34000 cm / s
⋅
440 Oscilação / s
Velocidade de propagação
=
77,2 cm
⋅
Freqüência
O comprimento de onda do som obtido é de 77,2
cm. Uma quarta parte do comprimento de onda é
assim igual a 19,3 cm.
No caso da ressonância, a distância do pistão da
apertura do tubo é de 19,3 cm.
4. A coluna de ar aberta
• Executar a experiência com o tubo de vidro
com a coluna de ar aberta.
A coluna de ar com um comprimento de
exatamente o dobro da fechada começa a vibrar
quando se mantém o diapasão frente à abertura, o
que é perceptível através de uma superelevação do
volume de som.
Explicação: colunas de ar abertas vibram quando o
seu comprimento equivale à metade do
comprimento de onda ou à multiplicação da
metade do comprimento de onda. Nas pontas da
coluna de ar aberta formam-se picos de vibração,
no seu meio surgem nós de vibração.
5. O apito de boca
• Soprar no apito de boca e alterar o
comprimento do apito puxando o pistão.
Conforme o comprimento do apito ouve-se um tom
mais ou menos baixo com uma coloração tonal
característica.
Explicação: ao soprar uma corrente de ar regular
na boca do apito, o ar que se encontra preso no
apito começa a vibrar, de modo que no lábio
formam-se a intervalos regulares rodamoinhos de
ar. O tom resultante depende da altura da coluna
de ar. No caso do apito fechado o comprimento do
apito (medido da boca o fundo) equivale no tom
fundamental a um quarto do comprimento de
onda. Na boca forma-se um pico e no fundo um
nó.
6. Varas vibrantes
• Bater em algumas varas do metalofone com o
martelo incluído no fornecimento.
Ao bater nas varas de metal surgem sons
agradáveis com uma coloração tonal característica.
Quanto mais curta a vara, mais alto o tom.
Explicação: As varas elásticas se convertem em
sistemas capazes de vibrar, quando estão deitados
sobre os pontos dos seus nós vibratórios
(aproximadamente 22% do comprimento total
distanciado das extremidades).
3
Page 44

7. Infra-som
• Levar o diapasão marcador a vibrar apertando
os dois braços ao mesmo tempo e soltando
repentinamente.
O diapasão executa vibrações lentas, fáceis de
observar a olho nu. Se ele for aproximado à orelha,
ouve-se um tom muito baixo (apenas perceptível).
Explicação: os braços do diapasão vibram em
direções contrárias de um lado para o outro e
produzem densificações e rarefações do ar do
ambiente. Quando estas atingem o tímpano este é
levado a vibrar. Ouve-se um tom.
O diapasão vibra a aproximadamente 20 vibrações
por segundo de um lado para o outro. O tom mais
baixo, ainda audível comporta aproximadamente
16 oscilações por segundo. Vibrações abaixo de 16
Hertz já não são audíveis. Elas são chamadas de
infra-som (do latim infra = abaixo).
8. Ultra-som
• Soprar no apito de Galton.
Já não se ouve tom algum, só um ruído agudo.
Resultado: por causa da sua curta longitude de
onda, o apito de Galton produz tons muito altos
que já não são audíveis pelo ouvido humano. Estes
são chamados de ultra-som (do latim ultra =
acima).
9. O diapasão registrador
• Fixar a caneta nos braços do diapasão
marcador.
• Levar o diapasão a vibrar apertando os braços
e deslocá-lo com a caneta sobre uma folha de
papel sobre uma superfície que não seja mole
demais.
A caneta desenha linhas em forma de ondas do
mesmo comprimento de onda, mas de amplitude
decrescente sobre o papel.
Explicação: o som é produzido pela vibração
periódica de corpos sólidos, líquidos ou gasosos. O
local geométrico das partículas vibrantes do corpo
em relação ao tempo se encontra numa linha
ondular (linha de seno). Ao serem batidos uma vez,
os corpos em vibração produzem uma vibração
"amortecida" (redução constante da amplitude). Se
o aporte de energia for constante (som constante
de uma buzina, órgão musical soprado
constantemente), então se obtém uma vibração
não amortecida de mesma amplitude (= volume).
10. Ondas em propagação
• Fixar o laço da corda de ondas numa maçaneta
porta fazendo simplesmente um nó.
• Esticar a corda medianamente e executar um
movimento brusco puxando lateralmente com
a mão.
A partir do centro do movimento (a mão) surge
uma onda com velocidade de propagação
específica ao longo da corda, que se reflete na
ponta fixa e logo volta para o ponto de partida.
Explicação: todo corpo sólido, líquido ou gasoso
produz vibrações ao ser sacudido bruscamente, as
quais se propagam no meio vibrante com uma
velocidade de propagação específica.
11. Efeito Doppler
• Bater firmemente com o diapasão de metal
leve (1700 Hz) com o martelinho de tocar do
metalofone, mante-lo brevemente em repouso
e logo sacudi-lo no ar rapidamente de um lado
para outro.
Em estado de repouso um diapasão produz um
som forte de altura tonal constante. Em
movimento, a altura do tom altera-se
constantemente. Se o som se dirige à orelha, o tom
aumenta, se ele se distancia da orelha, o tom
abaixa.
Explicação: por causa da distância decrescente da
orelha, a distância temporal entre duas
densificações é reduzida, já que a segunda
densificação tem um caminho mais curto para
atingir a orelha do que a primeira. A orelha
percebe uma freqüência mais alta. O tom sobe. Ao
distanciar-se a fonte de som da orelha, a distância
temporal entre densificação e rarefação é
prolongada. O tom torna-se mais baixo.
12. Figuras sonoras de Chladni
• Fixar a placa de Chladni na mesa por meio da
pinça de mesa e o talho de plástico. Distribuir
areia ou semelhante na placa de modo que
esta esteja coberta de uma fina camada na
terça parte de sua superfície.
• Friccionar o arco de violino bem preparado
com breu exatamente no meio entre duas
pontas enquanto ao mesmo tempo toca-se
levemente uma ponta com o dedo da outra
mão.
• Friccionar o arco várias vezes firmemente na
placa de modo que ela inicie uma vibração
intensa e audível.
Ao friccionar o arco na placa ouve-se um tom
acústico bem definido. Os grãos de areia começam
a vibrar intensamente em certas partes, dançam
pulando sobre a superfície da placa e se acumulam
formando estranhas figuras sonoras na superfície.
Explicação: sobre a placa formam-se "ondas
estacionárias". Ao ser excitada a placa não oscila
para baixo e para cima na sua integridade, ela só
vibra em certos pontos (nos picos), enquanto em
outros lugares (nós) ela fica em repouso total. Ao
tocar uma das pontas da placa foram forçados nós.
4
Page 45

13. Vibração de sinos
⋅
• Fixar o sino em concha com a apertura para
acima por meio da pinça de mesa e talho de
plástico, na mesa de trabalho.
• Bater na beira do sino com o martelo em
diferentes lugares (alternativamente, passar o
arco).
A altura do tom depende do lugar onde foi batido.
É facilmente possível de se obter diferenças de um
tom inteiro. Se o sino for excitado em várias partes,
então se formam ambos os tons e obtêm-se as
conhecidas "flutuações" (aumento e redução
periódicos do volume em seqüências mais ou
menos rápidas).
Explicação: os sinos são placas vibrantes
deformadas. Os tons mais altos geralmente não
harmonizam com o tom fundamental. Também os
sinos dividem-se em diferentes partes vibrantes
separadas.
14. Ondas estacionárias
• Fixar o laço da corda de ondas numa maçaneta
porta fazendo simplesmente um nó.
• Esticar a corda medianamente e executar um
movimento lento e circular.
• Logo esticar mais a corda e acelerar o
movimento em círculos.
Com movimento lento formam-se nós em cada
ponta e no meio um pico. Com o movimento mais
rápido surgem 3 nós e 2 picos e acelerando-se mais
surgem 4 nós e 3 picos.
Explicação: através da reflexão na porta forma-se
uma onda estacionária. Por causa da lentidão do
olho parece que a onda original e a refletida são
simultâneas.
Na vibração básica a corda vibra em todo o seu
comprimento na forma de uma meia onda para
cima e para baixo. No meio encontra-se o pico, em
ambas as pontas estão os nós. No primeiro nível de
vibração (oitava) a corda vibra na forma de uma
onda completa (2 picos e 3 nós). No segundo nível
temos 3 picos e 4 nós, etc.
15. Sobretons
• Soprar no apito e boca com os lábios, primeiro
levemente, logo com muita força.
Primeiro ouve-se um tom fundamental e ao soprar
com mais força ouve-se um tom muito mais alto.
Explicação: no caso do apito de boca, as ondas
estacionárias devem formar-se de modo que se
formem um nó no fundo e um pico no bico. Isto
acontece quando o comprimento do apito
corresponde exatamente a 1/4 do comprimento de
onda. Também é o caso quando a distância da
abertura ao fundo é equivalente a 3/4, 5/4, 7/4 e
assim por diante do comprimento de onda.
Além do tom fundamental surgem, portanto
também diversos sobretons impares da série tonal
harmônica em maior ou menor medida.
É só por causa (e graças ao) do surgimento dos
sobretons que cada instrumento musical tem ma
coloração tonal bem específica.
16. Medição do comprimento de onda
• Tampar a ponta do tubo de vidro de vidro de
exatamente 45 cm com a tampa de borracha e
introduzir com uma colher de chá uma
pequena quantidade de pó de licopódio no
tubo mantido em posição inclinada, de forma
que uma quantidade não muito grande de pó
se distribua de modo regular para que se
forme uma fina tira amarelada no tubo.
• Fixar o tubo de vidro por meio da pinça de
suporte, pinça de mesa e talho de plástico na
mesa de trabalho.
• Bater firmemente com o diapasão (1700 Hz) no
cabo de um martelo e manter um dos braços
com o lado largo bem perto da abertura do
tubo. Repetir essa excitação sonora
eventualmente várias vezes!
O pó de licopódio inicia uma forte vibração nos
picos de vibração enquanto que nos nós este fica
totalmente em repouso. As partículas de pó caem
no fundo do tubo e formam acumulações
periódicas que se repetem no comprimento do
tubo 4 1/2 vezes.
Explicação: o diapasão de metal leve tem uma
freqüência de 1700 vibrações por segundo.
Conforme a relação simples
Comprimento de onda
340
1700
s/m
⋅=
Hz
⋅
20
Velocidade do som
=
Freqüência
m,
o comprimento de onda correspondente é de 20 cm.
Num tubo de 45 cm de comprimento "cabem",
portanto 4½ meias ondas ou 2 completas, como
demonstrado na experiência. Na abertura do tubo
sempre se encontra um pico, no fundo sempre se
encontra um nó.
17. O fundo de ressonância
• Bater fortemente o diapasão a’ = 440 Hertz
com o martelinho de tocar do metalofone e
posicionar-lo com o seu cabo sobre a superfície
da mesa.
O tom do diapasão apenas audível no ar livre é
tão amplificado que ele agora é claramente
perceptível no espaço inteiro.
Explicação: por causa do movimento vibratório
da vara do diapasão, o tampo da mesa
também começa a vibrar. Sendo que superfície
efetiva da mesa é muito maior que o diapasão,
o volume do som é ampliado fortemente.
5
Page 46

18. A caixa de ressonância
• Bater com firmeza com o diapasão de lá' = 440
Hertz no talho de plástico (19) da pinça de
mesa e colocá-lo na caixa de ressonância do
monocórdio com a sua vara.
Ocorre um aumento significativo do tom.
Explicação: idêntica à experiência 17.
19. O ressonador esférico
• Manter os ressonadores de Helmholtz na
seqüência com ponta pequena perto da orelha.
Ouve-se um tom que fica mais baixo conforme
aumenta o diâmetro do ressonador.
Explicação: todo corpo oco, seja qual for a sua
forma (tubo, esfera oca) possui uma vibração
fundamental bem específica, praticamente livre de
sobretons. Esta vibração fundamental pode ser
excitada se sopra na abertura do corpo oco ou
mesmo só batendo com a articulação do dedo no
corpo oco. Porém a vibração própria só é excitada
quando se encontram no ruído de ambiente tons
que coincidam com a vibração fundamental do
ressonador. Assim, pode-se analisar o conteúdo em
diferentes semitons de uma mistura de sons. Se no
ambiente reina o silêncio total, então o ressonador
fica mudo.
20. Os instrumentos de corda e as suas leis
• Inserir a ponte perpendicularmente sob a
corda do monocórdio de modo que a quina
direita coincida exatamente com o número 20
da escala e a corda de 40 cm esteja dividida
em dois segmentos iguais de cada um 20 cm
de comprimento.
• Afinar o meio comprimento da corda
apertando a borboleta no diapasão (440 Hz) lá'
(lá fundamental).
• Comparar os tons originados puxando, ou
melhor, friccionando a corda nos pontos de 40
cm, 20 cm, 10 cm e 5 cm de comprimento.
Com 20 cm de comprimento de corda obtém-se o
lá fundamental = 440 Hertz, com 40 cm de
comprimento de corda obtém-se o tom mais baixo
de uma oitava lá = 220 Hertz, com 10 cm de
comprimento de corda obtém-se o tom mais alto
de uma oitava lá'’ = 880 Hertz com 5 cm de
comprimento de corda obtém-se o tom mais alto
de 2 oitavas lá'’’ = 1760 Hertz.
Explicação: com o dobro de comprimento de corda
obtém-se um tom mais baixo de uma oitava, com a
metade do comprimento de corda obtém-se a
primeira oitava e com ¼ do comprimento de corda
a segunda oitava. As freqüências das cordas são
inversamente proporcionais ao seu comprimento.
21. A escala musical nos instrumentos de corda
• Tocar a escala tonal habitual para o ouvido
humano no monocórdio mudando a ponte de
posição e medindo a cada vez o comprimento
do segmento de corda em vibração e
determinar a relação com o comprimento total
da corda (40 cm).
Tom Compr. corda Relação compr.
dó 40 cm 1
ré 35,55 cm 8/9
mi 32 cm 4/5
fá 30 cm 3/4
sol 26,66 cm 2/3
lá 24 cm 3/5
si 21,33 cm 8/15
dó’ 20 cm 1/2
Explicação: a corda deve ter a metade do
comprimento quando se queira obter a oitava sob
condições idênticas de tensão da corda, espessura
da corda, etc. Para os outros tons da escala tonal
resultam coeficientes da maior simplicidade para a
relação entre o comprimento do segmento em
vibração e o comprimento total da corda. Quanto
menor são esses números, melhor é o som. (Oitava
1:2, Quinta lá/sol 2:3, etc.)
22. Medição da tensão da corda
• Colocar a balança de mola no monocórdio e
encaixar a ponta da corda de perlon na fenda
da balança de mola.
• Afinar a corda no lá fundamental
esticando-a com a borboleta e
utilizando o diapasão lá' = 440 Hertz.
• Determinar a tensão da corda com a balança
de mola.
A tensão da corda no caso do perlon é de 5,5 kg.
23. Dependência da altura do tom da tensão das
cordas
Um dos resultados da experiência 22 era que para se
obter o lá fundamental, a corda de perlon deve ter
5,5 kg de tensão. Qual é a tensão da corda no caso
do tom lá (220 Hertz) de uma oitava mais abaixo
(220 Hertz)?
• Soltar a borboleta até obter o tom lá.
• Para efeitos de controle colocar a ponte na
marca de 20 (meio comprimento de corda) e
afinar o meio comprimento de corda no lá. A
corda toda vibra então em meia freqüência.
A tensão da corda cai para 1,4 kg.
6
Page 47

Explicação: a freqüência de uma corda é
proporcional à raiz quadrada do peso da tensão.
Quando a força que tensa a corda é 4x, 9x, 16x
maior, a freqüência aumenta em 2, 3 e 4 vezes. 1/4
de 5,5 é (aprox.) 1,4, como foi medido.
24. Os instrumentos de sopro e as suas leis
• Soprar no apito de boca com a boca e alterar o
comprimento efetivo do apito movendo mais
ou menos o seu fundo.
No caso de pequenos comprimentos de apito,
obtêm-se tons altos, no caso de maiores
comprimentos obtêm-se tons mais baixos.
Explicação: ao soprar uma corrente de ar fraca
formam-se ondas estacionárias, sendo que o
comprimento do apito equivale a uma quarta parte
do comprimento das ondas. Ao sopra-se uma
corrente mais forte surgem sobretons, cuja
freqüência é um múltiplo ímpar do tom
fundamental.
No caso do apito aberto, a vibração fundamental é
duas vezes maior do que no caso do apito fechado.
25. A escala dó maior e os seus intervalos
• Para determinar os intervalos dividem-se cada
freqüência mais alta pela próxima mais baixa.
Para o intervalo ré/dó = 1188/1056, o
denominador comum é 132, pelo que se obtém
então 9/8, 10/9, 16/15, 9/8, 10/9, 9/8 e 16/15.
Explicação: os intervalos de cada tom da escala
tonal não são do mesmo tamanho. Diferenciam-se
grandes inteiros (9/8), pequenos inteiros (10/9) e
passos de semitons (16/15).
26. Som harmônico e som desarmônico
• Soprar diferentes combinações de sons com o
apito de língua.
Obtêm-se consonâncias claras com a oitava, a
quinta e a quarta, e com as terças menor e maior.
Dissonantes são a segunda e a sétima, assim como
a harmonia de tons imediatamente seguidos.
27. A tríade sol maior
• Soprar simultaneamente os tons sol e ré no
apito de língua.
Ouve-se uma harmonia particularmente
consonante, conhecida como a tríade sol maior.
Explicação: caso vários tons formem uma
consonância harmônica, estes têm que o fazer em
pares. A tríade sol maior é formada pela conjunção
duas terças maior e menor. As freqüências dos tons
sol, si, ré, encontram-se numa relação
particularmente simples, ou seja, 4:5:6.
Para se obter essas relações numéricas, devem-se
dividir as freqüências fundamentais indicadas no
apito de língua a cada vez por 6.
(Para manter as fisicamente corretas freqüências,
as freqüências básicas impressas têm que ser
multiplicadas por 33).
Entre o apito de língua e o metalofone
dependendo do caso pode-se ouvir, além disso, um
desvio da afinação.
28. A tríade sol maior de quatro vozes
• Completar a tríade sol maior de quatro vozes
com a oitava sol'. Ou seja, tocar sol, si, ré', e
sol'.
Obtém-se assim o som particularmente cheio e
harmonioso da "tríade sol maior a quatro vozes".
Explicação: na tríade a quatro vozes encontram-se
as seguintes consonâncias:
A oitava 1:2
A quinta 2:3
A terça maior 4:5
A terça menor 5:6
29. A escala tonal maior com tom
aleatoriamente escolhido
• Tocar no metalofone primeiro a escala dó
maior começando com dó, e depois tocar a
escala tonal sol maior, começando com sol.
A escala tonal dó maior de dó' a dó'' soa
acusticamente pura. Na escala sol maior iniciando
com sol' surge um erro grave ao se chegar a fá''. O
tom é baixo demais em um semitom.
Explicação: segundo a experiência 25 os seguintes
intervalos devem surgir em todas as escalas:
9/8, 10/9 16/15, 9/8, 10/9, 9/8, 16/15.
Na seqüência tonal sol’... sol" encontram-se porém
os seguintes intervalos:
10/9, 9/8, 16/15
, 9/8, 10/9, 16/15, 9/8
Os intervalos sublinhados são corretos, os outros
mais ou menos errados.
Os intervalos 9/8 e 10/9 estão tão perto um do
outro que eles só podem ser diferenciados com
dificuldade, é por isso que o erro entre sol' e si' é
irrelevante. O erro entre mi" e fá" é bem mais
grave. Aqui, intervalo é de 16/15, enquanto que na
realidade ele deveria ser de 9/8. Por isso ouve-se o
fá" com um semitom abaixo do ideal.
30. Intervenção dos passos de semitons
• Tocar a escala de sol' a sol" no apito de língua,
depois de ter garantido que o tom lá' do apito
de boca esteja afinado com o tom
fundamental. Para tal, bater com o diapasão e
comparar.
A escala sol maior toca em total pureza no apito de
língua.
Explicação: em vez do tom fá' associa-se um novo
tom, o fá' sustenido, o qual é calculado de modo
7
Page 48

que o intervalo entre mi’ e fá’ sustenido 9/8 e entre
o fá'' sustenido e o sol’’ é de16/15. Isto ocorre
porque a freqüência do fá é elevada por
multiplicação por 25/24.
Os novos sons que surgem através da elevação dos
tons chamam-se: dó sustenido, ré sustenido, mi
sustenido, fá sustenido, sol sustenido, lá sustenido,
si sustenido.
A elevação é indicada nas partituras por uma cruz
na frente.
Os tons mais baixos de um semitom são obtidos
pela multiplicação do tom mais alto por 24/25.
Estes tons são indicados nas partituras por um b na
frente. Eles se chamam: dó bemol, ré bemol, mi
bemol, fá bemol, sol bemol, lá bemol, bemol.
No teclado do piano os tons dó bemol e ré bemol,
etc., são reproduzidos com mínimo de erro.
Elwe Didactic GmbH • Steinfelsstr. 6 • 08248 Klingenthal • Alemanha • www.elwedidactic.com
3B Scientific GmbH • Rudorffweg 8 • 21031 Hamburgo • Alemanha • www.3bscientific.com
Sob reserva de alterações técnicas
© Copyright 2009 3B Scientific GmbH
 Loading...