

Page 1
3B SCIENTIFIC® PHYSICS
Binokulares Kursmikroskop, Modell 200 U30701
Bedienungsanleitung
10/07 ALF
1. Sicherheitshinweise
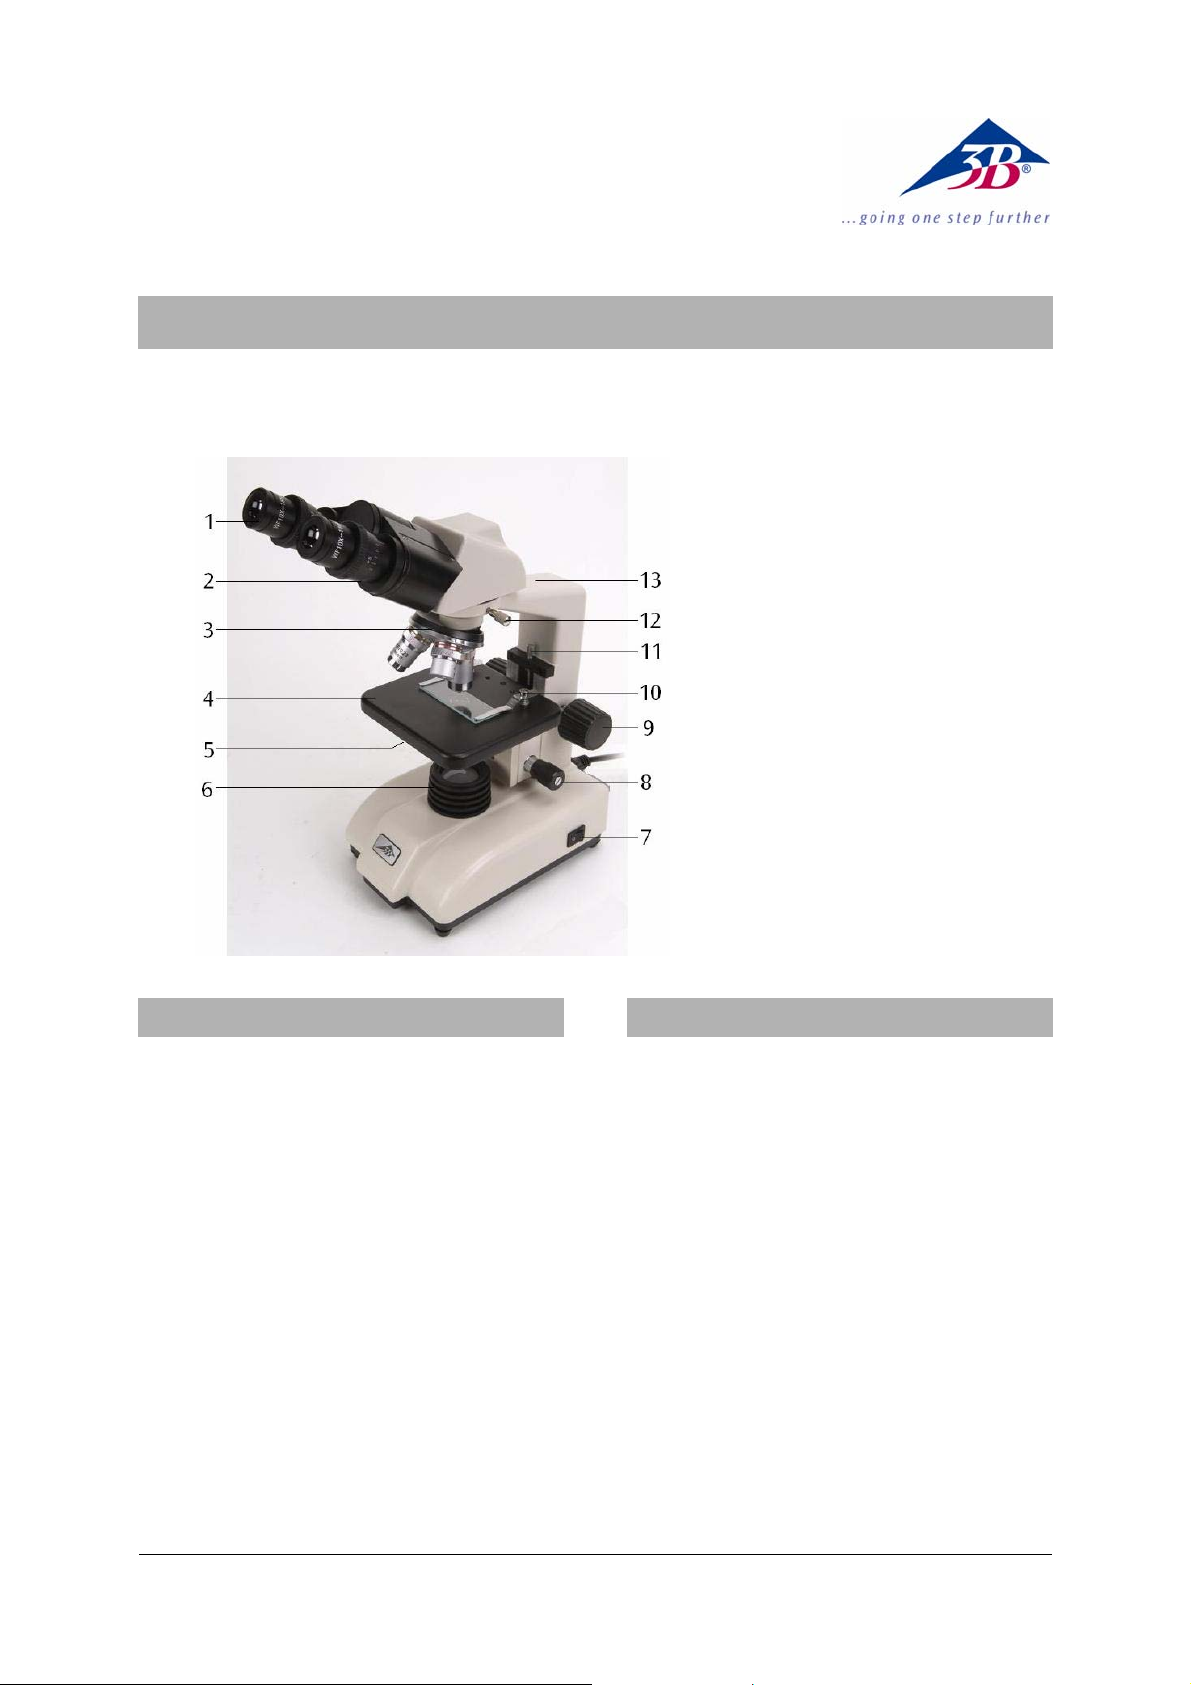
1 Okular
2 Tubus
3 Revolver mit Objektiven
4 Objekttisch
5 Kondensor mit Irisblende und
Filterhalter
6 Beleuchtung
7 Netzschalter
8 Triebknopf für Feintrieb
9 Triebknopf für Grobtrieb
10 Präparateklemmen
11 Feststellschraube für Objekt-
tisch T
12 Feststellschraube für Mikro-
skopkopf
13 Stativ
2. Beschreibung, technische Daten
• Elektrischer Anschluss des Mikroskops darf nur
an geerdeten Steckdosen erfolgen.
• Vor Pflege- und Wartungsarbeiten ist immer
der Netzstecker zu ziehen.
• Das Mikroskop darf mit keinen Flüssigkeiten in
Kontakt kommen.
• Das Mikroskop keinen mechanischen Belastun-
gen aussetzen.
• Optische Teile des Mikroskops nicht mit den
Fingern berühren.
• Zur Reinigung des Mikroskops keine aggressi-
ven Reiniger oder Lösungsmittel verwenden.
• Objektive und Okulare zum Reinigen nicht
auseinander nehmen.
• Bei Beschädigungen oder Fehlern das Mikro-
skop nicht selbst reparieren.
Das binokulare Kursmikroskop ermöglicht die
zweidimensionale Betrachtung von Objekten (dünne Schnitte von Pflanzen- oder Tieren) in 40- bis
400-facher Vergrößerung.
Das Mikroskop U30701-115 ist für eine Netzspannung von 115 V (±10 %) ausgelegt, U30701-230 für
230 V (±10 %).
Stativ: Robustes Ganzmetallstativ, Stativarm fest
mit Fuß verbunden; Fokussierung über beidseitig
am Stativ angebrachte separate Stellknöpfe für
Fein- und Grobtrieb, angetrieben über ein
Zahnstangengetriebe mit Schwalbenschwanzverzahnung; einstellbarer Anschlag zum Schutz der
Objektträger und Objektive
Tubus: Binokularer Seidentopf-Kopf, Schrägeinblick 30°, Kopf um 360° drehbar, Augenabstand
zwischen 54 mm und 75 mm einstellbar, Dioptrienausgleich ±5 für beide Okulare
Okular: Weitfeld-Okularpaar WF 10x 18 mm
1
Page 2

Objektive: Objektivrevolver mit DIN 3 achromatischen Objektiven 4x / 0,10, 10x / 0,25, 40x / 0,65
(mit Präparateschutz)
Vergrößerung: 40x, 100x, 400x
Objekttisch: 127 x 132 mm
2
mit 2 Präparateklem-
men
Beleuchtung: Im Fuß integrierte 5 W Leuchtstoff-
lampe und Sammellinse im Lampenschacht, Netzanschluss 115 V bzw. 230 V, 50/60 Hz
Kondensor: N.A. 0,65, Irisblende, Filterhalter und
Blaufilter
Abmessungen: ca. 282 x 148 x 357 mm³
Masse: ca. 4,69 kg
3. Auspacken und Zusammenbau
Das Mikroskop wird in einem Karton aus Styropor
geliefert.
• Nach Entfernen des Klebebands den Behälter
vorsichtig öffnen. Dabei darauf achten, dass
keine der optischen Teile (Objektive und Okulare) herausfallen.
• Um Kondensation auf den optischen Bestand-
teilen zu vermeiden, das Mikroskop so lange in
der Verpackung belassen, bis es die Raumtemperatur angenommen hat.
• Das Mikroskop mit beiden Händen (eine Hand
am Stativarm und eine am Fuß) entnehmen
und auf eine ebene Fläche stellen.
• Die Objektive sind separat in Döschen ver-
packt. Sie werden in der Reihenfolge vom Objektiv mit dem kleinsten bis zum Objektiv mit
dem größten Vergrößerungsfaktor im Uhrzeigersinn hinten beginnend in die Öffnungen der
Revolverplatte geschraubt.
• Anschließend den binokularen Mikroskopkopf
auf das Stativ setzen und mit der Feststellschraube fixieren. Okulare in den Tubus einsetzen.
4. Bedienung
4.1 Allgemeine Hinweise
• Das Mikroskop auf einen ebenen Tisch stellen.
• Das zu betrachtende Objekt in die Mitte des
Objekttisches platzieren und mit den Klemmen
festklemmen.
• Netzkabel anschließen und Beleuchtung an-
schalten.
• Objektträger so in den Strahlengang schieben,
dass das Objekt vom Strahlengang deutlich
durchstrahlt wird.
• Augenabstand einstellen bis nur ein Lichtkreis-
sichtbar ist.
• Diopterstärke den Augen anpassen.
• Zur Erreichung eines hohen Kontrasts Hinter-
grundbeleuchtung mittels der Irisblende einstellen.
• Das Objektiv mit der kleinsten Vergrößerung in
den Strahlengang drehen. Ein Klick-Ton zeigt
die richtige Stellung an.
Hinweis: Es ist am besten mit der kleinsten Vergrößerung zu beginnen, um zuerst größere Strukturdetails zu erkennen. Der Übergang zu einer
stärkeren Vergrößerung zur Betrachtung feinerer
Details erfolgt durch Drehen des Revolvers bis zum
gewünschten Objektiv.
Die Stärke der Vergrößerung ergibt sich aus dem
Produkt des Vergrößerungsfaktors des Okulars und
des Objektivs.
• Mit dem Triebknopf für Grobtrieb das unscharf
abgebildete Präparat scharf stellen, dabei darauf achten, dass das Objektiv den Objektträger
nicht berührt. (Beschädigungsgefahr)
• Anschließend mittels Feintrieb die Bildschärfe
nachregeln.
• Zur Benutzung von Farbfiltern Filterhalter
ausschwenken und Farbfilter einlegen.
4.2 Sicherungswechsel
• Stromversorgung ausschalten und unbedingt
Netzstecker ziehen.
• Sicherungshalter an der Rückseite des Mikro-
skops mit einem flachen Gegenstand (z.B.
Schraubenzieher) herausschrauben.
• Sicherung ersetzen und Halter wieder ein-
schrauben.
5. Aufbewahrung, Reinigung
• Das Mikroskop an einem sauberen, trockenen
und staubfreien Platz aufbewahren.
• Bei Nicht-Benutzung das Mikroskop immer mit
der Staubschutzhülle abdecken.
• Das Mikroskop keinen Temperaturen unter 0°C
und über 40°C sowie keiner relativen Luftfeuchtigkeit über 85% aussetzen.
• Nach Gebrauch sofort die Beleuchtung aus-
schalten.
• Bei starker Verschmutzung das Mikroskop mit
einem weichen Tuch und ein wenig Ethanol
reinigen.
• Die optischen Bestandteile mit einem weichen
Linsentuch reinigen.
3B Scientific GmbH • Rudorffweg 8 • 21031 Hamburg • Deutschland • www.3bscientific.com
Technische Änderungen vorbehalten
© Copyright 2007 3B Scientific GmbH
Page 3

3B SCIENTIFIC® PHYSICS
Binocular Course Microscope Model 200 U30701
Instruction Manual
10/07 ALF
1 Eyepiece
2 Tube
3 Revolver with objectives
4 Object stage
5 Condensor with iris diaphragm
and filter holder
6 Lamp housing
7 Mains switch
8 Adjustment knob for fine
focusing
9 Adjustment knob for coarse
focusing
10 Specimen clips
11 Lock screw for object stage
12 Head lock screw
13 Stand
1. Safety notes
• For power supply use only electrical sockets
with ground contact.
• Always unplug the mains plug before cleaning
or maintenance.
• Be careful not to spill any liquids on the mic-
roscope.
• Do not wipe the optics with your hands.
• Do not disassemble objective or eyepieces to
attempt to clean them.
• Do not mishandle or impose unnecessary force
on the microscope.
• Do not clean the unit with volatile solvents or
abrasive cleaners.
• Do not attempt to service the microscope your-
self.
2. Description, technical data
The binocular course microscope allows twodimensional viewing of objects (thin sections of
plant or animal specimen) in 40x to 400x magnification.
The microscope U30701-115 is for operation with a
mains voltage of 115 V (±10%), and the U30701-230
unit is for operation with 230 V (±10%).
Stand: Robust, all metal stand with arm permanently connected to the base. Focussing by means
of separate knobs for coarse and fine adjustment
located on either side of the stand and operated by
rack and pinion drive with dovetail teeth, adjustable stopper for protecting the object stage and
objective
Tube: Binocular Seidentopf head, 30° viewing
angle, 360° rotatable head, viewing distance adjustable between 54 and 75 mm, ±5 dioptric compensation for both eyepieces
1
Page 4

Eyepiece: Pair of wide field eyepieces WF 10 x
18 mm
Objectives: Revolver with 3 DIN achromatic objectives 4x / 0.10, 10x / 0.25, 40x / 0.65 (with specimen
protection)
Magnification: 40x, 100x, 400x
Object stage: 127 x 132 mm
2
with 2 specimen clips
Illumination: 5 W incandescent lamp incorporated
in the base integrated in base, with a converging
lens in lamp shaft, power supply 115 V resp. 230 V
50/60 Hz
Condenser: Condenser N.A. 0.65, iris diaphragm,
filter holder and blue filter
Dimensions: 282 x 148 x 357 mm³ approx.
Weight: 4.69 kg approx.
3. Unpacking and assembly
The microscope is packed in a molded styrofoam
container.
• Take the container out of the carton remove
the tape and carefully lift the top half off the
container. Be careful not to let the optical items (objectives and eyepieces) drop down.
• To avoid condensation on the optical compo-
nents, leave the microscope in the original packing to allow it to adjust to room temperature.
• Using both hands (one around the pillar and
one around the base), lift the microscope from
the container and put it on a stable desk.
• The objectives will be found within individual
protective vials. Install the objectives into the
microscope nosepiece from the lowest magnification to the highest, in a clockwise direction
from the rear.
• Put the binocular head onto the top of the
stand and tighten the head-lock-screw. Insert
the eyepieces into the tube.
4. Operation
4.1 General information
• Set the microscope on a level table.
• Place the object to be observed in the center of
the object plate. Use the clips to fasten it into
place.
• Connect the mains cable to the net and turn on
the switch to get the object illuminated.
• Make certain that the specimen is centered
over the opening in the stage.
• Adjust the interpupillary distance so that one
circle of light can be seen.
• Make the necessary eyepiece dioptre adjust-
ments to suit your eyes.
• Adjust the aperture of the iris diaphragm to get
the background brightness suitable for a high
contrast image.
• Rotate the nosepiece until the objective with
the lowest magnification is pointed at the
specimen. There is a definite “click” when each
objective is lined up properly.
NOTE: It is best to begin with the lowest power
objective. This is important to reveal general structural details with the largest field of view first.
Than you may increase the magnification as needed to reveal small details.
To determine the magnification at which you are
viewing a specimen, multiply the power of the
eyepiece by the power of the objective.
• Adjust the coarse-focusing-knob which moves
the stage up until the specimen is focused. Be
careful that the objective does not make contact with the slide at any time. This may cause
damage to the objective and/or crack your
slide.
• Adjust the fine-focusing-knob to get the image
more sharp and more clear.
• Colour filters may be inserted into the filter
holder for definition of specimen parts. Swing
the filter holder out and insert colour filters.
4.2 Changing the fuse
• Turn off the power switch and unplug the
mains plug.
• Unscrew the fuse holder on the back of the
stand base with a screwdriver.
• Replace the fuse and reinsert the holder in its
socket.
5. Storage and cleaning
• Keep the microscope in a clean, dry and dust
free place.
• When not in use always cover the microscope
with the dust cover.
• Do not expose it to temperatures below 0°C
and above 40°C and a max. relative humidity
of over 85%.
• Always turn off the light immediately after use.
• Use a soft linen cloth and some ethanol to
clean the microscope.
• Use a soft lens tissue to clean the optics.
3B Scientific GmbH • Rudorffweg 8 • 21031 Hamburg • Germany • www.3bscientific.com
Subject to technical amendments
© Copyright 2007 3B Scientific GmbH
Page 5

3B SCIENTIFIC® PHYSICS
Microscope binoculaire collège, modèle 200 U30701
Instructions d’utilisation
10/07 ALF
1 Oculaire
2 Tube
3 Revolver avec objectifs
4 Platine
5 Condenseur avec diaphragme
à iris et porte-filtre
6 Module de la lampe
7 Interrupteur secteur
8 Bouton pour mise au point
rapide précise
9 Bouton pour mise au point
rapide
10 Valets de fixation
11 Vis de serrage de la table
12 Vis de fixation de la tête du
microscope
13 Support
1. Consignes de sécurité
• Ne brancher le microscope qu’à des prises de
courant mises à la terre.
• Avant d’effectuer des travaux d’entretien et de
maintenance, retirer toujours la fiche secteur.
• Le microscope ne doit jamais entrer en contact
avec des liquides.
• Ne jamais exposer le microscope à des
contraintes mécaniques.
• Ne pas toucher les parties optiques du micros-
cope avec les doigts.
• Pour le nettoyage du microscope, ne pas utili-
ser de nettoyants ni de solvants agressifs.
• Pour le nettoyage, ne pas démonter les objec-
tifs ni les oculaires.
• En cas d’endommagement ou de défaut, ne pas
réparer soi-même le microscope.
2. Description, caractéristiques techniques
Le microscope binoculaire collège permet
d’observer des objets en deux dimensions (coupes
fines de plantes ou d’animaux) avec un agrandissement 40 à 400x.
Le microscope U30701-115 est prévue pour une
tension secteur de 115 V (±10 %) et l'alimentation
U30701-230 pour une tension secteur de 230 V
(±10 %).
Support : Bâti support entièrement métallique.
Grande robustesse. Mise au point rapide par pignon/crémaillère avec échappement, fine par vis
micrométrique séparée. Butée de protection
Tube : Tête de type Seidentopf binoculaire, inclinée à 30°, tête orientable à 360°, écartement interpupillaire réglable entre 54 et 75 mm, réglage
dioptrique ±5 pour les deux oculaires
Oculaire : Paire d’oculaires grand champ WF 10x
18 mm
Objectifs : Tourelle revolver avec 3 objectifs achro-
1
Page 6

matiques 4x / 0,10, 10x / 0,25, 40x / 0,65 (avec
protection de la préparation)
Grossissement : 40x, 100x, 400x
Platine : 127 x 132 mm
2
avec 2 valets de fixation
Eclairage : Tube fluorescent de 5 W intégré au
pied, avec lentille convexe dans le module de la
lampe, branchement secteur 115 V / 230 V, 50/60
Hz
Condenseur : O. N. 0,65, diaphragme à iris, portefiltre et filtre bleu
Dimensions : env. 282 x 148 x 357 mm³
Masse : env. 4,69 kg
3. Déballage et assemblage
Le microscope est livré dans un carton en
polystyrène.
• Après avoir retiré le ruban adhésif, ouvrir le
carton avec précaution. Veiller à ce que les
parties optiques (objectifs et oculaires) ne tombent pas.
• Pour éviter de la condensation sur les compo-
sants optiques, laisser le microscope dans
l’emballage, jusqu’à ce qu’il ait la température
ambiante.
• Retirer le microscope avec les deux mains (une
main au bras de la potence et l’autre au pied),
puis le poser sur une surface plane.
• Les objectifs sont emballés séparément dans de
petites boîtes. Les visser dans les orifices de la
plaque à revolver dans le sens des aiguilles
d’une montre en commençant par l’objectif au
plus petit facteur d’agrandissement.
• Ensuite, placer la tête binoculaire du micros-
cope sur le bras et l’arrêter avec la vis de fixation. Installer les oculaires dans le tube
4. Commande
4.1 Remarques générales
• Poser le microscope sur une table plane.
• Placer l’objet d’étude au milieu de la table du
microscope et le fixer avec les agrafes.
• Brancher le câble secteur et allumer
l’éclairage.
• Glisser le support d’objet dans le faisceau lu-
mineux de telle sorte que l’objet soit traversé
par le rayon.
• Régler l’écart des yeux, jusqu’à ce qu’on ne
voie plus qu’un cercle lumineux.
• Adaptez l'intensité dioptrique aux yeux.
• Pour obtenir un grand contraste, régler
l’éclairage de fond avec le diaphragme à iris.
• Tourner l’objectif avec le plus petit agrandis-
sement dans le faisceau lumineux. Un « clic »
signale la bonne position.
Remarque : commencer par le plus petit agrandissement pour découvrir d’abord les grands details
de la structure. Pour passer à un plus fort agrandissement pour voir des détails plus fins, tourner le
revolver jusqu’à l’objectif souhaité.
La force d’agrandissement résulte du produit du
facteur d’agrandissement de l’oculaire et de
l’objectif.
• Le bouton de mise au point rapide permet
d’obtenir une image nette de l’objet encore
flou ; veiller à ce que l’objectif ne touche pas le
support d’objet (risque d’endommagement).
• Ensuite, régler la netteté avec la vis micro-
métrique.
• Pour utiliser des filtres de couleurs, écarter le
portefiltre et insérer le filtre désiré.
4.2 Remplacement de fusible
• Couper l’alimentation électrique et retirer
impérativement la fiche secteur.
• Dévisser le porte-fusible à l’arrière du micros-
cope avec un objet plat (par ex. tournevis).
• Remplacer le fusible et visser de nouveau le
porte-fusible.
5. Rangement, nettoyage
• Ranger le microscope à un endroit propre, sec
et exempt de poussière.
• Si le microscope n’est pas utilisé, le recouvrir
de la housse.
• Ne pas exposer le microscope à des
températures inférieures à 0°C et supérieures à
40°C ainsi qu’à une humidité relative de l’aide
supérieure à 85%.
• Après son utilisation, éteindre immédiatement
l’éclairage.
• S’il est fortement encrassé, nettoyer le micro-
scope avec un chiffon doux et un peu
d’éthanol.
• Nettoyer les composants optiques avec un
chiffon doux pour lentilles.
3B Scientific GmbH • Rudorffweg 8 • 21031 Hamburg • Allemagne • www.3bscientific.com
Sous réserve de modifications techniques
© Copyright 2007 3B Scientific GmbH
Page 7

3B SCIENTIFIC® PHYSICS
Microscopio didattico binoculare, modello 200 U30701
Istruzioni d’uso
10/07 ALF
1 Oculare
2 Tubo
3 Revolver portaobiettivi
4 Tavolino portaoggetti
5 Condensatore con diaframma
a iride e portafiltri
6 Illuminazione
7 Interruttore di rete
8 Manopola per regolazione
micrometrica
9 Manopola per regolazione
macrometrica
10 Pinzette per il preparato
11 Vite di arresto del tavolino
12 Vite di fissaggio della testata
del microscopio
13 Stativo
1. Norme di sicurezza
• L’allacciamento elettrico del microscopio può
essere effettuato solo ad una presa collegata a
terra.
• Prima di effettuare lavori di cura o manuten-
zione è necessario staccare sempre la spina.
• Il microscopio non deve entrare in contatto
con sostanze liquide.
• Non sottoporre il microscopio a sollecitazioni
meccaniche.
• Non toccare con le dita le parti ottiche del
microscopio.
• Non impiegare detergenti o soluzioni aggressi-
ve per la pulizia del microscopio.
• Non separare gli obiettivi e gli oculari per effet-
tuarne la pulizia.
• In caso di danneggiamento o di difetti del
microscopio non cercare di effettuare la riparazione autonomamente.
2. Descrizione, dati
Il microscopio didattico binoculare consente
l’osservazione bidimensionale di oggetti (sezioni
sottili di piante o animali) con ingrandimento da
40 a 400 volte.
Il microscopio U30701-115 è progettato per una
tensione di rete di 115 V (±10 %), U30701-230 per
230 V (±10 %).
Stativo: Robusto stativo completamente in metallo, braccio dello stativo fissato saldamente alla
base; messa a fuoco attraverso manopole per regolazione macrometrica e micrometrica separate
poste ai lati dello stativo, azionate mediante un
ingranaggio a cremagliera con dentatura a coda di
rondine; battuta regolabile per la protezione del
portaoggetti e degli obiettivi
Tubo: Testata binoculare tipo Seidentopf, tubo
inclinato a 30°, testata girevole a 360°, distanza
interoculare regolabile tra 54 mm e 75 mm, compensazione diottrica ±5 per entrambi gli oculari
Oculare: Coppia di oculari grande campo WF 10x
18 mm
1
Page 8

Obiettivo: Revolver portaobiettivi con tre obiettivi
acromatici 4x / 0,10, 10x / 0,25, 40x / 0,65, (con
protezione del preparato)
Ingrandimento: 40x, 100x, 400x
Tavolino portaoggetti: 127 x 132 mm
2
con 2 pin-
zette per il preparato
Illuminazione: Lampada fluorescente da 5 W inte-
grata nella base con lente collettrice nel gambo
della lampada, allacciamento alla rete a 115 V o
230 V, 50/60 Hz
Condensatore: N.A. 0,65, diaframma a iride e
portafiltri
Dimensioni: ca. 282 x 148 x 357 mm³
Peso: ca. 4,69 kg
3. Disimballo e assemblaggio
Il microscopio viene fornito in un cartone in Styropor.
• Aprire con precauzione il contenitore una volta
rimosso il nastro adesivo. Durante tale operazione prestare attenzione affinché i pezzi
dell’ottica (obiettivi e oculari) non cadano.
• Per evitare la formazione di condensa sui
componenti ottici lasciare il microscopio nella
confezione finché non abbia raggiunto la temperatura ambiente.
• Estrarre il microscopio con entrambe le mani
(una mano sul braccio dello stativo e una sul
piede) e collocarlo su una superficie piana.
• Gli obiettivi sono confezionati in piccole scato-
le separate. Essi devono essere avvitati nelle
aperture della piastra portarevolver in ordine
progressivo, cominciando dal lato posteriore e
in senso orario a partire dall’obiettivo con il
fattore di ingrandimento minore fino a quello
con l’ingrandimento maggiore.
• Quindi collocare la testata del microscopio
binoculare sul braccio e fissarla con la vite di
bloccaggio. Inserire gli oculari nel tubo.
4. Comandi
4.1 Indicazioni generali
• Collocare il microscopio su un tavolo dalla
superficie piana.
• Collocare l’oggetto da osservare al centro del
tavolino portaoggetti e bloccarlo con le pinze.
• Collegare il cavo di rete e attivare
l’illuminazione.
• Spostare il supporto portaoggetti sul percorso
dei raggi luminosi in modo che questi lo illuminino chiaramente.
• Regolare la distanza interoculare finché non
sarà visibile un unico cerchio luminoso.
• Adattare agli occhi il potere diottrico.
• Per ottenere un contrasto elevato, regolare
l’illuminazione posteriore attraverso il diaframma ad iride.
• Ruotare l’obiettivo con l’ingrandimento mini-
mo fino a portarlo sul percorso dei raggi luminosi. Il raggiungimento della corretta posizione
viene segnalato dallo scatto dell’obiettivo.
Nota: È opportuno cominciare con l’ingrandimento
minimo per poter riconoscere dapprima i dettagli
macroscopici delle strutture. Il passaggio a fattori
di ingrandimento maggiori avviene attraverso la
rotazione del revolver fino all’inserimento
dell’obiettivo desiderato.
Il valore di ingrandimento viene ottenuto dal prodotto dei fattori di ingrandimento dell’oculare e
dell’obiettivo.
• Con la manopola di regolazione macrometrica
mettere a fuoco il preparato, ancora sfuocato;
prestare attenzione, durante tale operazione,
affinché l’obiettivo non vada a toccare il supporto portaoggetti. (rischio di danneggiamento)
• Quindi regolare la definizione dell’immagine
con la regolazione micrometrica.
• Per utilizzare filtri colorati spostare il supporto
portafiltri e inserire un filtro colorato.
4.2 Sostituzione del fusibile
• Disconnettere l’alimentazione elettrica ed
estrarre assolutamente la spina.
• Svitare il portafusibili sul lato posteriore del
microscopio con un oggetto piatto (ad es. un
cacciavite).
• Sostituire il fusibile e riavvitare il supporto.
5. Conservazione, pulizia
• Conservare il microscopio in un luogo pulito,
asciutto e privo di polvere.
• Durante il periodo di non utilizzo coprire se
pre il microscopio con la custodia antipolvere.
• Non esporre il microscopio a temperature
inferiori a 0°C e superiori a 40°, né ad
un’umidità relativa superiore all’85%.
• Dopo l’uso spegnere immediatamente la lam-
pada.
• In caso di sporco notevole ripulire il microsco-
pio con un panno morbido e un poco di etanolo.
• Pulire le componenti ottiche con un panno
morbido per lenti.
3B Scientific GmbH • Rudorffweg 8 • 21031 Amburgo • Germania • www.3bscientific.com
Con riserva di modifiche tecniche
© Copyright 2007 3B Scientific GmbH
Page 9

3B SCIENTIFIC® PHYSICS
Microscopio didáctico binocular, Modelo 200 U30701
Instrucciones de uso
10/07 ALF
1 Ocular
2 Tubo
3 Revólver portaobjetivos
4 Mesa de objetos
5 Condensador con diafragma
iris y portafiltros
6 Iluminación
7 Interruptor de red
8 Botón de ajuste fino
9 Botón de ajuste grueso
10 Pinzas portamuestras
11 Tornillo de sujeción de la
mesa de objetos
12 Tornillo de sujeción del cabe-
zal del microscopio
13 Soporte
1. Aviso de seguridad
• El microscopio sólo se puede conectar a
tomacorrientes con puesta a tierra.
• Antes de realizar trabajos de mantenimiento o
reparación, se debe desconectar el enchufe de
la red.
• El microscopio no debe entrar en contacto con
ningún tipo de líquido.
• El microscopio no debe ser sometido a ningún
tipo de carga mecánica.
• No tocar con los dedos las piezas ópticas del
microscopio.
• No se debe usar ningún elemento agresivo ni
disolventes para limpiar el microscopio.
• No desmontar los objetivos y oculares para
limpiarlos.
• En caso de daños o de que el microscopio
presentara fallos, no trate de repararlo Ud.
mismo.
2. Descripción, datos técnicos
El microscopio didáctico binocular permite la
observación bidimensional de objetos (cortes
delgados de tejido animal o vegetal) ampliados
entre 40 y 400 veces.
El microscopio U30701-115 está dimensionada
para una tensión de red de 115 V (±10 %) resp.
U30701-230 para 230 V (±10 %).
Soporte: Soporte de metal macizo robusto, brazo
soporte de incorporación fija en el pedestal;
Focalización por medio de botones de ajuste
separados a uno y otro lado del pedestal para el
accionamiento fino y burdo, accionado por
mecanismo de cremallera con engranaje de cola de
milano; tope ajustable para la protección de
portaobjeto y de los objetivos
Tubo: Cabezal binocular de Seidentopf, de
observación oblicua en 30°, Cabezal giratorio en
360°, ajuste de la distancia entre los ojos desde 54
mm hasta 75 mm, Compensación de dioptrías en
±5 para ambos oculares
Ocular: Par de oculares de campo amplio WF 10x
18 mm
Objetivos: Revólver portaobjetivos con 3 objetivos
acromáticos 4x / 0,10, 10x / 0,25, 40x / 0,65 (con
1
Page 10

protección de muestras)
Magnificación: 40x, 100x, 400x
Mesa de objetos: 127 x 132 mm
2
con 2 pinzas
portamuestras
Iluminación: Lámpara fluorescente de 5 W
incorporada en el pedestal, con lente convergente
en la caja de la lámpara, conexión a la red 115 V o
230 V, 50/60 Hz
Condensador: N.A. 0,65, diafragma iris, portafiltros
y filtro azul
Dimensiones: aprox. 282 x 148 x 357 mm³
Masa: aprox. 4,69 kg
3. Desembalaje y montaje
El microscopio se suministra embalado en un
cartón de estiropor.
• Una vez retirada la cinta adhesiva, abra cuida-
dosamente el paquete. Al hacerlo, tenga cuidado de que no caiga ninguna de las piezas ópticas (objetivos y oculares).
• Para evitar la presencia de condensado sobre
los componentes ópticos, el microscopio debe
permanecer dentro del embalaje el tiempo
que sea necesario para que adote la
temperatura ambiente.
• Saque el microscopio tomándolo con ambas
manos (tome con una el brazo del estativo y
con la otra la base), y colóquelo sobre una superficie plana.
• Los objetivos están embalados por separado en
pequeños botes y se enroscan, en sentido
horario, en las aperturas de la placa del
portaobjetivos, empezando por la parte de
atrás, con el objetivo de menor factor de
ampliación hasta llegar al mayor.
• A continuación, coloque el cabezal binocular
del microscopio en el brazo y fíjelo con el tornillo de sujeción. Coloque los oculares en el
tubo.
4. Servicio
4.1 Notas generales
• Coloque el microscopio sobre una mesa plana.
• Posicione el objeto de observación en el centro
de la platina y fíjelo con las abrazaderas de
sujeción.
• Conecte el cable a la red y encienda la ilumi-
nación.
• Desplace el portaobjetos hacia el haz de luz, de
manera que el objeto se vea claramente
iluminado.
• Ajuste la distancia interocular hasta que sólo
sea visible un círculo luminoso.
• Se acomoda el número de dioptrias de los ojos.
• Para obtener un contraste alto, ajuste la ilumi-
ación de fondo por medio del diafragma.
• Gire el objetivo con el menor factor de
ampliación hacia el haz de luz. Un sonido de
«clic» indica la posición correcta.
Nota: Es mejor empezar con la ampliación más
pequeña para, en primer lugar, reconocer los
detalles más burdos de la estructura. El paso a una
ampliación mayor, para la observación de detalles
más finos, se efectúa girando el portaobjetivos
hasta llegar al objetivo deseado.
La magnitud de la ampliación es el resultado del
producto del factor de ampliación del ocular por el
del objetivo.
• Ajuste la nitidez del objeto visualizado por
medio del botón de ajuste grueso, pero al
hacerlo, tenga cuidado de que el objetivo no
toque el portaobjetos. (Peligro de daño)
• Ajuste a continuación la nitidez de la imagen
por medio del botón de ajuste fino.
• Si se requiere un filtro de colores, gire el
portafiltros y colóquelo dentro de él.
4.2 Recambio de fusible
• Desconecte la alimentación de corriente. Es
imprescindible que también desconecte el enchufe de la red.
• En la parte posterior del microscopio, desator-
nille el portafusibles con un objeto plano (p. ej.
Un destornillador).
• Reemplace el fusible y vuelva a atornillar el
portafusibles.
5. Mantenimiento, limpieza
• El microscopio debe permanecer en un lugar
limpio, seco y libre de polvo.
• Si se lo mantiene fuera de uso, se debe cubrir
siempre con la envoltura protectora contra el
polvo.
• No someta el microscopio a temperaturas bajo
0°C o sobre 40°C, ni a una humedad relativa
del aire superior al 85%.
• Tras el uso, desconecte inmediatamente la
iluminación.
• Si el microscopio se encuentra muy sucio, se
debe limpiar con un paño suave y un poco de
etanol.
• Limpie los componentes ópticos con un paño
suave para lentes.
3B Scientific GmbH • Rudorffweg 8 • 21031 Hamburgo • Alemania • www.3bscientific.com
Se reservan las modificaciones técnicas
© Copyright 2007 3B Scientific GmbH
Page 11

3B SCIENTIFIC® PHYSICS
Microscópio binocular didático, modelo 200 U30701
Manual de instruções
10/07 ALF
1 Ocular
2 Tubo
3 Revólver porta-objetivas
4 Platina porta-objeto
5 Condensador com diafragma
de íris e porta-filtro
6 Iluminação
7 Interruptor elétrico
8 Botão rotativo para ajuste fino
9 Botão rotativo para ajuste
grosseiro
10 Pinças para a preparação
11 Rosca de fixação da platina
porta-objeto
12 Rosca de fixação da cabeça do
microscópio
13 Tripé
1. Indicações de segurança
• O microscópio só deve ser conectado à rede
elétrica por meio de uma tomada equipada de
um pólo terra.
• Antes de efetuar qualquer atividade de
manutenção deve-se sempre tirar o fio da
tomada elétrica.
• O microscópio jamais deve entrar em contato
com qualquer líquido.
• Não exercer qualquer pressão mecânica sobre
o microscópio.
• Nunca toque com os dedos nas partes óticas do
microscópio.
• Não utilize produtos de limpeza agressivos ou
solventes para limpar o microscópio.
• Não desmontar ou separar as objetivas dos
oculares ao efetuar a limpeza.
• Em caso de danificação ou defeito do
microscópio, não o conserte por si mesmo.
2. Descrição, dados técnicos
O microscópio binocular didático possibilita a
observação em duas dimensões de objetos (finas
lâminas cortadas de plantas ou animais) com um
aumento de 40 até 400 vezes.
O microscópio U30701-115 está equipado para
trabalhar com uma tensão de rede de 115 V (±10 %)
U30701-230 para 230 V (±10 %).
Tripé: Pé de apoio robusto integralmente de
metal, braço de apoio fixado no pé; ajuste focal
por meio de botões de ajuste fino e grosseiro
independentes a ambos lados do pé de apoio,
movidos por meio de um eixo de engrenagem de
ensamblagem de encaixe; limite de aproximação
ajustável para a proteção das objetivas e dos
suportes para objeto
Tubo: Ocular binocular Seidentopf, vista inclinada
em 30°, rotativo em 360°, distância entre olhos
ajustável entre 54 mm e 75 mm, compensação de
dioptria de ±5 para ambos oculares
Ocular: Par de oculares grande angular WF 10x
18 mm
1
Page 12

Objetivas: Revólver porta-objetivas com 3 objetivas
acromáticas 4x / 0,10, 10x / 0,25, 40x / 0,65 (com
proteção para a preparação microscópica)
Aumentos: 40x, 100x, 400x
Platina porta-objeto: 127 x 132 mm
2
com 2 pinças
para a preparação
Iluminação: Lâmpada fluorescente de 5 W
integrada no pé, com lente coletora no
compartimento da lâmpada, alimentação 115 V ou
230 V, 50/60 Hz
Condensador: N.A. 0,65, diafragma de íris, portafiltro e filtro azul
Dimensões: aprox. 282 x 148 x 357 mm³
Massa: aprox. 4,69 kg
3. Retirada da embalagem e montagem
O microscópio é entregue numa caixa de isopor.
• Depois de haver retirado a fita adesiva, abra a
caixa com cuidado. Assegure-se de que
nenhum elemento ótico (objetivas e oculares)
caia fora da caixa.
• Para evitar a formação de condensação nas
partes óticas, deixe o microscópio na
embalagem o tempo suficiente até que este
tenha adquirido a temperatura ambiente.
• Retire o microscópio com as duas mãos (uma
mão no braço do tripé e a outra na base) e
coloque-o sobre uma superfície plana.
• As objetivas encontram-se por separado,
embaladas em latinhas especiais. Estas devem
ser enroscadas nos orifícios da placa do
revólver na ordem da objetiva com o menor
grau de aumento até a de maior grau no
sentido horário, começando por trás.
• A seguir, instale a cabeça do microscópio
binocular no braço e logo fixe-o com a rosca de
fixação. Monte os oculares no tubo.
4. Operação
4.1 Indicações gerais
• Instalar o microscópio sobre uma superfície
plana.
• Colocar o objeto a ser observado no meio da
platina porta-objeto e fixar com os grampos.
• Pôr o fio de alimentação na tomada e ligar a
iluminação.
• Posicionar o porta-objeto no raio luminoso de
modo a que este atravesse o objeto de forma
clara.
• Ajuste a distância dos olhos até que só um
círculo de luz seja visível.
• Adaptar o grau de dioptria aos olhos.
• Para obter um contraste mais forte, ajuste a
iluminação de fundo fazendo uso do
diafragma íris.
• Girar a objetiva com o menor grau de aumento
até a linha do raio luminoso. O som de um
clique indicará que a posição está correta.
Observação: é melhor começar a observação com
a objetiva de menor grau de ampliação, de forma a
reconhecer primeiro os detalhes estruturais
maiores. A passagem para um grau maior de
aumento obtêm-se girando o revólver até chegar
na objetiva desejada.
O valor do grau de ampliação calcula-se a partir do
produto do fator de aumento do ocular e da
objetiva.
• Ajustar o foco da imagem desfocada da
preparação utilizando o botão rotativo para
ajuste grosseiro. Ao faze-lo, tomar cuidado
para que a objetiva não esbarre no portaobjeto. (perigo de danificação)
• Logo, efetuar o ajuste de foco final com o
ajuste fino.
• Para utilizar filtros cromáticos, girar o porta-
filtros e instalar o filtro cromático.
4.2 Troca de fusível
• Desligue a alimentação elétrica e retire em
todo caso o fio da tomada.
• Desenrosque o suporte do fusível na parte
posterior do microscópio com um objeto plano
(uma chave de fenda, por exemplo).
• Troque o fusível e volte a instalar o suporte.
5. Armazenamento, limpeza
• Armazenar o microscópio num lugar limpo,
seco e sem poeira.
• Quando não utilizado, guarde sempre o
microscópio na sua capa de proteção contra a
poeira.
• Não exponha o microscópio a temperaturas
inferiores a 0°C ou superiores a 40°C, assim
como a uma humidade ambiente superior a
85%.
• Desligue a iluminação imediatamente após
cada utilização.
• Caso o microscópio esteja muito sujo, limpe
com um pano suave e um pouco de etanol
(álcool).
• Limpe os elementos óticos com um pano
especial para lentes suave.
3B Scientific GmbH • Rudorffweg 8 • 21031 Hamburgo • Alemanha • www.3bscientific.com
Sob reserva de alterações técnicas
© Copyright 2007 3B Scientific GmbH
 Loading...