


Installation Instructions
ROPE TWIST™ BATHING POOL
HIGH GLOSS ACRYLIC SHOWN LESS ALL FITTINGS
MODELS: 2722.102 RHO 2722.202 LHO
USED WITH BATH WALLS: 5030.LBW
Thank you for selecting American-Standard...the benchmark of fine quality for over 100 years. To ensure that your installation proceeds smoothly--please read these instructions carefully before you begin.
BEFORE YOU BEGIN....
Local building codes vary by location. Observe all local plumbing and building codes.
Your new bath is shipped to you after careful inspection. All you need to finish the installation are your selected fittings. To insure maximum performance and pleasure from this product, please follow the instructions and cautions.
GENERAL INSTALLATION INFORMATION ....
1.WHEN INSTALLING THE MATCHING ROPE TWIST BATH WALLS (MODEL 5030.LBW), ADDITIONAL STUDS MAY BE REQUIRED. REFER TO THOSE INSTALLATION INSTRUCTIONS PRIOR TO INSTALLING TUB.
2.ROPE TWIST SHOWER WALLS ARE TO BE INSTALLED OVER STUD WALLS.
3.BATH MAY ONLY BE INSTALLED IN A RECESS TYPE INSTALLAION.
4.THIS BATH IS NOT SELF-SUPPORTING AND MUST BE SUPPORTED ALONG ITS ENTIRE BOTTOM WITH MORTAR OR GROUT. STRINGERS WILL HELP LEVEL TUB, BUT WILL NOT PROVIDE ADEQUATE SUPPORT.
5.TAKE EXTRA CARE WHEN DRIVING NAILS OR SCREWS TO AVOID DAMAGING THE BATH.
TOOLS & MATERIALS REQUIRED.... |
|
|
|
TOOLS: |
MATERIALS: |
||
• |
Level |
• |
Nails |
• |
Square |
• |
Plumber’s Putty |
• |
Tape Measure |
• |
Silicone Sealant |
• |
Pipe Wrench |
• |
1 x 3 or 2 x 4 Stringers |
• |
Slip Joint Pliers |
• |
Drop Cloth |
• |
Screw Driver |
• |
Mortar Mix or Grout |
•Standard Woodworking Tools
•Personal Safety Equipment
•Caulking Gun
NOTE: Take extra care in handling surfaces of the bath. Use only non-abrasive cloths to avoid scratching.
HOTLINE FOR HELP
FOR TOLL FREE INFORMATION AND ANSWERS TO YOUR QUESTIONS, CALL: 1 (800) 442-1902, in Canada call 1 (800) 387-0369.
Weekdays 8:00 a.m. to 4:00 p.m. Eastern time.
All product names listed herein are trademarks of AS America, Inc. unless otherwise noted. |
754049-100 Rev. J |
© AS America, Inc. 2009 |
|

ROUGH-IN INFORMATION:
GENERAL SPECIFICATIONS FOR 2722 BATHING POOL
INSTALLED SIZE |
|
|
|
|
|
|
|
|
|
|
60 x 32 x 17 In. |
|||||||
|
|
|
|
|
|
|
|
|
|
|
|
(1524 x 813 x 432mm) |
||||||
WEIGHT |
|
|
|
|
|
|
|
|
|
|
|
|
|
60 Lbs. (27 Kg) |
||||
WEIGHT w/WATER |
|
|
|
|
|
|
|
393 Lbs.(179 Kg) |
||||||||||
|
|
|
|
|
|
|
||||||||||||
GAL. TO OVERFLOW |
|
|
|
|
|
|
|
|
|
40 Gal. (151 L) |
||||||||
|
|
|
|
|
|
|
|
|
||||||||||
BATHING WELL AT SUMP |
|
|
|
22 x 44 In. (559 x 1118mm) |
||||||||||||||
|
|
|
||||||||||||||||
BATHING WELL AT RIM |
|
|
|
|
25.5 X 53 In.(648 x 1346mm) |
|||||||||||||
|
|
|
|
|||||||||||||||
WATER DEPTH TO OVERFLOW |
|
|
|
|
|
10 In. (254mm) |
||||||||||||
|
|
|
|
|
||||||||||||||
FLOOR LOADING |
|
|
29 Lbs./Sq.Ft. (195 Kgs/Sq.m) |
|||||||||||||||
|
|
|||||||||||||||||
(PROJECTED AREA) |
|
|
|
|
|
|
|
|
|
|
||||||||
PTS. |
|
|
|
|
|
|
|
15.3 |
||||||||||
CUBE (FT3) |
|
|
|
|
|
27 |
||||||||||||
|
|
|
|
|
||||||||||||||
|
|
|
|
|
|
|
|
|
|
60" |
|
|
|
|
|
|
|
|
|
|
|
|
|
|
|
|
|
|
|
9-3/8" |
(1524mm) |
|
||||||
3/4" |
|
|
|
|
|
|
|
(238mm) |
FINISHED |
70mm |
||
|
|
|
|
|
|
|||||||
|
|
|
|
|
|
|
|
(2-3/4) |
||||
(19mm) |
|
|
|
|
|
|
|
WALL |
||||
|
|
|
|
|
|
|
|
|||||
15-1/8" (385mm)
229mmx305mm  (9x12)
FLOOR CUTOUT
32"
(813mm)
25mm |
4-1/2" |
|
|
(1) C/LOF |
(114mm) |
|
|
DRAIN |
|
|
|
|
FINISHED |
||
|
WALL |
|
|
TOP OF |
3-1/2" |
|
|
DECK |
(89mm) |
|
|
1" |
|
|
|
(25mm) |
SEE |
16-3/4" |
|
17" |
|||
NOTE |
|||
(425mm) |
|||
(432mm) |
|||
|
|||
2" |
|
||
|
|
||
|
(51mm) |
|
|
|
|
ROUGH |
|
4-5/8" |
|
FLOOR |
|
1-1/2 N.P.T. THREADS |
|||
(117mm) |
|||
1-1/2 O.D. TAILPIECE |
|
||
|
|
||
BATH SUPPORT |
|
|
|
MATERIAL |
|
|
|
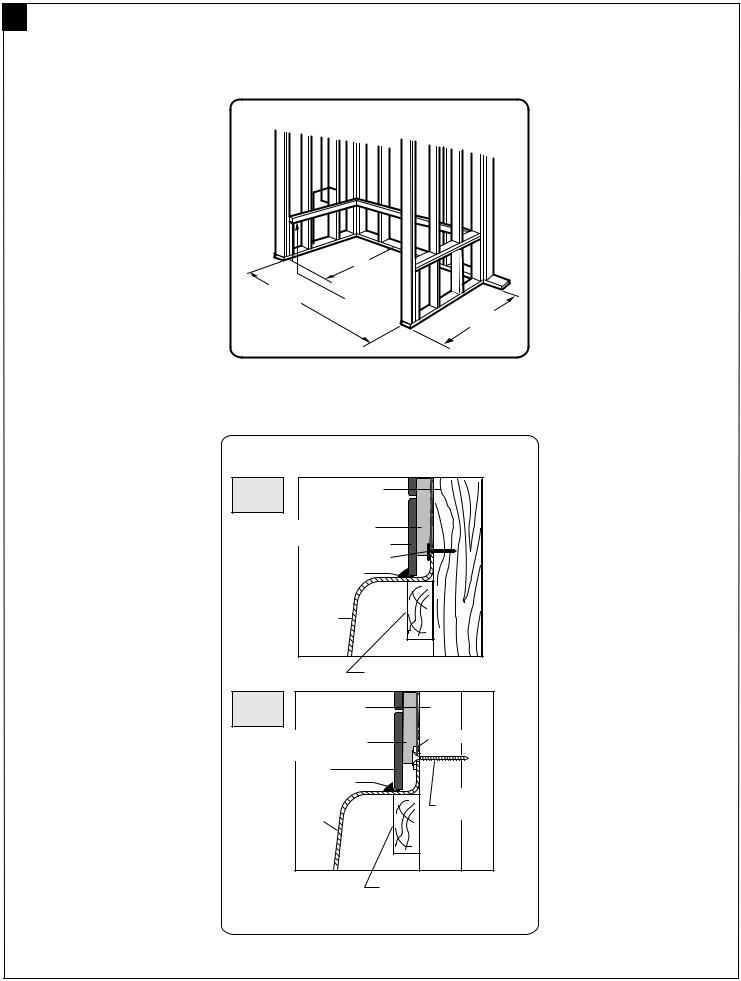
1INSTALLATION AND FRAMING INSTRUCTIONS:
A.) Locate studs as required. Ensure roughing-in dimensions are proper, plumb, and square. It is strongly recommended that an additional opening be provided for access to the drain components.
Illustration 1
Each alcove stud must be plumb and square.
B.) As shown in ILL. 2, mark the position of the underside of the deck by tracing a line onto the studs at the height indicated, using a level or other suitable straight edge.
C.) With the top of the stringer touching the traced line, attach the stringer to the studs.
Illustration 2 |
|
|
|
|
|
16-3/4 |
|
|
|
|
|
(425mm) |
|
|
0 |
|
) |
|
|
|
|
||
|
|
3 |
|
||
|
|
|
|
m |
|
|
|
|
m |
|
|
|
|
2 |
|
|
|
|
6 |
|
|
|
|
|
(7 |
|
|
|
|
D.) Install drain components to the bath following the manufacturer's instructions. See the roughing-in drawing for suggested opening size and location dimensions.
2 |
754049-100 Rev. J |
|
2
A.) THIS BATH MUST BE SUPPORTED ALONG IT'S ENTIRE BOTTOM. We recommend the use of mortar as bedding material (sand is not recommended). Apply enough bedding to support the complete bottom of the bath. After the bedding has been poured, and before it sets, position the bath within the recess until the rim is leveled against the leveling stringers (see "Typical Recess Installation") shown below. The rim of the bath MUST NOT support weight. Allow the bedding material to completely harden before applying weight to the rim or bottom of the bath.
TYPICAL RECESS INSTALLATION
60-3/16 (1529mm)
|
|
2 |
) |
|
|
3 |
|
||
|
|
|
|
m |
|
|
|
m |
|
( |
|
3 |
|
|
1 |
WIDTH |
|||
8 |
|
|
|
|
TUB |
|
|
||
LEVELING
STRINGERS
34 Typ. (864mm)
B.) Check level front to back and side to side, shim as necessary. To secure the tub to wood studs, use drywall screws with flatwashers or roofing nails immediately above the flange of the bath. To secure the tub to steel studs, use 4" drywall screws and flatwashers.
TYPICAL FLANGE MOUNTING DETAIL
SUGGESTED BATH
INSTALLATION METHOD
WOOD |
|
STUD |
STUDS |
|
|
WATERPROOF DRYWALL |
||
OR CEMENT BOARD |
TILE |
|
|
|
|
|
ROOFING NAIL |
|
|
SEALANT |
|
|
TUB |
|
|
|
1 x 3 (25 x 76mm) WOOD |
|
|
STRINGER FULL LENGTH |
STEEL |
STEEL |
|
STUDS |
STUD |
|
WATERPROOF DRYWALL |
WASHER |
|
OR CEMENT BOARD |
|
|
|
TILE |
|
|
SEALANT |
4" (102mm) |
|
|
|
|
|
DRYWALL |
|
TUB |
SCREW |
|
|
|
|
|
1 x 3 (25 x 76mm) WOOD |
|
|
STRINGER FULL LENGTH |
SECURE THE BATH TO THE STUDS AS SHOWN
FOR WOOD OR STEEL STUD CONSTRUCTION.
C.) Any finish material such as tile or wallboard must be self-supporting if it contacts the deck of the bath.
Flooring will be butted against the bottom of the tub apron, also holding the tub in place.
3 |
754049-100 Rev. J |
|
 Loading...