


FM 4500 FR-A
User manual |
Grill/Deep fat fryer |

2
Dear Customer
Thank you for choosing one of our high-quality products.
With this appliance you will experience the perfect combination of functional design and cutting edge technology.
Convince yourself that our appliances are engineered to deliver the best performance and control - indeed we are setting the highest standards of excellence.
In addition to this you find environmental and energy saving aspects as an integral part of our products.
To ensure optimal and regular performance of your appliance please read this instruction manual carefully. It will enable you to navigate all processes perfectly and most efficiently.
To refer to this manual any time you need to, we recommend you to keep it in a safe place. And please pass it to any future owner of the appliance.
We wish you much joy with your new appliance.
The following symbols are used in this user information:
1Warning! This must be read! Important advice for the safety of persons and information on avoiding damage to the appliance
3General information and advice
2Information on environmental protection
zDangerous voltage

Contents 3
Contents
Operating Instructions |
4 |
Safety instructions |
4 |
|
|
Description of the Appliance |
6 |
|
|
Grill/Deep fat fryer layout |
6 |
Control panel layout |
7 |
Touch Control sensor fields |
7 |
Displays |
8 |
Residual heat indicator |
8 |
Preparation of the appliance |
9 |
|
|
Using grilling |
9 |
Using deep fat fryer |
10 |
Operating the appliance |
11 |
|
|
Switching the appliance on and off |
11 |
Setting grill setting / temperature for the deep fat fryer |
11 |
Using the child safety device |
13 |
Using the timer |
14 |
Automatic switch off |
16 |
Tips on Cooking and Frying |
17 |
|
|
Frying frozen food |
17 |
Grill and deep fat fryer in combination |
18 |
Cleaning and Care |
19 |
|
|
Glass ceramic |
19 |
Grill |
20 |
Deep fat fryer |
21 |
What to do if … |
22 |
|
|
Disposal |
23 |
|
|
Installation Instructions |
24 |
Safety instructions |
24 |
Assembly |
26 |
|
|
Installing more than one Frontline hob |
30 |
|
|
Rating Plate |
34 |
Guarantee/Customer Service |
35 |
|
|
Service |
38 |
|
|

4 Operating Instructions
Operating Instructions
1 Safety instructions
Please comply with these instructions. If you do not, any damage resulting is not covered by the warranty.
Correct use
•This appliance is not intended for use by children or other persons whose physical, sensory or mental capabilities or lack of experience and knowledge prevents them from using the appliance safely without supervision or instruction by a responsible person to ensure that they can use the appliance safely.
•Do not leave the appliance unattended during operation.
•This appliance should be used only for the normal domestic grilling and frying of food.
•The appliance must not be used as a work surface or as a storage surface.
•Additions or modifications to the appliance are not permitted.
•Do not place or store flammable liquids, highly inflammable materials or fusible objects (e.g. plastic film, plastic, aluminium) on or near the appliance.
Children’s safety
•Small children must be kept away from the appliance.
•Only let bigger children work on the appliance under supervision.
General safety
•The appliance may only be installed and connected by trained, registered service engineers.
•Built-in appliances may only be used after they have built in to suitable builtin units and work surfaces that meet standards.
•In the event of faults with the appliance or damage to the glass ceramic (cracks, scratches or splits), the appliance must be switched off and disconnected from the electrical supply, to prevent the possibility of an electric shock.
•Repairs to the appliance must only be carried out by trained registered service engineers.
Safety instructions |
|
5 |
|
|
|
Safety during use
•Remove stickers and film from the glass ceramic.
•There is the risk of burns from the appliance if used carelessly.
•Cables from electrical appliances must not touch the hot surface of the appliance.
•Overheated fats and oils can ignite very quickly. Warning! Fire hazard!
•Smother fire using a cover, never use water to put out.
•In the case of fire, set all switches to zero and switch off any extractor.
•Switch off the appliance after each use.
Safety when cleaning
•For cleaning, the appliance must be switched off and cooled down.
•For safety reasons, the cleaning of the appliance with steam jet or high-pres- sure cleaning equipment is not permitted.
How to avoid damage to the appliance
• The glass ceramic can be damaged by objects falling onto it.

6 Description of the Appliance
Description of the Appliance
Grill/Deep fat fryer layout
Grill shelf |
Heating element |
Grill insert |
|||
|
|
|
|
with lava stones |
|
|
|
|
|
||
|
|
|
|
|
|
|
|
|
|
|
|
Oil cavity
Frontline strip
Socket
Control panel
|
|
|
|
|
|
|
|
|
|
|
|
|
|
|
|
Drain filter |
Safety catch |
Fryer basket |
Deep fat fryer plug |
||||
|
|
for drain tap |
|
|
|
|
|

Description of the Appliance |
|
7 |
|
|
|
Control panel layout
Child lock pilot |
Deep fat fryer |
Timer indicator |
Grill setting |
||
light |
power indicator |
|
indicator |
||
Temperature |
Grill indicator |
Grill power indicator |
On/Off pilot light |
||
indicator |
timer function |
|
|
|
|
|
|
Deep fat fryer |
|
|
|
|
|
indicator |
|
|
|
|
|
timer function |
|
|
|
|
|
|
|
|
|
|
|
|
|
|
|
|
|
|
|
|
|
|
|
|
|
|
|
|
|
|
|
|
|
|
|
|
|
|
|
|
|
|
|
|
|
|
|
|
|
|
|
|
|
|
|
|
|
|
|
|
|
|
|
|
|
|
|
|
|
|
|
|
|
|
|
|
|
|
|
|
|
|
|
|
|
|
|
|
|
|
|
|
|
|
|
|
|
|
|
|
|
|
|
|
|
|
|
|
|
|
|
|
|
|
|
|
|
|
|
|
|
|
|
|
|
|
|
|
|
|
|
|
|
|
|
|
|
|
Temperature |
|
|
Timer selection |
|
|
Grill setting |
|
|||||||||
|
|
|
setting |
|
|
|
|
|
|
|
|
|
selection |
|
||||
Child |
|
lock |
|
|
|
|
|
|
|
|
|
|
|
|
|
|
|
|
|
|
Deep fat fryer |
Timer |
Grill |
|
|
|
On/Off |
||||||||||
Touch Control sensor fields
The appliance is operated using Touch Control sensor fields. Functions are controlled by touching sensor fields and confirmed by displays and acoustic signals. Touch the sensor fields from above, without covering other sensor fields.
Sensor field |
Function |
On / Off |
To switch the appliance on and off |
Increase settings |
To increase grill setting / temperature |
Reduce settings |
To reduce grill setting / temperature |
Timer |
Timer selection |
Increase settings |
To increase Timer time |
Reduce settings |
To reduce Timer time |
Child lock |
Locking control panel for children |
|
|

8 Description of the Appliance
Displays
|
Display |
Description |
|
|
No grill setting / temperature |
|
|
set |
- |
Grill settings |
Grill setting is set |
120- |
Temperature in °C |
Temperature for the deep fat fryer is |
190 |
|
set. |
|
Fault |
Malfunction has occurred |
|
Residual heat |
Appliance is still hot |
|
Child safety device |
Child safety device is engaged |
|
Automatic switch off |
Switch off is active. |
|
|
|
Residual heat indicator
1Warning! Risk of burns from residual heat. After being switched off, the appliance needs some time to cool down. Look at the residual heat indicator  .
.
3When the grill is operated, the deep fat fryer heats up. The residual heat  of the deep fat fryer is displayed.
Preparation of the appliance |
|
9 |
|
|
|
Preparation of the appliance
Using grilling
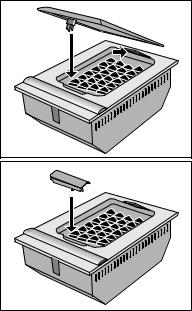
1The grill may only be used with the grill insert inserted.
1.Insert grill insert with lava stones in the grill.
The lava stones absorb fat that comes out of the food when grilling.
2.Take hold of grill shelf firmly with both
hands and tilt it backwards until it is in the |
B |
|
fixture (A). |
A |
|
3. Lower grill shelf and insert the plug in the |
|
|
socket (B). |
|
|
3 With very fatty foods the lava stones can be replaced with water.
A sufficient amount of water is important.
z
Socket has live parts and must be protected from moisture.
Only fill up with water when deep fat fryer plug is inserted in the socket.
10 Preparation of the appliance
Using deep fat fryer
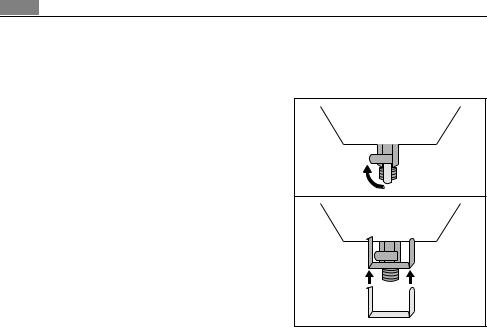
1.Remove grill shelf and grill insert.
2.Close drain tap and replace safety catch.
3The deep fat fryer’s oil cavity must be filled with oil between the marks MIN (1.5 litres) and MAX (3 litres).
3.Insert deep fat fryer plug in the socket.
4.Fill deep fat fryer oil cavity with oil.
3Frying fat can also be used instead of oil.
Operating the appliance |
|
11 |
|
|
|
Operating the appliance
Switching the appliance on and off
|
Control panel |
Display |
Pilot light |
|
Switch on |
Touch |
for 2 seconds |
/ |
lights up |
Switch off |
Touch |
for 1 second |
/ none |
goes out |
|
|
|
|
|
zImportant: Socket has live parts.
Only operate appliance with dry socket.
3After switching on, within approx. 10 seconds a function must be set, otherwise the appliance automatically switches itself off.
Setting grill setting / temperature for the deep fat fryer
|
Control panel |
|
Grill setting |
Temperature |
|
|
|
|
|
indicator |
indicator |
To increase |
Touch |
|
|
to |
120 to190 |
To decrease |
Touch |
|
|
to |
190 to120 |
To switch off |
Touch |
and |
at |
|
|
|
the same time |
|
|
|
|
|
|
|
|
|
|
3If a grill setting/temperature is selected, the indicator flashes until the grill setting/temperature is reached. When the grill setting/temperature selected is reached, an acoustic signal sounds.
3If the deep fat fryer plug or grill shelf is not inserted properly, the appliance does not heat up.
3A temperature from 170°C to 180°C is suitable for deep fat frying.

12 Operating the appliance
Deep frying
1.Fill fryer basket with food to be fried outside of the deep fat fryer and shake. Ice and small pieces of food to be fried can fall through the fryer basket into the hot oil.
2.Wait until oil has reached the selected temperature.
Temperature indicator no longer flashes and acoustic signal sounds.
3.Fry food until it has taken on the appropriate colour.
4.After deep frying lift the fryer basket out of the oil.
5.Carefully shake fryer basket to remove excess oil.
6.Hang fryer basket on the hanger to allow further draining.
3When dealing with larger quantities of food to be fried, take the fryer basket out of the oil after 1-2 minutes and heat the oil up again.
When the oil is heated up again, continue deep frying.
3If using frying fat, cut this into pieces and melt at 120°C.
 Loading...