

Page 1

Quick Start Guide
PLA Series
Powerline Ethernet Adapter
Utility Version 6.0.1
Edition 2, 04/2013
Default Network Name: HomePlugAV
User’s Guide
www.zyxel.com
Copyright © 2013 ZyXEL Communications Corporation
Page 2

IMPORTANT!
READ CAREFULLY BEFORE USE.
KEEP THIS GUIDE FOR FUTURE REFERENCE.
Note: This guide is a reference for a series of products. Therefore some features or
options in this guide may not be available in your product.
Screenshots and graphics in this book may differ slightly from your product due to differences in
your product firmware or your computer operating system. Every effort has been made to ensure
that the information in this manual is accurate.
Related Documentation
•Quick Start Guide
The Quick Start Guide is designed to help you get up and running right away. It contains
information on making your hardware connections.
PLA Series User’s Guide2
Page 3

Table of Contents
Table of Contents
Table of Contents .................................................................................................................................3
Part I: User’s Guide ...........................................................................................5
Chapter 1
Introducing the PLA .............................................................................................................................7
1.1 Overview .......................................................................... ... ... .... .........................................................7
1.2 LEDs ......................................... ... .... ... ... ... ... .... ...................................................................................8
1.3 Expand Your Network with the PLA ....................................................................................................9
1.4 Ways to Manage the PLA ......................................... .......................................................... ..............10
1.5 Security ......................................................................... ... .................................................................10
1.5.1 Passwords .... .......................................................... ... ..............................................................11
1.5.2 Setting Up Security ............................. .... ... ... ... .... ....................................................................11
1.6 Multiple Networks ... ... ... ... .... ... ... ... .... ... .......................................................... ... ... .... ... .......................12
Chapter 2
Installing the Utility.............................................................................................................................13
2.1 System Requirements .. ... .... ............................................................. ... ... ...........................................13
2.2 Installing the Utility ............................................................................................................................13
2.3 Standby Mode (Power Saving Mode) ............................................................ ... ... .... ... ... ... ... ..............16
Part II: Technical Reference............................................................................17
Chapter 3
The RESET/ENCRYPT Button............................................................................................................19
3.1 RESET/ENCRYPT Button Overview .................................................................................................19
3.2 Adding Devices to a Powerline Network ...........................................................................................19
3.3 Removing a Device from a Powerline Network ................................................................................21
3.4 Multiple Separate Powerline Networks .............................................................................................22
3.5 PLAs With One Combination RESET/ENCRYPT Button ..................................................................22
3.6 PLAs with Separate RESET and ENCRYPT Buttons .......................................................................23
3.6.1 ENCRYPT Button Behavior .................................... ... ... .... ... ... ... ... .... ... ... .................................23
3.6.2 RESET Button Behavior ..........................................................................................................24
Chapter 4
The Configuration Utility....................................................................................................................25
PLA Series User’s Guide
3
Page 4

Table of Contents
4.1 Overview .......................................................................... ... ... .... .......................................................25
4.1.1 Powerline Network Security ................ .......................... .......................... .................................25
4.1.2 Device Access Key (DAK) .......................................................................................................26
4.2 Starting the Configuration Utility ............................. ... .... ....................................................................26
4.3 Configuration Screen ............................................... .... ... ... ... .... ... ....................................................27
4.4 Firmware Screen ..............................................................................................................................28
4.5 Network Info Screen .........................................................................................................................29
4.6 Advanced Screen ..........................................................................................................................30
4.7 About Screen ............................................... .... .......................................................... .......................33
Chapter 5
Powerline Network Setup Tutorial.....................................................................................................35
5.1 Overview .......................................................................... ... ... .... .......................................................35
5.2 Important Terms .................. .......................................................... ... ... ... .... ... ....................................35
5.3 Accessing Your Powerline Adapter ...................................................................................................36
5.4 Adding a Powerline Adapter ..............................................................................................................37
5.5 Setting Up a New Network with a New Adapter ................................................................................38
5.6 Splitting a Network into Two Networks ..............................................................................................40
5.7 Troubleshooting ..................................... ... ... .... ... ... ...........................................................................42
Chapter 6
Troubleshooting.................................................................................................................................45
6.1 Power and Light Problems ................................................................................................................45
6.2 Configuration Utility Problems .......................................................... ... ... .... ... ... ... .... ... ... ....................46
6.3 Powerline Problems ......................................................................... ... ... .... ... ... ... .... ... ... ....................47
6.4 RESET/ENCRYPT Button Problems ................................................................................................47
Appendix A Legal Information............................................................................................................49
Index ....................................................................................................................................................53
4
PLA Series User’s Guide
Page 5

PART I
User’s Guide
5
Page 6

6
Page 7
1.1 Overview
This chapter introduces the main applications and features of your ZyXEL HomePlug AV compliant
powerline adapter, which is called “PLA” in this guide. The following generic icon is used to
represent all PLA models.
In this User’s Guide the electrical wiring network is referred to as the “powerline network”. The
HomePlug AV standard specifies how network devices communicate using standard electrical
wiring.
CHAPTER 1
Introducing the PLA
This User’s Guide covers the following models:
Table 1 PLA Comparison Table
PORT/FEATURE PLA4101 PLA4111 PLA4201 PLA4201 V2 PLA5205 PLA5215
One 10/100 Base-T
Ethernet port
AC Pass-Through
Reset/Encrypt Button
Reset Button
Encrypt Button
Maximum PHY Rate
over Powerline
Note: In this guide RESET/ENCRYPT refers to the ENCRYPT button in PLAs that have
You can directly plug an electrical device (such as a router or computer) into PLAs with an AC power
pass-through socket to supply power to the device.
There are two types of hardware for each of the PLA4101 and PLA4201 v2 models:
• One has an Ethernet port on the top and a power plug at the bottom of the rear panel.
• One has an Ethernet port on the bottom and a power plug at the top of the rear panel.
200 Mbps 200 Mbps 500 Mbps 500 Mbps 600 Mbps 600 Mbps
separate RESET and ENCRYPT buttons.
The power plug varies depending on your region.
PLA Series User’s Guide 7
Page 8
Chapter 1 Introducing the PLA
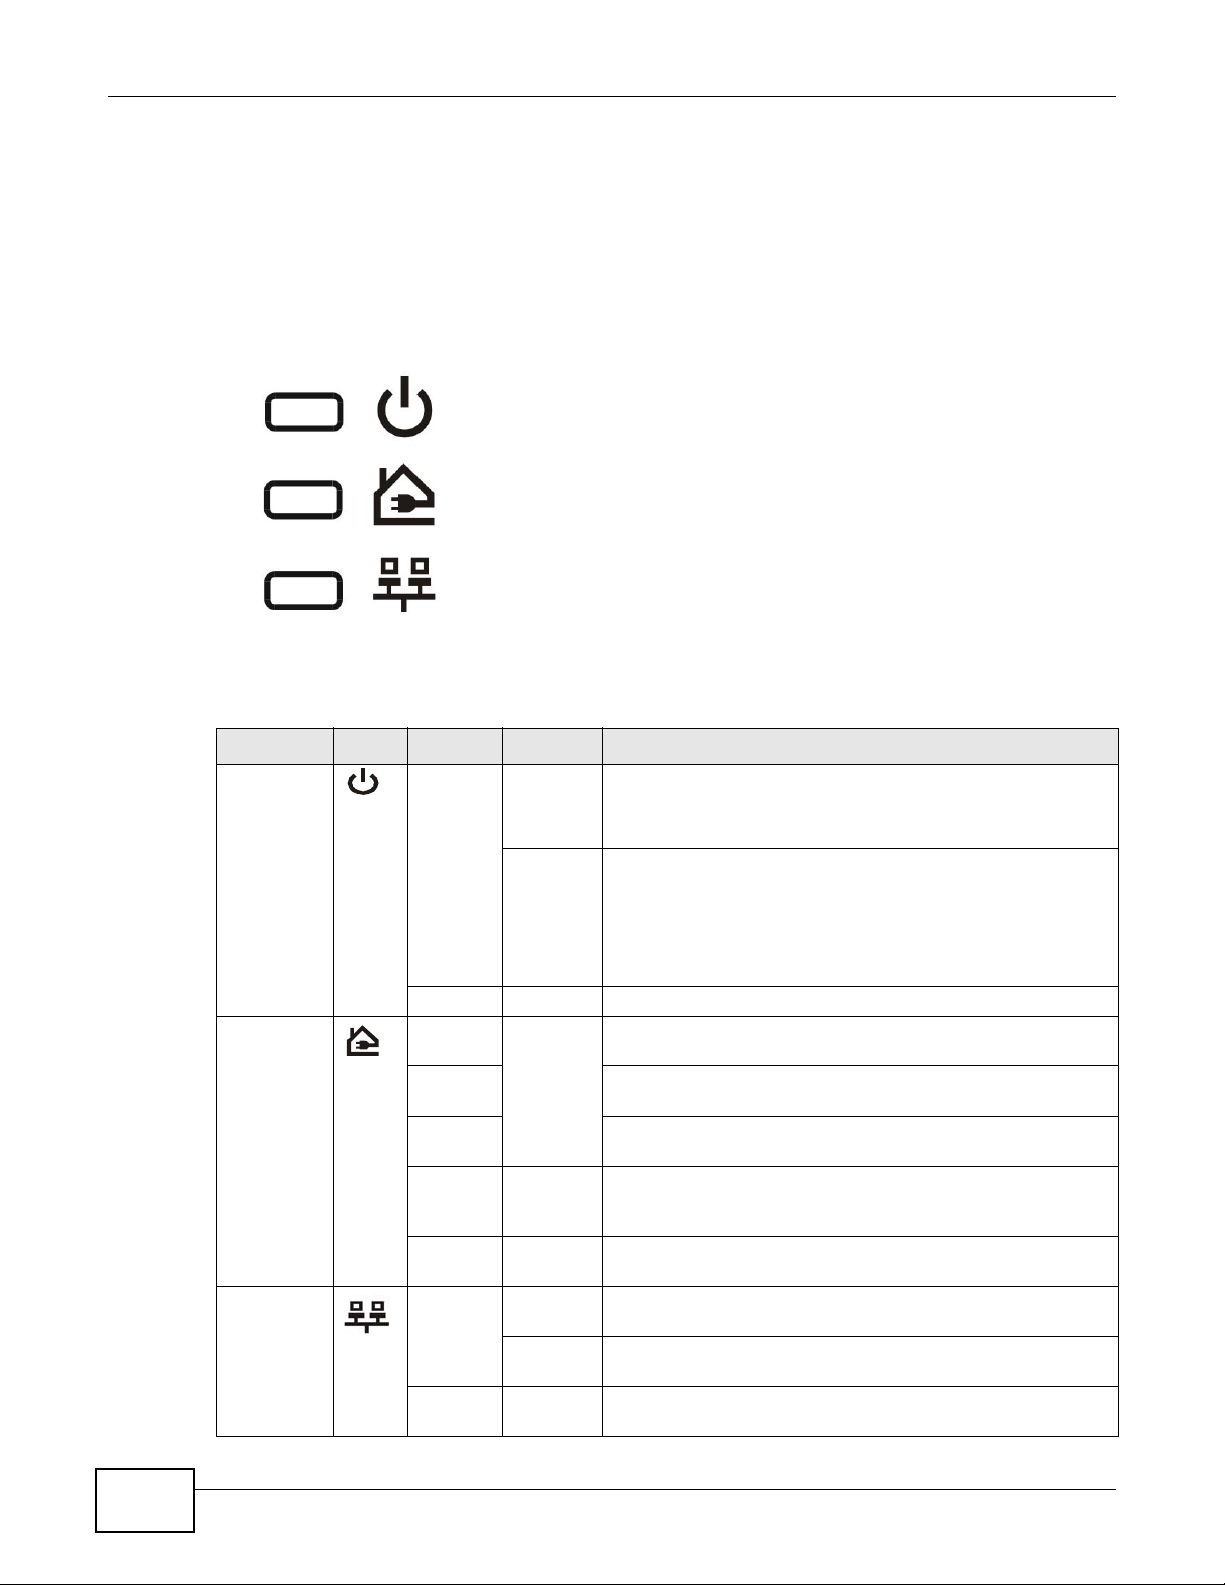
1.2 LEDs
The following sections describes the lights on the PLA.
The following figure is the front panel of the PLA. Use the lights to determine if the PLA is behaving
normally or if there are some problems on your powerline network.
Figure 1 PLA Lights
The following table describes the behavior of the lights on the PLA.
Table 2 LEDs: 200 Mbps Models
LIGHTS ICON COLOR STATUS DESCRIPTION
POWER Green On The PLA is on and receiving power.
It also indicates a successful connection using the RESET/
ENCRYPT button.
Blinking The PLA is starting up.
It also indicates the PLA is trying to connect with another
device using the ENCRYPT function.
The Power LED blinks when it is in standby mode. Refer to
Section 2.3 on page 16 for details on this feature.
Off The PLA is not receiving power.
HomePlug Green On The PLA detects another powerline adapter. The data transfer
rate is greater than 40 Mbps.
Amber The PLA detects another powerline adapter. The data transfer
rate is between 12~40 Mbps.
Red The PLA detects another powerline adapter. The data transfer
Green/
Amber/
Red
ETHERNET Green On The ETHERNET port is on and ready and the PLA detects a
Blinking The PLA is communicating with another powerline adapter.
Off The HomePlug port does not detect another powerline
Blinking The PLA is communicating with a net w orking device
Off The PLA does not detect any devices connected to its
rate is between 0~12 Mbps.
Data is being transmitted and/or received.
adapter.
device connected to it.
connected to it.
ETHERNET port.
8
PLA Series User’s Guide
Page 9
Chapter 1 Introducing the PLA
Table 3 LEDs: 500 and 600 Mbps Models
LIGHTS ICON COLOR STATUS DESCRIPTION
POWER Green On The PLA is on and receiving power.
It also indicates a successful connection using the RESET/
ENCRYPT button.
Blinking The PLA is starting up.
It also indicates the PLA is trying to connect with another
device using the ENCRYPT function.
The Power LED blinks when it is in standby mode. Refer to
Section 2.3 on page 16 for details on this feature.
Off The PLA is not receiving power.
HomePlug Green On The PLA detects another powerline adapter. The data transfer
rate is greater than 80 Mbps.
Amber The PLA detects another powerline adapter. The data transfer
rate is between 20~80 Mbps.
Red The PLA detects another powerline adapter. The data transfer
Green/
Amber/
Red
ETHERNET Green On The ETHERNET port is on and ready and the PLA detects a
Blinking The PLA is communicating with another powerline adapter.
Off The HomePlug port does not detect another powerline
Blinking The PLA is communicating with a net w orking device
Off The PLA does not detect any devices connected to its
rate is between 0~20 Mbps.
Data is being transmitted and/or received.
adapter.
device connected to it.
connected to it.
ETHERNET port.
1.3 Expand Your Network with the PLA
The PLA plugs into an ordinary power outlet to easily extend a cable or DSL broadband connection
or existing Ethernet (LAN) network to any other electrical outlet in any room of a house, all without
the need for any new cabling. Devices can securely communicate with each other at high data
PLA Series User’s Guide
9
Page 10
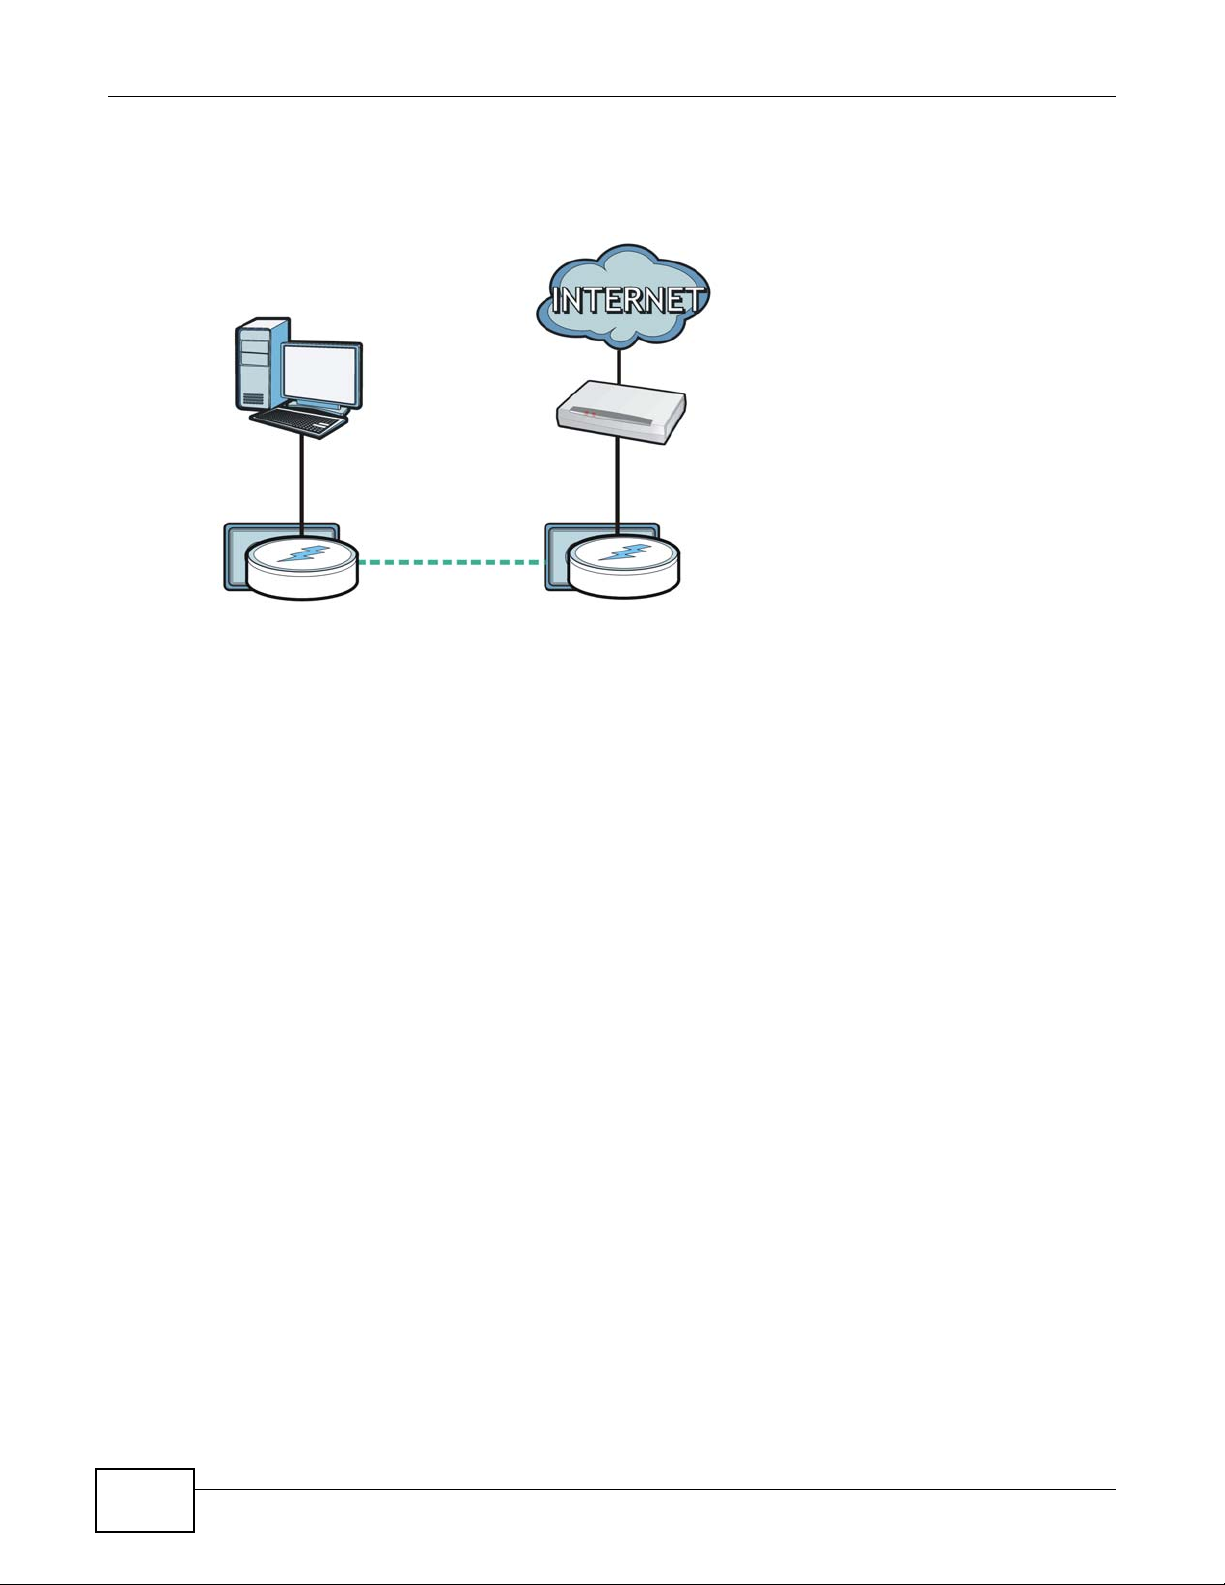
Chapter 1 Introducing the PLA
PLA
PLA
transfer rates. The PLA uses 128-bit Advanced Encryption Standard (AES) to ensure safe transfer of
information.
Figure 2 Expand Your Network wi t h the PLA
Connect your PLA to an Internet gateway such as a modem and plug it into an ordinary power
outlet in your home. Plug a second PLA into another power outlet and connect a computer to the
PLA for Internet access. Your network can be further expanded by plugging additional PLAs into
other outlets in your home and connecting other computers or network devices (for example, a
printer) to them.
Refer to your Quick Start Guide for hardware connection information.
1.4 Ways to Manage the PLA
Use the RESET/ENCRYPT button to add powerline devices to your powerline network if they have
this button. See Chapter 3 on page 19 for instructions on using the ENCRYPT feature.
Use the ZyXEL PLA Series Configuration utility (or utility, for short) to manage the PLA. See
Section 2.2 on page 13 for instructions on installing the utility.
1.5 Security
Since your powerline network may extend outside your premises, it is important to set up security
on your PLA.
10
PLA Series User’s Guide
Page 11

1.5.1 Passwords
You use two types of passwords in the HomePlug AV powerline network. The following table
describes the differences between the passwords.
Table 4 Password Summary
PASSWORD DESCRIPTION
Network Name All powerline adapters that follow the HomePlug AV standard are shipped with the
DAK (Data Access Key)
Password
1.5.2 Setting Up Security
Chapter 1 Introducing the PLA
same powerline network name “HomePlugAV”. Change the network name via the
ZyXEL PLA Series Configuration utility or RESET/ENCRYPT button to create a
private network. See Section 4.3 on page 27.
In order to manage the powerline adapters on your powerline network you must
enter the adapters’ DAK password in t he ZyXEL PLA Series Configuration util ity.
This password is printed on the powerline adapter itself.
You don’t need to add the password for the powerline adapter directly connected to
the computer running the configuration utility (local powerline adapter), you only
have to add the remote powerline adapters’ passwords (those on your circuit, but
not directly connected to your computer).
The ENCRYPT feature automatically sets up security on your powerline network. Use this feature if
your powerline devices have the RESET/ENCRYPT button.
Alternatively, use the ZyXEL PLA Series Configuration utility to set up security on the PLA.
Although the PLA is a “plug-and-play” network expanding solution there are several reasons for
enabling security on the powerline network in your home.
1 It’s easy and only requires you to change a network name.
2 It’s a good idea to ensure privacy of your communication. When you use the PLA and other
powerline adapters, the electrical wiring in your home becomes an extension of your Ethernet
network. Your network traffic flows freely within the electrical circuit of your home and is bounded
in most cases by a power meter.
Without security (encryption) your information is accessible to anyone using a powerline adapter on
the same electrical circuit. In some cases, a circuit can be shared by more than one household.
To prevent compromising your network security, you can create a private network. A private
network uses a secret password (Network Name) to make sure that only permitted powerline
adapters can communicate in your network. See Section 4.3 on page 27 for information on setting
up a private network.
3 You may need to change the Network Name to create multiple powerline networks. See the next
section for more information on how to set up a multiple network.
1.6 Multiple Networks
Multiple powerline networks can coexist on a single powerline circuit. You might want to implement
multiple powerline networks in a small office environment where you have two separate Ethernet
networks.
PLA Series User’s Guide
11
Page 12

Chapter 1 Introducing the PLA
1 Connect one powerline adapter to a router or switch on the first Ethernet network and assign a
Network Name (for example “Password1”) to this powerline adapter. Add additional powerline
adapters to your network by plugging them into your powerline outlets and assigning them
“Password1”. This completes the configuration of your first powerline network.
2 Connect another powerline adapter to a router or switch on the second Ethernet network and
assign a different Network Name (for example “Password2”) to this powerline adapter. Again, add
additional powerline adapters and assign them “Password2”.
You now have two private networks on your powerline circuit. Information is not shared between
the two networks as only powerline adapters with the same Network Name can communicate with
each other.
12
PLA Series User’s Guide
Page 13

This chapter guides you through the installation of the configuration utility for your PLA.
2.1 System Requirements
At the time of writing, the ZyXEL PLA Series Configuration utility is compatible with:
• Windows XP (32-bit version)
• Windows XP (64-bit version) (you may need to download and install .NET Framework version
2.0)
• Windows Vista (32-bit version)
• Windows Vista (64-bit version)
• Windows 7 (32-bit version)
• Windows 7 (64-bit version)
• Windows 8 (32-bit version)
• Windows 8 (64-bit version)
CHAPTER 2
Installing the Utility
Note: To check for your Windows operating system version, right-click on My Compute r
> Properties. You should see this information in the General tab.
Microsoft’s .NET Framework version 2.0 software is necessary for the installation of the ZyXEL PLA
Series Configuration utility. The utility automatically installs .NET Framework version 2.0 on all
supported operating systems (if it’s not already installed on your computer) except Windows XP
(64-bit version).
Note: Users with Windows XP (64-Bit version) operating systems can go to Microsoft’s
website to upgrade their systems to .NET Framework version 2.0 so it can work
with the utility.
2.2 Installing the Utility
Follow the steps below to install .NET Framework version 2.0 and the ZyXEL PLA Series
Configuration utility on your computer.
1 Insert the included CD-ROM into your computer’s CD-ROM drive. The Setup utility runs
automatically . Alternatively this can also be done manually by double clicking the setup.exe file on
the CD. A prompt appears asking you to install the .NET Framework v ersion 2. 0. R evi ew Microsoft’s
License Agreement, select Accept to proceed.
PLA Series User’s Guide 13
Page 14
Chapter 2 Installing the Utility
Note: If you al r eady have .NET Framework version 2.0 inst alled on your computer this
step will be skipped.
Figure 3 .NET Framework Installation Prompt
2 The next screen allows you to see the progress of the installation.
Figure 4 .NET Framework Installation Process
3 The Setup utility runs automatically. Click Yes or Next to continue through the initial screen. Click
Cancel only if you want to abort the installation.
Figure 5 InstallShield Wizard Start Screen
14
PLA Series User’s Guide
Page 15
Chapter 2 Installing the Utility
4 If you want the utility to be only available to the currently logged in user, select Just me.
Otherwise, click Everyone to allow all users to use the configuration utility . Click Next to install the
utility to the default folder, or click Browse to specify a different location on your computer.
Figure 6 Install Destination Folder
Note: You can also click Disk Cost to know how much available disk space you have in
the hard drives found in your computer.
5 When the installation is finished, a screen appears to confirm the InstallShield Wizard has
successfully installed the PLA Series Configuration Utility to your computer. Click Next.
Figure 7 Confirm Installation
PLA Series User’s Guide
15
Page 16
Chapter 2 Installing the Utility
6 Click Close to exit the wizard.
Figure 8 Installation Complete
Note: Y ou may be ask ed to restart your comput er when the install ation is complete . Click
“Yes” to restart your computer. If you select “No, I will restart my computer later”,
you will not be able to launch the utility until after a restart of your computer.
2.3 Standby Mode (Power Saving Mode)
Your PLA is a certified green product. It goes into standby mode when there is no Ethernet
connection.
When you plug the PLA into an electric socket, it waits for an Ethernet connection. When no
connection is detected after sixty (60) seconds, the Power LED blinks indicating that it is going into
standbymode.
The same process occurs when you disconnect the PLA from a previously working Ethernet
connection. Sixty (60) seconds after disconnecting the Ethernet cable, the PLA’s power LED blinks
signalling that it is going into standby mode.
The Ethernet and HomePlug LEDs are turned off in standby mode.
While in standbymode, you cannot use the RESET/ENCRYPT button. To enable the RESET/
ENCRYPT button again, you have to connect the PLA’s Ethernet cable to a computer/notebook or
modem/router first. The PLA wakes up from standby mode and you can start using the RESET/
ENCRYPT button.
16
PLA Series User’s Guide
Page 17

PART II
Technical Reference
17
Page 18

18
Page 19

CHAPTER 3
The RESET/ENCRYPT Button
Use the RESET/ENCRYPT button to automatically set up a secure powerline connection between
your powerline devices.
Note: In this guide RESET/ENCRYPT refers to the ENCRYPT button in PLAs that have
separate RESET and ENCRYPT buttons.
3.1 RESET/ENCRYPT Button Overview
The RESET/ENCRYPT button allows you to set up a secure powerline connection with other
HomePlug AV compliant powerline devices which also support the ENCRYPT feature. No other
powerline setting changes are required to connect.
You can use the RESET/ENCRYPT button to:
• set up a new powerline network.
• separate an existing powerline network into multiple networks.
• reset the PLA to the factory defaults.
3.2 Adding Devices to a Powerline Network
You can connect a num ber of PLAs on a powerline n etwork, but you can use the RESET/ENCRYPT
button on only two PLAs at a time.
Place a powerline device close to another powerline device so you have time to set up each one.
After you set up the first powerline device, you have 120 seconds to set up the second powerline
device.
Note: Y our PLA must be connected to a networking equipment for the RESET/ENCRYPT
button to work. Refer to Section 2.3 on page 16 for more detail s.
Follow the steps below to set up your HomePlug AV Network:
PLA Series User’s Guide 19
Page 20

Chapter 3 The RESET/ENCRYPT Button
press 0.5 ~ 3 seconds
press 0.5 ~ 3 seconds
within 2
minutes
PLA PLA
1 Press the RESET/ENCRYPT button at the side of your powerline device for 0.5 to 3 seconds. The
power ( ) light will blink as the powerline device tries to set up a connection with a new random
network name.
Figure 9 ENCRYPT Connection Procedure
Note: The RESET/ENCRYPT button’s location varies for each Powerline model.
Note: Check the lights on the two powerline devices. The power ( ) and HomePlug ( )
lights should be on while the devices are connecting. Wait for about two minutes
while your powerline devices connect.
If the power ( ) light does not blink when you press RESET/ENCRYPT, you have probably
pressed the RESET/ENCRYPT button for too long. Try again, pressing the RESET/
ENCRYPT button for 0.5 to 3 seconds.
If the HomePlug ( ) lights on both powerline devi ces do not light up, the powerline
devices are not connected. Repeat step 1 in this section. If that doesn’t work, see the
Troubleshooting in Section 6.4 on page 47 for su gg es tions.
2 To add more powerline devices to your network, use any powerline device (A or B) you have
connected to set up a connection with the powerline devices you want to connect (C and D).
3 Press the RESET/ENCRYPT button on both powerline devices (A and C, or B and C) for 0.5 to 3
seconds to add powerline device C. This must be done within 2 minutes (120 seconds) of pressing
the RESET/ENCRYPT button on the PLA.
20
PLA Series User’s Guide
Page 21

Chapter 3 The RESET/ENCRYPT Button
A
B
C
A OR B
D
A OR B OR C
A
C
B
D
4 Press the RESET/ENCRYPT button on both powerline devices (A and D, B and D or C and D) for
0.5 to 3 seconds to add powerline device D. This must be done within 2 minutes (120 seconds) of
pressing the RESET/ENCRYPT button on the PLA.
Figure 10 Adding More Powerline Adapters to Your Network
This sets up your powerline network between your pow e rline devices.
3.3 Removing a Device from a Powerline Network
Suppose you want to remo ve PLAs (C) and (D) from the following powerline network.
Figure 11 Removing Devices From an Existing Powerline Network
1 Press the RESET/ENCRYPT button on powerline device C for 5 to 8 seconds and then release it.
This disconnects C from the current network.
2 Press the RESET/ENCRYPT button on powerline device D for 5 to 8 seconds and then release it.
This disconnects D from the current network.
PLA Series User’s Guide
21
Page 22

Chapter 3 The RESET/ENCRYPT Button
E
G
F
H
3.4 Multiple Separate Powerline Networks
You can use the RESET/ENCRYPT button to create multiple separ ate powerline networks. Use the
RESET/ENCRYPT button on only two PLAs at a time.
1 Press the RESET/ENCRYPT button on powerline devices E and F for 0.5 to 3 seconds. This must
be done within 2 minutes (120 seconds) of pressing the RESET/ENCRYPT button on the first PLA.
2 Wait for about one minute while powerline devices E and F connect.
3 Now pair two different PLAs. Press the RESET/ENCRYPT button on powerline devices G and H for
0.5 to 3 seconds and within two minutes of each other.
4 Wait for about one minute while powerline devices G and H connect.
5 When the power ( ) and HomePlug ( ) lights shine steadily, the devices are connected.
Figure 12 Two Separate Powerline Networks
If the HomePlug ( ) lights on both powerline devi ces do not light up, the powerline
devices are not connected. Repeat the connection process, making certain you press the
RESET/ENCRYPT buttons for the correct time and within two minutes of each other. If that
does not work see Section 6.4 on page 47 for suggestions.
3.5 PLAs With One Combination RESET/ENCRYPT Button
Refer to Table 1 on page 7 to see which models have a combination RESET /ENCRYPT button.
22
PLA Series User’s Guide
Page 23

Chapter 3 The RESET/ENCRYPT Button
The following table summarizes the actions that occur when the RESET/ENCRYPT button is
pressed for specific lengths of time.
Table 5 RESET/ENCRYPT
TIME ACTION POWER LIGHT BEHAVIOR
0.5 to 3
seconds
5 to 8
seconds
10 to 15
seconds
Create a powerline network
with a new random network
name.
Join an existing powerline
network by sharing the same
network name as other
devices on the network.
Remove the device from any
network it is associated with
and its network name
assumes a random value.
Clear all user-entered
configuration information and
return the device to its
factory defaults.
The power ( ) light blinks
until the device is connected.
This may take a minute.
The power ( ) light blinks
and then shines steadily.
The power ( ) light blinks
and then shines steadily.
HOMEPLUG LIGHT
BEHAVIOR
The HomePlug ( ) light turns
on if your device is connected
to another powerline device or
a powerline network.
The HomePlug ( ) light turns
off when it disconnects from the
powerline network.
The HomePlug ( ) light turns
off when it disconnects from the
powerline network.
Note: The network name is unknown when you use the RESET/ENCRYPT button.
3.6 PLAs with Separate RESET and ENCRYPT Buttons
Refer to Table 1 on page 7 to see which models have separate RESET and ENCRYPT buttons.
3.6.1 ENCRYPT Button Behavior
The following table summarizes the actions that occur when the ENCRYPT button is pressed for
specific lengths of time.
Table 6 ENCRYPT
TIME ACTION POWER LIGHT BEHAVIOR
less than 3
seconds
more than
10 seconds
Create a powerline network
with a new random network
name.
Join an existing powerline
network by sharing the same
network name as other
devices on the network.
Remove the device from any
network it is associated with
and its network name
assumes a random value.
The power ( ) light blinks
until the device is connected.
This may take a minute.
The power ( ) light blinks
and then shines steadily.
HOMEPLUG LIGHT
BEHAVIOR
The HomePlug ( ) light turns
on if your device is connected
to another powerline device or
a powerline network.
The HomePlug ( ) light
blinks red one time and then
turns off when it disconnects
from the powerline network.
PLA Series User’s Guide
23
Page 24

Chapter 3 The RESET/ENCRYPT Button
3.6.2 RESET Button Behavior
Use a pointed device such as a pin to reset the Network Name back to default HomePlugAV.
Table 7 RESET Button
TIME ACTION POWER LIGHT BEHAVIOR
1 to 3
seconds
See Troubleshooting in Chapter 6 on page 47 for suggestions on problems with the RESET/
ENCRYPT button and the lights.
Clear all user-entered
configuration information and
return the device to its
factory defaults.
The power ( ) light blinks
and then shines steadily.
HOMEPLUG LIGHT
BEHAVIOR
The HomePlug ( ) light
turns off when it disconnects
from the powerline network.
24
PLA Series User’s Guide
Page 25

4.1 Overview
A
PLA
PLA
This chapter shows you how to use the ZyXEL PLA Series Configuration utility (or utility) to
secure, manage and set up Quality of Service (QoS) on your powerline network.
The PLA is designed as a plug-and-play network expanding solution. This means that once you
complete your hardware connections, the PLAs in your network (without additional configur ation )
are able to communicate with each other by sending and receiving information over your home’s
electrical wiring (A).
Figure 13 Example Network Setup
CHAPTER 4
The Configuration Utility
All HomePlug AV compliant powerline adapters within range can join your network. The range
varies depending on the quality of your home’s wiring.
Note: See Section 4.1.1 on page 25 for more information on enhancing your powerline
network security.
4.1.1 Powerline Network Security
When the PLAs communicate with each other, they use encryption to protect the information that is
sent in the powerline network. Encryption is like a secret code. If you do not know the secret code,
you cannot understand the message. The HomePlug AV standard uses 128-bit AES (Advanced
Encryption Standard) to safely transmit data between powerline adapters.
PLA Series User’s Guide 25
Page 26

Chapter 4 The Configuration Utility
For the powerline adapters to communicate with each other they all need to use the same network
name. This network name allows the powerline adapters to understand the encrypted information
sent in the powerline network.
By default the PLAs are all configured with the network name HomePlugAV, this allows you to
simply plug the devices in and not worry about setting up security. If you want to enhance the
security on your powerline network, you can change the network name on the powerline adapters
you want to allow to communicate in your powerline network.
4.1.2 Device Access Key (DAK)
In order to manage the powerline adapters on your powerline network you must enter the adapters’
password in the ZyXEL PLA Series Configuration utility. This password is called the DAK (Device
Access Key) password. This password is printed on the powerline adapter itself.
You don’t need to enter the DAK password for the powerline adapter directly connected to the
computer running the utility (local powerline adapter), you only have to add the remote powerline
adapters’ passwords (those in your powerline network, but not directly connected to your
computer).
4.2 Starting the Configuration Utility
To launch the ZyXEL PLA Series Configuration utility simply double click on the configuration
icon on your desktop.
Figure 14 ZyXEL PLA Series Configuration Utility Icon
Alternatively, start the utility by browsing to it from the start menu. Click Start > Programs >
ZyXEL PLA Series Configuration > PLA Series Configuration.
26
PLA Series User’s Guide
Page 27

4.3 Configuration Screen
Use the Configuration screen to see which devices are recognized by your powerline network, to
configure your PLA and to set up a secure powerline network by changing the powerline network
name. This screen opens up when you launch the utility.
Figure 15 Configuration Screen
Chapter 4 The Configuration Utility
The following table describes the labels in this screen.
Table 8 Configuration Screen
LABEL DESCRIPTION
Network
Topology
The fields described below are used to identify the powerline adapters recognized on the powerline network.
The configuration utility automatically updates this information every 10 seconds. Click Scan to refresh the
information in these fields (immediately).
Use this to select which powerline network information is displayed. Different powerline
networks are identified by the Ethernet interface (network card) connected directly to the
PLA. Typically there is only one connection, however, if your computer has two network
cards and both are connected to a powerline device then you have two powerline networks.
Note: Only devices which share the same network name are displayed in this table.
Site This field displays
• Local, if it is identifying the powerline adapter directly connected to the computer
running the configuration utility.
• Remote, if it is a powerline adapter in your powerline network but not directly
connected to the computer running the configuration utility.
MAC Address This is a read-only field which shows the MAC address of the powerline adapter you are
configuring. You can find the MAC address of your PLA displayed on a sticker on the bottom
of your device.
PLA Series User’s Guide
27
Page 28

Chapter 4 The Configuration Utility
Table 8 Configuration Screen (continued)
LABEL DESCRIPTION
DAK Password DAK (Device Access Key) password is used to verify that you are authorized to perform
Network Name
(NMK)
Set NMK to this
device
Set NMK to all
devices
Save Click this to apply your changes. The new Network Name is applied to the selected
changes on a remote device. You can find the DAK password printed on a sticker on the
bottom of your PLA.
Select the remote powerline adapter you want to manage by clicking the MAC address
which corresponds to it in the MAC Address column. Enter the DAK Password value and
click Save.
Note: You must enter the DAK Password value exactly as it is printed on the label (all caps
and with dashes “-”).
The default network name (sometimes called a network password or network membership
key (NMK)) of the PLA is “HomePlugAV”. HomePlug compatible de vices use the same
network name to recognize and communicate with each other over the powerline network.
If you change the network name of one device on the network, it will no longer be
recognized as part of that network.
If you change the network name, make sure you change the network name for all of the
powerline adapters that you want to be part of your powerline network.
The network name can be from 8 to 64 characters in length, using “A”~”Z”, “a”~”z”,
“0”~”9”; spaces are not allowed.
Select this to apply the NMK (entered in the field above) as the network name for the
powerline adapter directly connected to the computer running the configuration utility.
Select this to apply the NMK (entered in the field above) as the network name for all
powerline adapter detected by the utility.
powerline adapter.
Note: You must enter the correct DAK password for the selected powerline adapter before
you can make changes to it.
4.4 Firmware Screen
Use the Firmware screen to update the firmware on the PLA directly connected to the computer
running the configuration utility.
Firmware is the software which is embedded in the PLA. This software contains processing
instructions for how the PLA sends and receives information in a secure way.
Parameter Information Block (PIB) is similar to firmware. It contains the most basic operating
instructions for the PLA such as how to power up and how to load the firmware.
You can check the ZyXEL website for firmware upgrades for your PLA.
Note: If you update device firmware, it is recommended to check if there is a ZyXEL PLA
Series Configuration utility update.
28
PLA Series User’s Guide
Page 29

Chapter 4 The Configuration Utility
Note: Be sure to upload the correct model firmware as uploading the wrong model
firmware may damage your devic e.
Figure 16 Firmware Screen
4.5 Network Info Screen
Use the Network Info screen to see the rates at which a specific PLA is communicating with other
powerline adapters on your powerline network.
Figure 17 Network Info Screen
PLA Series User’s Guide
29
Page 30

Chapter 4 The Configuration Utility
The following table describes the labels in this screen.
Table 9 Network Info Screen
LABEL DESCRIPTION
Adapter This field identifies which powerline network information is displayed. Different powerline
Central
Coordinator
MAC
The information provided in the following table reflects transmission rate information about the powerline
adapters which communicate in your powerline network.
The powerline adapters listed in this table are all the powerline adapters in your powerline network except the
powerline adapter selected in the Configuration page of the configuration utility. In other words, if the Local
powerline adapter is selected in the Configuration screen, then this table will display the rates of
transmission from the powerline adapter connected to the computer running the configuration utility to all the
Remote powerline adapters.
Site This field displays:
MAC Address This field displays the MAC address of your powerline adapter. The MAC address of your
Trans mit Rate
(Mbps)
Receive Rate
(Mbps)
networks are identified by the Ethernet interface (network card) connected directly to the
PLA. Typically there is only one connection, however, if your computer has two network
cards and both are connected to a PLA, then you have two powerline networks.
The Central Coordinator of the powerline network is the powerline adapter which keeps
track of which devices are part of the network as well as synchronizes communication
within the powerline network. If the Central Coordinator is removed from the powerline
network then another powerline adapter takes its place. This fiel d displays the MAC address
of the PLA which is the Central Coordinator of the powerline network. The powerline
adapters in your powerline network automatically select the Central Coordinator.
• Local, if it is the PLA directly connecte d to the computer running the configuration
utility.
• Remote, if it is a PLA in your powerline network but not directly connected to the
computer running the configuration utility.
powerline adapter can be found by looking at the label on your device. It consists of six
pairs of hexadecimal characters (hexadecimal characters are “0-9” and “a-f”). In the case
of the PLA, this label is on the bottom of the device.
This field displays how fast information is sent from the powerline adapter selected in the
Configuration screen to this powerline adapter. The rate is given in the following format:
“application data transmission rate / raw data transmission rate”. Application data reflects
more accurately how fast devices are transmitting application relevant traffic (for example
Internet Protocol (IP) traffic). Raw data refers to the whole payload of the packets
transmitted across the powerline network.
This field displays how fast information is received from the powerline adapter selected in
the Configuration screen to this powerline adapter. The rate is given in the following
format: “application data transmission rate / raw data transmission rate”. Application data
reflects more accurately how fast devices are transmitting application relevant traffic (for
example Internet Protocol (IP) tr affic). R aw data refers to the whole payload of the packets
transmitted across the powerline network.
4.6 Advanced Screen
You can configure the powerline adapters on your network to give priority to network traffic
depending on its importance. When you set the priority of a powerline adapter, you set how quickly
messages FROM your powerline adapter are sent in your powerline network. T r ansmissions TO your
powerline adapter do not receive any priority.
For example, if you have a file server on your home network to deliver music and movie files to
computers in your home, you should set the priority of the powerline adapter connected to this
server to Medium. If video traffic is delivered too slowly, quality problems may occur.
30
PLA Series User’s Guide
Page 31

Chapter 4 The Configuration Utility
A
B
C
D
E
On the other hand, a powerline adapter attached to a printer should have a low priority setting
since the slow delivery of messages will not affect the print job.
Similarly , if you want to prioritize any downloads from the Internet, set the priority on the powerline
adapter attached to your Internet gateway to High.
Allocate priority settings based on application type as follows.
Table 10 Priority Settings
PRIORITY LEVEL APPLICATION
High Voice Application
Medium Video and Audio Applications
Normal Data Applications
Low Data Applications
The figure below shows an example powerline home network connected to the Internet.
• Device A is a printer and does not handle traffic with high importance, so the powerline adapter
connected to it can be set to low priority.
• Device B is a file server, delivering audio or movie files to other users on the network. The
powerline adapter attached to it should have a medium setting.
• Device C, a home computer which connects to the Internet, can receive a normal priority setting
as it usually sends simple requests for data. For example, when you surf the Internet, your
computer sends requests to open web pages.
• Device D is a modem attached to the Internet. It should receive a high priority setting if you want
faster downloading through your network.
• Although device E receives audio or movie files, it does not send a lot of traffic, so the powerline
adaptor attached to it can be set to a low priority.
Figure 18 Priority Settings
PLA Series User’s Guide
31
Page 32

Chapter 4 The Configuration Utility
Use this screen to configure priority settings for traffic from the powerline adapters on your
network.
Figure 19 Advanced Screen
The following table describes the labels in this screen.
Table 11 Advanced Screen
LABEL DESCRIPTION
Adapter This field identifies which powerline network information is displayed. Different powerline
networks are identified by the Ethernet interface (network card) on your computer which is
connected directly to a powerline adapter . Typically there is only one connection. However, if
your computer has two network cards and both are connected to a powerline adapter, then
you have two powerline networks.
Site This field displays:
• Local, if it is the PLA directly connected to the computer running the configuration utility.
• Remote, if it is a powerline adapter in your powerline network but not dire ctly connected
to the computer running the configuration utility.
MAC Address This is a read-only field which shows the MAC address of the powerline adapter you are
Priority Select a priority setting from the drop-down box for traffic FROM your selected device. The
Save Click this to apply your changes. The new Priority setting is applied to the selected
configuring. You can find the MAC address of your PLA displayed on a sticker on the bottom
of your device.
options, in order of importance, are High, Medium, Normal and Low.
powerline adapter.
32
PLA Series User’s Guide
Page 33

4.7 About Screen
Use the About screen to view information regarding the configuration utility and firmware version
of the PLA you are connected to. Click the icon in the top right corner of the utility to view the
About screen.
Figure 20 About Screen
Chapter 4 The Configuration Utility
The following table describes the labels in this screen.
Table 12 About Screen
LABEL DESCRIPTION
Utility version: This field displays the software version of the configuration utility.
Firmware version This field displays the firmware version of the device you selected in the Device Selection
field of the Configuration screen.
Released This field displays the date when the firmware was released.
Close Click the button in upper right corner to close the About window.
PLA Series User’s Guide
33
Page 34

Chapter 4 The Configuration Utility
34
PLA Series User’s Guide
Page 35

5.1 Overview
Use this tutorial to expand your existing powerline network.
After setting up your first home powerline network (instructions for that are in the Quick Start
Guide for your ZyXEL powerline adapter) you may w ant to extend the network or create a new one
by adding additional powerline adapters. This tutorial shows you the following.
• How to start up your new powerline adapter. You need to do this before you can begin the next
sections.
• How to make your existing powerline network bigger by adding new powerline adapters.
• How to make a new network separate from your existing network with new powerline adapters.
• How to make a new, separate powerline network with the powerline adapters you have.
CHAPTER 5
Powerline Network Setup Tutorial
The tutorial uses the ZyXEL PLA Series Configuration utility to set up your powerline adapter.
If you haven’t already installed the utility, see Chapter 2 on page 13 for instructions. If you do not
have the CD with the utility, the utility software is also available for download at www.zyxel.com.
Navigate to the powerline products section of the ZyXEL website to find this software. Follow the
instructions provided by the software to install it on your computer.
See the product specifications in the User’s Guide for a list of hardware and software compatible
with the utility.
Note: The PLA in this tutorial is an example only. Your powerline adapter may be
different.
5.2 Important Terms
Network Name The network name allows a powerline adapter to connect with o ther powerline
DAK Password DAK = Device Access Key.
adapters that have the same network name. It provides security for your powerline
network. The network name uses English letters or numbers, from 8 to 64
characters long, with no spaces allowed.
The DAK Password lets you access the powerline adapter. You can find the DAK
Password on a label on your powerline device.
PLA Series User’s Guide 35
Page 36

Chapter 5 Powerline Network Setup Tutorial
1
PLA
2
3
5.3 Accessing Your Powerline Adapter
1 Plug the powerline adapter you want to add to your network into a power socket and, if needed,
switch the power socket on.
Figure 21 Plug Your Powerline Adapter into a Power Socket
2 Connect the powerline adapter to your computer.
3 Use a LAN or Ethernet cable (shown below) to connect the LAN or Ethernet port on your adapter to
the same kind of port on your computer.
Figure 22 Connect Your Powerline Adapter to a Computer
4 Open the ZyXEL PLA Series Configuration utility on your computer. Go to Start > (All)
Programs > ZyXEL PLA Series Configuration > PLA Series Configuration Utility, or click on
the icon on your desktop shown below.
Figure 23 Click on the ZyXEL PLA Series Configuration utility Icon
5 You are now ready to extend your powerline network or set up a second network.
•See Section 5.4 on page 37 to add a new powerline adapter to your network.
•See Section 5.5 on page 38 to set up a second network with your new adapters.
•See Section 5.6 on page 40 to set up a second network with your existing adapters.
PLA Series User’s Guide
36
Page 37

5.4 Adding a Powerline Adapter
A
B
This section shows you how to add a new powerline adapter to expand your existing network.
The figure below shows the family computer with Internet access on a powerline network. Expand
the network by adding a new powerline adapter connected to a printer.
Figure 24 Add a Printer to Your Powerline Network
Chapter 5 Powerline Network Setup Tutorial
Note: You do not need to know the network name of the new adapter to add it to your
network.
1 Connect your computer to the powerline adapter you want to add to your network and open the
ZyXEL PLA Series Configuration utility (see Section 5.3 on page 36).
2 The utility should open to the configuration tab. On this screen in the Site column your new
powerline adapter should appear as Local (A). Check the Local adapter’s MAC address (B). It
should match the MAC address listed on the label on the back of your powerline adapter.
Figure 25 Adding a New Adapter
PLA Series User’s Guide
37
Page 38

Chapter 5 Powerline Network Setup Tutorial
C
3 Select your adapter by selecting Local and type the network name for your existing network in the
Network Name field (C).
Figure 26 Adding an Adapter to an Existing Network
4 Click Save and click OK on the pop-up.
Figure 27 Network Name Pop-up
5 Your new adapter will now have the same Network Name as your existing network and so has
now joined your existing network.
6 Connect the adapter to the device you want to add to the network, for example, your Internet
refrigerator in the kitchen.
7 Plug the adapter’s power cord into a power outlet and, if required, switch the power outlet on.
8 Repeat this procedure for all additional powerline adapters that you want to add to your existing or
new powerline network.
5.5 Setting Up a New Network with a New Adapter
This section shows you how to use your new powerline adapters to set up a new powerline network
separate to your existing network.
The figure below shows two powerline networks in a house. The first network (1) shows the home
computer connected to a printer and access to the Internet. The second network (2) has no
38
PLA Series User’s Guide
Page 39

Chapter 5 Powerline Network Setup Tutorial
Internet access but with a media adapter such as the ZyXEL DMA-1100P you can use your TV to
watch movies and play games which are stored on a computer.
Figure 28 Add New Adapters to Make a Second Network
1 Connect your new powerline adapter and open the configuration utility as shown in Section 5.5 on
page 38. The screen shown below appears.
2 Type a Network Name that is different from the Network Name for your existing network. Make
sure you use the same new Network Name for all new adapters you want to add to your new
network.
Figure 29 Making a New Network with the New Adapter
3 After you have set up a new network, you are ready to connect each powerline adapter on your new
network to devices, for example, a computer or a games console.
PLA Series User’s Guide
39
Page 40

Chapter 5 Powerline Network Setup Tutorial
5.6 Splitting a Network into Two Networks
This section shows you how to split your existing network into two networks. This is useful if you
want to set up a second powerline network in your home, for example, in your study connecting a
laptop and printer. See Figure 28 on page 39 for an example.
To set up your existing powerline network you had to set each powerline adapter with the same
network name. To create a second (separate) powerline network, configure the PLAs you want to
add to the second network with a new network name.
1 Connect a powerline adapter to your computer and open the ZyXEL PLA Series Configuration
utility (see Section 5.3 on page 36).
2 The utility should open to the configuration tab as shown below. A list of powerline adapters on your
network displays. These adapters all have the same network name as the adapter you are
connected to. The adapter you are connected to will appear as Local in this table. All others are
listed as Remote.
Figure 30 Local/Remote Adapters on a Powerline Network
3 To set up a new powerline network, type the DAK Password and change the Network Name on
all powerline adapters you wish to add to your network.
• Look for the DAK Password on a label on your powerline adapter. The DAK Password lets
you access the adapter.
• Select the Remote adapter you want to add (A) and type the DAK Password in the DAK
Password field (B).
• Then type the new network name in the Network Name field.
40
PLA Series User’s Guide
Page 41

Chapter 5 Powerline Network Setup Tutorial
B
A
Figure 31 Adding an Adapter to Your New Network
4 Click Save.
• If you do not type the DAK password or type it incorrectly either of the following pop-ups
appear. Click OK and type the DAK Password correctly in the DAK Password field.
Figure 32 Incorrect DAK or No DAK
• If you have correctly entered the DAK Password, click OK on the pop-up.
Figure 33 Correct DAK
PLA Series User’s Guide
41
Page 42

Chapter 5 Powerline Network Setup Tutorial
5 The settings for the adapter will now grey out and the adapter will disappear from the table after a
few minutes.
Figure 34 An Adapter on Your New Network
6 Go back to step 3 in this section to set the same, new Network Name for all remote adapters you
want to add to your new network.
7 Check you have added the adapters correctly by changing the network name for the local adapter.
All adapters with the new Network Name now appear in the list of adapters on your network.
These adapters are now part of your new network.
Figure 35 Adapters on a New Powerline Network
• If you want to access any of your new powerline networks using the ZyXEL PLA Series
Configuration utility, change the Network Name on your local adapter to the network name
for the network you want to access. The adapters on that network will then display in the adapter
table, allowing you to select and configure each one.
5.7 Troubleshooting
The HomePlug ( ) LED (light) should light up on your adapter when it successfully connects to
other adapters on your network. If it does not, try the following measures.
• Make sure the adapter is plugged in to a power socket and the power socket is turned on.
42
PLA Series User’s Guide
Page 43

Chapter 5 Powerline Network Setup Tutorial
• Check you have entered the correct network name for your network.
• Check your powerline adapter is connected to the same electrical circuit as other powerline
adapters on your network.
PLA Series User’s Guide
43
Page 44

Chapter 5 Powerline Network Setup Tutorial
44
PLA Series User’s Guide
Page 45

This chapter offers some suggestions to solve problems you might encounter.
6.1 Power and Light Problems
The PLA does not turn on. None of the lights turn on.
1 Make sure you are using the power cord included with the PLA.
2 Make sure the power cord is connected to the PLA and plugged in to an appropriate power source.
Make sure the power source is turned on.
CHAPTER 6
Troubleshooting
3 Disconnect and re-connect the power cord to the PLA.
4 Remove the powerline adapter from the outlet. Then connect an electrical device that you know
works into the same power outlet. This checks the status of the power outlet.
5 If the problem continues, contact the vendor.
The ETHERNET light does not turn on.
1 Check the hardware connections. See the Quick Start Guide.
2 Inspect your cables for damage. Contact the vendor to replace any damaged cables.
3 Check the Ethernet adapter on your computer and make sure it’s enabled and working properly.
4 If the PLA is connected to an Ethernet switch or router, make sure the device is working correctly,
and that the LAN network is working and configured correctly as well.
The HomePlug light does not turn on.
1 Check all PLAs on your network have the latest firmware installed. PLAs with the latest firmware
cannot communicate with PLAs using earlier versions of the firmware. Go to Section 4. 4 on page 28
for instructions on installing the latest firmware.
PLA Series User’s Guide 45
Page 46

Chapter 6 Troubleshooting
2 Use the ZyXEL PLA Series Configuration utility to detect all other HomePlug devices on your
powerline network. Make sure that the network name (sometimes called the network password) is
the same on all of your powerline adapters. See Section 4.3 on page 27 for instructions on checking
the network name.
3 Check the DAK password and MAC address for all powerline adapters are typed correctly in the
utility. See Section 4.3 on page 27 for instructions on checking the DAK and MAC address.
4 Make sure that all your powerline adapters are HomePlug AV compliant. Check the package it came
in or ask your vendor. This PLA can not detect earlier versions of HomePlug powerline adapters such
as HomePlug 1.0 or 1.0.1. (Although they can coexist on the same electrical wiring without
interfering with each other.)
5 Make sure that the powerline adapters on your network are all on the same electrical wiring.
Connect another powerline adapter into an outlet close to your PLA’s power outlet. They are
probably now on the same electrical wiring. Check the HomePlug ( ) light. If it now lights up your
powerline adapter was probably previously on separate electrical wiring. Ask an electrician for more
information on the electrical wiring in your building.
6 Make sure that you do not have a power meter between powerline adapters. Powerline signals
cannot pass this.
The POWER and HomePlug light blink at the same time.
• You have pressed the RESET/ENCRYPT button for more than three seconds. Try setting up a
connection again, this time pressing the RESET/ENCRYPT buttons on both devices for less than
three seconds.
6.2 Configuration Utility Problems
The ZyXEL PLA Series Configuration utility displays an error during installation.
• Make sure your computer is using the supported operating system. See Section 2.1 on page 13
for more information.
The ZyXEL PLA Series Configuration utility does not display all or any of my devices.
• Inspect the LEDs on your PLA and make sure that the ETHERNET and HomePlug LEDs are on or
blinking. See Section 1.2 on page 8 for troubleshooting LED related problems.
• Check all ZyxEL HomePlug AV devices on your network have the latest firmware installed. The
latest utility cannot communicate with PLAs using earlier versions of the firmware. Go to Section
4.4 on page 28 for instructions on installing the latest firmware.
46
PLA Series User’s Guide
Page 47

• Check you are using the latest version utility. Earlier version utilities cannot communicate with
PLAs using the latest firmware. If you do not have the latest utility, download it from the ZyXEL
website.
• If you are running another tool such as the Firmware Detection Tool , the utility will not detect
your local device.
• If your computer has more than one network interface card (NIC), make sure you select the right
NIC to which the PLA is connected in the utility’s Configuration screen.
6.3 Powerline Problems
The signal on my powerline network is weak.
1 Your powerline adapters may be connected to electrical surge protectors. Connect them to standard
power outlets.
2 Your powerline adapters may be located close to large appliances such as refrigerators or air-
conditioners that cause interference with the powerline signal. Move the adapters further away
from such appliances to reduce interference.
Chapter 6 Troubleshooting
3 Your powerline adapters may be placed close to electrical devices such as electrical insect-killers
which produce radio waves. These may interfere with the powerline signals. Move the adapters
further away from such electrical devices.
4 Your wiring may be old and/or low quality or with a long wiring path.
6.4 RESET/ENCRYPT Button Problems
This section applies only to PLAs with the RESET/ENCRYPT button. In this guide RESET/
ENCRYPT refers to the ENCRYPT button in PLAs that have separate RESET and
ENCRYPT buttons.
ENCRYPT buttons.
The HomePlug light is already on, but I haven ’t pressed the RESET/ENCRYPT button yet.
Your device has already connected to another powerline device. Press the RESET/ENCRYPT
button for 5 to 8 seconds to release the connection.
Refer to Table 1 on page 7 to see which models have separate RESET and
The POWER light does not blink when I press the RESET/ENCRYPT button.
• Check the device is on.
PLA Series User’s Guide
47
Page 48

Chapter 6 Troubleshooting
• Press the RESET/ENCRYPT button again, making certain you have pressed the button for 0.5 to
3 seconds.
• The POWER light on some powerline devices do not blink as part of the ENCRYPT process. Check
your powerline device is a PLA.
• For PLA, you cannot use the RESET/ENCRYPT button when it is in standby mode. Connect the
PLA to a computer/router then try again.
The POWER light blinks two times quickly then pauses, before repeating.
The ENCRYPT process has failed. Press the RESET/ENCRYPT button on both devices for 5 to 8
seconds, then try to reconnect.
The POWER lights on both devices blink when I press the RESET/ENCRYPT buttons, but the
HomePlug light does not turn on.
• Ensure you have pressed the RESET/ENCRYPT button on both devices.
• Wait for about a minute while the devices set up a connection.
• If that does not work, try again with both devices connected to a power strip next to each other.
If they now connect, then the devices were not on the same electrical circuit before.
The POWER lights on both devices blink, then many lights bl ink and the HomePlug light blinks
red.
Do not worry, the connection process is proceeding normally.
The POWER lights on both devices finished blinking, but only one device’s HomePlug light is
on.
One device may have connected to a third powerline device. To check device A is connected to
device B and not another device, disconnect device B from its power source. Device A’s HomePlug
( ) light will turn off if the connection is with Device B. Press the RESET/ENCRYPT button on
both devices for 5 to 8 seconds, then try to reconnect, pressing the RESET/ENCRYPT button for
0.5 to 3 seconds on both devices.
I pressed the RESET/ENCRYPT button for 5 to 8 seconds, but the HomePlug light is still on.
The HomePlug light is on, indicating it is still connected to another powerline device. Try again,
pressing the RESET/ENCRYPT button for 5 to 8 seconds.
48
PLA Series User’s Guide
Page 49

Copyright
APPENDIX A
Legal Information
Copyright © 2013 by ZyXEL Communications Corporation.
The contents of this publication may not be reproduced in any part or as a whole, transcribed,
stored in a retrieval system, translated into any language, or transmitted in any form or by any
means, electronic, mechanical, magnetic, optical, chemical, photocopying, manual, or otherwise,
without the prior written permission of ZyXEL Communications Corporation.
Published by ZyXEL Communications Corporation. All rights reserved.
Disclaimers
ZyXEL does not assume any liability arising out of the application or use of any products, or
software described herein. Neither does it convey any license under its patent rights nor the patent
rights of others. ZyXEL further reserves the right to make changes in any products described herein
without notice. This publication is subject to change without notice.
Trademarks
Trademarks mentioned in this publication are used for identification purposes only and may be
properties of their respective owners.
Certifications
Federal Communications Commission (FCC) Interference Statement
The device complies with Part 15 of FCC rules. Operation is subject to the following two conditions:
• This device may not cause harmful interference.
• This device must accept any interference received, including interference that may cause
undesired operations.
This device has been tested and found to comply with the limits for a Class B digital device pursuant
to Part 15 of the FCC Rules. These limits are designed to provide reasonable protection against
harmful interference in a residential installation. This device generates, uses, and can radiate radio
frequency energy, and if not installed and used in accordance with the instructions, may cause
harmful interference to radio communications. However, there is no guarantee that interference will
not occur in a particular installation.
If this device does cause harmful interference to radio/television reception, which can be
determined by turning the device off and on, the user is encouraged to try to correct the
interference by one or more of the following measures:
PLA Series User’s Guide 49
Page 50

Appendix A Legal Information
1 Reorient or relocate the receiving antenna.
2 Increase the separation between the equipment and the receiver.
3 Connect the equipment into an outlet on a circuit different from that to which the receiver is
connected.
4 Consult the dealer or an experienced radio/TV technician for help.
CE-Konformität
Das Produkt entspricht den grundlegenden Anforderungen der Richtlinie 1999/5/EG (R&TTE) sowie
den übrigen einschlägigen Bestimmungen des FTEG und ist zum Betrieb in der EU und Schweiz
vorgesehen. Das Produkt ist eine Einrichtung der Klasse A. Diese Einrichtung kann im Wohnbereich
Funkstörungen verursachen; in diesem Fall kann vom Betreiber verlangt werden, angemessene
Massnahmen durchzuführen.
Conformité CE
Le produit satisfait aux exigences techniques de la directive 1999/5/CE (R&TTE) et est conçu pour
être utilisé au sein de la Communauté européenne et en Suisse. Le produit fait partie de la classe A,
ce qui signifie que son exploitation peut entraîner des bruits parasites dans les zones d'habitation;
le cas échéant, l'exploitant peut être tenu de prendre des mesures appropriées pour remédier au
dérangement.
Conformità CE
Questo prodotto soddisfa le richieste tecniche della direttiva 1999/5/EG (R&TTE) ed è previsto per il
funzionamento nella UE e in Svizzera.Il prodotto è dispositivo della classe A. Questo dispositivo può
causare nel settore abitativo dei radiodisturbi.
In questo caso può essere richiesto al gestore di prendere opportune misure.
Notices
Changes or modifications not expressly approved by the party responsible for compliance could
void the user's authority to operate the equipment.
This Class B digital apparatus complies with Canadian ICES-003.
Cet appareil numérique de la classe B est conforme à la norme NMB-003 du Canada.
Viewing Certifications
Go to http://www.zyxel.com to view this product’s documentation and certifications.
ZyXEL Limited Warranty
50
ZyXEL warrants to the original end user (purchaser) that this product is free from any defects in
material or workmanship for a specific period (the Warr anty P eriod) from the date of purchase. The
Warrant y Period varies by region. Check with your vendor and/or the authorized ZyXEL local
PLA Series User’s Guide
Page 51

Appendix A Legal Information
distributor for details about the Warranty Period of this product. During the warranty period, and
upon proof of purchase, should the product have indications of failure due to faulty workmanship
and/or materials, ZyXEL will, at its discretion, repair or replace the defective products or
components without charge for either parts or labor, and to whatever extent it shall deem
necessary to restore the product or components to proper operating condition. Any replacement
will consist of a new or re-manufactured functionally equivalent product of equal or higher value,
and will be solely at the discretion of ZyXEL. This warranty shall not apply if the product has been
modified, misused, tampered with, damaged by an act of God, or subjected to abnormal working
conditions.
Note
Repair or replacement, as provided under this warranty, is the exclusive remedy of the purchaser.
This warranty is in lieu of all other warranties, express or implied, including any implied warr anty of
merchantability or fitness for a particular use or purpose. ZyXEL shall in no event be held liable for
indirect or consequential damages of any kind to the purchaser.
To obtain the services of this warranty, contact your vendor. You may also refer to the warranty
policy for the region in which you bought the device at http://www.zyxel.com/web/
support_warranty_info.php.
Registration
Register your product online to receive e-mail notices of firmware upgrades and information at
www.zyxel.com for global products, or at www.us.zyxel.com for North American products.
Safety Warnings
• Do NOT use this product near water, for example, in a wet basement or near a swimming pool.
• Do NOT expose your device to dampness, dust or corrosive liquids .
• Do NOT store things on the device.
• Do NOT install, use, or service this device during a thunderstorm. There is a remote risk of electric shock
from lightning.
• Connect ONLY suitable accessories to the device.
• Do NOT open the device or unit. Opening or removing covers can expose you to dangerous high voltage
points or other risks. ONLY qualified service personnel should service or disassemble this device. Please
contact your vendor for further information.Make sure to connect the cables to the correct ports.
• Place connecting cables carefully so that no one will step on them or stumble over them.
• Always disconnect all cables from this device before servicing or disassembling.
• Use ONLY an appropriate power adapter or cord for your device.
• Connect the power adapter or cord to the right supply voltage (for example, 110V AC in North America or
230V AC in Europe).
• Do NOT allow anything to rest on the power adapter or cord and do NOT place the product where anyone can
walk on the power adapter or cord.
• Do NOT use the device if the power adapter or cord is damaged as it might cause electrocution.
• If the power adapter or cord is damaged, remove it from the power outlet.
• Do NOT attempt to repair the power adapter or cord. Contact your local vendor to order a new one.
• Do no t use the device outside, and make sure all the connections are indoors. There is a remote risk of
electric shock from lightning.
• Do NOT obstruct the devi ce ventilation slots, as insufficient airflow may harm your device.
• If you wall mount your device, make sure that no electrical lines, gas or water pipes will be damaged.
• This power unit is intended to be correctly orientated in a vertical or floor mount position.
Your product is marked with this symbol, which is known as the WEEE mark. WEEE stands for Waste
Electronics and Electrical Equipment. It means that used electrical and electronic products should not be
mixed with general waste. Used electrical and electronic equipment should be treated separately.
PLA Series User’s Guide
51
Page 52

Appendix A Legal Information
52
PLA Series User’s Guide
Page 53

Index
Index
A
about screen 33
AC Pass-Through 7
Advanced Encryption Standard, see AES 9
AES 11, 25
AES (Advanced Encryption Standard) 9
applications 7
C
certifications 49
notices 50
viewing 50
configuration screen 27
configuration utility 10
connections overview 10
copyright 49
D
DAK 11, 25, 27
DAK (Data Access Password) 11
Data Access Key 11
Data Access Password, see DAK 11
disclaimer 49
documentation
related 2
F
FCC interference statement 49
firmware 28
G
Guide
Quick Start 2
H
HomePlug AV standard 7
I
installation
procedure 13
InstallShield wizard 14
introduction 7
L
LED 45
ETHERNET 8, 9
HomePlug 8, 9
POWER 8, 9
local vs. remote adapter 27
E
electrical and cable wiring 25
electrical circuit boundaries 25
ENCRYPT Button 23
encryption 9, 25
PLA Series User’s Guide 53
M
MAC address 27
management
multiple networks 11
Page 54

Index
overview 25
managing the device
using the utility
maximum PHY rate 7
multiple networks 12
N
network example 25
network information 29
Network Name 11
network name 23
O
other documentation 2
Q
Quick Start Guide 2
R
receive rate 29
registration
product 51
related documentation 2
RESET Button 24
RESET/ENCRYPT Button
Combination 22
Manage 10
Separate 23
S
P
Parameter Information Block, see PIB 28
pass-through 7
passwords 25, 27, 28
types of 11
PIB (Parameter Information Block) 28
PLA Comparison 7
plug-and-play 25
power pass-through 7
Powerline Network
Adding Devices 19
Creating multiple networks 22
Removing Devices 21
priority settings 30
application type 31
priority levels 32
private network 11
problems and solutions 45
product registration 51
security 10, 11, 25
passwords 11
standby mode (power saving mode) 16
starting the utility 26
T
trademarks 49
transfer rates 9
transmit rate 29
troubleshooting 45
U
utility 10
launching 26
W
warranty 50
note 51
PLA Series User’s Guide54
 Loading...