

Page 1

Quick Start Guide
ZyWALL USG Series
Unified Security Gateway
Version 3.30
Edition 2, 9/2013
User’s Guide
Default Login Details
LAN IP Address http://192.168.1.1
User Name admin
Password 1234
www.zyxel.com
Copyright © 2013 ZyXEL Communications Corporation
Page 2

IMPORTANT!
READ CAREFULLY BEFORE USE.
KEEP THIS GUIDE FOR FUTURE REFERENCE.
Screenshots and graphics in this book may differ slightly from your product due to differences in
your product firmware or your computer operating system. Every effort has been made to ensure
that the information in this manual is accurate.
Related Documentation
•Quick Start Guide
The Quick Start Guide shows how to connect the ZyWALL and access the Web Configurator
wizards. (See the wizard real time help for information on configuring each screen.) It also
contains a connection diagram and package contents list.
• CLI Reference Guide
The CLI Reference Guide explains how to use the Command-Line Interface (CLI) to configure the
ZyWALL.
Note: It is recommended you use the Web Configurator to configure the ZyWALL.
• Web Configurator Online Help
Click the help icon in any screen for help in configuring that screen and supplementary information.
ZyWALL USG 20-2000 User’s Guide2
Page 3

Contents
Contents
Introduction...........................................................................................................................................5
1.1 Overview ...................................... .... ... .......................................... ... ... ................................................5
1.2 Default Zones, Interfaces, and Ports ............................. ... ... ... .... ... ... ... ... .............................................8
1.3 Management Overview ....................................... ... ... .... ... ... ... .... ... ... ... ... .............................................9
1.4 Web Configurator ................................................ ... .......................................... ... .... ..........................10
1.5 Stopping the ZyWALL .......................................................................................................................20
1.6 Rack-mounting .......... .......................................... ... ... .... ... ... ..............................................................20
1.8 Front Panel ................................... .... .......................................... ... ... .................................................22
How to Set Up Your Network .............................................................................................................29
2.1 Wizard Overview .......... ... .......................................... .... ... ... ... .... .......................................................29
2.2 How to Configure Interfaces, Port Roles, and Zones ........................................................................29
2.3 How to Configure a Cellular Interface .............................. ... ... .... ......................................... ..............32
2.4 How to Set Up a Wireless LAN .........................................................................................................34
2.5 How to Configure Ethernet, PPP, VLAN, Bridge and Policy Routing ................................................37
2.6 How to Set Up IPv6 Interfaces For Pure IPv6 Routing .................................... ... .... ... ... ... ... .... ... ... ....38
2.7 How to Set Up an IPv6 6to4 Tunnel ..................................................................................................44
2.8 How to Set Up an IPv6-in-IPv4 Tunnel .............................................................................................48
Protecting Your Network....................................................................................................................53
3.1 Firewall ... .......................................... ... ... .......................................... ... ... ...........................................53
3.2 User-aware Access Control ... ... .......................................... ... .... ... ... ... ..............................................54
3.3 Endpoint Security (EPS) ...................................................................................................................55
3.4 Device and Service Registration .......................................................................................................55
3.5 Anti-Virus Policy Configuration ................................................................... ... ... ... .... ... ... ... .................56
3.6 IDP Profile Configuration .................................. ... ... ... .... ... ... ... .... ... ... .................................................58
3.7 ADP Profile Configuration .................................................................................................................59
3.8 Content Filter Profile Configuration ........... ........................................................................................61
3.9 Viewing Content Filter Reports .........................................................................................................63
3.10 Anti-Spam Policy Configuration .......................................................................................................66
Create Secure Connections Across the Internet.............................................................................69
4.1 IPSec VPN ....................................... ... ... ... ... .... .......................................... ... ... .................................69
4.2 VPN Concentrator Example ............. ... ... ... ... .... ... ... ... .... ....................................................................71
4.3 Hub-and-spoke IPSec VPN Without VPN Concentrator ...................................................................73
4.4 ZyWALL IPSec VPN Client Configuration Provisioning ....................................................................75
4.5 SSL VPN ................ ... .......................................... ... ... .......................................... .... ..........................77
4.6 L2TP VPN with Android, iOS, and Windows .....................................................................................79
4.7 One-Time Password Version 2 (OTPv2) .......... ... ... ... .... ... ... .......................................... ... ... ..............92
Managing Traffic ................................................................................................................................95
ZyWALL USG 20-2000 User’s Guide
3
Page 4

Contents
5.1 How to Configure Bandwidth Management ............................ ............. ............. ............. ............. .......95
5.2 How to Configure a Trunk for WAN Load Balancing .......................................................................102
5.3 How to Use Multiple Static Public WAN IP Addresses for LAN-to-WAN Traffic ..............................104
5.4 How to Use Device HA to Backup Your ZyWALL ............................................................................105
5.5 How to Configure DNS Inbound Load Balancing ............................................................................110
5.6 How to Allow Public Access to a Web Server .................................................................................112
5.7 How to Manage Voice Traffic ..........................................................................................................114
5.8 How to Limit Web Surfing and MSN to Specific People ..................................................................120
Maintenance......................................................................................................................................125
6.1 How to Allow Management Service from WAN ...............................................................................125
6.2 How to Use a RADIUS Server to Authenticate User Accounts based on Groups ..........................128
6.3 How to Use SSH for Secure Telnet Access ....................................................................................129
6.4 How to Manage ZyWALL Configuration Files .................................................................................130
6.5 How to Manage ZyWALL Firmware ................................................................................................131
6.6 How to Download and Upload a Shell Script ..................................................................................132
6.7 How to Change a Power Module ....................................................................................................133
6.8 How to Save System Logs to a USB Storage Device ..................................................................... 135
6.9 How to Get the ZyWALL’s Diagnostic File .......................................................................................138
6.10 How to Capture Packets on the ZyWALL ......................................................................................139
6.11 How to Use Packet Flow Explore for Troubleshooting .................................................................. 143
Appendix A Legal Information..........................................................................................................145
4
ZyWALL USG 20-2000 User’s Guide
Page 5
1.1 Overview
This guide covers the ZyWALL USG series and refers to all models as “ZyWALL”. Features and
interface names vary by model. Key feature differences between ZyWALL models are as follows.
Other features are common to all models although features may vary slightly by model. See the
specific product’s datasheet for detailed specifications.
Table 1 Model-Specific Features
Dual Personality Interfaces (1000Base-T/mini-GBIC combo ports) 2000
Dual Internal Buses for Gigabit Interfaces 2000
A. Reserved for future use.
CHAPTER 1
Introduction
FEATURE ZYWALL USG
Application Patrol 50, 100, 100-PLUS, 200, 300,
Anti-Virus 50, 100, 100-PLUS, 200, 300,
Intrusion, Protection and Detection 50, 100, 100-PLUS, 200, 300,
Two Ethernet WAN Ports 50, 100, 100-PLUS
Two Plus Ethernet WAN Ports 200, 300, 1000, 2000
WiFi (embedded or optional card) 20W, 300, 100, 200
Rack-mounting 50, 100, 100-PLUS, 200, 300,
Wall-mounting 20, 20W
Dual Power Modules 2000
Security Extender Module Slot 2000
Hard Disk Slot
Device High Availability 100, 200, 300, 1000, 2000
Auxiliary Port 100, 200, 300, 1000, 2000
A
1000, 2000
1000, 2000
1000, 2000
1000, 2000
2000
1.1.1 Key Applications
Here are some ZyWALL application scenarios. The following chapters have configuration tutorials.
Security Router
Security features include a stateful inspection firewall, intrusion, detection & prevention, anomaly
detection & prevention, content filtering, anti-virus, and anti-spam.
ZyWALL USG 20-2000 User’s Guide 5
Page 6
Chapter 1 Introduction
OTP PIN
SafeWord 2008
Authentication Server
File
Email
Web-based
Server
Server
Application
*****
Figure 1 Applications: Security Router
IPv6 Routing
The ZyWALL supports IPv6 Ethernet, PPP, VLAN, and bridge routing. You may also create IPv6
policy routes and IPv6 objects. The ZyWALL can also route IPv6 packets through IPv4 networks
using different tunneling methods.
Figure 2 Applications: IPv6 Routing
VPN Connectivity
Set up VPN tunnels with other companies, branch offices, telecommuters, and business travelers to
provide secure access to your network. You can also purchase the ZyWALL OTPv2 One-Time
Password System for strong two-factor authentication for Web Configurator, Web access, SSL VPN,
and ZyXEL IPSec VPN client user logins.
Figure 3 Applications: VPN Connectivity
6
ZyWALL USG 20-2000 User’s Guide
Page 7
Chapter 1 Introduction
Web Mail File Share
Web-based Application
https://
Application Server
Non-Web
LAN (192.168.1.X)
A
B
C
SSL VPN Network Access
SSL VPN lets remote users use their web browsers for a very easy-to-use VPN solution. A user just
browses to the ZyWALL’s web address and enters his user name and password to securely connect
to the ZyWALL’s network. Here full tunnel mode creates a virtual connection for a remote user and
gives him a private IP address in the same subnet as the local network so he can access network
resources in the same way as if he were part of the internal network.
Figure 4 SSL VPN With Full Tunnel Mode
User-Aware Access Control
Set up security policies to restrict access to sensitive information and shared resources based on
the user who is trying to access it. In the following figure user A can access both the Internet and
an internal file server. User B has a lower level of access and can only access the Internet. User C is
not even logged in and cannot access either.
Figure 5 Applications: User-Aware Access Control
Load Balancing
Set up multiple connections to the Internet on the same port, or different ports, including cellular
interfaces. In either case, you can balance the traffic loads between them.
Figure 6 Applications: Multiple WAN Interfaces
ZyWALL USG 20-2000 User’s Guide
7
Page 8
Chapter 1 Introduction
Physical Ports
Interfaces
Zones LAN
P1 P2 P3 P4 P5 P6 P7
ge1 ge2 ge3 ge6
WAN
ge7
P8
ge4 ge5
DMZ
ge8
USG 2000
Physical Ports
Interfaces
P1 P2 P3 P4 P5
ge1 ge2 ge3 ge5
ge4
USG 1000
Zones LAN WAN DMZ
Physical Ports
Interfaces
P1 P2 P3 P4 P5 P6
ge1 ge2 ge3
ge6
WLAN
ge4 ge5
USG 300
Zones LAN WAN DMZ
Physical Ports
Interfaces
Zones
P7
ext-wlan
USG 200
LAN1
lan1
LAN2
lan2
WAN
wan1 wan2
P1 P2 P3 P4 P5 P6
WLAN DMZ
dmz
OPT
opt
1.2 Default Zones, Interfaces, and Ports
The default configurations for zones, interfaces, and ports are as follows. References to interfaces
may be generic rather than the specific name used in your model. For example, this guide may use
“the WAN interface” rather than “ge2” or” ge3”.
Figure 7 Zones, Interfaces, and Physical Ethernet Ports
Configure the ZyWALL USG 200’s OPT (optional) Gigabit Ethernet port as a third WAN port, an
additional LAN1, WLAN, or DMZ port or a separate network.
8
ZyWALL USG 20-2000 User’s Guide
Page 9
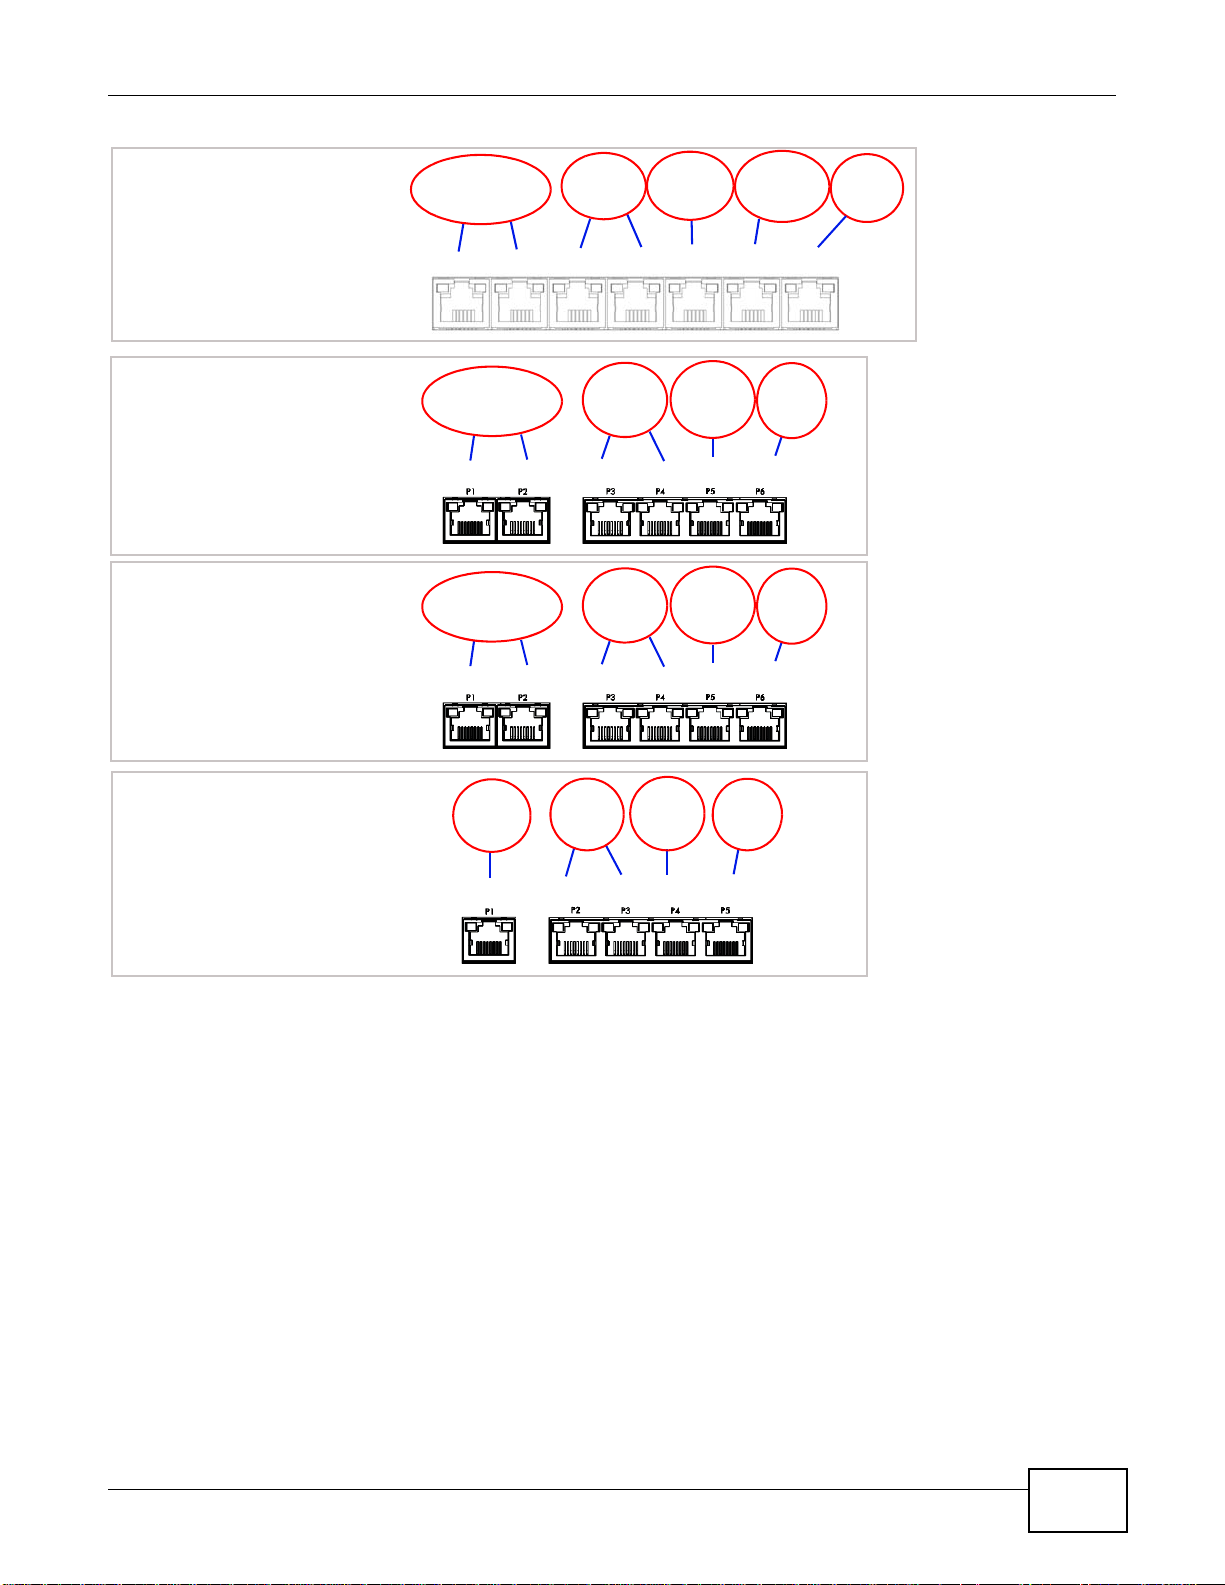
Chapter 1 Introduction
Physical Ports
Interfaces
Zones
P7
ext-wlan
USG 100
LAN1
lan1
LAN2
lan2
WAN
wan1 wan2
P1 P2 P3 P4 P5 P6
WLAN DMZ
dmz
Physical Ports
Interfaces
Zones LAN1 DMZ
lan1 dmz
LAN2
lan2
WAN
wan1 wan2
USG 50
P1 P2 P3 P4 P5 P6
Physical Ports
Interfaces
Zones LAN1 DMZ
lan1 dmz
LAN2
lan2
WAN
wan1 wan2
USG 100
P1 P2 P3 P4 P5 P6
PLUS
Physical Ports
Interfaces
Zones
USG 20/20W
LAN1 DMZ
lan1 dmz
LAN2
lan2
P1 P2 P3 P4 P5
WAN
wan1
1.3 Management Overview
ZyWALL USG 20-2000 User’s Guide
You can manage the ZyWALL in the following ways.
Web Configurator
The Web Configurator allows easy ZyWALL setup and management using an Internet browser. This
User’s Guide provides information about the Web Configurator.
9
Page 10
Chapter 1 Introduction
Figure 8 Managing the ZyWALL: Web Configurator
Command-Line Interface (CLI)
The CLI allows you to use text-based commands to configure the ZyWALL. Access it using remote
management (for example, SSH or Telnet) or via the physical or Web Configurator console port.
See the Command Reference Guide for CLI details. The default settings for the console port are:
Table 2 Console Port Default Settings
SETTING VALUE
Speed 115200 bps
Data Bits 8
Parity None
Stop Bit 1
Flow Control Off
Vantage CNM
The browser-based Vantage CNM (Centralized Network Management) global management tool lets
administrators to manage multiple devices. Use the System > Vantage CNM screen to allow your
ZyWALL to be managed by the Vantage CNM server. See the Vantage CNM User’s Guide for details.
1.4 Web Configurator
In order to use the Web Configurator, you must:
• Use one of the following web browser versions or later: Internet Explorer 7, Firefox 3.5, Chrome
9.0, Opera 10.0, Safari 4.0
• Allow pop-up windows (blocked by default in Windows XP Service Pack 2)
• Enable JavaScripts, Java permissions, and cookies
The recommended screen resolution is 1024 x 768 pixels.
1.4.1 Web Configurator Access
1 Make sure your ZyWALL hardware is properly connected. See the Quick Start Guide.
10
ZyWALL USG 20-2000 User’s Guide
Page 11
Chapter 1 Introduction
A
C
B
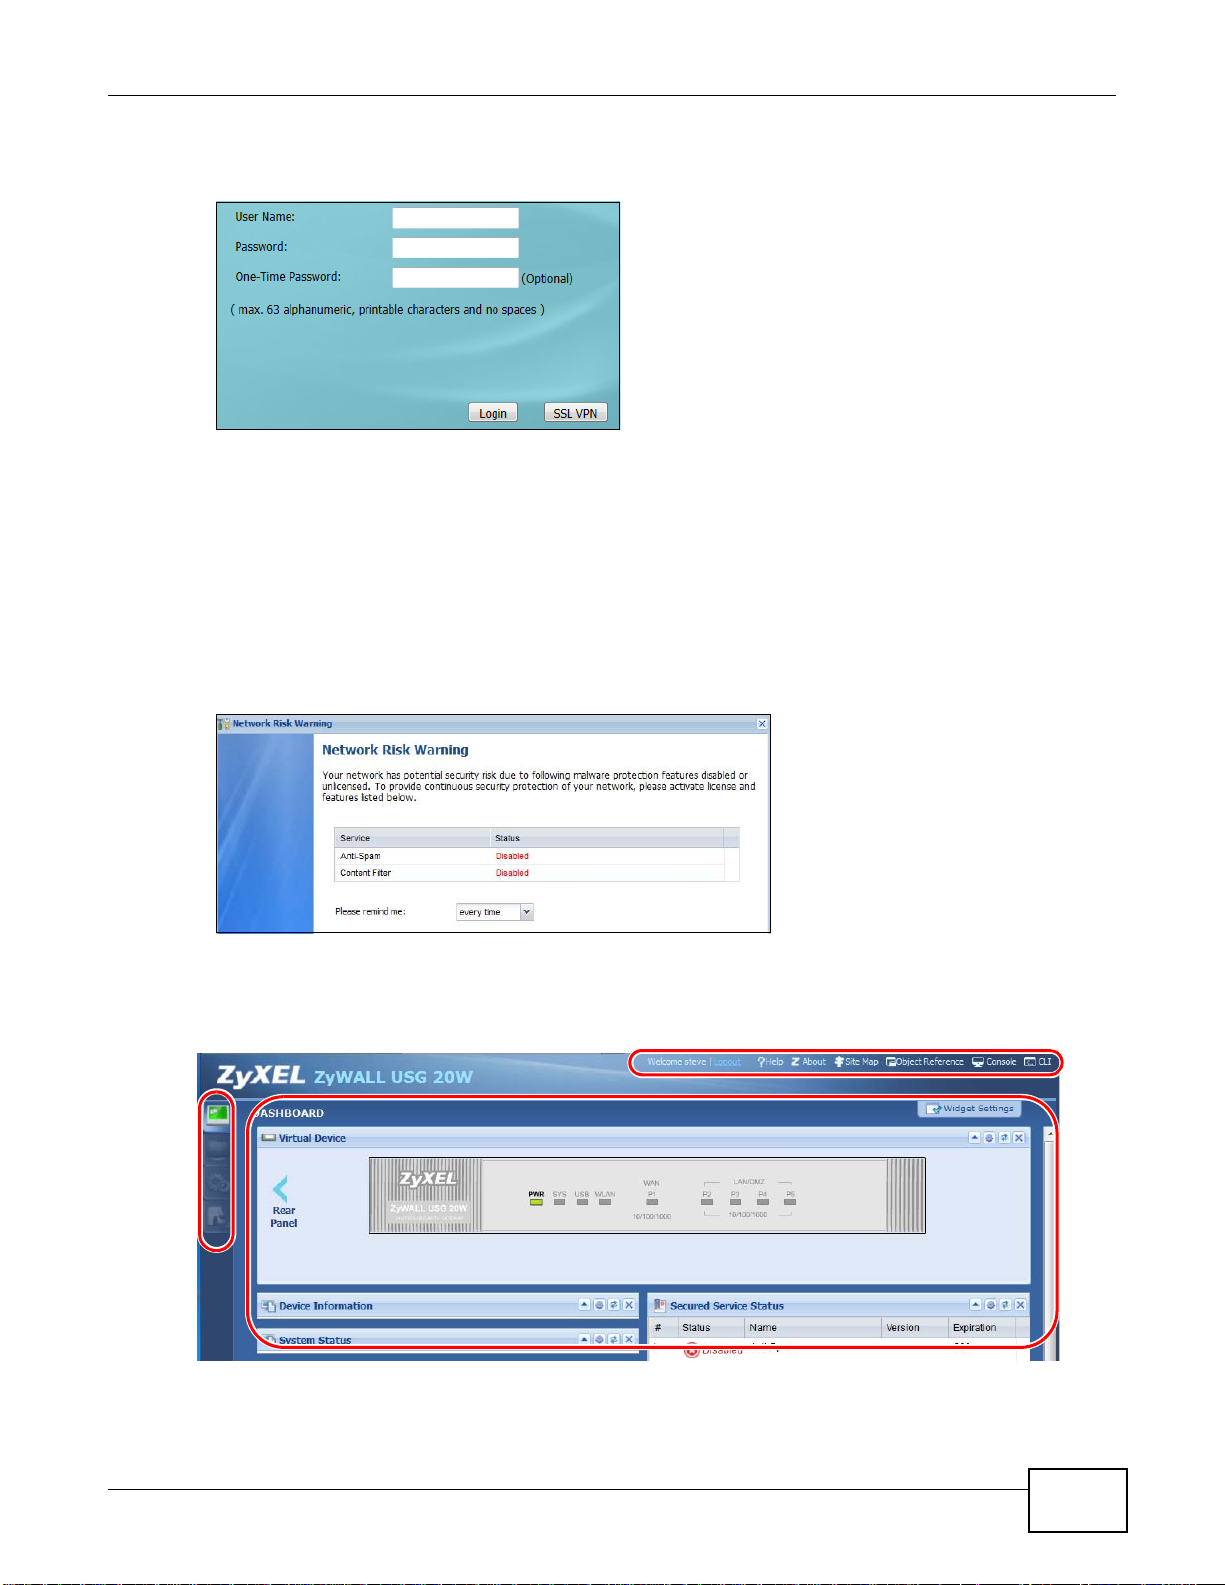
2 In your browser go to http://192.168.1.1. By default, the ZyWALL automatically routes this request
to its HTTPS server, and it is recommended to keep this setting. The Login screen appears.
3 Type the user name (default: “admin”) and password (default: “1234”).
If you have a OTP (One-Time Password) token generate a number and enter it in the One-Time
Password field. The number is only good for one login. You must use the token to generate a new
number the next time you log in.
4 Click Login. If you logged in using the default user name and password, the Update Admin Info
screen appears. Otherwise, the dashboard appears.
5 The Network Risk Warning screen displays any unregistered or disabled security services. Select
how often to display the screen and click OK.
6 Follow the directions in the Update Admin Info screen. If you change the default password, the
Login screen appears after you click Apply. If you click Ignore, the Installation Setup Wizard
opens if the ZyWALL is using its default configuration; otherwise the dashboard appears.
ZyWALL USG 20-2000 User’s Guide
11
Page 12
Chapter 1 Introduction
1.4.2 Web Configurator Screens Overview
The Web Configurator screen is divided into these parts (as illustrated on page 11):
• A - title bar
• B - navigation panel
• C - main window
Title Bar
Figure 9 Title Bar
The title bar icons in the upper right corner provide the following functions.
Table 3 Title Bar: Web Configurator Icons
LABEL DESCRIPTION
Logout Click this to log out of the Web Configurator.
Help Click this to open the help page for the current screen.
About Click this to display basic information about the ZyWALL.
Site Map Click this to see an overview of links to the Web Configurator screens.
Object Reference Click this to check which configuration items reference an object.
Console Click this to open a Java-based console window from which you can run command line
interface (CLI) commands. You will be prompted to enter your user name and password.
See the Command Reference Guide for information about the commands.
CLI Click this to open a popup window that displays the CLI commands sent by the Web
Configurator to the ZyWALL.
1.4.3 Navigation Panel
Use the navigation panel menu items to open status and configuration screens. Click the arrow in
the middle of the right edge of the navigation panel to hide the panel or drag to resize it. The
following sections introduce the ZyWALL’s navigation panel menus and their screens.
Figure 10 Navigation Panel
12
ZyWALL USG 20-2000 User’s Guide
Page 13

Chapter 1 Introduction
Dashboard
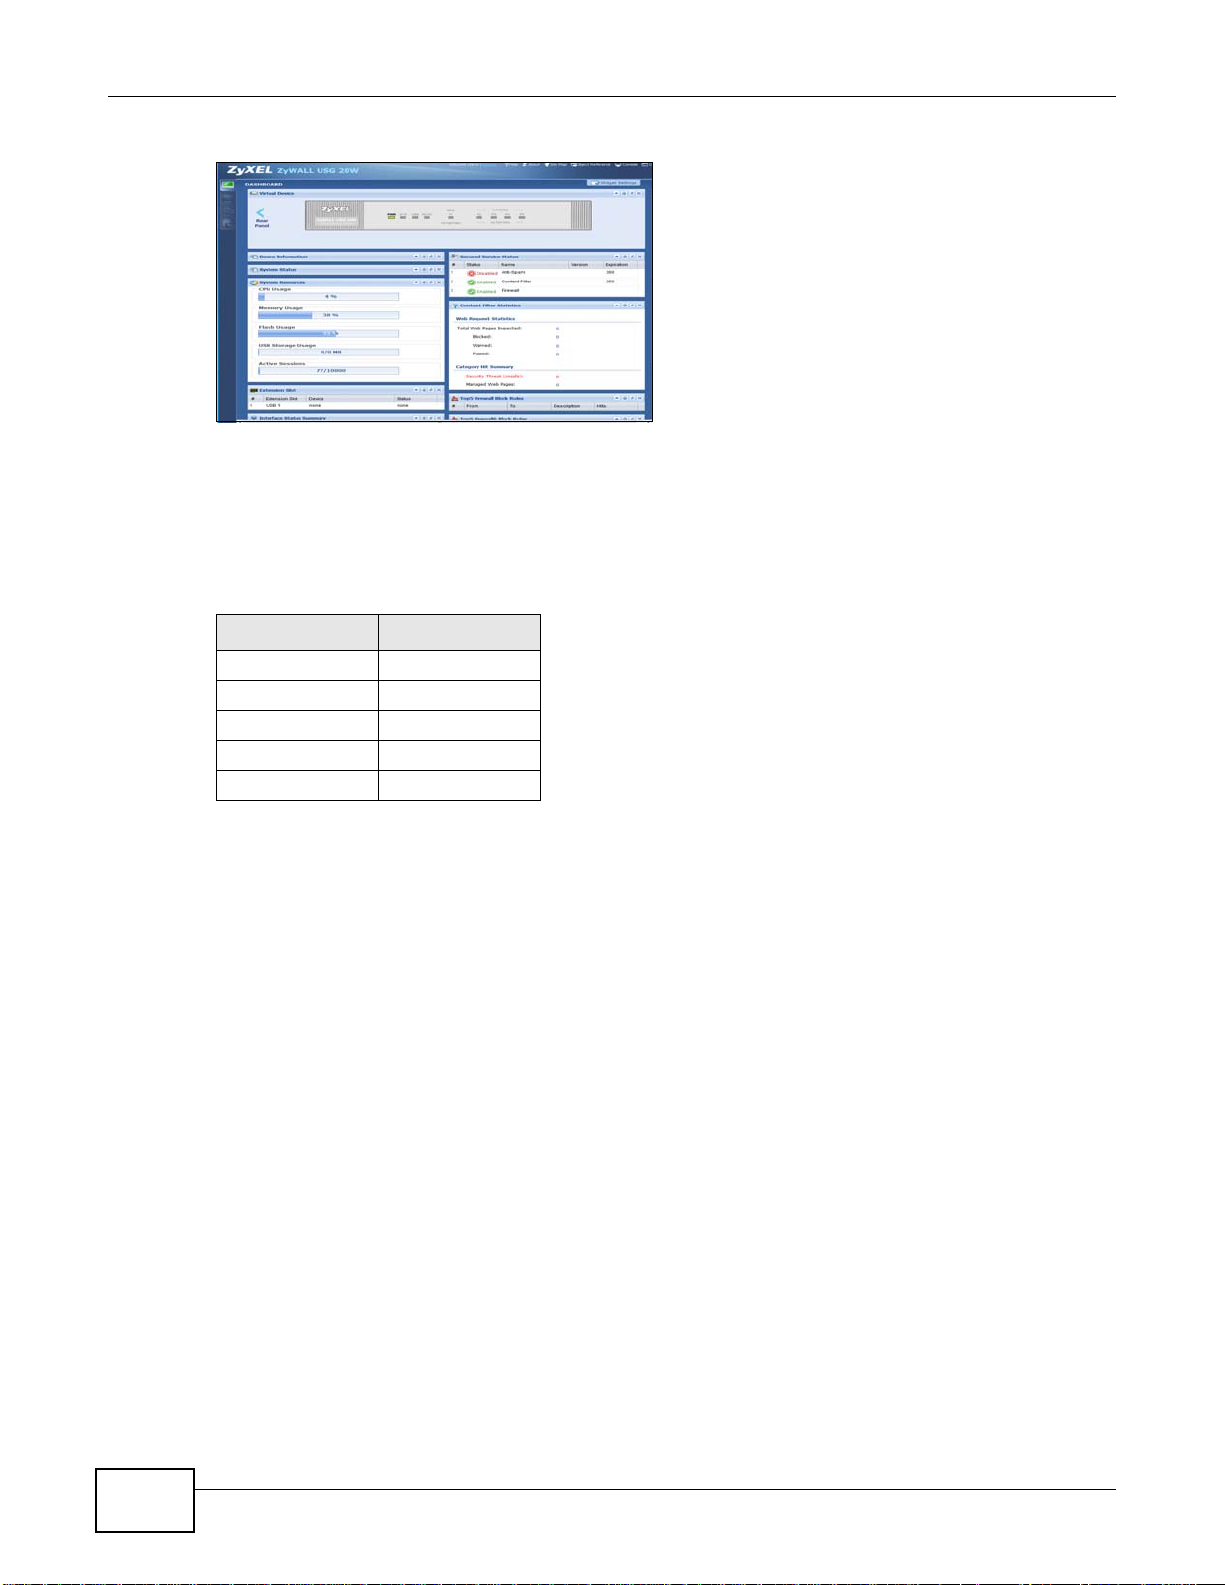
The dashboard displays general device information, system status, system resource usage, licensed
service status, and interface status in widgets that you can re-arrange to suit your needs. See the
Web Help for details on the dashboard.
Monitor Menu
The monitor menu screens display status and statistics information.
Table 4 Monitor Menu Screens Summary
FOLDER OR LINK TAB FUNCTION
System Status
Port Statistics Displays packet statistics for each physical port.
Interface
Status
Traffic
Statistics
Session
Monitor
DDNS Status Displays the status of the ZyWALL’s DDNS domain names.
IP/MAC Binding Lists the devices that have received an IP address from ZyWALL interfaces using
Login Users Lists the users currently logged into the ZyWALL.
WLAN Status Displays the connection status of the ZyWALL’s wireless clients.
Cellular Status Displays details about the ZyWALL’s 3G connection status.
USB Storage Displays details about USB device connected to the ZyWALL.
AppPatrol
Statistics
VPN Monitor
IPSec Displays and manages the active IPSec SAs.
SSL Lists users currently logged into the VPN SSL client portal. You can also log out
L2TP over
IPSec
Anti-X Statistics
Anti-Virus Collect and display statistics on the viruses that the ZyWALL has detected.
IDP Collect and display statistics on the intrusions that the ZyWALL has detected.
Content Filter Report Collect and display content filter statistics
Cache Manage the ZyWALL’s URL cache.
Anti-Spam Report Collect and display spam statistics.
Status Displays how many mail sessions the ZyWALL is currently checking and DNSBL
Log Lists log entries.
Displays general interface information and packet statistics.
Collect and display traffic statistics.
Displays the status of all current sessions.
IP/MAC binding.
Displays bandwidth and protocol statistics.
individual users and delete related session information.
Displays details about current L2TP sessions.
(Domain Name Service-based spam Black List) statistics.
ZyWALL USG 20-2000 User’s Guide
13
Page 14

Chapter 1 Introduction
Configuration Menu
Use the configuration menu screens to configure the ZyWALL’s features.
Table 5 Configuration Menu Screens Summary
FOLDER OR LINK TAB FUNCTION
Quick Setup Quickly configure WAN interfaces or VPN connections.
Licensing
Registration Registration Register the device and activate trial services.
Signature
Update
Network
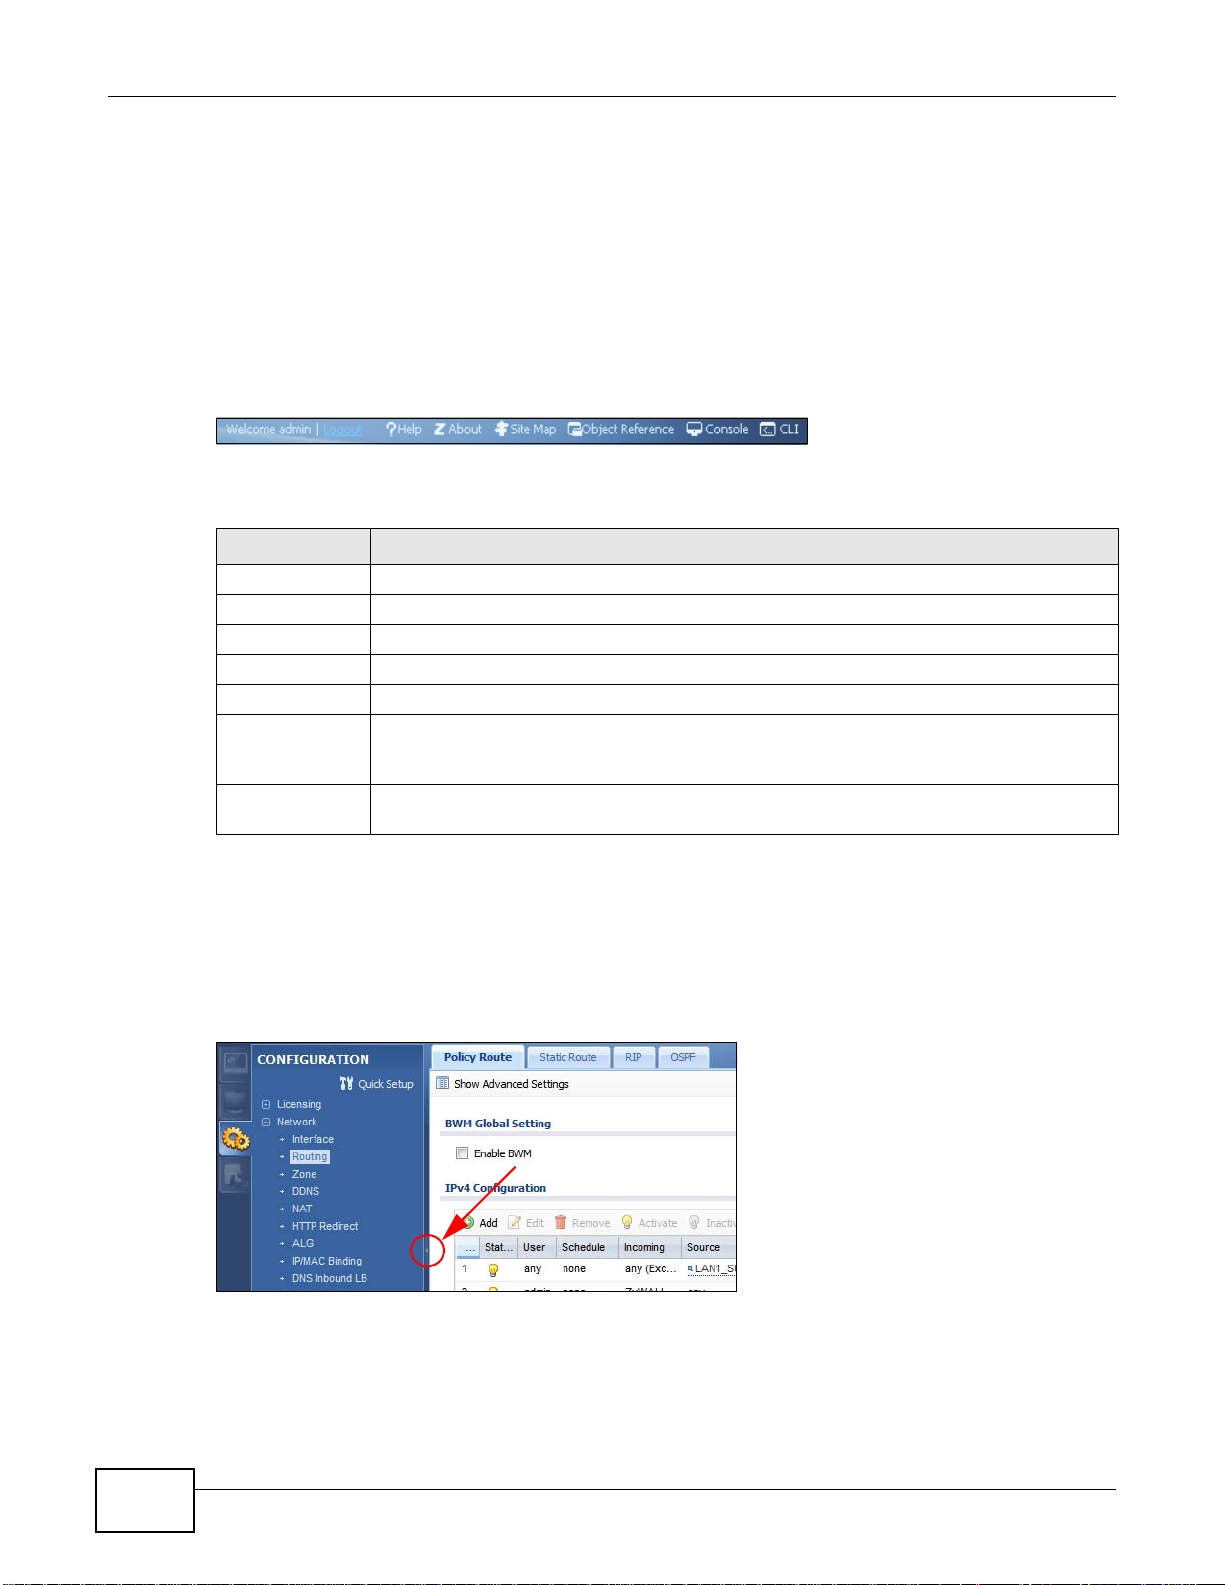
Interface Port Grouping Configure physical port groups.
Routing Policy Route Create and manage routing policies.
Zone Configure zones used to define various policies.
DDNS Profile Define and manage the ZyWALL’s DDNS domain names.
NAT Set up and manage port forwarding rules.
HTTP Redirect Set up and manage HTTP redirection rules.
ALG Configure SIP, H.323, and FTP pass-through settings.
IP/MAC
Binding
DNS Inbound LBDNS Load
Auth. Policy Define rules to force user authentication.
Firewall Firewall Create and manage level-3 traffic rules.
Service View the licensed service status and upgrade licensed services.
Anti-Virus Update anti-virus signatures immediately or by a schedule.
IDP/AppPatrol Update IDP signatures immediately or by a schedule.
System Protect View system-protect signatures status.
Port Role Use this screen to set the ZyWALL’s flexible ports as LAN1, WLAN,
or DMZ.
Ethernet Manage Ethernet interfaces and virtual Ethernet interfaces.
PPP Create and manage PPPoE and PPTP interfaces.
Cellular Configure a cellular Internet connection for an installed 3G card.
Tunnel Configure tunneling between IPv4 and IPv6 networks.
WLAN Configure settings for an installed wireless LAN card.
VLAN Create and manage VLAN interfaces and virtual VLAN interfaces.
Bridge Create and manage bridges and virtual bridge interfaces.
Auxiliary Manage the AUX port.
Trunk Create and manage trunks (groups of interfaces) for load balancing
and link High Availability (HA).
Static Route Create and manage IP static routing information.
RIP Configure device-level RIP settings.
OSPF Configure device-level OSPF settings, including areas and virtual
links.
Summary Configure IP to MAC address bindings for devices connected to
each supported interface.
Exempt List Configure ranges of IP addresses to which the ZyWALL does not
apply IP/MAC binding.
Configure DNS Load Balancing.
Balancing
Session Limit Limit the number of concurrent client NAT/firewall sessions.
14
ZyWALL USG 20-2000 User’s Guide
Page 15

Chapter 1 Introduction
Table 5 Configuration Menu Screens Summary (continued)
FOLDER OR LINK TAB FUNCTION
VPN
IPSec VPN VPN Connection Configure IPSec tunnels.
VPN Gateway Configure IKE tunnels.
Concentrator Combine IPSec VPN connections into a single secure network
Configuration
Provisioning
SSL VPN Access Privilege Configure SSL VPN access rights for users and groups.
Global Setting Configure the ZyWALL’s SSL VPN settings that apply to all
L2TP VPN L2TP VPN Configure L2TP over IPSec tunnels.
AppPatrol General Enable or disable traffic management by application and see
Query Manage traffic management by application.
Other Manage other kinds of traffic.
BWM BWM Enable and configure bandwidth management rules.
Anti-X
Anti-Virus General Turn anti-virus on or off, set up anti-virus policies and check the
Black/White List Set up anti-virus black (blocked) and white (allowed) lists of virus
Signature Search for signatures by signature name or attributes and
IDP General Display and manage IDP bindings.
Profile Create and manage IDP profiles.
Custom Signatures Create, import, or export custom signatures.
ADP General Display and manage ADP bindings.
Profile Create and manage ADP profiles.
Content Filter General Create and manage content filter policies.
Filter Profile Create and manage the detailed filtering rules for content filtering
Trusted Web Sites Create a list of allowed web sites that bypass content filtering
Forbidden Web
Sites
Anti-Spam General Turn anti-spam on or off and manage anti-spam policies.
Mail Scan Configure e-mail scanning details.
Black/White List Set up a black list to identify spam and a white list to identify
DNSBL Have the ZyWALL check e-mail against DNS Black Lists.
Set who can retrieve VPN rule settings from the ZyWALL using the
ZyWALL IPSec VPN Client.
connections.
registration and signature information.
anti-virus engine type and the anti-virus license and signature
status.
file patterns.
configure how the ZyWALL uses them.
policies.
policies.
Create a list of web sites to block regardless of content filtering
policies.
legitimate e-mail.
ZyWALL USG 20-2000 User’s Guide
15
Page 16

Chapter 1 Introduction
Table 5 Configuration Menu Screens Summary (continued)
FOLDER OR LINK TAB FUNCTION
Device HA General Configure device HA global settings, and see the status of each
Object
User/Group User Create and manage users.
Address Address Create and manage host, range, and network (subnet) addresses.
Service Service Create and manage TCP and UDP services.
Schedule Schedule Create one-time and recurring schedules.
AAA Server Active Directory Configure the Active Directory settings.
Auth. Method Authentication
Certificate My Certificates Create and manage the ZyWALL’s certificates.
ISP Account ISP Account Create and manage ISP account information for PPPoE/PPTP
SSL Application Create SSL web application objects.
Endpoint
Security
DHCPv6 Request Configure IPv6 DHCP request type and interface information.
System
Host Name Configure the system and domain name for the ZyWALL.
USB Storage Settings Configure the settings for the connected USB devices.
Date/Time Configure the current date, time, and time zone in the ZyWALL.
Console Speed Set the console speed.
DNS Configure the DNS server and address records for the ZyWALL.
WWW Service Control Configure HTTP, HTTPS, and general authentication.
SSH Configure SSH server and SSH service settings.
TELNET Configure telnet server settings for the ZyWALL.
FTP Configure FTP server settings.
SNMP Configure SNMP communities and services.
interface monitored by device HA.
Active-Passive
Mode
Legacy Mode Configure legacy mode device HA for use with ZyWALLs that
Group Create and manage groups of users.
Setting Manage default settings for all users, general settings for user
Address Group Create and manage groups of addresses.
Service Group Create and manage groups of services.
LDAP Configure the LDAP settings.
RADIUS Configure the RADIUS settings.
Method
Trusted Certificates Import and manage certificates from trusted sources.
Lease Configure IPv6 DHCP lease type and interface information.
Login Page Configure how the login and access user screens look.
Configure active-passive mode device HA.
already have device HA setup using a firmware version earlier than
2.10.
sessions, and rules to force user authentication.
Create and manage ways of authenticating users.
interfaces.
Create Endpoint Security (EPS) objects.
16
ZyWALL USG 20-2000 User’s Guide
Page 17
Chapter 1 Introduction
Table 5 Configuration Menu Screens Summary (continued)
FOLDER OR LINK TAB FUNCTION
Dial-in Mgmt. Configure settings for an out of band management connection
through a modem connected to the AUX port.
Vantage CNM Configure and allow your ZyWALL to be managed by the Vantage
CNM server.
Language Select the Web Configurator language.
IPv6 Enable IPv6 globally on the ZyWALL here.
Log & Report
Email Daily
Report
Log Setting Configure the system log, e-mail logs, and remote syslog servers.
Configure where and how to send daily reports and what reports to
send.
Maintenance Menu
Use the maintenance menu screens to manage configuration and firmware files, run diagnostics,
and reboot or shut down the ZyWALL.
Table 6 Maintenance Menu Screens Summary
FOLDER
OR LINK
File
Manager
Diagnostics Diagnostic Collect diagnostic information.
Packet
Flow
Explore
Reboot Restart the ZyWALL.
Shutdown Turn off the ZyWALL.
TAB FUNCTION
Configuration File Manage and upload configuration files for the ZyWALL.
Firmware Package View the current firmware version and to upload firmware.
Shell Script Manage and run shell script files for the ZyWALL.
Packet Capture Capture packets for analysis.
System Log Connect a USB device to the ZyWALL and archive the ZyWALL system logs
to it here.
Routing Status Check how the ZyWALL determines where to route a packet.
SNAT Status View a clear picture on how the ZyWALL converts a packet’s source IP
address and check the related settings.
1.4.4 Tables and Lists
Web Configurator tables and lists are flexible with several options for how to display their entries.
Click a column heading to sort the table’s entries according to that column’s criteria.
Figure 11 Sorting Table Entries by a Column’s Criteria
ZyWALL USG 20-2000 User’s Guide
17
Page 18
Chapter 1 Introduction
Click the down arrow next to a column heading for more options about how to display the entries.
The options available vary depending on the type of fields in the column. Here are some examples
of what you can do:
• Sort in ascending or descending (reverse) alphabetical order
• Select which columns to display
• Group entries by field
• Show entries in groups
• Filter by mathematical operators (<, >, or =) or searching for text
Figure 12 Common Table Column Options
Select a column heading cell’s right border and drag to re-size the column.
Figure 13 Resizing a Table Column
Select a column heading and drag and drop it to change the column order. A green check mark
displays next to the column’s title when you drag the column to a valid new location.
Figure 14 Moving Columns
Use the icons and fields at the bottom of the table to navigate to different pages of entries and
control how many entries display at a time.
18
ZyWALL USG 20-2000 User’s Guide
Page 19
Chapter 1 Introduction
Figure 15 Navigating Pages of Table Entries
The tables have icons for working with table entries. You can often use the [Shift] or [Ctrl] key to
select multiple entries to remove, activate, or deactivate.
Figure 16 Common Table Icons
Here are descriptions for the most common table icons.
Table 7 Common Table Icons
LABEL DESCRIPTION
Add Click this to create a new entry. For features where the entry’s position in the numbered list is
Edit Double-click an entry or select it and click Edit to open a screen where you can modify the
Remove To remove an entry, select it and click Remove. The ZyWALL confirms you want to remove it
Activate To turn on an entry, select it and click Activate.
Inactivate To turn off an entry, select it and click Inactivate.
Connect To connect an entry, select it and click Connect.
Disconnect To disconnect an entry, select it and click Disconnect.
Object
References
Move To change an entry’s position in a numbered list, select it and click Move to display a field to
important (features where the ZyWALL applies the table’s entries in order like the firewall for
example), you can select an entry and click Add to create a new entry after the selected entry.
entry’s settings. In some tables you can just click a table entry and edit it directly in the table.
For those types of tables small red triangles display for table entries with changes that you have
not yet applied.
before doing so.
Select an entry and click Object References to check which settings use the entry.
type a number for where you want to put that entry and press [ENTER] to move the entry to the
number that you typed. For example, if you type 6, the entry you are moving becomes number 6
and the previous entry 6 (if there is one) gets pushed up (or down) one.
Working with Lists
When a list of available entries displays next to a list of selected entries, you can often just doubleclick an entry to move it from one list to the other. In some lists you can also use the [Shift] or
[Ctrl] key to select multiple entries, and then use the arrow button to move them to the other list.
ZyWALL USG 20-2000 User’s Guide
19
Page 20
Chapter 1 Introduction
Figure 17 Working with Lists
1.5 Stopping the ZyWALL
Always use Maintenance > Shutdown > Shutdown or the shutdown command before you turn
off the ZyWALL or remove the power. Not doing so can cause the firmware to become corrupt.
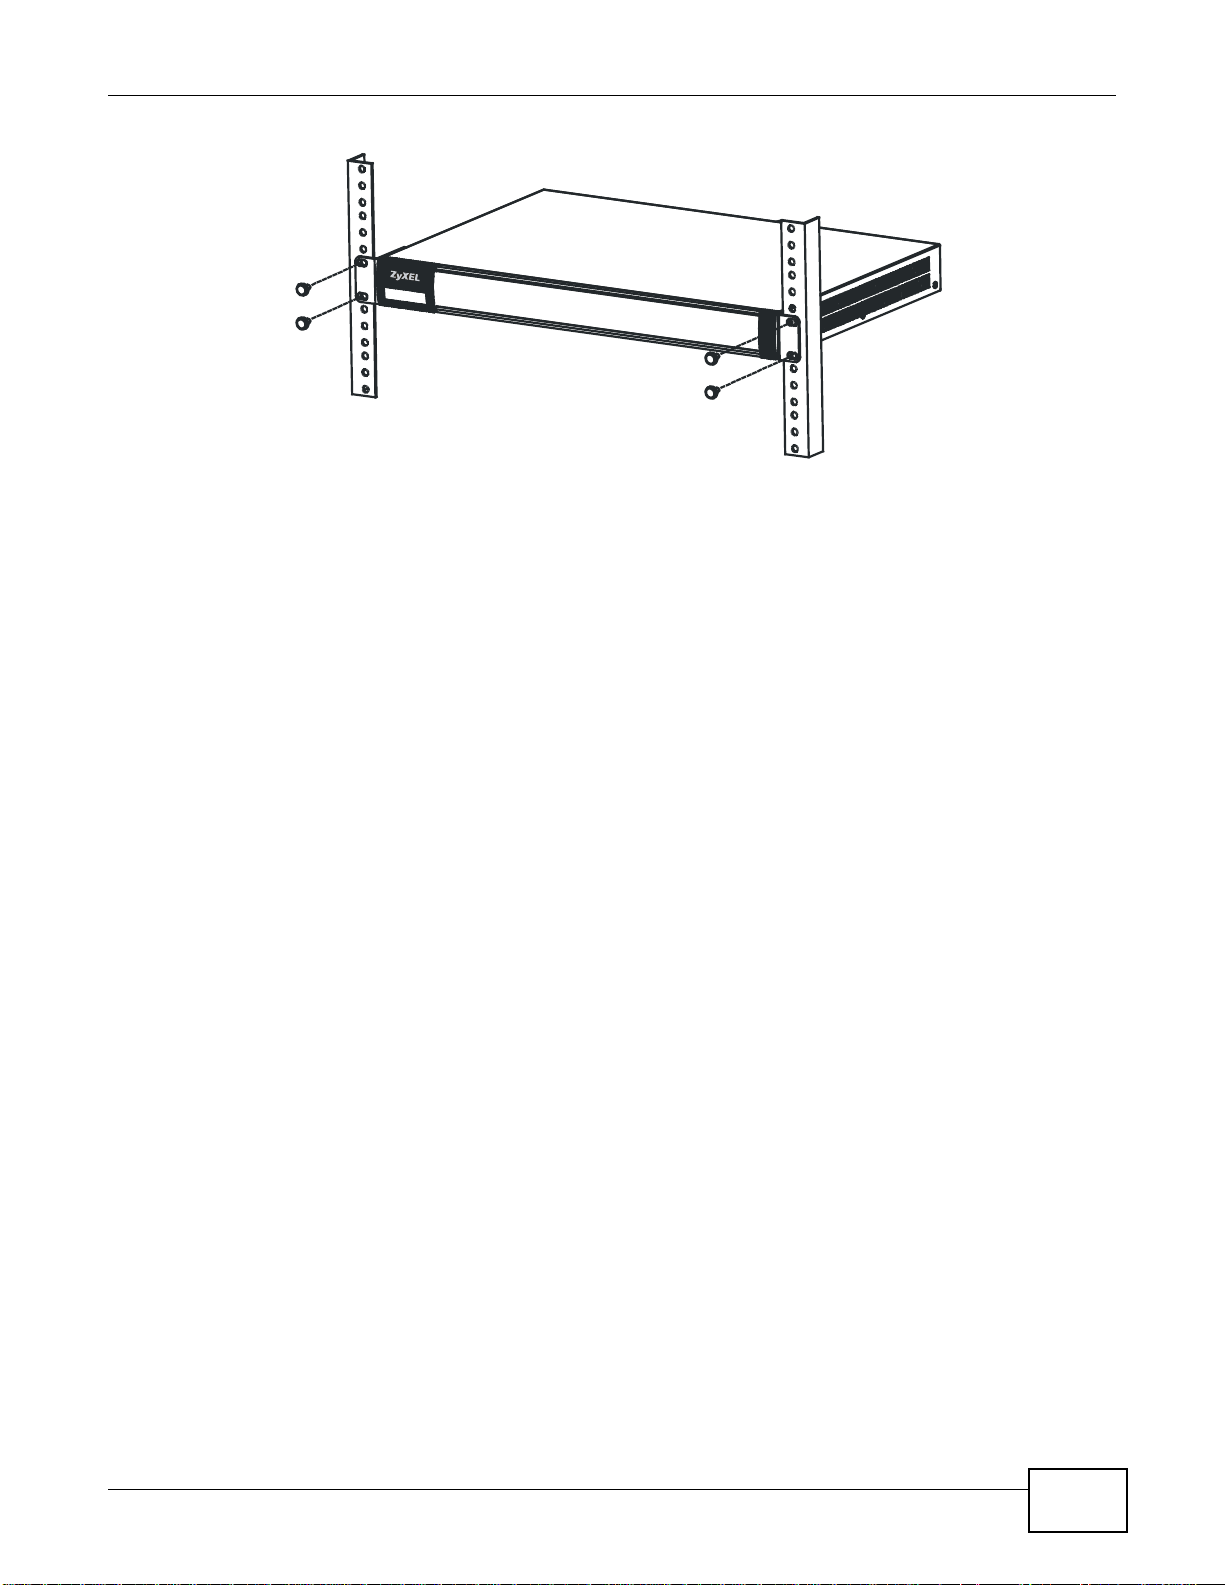
1.6 Rack-mounting
See Table 1 on page 5 for the ZyWALL USG models that can be rack mounted. Use the following
steps to mount the ZyWALL on an EIA standard size, 19-inch rack or in a wiring closet with other
equipment using a rack-mounting kit. Make sure the rack will safely support the combined weight of
all the equipment it contains and that the position of the ZyWALL does not make the rack unstable
or top-heavy. Take all necessary precautions to anchor the rack securely before installing the unit.
Note: Leave 10 cm of clearance at the sides and 20 cm in the rear.
Use a #2 Phillips screwdriver to install the screws.
Note: Failure to use the proper screws may damage the unit.
1 Align one bracket with the holes on one side of the ZyWALL and secure it with the included bracket
screws (smaller than the rack-mounting screws).
2 Attach the other bracket in a similar fashion.
3 After attaching both mounting brackets, position the ZyWALL in the rack and up the bracket holes
with the rack holes. Secure the ZyWALL to the rack with the rack-mounting screws.
20
ZyWALL USG 20-2000 User’s Guide
Page 21
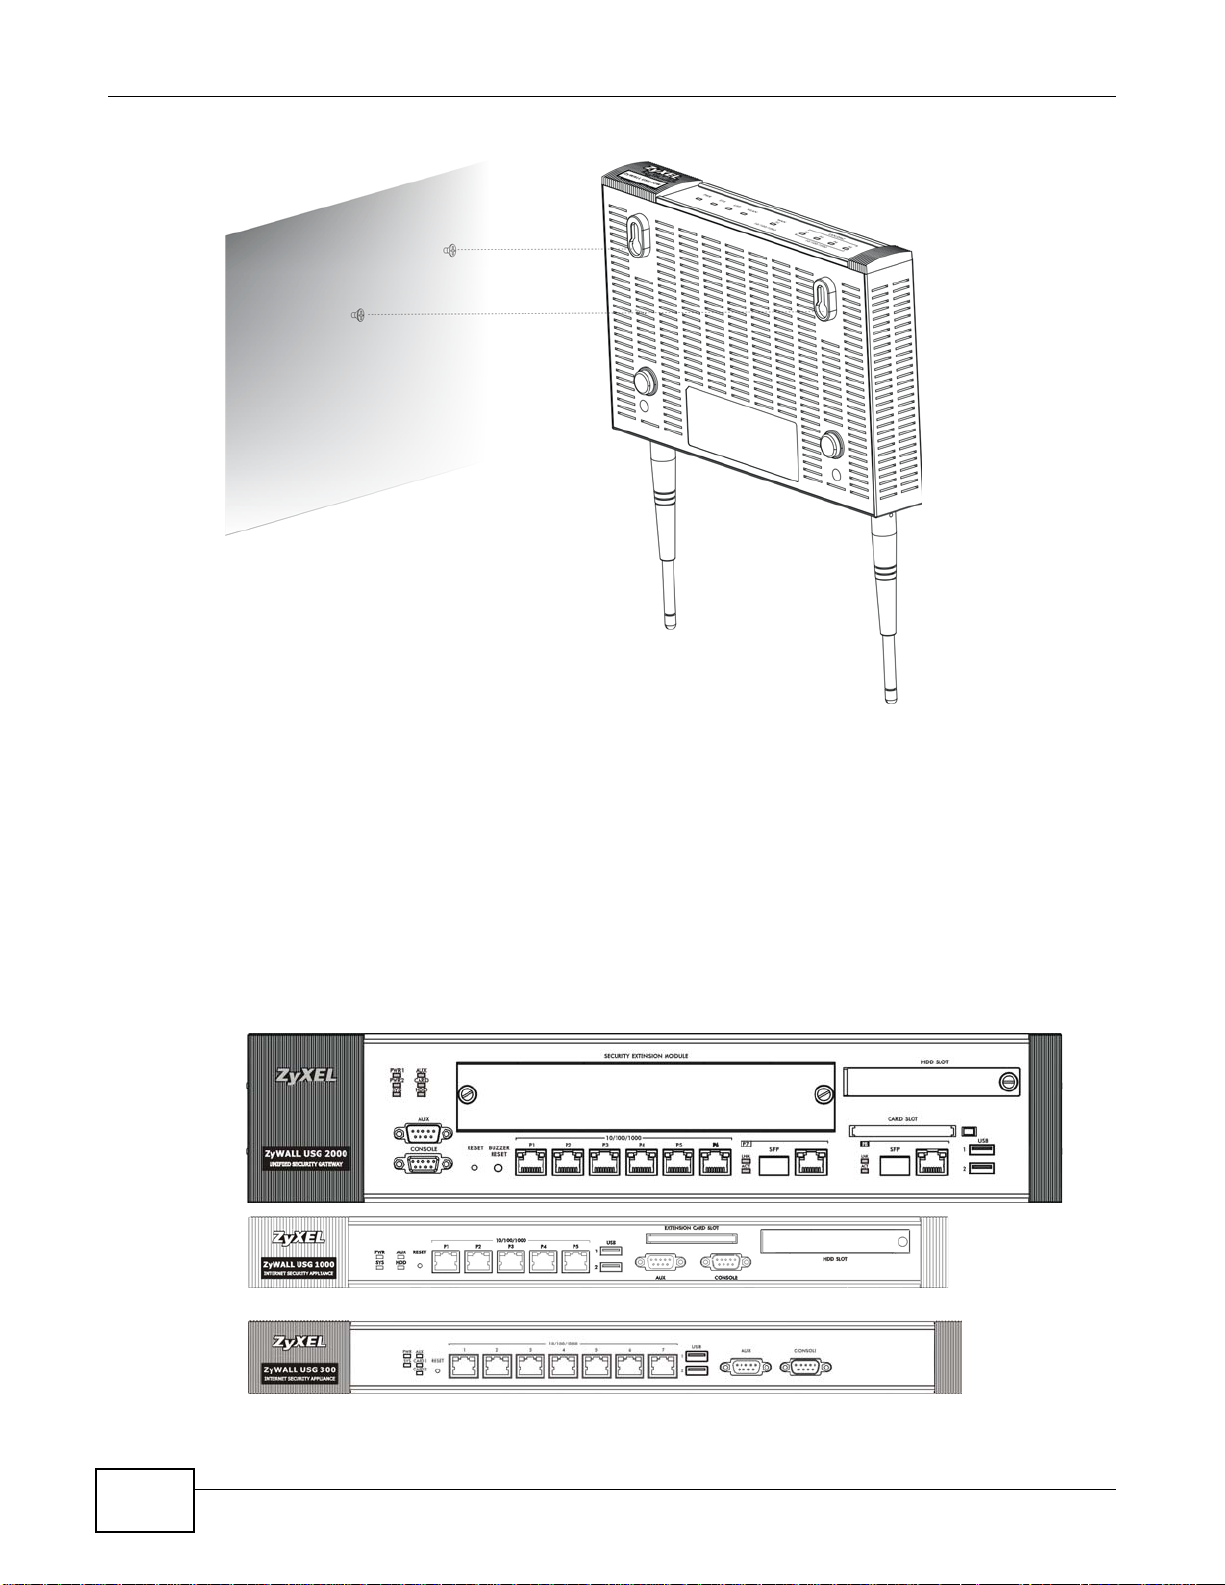
1.7 Wall-mounting
See Table 1 on page 5 for the ZyWALL USG models that can be wall-mounted. Do the following to
attach your ZyWALL to a wall.
Chapter 1 Introduction
1 Screw two screws with 6 mm ~ 8 mm (0.24" ~ 0.31") wide heads into the wall 150 mm apart (see
the figure in step 2). Do not screw the screws all the way in to the wall; leave a small gap between
the head of the screw and the wall.
The gap must be big enough for the screw heads to slide into the screw slots and the connection
cables to run down the back of the ZyWALL.
Note: Make sure the screws are securely fixed to the wall and strong enough to hold the
weight of the ZyWALL with the connection cables.
2 Use the holes on the bottom of the ZyWALL to hang the ZyWALL on the screws.
ZyWALL USG 20-2000 User’s Guide
21
Page 22
Chapter 1 Introduction
USG 20W
USG 2000
USG 1000
USG 300
Wall-mount the ZyWALL horizontally. The ZyWALL's side panels with
ventilation slots should not be facing up or down as this position is less
safe.
1.8 Front Panel
This section introduces the ZyWALL’s front panel.
Figure 18 ZyWALL Front Panel
22
ZyWALL USG 20-2000 User’s Guide
Page 23
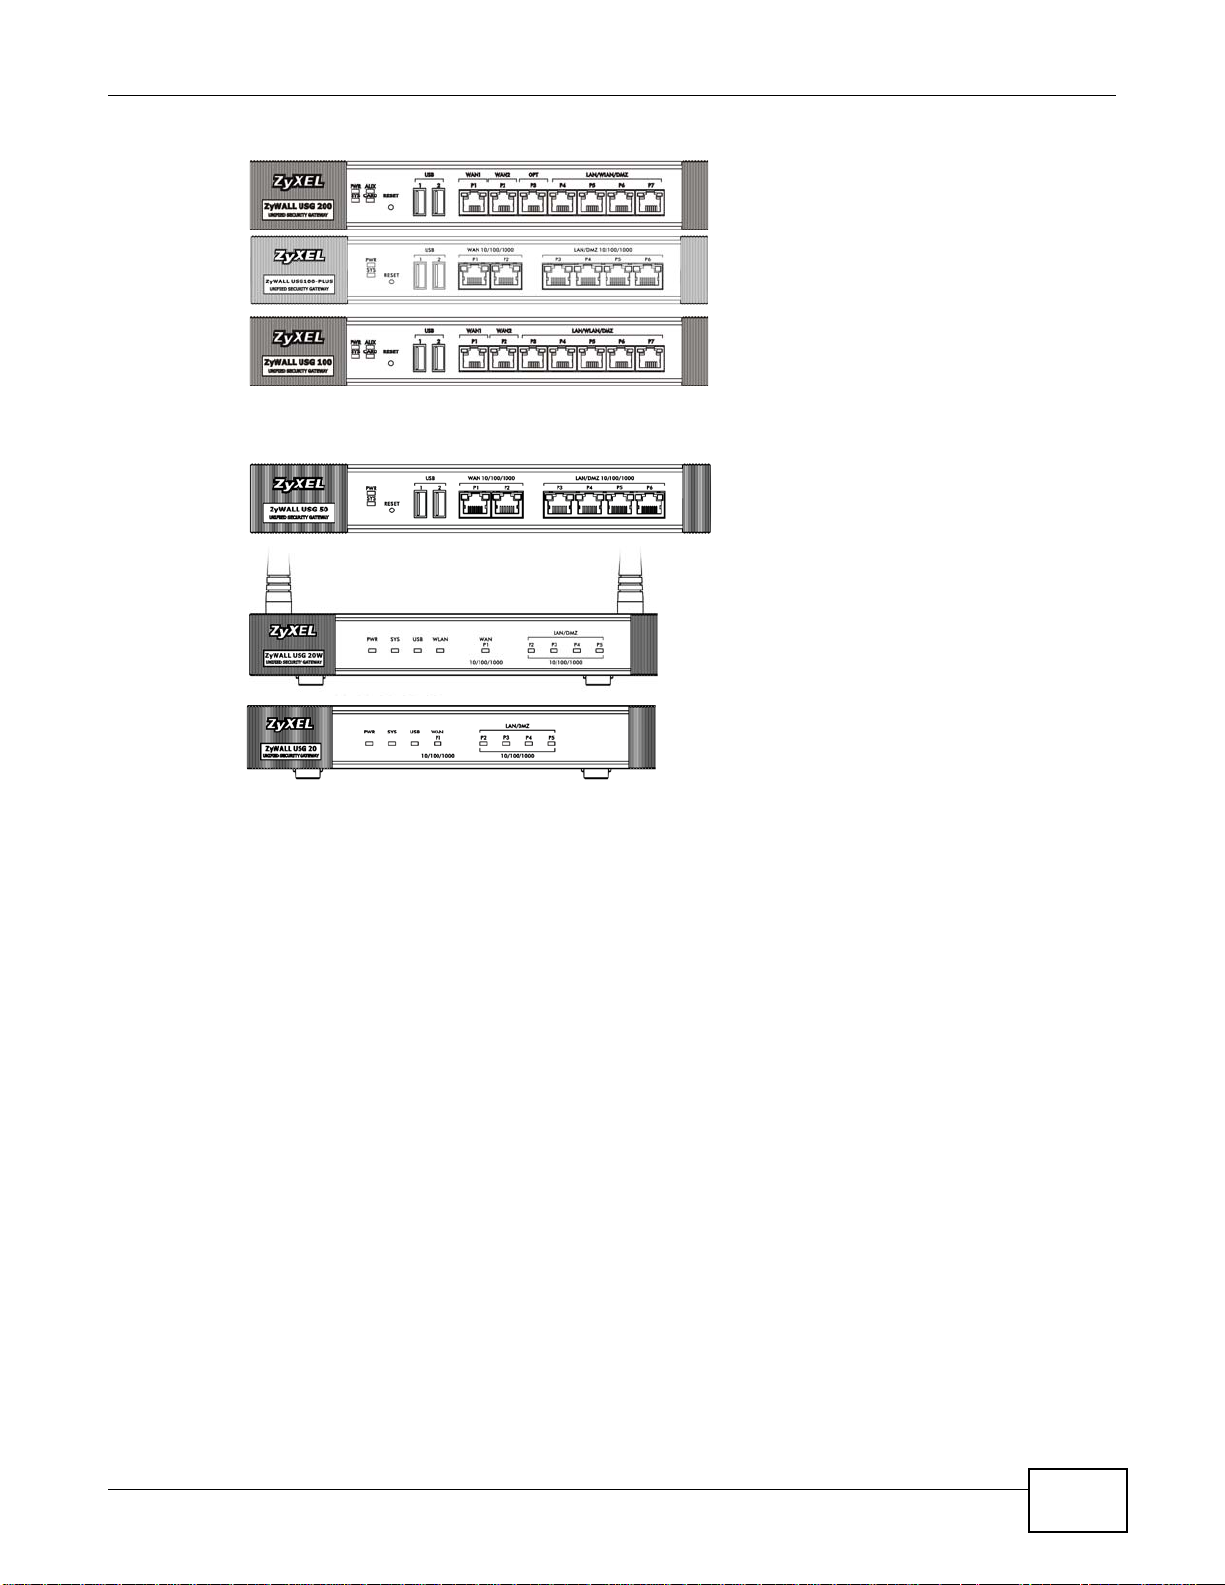
Chapter 1 Introduction
USG 200
USG 100
USG 100
PLUS
USG 50
USG 20W
USG 20
1.8.1 Dual Personality Interfaces
A dual personality interface is a 1000Base-T/mini-GBIC combo port. For each interface you can
connect either to the 1000Base-T port or the mini-GBIC port. The mini-GBIC port has priority over
the 1000Base-T port so the 1000Base-T port is disabled if both are connected at the same time.
1000Base-T Ports
The 1000Base-T auto-negotiating, auto-crossover Ethernet ports support 100/1000 Mbps Gigabit
Ethernet so the speed can be 100 Mbps or 1000 Mbps. The duplex mode is full at 1000 Mbps and
half or full at 100 Mbps. An auto-negotiating port can detect and adjust to the optimum Ethernet
speed (100/1000 Mbps) and duplex mode (full duplex or half duplex) of the connected device. An
auto-crossover (auto-MDI/MDI-X) port automatically works with a straight-through or crossover
Ethernet cable. The factory default negotiation settings for the Ethernet ports on the ZyWALL are
speed: auto, duplex: auto, and flow control: on (you cannot configure the flow control setting, but
the ZyWALL can negotiate with the peer and turn it off if needed)
Mini-GBIC Slots
These are slots for Small Form-Factor Pluggable (SFP) transceivers (not included). A transceiver is a
single unit that houses a transmitter and a receiver. Use a transceiver to connect a fiber-optic cable
to the ZyWALL. Use transceivers that comply with the Small Form-Factor Pluggable (SFP)
Transceiver MultiSource Agreement (MSA). See the SFF committee’s INF-8074i specification Rev
ZyWALL USG 20-2000 User’s Guide
23
Page 24
Chapter 1 Introduction
1.0 for details. You can change transceivers while the ZyWALL is operating. You can use different
transceivers to connect to devices with different types of fiber-optic connectors.
• Type: SFP connection interface
• Connection speed: 1 Gigabit per second (Gbps)
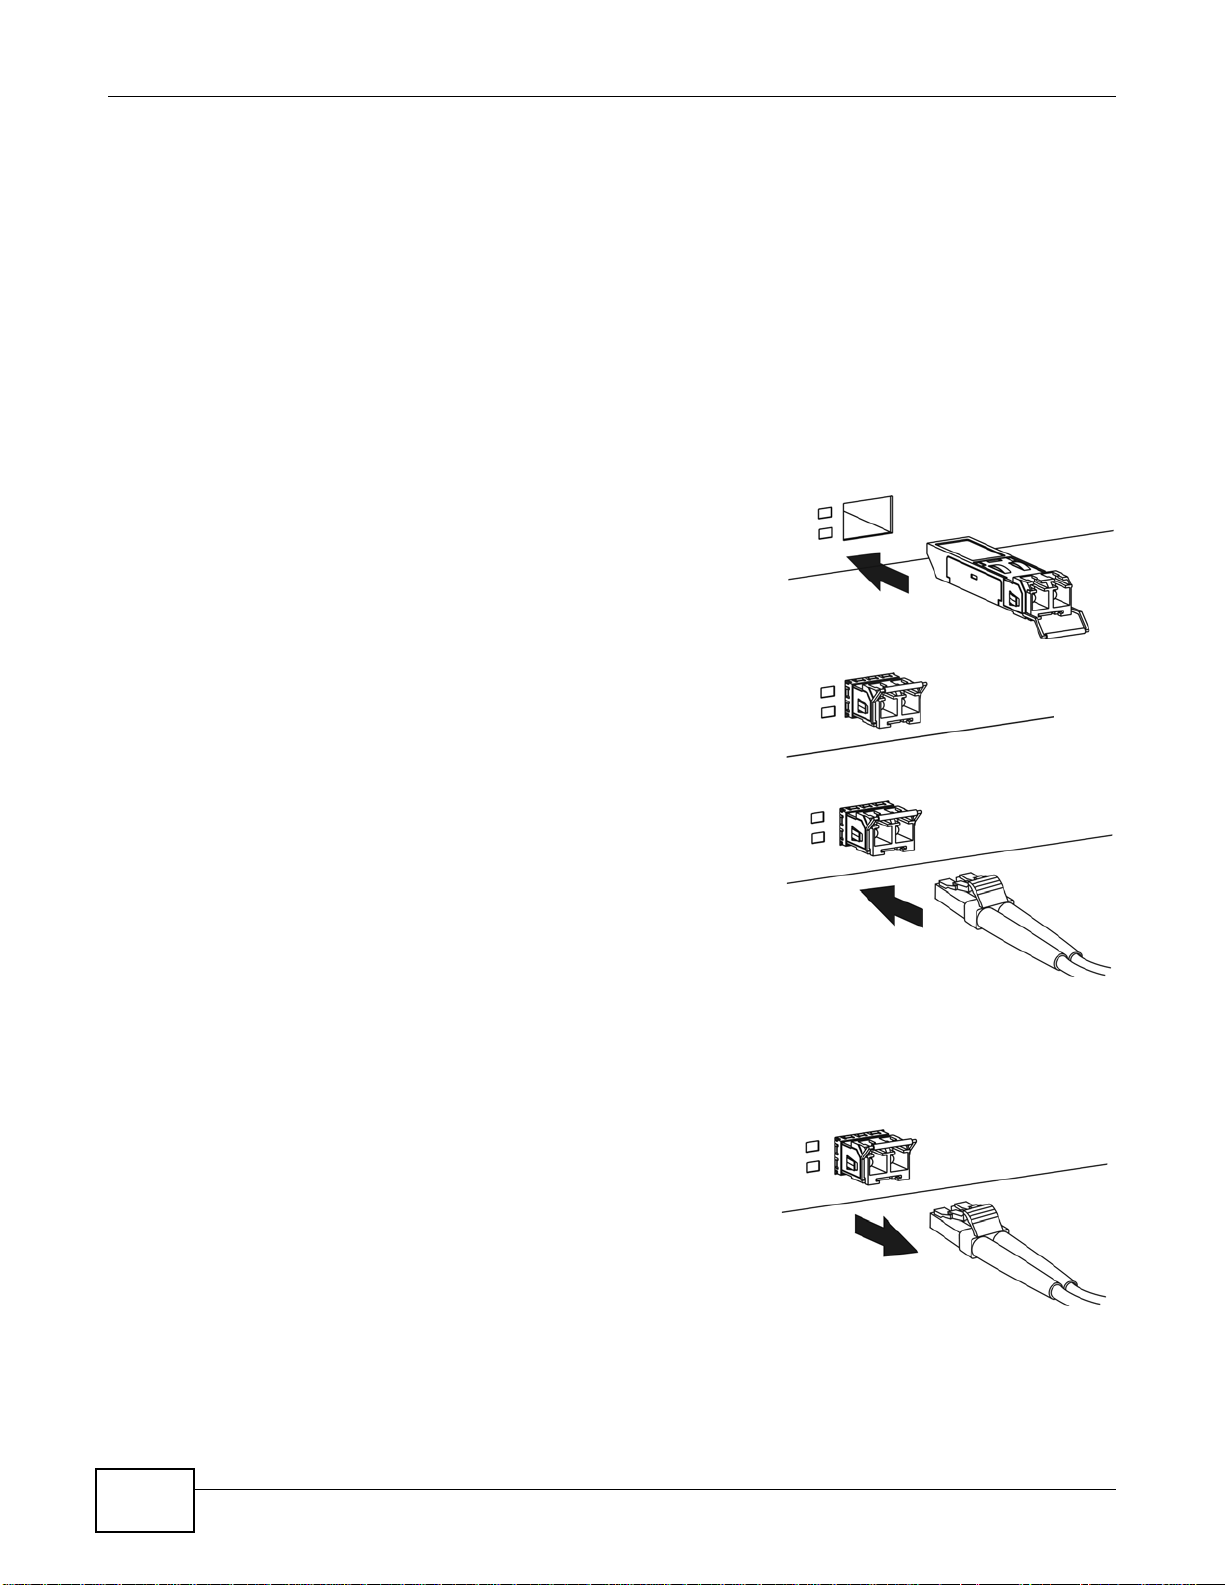
Transceiver and Fiber-optic Cable Installation
Use the following steps to install a mini GBIC transceiver (SFP module).
1 Insert the transceiver into the slot with the exposed section of
PCB board facing down.
To avoid possible eye injury, do not look into an operating fiber-optic
module’s connectors or fiber-optic cable.
2 Press the transceiver firmly until it clicks into place.
3 Push the end of the fiber-optic cable firmly into the
transceiver until it locks into place. When the other end of the
fiber-optic cable is connected, check the LEDs to verify the
link status.
Fiber-optic Cable and T ransceiver Removal
Use the following steps to remove a mini GBIC transceiver (SFP module).
1 Press down on the top of the fiber-optic cable where it
connects to the transceiver to release it. Then pull the fiberoptic cable out.
24
ZyWALL USG 20-2000 User’s Guide
Page 25
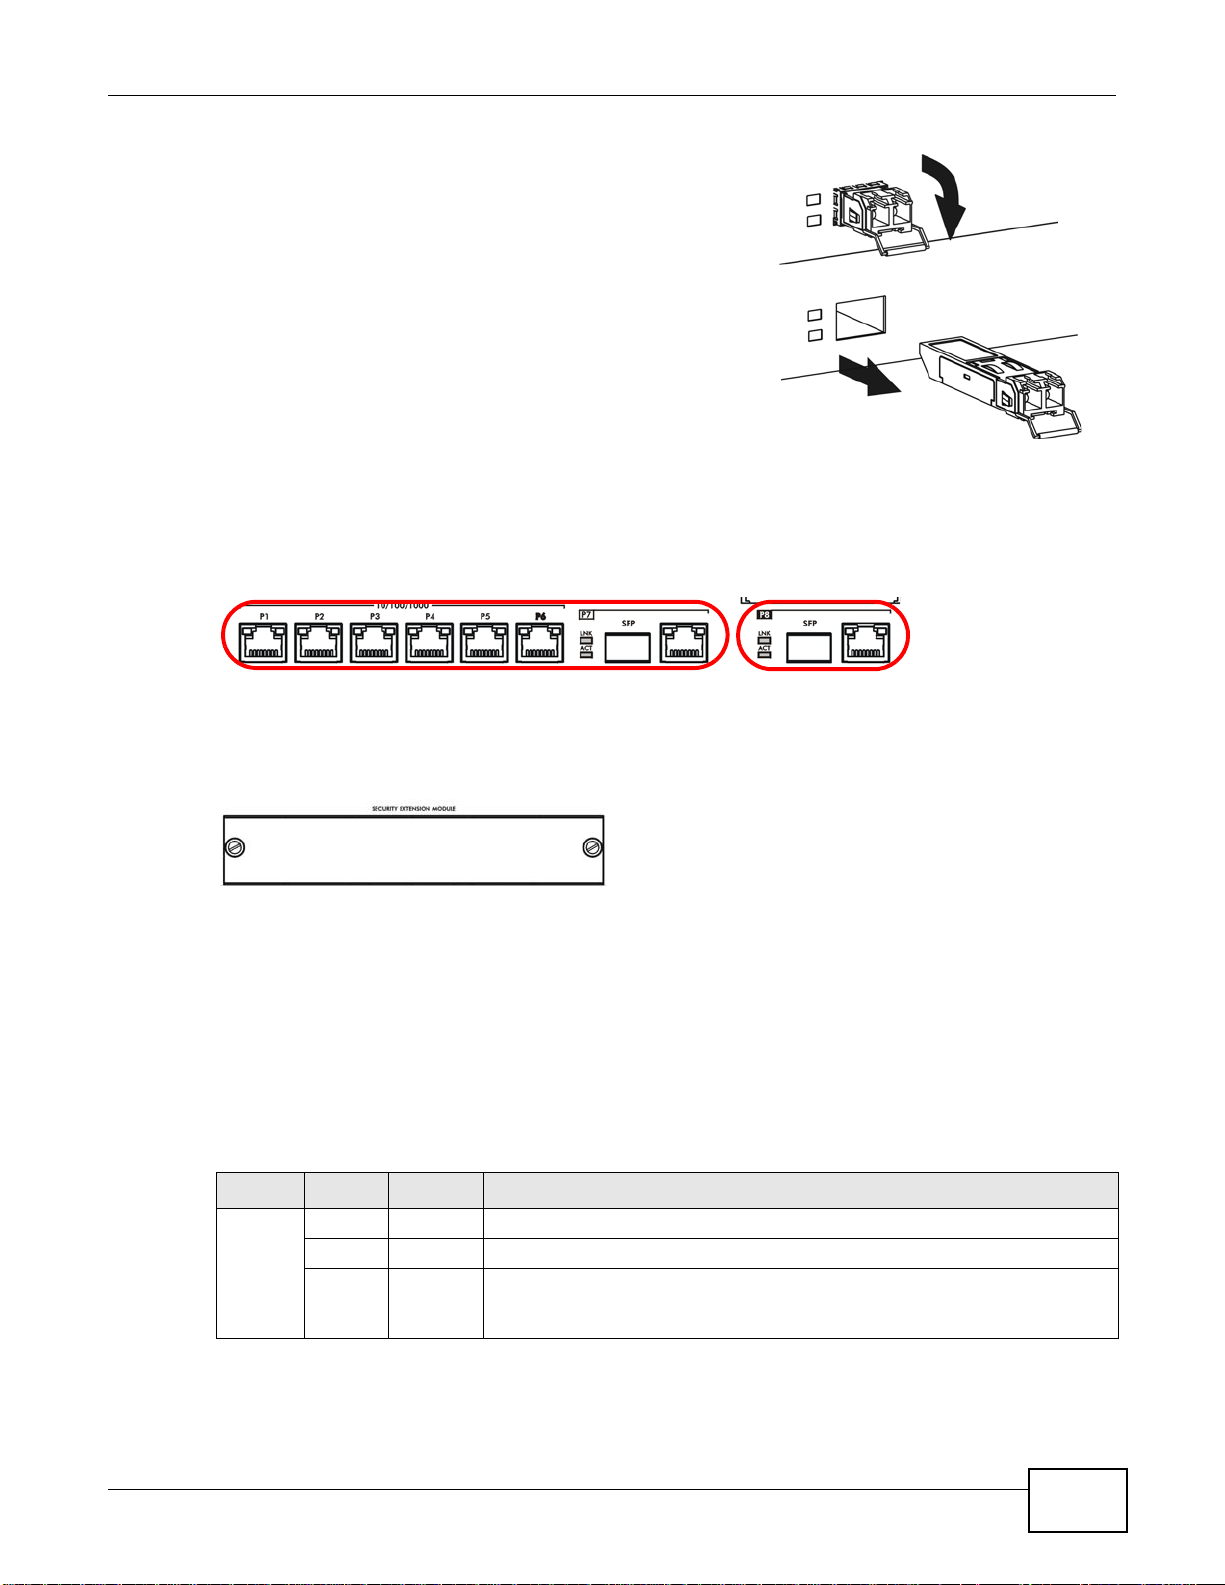
2 Open the transceiver’s latch (latch styles vary).
3 Pull the transceiver out of the slot.
1.8.2 Maximizing Throughput
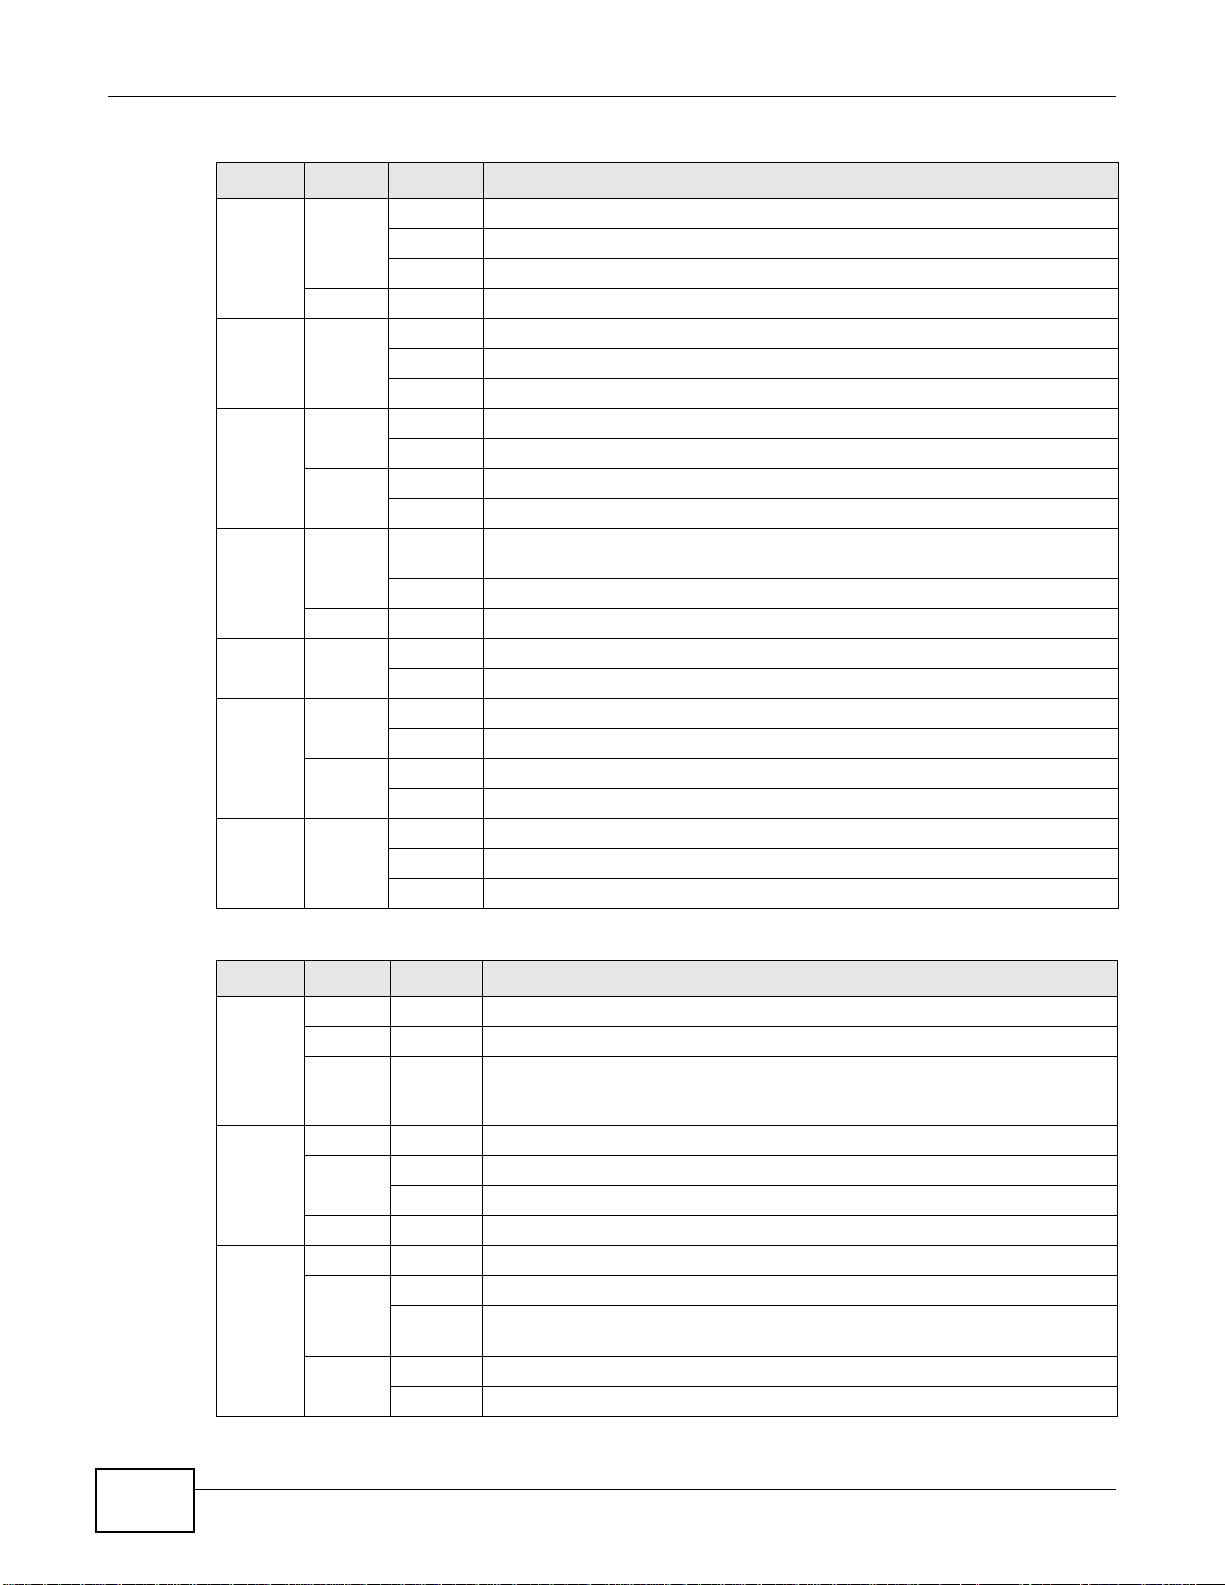
A ZyWALL USG with dual internal buses (see Table 1 on page 5) for Gigabit interfaces has one
internal bus for ports P1-P7 and another for port P8. To maximize the ZyWALL’s throughput, use
P8 for your connection with the most traffic.
Figure 19 Gigabit Interfaces and Internal Buses
Chapter 1 Introduction
Some ZyWALLs (see Table 1 on page 5) let you add an optional Security Extension Module (SEM) to
enhance the VPN or VPN and Unified Threat Management (UTM) capabilities.
Figure 20 Security Extension Module
• The VPN module (SEM-VPN) increases the maximum VPN throughput from 100 Mbps to 500
Mbps, the maximum number of IPSec VPN tunnels from 1,000 to 2,000 and the maximum
number of SSL VPN users from 250 (with a license) to 750 (with a license).
• The SEM-DUAL module provides the VPN performance enhancements and increases the
maximum anti-virus and IDP traffic throughput from 100 Mbps to 400 Mbps.
1.8.3 Front Panel LEDs
The following tables describe the LEDs.
Table 8 ZyWALL USG 20 ~ USG 1000 Front Panel LEDs
LED COLOR STATUS DESCRIPTION
PWR Off The ZyWALL is turned off.
Green On The ZyWALL is turned on.
Red On There is a hardware component failure. Shut down the device, wait for a few
minutes and then restart the device (see Section 1.5 on page 20). If the LED
turns red again, then please contact your vendor.
ZyWALL USG 20-2000 User’s Guide
25
Page 26
Chapter 1 Introduction
Table 8 ZyWALL USG 20 ~ USG 1000 Front Panel LEDs (continued)
LED COLOR STATUS DESCRIPTION
SYS Green Off The ZyWALL is not ready or has failed.
AUX Green Off The AUX port is not connected.
1, 2 ... Green Off There is no traffic on this port.
USB Green Off No device is connected to the ZyWALL’s USB port or the connected device is
WLAN Green Off The wireless function is disabled on the ZyWALL.
P1~P5 Green Off There is no traffic on this port.
Card1,2 Green Off There is no card in the slot.
On The ZyWALL is ready and running.
Blinking The ZyWALL is booting.
Red On The ZyWALL had an error or has failed.
Flashing The AUX port is sending or receiving packets.
On The AUX port is connected.
Blinking The ZyWALL is sending or receiving packets on this port.
Orange Off There is no connection on this port.
On This port has a successful link.
not supported by the ZyWALL.
On A 3G USB card or USB storage device is connected to the USB port.
Orange On Connected to a 3G network through the connected 3G USB card.
On The wireless function is enabled on the ZyWALL.
Blinking The ZyWALL is sending or receiving packets on this port.
Orange Off There is no connection on this port.
On This port has a successful link.
On There is a card in the slot.
Flashing The card in the slot is sending or receiving traffic.
26
Table 9 ZyWALL USG 2000 Front Panel LEDs
LED COLOR STATUS DESCRIPTION
PWR1,
PWR2
SYS Off The ZyWALL is turned off.
AUX Off The AUX port is not connected.
Green On The power module is operating.
Red On The power module has malfunctioned. Turn the power module off, wait a few
Green On The ZyWALL is ready and operating normally.
Red On The ZyWALL is malfunctioning.
Orange On The AUX port has a dial-in management connection.
Green On The AUX port has a dial backup connection.
Off Both power modules are turned off, not receiving power, or not functioning.
minutes, and turn the power module back on (see Section 1.5 on page 20).
If the LED shines red again, then please contact your vendor.
Flashing The ZyWALL is self-testing.
Flashing The AUX port is sending or receiving packets for the dial-in management
connection.
Flashing The AUX port is sending or receiving packets for the dial backup connection.
ZyWALL USG 20-2000 User’s Guide
Page 27
Chapter 1 Introduction
Table 9 ZyWALL USG 2000 Front Panel LEDs (continued)
LED COLOR STATUS DESCRIPTION
CARD Green Off Reserved for future use. There is no card in the CARD SLOT.
On There is a card in the CARD SLOT.
HDD This LED is reserved for future use.
P1~P8 Green Off There is no traffic on this port.
Flashing The ZyWALL is sending or receiving packets on this port.
Orange Off There is no connection on this port.
On This port has a successful link.
LNK Orange Off The Ethernet link is down.
On The Ethernet link is up.
ACT Green Off The system is not transmitting/receiving Ethernet traffic.
Blinking The system is transmitting/receiving Ethernet traffic.
ZyWALL USG 20-2000 User’s Guide
27
Page 28

Chapter 1 Introduction
28
ZyWALL USG 20-2000 User’s Guide
Page 29

CHAPTER 2
How to Set Up Your Network
Here are examples of using the Web Configurator to set up your network in the ZyWALL.
Note: The tutorials featured here require a basic understanding of connecting to and using the Web
Configurator, see Section 1.4 on page 10 for details. For field descriptions of individual screens, see
the Web Configurator Online Help.
• Wizard Overview on page 29
• How to Configure Interfaces, Port Roles, and Zones on page 29
• How to Configure a Cellular Interface on page 32
• How to Set Up a Wireless LAN on page 34
• How to Configure Ethernet, PPP, VLAN, Bridge and Policy Routing on page 37
• How to Set Up IPv6 Interfaces For Pure IPv6 Routing on page 38
• How to Set Up an IPv6 6to4 Tunnel on page 44
• How to Set Up an IPv6-in-IPv4 Tunnel on page 48
2.1 Wizard Overview
Use the wizards to quickly configure Internet connection and VPN settings as well as activate
subscription services.
WIZARD DESCRIPTION
Installation Setup Wizard Use this wizard the first time log into the Web Configurator to configure WAN
Quick Setup You can find the following wizards in the CONFIGURATION navigation panel.
WAN Interface Use these wizard screens to quickly configure a WAN interface’s encapsulation
VPN Setup Use these wizard screens to quickly configure an IPSec VPN or IPSec VPN
After you complete a wizard, you can go to the CONFIGURATION screens to configure advanced
settings.
connections and register your ZyWALL.
and IP address settings.
configuration provisioning.
2.2 How to Configure Interfaces, Port Roles, and Zones
This tutorial shows how to configure Ethernet interfaces, port roles, and zones for the following
example configuration.
ZyWALL USG 20-2000 User’s Guide 29
Page 30
Chapter 2 How to Set Up Your Network
•The wan1 interface uses a static IP address of 1.2.3.4.
•Add P5 (lan2) to the DMZ interface (Note: In USG 20/20W, use P4 (lan2) instead of P5 in this
example). The DMZ interface is used for a protected local network. It uses IP address
192.168.3.1 and serves as a DHCP server by default.
• You want to be able to apply specific security settings for the VPN tunnel created by the Quick
Setup - VPN Setup wizard (named WIZ_VPN). So you create a new zone and add WIZ_VPN
to it.
Figure 21 Ethernet Interface, Port Roles, and Zone Configuration Example
2.2.1 Configure a WAN Ethernet Interface
You need to assign the ZyWALL’s wan1 interface a static IP address of 1.2.3.4.
Click Configuration > Network > Interface > Ethernet and double-click the wan1 interface’s
entry in the Configuration section. Select Use Fixed IP Address and configure the IP address,
subnet mask, and default gateway settings and click OK.
30
ZyWALL USG 20-2000 User’s Guide
Page 31

2.2.2 Configure Port Roles
Here is how to take the P5 port from the lan2 interface and add it to the dmz interface.
1 Click Configuration > Network > Interface > Port Role.
2 Under P5 select the dmz (DMZ) radio button and click Apply.
Chapter 2 H ow to Set Up Your Network
2.2.3 Configure Zones
In this example you have created a WIZ_VPN tunnel through the Quick Setup - VPN Setup
wizard. By default, it is assigned to the IPSec_VPN zone. Do the following to move WIZ_VPN
from the IPSec_VPN zone to a new zone.
1 Click Configuration > Network > Zone and then double-click the IPSec_VPN entry.
2 Select WIZ_VPN and remove it from the Member box and click OK.
ZyWALL USG 20-2000 User’s Guide
31
Page 32

Chapter 2 How to Set Up Your Network
3 Back to the Configuration > Network > Zone screen and click Add in the User Configuration
section.
4 Enter VPN as the new zone’s name. Select WIZ_VPN and move it to the Member box and click
OK.
Then you can configure firewall rules to apply specific security settings to this VPN zone.
2.3 How to Configure a Cellular Interface
Use 3G cards for cellular WAN (Internet) connections. See www.zyxel.com for a supported 3G card.
In this example you connect the 3G USB card before you configure the cellular interfaces but is also
possible to reverse the sequence.
1 Make sure the 3G device’s SIM card is installed.
2 Connect the 3G device to one of the ZyWALL’s USB ports.
3 Click Configuration > Network > Interface > Cellular. Select the 3G device’s entry and click
Edit.
4 Enable the interface and add it to a zone. It is highly recommended that you set the Zone to WAN
to apply your WAN zone security settings to this 3G connection. Leaving Zone set to none has the
ZyWALL not apply any security settings to the 3G connection. Enter the PIN Co de provided by the
cellular 3G service provider (0000 in this example).
32
ZyWALL USG 20-2000 User’s Guide
Page 33

Chapter 2 H ow to Set Up Your Network
Note: The Network Selection is set to auto by default. This means that the 3G USB
modem may connect to another 3G network when your service provider is not in
range or when necessary. Select Home to have the 3G device connect only to your
home network or local service provider. This prevents you from being charged
using the rate of a different ISP.
5 Go to the Dashboard. The Interface Status Summary section should contain a “cellular” entry.
When its connection status is Connected you can use the 3G connection to access the Internet.
6 The ZyWALL automatically adds the cellular interface to the system default WAN trunk. If the
ZyWALL is using a user-configured trunk as its default trunk and you want this cellular interface to
be part of it, use the Trunk screens to add it.
ZyWALL USG 20-2000 User’s Guide
33
Page 34

Chapter 2 How to Set Up Your Network
This way the ZyWALL can automatically balance the traffic load amongst the available WAN
connections to enhance overall network throughput. Plus, if a WAN connection goes down, the
ZyWALL still sends traffic through the remaining WAN connections. For a simple test, disconnect all
of the ZyWALL’s wired WAN connections. If you can still access the Internet, your cellular interface
is properly configured and your cellular device is working.
2.4 How to Set Up a Wireless LAN
This tutorial applies only to models that include wireless LAN.
You can configure different interfaces to use on the wireless LAN card. This lets you have different
wireless LAN networks using different SSIDs. You can configure the WLAN interfaces before or after
you install the wireless LAN card. This example shows how to create a WLAN interface that uses
WPA or WPA2 security and the ZyWALL’s local user database for authentication.
2.4.1 Set Up User Accounts
Besides WPA-PSK, the ZyWALL also supports TTLS using PAP so you can use the ZyWALL’s local
user database with WPA or WPA2 instead of needing an external RADIUS server. For each WLAN
user, set up a user account containing the user name and password the WLAN user needs to enter
to connect to the wireless LAN.
1 Click Configuration > Object > User/Group > User and the Add icon.
2 Set the User Name to wlan_user. Enter (and re-enter) the user’s password. Click OK.
3 Use the Add icon in the Configuration > Object > User/Group > User screen to set up the
remaining user accounts in similar fashion.
2.4.2 Create the WLAN Interface
1 Click Configuration > Network > Interface > WLAN > Add to open the WLAN Add screen.
34
ZyWALL USG 20-2000 User’s Guide
Page 35

Chapter 2 H ow to Set Up Your Network
2 Edit this screen as follows.
A (internal) name for the WLAN interface displays. You can modify it if you want to.
The ZyWALL’s security settings are configured by zones. Select to which security zone you want the
WLAN interface to belong (the WLAN zone in this example). This determines which security settings
the ZyWALL applies to the WLAN interface.
Configure the SSID (ZYXEL_WPA in this example).
If all of your wireless clients support WPA2, select WPA2-Enterprise as the Security Type,
otherwise select WPA/WPA-2-Enterprise. Set the Authentication Type to Auth Method. The
ZyWALL can use its default authentication method (the local user database) and its default
certificate to authenticate the users.
Configure the interface’s IP address and set it to DHCP Server. Click OK.
3 Turn on the wireless LAN and click Apply.
ZyWALL USG 20-2000 User’s Guide
35
Page 36

Chapter 2 How to Set Up Your Network
4 Configure your wireless clients to connect to the wireless network.
2.4.2.1 Wireless Clients Import the ZyWALL’s Certificate
You must import the ZyWALL’s certificate into the wireless clients if they are to validate the
ZyWALL’s certificate. Use the Configuration > Object > Certificate > Edit screen to export the
certificate the ZyWALL is using for the WLAN interface. Then do the following to import the
certificate into each wireless client computer.
1 In Internet Explorer, click Tools > Internet Option s > Content and click the Certificates button.
2 Click Import.
3 Use the wizard screens to import the certificate. You may need to change the Files of Type setting
to All Files in order to see the certificate file.
4 When you get to the Certificate Store screen, select the option to automatically select the
certificate store based on the type of certificate.
5 If you get a security warning screen, click Yes to proceed.
6 The Internet Explorer Certificates screen remains open after the import is done. You can see the
newly imported certificate listed in the Trusted Root Certification Authorities tab. The values in
the Issued To and Issued By fields should match those in the ZyWALL’s My Certificates screen’s
Subject and Issuer fields (respectively).
36
ZyWALL USG 20-2000 User’s Guide
Page 37

Chapter 2 H ow to Set Up Your Network
The My Certificates screen indicates what type of information is being displayed, such as Common
Name (CN), Organizational Unit (OU), Organization (O) and Country (C).
Repeat the steps to import the certificate into each wireless client computer that is to validate the
ZyWALL’s certificate when using the WLAN interface.
2.4.2.2 Wireless Clients Use the WLAN Interface
Wireless clients enter their username and password when they connect to the wireless network.
2.5 How to Configure Ethernet, PPP, VLAN, Bridge and Policy Routing
The following table describes when to configure the Ethernet, PPP, VLAN, Bridge screens under
Configuration > Network > Interface and the Configuration > Network > Routing > Policy
Routing screen.
ZyWALL USG 20-2000 User’s Guide
37
Page 38

Chapter 2 How to Set Up Your Network
2006:1111:1111:1111::/64
IPv6
IPv6
Z
WAN
LAN
IPv6
Table 10 Ethernet, PPP, VLAN, Bridge and Policy Routing Screen Relationships
SCREEN DESCRIPTION
Ethernet Configure this if any interface on the ZyWALL is connecting to an Ethernet network. Ethernet
interfaces are the foundation for defining other interfaces and network policies.
PPP Configure this if you need your service provider to provide an IP address through PPPoE or PPTP in
VLAN Configure this if you want to divide your physical networks into multiple VLANs, or your service
Bridge Configure this if you want the ZyWALL to combine two or multiple network segments into one
Policy
Routing
Since firmware version 3.00, the ZyWALL supports IPv6 configuration in these Ethernet, PPP,
VLAN, Bridge and Policy Route screens under Configuration > Network > Interface and
Configuration > Network > Routing. Basically, these are the same as the ones for IPv4
networks except the following differences:
• You have to enable IPv6 globally in the CONFIGURATION > System > IPv6 screen to make
the IPv6 settings work.
•An Enable IPv6 setting - Select this in the screens listed above to enable the ZyWALL to be able
to send and receive IPv6 packets through the interface. Otherwise, the ZyWALL discards IPv6
packets flowing through the interface.
• IPv6 Address Assignment - This section allows you to enable auto-configuration and configure
prefix delegation.
• DHCPv6 Setting - This section allows you to configure the DHCPv6 role and the corresponding
settings for the interface.
order to access the Internet or another network.
provider or an aggregated network needs the ZyWALL to recognize the VLAN tags in the packets
flowing through the ZyWALL.
single network. Although the ZyWALL is “transparent” in this mode, you can still apply security
checking on packets flowing through the ZyWALL.
Configure this if you want to override the ZyWALL’s default routing behavior in order to send
packets through the appropriate interface or VPN tunnel.
2.6 How to Set Up IPv6 Interfaces For Pure IPv6 Routing
This example shows how to configure your ZyWALL Z’s WAN and LAN interfaces which connects two
IPv6 networks. ZyWALL Z periodically advertises a network prefix of 2006:1111:1111:1111::/64 to
the LAN through router advertisements.
Note: Instead of using router advertisement, you can use DHCPv6 to pass the network
settings to the computers on the LAN.
Figure 22 Pure IPv6 Network Example
38
ZyWALL USG 20-2000 User’s Guide
Page 39

2.6.1 Setting Up the WAN IPv6 Interface
1 In the CONFIGURATION > Network > Interface > Ethernet screen’s IPv6 Configuration
section, double-click the wan1.
2 The Edit Ethernet screen appears. Select Enable Interface and Enable IPv6. Select Enable
Auto-Configuration. Click OK.
Note: Your ISP or uplink router should enable router advertisement.
Chapter 2 H ow to Set Up Your Network
2.6.2 Setting Up the LAN Interface
1 In the CONFIGURATION > Network > Interface > Ethernet screen, double-click the lan1 in
the IPv6 Configuration section.
2 The Edit Ethernet screen appears. Select Enable Interface and Enable IPv6.
Select Enable Router Advertisement and click Add and configure a network prefix for the LAN1
(2006:1111:1111:1111::/64 in this example). Click OK.
ZyWALL USG 20-2000 User’s Guide
39
Page 40

Chapter 2 How to Set Up Your Network
You have completed the settings on the ZyWALL. But if you want to request a network address
prefix from your ISP for your computers on the LAN, you can configure prefix delegation (see
Section Section 2.6.3 on page 40).
2.6.3 Prefix Delegation and Router Advertisement Settings
This example shows how to configure prefix delegation on the ZyWALL’s WAN and router
advertisement on the LAN.
2.6.3.1 Apply a Network Prefix From Your ISP
First of all, you have to apply a network prefix from your ISP or the uplink router’s administrator.
The WAN port’s DUID is required when you apply the prefix. You can check the DUID information in
the WAN IPv6 Interface Edit screen.
This example assumes that you were given a network prefix of 2001:b050:2d::/48 and you decide
to divide it and give 2001:b050:2d:1111::/64 to the LAN network. LAN1’s IP address is
2001:b050:2d:1111::1/128.
40
ZyWALL USG 20-2000 User’s Guide
Page 41

Figure 23 Pure IPv6 Network Example Using Prefix Delegation
2001:b050:2d:1111::1/128
2002:b050:2d:1111::/64
IPv6
IPv6
Z
WAN
LAN
IPv6
2.6.3.2 Setting Up the WAN IPv6 Interface
1 In the Configuration > Network > Interface > Ethernet screen’s IPv6 Configuration section,
double-click the wan1.
2 The Edit Ethernet screen appears. Select Enable Interface and Enable IPv6.
Click Create new Object to add a DHCPv6 Request object with the Prefix Delegation type.
Select Enable Auto-Configuration.
Select Client in the DHCPv6 field. (WAN1’s DUID appears.)
Chapter 2 H ow to Set Up Your Network
Click Add in the DHCPv6 Request Options table and select the DHCPv6 request object you just
created. You cannot see the prefix your ISP gave you in the Value field until you click OK and then
come back to this screen again. It is 2001:b050:2d::/48 in this example.
Note: Your ISP or a DHCPv6 server in the same network as the WAN should assign an
IPv6 IP address for the WAN interface.
ZyWALL USG 20-2000 User’s Guide
41
Page 42

Chapter 2 How to Set Up Your Network
2.6.3.3 Setting Up the LAN Interface
1 In the Configuration > Network > Interface > Ethernet screen, double-click the lan1 in the
IPv6 Configuration section.
2 The Edit Ethernet screen appears. Click Show Advanced Settings to display more settings on
this screen.
Select Enable Interface and Enable IPv6.
In the Address from DHCPv6 Prefix Delegation table, click Add and select the DHCPv6 request
object from the drop-down list, type ::1111:0:0:0:1/128 in the Suffix Address field. (The
combined address 2001:b050:2d:1111::1/128 will display as LAN1’s IPv6 address after you click
OK and come back to this screen again).
Note: You can configure the IPv6 Address/Prefix Length field instead if the delegated
prefix is never changed.
Select Enable Router Advertisement.
In the Advertised Prefix from DHCPv6 Prefix Delegation table, click Add and select the
DHCPv6 request object from the drop-down list, type ::1111/64 in the Suffix Address field. (The
combined prefix 2001:b050:2d:1111::/64 will display for the LAN1’s network prefix after you click
OK and come back to this screen again).
42
ZyWALL USG 20-2000 User’s Guide
Page 43

Chapter 2 H ow to Set Up Your Network
2.6.4 Test
1 Connect a computer to the ZyWALL’s LAN1.
ZyWALL USG 20-2000 User’s Guide
43
Page 44

Chapter 2 How to Set Up Your Network
2002:7a64:dcee:1::111/128
122.100.220.238
192.99.88.1
2002:7a64:dcee:1::/64
IPv6
IPv4
Z
R
WAN
LAN
2 Enable IPv6 support on you computer.
In Windows XP, you need to use the IPv6 install command in a Command Prompt.
In Windows 7, IPv6 is supported by default. You can enable IPv6 in the Control Panel > Network
and Sharing Center > Local Area Connection screen.
3 Your computer should get an IPv6 IP address (starting with 2001:b050:2d:1111: for this example)
from the ZyWALL.
4 Open a web browser and type http://www.kame.net. If your IPv6 settings are correct, you can see
a dancing turtle in the website.
2.6.5 What Can Go Wrong?
1 If you forgot to enable Auto-Configuration on the WAN1 IPv6 interface, you will not have any
default route to forward the LAN’s IPv6 packets.
2 To use prefix delegation, you must set the WAN interface to a DHCPv6 client, enable router
advertisements on the LAN interface as well as configure the Advertised Prefix from DHCPv6
Prefix Delegation table.
3 If the Value field in the WAN1’s DHCPv6 Request Options table displays n/a, contact your ISP
for further support.
4 In Windows, some IPv6 related tunnels may be enabled by default such as Teredo and 6to4
tunnels. It may cause your computer to handle IPv6 packets in an unexpected way. It is
recommended to disable those tunnels on your computer.
2.7 How to Set Up an IPv6 6to4 Tunnel
This example shows how to use the interface configuration screens to create the following 6to4
tunnel.
Figure 24 6to4 Tunnel Example
In this example, the ZyWALL (Z) acts as a 6to4 router which connects the IPv4 Internet (through
WAN1 with an IP address of 122.100.220.238) and an IPv6 intranet network. In the 6to4 tunnel
application, you must configure the LAN1 with an IP address starting with 2002:7a64:dcee::/48 if
you decide to use the WAN1 IP address to forward 6to4 packets to the IPv4 network. The second
and third sets of 16-bit IP address from the left must be converted from 122.100.220.238. It
becomes 7a64:dcee in hexadecimal. You are free to use the fourth set of 16-bit IP address from the
left in order to allocate different network addresses (prefixes) to IPv6 interfaces. In this example,
44
ZyWALL USG 20-2000 User’s Guide
Page 45

the LAN1 network address is assigned to use 2002:7a64:dcee:1::/64 and the LAN1 IP address is
LAN1
(IPv6)
6to4 TUNNEL
WAN1
(IPv4)
set to 2002:7a64:dcee:1::111/128.
A relay router R (192.99.88.1) is used in this example in order to forward 6to4 packets to any
unknown IPv6 addresses.
2.7.1 Configuration Concept
After the 6to4 tunnel settings are complete, IPv4 and IPv6 packets transmitted between WAN1 and
LAN1 will be handled by the ZyWALL through the following flow.
Figure 25 6to4 Tunnel Configuration Concept
2.7.2 Setting Up the LAN IPv6 Interface
1 In the CONFIGURATION > Network > Interface > Ethernet screen’s IPv6 Configuration
section, double-click the lan1.
Chapter 2 H ow to Set Up Your Network
2 The Edit Ethernet screen appears. Select Enable Interface and Enable IPv6.
Type 2002:7a64:dcee:1::111/128 in the IPv6 Address/Prefix Length field for the LAN1’s IP
address.
Enable Router Advertisement. Then click Add in the Advertised Prefix Table to add
2002:7a64:dcee:1::/64. The LAN1 hosts will get the network prefix through the router
advertisement messages sent by the LAN1 IPv6 interface periodically. Click OK.
ZyWALL USG 20-2000 User’s Guide
45
Page 46

Chapter 2 How to Set Up Your Network
2.7.3 Setting Up the 6to4 Tunnel
1 Click Add in the CONFIGURATION > Network > Interface > Tunnel screen.
2 The Add Tunnel screen appears. Select Enable.
Enter tunnel0 as the Interface Name and select 6to4 as the Tunnel Mode.
In the 6to4 Tunnel Parameter section, this example just simply uses the default 6to4 Prefix,
2002:://16. Enter your relay router’s IP address (192.88.99.1 in this example).
Select wan1 as the gateway. Click OK.
46
ZyWALL USG 20-2000 User’s Guide
Page 47

Chapter 2 H ow to Set Up Your Network
2.7.4 Testing the 6to4 Tunnel
1 Connect a computer to the ZyWALL’s LAN1.
2 Enable IPv6 support on you computer.
In Windows XP, you need to use the IPv6 install command in a Command Prompt.
In Windows 7, IPv6 is supported by default. You can enable IPv6 in the Control Panel > Network
and Sharing Center > Local Area Connection screen.
3 You should get an IPv6 IP address starting with 2002:7a64:dcee:1:.
4 Type ping -6 ipv6.google.com in a Command Prompt to test. You should get a response.
2.7.5 What Can Go Wrong?
1 Do not enable Auto-Configuration for the LAN1 IPv6 interface. Enabling it will cause two default
routes, however, the ZyWALL only needs a default route generated by your relay router setting.
In 6to4, the ZyWALL doesn’t need a policy route to determine where to forward a 6to4 packet
(starting with 2002 in the IPv6 IP address). The next gateway information of where to forward a
6to4 packet can be retrieved from the packet’s destination IP address. The ZyWALL only forwards a
6to4 packet to the relay router using the default route if the packet’s destination is not an IP
address starting with 2002.
ZyWALL USG 20-2000 User’s Guide
47
Page 48

Chapter 2 How to Set Up Your Network
2003:1111:1111:1::1/128
1.2.3.4
2003:1111:1111:1::/64
IPv6
IPv4
Z
5.6.7.8
2004:2222:2222:2::1/128
2004:2222:2222:2::/64
Y
IPv6
WANLAN WAN
LAN
LAN1
(IPv6)
IPv6-in-IPv4
Policy Route
WAN1
(IPv4)
TUNNEL
2 You don’t need to activate the WAN1 IPv6 interface but make sure you enable the WAN1 IPv4
interface. In 6to4, the ZyWALL uses the WAN1 IPv4 interface to forward your 6to4 packets over the
IPv4 network.
Note: For 6to4, you do not need to enable IPv6 in the wan1 since the IPv6 packets will be
redirected into the 6to4 tunnel.
3 In Windows, some IPv6 related tunnels may be enabled by default such as Teredo and 6to4
tunnels. It may cause your computer to handle IPv6 packets in an unexpected way. It is
recommended to disable those tunnels on your computer.
2.8 How to Set Up an IPv6-in-IPv4 Tunnel
This example shows how to use the interface and policy route configuration screens to create an
IPv6-in-IPv4 tunnel.
Figure 26 IPv6-in-IPv4 Tunnel Example
In this example, the ZyWALLs (Z and Y) act as IPv6-in-IPv4 routers which connect the IPv4
Internet and an individual IPv6 network. This configuration example only shows the settings on
ZyWALL Z. You can use similar settings to configure ZyWALL Y.
Note: In the IPv6-in-IPv4 tunnel application, you must configure the peer gateway’s WAN
IPv4 address as the remote gateway IP.
2.8.1 Configuration Concept
After the IPv6-in-IPv4 tunnel settings are complete, IPv4 and IPv6 packets transmitted between
WAN1 and LAN1 will be handled by the ZyWALL through the following flow.
Figure 27 IPv6-in-IPv4 Tunnel Configuration Concept
2.8.2 Setting Up the IPv6-in-IPv4 Tunnel
1 Click Add in the CONFIGURATION > Network > Interface > Tunnel screen.
48
ZyWALL USG 20-2000 User’s Guide
Page 49

Chapter 2 H ow to Set Up Your Network
2 The Edit Tunnel screen appears. Select Enable.
Enter tunnel0 as the Interface Name and select IPv6-in-IPv4 as the Tunnel Mode.
Select wan1 in the Interface field in the Gateway Settings section.
Enter 5.6.7.8 as the remote gateway’s IP address. Click OK.
2.8.3 Setting Up the LAN IPv6 Interface
1 Select lan1 in the IPv6 Configuration section in the CONFIGURATION > Network > Interface
> Ethernet screen and click Edit.
2 The Edit Ethernet screen appears. Select Enable Interface and Enable IPv6.
Type 2003:1111:1111:1::1/128 in the IPv6 Address/Prefix Length field for the LAN1’s IP
address.
Enable Router Advertisement. Then click Add in the Advertised Prefix Table to add
2003:1111:1111:1::/64. The LAN1 hosts will get the network prefix through router
advertisements sent by the LAN1 IPv6 interface periodically. Click OK.
ZyWALL USG 20-2000 User’s Guide
49
Page 50

Chapter 2 How to Set Up Your Network
2.8.4 Setting Up the Policy Route
1 Go to the CONFIGURATION > Network > Routing screen and click Add in the IPv6
Configuration table.
2 The Add Policy Route screen appears. Click Create New Object to create an IPv6 address object
with the address prefix of 2003:1111:1111:1::/64.
Select Enable.
Select the address object you just created in the Source Address field.
Select any in the Destination Address field.
Select Interface as the next-hop type and then tunnel0 as the interface. Click OK.
50
ZyWALL USG 20-2000 User’s Guide
Page 51

2.8.5 Testing the IPv6-in-IPv4 Tunnel
Chapter 2 H ow to Set Up Your Network
1 Connect a computer to the ZyWALL’s LAN1.
2 Enable IPv6 support on you computer.
In Windows XP, you need to use the IPv6 install command in a Command Prompt.
In Windows 7, IPv6 is supported by default. You can enable IPv6 in the Control Panel > Network
and Sharing Center > Local Area Connection screen.
3 You should get an IPv6 IP address starting with 2003:1111:1111:1000:.
4 Use the ping -6 [IPv6 IP address] command in a Command Prompt to test whether you can
ping a computer behind ZyWALL Y. You should get a response.
2.8.6 What Can Go Wrong?
1 You don’t need to activate the WAN1 IPv6 interface but make sure you enable the WAN1 IPv4
interface. In IPv6-in-IPv4, the ZyWALL uses the WAN1 IPv4 interface to forward your 6to4 packets
to the IPv4 network.
2 In Windows, some IPv6 related tunnels may be enabled by default such as Teredo and 6to4
tunnels. It may cause your computer to handle IPv6 packets in an unexpected way. It is
recommended to disable those tunnels on your computer.
ZyWALL USG 20-2000 User’s Guide
51
Page 52

Chapter 2 How to Set Up Your Network
52
ZyWALL USG 20-2000 User’s Guide
Page 53

CHAPTER 3
LAN
WAN
Protecting Your Network
These sections cover configuring the ZyWALL to protect your network.
• Firewall on page 53
• User-aware Access Control on page 54
• Endpoint Security (EPS) on page 55
• Device and Service Registration on page 55
• Anti-Virus Policy Configuration on page 56
• IDP Profile Configuration on page 58
• ADP Profile Configuration on page 59
• Content Filter Profile Configuration on page 61
• Viewing Content Filter Reports on page 63
• Anti-Spam Policy Configuration on page 66
3.1 Firewall
The firewall controls the travel of traffic between or within zones for services using static port
numbers. Use application patrol to control services using flexible/dynamic port numbers (see
Section 5.8 on page 120 for an example). The firewall can also control traffic for NAT (DNAT) and
policy routes (SNAT). Firewall rules can use schedule, user, user groups, address, address group,
service, and service group objects. To-ZyWALL firewall rules control access to the ZyWALL itself
including management access. By default the firewall allows various types of management from the
LAN, HTTPS from the WAN and no management from the DMZ. The firewall also limits the number
of user sessions.
This example shows the ZyWALL’s default firewall behavior for WAN to LAN traffic and how stateful
inspection works. A LAN user can initiate a Telnet session from within the LAN zone and the firewall
allows the response. However, the firewall blocks Telnet traffic initiated from the WAN zone and
destined for the LAN zone. The firewall allows VPN traffic between any of the networks.
Figure 28 Default Firewall Action
ZyWALL USG 20-2000 User’s Guide 53
Page 54

Chapter 3 Protecting Your Network
3.1.1 What Can Go Wrong
• The ZyWALL checks the firewall rules in order and applies the first firewall rule the traffic
matches. If traffic is unexpectedly blocked or allowed, make sure the firewall rule you want to
apply to the traffic comes before any other rules that the traffic would also match.
• Even if you have configured the firewall to allow access for a management service such as HTTP,
you must also enable the service in the service control rules.
• The ZyWALL is not applying your firewall rules for certain interfaces. The ZyWALL only apply’s a
zone’s rules to the interfaces that belong to the zone. Make sure you assign the interfaces to the
appropriate zones. When you create an interface, there is no security applied on it until you
assign it to a zone.
3.2 User-aware Access Control
You can configure many policies and security settings for specific users or groups of users. Users
can be authenticated locally by the ZyWALL or by an external (AD, RADIUS, or LDAP)
authentication server. Here is how to have the ZyWALL use a RADIUS server to authenticate users
before giving them access.
1 Set up user accounts in the RADIUS server.
2 Set up user accounts and groups on the ZyWALL (Configuration > Object > User/Group).
3 Configure an object for the RADIUS server. Click Configuration > Object > AAA Server >
RADIUS and double-click the radius entry.
4 Then, set up the authentication method, Click Configuration > Object > Auth. Method. Double-
click the default entry. Click the Add icon.
5 Configure the ZyWALL’s security settings. The ZyWALL can use the authentication method in
authenticating wireless clients, HTTP and HTTPS clients, IPSec gateways (extended authentication),
L2TP VPN, and authentication policy.
3.2.1 What Can Go Wrong
• The ZyWALL always authenticates the default admin account locally, regardless of the
authentication method setting. You cannot have the RADIUS server authenticate the ZyWALL‘s
default admin account.
• The authentication attempt will always fail if the ZyWALL tries to use the local database to
authenticate an ext-user. An external server such as AD, LDAP or RADIUS must authenticate the
ext-user accounts.
• Attempts to add the admin users to a user group with access users will fail. You cannot put
access users and admin users in the same user group.
• Attempts to add the default admin account to a user group will fail. You cannot put the default
admin account into any user group.
54
ZyWALL USG 20-2000 User’s Guide
Page 55

3.3 Endpoint Security (EPS)
Use endpoint security objects with authentication policies or SSL VPN to make sure users’
computers meet specific security requirements before they are allowed to access the network.
1 Configure endpoint security objects (Configuration > Object > Endpoint Security > Add).
2 Configure an authentication policy to use the endpoint security objects (Configuration > Auth.
Policy > Add).
3.3.1 What Can Go Wrong
• Endpoint security checking fails if user computers do not have Sun’s Java (Java Runtime Envi-
ronment or ‘JRE’) installed and enabled with a minimum version of 1.4.
• When authentication or SSL VPN policies use multiple endpoint security objects the ZyWALL
checks users’ computers against the endpoint security objects in order. This may take awhile if
many objects need to be checked. Place the endpoint security objects that most user logins
should match higher in the list.
Chapter 3 Protecting Your Network
3.4 Device and Service Registration
This tutorial shows you how to create a myZyXEL.com account and register the ZyWALL. You can
then activate your service subscription.
1 You can directly create a myZyXEL.com account and register the ZyWALL on the Registration
screen. Click Configuration > Licensing > Registration to open the following screen. Select
new myZyXEL.com account. Fill in the fields marked in red in this screen. Click Apply to create
your account and register the device.
2 Click the Service tab. To activate or extend a standard service subscription enter your iCard’s
license key in the License Key field. The license key can be found on the reverse side of the iCard.
ZyWALL USG 20-2000 User’s Guide
55
Page 56

Chapter 3 Protecting Your Network
3.5 Anti-Virus Policy Configuration
This tutorial shows you how to configure an Anti-Virus policy.
Note: You need to first activate your Anti-Virus service license or trial. See Device and
Service Registration on page 55.
1 Click Configuration > Anti-X > Anti-Virus to display the Anti-Virus General screen. In the
Policies section click Add to display the Add Rule screen. Select Enable. In the Direction
section, you can select the From and To zones for traffic to scan for viruses. You can also select
traffic types to scan for viruses under Protocols to Scan. Click OK.
56
ZyWALL USG 20-2000 User’s Guide
Page 57

Chapter 3 Protecting Your Network
2 The policy configured in the previous step will display in the Policies section. Select Enable Anti-
Virus and Anti-Spyware and click Apply.
3.5.1 What Can Go Wrong
• The ZyWALL does not scan the following file/traffic types:
• Simultaneous downloads of a file using multiple connections. For example, when you use
FlashGet to download sections of a file simultaneously.
• Encrypted traffic. This could be password-protected files or VPN traffic where the ZyWALL is
not the endpoint (pass-through VPN traffic).
• Traffic through custom (non-standard) ports. The only exception is FTP traffic. The ZyWALL
scans whatever port number is specified for FTP in the ALG screen.
• ZIP file(s) within a ZIP file.
ZyWALL USG 20-2000 User’s Guide
57
Page 58

Chapter 3 Protecting Your Network
3.6 IDP Profile Configuration
IDP (Intrusion, Detection and Prevention) detects malicious or suspicious packets and protects
against network-based intrusions.
Note: You need to first activate your IDP service license or trial. See Device and Service
Registration on page 55.
You may want to create a new profile if not all signatures in a base profile are applicable to your
network. In this case you should disable non-applicable signatures so as to improve ZyWALL IDP
processing efficiency.
You may also find that certain signatures are triggering too many false positives or false negatives.
A false positive is when valid traffic is flagged as an attack. A false negative is when invalid traffic is
wrongly allowed to pass through the ZyWALL. As each network is different, false positives and false
negatives are common on initial IDP deployment.
You could create a new ‘monitor profile’ that creates logs but all actions are disabled. Observe the
logs over time and try to eliminate the causes of the false alarms. When you’re satisfied that they
have been reduced to an acceptable level, you could then create an ‘inline profile’ whereby you
configure appropriate actions to be taken when a packet matches a signature.
3.6.1 Procedure To Create a New Profile
To create a new profile:
1 Click Configuration > Anti-X > IDP > Profile and in the Profile Management section of this
screen, click the Add icon. A pop-up screen will appear allowing you to choose a base profile. Select
a base profile to go to the profile details screen.
Note: If Internet Explorer opens a warning screen about a script making Internet Explorer
run slowly and the computer maybe becoming unresponsive, just click No to
continue.
2 Type a new profile Name. Enable or disable individual signatures by selecting a row and clicking
Activate or Inactivate. Click OK.
58
ZyWALL USG 20-2000 User’s Guide
Page 59

Chapter 3 Protecting Your Network
3 Edit the default log options and actions.
3.7 ADP Profile Configuration
ADP (Anomaly Detection and Prevention) protects against anomalies based on violations of protocol
standards (RFCs – Requests for Comments) and abnormal traffic flows such as port scans.
You may want to create a new profile if not all traffic or protocol rules in a base profile are
applicable to your network. In this case you should disable non-applicable rules so as to improve
ZyWALL ADP processing efficiency.
You may also find that certain rules are triggering too many false positives or false negatives. A
false positive is when valid traffic is flagged as an attack. A false negative is when invalid traffic is
wrongly allowed to pass through the ZyWALL. As each network is different, false positives and false
negatives are common on initial ADP deployment.
You could create a new ‘monitor profile’ that creates logs but all actions are disabled. Observe the
logs over time and try to eliminate the causes of the false alarms. When you’re satisfied that they
have been reduced to an acceptable level, you could then create an ‘inline profile’ whereby you
configure appropriate actions to be taken when a packet matches a detection.
3.7.1 Procedure To Create a New ADP Profile
To create a new profile:
1 Click Configuration > Anti-X > ADP > Profile and in the Profile Management section of this
screen, click the Add icon. A pop-up screen will appear allowing you to choose a base profile.
Select a base profile to go to the profile details screen.
ZyWALL USG 20-2000 User’s Guide
59
Page 60

Chapter 3 Protecting Your Network
Note: If Internet Explorer opens a warning screen about a script making Internet Explorer
run slowly and the computer maybe becoming unresponsive, just click No to
continue.
2 The Traffic Anomaly screen will display. Type a new profile Name. Enable or disable individual
scan or flood types by selecting a row and clicking Activate or Inactivate. Selecting different
levels in the Sensitivity drop-down menu adjusts levels for scan thresholds and sample times. Edit
the default log options and actions by selecting a row and making a selection in the Log or Action
drop-down menus. Click OK.
3 Click the Protocol Anomaly tab. Type a new profile Name. Enable or disable individual rules by
selecting a row and clicking Activate or Inactivate. Edit the default log options and actions by
selecting a row and making a selection in the Log or Action drop-down menus. Click OK.
60
ZyWALL USG 20-2000 User’s Guide
Page 61

Chapter 3 Protecting Your Network
3.8 Content Filter Profile Configuration
Content filter allows you to control access to specific web sites or filter web content by checking
against an external database. This tutorial shows you how to configure a Content Filter profile.
Note: You need to first activate your Content Filter service license or trial to use
Commtouch or BlueCoat content filtering service. See Device and Service
Registration on page 55.
1 You will first configure a content filter profile. Click Configuration > Anti-X > Content Filter >
Filter Profile > Add to open the following screen. Enter a profile Name and select Enable
Content Filter Category Service and select desired actions for the different web page categories.
Then select the categories to include in the profile or select Select All Categories. Click Apply.
ZyWALL USG 20-2000 User’s Guide
61
Page 62

Chapter 3 Protecting Your Network
2 Click the General tab and in the Policies section click Add. In the Add Policy screen that
appears, select the Filter Profile you created in the previous step. Click OK.
3 In the General screen, the configured policy will appear in the Policies section. Select Enable
Content Filter and select BlueCoat. Then select Enable Content Filter Report Service to
collect content filtering statistics for reports. Click Apply.
62
ZyWALL USG 20-2000 User’s Guide
Page 63

3.9 Viewing Content Filter Reports
Content filtering reports are generated statistics and charts of access attempts to web sites
belonging to the categories you selected in your device content filter screen. You need to register
your iCard before you can view content filtering reports. Alternatively, you can also view content
filtering reports during the free trial (up to 30 days).
1 Go to http://www.myZyXEL.com. Fill in your myZyXEL.com account information and click Login.
Chapter 3 Protecting Your Network
2 A welcome screen displays. Click your ZyWALL’s model name and/or MAC address under
Registered ZyXEL Products (the ZyWALL 20W is shown as an example here). You can change the
descriptive name for your ZyWALL using the Rename button in the Service Management screen.
3 In the Service Management screen click Content Filter (BlueCoat) or Content Filter
(Commtouch) in the Service Name column to open the content filter reports screens.
ZyWALL USG 20-2000 User’s Guide
63
Page 64

Chapter 3 Protecting Your Network
4 In the Web Filter Home screen, click Commtouch Report or BlueCoat Report.
5 Select items under Global Reports to view the corresponding reports.
6 Select a time period in the Date Range field, either Allowed or Blocked in the Action Taken field
and a category (or enter the user name if you want to view single user reports) and click Run
Report. The screens vary according to the report type you selected in the Report Home screen.
64
ZyWALL USG 20-2000 User’s Guide
Page 65

Chapter 3 Protecting Your Network
7 A chart and/or list of requested web site categories display in the lower half of the screen.
8 You can click a category in the Categories report or click URLs in the Report Home screen to see
the URLs that were requested.
ZyWALL USG 20-2000 User’s Guide
65
Page 66

Chapter 3 Protecting Your Network
3.10 Anti-Spam Policy Configuration
This tutorial shows you how to configure an Anti-Spam policy with Mail Scan functions and DNS
Black List (DNSBL).
Note: You need to first activate your Anti-Spam service license or trial to use the Mail
Scan functions (Sender Reputation, Mail Content Analysis and Virus Outbreak
Detection). See Device and Service Registration on page 55.
1 To use the Mail Scan functions (Sender Reputation, Mail Content Analysis and Virus Outbreak
Detection) you need to enable them in the Mail Scan screen. Click Configuration > Anti-X >
Anti-Spam > Mail Scan to open this screen. Enable the desired Mail Scan functions. Click Apply.
2 To configure DNS Black List (DNSBL), click the DNSBL tab. Select Enable DNS Black List
(DNSBL) Checking. In the DNSBL Domain section click Add. Enter the DNSBL Domain for a
DNSBL service. In this example, zen.spamhaus.org is used. Click Apply.
66
ZyWALL USG 20-2000 User’s Guide
Page 67

Chapter 3 Protecting Your Network
3 Click the General tab. In the Policy Summary section, click Add to display the Add rule screen.
Select from the list of available Scan Options and click OK to return to the General screen.
4 In the General screen, the policy configured in the previous step will display in the Policy
Summary section. Select Enable Anti-Spam and click Apply.
ZyWALL USG 20-2000 User’s Guide
67
Page 68

Chapter 3 Protecting Your Network
68
ZyWALL USG 20-2000 User’s Guide
Page 69

CHAPTER 4
Create Secure Connections Across the
Internet
These sections cover using VPN to create secure connections across the Internet.
• IPSec VPN on page 69
• VPN Concentrator Example on page 71
• Hub-and-spoke IPSec VPN Without VPN Concentrator on page 73
• ZyWALL IPSec VPN Client Configuration Provisioning on page 75
• SSL VPN on page 77
• L2TP VPN with Android, iOS, and Windows on page 79
• One-Time Password Version 2 (OTPv2) on page 92
4.1 IPSec VPN
Besides using the VPN quick setup wizard to configure settings for an IPSec VPN tunnel, you can
use the Configuration > VPN > IPSec VPN screens to configure and activate or deactivate VPN
gateway and IPSec VPN connection policies. You can also connect or disconnect IPSec VPN
connections.
•Use the VPN Gateway screens to manage the ZyWALL’s VPN gateways. A VPN gateway specifies
the IPSec routers at either end of a VPN tunnel and the IKE SA settings (phase 1 settings). You
can also activate or deactivate each VPN gateway.
•Use the VPN Connection screens to specify which IPSec VPN gateway an IPSec VPN connection
policy uses, which devices behind the IPSec routers can use the VPN tunnel, and the IPSec SA
settings (phase 2 settings). You can also activate or deactivate and connect or disconnect each
VPN connection (each IPSec SA).
4.1.1 Test the VPN Connection
After you configure the VPN gateway and VPN connection settings, set up the VPN settings on the
peer IPSec router and try to establish the VPN tunnel. To trigger the VPN, either try to connect to a
device on the peer IPSec router’s LAN or click Configuration > VPN > IPSec VPN > VPN
Connection and use the VPN connection screen’s Connect icon.
4.1.2 Configure Security Policies for the VPN Tunnel
You configure security policies based on zones. The new VPN connection was assigned to the
IPSec_VPN zone. By default, there are no security restrictions on the IPSec_VPN zone, so, next,
you should set up security policies that apply to the IPSec_VPN zone.
ZyWALL USG 20-2000 User’s Guide 69
Page 70

Chapter 4 Create Secure Connections Across the Internet
4.1.3 What Can Go Wrong
If the IPSec tunnel does not build properly, the problem is likely a configuration error at one of the
IPSec routers. Log into both IPSec routers and check the settings in each field methodically and
slowly. Make sure both the ZyWALL and remote IPSec router have the same security settings for
the VPN tunnel. It may help to display the settings for both routers side-by-side.
Here are some general suggestions.
• The system log can often help to identify a configuration problem.
• If you enable NAT traversal, the remote IPSec device must also have NAT traversal enabled.
• Both routers must use the same authentication method to establish the IKE SA.
• Both routers must use the same negotiation mode, encryption algorithm, authentication
algorithm, and DH key group.
• When using manual keys, both routers must use the same encryption key and authentication
key.
• When using pre-shared keys, both routers must use the same pre-shared key.
• The ZyWALL’s local and peer ID type and content must match the remote IPSec router’s peer and
local ID type and content, respectively.
• Both routers must use the same active protocol, encapsulation, and SPI.
• If the sites are/were previously connected using a leased line or ISDN router, physically
disconnect these devices from the network before testing your new VPN connection. The old
route may have been learnt by RIP and would take priority over the new VPN connection.
• To test whether or not a tunnel is working, ping from a computer at one site to a computer at the
other.
Before doing so, ensure that both computers have Internet access (via the IPSec routers).
• It is also helpful to have a way to look at the packets that are being sent and received by the
ZyWALL and remote IPSec router (for example, by using a packet analyzer such as Wireshark).
Check the configuration for the following ZyWALL features.
• Make sure the To-ZyWALL firewall rules allow IPSec VPN traffic to the ZyWALL. IKE uses UDP port
500, AH uses IP protocol 51, and ESP uses IP protocol 50.
• The ZyWALL supports UDP port 500 and UDP port 4500 for NAT traversal. If you enable this,
make sure the To-ZyWALL firewall rules allow UDP port 4500 too.
• Make sure regular firewall rules allow traffic between the VPN tunnel and the rest of the network.
Regular firewall rules check packets the ZyWALL sends before the ZyWALL encrypts them and
check packets the ZyWALL receives after the ZyWALL decrypts them. This depends on the zone
to which you assign the VPN tunnel and the zone from which and to which traffic may be routed.
• If you set up a VPN tunnel across the Internet, make sure your ISP supports AH or ESP
(whichever you are using).
• If you have the ZyWALL and remote IPSec router use certificates to authenticate each other, You
must set up the certificates for the ZyWALL and remote IPSec router first and make sure they
trust each other’s certificates. If the ZyWALL’s certificate is self-signed, import it into the remote
IPsec router. If it is signed by a CA, make sure the remote IPsec router trusts that CA. The
ZyWALL uses one of its Trusted Certificates to authenticate the remote IPSec router’s
certificate. The trusted certificate can be the remote IPSec router’s self-signed certificate or that
of a trusted CA that signed the remote IPSec router’s certificate.
• Multiple SAs connecting through a secure gateway must have the same negotiation mode.
70
ZyWALL USG 20-2000 User’s Guide
Page 71

If you have the Configuration > VPN > IPSec VPN > VPN Connection screen’s Use Policy
Route to control dynamic IPSec rules option enabled and the VPN connection is up but VPN
traffic cannot be transmitted through the VPN tunnel, check the routing policies to see if they are
sending traffic elsewhere instead of through the VPN tunnels.
4.2 VPN Concentrator Example
A VPN concentrator uses hub-and-spoke VPN topology to combine multiple IPSec VPN connections
into one secure network. The hub routes VPN traffic between the spoke routers and itself. This
reduces the number of VPN connections to set up and maintain. Here a VPN concentrator connects
ZLD-based ZyWALLs at headquarters (HQ) and branch offices A and B in one secure network.
• Branch A’s ZyWALL uses one VPN rule to access both the headquarters (HQ) network and branch
B’s network.
• Branch B’s ZyWALL uses one VPN rule to access branch A’s network only. Branch B is not
permitted to access the headquarters network.
Figure 29 IPSec VPN Concentrator Example
Chapter 4 Create Secure Connections Across the Internet
This IPSec VPN concentrator example uses the following settings.
Branch Office A
VPN Gateway (VPN Tunnel 1):
• My Address: 10.0.0.2
• Peer Gateway Address: 10.0.0.1
VPN Connection (VPN Tunnel 1):
• Local Policy: 192.168.11.0/255.255.255.0
• Remote Policy: 192.168.1.0/255.255.255.0
• Disable Policy Enforcement
Policy Route
• Source: 192.168.11.0
ZyWALL USG 20-2000 User’s Guide
71
Page 72

Chapter 4 Create Secure Connections Across the Internet
• Destination: 192.168.12.0
• Next Hop: VPN Tunnel 1
Headquarters
VPN Gateway (VPN Tunnel 1):
• My Address: 10.0.0.1
• Peer Gateway Address: 10.0.0.2
VPN Connection (VPN Tunnel 1):
• Local Policy: 192.168.1.0/255.255.255.0
• Remote Policy: 192.168.11.0/255.255.255.0
• Disable Policy Enforcement
VPN Gateway (VPN Tunnel 2):
• My Address: 10.0.0.1
• Peer Gateway Address: 10.0.0.3
VPN Connection (VPN Tunnel 2):
• Local Policy: 192.168.1.0/255.255.255.0
• Remote Policy: 192.168.12.0/255.255.255.0
• Disable Policy Enforcement
Concentrator
• Add VPN tunnel 1 and VPN tunnel 2 to an IPSec VPN concentrator.
Firewall
• Block traffic from VPN tunnel 2 from accessing the LAN.
Branch Office B
VPN Gateway (VPN Tunnel 2):
• My Address: 10.0.0.3
• Peer Gateway Address: 10.0.0.1
VPN Connection (VPN Tunnel 2):
• Local Policy: 192.168.12.0/255.255.255.0
• Remote Policy: 192.168.1.0/255.255.255.0
• Disable Policy Enforcement
72
Policy Route
• Source: 192.168.12.0
ZyWALL USG 20-2000 User’s Guide
Page 73

Chapter 4 Create Secure Connections Across the Internet
• Destination: 192.168.11.0
• Next Hop: VPN Tunnel 2
4.2.1 What Can Go Wrong
Consider the following when using the VPN concentrator.
• The local IP addresses configured in the VPN rules should not overlap.
• The concentrator must have at least one separate VPN rule for each spoke. In the local policy,
specify the IP addresses of the networks with which the spoke is to be able to have a VPN tunnel.
This may require you to use more than one VPN rule for each spoke.
• To have all Internet access from the spoke routers go through the VPN tunnel, set the VPN rules
in the spoke routers to use 0.0.0.0 (any) as the remote IP address.
• Your firewall rules can still block VPN packets.
• If on a USG ZyWALL or ZyWALL 1050 the concentrator’s VPN tunnels are members of a single
zone, make sure it is not set to block intra-zone traffic.
4.3 Hub-and-spoke IPSec VPN Without VPN Concentrator
Here is an example of a hub-and-spoke VPN that does not use the ZyWALL’s VPN concentrator
feature. Here branch office A has a ZyNOS-based ZyWALL and headquarters (HQ) and branch office
B have ZLD-based ZyWALLs.
• Branch A’s ZyWALL uses one VPN rule to access both the headquarters (HQ) network and branch
B’s network.
• Branch B’s ZyWALL uses one VPN rule to access both the headquarters and branch A’s networks.
Figure 30 Hub-and-spoke VPN Example
This hub-and-spoke VPN example uses the following settings.
Branch Office A (ZyNOS-based ZyWALL):
Gateway Policy (Phase 1):
• My Address: 10.0.0.2
• Primary Remote Gateway: 10.0.0.1
ZyWALL USG 20-2000 User’s Guide
73
Page 74

Chapter 4 Create Secure Connections Across the Internet
Network Policy (Phase 2): Local Network: 192.168.167.0/255.255.255.0; Remote Network:
192.168.168.0~192.168.169.255
Headquarters (ZLD-based ZyWALL):
VPN Gateway (VPN Tunnel 1):
• My Address: 10.0.0.1
• Peer Gateway Address: 10.0.0.2
VPN Connection (VPN Tunnel 1):
• Local Policy: 192.168.168.0~192.168.169.255
• Remote Policy: 192.168.167.0/255.255.255.0
• Disable Policy Enforcement
VPN Gateway (VPN Tunnel 2):
• My Address: 10.0.0.1
• Peer Gateway Address: 10.0.0.3
VPN Connection (VPN Tunnel 2):
• Local Policy: 192.168.167.0~192.168.168.255
• Remote Policy: 192.168.169.0/255.255.255.0
• Disable Policy Enforcement
Branch Office B (ZLD-based ZyWALL):
VPN Gateway:
• My Address: 10.0.0.3
• Peer Gateway Address: 10.0.0.1
VPN Connection:
• Local Policy: 192.168.169.0/255.255.255.0
• Remote Policy: 192.168.167.0~192.168.168.255
• Disable Policy Enforcement
4.3.1 What Can Go Wrong
Consider the following when implementing a hub-and-spoke VPN.
74
• This example uses a wide range for the ZyNOS-based ZyWALL’s remote network, to use a
narrower range, see Section 4.3 on page 73 for an example of configuring a VPN concentrator.
• The local IP addresses configured in the VPN rules should not overlap.
• The hub router must have at least one separate VPN rule for each spoke. In the local policy,
specify the IP addresses of the hub-and-spoke networks with which the spoke is to be able to
have a VPN tunnel. This may require you to use more than one VPN rule.
ZyWALL USG 20-2000 User’s Guide
Page 75

Chapter 4 Create Secure Connections Across the Internet
• To have all Internet access from the spoke routers to go through the VPN tunnel, set the VPN
rules in the spoke routers to use 0.0.0.0 (any) as the remote IP address.
• Your firewall rules can still block VPN packets.
• If the ZLD-based ZyWALLs’ VPN tunnels are members of a single zone, make sure it is not set to
block intra-zone traffic.
• The ZyNOS based ZyWALLs don't have user-configured policy routes so the only way to get traffic
destined for another spoke router to go through the ZyNOS ZyWALL's VPN tunnel is to make the
remote policy cover both tunnels.
• Since the ZLD-based ZyWALLs automatically handle the routing for VPN tunnels, if a ZLD-based
ZyWALL ZyWALL is a hub router and the local policy covers both tunnels, the automatic routing
takes care of it without needing a VPN concentrator.
• If a ZyNOS-based ZyWALL’s remote network setting overlaps with its local network settings, set
ipsec swSkipOverlapIp to on to send traffic destined to A’s local network to A’s local network
instead of through the VPN tunnel.
4.4 ZyWALL IPSec VPN Client Configuration Provisioning
VPN configuration provisioning gives ZyWALL IPSec VPN Client users VPN rule settings
automatically.
Figure 31 IPSec VPN Configuration Provisioning Process
1 User Charlotte with the ZyWALL IPSec VPN Client sends her user name and password to the
ZyWALL.
2 The ZyWALL sends the settings for the matching VPN rule.
4.4.1 Overview of What to Do
1 Create a VPN rule on the ZyWALL using the VPN Configuration Provisioning wizard.
2 Configure a username and password for the rule on the ZyWALL.
3 On a computer, use the ZyWALL IPSec VPN Client to get the VPN rule configuration.
Now user Charlotte can access the network behind the ZyWALL through the VPN tunnel.
ZyWALL USG 20-2000 User’s Guide
75
Page 76

Chapter 4 Create Secure Connections Across the Internet
Figure 32 ZyWALL IPSec VPN Client with VPN Tunnel Connected
4.4.2 Configuration Steps
1 In the ZyWALL Quick Setu p wizard, use the VPN Settings for Configuration Provisioning
wizard to create a VPN rule that can be used with the ZyWALL IPSec VPN Client.
2 Click Configuration > Object > User/Group and create a user account for the ZyWALL IPSec
VPN Client user.
3 Then, enable Configuration Provisioning in Configuration > VPN > IPSec VPN >
Configuration Provisioning and configure it to allow the newly created user to retrieve this rule’s
settings using the ZyWALL IPSec VPN Client.
4 On the ZyWALL IPSec VPN Client, select Configuration > G et From Server.
5 Enter the WAN IP address or URL for the ZyWALL. If you changed the default HTTPS port on the
ZyWALL, then enter the new one here. Enter the user name (Login) and and password exactly as
configured on the ZyWALL or external authentication server. Click Next.
76
ZyWALL USG 20-2000 User’s Guide
Page 77

6 Click OK. The rule settings are now imported from the ZyWALL into the ZyWALL IPSec VPN Client.
4.4.3 What Can Go Wrong
Chapter 4 Create Secure Connections Across the Internet
• VPN rule settings violate the the ZyWALL IPSec VPN Client restrictions:
Check that the rule does not contain AH active protocol, NULL encryption, SHA512
authentication, or a subnet/range remote policy.
The ZyWALL IPSec VPN Client can also indicate rule violations. Check its warning screen.
Although the rule settings may be valid, whether the tunnel actually works depends on the
network environment. For example, a remote policy IP address for a server may be valid, but
the server may be down or have an actual different IP address.
• There is a login problem:
Reenter the user name (Login) and password in the ZyWALL IPSec VPN Client exactly as
configured on the ZyWALL or the external authentication server.
Check that the client authentication method selected on the ZyWALL is where the user name
and password are configured . For example, if the user name and password are configured on
the ZyWALL, then the configured authentication method should be Local.
• There’s a network connectivity problem between the ZyWALL and the ZyWALL IPSec VPN Client:
Check that the correct ZyWALL IP address and HTTPS port (if the default port was changed)
was entered.
Ping the ZyWALL from the computer on which the ZyWALL IPSec VPN Client is installed.
If there is no reply, check that the computer has Internet access.
If the computer has Internet access, contact the ZyWALL administrator.
• The entry is not activated:
Make sure that both Enable Configuration Provisioning in Configuration > VPN > IPSec
VPN > Configuration Provisioning is selected and that the entry has a yellow Status icon.
4.5 SSL VPN
SSL VPN uses remote users’ web browsers to provide the easiest-to-use of the ZyWALL’s VPN
solutions. A user just types the ZyWALL’s web address and enters his user name and password to
securely access the ZyWALL’s network. Here a user uses his browser to securely connect to network
resources in the same way as if he were part of the internal network.
ZyWALL USG 20-2000 User’s Guide
77
Page 78

Chapter 4 Create Secure Connections Across the Internet
Web Mail File Share
Web-based Application
https://
Application Server
Non-Web
LAN (192.168.1.X)
Figure 33 SSL VPN
• Click Configuration > Object > SSL Application and configure an SSL application object to
specify the type of application and the address of the local computer, server, or web site SSL
users are to be able to access.
• Click Configuration > VPN > SSL VPN > Access Privilege to configure SSL access policies.
•Use the Configuration > VPN > SSL VPN > Global Setting screen to set the IP address of the
ZyWALL (or a gateway device) on your network for full tunnel mode access, enter access
messages or upload a custom logo to be displayed on the remote user screen.
Remote users can access resources on the local network using one of the following methods:
• Using a supported web browser
Once you have successfully logged in through the ZyWALL, you can access intranet sites, web-
based applications, or web-based e-mails using one of the supported web browsers.
• Using the ZyWALL SecuExtender client
Once you have successfully logged into the ZyWALL, if the SSL VPN access policy has network
extension enabled the ZyWALL automatically loads the ZyWALL SecuExtender client program to
your computer. With the ZyWALL SecuExtender, you can access network resources, remote
desktops and manage files as if you were on the local network.
4.5.1 What Can Go Wrong
• If you uploaded a logo to show in the SSL VPN user screens but it does not display properly,
check that the logo graphic is in GIF, JPG, or PNG format. The graphic should use a resolution of
103 x 29 pixels to avoid distortion when displayed. The ZyWALL automatically resizes a graphic
of a different resolution to 103 x 29 pixels. The file size must be 100 kilobytes or less.
Transparent background is recommended.
• If users can log into the SSL VPN but cannot see some of the resource links check the SSL
application object’s configuration.
• If the user account is not included in an SSL VPN access policy, the ZyWALL redirects the user to
the user aware screen.
• Operating system and browser requirements for the remote user’s computer:
• Windows 7 (32 or 64-bit), Vista (32 or 64-bit), 2003 (32-bit), XP (32-bit), or 2000 (32-bit)
• Internet Explorer 7 and above or Firefox 1.5 and above
• Using RDP requires Internet Explorer
• Sun’s Runtime Environment (JRE) version 1.6 or later installed and enabled.
• Changing the HTTP/HTTPS configuration disconnects SSL VPN network extension sessions. Users
need to re-connect if this happens.
78
ZyWALL USG 20-2000 User’s Guide
Page 79

Chapter 4 Create Secure Connections Across the Internet
172.16.1.2
L2TP_POOL:
192.168.10.10~192.168.10.20
LAN1_SUBNET:
192.168.1.x
4.6 L2TP VPN with Android, iOS, and Windows
L2TP VPN uses the L2TP and IPSec client software included in remote users’ Android, iOS, or
Windows operating systems for secure connections to the network behind the ZyWALL.
1 L2TP VPN uses one of the ZyWALL’s IPSec VPN connections. Edit Default_L2TP_VPN_GW as
follows:
•Set My Address to the WAN interface domain name or IP address you want to use.
• Replace the default Pre-Shared Key.
2 Create a host-type address object containing the My Address IP address configured in the
Default_L2TP_VPN_GW and set the Default_L2TP_VPN_Connection’s Local Policy to use it.
3 In Configuration > VPN > L2TP VPN enable the connection and set the VPN connection L2TP
VPN uses, the L2TP client IP address pool, the authentication method, and the allowed users.
4 Configure a policy route to let remote users access resources on the network behind the ZyWALL.
• Set the policy route’s Source Address to the address object that you want to allow the remote
users to access (LAN1_SUBNET in the following example).
•Set the Destination Address to the IP address pool that the ZyWALL assigns to the remote
users (L2TP_POOL in the following example).
• Set the next hop to be the VPN tunnel you are using for L2TP.
4.6.1 L2TP VPN Example
Here a sales representative uses a laptop to securely connect to the ZyWALL’s network.
Figure 34 L2TP VPN Example
• The ZyWALL has a WAN interface with a static IP address of 172.16.1.2.
• The remote user has a dynamic public IP address and connects through the Internet.
• You configure an IP address pool object named L2TP_POOL to assign the remote users IP
addresses from 192.168.10.10 to 192.168.10.20 for use in the L2TP VPN tunnel.
• The VPN rule allows the remote user to access the LAN1_SUBNET (the 192.168.1.x subnet).
Do the following to configure the L2TP VPN example:
ZyWALL USG 20-2000 User’s Guide
79
Page 80

Chapter 4 Create Secure Connections Across the Internet
172.16.1.2
1 Click Configuration > VPN > IPSec VPN > VPN Gateway and double-click the
Default_L2TP_VPN_GW entry.
Select Enable.
Set My Address. This example uses a WAN interface with static IP address 172.16.1.2.
Set Authentication to Pre-Shared Key and configure a password. This example uses top-
secret. Click OK.
2 Click the VPN Connection tab and double-click the Default_L2TP_VPN_Connection entry.
Click Create New Object > Address and create a host type address object that contains the My
Address IP address you configured in the Default_L2TP_VPN_GW. The address object in this
example uses the WAN interface’s IP address (172.16.1.2) and is named L2TP_IFACE.
Select Enable, set Application Scenario to Remote Acces and Local Policy to L2TP_IFACE,
and click OK.
80
ZyWALL USG 20-2000 User’s Guide
Page 81

Chapter 4 Create Secure Connections Across the Internet
3 Click Configuration > VPN > L2TP VPN and then Create New Object > Address to create an
IP address pool for the L2TP VPN clients. This example uses L2TP_POOL with a range of
192.168.10.10 to 192.168.10.20. Click Create New Object > User/Group to create a user object
for the users allowed to use the tunnel. This example uses a user object named L2TP-test.
Enable the connection.
Set VPN Connection to Default_L2TP_VPN_Connection.
Set IP Address Pool to L2TP_POOL.
Select the authentication method (default in this example), and select the users that can use the
tunnel (L2TP-test in this example).
4.6.2 Configuring Policy Routing
You must also configure a policy route to let remote users access resources on the network behind
the ZyWALL.
• Set the policy route’s Source Address to the address object that you want to allow the remote
users to access (LAN_1SUBNET in this example).
•Set the Destination Address to the IP address pool that the ZyWALL assigns to the remote
users (L2TP_POOL in this example)).
• Set the next hop to be the VPN tunnel that you are using for L2TP VPN.
ZyWALL USG 20-2000 User’s Guide
81
Page 82

Chapter 4 Create Secure Connections Across the Internet
To manage the ZyWALL through the L2TP VPN tunnel, create a routing policy that sends the
ZyWALL’s return traffic back through the L2TP VPN tunnel.
•Set Incoming to ZyWALL.
•Set Destination Address to the L2TP address pool.
• Set the next hop to be the VPN tunnel that you are using for L2TP.
82
If some of the traffic from the L2TP clients needs to go to the Internet, create a policy route to send
traffic from the L2TP tunnels out through a WAN trunk.
•Set Incoming to Tunnel and select your L2TP VPN connection.
•Set the Source Address to the L2TP address pool.
ZyWALL USG 20-2000 User’s Guide
Page 83

Chapter 4 Create Secure Connections Across the Internet
•Set the Next-Hop Type to Trunk and select the appropriate WAN trunk.
4.6.3 Configuring L2TP VPN in Android
To configure L2TP VPN in an Android device, go to Menu > Settings > Wireless & networks >
VPN settings > Add VPN > Add L2TP/IPSec PSK VPN and configure as follows. The example
settings here go along with the L2TP VPN configuration example in Section 4.6.1 on page 79.
• VPN name is for the user to identify the VPN configuration.
• Set VPN server is the ZyWALL’s WAN IP address.
• Set IPSec pre-shared key is the pre-shared key of the IPSec VPN gateway the ZyWALL uses
for L2TP VPN over IPSec (top-secret in this example).
• Enable L2TP secret turn this off.
• DNS search domain leave this on.
• When dialing the L2TP VPN, the user will have to enter his account and password.
4.6.4 Configuring L2TP VPN in iOS
To configure L2TP VPN in an iOS device, go to Settings > VPN > Add VPN Configuration > L2TP
and configure as follows. The example settings here go along with the L2TP VPN configuration
example in Section 4.6.1 on page 79.
• Description is for the user to identify the VPN configuration.
• Server is the ZyWALL’s WAN IP address.
• Account is the user’s account for using the L2TP VPN (L2TP-test in this example).
• RSA SecurID leave this off.
• Password is the password for the user’s account.
ZyWALL USG 20-2000 User’s Guide
83
Page 84

Chapter 4 Create Secure Connections Across the Internet
• Secret is the pre-shared key of the IPSec VPN gateway the ZyWALL uses for L2TP VPN over
IPSec (top-secret in this example).
• Send All Traffic leave this on.
• Proxy leave this off.
4.6.5 Configuring L2TP VPN in Windows
The following sections cover how to configure L2TP in remote user computers using Windows 7,
Vista, or XP. The example settings here go along with the L2TP VPN configuration example in
Section 4.6.1 on page 79.
4.6.5.1 Configuring L2TP in Windows 7 or Windows Vista
Do the following to establish an L2TP VPN connection.
Create a Connection Object
1 Open the Network and Sharing Center screen.
Windows 7: click Start > Control Panel > View network status and tasks > Set up a new
connection or network.
Windows Vista: click Start > Network > Network and Sharing Center > Set up a connection
or network).
2 Select Connect to a workplace and click Next.
3 Select Use my Internet connection (VPN).
4 For the Internet address enter the My Address domain name or WAN IP address of the VPN
gateway the ZyWALL is using for L2TP VPN (172.16.1.2 in this example).
4a For the Destination name, specify a name to identify this VPN (L2TP to ZyWALL for
example).
4b Select Don’t connect now, just set it up so I can connect later and click Next.
5 Enter your ZyWALL user name and password and click Create.
84
ZyWALL USG 20-2000 User’s Guide
Page 85

Chapter 4 Create Secure Connections Across the Internet
Windows 7 Windows Vista
6 Click Close.
Configure the Connection Object
1 In the Network and Sharing Center screen, click Connect to a network. Right-click the L2TP
VPN connection and select Properties.
2 In Windows 7, click Security and set the Type of VPN to Layer 2 Tunneling Protocol with
IPsec (L2TP/IPSec). Then click Advanced settings.
In Windows Vista, click Networking. Set the Type of VPN to L2TP IPSec VPN and click IPSec
Settings.
3 Select Use preshared key for authentication and enter the pre-shared key of the VPN gateway
entry the ZyWALL is using for L2TP VPN (top-secret in this example). Click OK to save your changes
and close the Advanced Properties screen. Then click OK again to close the Properties window.
ZyWALL USG 20-2000 User’s Guide
85
Page 86

Chapter 4 Create Secure Connections Across the Internet
4 If a warning screen about data encryption not occurring if PAP or CHAP is negotiated, click Yes.
When you use L2TP VPN to connect to the ZyWALL, the ZyWALL establishes an encrypted IPSec
VPN tunnel first and then builds an L2TP tunnel inside it. The L2TP tunnel itself does not need
encryption since it is inside the encrypted IPSec VPN tunnel.
Connect Using L2TP VPN
1 In the Network and Sharing Center screen, click Connect to a network, select the L2TP VPN
connection and click Connect to display a login screen. Enter the user name and password of your
ZyWALL user account and click Connect.
2 A window appears while the user name and password are verified. The Connect to a network
screen shows Connected after the L2TP over IPSec VPN tunnel is built.
86
ZyWALL USG 20-2000 User’s Guide
Page 87

Chapter 4 Create Secure Connections Across the Internet
L2TP to ZyWALL
3 After the connection is up a connection icon displays in your system tray. Click it and then the L2TP
connection to open a status screen.
4 Click the L2TP connection’s View status link to open a status screen.
5 Click Details to see the address that you received is from the L2TP range you specified on the
ZyWALL (192.168.10.10-192.168.10.20 in the example).
6 Access a server or other network resource behind the ZyWALL to make sure your access works.
4.6.5.2 Configuring L2TP in Windows XP
In Windows XP, first issue the following command from the Windows command prompt (including
the quotes) to make sure the computer is running the Microsoft IPSec service.
net start "ipsec services".
Then do the following to establish an L2TP VPN connection.
1 Click Start > Control Panel > Network Connections > New Connection Wizard.
ZyWALL USG 20-2000 User’s Guide
87
Page 88

Chapter 4 Create Secure Connections Across the Internet
2 Click Next in the Welcome screen.
3 Select Connect to the network at my workplace and click Next.
4 Select Virtual Private Network connection and click Next.
5 Type L2TP to ZyWALL as the Company Name.
6 Select Do not dial the initial connection and click Next.
88
ZyWALL USG 20-2000 User’s Guide
Page 89

Chapter 4 Create Secure Connections Across the Internet
172.16.1.2
7 Enter the domain name or WAN IP address configured as the My Address in the VPN gateway
configuration that the ZyWALL is using for L2TP VPN (172.16.1.2 in this example).
8 Click Finish.
9 The Connect L2TP to ZyWALL screen appears. Click Properties > Security.
10 Click Security, select Advanced (custom settings) and click Settings.
11 Select Optional encryption (connect even if no encryption) and the Allow these protocols
radio button. Select Unencrypted password (PAP) and clear all of the other check boxes. Click
OK.
ZyWALL USG 20-2000 User’s Guide
89
Page 90

Chapter 4 Create Secure Connections Across the Internet
12 Click IPSec Settings.
13 Select the Use pre-shared key for authentication check box and enter the pre-shared key used
in the VPN gateway configuration that the ZyWALL is using for L2TP VPN. Click OK.
14 Click Networking. Select L2TP IPSec VPN as the Type of VPN. Click OK.
90
ZyWALL USG 20-2000 User’s Guide
Page 91

Chapter 4 Create Secure Connections Across the Internet
15 Enter the user name and password of your ZyWALL account. Click Connect.
16 A window appears while the user name and password are verified.
17 A ZyWALL-L2TP icon displays in your system tray. Double-click it to open a status screen.
18 Click Details to see the address that you received from the L2TP range you specified on the
ZyWALL (192.168.10.10-192.168.10.20).
ZyWALL USG 20-2000 User’s Guide
91
Page 92

Chapter 4 Create Secure Connections Across the Internet
OTP PIN
SafeWord 2008
Authentication Server
File
Email
Web-based
Server
Server
Application
*****
19 Access a server or other network resource behind the ZyWALL to make sure your access works.
4.6.6 What Can Go Wrong
The IPSec VPN connection must:
• Be enabled
• Use transport mode
• Not be a manual key VPN connection
•Use Pre-Shared Key authentication
• Use a VPN gateway with the Secure Gateway set to 0.0.0.0 if you need to allow L2TP VPN
clients to connect from more than one IP address.
Disconnect any existing L2TP VPN sessions before modifying L2TP VPN settings. The remote users
must make any needed matching configuration changes and re-establish the sessions using the
new settings.
4.7 One-Time Password Version 2 (OTPv2)
Two-factor authentication requires a user to provide two kinds of identification. Purchase the
ZyWALL OTPv2 One-Time Password System for strong two-factor authentication for Web
Configurator, Web access, SSL VPN, and ZyXEL IPSec VPN client user logins. For each login a user
must use his ZyWALL OTPv2 token to generate a new OTP password and use it along with his
normal account user name and password (the second kind of identification). An attacker cannot reuse an OTP password that was already used for login because it is no longer valid. The system
contains SafeWord 2008 authentication server software, hardware OTPv2 tokens, and software
OTPv2 tokens for Windows computers and Android and iOS mobile devices.
Figure 35 OTPv2 Example
92
Here is an overview of how to use OTP. See the ZyWALL OTPv2 support note for details.
ZyWALL USG 20-2000 User’s Guide
Page 93

1 Install the SafeWord 2008 authentication server software on a computer.
2 Create user accounts on the ZyWALL and in the SafeWord 2008 authentication server.
3 Import each ZyWALL OTPv2 token’s database file (located on the included CD) into the server.
4 Assign users to ZyWALL OTPv2 tokens on the server.
5 Configure the SafeWord 2008 authentication server as a RADIUS server in the ZyWALL’s
Configuration > Object > AAA Server screens.
6 Configure the appropriate authentication method object to use the SafeWord 2008 authentication
server RADIUS server object.
7 Configure Auth. Policy and VPN to use the authentication method object.
8 Give the ZyWALL OTPv2 tokens to the assigned users.
9 A user presses his ZyWALL OTPv2 token’s button to generate a password to enter in the Login
screens’ One-Time Password field.
4.7.1 What Can Go Wrong
Chapter 4 Create Secure Connections Across the Internet
• Users cannot log in if they try to re-use a password that they have already used to log in. Users
must generate a new password for each login.
• Authentication fails if the SafeWord 2008 authentication server goes down, loses its network
connection, or is too busy. Users can try again a little later.
ZyWALL USG 20-2000 User’s Guide
93
Page 94

Chapter 4 Create Secure Connections Across the Internet
94
ZyWALL USG 20-2000 User’s Guide
Page 95

CHAPTER 5
Connection
BWM
BWM
Outbound
Inbound
LAN1
Managing Traffic
These sections cover controlling the traffic going through the ZyWALL.
• How to Configure Bandwidth Management on page 95
• How to Configure a Trunk for WAN Load Balancing
• How to Use Multiple Static Public WAN IP Addresses for LAN-to-WAN Traffic on page 104
• How to Use Device HA to Backup Your ZyWALL on page 105
• How to Configure DNS Inbound Load Balancing on page 110
• How to Allow Public Access to a Web Server on page 112
• How to Manage Voice Traffic on page 114
• How to Limit Web Surfing and MSN to Specific People on page 120
5.1 How to Configure Bandwidth Management
Bandwidth management is very useful when applications are competing for limited bandwidth.
Connection and Packet Directions
Bandwidth management looks at the connection’s direction from the interface it was initiated on to
the interface it goes out. The connection initiator sends outbound traffic and receives inbound
traffic. The ZyWALL controls each flow’s bandwidth as it goes out through an interface or VPN
tunnel. For example, a LAN1 to WAN connection is initiated from LAN1 and goes to the WAN.
Figure 36
• Outbound traffic goes from a LAN1 device to the WAN. The ZyWALL applies bandwidth
management before sending the packets out a WAN interface.
• Inbound traffic comes back from the WAN to the LAN1 device. The ZyWALL applies bandwidth
management before sending the traffic out a LAN1 interface.
You can set outbound and inbound guaranteed and maximum bandwidths for an application.
LAN1 to WAN Connection and Packet Directions
ZyWALL USG 20-2000 User’s Guide 95
Page 96

Chapter 5 Managing Traffic
5.1.1 Bandwidth Allocation Example
Say a 10-person office has WAN1 connected to a 50 Mbps downstream and 5 Mbps upstream VDSL
line and you want to allocate bandwidth for the following:
• SIP: Up to 10 simultaneous 100 Kbps calls guaranteed
• Video conferencing: Up to 10 simultaneous 128 Kbps Skype video calls guaranteed
• Video streaming: up to 10 simultaneous 256 Kbps sessions
• HTTP: Internet access including downloading files for 10 users
• SMTP: 10 users sending email
• POP3: 10 users receiving email
• FTP: 10 users uploading and downloading files
Here is an example of allocating the any to WAN connection’s inbound and outbound packet flows.
Enable Maximize Bandwidth Usage (Max B.U.) on a packet flow to set no limit on it and let it use
any available bandwidth on the out-going interface.
Tab le 11 50 Mbps / 5 Mbps Connection Any to WAN Bandwidth Allocation Example
PRIORITY AND APPLICATION
1 SIP 1000/2000 1000/2000
2 Video conferencing 1280/3840 1280/3840
3 Video streaming 2560/3584 *
4 HTTP 10240/46080 *
4 SMTP * 2048/Max B.U.
4 POP3 10240/Max B.U. *
5 FTP 10240/46080 792/3072
Total guaranteed bandwidth: 35560 Kbps 5120 Kbps
GUARANTEED K / MAXIMUM K OR MAX B.U.
INBOUND OUTBOUND
* This application does not usually generate enough traffic in this direction to require management.
5.1.2 Setting the Interface’s Bandwidth
Use the Configuration > Interface screens to set the WAN1 interface’s upstream (egress)
bandwidth to be equal to (or slightly less than) what the connected device can support. This
example uses 5120 Kbps.
5.1.3 SIP Bandwidth Management
The most effective way to ensure the quality of SIP calls is to go to the Configuration > BWM
screen and enable BWM and select Enable Highest Bandwidth Priority for SIP Traffic. See the
following section if you prefer to configure specific bandwidth management rules for SIP instead.
5.1.4 SIP Any-to-WAN and WAN-to-Any Bandwidth Management Example
• Manage SIP traffic going to WAN1 from users on the LAN or DMZ.
96
ZyWALL USG 20-2000 User’s Guide
Page 97

Chapter 5 Managing Traffic
Inbound: 1000/2000 kbps
Outbound: 1000/2000 kbps
BWM
BWM
• Inbound and outbound traffic are both guaranteed 1000 kbps and limited to 2000 kbps.
Figure 37 SIP Any-to-WAN Guaranteed / Maximum Bandwidths Example
1 In the Configuration > BWM screen, click Add.
2 In the Add Policy screen, select Enable and type SIP Any-to-WAN as the policy’s name.
Leave the incoming interface to any and select wan1 as the outgoing interface.
Select App Patrol Service and sip as the service type.
Set the inbound and outbound guaranteed bandwidth to 1000 (kbps) and maximum bandwidth to
2000 kbps and priority 1. Click OK.
Note: Use App Patrol Service for the services classified by the ZyWALL’s IDP packet
inspection signatures. Use Service Object for pre-defined services.
3 Repeat the steps above to create another policy named SIP WAN-to-Any for calls coming in from
the SIP server on the WAN. It is the same as the SIP Any-to-WAN policy, but with the directions
reversed (WAN-to-Any instead of Any-to-WAN).
5.1.5 HTTP Any-to-WAN Bandwidth Management Example
• Set inbound guaranteed and maximum rates as the local users on the LAN and DMZ will probably
download more than they upload to the Internet.
• Set fourth highest priority (4) for the HTTP traffic in both directions.
ZyWALL USG 20-2000 User’s Guide
97
Page 98

Chapter 5 Managing Traffic
Inbound: 10240 kbps guaranteed
Outbound:
BWM
46080 kbps maximum
Bandwidth not managed
Figure 38 HTTP Any-to-WAN Bandwidth Management Example
1 In the Configuration > BWM screen, click Add.
2 In the Add Policy screen, select Enable and type HTTP Any-to-WAN as the policy’s name.
Leave the incoming interface to any and select wan1 as the outgoing interface.
Select App Patrol Service and http as the service type.
Set the guaranteed inbound bandwidth to 10240 (kbps) and set priority 4. Set the maximum to
46080 (kbps). Set the outbound priority to 4. Click OK.
98
ZyWALL USG 20-2000 User’s Guide
Page 99

5.1.6 FTP WAN-to-DMZ Bandwidth Management Example
Inbound: 792 kbps guaranteed
Outbound: 5120 kbps guaranteed
BWM
BWM
10240 kbps maximum
2048 kbps maximum
Suppose the office has an FTP server on the DMZ. Here is how to limit WAN1 to DMZ FTP traffic so
it does not interfere with SIP and HTTP traffic.
• Allow remote users only 2048 kbps inbound for downloading from the DMZ FTP server but up to
10240 kbps outbound for uploading to the DMZ FTP server.
• Set the fifth highest priority (5) for the FTP traffic.
Figure 39 FTP WAN-to-DMZ Bandwidth Management Example
Chapter 5 Managing Traffic
1 In the Configuration > BWM screen, click Add.
2 In the Add Policy screen, select Enable and type FTP WAN-to-DMZ as the policy’s name.
Select wan1 as the incoming interface and dmz as the outgoing interface.
Select App Patrol Service and ftp as the service type.
Set inbound guaranteed bandwidth to 792 kbps, priority 5, and maximum 2048 kbps.
Set outbound guaranteed bandwidth to 5120 kbps, priority 5, and maximum 10240 kbps. Click
OK.
ZyWALL USG 20-2000 User’s Guide
99
Page 100

Chapter 5 Managing Traffic
BWM
Outbound: 50 Mbps
BWM
Inbound: 50 Mbps
5.1.7 FTP LAN-to-DMZ Bandwidth Management Example
FTP traffic from the LAN1 to the DMZ can use more bandwidth since the interfaces support up to 1
Gbps connections, but give it lower priority and limit it to avoid interference with other traffic.
• Limit both outbound and inbound traffic to 50 Mbps.
• Set fifth highest priority (5) for the FTP traffic.
Figure 40 FTP LAN-to-DMZ Bandwidth Management Example
100
ZyWALL USG 20-2000 User’s Guide
 Loading...