

Page 1

P-2812HNU(L)-Fx Series
Quick Start Guide
802.11n Wireless VDSL2 VoIP
Combo WAN IAD
Firmware Version 3.10
Edition 1, 3/2011
DEFAULT LOGIN DETAILS
IP Address: http://192.168.1.1
Username: Admin account: admin
Password: Admin account: 1234
User account: user
User account: 1234
www.zyxel.com
C
2011 ZyXEL Communications Corporation
Page 2
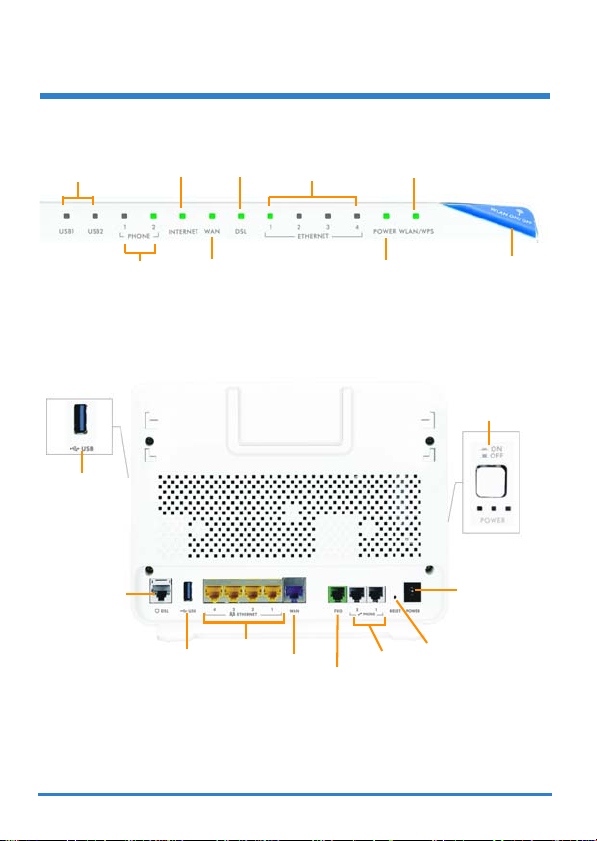
Device Panels
Front
USB1,2
LEDS
LED LED
DSLINTERNET
LEDS
WLAN/WPSETHERNET 1‐4
LED
Back
USB
PORT
PHONE1,2 WAN
LEDS
DSL
PORT
USB
PORT
LED
ETHERNET
PORT 1‐4
WAN
FXO
PORT
PORT
(
P-2812HNUL-Fx only)
2
POWER
LED
PHONE
PORT 1,2
RESET
BUTTON
WLAN/WPS
BUTTON
ON/OFF
BUTTON
POWER
Page 3

Requirements
Make sure you have the following things before you start:
• INTERNET ACCESS: You need an Internet account with an ISP
(Internet Service Provider) and information such as your user name,
password, and so on.
• VoIP ACCOUNT: If you wish to make phone calls over the Internet,
you need the account information provided by your VoIP service
provider (the company that lets you make phone calls over the
Internet).
• 3G account: if you want to access the Internet through a 3G
netw o rk. Th e P-2812HNU(L)-Fx Series uses this 3G connection as
your WAN or a backup when the DSL/Ethernet WAN connection
fails.
• WEB BROWSER: Internet Explorer 6.0 and later versions, with
JavaScript enabled, or Mozilla Firefox 3 and later versions, or Safari
2.0 and later versions. The browser will be used to access the
Internet and/or access the P-2812HNU(L)-Fx’s Web Configurator.
3
Page 4
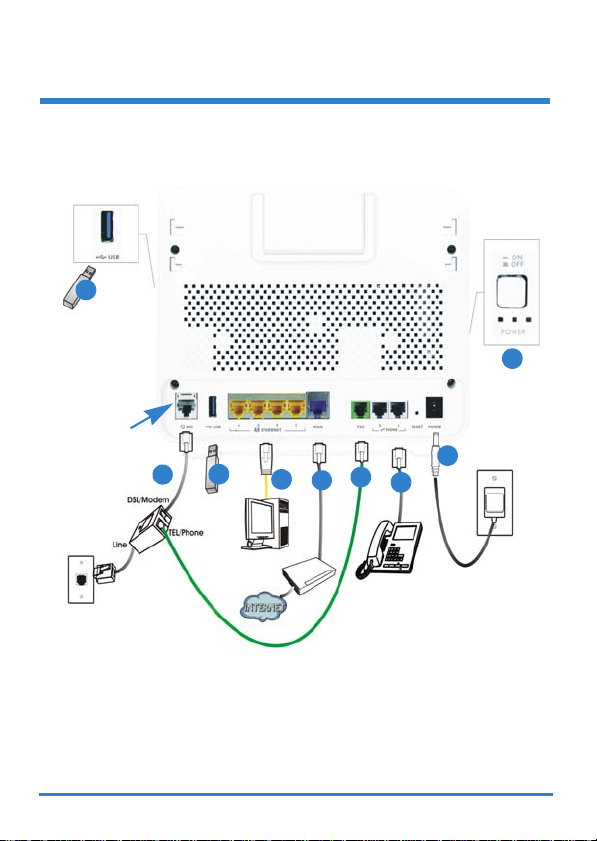
Hardware Connections
3
RJ-11 port for
P-2812HNU(L)-F1
RJ-45 port for
P-2812HNU(L)-F3
1a
3
1b
4
7
4
2
6
5
44
Page 5

1. Do one of the following for your Internet connection:
a. DSL: For P-2812HNU(L)-F1, the port is RJ-11; for P-2812HNU(L)-
F3, the port is RJ-45. Use a telephone wire to connect this port to
a telephone jack (or the DSL/MODEM jack on a splitter, if you
have one).
b. WAN: If you have a DSL router or modem already installed in your
network, use an Ethernet cable to connect this port to an
Ethernet jack in the modem with Internet access.
2. FXO (for “L” models only): You need a splitter to use the FXO port.
Use a PSTN line cable to connect the TEL (or PHONE) jack on a
splitter to this port.
3. USB 2.0: There are two USB ports on your P-2812HNU(L)-Fx Series,
one is at the back panel and one is at the side panel. You can do the
following:
a. Use a USB cable (not provided) to connect a USB device
(version 2.0 or lower) such as USB hard drive or printer for file or
printer sharing.
b. Insert a 3G adapter to access the Internet wirelessly via a 3G
network. The P-2812HNU(L)-Fx Series uses this 3G WAN
connection as a backup when the DSL/Ethernet WAN connection
fails.
4. ETHERNET: If you want a wired connection to the P-2812HNU(L)-Fx
Series, use an Ethernet cable to connect a computer to one of these
ports for initial configuration and/or Internet access.
5. PHONE: To make calls over the Internet, use a telephone cable (and
any telephone adaptor provided with your P-2812HNU(L)-Fx Series)
to connect a telephone to the PHONE 1 or PHONE 2 port. If you only
have one telephone, you should use PHONE 1.
5
Page 6

6. Use the power adaptor provided with your P-2812HNU(L)-Fx Series
to connect an appropriate power source to this socket.
7. Push the POWER button to the ON position.
Look at the LEDs (lights) on the front panel of the P-2812HNU(L)-Fx
Series:
• The POWER light blinks during start-up and stays on once the P2812HNU(L)-Fx Series is ready.
• The ETHERNET light turns on if the corresponding ETHERNET port
is properly connected and it blinks when there is traffic. If you do not
connect a computer correctly to any of these ports, the ETHERNET
lights will not turn on.
• The WLAN/WPS light stays on and green when the wireless LAN is
ready.The light will not turn on if the wireless connection is not
activated. It is blue when WPS configured.
• The DSL light will stay on if a physical DSL connection exists.
• The WAN light stays on if a physical Ethernet connection to the WAN
exists. It blinks when transmitting data.
• The INTERNET light is green when Internet access is available. It
blinks when transmitting data.
• The PHONE lights stay on when your SIP account is registered and
they blink if the receiver is off the hook.
• The USB light(s) turn on when there is a USB device (printer or
memory stick) or a 3G adapter connected to the P-2812HNU(L)-Fx
Series and blinks when transmitting data.
If the POWER light does not turn on during start up, try turning the P-2812HNU(L)-
Fx Series off, check the connections, wait a few seconds and then turn it back on. If
the problem persists, you may have a hardware problem and you need to contact
your vendor.
66
Page 7

Internet Access Setup
• If you are using a DSL connection and you have Internet access, the
DSL and INTERNET lights will be on.
• If you are using an Ethernet WAN connection and you have Internet
access, the WAN and INTERNET lights will be on.
Open your web browser and go to http://www.zyxel.com. You may be
prompted to enter your username and password when attempting to browse.
• If the DSL or WAN lights are not on, try turning the P-2812HNU(L)-
Fx Series off, check the connections, wait a few seconds and then
turn it back on. If the DSL or WAN lights are still not on, contact your
service provider.
• If the DSL or WAN lights are on, but the INTERNET light is off, you
may need to enter your Internet access configuration using the Web
Configurator - see page 10.
Setting Up a Wireless Connection
If you want to set up a wireless connection using the P-2812HNU(L)-Fx
Series, you can use the wireless SSID (network name) and the
encryption key located in the back panel.
If you wish to use WPS (Wi-Fi Protected Setup), please refer to the
User’s Guide.
Setting Up a Wireless Connection using the
Information on the Label
The wireless function on your device is disabled by default. Press the P2812HNU(L)-Fx Series’ WLAN ON/OFF at the top panel for 1 second to
turn this function on or off.
7
Page 8

To add a wireless client to the network, use the settings found in the
back panel of the P-2812HNU(L)-Fx Series, such as the following
example:
SSID: SecureWirelessNetwork
WPA2-PSK: 7WC3R7TVKWK3R
1. Right-click the wireless adapter icon which appears in the bottom
right of your computer monitor. Click View Available Wireless
Networks.
2. Select the P-2812HNU(L)-Fx Series’ SSID name and click Connect
(A). The SSID “SecureWirelessNetwork” is given here as an
example.
A
88
Page 9

3. You are prompted to enter a password. Enter the encryption key
(WPA-PSK) found in the back panel of the P-2812HNU(L)-Fx Series
and click Connect.
4. You may have to wait several minutes while your computer connects
to the wireless network.
5. You should now be securely connected wirelessly to the P2812HNU(L)-Fx Series.
#If you cannot connect wirelessly to the P-2812HNU(L)-Fx Series, check that
you have selected the correct SSID and entered the correct security key. If
that does not work, ensure that the WLAN/WPS LED on the front panel is
turned on.
Making Phone Calls
Follow these directions to make calls over the Internet.
1. To dial a SIP number, press the numbers on your phone’s keypad to
make the call.
2. To call regular telephone numbers, use your VoIP service provider’s
dialing plan.
9
Page 10

3. For call forward service, contact your service provider to know if they
support this feature.
4. To receive a call through the P-2812HNU(L)-Fx Series, the other
party must have your SIP number and a SIP account of their own.
The Web Configurator
The Web Configurator is a web browser tool that allows you to configure
the P-2812HNU(L)-Fx Series. The computer and the P-2812HNU(L)-Fx
Series need to be in the same IP address range to use this tool.
1. Open your browser and enter http://192.168.1.1 (the P-2812HNU(L)Fx Series' default IP address).
2. For administrator login, enter the default username “admin” and
password “1234”.
3. Click Login.
#If the login screen does not open, make sure you allow web browser pop-up
windows, JavaScript and Java permissions. Your computer should also be
set to get an IP address automatically from a DHCP server. See your User’s
Guide for more information.
1010
Page 11

4. If the INTERNET light is off, manually configure the Internet
connection. Click Network Setting > Broadband, then click on the
Edit icon of the connection you want to configure (EthernetWAN,
ADSL or VDSL).
5. Manually enter the information provided by your ISP. Click Apply,
wait for the INTERNET light to turn on and then try browsing to http://
www.zyxel.com. For more information check the Broadband section
in the User’s Guide.
• To configure wireless access, go to Network Setting > Wireless.
• To configure the USB File Sharing feature, go to Network Setting
> Home Networking > File Sharing.
• To set up WPS using the Web Configurator, go to Network
Setting > Wireless > WPS.
Procedure to View a Product’s Certification(s)
1. Go to www.zyxel.com.
2. Select your product from the drop-down list b ox on the ZyXEL
home page to go to that product's page.
3. Select the certification you wish to view from this page.
For more information, please refer to the User’s Guide on the provided CD or at the
www.zyxel.com download library.
Was this guide helpful? Send your comments to techwriters@zyxel.com.tw
11
Page 12

www.zyxel.com
Declaration of Conformity
We, ZyXEL Communications Corp., located at No.6, Innovation Rd II, Science-Park, Hsin-Chu,
300, Taiwan, declare under our sole responsibility that the product:
Product information
Product Name : VDSL2 VoIP IAD
Model Number :
Produced by
Company Name : ZyXEL Communications Corporation
Company Add. : No. 6, Innovation Road II, Science-Park, Hsin-Chu, 300, Taiwan
to which this declaration relates, is in conformity with the following standards or other
normative documents:
EN 301 489-17 V2.1.1: 2009
EN 301489-1 V1.8.1: 2008
EN 61000-3-2: 2006
EN 61000-3-3: 2008
EN 55022: 2006+A1: 2007
EN 300328 V1.7.1 (2006-10)
Safety EN 60950-1: 2006+A11: 2009
Following the provisions of 2004/108/EC; 92/31/EEC Directive; 93/68/EEC, 99/5/EEC ,
LVD 2006/95/EC, and ErP 2009/125/EC..
In accordance with Annex III of the Directive 1999/5/EC.
The TCF-File is located at:
Company Name : ZyXEL Communications Czech s.r.o.
Company Address : Modranska 621, 143 01 Praha 4, Czech Republic
Person is responsible for marking this declaration:
P-2812HNUL-F1, P-2812HNU-F1, P-2812HN-F1, P-2812HNL-F1,
P-2812HUL-F1, P-2812HL-F1, P-2812HNUL-F3, P-2812HNU-F3,
P-2812HN-F3, P-2812HNL-F3, P-2812HUL-F3, P-2812HL-F3
EN 50385: 2002
COMMISSION REGULATION (EC)
No 1275/2008
COMMISSION REGULATION (EC)
No 278/2009
Milan Baran VP Operations
Name (Full Name) Position/ Tit le
2011-03-14
Date Legal Signature
1/1
1212
 Loading...