

Page 1
P-2812HNU-51c
Dual WAN VDSL2 IAD with
802.11n Wireless
Firmware V1.02
Edition 1, 06/2010
DEFAULT LOGIN DETAILS
IP Address: 192.168.1.1
Username: Admin account: admin
User account: user
Password: Admin account: 1234
User account: user
www.zyxel.com
Copyright 2010
ZyXEL Communications Corporation
Page 2
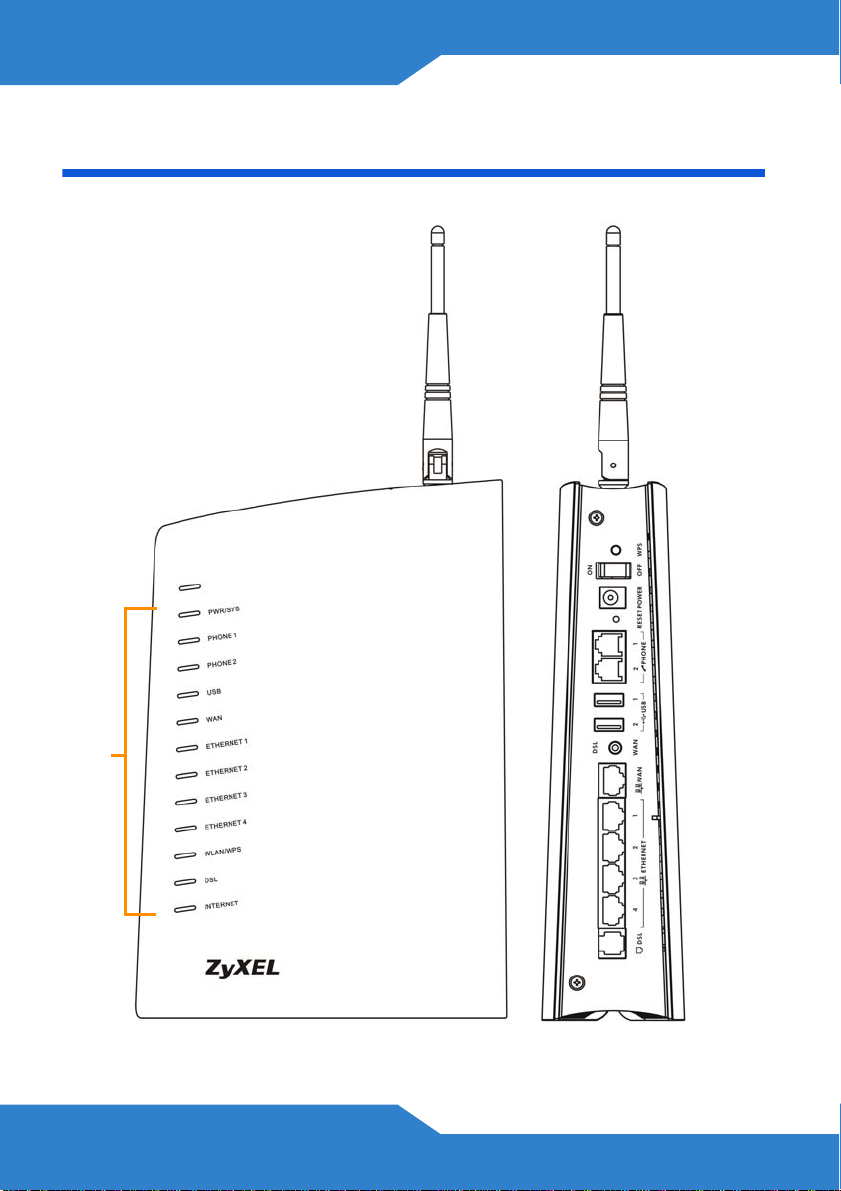
Device Panels
S
WPS
ON/OFF
POWER
RESET
PHONE
PORTS
USB PORT
LEDS
2
DSL/WAN
WAN PORT
ETHERNET
PORTS
DSL PORT
Page 3
Overview
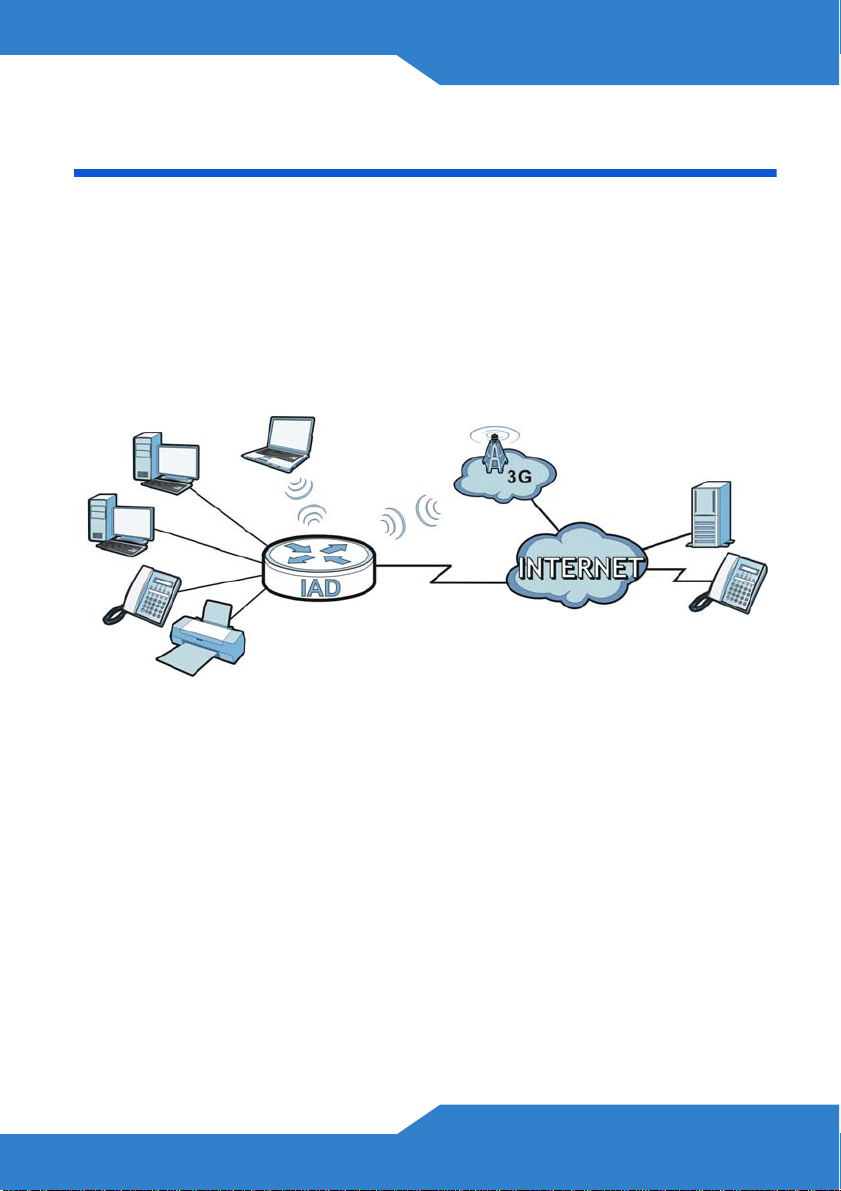
The P-2812HNU-51c is a router which combines high-speed VDSL/
ADSL Internet access, a built-in switch, a firewall and high-speed
wireless networking capability. The P-2812HNU-51c comes with two
phone ports for making calls over the Internet (Voice over IP or VoIP). It
also has two USB 2.0 ports for a 3G WAN connection via a 3G wireless
card and/or sharing files via a USB compatible storage device. The P2812HNU-51c can also function as a print server.
Requirements
Make sure you have the following things before you start.
• Internet access - account information provided by your ISP, such as
user name, password, and so on.
• VoIP account - You need the account information provided by your
VoIP service provider (the company that lets you make phone calls
over the Internet).
• 3G account - if you want to access the Internet through a 3G
network. The P-2812HNU-51c uses this 3G connection as a
backup when the DSL or Ethernet WAN connection fails.
3
Page 4
• Internet Explorer 6.0 and later versions, with JavaScript en abled, or
Mozilla Firefox 3 and later versions or Safari 2.0 and later versions.
Hardware Connections
Remove the P-2812HNU-51c’s plastic cover before using it.
4
Page 5

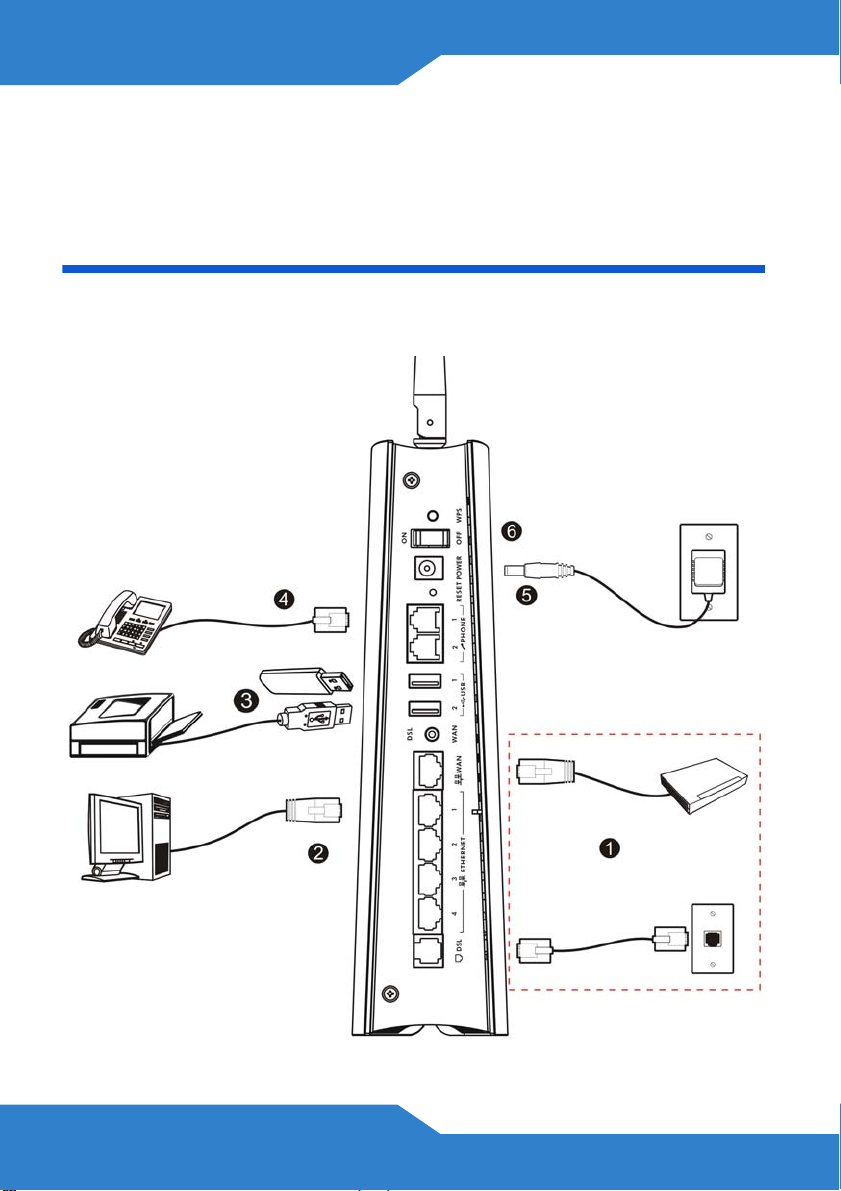
1. Do one of the following for your Internet connection:
a. DSL: Use a telephone wire to connect this port to a telephone jack
(or the DSL or MODEM jack on a splitter, if you have one). Make
sure the DSL/WAN switch is set to the DSL side.
b. WAN: If you have a DSL router or modem already in your network
or you want to use a cable modem or optical network terminal/unit
(ONT/ONU), push the DSL/W AN switch to the WAN side and use
an Ethernet cable to connect this port to an Ethernet jack with
Internet access.
2. ETHERNET: Use an Ethernet cable to connect a computer to one of
these ports for initial configuration and/or Internet access.
3. USB 2.0: Connect a USB (version 2.0 or lower) memory stick or a
USB hard drive for file sharing, or connect a 3G wireless card for
accessing the Internet through a 3G network. You can also use a
USB cable (not provided) to connect a USB printer (version 2.0 or
lower) to this port. The P-2812HNU-51c automatically detects the
USB device. Use a USB extension cable if the stick is too big to fit.
4. PHONE: Use a telephone cable (and any telephone adaptor provided
with your P-2812HNU-51c) to connect a telephone to the PHONE 1
or PHONE 2 port. If you only have one telephone, you should use
port 1.
5. Use the power adaptor provided with your P-2812HNU-51c to
connect an appropriate power source to this socket.
6. Push the power button to the on position.
Check the LEDs
Look at the LEDs (lights) on the rear panel of the P-2812HNU-51c.
5
Page 6

• The PWR/SYS light blinks during start-u p and
is green once the P-2812HNU-51c is ready.
• An ETHERNET light turns on if the
corresponding ETHERNET port is properly
connected. An Ethernet port’s light blinks
when the P-2812HNU-51c is sending or
receiving data through it.
• The WLAN/WPS light stays green when the
wireless LAN is ready. It blinks when the P2812HNU-51c is sending/receiving data
through the wireless LAN.
• The DSL light stays on if a physical DSL
connection exists and blinks when
transmitting data.
The WAN light stays on if this port is properly
connected and blinks when transmitting data.
The INTERNET light is green when Internet
access is available.
• The PHONE lights stay on when your SIP
account is registered and they blink if the
receiver is off the hook.
• The USB light turns on when there is a USB
device connected to the P-2812HNU-51c and
blinks when transmitting data.
If no lights are on, check your connections. Make sure that
you have the power adaptor connected to the P-2812HNU51c and plugged in to an appropriate power source. Make
sure the power source is turned on. Turn the P-2812HNU51c off, wait for a few seconds and turn it back on. If the
LEDs are still off, contact your local vendor.
6
Page 7

Set Up a Wireless Network
To set up a wireless network you need at least one wireless network
card/adapter.
• If you have a desktop computer, use either a wireless USB adapter
or a wireless PCI adapter.
• If you have a laptop, use either a wireless USB adapter or a
wireless CardBus card. These are built into many laptops.
There is no wireless security enabled on the P-2812HNU-51c by default.
If you do not set wireless security, anyone within transmission range
could use your P-2812HNU-51c to access your network and the Internet.
See the User’s Guide for how to configure wireless security settings.
Setting Up a Secure Wireless Network with
WPS
If your wireless devices display the WPS logo, you
can use Wi-Fi Protected Setup (WPS) to add
wireless devices to your wireless network. If your
wireless devices do not display the WPS logo, go to
Connecting Wirelessly to your P-2812HNU-51c on page 9 to have your
wireless devices join the P-2812HNU-51c’s wireless network using the
Windows wireless configuration tool.
The P-2812HNU-51c supports two WPS methods for creating a secure
connection.
• Push Button Configuration - create a secure wireless network
simply by pressing the P-2812HNU-51c’s physical WPS button.
See Push Button Configuration on page 8.
7
Page 8

• PIN Configuration - create a secure wireless network by entering
your wireless device’s PIN (Personal Identification Number) into the
configuration screen of the P-2812HNU-51c. See your User’s
Guide for more information.
You mu st use the same method on the P-2812HNU-51c and the wireless
client.
If no wireless security is enabled on the P-2812HNU-51c, the P2812HNU-51c automatically changes to use WPA-PSK/WPA2-PSK
mixed mode and generates a pre-shared key when you use WPS.
Push Button Configuration
1. Place a WPS-enabled device that is installed in your system and
supports the WPS Push Button method within range of the P2812HNU-51c.
2. Press the WPS button on the P-2812HNU51c’s rear panel for five seconds.
3. Use the WPS-enabled device’s WPS button. It
can be either a button in the utility or a physical
button. See the device’s documentation if you
cannot locate the WPS button. It doesn’t
matter which button is pressed first. You must
press the second button within two minutes of
pressing the first one.
4. The P-2812HNU-51c and the wireless device establish a secure
connection. This can take up to two minutes.
5. Congratulations! Your computer is now ready to connect to the
Internet wirelessly through your P-2812HNU-51c.
8
Page 9

Connecting Wirelessly to your P-2812HNU-51c
Manually configure wireless devices to join the P-2812HNU-51c’s
wireless network. If you didn’t configure the P-2812HNU-51c’s wireless
settings, use the wireless SSID (network name) on the P-2812HNU51c’s rear panel. If you have used WPS to set up a secure wireless
network, check the SSID and security key in the Network > Wireless
LAN > General screen after logging into the web configurator. The
connection procedure is shown here using Windows XP as an example.
1. Right-click the wireless adapter icon which appears in the bottom
right of your computer monitor. Click View Available Wireless
Networks.
2. Select the P-2812HNU-51c’s SSID name and click Connect (A). The
SSID “SecureWirelessNetwork” is given here as an example.
A
9
Page 10

3. You are prompted to enter a password. Enter it and click Connect.
4. You may have to wait several minutes while your computer connects
to the wireless network.
5. You should now be securely connected wirelessly to the P-2812HNU51c.
Congratulations! Your computer is now ready to connect to the Internet
wirelessly through your P-2812HNU-51c.
If you cannot connect wirelessly to the P-2812HNU-51c,
check you have selected the correct SSID and entered the
correct security key. If that does not work, ensure your
wireless network adapter is enabled by clicking on the
wireless adapter icon and clicking Enable. See the User’s
Guide for more suggestions.
Using Your Phones
Follow these directions to make calls over the Internet.
10
Page 11

• To dial a SIP number that only uses numbers (for example,
“12345”), dial the number on your phone’s keypad. You can also set
up a speed-dial entry, if you want. See the User's Guide for
instructions.
• To dial a SIP number that uses letters, set up a speed-dial entry
first. See the User's Guide for instructions. Then, dial the speed-dial
number to make the call.
• T o call regular telephone numbers, use your V oIP service provider’s
dialing plan.
• To receive a call through the P-2812HNU-51c, the other party must
have your SIP number and a SIP account of their own.
The Flash Key
You can invoke the supplementary services by using the flash key.
After pressing the flash key, if you do not issue the sub-command before
the default sub-command timeout (2 seconds) expires or issue an invalid
sub-command, the current operation will be aborted.
USA Flash Key Commands
Command
Flash Put a current call on hold to place a second call. Afte r
Flash *98# Transfer the call to another phone.
Subcommand
Description
the second call is successful, press the flash key again
to have a three-way conference call.
Put a current call on hold to answer an incoming call.
11
Page 12

European Flash Key Commands
Command
Flash Put a current call on hold to place a second call.
Flash 0 Drop the call presently on hold or reject an incoming call
Flash 1 Disconnect the current phone connection and answer
Flash 2 1. Switch back and forth between two calls.
Flash 3 Create three-way conference connection.
Flash *98# Transfer a call to another phone.
Subcommand
Description
Switch back to the call (if there is no second call).
which is waiting for answer.
the incoming call or resume with caller presently on
hold.
2. Put a current call on hold to answer an incoming call.
3. Separate the current three-way conference call into
two individual calls (one is on-line, the other is on hold).
Phone Functions Summary
Keys Function Description
*98# Call transfer Transfer a call to another phone.
*66# Call return Place a call to the last person who called you.
#### Internal Call Call the phone(s) connected to the P-2812HNU-51c.
*95# Enable Do
Not Disturb
#95# Disable Do
Not Disturb
Use these to set your phone not to ring when someone calls
you.
Turn the Do Not Disturb function off.
12
Page 13

Keys Function Description
*41# Enable Call
Waiting
#41# Disable Call
Waiting
Use these to allow you to put a call on hold when you are
answering another.
Turn the call waiting function off.
USB File Sharing
In order to start file sharing you need to:
• Connect your USB 2.0 file sharing device. See Hardware
Connections.
• Browse to your files using the IP address of the P-2812HNU-51c.
The P-2812HNU-51c automatically recognizes the USB device which is
connected to the USB port and makes it available for sharing.
Browse to the USB File Share
1. In Windows Explorer’s Address bar type a double backslash “\\”
followed by the IP address of the P-2812HNU-51c (192.168.1.1 is the
default) and hit [ENTER].
13
Page 14

2. Enter the default system user name and password in the window
prompt that appears and hit OK.
3. The files on the USB file sharing device connected to the P-
2812HNU-51c are now part of your file structure and you can manage
those files just like any other files on your computer.
If the password authentication screen does not display or
you see the following error message, make sure the file
sharing feature is enabled on the P-2812HNU-51c by logging
to the web configurator and clicking USB Services > File
Sharing.
Refer to the User’s Guide for a complete description of this feature.
14
Page 15

Log into the Web Configurator
You only need to use this section if you want to configure the WAN,
WLAN, VoIP or other advanced settings.
1. Open your browser and enter https://192.168.1.1 or http://
192.168.1.1 (the P-2812HNU-51c's default IP address) as the
address.
2. For administrator login, enter username admin and password 1234
(default). Only administrators can configure the SIP account settings.
For user login, enter user as the username and user as the
password. Click Login.
If the login screen does not open, make sure you allow web
browser pop-up windows, JavaScripts and Java
permissions. Your computer should be also set to get an IP
address automatically from a DHCP server. See the
appendices in your User’s Guide for more information.
15
Page 16

See your User's Guide for how to use the VoIP > SIP screen to set up
your VoIP account if the INTERNET light is green but the PHONE lig ht is
off.
If the PHONE light is on, skip to Using Your Phones on page 10 to see
how to make calls through the Internet.
See your User’s Guide for how to use the Network > WAN screens to
set up the WAN connection:
• If the DSL/WAN switch is set to DSL and the DSL light is on but
the INTERNET light is off.
• If the DSL/WAN switch set to WAN and the WAN light is on but
the INTERNET light is off.
• If you want to have the P-2812HNU-51c use 3G as your W AN or
as a backup when the DSL or Ethernet WAN connection fails.
How to View a Product’s Certification(s)
1. Go to www.zyxel.com.
2. Select your product from the drop-down list box on the ZyXEL
home page to go to that product's page.
3. Select the certification you wish to view from this page.
16
 Loading...