

Page 1

ZyXEL NBG-415N
Draft 802.11n Wireless Broadband
Router
Quick Start Guide
Version 1.00
10/2006
Edition 1
Table of Contents
ENGLISH 1
DEUTSCH 13
ESPAÑOL 27
FRANÇAIS 41
ITALIANO 55
РУССКИЙ 69
SVENSKA 83
繁體中文
97
Copyright © 2006 ZyXEL Communications Corporation. All rights reserved
Page 2

ENGLISH
ENGLISH
Introduction
The NBG-415N allows more than one computer on your
network to share an Internet connection. You can also use the
NBG-415N to set up a wireless network.
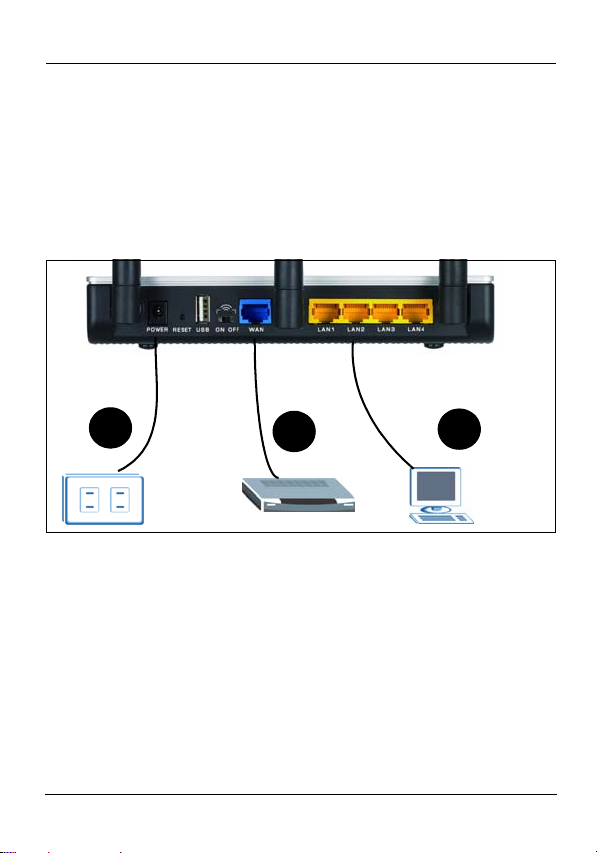
1 Hardware Connections
3
1LAN: Use an Ethernet cable to connect a computer to a
LAN port for Internet access.
2WAN: Use the Ethernet cable that came with your DSL/
cable modem to connect to the Ethernet port on the DSL/
cable modem.
3POWER: Use only the included power adaptor to connect
the POWER socket to an appropriate power source.
2
1
1
Page 3

ENGLISH
1.1 Check the LEDs (Lights)
•The PWR LED turns on.
•The WLAN LED turns steady on.
•The WAN and/or LAN LEDs turn on and sometimes blink if
the corresponding ports are properly connected.
V If none of the LEDs are on, unplug the device
and check your hardware connections again.
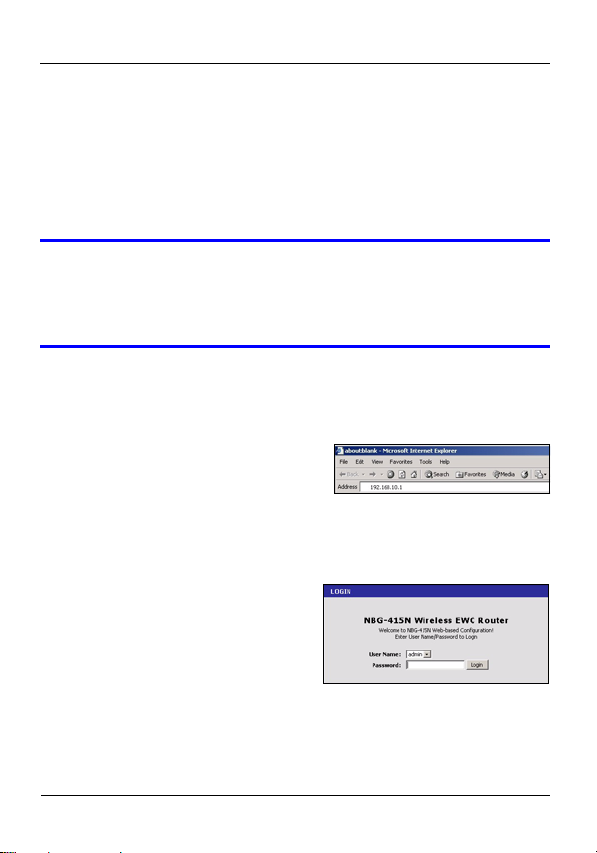
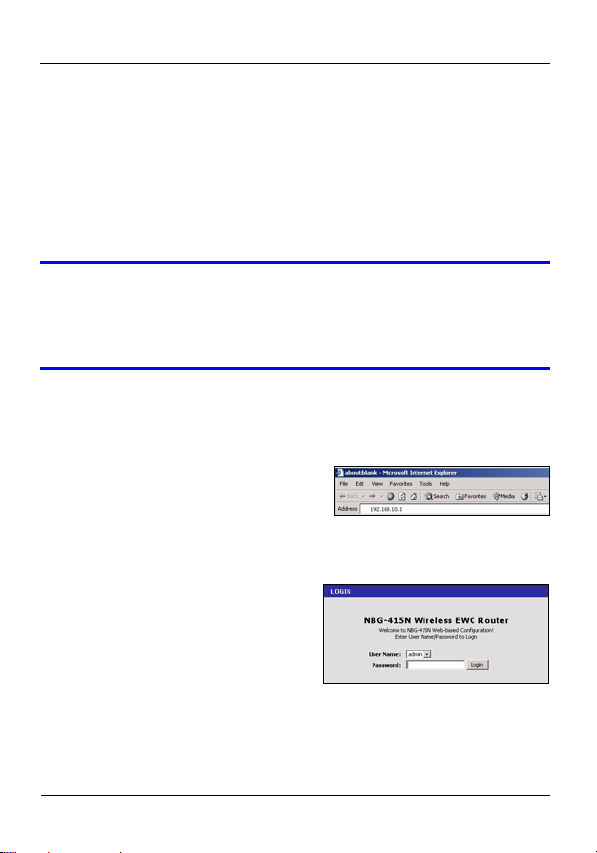
2 Access the NBG-415N
1 Start your web browser. Enter
192.168.10.1 (the default
management LAN IP address)
in the Location or Address field. Press [ENTER].
2 The login screen appears.
Select admin in the User
Name field, enter “1234” (the
default password) and click
Login to log in.
2
Page 4
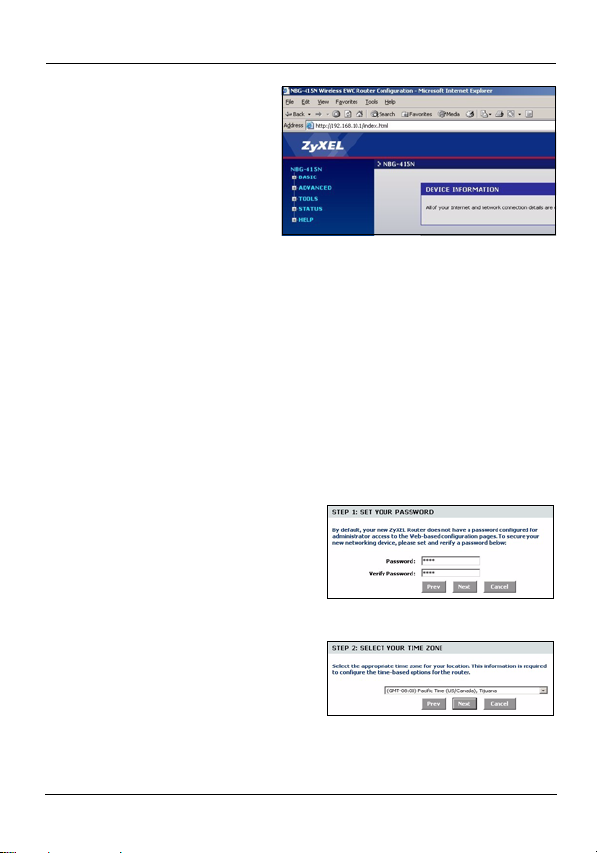
ENGLISH
3 The main web
configurator screen
displays.
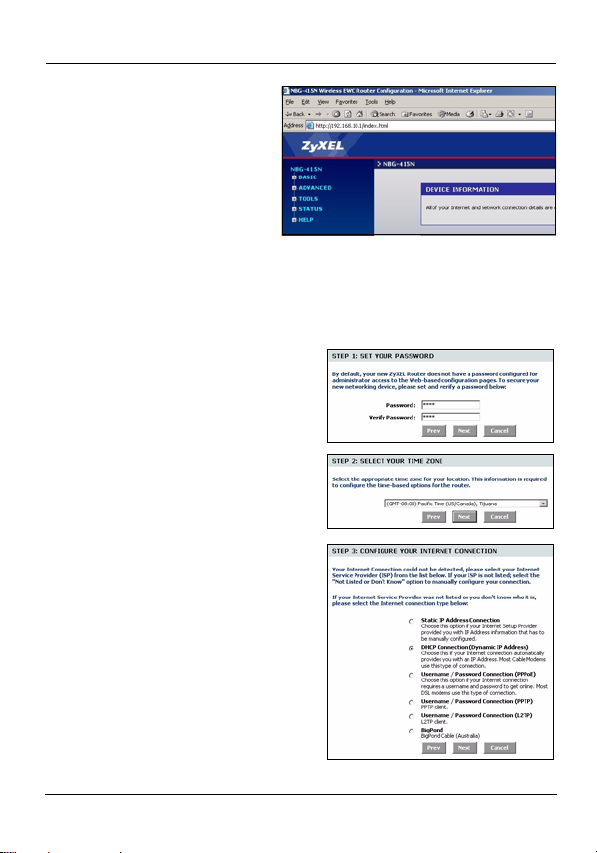
3 Internet Wizard
Setup
1 Click START > WIZARD > Launch Internet Connection
Setup Wizard to display the first wizard screen. Click
Next in each screen to continue. The NBG-415N may
have already detected your Internet connection.
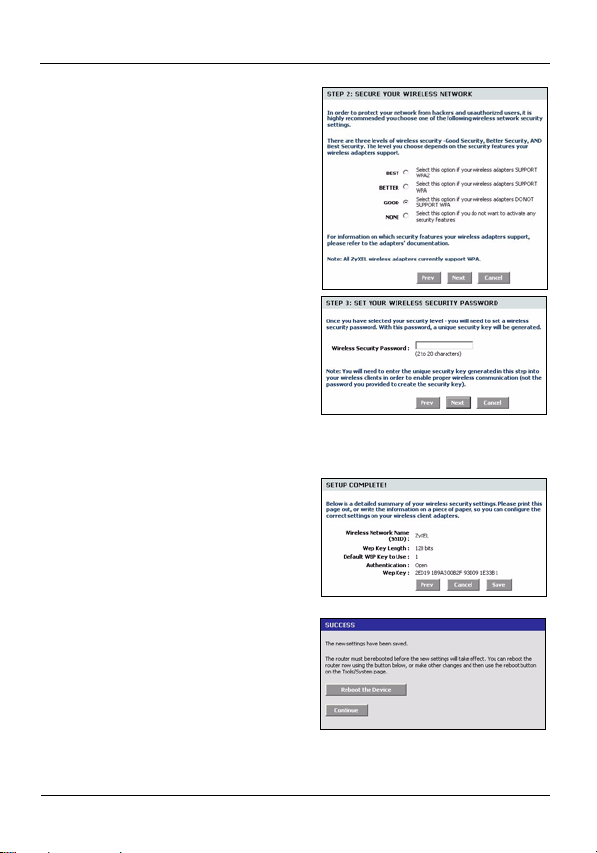
2 Change the login password
in the second wizard screen.
The password is case
sensitive.
3 Select the time zone for your
geographical location.
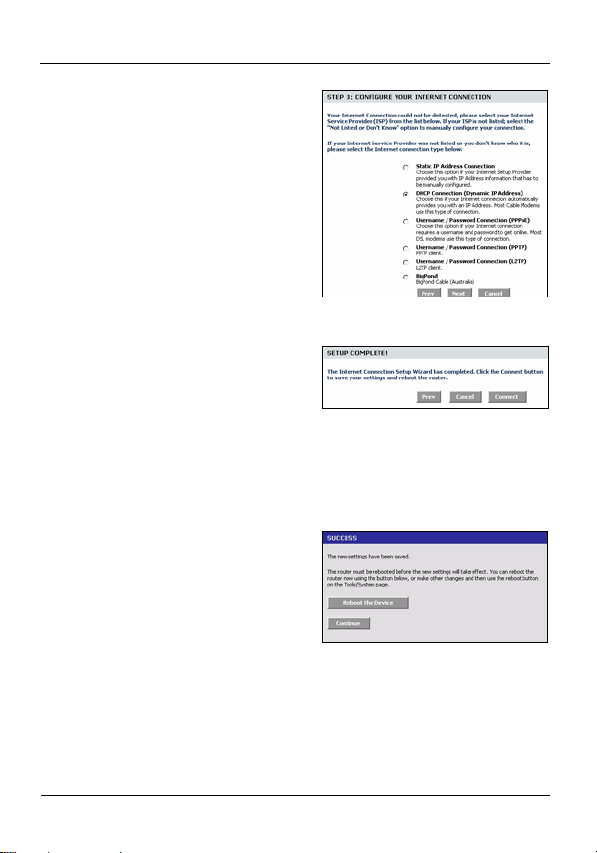
4 Select your Internet
connection type.
5 The next wizard screen
varies depending on the
connection type you have
selected. Configure the
fields with the information
provided by your ISP and
click Next.
3
Page 5
ENGLISH
6 In the last wizard screen,
click Connect to save the
settings to the NBG-415N.
7 Click Reboot the Device to
restart the NBG-415N and make the changes take effect.
Wait a couple of minutes for
the NBG-415N to finish
rebooting before accessing it
again.
8 Test your Internet
connection. Launch your
web browser and enter any web site address for example,
http://www.zyxel.com).
V If you cannot access the Internet, check that you
have entered your Internet account information
correctly in the wizard screens.
4 Wireless LAN Wizard Setup
1 Click START > WIZARD > Launch Wireless Security
Setup Wizard to display the first wizard screen. Click
Next in each screen to continue.
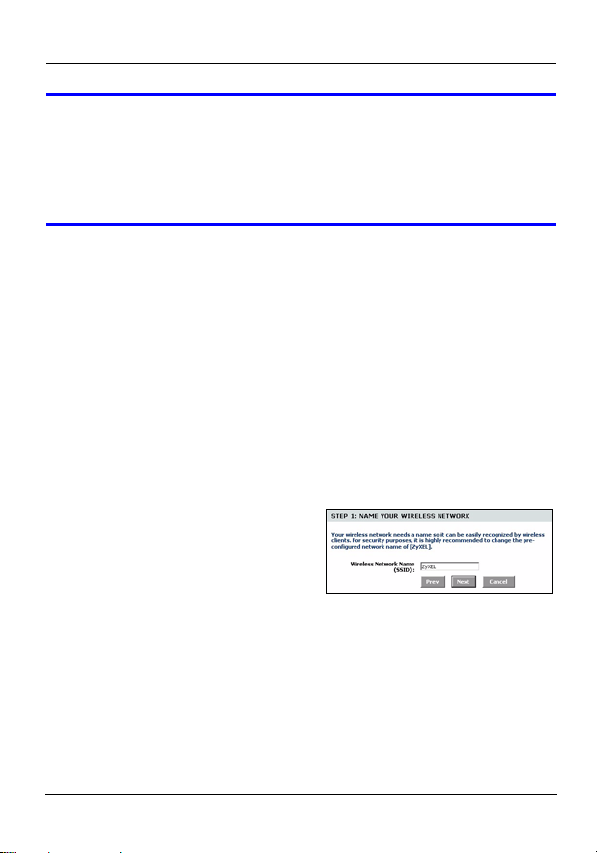
2 In the Wireless Network
Name field, enter a
descriptive name for
identifying the wireless
4
Page 6
ENGLISH
network. To connect to this wireless network, wireless
clients must associate to this ID. .
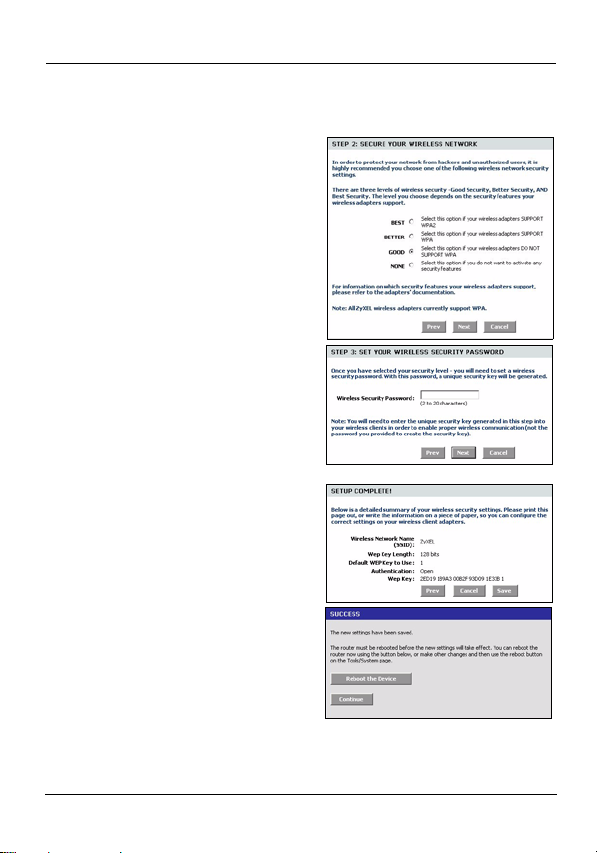
3 Follow the on-screen
instruction and select a
wireless security mode.
4 The next screen displays if
you enable a wireless
security mode. Follow the
on-screen instruction to
enter a WEP key or
password.
5 Check your wireless LAN
settings in this screen and
click Save to save the
settings to the NBG-415N.
6 Click Reboot the Device to
restart the NBG-415N and
make the changes take
effect.
7 Wait a couple of minutes for
the NBG-415N to finish
rebooting before accessing it again.
5
Page 7

ENGLISH
5 Wireless Connection Setup using
Windows® Connect Now
With Windows® Connect Now, you can transfer wireless
settings on your NBG-415N to a USB memory stick and then
save the settings to the wireless client computer(s). This
allows you to easily set up a wireless LAN. To take advantage
of this feature, you need:
• A USB memory stick with at least 300K of available memory.
• Windows XP with Service Pack 2 (SP2).
Follow the steps below to set up a wireless LAN using
Windows® Connect Now.
1 Click Start > Control Panel
and double-click Wireless
Network Setup Wizard.
2 The first wizard screen
displays. Click Next in each
screen to continue.
6
Page 8

ENGLISH
3 Select Set up a new wireless
network to configure a new
wireless network.
4 In the Network name (SSID) field,
specify a unique name to identify
your wireless LAN.
5 Select Automatically assign a
network key to have Windows
create a security key.
6 Select Use WPA encryption
instead of WEP for data
encryption.
7 Select Use a USB Flash drive to
set up a wireless network.
8 Connect the USB drive to your
computer and specify the drive
letter in the Flash drive field.
7
Page 9

ENGLISH
9 Follow the instructions on the
screen.
10This screen displays when you
have successfully set up a secure
wireless network. Click Finish.
11From a wireless computer, test
your wireless LAN connection to
the NBG-415N.
Troubleshooting
1 None of the LEDs turn on when the NBG-415N is on.
• Make sure that you use the included power adaptor to
connect to the NBG-415N and that it is plugged into an
appropriate power source.
• Check all cable connections.
• If the LEDs still do not turn on, you may have a hardware problem. In this case, you should contact your
local vendor.
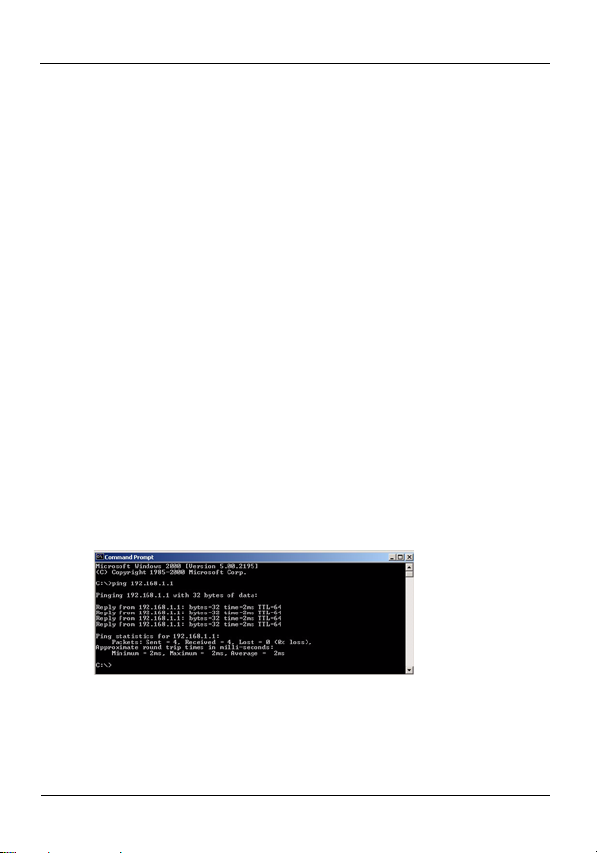
2 I cannot access the NBG-415N from the LAN.
• Check the cable connection between the NBG-415N
and your computer or hub. Refer to Hardware Connec-
tions for details.
8
Page 10

ENGLISH
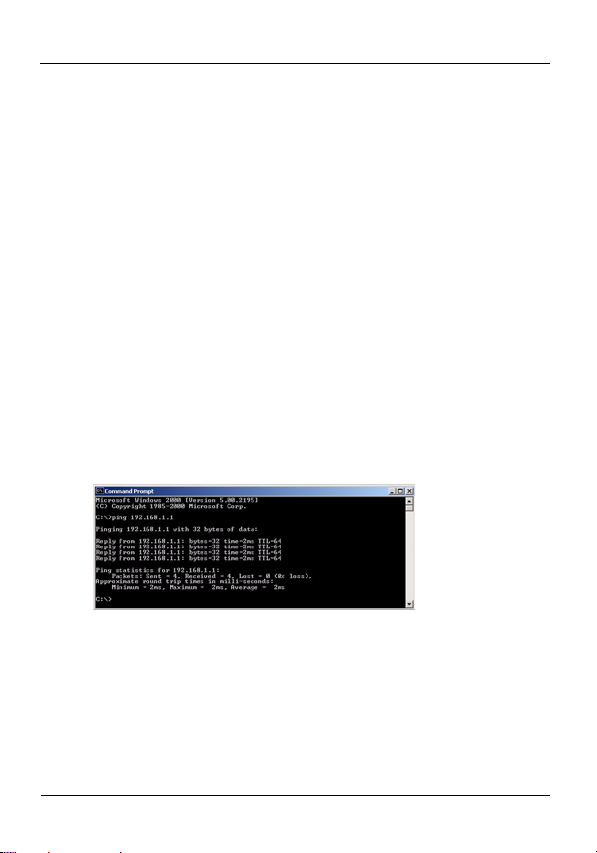
• Ping the NBG-415N from a LAN computer.
• Make sure your computer Ethernet card is installed
and functioning properly.
3 I cannot ping any computer on the LAN.
• If the LAN LEDs are off, check the cable connections
between the NBG-415N and your LAN computers.
• Verify that the IP address and subnet mask of the
NBG-415N and the LAN computers are in the same IP
address range.
4 I cannot access the Internet.
• Check the NBG-415N’s connection to the broadband
modem.
• Turn off and on to restart both the broadband modem
and the NBG-415N. If you are using a cable modem,
you must first turn off your cable modem and wait for
about two to three minutes before you connect the
cable modem to the NBG-415N.
• The WAN IP is provided after the ISP verifies the MAC
address, host name or user ID. Find out the verification
method used by your ISP and configure the corresponding fields in the Internet wizard screens or the
advanced WAN screen.
9
Page 11

ENGLISH
• Check that you have entered your Internet account
information correctly in the wizard screens.
5 I cannot connect to the wireless LAN via the NBG-415N.
• Make sure the ON OFF switch is in the ON position to
enable the wireless LAN on the NBG-415N.
• Make sure the wireless client is set to use the same
wireless LAN and security settings as the NBG-415N.
• Make sure the wireless client is within transmission
range of the NBG-415N.
• Make sure there is no radio interference (for example,
from other wireless LANs or cordless phones).
Set Up Your Computer’s IP Address
This section shows you how to set your Windows NT/2000/XP
computer to automatically get an IP address. Refer to your
User’s Guide for IP address configuration for other Windows
and Macintosh operating systems.
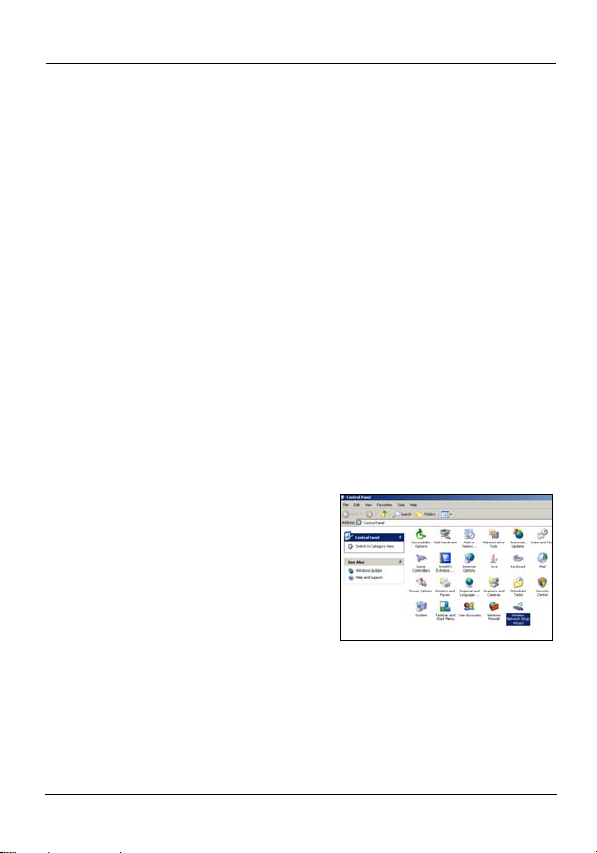
1 In Windows XP, click start, Control Panel. In Windows
2000/NT, click Start, Settings, Control Panel.
2 In Windows XP, click Network Connections. In Windows
2000/NT, click Network and Dial-up Connections.
10
Page 12
ENGLISH
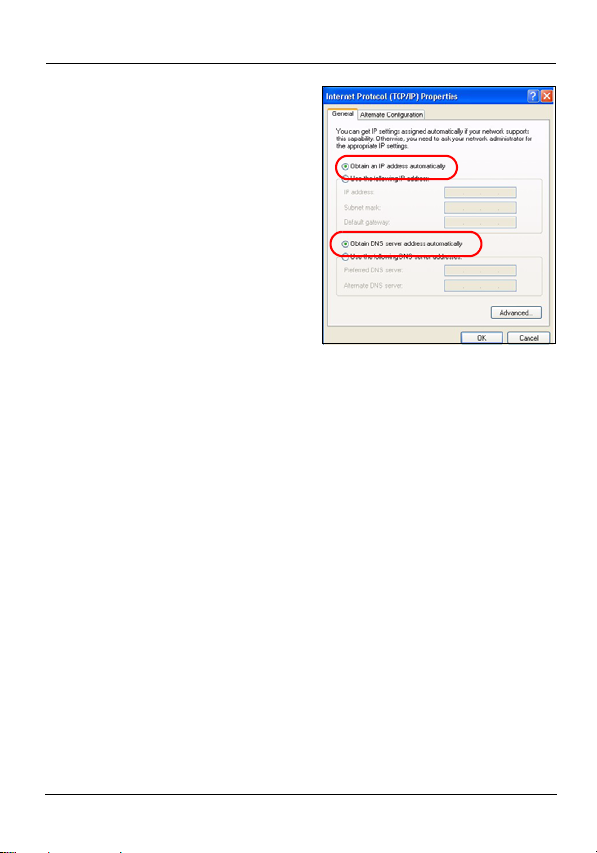
3 Right-click Local Area
Connection and then click
Properties.
4 Select Internet Protocol
(TCP/IP) (under the
General tab in Win XP) and
click Properties.
5 The Internet Protocol TCP/
IP Properties screen opens
(the General tab in
Windows XP).
6 Select the Obtain an IP
address automatically and Obtain DNS server address
automatically options.
7 Click OK to close the Internet Protocol (TCP/IP)
Properties window.
8 Click Close (OK in Windows 2000/NT) to close the Local
Area Connection Properties window.
9 Close the Network Connections screen.
View Your Product’s Certifications
1 Go to www.zyxel.com.
2 Select your product from the drop-down list box on the
ZyXEL home page to go to that product's page.
3 Select the certification you wish to view from this page.
11
Page 13

ENGLISH
12
Page 14

DEUTSCH
H
EUTSC
Einführung
Der NBG-415 ermoglicht den gleichzeitigen Internetzugang
mehrerer Computer in Ihrem Netzwerk.Sie konnen den NBG415N auch verwenden, um ein Drahtlosnetzwerk aufzubauen.
1 Anschließen der Hardware
3
1LAN: Schließen Sie für den Internetzugang einen
Computer mit einem Ethernet-Kabel an einen LANAnschluss an.
2WAN: Schließen Sie das mit dem DSL-/Kabelmodem
mitgelieferte Ethernet-Kabel an den Ethernet-Anschluss
des DSL-/Kabelmodems an.
3POWER: Verwenden Sie nur den mitgelieferten
Netzadapter, um den Netzanschluss des Geräts
(POWER) mit einer geeigneten Netzsteckdose zu
verbinden.
2
13
1
Page 15
DEUTSCH
1.1 Bedeutung der LEDs
• Die PWR-LED beginnt zu leuchten.
• Die WLAN-LED beginnt zu leuchten.
• Die WAN- und/oder LAN-LED leuchtet und blinkt ab und zu,
wenn die entsprechenden Kabel richtig gesteckt wurden.
V Wenn keine der LEDs leuchtet, trennen Sie das
Gerät vom Stromnetz, und prüfen Sie die
Kabelverbindungen.
2 Zugreifen auf den NBG-415N
1 Starten Sie Ihren
Internetbrowser. Geben Sie in
das Feld Address (Adresse)
oder Location (Position) 192.168.10.1 ein (das ist die
Standard-LAN-IP-Adresse fur die Verwaltung des Gerats).
Drucken Sie auf [ENTER].
2 Das Fenster Login erscheint.
Wählen Sie im Feld User
Name (Benutzername) die
Option admin
(Administrator), geben Sie
“1234” (das
Standardkennwort) ein, und klicken Sie zum Anmelden
auf Login (Einloggen) .
14
Page 16
DEUTSCH
3 Auf dem Bildschirm
erscheint das
Hauptfenster des WebKonfigurators.
3 Internet
Wizard Setup
(Assistent zum Einrichten der
Internetverbindung)
1 Klicken Sie auf START (Start) > WIZARD (Assistent) >
Launch Internet Connection Setup Wizard (Assistent
zum Einrichten der Internetverbindung starten), um
den Assistenten zu starten. Klicken Sie im folgenden
Fenster zum Fortfahren auf Next (Weiter). Möglicherweise
hat der NBG-415N bereits Ihre Internetverbindung
erkannt.
2 Ändern Sie im zweiten
Fenster des Assistenten das
Anmeldekennwort. Beim
Kennwort ist es wichtig, auf
die Groß- und
Kleinschreibung zu achten.
3 Wählen Sie die für Ihre
Region gültige Zeitzone.
15
Page 17
DEUTSCH
4 Wählen Sie Ihren
Internetverbindungstyp.
5 Das nächste Fenster des
Assistenten hängt davon ab,
welchen Verbindungstyp Sie
gewählt haben. Geben Sie
in die freien Felder die
Daten ein, die Sie von Ihrem
Internetdienstanbieter
erhalten haben, und klicken
Sie auf Next (Weiter).
6 Klicken Sie im letzten
Fenster des Assistenten auf
Connect (Verbinden), um
die Einstellungen im NBG415N zu speichern.
7 Klicken Sie auf Reboot the Device (Gerät neu starten),
um den NBG-415N mit den geänderten Einstellungen neu
zu starten.
Greifen Sie auf den NBG415N erst zu, wenn der
Neustart abgeschlossen ist.
8 Prüfen Sie Ihre
Internetverbindung. Starten
Sie Ihren Webbrowser, und
geben Sie die Adresse einer beliebigen Website ein, z. B.
http://www.zyxel.com.
16
Page 18
DEUTSCH
V Wenn Sie keine Verbindung zum Internet
herstellen können, prüfen Sie, ob die
Internetdaten in den entsprechenden Fenstern
des Assistenten richtig eingegeben wurden.
4 Wireless LAN Wizard Setup
(Assistent zum Einrichten des
Wireless-LAN)
1 Klicken Sie auf START (Start) > WIZARD (Assistent) >
Launch Wireless Security Setup Wizard (Assistent
zum Einrichten des Wireless-LAN), um den Assistenten
zu starten. Klicken Sie im folgenden Fenster zum
Fortfahren auf Next (Weiter).
2 Geben Sie in das Feld
Wireless Network Name
(Name des
Drahtlosnetzwerks) einen
beschreibenden Namen ein,
um das Drahtlosnetzwerk zu identifizieren. Um einen
Wireless-Client an dieses Drahtlosnetzwerk
anzuschließen, muss dieser mit dieser ID verknüpft
werden.
17
Page 19
DEUTSCH
3 Führen Sie die
Anweisungen auf dem
Bildschirm aus und wählen
Sie einen Modus für die
Drahtlossicherheit aus.
4 Das nächste Fenster
erscheint, wenn Sie einen
Sicherheitsmodus aktiviert
haben. Geben Sie ein
Kennwort ein, mit dem der
NBG-415N einen geheimen
Schlüssel für die
Drahtlosverbindung erzeugt.
5 Prüfen Sie in diesem
Fenster die Wireless-LANEinstellungen, und klicken
Sie auf Save (Speichern),
um die Einstellungen im
NBG-415N zu speichern.
6 Klicken Sie auf Reboot
theDevice (NBG-415N neu
starten), um den mit den
geanderten Einstellungen
neu zu starten.
7 Greifen Sie auf den NBG-
415N erst zu, wenn der Neustart abgeschlossen ist.
18
Page 20
DEUTSCH
5 Einrichten der Drahtlosverbindung
mit Windows® Connect Now
Mit Windows® Connect Now können Sie DrahtlosEinstellungen des NBG-415N auf einen USB-Memory-Stick
übertragen, und dann die Einstellungen in den WirelessClient-Computern speichern. Auf diese Weise können Sie ein
Wireless-LAN problemlos einrichten. Um diese Funktion
nutzen zu können, benötigen Sie:
• Einen USB-Memory-Stick mit mindestens 300 KB freien
Speicher.
• Windows XP mit Service Pack 2 (SP2).
Führen Sie die nachfolgenden Schritte aus, um ein WirelessLAN mit Windows® Connect Now einzurichten.
1 Klicken Sie auf Start >
Systemsteuerung, und
klicken Sie doppelt auf
Drahtlosnetzwerkinstallation
s-Assistent.
19
Page 21

DEUTSCH
2 Das erste Fenster des Assistenten
erscheint. Klicken Sie im
folgenden Fenster zum Fortfahren
auf Next (Weiter).
3 Um ein neues Drahtlosnetzwerk
zu konfigurieren, wählen Sie Set
up a new wireless network (Ein
neues Drahtlosnetzwerk
einrichten).
4 Geben Sie in das Feld
Netzwerkname (SSID) einen
eindeutigen Namen ein, um das
Wireless-LAN zu identifizieren.
5 Wählen Sie Netzwerkschlüssel
automatisch zuweisen, damit
Windows einen
Sicherheitsschlüssel erstellt.
6 Wählen Sie für die Datenverschlüsselung WPA-
Verschlüsselung an Stelle von WEP verwenden.
20
Page 22

DEUTSCH
7 Wählen Sie Ein USB-Flash-
Laufwerk zum Einrichten eines
Drahtlosnetzwerks verwenden.
8 Schließen Sie das USB-Laufwerk
an den Computer an, und geben
Sie den Laufwerksbuchstaben in
das Feld Flash-Laufwerk ein.
9 Führen Sie die Anweisungen auf
dem Bildschirm aus.
10In diesem Fenster wird angezeigt,
ob das sichere Drahtlosnetzwerk
erfolgreich eingerichtet wurde.
Klicken Sie auf Fertig stellen.
11Prüfen Sie von einem Computer
mit Drahtlosverbindung aus die
Wireless-LAN-Verbindung zum
NBG-415N.
21
Page 23
DEUTSCH
Problembeseitigung
1 Der NBG-415N ist eingeschaltet, aber die LEDs leuchten
nicht.
• Prüfen Sie, ob Sie den NBG-415N mit dem mitgelieferten Netzadapter an eine geeignete Stromquelle angeschlossen haben.
• Prüfen Sie alle Kabelverbindungen.
• Wenn die LED-Anzeigen auch dann nicht leuchten,
besteht möglicherweise ein Problem mit der Hardware.
In diesem Fall sollten Sie sich an Ihren Händler
wenden.
2 Vom LAN kann nicht auf den NBG-415N zugegriffen
werden.
• Prüfen Sie die Kabelverbindung zwischen dem NBG415N und Ihrem Computer oder Hub. Eine ausführliche Beschreibung finden Sie unter Anschließen der
Hardware.
• Versuchen Sie den NBG-415N mit einem Ping vom
LAN-Computer aus zu erreichen.
• Stellen Sie sicher, dass die Ethernetkarte des Computers installiert ist und einwandfrei funktioniert.
3 Ich kann keinen Computer im LAN anwählen.
22
Page 24

DEUTSCH
• Wenn die LAN-LEDs nicht leuchten, prüfen Sie die
Kabelverbindungen zwischen dem NBG-415N und den
LAN-Computern.
• Stellen Sie sicher, dass sich die IP-Adresse und Subnetz-Maske des NBG-415N und der LAN-Computer im
gleichen IP-Adressbereich befinden.
4 Es ist kein Zugriff auf das Internet möglich.
• Prüfen Sie die Verbindung des NBG-415N zum Breitbandmodem.
• Schalten Sie das Breitbandmodem und den NBG415N aus und wieder ein. Wenn Sie ein Kabelmodem
verwenden, müssen Sie zuerst das Kabelmodem
ausschalten und dann 2 bis 3 Minuten warten, bis Sie
das Kabelmodem an den NBG-415N anschließen können.
• Die WAN-IP wird dann geliefert, wenn der Internetdienstanbieter die MAC-Adresse, den Hostnamen oder
die Nutzer-ID geprüft hat. Ermitteln Sie das von Ihrem
Internetdienstanbieter verwendete Verifizierungsverfahren, und konfigurieren Sie dementsprechend die
Felder im Internetassistenten oder im erweiterten
WAN-Fenster.
• Stellen Sie sicher, dass Sie die Daten Ihres Internetkontos richtig im Assistenten eingegeben haben.
5 Über den NBG-415N ist keine Verbindung zum Wireless-
LAN möglich.
•Der ON OFF-Schalter muss auf ON stehen, um die
Wireless-LAN-Funktion des NBG-415N zu aktivieren.
23
Page 25

DEUTSCH
• Stellen Sie sicher, dass der Wireless-Client dieselben
Wireless-LAN- und Sicherheitseinstellungen hat wie
der NBG-415N.
• Stellen Sie sicher, dass sich der Wireless-Client innerhalb der Reichweite des NBG-415N befindet.
• Stellen Sie sicher, dass es keine Störungen durch
Überlagerungen gibt (z. B. von anderen WirelessLANs oder Funktelefonen).
Einrichten der IP-Adresse des
Computers
In diesem Abschnitt erfahren Sie, wie Sie Ihren Windows NT/
2000/XP-Computer einrichten, damit er automatisch eine IPAdresse bezieht. Eine Beschreibung der Konfiguration der IPAdresse bei anderen Windows- und MacintoshBetriebssystemen finden Sie im Benutzerhandbuch.
1 Klicken Sie bei Windows XP auf Start,
Systemsteuerung. Klicken Sie bei Windows 2000/NT auf
Start, Einstellungen, Systemsteuerung.
2 Klicken Sie bei Windows XP auf Netzwerkverbindungen.
Klicken Sie bei Windows 2000/NT auf Netzwerk- und
DFÜ-Verbindungen.
24
Page 26

DEUTSCH
3 Klicken Sie mit der rechten
Maustaste auf LAN-
Verbindung und dann auf
Eigenschaften.
4 Wählen Sie
Internetprotokoll (TCP/IP)
(bei Windows XP auf der
Registerkarte Allgemein),
und klicken Sie auf
Eigenschaften.
5 Auf dem Bildschirm
erscheint das Dialogfeld
Internetprotokolleigenschaften (TCP/IP) (bei Windows
XP die Registerkarte Allgemein).
6 Wählen Sie die Option IP-Adresse automatisch
beziehen und DNS-Serveradresse automatisch
beziehen.
7 Klicken Sie auf OK, um das Fenster
Internetprotokolleigenschaften (TCP/IP) zu schließen.
8 Klicken Sie auf Schließen (bei Windows 2000/NT auf
OK), um das Fenster Eigenschaften von LANVerbindung zu schließen.
9 Schließen Sie das Fenster Netzwerkverbindungen.
Produktzertifizierungen ansehen
1 Zu www.zyxel.com.
25
Page 27

DEUTSCH
2 Wählen Sie auf der ZyXEL-Startseite aus der Drop-down-
Liste Ihr Produkt aus, um die Seite des Produkts
aufzurufen.
3 Wählen Sie auf dieser die Zertifizierung aus, die angezeigt
werden soll.
26
Page 28
ESPAÑOL
ESPAÑOL
Introducción
El NBG-415N permite más de un ordenador en su red para
compartir una conexión a Internet. También puede usar el
NBG-415N para configurar una red inalámbrica.
1 Conexiones del hardware
3
1LAN: Utilice un cable Ethernet para conectar un
ordenador a un puerto LAN y acceder a Internet.
2WAN: Utilice el cable Ethernet que venía con su DSL/
cable módem para conectarlo al puerto Ethernet de su
DSL/cable módem.
3POWER: Utilice sólo el adaptador de alimentación
incluido para conectar el zócalo POWER a una fuente
de alimentación apropiada.
2
27
1
Page 29
ESPAÑOL
1.1 Compruebe los LEDs (luces)
• El LED PWR se encenderá.
• El LED WLAN permanecerá encendido.
• Los LEDs WAN y/o LAN se encienden y a veces par-
padean si los puertos correspondientes están conectados
correctamente.
V Si ninguno de los LEDs están encendidos,
desenchufe el dispositivo y compruebe de
nuevo sus conexiones de hardware.
2 Acceso al NBG-415N
1 Inicie su explorador de web.
Escriba 192.168.10.1 (la
dirección IP predeterminada
de la LAN) en el campo Ubicación o Dirección. Presione
[ENTRAR]
2 Aparecerá la pantalla de
acceso. Seleccione admin
en el campo User Name
(Nombre de usuario),
escriba “1234”(contraseña
predeterminada) y haga clic
en Login (acceso) para acceder.
28
Page 30

ESPAÑOL
3 Aparecerá la pantalla
del configurador web
principal.
3 Asistente para
la
configuración
de Internet
1 Haga clic en START (INICIAR) > WIZARD (ASISTENTE)
> Launch Internet Connection Setup Wizard (Lanzar
Asistente para la configuración de la conexión a
Internet) para mostrar la primera pantalla del asistente.
Haga clic en Next (Siguiente) en cada pantalla para
continuar. El NBG-415N puede haber detectado ya su
conexión a Internet.
2 Cambie la contraseña de
acceso en la segunda
pantalla del asistente. La
contraseña distingue
mayúsculas y minúsculas.
3 Seleccione la zona horaria
de su ubicación geográfica.
29
Page 31

ESPAÑOL
4 Seleccione su tipo de
conexión a Internet.
5 La siguiente pantalla del
asistente varía
dependiendo del tipo de
conexión que haya
seleccionado. Configure
los campos con la
información ofrecida por su
ISP y haga clic en Next
(Siguiente).
6 En la última pantalla del
asistente, haga clic en
Connect (Conectar) para
guardar la configuración en
el NBG-415N.
7 Haga clic en Reboot the Device (Reiniciar el
dispositivo) para reiniciar el NBG-415N y hacer que
los cambios tengan efecto.
Espere un par de minutos
para que el NBG-415N
finalice el reinicio antes de
volver a acceder.
8 Probar su conexión a
Internet. Abra su
explorador de web y escriba cualquier dirección de
página web como por ejemplo, http://www.zyxel.com).
30
Page 32

ESPAÑOL
V Si no puede acceder a Internet, compruebe si
ha introducido la información de la cuenta de
Internet correctamente en las pantallas del
asistente.
4 Asistente para la configuración de
la LAN inalámbrica
1 Haga clic en START (INICIAR) > WIZARD
(ASISTENTE) > Launch Wireless Security Setup
Wizard (Lanzar Asistente para la configuración de la
seguridad inalámbrica) para mostrar la primera
pantalla del asistente. Haga clic en Next (Siguiente) en
cada pantalla para continuar.
2 En el campo Wireless
Network Name (Nombre
de la red inalámbrica),
escriba un nombre para
identificar la red
inalámbrica. Para conectarse a esta red inalámbrica, los
clientes inalámbricos deben asociarse a este identificador.
31
Page 33

ESPAÑOL
3 Siga las instrucciones en
pantalla y seleccione un
modo de seguridad
inalámbrica.
4 La pantalla siguiente
muestra si ha habilitado un
modo de seguridad
inalámbrica. Escriba una
contraseña que el NBG415N utilice para generar
una única clave secreta
inalámbrica.
5 Compruebe la
configuración de su LAN
inalámbrica en esta
pantalla y haga clic en
Save (Guardar) para
guardar la configuración en
el NBG-415N.
6 Haga clic en Reboot the
Device (Reiniciar el
dispositivo) para reiniciar
el NBG-415N y hacer que
los cambios tengan efecto.
32
Page 34

ESPAÑOL
7 Espere un par de minutos para que el NBG-415N
finalice el reinicio antes de volver a acceder.
5 Configuración de la conexión
inalámbrica utilizando Windows®
Connect Now
Con Windows® Connect Now, puede transferir la
configuración inalámbrica de su NBG-415N a un lápiz de
memoria USB y luego guardar la configuración en los
ordenadores clientes inalámbricos. Esto le facilita la
configuración de una LAN inalámbrica. Para aprovechar
esta característica, necesitará:
• Un lápiz de memoria USB con al menos 300K de memoria
disponible.
• Windows XP con Service Pack 2 (SP2).
Siga los pasos siguientes para configurar una LAN
inalámbrica utilizando Windows® Connect Now.
1 Haga clic en Inicio > Panel
de control y haga doble clic
en Asistente para la
configuración de redes
inalámbricas.
33
Page 35

ESPAÑOL
2 Aparecerá la primera pantalla
del asistente. Haga clic en Next
(Siguiente) en cada pantalla
para continuar.
3 Seleccione Configurar una
nueva red inalámbrica para
configurar una nueva red
inalámbrica.
4 En el campo Nombre de la red
(SSID), especifique un único
nombre para identificar su LAN
inalámbrica.
5 Seleccione Asignar
automáticamente una clave de
red para que Windows cree una
clave de seguridad.
6 Seleccione Usar cifrado WPA en lugar de WEP para el
cifrado de datos.
34
Page 36

ESPAÑOL
7 Seleccione Usar una unidad
USB Flash para configurar una
red inalámbrica.
8 Conecte la unidad USB en su
ordenador y especifique la letra
de la unidad en el campo Unidad
flash.
9 Siga las instrucciones en
pantalla.
10Esta pantalla aparece cuando
ha configurado con éxito una red
inalámbrica segura. Haga clic en
Finalizar.
11Desde un ordenador
inalámbrico, pruebe su conexión
de LAN inalámbrica al NBG415N.
35
Page 37
ESPAÑOL
Solución de problemas
1 Ninguno de los LEDs se enciende con el NBG-415N
encendido.
• Asegúrese de utilizar el adaptador de alimentación
incluido para conectar al NBG-415N y que esté
enchufado en una fuente de alimentación apropiada.
• Compruebe todas las conexiones de los cables.
• Si los LEDs todavía no se encienden, puede que
tenga un problema de hardware. En este caso,
debería contactar con su vendedor local.
2 No puedo acceder al NBG-415N desde la LAN.
• Compruebe la conexión de cables entre el NBG415N y su ordenador o hub. Consulte Conexiones del
hardware para más detalles.
• Realice un ping al NBG-415N desde un ordenador
LAN.
• Compruebe que la tarjeta Ethernet de su ordenador
esté instalada y funcione correctamente.
3 No puedo realizar un ping a un ordenador en la LAN.
• Si los LEDs de la LAN están apagados, compruebe
las conexiones de cables entre el NBG-415N y los
ordenadores de la LAN.
36
Page 38

ESPAÑOL
• Verifique que la dirección IP y máscara de subred
del NBG-415N y los ordenadores de la LAN estén en
el mismo rango de dirección IP.
4 No puedo acceder a Internet.
• Compruebe la conexión del NBG-415N al módem de
banda ancha.
• Apague y vuelva a encender el módem de banda
ancha y el NBG-415N. Si utiliza un cable módem,
deberá apagarlo primero y esperar unos dos o tres
minutos antes de conectarlo al NBG-415N.
• La dirección IP WAN es facilitada tras la verificación
del ISP de la dirección MAC, nombre del host o identificador de usuario. Averigüe el método de verificación usado por su ISP y configure los campos
correspondientes en las pantallas del asistente para
Internet o en la pantalla avanzada de la WAN.
• Asegúrese de haber
introducido correctamente la información de su
cuenta de Internet en las pantallas del asistente.
5 No puedo conectar a la LAN inalámbrica a través del
NBG-415N.
• Asegúrese de que el interruptor ON OFF esté en la
posición ON para activar la LAN inalámbrica en el
NBG-415N.
• Asegúrese de que el cliente inalámbrico esté configurado para usar la misma LAN y configuración de
seguridad que el NBG-415N.
• Asegúrese de que el cliente inalámbrico esté dentro
del alcance de transmisión del NBG-415N.
37
Page 39

ESPAÑOL
• Asegúrese de que no haya interferencias de radio
(por ejemplo, desde otras LANs inalámbricas o teléfonos inalámbricos).
Configurar la dirección IP de su
ordenador
Esta sección le muestra cómo configurar el ordenador con
Windows NT/2000/XP para obtener automáticamente una
dirección IP. Consulte su Guía del usuario para la
configuración de dirección IP para otros sistemas
operativos Windows y Macintosh.
1 En Windows XP, haga clic en Inicio, Panel de control.
En Windows 2000/NT, haga clic en Inicio,
Configuración, Panel de control.
2 En Windows XP, haga clic en Conexiones de red. En
Windows 2000/NT, haga clic en Conexiones de red y
marcación.
38
Page 40

ESPAÑOL
3 Haga clic con el botón
derecho en Conexión de
área local y haga clic en
Propiedades.
4 Seleccione Protocolo
Internet (TCP/IP) (en la
ficha General en Win XP) y
haga clic en Propiedades.
5 La pantalla Propiedades
de Protocolo Internet
TCP/IP se abrirá (ficha
General en Windows XP).
6 Seleccione las opciones Obtener una dirección IP
automáticamente y Obtener la dirección del
servidor DNS automáticamente.
7 Haga clic en Aceptar para cerrar la ventana
Propiedades de Protocolo Internet (TCP/IP).
8 Haga clic en Cerrar (Aceptar en Windows 2000/NT)
para cerrar la ventana Propiedades de conexión de
área local.
9 Cierre la pantalla Conexiones de red.
Ver los certificados de su producto
1 Vay a a www.zyxel.com.
2 Seleccione su producto de la lista desplegable en la
página inicial de ZyXEL para ir a la página de ese
producto.
39
Page 41

ESPAÑOL
3 Seleccione el certificado que desee visualizar en esta
página.
40
Page 42

FRANÇAIS
S
RANÇAI
Introduction
Le NBG-415N permet a plusieurs ordinateurs de votre reseau
de partager une connexion Internet. Vous pouvez aussi
utiliser le NBG-415N pour etablir un reseau sans fil.
1 Connexions matérielles
3
1LAN : Utilisez un câble Ethernet pour connecter un
ordinateur à un port LAN pour l'accès à Internet.
2WAN : Utilisez le câble Ethernet qui accompagne votre
modem DSL/câble pour connecter au port Ethernet sur le
modem DSL/câble.
3ALIMENTATION : Utilisez uniquement l'adaptateur
d'alimentation fourni pour connecter la prise POWER
(ALIMENTATION) à une source d'alimentation
appropriée.
2
41
1
Page 43

FRANÇAIS
1.1 Observez les LED (Voyants)
• La LED PWR s'allume.
• La LED WLAN reste allumée.
• Les LED WAN et/ou LAN s'allument et clignotent parfois si
les ports correspondants sont correctement connectés.
V Si aucune LED n'est allumée, débranchez
l'appareil et revérifiez les connexions de votre
matériel.
2 Accéder au NBG-415N
1 Démarrez votre navigateur
web. Entrez 192.168.10.1
(l'adresse IP LAN de gestion
par défaut) dans le champ Emplacement ou Adresse.
Appuyez sur [ENTER] (ENTRÉE)
2 L’écran d'ouverture de
session apparaît. Entrez
admin dans le champ Nom
d'utilisateur, entrez "1234"
(le mot de passe par défaut)
et cliquez sur Login
(Ouverture de session) pour ouvrir une session.
42
Page 44

FRANÇAIS
3 L'écran du
configurateur web
principal apparaît.
3 Assistant
d'installation
Internet
1 Cliquez sur DÉMARRER > ASSISTANT > Lancer
l'Assistant d'installation Internet pour afficher le
premier écran de l'assistant. Cliquez sur Suivant dans
chaque écran pour continuer. Le NBG-415N a peut-être
déjà détecté votre connexion Internet.
2 Changez le mot de passe de
connexion dans le second
écran de l'assistant. Le mot
de passe est sensible à la
casse.
3 Sélectionnez le fuseau
horaire en fonction de votre
localisation géographique.
43
Page 45

FRANÇAIS
4 Sélectionnez votre type de
connexion Internet.
5 L'écran suivant de
l'assistant varie selon le
type de connexion
sélectionné. Remplissez les
champs avec les
informations fournies par
votre ISP et cliquez sur
Suivant.
6 Dans le dernier écran de
l'assistant, cliquez sur
Connecter pour enregistrer
les paramètres sur le NBG415N.
7 Cliquez sur Redémarrer l'appareil pour redémarrer le
NBG-415N et pour que les modifications prennent effet.
Patientez quelques minutes
afin que leNBG-415N finisse
de redémarrer avant
d'accéder à nouveau à celuici.
8 Tester votre connexion
Internet. Lancez votre navigateur web et entrez une
adresse quelconque de site par exemple, http://
www.zyxel.com).
44
Page 46

FRANÇAIS
V Si vous n'arrivez pas à accéder à Internet,
vérifiez que vous avez correctement entré les
informations de votre compte Internet dans les
écrans de l'assistant.
4 Assistant d'installation du LAN sans
fil
1 Cliquez sur DÉMARRER > ASSISTANT > Lancer
l'assistant d'installation de sécurité sans fil pour
afficher le premier écran de l'assistant. Cliquez sur
Suivant dans chaque écran pour continuer.
2 Dans le champ Nom du
réseau sans fil, entrez un
nom descriptif pour identifier
le réseau sans fil. Pour se
connecter à ce réseau sans
fil, les clients sans fil doivent s'associer à cette ID.
45
Page 47

FRANÇAIS
3 Suivez les instructions à
l'écran et sélectionnez un
mode de sécurité sans fil.
4 L'écran suivant indique si
vous avez activé un mode
de sécurité sans fil. Entrez
un mot de passe que le
NBG-415N utilise pour
générer une clé secrète
sans fil unique.
5 Vérifiez les paramètres de
votre LAN sans fil dans cet
écran et cliquez sur
Enregistrer pour enregistrer
les paramètres sur le NBG415N.
6 Cliquez sur Redémarrer
l'appareil pour redémarrer
le NBG-415N et pour que
les modifications prennent
effet.
7 Patientez quelques minutes
afin que le NBG-415N finisse de redémarrer avant
d'accéder à nouveau à celui-ci.
46
Page 48

FRANÇAIS
5 Installation de la connexion sans fil
à l'aide de Windows® Connect Now
Avec Windows® Connect Now, vous pouvez transférer les
paramètres sans fil de votre NBG-415N sur une clé USB
Memory Stick et enregistrer ensuite les paramètres sur le(s)
ordinateur(s) client sans fil. Cela vous permet d'établir
facilement un LAN sans fil. Pour tirer parti de cette
fonctionnalité, vous avez besoin de:
• Une clé USB Memory Stick et au moins 300K de mémoire
disponible.
• Windows XP avec Service Pack 2 (SP2).
Suivez les étapes ci-dessous pour installer un LAN sans fil à
l'aide de Windows® Connect Now.
1 Cliquez sur Démarrer >
Panneau de configuration et
double cliquez sur Assistant
d'installation de réseau sans
fil.
47
Page 49

FRANÇAIS
2 Le premier écran de l'assistant
apparaît. Cliquez sur Suivant
dans chaque écran pour
continuer.
3 Sélectionnez Installer un
nouveau réseau sans fil pour
configurer un nouveau réseau
sans fil.
4 Dans le champ Nom du réseau
(SSID), spécifiez un nom unique
pour identifier votre LAN sans fil.
5 Sélectionnez Attribuer
automatiquement une clé réseau
pour que Windows crée une clé
de sécurité.
6 Sélectionnez Utiliser le cryptage
WPA à la place de WEP pour le cryptage de données.
7 Sélectionnez Utiliser une carte
USB Flash pour établir un réseau
sans fil.
48
Page 50

FRANÇAIS
8 Connectez le lecteur USB à votre
ordinateur et spécifiez le la lettre
du lecteur dans le champ lecteur
Flash.
9 Suivez les instructions à l’écran.
10Cet écran s'affiche quand vous
avez réussi à établir un réseau
sans fil sécurisé. Cliquez sur
Terminer.
11A l'aide d'un ordinateur sans fil,
testez votre connexion LAN sans
fil au NBG-415N.
Dépannage
1 Aucune des LED ne s'allume quand le NBG-415N est
allumé.
• Vérifiez que vous utilisez l'adaptateur d'alimentation
fourni pour vous connecter au NBG-415N et qu'il est
branché à une source de courant appropriée.
• Vérifiez toutes les connexions des câbles.
49
Page 51

FRANÇAIS
• Si les LED ne s'allument toujours pas, vous avez peutêtre un problème matériel. Dans ce cas, vous devez
contacter votre vendeur local.
2 Impossible d'accéder au NBG-415N à partir du LAN.
• Vérifiez la connexion des câbles entre le NBG-415N et
votre ordinateur ou hub. Reportez-vous à Connexions
matérielles pour les détails.
• Exécutez la commande Ping sur le NBG-415N à partir
d'un ordinateur du LAN.
• Vérifiez que la carte Ethernet de votre ordinateur est
installée et fonctionne correctement.
3 Je ne peux pas envoyer de ping aux autres ordinateurs
sur le LAN.
• Si les LED LAN sont éteintes, vérifiez les connexions
du câble entre le NBG-415N et vos ordinateurs du
LAN.
• Vérifiez que l'adresse IP et le masque de sous-réseau
du NBG-415N et des ordinateurs du LAN sont dans la
même plage d'adresse IP.
4 Impossible d'accéder à Internet.
• Vérifiez la connexion du NBG-415N au modem large
bande.
50
Page 52

FRANÇAIS
• Eteignez et allumez pour redémarrer à la fois le
modem large bande et le NBG-415N. Si vous utilisez
un modem câble, vous devez d'abord éteindre votre
modem câble et attendre environ deux à trois minutes
avant de connecter le modem câble au NBG-415N.
• L'IP WAN est fournie une fois que l'ISP a vérifié
l'adresse MAC, nom d'hôte ou ID de l'utilisateur. Trouvez la méthode de vérification utilisée par votre ISP et
configurez les champs correspondants dans les
écrans de l'assistant Internet ou l'écran WAN avancé.
• Vérifiez que vous avez correctement entré les informations de votre compte Internet dans les écrans de
l'assistant.
5 Je ne peux pas me connecter au LAN sans fil via le NBG-
415N.
• Vérifiez que l'interrupteur MARCHE ARRÊT est sur la
position ON (MARCHE) pour activer le LAN sans fil sur
le NBG-415N.
• Vérifiez que le client sans fil est paramétré pour utiliser
les mêmes paramètres LAN sans fil et de sécurité que
le NBG-415N.
• Vérifiez que le client sans fil est dans la zone de couverture du NBG-415N.
• Vérifiez qu'il n'y a pas d'interférences radio (provenant
par exemple d'autres LAN sans fil ou de téléphones
sans fil).
51
Page 53

FRANÇAIS
Paramétrez l'adresse IP de votre
ordinateur
Cette section vous indique comment paramétrer votre
ordinateur Windows NT/2000/XP afin d'obtenir
automatiquement une adresse IP. Reportez-vous à votre
guide de l'utilisateur pour la configuration de l'adresse IP pour
les autres systèmes d'exploitation Windows et Macintosh.
1 Dans Windows XP, cliquez sur Démarrer, Panneau de
configuration. Dans Windows 2000/NT, cliquez sur
Démarrer, Paramètres, Panneau de configuration.
2 Dans Windows XP, cliquez sur Connexions réseau.
Dans Windows 2000/NT, cliquez sur Connexions réseau
et accès à distance.
3 Cliquez avec le bouton droit
de la souris sur Connexion
de réseau local et cliquez
sur Propriétés.
4 Sélectionnez Protocole
Internet (TCP/IP) (dans
l'onglet Général dans
Windows XP) et cliquez sur
Propriétés.
5 L'écran Propriétés TCP/IP
de Protocole Internet
s'ouvre (l'onglet Général
dans Windows XP).
52
Page 54

FRANÇAIS
6 Sélectionnez les options Obtenir automatiquement une
adresse IP et Obtenir automatiquement une adresse
de serveur DNS.
7 Cliquez sur OK pour fermer la fenêtre Propriétés de
protocole (TCP/IP) Internet.
8 Cliquez sur Fermer (OK dans Windows 2000/NT) pour
fermer la fenêtre Propriétés de connexion au réseau
local.
9 Fermez l'écran Connexions réseau.
Visualisez les certifications de votre
produit
1 Allez à www.zyxel.com.
2 Sélectionnez votre produit dans la liste déroulante dans la
page d'accueil de ZyXEL pour aller à la page de ce
produit.
3 Sélectionnez la certification que vous désirez consulter
dans cette page.
53
Page 55

FRANÇAIS
54
Page 56

ITALIANO
ITALIANO
Introduzione
NBG-415N consente di condividere la connessione a Internet
con più computer della rete. È possibile utilizzare NBG-415N
per installare una rete wireless.
1 Collegamenti hardware
3
1LAN: Utilizzare un cavo Ethernet per collegare un
computer a una porta LAN per abilitarne l'accesso a
Internet.
2WAN: Utilizzare il cavo Ethernet fornito a corredo con il
model DSL/via cavo per eseguire il collegamento alla
porta Ethernet del modem DSL/via cavo.
3POWER: Utilizzare solo l'alimentatore fornito a corredo
per collegare la presa POWER a una sorgente di
alimentazione.
2
55
1
Page 57

ITALIANO
1.1 Controllare i LED (spie)
• Il LED PWR si accende.
• Il LED WLAN si accende in modo fisso.
•I LED WAN e/o LAN si accendono e a volte lampeggiano se
le porte corrispondenti sono correttamente collegate.
V Se nessuno dei LED è acceso, scollegare il
dispositivo e ricontrollare i collegamenti
hardware.
2 Accedere a NBG-415N
1 Avviare il browser. Immettere
192.168.10.1 (l'indirizzo IP di
gestione della LAN
predefinito) nel campo Indirizzo. Premere [INVIO]
2 Appare la schermata di
login. Selezionare admin nel
campo Nome utente,
immettere “1234” (la
password predefinita) e fare
clic su Login (accedi) per
eseguire il login (accesso).
56
Page 58

ITALIANO
3 Appare la schermata
principale dello
strumento di
configurazione Web.
3 Configurazion
e guidata
connessione a Internet
1 Fare clic su START > PROCEDURA GUIDATA > Avvia
Configurazione guidata connessione a Internet per
visualizzare la prima schermata della procedura guidata.
Fare clic su Avanti in ogni schermata per continuare.
NBG-415N potrebbe aver già rilevato la connessione a
Internet.
2 Cambiare la password di
login nella seconda
schermata della procedura
guidata. Per la password
viene fatta differenza tra
maiuscole e minuscole.
3 Selezionare il fuso orario
secondo la posizione
geografica.
57
Page 59

ITALIANO
4 Selezionare il tipo di
connessione a Internet.
5 La successiva schermata
della procedura guidata
varia a seconda del tipo di
connessione selezionata.
Configurare i campi con le
informazioni fornite dal
proprio ISP e fare clic su
Avanti.
6 Nell'ultima schermata della
procedura guidata, fare clic
su Connetti per salvare le
impostazioni in NBG-415N.
7 Fare clic su Riavvia il dispositivo per riavviare NBG-
415N e rendere effettive le modifiche apportate.
Attendere un paio di minuti
affinché NBG-415N termini il
riavvio prima di accedere
nuovamente ad esso.
8 Testare la connessione a
Internet. Avviare il browser e
immettere l'indirizzo di un sito qualsiasi (ad esempio http:/
/www.zyxel.com).
58
Page 60

ITALIANO
V Se l'accesso a Internet non funziona, verificare
di aver inserito correttamente le informazioni
dell'account Internet nelle schermate della
procedura guidata.
4 Configurazione guidata LAN
wireless
1 Fare clic su START > PROCEDURA GUIDATA > Avvia
Configurazione guidata sicurezza wireless per
visualizzare la prima schermata della procedura guidata.
Fare clic su Avanti in ogni schermata per continuare.
2 Nel campo Nome rete
wireless, immettere un
nome descrittivo per
identificare la rete wireless.
Per connettersi a questa
rete wireless, i client wireless devono avere questo stesso
ID.
59
Page 61

ITALIANO
3 Seguire le istruzioni
visualizzate e selezionare
una modalità di protezione
wireless.
4 La schermata successiva
visualizza se è abilitata una
modalità di protezione
wireless. Immettere una
password che NBG-415N
utilizzerà per generare una
chiave segreta wireless
unica.
5 Controllare le impostazioni
LAN wireless in questa
schermata e fare clic su
Salva per salvare le
impostazioni in NBG-415N.
6 Fare clic su Riavvia il
dispositivo per riavviare
NBG-415N e rendere
effettive le modifiche
apportate.
7 Attendere un paio di minuti
affinché NBG-415N termini il riavvio prima di accedere
nuovamente ad esso.
60
Page 62

ITALIANO
5 Connessione guidata wireless
utilizzando Windows® Connect Now
Con Windows® Connect Now è possibile trasferire le
impostazioni wireless di NBG-415N in un pen drive di
memoria USB e quindi salvare le impostazioni nei computer
client wireless. Ciò consente di configurare facilmente una
LAN wireless. Per utilizzare questa funzione è necessario
disporre di:
• Una memoria pen drive USB con almeno 300KB di spazio
libero.
• Windows XP con Service Pack 2 (SP2).
Seguire i passi sotto per configurare una LAN wireless
utilizzando Windows® Connect Now.
1 Fare clic su Start > Pannello
di controllo e fare doppio clic
su Installazione rete senza
fili.
61
Page 63

ITALIANO
2 Viene visualizzata la prima
schermata della procedura
guidata. Fare clic su Avanti in
ogni schermata per continuare.
3 Selezionare Installa una nuova
rete wireless per configurare una
nuova rete senza fili.
4 Nel campo Nome rete (SSID),
specificare un nome univoco per
identificare la LAN wireless.
5 Selezionare Assegna
automaticamente una chiave di
rete per consentire a Windows di
creare una chiave di sicurezza.
6 Selezionare Usa crittografia WPA
invece di WEP come crittografia dati.
7 Selezionare Unità memoria flash
USB per installare una rete
wireless.
62
Page 64

ITALIANO
8 Collegare l'unità USB al computer
e specificare la lettera di unità nel
campo Unità memoria flash.
9 Seguire le istruzioni visualizzate.
10La schermata visualizza quando
la rete wireless sicura è installata
correttamente. Fare clic su Fine.
11Da un computer wireless, testare
la connessione LAN wireless a
NBG-415N.
Risoluzione dei
problemi
1 Nessuno dei LED si accende quando NBG-415N è
acceso.
• Utilizzare solo l'alimentatore incluso per collegare
NBG-415N e che lo stesso sia collegato a una sorgente di alimentazione valida.
• Controllare i collegamenti di tutti i cavi.
63
Page 65

ITALIANO
• Se i LED continuano a non accendersi, potrebbe
esserci un guasto hardware. In questo caso, è opportuno rivolgersi al rivenditore locale.
2 Impossibile accedere a NBG-415N dalla LAN.
• Controllare il collegamento dei cavi tra NBG-415N e il
computer o l'hub. Vedere Collegamenti hardware per i
dettagli.
• Eseguire il ping di NBG-415N da un computer della
LAN.
• Verificare che la scheda Ethernet del computer sia
installata e correttamente funzionante.
3 Non è possibile eseguire il ping ad alcun computer sulla
LAN.
• Se i LED LAN sono spenti, controllare i collegamenti
dei cavi tra NBG-415N e i computer della LAN.
• Verificare che l’indirizzo IP e la subnet mask di NBG415N e dei computer della LAN siano nel medesimo
intervallo di indirizzi IP.
4 Impossibile accedere a Internet.
• Controllare il collegamento di NBG-415N al modem
broadband.
• Spegnere e riaccendere il modem broadband e NBG415N. Se si utilizza un modem via cavo, è dapprima
64
Page 66

ITALIANO
necessario spegnere il modem via cavo e attendere
circa due/tre minuti prima di collegare il modem via
cavo a NBG-415N.
• L'IP WAN viene fornito dopo che l'ISP ha verificato
l'indirizzo MAC, il nome host o l'ID utente. Informarsi
sul metodo di identificazione utilizzato dal proprio ISP
e configurare i campi corrispondenti nelle schermate
della connessione guidata a Internet o nella schermata
WAN avanzata.
• Verificare di aver inserito correttamente le informazioni
dell'account Internet nelle schermate della procedura
guidata.
5 Impossibile connettersi alla LAN wireless tramite NBG-
415N.
• Verificare che l'interruttore ON OFF sia nella posizione
ON per abilitare la LAN wireless di NBG-415N.
• Verificare che il client wireless sia impostato per utilizzare la stessa LAN wireless e impostazioni di
sicurezza di NBG-415N.
• Verificare che il client wireless sia nel campo di trasmissione di NBG-415N.
• Verificare che non vi siano interferenze radio (ad
esempio altre LAN wireless o telefoni cordless).
65
Page 67

ITALIANO
Impostare l'indirizzo IP del computer
In questa sezione viene spiegato come configurare Windows
NT/2000/XP per ottenere l'indirizzo IP automaticamente.
Vedere la Guida dell'utente per le istruzioni su come
configurare l'indirizzo IP nei sistemi operativi Windows e
Macintosh.
1 In Windows XP, fare clic su Start, Pannello di controllo.
In Windows 2000/NT, fare clic su Start, Impostazioni,
Pannello di controllo.
2 In Windows XP, fare clic su Connessioni di rete. In
Windows 2000/NT, fare clic su Reti e connessioni
remote.
3 Fare clic con il pulsante
destro del mouse su
Connessione alla rete
locale e scegliere
Proprietà.
4 Selezionare Protocollo
Internet (TCP/IP) (sotto la
scheda Generale in
Windows XP) e fare clic su
Proprietà.
5 Viene aperta la schermata
Proprietà – Protocollo
Internet (la scheda Generale in Windows XP).
66
Page 68

ITALIANO
6 Selezionare le opzioni Ottieni automaticamente un
indirizzo IP e Ottieni indirizzo server DNS
automaticamente.
7 Fare clic su OK per chiudere la finestra Protocollo
Internet (TCP/IP) - Proprietà.
8 Fare clic su Chiudi (OK in Windows 2000/NT) per
chiudere la finestra Connessione alla rete locale Proprietà.
9 Chiudere la schermata Connessioni di rete.
Visualizzazione delle certificazioni del
prodotto
1 Aprire la pagina www.zyxel.com.
2 Selezionare il prodotto dall'elenco di riepilogo a discesa
nella Home Page di ZyXEL per passare alla pagina del
prodotto in questione.
3 Selezionare da questa pagina la certificazione che si
desidera visualizzare.
67
Page 69

ITALIANO
68
Page 70

РУССКИЙ
РУССКИЙ
Вступление
NBG-415N позволяет устанавливать совместный доступ к
сети Интернет нескольким компьютерам. Вы также можете
использовать NBG-415N для создания беспроводной сети.
1 Подключение оборудования
3
1LAN: При помощи кабеля Ethernet подключите
компьютер к порту ЛВС для доступа в Интернет.
2WAN: При помощи кабеля Ethernet, который
поставляется вместе с модемом, подключите ваш DSL/
кабельный модем к порту Ethernet.
3POWER: Подключите прилагаемый сетевой адаптер к
СЕТЕВОЙ розетке, соответствующей электрической
сети.
2
69
1
Page 71

РУССКИЙ
1.1 Проверьте индикаторы .
• Загорится индикатор PWR.
• Загорится индикатор WLAN.
• Индикаторы LAN и WAN включаются, если были
правильно выполнены соответствующие подключения.
V Если ни один из индикаторов не включился,
то отключите устройство от сети и снова
проверьте подключение оборудования.
2 Войдите в Доступ к вебконфигуратору NBG-415N
1 Запустите веб-браузер.
Введите 192.168.1.1 (IP
адрес управления ЛВС по
умолчанию) в поле Адрес или Расположение. Нажмите
[ENTER]
2 Появится окно входа в
систему. Наберите admin в
поле User Name[Имя
пользователя], введите
“1234” (пароль по
умолчанию) и щелкните на
Login (Вход) для входа в систему.
70
Page 72

РУССКИЙ
3 Отобразится главное
окно web-
конфигуратора.
веб-
3 Мастер
настройки
доступа в
Интернет
1 Щелкните на START[ПУСК] > WIZARD[МАСТЕР] >
Launch Internet Connection Setup Wizard[Запустить
мастер подключения к Интернет], для запуска
мастера. На каждой следующей странице щелкайте на
Next[Далее] для продолжения настройки. Может быть
NBG-415N уже обнаружил ваше подключение к сети
Интернет.
2 Измените пароль во
втором окне мастера.
Пароль чувствителен к
регистру.
3 Выберите ваш часовой
пояс.
71
Page 73

РУССКИЙ
4 Выберите тип вашего
соединения с
Интернетом.
5 Внешний вид следующего
окна будет зависеть от
выбранного вами типа
соединения. Заполните
поля информацией,
полученной от вашего
провайдера и щелкните на
кнопке Next[Далее].
6 В последнем окне мастера
установки нажмите
Connect[Подключить],
чтобы сохранить настройки
в NBG-415N.
7 Нажмите Reboot the Device[Перезагрузить
устройство] для перезапуска NBG-415N и вступления
в силу внесенных изменений.
Подождите пару минут
перед повторным входом,
пока NBG-415N закончит
перезагрузку.
8 Протестируйте
подключение к сети
Интернет. Запустите ваш web-браузер и http://
www.zyxel.com введите адрес любого web-сайта,
например, http://www.zyxel.com).
72
Page 74

РУССКИЙ
V Если вы не можете войти в Интернет, то
проверьте правильность введения
информации вашей учетной записи Интернет
в полях мастера.
4 Мастер настройки беспроводной
ЛВС
1 Щелкните на START[ПУСК] > WIZARD[МАСТЕР] >
Launch Wireless Security Setup Wizard[Запустить
мастер настройки беспроводной безопасности],
для запуска мастера. На каждой следующей странице
щелкайте на Next[Далее] для продолжения настройки.
2 В поле Wireless Network
Name[Имя беспроводной
сети] введите наглядное
описательное имя для
опознавания
беспроводной сети. Чтобы подключиться к этой
беспроводной сети, беспроводные клиенты должны
ассоциироваться с этим идентификатором.
73
Page 75

РУССКИЙ
3 Выберите режим
беспроводной
безопасности, следуя
подсказкам на экране.
4 Если вы включили режим
беспроводной
безопасности, то на экране
появиться следующее
окно. Введите пароль,
который будет
использоваться NBG-415N
для создания уникального ключа беспроводной
безопасности.
5 Проверьте настройки
вашей беспроводной ЛВС
и нажмите
Save[Сохранить], чтобы
сохранить изменения в
NBG-415N.
6 Нажмите Reboot the
Device[Перезагрузить
устройство] для
перезапуска NBG-415N и
вступления в силу
внесенных изменений.
74
Page 76

РУССКИЙ
7 Подождите пару минут перед повторным входом, пока
NBG-415N закончит перезагрузку.
5 Настройка беспроводной сети с
использованием функции
Windows® Connect Now
При помощи Windows® Connect Now вы можете перенести
настройки беспроводной сети с NBG-415N на карту
памяти USB, а затем сохранить их на
компьютере(компьютерах) с беспроводными клиентами.
Это позволяет легко создавать беспроводные сети. Чтобы
воспользоваться этой функцией вам понадобиться:
• Карта памяти USB, на которой имеется, по крайней мере,
300К свободного места.
• Windows XP с Service Pack 2 (SP2).
Ниже приведены инструкции по настройке беспроводной
сети с использованием Windows® Connect Now.
1 Нажмите Пуск > Панель
управления и дважды
щелкните на значке Мастер
беспроводной сети.
75
Page 77

РУССКИЙ
2 Появиться первое окно мастера.
На каждой следующей странице
щелкайте на Next[Далее] для
продолжения настройки.
3 Выберите Set up a new wireless
network to configure a new
wireless network[Создать
новую беспроводную сеть].
4 В поле Network name
(SSID)[Сетевое имя] укажите
уникальное название вашей
ЛВС.
5 Выберите пункт Automatically
assign a network key to have
Windows create a security
key[Автоматически назначить
ключ сети].
6 Выберите Use WPA encryption instead of WEP for data
encryption[Использовать WPA-шифрование вместо
WEP].
76
Page 78

РУССКИЙ
7 Выберите Use a USB Flash drive
to set up a wireless
network[Использовать USB
флэш-память].
8 Подключите USB флэш-память к
компьютеру и укажите букву
диска в поле Флэш-память .
9 Следуйте инструкциям,
появляющимся на дисплее.
10Когда вы успешно установите
безопасную беспроводную сети
на мониторе появится это окно.
Нажмите Finish[Завершить].
11Проверьте беспроводное ЛВС
соединение к NBG-415N с
беспроводного компьютера.
77
Page 79

РУССКИЙ
Устранение неисправностей
1 При включении NBG-415N индикаторы не загораются.
• Убедитесь, что NBG-415N подключен с
использованием сетевого адаптера необходимого
типа и этот адаптер присоединен к сети питания
указанного типа.
• Проверьте подключение всех кабелей.
• Если индикаторы все еще не горят, то, возможно, у
вас неисправно оборудование. В этом случае вы
должны связаться с вашим местным поставщиком.
2 Нет доступа к NBG-415N из ЛВС.
• Проверьте подключение кабеля между NBG-415N и
вашим компьютером или коммутатором.
Дополнительную информацию можно посмотреть в
разделе Подключение оборудования.
• Пропингуйте NBG-415N с компьютера,
подключенного к ЛВС.
• Проверьте наличие и правильность работы сетевой
карты Ethernet вашего компьютера.
3 Я не могу пропинговать ни один компьютер в ЛВС.
78
Page 80

РУССКИЙ
• Если индикатор LAN не светиться, то проверьте
подключение кабеля между NBG-415N и
компьютерами вашей ЛВС.
• Проверьте IP-адрес/маску подсети NBG-415N и
компьютеров ЛВС. Они должны находиться в
одинаковом диапазоне IP адреса
4 Не могу войти в Интернет.
• Проверьте подключение NBG-415N к
широкополосному модему.
• Выключите и перезагрузите широкополосный
модем и NBG-415N. Если вы используете
кабельный модем, то вы должны сначала
выключить именно его и подождать 2-3 минуты
перед подключением к NBG-415N.
•IP-адрес ГВС предоставляется после проверки
провайдером MAC-адреса, имени хоста и имени
пользователя. Узнайте метод верификации,
который использует ваш провайдер, и введите
информацию в соответствующие поля мастера
настройки
настройки ГВС.
• Проверьте правильность введения информации
вашей учетной записи
5 Я не могу подключиться к беспроводной ЛВС через
NBG-415N.
• Убедитесь, что пере
ВЫКЛ находится в положении ON[ВКЛ]. Этот
выключатель активирует ЛВС на NBG-415N.
Интернета или окна Расширенной
Интернета в полях мастера.
выключатель ON OFF[ВКЛ
одной подсети.
79
Page 81

РУССКИЙ
• Убедитесь, что беспроводной клиент настроен на
использование той же ЛВС и настроек
безопасности, что и NBG-415N.
• Убедитесь, что беспроводной клиент находится в
пределах радиуса действия NBG-415N.
• Убедитесь в отсутствии радиопомех (например, от
других беспроводных ЛВС или радиотелефонов).
Установка IP-адреса вашего
компьютера
В этом разделе показано как настроить Windows NT/2000/
XP на вашем компьютере для автоматического получения
IP-адреса. Обратитесь к Руководству пользователя для
получения информации о настройке IP-адреса для
компьютеров с другой версией Windows или
операционной системой Macintosh.
1 Для Windows XP, нажмите start [Пуск], Control Panel
[Панель управления]. Для Windows 2000/NT, нажмите
start [Пуск], Settings [Настройка], Control Panel
[Панель управления].
2 Для Windows XP, нажмите Network Connections [Мои
Cетевые подключения]. Для Windows 2000/NT,
нажмите Network and Dial-up Connections [Сеть и
удаленный доступ к сети].
80
Page 82

РУССКИЙ
3 Щелкните правой
клавишей мышки на
иконке Local Area
Connection
[Подключения по
локальной сети] и
нажмите Properties
[Свойства].
4 Выберите Internet
Protocol (TCP/IP)
[Протокол Интернет(TCP/
IP)] (на вкладке General
[Общие]) и нажмите
Properties [Свойства].
5 Откроется окно Internet Protocol TCP/IP Properties
[Свойства Интернет протокола TCP/IP] (на вкладке
General tab [Общие] дляWindows XP).
6 Выберите пункты Obtain an IP address automatically
[Получа
server address automatically[(Получа
сервера автоматически].
7 Нажмите OK, чтобы закрыть окно Internet Protocol
(TCP/IP) Properties [Свойства Интернет протокола
TCP/IP].
8 Нажмите Close [Закрыть] (OK для Windows 2000/NT),
чтобы закрыть окно Local Area Connection Properties
[Свойства подключений по локальной сети].
9 Закройте окно Network Connections [Мои сетевые
подключения].
ить IP-адрес автоматически] и Obtain DNS
ить адрес DNS
81
Page 83

РУССКИЙ
Просматривание Сертификатов
вашего изделия
1 Посетите сайт www.zyxel.com.
2 Выберите ваш продукт из выпадающего списка на
домашней странице ZyXEL и перейдите на его
страницу.
3 Выберите на этой странице сертификат, который вы
хотите просмотреть.
82
Page 84

SVENSKA
A
VENSK
Introduktion
NBG-415N låter mer än en dator i ditt nätverk dela en
Internet-anslutning. Du kan även använda NBG-415N för
att installera ett trådlöst nätverk.
1 Maskinvaruanslutningar
3
1LAN: Använd en Ethernet-sladd för att ansluta en dator
till en LAN-port för Internet-åtkomst.
2WAN: Använd Ethernet-sladden som medföljde ditt
DSL/kabelmodem för att ansluta till Ethernet-porten på
DSL/kabelmodemet.
3STRÖM: Använd enbart den medföljande
strömadaptern för att ansluta uttaget POWER till en
lämplig strömkälla.
2
83
1
Page 85

SVENSKA
1.1 Kontrollera indikatorlamporna
• Indikatorlampan PWR lyser.
• Indikatorlampan WLANlyser stadigt.
• Indikatorlamporna WAN och/eller LAN lyser och blinkar
ibland ifall de motsvarande portarna är rätt anslutna.
V Om ingen indikatorlampa tänds, koppla bort
enheten och kontrollera dina
maskinvaruanslutningar på nytt.
2 Öppna NBG-415N
1 Starta din webbläsare. Ange
192.168.10.1 (standard LAN
IP-hanteringsadress) i fältet
Location (plats) eller Address (adress). Tryck på
[ENTER].
2 Inloggningsskärmen visas.
Välj admin i fältet User
Name (användarnamn),
ange “1234”
(standardlösenordet) och
klicka på Login (inloggning)
för att logga in.
84
Page 86

SVENSKA
3 Webbkonfiguratorns
huvudskärm visas.
3 Guide för
Internetinstallation
1 Klicka på START > WIZARD > Launch Internet
Connection Setup Wizard (START-GUIDE-starta
installationsguide för Internet-anslutning) för att visa
den första guideskärmen. Klicka på Next (nästa) på
varje skärm för att fortsätta. NBG-415N har eventuellt
redan detekterat din Internet-anslutning.
2 Ändra
inloggningslösenordet på
den andra guideskärmen.
Lösenordet är
skiftlägeskänsligt.
3 Välj tidszon för din
geografiska plats.
85
Page 87

SVENSKA
4 Välj din Internet-
anslutningstyp.
5 Nästa guideskärm varierar
beroende på vilken
anslutningstyp du har valt.
Konfigurera fälten med den
information du fått av din
Internet-leverantör (ISP)
och klicka på Next (nästa).
6 På den sista guideskärmen
klickar du på Connect
(anslut) för att spara
inställningarna till NBG415N.
7 Klicka på Reboot the Device (starta om enheten) för att
starta om NBG-415N och låta ändringarna börja gälla.
Vänta några minuter tills
NBG-415N slutfört
omstarten innan du får
åtkomst till den igen.
8 Testa din Internet-
anslutning. Öppna din
webbläsare och ange vilken webbsideadress som helst,
t ex http://www.zyxel.com).
86
Page 88

SVENSKA
V Om du inte kan koppla upp dig på Internet,
kontrollera att du har angett din Internetkontoinformation rätt på guideskärmarna.
4 Installationsguide för trådlöst LAN
1 Klicka på START > WIZARD > Launch Wireless
Security Setup Wizard (START-GUIDE-starta
installationsguide för trådlös säkerhet) för att visa den
första guideskärmen. Klicka på Next (nästa) på varje
skärm för att fortsätta.
2 I fältet Wireless Network
Name (namn på trådlöst
nätverk), ange ett
beskrivande namn som
identifierar det trådlösa
nätverket. För att kunna ansluta till detta trådlösa
nätverk, måste trådlösa klienter associera med detta ID.
87
Page 89

SVENSKA
3 Följ anvisningarna på
skärmen och välj ett
trådlöst säkerhetsläge.
4 Nästa skärm visas om du
aktiverar ett trådlöst
säkerhetsläge. Ange ett
lösenord som NBG-415N
använder för att generera
en unik trådlös hemlig
nyckel.
5 Kontrollera dina trådlösa
LAN-inställningar på denna
skärm och klicka på Save
(spara) för att spara
inställningarna till NBG415N.
6 Klicka på Reboot the
Device (starta om enheten)
för att starta om NBG-415N
och låta ändringarna börja
gälla.
7 Vänta några minuter tills
NBG-415N slutfört omstarten innan du får åtkomst till
den igen.
88
Page 90

SVENSKA
5 Inställning av trådlös anslutning
med Windows® Connect Now
Med Windows® Connect Now kan du överföra trådlösa
inställningar på din NBG-415N till ett USB.minne och
därefter spara inställningarna till den trådlösa
klientdatorn(datorerna). På detta vis kan du enkelt
installera ett trådlöst LAN. För att kunna dra fördel av
denna funktion behöver du:
• Ett USB-minne med minst 300 K ledigt minne.
• Windows XP med Service Pack 2 (SP2).
Följ stegen nedan för att installera ett trådlöst LAN med
Windows® Connect Now.
1 Klicka på Start > Control
Panel (kontrollpanelen) och
dubbelklicka på Wireless
Network Setup Wizard
(installationsguide för
trådlöst nätverk).
89
Page 91

SVENSKA
2 Den första guideskärmen visas.
Klicka på Next (nästa) på varje
skärm för att fortsätta.
3 Välj Set up a new wireless
network (installera ett nytt
trådlöst nätverk) för att
konfigurera ett nytt trådlöst
nätverk.
4 I fälttet Network name (SSID)
(nätverksnamn (SSID)), ange ett
unikt namn som identifierar ditt
trådlösa LAN.
5 Välj Automatically assign a
network key (tilldela
nätverksnyckel automatiskt) för
att låta Windows skapa en
säkerhetsnyckel.
6 Välj Use WPA encryption instead of WEP (använd
WPA-kryptering i stället för WEP) för datakryptering.
90
Page 92

SVENSKA
7 Välj Use a USB Flash drive to
set up a wireless network
(använd USV-flashenhet för att
installera ett trådlöst nätverk).
8 Anslut USB-enheten till din dator
och specificera enhetsbokstaven
i fältet Flash drive (flashenhet).
9 Följ instruktionerna på skärmen.
10Denna skärm visas när du har
slutfört inställningen av ett säkert
trådlöst nätverk. Klicka på Finish
(slutför).
11Från en trådlös dator, testa din
trådlösa LAN-anslutning till
NBG-415N.
91
Page 93

SVENSKA
Felsökning
1 Ingen indikatorlampa tänds när NBG-415N är påslagen.
• Kontrollera att du använder den medföljande strömadaptern för att ansluta till NBG-415N och att den är
ansluten till en lämplig strömkälla.
• Kontrollera alla sladdanslutningar.
• Om indikatorlamporna fortfarande inte tänds, kan du
stå inför ett maskinvaruproblem. I sådant fall bör du
kontakta din lokala återförsäljare.
2 Det går inte att få åtkomst till NBG-415N från LAN.
• Kontrollera sladdanslutningen mellan NBG-415N
och din dator eller hubb. Se Maskinvaruanslutningar för
mer information.
• Pinga NBG-415N från en LAN-dator.
• Kontrollera att datorns Ethernet-kort är installerat
och fungerar som det ska.
3 Det går inte att pinga någon dator i LAN.
• Om LAN-indikatorlamporna är släckta, kontrollera
sladdanslutningarna mellan NBG-415N och LANdatorerna.
92
Page 94

SVENSKA
• Verifiera att IP-adress och subnetmask för NBG415N och LAN-datorerna befinner sig inom samma
IP-adressintervall.
4 Det går inte att ansluta till Internet.
• Kontrollera NBG-415N:s anslutning till bredbandsmodemet.
• Stäng och och starta om både bredbandsmodemet
och NBG-415N. Om du använder ett kabelmodem
måste du först stänga av ditt kabelmodem och sedan
vänta 2-3 minuter innan du ansluter kabelmodemet
till NBG-415N.
• WAN IP tillhandahålls sedan Internet-leverantören
verifierat MAC-adress, värdnamn eller användar-ID.
Ta reda på vilken verifieringsmetod som din ISP
använder och konfigurera de motsvarande fälten i
Internet-guidens skärmar eller på den avancerade
WAN-skärmen.
• Kontrollera att du har angett din Internet-kontoinformation korrekt på guideskärmarna.
5 Det går inte att ansluta till det trådlösa LAN via NBG-
415N.
• Kontrollera att omkopplaren ON OFF befinner sig i
läget ON (på) för att aktivera det trådlösa LAN på
NBG-415N.
• Kontrollera att den trådlösa klienten är inställd för att
använda samma trådlösa LAN- och säkerhetsinställningar som NBG-415N.
• Kontrollera att den trådlösa klienten befinner sig
inom överföringsräckvidd för NBG-415N.
93
Page 95

SVENSKA
• Kontrollera att det inte förekommer någon radiointerferens (t ex från andra trådlösa LAN eller sladdlösa
telefoner).
Ställa in datorns IP-adress
I detta avsnitt beskrivs hur du ställer in din dator med
Windows NT/2000/XP så att den hämtar en IP-adress
automatiskt. Se bruksanvisningen för IPadresskonfiguration för andra Windows och Macintosh
operativsystem.
1 I Windows XP, klicka på Start, Control Panel
(kontrollpanelen). I Windows 2000/NT, klicka på Start,
Settings(inställningar), Control Panel
(kontrollpanelen).
2 I Windows XP, klicka på Network Connections
(nätverksanslutningar). I Windows 2000/NT, klicka på
Network and Dial-up Connections (nätverk och
uppringda anslutningar).
94
Page 96

SVENSKA
3 Högerklicka på Local Area
Connection (LAN-
anslutningar) och klicka
sedan på Properties
(egenskaper).
4 Välj Internet Protocol
(TCP/IP) (Internetprotokoll)
(under fliken General
(allmänt) i Win XP) och
klicka på Properties
(egenskaper).
5 Skärmen Internet
Protocol TCP/IP Properties (Internetprotokoll TCP/IP
Egenskaper) öppnar fliken General (allmänt) i
Windows XP).
6 Välj alternativen Obtain an IP address automatically
(skaffa IP-adress automatiskt) och Obtain DNS server
address automatically (skaffa DNS-serveradress
automatiskt).
7 Klicka på OK för att stänga fönstret Internet Protocol
(TCP/IP) Properties (Internetprotokoll (TCP(IP)
Egenskaper).
8 Klicka på Close (stäng) (OK i Windows 2000/NT) för att
stänga fönstret Local Area Connection Properties
(LAN-anslutning Egenskaper).
9 Stäng skärmen Network Connections
(nätverksanslutningar).
95
Page 97

SVENSKA
Visa din produkts certifikat
1 Gå till www.zyxel.com.
2 Välj din produkt från rullgardinslistrutan på ZyXEL:s
hemsida för att gå till denna produkts sida.
3 Välj det certifikat du vill titta på från denna sida.
96
Page 98

繁體中文
中文
繁體
簡介
NBG-415N 可讓網路上的多台電腦共用同一網際網路連線。您也
可以使用 NBG-415N 設定無線網路。
1 硬體連接
3
1 LAN: 使用乙太網路線將電腦連接至區域網路埠以接取網際
網路。
2 WAN: 使用 DSL/ 纜線數據機隨附的乙太網路線連接至 DSL/
纜線數據機的乙太網路埠。
3 POWER:使用隨附的電源轉接器將 POWER 插槽連接至合適的
電源。
2
1
1.1 檢查 LED ( 指示燈 )
• PWR LED 指示燈亮起。
• WLAN LED 指示燈穩定亮著。
97
Page 99

繁體中文
• 如果對應的連接埠連接正確,則 WAN 及 / 或 LAN LED 指示燈
會亮起並間歇閃爍。
V 如果 LED 指示燈都沒有亮,請拔除裝置的插頭,
再檢查一次硬體連接。
2 存取 NBG-415N
1 啟動網頁瀏覽器,在 Location
( 位置 ) 或 Address ( 位址 )
欄位輸入 192.168.10.1 ( 預
設的管理區域網路 IP 位址 ),然後按 [ENTER]。.
2 出現登入畫面。選取 User
Name ( 使用者名稱 ) 欄位中
的 admin ( 管理員 ),輸入
"1234" (預設密碼) 再按一下
Login (登入)。
3 顯示網頁設定介面的主
畫面。
3 網際網路精靈設
定
1 按一下 START ( 開始 )
> WIZARD ( 精靈 ) > Launch Internet Connection Setup
Wizard ( 啟動網際網路連線設定精靈 ),顯示第一個精靈畫
98
Page 100

繁體中文
面。在各畫面按一下 Next ( 下一步 ) 以繼續進行下個步
驟。NBG-415N 可能已經偵測到您的網際網路連線。
2 在第二個精靈畫面中變更登
入密碼。密碼區分大小寫。
3 選取您所在地區的時區。
4 選擇網際網路連線類型。
5 下一個精靈畫面會隨您選取
的連線類型而有所不同。利
用 ISP 提供您的資訊設定畫
面中的欄位,然後按一下
Next ( 下一步 )。
6 在最後一個精靈畫面中,按
一下 Connect ( 連線 ),將設
定儲存至 NBG-415N。
7 按一下 Reboot the Device (
重新啟動裝置 ),重新啟動 NBG-415N 並使變更生效。
99
 Loading...