

ZUMEX SPEED, SPEED TANK PODIUM User Manual

MANUAL DE USUARIO • USER´S MANUAL
MANUEL DE L´UTILISATEUR • BEDIENUNGSANLEITUNG
MANUALE D´USO
MANUAL DE USUARIO
ESPAÑOL
ES
ÍNDICE GENERAL
ZUMEX MÁQUINAS Y ELEMENTOS, S.A.
Políg. Ind. Moncada II · C/ La Closa · 16
46113 · Moncada · Valencia · España
Tel.: +34 961301251
Fax: +34 961301255
www.zumex.com
zumex@zumex.com
235.6151.001 Enero 2008
Refs.: ZUMEX SPEED, ZUMEX SPEED TANK PODIUM
ESPAÑOL, ENGLISH, FRANÇAIS, DEUTSCH, I TALIANO
1. INFORMACION GENERAL IMPORTANTE.......................................................
2. CARACTERÍSTICAS TÉCNICAS........................................................................
3. GARANTÍA...........................................................................................................
4. INSTRUCCIONES DE UTILIZACIÓN.........................................................................
4.1 PREPARACIÓN...........................................................................................
4.2 FUNCIONAMIENTO...............................................................................
4.3 LIMPIEZA................................................................................................
5. PLANOS DE DESPIECE Y LISTA PIEZAS DE REPUESTO.....................................
6. DETECCIÓN DE AVERÍAS Y CONSEJOS DE SEGURIDAD..................................
7. DECLARACIÓN DE CONFORMIDAD........................................................................
ANEXO:
ESQUEMAS ELÉCTRICOS ........................................................................................
Zumex se reserva el derecho a modificar sin previo aviso la información contenida en este manual.
4
5
6
7
7
9
11
13
16
17
82
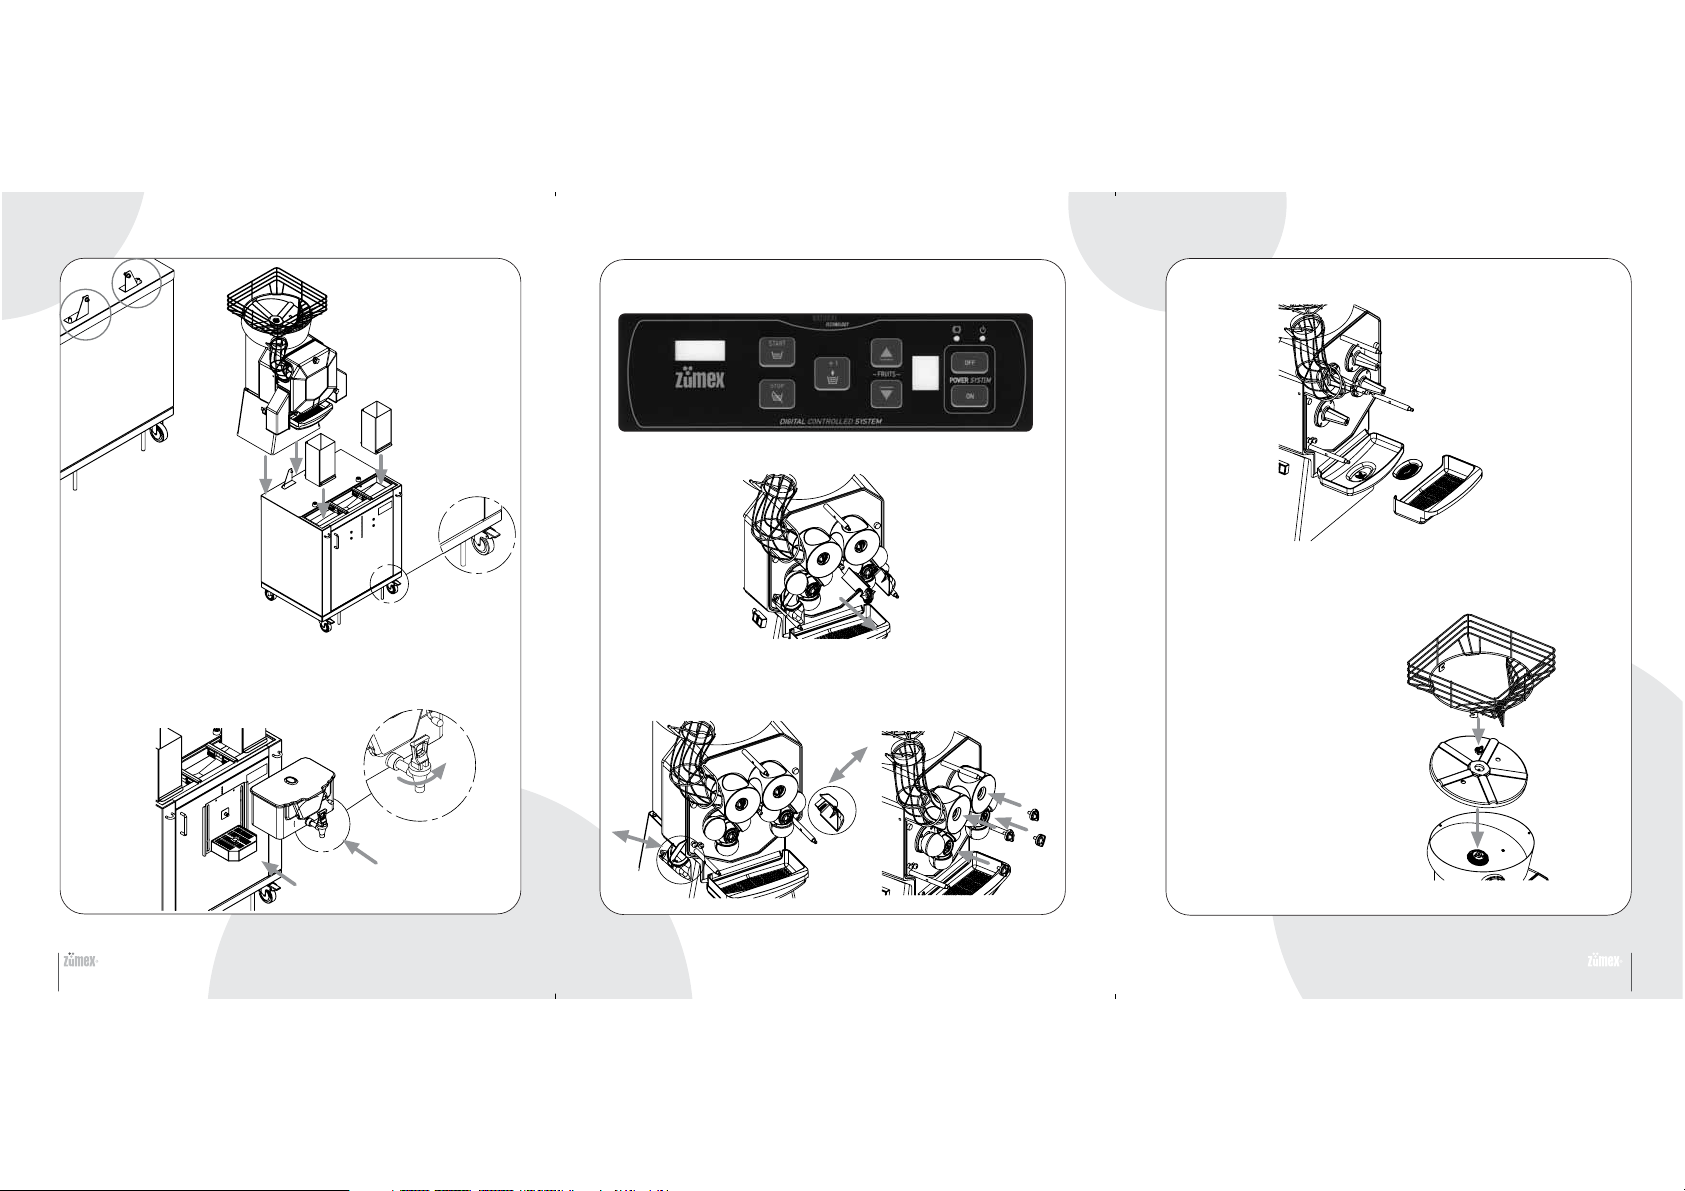
Fig. 2
Abb. 2
Fig. 4
Abb. 4
Fig. 8
Abb. 8
Fig. 1
Abb. 1
Fig. 3
Abb. 3
Fig. 6
Abb. 6
Fig. 5
Abb. 5
Fig. 7
Abb. 7
Fig. 9
Abb. 9
32
1. INFORMACIÓN GENERAL IMPORTANTE
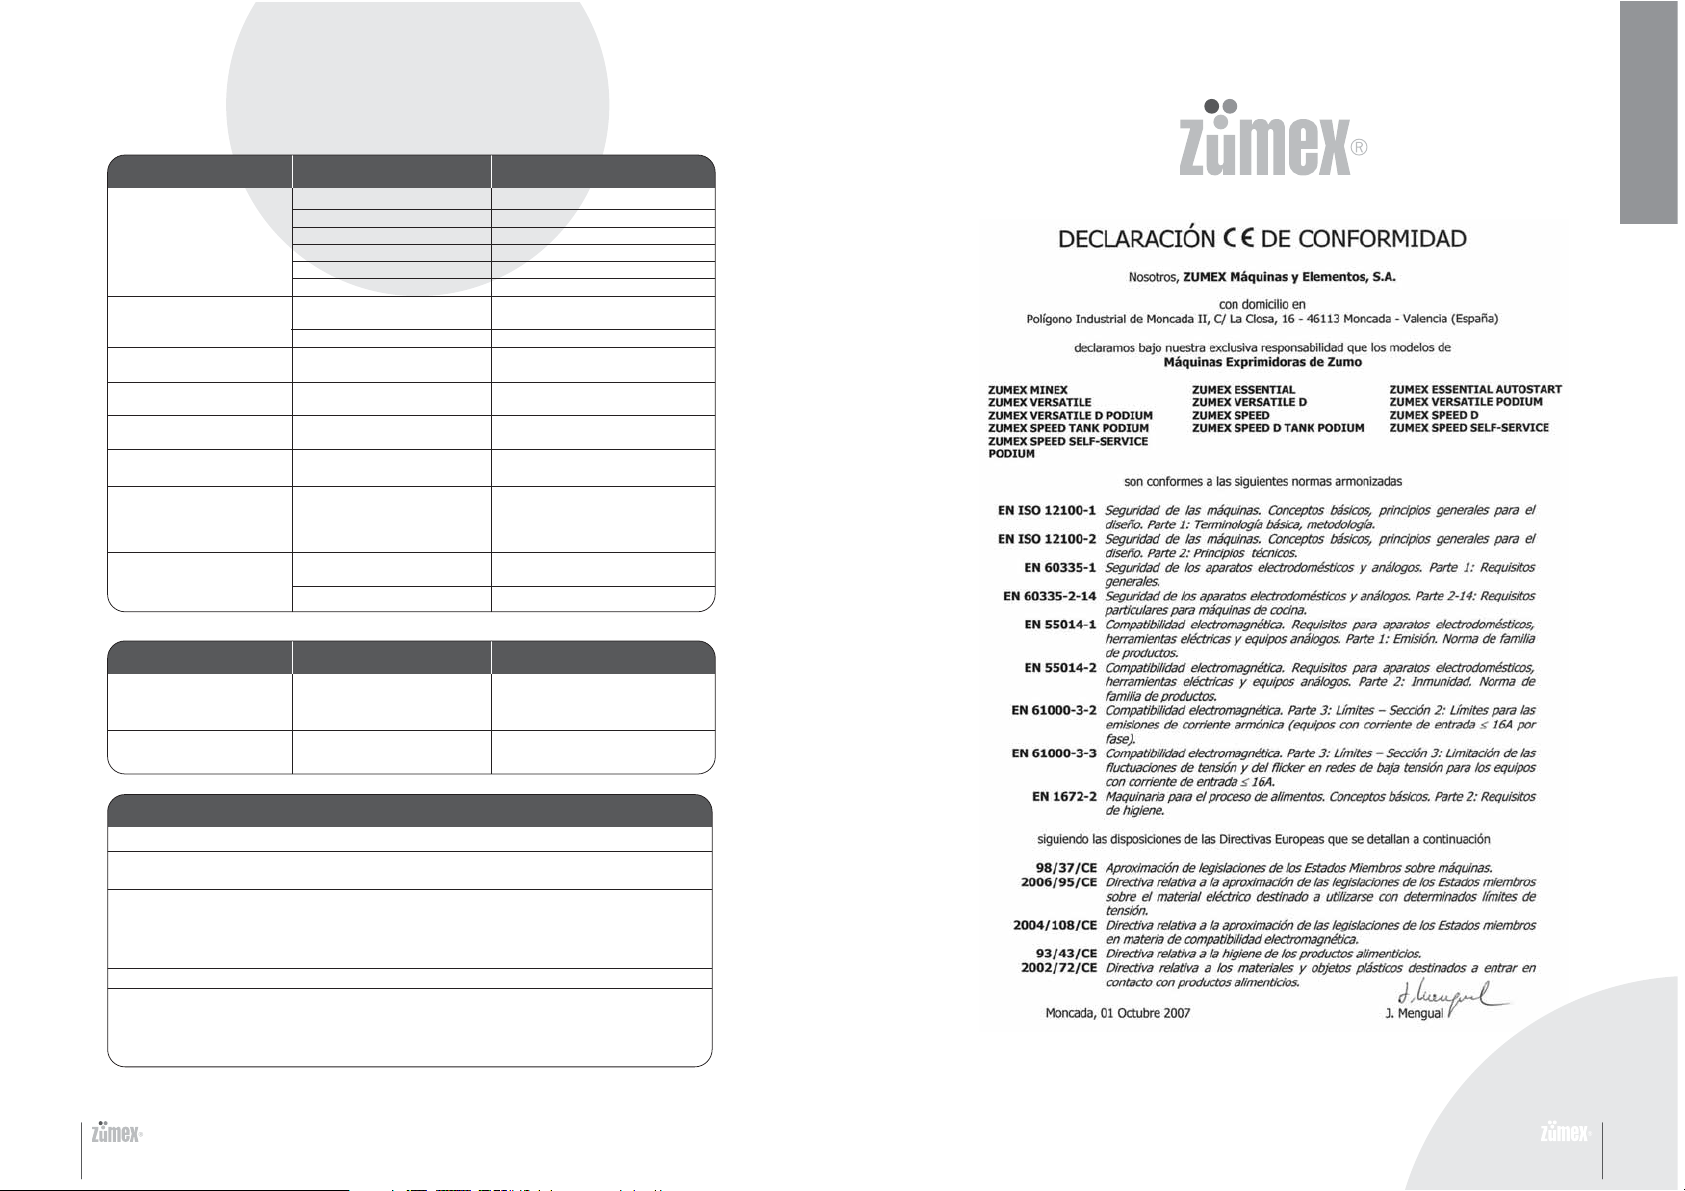
El presente manual hace referencia a los siguientes modelos de Zumex:
2. CARACTERÍSTICAS TÉCNICAS
MODELOS DE BARRA:
Zumex Speed
MODELOS CON MUEBLE:
Zumex Speed Tank Podium
• Los datos específicos de su exprimidora Zumex (tensión, frecuencia y otros datos
de interés), se encuentran en la Etiqueta de Identificación que encontrará tanto en
la portada de este manual como en la propia máquina.
• Recuerde que para cualquier consulta técnica, debe ponerse en contacto con su
Distribuidor habitual / Servicio de Asistencia Técnica Oficial, mencionando siempre
el Número de Serie de la Etiqueta de Identificación de la máquina.
• Antes de proceder a la limpieza de la máquina o realizar cualquier mantenimiento
desconéctela siempre de la red.
• Zumex adopta las medidas necesarias para que las máquinas puestas en el mercado
sean recogidas de manera selectiva y tengan una correcta gestión ambiental. Por
favor póngase en contacto con su distribuidor autorizado de Zumex para desechar
correctamente estas máquinas.
Zumex Speed D
Zumex Speed D Tank Podium
TANK PODIUM
ZUMEX SPEED D
ZUMEX SPEED
TANK PODIUM
ZUMEX
SPEED D
320 W para 115 V 60 Hz
280 W para 220-240 V 50/60 Hz
Doble detector magnético de seguridad
ES
Protección electrónica del motor
• Si tiene cualquier sugerencia o comentario para mejorar nuestras máquinas o red
de servicio, le agradeceríamos que contactase directamente con el Departamento
de Marketing de Zumex en la siguiente dirección:
ZUMEX MAQUINAS Y ELEMENTOS, SA
Pgno. Inds. Moncada II. c/ La Closa, 16
46113 Moncada, Valencia, España
Tfno.: + 34 961 301 251
Fax: + 34 961 301 255
E-mail: marketing@zumex.com
ZUMEX SPEED
MODELO
Naranjas por minuto 32 32 38 38
Dimensiones (cm) 64x62x99 64x62x99 68x72x176 68x72x176
Peso neto (kg) 60 62 101 103
Potencia
Protección IPX4
Nivel presión acústica Inferior a 70 dB (A)
Seguridad
Tamaño máximo fruta hasta 81 mm (recomendable entre 65 y 78 mm)
4 5

3. GARANTÍA
4. INSTRUCCIONES DE UTILIZACIÓN
4.1 PREPARACIÓN
• ALCANCE DE LA GARANTÍA: Esta máquina está
garantizada por un periodo de dos años contra toda reclamación
por fallos de materiales o de construcción que perjudique su
buen funcionamiento, siempre que no haya manipulación en
su interior o en sus mecanismos. Se excluyen de la presente
garantía los conceptos detallados a continuación.
• EXCLUSIONES: Mano de obra, desplazamiento, transporte,
piezas deterioradas por desgaste natural a consecuencia del
uso, así como daños que sean resultado de un mal uso o de su
incorrecta instalación, y averías producidas por causas de
fuerza mayor.
• La manipulación en la Etiqueta de Identificación de la máquina
anula la presente Garantía. Asimismo, dado que sólo el personal
de Servicio de Asistencia Técnica Oficial, está cualificado para
manipular esta máquina, esta garantía quedaría sin efecto en
el caso de que otras personas la manipularan.
• Para dirigirse a nuestro Servicio Técnico, será
indispensable mencionar el Nº DE SERIE de la Etiqueta
de Identificación.
Para comenzar a exprimir deberá seguir los siguientes pasos:
1º - Desembale su exprimidora y colóquela sobre una superficie lo
más horizontal posible.
2º - Asegúrese de que la tensión de la red coincida con la indicada
en la etiqueta de identificación de la máquina que encontrará tanto
en la portada de este manual como en la propia máquina.
3º - Modelos Zumex Speed y Zumex Speed D
En el interior de la base de la máquina encontrará las cubetas de
cortezas y la bandeja posavasos. Sitúe las cubetas a ambos lados
de la máquina debajo de las caídas de cortezas y la bandeja posavasos
con su filtro debajo de la salida de zumo.
4º - Modelos Zumex Speed Tank Podium y Zumex Speed D Tank
Podium
• Al adquirir una exprimidora Zumex Speed Tank Podium o Zumex
Speed D Tank Podium usted recibirá dos bultos. Desembale ambos
bultos, en uno encontrará la exprimidora y en otro el mueble.
• Una vez desembalado el mueble retire los tornillos de las escuadras
de sujeción Fig.1 (en el desplegable) y resérvelos para más tarde.
Prepare los siguientes componentes que encontrará en el interior
del mueble (para identificación de piezas ver apartado 5 del manual):
- Caídas de cortezas y bandeja goteo: Desembale y reserve para
la instalación
- Depósito de zumo: Desembale y prepárelo, coloque el agitador,
la tapa y enrosque el grifo
ES
6 7

• Para proceder a la instalación, bloquee con el pedal de freno las
ruedas delanteras del mueble y así evitar que se mueva durante la
instalación, detalle Fig. 2 (en el desplegable).
• Sitúe la máquina sobre el mueble Fig. 2 (en el desplegable), haciendo
coincidir las esquinas interiores de la base de la máquina con los dos
tacos de goma del mueble, de ese modo coincidirán los agujeros de
las escuadras de fijación con los de la máquina. Ahora podrá fijar la
máquina con los tornillos antes reservados.
4.2 FUNCIONAMIENTO
Funcionamiento en los modelos:
• Llene el alimentador de naranjas.
Zumex Speed
Zumex Speed Tank Podium
ES
• Coloque las caídas de cortezas, Fig. 2.
• Sitúe el depósito de zumo deslizándolo sobre las guías hasta el final
y fije la bandeja goteo del mueble con su filtro tal como indica la Fig.
3.
5º - Conecte el cable de la máquina a un enchufe normalizado provisto
de toma de tierra.
6º - Asegúrese de que la cubierta esté bien colocada, de lo contrario
los detectores de seguridad de la máquina harán que ésta no se
ponga en marcha.
RECUERDE:
Utilice fruta que no exceda de 81 mm
de diámetro
(aconsejado entre 65 y 78 mm)
• Ponga un vaso o jarra bajo la salida de zumo y pulse el botón verde que se encuentra
en el lateral izquierdo de la máquina. La máquina comenzará a exprimir zumo al
instante. Para detener el exprimido, pulse el botón rojo.
Funcionamiento en los modelos:
Zumex Speed D
Zumex Speed D Tank Podium
• Los modelos digitales le permitirán programar el número de naranjas que desea
exprimir cada vez que ponga la exprimidora en funcionamiento. Se pueden programar
desde 1 hasta 9 unidades. La cantidad programada permanece en memoria hasta una
nueva programación.
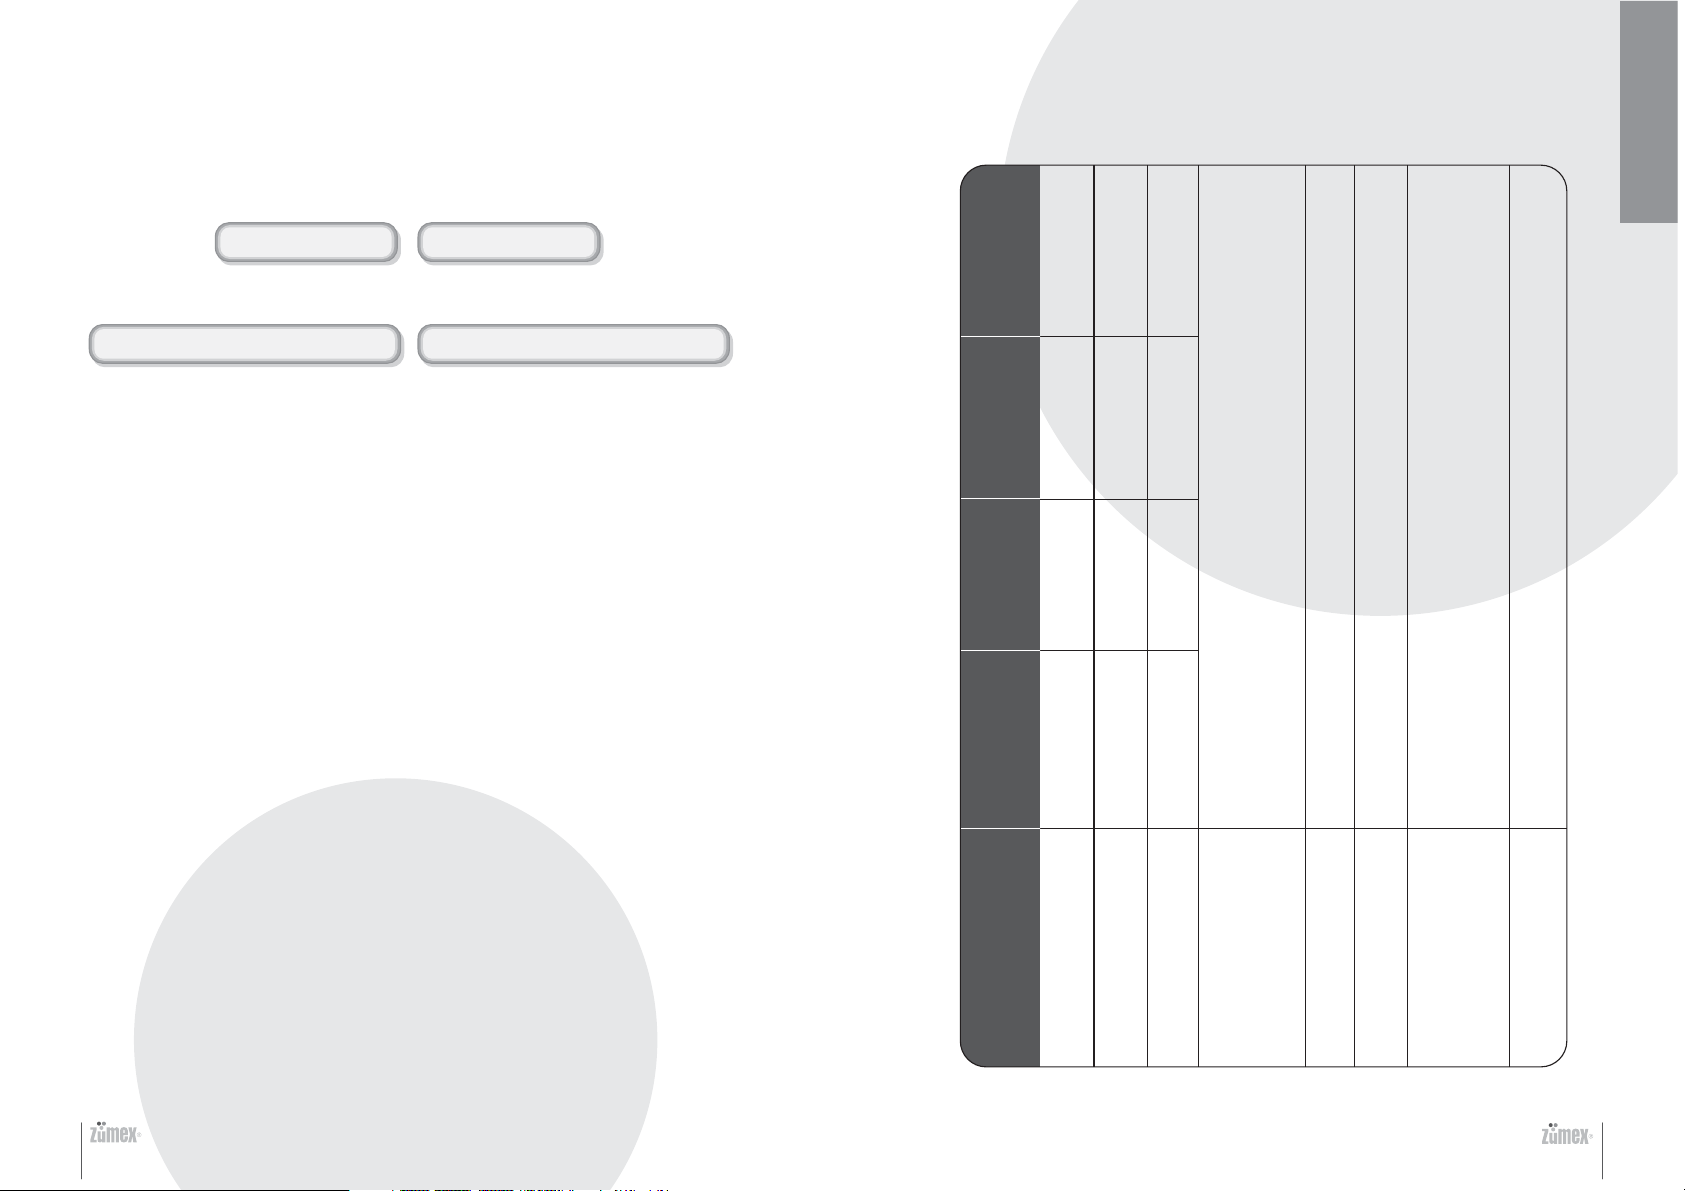
• Programación:
Guía de indicadores del panel digital (Fig.4):
1. Pulsador de marcha
2. Una fruta más
3. Aumentar nº de frutas programadas
4. Indicador de cubierta o cubeta mal
colocada
5. Indicador de conexión a red
6. Pulsador de desconexión
7. Pulsador de conexión
8. Contador parcial (nº frutas programadas).
Para exprimir en continuo poner a «C»
9. Disminuir nº de frutas programadas
10. Pulsador de paro
11. Contador totalizador
8 9

En el panel de mandos (Fig. 4) se iluminará una Iuz (nº 5) indicando que la máquina
está conectada a la red.
1º - Apriete el pulsador «ON» (nº 7) y se iluminará el contador parcial
(nº 8).
2º - Seleccione el número de frutas a exprimir por medio de los
pulsadores y . (nº 3 y 9). Cada vez que apriete el pulsador ,
el dígito correspondiente del contador aumentará una unidad. Cada
vez que apriete el pulsador , disminuirá una unidad. Una vez
terminado el ciclo de exprimido, se puede exprimir una fruta más
apretando el pulsador «+1» (nº 2) sin que por ello se modifique la
programación.
3º - Los modelos digitales también le permiten exprimir en continuo
(sin programación), de modo que la máquina trabaje hasta que vuelva
a apretar el botón de paro. Si desea exprimir en modo continuo,
seleccione “C” en el contador parcial (nº 8); la máquina parará cuando
Vd. apriete el pulsador «STOP» (nº 10).
• Para comenzar a exprimir, apriete el pulsador «START» (nº 1). Cuando haya exprimido
el número de frutas programado, la máquina se parará automáticamente.
• Si desea interrumpir el ciclo, puede apretar el pulsador «STOP» (nº 10) y la máquina
se parará cuando termine de exprimir la fruta que en ese momento esté exprimiendo
sin esperar a terminar el ciclo.
• Si, por el contrario, aprieta el pulsador «OFF» (nº 6), la máquina parará en ese mismo
instante, debiendo reiniciar la maniobra de puesta en marcha.
• El contador total (nº 11) le indicará el total de frutas exprimidas desde el primer día.
No es posible actuar sobre él sin dañar el circuito. Hay que resaltar que la máquina
cuenta frutas exprimidas y no las maniobras. Si en un periodo de 30 segundos la
máquina no detecta ningún exprimido (no se enciende un punto rojo en la esquina
inferior derecha del contador parcial), ésta se parará automáticamente y verá el
mensaje “P” en pantalla. Esto puede ocurrir por fallo de naranja o por que la sensibilidad
de la máquina está ajustada demasiado baja. Para continuar, pulse la tecla de paro
«STOP». Si fuera necesario ajustar la sensibilidad de la máquina, póngase en contacto
con su distribuidor habitual.
4.3 LIMPIEZA
Para una correcta limpieza deberá seguir los siguientes pasos:
1-Desconecte la máquina de la red.
2-Desmonte la cubierta delantera.
3-Desmonte el portacuchillas (Fig. 5) tirando hacia Vd., desde el asa.
¡Atención! maneje esta pieza con mucho cuidado, ya que podría
cortarse.
4-Saque de sus soportes las cuñas extractoras de cortezas (Fig. 6).
5-Desmonte los tambores de exprimido por parejas, desenroscando
previamente los volantes que los sujetan (Fig. 7).
6-Desmonte los filtros de zumo (Fig.8).
7- En los modelos con mueble desmonte las caídas de cortezas y el
depósito.
• Todas las piezas, EXCEPTO LA CUBIERTA Y EL DEPÓSITO DE ZUMO, pueden
introducirse en el lavavajillas para su lavado.
• La limpieza de la zona de exprimido, de la cubierta y del depósito de zumo, deberá
hacerla usando una bayeta suave empapada con agua y jabón apto para vajillas.
• Después, aclare con abundante agua limpia para que no queden restos de jabón.
• Una vez terminado el proceso de limpieza, deberá montar todos los elementos en
orden inverso a su desmontaje. Asegúrese de que todas las piezas están correctamente
ensambladas y sujetas.
• Para limpiar el interior del grifo, llene el depósito de agua limpia y accione el grifo,
de esta forma eliminará los restos de zumo y pulpa que puedan encontrarse en la
conducto del grifo. Para una limpieza más profunda desmonte el grifo completamente.
• Recuerde que cada extractor (Fig. 6) sólo encaja en un lado, por lo que no son
intercambiables. Cuando los coloque asegúrese de que la pala de la cuña entre hasta
el fondo en la ranura del tambor de exprimido macho.
• Con objeto de evitar la acumulación de cera, es importante limpiar frecuentemente
el alimentador de fruta (Fig. 9).
• En los modelos con mueble asegúrese de limpiar la tolva y el interior del mueble
asegurándose de que no queden cortezas ni restos de pulpa.
ES
10 11

5. PLANOS DE DESPIECE Y LIST A DE PIEZAS DE REPUESTO
Zumex Speed
19
Zumex Speed Tank Podium
ES
RECUERDE:
• No introducir la cubierta delantera ni
el depósito en el lavavajillas, para su
limpieza puede utilizar una bayeta suave
empapada en agua con jabón apto para
vajillas. En ningún caso deberá utilizar
productos abrasivos ni ningún producto
anti-cal.
• Para limpiar el interior del grifo, llene
el depósito de agua limpia y accione el
grifo, de esta forma eliminará los restos
de zumo y pulpa que puedan encontrarse
en la conducto del grifo. Si el grifo se
obstruye con semillas, desenrosque la
parte superior del grifo (detalle Fig. 3) y
limpie.
17
8
12
9
14
15
Indice Referencia
1
260.0202.001
2
260.0203.000
3
33.013.001 CUBIERTA ZUMEX
33.0031.000
4
5
33.0024.000
6
13.115.002
7
33.0001.000
8
200.3364.000
33.0059.000
9
10
33.0013.000
12
225.0921.002 CODO ALIM D85 C BLOQUEO
13
33.0004.000
33.0002.000
14
260.0214.001
15
16
260.0213.001 BANDEJA POSAVASOS
33.0003.001
17
33.0034.000 PLATO ALIMENTADOR
18
260.0908.003
19
18
10
7
6
16
17
FILTRO ZUMO PLASTICO
FILTRO INTERIOR CUBETA ZUMO PLASTICO
TAMBOR MACHO
TAMBOR HEMBRA
DEPOSITO CORTEZAS CUADRADO
CUÑA EXTRACTORA DERECHA
TAPON SOPORTE RETEN
GOMA PROTECCION PULSADOR
PORTACUCHILLAS
KIT POMOS HEMBRA PLASTICO
CUÑA EXTRACTORA IZQUIERDA
FILTRO POSAVASOS
VOLANTE PLASTICO INYECCION
CESTA ALIMENTADOR BAYONETA
Descripción
5
4
3
13
2
1
12 13

19
Zumex Speed D
Zumex Speed D Tank Podium
Zumex Speed Tank Podium
Zumex Speed D Tank Podium
Mueble
ES
8
17
18
9
6
11
14
9
10
7
8
6
5
7
10
13
12
4
3
13
12
2
1
3
14
15
16
17
5
4
Indice Referencia
1
260.0202.001
2
260.0203.000
3
33.013.001 CUBIERTA ZUMEX
33.0031.000
4
5
33.0024.000
6
13.115.002
7
33.0001.000
8
200.3364.000
9
235.3064.001 CARATULA DIGITAL
10
33.0013.000
12
225.0921.002 CODO ALIM D85 C BLOQUEO
13
33.0004.000
33.0002.000
14
260.0214.001
15
16
260.0213.001 BANDEJA POSAVASOS
33.0003.001
17
33.0034.000 PLATO ALIMENTADOR
18
260.0908.003
19
FILTRO ZUMO PLASTICO
FILTRO INTERIOR CUBETA ZUMO PLASTICO
TAMBOR MACHO
TAMBOR HEMBRA
DEPOSITO CORTEZAS CUADRADO
CUÑA EXTRACTORA DERECHA
TAPON SOPORTE RETEN
PORTACUCHILLAS
KIT POMOS HEMBRA PLASTICO
CUÑA EXTRACTORA IZQUIERDA
FILTRO POSAVASOS
VOLANTE PLASTICO INYECCION
CESTA ALIMENTADOR BAYONETA
Descripción
21
Indice Referencia
180.0008.000
1
180.0007.000
2
3
220.0219.001
165.0001.003
4
120.0014.001
5
220.0217.002
6
7
33.0063.000
8
260.3416.002
9
260.3415.002
10
33.0060.000
11
33.0062.000
12
33.0061.000
13
260.0233.002
33.0025.000
14
RUEDA GIRATORIA CON FRENO
RUEDA GIRATORIA SIN FRENO
TOLVA MUEBLE
CUBO 43 LTS
IMAN CIERRE PUERTA
CAIDA CORTEZAS 265 MM MUEBLE
SOPORTE DEPOSITO COLOR INY
TAPA DEPOSITO ZUMO
CUERPO DEPOSITO ZUMO
GRIFO DEPOSITO ZUMO INY
AGITADOR DEPOSITO COMPLETO
FRONTIS Y BANDEJA GOTEO
FILTRO BANDEJA GOTEO
DEPOSITO ZUMO INY
Descripción
14 15
6. DETECCIÓN DE AVERÍAS Y CONSEJOS DE SEGURIDAD
• PARA TODOS LOS MODELOS
CAUSA POSIBLE CORRECCIÓNAVERÍA
La máquina no funciona
La máquina se bloquea a
menudo en el momento de
exprimir
Los tambores están
bloqueados
Los tambores pierden el
sincronismo
Las cuñas extractoras se
rompen
Se oye funcionar el motor pero
no giran los tambores
El grifo se obstruye
(Zumex Speed Tank Podium y
Zumex Speed D Tank Podium)
La máquina se para cada poco
tiempo
• SOLO EN LOS MODELOS DIGITALES
No se enciende la luz nº 5
(ver fig. 4)
Se enciende la luz nº 4
(ver fig. 4)
Máquina desenchufada
No llega corriente al enchufe
Cubierta mal colocada
Detectores de seguridad averiados
Pulsador ON/ OFF defectuoso
Circuito defectuoso
Tensión de red insuficiente
Circuito defectuoso
Atasco de naranjas
Avería interna
Cuñas extractoras mal colocadas
Avería interna
El zumo tiene semillas o exceso de
pulpa
Insuficiente ventilación
Sobrecarga eléctrica
CAUSA POSIBLE CORRECCIÓNAVERÍA
No llega corriente al enchufe
Cubierta mal colocada
Conéctela a la red
Compruebe el enchufe
Asegúrese de su correcta colocación
Avisar al Servicio Técnico
Avisar al Servicio Técnico
Avisar al Servicio Técnico
Comprobar que la tensión sea la
indicada en el manual
Avisar al Servicio Técnico
Eliminar atasco
Avisar al Servicio Técnico
Colocarlas según manual (Fig.6)
Avisar al Servicio Técnico
Quitar la parte superior del grifo
desenroscándolo y limpiar (detalle Fig.
3). Asegúrese que ambos filtros de la
cubeta de zumo están puestos
Revisar que las rejillas de ventilación
de la máquina no estén obstruidas
Avisar al Servicio Técnico
Compruebe que la máquina está bien
conectada y si no funciona avise al
Servicio Técnico
Compruebe que la cubierta esté bien
puesta.
ES
CONSEJOS IMPORTANTES DE SEGURIDAD
Cualquier acción para desbloquear la máquina debe realizarse desconectando la misma de la red.
Para evitar accidentes no manipule la máquina para hacerla funcionar sin los detectores de
seguridad de la cubierta protectora.
La cubierta actúa sobre los detectores de seguridad. El correcto funcionamiento de los detectores
de seguridad debe ser testado periódicamente, para ello, estando la máquina en marcha, retire
la cubierta y compruebe que la máquina se para. Si al llevar a cabo esta prueba la máquina no
se para, avise al Servicio Técnico.
Si el cable de alimentación está dañado, no lo manipule, avise al Servicio Técnico.
Cuando mueva un conjunto de máquina y mueble (Zumex Speed Tank Podium y Zumex Speed
D Tank Podium):
Desbloquee las ruedas delanteras del mueble.
Nunca empuje la máquina, empuje el mueble. Nunca tire del mueble hacia usted.
ZUMEX, MÁQUINAS Y ELEMENTOS S.A.
Pgno. Inds Moncada II · c/ La Closa, 16
46113 Moncada, Valencia, España
Tfno: +34 961 301 251 · Fax: +34 961 301 255
www.zumex.com · zumex@zumex.com
16 17

USER´S MANUAL
ENGLISH
INDEX
1. GENERAL INFORMATION ....................................................................................
2. TECHNICAL CHARACTERISTICS........................................................................
3. WARRANTY...........................................................................................................
4. INSTRUCTIONS FOR USE.......................................................................................
4.1 PREPARATION...........................................................................................
4.2 OPERATION.............................................................................................
4.3 CLEANING................................................................................................
5. DIAGRAMS WITH PARTS AND LIST OF SPARE PARTS.....................................
6. DETECTING FAULTS AND PROBLEMS AND SECURITY ADVICES..................
7. DECLARATION OF CONFORMITY........................................................................
EN
20
21
22
23
23
25
27
29
32
33
ANNEX:
ELECTRICAL DIAGRAMS ...............................................................................................
Zumex reserves the right to modify the information included in this manual with no prior warning.
82
18 19

1. GENERAL INFORMATION
This manual describes the general information for the following models of Zumex:
COUNTERTOP MODELS:
2. TECHNICAL CHARACTERISTICS
Zumex Speed
MODELS WITH BASE STAND:
Zumex Speed Tank Podium
• The specific data of your Zumex juicer (voltage, frequency and other important data)
are located on the ID Label, found on the first page of the manual and on the unit.
• Contact your Distributor / Official Technical Support Service for any technical
questions you might have, providing the Serial Number shown on the ID Label of the
unit.
• Disconnect the unit before carrying out any cleaning or maintenance procedures.
• Zumex adopts all measures required to collect units that are not in operation,
guaranteeing the correct environmental management practices. Please, contact your
Zumex authorized distributor to discard these units.
• Zumex Marketing Department will address all comments and suggestions you might
have about our units or service network. Please contact them directly at this address:
Zumex Speed D
Zumex Speed D Tank Podium
TANK PODIUM
ZUMEX SPEED D
ZUMEX SPEED
TANK PODIUM
ZUMEX
SPEED D
ZUMEX SPEED
64x62x99 64x62x99 68x72x176 68X72X176
25’20’’x 24’41’’x 38’98’’ 25’20’’x 24’41’’x 38’98’’ 26’77’’ x 28’35’’ x 69’29’’ 26’77’’ x 28’35’’ x 69’29’’
320 W for 115 V 60 Hz
Lower than 70 dB(A)
280 W for 220-240 V 50/60 Hz
Double magnetic safety detector
EN
Electronic motor protection
ZUMEX MAQUINAS Y ELEMENTOS, SA
Pgno. Inds. Moncada II. c/ La Closa, 16
46113 Moncada, Valencia, Spain
Tel.: + 34 961 301 251
Fax: + 34 961 301 255
E-mail: marketing@zumex.com
MODEL
Oranges per minute 32 32 38 38
Dimensions (cm/inches)
Net weight (kg/lb) 60/132 62/136 101/222 103/227
Power
Accoustic pressure level
Protection IPX4
Safety
Maximum fruit size 81mm (recommended between 65 y 78 mm)
20 21

3. WARRANTY
• SCOPE OF THE WARRANTY: The unit has a two-year
warranty against defects and construction problems that could
harm the correct operation, provided that the inner parts or
mechanisms have not been manipulated. The following are
excluded from the warranty.
• EXCLUSIONS: Labor, trips, transport, parts that have become
deteriorated due to natural wear as a consequence of use, as
well as any damage resulting from the incorrect usage or
installation of the unit and faults caused as a result of force
majeure.
• Any incorrect handling of the ID Label will make the Warranty
void. Likewise, the warranty will also be void if other persons
handle the unit, since only the Official Technical Support Service
is qualified and authorized to do so.
• Always provide the SERIAL Nº on the ID Label when
contacting the Technical Support Service.
4. INSTRUCTIONS FOR USE
4.1 PREPARATION
To operate the juicer, follow these steps:
1 - Remove the packaging and place the unit on a flat surface.
2 - Check that the voltage is set as indicated on the identification label
which you will find both on the cover of this manual and on the appliance
itself.
3 - Zumex Speed and Zumex Speed D models
EN
Inside the base of the appliance you will find the peel buckets and the
tray. Place the buckets on each side of the appliance under the peel
outlets, and the tray with its filter, under the juice outlet.
4 - Zumex Speed Tank Podium and Zumex Speed D Tank Podium models
• When you purchase a Zumex Speed Tank Podium or Zumex Speed D
Tank Podium juicer, you will receive two packages. Unpack both; one
contains the juicer and the other the base stand.
• Once you have unpacked the stand, remove the screws from the fixing
brackets, Fig. 1 (in the foldaway page) and keep them for later use.
Prepare the following components, which you will find inside the base
stand (to identify the parts, see Section 5 of the manual):
- Peel outlets and drip tray: Unpack and leave to be fitted later
- Juice tank: Unpack and prepare by fitting the agitator and
the cover and screwing in the tap
22 23

• To install the appliance, block the front wheels of the base stand using
the brake pedal to avoid the stand moving during installation. See detail
in Fig. 2 (see first page of the manual).
• Place the appliance over the base stand Fig. 2 (see first page of the
manual) lining up the inside corners of the machine with the two rubber
pegs on the stand, so that the holes in the fixing brackets coincide with
those in the machine. Now you can fix the machine in place using the
screws you removed and kept before.
4.2 OPERATION
Operation of Models:
Zumex Speed
Zumex Speed Tank Podium
• Fill the feeder with oranges.
• Fit the peel outlets, Fig. 2.
• Insert the juice tank sliding it along the guides to the end and fit the
stand’s drip tray with its filter, as indicated in Fig. 3.
5. Plug the appliance into a standard earthed socket.
6. Make sure the front cover is fitted properly otherwise the safety
detectors will stop the appliance from working.
REMEMBER:
Use oranges up to 81 mm (we
recommend between 65 mm and 78
mm)
• Place a glass or jug under the juice outlet and press the green button located on the
left side of the appliance. The juicer will start to extract juice immediately. To stop the
juicer, press the red button.
Operation of Models:
Zumex Speed D
Zumex Speed D Tank Podium
• The digital models allow the user to program the number of oranges to be used when
the juicer starts to operate. The system can program up to 9 pieces. The quantity
programmed will be stored in the memory until a new program is saved.
• Programming:
Guide for the indicators on the digital display (Fig. 4):
1. Start button
2. One more piece
3. Increase nº of pieces programmed
4. Wrong placement of cover indicator
5. Network connection indicator
6. Disconnection push-button
7. Connection push-button
8. Partial counter (nº fruit programmed).
For continuous juicing. Set to «C»
9. Decrease nº of fruit programmed
10. Stop button
11. Totals counter
EN
24 25

On the control panel (Fig. 4), the light will be lit (nº 5), indicating that the machine is
on.
1º - Press «ON» (nº 7) and the partial counter will be lit (nº 8).
2º - Select the number of pieces of fruit used with the push-buttons
and (nº 3 and 9). When you push the button, the corresponding
digit on the counter will increase the number of units. When you
press the button, the number of units will decrease. After the
juicing cycle has ended, more fruit can be used, by pressing «+ 1»
(nº 2). However, this will not affect the program.
3º - Digital models can also squeeze in continuous operation (no
programming required), so that the machine can operate until the
stop button is pressed again. If you wish to use the continuous
operation mode, select “C” in the partial counter (nº 8); the machine
will stop when you press «STOP».
• To start the operation, press «START» (nº 1). When the programmed number of fruits
has been squeezed, the machine will automatically stop.
• If you wish to stop the cycle, press «STOP» (nº 10) and the machine will stop squeezing
at that moment, even if the cycle has not ended.
• However, if you press «OFF» (nº 6), the machine will stop and the machine must be
started again to restart all operations.
• The total counter (nº 11) will indicate the total number of pieces of fruit squeezed
from the start of the operation of the unit. If the counter is manipulated, the circuit
will be damaged. We must highlight that the machine counts every unit that has gone
through the juicer and not the juicing operations. If the machine does not detect a
juicing process during a period of 30 seconds (a red spot is not detected at the lower
right of the partial counter) the machine will automatically stop and the display will
show a “P” on the screen. This can be due to a problem with the orange or because
the sensitivity of the unit is too low. To continue, press “STOP”. In case the sensitivity
of the unit has to be adjusted, contact your distributor.
4.3 CLEANING
Follow the next steps to clean correctly the machine:
1. Unplug the machine from the socket.
2. Remove the front cover.
3. Remove the blade holder (Fig. 5) pulling it towards you by the handle.
Warning! Handle with care as it could cut you.
4.Remove the peel ejectors from their supports (Fig. 6).
5. Remove the pressing units in pairs, after unscrewing the securing
knobs (Fig. 7).
6. Remove the juice filters (Fig. 8).
7. In the case of models with base stand remove the peel outlets and the
juice tank.
• All parts, EXCEPT THE COVER AND THE JUICE TANK, are dishwasher safe.
• Clean the juicing area, the cover and the juice tank with a soft cloth dipped in water
and washing-up soap.
• Rinse well with clean water to ensure no traces of soap remain.
• After cleaning, assemble all the components in reverse order to that in which they
were dismantled. Make sure all the components are correctly assembled and secured.
• To clean inside the tap, fill the tank with clean water and turn on the tap to eliminate
any remains of juice and pulp that may be left in the tap pipe. For more thorough
cleaning, dismantle the tap entirely.
• Remember that each peel ejector (Fig 6.) only fits on one side and therefore, they
cannot be changed over. When you replace them make sure that you insert the peel
ejector paddle right down to the end of the lower pressing unit.
• In order to avoid accumulation of wax, it is important to clean the fruit feeder
frequently. (Fig. 9).
• In models with base stand, make sure you clean the peel hopper and the inside of
the stand to eliminate any peel or pulp remains.
EN
26 27
 Loading...