

Page 1
Smart Media Phone
ZIP 49G
WWW.ZULTYS.COM
Quick Start Guide
Page 2
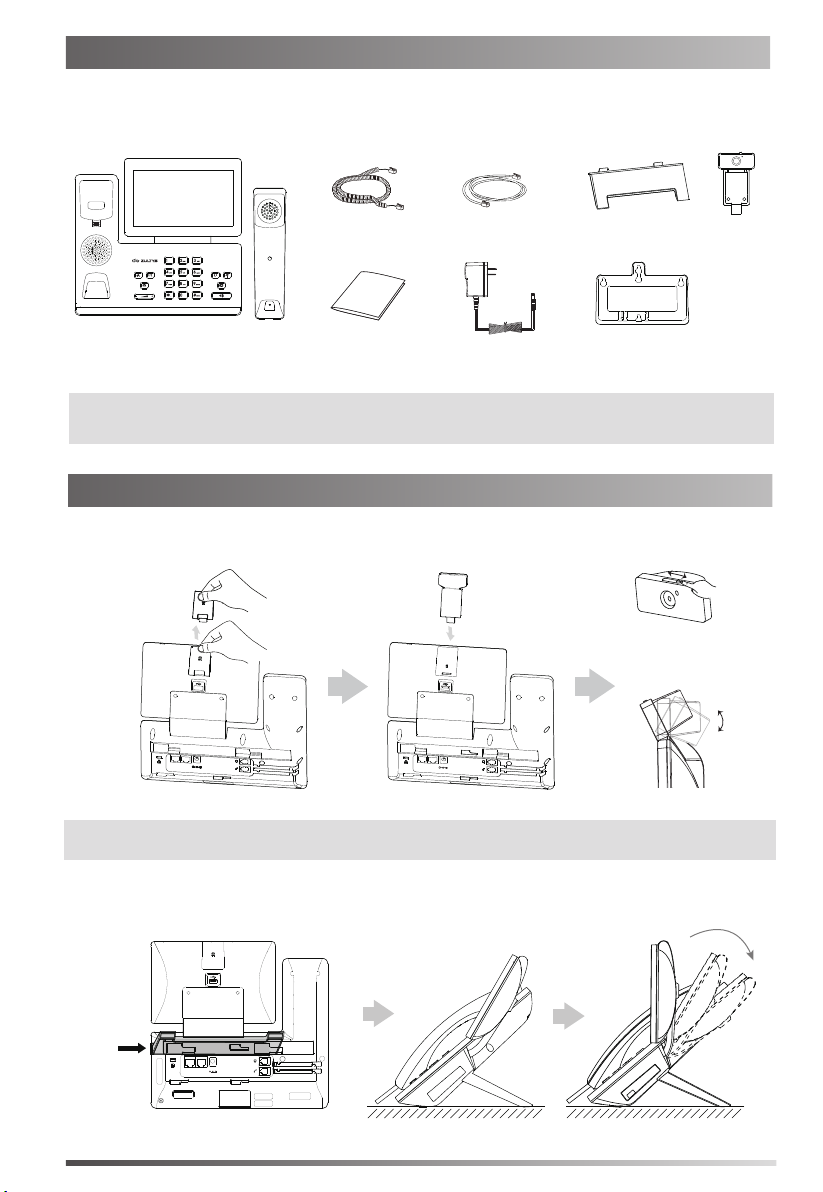
Packaging Contents
The following items are included in your package. If you find anything missing, contact your system
administrator.
Handset Cord
HandsetIP Phone
Note: The USB camera is an optional accessory for the ZIP 49G IP phone.
We recommend that you use the accessories provided or approved by ZULTYS. The use of unapproved
third-party accessories may result in reduced performance or damage.
Quick Start Guide
Ethernet Cable
(2m CAT5E FTP cable)
(Optional)
Stand
Wall Mount BracketPower Adapter
(Optional)
Camera
(Optional)
Assembling the Phone
1. Insert the optional camera, as shown below:
Adjust Shutter Switch
DC5V
PC
Internet
Note:
The optional camera can only be connected to the USB port on the top of the phone.
DC5V
PC
Internet
Adjust Camera Angle
2. Attach the stand and adjust the angle of touch screen, as shown below:
PUSH
2
DC5V
PC
Internet
Page 3
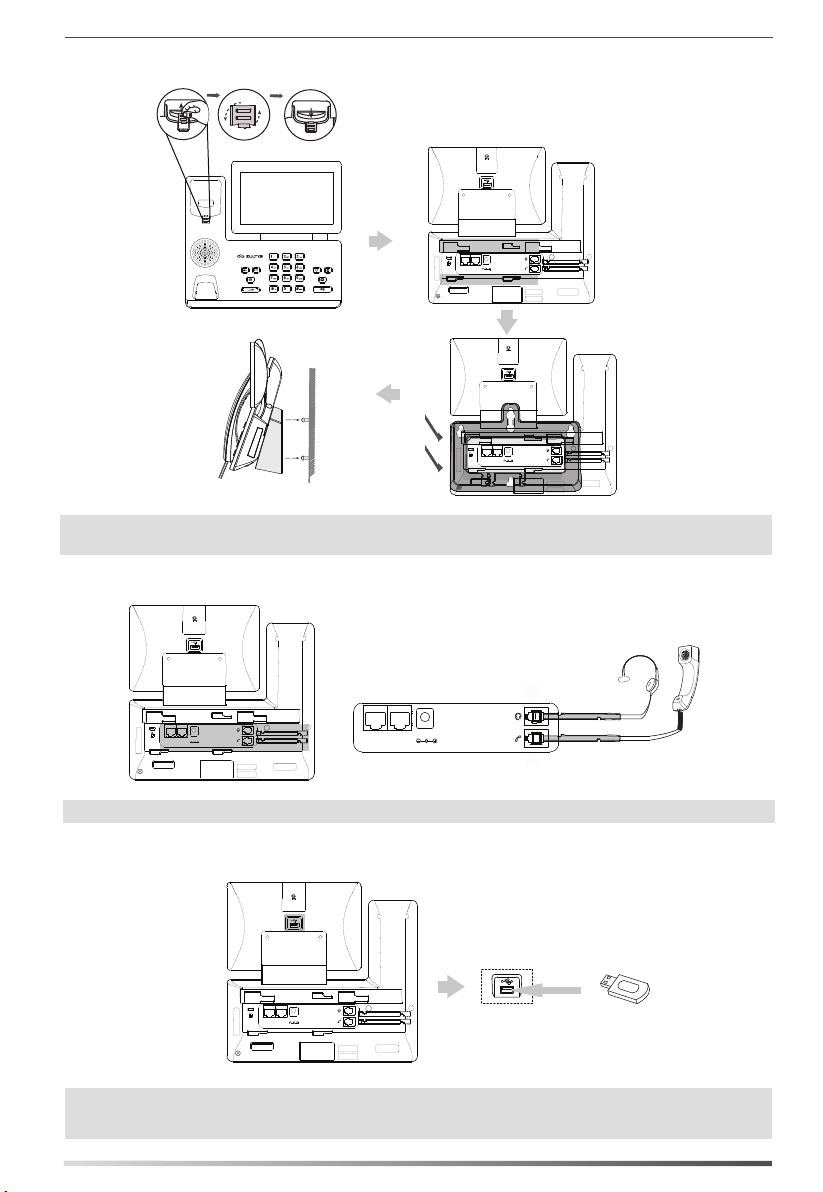
3. Attach the optional wall mount bracket, as shown below:
DC5V
PC
Internet
PUSH
Note:
The reversible tab has a lip which allows the handset to stay on-hook when the phone is mounted
vertically.
DC5V
PC
Internet
4. Connect the handset and optional headset, as shown below:
DC5V
PC
Internet
Note:
Headset purchased separately. The ZIP 49G may also be used with compatible Bluetooth & USB headsets
DC5V
PC
Internet
5. Connect the optional USB flash drive, as shown below:
DC5V
PC
Internet
The USB port (on the rear of the phone) can also be used to connect ZIP 450M Expansion Modules or a
Note:
compatible USB headset.
3
Page 4
6. Connect the power adapter or PoE, as shown below:
Power Adapter
(DC 5V)
DC5V
PC
A
Internet
AC Power Option
DC5V
PC
DC5V
PC
Internet
B
PoE ( Power over
Ethernet ) Option
Internet
IEEE 802.3af compliant
PoE Switch
Note: The IP phone should be used with a ZULTYS original power adapter (5V/2A) only or connected to an
IEEE 802.3af compliant PoE switch. The use of a third-party power adapter may cause damage.
7. Connect to the network, as shown below:
There are two options for network connection. Your system administrator will advise you which one
to use.
a) Connect to the wired network:
PC
PC Connection
(Optional)
DC5V
PC
DC5V
PC
Internet
Note: If you are connecting a PC to your phone, we recommend that you use the Ethernet cable provided by
ZULTYS.
Internet
b) Connect to the wireless network (Phone must be connected to power adapter):
1) Swipe down from the top of the screen to enter the control center.
2) Tap Settings->Basic->Wi-Fi.
3) Tap the On radio box in the Wi-Fi field.
The phone will automatically search for available
4) Select an available
wireless
network from the list of networks.
wireless
networks in your area.
5) If the network is secure, enter its password in the Password field.
6) Tap Connect to connect to the wireless network.
4
Page 5

Hardware Components
14
18
14
16
14
15
14
13
8
9
10
11
12
12
19
14
17
1
1
2
2
3
3
4
5
6
7
Item
1
Camera
2
Power Indicator LED
3
Touch Screen
4
HEADSET Key
5
MUTE Key
6
REDIAL Key
7
Speakerphone Key
DC5V
PC
Internet
Item
8
TRANSFER Key
9
HOLD Key
10
MESSAGE Key
11
Volume Key
12
Keypad
13
Speaker
14
Reversible Tab
Item
15
Hookswitch
16
Camera Lens
17
Camera Indicator LED
18
Shutter Switch
19
USB2.0 port
5
Page 6

Startup
After the IP phone is connected to the network
and supplied with power, it automatically begins
a process of initializing on the network and
downloading its configuration information.
Register status icons on the touch screen:
Welcome
Initializing... Please wait
Register Failed
Registered
(Green)
Note: Contact your system administrator if the phone fails to register with the IP phone system.
(Gray) (Green and Flashing)
Using Your Phone
Status Icons
The icons on the status bar of the touch screen provide information about phone:
Icons
(White)
(Green)
(White)
(Green)
(Green)
Description
Shows that camera is not detected.
Shows that Wi-Fi is turned on.
Shows that the phone is connected to wireless network successfully.
Shows that wired network is unavailable.
Shows that Bluetooth is turned on.
Shows that Bluetooth headset is paired successfully.
Shows that Bluetooth-Enabled mobile phone is paired successfully.
Shows that the phone is locked.
Shows that “Forward” is turned on.
Shows that “Do Not Disturb” is turned on.
Shows that “Auto Answer” is turned on.
Shows that you have missed calls.
Shows that you have unread voice mails.
Shows that ringer volume is set to “Silent”.
Shows that a USB flash drive is detected.
Registering
6
Page 7

Using the Touch Screen
By default, the IP phone supports three idle screens. The home screen displays as below:
Status Bar
Phone Dialer
Digital Clock Widget
Directory
History
Android Keys
Screen Indicator
Tap to expand key display
To navigate the touch screen:
Swipe left or right to switch among different idle screens.
Tap to go back to the previous screen.
Tap to return to the idle screen.
Tap to view and manage recently used applications.
To change the wallpaper:
1. Long tap an empty spot on the idle screen.
2. Tap WALLPAPERS.
3. Select a desired picture.
4. Tap Set wallpaper.
To add a widget to the idle screen:
1. Long tap an empty spot on the idle screen.
2. Tap WIDGETS.
3. Drag the desired widget up/down/left/right to the desired destination on the idle screen.
Control Center and Notification Center
Swipe down from the top of the screen to enter the control center and the notification center.
Display the phone’s time and date.
Control Center
To turn on/off common functions quickly, capture a
screenshot or go to the Settings screen, tap
corresponding icons.
To adjust the screen brightness, drag the slider.
Notification Center
Notification center displays the list of Notification,
Missed Calls, Voice Mail and Forwarded.
To delete all notifications, tap .
To delete a specific notification, swipe left or right.
To view the details, tap the desired notification message.
Android keys.
Swipe up from the bottom of the screen to hide this screen.
7
Page 8

Entering and Updating Data
To use onscreen keyboard:
1.Tap the input field, the onscreen keyboard will display on the touch screen:
Tap to backspace.
Label automatically to identify the
context-sensitive features.
Tap Next to go to next field.
Tap Done to confirm the settings.
Tap Send to dial out the number.
Tap Go to browse the web page.
Tap to switch to the uppercase input mode.
Tap to switch to the numeric&symbolic input
mode.
Tap to access input options to configure Input Languages or Android Keyboard Settings(AOSP).
2.When you finish entering, tap to hide the onscreen keyboard.
To use keypad:
Dial or enter number.
To select a field option:
Tap the field name, tap the desired option in the pop-up dialog box.
Basic Call Features
Placing a Call
Using the handset:
1. Pick up the handset.
2. Enter the number, and then tap Send.
Using the speakerphone:
1. With the handset on-hook, enter the number.
2. Then press or the Send soft key.
Using the headset:
1. With the headset connected, press to activate the headset mode.
2. Enter the number, and then tap Send.
Answering a Call
Using the handset:
Pick up the handset.
Using the speakerphone:
Press or the Answer soft key.
Using the headset:
Press
or the Answer soft key if headset mode is active.
Controlling Video During a Call
To change the video view:
Tap Full Screen to display the video in full screen.
Tap to return.
To turn on/off near-end video during a call:
Swipe down from the top of the screen to enter the control center, tap Video to turn on/off the
near-end video.
8
Page 9

Ending a Call
Using the handset:
Hang up the handset or tap the EndCall soft key.
Using the speakerphone:
Press or tap the EndCall soft key.
Using the headset:
Tap the EndCall soft key.
Redial
Press to enter the Placed Calls list, and then tap the desired entry.
Press twice when the phone is idle to call the last dialed number.
Call Mute and Un-mute
Press to mute the microphone during a call.
Press again to un-mute the call.
Call Hold and Resume
To place a call on hold:
Press or tap the Hold soft key during an active call.
To resume the call, do one of the following:
If there is only one call on hold, press or tap the Resume soft key.
If there is more than one call on hold, tap the call you want to resume, and press or tap
the Resume soft key.
Call Transfer
You can transfer a call in the following ways:
Blind Transfer
1. Press or tap the Transfer soft key during a call. The call is placed on hold.
2. Enter the number you want to transfer to.
3. Press to complete the transfer. Alternatively press Transfer soft key for options.
Semi-Attended Transfer
1. Press or tap the Transfer soft key during a call. The call is placed on hold.
2. Enter the number you want to transfer to, and then press .
3. Press or tap the Transfer soft key when you hear the ring-back tone.
Attended Transfer
1. Press or tap the Transfer soft key during a call. The call is placed on hold.
2. Enter the number you want to transfer to, and then press .
3. Press or tap Transfer soft key when ready to complete transfer. Press EndCall to cancel.
Call Forward
To enable call forward:
1. Swipe down from the top of the screen to enter the control center.
2. Tap Settings->
Features->Call Forward.
3. Select the desired forward type:
Always Forward----Incoming calls are forwarded unconditionally.
Busy Forward----Incoming calls are forwarded when the phone is busy.
No Answer Forward----Incoming calls are forwarded if not answered after a period of time.
4. Enter the number you want to forward to. For No Answer Forward, tap the After Ring Time
field, and then tap the desired ring time to wait before forwarding.
5. Tap to accept the change.
9
Page 10

Call Conference
1. Tap the Conference soft key during an active call. The call is placed on hold.
2. Enter the number of the second party, and then press or tap Conference.
3. Tap the Conference soft key again when the second party answers. All parties are now joined in
the conference. Up to 4 calls may be conferenced by repeating steps 2 & 3.
4. Tap the EndCall soft key to disconnect all parties.
Note: You may add a held call to a conference by selecting if from the screen after tapping Conference.
Voice Message
Message waiting indicator on the idle screen indicates that one or more voice messages are waiting
at the message center. The power indicator
To listen to voice messages:
LED slowly flashes red.
2. Follow the voice prompts to listen to your voice messages.
Customizing Your Phone
Call History
1. Tap , and then select the desired call list on the left.
2. Drag up and down to scroll.
3. Tap after the desired entry, and then you can do the following:
Tap Send to place a call.
Tap Add to add the entry to the local directory.
Tap Edit to edit the phone number of the entry before placing a call.
Tap Blacklist to add the entry to the blacklist.
Tap Delete to delete the entry from the list.
Contact Directory
To add a contact to Local Directory or Blacklist:
1. Tap , and then select the desired group on the left.
2. Tap to add a contact.
3. Enter a unique contact name in the Name field and contact numbers in the corresponding fields.
4. Tap to accept the change.
To edit a contact in Local Directory or Blacklist:
1. Tap , and then select the desired group on the left.
2. Tap after the desired contact.
3. Edit the contact information.
4. Tap to accept the change.
To delete a contact from Local Directory or Blacklist:
1. Tap , and then select the desired group on the left.
2. Tap after the desired contact and then tap Delete.
3. Tap OK when the touch screen prompts “Delete selected item?”.
Note: You can add contacts from call history. For more information, refer to Call History above.
Volume Adjustment
Press during a call to adjust the receiver volume of the handset/speakerphone/headset.
Press when the phone is idle or ringing to adjust the ringer volume.
Press to adjust the media volume in the corresponding screen.
10
Page 11

My Details
Name
Extension
DID
ZAC/MXIE Login Credentials
Login Name
(case sensitive)
Password
Host/URL
Assigned Phone ID
Support Contact
Phone
Email
Notes
11
Page 12

FCC Statement
This device complies with part 15 of the FCC Rules. Operation is subject to the following two
conditions: (1) This device may not cause harmful interference, and (2) this device must accept any
interference received, including interference that may cause undesired operation.
This equipment has been tested and found to comply with the limits for a Class B digital device,
pursuant to part 15 of the FCC Rules. These limits are designed to provide reasonable protection
against harmful interference in a residential installation. This equipment generates, uses and can
radiate radio frequency energy and, if not installed and used in accordance with the instructions, may
cause harmful interference to radio communications. However, there is no guarantee that interference
will not occur in a particular installation. If this equipment does cause harmful interference to radio or
television reception, which can be determined by turning the equipment off and on, the user is
encouraged to try to correct the interference by one or more of the following measures:
• Reorient or relocate the receiving antenna.
• Increase the separation between the equipment and receiver.
• Connect the equipment into an outlet on a circuit different from that
to which the receiver is connected.
• Consult the dealer or an experienced radio/TV technician for help.
FCC Caution
Changes or modifications not expressly approved by the party responsible for compliance could void
the user’s authority to operate this equipment.
ISED Canada Statement
This product meets the applicable Innovation, Science and Economic Development Canada technical
specifications.
Ce produit répond à la innovation, des sciences et de Développement économique Canada
spécifications techniques applicables.
About Zultys
Zultys is the global provider of a true all-in-one unified communications solution. Innovative, reliable
and scalable, Zultys IP phone systems integrate voice, video, data and mobility in a single premise
based appliance or in the cloud - to optimize collaboration for businesses of all sizes.
Zultys delivers a powerful, feature-rich communications system that is easy-to-use, deploy and
maintain. Zultys is headquartered in Silicon Valley with offices around the world.
Zultys, Inc.
785 Lucerne Drive, Sunnyvale
California, 94085, USA
Copyright © 2018 Zultys, Inc.
All rights reserved
WWW.ZULTYS.COM
96-35491- 01
 Loading...